LG DLEC733W El manual del propietario
- Categoría
- Secadoras de ropa eléctricas
- Tipo
- El manual del propietario

1-800-243-0000
24 HOURS A DAY, 7 DAYS A WEEK FOR LG CUSTOMER SERVICE
I
EectricD
r
Thank you for Buying an LGDryer.
manual carefully, as it provides
safe Installatian, Use, and Maintenance_
and Serial NumBers,
_r future reference.
visit our website at
P/No. :3828 EL4003H

Ultra Big Capacity Drum
The toG Dryer has a large capacity.
Reduced drying time
Drying time is shortened by effk:ient air flow mechanism and
optimized heater.
Innovative Noise Reduction
Noise is reduced by' optimized design of air flow system
vibration reduction technology.
and
Ease of U_
La_4e LED display and electronic control.
Your dryer i:)rovidc_ sensor drying and manuai drying programs,
Sen_r Dry Dryer electronically senses laundry moisture level and automatically determines operation time
based on the dryness of the k)ad and the s_lected program. At times you can sc<__sudden in( rease or
decrea_ of operation time. This happens because a sensor detects the moisture level of the laundry and adiusts
ac<:ordingJy. Sudden <:hange of operation time is not a malfun(:tion,
Manual Dry Manual Dry allows you to set operation time mar_uai[y to complete drying_ Use Manual Dry ff
c[othc_ are still dami:) after sensor dry cycle is finished. Manual Dry is more effective for heavyweight and bulky
ilems su<h as king-size bed sheets and thkk work clothes,
O
Safety Instructions 3
Installation Instructions 5
Electrical Requirement For E[ectdc Dryers 9
Appearance And Design 13
Operating Your Dryer ..........................................................................................................................................14
Additional Functions 17
Caring For Your Dryer 18
Additional Tips For Smart Use ........................................................................................................23
Troubleshooting Guide 25
Technical Data 29
Warranty 30

Instructions
r ¸
IMPORTANT SAFETY INSTRUCTIONS
precautions, including the following:
1) Read all instructions before using the appliance.
2) Do not dry articles that have come into contact with
gasoline, dry-cleaning solvents, or other flammable
or explosive substances, as they give off vapors
that could ignite or explode.
3) Do not allow children to play on or inthe appliance.
Close supervision of children is necessary when
using the appliance.
4) Before the appliance is removed from service or
discarded, remove the door to the drying
compartment.
5) Do not reach into the appliance if the drum is
rotating.
6) Do not install or store this appliance where it will be
exposed to the weather.
7) Do not tamper the with the controls.
8) Do not repair or replace any part of the appliance or
attempt any servicing unless specifically
recommended in the user-maintenance
instructions.
9) Do not use heat to dry articles containing foam
rubber or similarly textured rubber-like materials.
10)Clean lint screen before or after each load.
11)The interior of the appliance should be cleaned
periodically by qualified service per_nnel.
12)Do not place items exposed to cooking oils inyour
dr/er. Items contaminated with cooking oils may
contribute to a chemical reaction that could cause
a load to catch fire.
13)Do not use fabric softners or products to eliminate
static unless recommended by the manufacturer
of the fabric softner or product.
SAVE THESE INSTRUCTIONS
GROUNDING INSTRUCTIONS
This appliance must be grounded. Inthe event of
malfunction or breakdown, grounding will reduce the
risk of electric shock by providing a path of least
resistance for electric current. This appliance is
equi_ed with a cord having an equipment-grounding
conductor and agrounding plug. The plug must be
plugged into an appropriate outlet that is properly
installed and grounded in accordance with all I_al
codes and ordinances.
WARNING oImproper connection of the equipment-
grounding conductor can result in a risk of electric
sh_k. Check with a qualified ei_rician or service
person ifyou are in doubt as to whether the
appliance is properly grounded.
Do not modify the plug provided with the appliance.
If itwi[[ not fit the outlet, have a proper outlet installed
by a qualified electrician.
This appliance must be connected to a grounded
metal, permanent wiring system or an equipment-
grounding conductor must be run with the circuit
conductors and connected to the equipment-
grounding terminal or lead on the appliance.
iiiiiiiiiiiiiiiiiiiiiiiiiiiiiiiiiiiiiiiiiiiiiiiiiiiiiiiiiiiiiiiiiiiiiiiiiiiiiiiiiiiiiiiiiiiiiiiiiiiiiiiiiiiiiiiiiiiiiii
iiiiiiiiiiiiiiiiiiiiiiiiiiiiiiiiiiiiiiiiiiiiiiiiiiiiiiiiiiiiiiiiiiiiiiiiiiiiiiiiiiiiiiiiiiiiiiiiiiiiiiiiiiiiiiiiiiiiiii
iiiiiiiiiiiiiiiiiiiiiiiiiiiiiiiiiiiiiiiiiiiiiiiiiiiiiiiiiiiiiiiiiiiiiiiiiiiiiiiiiiiiiiiiiiiiiiiiiiiiiiiiiiiiiiiiiiiiiii
iiiiiiiiiiiiiiiiiiiiiiiiiiiiiiiiiiiiiiiiiiiiiiiiiiiiiiiiiiiiiiiiiiiiiiiiiiiiiiiiiiiiiiiiiiiiiiiiiiiiiiiiiiiiiiiiiiiiiii
iiiiiiiiiiiiiiiiiiiiiiiiiiiiiiiiiiiiiiiiiiiiiiiiiiiiiiiiiiiiiiiiiiiiiiiiiiiiiiiiiiiiiiiiiiiiiiiiiiiiiiiiiiiiiiiiiiiiiii

Instructions
To reduce the risk of fire or explosion, electric
shock, property damage, personal :il_jmT,or death
when using this appliance, please follow all
:instruct:ions and :information.
• Do :not store or use any gasoline, dry-cleaning
solvents, or any other flammable vapors or
liquids :inthe area surrounding this appliance.
• Do :not dry anything that has ever ihad anything
flammable on :it, even after washing.
• No washer can completely remove oil. Do not
dry any articles that have ever ihad any kind of
oil on them, including cooking oil.
• Art:icles containing foam, rubbel, rubber-like
materials, plastic, or similar materials should be
a:ird Fred.
• Failure to follow these instructions can result in
fire, death, or serious injury.
• A qualified service person or company must
perform installaion and service of this
appliance.
• Keep flammable materials and vapors, such
as £asoline, away from dryer.
• Failure to do so can result in death,
explosion or fire.

Instructions
The following insu_uctions will ihelp guide you through the initial steps of setting up your dryer for use.
Please note that every section of this manual provides important int:o_ation regarding the preparation
and use of your dryer, and it is important that you review this entire manual before proceeding with any
installation or use. More detailed instructions concerning electrical connections, gas connections, and
exhaust requirements are provided :inother parts of this manual.
)
Chocse a location with a solid floor lbr your dryer. Place the dryer at least eighteen inches above the l]oor I_.}ra
garage inst.allat:ion.After placing the dryer in the desired location, make sure that it has the required clearances
shown.
23_6°
(600cm)
Levelinglegsshouldbes_ured.
Allfour legsare stablyplacedonthesolidand_en fl_r.
If dryerisnotlevel, laundrymaynottumbleproperlyandthesensorwillnot detecttheaccuretehumidity
Whenleveling,pleasebecautioustoavoid injury.

nstallat
ns
Following are several warnings and insu'uctions
concerning making the electrical connection |br
electric dryers. More detailed into:rmation
concerning the electrical connection is provided at
the manual section entitled. Electrical Req?airements
/:or Electric D:ryer and :it is imF,ortant that you
thoroug!lly review that section, m_d the remainder of
this manual,, before taking any steps m install or u_e
this dryer.
1. Use only a new U.L. listed No. 10 (copper wire
only) three conductor _}wer supply cord kit :rated
240 _k_lts (minimum) 30 Amperes and labeled as
suitable lbr use in a clothes drym:
2./:our-wire cord is required |or manufactured
(mobile) home installations and use and where
local codes do not allow grounding of this
appliance throug!l neutral.
3. Electrical Plug Connections.
4. For additional instruction on colmecting the dryer
to an electrical power source, please refer to this
manual's section on Electrical Requirements and
Electric l)ryer.
WARNING!
- Use a new UL approved 30 amp power supply cord
or 10 gauge solid copter wire
• use a UL approved s|rain relieL
• DisconnecI power h_lbre m_e_ingeleclrical
COllneclio_ls.
• ConnecI neutral wire (white or cenler wire) m center
uarminM.
• Ground wire ¢gr_:en or bare wire_ must N: c_umecmd
1o gr_2_l _::._13nlld con_leclor.
• Securely lighten all elec|ricN eonneedons
° See installal _on mstructions for complete
ins fftlC tion s.
• Failure to do so can result in fire or electricM sh(_k.
Clo_ the d(_)r to the dryer drum/drying compartment and,
after completing Ml steps in ihis manual for prot_r
installation of this dryer, start the dryer on a hem setting,
as descried more fidly in llle ot>erafing insmlctions thai
accompany tile dryer.
'I]le follow:ing :instruct:ions are applicable m
installations of the dryer in a mmmtactured or
mobile home. Any installation in a matmfacmred
or mobile home must comply with the
Manufactured I:lome Construction and Safety
Standards Title 24 CI;R, Part 32-8(i) or Standard
CAN/('SAOZ240 MII and local codes mid
ordinances. If you am mlcertain whetller your
propsed installation will comply with these
standards, please contact a service mid installation
professional lot assistance.
1) The electrical connection lbr ml electric dryer
must be a 4-wire connection. More detailed
information concerning the electrical connection
is provided at the manual section entitled
Electrical Requiremmlts l_._rElectric I_yer
Prior to the first use of this appliance, use all-purtx)se
cleaning pr(_lucts or a ._)lution of detergent and waler,
with a damp cloth m rcmove fixml the inside of lhe dryer
dram/drying comparlmcni any dusi or dirt thin may have
accmnulatcd in lhe inside of lhe drycr. Plug in your dryer
afler reviewing Ihe lollowing parks on your drycr's
Elcclrieal Requirements.

Instructions
Stacking Kit
In order to stack this dryer on an LG washing
machine, an LG stacking kit is needed.
Incorrect installation can cause serious
accidents.
The weight of the dryer and the height of
installation makes the stacking procedure
too risky for one person. This procedure
should be performed by 2 or more
experienced service personnel.
3. After detaching protection sheet of double-side
taFm, align stacking kit holes rear cover hoies
and then attach ta_ to the washer by pressing
hard.
....2&6inch(6OO mm 21 inch(550 ram)
........................................................................................................
Installation Procedure
1. Place the LG dryer on the LG Washing
machine.
2. Unscrew Rear cover in the Base by unscrewing
2 screws.
4, Assemble a stacking kit as following.
• Screw 2 screws which is unscrewed earlier to
assembledryer rear back and stacking kiL C/
Use accessoryscrews to assemblewasher rearcover
and stacking kiL #),®
The procedure for the opposite sidewill be the
same,

nstallat
vel the dryer
US
1, Levelling the dryer is to prevent undesirable
noise and vibration.
When placing your dryer in a solid and level
area where water is not dripping and freezing,
and flammable materials are not stor_.
2, ff the dryer is not pro[_rly level, adjust the front
levelling legs up and down as necessary.
Turn them clockwise to raise and
counterclockwise to lower until the dryer is not
wobbling both front-to-back and side4ooside.
Adjustable feet,'
Lower
Adjustable feet Adjustable feet
_:_Diagonal Check
When pushing down the edges of the washing machine,
the machitze should not move up and down at all.
(Cheek in both directions.)
!f maehine rocks when pushing the machine lop plate
dblgonally, adjust the feet again.

uirement For E c D
Following are additional instructions regarding electrical c_mnections and. requirements ti_r electtic dryers.
Impo_ant Warning: "I_ help prevent fire, electric shock, serious i1_ury or death, the wiring and grounding
must conform to the latest edition of the National Electrical Code, ANS|/NFPA 70 and all applicable local
regulations. Please contact a qualified electrician to check your home's witing and fuses to ensure that your home
has adequate electrical power m operate the &yer.
120V/240V,. 60 Hertz,. 3-Wire Installation
Instructions for Grounding of your Electric
a) This dryer must be com_ected, to a grounded
metal,, permanent wiring system or an
equipment-grounding conductor must be run
with the circuit conductors and connected to the
equipment-grounding tem_inal or lead on the
dryer.
b) The dryer has its own terminal block that must
t_ connected to a separate 60 Hertz single
phase AC circuit, fused at 30 Am_res (the
circuit must be fused on tx)th sides of the line).
ELECTRICAL SERV|CE FOR THE DRYER
SHOI ,ILl) BE OF MAXIM1 M RATE
VOIJ|"AGE I_ISTEI) ON THE NAMEPLATE.
DO NOT ('.()NNE(rF DRYER TO 110. 115,
OR 120 VO/;/' CIRCUrll Heatil g elements are
available lor field installation in drym> which
are to _ connected to electrical service of
different volta ge than that listed on nameplate.
c) If branch circuit to dryer :is :fifteen tiaet (4.50 m)
o:r less in length, use [.L. (Underwriters
/,aboratories) listed No. 10 A.W.G. wire (copper
wire only), or as required by local codes. If over
|ifteen liaet (4.50 m), use ILL. (Underwriters
Lat_)ratories) listed. No. 8 A.W.(L wire (copper
wire only),, or as required by local codes. Allow
sul]'icient slack in wiring so dryer can t-_e moved
|rom its normal location when necessary.
d)
e)
0
The lx_wer cord (pigtail) connection between
wall receptacle and dryer terminal block IS NOT
supplied with dryer. Type of pigtail and gauge of
wire nmst cont_.mn to local codes and with
insmactions mentioned on the |k_llowing pages.
'/11e method of wiring the dryer :isoptional arid
subject to local code requirements. Refer to
examples on next page.
You must select the method by which to wire
your dryer according m local code and ordinance
:requirements. Sample methods are included in
the |k_llowing pages,
Label all wires prior to disconnection When
servicing the dryer, because wiring errors can
cause serious injury to you and your dryer.

lectrical Requirement For E
Review the following options to determine the appropriate electrical
connection for your home:
Use the instructions hi this section :ifyour home has
a 4-wire receptacle (NEMA type 14-30R) and you
will be using a UL listed, 120/240 volt minimum,.
30 amp, dryer power supply cord.
Ise the instructions in this section if your home has
a 3-wire receptacle (NEMA type 10=30R) and you
will t_e using a IL listed., 120/240 volt n_ininmm,
3(i)amp, dryer power supply cord.
Important : Grounding through the neutral conductor
is p¢ohiNted tor(l) new brm_ch-circuit installations, (2)
mobile homes, and (3) recreational vehicles, and (4)
areas where local codes prohibit grounding through the
neutral conductor.
Prepare minimum 5ft (1.52m) of length in order for
dryer to _ :replaced.
First, peel 5 inches (12.7cm) of covering material from
end. Strip 5 inches of ground wire insulation. After cutting
1"/2inch (3.8cm) t_3m 3 other wi_s peel insulation back
linch (2.5cm). Make ends of 3 wires a hook sha_.
,¢
If this type is available at your home. you will k,e
connecting to a :tused discolmect or circuit breaker
box
It' this type is available at your home. you will
connecting to a Oa_d disconnect or circuit breaker
t_x
• Screw powersupplywiretotheterminalbl_
Coloredwireshouldheconn_ed tosamecolor
screw.Wirecolorindicatedonmanualis
connectedto thesamecolorscrewinblock.
Othe_ise, excessivecurrentisappliedresulting
indamageson productand heatingfailure.
• [)irect-wi reconnections _ not meetthe
building coderegulationsinmost areas. It isthe
customer'sresponsibility toensurethat the
installationmeetsall suchrequirements.
Then, put the h_ked shape end of the wire under the
screw of the mnninal bl_k (h_ked end facing rightward)
and pinch the hook together and screw tightly.
1. Connect neutral wi_ (white) of power cord to center
terminal block screw.
2. Connect red and black wire to the left and right
terminal bl_k screws.
3. Connect ground wire }green) of power cord to
external ground screx_ and the move neutral ground
,_,:ireof a}pliance and connect it to center scow.
4. Make sure that the strain relief screw is tightened.
and be sure that N1 terminN block imts are on tight
and power cord is in right position.
C_r terminal Nook
scr_
Neutral grounding
NeL_r_l wire
(white Orcenter_)
Green wire of _ _d
_re_

uirement For E c D
hnportant : Grounding _hrough the neutral conductor
is prohibited tbr (1) new branch_ircuit installations,
(2) mobile homes,, and (3):recreational veNcles,, and
(4) areas where local codes prohibit grounding fllrough
the neural conductor.
Prepare minimmn 5fi (1.52m) of length in order for
dryer to be :replaced..
First, strip 5 inches (12.7cm)of outer sheath from
end and strip 1 inch of insulation from each
conductor.
Then, put tile hooked shaN end of the wire under the
screw of fl_eternfinal block (hooked end facing
rightward) and pinch the hook together and screw tightly.
• if your Mcal codes or ordfllmlces do not allow file
use of a 3 wire connection, or you are installing
your dryer in a mobile home, you must use a 4-
wire connection.
plug
3/4 in.(1.9 _l .
ULapprovedstrainrelief
1. Comlect neutral wire (white) of power cord to
center terminal block screw.
2. Comlect red mid black wire to the left mid right
terminal block screws.
3. Make sure lhat lhe strain relief screw is lightened
and be sure that all terminal block nuts are on
tight and power cord is ill right position.
Cen_ t_inal
_k _ {silver)
_ _our_ing
wi_ (wN_)
Ne_I g_an_
F_xterr_g_nd
_r
Direc>wire connections do not meet the
building code regulations in most areas, !t is
the customer's responsibility to ensure that the
I:_'or_ Ringterminals
--Neutral
.
.
(_ nnect neutral wire (white) of power cord to
center terminal block screw.
C_ nnect :redand black wire to the left and right
terminal block screws.
3. Connect ground wire (green) of power cord m
external ground screw and move neutral ground
wire of appliance and connect :itm cenmr screw.
4. Make sure that the strain relief screw is tightened
and be sure that all terminal block nuts arc on
tight and power cord is in right position.

lectrical Requirement For E
If your h_al codes or ordinances F__mnit the
connection of a frame-grounding conductor to the
neutral wire, use these instructions. If your local
codes or ordinances do not allow the connection of
a frame-grounding conductor to the neutral wire,
use the instructions under
_ction 3: Optional a-wire connection.
• If your local codes or ordinances do not allow the
connection of a frame-grom_ding conductor to the
neutral wire, use the instructions under this
section.
-- 3-wire _ptacJe
(NEMAtype 10-30R)
-- 3-wireplug te_inals with
) tum_ ends
-- Neural prong
3-wire plug r_ 3/4 in. (t.9 cm) ,
, ULapprov_ stratarelief
-- Neu_! nron_ Ringterminals
r .. _Neutral (_ite or center wire)
Center termln_ .............
block screw (_lver)
Q_
l,
.
.
Connect neutral wire (white) of pwer cord to
center terminal block screw.
Connect ground wire of appli_lce and neutral
wire of _-_wer cord to center terminal block
screw.
Connect red and black wire to the left and right
terminal block screws.
4. Make sure dlat dae strain relief screw is tightened.
and be sure d_at all terminal block nuts are on
tight aud _we:r cord is in right F_sidon.
5. ( onnect a indele_ndent ground wire l¥om external
ground connector to prope:r g,:aound.
"I]lis is probably a good way to create a g:round
loop and electrcute someone.

Water Container --
Door --
Condenser Cover --
Air Ventilation GAll
-- Control Panel
Control Panel
LED Display
• Time Display
• hdicator Lamps
Prog ram Selector
Additional Function Buttons
• High Temp. / Low letup.
• Buzzer off
• "vVrink[ecare
• Favorite
• Time Delay
....HH_H_..... _______________________________________________________________________________________________________________________
_______________________________________________________________________________________________________________________
_______________________________________________________________________________________________________________________
_______________________________________________________________________________________________________________________
iiiiiiiiiiiiiiiiiiiiiiiiiiiiiiiiiiiiiiiiiiiiiiiiiiiiiiiiiiiiiiiiiiiiiiiiiiiiiiiiiiiiiiiiiiiiiiiiiiiiiiiiiiiiiiiiiiiiiii

Cycle _lection Table
El_lr_ic AutoDryCycles
(Note)Pressthe LowTemp._lton forh_t-sensi_veitems
_d linenand t_le linen,tracksuJts,
anorak, blankets
Shirts,blouses and s_rtswear
Trou_rs, dressers, skirts, blouses
Cottm_/Linen(Whitesandcol_,,_s)
(Note)Pressthe LowTemp._lton forh_t-sensi_veitems
and bed linen
Terry towelling,tea towels, towel,
bed linen
Bathtowels, tea towels,
underwear, cottonsocks
T-shirts,trou_rs, underwear,
work clothes
Standard
Program
Forthick and quilted fabrics which do not needto be ironed. Very
For fabricswhich do not need to be ironed. Normal
For fabricswhich do need to be ironed. Damp
Forthick and quilted fabrics.
Forthick and quilted fabrics which do notneedto be ironed
For fabricswhich do not need to be ironed.
For fabricswhich do need to be ironed lightly, notcompletely.
For fabricswhich do need to be ironed.
For fabricswhich do need to be pressed.
Polo shirts, and woA clothes
_d linen,table linen,towels
_nual by Cyc_sfor_l_ted lengthoffim_
Bathtowels, bath robes,dJshclothes, Smallclothes & pre-dried laundry Normal
Quilt_ fabrics made of acrylic Normal fabrics usinghot temperaturefor 20minutes
Small clothes& pre-dried laundry
Normal fabrics using hottemperature40minutes
All fabrics ne_ing freshing,tumbles without heat
S_ial FaCies
'very
More
Normal
Less
Damp
Damber
Warm (20 min)
Warm (40 rain)
C_l Air (20 rain.)
Wool should be used in Wool pr_ram and heat-sensitive fabrics including silk, underwear and
lingerie should be dried using one of the delicate cycles,
Otherwise, these clothes can cause undesirable drying results,

Before first use of the dryer
Before you u_ the dryer for the first time, there are some _in_ that you have to check.
After removing _ckage, you wiJ[ check the produd has no problem and is pro_rly installed.
1. U_ a level to adjust the I_s of the dryer.
2. Check some major _rts such as wa_r container, condenser, control panel and drum.
3. It Run the dryer for 5 minutes to make sure drum inside gets warm.
1. Turn power on.
First, press the Power button. The hldicator light
ab_we the button wi[[ become illuminat_
indicating that the machine is ready set to run.
2. Open the door.
3. Check the lint filter, water
container, and condenser.
The lint filter near the door, should be ernpti_
after or b_ore drying operation.
Open the d_×_rand check if lint filter is c[ean_.
ff not, please clean it referring to page 15.
Water container and condenser are also
check_ to be empti_ and cleaned for better
drying resu[t.
4. Place laundry into the drum a_er
The clothes should be sort_t by its fabric h/pe
and dryness [eve[ and all the strings and belts of
clothes should be secur_ before k_ing put into
the drum.
Push the you push laundry a[[ the way back to
k_p it away from the door sea[.
ff not, d_x_rsea[ and clothes may be damaged,
Turn om
Open the
Doon
Check the
Hntfilter.

m
5. Close the Door.
Beforeyou c[o_ the doo_. make sure fabrics are well
placed his[de and that foreign obiects, es_c[a[[y
flammable ones, are not caughtaround &×)r.
6. Select the Drying Cycle you want.
Youcanchoo_ acycle by turnhlgthe programcontrol
knobuntil the r_ui_d program_achesto itshldicator.
Ifyou only pressStarb/Pausebuttonwithout ch<×)singany
cycle, thedryerwill proceedwith the Cupboardprogram.
[Pleamreferto following CycleSelectiontable (page1O)for
thedeuil_j information
7. Press the Start button.
You can hear the drum turning.
8. After operation is completed, open
the door and remove the laundry.
Be carefu[! The the drum inside could be still hot.
(Operation time varies depending on your cycle
selection or options.)
9. Clean the Lint Filters and
empty water container.
The lint filter should be cleaned after each [oad.
10. Turn off the Dryer.
Press the Power button.
Seiect the
desired
oycle.
Take out
the iaundry.
Clean the
door lint
filter.
- Be careful of the fact that filter should not be
torn when using a vaccum cleaner. If there
is a little residue buildup on filter, you can
scrub lint screen with the brush to remove.
- If you want to open the door while dryer is
operating, please press the Start/Pause
button first, wait until drum completely stops
and then open the doer.
• e lint filter every time,
Clean the
lower lint
filter.

dditional Functions
ManualDry l
High Temp./Low Temp.
These are functioning to shorten or lengthen
the cycle time by increasing or decreasing
temperatu re.
Buzzer off
After power is on and you select cycle, buzzer
will sound when you press a button on the
panel.
ffyou don't Iike to hear that sound, just press
button. The Buzzer is then turned off.
Favorite
ff there is some cycle you would like to make
ba_d on your own drying habit, use Favorite.
Once Faw:)ritecycle issk:)red, you can repeatedly
use next time [_fore changing the stored setting.
For instance, you turn power on and select Extra
Dry in Cotton Cycle and Low temp and Anti°
Crease in _ries and then [astiy press Favorite until
the dryer _eps. It's a_:_:_ut3 seconds. That's all
you have to do.
The next time, when turning the dryer on and
pressing Favorite you can _e your _[ected
_ttings on the display panel.
Wrinkle Care
Wrinkle care is functioning to prevent creases
and wrinkles that are formed when the
laundry is not unloaded promptly at the end
of drying cycle. In this function, the dryer
repeat_[y runs and paus_ to the cycle end.
If the door is open during Wrinkle Care
process, this function is cancelled. But in
case of d_×>ropen during normal o_ration
without selecting Wrinkle care, this function
will be remembered and processed.
Before the Wrinkle Care part of the cycle is
reached, it will not be affected.
Time Delay
You can use the Time Delay function to delay
the finishing time of drying cycle.
Maximum Time Delay is 19 hours.
1. Turn the dryer on
2. Select cycle
3. Set time delay hour
4. Press Start/Pause button
Child Lock
For the safety of your children, press High Temp.
and Low Temp. buttons at the same time for
at_ut 3 seconds. You can check this function by
_eblg the dryer display LLr",on LED window.

arin
How important Care and cleaning is ~
Ws not very difficult to care for your dryer. All you
have to do is to follow the informatk)n bek)w.
Clean Lint Filter
Clean lint filter after each use and check it before
each use. It should also be cleaned if the Clean
Filter light b_comes illumhlated and the buzzer
sounds during operation of the dryer:
C[eanhlg or emptying the filter will reduce drying
times and energy consumption and lengthen the
dryer life.
1, Open the door.
2, Pull the filter
out.
3. Clean the filter
by using a
vacu u m
cleaner or
rinsing under
the tap.
4. Replace the
filter.
- Push the
filter all the
way down to
avoid
Interference
with the door.
5. Close the door.
Clean lint filter during a cycle
]f "Clean Filter" indicator ]amp flashes during
operation, clean the filter promptly.
1. Coo[ the dryer down and follow the mentk)ned steps.
2. Pros the Start!Pause button.
Empty Water container
Condensed water is co]]ect_ to water container.
Y_.)ushould empty the water container after every
use. Not doing this may resuff in irrlpro[_r drying
[_rformance.
If water container [sfull, "Empty Water"
Lamp glows and a buzzer sounds while the dryer is
operating, in this case, water container must be
emptied [n 1 hour.
1. Draw water
container out.
2, Empty water
container to
sink.
3, Replace the water drawer.
4, Press the Star'dPause button.

arin
Condenser is also a very important pa_ for efficient drying performance result so it need special care..:,..:_s from you.
Clean the conden_r 3 or 4.times a year.
1. Open condensing cover by using a coin or flat
blade screwdriver,
4, Draw the condenser out by inserting a finger
into a hole down the front of condenser,
(Do not damage the condenser using force.)
2. Open sealing cover by turning
the locking lever.
Sealing cover /
3. Release the both locking levers turning
towards each other,
J
5, Clean the condenser completely under the
tap letting water flow through,
Front
Side
6, Close all with the reverse order of opening,

arin
Front Ventilation Grille
Vacuum the front ventilation grill 3~4 time a year to
make sure there must be no build-up of lint or dirt
which causes improper intake air flow.
Norma[_y,conden_ water ispumpedupto water
containerwherewateriscollecteduntil empti_
Also,thewatercanbe drainedoutdkect_ todrain hose,
e_ecia[_ whendryer isstacked_ topof washing
machine.
With conning kitfor drain ho_, y_ cansimplychange
water_th andwater reroutetothedrainagefaciJity.
Pleaseb[[ow thestepsbeJow.
1, Unscrew -_
cover. _
Moisture Sensor?
This device functions to sense the moisture
remai ning contents of the laund ry du ring operation
which means it must be c[ean_ all the time, The
main reasxm of cleaning this part is to remove the
build-up of lime scale on the surface of sensoc Wi_
the sensors inside drum (Shown in the picture).
I
I
I
I
3, Pull the water
hose off the
conn ector.
2, Remove the
conn ector.
4, Connect drain
hose to the kit.
!

arin
Reverse the door
The door can b_ revers_ to fit to your own
installation conditions. From the factor_¢ the d_x)r
hinge is located on the right side.
4, Detach both
hinge point
covers.
5. Unscrew two
d_r hinges.
1. Unscrew the bottom hinge of the door first
and top hinge, Place place on the blanket to
prevent scratches.
2, Remove the
door lock
cove r.
6, Replace both
hinge point
covers where
d_r hinge is
located,
7. Replace the
d_r catch to
the reverse
location,
3. Remove the
door lock and
replace where
door lock
cover is
located.
8. Replace the
hinge screws.

arin
Change the Bulb
The bulb itself could be very hot when the dryer just
finishes its operation, Before before changing the
bulb, t?esure that the inside of the drum is cool
dow n.
1, Open the door, put a hand into the drum and
grasp the bulb cover.
2, Hold the bulb and carefully twist it clockwise.
Be careful to avoid breaking it off.
3, Remove the bulb cover from the socket housing.
/
Power cord must be unplugged before this
work to avoid danger of electric shock.
4, Remove the current bulb turning it to
counterclockwise.
Be careful that it does not fall off.
5, Replace the bulb.

dditional Tips For
Drying Guide
Woolen Article
Dry w_×_[ens hi woo[ cycle. Be sure to follow fabric
care label symb_ls, first. W_×_Iis not completely
driexj from the program so don't repeat drying. Pull
woolens to their original sha_ and dry them flat.
Woven and Ioopknit materials
Some woven and [oopknit materials may shrink,
de_nding on qualiW.
Permanent Press and Synthetics
Do not overload your dryer.
Take out permanent press items as soon as the dryer
stops to r_Juce vwink[es.
Baby clothes and night gowns
Always check the manutacturers instructions.
Rubber and Plastics
Do not dry any items made from or containing
rubber or plastics such as:
a) Aprons, bibs and chair covers
b) Curtains and table clothes
c) Bathmats
Fiber glass
Do not dry fiberglass articles in your dryer.
Glass particles left in the dryer could lye pick_ up
by your clothes the next time you use the dryer and
irriate your skin.
Fabric Care Labels
C[oth_ have its own wash care labels so drying
according to wash care labels is recommendS.
Not only that, the laundry must iv_ sorted according
to size and fabric type.
Do not overload in order to save energy, time, and
best dry _rformance.
Below are j_bric care labels.
Dry
liJmble dry
Permanent Press /
D Wrinkle resistant
D Gentle / Delicate
Do not tumble dry
Do not dry
1_ High heating
D Medium heating
Low heating
No heat / air
Line Dry / hang to dry
Drip dry
Dry flat
In the shade

P$
Spare Parts
Spare ports in your n_ are provided under the
_rms of warranty. Components covered by
warranty is provided free of charge, if coverage
is expired, spare parts must _ purcha_ [TOm
service center.
Disposal of the dryer
it is desirable for you to dispose the dryer so_ly
to k_ your children away from the possibJe
injury.
The door and lid and other protruded i_ms must
taken away and power cord must _ cut off
to avoid future use. After that, the dryer is to be
disposed sa_ly.
Service contact
if there is something wrong with your dryer, fi_t
you must be through the troubleshooting table.
in case that you can't find the same troubJe and
you can not handle by yourself, pJease contad
the service centre.
A service parson will ask you some questions
Jike foJJowings:
1. Your name, address, and postcode.
2. Your phone number.
3. Description of trouble.
4. The modeJ model num_r and serial num_r
of your dryer.
5. The date of purchase.
Accessory parts
Your dryer comes with accessories such as
1, Condensing drain hose
2. Hose holder
3. Stacking kit
Holder 2 EA
Screw 4 EA
Dryer Rack

I i
TroubleshootingTips
Savetime and money! Reviewthe chartson the following pages firstand you may not n_d to caJJfor service.
1. Problem:My dryer won't start
ipoweroutlet
• isthefuseblown, or isthecircuit Checkyour home'sor laundryroom'sfusebox/circuit breaker_x and replace
breakertripped? theruseor resetthecircuitbreakers
2. Problem:My dryer doesn'theat
• Isthefuseblown, or isthecircuit
breakertripped?
If thefuseis blown or thecircuitbreakertripped, thedryer mighttumblebut not
heat.Checkyour home'sor laundryroom'srusebox/circuit breaker_x and
replacethefuseor resetthecircuitbreaker.
3. Problem:Thereare greasys_ts on my clo_es
Did instructionson ch_k and fdbw theinstructionsprovidedwith your _bric Softenerproduct]
your Fabricsoftenerproduct?
• Are youdrying dean and dirty Make sureto useyourdryer to dry onlycleanitems,_ause dirty itemscansoiJ
clothestogether? cleanclothespicked in thesamebad or laterplacedin thedryer drum.

Llroublesh
4. Probl_: Thereislinton myclothes
i Isyoui i!ntfiltei _l!? PleaSe_efertothe manuals_tion 0n deaning the lintfilterl and phase c0nfirm
thatthelint Filter;sdeanl It is impo_antthatthelint filter is deanbefo_eeach new
............. load of laund_i
• Did youpro_rly sortyour load of
laundry?
• Did youoverleadyourdryer?
inorder toreducetheamountof lintin a bad of laundry,sortlint producers(I;kea
fiJzzywhite cottontowel)s_rately from clothesthat mightcatchlint (suchasa
pair of black linen pants)_
Divideyour larger load into smallerleads.
5. Probl_: Thereisstaticin my clothesafterdrying
• 9
Did youusefabric softener::i Try us!riga fabr!€softenertoreducestaticel_tr]ci_:
• DidyouoverdrytheI_d oflaundry? Overdrying a load of laundrycancausea build up of staticebctricity. T_
usinga [abric softeneror adiustyour settingsand usea shorterdrying time.
The_ materialscancauie statictObuild up a load.Ofdiied dothe_iTry
_anent pressandblends?
6. Probl_: Thedrying time isnotconsistent
• Are you usingconsistentheatsettings Thedrying time fora leadwill varydependingon theheatsetting,thesize of the
and consistentload sizes? load,the_ of [abrics,thewetnessof theciothes,and thecondition of theiint
filter.

I i
7. Problem:It tokestoolong_r my clothestodry
• Are youdrying largelocalsof h_
fabrics?
H_ fabricstake longerto dry b_ause theytendto retainmoremoisture
Tohdp reduceand maintainmoreconsistentdrying timesfor large and heavy
fabrics, serrate theseitemsintosmallerleadsof aconsistentsize
theappi0Piiate €ontrdSeffingsfoiihe _ 0f 10adyou aie dryingl
Pleaseconfirmthat thelintfilter iscleanprior to eachnewlead of laundry.
,IS thefu_ blownl or isthe circuit ch_k your homesor laundryrooms fuseb0x/arcu!t breakerboxand replace
bt_ker tripp_? thefu_ or resetthedrCdt breaker
• Didyou overloadyourd_r? Divideyour Jargerload into a numberof smdbr leads.
'Did youUnderl_d yourd_er? if you are onlydrying a handfiglOfitems]add a few extra pi_es tOhelpensure
............... proof _mbling adion.
8. Problem:My clothesare wrinkled
ZZZZZZZZZZZZZZZZ
• Are you removingyour laundryfrom
thedryer soonafterthedrying cycle
iscompJete?
Removeyour laundryfrom thedryerafter thedrying cycleendsand eitherhang
or fdd theitems.
9, Problem:My clothesare shrinking
• Are youfallowing thecare
instrudionsfor yourgarment?
Toavoidshrinkage,carefullyfollow thecareand useinstructionsfor your
garment,_ause somefabricswill naturallyshrinkwhenwashed.Other fabrics
can_ washedbutwiJJshrinkwhendried in a dryer.

lroublesh
Error Mode
* LEDdisplays dE in ca_ of the door open. The door must be dosed and start
Button must _ pres_ for re-_eration.
High tem_rature and high humidity of will remain contained in dryer if the dryer suddenly stops due
to power failure or other causes while drying is in progress.
Leaving the wet clothes in the dryer may reduce durability of the dryer or have a bad effect on major
electrical parts.
O_n the door so that high temperature and high humidity discharges outside if the dryer stops for a
long time while drying is in progress.
EHE
This is indication to detect and inform high temperature and high humidity within the dryer if
it stops during a cycle. If this happens, take the clothes out, let the interior old the dryer dry
out, rel_d the clothes, and start the cycle over.
(Contad with the _rvice Center if such conditions continue even a_r leaving the door open
for a sufficient time.)
• ELE ELE error continues to occur, unplug the power cords and then call the Service Center.
" _ E unplug the power plug and call for _rvice.

echnical Data
33 1/2"(850mm)
23 5/8"(600mm)
23 g/16"(595mm) Weight : 110 Ib (50kg)
0 Electrical Requirements
120/240 V 60 Hz 29_
You are sure to check the rating plate on the
dryer to make sure the dryer has right rating.
0 inch (0 mm} 0 inch (0 mm}
] inch (2.5 cm) 5 inch (12.5 cm)
Ventilation Requirement
112cu.fl./min
throughdryer
Clout door musthave
2 (Iouvered)openings,
each having a minimum
area of 60 sq. inches
(387 sq.cm), located3
inches(8 cm) from
bottom and top of door.

SEEKINGWARRANTYASSISTANCE
Warran_ Service is available by contacting your nearest LG Service Center. If this
product is installed and operated per this manual, LG will repair or replace any parts
defective in material or workmanship throughout the warran_ period, beginning with the
date of purchase.
For your safety, the recommendations in this manual must be followed. To reduce the
risk of fire or explosion, electric shock, or to prevent property damage, personal injury,
or death when using your appliance, follow basic precautions, including the following.
WarrantyRestriction:If the dryer is subjected to other than private family use, all wanranty
coverage is effective for only 90 days.
You will need the complete Model and Serial Number when requesting Warranty Service. Proof
of purchase date is required.
Use the space below to record the model number and serial number of your new LG dryer.
Model No.
Serial No.
Date of Purchase
_t{ Sta.ple your receipt HERE.

LG Electronics Inc, will repair or at its option re_ace, with.oL._charge, your product if ff proves to be defecltve in
mater_al or w_anship unber nor--_l _ duri_ the worr_ty ber_od set forth below, effective from the date of
original cat.met purchase of the product, Thislimffed warranty isgood onB/to the ori_nal purchaser of the product
and effective only wtlen u_ in the U_ted States including Alaska, Hawaii, and U,S,Territories,
WARRANIYPE_:
Labo_ 1¥_ from the Date of Purch_,
All Farts: 1Year from the Date of _JrCh_e.
HOW_RVICEISHANDLED:
Call 1°800°243-00c_and cl_ose the appropriate prompt. Pl_se
have product type (Dryer), model humor, serial
number, and _P co,_ r_y.
Thewarranted 1-year of _abercovers the cost of In-Home _ce
on all pantslnclu._ng the _m Tub and Motor,
fftlS W_ B IN LiEUOF ANY OTHERW_A,N11_, _ OR IMBED, INCLUDING_ UMITATI_,
WARR._ OF MERCHANTA_ ORfll_E_ FORA PARTICULARPU_E. TO_E _NT ANY IMPUEDW_lY iS
RE_I_D BYLAW,IT_ LIM_D iN I_JRATFONTOTHEEXPRE_WARRANTYPER_ ABOVE. LGWiLLNOT_ LIABLEFOR
ANY CON-_E_AL INDIRECT,OR I_DENTAL DAMAGESOF ANY KIND,INCLUDINGLOSTREVENUES_ _, IN
CC'_NECT_ WiTH_E F'_, _ME _A_S _ NOTAllOW UMITAT_ _ _W LO_ AN IM_JED W_
OR_IE OF INCIDENTAL_ _QUENTI_ DAmaGES,_ THEABOVEUM_AT_ OREXCLUSIONS
_,_Y NOT_YTO Y_.
THISI.IM_D WAR_ _ES _T _LY TO:
!_, Se_Mcetrips to your hon_ to deliver, pick up, and/or installtt-e product, instruct, or tepee house fuses
or correct,MrinG or correction of unauthorized repairs; and
Da_es or operating pro_rc6 that result from misuse, a_se, operation outside environmentai
_lflcaflons or contrap/to tt'e requirements o_precacffiom in the Ope_ng Guide, accident, vermin,
fire, fl_d, Imprope_tnstalla_.<_q,acts of God, unauthorized modiflcatic.n _ alterati_, inco_ect electrical
_,_rrentor v_o_e, or c_mme_clal use, or _ for other than intended purpose,
3. _nerefore,thecosto__ir _ rep_cen',_ntofsu_ a detec_e pro_ct _a_ _ bo_ byt1"__nsumer.
CUST_ER INIER-AC_VECENTERNUM_RS:
ToProveWa_ Goveta"_
To_tain NearestAutt'_o_ _ri_e Center_ Sa_
_r, ortoObtainP_ct, _n'_r, _ _ce
_nce
Rein your _1_ Receipt to _ve date of purchase. A
copy of your SalesReceipt must be _Jbm_ed at the time
warranty service Isprovided.
C_ 1-800-243_._]0
(24 h_ a day, 7 _ys per "week) and ch_e the
app_o_ate prompt from the menu, and have y_Jr
product type (Dryer), _del number, serial
number, and ZiP Code; or visff our website at
hflP:llwwwJ_rvice.com,

emo

1-800-243-0000
Para el Servicio LG (Atenci6n ai Cliente) 24 horas al dia, 7 dias a Jasemana
comprar una Secadora LG.
manual correctamente, ya que
importante de una instalaci6n segura, Uso y
eJmodelo y n6mero de serie y conserve su
ncias.
luestro sitio web http//us.lge.com

aracteristicas
Tambor de capacidad ultragrande
LG Secadora tiene una capacidad.
@ Tiempo de secado reducido
Se acorta el tiempo de secado gracias a un eficaz mecanismo
de circulaci6n del aire y a un calentador optinfizado.
@
Innovador sistema de reducci6n de ruido
La tecnologi'a de absorci6n de[ ruido y de blindaje reduce el
ruido.
F&cil de usar
Pantalla de LED que utiliza un control electr6nico.
Qu_ sign_ica secado _r _ns_ o _ado _r tiem_?
Su seoadora le proporciona la posibilidad de programar acciones de _cado per sensor o F_r tiempo.
Secado _r sensor: La secadora detectar& autom&ticamente la humedad de la carga y determJnar& el tiempo de
funcionamiento necesario bas&ndose en el nivel de sequedad de la carga y el programa seleccionado_ En
ocasiones, _dr& observar un incremento o disminuci6n repentinos del tiempo de operaci6n. Si esto ocurriera,
ser& debido a que el sensor detecta la humedad de la carga dentro de un periodo de tiempo determinado_ Un
cambio repenSno en el tiempo de operaci6n no significa un real funcionamiento.
Secado _r tiempo: Signiffca que puede programar el tiempo de operad6n manualmente para completar el
secado. Altemativamente, puede usar esta funci6n para secar la ropa si las prendas at_n est_n ht)medas pese a
haber terminado un ciclo de s_ado, El secado per tiempo es m&s elective cuando tenga prendas pesadas u
objetos voluminosos come s&banas de camas tamale King size o ropa de trabaio gruesa.
ontenido
Instrucciones de seguridad ....................................................................... 3
Instrucciones de instalaci6n ...................................................................... 5
Requerimientos el6ctricos para secadora el6crtica ................................... 9
Aspecto y diseffo .................................................................................... 13
Funcionamiento de la secadora ............................................................. 14
Funciones adicionales ............................................................................. 17
Cuidado de la secadora ......................................................................... 18
Consejos adicional_ para un use inteligente ......................................... 23
Gufa para la soluci6n de problemas ....................................................... 25
Dates t6cnicos ........................................................................................ 29
T6rminos de la garant_a .......................................................................... 30

]NSTRUCCIONES DE SEGURIDAD _PORTAN_S
1)
2)
3)
4)
5)
6)
Lea todas las instrucckmes antes de usar el artel_acl:o.
No seque artfculos que hayan esl:ado en comacto con
gasolina, solvenles para lavado en seco, o cualquier
olra sustancia inflamable o explosiva, ya que.
despiden va[×_res que pueden incendiarse o explotar.
No l_nnim que los nifios jueguen sobm o denim del
artefacto Es necesario que su_rvise de cerca a los
nifios cuando utiliza el ariefacto.
Antes de que el ar|efacto sea removido del servicio
o desechado, quite la puerta del conlpartinliento de
secado_
No mere la mano en el aparal:o si el l:ambor est_ en
movimiento.
No instale o ahnacene este artefac{o donde est_
expuesto a la intemperie.
7) No fuerce los conlroles.
8) No repam o reemplace ninguna pieza del arlefacto
ni imente darle servicio a menos _e estg
especfficamente recomendado en las instrucciones
de mantenimienm para el usuario
9) No use calor para secar artfculos que contengan hule
espuma o ma{eriales de textura similares al hule.
10) Limpie la malla pm'a pelusas antes o despu_s de
cada carga.
11) E1 interior del artefacto y el ducto de escaFm deben
ser limpiados peri6dicamente por personal de
servicio calificado.
12) No cokNue articulos qoe hayan sido expuestos a
aceite de cocina demro de la secadora. A_fculos
contaminados con aceite de cocina pueden
comribuir a tma reaccidn qulmica causante de
incendiar una carga.
13) No use suavizantes de telas o pr_uctos para
eliminar la est_tica a menos que sea recomendado
por el fabricante de estos pmductos.
GUARDE ESTASINSTRUCCIONES
INSTRUCCIONES DE CONEXION A TIERRA
Este arte[acl:o debe estar conecl:ado a tierra. 1_ caso de
real funcionamienm o avenqa, la conexidn a tierra
reduce el riesgo de choque el6ctfico al proveer una ruta
de menor resisl:encia a la c_menl:e el_ctrica. Esl:e
artetacl:o estfi equipado con un cord6n que confiene un
conductor eq¢aipo-tierra y un enchulie con conexi6n a
tie_a. E1 enchufe deNe set conectado a un
tomacorrieme adecuado,, debidameme instalado y
conectado a fimTa de acuerdo con todos los c(xtigos
locales y ordenanzas.
ADVEF(FENCIA- Una incorrccta conexi6n del
conductor eq?aipo-tierra puede resultar en un riesgo de
ch_.Nue elEctrico.
Verifique con un electricista calificado o un tdcnico de
servicio si tiene alguna duda si el artefacto estfi
debidameme conectado a tierra.
No m_ifique el enchul) suministrado con el artefaclo;
si _ste no encajase en el tomacomente, haga que le
instalen un tomaco_iente adecuado t×_run elec|ricista
calificado.
v_ j
iiiiiiiiiiiiiiiiiiiiiiiiiiiiiiiiiiiiiiiiiiiiiiiiiiiiiiiiiiiiiiiiiiiiiiiiiiiiiiiiiiiiiiiiiiiiiiiiiiiiiiiiiiiiiiiiiiiiiii
iiiiiiiiiiiiiiiiiiiiiiiiiiiiiiiiiiiiiiiiiiiiiiiiiiiiiiiiiiiiiiiiiiiiiiiiiiiiiiiiiiiiiiiiiiiiiiiiiiiiiiiiiiiiiiiiiiiiiii
iiiiiiiiiiiiiiiiiiiiiiiiiiiiiiiiiiiiiiiiiiiiiiiiiiiiiiiiiiiiiiiiiiiiiiiiiiiiiiiiiiiiiiiiiiiiiiiiiiiiiiiiiiiiiiiiiiiiiii

ADVERTENCIA
Para reducir el riesgo de incendio o explosi6n,
choque el4ctrico, dafio a la propiedad, lesiones
personales, o muerle cuando use este artefacto, pot
favor siga todas las instrucciones e informaci6n.
• No ahnacene o use gasolina, solventes para
lavado en seco, o cuMquier otro vapor o lfquido
inflamable en ell _irea adyacente a este artefact:o.
• No seque nada que alguna vez haya tenido
contacto con aigo inflamable, afin despu4s de
iavario.
• Ninguna lavadora puede remover completamente
el aceite. No seque ning6n arlfculo que haya
tenido contacto con cualquier clase de aceite,
incluyeMo aceite de cocinar.
• Articuios que contienen espuma,/mie, materiales
similares al hule, pi_stico, o materiales simiiares
dean secarse en el tendedero o utilizando el
ciclo de aire.
• La faita de cumpiimiento de estas instrucciones
puede resultar en incendio, mue_e o lesiones
sefias.
• Un t4cnico o una compafifa calificada debe
efectuar la instalaci6n y proveer el servicio a este
agefacto.
- Mantenga los materiales y vapores
inflamables, como la gasolina, lejos de la
secadora
- Si no cumple con estas instrucciones puede
resultar en muerte, explosion o incendio

nstrucciones de ci6n
Las siguientes instmcciones le servir_in de gufa a tray,s de los pasos iniciales para la preparacidn de su
secadora paFa el uso. Por favor note que cada seccidn de este manual proporciona infon_naci6n
imponante soN-e la preparaci6n y uso de su secadora, yes muy importante que lea este manual
completamente antes de proceder con cualquiera instalacidn o con su uso. lnstrucciones detalladas
adicionales concemientes alas conexiones el&tricas, conexiones dell gas, y los requerimientos sobre el
escape son suministrados en otras partes de este manual.
Elija un lugar de suelo s61ido en el que se pued.a ubicar su secad.ora. Col6quela al menos 18 pulgadas sobrc el
suelo si la instala en un gar_e. Una vez la secadora ha sido instalada en el lugar deseado, asegfrese de qjae cuenta
con las holguras necesarias que puede ver en la siguiente ilustracidn yen las secciones de los requisitos de salida y
de mantenimiento.
41,9"
(106.4cm)
Deberiaasegurarlaspatasniveladoras.
Lascuatropatasdebenquedarsentadascontotalseguridadenun suelos61idoy n|velado.
Si !asecadoranoestbnivelada0la cargapodrianodarvueltasdebidamenteyel sensornodetectarbla humedad
corr_a.
AI ajustarel nivel,tengacuidaclodeno lesionarseseriamentelosdedosde laaano ni delpie.

nstrucciones de instalac
Acontmuacidnencomrarfiadvertenciase i1_stracciones
concerniemesa/a confeccidnde la conexidne/_trica para
secadorase/Sctricas,lntbrmacidndetalladaadiciona/concemiemea
/aconexidnel_ztficaessuminist_a_ en/a sezcidndelmanual
RequerimiemosEl_ztficosNm iaSecadoraE/Sdricayes
importamequeusted/_ esms_ci6n comp/etamente,as_comoe/
restodel manuN,amesde tomaralgfinpasoparainsmlaro u_r esta
secadora.
I. Use solmnemeun cabledealimemacidnnuevolismdoNo. 10
por U,L.(alan-_redecobre finicamenre)de_rescondudores
clasificadopara240Voltios(mhfimo)30AmNfios y queest_
mdicadodeuso aceptableparauna sezadoraderopa,
2.Un cablede4alambresesrequefidoparainsmlacionesyusoen
msas prefabficadas(mdvil)ydome Jogcddigosl_ales no
permitanconexi6natierra dees_eaparatoa tray,s de/nemral,
3.NectficN PlugConnectionsConexidnE/_rica
4.Para instrucdonesadicionalesdecomoconectar/a secadoraa
una Nemeel_ctfica,favorrefi_$asea lasezcidnde este manual
sobreRequefimiemosEl&tricos IxaraSecadoraEl_ctfica,
A ADVERTENCIA!
• Use un cable de Nimentaci6n nuevo aprobado per U& de 30
amp.o alambre de cobre solido calibre l&
•rise un Iiberaderde tens_6na3robado per UL,
•Desco_cte a corriente antes de nacer msconexJones
elecNcas,
•Conecte el alambre neutral lalambre blanco o central) al
[erminal centra_
, IEIalambre atierra Nambre ver_ o descubierto) debe
ce_ctarse al conector a lJerraverde.
•A_0rese de apretartodas las conexiones electricas
•Yea las instruccio_s de i_stalacidn ;_araunasmstrucc_ones
completas,
•De _oseguir estas advertencias puede resultar en incendio o
cl_ue electrioo
Cierre la puerta al mm_r / Compartimiento de secado de
la secadora y despu_s de haber comOetado todos los
pasos en este manual para una instalaci6n correcta de esta
secadora, encienda la secadora en temperatura caliente,
como mejor se describe en las instmcciones de oNmci6n
provistas con la secadora.
/.,as siguientes instrucc:iones se a'plicm_ a
instalaciones d.e la secadora en casas wefabricadas o
rodanm. La instalacidn en una casa pret3bricada o
rodante deN2 cmnplir con los estfindams de
Seguridad y Consmacci6n de Casas Prefabricadas,
Tft:ulo 24 CFR, Parte 32-80 o el Esulndar
CAN/CSAOZ240 Mill y los c6digos y ordenmlzas
locales. Si no est_ seguro de que la instalaci6n
cumplirfi con esms est_indares, por :flavorcontacm a
un prolizsional d.e manmnimienm e instalaci6n para
que le ayude.
1) La conexi6n eldctfica para una secadora eldctrica
debe ser d.e conexidn de 4 alambres. In:lbrmaci6n
adicional demllada concernienm a la conexidn
eldctrica es smninistrada en la secci6n del manual
Requefimienms Eldctricos para la Secadora
Eldctdca.
Antes de usar por p:rime_ayes esta secadora, utilice u_
pr_ucto limpiador pa_J todo pmpdsito, o una solucidn de
detergente y agua, con un patio h-dmedopara remover de la
parte interior del tambor de la secadom/compartimiento de
secado cualquier p/vo o sucio que se haya podido acumular
dentro de la secadom. Enchuf_ su secadora despu4s de haber
revisado las siguientes partes ea los Requefimiemos
EldcNcos de su _cad.om.

nstrucciones de ci6n
Kit de superposicion
Para co]ocar esta secadora sc)bre una [avadora
LG, _ necesario un kit de superD_sici6n de LG.
/
i
\ /\
R
/
A____ADVERTENCIA!
Una insta_aciSn mcorrecta puede causar
accidentes se rios.
El peso de la secadora y la a[tura de [a
[nstalaciOn hacen que montar el kit sea
peligroso para una sola persona.
Este procedimiento debe reaIizarse pot 2 o
m&s personas con experiencia en este tipo de
seP¢lClOS.
3. Despu_sde separar[ahoia de protecci6nde cintade
dob[e4amaSo,a[ineelosagujerosde[iuegode
api[amientode [acubiertaposteriorydespu_suna [a
cinta a [a[avadorapresionando(;onfuerza,
Procedimiento de instalaci6n
1. Coloque la secadora LG sobre la lavadora LG.
2. Desatomille [a cubierta posterior en [a base
desatomillar_do los 2 tomi[[os.
4, Elmontaiede un iuegode acce_rios de apilamientose
realizacomo sigl_e:
• Atornillelos2tornillosquedesatornil[6anteriormerltepara
montarlaparteposteriordela s_:adoraye[juegode
accesoriosdeapi[amiento,(_) )
• Utilicelostomillosacce_3riosparamortar [acubierta
posteriorde[a[avadoray eljuegodeaccesoriosde
apilamiento,(_,®/
• [1procedimier_toparael ladoopuestoser,iexactameriteiguaL

nstrucciones de
Nivele la se dora
4
Patas ajustabies Patas ajustabies
instalaci6n
1. Sede_ niveiar [a secadora para evitar ruidos y
vibraciones no deseab]es.
Co[oque ]a sc_.:adorasobre una superficie firme
y lisa donde no gotc_ e[ agua ni se guarden
materia[es conge[ados ni irrlf[amab[es.
m
Si ]a secadora no est_ adecuadamente nive[ada,
ajuste [as paras niveJadoras de[anteras,
subi6ndo]as o baj4ndoJas seg(m sea necesafio.
Gire]as en e] sentido de [as agujas de[ m]oj para
subir]as yen sentido contrario a [as agujas de[
re]oi para bajar[as, basra que ]a secadora deje de
moverse de arras hacia adeiante y de un [ado a[
otro.
_:_Cot_.robaci6n diagonal
AI empujar hacia abajo diagonalmente los bordes de la
piaca superior de la secadora, la mdquina no deber6
moverse en absoluto hacia arr_ ni hacia abajo.
(Compruebe ambas direcciones)
Si la n_quina se balancea al e.lpujar _ placa sKperior
d_lgonalmente, ajuste de nuevo las paras.

equerimientosel ricos para
Las siguientes son inslrucciones adicionales sobre las conexiones y :requerimientos eldctricos para las secadoras
eldctricas.
Advertencia Importante: Para a_dar a prevenir :incend:ios, choque eldctr:ico, lesiones serias o muerte,
el cableado y la conexi6n a tierra d.eben estar d.e acuerdo con la edicidn mils reciente del c6digo El4ctrico
Nacional, ANS/_FPA 7(i)y todas las regulaciones locales aplicables. Por l_avorcontacte a un electricista
calificado para verificar el cableado y :fusibles de su casa y para asegurar que tiene la energfa el4ct:fica adecuada
para el Pancionamiento de la _ecadora.
120V/240V, 60 Hertz, Instalaci6n de 3-Alambres
Instrucciones para la Conexibn a Tierra de su
Secadora EMctrica:
a) Esta secadora debe ser conectada a ui_ metal con
conexidn a tierra,, sistema de cableado F_mnanenm, o
un conductor equi_-tierra deNe cor:rer con los
conductores de ci:rcuito y estar conectado al terminal
equi_-tierra o lfnea principal de la secadora.
b) La secado:ra tiene su propia caja temlinal la cual d.ebe
estar conectada a una lfnea separada,.
60 Hertz, circuito de fase sencilla, circuito AC
(corriente altema),, con fusible de 3(i)Amperios (el
circuito det_ tener l_asibles en ambos lados d.e la
lfnea). EL SERV/C/O EL(4CTRICO PARA I.,A
SECAI)ORA DEBE SER DEL MAXIMO RANGO
DE VOH"AJE I)ESCRITO EN LA PI_ACA. NO
CONECFE LA SECADORA A IN CIRCUITO DE
110,. 115,. 0 120 VOI.SHOS. Hay elementos
calet_acmres disponibles para secadoras q2ae se
conectar_in a servicios el4ctricos de diferente voltaje
q2aelos q2ae se listm_ en la placa, tal como d.e 208
voltios.
c) Si la d.istm_cia entre la caja de circuito y la secadora
es de 15 pies (4.50 m) o menos,, use un cable No. 10
A.W.G. (de cobre dnicamente) listado por [.I ....
(Underw:rimrs LaN}ratories), o como 1o :mquieran los
c6digos locales. Si es de ross de :15pies (4.50 m), use
un cable No. 8 A.W.G. (de cobre dnicamente) listado
por [.L (Underwrimrs I_aN_:rato:ries) o como lo
requieran los cddigos locales. I)eje suficiente holgura
en el cableado de manera q2ae la secadora pued.a ser
movida de su posici6n cuando _:a necesario.
d)
e)
:r)
La conexidn d.el c_le de alimentaci6n (cable
t]exible) entre el tomacorrienm y la caja terminal
de la secadora NO ES suministrada con la
secadora. E1 ti_ del cable :flexible y el calibre del
alambre deben estar conli_mne con los cddigos
locales y con las instrucc:iones de las p_ginas
siguientes.
E1 mdtodo de cableado de la secadora es oF_::ional
y sujeto a los requefimientos del cddigo local.
Refifirase a los ejemplos en la prdxima p_gina.
Usted debe seleccionar el m6todo para cablear su
secadora de acuerdo a los requerimientos de los
cddigos locales y ordenanzas. Mdtodos de ejemplo
estfin incluidos en las siguientcs p_iginas.
ADVERTENCIA!
Etiquete todos los cables antes de
desconectarlos para darle mantenimiento a la
secadora, ya que errores en el cableado
pueden causar lesiones serias a usted y dafiar
su secadora.

ientosel ctricospara
el crtica
Revi las siguientes opciones para determinar la conexion electrica adecuada
para su casa:
Utilice las insbrucciones en esta secci6n si su casa
tiene un tomacorriente de 4-alambres (Tipo NEMA
14-30R) y si usarfi un cable de alimentacidn para
secadora listado por UL, de 12(i/240 voltios mh_imo
y de 30 amp.
Utilice las hlstrucciones en esta secci6n si su casa
tiene un tomaconiente de 3-alambres (Tipo NEMA
10-30R) y si usarfi un cable de alimentaci6n para
secadora listado _:r UL, de 120/240 voltios
mhlimo y de 30 amp.
Si este tipo est_ disponible en su casa,, lo conectar_
a una caja de corto circuito o una pipa desconectada
Imporlan|e : Contacto por conductor neutro esta prohiNdo
[_r(1) nuevas instNciones de branch° circuim (2) las casas de
mobiles (3) vehiculo recreacional y (4) areas donde los cddigos
locales prohi_ contact_ _r el conductor ncutro.
Prepare nn mfnimo de 5 ps (1 52.m'i de longimd para poder
reemplaz_u-la _cadora.
Primero, despegue 5 pulg (12.7 cm) de la cnbier_adei cable
desdeel finN. Descubra 5 pulgadas del cable de tierra. Despn_s
decortar ! 1/2 pul (3.8cm) delos otms 3 cables, aisle 1o
des_gado, at_Sslpul (2.5cm).haga los finales de loscables en
torma de gancho. ¢
Luego, _nga el final de esas puntas debajo del tornillo de la
_ennhml (la parte de la punta con fbnna de gancho mostrandose
derecho) y nna el cable con el tomillo tuertemente.
Si este tipo est5 dis_mible en su casa, lo conectarh
a una c_a de corto circuito o una pipa desconectada
,, Atornilleel cabledela alimen=mcibnalbloque
terminal.El_ble decolorde_ria conectarsea los
ternillos del mismo color.El_lor del cableindicada
enelmanualestbconectadoaltornillodelmisn'm
colordel bloq_. DeIoco.rio, se aplicarbuna
• Coneccio_s Direct-Wire(tipodetec_l_ia) no
cumplencon el _igo _ regulacionesdel edificio
enla n'myoriadelas breas.,es _ponsaNlidad del
clienteasegura_e quela i_mlacibn cumplacon
todoslos_uerimientos.
1.Conecte un cable neutral (blanco) al cane de poder para centrar ]a
tem_inal del ton_illo.
2. Conecle un cable roio y otro Nego en las termiimles iNuierdas y
derechas de los tornillos.
3. Conecte el cable de tierra(veNe) del cane de _er al tomillo de
tierra extemo y mueva el cable de tierra neutral Nero del aparato y
con6ctelo al tornillo central.
4. A_g_l_se qne el tomillo de alivio de tensidn este apretado.
Asegure que t_to el bl_ue de ttlercas esten bien ap_etados, y el
cable el_cNco de _der este en la _sicldn correcta_
T_(o de _ _na_
CaNe _ T_r_ neu_._
_1_

equerimientosel ricos para
lmportante : Contacto por conductor neutro esta prohibido
por(1) nuevas instalciones de branch- circuito (2)las casas
rodmlte (311vehiculo recreacional y (4) _"easdonde los
c_igos l_ales prohibe contactar por el conductor neutro.
Net_re un mfnimo de 5 ps (1.52 m) de iongimd para
t_der reemplazar ia _cadora.
_imero, des_gnJe 5 pulg (12.7 cm) de la cuNerm del
cable desde el final, i_ubra 5 pulgadas del cable de
tien:a. P_spu6s de corVar 11/2 pul (3.8cm) de los otros 3
cables, aisle lo des_gado, anSs lpul (2.5cm). haga los
finales de los cables en fbrma de g_:ncho.
Luego,. F,onga el final de esas punt.as debajo del
tomillo de la tem_inal (la parte de la puma con
fonna de gancho mostrandose derecho) y junte el
cable con el tornillo :ihertemente.
• Si los c6digos y ord.enmlzas locales no permiten el
uv_ de una conexi6n de 3 alambres, o estfi
instalando la secadora en mla casa rodmlte, debe
usar una conexi6n de 4-alambres.
1. Conecte un cable neutral (blanco) al cable de
r,oder para centrar la terminal del tomillo.
2. Conecm un cable rojo y om_ Negro en las
tenninales izquierdas y derechas de los tornillos.
3. Asegfirese q?ae el tomillo d.e alivio de tensi6n
este apret.ado. Asegure que todo el bloque de
tuercas esten bien apretados, y el cable eldctrico
de r,oder este en la r,osicidn correcta.
.....................................................Cla_,_a neutral
Tomlmk_de Noque _rrrdnN
_e de T_ n_l
C_e _L_ral
_Ver_ de_n deP_r
_mo deT_
Ca_ de _ n_,_t,a_
(Naneo/
C_ _
_ _rrm da _a
Conecciones Direct-Wire [tipo de tecnologfa) no
cumpien con el cOdigo de regulaciones dei
edificio en la mayorfa de las areas, es
responsabilidad dei ciiente asegurarse que la
instalacion cumNa con todos los requerimientos.
1. Conecte un cable neutral (blmlco) al cable de
poder para centrar la terminal del tornillo.
2. Conecte un cable rojo y otto Negro en las
terminales :izq_aierdas y derechas de los tornillos.
3. Conecte el cable de tierra(verde) del cable de
poder al tornillo de tierra exmmo y mueva el
cable de tierra neutral fiaera del aparato y
con_cmlo al mrnillo central.
4. Asegfirese que el tomillo de alivio de tcnsidn
este apretado. Asegure que redo el bloque de
tuercas esten bien apretados, y el cable el6ctrico
de t_Jer esm en la posicidn correcta.

ientosel ctricospara
el crtica
Si los cddigos y ordenanzas Mcales pemfiten la
conexi6n de un conductor estmcmra4ierra al
alambre neutral, utilice estas insbrucciones. Si los
cddigos y ordenanzas locales no permiten la
conexi6n de un conductor estructura4ien*a al
alambm neutral, utilice las instrucciones bajo la
Secci6n 3: Conexidn opcional de 3-alambres.
• Si los cddigos y ordenanzas locales no permiten la
conexidn de un conductor estructura-tierra a un
cable neutral, utilice las instrucciones bajo esta
secclon.
_ 3*iambres
Clavija nell
oe espada
con puntaslevantadas
-- En_ufe de 3_lavijas
,,,,,,,,,,,Li_rador de tensi6n de 3/4
as (1,9 cm) aprobado _r UL
-- Clavija neutra_ I -I:erminales de anillo
-" _eutral
(alambre blanco o _n_al)
CaNe Neutral
(Na_ o Cab_ _0
Tomillo _ _ue tetmir_l
_nt*_ (Plata)
Cable _ _a neutral
lbi_o)
Cab_ _Jal
(N_ o Cable c_r_u_'dl)
VeMedel_ _ P_
Co--or F_._emo de T'_a
1. Conecte un cable neu|ral (blanco) al cable de
_)der para centrar la terminal del u)rnillo.
2. Conecte el cable de fierra(verde) del cable de
_)der al mmillo de tierra exmmo y mueva el
cable d.e fierra neutral fuera del aparato y
condcmlo al tornillo central.
3. Conecte un cable rojo y otro Negro cal las
mrminales izquierdas y derechas de los
tornillos.
4. Asegdrese que el mmillo de alivio de mnsi6n
este ap:mtad.o. Asegu:m que todo el bloque de
tuercas esten bien ap:mtados, y el cable eldctrico
de F_d.er este en la F_sici6n correcta.
5. Conecte un alambre de tierra indeF_2ndieate del
conectador de tierra externo con la derra
apropiada.

Contenedor de --
Cubierta del
R_illa de --
-- Panel de control
Panel de control Pantalla LED
• Indicador de tiempo
• Luces indicadoras
Selector de Botones de funciones adicionales
. Temp. Aff_Femp. Baja
- Sonido
" Cuidado arrugas
,, Favorito
. Tiemix_ diferido

uncionam de la
Tabla de selecci6n de ciclos
Ciclosde secodooutom6ficodec_-_icos Programa
est&qdar
Ciclosparatejidosm_tos
(Nora}Pulsed _t6n "TernF _ia" para_endos sensiblesalcalor
Ropade coma y manteierias,
Para tejidos gruesos y acolchadosque no necesitanplanchado.
ch&ndals,anor_s, mantas
Camisas,biusas y toga dede_rte Para tejidos que no n_esitan pianchado.
Pantalones,vestidos,faldas, blusas Para tejidos que necesitanplanchado.
_god6n (_endosbloncosy decolor)
(Nora}Pulsed _t6n "Temp,_ia" para _endos sensiblesalcalor
Muy seco
Sin planchado
Pianchadonormal
Toallas,albornoces y ropa de
cama
Prendasde felpa, paSosde
®cina, toallas, ropa de cama
Toallas de bafio, p_os de cocina,
ropa interior, calcetines de algod6n
Camisetas, pantalones,ropa
interior, ropa de trabajo
Ropadecam&mantdetias,toallas,
_misetas,polosy topadetrabajo
Ro_ de cam& mantelet[as,toa_las
Para tejidos gruesos y acolchados.
Para tejidos gruels y acolchadosque no neces_anplanchado,
Para tejidos que no n_esitan planchado,
Para tejidos que no necesitanset planchadosligeramente,
ni completamente.
Para tejidos que necesitanplanchado.
Para tejidos que neces_anplanchado,
Extra seco
Muy seco
Sin planchado
Ligeramente
seco
Planchado
normal
Planchadoavapor
Ciclosde tlempapareunaduroci6nsel_cionada
Toallas de bafio, albornoces, Prendas _queSas y ropa presecada Normal
paSosde cocina, tejidos Tejidos normales utilizando temperaturaalta durante 20 minutos
Prendas _queSas y ropa presecada
Tejidos normales utilizando temperaturaalta durante 40 minutos Caliente (40min,)
Todos lostejidos que necesiten airear_; _car sin color Airefre_o (20min.)
Jers_is,teiidosde[icados!z_a!osdedeposeI Para los tejidos que no quiere secar en tambor, Secadoen cesto
Progromoes_ial
Lana ......
Seda,prendasfemeninasfinas,lenceria Parateiidosque seansensiblesal colorcomolostejidossinteticos. Delicado
Sin embargo, los tejidos de lana y delicados deber&n utilizarse en ciclos para lana y tejidos delicados.
En caso contrario, la ropa puede sufrir da5os.

uncionam de la
Antes de utilizar la secadora por primera vez
Antes de utilizar la s_adora _r primera vez, hay algunos puntos que debe comprobar.
_spu6s de quitar el _laje, comprJe_ que el produdo no tiene ninggn problema y que est6 adeoJadamente
instalado.
1. Compruebe que Io_ca_ro est6 bien equilibrado utilizando un nivel de burbuio.Para comprob_r esto, puede
examinar y ojustar los _tes, que se su_ne que van o quedor puestas.
2. ComprJebe algunas de las piezas im_rtantes como el c_ten_or de agua, el condensador, el panel de c_trol y el
tambor.
3. Esnecesario accionar duronte 5 minutos el secado para o_gurar que el interior del tambor secaliente.
1. Conecte la corriente.
Primero, pulse el bot()n de "Encendido". Se
encender4 [a [uz indicadora situada encima
de] bot6n indicando que [a m4quina est4
preparada para ponerse en marcha.
2. Abra la puerta.
3. Compruebe el filtro de pelusas,
el contenedor de agua y el
El filtro de pelusas situado junto a [a puerta
deber4 vaciarse despu6s o antes de [a
operaci6n de secado.
Abra la puerta y compruebe si e[ fi[tro de
_.s.]usasest4 ]impio. Si no es as_,[impie]o
como se indica en [a p4gina 15.
E]contenedor de agua y e[ condensador
tambi_n deben vaciarse y [impia_e para
obtener unos mejores resu]tados de secado.
Conec[e.
Abra [a
pue_a
4, Ponga la ropa en el tambor
despu@s de clasificarla.
La ropa deber4 dasificarse por el tip() de tejido
y i'_)r e[ hive] de sequedad y comprobar que
k_os los cordones y cinturones de ]a ropa
est@nbien atados y fijos antes de D)ner[a en e[
tambor.
Esaconsejab[e empujar [a ropa basra e[ fondo
para mantenerJa a]ejada de[ cierre de [a
puerta. En caso contrario, se podria daffar e[
cierre de [a puerta.
Compruebe
e] fi]tro.

uncionamiento de la
5. Cierre la puerta.
Antes de cerrar [a puerta, es necesario asegurarse
de que ]as prendas est6n bien co]ocadas y que no
haya obietos extraffos, especia]mente hlflamab[es,
atrapados a[r_or de [a puerta.
6. Seleccione el ciclo de secado que
Puede e[_gir un cic[o girando e[ bot6n de control
de programas hasta que e] programa requeddo
[[egue a su hldicador. Si s6[o pu]sa e[ [_x)t6n
lnicio/Pausa sin e[egir ning_n cic[o, ]a secadora
continuar_ con e[ Sin p]anchado
[Consu]te [a tab[a anterior de Se[ecci6n de Cic]os
(p_gina 1O)para una informaci6n deta[[ada]
7. Pulse el boron INICIO.
Se puexJe o]'r como gira e[ tamb_)r,
8. Una vez que termine de funcionar,
abra la puerta y saque la ropa.
Cuidado! E] interior de] tambor a_n p{_ria estar
ca]iente. (El tiempo de funcionamiento varfa
dependiendo de[ cic[o o de [as opciones e]egidos)
9, Limpie los filtros de pelusas y
vacie el contenedor de agua,
E[ fiitro de peiusas deb_r_ [impiarse d_pu_s de
cada carga
10. Apague la secadora.
Pu[seel &:)t6n "Encendido".
- Asegurese de que eI fiitro no se rompa o
este daffado cuando utilice una aspiradora.
Si hay una pequeffa acumulaci6n de
residuos en el filtro, puede limpiar el filtro de
pelusas con un cepillo para eliminarlos.
- Si desea abrir la puerta mientras la
secadora est& funcionando, pulse primero
el boton StartJPause (Inicio/Pausa), espere
a que el tambor se detenga por completo y
luego abra la puerta.
NadiesacaraIaaspir,adoraparalimpiarelfiltrode
pelu_ c_adadi&
Seieccione
e[ cicio
deseado
Saque ia
ropa
Limpie e[
fiitro de
peiusas de
]a puerta.
Limpie e[
fiitro de
peiusas
inferior.

unciones adicionales
Temp. Alta / Temp. Baja
Estasfunciones seutilizan para acortar o alargar [a
duraci6n del cic[o aumentando o disminuyendo la
temperatura_Estosbotones s61ofuncionan con los
Ciclos de Tejidos Mixtos y losCiclos de Algf_d6n,
Si [a puerta est,1abierta durante e[ funcionamiento,
[a secadorasedetendr_.
sonido
Serefiere a la acfivaci6n y desactivaci6n del sonido
de a[arma.
Una vez que hayaconectado la corriente y
seleccionado e[ cic[o, _nani la a[arma cuando pulse
un determinado bot6n del panel
Si no quiere ofr ese_nido, pulseel bot6n sonido.
A continuaci6n el bot6n sonido seencendeni
indicando que e[ sonido est_desconectado,
Antiarrugas
La fina[idad de [a funci6n Antiarrugas esevitar [as
arrugasque seforman cuando la ropa no sesaca
inmediatamente despu_sde finalizado e[ ciclo de
secado. Enestafunci6n, [a secadorase pone en
marcha y separa continuamente hastae[ final de[
cic[o,
Si seabre la puerta, esta funci6n queda cancelada_
Pero en otros casosen que [apuerta est6 abierta, [a
funci6n Antiarrugas sen1recordada y procesada_Para
affadir estafunci6n, pulse e[ bot6n "Antiarrugas"
despu6sde se[eccionar e[ programa desecado,
Favorito
Si hay algLinciclo que deseerea[izar bas_ndoseen
sus propios h_bitos de secado,utilice "Favodto".
Una vez que se ha guardado e[ cic[o favorito, puede
utilizarlo repetidamente lasvecessiguientes antes de
cambiar e[ajuste guardado. Pot eiemplo, conecte [a
corriente y seleccione ExtraSecoen e[ Ciclo de
Algod6n y Alta Temp.y Antiarrugas sucesivamente,
y por 6ltimo pulse "Favorito" hastaque [a secadora
emita un __n[do. Tardar_unos 3 segundos.E_ es
todo Io que tiene que hacer.
La vez siguiente, a[ porter en marcha la secadora y
pulsar "Favor[to" podr_ ver lasopciones anteriores
que ha seleccionado en e[ panel.
Tiem diferido
Tiempo diferido indica la hora de fina[izaci6n de[
funcionamiento de la secadora.
El tiempo m4ximo de demora esde 19 horas.
1, Pongaen marcha la secadora
2, SeIeccione el ciclo
3, Ajuste la hora del temporizador
4, Pulseel boI6n lnicidPausa
Bl queo para nifios
Para [aseguridad de sushiios, pulse los botones
Temp,AIta y Temp. Baia al mismo fiempo durante 3
segundosaproximadan_ente. Puedecomprobar esta
func[6n viendo como la secadoraindica" C L" en [a
pantal[a LED.

U
de la
Importancia del cuidado y la
No es muy difi'cfl cuidar su _cadora. Todo [o que
dene que hacer es _guir [asinstrucdones siguientes.
Limpie el filtro de pelusas
Limpie e[ fi[tro de pe[usas despu6s de cada us() y
compru6L'_lo antes de cada uso. Tambi_n deL'_r_
]impiarse si se i[umbla el pi[oto de %impiar Fi[tro" y
suena la alarma durante el funcionamiento de la
secadora.
La limpieza o e[ vaciado de] fi[tro reducir4 los
tiempos de secado y el consumo de energia, y
a]argar4 la vida de [a secadora.
1. Abra [a puerta,
2. Extraiga el
filtro.
3. Umpie el filtro
usando una
aspiradora o
aclar&ndolo
bajo el grifo.
4. Vueiva a
colocar el filtro.
Empuje el filtro
hasta el rondo
para evitar
interferencias
con la puerta.
5. Cierre [a puerta.
Limpieza del filtro de pelusas
durante un ciclo
Sid p[[o_o[ndicadorde_LimpiarFi[t_d__ enciendeyseapaga
durantee]funcionam[ento,]impieel filtro inmediatamen_e.
]. Dejeque ]asex:adoraseenfffeysi@lospasosmenc[onados.
2. Pulsee]bol6n [nicio/Pausa.
Vacie el contenedor de agua
E[agua condensada se recoge en e[ contenedor de
agua. Debera"vaciar e[ contenedor de agua despu6s de
cada uso. En caso contrar[o, el secado no set4
adecuado.
Si e] contenedor de agua est_ [[eno, e[ pi[oto de "V_ciar
agua" se enciende y suena una alarma mientras la
secadora est4 funcionando. En este ca_, debe vaciarse
e[ contenedor de agua en el p[azo de 1 hora.
1, Extraiga el
contenedor de
agua.
2. Vacie el
contenedor de
agua en el
fregadero.
3, Vuelva a col_arlo,
4, Pulse el bot6n inicio/Pausa.

m
Ul
£[ condensador es tambi6n una pieza muy importante para conseguir un secado eficaz, por Io que es necesario
que le preste un cuidado especial Se recomienda [impiar e[ condensador tres o cuatro veces a[ afio.
1. Abra la cubierta de condensaci6n utiiizando
una moneda o un destornillador de hoja piana.
4, Extraiga e[ condensador insertando un dedo
en un orificio situado en la parte delantera de[
condensador. (No fuerce el condensador),
2, Abra la cubierta protectora girando una de las
palancas de bloqueo,
__
CubieHa prot_tora
/
3. Suelte las dos palancas de bloqueo
gir&ndolas una hacia la otra.
,I"
5, Limpie el condensador a fondo bajo el grifo
dejando correr el agua,
< Parte delantera >
< Late ral >
6, Cierre todo en el orden inverso a su apertura,

U
de la
R_illa de ventilacion frontal
Limpie con aspiradora [a reiilla de vend [aci6n
delanfera 3-4 veces a[ a_o para asegurarse de que
no se acumu[e pe[usa ni sudedad, que puede dar
lugar a una incorrecta entrada de aire.
NormQImente e[ Qgua conden_dQ esbom_dQ
ol con_edor de oguo, donde serecoge hosta su
vociodo.
No s61oseutiliza el contenedor de QguQ,sino que
e[ agua _ puede vadar directamente Q la
monguero de vaciado, e_eciolmente cuondo [a
secadoro es_ apilada encima de una lavadoro.
Con el kit de conexi6n para una mQnguero de
vociodo, puede simplemen_ combiar el curso del
ogua y reconducir[a ol sistema de desag0e.
Siga los posos siguientes.
1. Desenrosque -_
la cubie_a. ,_
Sensor de humedad
La funci6n de este dispositivo es detectar e[ contenido
de humedad que queda en [a ropa durante el
funcionam[ento, Io que significa que sedebe [impiar
confinuamente. La principal raz6n de [a [impieza de
esta p[eza es el[m[nar [a acumu[aci6n de ca[ en [a
su_rficie de[ _n.,_r. Limpie los sensores de[ [ntedor
de[ tambor (como aparecen en la imagen).
I
I
I
I
3, Separe la
manguera del
contenedor de
agua del kit.
2. Extraiga el kit de
conexi6n,
4. Conecte la
manguera de
vaciado a[ kit.

Cambiar la orientacion de la puerta
Se pu_e cambiar [aor[entac[6n de ]a puerta para que se
ajuste a sus condiciones de insta]ac[6n. La bisagra de [a
puerta viene situada de f,_bricaen e[ ]ado derecho_
4, Quite las dos
cubiertas de
las bisagras.
5. Desatomille
las dos
bisagras de la
pue_a.
1. Desatornille primero la bisagra inferior de la
puerta y lu_o la superior. A continuaci6n
p6ngaia sobre una manta para evitar rayones.
2. Quite la
cubierta de la
cerradura de la
puerta.
6, Coloque las dos
cubiertas de las
bisagras donde
est&n situadas
las bisagras de
ia puerta.
7. Coloque el
pestillo de [a
puerta en el
lugar contrario.
3. Quite la
cerradura de la
puerta y
col6quela
donde est&
situada la
cubierta de la
cerradura.
8. Atomille las
bisagras de la
puerta.

U
de la
Cambiar la bombilla
La F_)mbi[]a _ria estar muy ca]iente cuando ]a
secadora acaba de terminar su funcionamiento. As_
que, antes de cambiar ]a F_)mbi]]a, aseg_r_e de
que e[ interior de[ tam[-_)r se haya enfriado.
Debe desenchufarse el cable de corriente
antes de hacer esto para evitar el riesgo de
una descarga el6ctrica.
1, Abra la puerta, ponga una mano en el tambor
y sujete la cubierta de la bombilla.
2. Con la cubierta de la _mbilla sujeta con una
mano, girela en el sentido de las agujas del
reloj haciendo un _o de fuerza.
4, Extraiga la _mbilla gir&ndola en el sentido
de las agujas del reloj.
Tenga cuidado de no dejarla caer.
\
5, Enrosque la nueva bombilla en sentido
contrario al que la ha desenroscado.
3, Separe]acubiertade]a_mbilla de]abjamientode]ca_uii]o.

Gula para el secado
Prendas de lana
Estate[as basra que recuperen su farina original y
s6que[as extendidas.
Materiales tejidos y de rizo
A[gunos materia]es teiidos y de rizo pueden encoger,
de_ndiendo de su ca[idad.
Prendas inarrugables y sinteticas
No sobreca_4ue la secadora.
Saque ]as prendas inarrugab[es en cuanto se detenga
[a secadora para redudr ]asarrugas.
Ropa de ni_o y camisones
Compruebe siempre [as instrucciones de[ fabricante.
Goma y plasticos
No seque ning_n arffculo de, o que contenga, goma
o p]_sticos coma:
a) De[anta]es, baberos y fundas de si[[a
b) Cortinas y mante]es
c) A[fombras de bafio
Fibra de vid_o
No seque a_iculos de fibra de vidrio en la secadora.
Las particuJas de vidrio que quean en [a secadora
p_xjrian quexjar adheridas a su ropa ]a siguiente vez
que uti[ice [a secadora e irritar [a pie].
Etiquetas sobre el cuidado de las
Las prendas tienen sus etiquetas con
recomendaciones de [avado, D)r [o que se
recomienda e[ secado segSn las etiquetas de la
prenda.
No s6[o eso, [a ropa debe c[asificarse segSn e[
tama_lo y el tipo de _jido.
No sobrecargue la secadora para ahorrar energ_a y
tiemD), y para unos mejores resultados de secado.
A continuaci6n figuran _s etiquems de
cuidado de los tejidos.
_ado
D So:ado secadora
erl
D Inorrugoble/
Resistentea lasarrugas
D Suave/ Delicado
_ar en
No
s_adora
No sg¢or
Temperaturaalta
Temperaturamedia
D Temperaturaba[a
Sin calor / aire
Secorencuerda/ c0lgar_ro secar
[_ Deior escurrir
El _ar en horizontal
A la s_bra

Pie_s de repuesto
Los piezQs de repuesto que n_esite
proporcionon _On los t_rminos de la gorontia.
Los com_nentes cubiertos pot la gQrant_a
proporcionan gratis. Si la garantla ha _pirado,
k_spiezas de repuesto dean adquirirse en el
servicio t_nico.
C6mo deshacerse de la secadora
Esaconsejoble que se deshago de la secadora
de manera segura _ra evitar el rie_o de
lesiones a sus hiios.
Se debe quitQr lo puertQ, Io tape y otros
elementos que sobresalgon y se debe cortor el
coble de corriente poro evitar su futuro uso. A
continuaci6n, _ d_e des.._har la _cadora de
Contacto con el servicio t_cnico
Si tiene olgOn problemo con la _odora,
consulte primero la guiQ _ra la soluci6n de
problemas. En caso de que no figure el mismo
problema y no pu_a resolverlo usted mismo,
_ngQ_ en contacto con el _rvicio t6cnico.
Una personQ del servicio t_cnico le hat6
preguntas como los siguientes:
1. Su hombre, direcci6n y c6digo postal.
2. Su nOmero de tel6fono.
3. Descripci6n del problemQ.
4. El nOmero de modelo y nOmero de serie de la
secadora.
5. La _ha de compra.
Accesorios
_c, dora viene con los accesorios siguientes:
1, Manguera de vaciado del agua de
condensaci6n
2, Soporte de ia manguera
3. Cesto 6e la secadora
I Percha fijadora : 2EA
Tornillo : 4EA
Kit de superposici6n

uia la soluci6n de
Consejos para la soluci6n de problemas
Ahorre tiempo y dinero! Primero revise las tabias en las siguientes
pfiginas quizAs no necesite Ilamar a sewic[o.
l _rob_: Mi Secadora no A_anca
• Est_ila _adora ¢onectada?
del euavto de lavado..
• Es_ el fusible _ndido, o el _syuntor Verifique la caja de fusibles/disyuntores del cuav_ode lavado de su casa y eatable los fusibl_
dispa_ato? o reconecte los disy-antores.
2.Problema: Mi Secadora no Calienta
• Es_ el fusible fian_do, o el dis_tor Si el f_ible est_ _dido o el _yuntor disp_ado, la _cadora quiz_ de vueltas pero no
dispart? calienta. Vefifique ia caja de fusibi_s/disytmtores dei cu&rtode lavado de su casa y cambie
los fusibies o mconecte los disyuntores.
3.Problema: Hay Manchas de Grasa en la Ropa
• Es_ usted secando ropa limpia y mpa /_ de usar sa se_ _ _ _ _ias _,nente, _o a que prendas suei_ _
sucia junt_? _ la_ lkmpia_ e_ en la _ma _ o colc_ __te en eltambor de lav_.
:" Estabma sus pren_ _mpletamen_ __ h_ _a son manchas que _ f_ e_ du_ranted_so _ lavadol
limpias? Pot favor refise y ¢OnfLrme que se es_ siguiendo las instmcciones de largo y clue la
] _t_ quedaado coraPletamente _pia i

uia
la soluci6n de problemas
4_Problema : Hay Pelusa en la Ropa
uaa nueva carg_
• Ciasific6 adecuadamentela carga Para reduc;;rla c_tidad de _lu_ en _ carga _ ropa, c_que los productores det_lus_
de ropa? (como _ vellosa 'blaaca_ alg_n ) _ las ropas q_ puedan cogerpel_
(como pantalones aegros de lino).
• Tiene !a ropa eX_ _ e!_ci dad
est_fica?
• Sobrecarg6 su _cadora? Divida la_scargas grandes en cargas _uefias.
' Co1_6 algnlnp_l, _ilie_ _A,_ ve_s_ olvida _tirar _ 1_ _!sill_ del pantal6n _ _ ,_ p_I o serville_,
u otromaterial simil_ en 1a c_ga? y es_ P_!, Se_e_ o _terial s_ pu_ causar exceso _ _lu_ _ una carga,
Com"L,lx_ que los bolsiU_ _ I_ pantalones, camisas y de otros artfculos es_aSnvacfos_
5.Problema: Ocurre Es_a en la Ropa despu_s _1Secado
• Ufil_ suaviz_ de _la? Tra_ usando un suavizante de teb_ para reducir la elec_cidad est_tica.
• Sec6 en exceso la carga?
6J_roblema: E1 Tiempo de Secado no es Consistente
D tiem_ de secado para una carga varla depen_endo de lascaracterL_cas _1 _or, tipo
calor usado (el_trico, g_ natural o LP), el t_o de la carga,el ti_ de tela, la hu_me_
de las prendas, y la condici6n de los ductos de escape y filtro de pelusa.

uia la soluci6n de
7. Problema: Las Pren_ Toman Mucho Tiempo en Secarse
• _ _do cargas grandes de ropa
_sada?
, _t_ua I_ con_les de secado ajustados
La ro_ pe_ tarda mis fiem_ en secarse _rque fienden a retener mls humed_, Para
ayudar a reducir y mantener tiem_s de secado m_ consistentes _ tel_ grandes y
_sadas, sepa_ es_s a_-tfculos en cargas _ r_uefias de an tama_fio consistente.
U_ el ajuste de control adecuado para el fipo de ¢_aq_ est_ seeand01
correctamente ?
• Estfi el fdtro de _basa limpio antes de Pot favor confirme que el filtro de pelusa est6 limpio antes de cada carga nuev_
cada carga nueva?
Verififfae h caja de fasiblesJdJsyuntores de! o._to _ !avado de _a ,casa y cambie l_ Pasibles
• Sobrecarg6 _ _adora? Divida sus cargas _des en cargas mils peque,_.
8.Problema: Las Prendas estdn A
tiem_ de se_ado m_s ¢orto,y mm_va !_ prendas cuando attn teng_ algo de humed_,
• F_st_usted renaoviendo su ropa de la Rernueva su ropa de la secadora despu_Ssde finali_do el ciclo de secado y cuelgue o
secadom inmedia_nte despu6s doble las pren_.
que el ciclo de _ado es completado?
9.Problema: l__s Prendas se Encogen
• _t_ usted siguiendo 1_ _trucciones
sobre el cuidado de sus prendas,
Para evitar e_o_ento, Ir_vrfavor siga cui_en_ las _tra_iones sobrecui_o y
uso de sus prendas, debido a que algunas teias se encogen naturalmentecuando se iavan.
Otras telas pueden ser lavadas _ _ encogen cuando son _adas en _.cadoms.

uia
la solucibn de problemas
Modo
O
de Error
Pu_e _istir alto tem_ratura y humedad del aire en el tamer de la secadora, bien despu6s de
su funcionamiento, o bien por interrupci6n de Io corriente el_trica u otras causas diversas durante
eI proceso de secado. Esta situaci6n hat6 que se reduzca Io durabilidad de la secadora o afecte a
los principles piezos el_tricos.Poro evitorlo, obro Io puerto de la secodoro, de m_o que se
extroigo el color y lo humedod, si no _ vo ho utiiizor lo secodoro durante un tiempo.
• EHE Esta es uno indicoci6n poro detector e informor de oils tempero_ros y altos niveles de humedod en
el aire dentro de un secador si 6ste se para en pleno proceso. En este caso, por favor utilice de
nuevo el secador despu6s de ventilar el aire sacando todos los objetos secos y dejando abierto la
puerto durante m6s de una hora.
(P6ngo_ en contacto con el Centro de Asistencio si tales condiciones continOan inclu_ despu6s de
dejor lo puer_ obierta durante el tiempo suficiente.)
° EL E si el error ELE continOo sucediendo, desenchu_ los cobies de olimentaci6n y despu6s Ilome ol
Centro de Asistencia.
= Desconec_ el enchu_ y llame al servicio t_nico.

atos t cnicos
33 1/2"(850mm)
23 5/8"(600mm)
Peso: 110 ib (50kg)
Requisitos el_ctricos Requisitos de ventilaci6n
120/240 V 60 Hz 2900
Asegdrese de comprobar [a p[aca de datos de
la s_adora para asegurarse de que [a secadora
tiene los va[ores adecuados.
I-lu_oodebaio
deuna_cimera
La_rales 0 inch (0 mm) 0 inch (0 mm}
Encimera 0 inch (0 mm) 10inch (25cm}
Potte_seta ] inch (2.5cm) 5 inch(] 2.5cm)
Assure una
circulaci6ndel
aire de 112
pies cenfimetros
cubicos/min, en
toda la
AsegureunacircuJaci6ndel
aire de 112 pies
cObicos/min,en toda [o
secadoro
Lopuerfade[armario debe
fener 2 aberturas(de t;_
persiana),codauna de elias
conun6tea minimade 60
pulgadascuadradas(387
cm2),situadasa 3 pJIgadas
(8 cm)de la parteinferiory
su_rior de la puerta.

rminos de la arantia
BOSQUEDA DEASISTENCIA SOBRELA GARANTJA
Encontrar& la garantia de su secadora en la parte final de este manual. El servicio de
garantia estfi disponible contactando con su Centro de Servicio LG m&s proximo. Si este
producto se instala y se opera siguiendo las instrucciones de este manual, LG reparar& o
recambiarfi cualquier pieza defectuosa en material o mano de obra a Io largo del periodo
cubierto por la garantia, comenzando desde el alia de compra.
ADVERTENCIA! Para su seguridad, debe seguir las recomendaciones
de este manual. Para reducir el riesgo de |ncendio o explosibn, o choque eldctrico, o para
prevenir da_os a la propiedad, lesiones personales, o muerte cuando use su a_efacto,
siga las precauciones b_sicas, incluyendo las siguientes.
Restriccion de la Garantia : Si la secadora es utilizada pare otro prop6sito que no sea el uso
farniliar privado, toda cobertura de la gamntla es efectiva por s61o 90 dfas.
Necesitar_ el nfimero de rnodeloo y de serie completo al solicitar la garant/a de se_'icio. Es
necesaria la prueba de la cornpra (ticket o recibo).
Utilice el siguiente espacio para anotar el nfimero de modelo y de serie de su nueva secadora LG.
Modelo No.
No. de Serie
Fecha de Adquisici6n
_I_Grape su recibo AQUI.

rminos de la arantia
LG Elecffoni_ inC,, re.far6 o en su defecto repondr0, sin cargo algun_, su producto si pnJeba _ defectuoso
en mated.31o m_no de obra dentro de un _o nodal durante el _r[odo _bl_ido en la porte inferior de la
gorant_a, efectivo desde @di'a de compra del _-oducto. Esta goran_ lim_tada es efectiva Qnicart_nte para el
comprador ordinal del #-oducto, y efectivo Qnicamente si ha Ado usado en _ Estados Unidos, tncluyen_._3
Alaska, Hc_vaiy t__orio r'_offeamer_car_,
V.'_encla: TaP_ d_e la fe_a de compra
T_as las _rfes: 1afio desde la fecha de
compra
Uameal 1,,,,_%2_ 00COyescojama_i_ apropiada.
Porfavortenga listoeltipo de pr_ucto (Lav_ora),
n_Jmerode rT_odelo,nCJmerode _e y c_igo p_al.
ESTAGAmmA REEMPLAZACUALQUIERO_ GARAN_A, _PRE_ O IMI_A_ I_b%'EN_ _N UMITACI_)N
CUALGUIERG_NT_A _ VENTADE ME O _NVENIENCIA PA_ P_rTOS PA_r:_LA_S.
EN EL_NDIDO CUAL_JIERGAILANT_AIMPL_C_TA_ _QUERIDA _ b::'_,I:SUM_TADAEN DURAC_ AL
_R|ODO _ GARANT_J__RESA EN LAPA_E INFERI_. LG NO SEHAJ_,_SPOt_ PORCUALQUIERD_
|NDI_O, CONS_NTE O INCIDENTALDE NINGUNTIPO,It_CLU_/EN_ _RDIDAS _ IN_ESO_ O GANA_AS,
EN RELAC_N _N ELPR_, ALGU_ ESTA_S NO _N L[MrfF_EN CUANTOA_ _C:46N DE
GARANIJ'AIM_CITA, O LA_CLUSI_ _ DA_I_ INfaNT.S O D_S COt_CU_S, _ _E LOCffA.DO
EN I,A P_ INFERI_ PUEDENO APLICARSEA LL,el'ED.
_A G_A _MITADANO APUCAA:
1, Vlajes de ServicJoa su cesa para Ilevar, [ecoger y/o instalat el produ<_to,InstPdi_O rep_er fusibles
o conectar correcta_nte ca_s, o la correcci6n de _zas desautor_ad_; y
2. Dafios o prob_mos operacbP_3_s cc_mo resultado de un real uso, ab_o, _raci6n
dentro de un amlcdente no especiffca_o o contralto a los requerim_ntos o precaucior_es
en la Gu[a Operaclonal, acddente, _gas_ in_endios, tnundaciones, instalaci6n inaproplada,
c_ctos de _s, alteracio_s o m_if_c_ciones _saubdzad_ voffaje ir_cor_ecto, _o come_cial,
o _ra el _ de otros fines que no _n los prop6dtos intencio_dos.
3. __nte, _ costode _ repa_ o _p_zo del p_ _, set6 asu_de
_r _ _umider.
NOME_ CENI_=.A_ I_RAC11VOS PAPAEL_E_
F_racomprobar _aco_ra de la _rant'_:
Faraobten_ C_ de_clo _,
o_m obten_ pn_cto, oa_c_ desen,.icioo_a
elcor_umi_r:
G_rve _ _bo pare_t la _I_ de
com_, Una_ de s_t_ _ req_r_.._aen el
mo_r_ntoen e_q_ el _clo de _ _ran_ es
Uarr_ al 1800243°_0 (lunes a _mes, 7am-Spm, y
s_bados de 8am_m) y escoja la o_i6n del _nQ
alc_ada y tenga a la mar'K) su tlpo de producto
(lavadora), nOmefo de modelo, n_mero de _rb y
c6digo _tal; o _ffe nu_a p_gina de internet en
hflP:ll_._._

emo
-
 1
1
-
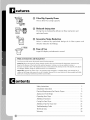 2
2
-
 3
3
-
 4
4
-
 5
5
-
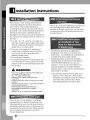 6
6
-
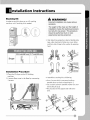 7
7
-
 8
8
-
 9
9
-
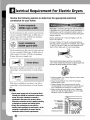 10
10
-
 11
11
-
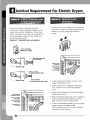 12
12
-
 13
13
-
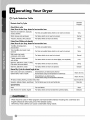 14
14
-
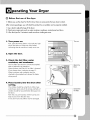 15
15
-
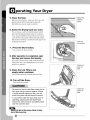 16
16
-
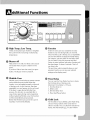 17
17
-
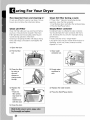 18
18
-
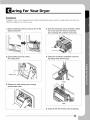 19
19
-
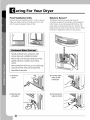 20
20
-
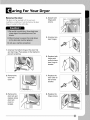 21
21
-
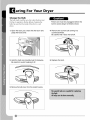 22
22
-
 23
23
-
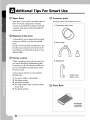 24
24
-
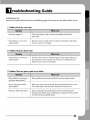 25
25
-
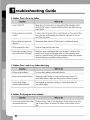 26
26
-
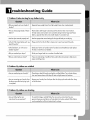 27
27
-
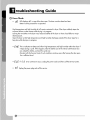 28
28
-
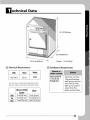 29
29
-
 30
30
-
 31
31
-
 32
32
-
 33
33
-
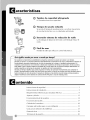 34
34
-
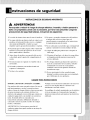 35
35
-
 36
36
-
 37
37
-
 38
38
-
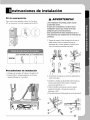 39
39
-
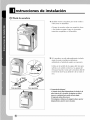 40
40
-
 41
41
-
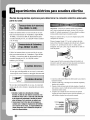 42
42
-
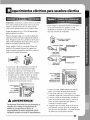 43
43
-
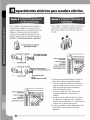 44
44
-
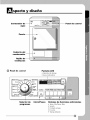 45
45
-
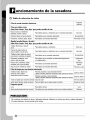 46
46
-
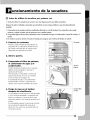 47
47
-
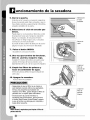 48
48
-
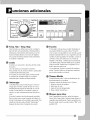 49
49
-
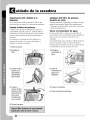 50
50
-
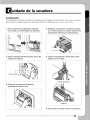 51
51
-
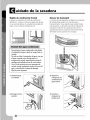 52
52
-
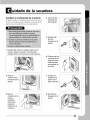 53
53
-
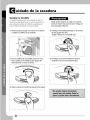 54
54
-
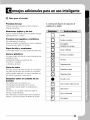 55
55
-
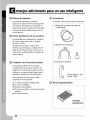 56
56
-
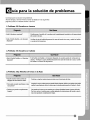 57
57
-
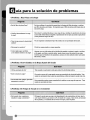 58
58
-
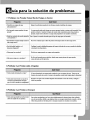 59
59
-
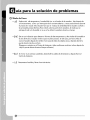 60
60
-
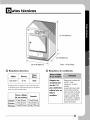 61
61
-
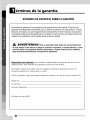 62
62
-
 63
63
-
 64
64


LG DLEC733W El manual del propietario
- Categoría
- Secadoras de ropa eléctricas
- Tipo
- El manual del propietario
En otros idiomas
- English: LG DLEC733W Owner's manual
Documentos relacionados
Otros documentos
-
LG Electronics DLEC855W Guía del usuario
-
Samsung DV665JW/XAA-00 El manual del propietario
-
-
Bosch WTVC5330US/09 El manual del propietario
-
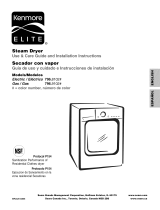 Kenmore Elite 79681028900 El manual del propietario
-
 Kenmore Elite 796.9219 El manual del propietario
-
Haier HLF13EC Manual de usuario
-
Bellavita DC 7 B WMIC El manual del propietario
-
 High One DC 7 B W566C El manual del propietario


