Samsung WF397UTPA Serie El manual del propietario
- Categoría
- Lavadoras
- Tipo
- El manual del propietario
Este manual también es adecuado para

the possibilities
Thank you for purchasing this Samsung product.

koy foatuFo¢of
PoworYoa_mTM
1. Extra Large Capacity
Samsung's extra-large capacity laundry machine can wash a full set of your bedding, a king-
size comforter, or up to 28 bath towels in a single load. Since you don't have to do as many
loads, you save time, money, water, and energy.
2. PowerFoam TM
Samsung's effective PowerForm delivers improved cleanliness with advanced fabric care.
PowerFoam allows detergent to disperse evenly and penetrate fabrics faster and deeper.
3. SpeedSpray TM
Samsung's new SpeedSpray technology saves you time by shortening wash times while still
keeping all portions of the washing process and getting your clothes clean.
SpeedSpray performs in Normal, Bedding PLUS, Deep Steam, Stain Away and Eco Cold
cycle and the saving time may vary by cycles and various load and option compositions.
4. Smart Care
Samsung's Smart Care, an automatic error-monitoring system, detects and diagnoses
problems at an early stage and provides quick and easy solutions.
5. VRT TM (Vibration Reduction Technology)
This Samsung washer performs smoothly at top spin speeds, minimizing noise and vibration.
6. Pure Cycle TM (Tub Cleaning cycle)
Clean your drum with one button! Pure Cycle is specially designed to remove detergent
residue and dirt buildup in the tub, diaphragm, and on the door glass without the need for
special chemical detergents.
7. Deep steam
The Deep Steam feature boosts cleaning performance and loosens grime and dirt, providing
superior cleaning results.
8. Diamond drum TM
Takes gentle care of your fabrics. With inside holes 36 % smaller than those of conventional
drums,the diamond drum prevents fabrics from sticking out through the holes and
consequently being damaged.
9. Woolmark Certified
The machine wash wool cycle on Samsung machines has been tested and has passed the
required Woolmark Company specification for machine washable wool products. Fabrics
should be washed according to the instructions on the garment label as specified by
Woolmark and Samsung.
1&Digital display & Center jog dial
The jog dial enables you to select cycles in both directions with ease, and the display is easy
to use and understand.
11 .DD Motor
The power to handle anything! Our direct-drive inverter motor delivers power right to the
washer tub from a variable speed, reversible motor. A beltless direct-drive motor generates a
higher spin speed of 1200 rpm for more effective, quiet operation. The washer also has fewer
moving parts, meaning fewer repairs.
2 key features of your new PowerFoam rMwasher

12.Sanitize
When you select the NSF certified Sanitize cycle, the water heats to an extra high
temperature and removes 99.9 % of certain bacteria typically found on clothing, bedding, or
towels. This certification is awarded by NSF International, an independent third-party testing
and certification organization.
Please check the garment care label to avoid garment damage. Only sanitizing cycles have
been designed to meet the requirements of this protocol for sanitization efficacy.
_S_ NSF Protocol P172
Sanitization Performance of Residential and
Commercial, Family-Sized Clothes Washers
1&Pedestal with Storage Drawers (Model No : WE357")
An optional 15" pedestal is available to raise the washer for easier loading and unloading.
Italso offers a built-in storage drawer that can hold a 100 oz. bottle of detergent
14.Stacking (Model No: SK-3A1/XAA, SK-4A/XAA, SK-5A/XAA)
Samsung washers and dryers can be stacked to maximize usable space. An optional
stacking kit is available for purchase from your Samsung retailer.
<Pedestal with Storage Drawers> <Stacking>
key features of your new PowerFoam _Mwasher 3

Congratulations on your new Samsung washer. This manual contains important
information on the installation, use, and care of your appliance. Please take time
to read this manual to take full advantage of your washer's many benefits and
features.
WHAT YOU NEED TO KNOW ABOUT SAFETY INSTRUCTIONS
Warnings and Important Safety Instructions in this manual do not cover all possible conditions and
situations that may occur. It is your responsibility to use common sense, caution, and care when installing,
maintaining, and operating your washer.
IMPORTANT SAFETY SYMBOLS AND PRECAUTIONS
What the icons and signs in this user manual mean:
Hazards or unsafe practices that may result in severe personal injury
or death.
WARNING To reduce the risk of fire, explosion, electric shock, or personal injury
when using your washer, follow these basic safety precautions:
Z_ Hazards or unsafe practices that may result in minor personal injury or
CAUTION property damage.
Do NOT attempt.
Do NOT disassemble.
Do NOT touch.
Follow directions explicitly.
Unplug the power plug from the wall socket.
Make sure the machine is grounded to prevent electric shock.
Call the service center for help.
Note
These warning signs are here to prevent injury to you and others.
Please follow them explicitly.
After reading this section, keep it in a safe place for future reference.
_Read all instructions before the
using appliance.
SAVE THESE INSTRUCTIONS
4 Safety informaton

//_ WARNING: To reduce the risk of fire, electric shock, or injury to when using
persons your
WARNINGappliance, follow basic precautions, including the following:
1. Read all instructions before using the appliance.
2. Do not wash or dry articles that have been previously cleaned in, washed in, soaked in,
or spotted with gasoline, dry-cleaning solvents, other flammable or explosive substances
as they give off vapors that could ignite or explode.
3. Do not allow children to play on or in the appliance. Close supervision of children is
necessary when the appliance is used near children.
4. Before the appliance is removed from service or discarded, remove the door to the
washing or drying compartment.
5. Do not reach into the appliance if the drum is moving.
6. Do not install or store this appliance where it will be exposed to the weather.
7. Do not tamper with controls.
8. Do not repair or replace any part of the appliance or attempt any servicing unless
specifically recommended in the user-maintenance instructions or in published user-
repair instructions that you understand and have the skills to carry out.
9. Do not add gasoline, dry-cleaning solvents, or other flammable or explosive substances
to the wash water. These substances give off vapors that could ignite or explode.
10.Under certain conditions, hydrogen gas may be produced in a hot water system
that has not been used for 2 weeks or more. HYDROGEN GAS IS EXPLOSIVE. If
the hot water system has not been used for such a period, before using a washer or
combination washer-dryer, turn on all hot water faucets and let the water flow from
each for several minutes. This will release any accumulated hydrogen gas. As the gas is
flammable, do not smoke or use an open flame during this time.
State of California Proposition 65 Warnings:
WARNING
WARNING:This product contains chemicals known to the State of California to cause
cancer and reproductive toxicity.
SAVE THESE INSTRUCTIONS
Safety information 5

SEVERE WARNING SIGNS FOR iNSTALLATiON
WARNING
®
Plug the power cord into an AC 120 V / 60 Hz / 15 A wall socket or higher and use the
socket for this appliance only. In addition, do not use an extension cord.
Sharing a wall socket with other appliances using a power strip or extending the power
cord may result in electric shock or fire.
Do not use an electric transformer. It may result in electric shock or fire.
Ensure that the power voltage, frequency and current are the same as those of the
product specifications. Failing to do so may result inelectric shock or fire.
The installation of this appliance must be performed by a qualified technician or service
company.
Failing to do so may result in electric shock, fire, an explosion, problems with the
product, or injury.
Remove all foreign substances such as dust or water from the power plug terminals and
contact points using a dry cloth on a regular basis.
Unplug the power plug and clean it with a dry cloth.
Failing to do so may result in electric shock or fire.
Plug the power plug into the wall socket in the right direction so that the cord runs towards
the floor.
Ifyou plug the power plug into the socket in the opposite direction, the electric wires
within the cable may be damaged and this may result in electric shock or fire.
This appliance must be properly grounded.
Do not ground the appliance to a gas pipe, plastic water pipe, or telephone line.
This may result in electric shock, fire, an explosion, or problems with the product
Never plug the power cord into a socket that is not grounded correctly and make sure
that it is in accordance with local and national codes.
Q
Do not install this appliance near a heater or inflammable material.
Do not install this appliance in a humid, oily or dusty location, in a location exposed to direct
sunlight and water (rain drops).
Do not install this appliance in a location where gas may leak.
This may result in electric shock or fire.
Plug the power plug into the wall socket firmly. Do not use a damaged power plug,
damaged power cord or loose wall socket.
This may result in electric shock or fire.
Do not pull or excessively bend the power cord.
Do not twist or tie the power cord.
Do not hook the power cord over a metal object, place a heavy object on the power cord,
insert the power cord between objects, or push the power cord into the space behind the
appliance.
This may result in electric shock or fire.
Do not pull the power cord when unplugging the power plug.
Unplug the power plug by holding the plug.
Failing to do so may result in electric shock or fire.
SAVE THESE INSTRUCTIONS
6 Safety informaton

When the power plug or power cord is damaged, contact your nearest service center.
! CAUTION SIGNS FOR INSTALLATION
CAUTION
_This appliance should be positioned in such a way that it is accessible to the power plug.
Failing to do so may result in electric shock or fire due to electric leakage.
Install your appliance on a level and hard floor that can support its weight.
Failing to do so may result in abnormal vibrations, noise, or problems with the product.
_ nplug the power plug when the appliance is not being used for long periods of time or
during a thunder/lightning storm.
Failing to do so may result in electric shock or fire.
A
SEVERE WARNING SIGNS FOR USING
WARNING
lf the appliance is flooded, cut the power immediately and contact your nearest service
center.
If the appliance generates a strange noise, a burning smell or smoke, unplug the power
plug immediately and contact your nearest service center.
Failing to do so may result in electric shock or fire.
In the event of a gas leak (such as propane gas, LP gas, etc.), ventilate immediately without
touching the power plug. Do not touch the appliance or power cord.
Do not use a ventilating fan.
A spark may result in an explosion or fire.
Do not wash items contaminated with gasoline, kerosene, benzene, paint thinner, alcohol or
other flammable or explosive substances.
This may result in electric shock, fire or an explosion.
Do not open the washer door by force while it is operating (high-temperature washing/
drying/spinning).
Water flowing out of the washer may result in burns or cause the floor to be slippery.
This may result in injury.
Opening the door by force may result in damage to the product or injury.
Make sure to remove the packaging (sponge, styrofoam) attached to the bottom of the
washer before using it.
Do not insert your hand under the washer.
This may result in injury.
SAVE THESE INSTRUCTIONS
Safety information 7

Do not touch the power plug with wet hands.
This may result in electric shock.
Do not turn the appliance off by unplugging the power plug while an operation is in
progress.
Plugging the power plug into the wall socket again may cause a spark and result in
electric shock or fire.
Keep all packaging materials well out of the reach of children, as packaging materials can
be dangerous to children.
If a child places a bag over its head, it may result in suffocation.
Do not let children or infirm persons use this washer unsupervised.
Failing to do so may result in electric shock, burns or injury.
Do not insert your hand or a metal object under the washer while it is operating.
This may result in injury.
Make sure the detergent drawer is closed before you put laundry into the washer or remove
laundry from the washer.
If the detergent drawer is open, you could strike the drawer with your head and injure
yourself.
Do not attempt to repair, disassemble, or modify the appliance yourself.
Do not use any fuse(such as cooper, steel wire, etc.) other than the standard fuse.
When repairing or reinstalling the appliance is required, contact your nearest service
center.
Failing to do so may result in electric shock, fire, problems with the product, or injury.
lf any foreign substance such as water has entered the appliance, unplug the power plug
and contact your nearest service center.
Failing to do so may result in electric shock or fire.
When the water supply hose comes loose from the faucet and floods the appliance, unplug
the power plug.
Failing to do so may result in electric shock or fire.
Ifany foreign substance enters the appliance, unplug the power plug and contact you
nearest service center.
Failing to do so my result in electric shock or fire.
SAVE THESE INSTRUCTIONS
8 Safety info_'maton

CAUTION SIGNS FOR USING
CAUTION
When the washer is contaminated by a foreign substance such as detergent, dirt, food
waste, etc., unplug the power plug and clean the washer using a damp and soft cloth.
Failing to do so may result in discoloration, deformation, damage or rust.
The front glass may be broken by a strong impact. Take care when using the washer.
When the glass is broken, it may result in injury.
After a water supply failure or when reconnecting the water supply hose, open the faucet
slowly.
Open the faucet slowly after a long period of non-use.
The air pressure in the water supply hose or the water pipe may result in damage to a
part or in water leakage.
If a drain error occurs during an operation, check if there is a draining problem.
Ifthe washer is used when it is flooded because of a draining problem, it may result in
electric shock or fire due to electric leakage.
Insert the laundry into the washer completely so that laundry does not get caught in the
door.
Iflaundry gets caught in the door, it may result in damage to the laundry or the washer,
or result in water leakage.
Ensure that the faucet is turned off when the washer is not being used.
Ensure that the screw on the water supply hose connector is properly tightened.
Failing to do so may result in property damage or injury.
Take care that the Rubber Seal and the Front Door Glass are not contaminated by a foreign
substance (e.g. waste, thread, hair, etc.)
Ifa foreign substance is caught in the door or the door is not completely closed, it may
cause a water leakage.
Open the faucet and check if the water supply hose connector is firmly tightened and that
there is no water leaking before using the product.
Ifthe screws or the water supply hose connector are loose, it may result in water
leakage.
The product you have purchased is designed for domestic use only.
The use for business purposes qualifies as product misuse. In this case, the product will
not be covered by the standard warranty provided by Samsung and no responsibility can
be attributed to Samsung for malfunctions or damages resulting from such misuse.
If the wash is not started and the laundry is left for a period of time after you have added
detergent or applied stain remover or pre-treatment onto the laundry, the laundry may be
discolored.
Select the recommended cycle and temperature on the basis of the laundry items, sort the
laundry by color on the basis of its colorfastness and select the appropriate cycle.
Make sure that foreign objects such as pins, buttons and coins are removed from clothing
items when adding laundry to the washer. Wash dirty laundry separately from relatively
clean items and wash fragile items separately from tougher textiles.
If an item is stained, wash it as soon as possible. Use stain remover or detergent only after
testing the colorfastness of the item by applying a small quantity to an inside seam.
SAVE THESE INSTRUCTIONS
Safety information 9

Do not stand on top of the appliance or place objects (such as laundry, lighted candles,
lighted cigarettes, dishes, chemicals, metal objects, etc.) on the appliance.
This may result in electric shock, fire, problems with the product, or injury.
Do not operate the appliance with wet hands.
This may result in electric shock.
Do not spray volatile material such as insecticide onto the surface of the appliance.
As well as being harmful to humans, it may also result in electric shock, fire or problems
with the product.
Do not place an object that generates a electromagnetic field near the washer.
This may result in injury due to a malfunction.
Since the water drained during a high-temperature wash or drying cycle is hot, do not touch
the water.
This may result in burns or injury.
Do not wash, spin or dry water-proof seats, mats or clothing (*).
Do not wash thick, hard mats even if the washer mark is on the care label.
This may result in injury or damage to the washer, walls, floor or clothing due to
abnormal vibrations.
* Woolen Bedding PLUS, rain covers, fishing vests, ski pants, sleeping bags, diaper
covers, sweat suits, and bicycle, motor cycle, car covers, etc.
Do not operate the washer when the detergent box is removed.
This may result in electric shock or injury due to water leakage.
Do not touch the inside of the tub during or just after drying as it is hot.
This may result in burns.
Do not insert your hand into the detergent dispenser after opening it.
This may result in injury as your hand may be caught.
Do not place any objects (such as shoes, food waste, animals) other than laundry into the
washer.
This may result in damage to the washer, or injury and death inthe case of pets due to
the abnormal vibrations.
Do not press the buttons using sharp objects such as pins, knifes, fingernails, etc.
This may result in electric shock or injury.
Do not wash laundry contaminated by oils, creams or lotions usually found in skincare
shops or massage clinics.
This may result in the rubber seal becoming deformed and water leakage.
Do not leave metal objects such as a safety pin or hair pin, or bleach in the tub for long
periods of time.
This may cause the tub to rust.
If rust starts appearing on the surface of the tub, apply a cleansing agent (neutral) to the
surface and use a sponge to clean it. Never use a metal brush.
SAVE THESE INSTRUCTIONS
10 Safety information

Do not use dry cleaning detergent directly and do not wash, rinse, or spin laundry
contaminated by dry cleaning detergent.
This may result in spontaneous combustion or ignition due to the heat of the oxidation of
the oil.
Do not use hot water from water cooling/heating devices.
This may result in problems with the washer.
Do not use natural hand-washing soap for the washer.
Ifit hardens and accumulates inside the washer, it may result in problems with the
product, discoloration, rust or bad odors.
Do not wash large laundry items such as Bedding PLUS in the washing net.
Failing to do so may result in injury due to abnormal vibrations.
Place smaller items, such as lace socks and lingerie in the washing net.
Do not use hardened detergent.
Ifit accumulates inside the washer, it may result in water leakage.
Do not wash throw rugs or doormats.
Ifyou wash throw rugs or doormats, the sand will accumulate inside the washer. It may
result in error such as no draining.
Take care that children's fingers are not caught in the door when closing it. This may result
in injury.
SEVERE WARNING SIGNS FOR CLEANING
WARNING
Do not clean the appliance by spraying water directly onto it.
Do not use the strong acid cleaning agent.
Do not use benzene, thinner or alcohol to clean the appliance.
This may result in discoloration, deformation, damage, electric shock or fire.
Before cleaning or performing maintenance, unplug the appliance from the wall socket.
Failing to do so may result in electric shock or fire.
SAVE THESE INSTRUCTIONS
Safety informaton 11

INSTALLING YOUR WASHER
s
OPERATING INSTRUCTIONS
13 Unpacking your washer
13 Overview of your washer
14 Electrical
14 Grounding
14 Water
15 Drain facility
15 Flooring
15 Location considerations
15 Alcove or closet installation
15 Undercounter installation (washer only)
16 With optional pedestal base or stacking kit
17 Important note to installer
17 Installation flow chart
20 Loading your washer
20 Washing clothes: Basic Instructions
WASHING A LOAD OF LAUNDRY
MAINTAINING YOUR WASHER
TROUBLESHOOTING
21 Overview of the control panel
23 Child Lock (_
24 Spin Only
24 Garment+ _"_
24 Delay Start
25 My Cycle
25 Smart Care
26 DEEP STEAM
26 Washing clothes using the cycle selector
27 Using steam wash
27 ATC (Auto Temperature Control)
28 Detergent use
28 Features
30 Cleaning the exterior
30 Cleaning the interior
30 Cleaning the dispensers
30 Storing your washer
31 Cleaning the debris filter
32 Cleaning the door seal/bellow
32 Preserving the top cover and the front frame
33 Pure Cycle TM
34 Check these solutions if your washer.,.
36 Information codes
APPENDIX
38 Fabric care chart
39 Cycle chart
41 Helping the environment
41 Declaration of conformity
41 Specification
12 Contents

UNPACKING YOUR WASHER
Unpack your washer and inspect it for shipping damage. Make sure you have received all the items
shown below. If your washer was damaged during shipping, or you do not have all of the items, contact
1-800-SAMSUNG (726-7864).
To prevent personal injury or strain, wear protective gloves whenever lifting or carrying the unit.
Z_ Packing materials can be dangerous to children. Keep all packing material (plastic bags, polystyrene,
....... etc.) well out of the reach of children.
OVERVIEW OF YOUR WASHER
Hot water supply
hose
Cold water supply
Detergent drawer _ /- /
Control panel
Door
Tub
Debris filter
Drain tube
Filter cover
_ Drain Hose
Adjustable legs
Wrench Bolt Hole Covers
Water Supply Hoses
Hose Guide
Plastic Zip Hose Tie
[_* Bolt hole covers The number of bolt hole covers depends on the model (3-6 covers).
m
hstal ing your washer 13

BASIC LOCATION REQUIREMENTS
Electrical
120 Volt 60 Hz 15 AMP fuse or circuit breaker
Individual branch circuit serving only your washer is recommended.
Your washer is equipped with a power cord.
Z_ NEVER USE AN EXTENSION CORD.
CAUTION
Grounding
ELECTRICAL GROUNDING IS REQUIRED FOR THIS APPLIANCE,
This appliance must be grounded. In the event of malfunction or breakdown, grounding will
reduce the risk of electric shock by providing a path of least resistance for electric current.
This appliance is equipped with a power cord having a three-prong grounding plug for use in a
properly installed and grounded three-prong outlet.
The plug must be plugged into an appropriate outlet that is properly installed and grounded in
accordance with all local codes and ordinances.
_An improperly connected equipment-grounding conductor can increase the risk of electrical
....... shock. Check with a qualified electrician or serviceman if you are not sure whether the
appliance is properly grounded. Do not modify the plug provided with the appliance - if it
does not fit the outlet, have a proper outlet installed by a qualified electrician.
IMPORTANT SAFETY PRECAUTIONS
To prevent unnecessary risk of fire, electrical shock or personal injury, all wiring and
grounding must be done in accordance with the National Electrical Code ANSI/FNPA, No.
70 Latest Revision and local codes and ordinances. It is the personal responsibility of the
appliance owner to provide adequate electrical service for this appliance.
i_X NEVER CONNECT THE GROUND WIRE TO PLASTIC PLUMBING LINES, GAS LINES, OR
....... HOT WATER PIPES.
Water
Using bad quality water may cause the water supply valve to operate abnormally.
To correctly fill your washer in the proper amount of time, water pressure of 20-116 psi (137-
800 kPa)is required.
Water pressure less than 20 psi may cause water valve failure, may not allow the water valve to
shut off completely, or may extend the fill time beyond what your washer controls allow, causing
your washer to turn off. A time limit is built into the controls to prevent extensive flooding in your
home if an internal hose becomes loose.
The water faucets must be within 4 feet / 122 cm of the back of your washer to match the inlet
hoses provided with your washer.
[_ ccessory inlet hoses are available in various lengths up to 10 feet/305 cm for faucets that
are further away from the back of your washer.
To avoid the possibility of water damage:
,, Have water faucets easily accessible
,, Turn off faucets when the washer is not in use.
,, Periodically check that there is no leakage from the water inlet hose fittings.
CHECK ALL CONNECTIONS AT THE WATER VALVEAND FAUCET FOR LEAKS.
WARNING
14 Hnstalling your washer

Drain facility
The recommended height of the standpipe is 18 in/46 cm. The drain hose must be routed
through the drain hose clip to the standpipe. The standpipe must be large enough to accept the
outside diameter of the drain hose. The drain hose is attached at the factory.
Flooring
For best performance, you must install your washer on a solidly constructed floor. Wood floors
may need to be reinforced to minimize vibration and/or unbalanced load situations. Carpeting
and soft tile surfaces are contributing factors to vibration which can cause your washer to move
slightly during the spin cycle.
Never install your washer on a platform or weakly supported structure.
Location considerations
Do not install your washer in areas where water may freeze, since your washer will always retain
some water in its water valve, pump, and hose areas. Freezing water can damage the belts,the
pump, hoses and other components.
Alcove or closet installation
MINIMUM CLEARANCES FOR CLOSET AND ALCOVE INSTALLATIONS:
Sides - 1 in/ 25 mm Top - 17 in / 432 mm
Rear- 5.9 in / 150 mm Closet Front - 2 in / 51 mm
Ifthe washer and dryer are installed together, the closet front must have at least a 72 in2(465
cm 2)unobstructed air opening. Your washer alone does not require a specific air opening.
A. Recessed area
A
1 in,
(2.5cm)
_q rq
1in. ---_-14_- 27 in. ----_1 I_" 27in. _ 1in.
(2.5cm) (68.8cm) (68.6cm) (2.5cm)
B
17in. '
432om i
l i;
2in. --_1_- 32.3 in. ----_1_-5.9 in.
. (Scm) (82cm) (15cm)
B. Side view - closet or confined area
Undercounter installation (washer only)
m
40 in. _ 1| _ I
(101.6ore)
I in. -..._I_.------ 27 in. ----_p_.- I in.
(2.5ore) (68.6cm) (2.5ore)
Hnstal in9 your washer 15

With optional pedestal base or stacking kit
Required Dimensions for Installation With Pedestal
51.7in.(131.4cm)toclearopendoor
I_e-5.9in.
(86.5cm) (15cm)
(98.4)
......._ .... 53.3in. |
(135.5cm)¢
,<-"-'-- 27in. ---------'_-
(68.6cm)
3 in.
(7.6cm)
3 in.
(7.6ore)
Closetor Door /_"
-_11_- 5in.
(12.7cm)
1in. -'_1 _-- 32.3 in. -"_1 _ 5.9 in.**
(2.5cm) (82cm) (15cm) ,,,
Required Dimensions for Installation With Stacking Kit
77.5in.
(196.8cm)
©
©
* Required spacing
** External exhaust elbow requires
additional space.
16 Hnstalling your washer

IMPORTANT NOTE TO INSTALLER
Please read the following instructions carefully before installing the washer.
These instructions should be retained for future reference.
We recommend you hire a professional to install this washer.
Installation flow chart
Selectinga _ Removingthe shipping _ Connectingthewater
location bolts (*Drumonly) andthe drain
T
i i i ii i ii i
Please Adjusting the _ poweringyour washing
check again levellingfeet machine
before
steps.
[
Yes
DOes
yourwasher
haveexcessvibration
ornoise?
Runninga Calibration mode
(RefertOthe following _ Finish the
installation
No description)
STEP 1
Removing the Shipping Bolts
Before using your washer, you must remove all shipping bolts from the
back of the unit.
1, Loosen all the bolts with the supplied wrench.
2, Slide the bolt and spacer up and remove the bolt with the spacer
through the hole in the rear wall of your washer. Repeat for each
bolt.
3, Cover the holes with the supplied Bolt Hole Covers (Seepage 13).
4, Keep the shipping bolts and spacers for future use.
STEP 2
Selecting a Location
_ Before you install your washer, make sure the location:
Has a hard, level surface
Is away from direct sunlight
Has adequate ventilation
Will not freeze (tempuratures are never below 32 °F or 0 °C).
Is away from heat sources such as oil or gas
Has enough room for the power cord.
Doesn't have any carpeting that will obstruct ventilation openings.
Hnstalling your washer 17

STEP 3
Installing your Washer
1. Ifyou use a stand pipe, make sure the connection
between the drain hose and the standpipe is NOT
airtight. The standpipe must be at least 18 in or 46
cm high.
You must always exercise caution to avoid
collapsing or damaging the drain hose. For best
results, the drain hose should not be restricted
in any way - by elbows, couplings, or excessive
length. For situations where the drain hose cannot
be conveniently elevated to at least 18 in or 46 cm,
the drain hose must be supported.
If drain hose is installed below 18"(46cm), water
can be drained in cycle working cause of siphon
phenomenon. It causes the washer to "nF" error.
Laundry tub
Drain Hose can be installed until 96"(245cm) maximum, f._l-
But drain capability can be reduced at this height. It Nomorethan_....
causes the washer to have odor, because of remained 6"(15crn)_....
water inthe drain system.
_ onnection the hose guide within 6"(15cm) from the end HoseGuide
of the drain hose. If the drain hose is extended more
than 6"(15cm) beyond the end of the hose guide, mold
or microorganisms could spread to the inside of the washer.
Cold
2. Check the inlet hose to ensure a washer is inside each fill hose.
Thread the inlet hoses to the HOT and COLD faucet connections.
On the other end of the hose, check for one rubber washer per hose
and attach each fill hose to the water valve. Make sure the hose with
Hot printed on it is attached to the HOT faucet. Tighten by hand until
snug, then two-thirds of a turn with pliers.
For correct water use, connect both HOT and COLD water valves. If
either or both are not connected, an "nF" (no fill)error can occur.
Cold printed
3. Turn on the "HOT" and "COLD "water supply and check the water
valve and the water supply connections for leaks.
Stand pipe
Hot
Rubber
Washer
Hot printed
18 Hnstalling your washer

4, Slide your washer into position.
5, Level your washer by turning the leveling legs in or out as
necessary by hand or by using the wrench included with your
washer.
When your washer is level, tighten the locking nuts using the
wrench or (-) flathead screwdriver.
6, Plug the power cord into a 3-Prong, well grounded 120 volt
60 Hz approved electrical outlet protected by a 15-amp fuse
or comparable circuit breaker.
Your washer is grounded through the third prong of the
power cord when plugged into a three-prong grounded
receptacle.
Your washer must be leveled on all four sides. A carpenter's
level should be used on all four corners of your washer. We
recommend you recheck your washer after a dozen or so
washes to make sure it's sitll level.
_ void damage to the legs. Do not move
the washer unless the Locking-nuts are
fastened to the bottom of the washer.
Test run
Make sure that you install your washing machine correctly by running the Rinse+Spin cycle
after the installation is complete.
STEP 4
Calibration mode
Your Samsung washing machine automatically detects the weight of the laundry.
For more accurate weight detection, please run Calibration Mode after the installation.
To run Calibration Mode, follow these steps:
1. Turn on the washer.
2. Press the Temp button and Delay Start button simultaneously for at least 3 seconds.
3. Remove any contents in the tub and close the door.
4. Press the Start/Pause button.
5. The drum rotates clockwise and counterclockwise for approximately 3 minutes.
6. When Calibration Mode is finished, the "En/End" appears on the display and the washing
machine turns off automatically. The washing machine is now ready for use.
hstal in9 your washer 19

na n tnActon
I
/_To reduce the risk of fire, electric shock, or injury to persons, read the IMPORTANT SAFETY
....... INSTRUCTIONS before operating this appliance.
LOADING YOUR WASHER
,, You can fill the tub with dry, unfolded clothes, but DO NOT OVERLOAD the tub. No more than 3/4 full.
,, Overloading may reduce washing efficiency, cause excess wear, and possibly cause creasing or
wrinkling of the load.
,, Wash delicate items such as bras, hosiery, and other lingerie in the Delicates cycle with similar
lightweight items.
,, When washing big bulky items or a few smaller items that don't fill the tub completely - a rug, a pillow,
stuffed toys, or one or two sweaters, for example - add a few towels to improve tumbling and spin
performance.
_ uring the spin cycle, the washer may add additional water to redistribute the clothes and correct an
inbalance inside the drum.
,, To ensure good cleaning result when washing heavily soiled loads, do not overload your washer.
,, When the "Garment+_._" light is ON (see page 24), you can add or remove laundry items during a wash.
1. Press the Start/Pause Button.
2, Wait for the Door Lock light to go out (5 seconds).
3, Add the item, close the door, and press the Start/Pause Button.
After a 10-second pause, the cycle will resume.
_To add items within five minutes of the wash
ensure
thorough cleaning, starting cycle.
WASHING CLOTHES: BASIC INSTRUCTIONS
1. Press the Power button, open the door, and then load the washer.
2, Close the door.
_Push the laundry into the drum completely to prevent the laundry from being caught in the door or
....... from falling out of the drum.
3, Add detergent and additives to the dispenser (see pages 28-29).
4, Select the appropriate cycle and options for the load (see pages 21-23 and 26).
5, Press the Start/Pause Button.
The drum automatically rotates and measures the weight of the laundry without supplying water in
order to adjust the wash time. (The rotating display on the display panel indicates that the weight of the
laundry is being measured.)
6, The Wash Indicator light will illuminate.
7° The estimated cycle time will appear in the display.
The time may fluctuate to indicate the time remaining in the cycle better.
The actual time required for a cycle may differ from the estimated time inthe display depending on the
water pressure, water temperature, detergent, and laundry.
8. Before your washer starts to fill, it will make a series of clicking noises to check the door lock and do a
quick drain.
_ hen the cycle is complete, the Door Lock light will go out and "End" will appear in the display.
,, DO NOT attempt to open the door until the Door Lock light is off. To add a forgotten item, see the
"Loading your Washer" section above.
When your washer is restarted after a pause, expect a delay of up to 15 seconds before the cycle
continues.
,, Pressing the Power button cancels the cycle and stops your washer.
,, The Pre Wash, Wash, Rinse, and Spin indicator lights will illuminate during those portions of the
cycle.
ADo not place anything on top of your washer while it is running.
WARNING
20 operatng nstructons

Heav
Bedding PLUS
[] Steam Cycles
Heav
[] Steam Cycles
Ro Cold
@
EcoCold
Active Wear
_Wool
Qu ck Wash
- Active Wear
Delicates /
Wool
Quick Wash
Rinse+Spin
Power
StaCdPause
®@
Power
Start/Pause
Select the appropriate cycle for the type of load.
This will determine the tumble pattern and spin speed for the cycle.
_To minimize of select the Perm Press
wrinkling laundry, cycle.
Eco Cold - Provides useful, gentle, and energy saving daily care for normally
and lightly soiled laundry using only cold water.
This cylce cleans as effectively as the warm wash setting on the
Conventional Normal* cycle under Normal and Light Soil level options.
(Cleaning performance of Eco Cold cycle may not be equal to conventional
Normal cycle under the heavy soil level option) For best result, we
recommend using for loads of 8 pounds or less.
* Conventional Normal cycle - Normalcycle on previousand existing Samsungfront
loadingwashers releaseduntil2009 without PowerFoam.
Normal - For most fabrics including cottons, linens, and normally soiled
garments.
Heavy Duty - For sturdy, colorfast fabrics and heavily soiled garments.
Bedding PLUS - For bulky items such as blankets, comforters and sheets.
When you are washing bulky items, use liquid detergent
Sanitize - For heavily soiled, colorfast garments. This cycle heats the water to
150 °F to eliminate bacteria.
lf you select pause during the heating portion of the Sanitize Cycle, your
Washer door will remain locked for your safety.
Stain Away - For stained clothes. The Stain Away cycle provides outstanding
stain removal performance, with the utmost gentle care, avoiding the need for
pre-treatment of stains. For best stain removal performance, we recommend
using the hot temperature option in this cycle, in which the wash temperature
is increased using the internal heater, for overall cleaning of a wide variety of
stains.
Deep Steam - For heavily soiled, colorfast garments, this cycle provides a
high washing temperature and steam and is effective for cleaning stains.
wash ng a cad of aundry 21

iiiiiiiiiiiiiiiiiiiiiiiiiiiiiiiiiiiiiiiiiiiiiiiiiiiiiiiiiiiiiiiiiiiiiiiiiiiiiiiiiiiiiiiiiiiiiiiiiiiiiiiiiiiiiiiiiiiiiiiiiiiiiiiiiiiiiiiiiiiiiii
iiiiiiiiiiiiiiiiiiiiiiiiiiiiiiiiiiiiiiiiiiiiiiiiiiiiiiiiiiiiiiiiiiiiiiiiiiiiiiiiiiiiiiiiiiiiiiiiiiiiiiiiiiiiiiiiiiiiiiiiiiiiiiiiiiiiiiiiiiiiiii
iiiiiiiiiiiiiiiiiiiiiiiiiiiiiiiiiiiiiiiiiiiiiiiiiiiiiiiiiiiiiiiiiiiiiiiiiiiiiiiiiiiiiiiiiiiiiiiiiiiiiiiiiiiiiiiiiiiiiiiiiiiiiiiiiiiiiiiiiiiiiii
iiiiiiiiiiiiiiiiiiiiiiiiiiiiiiiiiiiiiiiiiiiiiiiiiiiiiiiiiiiiiiiiiiiiiiiiiiiiiiiiiiiiiiiiiiiiiiiiiiiiiiiiiiiiiiiiiiiiiiiiiiiiiiiiiiiiiiiiiiiiiii
iiiiiiiiiiiiiiiiiiiiiiiiiiiiiiiiiiiiiiiiiiiiiiiiiiiiiiiiiiiiiiiiiiiiiiiiiiiiiiiiiiiiiiiiiiiiiiiiiiiiiiiiiiiiiiiiiiiiiiiiiiiiiiiiiiiiiiiiiiiiiii
iiiiiiiiiiiiiiiiiiiiiiiiiiiiiiiiiiiiiiiiiiiiiiiiiiiiiiiiiiiiiiiiiiiiiiiiiiiiiiiiiiiiiiiiiiiiiiiiiiiiiiiiiiiiiiiiiiiiiiiiiiiiiiiiiiiiiiiiiiiiiii
iiiiiiiiiiiiiiiiiiiiiiiiiiiiiiiiiiiiiiiiiiiiiiiiiiiiiiiiiiiiiiiiiiiiiiiiiiiiiiiiiiiiiiiiiiiiiiiiiiiiiiiiiiiiiiiiiiiiiiiiiiiiiiiiiiiiiiiiiiiiiii
Perm Press - For wash-and-wear, synthetic fabrics, and lightly to normally
soiled garments.
Active Wear - Use this cycle to wash exercise wear such as sports jerseys,
training pants, shirts/tops and other performance clothing. This cycle provides
effective soil removal with gentle action for special fabric care.
Delicates/Hand Wash - For sheer fabrics, bras, lingerie silk, and other
handwash-only fabrics. For best results, use liquid detergent.
Wool - For machine-washable wool. Loads should be under 8 pounds. For
best results, we recommend a load of 4.4 pounds or less.
The Wool cycle washes laundry by moving the wash drum horizontally
to maintain the characteristics of the wool fibers and to prevent damage
to the cloth. It then stops for a while to allow the laundry to soak in the
water. This pause in the operation of the Wool cycle is normal.
We recommend you use a neutral detergent to prevent damage to the
cloth and to improve the washing results.
Quick Wash - For lightly soiled garments needed quickly.
Rinse + Spin - Use for loads that need rinsing only or to add rinse-added
fabric softener to a load.
The large Digital Display is easy to use. It provides instructions and
diagnostics while keeping you updated on the cycle status and time
remaining.
Press these buttons to select different cycle options.
Pure Cycle TM - Use to clean dirt and bacteria from the drum. Regular use
(after every 40 washes) is recommended. No detergent or bleach is needed
(see page 33).
Steam - Press this button to use the Steam Wash function. Steam Wash is
available with the Normal, Heavy Duty, Bedding PLUS, Sanitize, Stain Away
and Deep Steam cycles. For heavily soiled, colorfast garments, Steam Wash
improves stain treatment and uses less water (See page 27).
The steam may not be visible during the Steam cycle, and may also not
always be visible while the total steam cycle is being performed.
Delay Start - Any cycle can be delayed for up to 24 hours in one-hour
increments. Displayed hour indicates the time at which the wash will be
started. (See page 25).
Pre Wash - To use this feature, add detergent to the pre wash section of the
detergent compartment. When turned on, the washer fills with cold water and
detergent, tumbles, then drains and advances to the selected wash cycle.
Some cycles cannot be selected with this option (See page 28-29).
You cannot select the prewash option in the Wool, Quick Wash,
Delicates/Handwash and Rinse+Spin cycles.
Extra Rinse - Add an additional rinse at the end of the cycle to remove
laundry additives and perfumes more thoroughly.
Extra Spin - Add additional time to remove more water from loads.
My Cycle - Choose your favorite cycle including temperature, spin, soil level,
options, etc. (see page 25)
Press the button repeatedly to cycle through the different water temperature
options.
Extra Hot - Heavily soiled, colorfast items.
Hot - Whites and heavily soiled, colorfast items.
Warm - Colorfast items. When you select warm rinse, only the final rinse will
be warm.
The other rinses will be cold to conserve energy.
Eco Warm - Moderately soiled, colorfast items, most wrinkle-free items.
Cold - Brightly colored, very lightly soiled items.
22 washng a cad of aundry

Press the button repeatedly to cycle through the different spin speed options.
Extra High - Removes more water from loads during spin.
To minimize wrinkling of wrinkle-free and no-iron fabrics, DO NOT use
the Extra High spin option for these loads, nor overload your washer.
High - Use for underwear, t-shirts, jeans, and sturdy cottons.
Medium - Use for jeans, wrinkle-free, or wash-and-wear items and
synthetics.
Low - Use for delicate items needing a slow spin speed.
No Spin - Drains your washer without spinning. Use for extremely delicate
items that cannot tolerate any spin.
Press the button to select the soil level/washing time. (Light -_ • -_ Normal
-_ _ --> Heavy)
Heavy - For heavily soiled loads.
A
Normal - For moderately soiled loads. This setting is best for most loads.
Light - For lightly soiled loads.
Press the button to select the signal level.
(Off _ Y _ Softer _ _, _ Louder)
Press to pause and restart programs.
Press once to turn your washer on, press again to turn your washer off. If
the washer is left on for more than 10 minutes without any buttons being
touched, the power automatically turns off.
Child Lock 6
Child Lock prevents children from playing with your washer.
Once you have activated the Child Lock function, the control panel cannot be activated,
preventing children from playing with the washer.
Activating the Child Lock function
Pressand hold both the Soil Level and Signal buttons simultaneously for approximately 3 seconds.
• When you activate the Child Lock function, the door locks and the "Child Lock _" lamp
illuminates.
Ifyou press the Start/Pause button after you have activated the Child Lock function, none of
the buttons will work except for the Power button.
Ifyou press a button when the buttons are locked, the "Child Lock 6" lamp blinks.
Pausing the Child Lock function
When the door is locked or the buttons are locked by the Child Lock function, you can pause
the Child Lock operation for 1 minute by pressing and holding both the Soil Level and Signal
buttons simultaneously for approximately 3 seconds.
Ifyou pause the Child Lock mode temporarily, the door lock is released for 1 minute for user
convenience. During this period, the "Child Lock (_" lamp blinks.
Ifyou open the door after the minute is over, an alarm sounds for up to 2 minutes.
Ifyou close the door within the 2 minutes, the door is locked and the Child Lock function is
reactivated. Ifyou close the door after the 2 minutes, the door is not locked automatically and
no alarm sounds.
wash ng a oad of aundry 23

Deactivating the Child Lock function
Pressand hold both the Soil Level and Signal buttons simultaneouslyfor approximately6 seconds.
• Whenyou deactivatethe Child Lockfunction,the door isunlocked andthe "Child Lock@" is turned off.
/_o TheChild Lockfunction preventschildrenor the infirmfrom accidently operatingthe washerand
....... injuringthemselves.
Ifachild entersthe washingmachine,the child may becometrapped and suffocate.
Once you haveactivated the Child Lockfunction, it continuesworking even ifthe power isturned
off.
Openingthe door by force can resultin injurydueto damageto the product.
z_To add laundryafter you haveactivatedthe Child Lockfunction, you must first pause or deactivatethe
....... Child Lockfunction.
Ifyou want to openthe door of the washing machinewhen the ChildLock function isactivated:
Pauseor deactivatethe Child Lock function.
Turnthe washing machineoff and then on again.
Spin Only
Ifyou press the Power button and then press and hold the Spin button for 2 seconds, the spin
time will be displayed on the display panel.
Then, press the Spin button repeatedly until the required spin level is selected, and then press
the Start/Pause button.
Before pressing the Spin Only button to use the Spin Only function, you can select a cycle
with the Cycle Selector. Ifyou have selected a cycle, you can only select the spin level
corresponding to the selected cycle.
Garment+ _+
You can add or take out laundry items even after the wash has started, as long as the
"Garment+_+" light is on. Pushing the Start/Pause button unlocks the door, unless the water is
too hot or if there is too much water in your washer. Ifyou are able to unlock the door and wish
to continue the wash cycle, close the door, and then press the Start/Pause button.
Delay Start
You can setthe washingmachineto startyour wash automaticallyat a latertime, choosing adelay time.
The hour displayed indicatesthe time at which the wash will be started.
1. Set yourwash course.
2. Pressthe Delay Start button repeatedly untilthe delay time is set.
3. Pressthe Start/Pause button.The "Delay Start _" indicator will be lit, andthe clock willbegin
counting down until it reachesthe set time.
4. Tocancel a DelayStart function, pressthe Power buttonand thenturn the washing machineon again.
24 washn9 a oad of aundry

My Cycle
Allows you to activate your custom wash (temperature, spin, soil level, etc.) with one-button
convenience. By pushing the My Cycle button, you activate the settings used during the My
Cycle mode. The "My Cycle" light goes on, indicating activation. You can select all options as
follows in "My Cycle" mode.
1. Press the My Cycle button on the Control Panel.
2. Select the cycle using the Cycle Selector dial.
3. After cycle selection, set each option.
[_See 39 for available option settings with each cycle.
page
4. Start "My Cycle" by pushing the Start/Pause button in "My Cycle" mode.
The washer will display the cycle and options you selected the next time you choose "My
Cycle".
You can change the "My Cycle" settings by repeating the process above.
The washer displays the last settings used the next time you choose "My Cycle".
To program "My Cycle" settings into your washer, the washer needs to complete an entire
wash cycle. If for any reason the wash cycle is interrupted and the washer does not finish
the cycle, it will not program in the settings for later use.
Smart Care
This function enables you to check the status of the washing ........................................
machine using a smartphone.
1. Press and hold the Smart Care button for 3 seconds to
2.
use the Smart Care function when an error occurs or if you
do not press any buttons since you turn on the washer.
The error code history is deleted after using the function.
Ifthe Smart Care function is activated, the LED on the
window display rotates for 2 or 3 seconds and then the
Smart Care indicator is lit on the display.
Run the Smart Care app on your smart phone.
3.
• The Smart Care function is optimized with Galaxy S, Galaxy $2, iPhone 4 and iPhone 4S.
4. Focus your smart phone's camera on the display panel of the washing machine.
5. If the smart phone's camera is focused on the display panel of the washing machine,
the panel and error message is automatically recognized and the error type and
countermeasures are displayed on the smart phone.
6. If the smartphone fails to recognize the error code more than twice, please enter the error
code displayed on the display panel of the washer manually into the Smart Care app.
(_ Downloading the Smart Care app
• Download the Samsung Laundry App into your mobile phone
from the Android market or Apple App store. (Search word :
Samsung Smart Washer/Dryer}
[_ Precautions when Smart Care
using
Iflight from a light bulb, fluorescent bulb, or lamp is reflected on
the display panel of the washing machine, the smartphone may
not be able to recognize the panel or error mesage easily.
Ifyou hold the smartphone at too large an angle relative to the
front of the display panel, it may not be able to recognize the error
code. For best results, hold the smartphone so that the front of
the panel and the smartphone are parallel or nearly parallel.
wash nga cad of aundry 25

DEEP STEAM
DEEPSTEAM(MagicSteam)
The DeepSteamfeature boosts cleaningperformanceand loosensgrime anddirt, providingsuperior
cleaningresults.
Forheavilysoiled,colorfast garments, this cycle provides a high washingtemperature andsteam and is
effectivefor cleaningstains.
How DEEPSTEAMworks
Ifyou selectsteam, the steam acts atthe most effectivetimes for the detected amount of laundry,
maximizingthe effectof the steam, increasingthe washtemperature, enhancingthe Soak effect, and
improvingwash performance.
PressSteam button to usethe SteamWashfunction. SteamWash isavailablewith the Normal, Heavy
Duty, Bedding PLUS,Sanitize,Stain Awayand Deep Steamcycles. Forheavilysoiled, colorfast garments,
SteamWashimprovesstain treatment anduses lesswater.
Washertakes smallamounts of water intub and Heaterheatswater into evaporation.
Tousethe Steamfunction, performthe following steps:
1. Loadthe washer.
2. Pressthe Powerbutton.
3. Turnthe CycleSelector and select a SteamCycle. (TheDeepSteam course automaticallyselects
Steam.)
4. Pressthe Steam button.
5. Add detergentto the dispensertray andadd fabricsoftener up to the marked line.
6. Pressthe Start/Pausebutton.
Thewasher automaticallyselectsthe optimal wash conditions by sensingthe weight ofthe laundry.
The steam may not be visibleduringthe Steam cycle, and may also not alwaysbe visiblewhile the
total steamcycle isbeing performed.
This is normal.
Z_ * Toomuch steamcould damageclothing. Do not use steamwith delicatefabricssuch as wool, silk
....... or easilydiscolored fabrics.
Steam may notbe present during entiresteam washcycle.
Do not touch the door. Thedoor surface can becomevery hot.
Washing clothes using the cycle selector
Your new washing machine makes washing clothes easy, using Samsung's "Fuzzy Control"
automatic control system. When you select a wash program, the machine will set the correct
temperature, washing time, and washing speed.
1. Turn on your sink's water tap.
2. Press the Power button.
3. Open the door.
4. Load the articles of clothing one at a time loosely into the drum, without overfilling it.
5. Close the door.
6. Add detergent, softener, and pre-wash detergent (ifnecessary) into the appropriate
compartments.
Pre-wash is only available when selecting the Eco Cold, Normal, Heavy Duty, Perm Press,
Sanitize, Stain Away, Deep Steam, Active Wear and Bedding PLUS cycles. It is only
necessary if your clothing is heavily soiled.
26 washng a cad of aundry

2, Use the Cycle Selector to select the appropriate cycle according to the type of material:
Normal, Heavy Duty, Perm Press, Sanitize, Bedding PLUS, Deep Steam, Stain Away,
Active Wear, Delicates/Hand Wash, Wool, Quick Wash, Rinse+Spin, Eco Cold. The relevant
indicators will illuminate on the control panel.
8, At this time, you can control the wash temperature, the number of rinse cycles, the spinning
speed, and the delay time by pressing the appropriate option button.
9, Press the Start/Pause button on the Cycle Selector and the wash will begin. The process
indicator will light up and the remaining time for the cycle will appear in the display.
Pause Option
1, When the "Garment+_+" light is ON, you can add or remove laundry items.
2. Press the Start/Pause button to unlock the door.
You cannot open the door when the water is too HOT or the water level is too HIGH.
3, After closing the door, press the Start/Pause button to restart the wash.
USING STEAM WASH
Ifyou select steam, the steam acts at the most effective times for the detected amount of laundry,
maximizing the effect of the steam, increasing the wash temperature, enhancing the Soak effect, and
improving wash performance.
1. Load the washer.
2. Press the Power button.
3. Turn the Cycle Selector and select a Steam Cycle. (The Deep Steam course automatically selects
Steam.)
4. Press the Steam button.
5. Add detergent to the dispenser tray and add fabric softener up to the marked line.
6. Press the Start/Pause button.
: The washer automatically selects the optimal wash conditions by sensing the weight of the laundry.
_ team may not necessarily be visible during the steam cycles. Steam may not be present during the
entire steam wash cycle.
ATC (AUTO TEMPERATURE CONTROL)
ATCis the control function that the washer controls watertemperaturewith temperaturesensor (thermistor).
_ ecause there are numerous water temperatures depending on the customer's environments(cold
areas, warm areas, various water temperature, settings of heater temperature, etes), ATC function in
our washer maintains the certain level of wash temperature to output the best washing performance at
each cycle.
lf you select normal & heavy duty course, those courses are the regulation and UL course. Since new
washer must reduce the amount of energy usage at first priority, customer will notice more cold water
entering the washer. But This is Normal, not a problem.
ln those regulation course, Hot temperature is similar to acceptable adult bath-water temperature and
warm temperature is similar to comfortable swimming-pool water temperature.
Ifcustomer want to wash clothes in specific water temperature, customer should choose a different
course at each temperature(Hot/Warm/Eco Warm)
wash nq a oad of aundrv 27

DETERGENT USE
Your Washer is designed to use high efficiency (HE)detergents.
,, For best cleaning results, use a high efficiency detergents such as
Tide HE, Wisk HE, Cheer HE, or Gain HE*. High efficiency detergents
contain suds suppressors that reduce or eliminate suds. When fewer
suds are produced, the load tumbles more efficiently and cleaning is
maximized.
/_ Regular detergent is NOT recommended. Please use HE detergents
w%"_,,,only.
_ educing the amount of detergent may reduce the quality of cleaning. It is important to pre-treat
stains, sort carefully by color and soil level, and avoid overloading.
* Brand names are trademarks of their respective manufacturers.
FEATURES
Automatic dispenser
Your washer has separate compartments for dispensing
detergent and color-safe bleach, chlorine bleach, and
fabric softener. Add all laundry additives to their respective
compartments before starting your washer.
The automatic dispenser MUST ALWAYS be in place before
you start your washer.
DO NOT open the automatic dispenser when your washer is
running.
Usage Pointers:
,, Never exceed the manufacturer's recommendations when
adding detergent.
,, This compartment holds liquid detergent for the main wash
cycle, which the washer adds to the load at the beginning
of the cycle.
_ efore using powdered detergent, remove the Liquid
Detergent holder from the compartment. Powdered
detergent will not dispense from the Liquid Detergent
holder.
----I Liquid Detergent
•......q Pre wash
compartment
Detergent compartment
,, Pour the recommended amount of laundry detergent directly into the detergent compartment
before starting your washer.
28 wash nga oad of aundry

Pre wash compartment
When using the Pre Wash option, add detergent to both the Pre Wash compartment and the
detergent compartment. The washer will automatically dispense the detergent during Pre Wash.
Ifyou use a high efficiency (HE) detergent, add 1/3 of the recommended amount to the Pre
Wash compartment and 2/3 of the recommended amount to the detergent compartment.
Bleach compartment
(Liquid chlorine bleach only)
1. Add chlorine bleach to the bleach compartment.
DO NOT exceed the MAX FILL line.
2. Avoid splashing or over-filling the compartment.
3. Your washer automatically dispenses bleach into the tub at
the appropriate time.
4. The dispenser automatically dilutes liquid chlorine bleach
before it reaches the wash load.
®
®
Fabric Softener
compartment
BLeach i,--
compartment
Never pour undiluted liquid chlorine bleach directly onto
the load or into the tub. Itis a powerful chemical and __.
can cause fabric damage, such as weakening of the
fibers or color loss, if not used properly.
Oxi-type boosters or color-safe bleach can be added to
the drum prior to adding laundry.
Put the laundry into the drum only after confirming
that the oxi-type boosters or color-safe bleach has
completely entered the hole of the drum.
To use powdered detergent and powder oxi-type
boosters or powdered color-safe bleach at the same
time, it is more effective to put them in the drum
together before adding the laundry. When you use
powdered detergent, remember to remove the Liquid
Detergent holder from the detergent compartment.
Fabric softener compartment
1. Pour the recommended amount of liquid fabric softener into the softener compartment.
For smaller loads, use less than one capful.
2. Dilute the fabric softener with water until it reaches MAX FILL in the compartment.
3. The dispenser automatically releases liquid fabric softener at the proper time during the rinse
cycle.
_ se the softener compartment ONLY for liquid fabric softeners.
DO NOT use a Downy Ball* in the Fabric softener compartment of this washer. It will not
be added at the appropriate time.
Use the detergent compartment.
* Brand names are trademarks of their respective manufacturers.
lf you overfill the detergent, bleach, or softener compartments, the contents of the
compartment will automatically be released into the washer. This could damage any
garments that are in the drum.
wash nga cad of aundry _29

CLEANING THE EXTERIOR
Turn off the water faucets after finishing the day's washing.
This will shut off the water supply to your washer and prevent the unlikely possibility of damage from
escaping water. Leave the door open to allow the inside of your washer to dry out.
Use a soft cloth to wipe up all detergent, bleach or other spills as they occur.
Clean the following as recommended below:
Control Panel - Clean with a soft, damp cloth. Do not use abrasive powders or cleaning pads. Do not spray
cleaners directly on the panel.
Cabinet - Clean with soap and water.
CLEANING THE INTERIOR
Clean the interior of your washer periodically to remove any dirt, soil, odor, mold, mildew, or bacterial
residue that may remain in your washer as a result of washing clothes.
Failureto follow these instructions may result in unpleasant conditions, including odors and/or permanent
stains on your washer or laundry.
Hard water deposits may be removed, if needed. Use a cleaner labeled "Washer safe".
CLEANING THE DISPENSERS
You may need to clean the automatic dispenser periodically to remove
laundry additive buildup.
1. Pull out the Liquid Detergent holder from the detergent compartment.
2. Remove the siphon cap from the fabric softener and bleach
compartments.
3. Wash all of the parts under running water.
4. Clean the dispenser recess with a soft brush.
5. Reinsert the siphon cap and push it firmly into place.
6. Push the Liquid Detergent holder back into place.
7. Run a Rinse+Spin cycle without any load in your washer.
Siphon cap
STORING YOUR WASHER
Washers can be damaged if water is not removed from hoses and internal components before storage.
Prepare your washer for storage as follows:
,, Select the Quick Wash cycle and add bleach to the automatic dispenser. Run your washer through the
cycle without a load.
,, Turn the water faucets off and disconnect the inlet hoses.
* Unplug your washer from the electrical outlet and leave your washer door open to let air circulate inside
the tumbler.
* Ifyou store your washer in below-freezing temperatures, make sure you allow time for any leftover water
in your washer to thaw before use.
30 maintainng your washer

CLEANING THE DEBRIS FILTER
We recommend cleaning the debris filter when water does not drain well or the "nd" error message is displayed.
1. Open the filter cover by pressing and then pulling the handle of_thefilter cover with your finger.
2. Holding the drain cap, pull the drain tube that
is hooked on the guide hook to the front. Do
not pull the drain tube with excessive force.
3. Place a bowl under the washing machine to
catch any remaining water. Then, hold the
drain tube with one hand, and turn the drain
cap counter clockwise with the other hand to
separate it from the drain tube.
4. Drain the remaining water completely.
step 1 step2
5.
Turn the debris cap counterclockwise, and then pull
the debris cap and debris filter assembly out of the
washer.
Debris filter ca
6.
Wash any dirt or other material from the
debris filter. Make sure the drain pump
propeller behind the debris filter is not
blocked.
Debris filter cap
Debrisfilter
7. When you have finished cleaning the filter, insert the debris
cap and filter assembly back into the washer. Turn the
debris filter cap clockwise until the indicator on the debris
filter cap is in the 12 o'clock position, pointing to the
indicator on the washer.
8. Re-attach the emergency drain cap to the drain tube, and
then hook the tube to the hook guide.
9. Re-install the filter cover.
maintainng your washer 31

CLEANING THE DOOR SEAL/BELLOW
1. Open the washer door and remove any clothing or items from the washer.
2. Check if there are any foreign substances on the grey seal/
bellows (9 between the lid and the drum.
Tocheck this, turn the seal/bellows @out.
3. If there are any foreign substances, remove them.
4, Ifyou find stained areas, wipe them down using the procedure below:
a} Carefully combine s4cup (177 mL) of liquid chlorine bleach with 1 gal. (3.8 L) of warm
tap water.
b} Wipe the seal/bellow area with the dilute solution using a damp cloth.
c) Let stand 5 minutes.
d} Wipe down the area thoroughly with a dry cloth and let the washer interior air dry with
the door open.
IMPORTANT:
Wear rubber gloves when cleaning for prolonged periods.
Refer to the bleach manufacturer's instructionsfor proper use.
PRESERVING THE TOP COVER AND THE FRONT FRAME
Do not place any heavy or sharp objects or a detergent box on the washing machine. They can scratch or
damage its top cover. Keep them in the pedestal (if purchased) or in a separate storage box.
_ ince the entire washing machine has a high-gloss finish, the surface can be scratched or damaged.
Avoid scratching or damaging the surface when using the washing machine.
32 maintainng your washer

PURE CYCLE TM
Pure Cycle is a self cleaning cycle that removes mold that may occur inside the washing machine.
1. Press the Power button.
2. Press the Pure Cycle TM button,
Once the Pure Cycle button is pressed, the only
function that can be set is Delay Start,
3. Press the Start/Pause button,
When you press the Start/Pause button, Pure Cycle
begins,
Pur_
0 Cyd_
Using Pure Cycle, you can clean the drum without using a cleansing agent,
Never use Pure Cycle when laundry is in the washing machine, It may cause damage to the
laundry or a problem with the washing machine,
If you want to use a drum cleansing agent, use only 1110 of the amount of the drum
cleansing agent recommended by the cleansing agent manufacturer. (When using a
powder-type cleansing agent, remove the liquid detergent compartment.)
_The Pure Cycle Auto indicator Function
Ifthe "Pure Cycle" button is lit after a wash, it indicates
that tub (drum) cleaning is required. In this case, remove
the laundry from the washing machine, turn the power on,
and clean the drum by running Pure Cycle.
Ifyou do not run Pure Cycle, the "Pure Cycle" indicator
turns off. However, the "Pure Cycle" indicator will light
again after two washes. Not running Pure Cycle at this
point will not cause a problem with the washing machine,
Although the Pure Cycle Auto Indicator appears once a
month or so, the frequency may differ depending on the
number of times the washing machine is used,
r t
........
r
, ) ................ .........
)
your wasll'er 33

CHECK THESE SOLUTIONS IF YOUR WASHER...
Will not start.
,, Make sure the door is firmly closed.
Make sure your washer is plugged in.
Make sure the water source faucets are open.
Make sure to press the Start/Pause Button to start your washer.
Make sure the Child Lock is not activated. See page 24.
Before your washer starts to fill, it will make a series of clicking noises
to check the door lock and do a quick drain.
,, Check the fuse or reset the circuit breaker
Turn both faucets on fully.
Make sure the door is tightly closed.
,, Straighten the water inlet hoses.
,, Disconnect hoses and clean the screens. Hose filter screens may be
clogged.
Open and close the door, then press the Start/Pause Button.
Make sure your washer is running with sufficient water pressure.
Make sure the Detergent Selector dial is in the upper position when
using granular detergent.
Has no water or not enough
water.
Has detergent remains in
the automatic dispenser
after the wash cycle is
complete.
Vibrates or is too noisy. ,,
Stops
Make sure your washer is set on a level surface. If the surface is not
level, adjust your washer feet to level the appliance.
Make sure that the shipping bolts are removed.
Make sure your washer is not touching any other object.
Make sure the laundry load is balanced.
,, Plug the power cord into a live electrical outlet.
,, Check the fuse or reset the circuit breaker.
Close the door and press the Start/Pause Button to start your
washer.
For your safety, your washer will not tumble or spin unless the door is
closed.
Before your washer starts to fill, it will make a series of clicking noises
to check the door lock and do a quick drain.
,, There may be a pause or soak period in the cycle. Wait and it may
start.
,, Check the screens on the inlet hoses at the faucets for obstructions.
Clean the screens periodically.
34 troubleshooting

Fills with the wrong
temperature water.
Door locked or will not
open.
Does not drain and/or spin.
®
Load is too wet at the end •
of the cycle.
®
Leaks water.
Has excessive suds.
Has an odor.
,, Turn both faucets on fully.
,, Make sure the temperature selection is correct.
,, Make sure the hoses are connected to the correct faucets.
Flush water lines.
,, Check the water heater. It should be set to deliver a minimum 120 °F
(49 °C) hot water at the tap. Also check the water heater capacity
and recovery rate.
,, Disconnect the hoses and clean the screens. The hose filter screens
may be plugged.
As your washer is filling, the water temperature may change as
the automatic temperature control feature checks incoming water
temperature. This is normal.
While your washer is filling, you may notice just hot and/or just
cold water going through the dispenser when you have selected
cold or warm wash temperatures. This is a normal function of the
automatic temperature control feature as your washer determines the
temperature of the water.
Press the Start/Pause Button to stop your washer.
Your washer door will remain locked during the heating portion of the
Sanitize Cycle
It may take a few moments for the door lock mechanism to
disengage.
,, Check the fuse or reset the circuit breaker.
,, Straighten the drain hoses. Eliminate kinked hoses. Ifthere is a drain
restriction, call for service.
Close the door and press the Start/Pause Button. For your safety,
your washer will not tumble or spin unless the door is closed.
Make sure the debris filter is not clogged.
Use the High or Extra High spin speed.
Use high efficiency detergent to reduce over-sudsing.
The load is too small. Very small loads (one or two items) may
become unbalanced and not spin out completely.
Make sure the door is firmly closed.
,, Make sure all hose connections are tight.
Make sure the end of the drain hose is correctly inserted and secured
to the drainage system.
Avoid overloading.
,, Use high efficiency detergent to prevent over-sudsing.
,, Use high efficiency detergent to prevent over-sudsing.
,, Reduce the detergent amount for soft water, small or lightly soiled
loads.
,, Non-HE detergent is NOT recommended.
,, Excessive suds collect in nooks and crannies and can cause foul
odors.
Run cleansing cycles to sanitize the machine periodically. (Silver Care
or Sanitize Cycle or Pure Cycle)
Clean the door seal (Diaphragm).
,, Dry the interior of your washer after the total cycle has finished.
troub eshooting 35

tro Abe hoot ncj
INFORMATION CODES
The washer may display information codes to help you better understand what is occurring with your
washer.
dS
FI,.
HI"
Unbalanced load prevented your
washer from spinning.
Door is open when washer is running.
Your washer failed to lock the door.
This error code appears when the
heater is 96 °C or above.
Your washer has tried to fill, but has not
reached the proper water level.
Redistribute the load, press the Start/
Pause button.
Closethe door tightlyand restartthe cycle.
If the code reappears, call for service.
Close the door tightly and restart the
cycle.
If the code reappears, call for service.
Call for service.
Call for service.
LE
Leak problem or Waterlevel Sensor has Call for service.
/EIII=} an abnormal reading.
The door will not unlock.
LO
nd
nF
Your washer is not draining.
It can also mean that the unit senses a
small clog while draining.
Your washer has tried to fill but was
unsuccessful.
Check if the hot water supply hose is
connected.
Make sure the door is firmly closed.
Press the Power button to turn off your
washer, then turn it on again. If the
code reappears, call for service.
Clean the drain filter. Then, clean the
debris filter (See page 31).
If you are in the middle of a wash you
can try this first:
1. Turn off the unit for 10 seconds and
then turn it on again.
2. Select the Spin Only cycle (See page
24).
3. Press the Start/Pause to drain the
water.
If it still does not drain, call for service.
Make sure the water faucets are open all
the way. Check for kinked hoses.
Check the inlet screens on the fill hoses.
Ifyou use a Flood Safety Device, then
slease remove the device and connect
the water hoses directly to the unit.
You must connect the hot water supply
hose because hot water is supplied by
the Auto Temperature Control (A.T.C.)
function if the temperature of the cold
water is lower than 59°F.
36 troubleshooting

nF1
OE
E2
tE
3E
AE
SF
SUdS
This error code appears when the
water temperature is 80 °C or above
for 8 seconds or longer in the Wool and
Delicate course.
Water detected over the safe water
level.
Jammed key.
Temperature sensor problem.
Motor problem.
Communication error between SUB
PBA and MAIN PBA
System error
Too many suds are detected during the
washing session.
The unit is put on hold until the suds
are reduced. Then, the unit will go back
into the operation.
When it finishes washing, "End" and
"SUDS" codes will blink in turn.
Please connect the hot/cold water hose
connection correctly.
Call for service
Call for service
Restart the cycle.
If the code reappears, call for service.
Restart the cycle.
If the code reappears, call for service.
Call for service
Call for service
Reduce the amount of detergent you
use.
For any codes not listed above, call 1-800-726-7864 (1-800-SAMSUNG)
troub eshootin9 _37

appendx
FABRIC CARE CHART
The bllowing symbols provide garment care direction. The Clothing care labels include symbols for
washing, bleaching, drying and ironing, or dry cleaning when necessary. The use of symbols ensures
consistency among garment manufacturers of domestic and imported items. Follow care label directions to
maximize garment life and reduce laundering problems.
iiii!!!!iA:iii@i{{{{{i{{{{{{{{{{{{{{{{ii{{{{{i@#ss S(SSii¸
Permanent Press /
Wrinkle Resistant /
Wrinkle Control
Gentle/Uelicates
BandWash
Hot
co Warm
. Cold O
Line Dry/Hang to Dry Do Not Wash
[] Drip Dry
Dry Flat
High
Medium
Low
Any Heat
Do Not Wring
Do Not Bleach
Do Not Tumble Dry
No Steam (added to
iron)
Do Not Iron
O Dry Clean
No Heat/Air
Any Bleach (when
needed)
Only Non-Chlorine
(color-safe) High [] Drip Dry
Bleach (when needed)
Tumble Dry Cycle _ Medium Dry Flat
Low
PermanentPress/
Wrinkle Resistant/
Wrinkle Control
Gentle/Delioates
Do Not Dry Clean
Line Dry/Hang to Dry
** The dot symbols represent appropriate wash water temperatures for various items. The temperature
range for Hot is 105° - 125 °F / 41° _52 °C, for Warm 85° - 105 °F / 29° - 41 °C and for Cold 60° - 85 °F
/ 16° - 29 °C. (Wash water temperature must be a minimum of 60 °F / 16 °C for detergent activation and
effective cleaning.) The clothes washer can not ensure these temperatures because the actual temperature
of the water entering your washer is dependent on water heater settings and regional water supply
temperatures. For example, cold water entering the home in the northern states during winter may be
40 °F / 4 °C which is too cold for effective cleaning. The water temperature in this situation will need to be
adjusted by selecting a warm setting, adding some hot water to the MAX FILL line or using your washer's
heating option, if available.
38 appendix

CYCLE CHART
Use this chart to set the best cycle and option for you laundry.
Model: WF405ATPA** / WF398ATPA**
( • ' factory setting, _ ' selectable )
Normal _ ® _ _ _ ® _ _ _ _ _ ® _ _
Heavy Duty ® _ _ _ ® _ _ _ _ ® _ _ _ _
Bedding PLUS ...................
Sanitize ® ® _ _ _ _ _ _ ® _ _
Stain Away _ ® _ _ ® _ _ _ _ ® _ _ _ _
Deep steam ® ® _ _ _ _ ®
Rinse+Spin ® ® _ _ _ _
Quick Wash _ ® _ _ _ ® _ _ _ _ _ _ _ ®
Delicates/Hand Wash _ _ ® ® _ _ _ ® _ _
Active Wear ® _ _ _ ® _ _ _ ® _ _
Perm Press ® _ _ _ _ ® _ _ _ ® _ _
Eco Cold _ ÷ ÷ ÷ ÷ ÷ ÷ ÷ ÷
Pure Cycle ® ®
®
®
®
®
®
®
Norrnal
Heavy Duty
Bedding PLUS
Sanitize
Stain Away
Deep steam
Rinse+Spin
Quick Wash
Wo01
Delicates/Hand Wash
Active Wear
Perm Press
5C0Co_d
Pure Cycle
®
®
®
®
®
®
®
®
® ®
® ®
® ®
® ®
® ®
® ®
® ®
®
®
®
®
®
®
®
®
®
®
®
®
®
®
®
®
®
®
®
®
®
®
®
®
®
®
EH: Extra Hot EH: Extra High H: Heavy
H: Hot H: High
W: Warm M: Medium N: Normal
EW: Eco Warm L: Low
C: Cold NS: No Spin L: Light
®
®
®
®
®
®
®
®
®
®
®
®
®
®
®
®
®
®
®
®
®
®
®
®
®
®
®
®
®
®
®
®
®
®
®
®
®
®
append x 39

a_ppondx
Model: WF397UTPA**
( • ' factory setting, _ ' selectable )
Heavy Duty ® _ _ _ ® _
Bedding PLUS ® _ _
Sanitize ® ® _
Stain Away _ ® _ _ ® _
Deep steam ® ® _
Rinse+Spin ® ® _
Quick Wash _ ® _ _ _ ®
Wool ® _ _
Delicates/Hand Wash _ _ ®
Active Wear ® _ _
Perm Press ® _ _ _
Eco Cold ® _, ®
Pure Cycle ®
®
®
®
®
®
®
®
®
®
®
®
®
®
®
®
®
®
®
®
®
®
®
®
®
®
®
®
®
®
®
®
®
®
®
®
®
®
®
®
®
®
®
®
®
®
®
®
®
®
®
®
®
®
®
®
® ® ®
® ® ®
® ® ®
® ® ®
® ® ®
® ® ®
®
® ® ®
® ® ®
® ® ®
® ® ®
iiiii%iiiiiiiiiiiiiiiii!_i;il;iii!!!!!Jiiiii,ii;iiiiiill!i!!!!!!!!!!!!!!!!!!!!!!!!!!!!!_iiiiiiii_i_i_i_i_!!i!i!i!i_i!i!i!i!iiiiiiiiiiiii!i_i_i_j_%iliii!ii%!!i!iliii!_!iii!i!i!%!iiii!i!i!i!;iii!i!ii!,_!i!i!i!i!i!i!ji!i!i!i_!_%!ili!ililiiiii!,!!i!i!i!i!i!,i!!i!i!i!i!ii!i_i_%i!i!i!i!i!i!,i!i!i!i!i!l!i!i!i!i!i!i!i!i!_i_i_i_;!!!!!!!i!iii!i!i!ili!;!_!_!_i_i_i!iiii!i!i!!!i!i!i!,i!i!i!i!i!i!i!i!!!i!i!i!i!!!i_!!i!i!i!iiiiili!,_i_i_i!iiii!i!i!ii_i;_!_iii_!_iiiiiii_ii!ii!ii!ii!ii_iiiiii_i_!i_i_!i!!ii!ii!iiiiiiiiiiiiiiii!ilii!i!!_!!i!ii!ii!iiiii!ii!ii!ii!ii!iiiiiiiiiiiiiiiiiiiiiiiiiiiiiiiiiii_i_ii_ii_ii_ii_ii!i!ii!ii!ii!ii!ii_iii_iiii_i_ii_ii_ii!ii!ii!ii!i!i!i!ii!ii!ii!iiiiili!ili!i!ililili!iii_i!ii!ii!i!i!i!iiiiil;ii_i!iii!iiiiiiiliiiiliiiiiii_i_!i!i!i!!i!i_!i!ii!ii!ii!i!iii!ii_i;ii_ii!i!ili!_iiii!iiii!ii!ii!i_ii!_!!i!_i!ii!ii!iiiiiiiiiiii_iiii_ililiiii!i!iiiii_!iiiii_iii!i_iiiiiiii!i!ili_i_iiiii_iiiiiiiiiiiiiiiiiiiiiiiiiiiiiii!iii_i_ii!i!!i!i_!i!ii!ii!iii!_i!iii_ii_ii_i_i!_!i,i!i_!_iiii!iili_ii_ii_!_!i_i!i_i_!_!_i_i!iii_iii_i_ii_iiii_ii!_!iiii_!_i_i_i_i!i_i_ii!ii_iiiiill
!i !i !i !i !i !i !i !iii!ii B!i!!ii i ii ii jiiiili iil;i :ili¸iiiii !i!i!i!i!i!ii!ii!i!!ii!i i !ilili! i!i !!i!!i!!i!iiiiiiiiiiii!i!ili!iiiiiiiiiiiiiiiiiiiiiiiiiiiii i ' iiiiiiiiiiiiiii!;ililililili i 'i i !i ii ii' ! i i ii'ii'ii'ii'ii'i!i!il¸
Normal _ _ _ _ _ _ _ _
Heavy Duty
Bedding PLUS
Sanitize
Stain Away
Deep steam
Rinse + Spin
Quick Wash
Wool
Delicates/Hand Wash
Active Wear
Perm Press
®
®
®
®
®
®
®
®
®
®
®
®
®
®
®
®
®
®
®
®
®
®
®
®
®
®
®
®
®
®
®
®
®
®
®
®
®
®
®
®
®
®
®
®
®
®
®
®
Pure Cycle _ _
EH: Extra Hot EH: Extra High H: Heavy
H: Hot H: High _k
W: Warm M: Medium N: Normal
EW: Eco Warm L: Low Y
C: Cold NS: No Spin L: Light
®
®
®
®
®
®
®
®
®
®
®
®
®
®
®
®
®
®
®
®
®
®
®
®
®
®
®
®
40 appendix

HELPING THE ENVIRONMENT
Your washer is manufactured from recyclable materials. Ifyou decide to dispose of it, please observe
local waste disposal regulations. Cut off the power cord so that the appliance cannot be connected
to a power source. Remove the door so that animals and small children cannot get trapped inside the
appliance.
Do not exceed the detergent quantities recommended in the detergent manufacturers' instructions.
Use stain removal products and bleaches before the wash cycle only when necessary.
Save water and electricity by only washing full loads (the exact amount depends upon the program used).
DECLARATION OF CONFORMITY
This appliance complies with UL2157.
SPECIFICATION
DIMENSIONS' ...... Div ' ..... Inches (cm)
A. Height-Overall 38.7" (98.4)
B. Width 27" (68.6)
C. Depth with door open 90° 51.7" (131.4)
D. Depth 32.3" (82.0)
WATER PRESSURE
WEIGHT
HEATER RATING
POWER
CONSUMPTION
WF405ATPA / WF397UTPA
WF398ATPA**
WASHING
WASHING AND HEATING
SPIN
DRAIN
20-116 psi(137-800 kPa)
88 kg (194 Ib)
96 kg (212 Ib)
SPiN REVOLUTION
9OOW
120V
120V
120V
120V
1200 rpm
25O W
1100W
600 W
80/32 W
append x 41

SAMSUNG WASHER
LiMiTED WARRANTY TO ORiGiNAL PURCHASER
This SAMSUNG brand product, as supplied and distributed by SAMSUNG ELECTRONICS AMERICA, INC.
(SAMSUNG) and delivered new, in the original carton to the original consumer purchaser, is warranted by
SAMSUNG against manufacturing defects in materials and workmanship for a limited warranty period of:
One (1)year part and labor, Two (2)years Control Board Parts (Part Only), Three (3)years stainless tub part
(Part Only), Five (5)years washing motor part (Part Only), Ten (10) years washing DD motor part (Part Only)
This limited warranty begins on the original date of purchase, and is valid only on products purchased and
used in the United States. To receive warranty service, the purchaser must contact SAMSUNG for problem
determination and service procedures. Warranty service can only be performed by a SAMSUNG authorized
service center. The original dated bill of sale must be presented upon request as proof of purchase to
SAMSUNG or SAMSUNG's authorized service center. SAMSUNG will provide in-home service during the
warranty period at no charge, subject to availability within the contiguous United States. In-home service is
not available in all areas.
To receive in-home service, product must be unobstructed and accessible to the service agent. Ifservice
is not available, SAMSUNG may elect to provide transportation of the product to and from an authorized
service center.
SAMSUNG will repair, replace, or refund this product at our option and at no charge as stipulated herein,
with new or reconditioned parts or products if found to be defective during the limited warranty period
specified above. All replaced parts and products become the property of SAMSUNG and must be returned
to SAMSUNG. Replacement parts and products assume the remaining original warranty, or ninety (90)
days, whichever is longer.This limited warranty covers manufacturing defects in materials and workmanship
encountered innormal, noncommercial use of this product and shall not apply to the following: damage
that occurs in shipment; delivery and installation; applications and uses for which this product was not
intended; altered product or serial numbers; cosmetic damage or exterior finish; accidents, abuse, neglect,
fire, water, lightning, or other acts of nature or God; use of products, equipment, systems, utilities, services,
parts, supplies, accessories, applications, installations, repairs, external wiring or connectors not supplied
or authorized by SAMSUNG that damage this product or result in service problems; incorrect electrical
line voltage, fluctuations and surges; customer adjustments and failure to follow operating instructions,
maintenance and environmental instructions that are covered and prescribed in the instruction book;
product removal and reinstallation; problems caused by pest infestations. This limited warranty does not
cover problems resulting from incorrect electric current, voltage or supply, light bulbs, house fuses, house
wiring, cost of a service call for instructions, or fixing installation errors. SAMSUNG does not warrant
uninterrupted or error-free operation of the product.
42 warranty

EXCEPT AS SET FORTH HEREIN, THERE ARE NO WARRANTIES ON THIS PRODUCT EITHER EXPRESS
OR IMPLIED, AND SAMSUNG DISCLAIMS ALL WARRANTIES INCLUDING, BUT NOT LIMITED TO,ANY
IMPLIED WARRANTIES OF MERCHANTABILITY, INFRINGEMENT OR FITNESS FOR A PARTICULAR
PURPOSE.
NO WARRANTY OR GUARANTEE GIVEN BY ANY PERSON, FIRM, OR CORPORATION WITH RESPECT
TO THIS PRODUCT SHALL BE BINDING ON SAMSUNG. SAMSUNG SHALL NOT BE LIABLE FOR LOSS
OF REVENUE OR PROFITS, FAILURE TO REALIZE SAVINGS OR OTHER BENEFITS, OR ANY OTHER
SPECIAL, INCIDENTAL OR CONSEQUENTIAL DAMAGES CAUSED BY THE USE, MISUSE, OR INABILITY
TO USE THIS PRODUCT, REGARDLESS OF THE LEGAL THEORY ON WHICH THE CLAIM IS BASED,
AND EVEN IF SAMSUNG HAS BEEN ADVISED OF THE POSSIBILITY OF SUCH DAMAGES.
NOR SHALL RECOVERY OF ANY KIND AGAINST SAMSUNG BE GREATER IN AMOUNT THAN THE
PURCHASE PRICE OF THE PRODUCT SOLD BY SAMSUNG AND CAUSING THE ALLEGED DAMAGE.
WITHOUT LIMITING THE FOREGOING, PURCHASER ASSUMES ALL RISK AND LIABILITY FOR LOSS,
DAMAGE, OR INJURY TO PURCHASER AND PURCHASER'S PROPERTY AND TO OTHERS AND THEIR
PROPERTY ARISING OUT OF THE USE, MISUSE, OR INABILITY TO USE THIS PRODUCT. THIS LIMITED
WARRANTY SHALL NOT EXTEND TO ANYONE OTHER THAN THE ORIGINAL PURCHASER OF THIS
PRODUCT, IS NONTRANSFERABLE AND STATES YOUR EXCLUSIVE REMEDY.
Some states do not allow limitations on how long an implied warranty lasts, or the exclusion or limitation
of incidental or consequential damages, so the above limitations or exclusions may not apply to you. This
warranty gives you specific rights, and you may also have other rights, which vary from state to state.
To obtain warranty service, please contact SAMSUNG at:
Samsung Electronics America, inc.
85 Challenger Road Ridgefield Park, NJ 07660
1-800-SAMSUNG (726-7864)
www.samsung.com/us/support
Visits by a Service Engineer to explain functions, maintenance or installation is not covered by warranty.
Please contact your Samsung call agent for help with any of these issues.
warranty 43

SAMSUNG WASHER
LiMiTED WARRANTY TO ORiGiNAL PURCHASER
This SAMSUNG brand product, as supplied and distributed by SAMSUNG ELECTRONICS CANADA, INC.
(SAMSUNG) and delivered new, in the original carton to the original consumer purchaser, is warranted by
SAMSUNG against manufacturing defects in materials and workmanship for a limited warranty period of:
One (1)year part and labor, Ten (10) years washing DD motor (Part only)
This limited warranty begins on the original date of purchase, and is valid only on products purchased
and used in the Canada. To receive warranty service, the purchaser must contact SAMSUNG for problem
determination and service procedures. Warranty service can only be performed by a SAMSUNG authorized
service center. The original dated bill of sale must be presented upon request as proof of purchase to
SAMSUNG or SAMSUNG's authorized service center. SAMSUNG will provide in-home service during the
warranty period at no charge, subject to availability within the Canada. In-home service is not available in all
areas.
To receive in-home service, product must be unobstructed and accessible to the service agent. Ifservice
is not available, SAMSUNG may elect to provide transportation of the product to and from an authorized
service center.
SAMSUNG will repair, replace, or refund this product at our option and at no charge as stipulated herein,
with new or reconditioned parts or products if found to be defective during the limited warranty period
specified above. All replaced parts and products become the property of SAMSUNG and must be returned
to SAMSUNG. Replacement parts and products assume the remaining original warranty, or ninety (90)
days, whichever is longer.This limited warranty covers manufacturing defects in materials and workmanship
encountered innormal, noncommercial use of this product and shall not apply to the following: damage
that occurs in shipment; delivery and installation; applications and uses for which this product was not
intended; altered product or serial numbers; cosmetic damage or exterior finish; accidents, abuse, neglect,
fire, water, lightning, or other acts of nature or God; use of products, equipment, systems, utilities, services,
parts, supplies, accessories, applications, installations, repairs, external wiring or connectors not supplied
or authorized by SAMSUNG that damage this product or result in service problems; incorrect electrical
line voltage, fluctuations and surges; customer adjustments and failure to follow operating instructions,
maintenance and environmental instructions that are covered and prescribed in the instruction book;
product removal and reinstallation; problems caused by pest infestations. This limited warranty does not
cover problems resulting from incorrect electric current, voltage or supply, light bulbs, house fuses, house
wiring, cost of a service call for instructions, or fixing installation errors. SAMSUNG does not warrant
uninterrupted or error-free operation of the product.
44 warranty

EXCEPT AS SET FORTH HEREIN, THERE ARE NO WARRANTIES ON THIS PRODUCT EITHER EXPRESS
OR IMPLIED, AND SAMSUNG DISCLAIMS ALL WARRANTIES INCLUDING, BUT NOT LIMITED TO,ANY
IMPLIED WARRANTIES OF MERCHANTABILITY, INFRINGEMENT OR FITNESS FOR A PARTICULAR
PURPOSE.
NO WARRANTY OR GUARANTEE GIVEN BY ANY PERSON, FIRM, OR CORPORATION WITH RESPECT
TO THIS PRODUCT SHALL BE BINDING ON SAMSUNG. SAMSUNG SHALL NOT BE LIABLE FOR LOSS
OF REVENUE OR PROFITS, FAILURE TO REALIZE SAVINGS OR OTHER BENEFITS, OR ANY OTHER
SPECIAL, INCIDENTAL OR CONSEQUENTIAL DAMAGES CAUSED BY THE USE, MISUSE, OR INABILITY
TO USE THIS PRODUCT, REGARDLESS OF THE LEGAL THEORY ON WHICH THE CLAIM IS BASED,
AND EVEN IF SAMSUNG HAS BEEN ADVISED OF THE POSSIBILITY OF SUCH DAMAGES.
NOR SHALL RECOVERY OF ANY KIND AGAINST SAMSUNG BE GREATER IN AMOUNT THAN THE
PURCHASE PRICE OF THE PRODUCT SOLD BY SAMSUNG AND CAUSING THE ALLEGED DAMAGE.
WITHOUT LIMITING THE FOREGOING, PURCHASER ASSUMES ALL RISK AND LIABILITY FOR LOSS,
DAMAGE, OR INJURY TO PURCHASER AND PURCHASER'S PROPERTY AND TO OTHERS AND THEIR
PROPERTY ARISING OUT OF THE USE, MISUSE, OR INABILITY TO USE THIS PRODUCT. THIS LIMITED
WARRANTY SHALL NOT EXTEND TO ANYONE OTHER THAN THE ORIGINAL PURCHASER OF THIS
PRODUCT, IS NONTRANSFERABLE AND STATES YOUR EXCLUSIVE REMEDY.
Some provinces do not allow limitations on how long an implied warranty lasts, or the exclusion or limitation
of incidental or consequential damages, so the above limitations or exclusions may not apply to you.
This warranty gives you specific rights, and you may also have other rights, which vary from province to
province.
To obtain warranty service, please contact SAMSUNG at:
Samsung Electronics Canada inc.
2050 Derry Road West, Mississauga, Ontario L5N 0B9 Canada
1-800-SAMSUNG (726=7884)
www.samsung.com/ca/support (English)
www.samsung.com/ca_fr/support (French}
FAX:1-866-436-4617
Visits by a Service Engineer to explain functions, maintenance or installation is not covered by warranty.
Please contact your Samsung call agent for help with any of these issues.
warranty 45


QUESTIONS OR COMMENTS?
bit.ly/samsungwashers
Scan the QR code* or visit
www.samsung.com/spsn
to view our he[pfut
How-to Videos and Live Shows
_Requires reader to be installed on your smartphone
U.S.A 1-800-SAMSUNG (726-7864) www.samsung.com/us/support
MEXICO 01-800-SAMSUNG (726-7864) www.samsung.com/mx/support
www.samsung.com/ca/support (English)
CANADA 1-800-SAMSUNG (726-7864) www.samsung.com/ca_fr/support (French)
Visits by a Service Engineer to explain functions, maintenance or installation is not covered by warranty.
Please contact your Samsung call agent for help with any of these issues.
Code No. DC68-03145A-09_EN

manual
or8
del usuario
las posibilidades
Gracias pot adquirir este producto Samsung.

1. Capacidad extra grande
Las eapacidad extra grande de la lavadora Samsung le permite lavar un juego complete de
ropa de cama, un edred6n king-size o hasta 28 toallas de bane en una sola carga. AI hacer
menos eargas, se ahorra tiempo, dinero, agua y energfa.
2. PowerFoam TM
Gracias alefieaz PowerFoam de Samsung se eonsigue una mejor limpieza con los
cuidados ma.s avanzados para el tejido. PowerFoam permite que el detergente se disperse
uniformemente y que penetre las telas con mayor rapidez y profundidad.
3. SpeedSpray TM
La nueva tecnologfa SpeedSpray de Samsung le ahorra tiempo al acortar la duraei6n de
todas las rases del proeeso del lavado, aunque se mantienen las mismas fases y la ropa
queda igualmente limpia.
La funci6n SpeedSpray TM se puede seleeeionar en los programas Normal (Normal), Bedding
PLUS (Ropa de cama PLUS), Deep Steam (Vaporizaci6n profunda), Stain Away (Eliminaci6n
de manehas) y Eco Cold (Lavado eeol6gieo frio) y el tiempo que se ahorra varia segLin el
peso de la ropay los cielos y opeiones seleceionados.
4. Smart Care
El sistema automa.tieo de supervisi6n de fallas Smart Care de Samsung deteeta y
diagn6stiea problemas tempranamente y proporciona una soluci6n fa.cily r_tpida.
5. VRT TM (Tecnologia de Reducci6n de la Vibraci6n)
Esta lavadora Samsung funciona con suavidad durante el centrifugado a veloeidad m_txima,
minimizando el ruido y las vibraeiones.
6. Pure Cycle TM (Ciclo de limpieza del tambor)
Limpie su tambor con un solo bot6n. Pure Cycle se ha diserado espeeialmente para eliminar
la acumulaci6n de restos de detergente y suciedad en el tambor, el limitador y el vidrio de la
puerta sin detergentes especiales.
7. Deep Steam (Vaporizaci6n profunda)
La funci0n Deep Steam (Vaporizaci0n profunda) mejora la calidad de la limpieza, elimina todo
tipo de suciedad y brinda unos resultados superiores de limpieza.
8. Diamond drum TM
Para un cuidado especial de sus telas. Con orificios internes un 36 % m_ts pequeros que
los de los tambores convencionales, el tambor Diamond evita que las telas se estiren y, per
consiguiente, se darien.
9. Certificado Woolmark
El ciclo de lavado de lana en las ma.quinas Samsung ha side probado y cumpli0 con la
especificaci0n de Woolmark Company requerida para productos de lana lavables en
lavadora. Las prendas deben lavarse de acuerdo con las instrucciones que figuran en sus
etiquetas, tal come Io establecen Woolmark y Samsung.
10.Pantalla digital y jog dial central
El jog dial central le permite seleccionar ciclos en ambas direcciones con facilidad y la
pantalla es fa.cilde usar y comprender.
11. Motor de accionamiento directo
iEI poder de manejarlo todo! El motor inversor de accionamiento directo suministra energia
al tambor de la lavadora desde un motor reversible de velocidad variable. Un motor de
accionamiento directo sin correa genera una velocidad m_ts alta de centrifugado de
1200 rpm para un funcionamiento ma.seficiente y silencioso. La lavadora tambi_n posee
menos piezas movibles, Io cual se traduce en menos reparaciones.
2 caractedst cas cave de su nueva avadora PowerYoam TM

12.Sanitize (Desinfecci6n)
AI seleccionar el ciclo Sanitize (Desinfeccion), el agua se calienta a una temperatura
extremadamente alta para eliminar el 99.9 % de las bacterias que suelen alojarse en
prendas, ropa de cama o toallas. La presente certifieacion ha sido otorgada pot NSF
International, una organizacion privada de evaluacion y certifieaci0n.
Lea la etiqueta de la prenda para evitar danos aesta. 0nieamente los cicIos de desinfeeci0n
fueron disenados para cumplir con los requisitos de este protocolo para una desinfeceion
efieaz.
NSF Protocol P172
Desinfecci6n en lavadoras comerciales,
residenciales y familiares
13.Pedestal con cajones de almacenamiento (Modelo N.°: WE357")
Tiene una base de 15" opcional a disposicion para elevar la lavadora y Iograr ad una carga y
descarga m&.ssencilla.
Tambi_n ofrece un cajon de almacenamiento incorporado que puede sostener una botella de
detergente de 100 oz.
14.Apilamiento (Modelo N.°: SK-3A1/XAA, SK-4A/XAA, SK-5A/XAA)
Las lavadoras y las secadoras Samsung pueden apilarse para maximizar el espacio
aprovechable. Puede adquirir un kit de apilamiento opcional en su comercio minorista de
productos Samsung.
<Pedestal con cajones de almacenamiento> <Apilamiento>
caracter[sticas cave de su nueva avadora PowerFoam _M3

Felicitaciones por la compra de la nueva lavadora Samsung. Este manual
contiene informaci6n importante acerca de la instalaci6n, el uso y el cuidado del
electrodomestico. Lea detenidamente estas instrucciones a fin de aprovechar al
m_ximo los mOltiples beneficios y funciones de la lavadora.
LO QUE NECESITA SABER SOBRE LAS INSTRUCCIONES DE
SEGURIDAD
Las advertencias y las instrucciones de seguridad importantes de este manual no cubren todas las posibles
condiciones y situaciones que pueden ocurrir. Es su responsabilidad actuar con sentido comLin, precaucion
y cuidado cuando instale, realice el mantenimiento y ponga en funcionamiento la lavadora.
SiMBOLOS Y PRECAUCIONES DE SEGURIDAD IMPORTANTES
Los fconos y las se_ales incluidas en este manual del usuario
significan Io siguiente:
/k
ADVERTENCIA
Peligros o pr_tcticas insegurasque pueden causar lesiones fisicas
graves o la muerte.
Para reducir el riesgo de incendio, explosion, descargas el_ctricas o
lesiones fisicas cuando usa esta lavadora, siga estas instrucciones de
seguridad bb.sicas:
//_ Peligros o pr&.cticas insegurasque pueden causar lesiones fisicas
PRECAUCION leves o da_os materiales.
NO intente hacer nada.
NO desarme.
NO toque.
(_ Siga las instrucciones completamente.
Desenchufe el cable de alimentacion el_ctrica del tomacorriente de
pared.
AsegOrese de que la m_tquina tenga buena conexion a tierra para evitar
descargas el_ctricas.
Llame al centro de servicio t_cnico para obtener asistencia.
Nota
Estas sefiales de advertencia estAn aqui para evitar que usted u otras personas sufran daSos.
Siga las instrucciones completamente.
Despu_s de leer esta secci6n, guArdela en un lugar seguro para consultas futuras.
_Lea todas las instrucciones antes de usar el electrodom_stico.
CONSERVE ESTAS INSTRUCCIONES
4 informacon sobre seguridad

/_ ADVERTENCIA: Para reducir el riesgo de incendio, descargas el_ctricas o lesiones fisicas
A_cuando usa este electrodom_stico, siga las instrucciones de seguridad bb.sicas que figuran
a continuacion:
1. Lea todas las instrucciones antes de usar el electrodom_stico.
2. No lave o seque prendas que han sido previamente limpiadas, lavadas, remojadas o
salpicadas con gasolina, solventes de limpieza en seco u otras sustancias inflamables o
explosivas, ya que emiten vapores que pueden prenderse fuego o explotar.
3. No permita que los niflos jueguen sobre la lavadora o dentro de ella. Se requiere de
supervision cuando el electrodom_stico es utilizado cerca de los niflos.
4. Antes de descartar el aparato o de trasladarlo para que se le efectLie el servicio t_cnico,
retire la puerta del compartimiento de la lavadora o la secadora.
5. No introduzca la mano en el electrodom_stico si el tambor est&.en movimiento.
6. No instale o guarde este electrodom_stico donde quede expuesto a factores clim&.ticos.
7. No modifique los controles.
8. No repare, reemplace ni intente realizar el mantenimiento de cualquier pieza del
electrodom_stico salvo que est_ recomendado especfficamente en las instrucciones
de mantenimiento del usuario o en las instrucciones de reparacion para el usuario
publicadas y que, a su juicio, usted tenga la habilidad para Ilevarlas a cabo.
9. No agregue gasolina, solventes de limpieza en seco u otras sustancias inflamables o
explosivas al agua del lavado. Estas sustancias emiten vapores que se pueden prender
fuego o explotar.
10. En ciertas circunstancias, se puede producir gas hidrogeno en un sistema de agua
caliente que no se ha usado durante 2 semanas o ma.s. EL GAS HIDR©GENO ES
EXPLOSIVO. Si el sistema de agua caliente no fue utilizado durante dicho perbdo, antes
de usar la lavadora o la lavadora y la secadora combinadas, abra las Ilaves de agua
caliente y deje cotter el agua pot varios minutos. De esta manera, se eliminar&,elgas
hidrogeno acumulado. Dado que el gas es inflamable, no fume ni use una llama abierta
en ese momento.
_ Advertencias de la disposici6n 65 del Estado de California:
ADVERTENCmA
ADVERTENCIA:Esteproductocontienequimicosquese sabeen elestadodeCaliforniaque[email protected]
y toxicidadreproductiva.
CONSERVE ESTAS INSTRUCCIONES
informaciOn sobre seguridad 5

SENALES DE ADVERTENCIA IMPORTANTES PARA LA
ADVERTENC_, INSTALACiON
®
Enchufeel cable de alimentaciOnen un tomacorrientede pared de 120V/60 Hz/15A CA o superiory
utiliceel tomacorriente solocon esteelectrodomestico. No useun cable prolongador.
Compartir el tomacorrientemural con otros electrodomesticosutilizandoun multicontacto o
prolongandoel cable de alimentaciOnpuede provocar un incendioo unadescarga electrica.
No utiliceun transformadorelectrico. Puedeprovocar un incendioo unadescarga electrica.
Aseguresede que el voltaje,la frecuenciay la corriente son los mismosque los especificadosen
el producto. Si no Iohace puede provocar un incendioo una descarga electrica.
La instalaciOnde esteelectrodomestico ladebe efectuar untecnico cualificadoo unaempresa de
servicios.
Si no Iohace, puede provocar unadescarga electrica,un incendio, unaexplosion, problemascon
el producto o lesiones.
Retireregularmentetodas lassustanciasextranas,como polvo o agua,de losterminalesy los puntos
de contacto de laalimentaciOncon un pano seco.
Desenchufeelcable de alimentaciOny Ifmpielocon un pano seco.
Si no Iohacepuede provocar un incendioo una descarga electrica.
Enchufeel cable de alimentaciOnen un tomacorrientede pared en ladirecciOnadecuada de manera
queel cablebaje haciael suelo.
Si enchufael cablede alimentaciOnenel tomacorriente en ladirecci6nopuesta, los cables
electricosdel interior delcable se puedendanary se puede provocar un incendio ouna descarga
electrica.
@
Esteelectrodomesticodebe conectarse a tierra correctamente.
Latoma de tierra no se hade conectar a unaconducciOnde gas o de aguani a la IfneatelefOnica.
Puede provocar un incendio,una descarga electrica, un incendioo problemascon el producto.
Nunca enchufeel cablede alimentaciOnaun tomacorriente queno este conectado a tierra
correctamentey aseguresede que guarde conformidad con los c6digos localesy nacionales.
@
No instaleeste electrodomestico cercade un calefactoro materialesinflamables.
No instaleeste electrodomestico en unlugar humedo, con aceites o polvo, ni expuestoa la luz
directadel sol o alagua (gotasde Iluvia).
No instaleeste electrodomestico en unlugar donde pueda haberfugas de gas.
Puede provocar un incendioo una descargaelectrica.
Enchufeel cable de alimentaciOnfirmementeen eltomacorrientede pared. No utilice un cablede
alimentaci6ndanado ni untomacorriente que este flojo.
Puede provocar un incendioo una descargaelectrica.
No tire delcable de alimentaciOnni Iodobleexcesivamente.
No tuerza ni ate el cable de alimentaciOn.
No cuelgue elcablede alimentaciOnde un objeto metb.lico,no coloque objetos pesadossobre 61,no
inserteel cable de alimentaciOnentreobjetos ni Ioempuje en unespacio detrb.sdelelectrodomestico.
Puede provocar un incendioo una descargaelectrica.
No tire delcable de alimentaciOnparadesenchufarlo.
Desenchufeelcable de alimentaciOnsujetb.ndolopot el enchufe.
Si no Iohacepuede provocar un incendioo una descarga electrica.
CONSERVE ESTAS INSTRUCClONES
6 informac6n sobre seguridad

Si el enchufeo elcable de alimentaciOnestb.ndanados, comun[quesecon elcentro de serviciomb.s
cercano.
SENALES DE PRECAUCi0N PARA LA INSTALACi0N
PREOAUCION
_Este electrodomesticodebe estar ubicado de maneratal sepueda acceder alenchufe.
que
Si no Io hace puede provocar un incendio o unadescarga causados pot fugas electricas.
Instaleel electrodomesticosobre unasupefficie niveladaque pueda soportarsu peso.
Si no Io hace pueden producirsevibraciones anormales,ruidoso problemascon el producto.
Desenchufeelelectrodomestico si no Iova a utilizarduranteun perbdo prolongado o durante una
tormenta con aparato electrico.
Si no Io hace puede provocar un incendio o unadescarga electrica.
SENALES DE ADVERTENCIA IMPORTANTES DURANTE EL USO
ADVERTENCIA
Si el electrodomesticose inunda,desconectelo inmediatamentey Ilamealcentro de servicio mb.s
cercano.
Si el electrodomesticogeneraruidos extranos,oloresde quemado o humo,desconectelo
inmediatamentey Ilameal centro de serviciomb.scercano.
Si no Io hace puede provocar un incendio o unadescarga electrica.
En casode fugas de gas (como propano, LP,etc.),ventile inmediatamentesin tocar el enchufe. No
toque elelectrodomestico nielcable de alimentaci6n.
No utiliceunventilador.
Unachispa puede provocar un incendio o unaexplosion.
No laveprendascontaminadascon gasolina,queroseno, benceno,disolventesde pinturas,alcoholu
otras sustanciasinflamableso explosivas.
Puedeprovocar unadescarga electrica,un incendio o unaexplosion.
No abra lapuerta de la lavadorapor lafuerza mientrasesteen funcionamiento (lavadoaalta
temperatura/secado/centrifugado).
Elaguaque salgade la lavadorapuede causar quemaduraso convertirel suelo en resbaladizo.
Se puede causar lesionespersonales.
Abrir lapuerta pot lafuerza puededanarel producto o causar lesionespersonales.
Aseguresede quitar elembalaje (gomaespuma,poliestireno)delfondo de la lavadoraantesde utilizar
esta.
No introduzcalas manos bajo la lavadora.
Se puede causar lesionespersonales.
CONSERVE ESTAS INSTRUCClONES
[nformaci6n sobre segur[dad 7

_No toque el enchufe con las manos mojadas.
Puede causar lesiones personales.
No apague el electrodom_stico desenchuf&.ndolo mientras est_ en funcionamiento.
Si vuelve a enchufar elelectrodom_stico en el tomacorriente puede originar una chispa y
causar una descarga el_ctrica o un incendio.
Mantenga los materiales del embalaje fuera del alcance de los ninos, ya que son peligrosos
para _stos.
Si un nino introduce la cabeza en una bolsa se puede asfixiar.
No permita que los ninos o las personas inestables utilicen la lavadora sin supervision.
Si Io hace puede provocar una descarga el_ctrica, quemaduras o lesiones.
No introduzca la mano ni objetos de metal bajo la lavadora mientras _sta est_ en
funcionamiento.
Se puede causar lesiones personales.
Antes de poner la ropa a lavar o de sacar la ropa limpia, compruebe que el cajon para
detergente est_ cerrado.
Si el cajon para detergente esta.abierto, se podrfa golpear la cabeza con _1y lesionarse.
No trate de reparar, desensamblar ni modificar la lavadora usted mismo.
No utilice un fusible (de cobre, cable de acero, etc) que no est_ normalizado.
Para reparar o volver a instalar el electrodom_stico comun(quese con el centro de
servicio ma.scercano.
Si no Io hace puede provocar una descarga electrica, un incendio, problemas con el
producto o lesiones.
Si alguna sustancia extrana, como agua, se introduce en el electrodom_stico, desenchufe
el cable de alimentacion y comun(quese con el centro de servicio ma.scercano.
Si no Io hace puede provocar un incendio o una descarga el_ctrica.
Si se afloja la manguera de suministro de agua del grifo y se inunda el electrodom_stico,
desenchufe el cable de alimentacion.
Si no Io hace puede provocar un incendio o una descarga el_ctrica.
Si entra alguna sustancia extrana en la m&.quina, desenchufe el cable de alimentacion y
comun(quese con el centro de servicio mas cercano.
Si no Io hace puede provocar un incendio o una descarga el_ctrica.
CONSERVE ESTAS INSTRUCClONES
8 informac6n sobre seguridad

SENALES DE PRECAUCION DURANTE EL USO
PRECAUCION
Si la lavadoraestb.contaminada por sustanciasextranas,como detergente,tierra, restosde
alimentos,etc. desenchufeel cable de alimentacbn y limpiela lavadoracon un pano suave
humedecido.
Si no Io hace sepuede producir decoloracbn, deformacbn, danos u6xido.
El cristalfrontal se puede romper con un impacto fuerte. Seacuidadoso cuando utilice la lavadora.
Larotura delcristal puedecausar lesiones.
Anteuna fallade suministrode agua o cuando sevuelvea conectar la manguerade suministro,abra
lentamentela Ilavedel agua.
Abra lentamentelaIlavedelaguatras un periodo prolongado de faltade uso.
LapresiOndel airede lamanguerade suministroo de la conduccbn de agua puede danar una
piezao provocar fugasde agua.
Si duranteel funcionamiento hay unafallaen el drenaje,compruebe este.
Si se utilizala lavadorainundadapot unafallaen el drenaje,sepuede provocar unadescarga
electricao un incendio.
Introduzcacompletamente laropa en la lavadoraparaque no pueda quedar atrapadapor la puerta.
Si la ropa queda atrapadapot la puerta,se puededanar laropa o la lavadora,o puede haber
fugas de agua.
Aseguresede que la Ilavedel aguaeste cerradacuando la lavadorano se utiliza.
Aseguresede que el tornillodelconector de la manguerade suministrodelagua este
correctamente apretado.
Si no Io hace puede provocar danos materialeso lesiones.
Procureque lajunta de goma y elvidrio de la puertafrontal noesten contaminados pot sustancias
extranas(comorestos, hilos,cabellos,etc.)
Si una sustancia extranaqueda atrapadaen lapuertao si lapuertano estb.bien cerrada,se puede
producir unafuga de agua.
Antesde utilizarelproducto, abra laIlavedel aguay compruebe sielconector de la manguerade
suministrodelagua estb.firmementeaseguradoy que no hayafugas de agua.
Si los tornilloso elconector de la manguerade suministrodel aguaestb.nflojos, puede haber
fugas de agua.
El producto adquirido estb.disenadoexclusivamentepara usodomestico.
Su utilizacbn con finescomercialesse consideraun uso incorrecto delproducto. Ental caso el
producto no quedarb,cubierto pot la garantfaestb.ndarqueofrece Samsungy no se podrb,atribuir
aSamsung ningunaresponsabilidadpot el malfuncionamientoo losdanos resultantesde este uso
incorrecto.
Si no seinicia el lavadoy laropa sedeja por un tiempo despues de agregardetergente o aplicar
productos quitamanchaso de tratamiento previo,laropa sepuede decolorar.
Seleccioneelciclo y latemperatura recomendadosdependiendo de la ropa quevaa lavar,clasifique
las prendassegun la solidezdel color y seleccioneel ciclo apropiado.
Aseguresede que no hayaobjetosextranoscomo clips, botones o monedas en la ropa que vaa
lavar.Antes del lavadoseparelavela ropa suciade laque estb.relativamentelimpia,y ladelicada de
las telasmb.sresistentes.
Si una prenda estb.manchada,Ib.velaIomb.spronto posible.Antes de utilizarproductos quitamanchas
o detergente, pruebe lasolidezdelcolor aplicando una pequena cantidad en unacostura interior.
CONSERVE ESTAS INSTRUCClONES
informaci6n sobre seguridad 9

No se suba encima del electrodom_stico ni coloque encima de _ste objetos (como ropa,
velas o cigarrillos encendidos, platos, productos qu(micos, objetos metalicos, etc.)
Puede provocar una descarga el_ctrica, un incendio, problemas con el producto o
lesiones.
No haga funcionar el electrodom_stico con las manos mojadas.
Puede causar lesiones personales.
No roc(e materiales vol&.tiles, como insecticidas, en la superficie del electrodom_stico.
Adema.s de ser perjudiciales para las personas, tambi_n pueden provocar una descarga
el_ctrica, un incendio o problemas con el producto.
No coloque objetos que generen campos electromagn_ticos cerca de la lavadora.
Puede causar lesiones por un malfuncionamiento.
No toque el agua que se drena durante el lavado a alta temperatura o durante el ciclo de
secado ya que est&.caliente.
Puede causar lesiones personales o quemaduras.
No lave, centrifugue ni seque alfombrillas o prendas impermeables(*).
No lave alfombrillas gruesas y espesas aunque Ileven la marca de lavado en la etiqueta.
Se pueden causar lesiones o danar la lavadora, las paredes, el suelo o la ropa debido a
vibraciones anormales.
* Ropa de cama de lana PLUS, fundas de Iluvia, ropa para pescar, pantalones de esqd,
bolsas de dormir, cubiertas de panales, cha.ndales, cubiertas de bicicletas, mobs y
automoviles, etc.
No haga funcionar la lavadora sin el cajon del detergente.
Se puede provocar una descarga el@trica o lesiones debido a fugas de agua.
No toque el interior de la tina durante o inmediatamente despu_s del secado, ya que est&.
caliente.
Puede causar quemaduras.
No introduzca las manos en el dosificador de detergente despu_s de abrirlo.
Se puede causar lesiones en la mano si _sta queda atrapada.
No introduzca ningOn objeto (como zapatos, restos de comida, animales) que no sea ropa
en la lavadora.
Se puede danar la lavadora, causar lesiones o la muerte en caso de mascotas por
vibraciones anormales.
No presione los botones con objetos afilados, como alfileres, cuchillos, las unas, etc.
Puede provocar una descarga el_ctrica o lesiones personales.
No lave ropa contaminada por aceites, cremas o Iociones que se utilizan normalmente en
los establecimientos para el cuidado de la piel o en las clfnicas de masajes.
Se puede deformar la junta de goma y provocar fugas de agua.
No deje objetos de metal, como horquillas o clips, ni lejfa en la tina durante periodos
prolongados de tiempo.
Se puede oxidar el tambor.
Si comienza a aparecer Oxido en la superficie de la tina, aplique un agente limpiador
(neutro) sobre la superficie y utilice una esponja para limpiarla. Nunca utilice un cepillo de
metal.
CONSERVE ESTAS INSTRUCClONES
10 informac6n sobre seguridad

No utilice detergentes de limpieza en seco directamente ni lave, enjuague ni centrifugue
ropa contaminada por detergentes de limpieza en seco.
Se puede producir una combusti6n espont_tnea o un incendio por el calor de la
oxidaci6n del aceite.
No utilice agua caliente de los dispositivos de calentamiento o enfriamiento del agua.
Podrfa tener problemas con la lavadora.
No utilice jab6n natural para lavado a mano en la lavadora.
Si se endurece y se acumula en el interior de la lavadora, puede causar problemas en el
producto, como decoloraci6n, 6xido y malos olores.
No lave prendas grandes como ropa de cama PLUS dentro de una red.
De no hacerlo se pueden producir lesiones personales por las vibraciones anormales.
Coloque los art(culos mas pequenos, como las medias y la lencer(a, dentro de una red.
No utilice detergente endurecido.
Si se acumula en el interior de la lavadora, puede provocar fugas de agua.
No lave alfombras ni felpudos.
Si lava alfombras o felpudos, se acumular_t arena en el interior de la lavadora. Puede
provocar errores como la falta de drenaje.
AI cerrar la puerta tenga cuidado de no atrapar los dedos de los ninos. Se puede causar
lesiones personales.
SENALES DE ADVERTENCIA IMPORTANTES DURANTE LA
ADVERTENCIA LIMPIEZA
No limpie el electrodom_stico rociando directamente agua dentro de _1.
No utilice un agente limpiador muy a,cido.
No utilice benceno, disolventes ni alcohol para limpiar el electrodom_stico.
Puede provocar decoloraci6n, deformaci6n, danos, incendio o descarga el_ctrica.
Antes de la limpieza o las tareas de mantenimiento, desenchufe el electrodom_stico del
tomacorriente de la pared.
Si no Io hace puede provocar un incendio o una descarga el_ctrica.
CONSERVE ESTAS INSTRUCClONES
informac6n sobre seguddad 11

contendo
INSTALACION DE LA LAVADORA
MANUAL DE INSTRUCClONES
i
LAVADO DE UNA CARGA DE ROPA
MANTENIMIENTO DE LA LAVADORA
GU|A DE SOLUCI6N DE PROBLEMAS
APENDICE
;i (
13 Desembalaje de la lavadora
13 DescripciOn general de la lavadora
14 Instalacion el_ctrica
14 Conexion a tierra
14 Agua
15 Drenaje
15 Suelo
15 Consideraciones acerca de la ubicacion
15 Instalacion del electrodom_stico en un
gabinete o en un hueco
15 Instalacion bajo contador (s01olavadora)
16 Con pedestal opcional o kit de apilamiento
17 Nota importante para el instalador
17 Diagrama de instalacion
20 COmo cargar la lavadora
20 Lavado de la ropa: Instrucciones Basicas
21 DescripciOn general del panel de control
23 Seguro para ninos [_]
24 S01ocentrifugado
24 Garment+ (Mb.s prendas)
24 Delay Start (Inicio retardado)
25 My Cycle (Mi ciclo)
25 Smart Care
26 DEEP STEAM
26 Lavado de prendas con el selector de
ciclos
27 Uso del lavado a vapor
27 ATC (AutocontrSle de temperature)
28 Uso del detergente
28 Funciones
30 Limpieza del exterior
30 Limpieza del interior
30 Limpieza de los dosificadores
30 COmo guardar la lavadora
31 Limpieza del filtro de residuos
32 Limpieza del sello/fuelle de la puerta
32 Mantenimiento de la cubierta superior y del
marco frontal
33 Pure Cycle TM
34 Controle estas soluciones si su lavadora...
36 COdigos de informaciOn
38 Tabla de indicaciones sobre la tela
39 Tabla de ciclos
41 Ayuda al medioambiente
41 DeclaraciOn de conformidad
41 Especificaciones
12 contendo

DESEMBALAJE DE LA LAVADORA
Desembale la lavadora e inspecci0nela para controlar que no se hayan producido daflos durante
el transporte. Compruebe que haya recibido todos los elementos que se muestran a continuaci0n.
Si la lavadora sufri0 danos durante el transporte, o si falta algOn elemento, comun(quese con el
1-800-SAMSUNG(726-7864).
Para evitar lesiones f(sicas o tirones, use guantes protectores cada vez que levante o transporte la unidad.
/_Los materiales de embalaje pueden set peligrosos para los ninos. Mantenga todos los materiales de
...........embalaje (bolsas de pl_tstico, poliestireno, etc.) lejos del alcance de los ninos.
DESCRIPCION GENERAL DE LA LAVADORA
Caj6n para
detergente
_ Manguera de
Manguera de suministro _---_ !_!_.---_suministro de agua fria
de agua caliente
Panel de control
Puerta
Tambor
Filtro de residuos
Tubo de drenaje
Cubierta del filtro
Manguera
_je
Patas
_ajustables
Llave inglesa Tapones para los
orificios de los tornillos
Manguera de suministro
de agua
Guia de la manguera
Abrazadera pl_stica de
sujecibn de la manguera
* Tapones para los orificios de los tornillos: El nOmero de tapones para los orificios de los tomillos
depende del modelo (3_6 tapones).
instalaci6n de la lavadora 13

/
REQUISITOS BASICOS ACERCA DE LA UBICACi0N
Instalaci6n el ctrica
* Fusibleo disyuntor de 120voltios, 60 Hz, 15 A
* Se recomiendacontar con uncircuito derivadoindividualdestinado 0nicamentea la lavadora.
* La lavadoraestb,equipada con uncable de alimentaciOn.
NUNCAUTILICEUN CABLE PROLONGADOR.
PRECAU¢ION
Conexi6n a tierra
ES PRECISO QUE ESTE ELECTRODOMESTICO ESTE CONECTADO A TIERRA.
Esteelectrodomesticodebeconectarseatierra.Encaso dequeel electrodomesticofuncione malo se
descomponga,laconexiOna tierra reducira,el riesgode descargaelectricaalofrecer unavia de menos
resistenciaalacorrienteelectrica.
Esteelectrodomesticoestb,equipadocon uncable dealimentaciOnquecuenta con un enchufedetres pines
con conexiOna tierraparautilizarenun tomacorrientecon conexiOna tierra.
Elenchufedebe conectarsea untomacorrienteadecuado que estecorrectamenteinstaladoy conectado a
tierra enconformidadcon todos los codigosy ordenanzaslocales.
_La conexioninadecuadadelconductor de conexiOna tierradel equipopuede aumentarel riesgo
..........dedescargaelectrica.Consultea unelectricistao tecnicocalificadosi lesurgendudas acercade
sila conexiona tierradelelectrodomesticoesadecuada. No modifiqueel enchufeprovistocon el
electrodomestico;sino entraen eltomacorriente,solicitea unelectricistacalificadoque instaleel
tomacorrienteadecuado.
PRECAUCIONES DE SEGURIDAD IMPORTANTES
• Paraevitarel riesgode incendio,descargaelectricao lesionesfisicasinnecesarias,todo elcableadoy la
conexionatierradebenrealizarseenconformidadcon elCodigo ElectricoNacional,ANSI/FNPA,Nro. 70,
la revisionma.sreciente,y loscOdigosy ordenanzaslocales.Es exchsiva responsabilidaddel propietario
delelectrodomesticoproveerlos servicioselectricosadecuados paraesteelectrodomestico.
/_ NUNCACONECTEELCABLEA TIERRAALAS TUBER[ASDEPLASTICO,LASTUBER[ASDEGASO
......._0, LASCANER[ASDEAGUACALIENTE.
Agua
Usaraguade malacalidad puede provocarquela va.lvulade suministrode agua nofuncionecorrectamente.
ParaIlenarcorrectamentela lavadoraenel tiempo adecuado,serequiereuna presiOnde aguade 20-116 psi
(137-800kPa).
UnapresiOnde aguainferiora20 psi puede ocasionarfallasen lava,lvulade agua,impedirque lava.lvulade
aguase cierrecompletamenteo prolongarel tiempo de Ilenadoma.salia.de Iopermitidopor los controlesde
la lavadoray que, comoresultado,la lavadoraseapague.Enlos controles,se estableceun I[mitedetiempo
paraevitarque se inundelacasa siuna manguerainternase afloja.
LasIlavesde aguadebenestar colocadasdentrode los4 pies(122cm) de distanciade la parte posteriorde
la lavadoraparalasmanguerasde entrada provistascon ella.
Lasmanguerasde entradaaccesoriasestb,n disponiblesenvarias longitudeshasta10 pies(305cm)
paraIlavesque seencuentrenalejadasde laparte posteriorde la lavadora.
Paraevitarlaposibilidadde quese produzcanda_os acausa delagua:
• LasIlavesde aguadeben serde fa,cilacceso.
• Cierrelas Ilavescuando nouse la lavadora.
VerifiqueperiOdicamenteque no hayaperdidasdeagua queprovengande los accesoriosde la
manguerade entradade agua.
/_ CONTROLEQUETODASLASCONEXIONESDELAVALVULAYDE LALLAVEDEAGUANO
.........._ PRESENTENPERDIDAS.
14 [nstalacOn de a avadora

Drenaje
Laalturarecomendada de latoma de aguaes de 18pulg. (46cm.). La manguerade drenajedebe
colocarse atraves delgancho paradicha mangueray dirigirsehacia latoma de agua. Latoma de agua
debe tener la suficienteIongitud como para aceptareldib.metroexteriorde la manguerade drenaje. La
manguerade drenajeviene conectada defb.brica.
Suelo
Paraun mejor desempeno, debe instalarla lavadorasobre un piso de construcciOnsolid& Posiblemente
los pisosde maderanecesitenreforzarsepara minimizarlavibraciOny/o los desequilibriosde lacarga. Las
superficiesalfombradas o con revestimientosintetico son factoresque contribuyena la vibracbn y pueden
provocar que la lavadorase muevalevementeduranteel ciclo de centrifugado.
Nunca instalela lavadorasobre una plataformao sobre una estructura con soportes poco resistentes.
Consideraciones acerca de la ubicaci6n
No instalelalavadoraen b.reasdonde el agua se congele, dado que lalavadorasiempre retendrb,algo de
agua en elb.reade lavb.lvulade agua, labombay lamanguera. Elagua congeladapuede ocasionardanos
a la bomba, lasmanguerasy demb.scomponentes.
Instalaci6n del electrodom_stico en un gabinete o en un hueco
DEJE UN ESPACIO LIBRE MiNIMO CUANDO INSTALE EL
ELECTRODOMESTICO EN UN GABINETE O EN UN HUECO:
Laterales: 1 pulg. / 25 mm Parte superior: 17 pulg. / 432 mm
Parte posterior: 5,9 pulg. / 150 mm Frente del gabinete: 2 pulg. / 51 mm
Si la lavadora y la secadora se instalan una junto a laotra, el frente del gabinete debe contar pot
Io menos con una abertura de aire sin obstrucciones de 72 pulg 2(465 cm2). La lavadora sola no
re( Jlere una abertura de aire espec(fica.
1 pulg.
(2,5ore)
•--_1P,_..-
1 pulg. -_t._e-- 27 pulg. _ _ 27 pulg.-_.,_- 1 pulg.
(2,5 cm) (68,6 cm) (68,6 cm) (2,5 cm)
A. Area empotrada
B. Vista lateral - gabinete o dtreaempotrada
_B
17 pulg.T
(43,2cm)_
2 pulg._l-,_-_32,3 pulg.m-)_kS,9 pul_
,, (5cm) (82cm) (15cm)
Instalaci6n bajo contador (s61o lavadora)
m
40 pulg. ' _'
(101,6cm)
_f
@
1 pulg.-4_l_-----27 pulg.------_-I÷ 1 pulg.
(2,5cm) (68,6cm) (2,5cm)
instalaciOn de la lavadora 15

/
Con pedestal opcional o kit de apilamiento
Dimensiones requeridas de la instalaci6n con pedestal
1_--5.9pulg.
(86,5cm) (15 cm)
Gabinete o puerta
3pulg.
........ _ ............ 53,3 pulg.
[135,5cm)
27p01g.---_--
(68,6 cm)
38,7 pulg.
(98,4cm)
-_1I_- 5pulg.
(12,7cm)
Dimensiones requeddas de la instalaci6n con kit de apilamiento
77,5pulg.
(196,8cm)
©
©
* Espacio necesado
** El cod© del drenaje extemo requiere
espacio adicional.
16 instalacon de a avadora

NOTA IMPORTANTE PARA EL INSTALADOR
Lea las siguientes instrucciones con detenimiento antes de instalar la lavadora.
Estas instrucciones se deben conservar para consultas futuras.
Le recomendamos que contrate a un profesional para que instale esta lavadora.
Diagrama de instalaci6n
Seleccionaruna_ Betirarlostomillosde _ Conectarelsuministrode
ubicacbn transporte(*s6!ode!tambor) aguayeldrenaje
T
Vuelvaa
controEar
antesde
cadapaso.
L
ii I i _
Ajustarlaspatas _ Surn!nistrarelectric!dadasu
niveladoras lavadora
i_Produce
Sulavad0ra
demasiadosruidoso
vibraciones? No
EJecucbndeunMod0de Finalizarla
calibraciOn(Remftaseala -_ instalacbn
siguientedescripcidn)
PASO 1
Retirar los tornillos de transporte
Antesde utilizarlalavadora,debequitartodoslostornillosdetransportedela parte
posteriorde launidad.
1. Aflojetodoslos tornilloscon laIlaveprovista.
2. Desliceeltornilloy elseparadorhaciaarribay retireeltornillocon laarandela
atravesdelorificiode la parteposteriordela lavadora.Repitaelprocesopara
cadatornillo.
3. Cubralosorificioscon lostaponesparalos orificiosdelostornillos(consultela
pagina13).
4. Conservelostornillosdetransportey lasarandelasen casedeque los
necesiteenelfuturo.
PASO 2
Seleccionar una ubicaci6n
_ Antes de instalar la lavadora, asegOrese de la ubicacion:
que
Tenga una superficie resistente y nivelada
Est_ alejada de la luz solar directa
Tenga una ventilaci0n adecuada
No se congele (temperaturas nunca inferiores a los 32 °F o 0 °C)
Est_ alejada de las fuentes de calor, tales como el aceite o el gas
Tenga suficiente espacio para el cable de alimentacion.
No tenga alfombras que obstruyan los orificios de ventilacion.
instalaciOn de a avadora 17

PASO 3
Instalaci6n de la lavadora
1. Siutilizaunatomadeagua,aseg@esedeque laconexion
entrelamanguerade drenajey latomadeaguaNOsea
hermetica.Latomadeaguadebeestaraunaalturade
18 pulg,o46 cmcome mhimo.
®
Siempresedebetenerlaprecauci6nde evitarplegar
oda_arla manguerade drenaje.Paraobtenermejores
resultados,lamanguerade drenajeno debepresentar
obstruccionesde ningunaindole:codos,acoplamientoso
longitudesexcesivas.Encasede queno sepuedacolocar
lamanguerade drenajeconvenientementea unaalturade
18pulg. o46 cm.,colOqueleunsoporte.
Silamanguerade drenajeesta instaladaperdebajode 18
pulg.(46cm),elaguapuedesalirduranteelciclode trabajo
acausadelfen6menodelsifony causaquelalavadora
tengael error"nF".
LamangueradedesagOesepuedeinstalarhastaunaalturam$ximade 96
pulg.(245cm).Perola capacidadde drenajese puedereducira esaaltura.
Estocausaraque la lavadoraadquieraoloresacausadelaguaretenidaen
elsistemade drenaje.
Conectelaguiadela mangueraaunas6 pulg.(15cm)delasalidade
lamanguerade desagOe.Si lamanguerade drenajequedaam_tsde
6pulg. (15cm)de lasalidade lamanguerade desagOe,los hongoso
microorganismospodrianextendersehaciael interiorde lalavadora,
2_
Parausarelaguacorrectamente,conectetantolavalvuladeaguaCALIENTE
comeladeaguaFRIA.Sialgunade eliaso ambasestandesconectadas,
apareceraelerror"nF"(nohaycarga).
3. Abrael suministrode agua "CALIENTE"y "FR[A"y controle la vb,lvulade
aguay lasconexionesa la Ilavede agua paraverificarsi hayperdidas.
Tambor de lavado Tomadeagua
No morethan Y _ _TI
Hose
Fria Caliente
Controlelamangueradeentradaparaasegurarsede quehayaunaarandeladentro
decada mangueradecarga,
d
Enrosquelasmanguerasde entradaalas conexionesdelas Ilavesde agua
OALIENTEy FRIA.
Enelotroextremode lamanguera,verifiquequehayauna arandeladegomaper
mangueray conectecadamangueradecargaalavalvuladeagua.AsegOresede
conectarlamangueraconlaleyendaimpresaque dice"HOT"(Caliente)alaIlavede
aguaCALIENTE.AjusteamanohastaquequedeceSido,y acontinuacionde dos
terciosdegiroconla pinza.
Leyenda
impresa"Fria"
18 instalacon de a avadora

4. Deslicela lavadorahasta dqarla ensu lugar,
5. Nivelela lavadoragirando manualmentelas patasniveladorashacia
adentro o hacia afuerasegun sea necesarioo paraellouse la Ilave
incluida con la lavadora,
Cuando la lavadoraeste nivelada,ajustelastuercasusando la Ilave
o un destornilladorde cabeza plana(-),
6. Enchufeelcable de alimentaciOna untomacorriente aprobado de
tres pines,correctamenteconectado atierra,de 120voltiosy 60
Hz, protegidopot unfusible o un disyuntorde 15A,
Lalavadoraestb.conectada atierra a travesdel tercer pin delcable
de alimentaciOncuando seIoenchufaa un tomacorrientede tres
pines con conexiOna tierra.
Las cuatrocarasde lalavadoradeben quedar niveladas,Se
debe usarun niveladorde carpinteroen las cuatro esquinasde la
lavadora,Recomendamos volvera verificar lalavadoradespues
de aproximadamentedoce lavadospara asegurarsede que sigue
nivelada.
_ Eviteel dano de las patas, No mueva la
lavadoraamenos que lastuercas de bloqueo
seencuentren sujetasa la parte inferiorde la
misma.
_ rueba de funcionanniento
Verifique que la instalaciOn de la lavadora es correcta al ejecutar el ciclo
Enjuague+Centrifugado despu_s de finalizar la instalacion.
PASO 4
Modo de calibraci6n
Su lavadora Samsung detecta autom&.ticamente el peso de la ropa.
Para una deteccion ma.sprecisa del peso, realice el Modo de calibracion despu_s de la
instalacion.
Para ejecutar el Modo de calibracion, siga estos pasos:
1. Encienda la lavadora.
2o Presione al mismo tiempo los botones Temp. (Ternperatura} y Delay Start (Inicio
retardado} al menos durante 3 segundos.
3. Retire todo el contenido del tambor y cierre la puerta.
4. Presione el boton Start/Pause (Inicio/Pausa).
5. El tambor gira hacia la derecha y hacia la izquierda durante unos 3 minutos.
6. Una vez finalizado el Modo de calibracion en la pantalla se muestra el mensaje "En/End" y la
lavadora se apaga autom&.ticamente. La lavadora est&.preparada para set utilizada.
instalaciOn de a avadora 19

Z_ Para reducir el riesgo de incendio, descarga el_ctrica o lesiones personales, lea las INSTRUCCIONES
..........DE SEGURIDAD IMPORTANTES antes de poner en funcionamiento el aparato.
COMO CARGAR LA LAVADORA
* Puedecargarel tambor con ropa seca,sin doblar,pero NO LOSOBRECARGUE.No mb.sde 3/4 Ileno.
Lasobrecarga puedereducir la eficaciadel lavado,causar desgasteadicionaly posiblementecausar pliegueso
arrugas en las prendas.
Laveprendas delicadas,tales como los brassieres,los calcetinesy demb.slencerfa,en elciclo Delicates(Ropa
delicada)con prendas livianassimilares.
Cuando laveartfculosvoluminosos o algunos artfculosmb.spequenos, no cargueeltambor completamente;
coloque, pot ejemplo, untapete, unaalmohada, munecosde peluche, o unoo dos sueteres,agregue algunas
toallas paraque el lavadoy elcentrifugado resultenmb.seficaces.
_ uranteelciclo de centrifugado,la lavadorapuede agregaragua adicionalpara redistribuirlas prendasy corregir
el desequilibriodentro deltambor.
Paragarantizarun lavadode Optimacalidad cuando laveropa muy sucia,no sobrecargue lalavadora.
Cuando la luz"Garment+_'_+"(Mb.sprendas)estb.ENCENDIDA(consultela pb.gina24), puede agregaro retirar
prendas.
1. Presioneel bot6n Start/Pause (Inicio/Pausa).
2. Esperehastaque la luz de latraba de la puertase apague(5 segundos).
3. Agregue la prenda, cierre la puertay presioneel bot6n Start/Pause (Inicio/Pausa}.
Despuesde una pausade 10 segundos, sereanudarb,el ciclo.
Paragarantizarun lavadoafondo, agreguela prenda dentrode los cinco minutos posterioresalcomienzo del
ciclo de lavado.
LAVADO DE LA ROPA: INSTRUCCIONES B.4,SiCAS
1. Presioneel botOnPower (Encender/Apagar), abra la puertay cargue lalavadora.
2. Cierrela puerta.
//_ Introduzcala completamenteen el tambor evitar ningunaprenda quedeatrapadaen lapuerta o se
ropa para que
........0Ndesprendadel tambor.
3. Viertadetergente y aditivosen el dosificador (consultelas pb.ginas28~29).
4. Seleccioneel ciclo apropiadoy lasopciones para lacarga (consultelas pb.ginas21-23 y 26).
5. Presioneel botOnStart/Pause {Inicio/Pausa).
EItambor gira automb.ticamentey calcula el pesode lacarga sin agregaragua parapoder ajustarel tiempo de
lavado.(Elindicadorgiratoriode la pantallaindicaque se estb.calculando el pesode la carga.)
o
o
o
o
o
No
ADVERTE_¢_
6. Se iluminarb,la luz delindicadorWash (Lavado).
7. Eltiempo del ciclo calculadoaparecerb,en la pantalla.
Esposible queel tiempo fluct0e paraindicar mejoreltiempo restanteenelciclo.
EItiempo real requeridopara unciclo puede diferirdel estimadoen la pantalladependiendo de lapresiOny la
temperaturadel agua, el detergentey la ropa.
8. Antesde que la lavadoracomience aIlenarse,se escucharb,unaseriede sonidos semejantesaun "clic" para
controlar la traba de la puertay quese efect0eun drenajerb.pido.
Cuando hayafinalizadoel ciclo, la luz de la Trabade la puerta seapagarb,y la palabra"End" (Fin)aparecerb,en
la pantalla.
NOintente abrirla puerta hastaque la luzde latraba de la puertase hayaapagado. Paraagregarunaprenda
olvidada, consultela secciOn"COmocargar la lavadora".
Cuando lalavadorareiniciael funcionamientodespues de unapausa,deberb,esperarhasta15 segundos
antesde que el ciclo contin0e.
Si presionaPower (Encender/Apagar), secancelarb,el ciclo y la lavadorasedetendrb..
Laslucesdel indicador PreWash(Prelavado),Wash (Lavado),Rinse (Enjuague)y Spin (Oentrifugado)se
iluminarb.ndurante dichas fases delciclo.
coloque ningunobjeto en la parte superior de lalavadoracuando estb.enfuncionamiento.
20 manual de nstruccones

DESCRIPCi0N GENERAL DEL PANEL DE CONTROL
iiiiiiiiiiiiiiiiiiiiiiiiiiiiiiiiiiiiiiiiiiiiiiiiiiiiiiiiiiiiiiiiiiiiiiiiiiiiiiiiiiiiiiiiiiiiiiiiiiiiiiiiiiiiiiiiiiiiiiiiiiiiiiiiiiiiiiiiiiiiiiiiiiiiiiiiiiiiiiiiiiiiiiiiiiiiiiiiiiiiiiiiiiiiiiiiiiiiiiiiiiiiiiiiiiiiiiiiiiiiiiiiiiiiiiiiiiiiiiiiiiiiiiiiiiiiiiiiiiiiiiii7iiiiiiiiiiiiiiiiiii
............................................................................................................................................i?!i
________________________________________________________________________________________________________________________________________________________________________________________________________________________________________________________________________________________________i
Power
--i
Start/Pause
Normal .....................................................\ Eco Cold [ Perrn Press
Heavy Active Wear
geddm H
Sanitize- ((_!_ ( _ ,\(-_/ _W°°' --, .o_....... _:] .bE".......... ] ._.... _' _.......
Stain Away t'_'_ k J L)/ quickWash : ....... ........ • ........ _W .....
Deep Steam Rinse+Spin [ ] (aid [ ] NoSpln {) Li#ht ] Off
[] Steam Cycles _ _ _ _ _
@ @@@ ® ® © ®@
P
.....
Nor.a,-,,coCold,......................................,erm,....
Reddhlg PLUSHeavy Duty __ Active//_ _,_ Wear :
I/_/--- _(_ _ HDaea_IC_ae_h J StartJP ....
,°°.. /o/_ w0o, , .........,,.............. ......
Stare Away
Warn" ) Medkm f Normal {[) Softer
\_s)__\_ _7/C_/ Rinse+Spin ' ......... ' w. 71:. ]"
Deep St
; cone ,_ NoSpin • [bh_ • of
Seleccioneel cicloapropiadoparael tipodecarga.
Estodeterminaraelpatrondegiroy lavelocidaddecentrifugadodelciclo.
Paraminimizarlaformacionde arrugasdela ropa,seleccioneelcicloPermPress
(Planchadopermanente).
Eco Cold(Lavadoecol6gicofdo): ProporcionauncuidadodiarioOtily suavealas prendas
ligeraomedianamentesuciasOnicamentemedianteaguafria,Ioqueahorraenergia.
Estecicloproduceunalimpiezatanefectivacomoenellavadoconaguacalienteenelciclo
Normal*(Normal)convencionalcon lasopcionesdenivelNormaly LightSoil(Ligeramente
sucia).(LacalidaddelalimpiezadelcicloEcoCold(Lavadoecologicofrio)puedenoserigual
queladelcicloNormalconvencionalconelcicloHeavysoil(Muysucia).Paraobtenerlos
mejoresresultados,serecomiendaunacargade8librasomenores.
* CicloNormalconvencional:Ciclonormaldelaslavadorasdeoargafrontalanterioresyexistentes
fabricadashasta2009sinPowerFoam.
Normal: Paralamayorpartedetelas,inchidoalgodon,linoy prendasmoderadamente
sucias.
HeavyDuty(Potenciaextra):Paratelasresistentesque nodesti_eny prendasmuysucias.
Bedding PLUS(Ropadecama PLUS):Paraprendasvohminosas,talescomolasfrazadas,
los edredonesy lassabanas.Ouandolaveprendasvoluminosas,utilicedetergenteliquido.
Sanitize(DesinfecciOn):Paraprendasmuysuciasy quenodesti_en.Esteciclocalientael
aguaa 65,56°O(65°0)paraeliminarlas bacterias.
SiseleccionapausadurantelafasedecalentamientodelcicloEsterilizar,lapuertade la
lavadorapermanecer_ttrabadaporsu seguridad.
StainAway (EliminaciOnde manchas):Paraprendasmanchadas.ElcicloStainAway
(Eliminacionde manchas)poseeunrendimientoexcepcionaldeeliminaciondemanchas,que
proporcionaelmayorcuidadoespecialy evitalanecesidadderealizartratamientoprevioa
lasmanchas.Paraun mejorrendimientode laeliminacionde lasmanchas,enesteciclose
recomiendautilizarla opciondetemperaturacaliente,enlaquese aumentalatemperatura
de lavadoalusarelcalentadorinternopararealizarunalimpiezacompletadeunaamplia
variedaddemanchas.
Deep Steam(VaporizaciOnprofunda):Paraprendasmuysuciasy quenodestiflen,este
cicloofreceunaaltatemperaturade lavadoy vapory resultaeficazparaeliminarmanchas.
lavado de una carga de ropa _21

iiiiiiiiiiiiiiiiiiiiiiiiiiiiiiiiiiiiiiiiiiiiiiiiiiiiiiiiiiiiiiiiiiiiiiiiiiiiiiiiiiiiiiiiiiiiiiiiiiiiiiiiiiiiiiiiiiiiiiiiiiiiiiiiiiiiiiiiiiiiiii
iiiiiiiiiiiiiiiiiiiiiiiiiiiiiiiiiiiiiiiiiiiiiiiiiiiiiiiiiiiiiiiiiiiiiiiiiiiiiiiiiiiiiiiiiiiiiiiiiiiiiiiiiiiiiiiiiiiiiiiiiiiiiiiiiiiiiiiiiiiiiii
iiiiiiiiiiiiiiiiiiiiiiiiiiiiiiiiiiiiiiiiiiiiiiiiiiiiiiiiiiiiiiiiiiiiiiiiiiiiiiiiiiiiiiiiiiiiiiiiiiiiiiiiiiiiiiiiiiiiiiiiiiiiiiiiiiiiiiiiiiiiiii
iiiiiiiiiiiiiiiiiiiiiiiiiiiiiiiiiiiiiiiiiiiiiiiiiiiiiiiiiiiiiiiiiiiiiiiiiiiiiiiiiiiiiiiiiiiiiiiiiiiiiiiiiiiiiiiiiiiiiiiiiiiiiiiiiiiiiiiiiiiiiii
iiiiiiiiiiiiiiiiiiiiiiiiiiiiiiiiiiiiiiiiiiiiiiiiiiiiiiiiiiiiiiiiiiiiiiiiiiiiiiiiiiiiiiiiiiiiiiiiiiiiiiiiiiiiiiiiiiiiiiiiiiiiiiiiiiiiiiiiiiiiiii
iiiiiiiiiiiiiiiiiiiiiiiiiiiiiiiiiiiiiiiiiiiiiiiiiiiiiiiiiiiiiiiiiiiiiiiiiiiiiiiiiiiiiiiiiiiiiiiiiiiiiiiiiiiiiiiiiiiiiiiiiiiiiiiiiiiiiiiiiiiiiii
iiiiiiiiiiiiiiiiiiiiiiiiiiiiiiiiiiiiiiiiiiiiiiiiiiiiiiiiiiiiiiiiiiiiiiiiiiiiiiiiiiiiiiiiiiiiiiiiiiiiiiiiiiiiiiiiiiiiiiiiiiiiiiiiiiiiiiiiiiiiiii
iiiiiiiiiiiiiiiiiiiiiiiiiiiiiiiiiiiiiiiiiiiiiiiiiiiiiiiiiiiiiiiiiiiiiiiiiiiiiiiiiiiiiiiiiiiiiiiiiiiiiiiiiiiiiiiiiiiiiiiiiiiiiiiiiiiiiiiiiiiiiii
i i!
' ilii
i
!!
iiiiiiiiiiiiiiiiiiiiiiiiiiiiiiiiiiiiiiiiiiiiiiiiiiiiiiiiiiiiiiiiiiiiiiiiiiiiiiiiiiiiiiiiiiiiiiiiiiiiiiiiiiiiiiiiiiiiiiiiiiiiiiiiiiiiiiiiiiiiiii
iiiiiiiiiiiiiiiiiiiiiiiiiiiiiiiiiiiiiiiiiiiiiiiiiiiiiiiiiiiiiiiiiiiiiiiiiiiiiiiiiiiiiiiiiiiiiiiiiiiiiiiiiiiiiiiiiiiiiiiiiiiiiiiiiiiiiiiiiiiiiii
iiiiiiiiiiiiiiiiiiiiiiiiiiiiiiiiiiiiiiiiiiiiiiiiiiiiiiiiiiiiiiiiiiiiiiiiiiiiiiiiiiiiiiiiiiiiiiiiiiiiiiiiiiiiiiiiiiiiiiiiiiiiiiiiiiiiiiiiiiiiiii
iiiiiiiiiiiiiiiiiiiiiiiiiiiiiiiiiiiiiiiiiiiiiiiiiiiiiiiiiiiiiiiiiiiiiiiiiiiiiiiiiiiiiiiiiiiiiiiiiiiiiiiiiiiiiiiiiiiiiiiiiiiiiiiiiiiiiiiiiiiiiii
iiiiiiiiiiiiiiiiiiiiiiiiiiiiiiiiiiiiiiiiiiiiiiiiiiiiiiiiiiiiiiiiiiiiiiiiiiiiiiiiiiiiiiiiiiiiiiiiiiiiiiiiiiiiiiiiiiiiiiiiiiiiiiiiiiiiiiiiiiiiiii
PermPress(Planchapermanente):Paratelassinteticasquenonecesitanplanchadoy
prendasligeramenteamoderadamentesucias.
Active Wear(Ropadeportiva):Useestecicloparalavarropadeportiva,talcomebuzos
deportivos,pantalonesdeportivos,camisetasuotrasprendasdeentrenamiento.Esteciclo
proporcionalaeliminaciondesuciedadefectivaalrealizarel lavadoconsuavidadpara
prendasque requierenuncuidadoespecial.
Delicates/HandWash(Ropadelicada/Lavadoa mano):Paratelasfinas,brassieres,
lenceriade seday otrastelasparaserlavadasa mane0nicamente.Paraobtenermejores
resultados,usedetergenteliquido.
Wool (Lana):Paralanaquesepuedalavarenlavadora.Lascargasdebentenerunpeso
inferioralas 8 Ib.Paraobtenerlosmejoresresultadosserecomiendancargasde4,4Ibo
menos.
ElcicloWool(Lana)lavalaropamoviendoeltamborhorizontalmenteparamantenerlas
caracteristicasdelasfibrasde lanay noda_arlaropa.SedetienedurantealgL_lntiempo
parapermitirque laropaseremoje.Estapausaenelciclodelanaesnormal.
Seaconsejautilizardetergenteneutroparanoda_arlaropay mejorarel lavado.
QuickWash(LavadoR#.pido):Paraprendasligeramentesuciasquesenecesitancon
urgencia.
Rinse+ Spin(Enjuagado+Centrifugado):Useloparacargasquenecesitan0nicamente
enjuagueo paraagregara lacargasuavizantedetelasque sea_adeduranteelenjuague.
Laampliapantalladigitales f#tcilde usar.Ofreceinstruccionesy diagnosticosy Iomantiene
informadosobreelestadodelcicloy eltiemporestante.
Presioneestosbotchesparaseleccionardiferentesopcionesdelciclo.
PureCycleTM:Useloparalimpiarsuciedady bacteriasdeltambor.Serecomiendaeluso
regular(despuesde40 lavados).Noesnecesariodetergenteni lejia(consultela pagina33).
Steam(Vapor):Presioneestebotonparausarlafuncionde limpiezaalvapor.Ellavadocon
vaporseencuentradisponibleparalosciclosNormal,HeavyDuty(Potenciaextra),Bedding
PLUS(Ropade camaPLUS),Sanitize(Desinfeccion),StainAway(Eliminacionde manchas)y
DeepSteam(Vaporizacionprofunda).Paraprendasmuysuciasy queno desti_en,ellavado
alvapormejoralostratamientosparaeliminarmanchasy empleamenosaguaencadaciclo
(consultelapagina26).
Puedesucederque elvaporno seavisibleduranteelcicloSteam(Vapor).Adem#ts,no
siempreseravisiblemientrasseIlevaa caboelciclodevaporcompleto.
DelayStart (Inicioretardado):Cualquierciclopuederetardarsehasta24horasen
incrementosde unahera.Laheraenpantallaindicaeltiempoenel cualcomenzaraellavado.
(Consultelap_tgina24).
PreWash(Prelavado):Parausarestafuncion,coloquedetergenteenelcompartimiento
paraeldetergentedelaseccionde prelavado.Unavezqueseenciende,lalavadorase
Ilenadeaguafriay detergente,rota,luegodrenay avanzaalciclode lavadoseleccionado.
Algunosciclosno puedenserseleccionadosconestaopcion(Consultelaspaginas28y 29).
Nopodraseleccionarlaopciondeprelavadoen losciclosWool(Lana),QuickWash
(Lavador_tpido),Delicates/Handwash(RopadelicaddLavadoa mane)y Rinse+Spin
(Enjuagado+Oentrifugado).
ExtraRinse(Enjuagueextra):Agregueunenjuagueadicionalalfinaldelciclopararemover
losaditivosy perfumesdellavadoconmayoreficacia.
ExtraSpin(Centrifugadoextra):Agreguetiempoadicionalparaextraerm#tsaguadelas
cargas.
MyCycle (MiCiclo): Elijasuciclofavorito,incluyendotemperatura,centrifugado,nivelde
suciedad,opciones,etc.(consultelapagina25)
Presioneestebotonrepetidamentepararotarentrelasdistintasopcionesdisponiblesde
temperaturadelagua.
ExtraHot(Muycaliente):Prendasmuysuciasquenodesti_en.
Hot(Caliente):Ropablancay prendasmuysuciasque nodesti_en.
Warm(Tibia): Prendasquenodesti_en.Ouandoseseleccionaenjuagaratemperatura
calida,s01oelenjuaguedelfinaltendr_ttemperaturac_tlida.
Losdem#tsenjuaguesse efectuar_tnconaguafriaparapreservarlaenergia.
EcoWarm (LavadoecolOgicoc_.lido):Prendasmoderadamentesucias,quenodesti_en;la
mayoriade lasprendassinarrugas.
Cold(Fria):Prendasdecoloresvivos,ligeramentesucias.
22 avado de una carga de ropa

Presioneestebot6nrepetidamentepararotarentrelasdistintasopcionesdevelocidadde
centrifugado.
ExtraHigh(Muyalto): Extraema.saguade lascargasduranteelcentrifugado.
Paraminimizarlaformaci6nde arrugasdelastelassinarrugasy quenonecesitan
planchado,NOuselaopci6ndecentrifugadoMuyaltaparadichascargasy tampoco
sobrecarguelalavadora.
High(Alto):Useparalaropainterior,lascamisetas,losjeansy losalgodonesresistentes.
Medium(Mediano):Useparalosjeans,lasprendassinarrugasoquenonecesitan
planchadoy lastelassinteticas.
Low (Bajo):Useparaprendasdelicadasquenecesitancentrifugadoavelocidadlenta.
No Spin (Sincentrifugado):Drenala lavadorasin centrifugar.Useparaprendas
extremadamentedelicadasque nopuedantolerarelcentrifugado.
Presioneelbot6nparaseleccionarelniveldesuciedady eltiempodelavado.Light
(Ligeramentesucia)---)_' ---)Normal---)A,---)Heavy(Muysucia))
Heavy(Muysucia):Paraprendasmuysucias.
A
Normal: Paraprendasmoderadamentesucias.Estaopci6nes lamejorparala mayoriade
lascargas.
Y
Light (Ligeramentesucia):Paraprendasligeramentesucias.
Presioneestebot6nparaseleccionarelnivelde lase_al.
(Off(Apagar)--) • --)Softer(Bajo)--)A --)Louder(Alto))
Presi6neloparadetenery reiniciarlosprogramas.
Presioneunavezparaencenderlalavadoray presi6nelonuevamenteparaapagarla.Si la
lavadorapermaneceencendidadurantemasde10 minutessinquesetoqueningunode los
botones,se apagara,automa.ticamente.
Sequro para ni_os @
Lafunci6nSeguroparanihosevitaque losnihosjueguenconla lavadora.
Unavez activadalafunci6ndelSeguroparanihos,elpaneldecontrolnosepuedeactivar,asiseevitaquelos
nihosjueguenconla lavadora.
Activaci6n de la funci6n Seguro para nifios
Mantengapresionadossimulta.neamentelosbotonesSoil Level(Nivel de Sueio}y Signal (SePal)durante
aproximadamente3segundos.
• Cuandoseactivalafunci6nSeguroparani_os,lapuertase bloqueayse enciendelala.mpara"ChildLock
(Seguroparanihos)I_".
Si sepresionaelbot6n Start/Pause (Inlclo/Pausa} despuesde activarlafunci6nde Seguroparani_os,no
funcionaning0nbot6n,exceptoPower (Eneender/Apagar).
Si sepresionaunbotoncuando losbotonesestanbloqueados,la la.mparade "ChildLock(Seguropara
niflos)I_" parpadea.
Pausa en la funci6n Seguro para nifios
Cuandolapuertaesta.bloqueadao losbotonesesta.nbloqueadospor lafunci6nSeguroparaniflos,puedehacer
unapausaenlafunci6nde seguroparaniflosdurante1minuteal mantenerpresionadossimulta.neamentelos
botonesSoil Level(Nlvelde Sueio)y Signal (SePal)duranteaproximadamente3 segundos.
Si poneenpausael mododeSeguroparaniflos,elbloqueode lapuertase liberadurante1minutopara
comodidaddelusuario.Duranteestetiempo,lala.mparade "ChildLock(Seguroparaniflos)@"parpadea.
Si seabre lapuertatranscurridoelminute,suenaunaalarmadurante2 minutos.
Si secierralapuertaantesdetranscurrirlos2 minutes,estasebloqueay lafunci6nSeguroparaniflosse
reactiva.Sisecierrala puertadespuesde transcurrirlos2 minutos,estano sebloqueaautoma.ticamentey la
alarmanosuena.
lavado de una carga de ropa 23

Desactivaci6n de la funci6n Seguro para ni_os
Mantengapresionadossimultb.neamentelos botones Signal (SeOal)y SoilLevel (Nivel suciedad)
duranteaproximadamente6 segundos.
• Si sedesactiva lafunciOnSeguropara ninos, la puerta sedesbloqueay laIb.mparade "Child Lock
(Seguropara nines)I_" seapaga.
• LafunciOnSeguro para ninesimpide que los ninoso las personasdiscapacitadas pongan en
........... funcionamiento lalavadoraaccidentalmentey se lesionen.
Si un nino entraa la lavadora,puedequedar atrapadoy asfixiarse.
Unavezactivada lafunciOnSeguro paraninos, esta contin0a funcionando aunquela lavadoraeste
apagada.
Abrir lapuertaper la fuerza puede danar el producto y causar lesionespersonales.
Paraagregarropa cuando lafunciOnSeguro para ninosestb.activada, primerose debe poneren
........o,pausao desactivardicha funciOn.
Sidesea abrir la de lalavadoracuando lafunciOn ninos estb.activada:
puerta Seguropara
Pongaen pausa o desactivela funciOnSeguro para ninos.
Apaguela lavadoray enciendalade nuevo.
$61o centrifugado
Si presiona el boton Power (Encendido) y luego mantiene presionado el boton
Spin (Centrifugado) durante 2 segundos, se indica el tiempo de centrifugado en la pantalla.
Luego vuelva a presionar el boton Spin (Centrifugado} hasta que se seleccione el nivel de
centrifugado requerido y presione el boton Start/Pause (Inieio/Pausa}.
Antes de pulsar el boton Spin Only (S01ocentrifugado) para utilizar esta funcion, puede
seleccionar un ciclo con el Selector de ciclos. Si ya ha seleccionado un ciclo, sOlo puede
seleccionar el nivel de centrifugado correspondiente al ciclo seleccionado.
Garment+ (M_s prendas) _+
Puede retirar o agregar prendas para lavar incluso una vez que haya comenzado el lavado,
siempre y cuando est_ encendida la luz de "Garment+ (M_.s prendas) _++".AI presionar el
boton Start/Pause (Inicio/Pausa} se destraba la puerta, salvo que el agua est_ demasiado
caliente o que no haya mucha agua en la lavadora. Si puede destrabar la puerta y desea
continuar el ciclo de lavado, cierre la puerta y presione el boton Start/Pause (Inicio/Pausa}.
Delay Start (Inicio retardado)
Puedehacer que la lavadorainicie automb.ticamenteel lavadoen otto momento, eligiendoun tiempo de
retardomb.ximoLa heraen pantallaindica eltiempo en el cualcomenzarb,el lavado.
1. Establezcasuprograma de lavado.
2. Presionerepetidamenteel botOnDelay Start (Inieio retardade} hastaestablecereltiempo de retardo.
3. Presioneel botOnStart/Pause (Inieie/Pausa}. Elindicadorde "Delay Start (Inicio retardado) @" se
encenderb,y el relojcomenzarb,la cuenta regresivahasta Ilegaral memento establecido.
4. Paracancelar lafunciOnde DelayStart (Inicioretardado),presioneel botOnPower (Eneender/
Apagar}y luegoenciendala lavadoranuevamente.
24 avado de una carga de ropa

My Cycle (Mi ciclo)
Lepermiteactivarel lavadoa su medida (temperatura,centrifugado,nivelde suciedad, etc.)con la
practicidad de presionarun sOlobotOn.AIpresionarel botOnMy Cycle (Mi ciclo), activa lasopciones
usadas duranteelmodo My Cycle (Mi ciclo). La luz de "My Cycle (Mi ciclo)" indicarb,queestb.activo.
Puedeseleccionartodas las opciones en elmodo "My Cycle (Mi ciclo)" de lasiguiente manera:
1. Presioneel bot6n My Cycle (Mi ciclo) en elpanelde control•
2. Seleccione elciclo utilizandoel disco Selector de ciclos.
3. Despuesde seleccionarel ciclo, elija una opciOn.
Consulte pb.gina paraconocer configuraciones opciones disponibles para
la 39 las de las cadaciclo.
4. Inicie"My Cycle (Miciclo)" presionandoel botonStart/Pause (inicio/Pausa} enel modo"My Cycle(Mi
cicio)". Elcicloy lasopcionesqueustedseleccioneaparecer_tnlaproximavezqueseleccione"My Cycle (Mi
ciclo)".
Puede modificarlas configuracionesde "My Cycle (Mi ciclo)" repitiendoel procesoanterior.
Aparecerb.la ultimaconfiguraci6nutilizadalapr6xima vezque seleccione"My Cycle (Mi ciclo)".
Paraprogramar lasconfiguracionesde "My Cycle (Miciclo)"en la lavadora,esnecesarioque esta
completetodo el ciclo de lavado.Si pot alguna razOn,elciclo de lavadose interrumpey la lavadora
no terminael ciclo, lasconfiguraciones no seprogramarb.nparaset utilizadasen otto momento.
Smart Care
Esta funci6n permite comprobar el estado de la lavadora con
un tel_fono inteligente.
1. Mantengapresionadoel bot6n Smart Care durante 3 segundos
para usar lafunciOnSmart Carecuando se produce un erroro si
no presionaningunbot6n cuando la alimentaci6nestb.encendida ......... .......... .........
• ............
2.
* Elhistorialde losc6digos de errorse borra luegode usarla
funciOn.
Si activa lafunciOnSmart Care, la LEDde la pantallagiradurante
2 o 3 segundosy elindicador SmartCare seenciende en la
pantalla.
Ejecutela aplicaciOnSmartCare en suteldono inteligente.
............................ ilii!
3.
* Lafunci6n Smart Careestb.optimizadacon GalaxyS, Galaxy$2, iPhone4 eiPhone 4S.
4. Enfoquela cb.maradelteldono inteligenteal panelde la pantallade lalavadora.
5. Si enfoca la cb.maradel teBfono inteligenteal panelde la pantallade lalavadora,elpanely el mensaje
de errorse reconocenautomb.ticamentey eltipo de errory la soluciOnse muestranen el teldono
inteligente.
6. Si eltelefonointeligenteno reconoceelc6digo de error mb.sde dos veces, ingreseen forma manualel
cOdigode error indicado en el panelde la pantallade la lavadoraen la aplicaciOnSmartCare.
Descarga de la aplicacion Smart Care
,, Descargue la Samsung Laundry App en su tel_fono celular
desde Android Market o Apple App store. (Buscar palabra:
Samsung Smart Washer/Dryer}
Precauciones de de Smart Care
uso
o Si la luz de un fluorescente o una Ib.mparase refleja en el
panel de la pantalla de la lavadora, es posible que el telefono
inteligente no reconozca fb.cilmente el panel o el mensaje de
error.
,, Si sostiene el telefono inteligente en un a.ngulo demasiado
abierto respecto al frontal del panel de la pantalla, es posible
que no se reconozca el c0digo de error. Para obtener los
mejores resultados, sostenga el telefono inteligente en una
posiciOn paralela o casi paralela respecto al frontal del panel.
lavado dn _na cnrr_a dn rona 2B

DEEP STEAM(VAPOR PROFUNDO)
VAPOR PROFUNDO (Vapor Ma.gico)
La funcion Vapor Profundo aumenta el rendimiento de limpieza y afloja la mugre y la suciedad,
proporcionando mejores resultados de limpieza.
Este ciclo ofrece una alta temperatura de lavado y el vapor es eficaz para limpiar las manchas de
prendas muy sucias y para piezas que no se decoloran.
El funcionamiento del Vapor Profundo
Si selecciona Vapor, el vapor saldra, para la cantidad detectada de lavandeffa durante los
momentos mas eficaces maximizando as( el efecto del vapor, aumentando la temperatura de
lavado, mejorando el efecto de Remojo y mejorando tambi_n el rendimiento del lavado. Pulse
el boton de Vapor para usar lafuncion de Lavado de Vapor. El Lavado de Vapor puede estar
en los ciclos de Normal (Normal), Heavy Duty (Carga Pesada), Bedding PLUS (Ropa de Cama),
Sanitize (Desinfectar), Stain Away (Quitar Manchas) y Deep Steam(Vapor Profundo). Para
prendas muy sucias y no que no se decoloran, el Lavado con Vapor mejora el tratamiento de las
manchas y usa menos agua.
La lavadora toma pequenas cantidades de agua en su tina y el calentador calienta elagua hasta
la evaporacion.
(_ ara utilizar la funcion vapor, Ileve a cabo los siguientes pasos '
1. Cargue la lavadora.
2. Pulse el boton de Power(Encender/Apagar).
3. Gire el [Selector de Ciclos] y seleccione un Ciclo de vapor. (La seleccion de Vapor
Profundo automa.ticamente selecciona el Vapor.)
4. Pulse el boton de Vapor.
5. Agregue el detergente al dosificador y vierta el suavizante de telas hasta la I(nea
marcada.
6. Pulse el boton de Inicio/Pausa.
:AI detectar el peso de la carga, la lavadora selecciona las condiciones de lavado
optimas automaticamente.
_ mportante: Elvapor de agua puede no ser visible durante el ciclo de Vapor, y puede no
ser visible durante todo el ciclo de vapor.
Esto es normal.
//_* Demasiado vapor puede danar la ropa. No use vapor en telas delicadas como la lana,
.......0, seda o telas que se decoloran fa.cilmente.
* El vapor puede no estar presente durante todo el ciclo de lavado con vapor.
,, No toque la puerta. La superficie de la puerta se puede calentar demasiado.
Lavado de prendas con el selector de ciclos
Su nueva lavadora facilita el lavado de las prendas gracias al sistema de control automatico
"Fuzzy Control" de Samsung. Cuando seleccione un programa de lavado, la lavadora elegir_t la
temperatura correcta, el tiempo de lavado y la velocidad de lavado.
1. Abra la Ilave de agua del fregadero.
2. Presione el boton Power (Encender/Apagar).
3. Abra la puerta.
4. Coloque las prendas una a una bien extendidas en el tambor, sin Ilenarlo demasiado.
5. Cierre lapuerta.
6. Agregue el detergente, el suavizante y el detergente para prelavado (sies necesario) en el
compartimiento adecuado.
El prelavado solo esta.disponible cuando se seleccionan los ciclos Eco Cold (Lavado
ecol0gico fifo), Normal, Heavy Duty (Potencia extra), Perm Press (Plancha permanente), Stain
Away(Eliminacion de manchas), Sanitize (Desinfeccion), Deep Steam (Vaporizacion profunda),
Active Wear (Ropa deportiva) y Bedding PLUS (Ropa de cama PLUS). S01oes necesario si la
ropa estermuy sucia.
26 avado de una carga de ropa

7. Utilice el selector de ciclos para seleccionar el ciclo adecuado para cada tipo de material:
Normal, Heavy Duty (Potencia extra), Perm Press (Plancha permanente), Sanitize
(DesinfecciOn), Bedding PLUS (Ropa de cama PLUS), Deep Steam (VaporizaciOn profunda),
Stain Away (Eliminacion de manchas), Active Wear (Ropa deportiva), Delicates/Hand
Wash (Ropa delicada/Lavado a mano), Wool (Lana), Quick Wash (Lavado r&.pido),Rinse
+ Spin (Enjuagado + Centrifugado) y Eco Cold (Lavado ecologico fifo). Se encendera.n los
indicadores correspondientes en el panel de control.
8. En ese momento, puede controlar la temperatura del lavado, la cantidad de oicIos de
enjuague, la velocidad de centrifugado y el tiempo de retardo presionando el boton de la
opciOn adecuada.
9. Presione el botOn Start/Pause (Inicio/Pausa} en el selector de ciclos y se iniciar&,el lavado.
El indicador de funcionamiento se iluminar&,y aparecer&, en la pantalla el tiempo restante del
ciclo de lavado.
Opci6n de pausa
1. Cuando la luz "Garment+ (Mb.sprendas) _-_+"esta.ENCENDIDA, puede agregar o retirar
prendas.
2. Presione el boton Start/Pause (Inicio/Pausa} para destrabar la puerta.
La puerta no se puede abrir cuando el agua est&.demasiado CALIENTE o cuando el nivel
del agua est&.demasiado ALTO.
3. Despu_s de cerrar la puerta, presione el boton Start/Pause (Inicio/Pausa} para reiniciar el
lavado.
USO DEL LAVADO A VAPOR
Si selecciona el lavado a vapor, el vapor actOa en el momento m&.sefectivo para la cantidad de ropa
detectada y ad maximiza el efecto del vapor al aumentar la temperatura de lavado, mejora el efecto remojo
y mejora el desempeSo del lavado.
1. Cargue la lavadora.
2. Presione el boton Power (Encender/Apagar}.
3. Active el Selector de ciclos y seleccione un Ciclo de vapor. (El programa Deep Steam (VaporizaciOn
profunda) selecciona automa.ticamente la funcion Steam (VapoO).
4. Presione el botOn Steam (Vapor).
5. Vierta detergente en la bandeja del dosificador y suavizante de telas hasta la I(nea marcada.
6. Presione el boton Start/Pause (Inicio/Pausa}
La lavadora selecciona autom&.ticamente las condiciones de lavado optimas al detectar el peso de la
ropa.
EIvapor puede no ser necesariamente visible durante los ciclos de vapor. Es posible que el vapor no
est_ presente en todo el ciclo de lavado alvapor.
ATC (CONTROL AUTOM, ,TiCO DE TEMPERATURA)
El ATC es la funciOn que controla la temperatura del agua en la lavadora mediante un sensor (el termostato).
_ ependiendo de donde est_ Iocalizado el cliente, hay variantes de temperaturas de agua (zonas if(as,
zonas calientes, varias temperaturas de agua, configuraciones de temperatura del calentador, etc.),
por Io tanto, la funciOn ATC de nuestra lavadora es mantener un cierto nivel de temperatura de lavado
para poder Iograr el mejor rendimiento de lavado en cada ciclo.
Si usted selecciona las configuraciones de servicio normal o pesado, esas configuraciones ser&.n
las reglamentarias y tambi_n las de UL. Ya que esta lavadora nueva tiene como su primera prioridad
reducir el consumo de energ(a, el cliente se dar&.cuenta de que estar&,entrando m&.sagua fr(a a la
lavadora. Pero esto es normal y no es un problema.
[_ Durante el normal de la de la la caliente ser&.deproceso
regulaciOn temperatura,
una
temperatura
similar a laque es aceptable para un adulto durante un bano y la temperatura tibia ser&.similar a la
temperatura del agua de una alberca.
Si el cliente quiere lavar la ropa a una temperatura de agua espec(fica, deber&,seleccionar una
configuraciOn distinta para cada temperatura (Caliente/Tibia / Eco Tibia)
avado de una carga de ropa 27

USO DEL DETERGENTE
La lavadora fue diseflada para usar detergentes de alta eficacia (HE, por su sigla en ingles).
Para obtener un lavado de Optima calidad, use detergentes de alta
eficacia, por ejemplo: Tide HE,Wisk HE, Cheer HE o Gain HE*. Los
detergentes de alta eficacia contienen supresores de la espuma que
reducen o eliminan la espuma. Cuando se produce menos espuma, la
carga se mueve con mayor eficacia y el lavado se maximiza.
,/_ NO se recomienda un detergente convencional. Use Onicamente
A_ detergentes de alta eficacia.
_ Reducir la cantidad de detergente puede reducir la calidad del lavado. Es importante tratar las
manchas previamente, clasificar las prendas con cuidado por color y nivel de suciedad, y evitar
sobrecargar la lavadora.
* Los nombres de las mamas son mamas comemiales de sus respectivos fabricantes.
FUNCIONES
Dosificador automatico
La lavadora cuenta con compartimientos separados para
dosificar el detergente y el blanqueador con proteccion
para ropa de color, el blanqueador que contenga cloro
y el suavizante de telas. Coloque todos los aditivos de
lavado en su compartimiento respectivo antes de poner en
funcionamiento la lavadora.
El dosificador autom&.tico SIEMPRE DEBE estar en su sitio
antes de poner en funcionamiento la lavadora.
NO abra el dosificador autom&.tico cuando la lavadora est&.en
funcionamiento.
Indicaciones de uso:
Cuando vierta detergente nunca sobrepase las
recomendaciones del fabricante de la lavadora.
Este compartimiento contiene el detergente I(quido durante
el ciclo de lavado principal, que se vierte a la carga al inicio
del ciclo.
---I Detergente liquido
Compartimiento
para prelavado
_ Cuado utilice detergente en polvo, quite el detergente I(quido del compartimiento. El
detergente en polvo no se dispensa desde el compartimiento para el detergente I(quido.
Compartimiento para el detergente
Vierta la cantidad recomendada de detergente para ropa directamente en el compartimiento
para el detergente antes de encender la lavadora.
28 lavado de una carga de ropa

Compartimiento para prelavado
Cuando usa la opciOnde prelavado,se debeverter el detergentetanto en el compartimiento para
prelavado como enel compartimientopara el detergente,La lavadoradispensara,automa.ticamentedurante
el prelavado.
* Si se usa undetergentede altaeficacia (HE),agregue 1/3 de la cantidadrecomendada enel
compartimiento para prelavadoy 2/3 de la cantidad recomendadaen elcompartimiento parael
detergente,
Compartimiento para el blanqueador Compartimiento P-
para el suavizante
(SOloblanqueadorIfquidoque contenga cloro) de telas
1. Agregue blanqueadorque contenga cloro enel compartimiento Compartimiento]--
para elblanqueador, parael blanqueador
NOexceda la IfneaMAX FILL(Llenadoma.ximo).
2. Evitesalpicaro rebasarelcompartimiento.
3. Lalavadoradosificara,automa.ticamenteel blanqueadordentro del
tambor enel momento apropiado.
4. Eldosificadordiluye automa.ticamenteel blanqueador Ifquidoque
contenga cloroantes de que Ileguea lacarga para lavar.
* Nuncaviertaelblanqueador Ifquidoque contengacloro sin
diluirdirectamente sobre lacarga o dentrodel tambor. Se
trata de un qdmico potentey puede set perjudicialpara
la tela, pot ejemplodesgastando las fibraso causando
decoloraciOn,si no se usacorrectamente.
* Se puede agregaral tambor un potenciador de lavadoo
blanqueadorcon protecciOnpararopa de colorantesde
cargar la ropa.
* No carguela ropa en eltambor hastadespues de
comprobar queel potenciador de lavadoo elblanqueador
con protecciOnpararopa de color ha penetrado
completamente enel orificio deltambor.
* Parautilizardetergente en polvoy potenciadorde lavadoo
blanqueadorcon protecciOnpararopa de coloral mismo
tiempo, esma.seficaz ponerlosjuntos en eltambor antes
de agregarlaropa. Cuado utilicedetergente en polvo,no se
olvidede quitar eldetergenteIfquidodel compartimiento.
Compartimiento para el suavizante de telas
1. Viertala cantidad recomendadade suavizanteIfquidoparatelas en el compartimiento parael
suavizante,
Paracargas ma.spequenas, use menos delcontenido de unatapa.
2. Diluyaelsuavizantede telas con agua hastaque alcancela IfneaMAX FILL(Llenadoma.ximo)del
compartimiento.
3. Eldosificador liberaautoma.ticamenteel suavizantede telas Ifquidoen el momentocorrecto durante el
ciclo de enjuague.
* Use el compartimiento parael suavizanteSOLOparasuavizantesde telasIfquidos.
* NOuse un dosificador DownyBall*en el compartimiento parael suavizantede telas de esta
lavadora.No agregara,el suavizantede telasen el momento correcto.
Use el compartimiento parael detergente.
* Losnombres de las mamas son mamas comercialesde sus respectivosfabricantes.
Si sobrecarga loscompartimientosdel detergente, delblanqueadory del suavizante,sucontenido se
liberara,automa.ticamenteen lalavadora.Esto podffa daflar lasprendasque esta.nen el tambor.
avado de una carga de ropa 29

LIMPIEZA DEL EXTERIOR
Cierrelas Ilavesde agua despues de finalizarel lavadodeldfa.
Estocerrarb,el suministrode agua ala lavadoray evitarb,la improbableposibilidadde que se produzcan danosa causa
del derramede agua. Dejela puertaabiertapara permitirque el interiorde la lavadorase seque.
Use un pano suavepara limpiartodo el detergente,elblanqueador u otros derramesa medidaque ocurran.
LimpieIosiguientetal como se recomienda:
Panelde control:limpiecon un pano suavey humedo. Nouse polvos abrasivosnipanos de limpieza.No rode el panel
directamente con limpiadoresen aerosol.
Gabinete:lavecon agua yjabOn.
LIMPIEZA DEL INTERIOR
Limpieel interiorde la lavadoraperbdicamente paraeliminartodo vestigio de suciedad,polvo, olor, moho, hongos o
bacteriasque pueda permaneceren la lavadoracomo consecuenciadel lavadode ropa.
Elincumplimientode estas instrucciones puede darcomo resultadosituaciones poco satisfactorias,tales como olor y/o
manchas permanentesen la lavadoraoen las prendas.
Se pueden retirarlosdepOsitosde aguadura si fueranecesario. Useun limpiadorcon el rOtulo"Washersafe" (Seguro
para lavadoras).
LIMPIEZA DE LOS DOSIFiCADORES
Posiblemente,el dosificador automb.ticonecesiteuna limpiezaperbdica para
eliminarla acumulacbn de aditivos del lavado.
1, Extraigael recipienteparael detergente Ifquidodel compartimiento del
detergente.
2, Retirelatapa del sifOnde los compartimientos parael suavizantede telasy el
blanqueador.
3, Lavetodas las partes con aguacorriente.
4, Limpieel huecodel dosificador con un cepillosuave.
5, Vuelvaa colocar latapa del sifOny aj0stelacon firmeza.
6, Ponganuevamenteel recipienteparael detergente Ifquidoensu sitio.
7, Ejecuteun ciclo de Rinse+ Spin (Enjuagado+ Centrifugado) sin ninguna
carga en la lavadora.
Tapa del sif6n l-_
COMO GUARDAR LA LAVADORA
Laslavadorasse puedendanar sino se extraeel aguade las manguerasy de loscomponentes internosantesde
guardarla. Preparela lavadoraparaguardarde lasiguientemanera:
• Seleccioneel ciclo QuickWash (LavadoRb.pido)y agregueblanqueadoral dosificadorautomb.tico.Ejecuteese ciclo
en lalavadorasin carga.
Cierrelas Ilavesde agua y desconecte lasmanguerasde entrada.
Desenchufela lavadoradeltomacorrientey deje lapuerta de la lavadoraabiertaparaque circuleaire pot el tambor.
Si su lavadoraha estado almacenadaen un lugarcon temperaturas pot debajo del punto de congelacbn, deje
transcurrir untiempo paraque los restosde agua sederritan antesde usarla.
30 mantenmiento de a avadora

LIMPIEZA DEL FILTRO DE RESIDUOS
Recomendamos limpiar el filtro de residuos cuando el agua no drena correctamente o cuando aparece en el
display el mensaje de error "nd".
1, Abra la tapa del filtro presionando y tirando de la manija con el
dedo.
2.
3.
4.
5.
Sosteniendo la tapa del drenaje, tire del tubo
de drenaje que esta, conectado al gancho
gufa en el frente. No tire del tubo de drenaje
con demasiada fuerza.
Coloque un recipiente debajo de la lavadora
para recuperar cualquier agua restante.
Sostenga el tubo de drenaje con una mano
y con la otra gire el tapon de drenaje hacia la
izquierda y sepa,relo.
Drene el resto de agua por completo.
PaSo1
a de drenaje
Gire el tapon del filtro de residuos hacia la izquierda
y saque el tapon y el conjunto del filtro de residuos Tapa de[fi[tro del
de la lavadora, residuos
Paso2
6.
Limpie lasuciedad u otros materiales
que hubieran quedado en el filtro de __
residuos. AsegOrese de que no est_
bloqueada la bomba de drenaje ubicada
detr_ts del filtro de residuos.
Tapa del filtro de
residuos L4 Filtrode
residuos
7. Una vez realizada la limpieza del filtro, inserte de nuevo el
tapon y el conjunto del filtro de residuos en la lavadora.
Gire el tapon del filtro de residuos en el sentido de las
agujas del reloj hasta que el indicador del tapon del filtro
de residuos se sitOe en la posici0n de las 12 horas; el
indicador debe apuntar a la lavadora.
8. Vuelva a montar el tapon del desagOe de emergencia en el
tubo de drenaje y cuelgue el tubo en el gancho gala.
9. Vuelva a instalar la tapa del filtro.
iiiiiiiiiiiiiiiiiii
mantenmiento de a avadora 31

LIMPIEZA DEL SELLO/FUELLE DE LA PUERTA
1. Abra la puerta de la lavadora y saque la ropa o cualquier otro objeto.
2. Compruebe si hay sustancias extranas en los sellos/fuelles
de color gris@ entre la tapa y el tambor.
Para hacer esto, d_ la vuelta a los sellos/fuelles @.
3. Si hay sustancias extranas, ret(relas.
4. Si encuentra zonas sucias, I(mpielas utilizando el siguiente procedimiento:
a} Mezcle una soluci0n diluida de s4 de taza (177 mL) de blanqueador Ifquido con cloro y
1 gal. (3,8 L) de agua corriente caliente.
b) Limpie el a.rea del sello/fuelle con esta solucion mediante un pano h0medo.
c) Deje reposar durante 5 minutos.
d} Limpie meticulosamente el a.reacon un pano seco y deje la puerta abierta para que se
seque el interior de la lavadora.
IMPORTANTE:
,, P0ngase guantes de goma cuando vaya a realizar una limpieza prolongada.
,, Consulte las instrucciones del fabricante del blanqueador para un uso adecuado.
MANTENIMIENTO DE LA CUBIERTA SUPERIOR Y DEL MARCO
FRONTAL
No coloque objetos pesados ni afilados ni tampoco el paquete de detergente sobre la lavadora. Pueden
rayar o danar la cubierta superior. Mant_ngalos apartados en el pedestal (si Io adquirio) o en una caja de
almacenaje por separado.
Ya que toda la lavadora tiene un acabado brillante, la superficie se puede rayar o danar f&.cilmente.
Evite rayar o danar la superficie cuando use la lavadora.
32 mantenmiento de a avadora

PURE CYCLE TM
Pure Cycle es un programa de autolimpieza que elimina el moho que puede producirse dentro de la
lavadora.
1, Presione el botOn Power (Eneender/Apagar}.
2, Presione el bot6n Pure Cycle TM. 0_5.
Una vez presionado el bot6n Pure Cycle, laOnica
funci6n que se puede configurar es Delay Start (Inicio
retardado).
3, Presione el bot6n Start/Pause (inicio/Pausa}.
Cuando presiona el bot6n Start/Pause (mnicio/
Pausa}, comienza el programa Pure Cycle.
%
Pure Cycle le permite limpiar el tambor sin usar un agente limpiador.
Nunca use Pure Cycle cuando haya ropa en la lavadora. Esto puede daBar la ropa o causar
un problema en la lavadora.
Si desea utiiizar agente iimpiador para tambores, use s6io 1/10 de ia cantidad
recomendada pot el fabricante, (Cuando utilice un agente limpiador en polvo, retire el
compartimiento para el detergente I[quido.)
La funci6n dei indicador autom_tico de Pure Cycle
Si se ilumina el bot0n "Pure Cycle" despues de un
lavado, indica que es necesaria la limpieza de la tina
(tambo0. En este caso, retire la ropa de la lavadora,
presione el bot0n de encendido y limpie el tambor
activando el programa Pure Cycle.
Si no se eiecuta Pure Cycle, se apaga el indicador de
"Pure Cycle". No obstante, el indicador de "Pure Cycle"
se encendera nuevamente despues de dos lavados. No
ejecutar Pure Cycle en este momento no causara ning0n
probbma en la lavadora.
Si bien el indicador automatico de Pure Cycle aparece una
vez por rues aproximadamente, la frecuencia puede vadar
dependiendo de la cantidad de veces que se utilice la
lavadora.
, , ...............................
manter mertode a avadora 33

CONTROLE ESTAS SOLUCIONES Si SU LAVADORA...
NO enciende.
NOtiene agua o notiene
suficiente agua.
TIENErestosde detergente en el
dosificador autom_.ticodespu_s
de que hafinalizado el ciclo de
lavado.
Vibra o hacedemasiado ruido.
SEdetiene
,, Aseguresede quela puertaestebiencerrada.
,, Verifiqueque la lavadoraesteenchufada.
,, Verifiqueque las Ilavesdeaguaestenabiertas.
,, Aseguresede presionarel bot6nStart/Pause(Inicio/Pausa)paraencenderla
lavadora.
,, Aseguresede quelafunci6nSeguroparani_osnoesteactivada.Consultela
p_,gina24.
,, Antesde quelalavadoracomienceaIlenarse,seescuchar_,unaseriede sonidos
semejantesa un "clic"paracontrolarlatrabade la puertay quesedeckle un
drenajer_,pido.
,, Controleelfusibleo reinicieel disyuntor.
,, Abralasdos Ilavescompletamente.
,, Aseguresede quela puertaestebiencerrada.
,, Enderecelasmanguerasde entradade agua.
,, Desconectelasmanguerasy limpielosfiltros.Posiblementelosfiltrosde las
manguerasestentapados.
,, Abray cierrela puertay, acontinuaci6n,presioneelbot6n Start/Pause(Inicio/
Pausa).
,, Aseguresede quela lavadorafuncionecon suficientepresi0nde agua.
,, Aseguresede queeldiscoselectordedetergentese encuentreen laposici6n
superiorcuando usadetergenteen polvo.
,, Compruebeque la lavadoraesteubicadasobre unasuperficienivelada.Si
la superficienoest,, nivelada,ajustelaspatasde la lavadoraparanivelarel
electrodomestico.
,, Aseguresede quesehayanretiradolostornillosde transporte.
,, Aseguresede quela lavadoranotoque ningunotroobjeto.
,, Verifiqueque la cargaderopa seaequilibrada.
,, Enchufeelcablede alimentaci6na untomacorrienteque funcione.
,, Controleelfusibleo reinicieel disyuntor.
,, Cierrela puertay presioneel bot6n Start/Pause(Inicio/Pausa)parahacer
funcionarla lavadora.
Porsu seguridad,lalavadoranolavar_,nicentrifugar_,salvoque la puertaeste
cerrada.
,, Antesde quelalavadoracomienceaIlenarse,seescuchar_,unaseriede sonidos
semejantesa un "clic"paracontrolarlatrabade la puertay quesedeckle un
drenajer_,pido.
,, Sepuedeproducirunapausao unperiodode remojoen elciclo.Esperehasta
quecomienceafuncionar.
,, Controleque losfiltrosdelas manguerasdeentradaalaalturade lasIlavesno
presentenobstrucciones.
Limpielos filtrosperi6dicamente.
34 gua de soluc on de problemas

SEIlenacon agua auna
temperatura incorrecta,
TIENElapuerta trabada o no se
abre.
NOdrenay/o no centrifuga.
DEJAla carga demasiado
hQmedaal final del ciclo.
PIERDEagua.
TIENEespumaen exceso.
Tiene olor.
,, Abralas dos Ilavescompletamente.
,, Aseg_lresedeque laselecci6ndetemperaturasealacorrecta.
,, Aseg_lresedeque lasmanguerasestenconectadasalas Ilavescorrectas.
Purguelasca_erias.
,, Controleelcalentadorde agua.Debeestarconfiguradoparasuministraragua
calienteen lasalidade aguaa unatemperaturaminimade 120°F (49°C).
Asimismo,verifiquelacapacidaddelcalentadorde aguay lavelocidadde
recuperaci6n.
,, Desconectelasmanguerasy limpielosfiltros. Posiblemente,losfiltrosde las
manguerasestentapados.
,, A medidaque lalavadoraseIlena,latemperaturadelaguapuedevariardebido
aque lafunci6nautom_,ticade controlde latemperaturacontrolalatemperatura
delaguaque ingresa.Estoes normal.
,, Mientrasla lavadoraseIlena,es posibleque observequepor eldosificadorpasa
s61oaguacalientey/o s61oaguafria cuandoseseleccionanlastemperaturas
delavadofriaotibia. Estaesunafunci6nnormalque cumpleel controlde
temperaturaautom_,ticodadoque lalavadoradeterminalatemperaturadelagua.
,, Presioneel bot6n Start/Pause(Inicio/Pausa)paradetenerla lavadora.
,, Lapuertade la lavadorapermanecer_,trabadadurantelafasede calentamiento
delcicloSanitize(Desinfecci6n)
,, PuedeIlevaralgunosminutosque el mecanismode cierrede la puertase
desconecte.
,, Controleelfusibleo reinicieel disyuntor.
,, Enderecelasmanguerasdedrenaje.Eliminelasmanguerasenroscadas.Si
existealgunarestricci6nen cuantoaldrenaje,comuniqueseconelservicio
tecnico.
,, Cierrelapuertay presioneel bot6nStart/Pause(Inicio/Pausa).Porsu seguridad,
lalavadoranogirard,nicentrifugar_,salvoquelapuertaestecerrada.
,, Compruebeque elfiltro de residuosnoesteobstruido.
,, Uselavelocidadde centrifugadoAltao Muyalta.
,, Useundetergentede altaeficaciaparareducirlaformaci6nde espumaen
exceso.
,, Lacargaesdemasiadopeque5a.Lascargasmuypeque5as(unao dos
prendas)sepuedendesequilibrary no centrifugarseenabsoluto.
,, Aseguresedeque lapuertaeste biencerrada.
,, Aseguresedequetodaslasconexionesde lasmanguerasestenajustadas.
,, Aseguresedequeel extremode lamangueradedrenajeestecorrectamente
conectadoy aseguradoal sistemadedrenaje.
,, Evitesobrecargarlalavadora.
,, Useundetergentede altaeficaciaparaevitarlaformaci6nde espumaen
exceso.
,, Useundetergentede altaeficaciaparaevitarlaformacbnde espumaen
exceso.
,, Reduzcala cantidaddedetergenteparael aguablanda,lascargasligeramente
suciasopequeSas.
,, NOserecomiendaun detergentede bajaeficacia.
,, Elexcesode espumaacumuladaenlosrinconespuedecausarmalesolores.
,, Realiceciclosde limpiezaparadesinfectarlam_,quinaperbdicamente.(Silver
Careo SanitizeCycleo PureCycle)
,, Limpieelsellode la puerta(Diafragma).
,, Sequeelinteriorde la lavadoraunavezquefinaliceel ciclocompleto.
gua de soluc On de problemas 35

C0DIGOS DE INFORMACi0N
Pueden apareeer c0digos de informaci0n para ayudarle a comprender mejor qu_ ocurre con lalavadora.
I_C
dS
FL
Hr
LE
Un desequilibrio en la carga impidi0
que la lavadora centrifugara.
La puerta esterabierta cuando la
lavadora esteren funcionamiento.
No se Iogra cerrar lapuerta de la
lavadora.
Este c0digo de error aparece cuando el
calentador estera 96 °C o m_ts.
La lavadora intent0 Ilenarse, pero no
alcanz0 el nivel de agua adecuado.
Redistribuya la carga y presione el
bot0n StaWPause (Inicio/Pausa).
Cierre la puerta firmemente y reinicieel
ciclo.
Si el c0digo vuelve a aparecer,
comun(quese con el servicio t_cnico.
Cierre la puerta firmemente y reinicie el
ciclo.
Si el c0digo vuelve a aparecer,
comun(quese con el servicio t_cnico.
Comun(quese con el servicio t_cnico.
Comun(quese con el servicio t_cnico.
Problemas de fugas o el sensor de nivel Comun(quese con el servicio t_cnico.
LE(1E} del agua realiza lecturas anormales.
La puerta no se puede abrir.
La lavadora no est&.drenando.
Tambi_n puede significar que la unidad
percibe una pequena obstrucci0n
mientras drena.
LO
nd
AsegOrese de que la puerta est_ bien
cerrada.
Presione el bot0n de Power (Encender/
Apagar) para apagar la lavadora y, a
continuaci0n, vu_lvala a encender. Si el
c0digo vuelve a aparecer, comun(quese
con el servicio t_cnico.
Limpie el filtro de drenaje. Luego,
limpie el filtro de residuos (consulte la
ps.gina 31).
Si la lavadora est&.funcionando, puede
intentar Iosiguiente primero:
1. Apague la unidad durante
10 segundos y luego vuelva a
encenderla nuevamente.
2. Seleccione el ciclo Spin Only (Solo
Centrifugado) (Consulte la ps.gina 24).
3. Presione StaWPause (Inicio/Pausa)
para que el agua drene.
Si no drena, comunfquese con el
servicio alcliente.
36 gua de soluc on de problemas

La lavadora intent0 Ilenarse pero no Io
Iogro.
nF
nF1
OE
E2
tE
3E
AE
SF
SUdS
Verifique si la manguera de suministro
de agua caliente estB.conectada.
Este c0digo de error aparece cuando
la temperatura del agua estB.a 50 °C
o mB.sdurante 8 segundos o mB.sen
los ciclos Wool (Lana) y Delicate (Ropa
delicada).
Agua detectada per encima del nivel de
agua de seguridad.
Tecla atascada.
Problema con el sensor de
temperatura.
Problema del motor.
Fallade comunicaci6n de PBA principal
y secundaria
Error del sistema
Detect6 demasiada espuma durante la
sesi6n de lavado.
La unidad ingresarB,en estado de
espera hasta que disminuya la espuma.
A continuaci6n, la unidad volverB,a
funcionar.
Cuando termine el lavado, per su
parte, los c6digos "End" y "SUDS" se
iluminara.n.
AsegOrese de que las Ilaves de
agua est@ncompletamente abiertas.
Controle que no haya mangueras
enroscadas.
Controle los filtros interiores de las
mangueras de carga.
Si utiliza un dispositivo de seguridad
contra inundaci6n, retffelo y conecte la
manguera del agua directamente en la
unidad.
Se debe conectar la manguera de
suministro de agua caliente ya que si la
temperatura del agua fr(a es inferior a
59 °F la funci6n de control automB.tico
de la temperatura (A.T.C) suministra agua
caliente.
Conecte la manguera de agua caliente/
fr(a correctamente.
Comun(quese con el servicio t@cnico.
Comun(quese con el servieio t@cnico.
Reinicie el ciclo.
Si el c6digo vuelve a aparecer,
comun(quese con el servicio t@cnico.
Reinicie el ciclo.
Si el c6digo vuelve a aparecer,
comun(quese con el servicio t@cnico.
Comun(quese con el servicio t@cnico.
Comun(quese con el servicio t@cnico.
Reduzca la cantidad de detergente.
Para los c6digos que no figuran ma.sarriba, Ilame al 1-800-726-7864 (1-800-SAMSUNG).
gua de soluc 6n de problemas _37

apend ae
TABLA DE INDICACIONES SOBRE LA TELA
Lossiguientessfmbolosofrecen indicacionesacerca de lasprendas. Laetiquetade indicacionesde laprenda incluye
sfmbolos para lavado,blanqueado,secado y planchado, o limpiezaa seco cuando sea necesaria.El usode sfmbolos
garantizala consistenciaentre los fabricantestextilesde artfculosnacionalese importados. Siga lasindicaciones de la
etiquetapara prolongar lavida 0til de la prenday reducirlos problemasdel lavado.
Normal [] Secarcolgado/tender No lavar
Planchapermanente/
Antiarrugas/ Control de
arrugas
PrendassuavesJde,cadas
,avadoamano
coo Caliente
o® Tibia/Tibia
Frfa
Colgarpara queescurra No retorcer
Secaren posiciOnhorizontal _ No usarblanqueador
No secaren secadora
Alto
Medic
Bajo
O Cualquiercalor
Sincalor/ aire
Sinvapor (agregadoa la
plancha)
No planchar
O Limpiaren seco
No limpiaren seco
Cualquierblanqueador _ _ at ra _ _
(cuandosea necesario)
S01oblanqueadorsin cloro
m de(C°ncolor)Pr°tecciOnpararopa Alto
(cuandosea necesaria)
Ciclo de secado en Medic
secadora
[] Secarcolgado/tender
Colgarpara queescurra
Secaren posiciOnhorizontal
Bajo
Planchapermanente/
Antiarrugas/ Control de
arrugas
Prendassuaves/ delicadas
** Lossfmboloscon punto representanlastemperaturas delagua del lavadoapropiadasparadiversasprendas. El
tango de temperatura paraCalientees de 1050a 125°F / 41oa 52 °C, paraTibiaesde 850 a 105 °F/ 290a41 °C
y para Frfaes de 600a 85 °F / 160a 29 °C. (Latemperaturadel agua dellavadodebe alcanzarun mfnimode 60 °F
/ 16 °C paraque seactive eldetergente y se Iogreun lavadoeficaz.)Posiblemente,la lavadorano garanticeestas
temperaturasporque lastemperaturas realesdel aguaque ingresaen lalavadoradependen de la configuraciOndel
calentadorde agua y de las temperaturasdelsuministrode agua regional.Pot ejemplo,elagua frfaque ingresaen las
casas de los Estadosdel Norteduranteel inviernopuede set de 40 °F/4 °C, lacual esdemasiado frfaparaque seIogre
un lavadoeficaz. Eneste caso, sera.preciso ajustarla temperaturadel aguaseleccionando laopciOnde temperatura
@.lid&agregandoalgo de aguacalientea la IfneaMAX FILL(Llenadoma.ximo)o usandola opciOnde calentamientode
la lavadora,si sedispone de ella.
38 apendice

TABLA DE CICLOS
Use esta tabla para configurar el mejor oiclo y opciOn para su lavadora.
Modelo: WF4OSATPA** / WF398ATPA** (® ' configurado en f&.brica, _ ' seleccionable)
Potenciaextra ® _ _ _ ® _ _ _ _ ® _ _ _
Ropa de eama PLUS .................
Desinfeeci6n ® ® _ _ _ _ _ _ ® _
Eliminaci6n de manchas _ ® _ _ ® _ _ _ _ ® _ _ _
Vaporizaci6nprofunda ® ® _ _ _ _ ®
Enjuagado + centrifugado ® ® _ _ _ _
LavadoR_pido _ ® _ _ _ ® _ _ _ _ _ _ _
Lana ® _ _ ® _ ®
Ropadeiicada/Lavado a mane _ _ ® ® _ _ _ ® _
Ropadeportiva ® _ _ _ ® _ _ _ ® _
Planchapermanent® ® _ _ _ _ ® _ _ _ ® _
Lavadoecol6gico frio ® _ ® _ _ _ ® _
PureCycle ® ®
®
®
®
®
®
®
®
®
®
Potenciaextra _, _, _, ® _, _, _, _,
Ropade camaPLUS _, _, _, _, _, _, _, _,
Desinfecci6n _, _, _, _, _, _, _, _,
Eliminaci6n de manchas _, _, _, _, _, _, _, _,
Vaporizaci6nprofunda _, _, _, _, _, ® _, _,
Enjuagado +Centrifugado _, _, _, _,
LavadoR_pido _, _, _, _,
Lana ® _, _, _,
Ropadelicada/Lavado a mane _, _, _, _,
Ropa deportiva _, _, _, _, _, _,
Planchapermanent® _, _, _, _, ¢ ¢
Lavadoecol6gico frio _, _, _, _, _, _,
PureCycle _, _,
EH: Muy caliente EH: Muy alto H: Muy sucia
H: Caliente H: Alto
W: Tibia M: Mediano N: Normal
EW: Eco Warm (Lavado ecolOgico c_lido) L: Bajo
C: Fria NS: Sin centrifugado L: Poco sucia
apend ce 39

ae
Model®: WF397UTPA**
Normal
Potenciaextra
Ropa de CamaPLUS
Desinfecci6n
Eliminaci6nde manchas
Vaporizaci6nprofunda
Eojuagado+ Centrifugado
LavadoR_pido
Flopadelioada/Lavadoa man®
Ropa deportiva
Planchapermanente
Lavadoecolbgicofrio
Pure Cycle
( ®' configurado en f&.brica, _ ' seleccionable)
®
®
®
®
®
®
®
®
®
®
® ® ® ® ® ® ® ® ® ® ® ®
® ® ® ® ® ® ® ® ® ® ® ®
® ® ® ® ® ® ® ® ® ®
® ® ® ® ® ® ® ® ® ®
® ® ® ® ® ® ® ® ® ® ® ®
® ® ® ® ® ®
® ® ® ® ® ®
® ® ® ® ® ® ® ® ® ® ® ®
® ® ® ® ®
® ® ® ® ® ® ® ® ®
® ® ® ® ® ® ® ® ® ®
® ® ® ® ® ® ® ® ® ® ®
® ® ® ® ® ® ® ® ®
®
®
®
iiiii!i!i!!!!iiiiiiiiii!_i!_i_i!!!_!_!_!_!_!_!_!_!_!_!_!_!_i!iiiii!!!iiiiiiii_!i_!i_ii_ii_ii_ii_ii_ii_ii_ii_ii!i_i_i!i_!i_!i_!i_!i_!i_!i_!i_!i_!i_ii!i!!ililiiiiilil!i!i!ii_i_i!i_i_i_!_i_ilii;il;!i_!iiii_i_i_i_i_i_i_i_i_iiii_i!ii_i__iiiiiiiiiiiiii_ii
Normal _, _, _, _, _ _, _, _,
Potenciaextra _, _, _, ® _ _, _, _,
Ropade cama PLUS ® _, _, _, _ _, _, _,
Desinfecoibn _, _, _, _, _ _, _, _,
Eliminaci6_ demanchas _, _, _, _, _ _, _, _,
® ® ® ® ® ® ® ®
Enjuagado + Centrifugado _, _, _, _ _,
LavadoR_pido _, _, _ _, _,
Lana ® _, _ _, _,
Ropadelicada/Lavado a man® _, _, _ _, _,
Ropadeportiva _, _, _, _, _ _, _,
Planchapermanente _, _, _, _, _ _, _,
Lavadoecol6gico fr_o _, _, _, _, _ _, _,
PureCycle _, _ _,
EH: Muy caliente EH: May alto H: Muy suoia
H: Caliente H: Alto _k
W: Tibia M: Median® N: Normal
EW: Eco Warm (Lavado ecolOgico c_lido) L:Bajo y
C: Fria NS: Sin centrifugado L: Poco sucia
40 apendice

AYUDA AL MEDIOAMBIENTE
* Esta lavadorasefabrica con materialesreciclables.Si decidedeshacerse de ella,siga lanormativa localrelacionada
con laeliminaciOnde desechos.Corte el cable de alimentaciOnpara queel electrodomesticono pueda conectarse
auna fuente de alimentaciOn.Quite lapuerta paraque los animalesy los ninos pequenos no puedan quedar
atrapadosdentro del electrodomestico.
* No utilicecantidades de detergente mayoresalas recomendadaspot el fabricante deldetergente.
Utiliceproductos quitamanchasy blanqueadoresantesdel ciclo de lavadoy sOlocuando sea necesario.
Ahorreaguay electricidadutilizandola capacidadtotal de la lavadora(lacantidadexacta depende del programa
quese utilice).
DECLARACION DE CONFORMIDAD
Este electrodom_stico cumple con la norma UL2157.
ESPECIFICACIONES
DIMENSIONES, Div ......... Pulgadas (cm)
A. Altura - General 38,7" (98,4)
B. Ancho 27" (68,6)
C. Profundidad con la puerta abierta
90° 51,7" (131,4)
D. Profundidad 32,3" (82,0)
PRESK)N DEL AGUA
PESO
POTENCIA DEL CALENTADOR
CONSUMO DE
ENERGiA
WF405ATPA** / WF397UTPA**
WF398ATPA**
LAVADO
LAVADO Y CALENTAMIENTO
CENTRIFUGADO
DRENAJE
20-116 psi (137-800 kPa)
88 kg (194 Ib)
96 kg (212 Ib)
9OOW
1200 rpm
REVOLUCION DEL CENTRIFUGADO
120V
120V
120V
120V
25O W
1100W
600 W
80/32 W
apend ce 41

aarantia/LJ,S,A
LAVADORA SAMSU NG
GARANTIA LIIVIITADA PARA EL COMPRADOR ORIGINAL
El presente producto de la marca SAMSUN®, tal como Io provee y distribuye SAMSUN® ELECTRONICS
AMERICA, INC. (SAMSUNG) y Io entrega nuevo, en su embalaje de carton original al comprador o
consumidor original, esta.garantizado por SAMSUN® contra defectos de fabrieacion de los materiales y la
mano de obra durante el periodo limitadode lagarantia de:
Un (1)aflo para las piezas y la mano de obra, Dos (2)aflos para las piezas del panel de control (Solo
piezas), Tres (3)aflos para las piezas del tambor inoxidable (Solo piezas), Cinco (5) aflos para las piezas del
motor de la lavadora (Solo piezas), Diez (10) aflos aflos para las piezas del motor DD de la lavadora (Solo
piezas).
La presente garant(a limitada comienza en la fecha original de compra yes v&.lida0nicamente para
productos comprados y usados en los Estados Unidos. Para recibir elservicio t_cnico de la garantia,
el comprador debe comunicarse con SAMSUNG con el fin de que se determine el problema y los
procedimientos del servicio. El servicio t_cnico de la garantia s01o puede ser prestado por un centro de
servicio t_cnico autorizado de SAMSUNG. Se debe presentar la factura de compra original como pmeba de
compra a SAMSUNG o al servicio t_cnico autorizado de SAMSUNG. SAMSUNG prestar&,servicio t_cnico a
domicilio durante el per(odo de la garant(a sin costo, sujeto a la disponibilidad dentro de los Estados Unidos
contiguos. El servicio t_cnico a domicilio no est&.disponible en todas las &.reas.
Para recibir el servicio t_cnico a domicilio, el producto no debe presentar obstrucciones y debe ser
accesible para el agente del servicio t_cnico. Si el servicio t_cnico no est&.disponible, SAMSUNG puede
optar por transportar el producto hasta y desde elservicio t_cnico autorizado.
SAMSUNG reparar&.,reemplazar&, el producto u offecer&, un reembolso a su criterio y sin cargo adicional,
tal como se establece en la presente garant(a, con piezas o productos nuevos o reacondicionados si se
comprueba que es defectuoso durante el per[odo limitado de la garant[a especificado anteriormente. Todas
las piezas y los productos reemplazados pasan a ser propiedad de SAMSUNG y deben ser devueltos a
SAMSUNG. Las piezas y los productos reemplazados asumen la garant(a original que resta, o noventa (90)
d(as, el per(odo que sea el m&.sprolongado. La presente garant(a limitada cubre defectos de fabricacion
de los materiales y la mano de obra encontrados durante el uso normal y dom_stico de este producto y
no ser&.v&.lidapara Io siguiente: daflos que ocurran durante el env(o; entrega e instalacion; aplicaciones
y usos para los cuales el presente producto no fue destinado; nLimeros de serie o producto alterados;
daflo cosm_tico o acabado exterior; accidentes, abuso, descuido, incendio, inundacion, ca(da de rayos, u
otros casos fortuitos o de fuerza mayor; uso de productos, equipo, sistemas, utilidades, servicios, piezas,
suministros, accesorios, aplicaciones, instalaciones, reparaciones, cableado extemo o conectores no
provistos ni autorizados por SAMSUNG que darien este producto o que acarreen problemas en el servicio;
voltaje de la I(nea el_ctrica incorrecto, fluctuaciones y sobretensi0n; ajustes del cliente e incumplimiento
de Io establecido en el manual de instrucciones, instrucciones de mantenimiento y ambientales que est&.n
cubiertas y recomendadas en el manual de instmcciones; traslado y reinstalaci0n del producto; problemas
causados por plagas. La presente garant[a limitada no cubre problemas derivados de la corriente, el voltaje
o el suministro el_ctrico incorrectos, las bombillas de luz, los fusibles de la casa, el cableado de la casa,
el costo del servicio t_cnico para recibir instmcciones o corregir errores en la instalacion. SAMSUNG no
garantiza el funcionamiento inintermmpido o sin errores del producto.
42 9arant[a

SALVO LO ESTABLECIDO EN LA PRESENTE GARANT[A, NO EXISTEN GARANT[AS SOBRE EL
PRESENTE PRODUCTO, YA SEAN EXPRESAS O TACITAS, Y SAMSUNG DESCONOCE TODAS LAS
GARANT[AS QUE INCLUYEN, AUNQUE NO EN CARACTER TAXATIVO, CUALQUIER GARANT[A
T_,CITA DE QUE EL PRODUCTO SE ENCUENTRA EN CONDICIONES APTAS PARA LA VENTA, DE
DEFRAUDACION DE DERECHOS O DE QUE EL PRODUCTO SE ADECUA A LOS FINES ESPEC[FICOS
PARA LOS CUALES SE ADQUIERE.
NINGUN AVAL O GARANT[A OTORGADOS POR PERSONA, COMPAN[A O CORPORACION
ALGUNA CON RESPECTO AL PRESENTE PRODUCTO REVESTIRA CARACTER VlNCULANTE PARA
SAMSUNG. SAMSUNG NO SERA RESPONSABLE POR PCRDIDA DE INGRESOS O LUCRO CESANTE,
IMPOSIBILIDAD DE GENERAR AHORROS U OBTENER OTROS BENEFICIOS, O CUALQUIER DAiqO
DERIVADO DE CIRCUNSTANCIAS ESPECIALES, DANO IMPREVlSTO O DERIVADO CAUSADO
POR EL USO, USO INCORRECTO, O INCAPACIDAD PARA USAR EL PRESENTE PRODUCTO,
INDEPENDIENTEMENTE DE LA TEOR[A LEGAL EN QUE SE FUNDE EL RECLAMO Y AUN CUANDO SE
LE HAYA NOTIFICADO A SAMSUNG DE LA POSIBILIDAD DE TALES DAIqOS.
NINGUN RESARCIMIENTO DE NINGUNA [NDOLE CONTRA SAMSUNG SUPERARA EL MONTO DE
COMPRA DEL PRODUCTO VENDIDO POR SAMSUNG Y CAUSANTE DEL PRESUNTO DANO. SIN
LIMITAR LO PRECEDENTE, EL COMPRADOR ASUME TODO EL RIESGO Y LA RESPONSABILIDAD POR
PCRDIDA, DANO O LESION AL COMPRADOR Y A LOS BIENES DEL COMPRADOR Y A TERCEROS Y A
SUS BIENES DERIVADOS DEL USO, USO INCORRECTO O INCAPACIDAD PARA USAR EL PRESENTE
PRODUCTO. LA PRESENTE GARANT[A LIMITADA NO SE EXTENDERA A NINGUNA PERSONA DISTINTA
DEL COMPRADOR ORIGINAL DEL PRESENTE PRODUCTO, ES INTRANSFERIBLE Y ESTABLECE SU
EXCLUSIVA REPARACION.
Algunos Estados no permiten limitaciones en cuanto al plazo de una garant(a impl(cita, o la exclusion o
limitacion de danos imprevistos o derivados, por Io tanto las limitaciones o exclusiones antedichas pueden
no aplicarse en su caso. Esta garant(a le otorga derechos espec(ficos, y adem&.spuede tener otros
derechos que var(an segOn el Estado en el que se encuentre.
Para recibir un servicio t_cnico de garantia, comuniquese con SAMSUNG a:
Samsung Electronics America, Inc.
85 Challenger Road Ridgefield Park, NJ 07660
I=800=SAMSUNG (726=7864)
wwwosamsungocom/us/support
Las visitas del personal de servicio tecnico para explicar funciones, mantenimiento o instalaciOnno estb.n
cubiertas per lagarantfa.
POngaseen contacto con su agente del centro de Ilamadas Samsung para que le asesore.
garant[a 43

LAVADORA SAMSU NG
GARANTIA LIMITADA PARA EL COMPRADOR ORiGiNAL
El presente producto de la marca SAMSUNG, tal como Io provee y distribuye SAMSUNG ELECTRONICS
CANADA, INC. (SAMSUNG) y Io entrega nuevo, en su embalaje de carton original al comprador o
consumidor original, est&.garantizado pot SAMSUNG contra defectos de fabricacion de los materiales y la
mano de obra durante el perfodo limitado de la garantfa de:
UUn (1) ano para las piezas y la mano de obra. Diez (10) anos anos para las piezas del motor DD de la
lavadora (Solo piezas).
La presente garant(a limitada comienza en la fecha original de compra yes v&.lidaLinicamente para
productos comprados y usados en Canadb.. Para recibir el servicio t_cnico de la garantfa, el comprador
debe comunicarse con SAMSUNG con el fin de que se determine el problema y los procedimientos
del servicio. El servicio t_cnico de la garantfa s01o puede ser prestado por un centro de servicio t_cnico
autorizado de SAMSUNG. Se debe presentar la factura de compra original como prueba de compra a
SAMSUNG o al servicio t_cnico autorizado de SAMSUNG. SAMSUNG prestar&, servicio t_cnico a domicilio
durante el per(odo de la garant(a sin costo, sujeto a la disponibilidad dentro de Canadb.. El servicio t_cnico a
domicilio no est&.disponible en todas las &.teas.
Para recibir el servicio t_cnico a domicilio, el producto no debe presentar obstrucciones y debe ser
accesible para el agente del servicio t_cnico. Si el servicio t_cnico no est&.disponible, SAMSUNG puede
optar por transportar el producto hasta y desde elservicio t_cnico autorizado.
SAMSUNG reparar&.,reemplazar&, el producto u ofrecer&, un reembolso a su criterio y sin cargo adicional,
tal como se establece en la presente garant(a, con piezas o productos nuevos o reacondicionados si se
comprueba que es defectuoso durante el per[odo limitado de la garant[a especificado anteriormente. Todas
las piezas y los productos reemplazados pasan a ser propiedad de SAMSUNG y deben ser devueltos a
SAMSUNG. Las piezas y los productos reemplazados asumen la garant(a original que testa, o noventa (90)
d(as, el per(odo que sea el m&.sprolongado. La presente garant(a limitada cubre defectos de fabricacion
de los materiales y la mano de obra encontrados durante el uso normal y dom_stico de este producto y
no set&.v&.lidapara Io siguiente: danos que ocurran durante el env(o; entrega e instalacion; aplicaciones
y usos para los cuales el presente producto no fue destinado; nOmeros de serie o producto alterados;
dano cosm_tico o acabado exterior; accidentes, abuso, descuido, incendio, inundacion, ca(da de rayos, u
otros casos fortuitos o de fuerza mayor; uso de productos, equipo, sistemas, utilidades, servicios, piezas,
suministros, accesorios, aplicaciones, instalaciones, reparaciones, cableado externo o conectores no
provistos ni autorizados por SAMSUNG que danen este producto o que acarreen problemas en el servicio;
voltaje de la I(nea el_ctrica incorrecto, fluctuaciones y sobretension; ajustes del cliente e incumplimiento
de Io establecido en el manual de instrucciones, instrucciones de mantenimiento y ambientales que est&.n
cubiertas y recomendadas en el manual de instrucciones; traslado y reinstalacion del producto; problemas
causados por plagas. La presente garant[a limitada no cubre problemas derivados de la corriente, el voltaje
o el suministro el_ctrico incorrectos, las bombillas de luz, los fusibles de la casa, el cableado de la casa,
el costo del servicio t_cnico para recibir instrucciones o corregir errores en la instalacion. SAMSUNG no
garantiza el funcionamiento ininterrumpido o sin errores del producto.
44 garant[a

SALVOLOESTABLECIDOENLAPRESENTEGARANT[A,NOEXISTENGARANT[ASSOBREEL
PRESENTEPRODUCTO,YASEANEXPRESAS0TACITAS,YSAMSUNGDESCONOCETODASLAS
GARANT[ASQUEINCLUYEN,AUNQUENOENCARACTERTAXATIVO,CUALQUIERGARANT[A
T_,CITADEQUEELPRODUCTOSEENCUENTRAENCONDICIONESAPTASPARALAVENTA,DE
DEFRAUDACIONDEDERECHOS0 DEQUEELPRODUCTOSEADECUAALOSFINESESPEC[FICOS
PARALOSCUALESSEADQUIERE.
NINGUNAVAL0GARANT[AOTORGADOSPORPERSONA,COMPAN[A0CORPORACION
ALGUNACONRESPECTOALPRESENTEPRODUCTOREVESTIRACARACTERVlNCULANTEPARA
SAMSUNG.SAMSUNGNOSERARESPONSABLEPORPCRDIDADEINGRESOS0 LUCROCESANTE,
IMPOSIBILIDADDEGENERARAHORROSUOBTENEROTROSBENEFICIOS,0CUALQUIERDAiqO
DERIVADODECIRCUNSTANCIASESPECIALES,DANOIMPREVlSTO0 DERIVADOCAUSADO
PORELUSO,USOINCORRECTO,0 INCAPACIDADPARAUSARELPRESENTEPRODUCTO,
INDEPENDIENTEMENTEDELATEOR[ALEGALENQUESEFUNDEELRECLAMOYAUNCUANDOSE
LEHAYANOTIFICADOASAMSUNGDELAPOSIBILIDADDETALESDAIqOS.
NINGUNRESARCIMIENTODENINGUNA[NDOLECONTRASAMSUNGSUPERARAELMONTODE
COMPRADELPRODUCTOVENDIDOPORSAMSUNGYCAUSANTEDELPRESUNTODANO.SIN
LIMITARLOPRECEDENTE,ELCOMPRADORASUMETODOELRIESGOYLARESPONSABILIDADPOR
PCRDIDA,DANO0LESIONALCOMPRADORYALOSBIENESDELCOMPRADORYATERCEROSYA
SUSBIENESDERIVADOSDELUSO,USOINCORRECTO0INCAPACIDADPARAUSARELPRESENTE
PRODUCTO.LAPRESENTEGARANT[ALIMITADANOSEEXTENDERAANINGUNAPERSONADISTINTA
DELCOMPRADORORIGINALDELPRESENTEPRODUCTO,ESINTRANSFERIBLEYESTABLECESU
EXCLUSIVAREPARACION.
Algunasprovinciasnopermitenlimitacionesencuantoalplazodeunagarant(aimpl(cita,olaexclusiono
limitaciondedanosimprevistosoderivados,porIoquelaslimitacionesoexclusionesantedichaspueden
noaplicarseensucaso.Estagarant(aleotorgaderechosespec(ficos,yadem&.spuedetenerotros
derechosquevar(ansegOnlaprovinciaenlaqueseencuentre.
Para recibir un servicio t_cnico de garantia, comuniquese con SAMSUNG a:
Samsung Electronics Canada Inc.
2050 Derry Road West, Mississauga, Ontario L5N 0B9 Canada
1-800-SAMSUNG (726=7884}
www.samsung.com/ca/support (English}
www.samsung.com/ca_fr/support (French}
FAX:1-866-436-4617
Las visitas del personal de servicio tecnico para explicar funciones, mantenimiento o instalaciOnno estb.n
cubiertas per lagarantfa.
POngaseen contacto con su agente del centro de Ilamadas Samsung para que le asesore.
garant[a 45


sTiENE PREGUNTAS O COMENTARiOS?
U.S.A 1-800-SAMSUNG(726-7864) www.samsung.com/us/support
MEXICO 01-800-SAMSUNG(726-7864) www.samsung.com/mx/support
www.samsung.com/ca/support (English)
CANADA 1-800-SAMSUNG(726-7864) www.samsung.com/ca fr/support (French)
Las visitas del personal de servicio tecnico para explicar funciones, mantenimiento o instalaci6n no estb.n
cubiertas pot la garantfa.
P6ngase en contacto con su agente del centro de Ilamadas Samsung para que le asesore.
N.° de codigo: DC68-03145A-09_MES
-
 1
1
-
 2
2
-
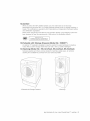 3
3
-
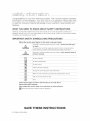 4
4
-
 5
5
-
 6
6
-
 7
7
-
 8
8
-
 9
9
-
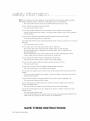 10
10
-
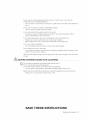 11
11
-
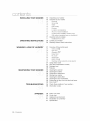 12
12
-
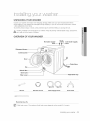 13
13
-
 14
14
-
 15
15
-
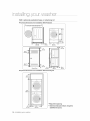 16
16
-
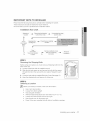 17
17
-
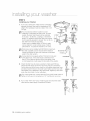 18
18
-
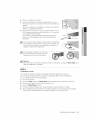 19
19
-
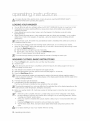 20
20
-
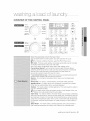 21
21
-
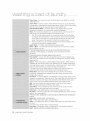 22
22
-
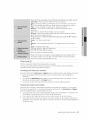 23
23
-
 24
24
-
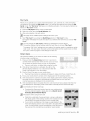 25
25
-
 26
26
-
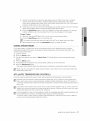 27
27
-
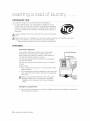 28
28
-
 29
29
-
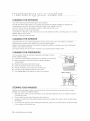 30
30
-
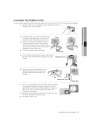 31
31
-
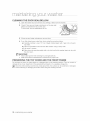 32
32
-
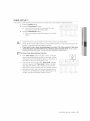 33
33
-
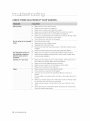 34
34
-
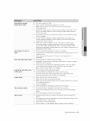 35
35
-
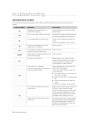 36
36
-
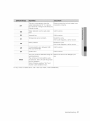 37
37
-
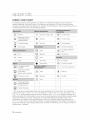 38
38
-
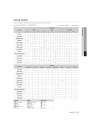 39
39
-
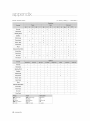 40
40
-
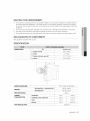 41
41
-
 42
42
-
 43
43
-
 44
44
-
 45
45
-
 46
46
-
 47
47
-
 48
48
-
 49
49
-
 50
50
-
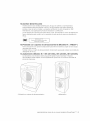 51
51
-
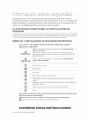 52
52
-
 53
53
-
 54
54
-
 55
55
-
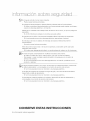 56
56
-
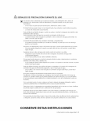 57
57
-
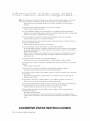 58
58
-
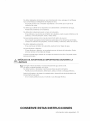 59
59
-
 60
60
-
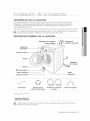 61
61
-
 62
62
-
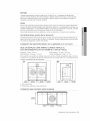 63
63
-
 64
64
-
 65
65
-
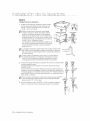 66
66
-
 67
67
-
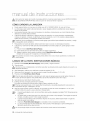 68
68
-
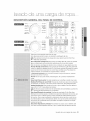 69
69
-
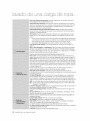 70
70
-
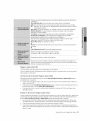 71
71
-
 72
72
-
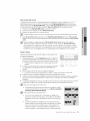 73
73
-
 74
74
-
 75
75
-
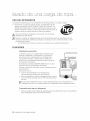 76
76
-
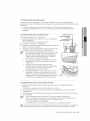 77
77
-
 78
78
-
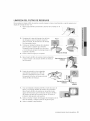 79
79
-
 80
80
-
 81
81
-
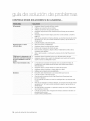 82
82
-
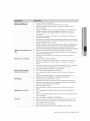 83
83
-
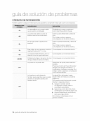 84
84
-
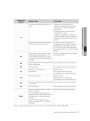 85
85
-
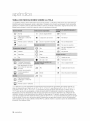 86
86
-
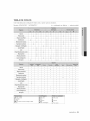 87
87
-
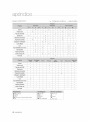 88
88
-
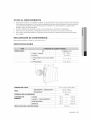 89
89
-
 90
90
-
 91
91
-
 92
92
-
 93
93
-
 94
94
-
 95
95
-
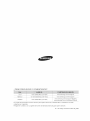 96
96


Samsung WF397UTPA Serie El manual del propietario
- Categoría
- Lavadoras
- Tipo
- El manual del propietario
- Este manual también es adecuado para
En otros idiomas
Documentos relacionados
-
Samsung WF435ATGJRA/A2-00 El manual del propietario
-
-
Samsung WF397UTPAGR/A2 Manual de usuario
-
-
-
-
-
-
-