Kenmore Elite 79043999403 El manual del propietario
- Categoría
- Encimeras
- Tipo
- El manual del propietario

®
LECTRIC COOKTOP
PLANCHA COCl
Models, Modelos 790.4399=',_
°,."= Color number, n_mero de color
f
ELECTRICA
iii.........
Sears Roebuck and Co., Hoffman Estates, IL 60179 U.S.A.
www, sears,oom
P/N 318200614 Rev. D (0601)

Table of Contents
CooktopWarranty ..................................................................... 2
iMPORTANTSAFETY INSTRUCTIONS ................................. 3-4
Product Record ......................................................................... 4
Serial PlateLocation ................................................................. 4
Protection Agreements ............................................................ 5
CooktopControlFunctions ...................................................6-7
Surface Cooking ........................................................................ 7
Setting Surface Controls ..................................................... 8=11
, General Cooktop Information.............................................8-9
, Operating Single Radiant Surface Elements ........................ 9
, Operating Dual Radiant Surface Element ........................... 10
, Operating Bridge Element .............................................. 10-11
, Surface Controls Lock Feature ............................................ 11
General Care & Cleaning ................................................... 12-13
, Cooktop Cleaning Maintenance .......................................... 12
,, Cleaning Recommendations for the Ceramic
Glass Cooktop ...................................................................... 12
,, Do Not Use the Following on the
Ceramic Glass Cooktop ....................................................... 13
,, Special Caution for Aluminium Foil and
Aluminium Cooking Utensils ............................................... 13
UsingWoks .............................................................................. 14
Canning Tips & information .................................................... 14
Before You Call ........................................................................ 15
Espaffol ............................................................................... 17-32
Sears Service .......................................................... Back Cover
Kenmore Elite Appliance Warranty
OneYear Limited Warranty
When installed, operated and maintained according to all instructionssupplied with the product, ifthis appliance fails due to
a defect in material or workmanship within one year from the date of purchase, ca[[ 1-800-4-MY-HOME ®to arrange for free
repair. If this appliance is used for other than private family purposes, this warranty applies for only 90 days from the date of
purchase.
This warranty covers only defects in material and workmanship. Sears will NOT pay for:
1. Expendable items that can wear out from normal use, including but not limited to filters, belts, light bulbs, and bags.
2. A service technician to instruct the user in correct product installation, operation or maintenance.
3. A service technician to clean or maintain this product.
4. Damage to or failure of this product if it is not installed, operated or maintained according to all instructions supplied with
the product.
5. Damage to or failure of this product resulting from accident, abuse, misuse or use for other than its intended purpose.
6. Damage to or failure of this product caused by the use of detergents, cleaners, chemicals or utensils other than those
recommended in all instructions supplied with the product.
7. Damage to or failure of parts or systems resulting from unauthorized modifications made to this product.
FIVE=YEAR LIMITED WARRANTY
For the second through the fifth year from the date of purchase, when installed and operated according to the Installation
instructions and Use & Care Guide, Sears will supply the following range parts free of charge ifthey fail for the reasons
listed below. Customer must pay labor cost of installation.
= Cooktop glass if it fails due to thermal shock.
Cooktop elements ifthey are defective.
What Sears will not cover:
• Failure of the product ifit isabused, misused, or used for other than the intended purpose.
• Damage to the cooktop glass caused by the use of cleaners or utensils other than the recommended cleaning cream
and tools.
= Damage to the cooktop glass caused by hardened spills of sugary materials (including starches from vegetables or
pastas) or melted plastic that are not cleaned according to the directions in the Use & Care Guide.
• Repairs to parts or systems resulting from unauthorized modifications made to the appliance.
Disclaimer of implied warranties; limitation of remedies
Customer's sole and exclusive remedy under this limited warranty shall be product repair as provided herein, implied
warranties, including warranties of merchantability or fitness for a particular purpose, are limited to one year or the shortest
period allowed by law. Sears shall not be liable for incidental or consequential damages. Some states and provinces do not
allow the exclusion or limitation of incidental or consequential damages, or limitations on the duration of implied warranties
of merchantability or fitness, so these exclusions or limitation may not apply to you.
This warranty applies only while this appliance is used inthe United States and Canada.
This warranty gives you specific legal rights, and you may also have other rights which vary from state to state.
Sears, Roebuck and Co., Dept. 817WA, Hoffman Estates, IL 60179
Sears Canada Inc.,Toronto, Ontario, Canada M5B 2B8
Printed in United States 2

important Safety instructions
Read all instructions before using this appliance.
Save these instructions for future reference.
This manual contains important safety symbols and instructions. Please pay attention to these symbols and follow all instructions
given.
Thssymbo w he Paelt you to iuaionsthai may cause SetOu; bo_ haim deaih or pl;p;ity damage
This symbol will help alert you to situations that mayCause bodily injury or property damage.
• Remove all tape and packaging wrap before using the
appliance. Destroy the carton and plastic bags after
unpacking the appliance. Never allow children to play
with packaging material.
= Proper Installation. Be sure your appliance is properly
installed and grounded by a qualified technician in
accordance with National Electrical Code ANSI/NFPA
No.70-1atest edition and local code requirements.
Install only per installation instructions provided in the
literature package for this appliance.
Ask your dealer to recommend a qualified technician and an
authorized repair service. Know how to disconnect the
electrical power to the appliance at the circuit breaker or fuse
box in case of an emergency.
= User Servicing. Do not repair or replace any part of the
appliance unless specifically recommended in the
manuals. All other servicing should be done only by a
qualified technician to reduce the risk of personal injuryand
damage to the appliance.
= Never modify or alter the construction of an appliance
by removing panels, wire covers or any other part of the
product.
• Storage on Appliance. Flammable materials should
not be stored near surface units. This includes paper,
plastic and cloth items, such as cookbooks, plasticware
and towels, as well as flammable liquids. Do not store
explosives, such as aerosol cans, on or near the appliance.
Flammable materials may explode and result in fire or
property damage.
Do not store items of interest to children in
the cabinets above the appliance.
= Do not leave children alone. Children should not be left
alone or unattended in the area where an appliance is
in use. They should never be allowed to sit or stand on any
part of the appliance.
= DO NOT TOUCH SURFACE UNITS OR AREAS NEAR
THESE SURFACES. Surface units may be hot even
though they are dark incolor. Areas near surface units may
become hot enough to cause burns. During and after use,
do not touch, or let clothing or other flammable materials
touch these areas until they have had sufficient time to
cool. Among these areas are the cooktop and areas facing
the cooktop.
Wear Proper Apparel. Loose-fitting or hanging
garments should never be worn while using the
appliance. Do not let clothing or other flammable
materials contact hot surfaces.
Never use your appliance for warming or
heating the room. i:'........
• Do Not Use Water or Flour on Grease Fires. Smother
the fire with a pan lid, or use baking soda, a dry ........
chemical or foam-type extinguisher.
• When heating fat or grease, watch it closely. Fat or
grease may catch fire if allowed to become too hot.
Use Only Dry Potholders. Moist or damp potholders
on hot surfaces may result in burns from steam. Do not
let the potholders touch hot heating surface units. Do not
use a towel or other bulky cloth instead of a potholder.
• Do Not Heat Unopened Food Containers. Buildup of
pressure may cause the container to burst and result
in injury.
iMPORTANT. Do not attempt to operate the cooktop
during a power failure, ifthe power fails, always turn off
the cooktop. If the cooktop isnot turned off and the power
resumes, the cooktop will begin to operate again. Food left
unattended could catch fire or spoil.
IMPORTANT INSTRUCTIONS FOR USING
YOUR COOKTOP
• Know which touch pad controls each surface unit.
Clean the appliance regularly to keep all parts free of
grease that could catch fire. Exhaust fan ventilation
hoods and grease filters should be kept clean. Do not allow
grease to accumulate on hood or filter. Greasy deposits in
the fan could catch fire.When flaming food under the hood,
turn fan on. Refer to hood manufacturer's instructions for
cleaning.

important Safety instructions
Use Proper Pan Size. This appliance is
equipped with one or more surface units of different sizes.
Select utensils having flat bottoms large enough tocover the
surface unit. The use of undersized utensils will expose a
portion of the surface heating unit to direct contact and may
result in ignitionof clothing. Proper relationship of utensil to
the surface unit will also improve efficiency.
• Utensil Handles Should BeTurned inward and Should
Not Extend Over Adjacent Surface Units. To reduce the
risk of burns, ignition of flammable materials, and spillage
due to unintentional contact with the utensil.
• Never Leave Surface Units Unattended. Boilovers cause
smoking and greasy spillovers that may ignite,ora pan that
has boiled dry may melt.
FOR GLASS COOKTOP ONLY
• Do Not Clean or Operate a Broken Cooktop. Ifcooktop
should break, cleaning solutions and spillovers may
penetrate the broken cooktop and create a risk of electric
shock. Contact a qualified technician immediately.
Clean Cooktop with Caution. Ifa wet sponge or cloth is
used to wipe spills on a hot cooking area, be careful to avoid
a steam burn. Some cleaners can produce harmful fumes
if applied to a hot surface.
• Do Not Place Hot Cookware on Cold Cooktop Glass.
This could cause glass to break.
• Donotslidepansacrossthecooktopsurface. Theymay
scratch the cooktop surface.
• Protective Liners. Do not use aluminum foil to line any part
of the appliance. Only use aluminum foil as recommended
for baking ifused as a cover placed on the food. Any other
use of protective liners or aluminum foil may result in a risk
of electric shock or fire or short circuit.
• Glazed Cooking Utensils. Only certain types of glass,
glass/ceramic, ceramic, earthenware, or other glazed
utensils are suitable for range top service without breaking
due to the sudden change in temperature. Check the
manufacturer's recommendations for cooktop use.
• Ventilating hood. The ventilating hood above your
cooking surface should be cleaned frequently, so the
grease from cooking vapors does not accumulate on the
hood or filter.
Do not let pans boil dry. This may cause permanent
damage inthe form of breakage, fusion, or making that can
affect the ceramic-glass cooktop. (This type of damage is
not covered by you rwarranty).
IMPORTANT SAFETY NOTICE
The California Safe Drinking Water and Toxic Enforcement
Act requires the Governor of California to publish a list of
substances known to the state to cause cancer, birth
defects or other productive harm, and requires businesses
to warn customers of potential exposure to such
substances.
IMPORTANTINFORMATION FOR PROPER iNFRARED TOUCH CONTROL FUNCTION
In order to prevent faulty adjustment of the controller sensors due to foreign light, the intensity of illumination at the
first power on should not exceed 1000 lux. Direct irradiation of the touch panel with light from a spotlight should be
avoided during the power process.
if the illumination exceeds 1000 lux, the control doesn't display the version and stop the automatic adjustment, in this
case turn down the controls switch of the light till the illumination is lower than 1000 lux.
Product Record
(See Serial Plate Location below)
Model No. 790.
Serial No. Save your sales receipt for future reference.
Date of Purchase
Serial Plate Location
You will find the model and serial number printed on the
serial plate. The serial plate is located under the cooktop.
Please see the illustrationfor exact location. Remember to
record the serial number for future reference (See Product
Record above).

PROTECTION AGREEMENTS
in the U.S.A.
Master Protection Agreements
Congratulations on making a smart purchase. Your new
Kenmore ®product is designed and manufactured for years
of dependable operation. But like all products, it may require
preventive maintenance or repair from time to time. That's
when having a Master Protection Agreement can save you
moneyand aggravation.
Purchase a Master Protection Agreement now and protect
yourself from unexpected hassle and expense.
The Master Protection Agreement also helps extend the life
of your new product. Here's what's included in the
Agreement:
I_ Expert service by our 12,000 professional repair
specialists
1_ Unlimited service and no charge for parts and labor on
all covered repairs
[_ "No-lemon"guarantee- replacement
of your covered product if four or more product failures
occur within twelve months
I_ Product replacement if your covered product can't be
fixed
[23" Annual Preventive Maintenance Checkatyour request
- no extra charge
[23" Fast help by phone- phone support from a Sears
technician on products requiring in-home repair, plus
convenient repair scheduling
5_" Power surge protection against electrical damage due
to power fluctuations
[23" Rental reimbursement ifrepair of your covered product
takes longer than promised
Once you purchase the Agreement, a simple phone call is
all that it takes for you to schedule service. You can call
anytime day or night, or schedule a service appointment
online.
In Canada
Maintenance Agreements
Your purchase has added value because you can depend
on Sears HomeCentraPfor service. With over 2400
Service Technicians and more than a million parts and
accessories, we have the tools, parts, knowledge and
skills to ensure our pledge: We Service What We Sell.
Your Kenmore®product is designed, manufactured
and tested to provide years of dependable operation. But
like all products, it may require service from time to time.
The Sears Maintenance Agreement offers you an
outstanding service program, affordably priced.
The Sears Maintenance Agreement:
Is your way to buy tomorrow's service at today's price
Eliminates repair bills resulting from normal wear and
tear
Provides phone support from a Sears technician on
products requiring in-home repair
Even if you don't need repairs, provides an annual
Preventive Maintenance Check, at your request, to
ensure that your product is in proper running condition.
Some limitations apply. For more information about
Sears Canada Maintenance Agreements,
call 1-800-361-6665
iF........
Sears has over 12,000 professional repair specialists, who
have access to over 4.5 million quality parts and
accessories. That's the kind of professionalism you can
count on to help prolong the life of your new purchase for
years to come. Purchase your Master Protection Agreement
today!
Some limitations and exclusions apply.
For prices and additional information call
1-800-827-6655.
Sears Installation Service
For Sears professional installationof home
appliances, garage door openers, water heaters,
and other major home items, in the U.S.A. call
1-800-4-MY-HOME ®
REV. 030509

Cooktop Control Functions
READ THESE iNSTRUCTiONS CAREFULLY BEFORE USING THE COOl(TOP
.............BRIDGE iNDiCATOR LIGHT- will glow when the Bridge element is selected.
BRIDGE ELEMENT CONTROL - Touch this pad to activate the Bridge element. The Bridge element will not
activate until the left front single element is also turned ON. (See page t0)
DUAL ELEMENT iNDiCATOR LIGHT -will glow when the Dual element isselected.
i?
_ Theouter
.................... .......... ON. (See page 10)
BOTI- 0 ..........
O POWER LEVEL & HOT SURFACE INDICATORS (4 locations) - These indicators show
the selected Power Level setting. Also, the indicators flash "H" when you turn an element
OFF but the cooktop is still ON, indicating that the cooktop surface is too hot to touch.
ELEMENTSELEMENTS The "H" will glow steadily when you turn OFF the entire cooktop, also indicatingthat the
.........cooktop may be hot to the touch. In each case the "H" light will go out within 30 minutes.
...........................................................................RIGHT REAR SINGLE ELEMENT ON/OFF - Use this pad to turn element ON or
OFF. Once the element isturned ON, use the Up or Down arrow pads to change
the Power Level settings. (See page 9)
V
O O POWER LEVEL UP & DOWN ARROW PADS (4 locations) - Use these pads to
...........................................................................................................................................................................increase or decrease the Power Level settings to higher or lower temperatures. The
temperature settings are from 1 (lowest) to 9 (highest). The 0 setting has no heat
ONIOFF level.
......................................................................LEFT REAR SINGLE ELEMENT ON/OFF - Use this pad to turn element ON or
OFF. Once the element isturned ON, use the Up or Down arrow pads to change the
V A Power Level settings.
C)C)
ON/OFF
................................................................................LEFT FRONT SINGLE (& BRIDGE) ELEMENT ON/OFF - Use this pad to turn
element ON or OFF. Once the element isturned ON, use the Up or Down arrow
pads to change the Power Level settings. This element must be turn ON before you
V A connect the Bridge element to it.
C)C)
ON/OFF
.........................................................................RIGHT FRONT SINGLE (& DUAL) ELEMENT ON/OFF - Use this pad to turn
element ON or OFF. Once the element isturned ON, use the Up or Down arrow
pads to change the Power Level settings. This element must be turned on before
V A you touch the Dual Element pad.
_ LOCK INDICATOR LIGHT- The Lock Indicator Light will glow when lock isproperly activated.
COOl(TOP LOCK ON/OFF PAD - Use to disable all cooktop functions. Touch and hold pad
o for at least 2 seconds to activate the Lock feature ON or OFF. The cooktop will not lock if
POWER LOCK ................
O _. ................any element isin use. The Power to the entire cooktop must be turned OFF in order to Lock
the cooktop. Deactivate the Lock feature by touching and holding down for 2 seconds.
(See page11 )
COOl(TOP POWER ON/OFF PAD - Use this pad to turn power ON or OFF to the entire cooktop. IMPORTANT: You must
power cooktop ON before any element may be used. To turn power ON you must press and hold the Power ON/OFF pad for at
least 2 seconds. 6

Cooktop Control Functions
Using the Touch Control
The recommended way to use the
touch pads on the cooktop is
shown in the illustration. Be sure
that your finger is placed in the
center of the touch pad as shown.
Contact the pad with the flat part
of your fingertip. Do not just use
the narrow end of your fingertip.
Recommended finger
position for touch pads
iii'%
Surface Cooking
Use Proper Cookware *CORRECT INCORRECT__
W _w ':''i:'
Cookware should have flat bottoms
that make good contact with the t t
entire surface heating element. • Flatbottomandstraight
Check for flatness by rotating a ruler sides.
across the bottom of the cookware • Tightfittinglids.
(See Figure 2). Be sure to follow the - Weightof handledoesnot
tilt pan. Pan is well
recommendations for using balanced.
cookware as shown in Figure 1. • Pansizesmatchthe
amount of food to be
prepared and the size of
the surface element.
® Made of a material that
conducts heat well.
• Easy to clean.
® Always match pot diameter
to element surface
diameter.
Note: The size and type of
cookware used will influence the
setting needed for best cooking
results.
o Curved and warped pan
bottoms.
• Pan overhangs element by
more than one-half inch.
÷1 I,_
• Pan is smaller than
element.
• Heavy handle tilts pan.
Figure 2
Figure 1

Setting Surface Controls
General Cooktop information
About the Ceramic Glass Cooktop
The ceramic cooktop has radiant surface elements
located below the surface of the glass. The design of the
ceramic cooktop outlines the area of the surface element
underneath. Make sure the diameter of the pan matches
the diameter of the element outline on the cooktop (See
Figure 1).
Heat is transferred up through the surface of the cooktop
to the cookware. Only flat-bottom cookware should be
used. The type and size of cookware, the number of
surface elements in use and their settings, are all factors
that will affect the amount of heat that will spread to
areas beyond the surface elements. The areas
surrounding the elements may become hot enough to
cause burns.
About the Radiant Surface Elements
The element temperature rises gradually and evenly. As
the temperature rises, the element will glow red. To
maintain the selected setting, the element will cycle on
and off. The heating element retains enough heat to
provide a uniform and consistent heat during the off
cycle. For efficient cooking, turn off the element several
minutes before cooking is complete. This will allow
residual heat to complete the cooking process.
Locations of the Radiant Surface Elements
and Controls
Your cooktop isequipped with radiant surface burners
with 4 different wattage ratings. The ability to heat food
quicker and in larger volumes increases as the element
wattage increases.
The radiant surface elements are located on the cooktop
as follows (See Figure 2):
• One small 6 inch radiant element located at the right
rear position
= One dual 6 or 9 inch radiant element located at the
right front position
• Two 8 inch radiant elements located at both the left
front and rear positions.
• One Bridge radiant element located between left front
and rear elements.
See pages 10 and 11 for more information about using
Bridge radiant element.
NOTE: (White glass cooktops only). Due to the high
intensity of heat generated by the surface elements, the
glass surface will turn green when the element isturned
off. This phenomenon isnormal and the glass will come
back to itsoriginal white color after ithas completely
cooled down.
Cooktop Appearance
Figure 1
Cooktop radiant areas that heat
Figure 2
NOTE: Please read detailed instructionsfor ceramic
glass cooktop cleaning in the General Care & Cleaning
section and Before You Call checklist section of this
Use and Care Guide.
NOTE: Radiant elements have a limiter that allows the
element to cycle on and off, even at the Hi setting. This
helps to prevent damage to the ceramic cooktop. Cycling
at the Hi setting isnormal and can occur if the cookware
istoo small for the radiant element or if the cookware
bottom isnot flat (For information concerning cookware,
refer to use proper cookware on page 7 of this Use and
CareGuide)

Setting Surface Controls
General Cooktop information
Use the chart below to determine the correct setting for the kind of food you are
preparing. The Simmer settings are used to simmer and keep larger quantities of foods
warm such as stews and soups. The lower Simmer settings are ideal for delicate foods
and melting chocolate or butter.
Note: The size and type of cookware used will influence the setting needed for best
cooking results.
Recommended Settings Table
.............................................f°r Sing!e, Dual and Bddge surface E!ements ...............................................................................................................................................
9(High)
5-8 (Medium high)
5(Medium)
2-4 (Medium low)
1-2 (Low)
Start most foods, bring water to a boil, pan broiling
Continue a rapid boil, fry, deep fat fry
Maintain a slow boil, thicken sauces and gravies, steam vegetables
Keep foods cooking, poach, stew
Keep warm, melt, simmer
Radiant
surface elements may appear
to have cooled after they
have been turned off. "H" will
appear in the display and will
continue to glow for 30
minutes or less. The glass
surface may still be hot and
burns may occur.
Do not place
plastic items such as salt
and pepper shakers, spoon
holders or plastic
wrappings on top of the
range when it is in use.
These items could melt or
ignite. Potholders, towels or
wooden spoons could catch
fire if placed too close to the
surface elements.
Operating the Single Radiant Surface Elements
The cooktop has single radiant surface elements at 3 locations; right rear, left
rear and left front element positions. There is also a Bridge element that can be
connected to the left front element (See Bridge Element Operating instructionson
pages 10-11 ).
To Operate the Single Surface Elements:
1. Place correctly sized cookware on the radiant surface element.
2,
3,
4,
Touch POWERpad (See Figure 3) for2 seconds, a beep will sound and steady
ON/OFF
"-" will appear in all displays. Touch ON/OFFpad (See Figure 2) of the selected
cooking surface and "0" will appear inthe display. Touch iX. or V pads
(See Figure 2) to set the element at the temperature desired. To instantly
reset temperature to "0" touch /X. and V simultaneously. A beep will be
heard each time the pads are touched.
Start most cooking operations on a higher setting and then decrease to a
lower setting to finish cooking. Each surface element provides a constant
amount of heat at each setting. A glowing red surface heating area extending
beyond the bottom edge of the cookware indicates the cookware is too small
for the surface heating area.
When cooking has finished on any of the surface elements, touch ON/OFFpad
to turn OFF that element. The indicator(s) will flash "H" when the cooktop is
ON but the element is turned OFF indicating that the surface may be hot to
the touch. The flashing "H" indicator will turn OFF after 30 minutes or less.
To switch the entire cooktop OFF touch and hold the POWERpad for 2 seconds
ON/OFF
(a beep will sound) and release. When the cooktop is powered OFF the "H"
will glow steadily indicating the cooktop may be hot to the touch. The "H"
indicator will turn OFF after 30 minutes or less.
ON/OFF
\
V i
_ure 3
Figure 2
Note: The entire cooktop will automatically power OFF 10 seconds after all
surface elements have been turned OFF.
Note: See Recommended Surface Element Settings Table above.
iF........

Setting Surface Controls
Operating the Dual Surface Radiant Element
The cooktop is equipped with a dual radiant surface element located at the right front
position. (See Figures 1and 2)
To Operate the Dual Surface Element:
1. Place correctly sized cookware on the dual surface element.
2.
Touch POWERpad (See Figure 3, on page 9) for 2 seconds, a beep will sound and steady
ONtOFF
"-" will appear in all displays. Touch ON/OFFpad (See Figure 2, on page 9) of the selected
cooking surface and "0" will appear inthe display. For smaller cookware, touch /X or
V pads (See Figure 2, on page 9) to set the element at the temperature desired. If
@
largercookware is used, touch Bo,. pad (See Figure 1, on page 9) and then touch /X.
ELEMENTS
or V pads to set the element at the temperature desired. You may switch from either
of these settings at any time during cooking with the dual element by touching _o,,0pad.
ELEMENTS
To instantly reset temperature to "0" touch /X. and V simultaneously. A beep will be
heard each time the pads are touched.
3.
Start most cooking operations on a higher setting and then turn to a lower setting to
finish cooking. Each surface element provides a constant amount of heat at each
setting. A glowing red surface heating area extending beyond the bottom edge of the
cookware indicates the cookware is too small for the surface heating area.
4.
When cooking has finished on any of the surface elements, touch ON/OFFpad to turn
OFF that element. The indicator(s) will flash "H" when the cooktop is ON but the
element is turned OFF indicating that the surface may be hot to the touch. The flashing
"H" indicator will turn OFF after 30 minutes or less.
To switch the entire cooktop OFF touch and hold the POWERpad for 2 seconds (a beep
ON/OFF --
will sound) and release. When the cooktop is powered OFF the "H" will glow steadily
indicating the cooktop may be hot to the touch. The "H" indicator will turn OFF after 30
minutes or less.
Note: The entire cooktop will automatically power OFF 10 seconds after all surface elements
have been turned OFF.
Note: See Recommended Surface Element Settings Table on page 9.
Radiant surface elements may appear to have cooled after they have been
turned off. "H" will appear in the display and will continue to glow for 30 minutes or less. The
glass surface may still be hot and burns may occur.
Figure 1
Figure 2
Operating the Bridge Element
The cooktop contains a Bridge element that you may connect with the left front element to
allow for griddle-type cooking with suitably long rectangular or oval cookware. When the
Bridge element is engaged, a single control maintains even temperature across both
elements. See figure 3. For even longer cookware, turn on the left rear element. See figure
4. Since it has an independent control, you may set the rear element to the same cooking
temperature as the Bridge, or to a cooler temperature to create an area on the cookware
surface for keeping food warm.
To Operate the Bridge Element:
1. Place correctly sized cookware on the Bridge surface element.
2. Touch PowE,pad (See Figure 3, on page 9) for 2 seconds, a beep will sound and steady
ON/OFF
"-" will appear in all displays. Touch ON/OFFpad (See Figure 2, on page 9) of the left front
10
Figure 3
Figure 4

element and "0" will appear in the display. Touch Uo pad (See Figure 1, on page 9) to
connect bridge element and then touch /_ or V pads to set the temperature
desired. You may disconnect the bridge element at any time during cooking by
touching _, pad. To instantly reset temperature to"O" touch /_. and V
BEM_TS
simultaneously. A beep will be heard each time the pads are touched.
3.
Start most cooking operations on a higher setting and then decrease to a lower setting
to finish cooking. Each surface element provides a constant amount of heat at each
setting. A glowing red surface heating area extending beyond the bottom edge of the
cookware indicates the cookware is too small. Please note that not all cookware will
fit the Bridge element correctly.
4.
When cooking has finished on any of the surface elements, touch ON/OFFpad to turn
OFF that element. The indicator(s) will flash "H" when the cooktop is ON but the
element is turned OFF indicating that the surface may be hot to the touch. The
flashing "H" indicator will turn OFF after 30 minutes or less.
To switch the entire cooktop OFF touch and hold the POWERpad for 2 seconds (a beep
ON/OFF
will sound) and release. When the cooktop is powered OFF the "H" will glow steadily
indicating the cooktop may be hot to the touch. The "H" indicator will turn OFF after 30
minutes or less.
Note: The entire cooktop will automatically power OFF 10 seconds after all surface
elements have been turned OFF.
Note: See Recommended Surface Element Settings Table on page 9.
_Radiant
surface elements may
appear to have cooled
after they have been
turned off. "H" will appear
in the display and will
continue to glow for 30
minutes or less. The
glass surface may still
be hot and burns may
occur.
iF........
Surface Controls Lock Feature
It is possible to lock the surface element controls by touching and holding down on LOCK
ON/OFF
pad for 2 seconds. One beep will sound and the Lock indicator light will glow when properly
activated.
Ii
To unlock the surface elements touch and hold down Loc, pad for 2 seconds. One beep
ON/OFF
will sound and the Lock Indicator light will turn off.
11

General Care & Cleaning
Cooktop Cleaning & Maintenance
Consistent and proper cleaning is essential to maintaining your ceramic glass cooktop
Prior to using your cooktop for the first time, apply the recommended CookTopO Cleaning Creme to the ceramic surface
(on the web visit www.sears.com for replacement cooktop cleaner, item number 40079). Buff with a non-abrasive cloth or
no-scratch cleaning pad. This will make cleaning easier when soiled from cooking. The special cooktop cleaning cream
leaves a protective finish on the glass to help prevent scratches and abrasions.
Sliding aluminum or copper clad bottom pans on the cooktop can cause metal
markings on the cooktop surface. These marks should be removed immediately
after the cooktop has cooled using the cooktop cleaning cream. Metal marks can
become permanent ifnot removed prior to future use.
Cookware (cast iron, metal, ceramic or glass) with rough bottoms can mark or
scratch the cooktop surface. Do not slide anything metal or glass across the
cooktop. Do not use your cooktop as a cutting board or work surface in the
kitchen. Do not cook foods directly on the cooktop surface without a pan. Do not
drop heavy or hard objects on the glass cooktop, because they may cause it to
crack.
Cleaning Recommendations for the Ceramic Glass Cooktop
Before cleaning the cooktop, be sure the controls are turned to OFF and the cooktop is COOL.
DO NOT use a cooktop cleaner on a hot cooktop. The fumes can be hazardous to your health, and can
chemically damage the ceramic-glass surface.
For light to moderate soil:
Apply a few drops of CookTopO Cleaning Creme directly to the cooktop. Use a paper towel or use a non=abrasive plastic
type no=scratch pad to clean the entire cooktop surface. Make sure the cooktop iscleaned thoroughly, leaving no residue.
For heavy, burned on soil:
Apply a few drops of CookTop® Cleaning Creme directly to the soiled area. Rub the soiled area using a non-abrasive
plastic type no=scratch pad, applying pressure as needed. Do not use the pad you use to clean the cooktop for any other
purpose.
if soils remain, carefully scrape soils with a metal razor blade scraper,
holding scraper at a 30 degree angle to the surface. Remove loosened soils
with cooktop cleaning cream and buff surface clean.
IMPORTANT NOTE: Damage to the ceramic glass cooktop may occur if
you use an abrasive type scratch pad. Only use cleaning products that
have been specifically designed for ceramic glass cooktop.
Plastic or foods with a high sugar content:
These types of soils need be removed immediately ifspilled or melted onto
the ceramic cooktop surface. Permanent damage (such as pitting of the
cooktop surface) may occur ifnot removed immediately. After turning the
surface elements OFF, use a razor blade scraper or a metal spatula with a
mitt and scrape the soil from the hot surface (as illustrated). Allow the
cooktop to cool, and use the same method for heavy or burned on soils.
12

General Care & Cleaning
Do not use the following on the ceramic glass cooktop:
• Do not use abrasive cleaners and scouring pads, such as metal and some nylon
pads. They may scratch the cooktop, making it more difficult to clean.
• Do not use harsh cleaners, such as chlorine bleach, ammonia or oven
cleaners, as they may etch or discolor the cooktop.
• Do not use dirty sponges, cloths or paper towels, as they can leave soil or lint
on the cooktop which can burn and cause discoloration.
Special Caution for Aluminum Foil and Aluminum Cooking
Utensils
o Aluminum foil
Use of aluminum foil will damage the cooktop. Do not use under any circum-
stances.
• Aluminum utensils
Since the melting point of aluminum ismuch lower than that of other metals, care
must be taken when aluminum pots or pans are used. If allowed to boil dry, not
only will the utensil be ruined, but it may fuse to, break or mark the ceramic glass
surface, permanetly damaging it.
iF........
13

Using Woks
For glass smoothtop models, only flat
bottomed woks (without support rings)
may be used.
Woks with flat bottoms suitable for
use on your cooktop are available in
most cookshop or hardware stores.
Wire trivets : Do not use wire trivets.
Cookware bottoms must be in direct
contact with the surface cooking ar-
eas.
DO NOT use two sur-
face cooking areas to heat one large
pan such as a roaster or griddle and
allow cooking utensils to boil dry. The
bottom surface of the pan in either of
these situations could damage the
glass ceramic cooktop.
DO NOT use a wok if itis equipped
with a metal ring that extends be-
yond the surface element. Be-
cause this ring traps heat, the sur-
face element and cooktop surface
could be damaged.
Canning Tips & Information
1. Use tested recipes and follow instructions carefully. Check with a manufacturer
of glass jars for the latest canning information.
2. Use flat-bottomed canners only. Heat is spread more evenly when the bottom
surface is flat.
3. Center canner on the surface element.
4. Start with hot water and a high heat setting to reduce the time ittakes to bring
the water to a boil ; then reduce the heat setting as low as possible to main-
tain a constant boil.
5. It is best to can small amounts and light loads.
Prevent damage to cooktop :
1. Do not use water bath or pressure canners that extend more than one inch (2,5
cm) beyond the edge of the surface element.
2. Do not leave water bath or pressure canners on high heat for an extended
amount of time.
3. Do not use large diameter canners or other large diameter pans for frying or
boiling foods other than water. Most syrups or sauces and all types of frying,
cook at temperatures much higher than boiled water. Such temperatures will
eventually damage the cooktop surface.
4. Alternate surface elements between each batch to allow the units and sur-
rounding surfaces to cool down. Try to avoid canning on the same surface
cooking area all day.
Safe canning requires that harmful microorganisms are destroyed
and the jars are sealed completely. When canning in a water bath canner, a gentle
but steady boil must be maintained continuously for the required time. When can-
ning with a pressure canner, the pressure must be maintained continuously for the
required time.
14
Canning can gener-
ate large amounts of steam. Use
extreme caution to prevent burns.
Always raise the lid to vent steam
away from you.

Before You Call
Solutions to Common Problems
Before you call for service, review this list. It may save you time and expense. The list includes common occurrences that
are not the result of defective workmanship or materials in this appliance.
OCCURRENCE POSSIBLE CAUSE/SOLUTION
Entire cooktop does
not operate.
Make sure the Lock feature is set to OFE
Service wiring is not complete. Call 1-800-4-MY-HOME® for service (See back cover).
Power outage. Check house lights to be sure. Call your local electric company for service.
Surface element does
not heat.
No power to the appliance. Check steps under"Entire Cooktop Does Not Operate" in this
Before You Call checklist.
Incorrect control setting. Be sure the Lock feature is set to OFF. Make sure the Cooktop
POWER pad has been set for ON. Make sure the corresponding pad for the element to be
used is set for ON. Raise or lower the power level settings until the proper amount of heat is
obtained.
Surface element too
hot or not hot enough.
Incorrect control setting. Be sure the Lock feature is set to OFF. Make sure the Cooktop
POWER pad has been set for ON. Make sure the corresponding pad for the element to be
used is set for ON. Raise or lower the power level settings until the proper amount of heat is
obtained.
Voltage is incorrect. Be sure appliance is properly connected to the specified power source. If !',i:'i
your not sure about this requirement call 1-800-4-MY-HOME® for service (See back cover). "_._
Lightweight or warped pans were used. Be sure to use proper cookware. Use only flat bottom
evenly balanced medium or heavyweight cookware. Heavy and medium weight pans heat
evenly. Because lightweight pans heat unevenly, foods may burn easily.
Food not heating
evenly.
Lightweight or warped pans were used. Be sure to use proper cookware. Use only flat bottom
evenly balanced medium or heavyweight cookware. Heavy and medium weight pans heat
evenly. Because lightweight pans heat unevenly, foods may burn easily.
Incorrect control setting. Be sure the Lock feature is set to OFF. Make sure the Cooktop
POWER pad has been set for ON. Make sure the corresponding pad for the element to be
used is set for ON. Raise or lower the power level settings until the proper amount of heat is
obtained.
Scratches or abrasions
on Ceramic glass
cooktop surface.
Coarse particles such as salt or sand between cooktop and utensils can cause scratches. Be
sure cooktop surface and bottoms of utensils are clean before usage. Small scratches do not
affect cooking and will become less visible with time.
Cleaning materials not recommended for ceramic-glass cooktop have been used. See General
Care & Cleaning section in this Use and Care Guide.
Cookware with rough bottom has been used. Use smooth, flat-bottomed cookware.
Metal marks on Ce-
ramic glass cooktop
surface.
Sliding or scraping of metal utensils on cooktop surface. Do not slide metal utensils on
cooktop surface. Use a ceramic-glass cooktop cleaning cream to remove the marks. See
General Care & Cleaning section in this Use and Care Guide.
Brown streaks and
specks on Ceramic
glass cooktop surface.
Boilovers have cooked onto surface. Use razor blade scraper to remove soil. See General
Care & Cleaning section in this Use and Care Guide.
Cleaning materials not recommended for ceramic-glass cooktop have been used. Use recom-
mended cleaners and cleaning method. See General Care & Cleaning section in this Use
and Care Guide.
Areas of discoloration
on Ceramic glass
cooktop surface.
Mineral deposits from water and food. Remove using a ceramic-glass cooktop cleaning creme.
Use cookware with clean, dry bottoms.
15

Notes
16

Tabla de rnaterias
Garantia de laplancha de cocina ..........................................17
IMPORTANTES INSTRUCCIONES DE SEGURIDAD...... 18-19
Registro del Producto............................................................19
Ubicacibn de la pmacade serie ..............................................19
Acuerdes de protecci6n ........................................................20
Controles de la planche de cocina .......................................21
Funcienes decontrol de laplancha decocina .....................22
Cocinandoen la estufa ..........................................................22
Ajuste de los Controies Superiores ............................... 23-26
. Generalidades sobre la cubierta de vidrio cerb,mico ..........23
,, Funcionamiento de los Elementos Superiores
Radiantes Sencillos ............................................................. 24
,, Funcionamiento del Elemento Radiante Doble .................. 25
,, Funcionamiento del Elemento Radiante de Puente ..... 25-26
,, Dispositivo de bloqueo de los controles de superficie ....... 26
Cuidado y Limpieza General ........................................... 27-28
Caserolas y soportes especiales ......................................... 29
Truces para el cierre de cacerolas e informaci6n .............. 29
Antes de Llamar ..................................................................... 30
Servicio Sears ................................................ Cubierta trasera
Garant{a de electrodom_sticos Kenmore Elite
Garant_a limitada de un a_o
Si este producto falla debido a un defecto de material o mane de obra durante el primer aSo a partir de la fecha de
compra cuando se instala, utiliza y mantiene de acuerdo con todas las instrucciones proporcionadas con el producto,
Ilame al l=888=SU=HOGAR sMpara hacerlo reparar de manera gratuita. Si este electrodom_stico se usa para fines que no
sean privados de familia, esta garantia es vbJida Onicamente per 90 dias a partir de la fecha de compra.
Esta garantia cubre _nicamente los defectos de material y mane de obra. Sears NO pagarA Io siguiente:
1. Articulos desechables que se desgasten per use normal, incluyendo sin limitarse a los filtros, correas, bombillas y bolsas.
2.T_cnicos de servicio que instruyanal usuario en la manera adecuada de instalar,utilizar o mantener el producto.
3.T_cnicos de servicio que limpien o realicen mantenimiento al producto.
4. DaSos o fallas de este producto si el mismo no rue instalado, utilizado o mantenido de acuerdo con todas las
instruccionesproporcionadas con el producto.
5. DaSos o fallas de este producto per accidente, abuse o real use del producto o use para fines para los cuales no fue
diseSado.
6. DaSos o fallas de este producto per el use de detergentes, limpiadores, quimicos o utensilios que no sean los
recomendados en todas las instrucciones proporcionadas con el producto.
7. DaSos o fallas de piezas o sistemas per modificaciones al producto que no hayan side autodzadas.
GARANT|A LIMITADA DE CINCO ANOS
Desde el segundo y hasta el quinto a_o a partir de la fecha de compra, cuando se instala y opera de acuerdo con las
Instrucciones de instalaci6n y con la Guia de use y cuidado, Sears proporcionarA las siguientes piezas de la estufa
sin costo alguno si fallan per las razones que se indican a continuaci6n. El cliente debera pagar los costos de mane
de obra de la instalaci6n.
• Vidrio de la cubierta si falla debido a cheque t_rmico.
• Elementos superiores si estan defectuosos.
Lo que Sears no cubre: f_
• Fallas del producto per abuse, real use o use para prop6sitos para los cuales este electrodom_stico no fue diseSado.
• DaSos al vidrio de la cubierta causados per el use de limpiadores o utensilios que no sean las cremas de limpieza y
los accesodos recomendados.
• DaSos al vidrio de la cubierta causados per derrames endurecidos de materiales azucarados (incluyendo el almid6n
de las verduras o pasta) o de plAstico derretido que no se limpien de acuerdo con las instrucciones de la Guia de use
y cuidado.
• Reparaciones alas piezas o sistemas que resulten de modificaciones al electrodom_stico que no hayan side
autorizadas.
Renuncia de responsabilidades de garantias implicitas; limitaci6n de acciones legales
La _nica y exclusiva opci6n del cliente bajo esta garantia limitada es la reparaci6n del producto seg_n se indica. Las
garantias implicitas, incluyendo las garantias de comercializaci6n o aptitud del producto para un prop6sito especifico, estAn
limitadas a un aSo o al periodo minimo permitido per ley.Sears no sera responsable per daSos consecuentes o incidentales.
AIgunos estados y provincias no permiten la exclusi6n o limitaci6n de daSos incidentales o consecuentes o las limitaciones
de duraci6n de las garantias implicitas de comercializaci6n o aptitud, per Io que estas exclusiones o limitaciones pueden no
aplicarse en su case.
Esta garantia se aplica Qnicamente mientras este electrodom_stico este en use dentro de los Estados Unidos o CanadA.
Esta garantia le otorga derechos legales especificos. Usted puede tenet ademas otros derechos que varian de un estado a
otro.
Sears, Roebuck and Co., Dept. 817WA, Hoffman Estates, IL 60179
Sears Canada Inc.,Toronto, Ontario, Canada M5B 2B8
Impreso en los Estados Unidos 17

Importantes Instrucciones de Seguridad
Lea todas las instrucciones antes de utilizar el aparato
Guarde estas instrucciones para futura consultaci6n
Este manual contiene importantes mensajes de seguridad. Simpre lea y obedezca todo mensaje de seguridad.
Indica Una situaci6n muy peligrosa, la Cua! de n0 sei evitada puede ocasi0nar graves heridas Y hasta !a
muerte :
Indica una situaci6n de peligro inminente, la cual de no set evitada puede ocasionar hefidas leves o da5os al
producto solamente.
* Retire toda cinta adhesiva y empaquetado antes de usar
la estufa. Destruya el cart6n y las bolsas de pl_stico
despues de haber desenvuelto la estufa. No permita que
los niSos juegen con el material de empaquetado.
Instalaci6n apropiada- AsegQrese que su aparato est_
bien instaladado y puesto a tierra por un t_cnico
calificado de acuerdo con el Natioal Electrical Code
ANSI/NFPA No 70- _ltima edicici6n y los requisitos
locales. Instale solamente con las instrucciones provistas
con el empaquetado de la plancha de cocina.
Pregunte en su concesionafio pot un t6cnico calificado y un
servicio autofizado. Aprenda como desconectar la estufa del
cortacircuito o de la caja de fusibles en caso de emergencia.
* Servicio al usuario. No repare o remplace ninguna
pieza de su aparato a menos que se Io recomiende los
manuales especfficamente. Culaquier typo de servicio
debe set hecho pot un t_cnico calificado. Esto reducirb, el
riesgo de heridas personales o de daSos al aparato.
= Nunca modifique o altere la constituci6n de una estufa
moviendo la patas niveladoras, ni el alambrado u otra
parte del aparato.
Almacenamiento sobre del aparato. Los materiales
inflamables no deberian ser almacenados sobre la
unidad. Esto incluye el papel, el plb,stico y la ropa como:
libros de cocina, recipientes de plb,stico o toallas, as{ como
Ifquidos inflamables. No almacene explosivos como latas
de aeros61 sobre del aparato. Los materiles inflamables
pueden explotar y ocasionar fuego o daSos a la propiedad.
No alamacene objetos de interns para
los niSos en los armarios que est_n sobre la cocina.
* No deje a los niSos solos. Los niSos no deben set
dejados solos o sin atenci6n donde el aparato est_
funcionando. No les permita sentarse o pararse sobre
niguna parte del aparato.
* NO TOQUE LOS QUEMADORES DE SUPERFIClE O LAS
AREAS CERCANAS A ESOS QUEIVIADORES. Las
superficies o los elementos del homo pueden estar
calientes ann que est_n de color oscuro. Las areas cerca de
la superficie pueden estar Io suficientemente calientes para
causar quemaduras. Despu_s o antes del uso, no permita
que la ropa u otros matefiales inflamables esten en contacto
con estas areas hasta que hallan enffiado. Estas areas son:
la plancha de cocinar, las areas frente a la plancha de
cocinar.
Use una vestimenta apropiada. No use ropa que es suelta
u holgada cuando utilice el aparato. No ponga la ropa u
otros materiales inflamables en contacto con las areas
calientes.
Nunca utilice su aparato para calentar
o entibiar la pieza.
No utilice agua o harina para apagar un fuego- Apague el
fuego con la tapa de una sarten o use soda c_ustica, un
quimico seco o un e×tinguidor en aeros61.
Cuando caliente substanciaa grasosaa, tenga cuidado.
Puede ocasionar un fuego si es calentado pot mucho tiempo.
Utilice unicamente los soportes para recipientes que
est_n secos. Los soportes que eaten hQmedos o mojados
puden ocaaionar quemaduras a causa del vapor. No
permita que los soportes est6n en contacto con las
superficies calientes. No utilice una toalla o un papel para
remplazar al soporte.
No caliente recipientes de comida que est_n cerrados- La
preai6n al interior de estos puede hacerlos e×plotar y
ocasionar heridas.
IIVlPORTANTE- No trate de utilizar el homo durante un
corte de electricidad. Si no hay electricidad, apaga su
estufa. Si no apaga el homo y que la electricidad es
restablecida, el homo puede seguir funcionando. La comida
que deja sin cuidado puede quemarse o deteriorarse.
INSTRUCCIONES IlVlPORTANTES PARA
UTILIZAR SU PLANCHA DE COCINAR.
Saber que perillas controlan cada una de los
quemadores.
Limpie la plancha de cocina regularmente para mantener
todas las partes sin grasa que puede encenderse y causar
un incendio. La cubierta del escape de ventilaci6n y los
filtros de grasa deben estar limpios. No permita que la grasa
se acumule en la cubierta o en el filtro. Los dep6sitos
grasosos pueden encenderse y causar un incendio. Cuando
caiiente comida bajo la cubierta, encienda el ventilador.
Consulte las instrucciones del fabricante para la limpieza.
Utilice una sarten de tamaSo
apropiado. Este aparato estb, equipado con quemadores de
diferentes tamaSos. Elija utensilios con las bases aplanadas y
Io suficientemente grandes para cubrir todo el area del
quemador. Utilizar utensilios mb,s pequeSos puecle exponer
parte del quemador yocasionar quemaduras de las prendas que
lieva puesta.
18

Importantes Instrucciones de Seguridad
= Los mangos de los utensilios deben set colocados
hacia el interior y no sobre otras unidades de superficie.
Para reducir el riesgo de quemaduras, el encendido de
materiales inflamables y los derrames ocasionados de
casualidad.
• Nunca deje los quemadoreas con alta temperatura sin
cuidado- Los derrames ocasionan humo y derrames
grasosos que pueden encenderse, o una sart_n que ha
calentado pot mucho tiempo puede derretirse.
= Delineadores protectores. No utilice pelfcula de
aluminium a la base del homo u otra parte del aparato. 361o
utilizela para cubrir la comida cuando est_ coci6ndola.
Cualquier otra utilizaci6n puede ocasionar un incendio, una
electrocuci6n o un cortocircuito,
No coloque utensilios de cocina calientes sobre el
vidrio de la plancha de cocinar ann fria. Esto podrfa
causar la ruptura del vidrio.
= No deslice utensilios sobre la superficie de la cocina.
Podrfan rayar la superficie.
* Utensilios de cocina envidriados- $61o algunos tipos de
utensilios de vidrio, de vidrio/cerb, mica, de cerb,mica pueden
resistir la temperatura del quemador de su plancha de
cocinar. Verifique las recomendaciones del fabricante
sobre el uso con las planchas de cocinar.
No deje que los utensilios hiervan hasta quedarse sin
liquido. Esto podrfa causar daSos permanentes como
rupturas, fusiones o diseSo que afecten la cocina de
superficie en vidrio. (Estos tipos de daSos no son
cubiertos pot la garantfa).
ADVERTENClA DE SEGURIDAD IMPORTANTE
El California Safe Drinking Water y Toxic Enforcement
Act requiere al Gobierno de California de publicar una
lista de sustancias conocidas por el estado como causa
de cancer, defectos de nacimiento u otros daSos
reproductivos, y requiere que se avisen los usuarios
sobre la exposici6n eventual a sustancias.
Cubierta de ventilaci6n. La cubierta de ventilaci6n sobre
el Area de cocci6n debe ser limpiada frecuentemente, de
manera que la grasa de la cocci6n no se acumule en la
cubierta o en el filtro.
PARA VIDRIO PLANCHAS DE COClNAR
SOLAMENTE
* No limpie o utilice una plancha de cocinar que est_
rota- Si la plancha de cocinar se rompe, los productos
de limpieza o los derrames pueclen penetrar en ella y
producir un riesgo de electrocuci6n. Llame a un t_cnico
calificado inmediatamente.
INFORMACION IMPORTANTE PARA LA FUNCI()N
DE CONTROL POR TACTO DEL INFRARROJO
Para prevenir malos ajustes de los sensores del control
debido a la luz extranjera, la intensidad de la iluminaci6n
cuando se enciende por la primera vez no debe exceder
1000 lux. La irradiaci6n directa del panel de tacto con la
luz de un proyector se debe evitar cuando se enciende.
Si la iluminaci6n excede 1000 lux, el control no exhibe la
versi6n y para el ajuste automatico. En este caso de
vuelta al interruptor del control de la luz hasta que la
iluminaci6n sea mas baja de 1000 lux.
Limpie el vidrio de la plancha de cocinar con
cuidado- Si utiliza una esponja mojada para limpiar
derrames en una superficie caliente, tenga cuidado de
no quemarse con el vapor. Algunos productos de
limpieza puden producir peligrosas emanaciones si se
les usa sobre areas muy calientes.
Registro del Producto
(Vea ubicaci6n de la plata de eerie.)
No. de Modelo 790.
No. de Serie
Conserve estas instrucciones y su recibo de
compra para referencia futura.
Fecha de Compra
Ubicacibn de ia placa de serie.
Encontrara el modelo y el nQmero de serie imprimado
en la placa de serie. La placa de serie est& ubicada
bajo la plancha de cocina.
Vea la ilustraci6n para la ubicaci6n exacta. AsegQrese
de tomar nota del nOmero de serie para futura
referencia (vea aqui arriba, Registro del Producto).
La placa de serie
est_ ubicada bajo la _/ I
hornilla. _'_vjXJ
19

ACUERDOS DE PROTECCION
En los EU.
Acuerdos Maestro de Protecci6n
Felicitaciones por haber hecho una compra Jnteligente. Su
nuevo producto Kenmore ®es dise_ado y manufacturado
para muchos a_os de servicio confiable. Pero como todo
producto, pod ria reque rJr mantenimiento preventivo o
reparaci6n entre tiempo. Ahf es cuando el tener un Acuerdo
Maestro de Protecci6n le podfia ahorrar dinero y molestias.
Compre ya un Acuerdo Maestro de Proteccion y pretejase
de gastos y frustraciones inesperadas,
El Acuerdo Maestro de Protecci6n tambi6n ayuda a extender
la vida de su nuevo producto. Esto es Io que se incluye en
el Acuerdo.
I_" Servicio Profesional por nuestros 12,000 especialistas
profesionales en reparacJ6n.
5_ Servicio ilimitado sin cargo pot piezas y servicio en
toda reparaci6n cubierta
I_" Garantia de"No-lim6n"- reemplaza su producto
cubJerto si ocurren cuatro o m_.sdesperfectos dentro de
doce meses.
lY_ Reemplazo de Producto si el producto cubierto no
puede ser reparado.
Verificaci6n de Mantenimiento Preventivo Anual a su
petici6n sin cargos adicionales.
lY_ Pronta ayuda pot tel_fono- apoyo por tel6fono por un
t6cnico de Sears en los productos que requieran
reparaci6n en casa, mas la conveniencia de hacer cita
para reparaci6n.
Protecci6n contra picos de energJa o da_os el6ctricos
causados por fluctuaciones en energia.
Reembolso de alquiler si la reparaci6n de su producto
cubierto toma mas tiempo de Io prometido.
Una vez compres el Acuerdo, una simple Ilamada telef6nica
es todo Io que necesJtas para hacer cita para su servicio.
Puedes Ilamar a cualquier hora, dia o noche o concertar una
cita para servicio via computadora.
En Canada
Acuerdos de Mantenimiento
Su compra tiene valor mayor porque puedes depender de
Sears HomeCentral ®para servicio. Con sobre 2,400
T6cnJcos de Servicios y mb,s de un mill6n de pJezas y
accesorios, tenemos las herramientas, piezas,
conocimiento y destrezas para asegurar nuestro
compromiso: Le damos servicio a Io que vendemos.
Su producto Kenmore_es dJseSado y puesto a prueba para
proveer muchos aSos de operaci6n confiable. Pero como
todo producto, podfia requerir servicJo entre tiempo. El
Acuerdo de Mantenimiento Sears le ofrece un programa de
servicio incomparable a un precio m6dico.
El Acuerdo de Mantenimiento Sears:
Es su manera de comprar servicio para el maSana a
precio de hoy
ElimJna facturas pot reparaci6n como resultado de uso y
desgaste normal
Provee apoyo via tel6fono de un t6cnJco de Sears en
productos que requieran reparaci6n en casa
• Aunque no necesite reparaci6n, provee Verificaci6n de
MantenJmiento Preventivo anual, a su petici6n, para
asegurar que su producto est,. en condiciones apropiadas.
AIgunas limitaciones podrian aplicar. Para m_s
informaci6n sobre el Acuerdo de Mantenimiento de
Sears Canada,
liame al 1-800-361-6665.
Sears tiene sobre 12,000 especialistas profesionales de
reparaci6n, con acceso a sobre 4.5 millones de piezas y
accesorios de calidad. Esa es la clase de profesJonalismo
con la que puedes contar para ayudar a prolongar la vida de
su nueva compra pot muchos aSos. iCompre su Acuerdo
Maestro de Protecci6n hoy!
Algunas limitaciones y exclusiones podrJan aplicar.
Para precios e informaci6n adicional, Ilame al 1-800-827-
6655.
Servicio de Instalaci6n Sears
Para instalacidn profesional de Sears en enseres del hogar,
abridores de puertas de garaje, calentadores de agua y otros
articulos mayores del hogar, en EU. Ilame al
l=888-SU-HOGAR®.
2O

Controles de ia plancha de cocina
LEA ESTAS INSTRUCCIONES ANTES DE UTILISAR SU PLANCHA DE COCINA
INDICADOR LUMINOSO DE PUENTE - se iluminar_, cuando el elemento de puente sea seleccionado.
CONTROL DEL ELEMENTO DE PUENTE - Toque este boton para activar el elemento de puente. Este no se activar_, hasta
que el elemento anterior de la izquierda sea encendido a su vez. (yea p&gina 25)
INDICADOR LUMINOSO DE LOS ELEMENTOS DOBLES - se encenderb, cuando el elemento
doble sea seleccionado.
Fu- .............coo oo o
...... La parte externa del Elemento Doble no se activarA hasta que el elemento frontal derecho sea
...................................... ...........encendido a su vez. (vea p_gina 25)
BOTF BOTH .................
Estos indicadores muestran el nivel de intensidad seleccionado. Tambien, una 'H' se iluminarb,
al momento de apagar un elemento pero que la plancha de cocina est& aun encendida,
ELEMENTS ELEMENTS sedalando que la superficie de la plancha de cocina est& caliente. La "H" se iluminar&
............................................................ON)OFF..................................constantemente, indicando que la plancha de cocina podria estar caliente. En cada caso, el
indicador "H" se apagarb, en 30 minutos.
...............................................................................BOTON DE "ON/OFF" DEL ELEMENTO SENCILLO POSTERIOR DERECNO- Utilice este
bot6n para apagar oencender el elemento especifico. Una vez que el elemento se encienda,
ajuste el nivel de intensidad con la ayuda de los botones correspondientes (Flechas Arriba
V A y Abajo). (vea p_.gina 24)
@O
BOTONES DE NIVEL DE INTENSIDAD (FLECHAS ARRIBA g ABAJO) (4 Iocalizaciones)
...............................................................................- Utilice estos botches para aumentar o disminuir el Nivel de Intensidad a altas o bajas
ON/OFF temperaturas. Los ajustes de temperatura son de 1 (bajo) a 9 (alto). El nivel 0 no calienta.
...................................................................................BOTON "ON/OFF" DEL ELEMENTO SENCILLO POSTERIOR IZQUIERDO-
Utilice este bot6n para apagar o encender el elemento espec(fico. Una vez que el
elemento se encienda, ajuste el nivel de intensidad con la ayuda de los botones
V A correspondientes (Flechas Arriba y Abajo).
(DO
ON/OFF
BOTON " ON/OFF " DEL ELEMENTO SENCILLO ANTERIOR IZQUIERDO (Y
PUENTE) - Utilice este botdn para Apagar o Encender un elemento. Una vez el
elemento encendido, utilice las Flechas Arriba y Abajo para ajustar el nivel de
V J_ intensidad. Este elemento debe ser encendido antes de conectarlo al elemento de
O O Puente.
ON/OFF BOTON" ON/OFF" DEL ELEMENTO SENOILLO (DOBLE) ANTERIOR DERECHO -
O ......................................................................................................Utilice este bot6n para Apagar o Encender un elemento. Una vez el elemento encendido,
utilice las Flechas Arriba y Abajo para ajustar el nivel de intensidad. Este elemento debe
ser encendido antes de tocar el bot6n del Elemento Doble.
V /x.
O _,,,_) INDICADOR LUMINOSO DE BLOQUEO - El indicador luminoso de bloqueo se encender_ cuando
.........................se le active adecuadamente.
BOTON "LOCK-ON/OFF" DE LA PLANCHA DE COCINA - Utilizado para deshabilitar todas las
POWER LOCK ......................funciones de la plancha de cocina. Toque y mantenga presionado por al menos 2 segundos para
C) _-'_, ............ activar el dispositivo de bloqueo del Apagado/Encendido. La plancha de cocina no se bloquear_.
si hay elementos en uso. Debe cortar el suministro electrico a la plancha de cocina para poder
, activar el dispositivo de bloqueo. Desactivelo tocando y manteniendo presionado el botch por 2
ON/OFF,j segundos (yea pb,gina 26).
BOTON "POWER-ON/OFF" DE LA PLANONA DE COClNA - Utilice este bot6n para Encender u Apagar la plancha de cocina. Debe
encender el aparato antes de usar cualquier elemento. Para encender, debe de tocar y mantener presionado el bot6n por unos 2
segundos. 21

Funciones de control de
Como utilisar los botones
de control
La manera recomendada de usar los
botones tactiles se muestra en la
ilustraci6n. AsegOrese que el dedo
esta ubicado en el centro del bot6n
tactil como se muestra.
AsegQreseque el dedo haga el mejor
contacto posible con el bot6n tb,ctil.
No utilice Qnicamente la punta de
su dedo.
ia plancha de cocina
Posici6n del dedo
recomendada para los
botones tactiles.
Cocinando en la estufa
Use el utensilio correcto
Use utensilios de fondo piano _tL
para que tengan buen contacto
con toda la superficie del
elemento calefactor. Verifique si
el fondo es piano pasando una
regla a trav6s del fondo del
utensilio (Ver Fig. 3). AsegQrese
de seguir las recomendaciones
para usar utensilios como se
muestra en la Fig. 2.
Nota: El tama_o y el tipo del
utensilio usado influira en el ajuste
necesario para obtener los
mejores resultados.
Figura 3
*CORRECTO
t t
Fondo plane y lades rectos.
A Tapas que aprieten bien.
El peso del mango que no
vuelque el sarten. El utensilio
debe estar bien equilibrado.
Los tama_os de los utensilios
son apropiados para la
cantidad de alimento que se
prepararA y par a el tama_o
del elemento superior.
Fabricado de un material que
sea buen conductor del calor.
* FAcil de limpiar.
Siempre haga coincidir el
dib_metro del utensilio con el
diAmetro del elemento
superior.
*CORRECTO
AFondoscurvosycombados
delosutensilios
44 I_
^Elutensiliosobresalemgtsde
mediapulgadadelelemento.
^Elutensilioesmgtspeque_o
queelelemento.
Elmangopesadohacevolcar
elutensilio.
Figura 2
22

Ajuste de los Controles Superiores
Generalidades sobre la Cubierta de Vidrio Cer_mico
La cubierta de vidrio cerb,mico tiene elementos radiantes
superiores situados debajo de la superficie de vidrio. El
diseSo de la cubierta de vidrio cerb,mico delinea el contorno
del elemento superior que estb, debajo. AsegQrese de que el
dib,metro del utensilio coincida con el dib,metro del elemento
en la cubierta (Vet Figura 1).
El calor es transferido hacia arriba a trav_s de la superficie de
la cubierta hacia el utensilio.Se deben usar solamente
utensilios de rondo piano. El tipo y tamaSo de los utensilios,
el numero de elementos superiores que est_n en uso y el
ajuste de cada uno de ellos son factores que afectarb.n la
cantidad de calor que se esparcirb, alas Areas que rodean a
los elementos superiores. Las Areas que rodean a los
elementos pueden calentarse Io suficiente como para
causar quemaduras.
Generalidades sobre los Elementos Radiantes
Supedores
La temperatura deJ elemento aumenta gradual y
uniformemente. A medida que la temperatura va aumentando,
el elemento se iluminarb, de rojo. Para mantener el ajuste
seleccionado, el elemento pasar4 por ciclos de encendido y
apagado. El elemento calefactor retiene suficiente calor para
proporcionar un calor uniforme y consistente durante el ciclo
de apagado. El dispositivo de cerb,mica aisla t_rmicamente al
eJemento calefactor, concentrando el calor en el b,rea
calefactora. Para cocci6n eficiente, apague el elemento
varios minutos antes de terminar de cocinar. Esto permitirb,
que el calor residual termine el proceso de cocci6n.
Ubicaci6n de los Elementos Superiores Radiantes y
de los Controles
Su estufa estb, equipada con quemadores superiores
radiantes con 4 wattajes nominales diferentes. La habJlidad de
calentar alimentos mb,s rb,pidamente yen volumenes mayores
aumenta a medida que aumenta el wattaje del elemento.
Los elementos radiantes estan Iocalizados en la pJancha de
cocina de la siguiente manera. (vet figura 2):
® Un elemento radiante de 6 pulgadas Iocalizado en la parte
posterior derecha.
o Une elemento doble de 6 y 9 pulgadas Iocalizado en la parte
anterior derecha.
• Dos elementos de 8 pulgadas Iocalizados en la parte anterior
y posterior izquierda.
• Un elemento radiante de puente Iocalizado entre los elementos
anterior y posterior izquierdos.
Vet las pb,ginas 25 y 26 para mayor informaci6n sobre el uso del
elemento radiante de PUENTE.
NOTA: El vidrio volverb, verde cuando los elementos de
superficie estan en la posici6n de apagado despu_s de haber
sido utilizados a agrande intensidad. Este fen6meno es
normal y el vidrio volverb, a su color blanco inicial despu_s de
haberse completamente enfriado. (Vidrio blanco solamente).
\
®
h
,,....j
62 _
o5
Vista de la cubierta
Figura 1
Areas radiantes de la cubierta que se calientan
Figura 2
NOTA: Por favor lea las instrucciones detalladas
sobre la limpieza de la cubierta de vidrio cerb,mico
en las seccJones Cuidado y Limpieza y Antes
de Solicitar Servicio de este Manual del Usuario.
NOTA: Los elementos radiantes tienen un limitador
que les permite pasar pot un ciclo 'ON' (encendido)
y un ciclo 'OFF' (apagado), ann cuando est_n en el
ajuste 'HI' (Alto). Esto ayuda a evitar que se daSe
la cubierta de vidrio cerb,mico. El funcionamiento
ciclico en el ajuste 'HI' es normal y puede ocurrir si
el utensilio es demasiado pequeSo para el
elemento radiante o si el rondo del utensilio no es
piano. (Consulte la pb,gina 22 para las
instrucciones sobre el uso de los utensilios
correctos en la cubierta).
iii.......
23

Ajuste de los Controies Superiores
Ajustes Recomendados para Cocinar en la Cubierta
Use ia tabla para determinar el ajuste correcto para la clase de alimento que est6
preparando. Los ajustes de 'Simmer' se usan para cocinar a fuego lento y mantener
calientes cantidades grandes de alimentos tales como estofados y sopas. Los ajustes mas
bajos de cocci6n a fuego lento son ideales para alimentos delicados y derretir chocolate o
mantequilla.
Nota: El tama_o y el tipo del utensilio usado influiraen el ajuste necesario para obtener los
mejores resultados.
Ajustes Recomendados para el elemento Superior Sencillo,
el Elemento de Puente y los Elementos dobles
Ajuste Tipo de Cocci6n
9 (Alto) Para comenzar iamayoria de los alimentos, para hacer hervir agua
y para asara la parrilla
5-8 (Mediano alto) Para continuar un hervor rapido, freir y freir en la sarten
5 (Mediano) Mantener unhervor lento, espesar salsas yjugos de came y cocer
verduras alvapor
2-4 (Mediano bajo) Mantenerlos alimentos cocinAndose, cocera fuego lento yestofados
1-2 (bajo) Para mantener caliente, derretir o cocinar a fuego lento
Funcionamiento de los Elementos Superiores Radiantes Sencillos
La
superficie de los elementos
radiantes podria parecer fria
luego de haberlos apagado.
La "H" aparecera y
continuara encendida pot
unos 30 minutos o menos. La
superficie del vidrio podria
ann estar caliente y causar
quemaduras.
No coloque
objetos de plAstico tales
como saleros y pimenteros,
apoyacucharas o
envoltorios de plAstico
sobre la estufa cuando la
est_ usando. Estos objetos
se pueden derretir o
encender. Los tomaollas, las
toallas o cucharas de madera
se pueden prender fuego si se
colocan muy cerca de los
elementos superiores.
La plancha de cocina posee elementos radiantes simples en 3 lugares; elementos posterior derecho, posterior izquierdo e
anterior izquierdo. Hay tambi6n un elemento de Puente que puede set conectado con el elemento anterior izquierdo (Vea
Instrucciones para el uso del Elemento de Puente en las pAginas 25-26).
Uso de los Elementos Superiores Radiantes Sencillos:
1. Coloque el utensilio de tama_o correcto en el elemento superior radiante.
2. Toque el bot6n tActil POWER(vet figura 3) pot 2 segundos, una sepal sonora se
ON/OFF
escucharA y un "-" aparecera en el indicador. Toque el bot6n tActil ON/OFF(Vet
figura 2) que corresponde con el elemento de superficie elegido y el "0"
aparecerA en el indicador. Toque los botones /X. o V (vet figura 2) para
ajustar el elemento a la temperatura deseada. Para reajustar la temperatura a
"0", toque /X. o V al mismo tiempo. Una sepal sonora se escuchara a cada
toque de los botones.
3. Comience la mayor parte de sus cocciones a alta intensidad y redQzcala a
intensidad baja para terminar la cocci6n. Cada elemento superior proporciona
una cantidad constante de calor en cada ajuste. Si el Area de calor de color rojo
radiante se extiende mas alia del borde inferior del utensiiio significa que ese
utensilio es demasiado pequeSo para el Area de calefacci6n del elemento.
4. Cuando la cocci6n ha terminada en cualquiera de los elementos de superficie,
toque el bot6n tactil ON/OFFpara apagar ese elemento. El(los) indicador(es)
indicara(n) "H" cuando la cocina de plancha est6 encendida pero que el
elemento este apagado, se_alando que la superficie podria estar caliente. El
indicador"H" se apagara iuego de 30 minutos o menos.
Para apagar completamente la plancha de cocina, toque y mantenga
presionado el bot6n POWERpot 2 segundos (una sepal sonora se escuchara) y
ON/OFF
su61telo. Cuando la plancha de cocina se apague, una "H" se iluminara
indicando que la superficie puede estar caliente. El indicador"H" se pagarA en
30 minutos o menos.
(
(
©<
Figura 1
ON/OFF
V A
_ON_oFFPOWER LOCK \
Figura 3
lgura 2
Nota: La plancha de cocina entera se apagarA automaticamente 10 segundos despues de que todos los elementos hallan
sido apagados.
24

Nota:Yeam_.sarribalaTabladeAjustesRecomendadosparaloselementosde
superficie.
Ajuste de los Controles Superiores
Funcionamiento del Elemento Radiante Doble
La cubierta esta equipada con un elemento superior radiante doble situado en la posici6n
delantera derecha (vet figura 1 y 2).
Funcionamiento del Elemento Superior Doble:
1. Coloque el utensilio de tamaSo correcto en el elemento superior doble.
2. Toque el bot6n t_.ctil POWER(vet figura 3, pAgina 24) pot 2 segundos, una seSal sonora
ON/OFF
se escuchar_, y un "-" aparecera en el indicador. Toque el bot6n tactil ON/OFF(vet figura
2, pagina 24) del elemento anterior izquierdo y el "0" aparecer_, en el indicador. Toque
0
el bot6n B,,r, (vet figura 1, p_.gina 24) para conectar el elemento de puente, y luego
_L£M NTS
toque los botones/X o V para ajustar la temperatura deseada. Puede desconectar
el elemento de puente a cualquier momento de la cocci6n con s61otocar el bot6n
0
B.... Para reajustar la temperatura a "0", toque /_ o V al mismo tiempo. Una
ELEMEN]S
sepal sonora se escuchara a cada toque de los botones.
3. Comience la mayor parte de sus cocciones a alta intensidad y redOzcala a intensidad
baja para terminar la cocci6n. Cada elemento superior proporciona una cantidad
constante de calor en cada ajuste. Si el _.rea de calor de color rojo radiante se
extiende mas all_.del borde inferior del utensilio significa que ese utensilio es
demasiado peque_o para el b,rea de calefacci6n del elemento.
4. Cuando la cocci6n ha terminada en cualquiera de los elementos de superficie, toque
el bot6n t_.ctil ON/OFFpara apagar ese elemento. El(los) indicador(es) indicar_.(n)"H"
cuando la cocina de plancha este encendida pero que el elemento este apagado,
se_alando que la superficie podria estar caliente. El indicador"H" se apagara luego de
30 minutos o menos.
Para apagar completamente la plancha de cocina, toque y mantenga presionado el
bot6n POWERpot 2 segundos (una sepal sonora se escuchar_.) y sueltelo. Cuando la
ON/OFF
plancha de cocina se apague, una "H" se iluminar_, indicando que la superficie puede
estar caliente. El indicador "H" se pagar_, en 30 minutos o menos.
Nota: La plancha de cocina entera se apagara autom_.ticamente 10 segundos despues de
que todos los elementos hallan sido apagados.
Nota: Vea la Tabla de Ajustes Recomendados para los elementos de superficie a la
pagina24.
Figura 1
Figura 2
iii.......
Funcionamiento del Elemento Radiante Superior de Puente
La plancha de cocina posee un elemento de puente que puede ser utilizado al mismo
tiempo que el elemento anterior izquierdo, Ioque permite obtener una cocci6n a la
plancha utilizando utensilios rectangulares u ovales. Cuando encienda el elemento de
puente, un control Onico mantiene la misma temperatura en ambos elementos. Vet figura
3. Para una cocci6n m_.slarga, encienda el elemento posterior izquierdo. Vet figura 4.
Como 6ste Oltimo puede set controlado independientemente, Ud podria ajustar el
elemento posterior a la misma temperatura que la del puente, o mb,s aOn, a una
temperatura mas baja y crear asi una Area de cocci6n para mantener comida tibia.
Funcionamiento del Elemento Superior de Puente
1. Coloque el utensilio de tama_o correcto en el elemento superior de Puente.
2. Toque el bot6n t_.ctil POWER(vet figura 3, pagina 24) pot 2 segundos, una sepal sonora
ON/OFF
se escuchar_, y un "-" aparecerb, en el indicador. Toque el bot6n t_.ctil ON/OFF(vet figura
2, pagina 24) del elemento anterior izquierdo y el "0" aparecer_, en el indicador. Toque
25
Figura 3
Figura 4

el bot6n _, (ver figura 1, p_.gina 24) para conectar el elemento de puente, y luego
toque los botones iX. o V para ajustar la temperatura deseada. Puede desconectar
el elemento de puente a cualquier momento de la cocci6n con s61otocar el bot6n _,_:,.
Para reajustar la temperatura a "0", toque /_ o V al mismo tiempo. Una sepal
sonora se escuchara a cada toque de los botones.
3. Comience la mayor parte de sus cocciones a alta intensidad y redOzcala a intensidad
baja para terminar la cocci6n. Cada elemento superior proporciona una cantidad
constante de calor en cada ajuste. Si el area de calor de color rojo radiante se
extiende mas all_.del borde inferior del utensilio significa que ese utensilio es
demasiado pequeSo para el _.reade calefacci6n del elemento.
4. Cuando la cocci6n ha terminada en cualquiera de los elementos de superficie, toque el
bot6n tb,ctil ON/OFFpara apagar ese elemento. El(los) indicador(es) indicara(n) "H"
cuando la cocina de plancha este encendida pero que el elemento este apagado,
se_alando que la superficie podria estar caliente. El indicador"H" se apagara luego de
30 minutos o menos.
Para apagar completamente la plancha de cocina, toque y mantenga presionado el
bot6n POWERpot 2 segundos (una sepal sonora se escuchara) y su61telo. Cuando la
ON/OFF
plancha de cocina se apague, una "H" se iluminar_, indicando que la superficie puede
estar caliente. El indicador"H" se pagara en 30 minutos o menos.
Nota: La plancha de cocina entera se apagarb, autom_.ticamente 10 segundos despues de
que todos los elementos hallan sido apagados.
Nota: Vea la Tabla de Ajustes Recomendados para los elementos de superficie a la pagina
24.
La
superficie de los elementos
radiantes podria parecer fria
luego de haberlos apagado.
La "H" aparecera y
continuara encendida por
unos 30 minutos o menos.
La supetficie del vidrio
podria a_n estar caliente y
causarquemaduras.
Dispositivo de bloqueo de los controles de superficie
Es posible inhabilitar los controles de los elementos de superficie al tocar y mantener
Ii
presionado el bot6n lock durante 2 segundos. Una sepal sonora se escuchara y el
ON/OFF
indicador luminoso de BIoqueo se iluminar_, al activarse.
Para retirar el bloqueo de los elementos de superficie, toque y mantenga presionando el
ii
bot6n Lockdurante 2 segundos. Una sepal sonora se escuchara y el indicador luminoso de
ON/OFF
BIoqueo se apagar_.
26

Cuidado y Limpieza General
Limpieza y Mantenimiento de la Cubierta
Es esencial limpiar regularmente y en forma correcta la Cubierta de vidrio cer4micO'
Antes de usar su cubierta per primera vez, aplique en la superficie de vidrio la crema de limpieza para cubJertas
recomendada (P/N 40079). Pula con un pare no abraslvo o una esponja de limpieza antirayaduras. Esto facilitarA la
limpieza cuando se ensucie al cocinar. Esta crema especial de limpieza deja una pelicula protectora sobre el vidrio que
evita las rayaduras y abrasiones.
Si se deslJzan sobre la cubierta utensilios con fondo de aluminio o de cobre se
pueden causar marcas de metal en la superficie de la cubierta. Estas marcas
deben set quitadas inmediatamente despu6s de que la cubierta se haya
enfriado usAndo la crema de limpieza para cubiertas. Las marcas de metal
pueden set permanentes si no se sacan antes del pr6xJmo use de la estufa.
_ Los utensilios de cocina (de hierro fundido, metal, ceramica o vidrio) con rondos
Asperos pueden marcar o rayar la superficie de la cubierta. No deslice nada
que sea de metal o de vidrio a trav6s de la cubierta. No use la cubierta come
una tabla de cortar o come superficie de trabajo en la cocina. No cocine
alimentos dJrectamente sobre la cubierta sin usar un utensilio. No deje caer
objetos duros o pesados sobre la cubierta de vidrio, pues pueden quebrarla.
Recomendaciones de Limpieza para Cubiertas de Vidrio Cer_mico:
Antes de limpiar la cubierta, aseg_rese de que los controles esten en la posici6n 'OFF' y que la
cubierta est6 FRIA.
NO use limpiadores para la cubierta cuando este caliente. Los vapores pueden ser
perjudiciales para su salud y pueden daRar qufmicamente la superficie de vidrio ceramico.
Para suciedad leve y moderada
Para aplicar la crema de limpieza sobre la superficie de la cubierta. Use una toalla de papel o una esponja de limpieza
antirayaduras de plastico no abrasiva para limpiar la superficie completa de la cubierta. AsegQrese de que la cubierta sea _/:i
enjuagada minuciosamente, sin dejar ningQn residue de detergente o de limpiador.
Para suciedad dura y quemada
Para aplicar la crema de limpieza sobre la superficie de la cubierta. Frote el Area manchada usando una esponja de limpieza f_
antirayaduras de plastico no abrasiva y aplique presi6n cuando sea necesario.
Si permanece suciedad, raspe cuidadosamente la suciedad con un raspador
con hoja de afeitar, sosteniendo el raspador en un Angulo de 30 grades en
relaci6n con la cubierta. Retire la suciedad suelta con crema de limpieza
y frote la superficie hasta que quede limpia.
NOTA IMPORTANTE: Si utiliza una esponja de limpieza abrasiva, la
cubierta de vidrio ceramico puede sufrir daRos. S61ouse productos de
limpieza que hayan side diseRados especificamente para cubiertas de
vidrio cerAmico.
PIAstico o alJmentos con un alto contenJdo de az_car
Estos tJposde suciedad necesJtan ser quitados inmediatamente despues
de que se derraman o derriten sobre lasuperficie de vidrio cerAmico. Puede
ocurrir dare permanente (tal come picadura de la superficie de la cubierta)
si no se quitan inmediatamente. Despu6s de apagar los elementos
superiores, use un raspador con hoja de afeitar o una espatula de metal con
un guante y raspe la suciedad de la superficie caliente (come se muestra
en la ilustraci6n). Espere que lacubierta se enfrie y use el mismo metodo
que para la suciedad dura y quemada.
27

Cuidado y Limpieza GeneraJ
No use los siguientes productos en la cubierta de vidrio cer_mico:
• No use Jimpiadores abrasivos ni esponjas de restregar, tales como esponjas de
metal y algunas esponjas de niJ6n. Elias pueden rayar Jacubierta, haciendo
m_s dificiJ su Jimpieza.
• No use limpiadores abrasivos, tales como blanqueador de cloro, amoniaco o
Jimpiadores de hornos, pues pueden rayar o descoJorar Jacubierta.
• No use esponjas, paSos o toallas de papeJ sucias, pues pueden dejar
suciedad o pelusas en Jacubierta que pueden quemarse y causar
descoJoraci6n.
Advertencia para hoja de aluminio y utensilios en aluminio
• Hoja de aJuminio
La utilizaci6n de hojas de aluminio da_argt la cocina. No utiliza en ningQn caso.
Utensilios en aluminio
Tenga cuidado al utilizar utensilios en aluminio puesto que el punto de fusi6n es
6ste es mgts bajo que el de otros metales. Si Io deja mucho tJempo en el calor, no
sol6 en utensilio se daSargt pero tembi6n la superficie en fibra de vidfio.
28

Cacerolas y soportes
especiales
Para los modelos con elementos
s61idos o cubierta lisa de vidrio, s6io
pueden usarse woks con fondo piano
(sin anillo de soporte).
Los Woks con rondos pianos ade-
cuados para usarse en la cubierta
estan disponibles en la mayoria de las
tiendas de articulos de cocina yen las
ferreterias.
Soportes metbficos : No use
soportes metalicos. El fondo de ias
cacerolas debe estar en contacto
directo con los elementos de
superficie.
NO use un wok que est6 equipado
con un anillo metAlico que se
extienda mAs alia del elemento de
superficie. Debido a que este anillo
aprisiona el calor, el elemento de
superficie y la superficie de la
cubierta pueden verse da_ados.
NO use dos elementos calentar una cacerola grande
como una rustidera o una plancha, ni deje que los utensilios hiervan hasta
quedarse sin liquido. El fondo de la cacerola en cualquiera de estos casos
puede decolorar o cuartear la superficie de porcelana esmaltada de la
cocina, y daSar los elementos de superficie y/o daSar las bandejas
recolectoras (si esta equipada).
Trucos para el cierre de
cacerolas e Informaci6n
La utilizaci6n de
cacerolas con tapa podria ocasionar
una gran cantidad de vapor. Sea
precavido para evitar quemaduras.
Tome la habitud de levantar ia tapa en
la direcci6n opuesta a Usted y asi
dirigir el vapor del otto lado.
1. Utilice recetas conocidas y siga las instrucciones con cuidado.
Verifique con el fabricante de jarras en vidrio sobre las Qltimas
informaciones respecto al cierre de cacerolas.
2. Utilice _nicamente cacerolas a base plana. El calor se reparte
uniformemente cuando la base es plana.
3. Coloque las cacerolas en el centro del elemento de superficie.
4. Comience con agua caliente y a alta intensidad para hervir el agua
mas rapido. Luego, disminuya la intensidad del fuego y mantener un
hervorconstante.
5. Es mejor mantener cerrado pequeSas y ligeras cantidades.
iii.......
Evite de daSar la plancha de cocina:
1. No utilice ba_os de agua o cacerolas a presi6n que sean mas anchas
que el borde del elemento de superficie (2,5 cm).
2. No deje baSos de agua o cacerolas a presi6n a alta intensidad y pot
mucho tiempo.
3. No utilice cacerolas de gran diametro u otros sartenes para freir o
hervir alimentos otros que agua. Muchos (incluyendo siropes, saisas y
toda clase de frituras), se cosen a temperaturas mucho mas aitas que
el agua. Estas temperaturas pueden daSar la superficie de la plancha
de cocina.
4. Alteme los elementos de superficie cada vez para permitir que las
unidades y sus alrededores se enfrien. No use la misma Area de la
superficie para cocinar todo el dia.
Para utilizar cacerolas se requiere que microorganismos
sean destruidos y que las jarras sean selladas completamente. Cuando se
usan cacerolas ai baSo Maria, un ligero hervor debe set mantenido durante
el tiempo necesario. Cuando utilice una cacerola a presi6n, 6sta debe
mantenerse continua pot el tiempo necesario.
29

Antes de llamar
Soluciones a problemas comunes
Antes de Ilamara! servicie, revise 6sta lista. Puede ahorrarle tiempo y dinero. Esta lista contiene situaciones comunes que
no son el resultado de errores de fabricaci6n o matefiales de este artefacto.
SITUACIONES CAUSAS POSIBLES/SOLUCION
La plancha de cocina
no funciona.
Los elementos de
supetficie no
calientan.
AsegOrese que el indicador luminoso de bloqueo esta en OFF.
La instalaci6n de cables no esta terminada. Llame al 1-800-4-MY-HOME para obtener servicio
(Vet la cobertura posterior).
Interrupci6n de corriente. Verifique las luces de lacasa. Llame a su compa_ia de electricidad.
No hay corriente el6ctrica hacia el artefacto. Verifique las etapas en "La plancha de cocina
no funciona".
Ajuste inapropiado de loscontroles. AsegQrese que el dispositivo de Bloqueo est6 apagado.
AsegQrese que el botdn POWER de la plancha de cocina haya sido encendido. AsegQrese que
el bot6n del elemento correspondiente est6 encendido. Aumente o disminuya el nivel de
intensidad hasta obtener el nivel deseado.
Elemento de superficie
muy caliente o no
suficientemente
caliente.
AsegQrese que el botdn POWER de la plancha de cocina haya sido encendido. AsegQrese que
el bot6n del elemento correspondiente este encendido. Aumente o disminuya el nivel de
intensidad hasta obtener el nivel deseado.
Los alimentos no se
calientan
uniformemente.
El voltaje es inapropiado. AsegQrese que el aparato est6 bien conectado al suministro de
energfa especificado. Si no est,. seguro de esto, Ilame al 1-800-4-MY-HOME para obtener
ayuda (Vea la cobertura).
Cacerolas ligeras o deformadas fueron utilizadas. AsegQrese de usar los utensilios
adecuados. Utilice solamente cacerolas a base plana y de peso medio a robusto. Las
cacerolas de peso mediano a robusto calientan m_.suniformemente. Puesto que lascacerolas
de peso ligerono calientan uniformemente, los alimentos pueden quemarse f_.cilmente.
Cacerolas ligeras o deformadas fueron utilizadas. AsegQrese de usar los utensilios
adecuados. Utilice solamente cacerolas a base plana y de peso medio a robusto. Las
cacerolas de peso mediano a robusto calientan mas uniformemente. Puesto que lascacerolas
de peso ligerono calientan uniformemente, los alimentos pueden quemarse facilmente.
AsegQrese que el bot6n POWER de la plancha de cocina haya sido encendido. AsegQrese que
el botdn del elemento correspondiente este encendido. Aumente o disminuya el nivel de
intensidad hasta obtener el nivel deseado.
Raspaduras o
abrasiones en el vidrio
de cer_mica de la
plancha de cocina.
Marcas de metal en el
vidrio de cer&mica de
la plancha de cocina.
Rayaduras en el vidrio
de cer&mica de la
plancha de cocina.
Areas de decoloraci6n
sobre el vidrio de
cer&mica de la plancha
de cocina.
Partfculas gruesas como sal o arena pueden causar rayas si se depositan entre los utensilios
y la plancha de cocina. AsegQrese que la base de los utensilios y la superficie de la plancha
de cocina est6n limpias antes de set utilizados. Los peque_os rasgu_os no afectan la cocci6n
y desaparecer_.n con el tiempo.
Utilizaci6n de material de limpieza inadecuado para el vidrio de ceramica. Vet la secci6n
Cuidado General y Limpieza en este manual de uso y mantenimiento.
Utensilios con bases rugosas fueron usados. Utilice utensilios a base plana y lisa.
Deslizamiento o raspado de utensilios metbJicos sobre la superficie de la plancha de cocina.
No deslice utensilios de metal sobre la superficie de la plancha de cocina. Utilice una crema
limpiadora para vidrio de cer_.mica para retirar las marcas. Consulte la secci6n Cuidado
General y Limpieza en 6ste manual de uso y mantenimiento.
Derramamiento de substancias en la superficie. Utilice una lama de metal para retirar las
manchas. Consulte la secci6n Cuidado General y Limpieza en 6ste manual de uso y
mantenimiento.
Utilizaci6n de material de limpieza inadecuado para el vidrio de cer_mica. Utilice los m6todos
de limpieza y los limpiadores recomendados. Consulte la secci6n Cuidado General y Limpieza
en 6ste manual de uso y mantenimiento.
Dep6sitos minerales provenientes del agua o de los alimentos. Retirelos con ayuda de una
crema limpiadora para vidrio de ceramica. AsegQrese de usar utensilios con bases limpias y
secas.
3O

Notas
iii.......
31

Your Home
www.sears.com
iiiiiiiiiiiiiiiii_ :::::::::::::::
HHHHHHHHi_ ...............
HHHHHHHHi_ HHHHHHHi
iiiiiiiiiiiiiiiiiii To purchase a protection agreement (U.S.A.) iiiiiiiiiiiiiii
iiiiiiiiiiiiiiiiiiior maintenance agreement(Canada)on a product serviced by Sears: iiiiiiiiiiiiiii
iiiiiiiiiiiiiiiiiii1-800-827-6655 (U.S.A.) 1-800-361-6665 (Canada) iiiiiiiiiiiiiii
iiiiiiiiiiiiiiiH_ HHHHHHHi
iiiiiiiiiiiiiiiiiii............................ iiiiiiiiiiiiiii
iiiiiiiiiiiiiiiiiii a domicilio, y para ordenar piezas: 1-800-LE-FOYER Mc
1-888-S U -HOG AR c (1-800-533-6937)
!iiiiiiii!!!!i!iii'ii'ii ,, 1-888-784-6427
Sears
www.sears.ca
® Registered Trademark / _'MTrademark / SMService Mark of Sears Brands, LLC
TM
® Mama Registrada / Marca de Fabrica / SMMarca de Servicio de Sears Brands, LLC
MD
MCMarque de commerce / Marque deposde de Sears Brands, LLC ® Sears Brands, LLC
-
 1
1
-
 2
2
-
 3
3
-
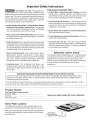 4
4
-
 5
5
-
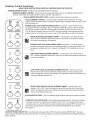 6
6
-
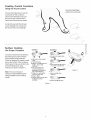 7
7
-
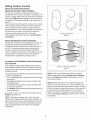 8
8
-
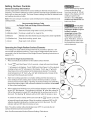 9
9
-
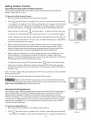 10
10
-
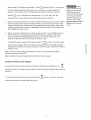 11
11
-
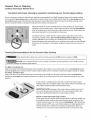 12
12
-
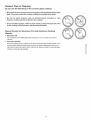 13
13
-
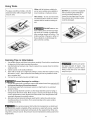 14
14
-
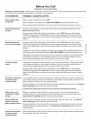 15
15
-
 16
16
-
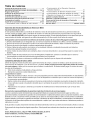 17
17
-
 18
18
-
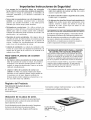 19
19
-
 20
20
-
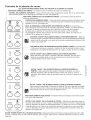 21
21
-
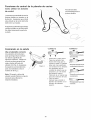 22
22
-
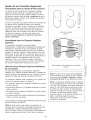 23
23
-
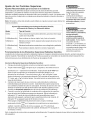 24
24
-
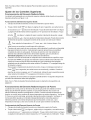 25
25
-
 26
26
-
 27
27
-
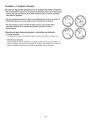 28
28
-
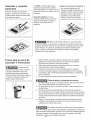 29
29
-
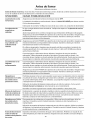 30
30
-
 31
31
-
 32
32


Kenmore Elite 79043999403 El manual del propietario
- Categoría
- Encimeras
- Tipo
- El manual del propietario
en otros idiomas
Artículos relacionados
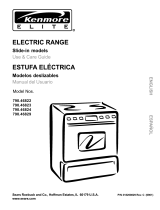
Otros documentos
-
Kenmore 79040503 Manual de usuario
-
-
-
-
-
-
-
Kenmore 790.42734406 Manual de usuario
-
Kenmore 790.4274 Series El manual del propietario
-
IKEA Förvälla Neddragen Manual de usuario