
1
SAFETY MESSAGES IDENTIFICATION OF PARTS
OPERATIONS AND FUNCTIONS
USING YOUR REFRIGERATOR
www.lg.com
MFL68882505-1
MANUAL DE USUARIO
REFRIGERADOR CON
CONGELADOR SUPERIOR
Lea detenidamente este manual antes de empezar a utilizar el refrigerador
y guárdelo como referencia para el futuro.
Model Name / Nombre de Modelo:
GM-C372SQCN, GM-F372SQCN, LT29BPP, LT29BPPK, LT29BPPX, LT29BPW, LT29WPP,
LT29WPPX, LT32BPP, LT32BPPK, LT32BPPX, LT32BPW, LT32WPP, LT32WPPX.
OWNER’S MANUAL
TOP MOUNT
REFRIGERATOR
Please read this manual carefully before operating your set and retain it for
future reference.
ENGLISH
ESPAÑOL
2
3 4
THIS MANUAL CONTAINS SEVERAL IMPORTANT SAFETY NOTICES. ALWAYS READ AND OBEY
ALL OF THE FOLLOWING SAFETY MESSAGES.
DANGER
If you fail to follow these instructions you will be killed or seriously injured.
WARNING Misuses of the product will cause you physical damage or personal wounds.
CAUTION Inadequate use and installation will cause damage to your property.
All safety labels will inform you of potential danger, ways to reduce chance of injury and what can happen if
instructions are not followed.
WARNINGS AND IMPORTANT SAFETY MEASURES
Read all instructions before use your product.
WARNING: This appliance contains a small amount of isobutane refrigerant (R600a), natural gas with high
environmental compatibility, but it is also combustible. When transporting and installing the appliance, care should be
taken to ensure that any part of the refrigerating circuit is damaged. Refrigerant squirting out of the pipes could ignite
or cause an eye injury. If a leak is detected, avoid any naked flames or potential sources of ignition and air the room
in which the appliance is placed for several minutes. In order to avoid the creation of a flammable gas air mixture if a
leak in the refrigerating circuit occurs, the size of the room in which the appliance may be placed depends on the
amount of refrigerant used. The room must be 1m² in size for every 8 grams of R600a refrigerant inside the appliance.
The amount of refrigerant in your particular appliance is shown on the identification label inside the appliance. Never
start up an appliance showing any signs of damage. If in doubt, consult your service center.
CAUTION: Risk of Fire, keep in mind next caution points when you move or install your refrigerator, gas used in
your appliance is inflammable:
•
Avoid use any flame or heat sources to access to the sealing system when the appliance is being fulled with
refrigerant.
• In case of refrigerant leak the area must be completely ventilated before start working.
• Be careful, DO NOT damage refrigeration circuit.
CAUTION: Risk of Fire or Explosion (Inflammable Refrigerant), the refrigerator only must be repaired by qualified
personal. Do not drill refrigeration circuit. Read instructions in your Owner’s Manual before use this product, all safety
messages must be followed.
CAUTION: This appliance is not intended for being used by children, persons with physical or mental disabilities,
persons with reduced sensory or mental capacity, or persons with lack of experience or know-how, unless they have
supervision or instruction in relation to the use of the appliance by the person responsible for their safety. Children
should be supervised to assure that they do not play with the appliance.
NEVER USE EXTENSION CORDS AND POWER STRIPS: Your refrigerator must be installed near from outlet to
avoid extension cords and never connect multiple machines in the same socket, this can cause wiring to overcharge,
warming, voltage variation and bad functioning. Do not use extension cords or ungrounded (two prong) adapters.
ELECTRICAL CORD REPLACEMENT: If electrical cord gets damaged it must be replaced by the
manufacturer, our service center or qualified LG Electronics personnel to minimize risks.
GROUND CONNECTION: In case of electrical surge, connection to ground will reduce risks of electric shock
hazard. This unit must be grounded. Consult a qualified electrician. When moving your refrigerator, be careful not to
step on the electrical cord with the machine’s rollers.
¡¡¡NEVER KEEP EXPLOSIVES INSIDE!!! : Never store explosive substances or
chemicals in your refrigerator such as benzene, alcohol, etc.
¡¡It is DANGEROUS!!
DANGEROUS FUN:
An empty refrigerator can be very dangerous for children. Remove doors or
magnetic packaging when not be in use or secure it in a way to make it impossible to open and allow a child
to go in as this can lead to suffocation. Never allow a child to climb, hang or play with the refrigerator
compartments. They can get hurt themselves and damage the refrigerator.
CLEANING
1. CONNECTION
Remember that your refrigerator must be grounded.
CAUTION: If operation is interrupted, wait 5 minutes before restarting it.
2. ICE MAKER OPERATION
Ice Maker “Twist’n Serve”
• For filling your ice shelves
first you must remove ice
container (Figure 1), then
pull out the ice shelves
(Figure 2) and fill them with
water until the indicated
level (Figure 3).
WARNING: Fill only with potable water.
• Place the ice shelves and ice container in their original
position. For removing ice cubes, turn the knob clockwise
and the ice cubes will fall into ice container (Figure 4).
• In order to accomplish with your spacing needs, your ice
maker can be moved from one side to another (Figure 5).
3. THAWING
Thawing occurs automatically, you do not need to worry about this. Thawed water will flow into the evaporation
shelf
4. TEMPERATURE CONTROL SETTINGS
Control types for adjusting cooling.
• Keep fresh food in the refrigerator compartment.
• Freeze only small amounts of food.
• After you freeze some food, once you thaw it do not freeze it again, it looses its taste and nutritional
value; after thawing it, you might keep it in the refrigerator up to 48 hours.
• Do not store food that might get decomposed under low temperatures (ie. pineapple, bananas and
cantaloupe).
• Do not store garlic in the refrigerator.
• When you store food in the refrigerator use closed containers in order to avoid odor mixing and
loosing of humidity.
• Always clean the food before placing them in the refrigerator. Wash and dry the fruits and vegetables.
Keep fresh food in the refrigerator.
• It is recommendable to store onion in plastic bags to avoid other food odor to get mixed with it odor.
• If you are going to store ice cream for a long period of time, place it on the freezer shelf and not on
the freezer door.
• When storing eggs always place them in the highest shelf or in the first basket in order to keep them
fresh for a longer period of time.
• Throw away any food that is being decomposed; it may contaminate other foods.
• Store cold cuts, cheese and sausages in bags or pla stic sealed containers.
• Do not store on freezer glass containers, they might break.
• Do not store hot food inside the refrigerator they might decrease the refrigerator’s efficiency.
• For models with water dispenser it is recommended change water in container at least once per
week.
• Do not store any medicine in your refrigerator because they can be damaged or cause an unexpected
reaction.
1. SHELVES
The shelves of your refrigerator can be adjusted to comply with your storage needs; depending on the model you
have it can include glass shelves or plastic shelves. Storing your foods together and adjusting the shelves to different
heights will help you to locate what you need in an easier way. This also helps your refrigerator to stay shut longer
which will save you energy.
IMPORTANT: While your refrigerator glass shelves are cold do not clean with hot or warm water. The glass shelves
may break if they’re exposed to rapid temperature changes or hard impacts. For your safety the glass shelves are
made out of tempered glass so when at breaking they will fracture into tiny fragments. NOTE: Be careful while
moving or relocating the shelves, they are heavy. If moving the shelves is required keep in mind to locate them in a
safe environment to prevent them from breaking (the tempered glass on the front side of the appliance door or the
shelves can be damaged by an impact. If it is broken, do not touch it with wet hands, as this may result in injury).
Refrigerator Shelf
In order to remove the refrigerator shelves follow these instructions:
1. Lift the back of the shelf from below, (see Figure 6). Use enough force to lift the shelf and release it from the
holders (see Figure 7).
2. Slide the shelf forward to remove it completely (see Figure 8).
NOTE: Be careful when you remove the shelves from the refrigerator, because they are secured to the refrigerator
walls.
WARNING: Do not insert the shelves upside down. The shelves may fall, causing injury.
2. COMPARTMENTS
• Door Baskets
The door baskets are removable for easy cleaning and adjustment.
1. To remove the basket, simply lift the bin up and pull straight out.
2. To replace the basket, slide it in above the desired support and push down until it snaps into place.
NOTE: Empty the food charge before you move the door basket.
WARNING: Someone could get hurt if the baskets are not well assembled.
WARNING: Do not hang from the appliance door, storage room or shelf. It may make the refrigerator fallen down
or damage the hands. Especially, do not allow the children to do the above.
CAUTION: DO NOT allow children play with baskets. Sharp corners on basket could cause injury.
• Vegetable Drawer (Magic Crisper)
The magic crisper provides fresher tasting fruit and vegetables by letting you easily control humidity.
High: lets moist air out of the crisper for best storage of fruit.
Low: keeps moist air in the crisper for best storage of fresh, leafy vegetables.
To remove vegetable drawer, follow these instructions:
1. First pull drawer straight out using handle, once out avoid lifting the drawer just by the handle,
use two support points.
2. Return the drawer, sliding it in until it stops.
3. WATER CONTAINER (some models)
Your refrigerator has a system that allows you having cold water without opening refrigerator door. For
dispensing water, push backward the dispenser lever with a glass until the water flows.
NOTE: After using your dispenser, it is normal if some drops fall, you can reduce this by removing slowly
the glass from the lever.
3.1 Water Tank Cleaning
For cleaning the water tank of your dispenser, follow the next steps:
• Take the water tank with both hands and pull it out to you, this will remove it from refrigerator (Figure 9).
• Once the tank is uninstalled from the door, lift up the holders of the lid and take it out (Figure 10).
• Wash the tank with water and do not use detergents or cleaners with odor, after this, dry with a piece of cloth (see
Figure 11).
• Finally, align the lid with the water tank (see figure 12), then close the holders (see Figure 13), you must listen a
“click”, this means that the lid has been correctly assembled.
3.2 How install the Water Tank
For installing the tank in its original position (in refrigerator’s door), follow the next
instructions:
• Take the water tank and insert the valve in the hole of the
refrigerator (Figure 14).
• Put the tank over the guides and push it down (Figure 15).
NOTE: If the water container is not well placed, water could
spill or drain and no water will come out from the dispenser
in the door.
3.3 Filling Water Tank
For supply the tank with water, follow the instructions below:
• With the tank already assembled in the refrigerator, lift the tank’s lid
and use a glass or jar for fill up the tank ( see Figure 16).
• Close the lid by pushing and release until you hear a “click”, this
means that the lid was correctly closed ( Figure 17).
• Dispense 2 or 3 times to purge the system.
NOTE: Do not fill the tank completely in order to avoid water spills, the maximum capacity it is indicated in your water
tank.
WARNING: Fill only with potable water. Using other beverages (as beer, soda or liquids with sugar) may damage
the dispensing system.
If you need to empty the water tank, follow the next steps:
• Remove the water tank and its lid, see section “3.1 Water Tank Cleaning”.
• Dispose the leftover water.
• Assemble the lid and put the tank in the refrigerator (See section “3.2 How Install the Water Tank”).
4. DOOR ALARM (in some models)
The Door Alarm function is designed to prevent refrigerator malfunctioning that could occur if refrigerator door
remains open. If refrigerator door is left open for more than 1 minute, a warning alarm sounds at 30 second intervals.
NOTE: This function can not be deactivated.
5. SMART DIAGNOSIS
TM
(in some models)
Use the function to contact the service center and receive precise diagnosis when the refrigerator malfunctions or
fails. Use it only to connect to the consultant and do not use it in normal times.
5.1 How to use this function
1. Open all the doors of the refrigerator.
2. Inside your refrigerator you will find a switch (Figure 18).
3. For activating this function, open the refrigerator door and after this close it and open it 5 times within 8 seconds,
now the feature SMART DIAGNOSIS
TM
is activated.
4. Hold the mouthpiece of your phone in front of the speaker that is located on the right hinge of the refrigerator door
(Figure 19).
5. Keep the phone in place until the tone transmission has finished. Once the data transmission is completed and the
tones have stopped, resume your conversation with the specialist, who will then be able to assist you in using the
information transmitted for analysis.
CAUTION: The transmission sound may be irritating. Do not take away the telephone until the sound stops for
good diagnosis.
6. After the completion of the data transmission, listen to the explanation of the consultant about the result of the
smart diagnosis. When the data transmission is completed, along with the display of the data transmission comple-
tion, the refrigerator will be automatically turned off and on a few seconds later. Listen to the explanation of the
consultant about the result of the analyzed diagnosis and follow the instructions.
Please consider next points when you are using SMART DIAGNOSIS
TM
.
• Call quality differences by region may affect the function.
• Use the home telephone for better communication performance, resulting in better service.
• Bad call quality may result in poor data transmission from your phone to the machine, which could cause SMART
DIAGNOSIS
TM
to malfunction.
1. THE OVERALL PERFORMANCE OR EFFICIENCY OF YOUR REFRIGERATOR MAY BE AFFECTED IF:
• It is placed near a heat source or humid area.
• You open the door frequently.
• If you introduce water or any object in the cold air vents.
• You block the air vents with food.
• You store hot food.
2. DURING VACATIONS WE RECOMMEND YOU THE FOLLOWING:
• If the vacations are for a short period of time place the freezable food in the refrigerator.
• If you are going to be outside or away for a longer period of time, do the following:
1. Take out all food.
2. Unplug the electrical cord.
3. Leave the doors open to avoid bad doors.
4. Thoroughly clean the refrigerator.
5. Empty and clean the water bin not forgetting to purge the system (turning on the switch).
3. IF YOU ARE PLANNING TO MOVE OR TO CHANGE YOUR REFRIGERATOR FROM ITS CURRENT POSITION:
• Remove and secure all attachments inside the refrigerator.
• To avoid any damage to the leveling height adjusting screws, turn them completely until the base (see Figure 20).
• Place the electrical cord in the hook located in the upper left side (see Figure 21).
• Clean and empty the water container and do not forget to purge the system (turning on the switch).
• After these procedures, you will be able to move your refrigerator.
• Do not grip back handle when you change position of refrigerator.
• When you move your refrigerator, place a protection sheet, such as packing cartoon under the refrigerator to avoid
floor damage. Always pull your refrigerator straight out. Do not shift from side to side or “walk” the refrigerator when
you are moving it (see Figure 22).
• Use the assistance of two or more persons to move or install the refrigerator. Not following these instructions may
cause injury to the back and other parts of the body.
4. IN CASE OF REFRIGERANT LEAK
• Do not touch the refrigerator or the outlet and ventilate the room immediately.
• The explosion by spark may cause fire or burn.
• Because this refrigerator uses natural gas (isobutene, R600a) as the environment-friendly refrigerant, even a small
amount (80~90 g) is combustible.
• When the gas is leaked by the severe damage during delivering, installing or using the refrigerator, any spark may
cause fire or burn.
5. LAMP REPLACEMENT (LED)
Your refrigerator has a LED lamp for changing it you must call Service Center to perform the replacement by qualified
technician.
WARNING: In case of replacement, the new lamp must have the same specification than the original one.
6. THE FRONT SIDE WARMS UP
The front wall of the cabinet of the refrigerator might warm up sometimes
specially during installation. DO NOT ALARM! It’s normal due to avoid
humidity or “sweat”.
7. THE BACK AND LATERAL SIDE OF THE REFRIGERATOR WARM UP
(some models)
¡DO NOT ALARM! The warming up is normal because in both sides the
refrigeration pipes are located.
WARNING. In case of your refrigerator was damaged for some flood,
do not use it until qualified technician confirms its performance.
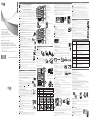
A
C
I
L
A
B
C
F
G
D
I
E
Pull-ou t Tray
J
K
I
L
M
N
O
O
P
Q
H
A
F
I
K
A
B
C
F
G
D
I
E
Pull-ou t Tray
J
K
I
L
M
N
O
R
P
Q
H
I
K
Water Dispenser in the
front of Refrigerator Door
Ice Maker (Twist’n serve)
A
B
C
D
E
F
G
H
I
J
K
L
M
N
O
P
Q
A
B
C
D
E
F
G
H
I
J
K
L
M
N
O
P
Q
R
REMEMBER: In a power failure, a full freezer stays cold longer than a partially filled one. A freezer full of meat stays
cold longer than a freezer full of baked goods.
Control of:
Freezer
Controls the flow of cold air
that goes from the freezer
into the refrigerator.
Controls the temperature of
the refrigerator.
Turn the knob until indicates the desired temperature (see table
below as reference).
Change the control by sliding it softly, the arrow shows the
temperature selected for your freezer compartment (see table
below as reference).
Refrigerator
¿What does it control? ¿How it can be adjusted?
Figure 3
Ice
Container
Ice
Shelves
Figure 2
Figure 1
WARNING: Remove water or dust from the power plug and insert it with the ends of the
pins securely connected. Dust, water or unstable connection may fire or electric shock.
In order to avoid bad or unwanted odors, is important to keep the refrigerator clean. Any spilled food must be cleaned
immediately; they can stain and/ or acidify the plastic parts of the refrigerator if they are let to get dry.
WARNING:
• Unplug the electrical cord always before cleaning around the electrical parts (lamps, switches, etc.).
• Clean any humidity to avoid any liquid might get into any electrical part.
• Do not touch the frozen parts with wet objects, humid or wet hands, they can stick to frozen surfaces.
Exterior: Use a warm mixture of mild detergent or soap to clean the refrigerator’s surface. Clean with a damp cloth
and dry immediately.
WARNING: Do not clean power cord using wet cloth, as this may cause an electric shock.
Interior: It is recommended to clean the interior often. Wash all the baskets and drawers with a mixture of bicarbon-
ate or mild detergent with water. Clean and dry. Using other kinds of products might damage your refrigerator.
After Cleaning: Check that the electrical cord is not damaged or overheated and it is properly plugged.
Door lining and gaskets: For plastic parts do not use cleaners, hard detergents, bleach or cleaners with petroleum.
Plastic Parts: Do not use paper towels, abrasive cleaners or flammable products, these could damage or scratch the
product.
Back Cover: In order to get an efficient performance of your refrigerator, clean its back cover at least twice a year.
Verify that electrical cord is not damaged and the plug is not overheated and it’s connected in outlet in a proper way.
The refrigerator does not
work.
There is a power
interruption.
The temperature of the
refrigerator or the
freezer is too warm or
hot.
I can hear some weird or
abnormal sounds.
There are some odors
in the refrigerator.
Some humidity is formed
in the cabinet’s surface.
The front part of the
refrigerator is getting
warm.
The compressor works
too frequently and for
extended periods of time.
• Check if any fuse is broken in the electric facility.
• Check if the power cord is correctly plugged.
• Check if the power outlet is not damaged.
• Identify if there are any high consume electrical appliances working at the same time, unplug those
that are not necessary.
In case of a black out, call your electric company and ask how long it will last.
• In case of a 24 hour or less black out, do not open the refrigerator; this will keep the food fresh.
• In case of a longer black out, do one of the following options:
1. Pull out all of the frozen food and keep them in an ice chest.
2. Put 2 lbs (0,907 Kg) of frozen ice (make sure you use gloves) for each square foot (28 L) inside
the freezer. This task will preserve the food for 2 to 4 days. While handling dry ice (CO
2), wear
gloves to protect your hands from frostbite.
3. In case you do not possess neither ice chest or dry ice (CO
2), consume your food as soon as
possible.
• Check that the temperature control is in the recommended position.
• Place the refrigerator away from any heat sources or direct sunlight.
• Open the doors only when is necessary.
• There is too many food that blocks the air vents.
• Don’t let the doors open for a long period of time.
• Check that the refrigerator is placed over an even leveled surface, if not, adjust the refrigerator
using the leveling height adjusting screws.
• Remove the unnecessary object from the back or top of the refrigerator.
• Check that the voltage is the correct one, if not call your electric company.
• Store all food in sealed containers.
• Frequently clean the refrigerator inside.
• When the weather is humid is normal.
• The door might be opened, check that is properly closed.
• Do not worry, is part of the normal functioning of the refrigerator, and this happens in order to
avoid condensation or “sweat”. If this occurs, just clean with a dry piece of cloth.
• Check if the temperature controls are placed in the maximum, if so, placed them in the middle
setting.
• Check that the doors are properly closed.
• Do not store over heated products.
• Do not let the doors open for a long period of time.
• Move away from any heat sources the refrigerator.
Back
Side
Front
Side
Lateral
Side
INSTALLATION
1. UNPACKING
Before installing your refrigerator, remove any tape or temporary stickers. Do not remove any stickers that feature
warnings, the model serial number or the technical label of the product located on the back of the refrigerator. To
remove adhesive tape residue, rub it well with your fingers and a little liquid detergent. Clean with warm water and
let dry. Do not use sharp instruments, rubbing alcohol, flammable liquids or abrasive cleaning products to remove the
adhesive tape or glue. These products can damage the surface of your refrigerator. The shelves come already
installed in their factory position. Remove the shelves and replace them according to your spacing needs.
2. INSTALL IT AWAY FROM HEAT SOURCES AND HUMID AREAS
In places with high temperatures, freezing capacity can be affected and cause high consumption of
electrical energy. Never install in places with high humidity as this can cause oxidation and electric
shock hazard.
3. TOUGH AND EVEN FLOOR
Your refrigerator must be leveled and placed on a strong floor. An unstable installation
can produce noise and vibrations. If the floor is uneven, level the unit by twisting the
height adjusting screw, this will eliminate unwanted sounds and vibrations.
NOTE: For
adjusting leveling screws lift the front of the refrigerator and insert a screwdriver in the
holes located in the leveling screws, then turn them clockwise ( ) to raise your
refrigerator and counter-clockwise ( ) to lower it.
4. AMBIENT TEMPERATURE
The refrigerator will work efficiently if room temperature is between 10 °C and 43 °C (50 °F and 109,4 °F).
This refrigerator is not for outdoor installation.
5. A PROPER DISTANCE FROM ADJACENT ITEMS
Adequate air flow is needed for an efficient operation. Keep your refrigerator at a relative
distance from other objects. Reduced distances between the unit and other nearby
objects can diminish freezing capacity and rise consumption of electrical energy.
NOTE: Be careful when you open the doors, one of them can be open more than the
other one. Avoid hit the doors with items around the refrigerator area.
The room must be 1m² in size for every 8 grams of R600a refrigerant inside the appliance.
The amount of refrigerant in your particular appliance is shown on the identification label inside the appliance.
WARNING. EXCESSIVE WEIGHT HAZARD. Use the assistance of two or more persons to move or install the
refrigerator. Not following these instructions may cause injury to the back and other parts of the body.
6. WAITING PERIOD
Wait at least one hour before connecting, after installation was completed.
7. CONNECTION
DANGER. FOR YOUR PERSONAL SAFETY, this device must be properly grounded.
Connect to a single undamaged socket. Not having proper installation will require you to call
qualified personnel to achieve it.
Do not, under any circumstance, cut or extract the third prong from the plug. It is your
responsibility and obligation to replace two-prong outlets with that of an adequately
grounded three-prong outlet.
WARNING. REPLACING ELECTRICAL CORD, if the electrical cord is damaged, it must be replaced
by our service center or qualified LG technician to avoid any risk. NEVER disconnect the refrigerator
by pulling the electrical cord, always grip the plug firmly and disconnect it directly from the outlet.
8. BEFORE STORING FOOD
Leave your refrigerator working from 2 h to 3 h before storing food. If operation is interrupted wait 5 minutes before
trying again.
9. IN CASE OF UNINSTALLING
If you wish to dispose of your refrigerator, keep in mind the following Warning.
WARNING: If the use of this unit is no longer needed, please contact local authorities to dispose of this product in
a safe way due contains Cyclopentane or pentane as gas for insulation and R600a as refrigerant. Insulation gases and
refrigerant require a special elimination process. This product contains flammable insulation and refrigerant.
Screwdri ver
Leveling
Screw
10 cm.
10 cm.
3 cm.
Duplex Outlet
Make sure the
connection is
grounded
Three
terminal
plug
I
J
Pull-out Tray
NOTE: For an optimal performance of your refrigerator, it is necessary adjust the control in the settings
recommended by the manufacturer.
I
J
SUMMER
(Hot, more of 28 °C)
SPRING
(Warm, 17-28 °C)
AUTUMN
(Fresh, 12-17 °C)
WINTER
(Cold, 5-12 °C)
Recommended Temperature Settings
Freezer
Refrigerator
Set in 1
Set in 2
Set in 3 Set in 3
Set in 7
Set in 6
Set in 5
Set in 4
Control of:
Figure 5
STORING FOOD SUGGESTIONS
WHAT YOU NEED TO KNOW ABOUT YOUR REFRIGERATOR
WHAT TO DO WHEN...
Freezer Shelf (Glass)
Ice Maker (Twist’n Serve)
Refrigerator Lamp (LED)
Refrigerator Shelf (Pull-out Tray)
Temperature Control (Refrigerator)
Door Cooling *, maximizes cooling level
Refrigerator Shelf (Glass)
Magic Crisper (Plastic), cover for vegetable
drawer that controls humidity
Humidity Control
Vegetable Drawer, keeps vegetables and fruits
fresh
Leveling Screws
Smart Diagnosis
TM
*
Door Alarm*
Temperature Control (Freezer)
Freezer Basket
Refrigerator Big Basket
Refrigerator Small Basket
Egg Tray
* On some models
Freezer Shelf (Glass)
Ice Maker (Twist’n Serve)
Refrigerator Lamp (LED)
Refrigerator Shelf (Pull-out Tray)
Temperature Control (Refrigerator)
Door Cooling *, maximizes cooling level
Refrigerator Shelf (Glass)
Magic Crisper (Plastic), cover for vegetable
drawer that controls humidity
Humidity Control
Vegetable Drawer, keeps vegetables and fruits
fresh
Leveling Screws
Smart Diagnosis
TM
*
Door Alarm*
Temperature Control (Freezer)
Freezer Basket
Water tank
Refrigerator Small Basket
Egg Tray
Refrigerator Big Basket
* On some models
Shelf
Holder
Shelf
Figure 6
Figure 7
Figure 8
OP
E
N
O
PE
N
F
R
E
S
H
W
A
T
E
R
O
PE
N
OP
E
N
F
R
E
SH
W
A
T
E
R
O
P
E
N
OP
E
N
F
R
E
S
H
W
AT
E
R
O
P
E
N
O
P
EN
Figure 14
Figure 15
Figure 16 Figure 17
Valve’s hole
Guide Guide
Valve
Lid
Push down
NOTE: Be careful of not blocking or moving
with food packages the temperature
controls, you might change or not
recognize the temperature in which your
refrigerator is set.
Refrigerator Temperature Control
Freezer Temperature Control
PLUG ACCESS: The refrigerator- freezer must be placed in a way that the electrical cord can be pulled easily in
case of emergency.
WHAT TO DO WITH YOUR OLD REFRIGERATOR: Your refrigerator contains liquids
(refrigerant, lubricant) made of recyclable materials. All these materials must be sent to a recycling waste
disposal site as they can be reused after a specific recycling process. Contact local authorities.
DO NOT STORE ANIMALS: Do not store any living animal in your refrigerator.
CAUTION: Please do not catch the side of the door when opening the door. When open/ close
the door, please use handle. There is a possibility that the hand is caught on the door and injured.
WARNING: Do not use mechanical devices or other means to accelerate the defrosting
process, other than those recommended by the manufacturer.
WARNING: Do not use electrical appliances inside the food storage compartments of the
appliance, unless they are of the type recommended by the manufacturer.
WARNING: The maintenance of the lowest area from the refrigerator’s back side (see image)
only must be done by qualified personal, do it by non qualified technician can produce risk of
electric shock.
WARNING: Do not place heavy or dangerous objects (vessel with liquid or medicines, etc.)
on the top of the refrigerator, as this may cause physical damage to you or the refrigerator.
CAUTION: This appliance is intended to be used in household and similar applications such as: staff ktichen
areas in shops, offices and other working environments; farm houses and by clients in hotels, motels and other resi-
dential type environments; bed and breakfast type environments; catering and similar non-retail applications.
WARNING: Keep ventilation openings, in the appliance enclosure or in the built-in structure, clear of obstruction.
WARNING: Do not damage the refrigerant circuit.
WARNING: Do not use the refrigerator in horizontal position.
WARNING: Do not put fingers in “pinch point” areas (like clearances between doors & cabinets) when the door
is opened or closed. Make sure your hands and feet do not get stuck when opening and closing the appliance door.
Back
lower
area
Upper
part
5
3
5
3
5
3
5
3
FR
E
S
H
W
A
T
E
R
O
P
E
N
O
P
EN
FR
ES
H
W
A
T
E
R
O
P
E
N
O
P
E
N
F
R
E
S
H W
A
T
ER
OP
EN
OP
E
N
F
R
ESH
WA
T
E
R
O
P
E
N
O
P
E
N
Figure 9
Figure 10 Figure 11
Figure 12
Figure 13
Lift up
Align the lid
with the tank
Press to close
Figure 19
NOTE: This guide covers different models. Your refrigerator could have some or all of the features and parts listed
below. The location of some of the parts may not correspond with your model.
5
3
Pull-ou t Tray
Figure 18
Switch
Figure 21
Figure 22
Figure 20
Figure 4
Copyright © 2017 LG Electronics Inc. All Rights Reserved.
Copyright © 2017 LG Electronics Inc. Todos los Derechos Reservados.

5
6 7
8 9
ESTA SIMBOLOGIA SERÁ UTILIZADA EN ESTE MANUAL PARA INDICAR ACCIONES QUE NO DEBEN
REALIZARSE.
PELIGRO Si no sigue las instrucciones de inmediato puede morir o sufrir una lesión grave.
ADVERTENCIA El uso inadecuado puede provocarle daño físico o heridas personales.
PRECAUCIÓN El uso inadecuado puede dañar la vivienda.
Todos los mensajes de seguridad le dirán el peligro potencial, le dirán como reducir las posibilidades de sufrir una
lesión y lo que puede suceder si no se siguen las instrucciones.
PRECAUCIONES Y ADVERTENCIAS IMPORTANTES
Lea todas las instrucciones antes de usar el producto.
ADVERTENCIA: Este refrigerador contiene una pequeña cantidad de refrigerante isobutano (R600a), gas natural
con una alta compatibilidad ambiental, también es combustible. Cuando la unidad sea transportada e instalada, tenga
cuidado de asegurarse que ningún componente del circuito refrigerante esté dañado. Si el refrigerante fuga de la
tubería puede encenderse o causar daños en los ojos. Si alguna fuga es detectada, evite el contacto con llamas o
fuentes potenciales de incendio y mejore la ventilación del lugar donde se encuentra el refrigerador. En caso de
detectar una fuga en el circuito del refrigerante y con el fin de evitar la creación de una mezcla de gas flamable, el
tamaño de la habitación del lugar donde el aparato está localizado debe depender de la cantidad de refrigerante usado.
El lugar debe ser de 1m
2
por cada 8 gramos de refrigerante R600a que contenga el refrigerador. La cantidad de
refrigerante usada en su refrigerador es mostrada en la etiqueta de especificación localizada en el interior. Nunca
conecte el aparato si muestra algún signo de daño, si tiene alguna duda consulte a su centro de servicio.
PRECAUCIÓN: Riesgo de Incendio, tenga siempre en cuenta los siguientes puntos de precaución cuando mueva
o repare el refrigerador ya que el refrigerante usado es un gas inflamable:
• Evite el uso de cualquier llama o fuente de calor para acceder al sistema de sellado cuando la unidad esté siendo
cargada con refrigerante.
• En caso de alguna fuga de refrigerante, ventilar completamente el área de trabajo antes de comenzar a trabajar.
• Tenga cuidado de NO dañar la tubería de refrigeración.
PRECAUCIÓN: Riesgo de Fuego o Explosión (Refrigerante Inflamable), el refrigerador solamente debe ser
reparado por personal de servicio calificado. No perforar la tubería de refrigeración. Consulte el manual de usuario
antes de poner en servicio este producto. Deben seguirse al pie de la letra todas las precauciones de seguridad.
PRECAUCIÓN: Este aparato no está diseñado para utilizarse por personas (incluyendo niños) cuyas capacidades
físicas, sensoriales o mentales sean diferentes o estén reducidas, o carezcan de experiencia o conocimiento, a
menos que dichas personas reciban una supervisión o capacitación para el funcionamiento del aparato por una
persona responsable de su seguridad. Los niños deben ser supervisados para asegurarse que ellos no usen los
aparatos como juguete.
NO UTILICE CABLES DE EXTENSIÓN O MULTICONTACTOS: Su refrigerador deberá estar instalado
cerca de un tomacorriente para evitar utilizar extensiones eléctricas, nunca conecte varios aparatos a un
mismo tomacorriente ya que puede sobrecargar y calentar el cableado, esto puede causar variaciones
de voltaje y un mal funcionamiento. No utilizar extensiones o adaptadores sin puesta a tierra.
ADVERTENCIA: Remover agua o polvo de la clavija e insertelo con los pines hasta que esté segura la conexión.
Polvo, agua o una conexión inestable pueden causar fuego o una descarga eléctrica.
REEMPLAZO DE CORDÓN DE ALIMENTACIÓN: Si el cordón de alimentación está dañado, éste debe de sustitu-
irse por un cordón o ensamble especial por medio del fabricante (si está dentro de garantía) o por su agente de
servicio autorizado.
CONEXIÓN A TIERRA: En caso de un corto circuito eléctrico, la conexión a tierra reduce
el riesgo de choque eléctrico. Este electrodoméstico debe ser aterrizado. Consulte a un
técnico calificado. Cuando mueva su refrigerador, tenga cuidado de no pisar el cordón de
alimentación con la base de su refrigerador o con los tornillos niveladores del aparato.
¡¡¡NO GUARDE SUSTANCIAS EXPLOSIVAS!!! Nunca guarde sustancias explosivas ni químicos en su refrigera-
dor, tales como benceno, alcohol, etc. ¡¡Es PELIGROSO!!.
DIVERSIÓN MUY PELIGROSA: Un refrigerador vacío representa un gran peligro para los niños. Quite las
puertas o los empaques magnéticos al momento en que ya no los use, asegúrelo de tal manera que no se
pueda abrir e introducir un niño.
ACCESIBILIDAD DEL ENCHUFE (Cable de Alimentación): El refrigerador-congelador debe ser colocado de manera
que el enchufe (cable de alimentación) esté accesible para desconectarlo rápidamente en caso de presentarse un
accidente.
QUE DEBE HACER CON SU REFRIGERADOR ANTERIOR: Su refrigerador contiene líquidos (refrigerante,
lubricante) y está hecho de partes y materiales los cuales son reutilizables y/o reciclables. Todos estos
materiales deben ser enviados a un centro de recolección de material de desecho, ya que puede ser usado
después de un proceso de reciclaje. Para realizar esto, contacte a la agencia de su localidad.
PRECAUCIÓN: No agarre la parte lateral de la puerta cuando la esté abriendo. Cuando abra o cierre
la puerta utilice la manija. Existe la posibilidad de que su mano quede atrapada y sufra una lesión.
NO INTRODUCIR ANIMALES: No introduzca a su refrigerador ningún tipo de animal viviente.
ADVERTENCIA: No use dispositivos mecánicos u otros medios para acelerar el proceso de descongelamiento, solo
aquellos recomendados por el fabricante.
ADVERTENCIA: No use aparatos eléctricos en el interior del compartimento para almacenar
comida, al menos que éstos sean del tipo recomendado por el fabricante.
ADVERTENCIA: El mantenimiento del área inferior de la parte trasera de su refrigerador (ver
imagen) solamente debe ser realizado por personal técnico calificado, el realizarlo por personal no
capacitado puede provocar riesgo de choque eléctrico.
ADVERTENCIA: Evite colocar objetos pesados u objetos peligrosos (recipientes que contengan
líquidos o medicinas, etc.) en la parte superior del refrigerador ya que esto podría causar daños
físicos o al mismo refrigerador.
PRECAUCIÓN: Este aparato está destinado a ser usado en aplicaciones domésticas y similares, tales como: áreas
de personal de cocina en tiendas, oficinas y otros ambientes de trabajo; casas de campo y por clientes en hoteles,
moteles y otros ambientes tipo residencial; entornos de alojamiento y desayuno de tipo; hostelería y similares
aplicaciones no comerciales.
ADVERTENCIA: Mantener libres de obstrucción las aberturas de ventilación en el envolvente del aparato o en la
estructura de ensamble.
ADVERTENCIA: No dañar el circuito de refrigeración.
ADVERTENCIA: No utilizar el refrigerador acostado.
ADVERTENCIA: No ponga los dedos en el punto de cierre de las puertas (por ejemplo: la distancia entre puertas)
cuando abra o cierre las puertas. Asegúrese de que sus manos o pies no queden atrapados cuando abra o cierre las
puertas de su producto.
Es importante conservar el refrigerador limpio para evitar olores no deseados. Los alimentos derramados se deben
limpiar inmediatamente, ya que pueden dañar y manchar las superficies de plástico si se dejan secar.
ADVERTENCIA:
• Retire siempre el cable de alimentación de la toma de corriente antes de limpiar alrededor de los componentes
eléctricos (lámparas, interruptores, etc.).
• Limpie el exceso de humedad para evitar que se introduzcan líquidos en algunas piezas eléctricas.
• No toque las superficies congeladas con las manos mojadas, ya que los objetos húmedos se adhieren a las superfi-
cies muy frías.
Exterior. Utilice una solución tibia de detergente o jabón suave para limpiar la superficie del refrigerador. Retirarla con
un trapo o paño húmedo y secar inmediatamente. No limpiar cable de alimentación usando trapos húmedos ya que
esto podría causarle una descarga eléctrica.
ADVERTENCIA: No limpie el cable de alimentación con un paño humedo, esto puede ocasionar un choque
eléctrico.
Interior. Es recomendable limpiar con regularidad. Lave todos los compartimentos con una solución de bicarbonato o
detergente suave y agua caliente. Enjuáguelos y séquelos. El uso de otro tipo de sustancias puede dañar su refrigera-
dor.
Después de la Limpieza. Verifique que la conexión no está dañada o sobrecalentada y que se encuentra conectada
apropiadamente.
Puertas y Sellos. Para las partes plásticas, no utilice limpiadores, detergentes concentrados, blanqueadores o limpia-
dores a base de petróleo.
Partes Plásticas (Cubiertas y Paneles). No utilice toallas de papel, aspersores para vidrio, limpiadores abrasivos o
fluidos inflamables. Estos pueden rayar o dañar el material.
Cubierta Trasera. Limpie la cubierta trasera por lo menos dos veces al año, para que su refrigerador trabaje eficiente-
mente. Compruebe que el cable de alimentación no esté dañado y que el enchufe no se ha sobrecalentado y está bien
conectado en la toma de corriente.
1. PARRILLAS
Las parrillas de su refrigerador se ajustan para cumplir con sus necesidades de almacenamiento. Almacenar apropia-
damente los alimentos en su refrigerador y ajustar las parrillas para que tengan distintas alturas, hará más fácil la
búsqueda de los artículos que necesita. Esto también reducirá el tiempo en el que se encuentran abiertas la puertas,
lo que ahorrará energía.
IMPORTANTE: No limpie las parrillas de vidrio con agua caliente o tibia cuando se encuentren frías. Las parrillas se
pueden quebrar si se exponen a cambios bruscos de temperatura o impactos fuertes. Para su seguridad, las parrillas
están fabricadas con vidrio templado para que al romperse se fracturen en muchos pedazos pequeños, esto es
normal. NOTA: Las parrillas de vidrio son pesadas. Tenga especial cuidado cuando las mueva de lugar para evitar
impactos por caída (el vidrio templado en las parrillas de su producto puede ser dañado por un impacto. Si se rompe,
no lo toque con las manos humedas o mojadas, ya que esto podría causar una lesión).
Parrilla del Refrigerador
Para retirar la parrilla del refrigerador y/o congelador lleve a cabo las siguientes instrucciones:
1. Tome la parrilla de la parte de atrás (Figura 6). Levántela aplicando la fuerza necesaria por la parte de abajo para
liberar los seguros (Figura 7).
2. Por último deslícela hacia afuera (Figura 8).
NOTA: Tenga cuidado al sacar la parrilla, ya que esta se sujeta de las paredes del refrigerador.
ADVERTENCIA: No inserte las parrillas volteadas. Las parrillas podrían caerse y causar una lesión.
2. COMPARTIMENTOS
• Compartimentos en Puerta
Los compartimentos se pueden quitar para una mejor limpieza y ajuste.
1. Para quitar el compartimento, levántelo y jale hacia afuera.
2. Para sustituir el compartimento, deslícelo sobre la guía y empújelo hacia abajo hasta que tope.
NOTA: No ajuste el compartimento si está cargado de alimentos.
ADVERTENCIA: Alguien puede resultar herido si los compartimentos no están firmemente ensamblados.
ADVERTENCIA: No se cuelgue o trepe de la puerta, cajones o parrillas de su producto. Esto podría ocasionar daños
en las manos o hacer que el refrigerador caiga. Especialmente no permitir que los niños hagan lo antes mencionado.
PRECAUCIÓN: No permita que los niños jueguen con los compartimentos. Las esquinas filosas podrían lesionar-
los.
• Cajón para Frutas y Vegetales (Magic Crisper)
La cubierta “Magic Crisper” permite una mejor conservación de las frutas y vegetales, ayudándole a mantener la
humedad del interior fácilmente. Dispone de un control que le permite mantener o dejar salir la humedad.
High: en esta posición el aire húmedo sale del cajón para lograr un mejor
almacenamiento de las frutas.
Low: en esta posición el aire húmedo se mantiene en el cajón con un mejor
almacenamiento de las verduras.
Para quitar el cajón de vegetales, lleve a cabo las siguientes instrucciones:
1. Primero deslice el cajón hacia afuera hasta que tope. Levante la parte frontal del cajón y jale
para sacarlo, una vez afuera evite cargarlo solo de la parte frontal, use dos puntos de agarre.
2. Vuelva a colocar el cajón, deslizándolo hacia adentro hasta pasar los topes.
3. SISTEMA DE DISPENSADO DE AGUA (en algunos modelos)
Su refrigerador cuenta con un sistema que le permite tener agua fría sin necesidad de abrir la puerta del
refrigerador. Para dispensar agua, solo empuje hacia atrás la palanca del dispensador con un vaso hasta
que el agua salga.
NOTA: Después de despachar agua, la caída de algunas gotas es normal, usted puede reducir esto
retirando el vaso lentamente de la palanca.
3.1 Limpieza del Contenedor de Agua
Para limpiar el contenedor de agua de su dispensador realice los siguientes pasos:
• Tome el contenedor con ambas manos y jale en dirección hacia usted para retirarlo del refrigerador (Figura 9).
• Una vez que el contenedor está desinstalado de la puerta, levante la tapa y retírela (Figura 10).
• Enjuague el contenedor con abundante agua y no recurra a detergentes u otros limpiadores con olor, después de
esto, séquelo con un paño (Figura 11).
• Por último, alinee la tapa con el contenedor (vea Figura 12) y ejerza presión sobre toda la tapa hasta que se encuen-
tre alineada, esto significa que ha sido ensamblada correctamente (Figura 13).
3.2 Como colocar el Contenedor de Agua
Para colocar el contenedor en su posición original (en la puerta del refrigerador),
lleve a cabo los siguientes pasos:
• Tome el contenedor e introduzca la válvula en el orificio del
refrigerador (Figura 14).
• Coloque el contenedor sobre las guías laterales y presione hacia
abajo (Figura 15).
NOTA: Si el contenedor de agua no está bien colocado puede haber
escurrimiento y no saldrá agua por el dispensador de la puerta.
3.3 Llenado del Contenedor de Agua
Para abastecer el contenedor con agua siga los siguientes pasos:
• Con el contenedor ya instalado en el refrigerador, levante la tapa del
tanque y use un vaso o jarra para llenarlo (Figura 16).
• Para cerrar la tapa, bájela y presiónela, suelte hasta que escuche
un “click”, esto significa que la tapa se encuentra correctamente
cerrada (Figura 17).
• Dispense de 2 a 3 veces para purgar el sistema.
NOTA: Evite llenar el contenedor a tope para que no exista desbordamiento de agua, el nivel máximo se encuentra
indicado en su tanque de agua.
ADVERTENCIA: Llenar con agua potable solamente. El uso de otras bebidas (tales como cervezas, refrescos o
líquidos con azúcar) puede ocasionar daños en el sistema.
Si necesita vaciar el contenedor de agua, lleve a cabo los siguientes pasos:
• Retire el contenedor de agua y su tapa, haga referencia a la sección “3.1 Limpieza del Contenedor de Agua”.
• Desheche el agua restante.
• Coloque nuevamente la tapa y ensamble el contenedor en el refrigerador (Vea sección “3.2 Como colocar el
Contenedor de Agua”).
4. ALARMA DE LA PUERTA (en algunos modelos)
Con esta función Usted escuchará una alarma cuando la puerta del refrigerador permanezca abierta por más de 1
minuto. Esta alarma sonará cada 30 segundos y dejará de sonar cuando la puerta del refrigerador esté cerrada
correctamente. NOTA: Esta función no se puede desactivar.
5. SMART DIAGNOSIS
MR
, Diagnóstico Inteligente (en algunos modelos)
Use la función para contactar a su Centro de Servicio y recibir un diagnóstico preciso cuando el refrigerador no
funciona correctamente o falla. Su uso es exclusivo para consultas, no la use durante el funcionamiento normal.
5.1 Como usar esta función
1. Abra ambas puertas del refrigerador.
2. En el interior del refrigerador se encuentra el interruptor (Figura 18).
3. Para activar esta función, abra la puerta del refrigerador y posteriormente ciérrela y ábrala 5 veces durante un lapso
de 8 segundos, con esto se activa la función de SMART DIAGNOSIS
MR
.
4. Coloque el teléfono cerca del altavoz localizado en la parte superior derecha. Confirme que la bocina (micrófono)
del teléfono se encuentra en dirección hacia el altavoz (Figura 19).
5. Mantenga su télefono en esa posición hasta que la transmisión de los tonos haya terminado. Cuando la transmisión
de datos y tonos se hayan detenido continúe su conversación con el especialista, quien lo atenderá para darle apoyo
en el análisis de la información transmitida.
PRECAUCIÓN: Los sonidos de transmisión pueden ser irritantes. Para un correcto diagnóstico, no retire su
teléfono del altavoz hasta que el sonido se detenga.
6. Una vez que la transferencia de datos ha terminado, escuche la explicación del operador acerca del resultado del
diagnóstico inteligente. Cuando la transferencia termine, su refrigerador automáticamente se apagará y unos segun-
dos después se encenderá. Escuche la explicación del operador acerca del resultado del diagnóstico analizado y siga
las instrucciones que se le indiquen.
Considere los siguientes puntos al momento de usar SMART DIAGNOSIS
MR
• La diferencia en la calidad de las llamadas por región puede influir en el rendimiento de la función.
• Se recomienda usar el teléfono de casa para una mejor comunicación, esto resulta en un mejor servicio.
• Una mala calidad de la llamada puede resultar en una baja transmisión de datos desde su teléfono a la máquina, esto
ocasionaría que SMART DIAGNOSIS
MR
no funcione correctamente.
• Guarde los alimentos frescos en el compartimento del refrigerador.
• Congele los alimentos en porciones pequeñas.
• Cuando congele alimentos, una vez que los descongele, no los vuelva a congelar, ya que pierden su
valor nutricional y su sabor puede cambiar, después de descongelarlos puede guardarlos en el
refrigerador hasta 48 horas.
• No almacene alimentos que puedan descomponerse a bajas temperaturas (piñas, plátanos y
melones).
• No guarde ajo dentro del refrigerador.
• Cuando almacene alimentos utilice recipientes cerrados, para evitar que pierdan la humedad y se
mezclen olores.
• Siempre limpie los alimentos antes de refrigerarlos. Lave los vegetales y las frutas y siempre séque-
los.
• Es recomendable guardar la cebolla en bolsas plásticas, para evitar que otros alimentos se
contaminen con el olor.
• Si almacena nieve por períodos de tiempo largos, colóquela en la parrilla del congelador, no en el
compartimento de la puerta.
• Cuando almacene huevos, colóquelos en el estante más alto o en la primera parrilla para mantenerlos
frescos durante más tiempo.
• Tire la comida que comienza a descomponerse; puede contaminar otros alimentos.
• Guarde las carnes frías, quesos o embutidos en bolsas o recipientes de plástico con sello hermético.
• No almacene envases de vidrio en el congelador, pueden quebrarse.
• No guarde alimentos calientes dentro del refrigerador, disminuye la eficiencia.
• En los modelos con dispensador de agua se recomienda cambiar el agua almacenada al menos cada
7 días.
• No almacene medicinas en su refrigerador ya que se pueden deteriorar o causar una reacción
inesperada.
1. EL DESEMPEÑO O EFICIENCIA DE SU REFRIGERADOR PUEDE VERSE AFECTADO:
• Si está colocado en un lugar caliente o húmedo.
• Si abre frecuentemente la puerta.
• Si introduce agua u objetos extraños en las áreas de salida de aire frío.
• Si obstruye las salidas de aire frío con alimentos.
• Si introduce alimentos calientes.
2. EN PERÍODOS DE VACACIONES LE RECOMENDAMOS LO SIGUIENTE:
• Si las vacaciones son por un período de tiempo corto, coloque los alimentos congelables en el congelador.
• Si va a estar fuera de casa por un período de tiempo largo haga lo siguiente:
1. Saque toda la comida.
2. Desconecte el cable de corriente.
3. Deje abiertas las puertas para evitar formación de olores.
4. Limpie completamente el interior.
5. Vacíe y limpie el contenedor de agua y no olvide purgar el sistema (accionando la palanca del dispensador).
3. SI PIENSA CAMBIARSE O CAMBIAR DE POSICIÓN SU REFRIGERADOR:
• Remueva o asegure todos los aditamentos dentro del refrigerad
or.
• Para evitar daños en los tornillos niveladores, gírelos totalmente hasta la base (Figura 20).
• Coloque el cable de alimentación de corriente en el gancho localizado en parte posterior de su refrigerador (Figura
21).
• Vacíe y limpie el contenedor de agua y no olvide purgar el sistema (accionando la palanca del dispensador).
• Después de esto puede mover su refrigerador, al realizar esta acción tenga cuidado de no golpearse o lastimarse
los pies.
• No sujete los ganchos localizados en la parte superior posterior.
• Cuando mueva de posición el refrigerador, cubra el suelo con un pedazo de cartón para evitar que este se dañe o
maltrate. Siempre tire directamente hacia afuera. No mueva el refrigerador de lado a lado ni lo arrastre cuando lo trate
de mover (Figura 22).
• Mueva o instale el refrigerador entre dos o más personas. No seguir estas instrucciones puede ocasionar una lesión
en la espalda u otro tipo de lesiones.
4. EN CASO DE FUGA DE REFRIGERANTE
• No toque el refrigerador y/o el enchufe y mejore la ventilación del área inmediatamente.
• La explosión a causa de una chispa puede ocasionar fuego o quemaduras.
• Su refrigerador usa gas natural (Isobutano, R600a) como un refrigerante no agresivo para el medio ambiente, una
cantidad pequeña (80~90 gramos) es considerada combustible.
• Cuando el gas fugue por daños durante la entrega, instalación o uso de su refrigerador cualquier chispa puede
ocasionar fuego o quemaduras.
1. DESEMPAQUE
Despegue de su refrigerador las cintas y etiquetas temporales antes de instalarlo. No retire aquellas etiquetas que
muestran advertencias, el modelo y número de serie o la ficha técnica del producto (algunos modelos) que se encuen-
tran en la pared posterior del refrigerador. Para quitar los residuos de cinta o adhesivo, frote bien con sus dedos un
poco de detergente líquido para vajillas encima del adhesivo. Limpie con agua tibia y seque. No utilice instrumentos
filosos, alcohol para fricciones, líquidos inflamables o productos de limpieza abrasivos para quitar la cinta adhesiva o
goma. Estos productos pueden dañar la superficie de su refrigerador. Las parrillas vienen instaladas en su posición de
fábrica. Instale las parrillas de acuerdo a sus necesidades de espacio.
2. LEJOS DE FUENTES DE CALOR Y LUGARES HUMEDOS
En lugares de altas temperaturas, la capacidad de congelación puede verse afectada, al mismo
tiempo que aumenta la carga eléctrica. No instale en lugares de alta humedad ya que puede causar
oxidación y riesgo eléctrico, evite colocar su refrigerador al lado de la estufa.
3. SUELO NIVELADO Y RESISTENTE
Su refrigerador debe estar nivelado y sobre piso firme. Si su refrigerador parece inestable
o quiere que las puertas cierren más fácilmente, incline ligeramente su refrigerador hacia
atrás girando los tornillos de nivelación.
NOTA: Para ajustar los tornillos niveladores, levante un poco el refrigerador de la parte frontal,
inserte un desarmador plano en las ranuras de los tornillos y gírelos en sentido de las manecillas
del reloj ( ) para levantar la unidad o en contra de las manecillas ( ) para bajarla.
ADVERTENCIA. PELIGRO DE PESO EXCESIVO. Use la asistencia de dos o más personas para mover o instalar el
refrigerador, no seguir esta indicación puede causarle alguna lesión en la espalda o alguna otra parte del cuerpo.
4. TEMPERATURA AMBIENTE
El refrigerador trabaja eficientemente si la temperatura de la habitación se encuentra entre los 10 °C y 43 °C (50 °F y
109,4 °F). Este refrigerador no es para instalaciones a la intemperie.
5. A UNA DISTANCIA ADECUADA DE ELEMENTOS CERCANOS
La circulación de aire debe ser adecuada para una operación eficiente. Mantenga el
refrigerador a una distancia prudente de otros objetos. Una distancia demasiado reducida
entre la unidad y los elementos cercanos podría resultar en un aumento del consumo de
electricidad.
NOTA: Tenga cuidado al abrir las puertas, ya que una puede abrir más que la otra. Evite
golpear las puertas con objetos cercanos a su alrededor. La habitación debe tener 1m
2
por cada 8 gramos de refriger-
ante R600a que esté dentro del aparato. La cantidad de refrigerante que hay en su refrigerador aparece en la etiqueta
de especificación dentro del aparato.
6. PERÍODO DE ESPERA
Antes de conectar espere cuando menos 8 horas después de haberlo instalado.
7. CONEXIÓN PELIGRO. PARA SU SEGURIDAD PERSONAL, este aparato debe estar aterri-
zado apropiadamente. Conéctelo a un tomacorriente EXCLUSIVO y que no esté dañado. Si no
cuenta con la instalación correcta, llame al personal calificado para que la realice. Bajo ninguna
circunstancia corte la tercera terminal (tierra) del enchufe. Es su responsabilidad y obligación
reemplazar aquellos receptáculos de 2 terminales por uno de 3 terminales conectado
debidamente a tierra.
ADVERTENCIA. REEMPLAZO DEL CABLE DE CORRIENTE, si el cable de corriente se daña,
éste debe ser reemplazado por el fabricante, por nuestro centro de servicio o personal calificado
por LG para evitar algún riesgo. NUNCA desconecte su refrigerador jalando del enchufe. Siempre
tome firmemente el enchufe y desconéctelo. No conecte o desconecte su refrigerador con las
manos húmedas.
8. ANTES DE INTRODUCIR ALIMENTOS
Déjelo funcionando de 2 a 3 horas antes de introducir alimentos. Si la operación llegara a interrumpirse espere 5
minutos antes de volver a iniciarlo.
9. EN CASO DE DESINSTALACIÓN
Si desea desechar su refrigerador, tome en cuenta la siguiente Advertencia.
ADVERTENCIA: Si ya no requiere del uso de esta unidad, contacte a las autoridades locales para deshacerse de
este producto de forma segura ya que usa Ciclopentano o Pentano como gases inflamables espumantes para el
aislamiento y gas R600a como refrigerante. Los gases del material de aislamiento y refrigerante requieren un proceso
especial de eliminación. Este producto contiene gases aislantes y refrigerante inflamable.
1. CONEXIÓN
Recuerde que su refrigerador debe estar conectado a tierra.
PRECAUCIÓN. Si la operación es interrumpida, espere 5 minutos antes de restaurarla.
2. MÉTODO PARA HACER HIELOS
Charola “Twist’n Serve” (Cubetera)
• Para llenar su charola,
primero debe de retirar la
bandeja para hielos (Figura 1),
después jale hacia Usted la
charola (Figura 2) y llénela con
agua hasta donde lo indica el
nivel (Figura 3).
ADVERTENCIA: Llenar
con agua potable solamente.
• Vuelva a poner la charola y bandeja en su posición
original. Para remover los cubos, sujete las perillas y
gírelas (en sentido de las manecillas del reloj), los cubos
de hielo caerán en el interior de la bandeja (Figura 4).
• Para cumplir con sus necesidades de espacio, su fábrica
de hielos puede ser deslizada de un lado a otro, solo es
necesario moverla en la dirección deseada (Figura 5).
3. DESHIELO
El deshielo se realiza automáticamente, por lo que no tiene que preocuparse por ésto; el agua de deshielo fluye hacia
la charola (caja) de evaporación en la parte trasera del refrigerador.
4. FUNCIONES DEL CONTROL DE TEMPERATURA
Tipos de controles para ajustar el enfriamiento.
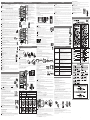
NOTA: Algunos componentes mostrados en este diagrama, pudieran no estar incluidos en su refrigerador, ya que
estos varían según las características de cada modelo.
RECUERDE: Un congelador lleno se mantiene más tiempo frío que uno parcialmente lleno. Un congelador lleno de
carne se mantiene más tiempo frío que uno que contenga pastelillos u otros alimentos horneados.
El refrigerador no
funciona.
Hay una interrupción
de energía.
La temperatura del
refrigerador o del
congelador es muy
caliente.
Se escuchan ruidos
anormales.
El refrigerador guarda
olores.
Hay humedad en el
gabinete.
Se calienta la parte
frontal del refrigerador.
El compresor trabaja
muy frecuentemente y
por períodos muy
largos.
• Verifique si no se fundió algún fusible en la instalación eléctrica.
• Revise si el cable de corriente está conectado.
• Compruebe que el contacto eléctrico no esté dañado.
• Identifique si tiene varios aparatos eléctricos de alto consumo de energía trabajando al mismo
tiempo, desconecte los que no necesite.
Si se desconecta la energía de su hogar, llame a su compañía de energía y pregunte cuánto tiempo
durará sin suministro eléctrico.
• Si no habrá energía en las próximas 24 horas o menos, mantenga las puertas del refrigerador
cerradas, para que los alimentos se conserven fríos y congelados.
• Si no habrá energía por más de 24 horas, use alguna de las siguientes opciones:
1. Saque todos los alimentos congelados y guárdelos en una hielera.
2. Coloque en el congelador 0,907 Kg (2 lbs) de hielo seco por cada pie cúbico (28 L) del espa-
cio del congelador. Esto ayudará a que los alimentos congelados duren así de 2 a 4 días.
Utilice guantes para manejar hielo seco (CO
2), ya que puede sufrir quemaduras.
3. Si no cuenta con hielo seco (CO
2) o hielera, consuma lo antes posible los alimentos
perecederos.
• Verifique que el control de temperatura esté en posición correcta.
• Retírelo de fuentes de calor o de la luz directa del sol.
• Abra las puertas sólo lo necesario.
• Tiene demasiados alimentos que obstruyen la salida del aire.
• No deje abiertas las puertas por mucho tiempo.
• Revise que el refrigerador esté sobre una superficie uniforme, si no es así, realice el ajuste
apropiado de los tornillos niveladores.
• Retire los objetos innecesarios en la parte posterior del refrigerador.
• Verifique que no haya una baja de voltaje, si es así, llame a la compañía de luz.
• No se preocupe, es parte normal del funcionamiento del refrigerador y esto sucede para evitar
la formación de condensación o de “sudor”. Si esto pasa, limpie con un paño seco.
• Es normal en período de humedad alta.
• La puerta se pudo haber quedado abierta, revise que esté cerrada.
• Guarde los alimentos en recipientes tapados.
• Limpie frecuentemente el interior de su refrigerador.
• Verifique si los controles de temperatura están al máximo, si es así colóquelos a la mitad.
• Revise que las puertas estén bien cerradas.
• No almacene alimentos muy calientes.
• No deje las puertas abiertas por períodos muy largos.
• Retire el refrigerador de las fuentes de calor.
5. REEMPLAZO DE LÁMPARA (LED)
Su refrigerador cuenta con una lámpara tipo LED, para cambiarla es necesario llamar a su Centro de Servicio, el
cambio solo debe ser realizado por personal calificado.
ADVERTENCIA: En caso de reemplazo, la nueva lámpara debe ser de la misma especificación que la original.
6. EL ÁREA FRONTAL SE CALIENTA
La pared frontal del gabinete del refrigerador se podrá calentar sobre todo después de la instalación. ¡NO SE
ALARME! es parte del funcionamiento normal para evitar condensación o “sudor”.
7. EL ÁREA POSTERIOR Y COSTADO SE CALIENTAN
¡NO SE ALARME! Es normal el calentamiento, ya que por la parte
posterior y costado derecho de su refrigerador pasa la tubería del
sistema de funcionamiento.
ADVERTENCIA: En caso de que el refrigerador se haya visto
afectado por alguna inundación, no lo use hasta que personal calificado
valide su estado y funcionamiento.
Parte
Posterior
Parte
Lateral
Parte
Frontal
Parrilla
Figura 19
Pull-ou t Tray
Figura 18
Interruptor
12 Meses
:
:
:
l.:
:
:
:
:
:
:
/
/
/
/
/
/
/
/
/
/
/
/
ro
)
FR
E
S
H
W
A
T
E
R
O
P
E
N
O
P
EN
Figura 9
PRECAUCIONES DE SEGURIDAD
DIAGRAMA DE COMPONENTES
USO DEL REFRIGERADOR LIMPIEZA
SUGERENCIAS PARA EL ALMACENAMIENTO DE ALIMENTOS
SOUTHAMERICA WARRANTY / HOJA DE GARANTÍA SUDAMÉRICA
QUÉ HACER CUANDO...
LO QUE NECESITA CONOCER ACERCA DE SU REFRIGERADOR
INSTALACIÓN
OPERACIÓN Y FUNCIONAMIENTO
A
C
I
L
A
F
I
K
Dispensador de
Agua al frente de la
Puerta del Refrigerador
Fábrica para Hielos
Deslizable (Twist’n Serve)
A
B
C
F
G
D
I
E
Pull-out Tray
J
K
I
L
M
N
O
O
P
Q
H
A
B
C
F
G
D
I
E
Pull-ou t Tray
J
K
I
L
M
N
O
R
P
Q
H
Parrilla (Estante) del Congelador (Vidrio)
Fábrica para Hielos Deslizable (Twist’n Serve)
Lámpara del Refrigerador (LED)
Parrilla (Estante) Desplegable (Pull-out Tray)
Perilla del Control de Temperatura (Refrigerador)
Door Cooling *, maximiza el nivel de enfriamiento
Parrilla (Estante) del Refrigerador (Vidrio)
Magic Crisper (Plástico), cubierta de cajón de frutas
y vegetables que controla la humedad
Control de Humedad
Cajón para frutas y vegetables, mantiene las frutas
y vegetales frescos
Tornillos Niveladores
Smart Diagnosis
MR
(Diagnóstico Inteligente)*
Alarma de la puerta*
Control de Temperatura (Congelador)
Compartimiento (Canasta) del Congelador
Compartimiento Grande (Canasta) del Refrigerador
Compartimiento Pequeño (Canasta) del Refrigerador
Bandeja para Huevos
* En algunos modelos
Parrilla (Estante) del Congelador (Vidrio)
Fábrica para Hielos Deslizable (Twist’n Serve)
Lámpara del Refrigerador (LED)
Parrilla (Estante) Desplegable (Pull-out Tray)
Perilla del Control de Temperatura (Refrigerador)
Door Cooling *, maximiza el nivel de enfriamiento
Parrilla (Estante) del Refrigerador (Vidrio)
Magic Crisper (Plástico), cubierta de cajón de frutas
y vegetables que controla la humedad
Control de Humedad
Cajón para frutas y vegetables, mantiene las frutas
y vegetales frescos
Tornillos Niveladores
Smart Diagnosis
MR
(Diagnóstico Inteligente)*
Alarma de la puerta*
Control de Temperatura (Congelador)
Compartimiento (Canasta) del Congelador
Contenedor de agua*
Compartimiento Pequeño (Canasta) del Refrigerador
Bandeja para Huevos
Compartimiento Grande (Canasta) del Refrigerador
* En algunos modelos
Figura 1
Bandeja
para Hielos
Charola
Control de Temperatura del
Congelador
I
J
Pull-ou t Tray
NOTA: Tenga cuidado de no
obstruir o mover con los alimentos
los controles de temperatura, ya
que podría cambiar o desconocer el
nivel de temperatura al cual se
encuentra su refrigerador.
Parrilla
F
R
E
SH
W
A
T
ER
O
P
E
N
O
PE
N
FR
E
SH
W
ATE
R
OP
E
N
O
PE
N
Figura 14
Figura 15
Orificio para
la Válvula
Guía Guía
Válvula
OP
E
N
O
P
E
N
F
R
E
S
H
W
A
T
E
R
O
P
E
N
O
PE
N
Figura 16 Figura 17
Tapa
Presione
Parte
Inferior
Trasera
Parte
Superior
10 cm.
10 cm.
3 cm.
Desarmador
Tornillo
Receptáculo de pared
aterrizado para
3 terminales
Control del: ¿Qué controla? ¿Cómo se puede ajustar?
Congelador
Refrigerador
NOTA: Para un óptimo funcionamiento del refrigerador es necesario ajustar los controles de temperatura en los
niveles recomendados por el fabricante.
VERANO
(Caluroso, más de 28 °C)
PRIMAVERA
(Cálido, 17-28 °C)
OTOÑO
(Fresco, 12-17 °C)
INVIERNO
(Frío, 5-12 °C)
Ajustes de Temperatura Recomendados
Congelador
Refrigerador
Ajuste en 1
Ajuste en 2
Ajuste en 3
Ajuste en 3
Ajuste en 7
Ajuste en 6
Ajuste en 5
Ajuste en 4
Control de:
5
3
5
3
5
3
5
3
Clavija
de 3
terminales
Asegúrese de
que la conexión para
tierra existe
Figura 2 Figura 3
Figura 5Figura 4
5
3
Control de Temperatura del Refrigerador
Para cambiar de posición el control, impúlselo hacia los lados para
que gire. La flecha le indica el nivel de temperatura en que se
encuentra su congelador (ver tabla de abajo como referencia).
Para configurar este control, necesita girar la perilla hacia el nivel
deseado (ver tabla de abajo como referencia).
El paso del aire frío que va del
congelador al refrigerador.
Controla la temperatura del
refrigerador.
Seguro
Figura 8Figura 7
Figura 6
FR
ES
H
WAT
E
R
O
P
E
N
O
PE
N
F
R
E
S
H W
A
T
ER
OP
EN
OP
E
N
F
R
ESH
WA
T
E
R
O
P
E
N
O
P
E
N
Figura 10 Figura 11
Figura 12
Figura 13
Levante
Alinear la tapa con
el contenedor
Presione para cerrar
Figura 21
Figura 22
Figura 20
A
B
C
D
F
G
H
J
K
Q
P
O
N
M
L
I
E
A
B
C
D
F
G
H
J
K
Q
P
O
N
M
L
I
E
R
-
 1
1
-
 2
2


LG LT29WPP El manual del propietario
- Tipo
- El manual del propietario
en otros idiomas
- English: LG LT29WPP Owner's manual
Artículos relacionados
-
LG GT29BPPX El manual del propietario
-
LG GT46HGPP Manual de usuario
-
LG GT26BPG El manual del propietario
-
LG GT29WDC El manual del propietario
-
LG Electronics LRBNC1104S El manual del propietario
-
-
LG MB482UWS-G El manual del propietario
-
LG LT43BGP El manual del propietario
-
-