
INSTRUCTION MANUAL
MANUAL DE INSTRUCCIONES
Cordless Vacuum Cleaner
Aspiradora Inalámbrica
XCV14
XCV15
XCV16
IMPORTANT: Read Before Using.
IMPORTANTE: Lea antes de usar.

2 ENGLISH
ENGLISH (Original instructions)
SPECIFICATIONS
Model: XCV14 XCV15 XCV16
Standard lter type Cloth lter (for dry
and wet dust)
Powder lter (for dry dust)
Maximum air volume
(with BL1850B, ø38 mm (1-1/2") x 2.5 m (98-1/2") hose)
2.1 m
3
/min (74 cu.ft/min)
Vacuum (with BL1850B, ø38 mm (1-1/2") x 2.5 m (98-1/2") hose) 9.8 kPa
Recoverable capacity Dust 15 L (4.0 gal.)
Water 12 L (3.2 gal.) -
Dimensions (L x W x H) 366 mm x 334 mm x 421 mm
(14-3/8″ x 13-1/8″ x 16-1/2″)
Rated voltage D.C. 36 V
Net weight 7.3 - 7.9 kg
(16.0 - 17.4 lbs)
8.0 - 8.6 kg (17.6 - 19.0 lbs)
Bluetooth
®
version - 4.1
(Bluetooth low energy)
Frequency band - 2,402 - 2,480 MHz
Maximum radio-frequency power - 1.0 dBm (EIRP)
Transmission range - Approximately 10 m
•
Due to our continuing program of research and development, the specications herein are subject to change without notice.
• Specications and battery cartridge may differ from country to country.
• The weight does not include accessories but battery cartridge(s). The lightest and heaviest combination weight
of the appliance and battery cartridge(s) are shown in the table.
• For wet dust, the oat and the water lter or cloth lter are required.
The Bluetooth
®
word mark and logos are registered trademarks owned by the Bluetooth SIG, Inc. and any use of
such marks by Makita is under license. Other trademarks and trade names are those of their respective owners.
Applicable battery cartridge and charger
Battery cartridge
BL1815N / BL1820B / BL1830 / BL1830B / BL1840B / BL1850B / BL1860B
Charger DC18RC / DC18RD / DC18RE / DC18SD / DC18SE / DC18SF
•
Some of the battery cartridges and chargers listed above may not be available depending on your region of residence.
WARNING: Only use the battery cartridges and chargers listed above. Use of any other battery cartridges
and chargers may cause injury and/or re.
SAFETY WARNINGS
IMPORTANT SAFETY
INSTRUCTIONS
When using an electrical appliance,
basic precautions should always be fol-
lowed, including the following:
READ ALL
INSTRUCTIONS
BEFORE USING
THIS APPLIANCE.

3 ENGLISH
WARNING
To reduce the risk of re, electric shock
or injury:
1.
Do not leave appliance when battery
tted. Remove battery from appliance
when not in use and before servicing.
2. Do not allow to be used as a toy.
Close attention is necessary when
used by or near children.
3. Use only as described in this man-
ual. Use only manufacturer's recom-
mended attachments.
4. Do not use with damaged battery.
If appliance is not working as it
should, has been dropped, dam-
aged, left outdoors, or dropped into
water, return it to a service center.
5. Do not handle battery or appliance
with wet hands.
6.
Do not put any object into openings.
Do not use with any opening blocked;
keep free of dust, lint, hair, and any-
thing that may reduce air ow.
7. Keep hair, loose clothing, ngers,
and all parts of body away from
openings and moving parts.
8. Turn off all controls before removing
the battery cartridge.
9.
Use extra care when cleaning on stairs.
10. Do not use to pick up ammable or
combustible liquids, such as gaso-
line, or use in areas where they may
be present.
11. Use only the charger supplied by
the manufacturer to recharge.
12. Do not pick up anything that is burn-
ing or smoking, such as cigarettes,
matches, or hot ashes.
13. Do not use without lters in
place. Replace a damaged lter
immediately.
14. Do not charge the battery outdoors.
15. (For the powder lter models.) Do not
use on wet surfaces. Do not expose
to rain. Store indoors.
16. (For the cloth lter models.) Do not
expose to rain. Store indoors.
17. Always install oat before any wet
pick-up operation.
18.
Do not use the cleaner as a stool or
work bench. The machine may fall
down and may result in personal injury.
19. Do not vacuum the following:
• Flammable liquid (kerosene,
gasoline, solvents such as ben-
zine, thinner, etc.)
• Hot substances that are burn-
ing or smoking (cigarettes,
matches, incense sticks, can-
dles, hot ashes), sparks and
metal dust generated by cutting
or grinding metal, etc.
• Flammable material (toner,
paint, spray, etc.)
• Foam like carpet cleaning agent,
etc. (they may cause explosion
or re)
• Explosive or pyrophoric sub-
stances (nitroglycerin, alumi-
num, magnesium, titanium, zinc,
red phosphorus, yellow phos-
phorus, celluloid, etc. and their
dust, gas or steam)
• Sharp objects (glass, cutlery,
wood splinter, metal, stone, nail,
razor, push pin, etc.)
• Solidifying and conductive
ne powder (metal or carbon
powder)
• Dehumidier
• Large amount of powder (our,
re extinguisher powder, etc.)
• Substances that cause toxic
symptoms
• Aggressive chemicals (acid,
leach, etc.)
• Liquid or damp garbage, includ-
ing vomit and excreta
• Asbestos
• Pesticides
Such action may cause re, injury
and/or property damage.
To reduce your exposure to these
chemicals, always wear approved
respiratory protection such as dust
masks that are specially designed
to lter out microscopic particles.
Direct the exhaust air away from
your face and body.

4 ENGLISH
NOTE: Read the OSHA regulation on
silica dust to understand the require-
ments needed to reduce exposure to
silica dust at the jobsite. Specic rules
apply to the drilling, demolition cutting
and grinding materials that contain sil-
ica. All OSHA requirements regarding
reducing silica dust can be found at
the OSHA website: www.osha.gov.
Battery tool use and care
1.
Prevent unintentional starting. Ensure
the switch is in the off-position before
connecting to battery pack, picking
up or carrying the appliance. Carrying
the appliance with your nger on the
switch or energizing appliance that have
the switch on invites accidents.
2. Disconnect the battery pack from
the appliance before making any
adjustments, changing accessories,
or storing appliance. Such preventive
safety measures reduce the risk of
starting the appliance accidentally.
3. Recharge only with the charger
specied by the manufacturer. A
charger that is suitable for one type of
battery pack may create a risk of re
when used with another battery pack.
4.
Use appliances only with specically desig-
nated battery packs. Use of any other battery
packs may create a risk of injury and re.
5. When battery pack is not in use,
keep it away from other metal
objects, like paper clips, coins,
keys, nails, screws or other small
metal objects, that can make a
connection from one terminal to
another. Shorting the battery terminals
together may cause burns or a re.
6. Under abusive conditions, liquid
may be ejected from the battery;
avoid contact. If contact acciden-
tally occurs, ush with water. If liq-
uid contacts eyes, additionally seek
medical help. Liquid ejected from the
battery may cause irritation or burns.
7.
Do not use a battery pack or appliance
that is damaged or modied. Damaged
or modied batteries may exhibit
unpredictable behaviour resulting in
re, explosion or risk of injury.
8. Do not expose a battery pack or
appliance to re or excessive tem-
perature. Exposure to re or tem-
perature above 130 °C may cause
explosion.
9. Follow all charging instructions
and do not charge the battery
pack or appliance outside of the
temperature range specied in the
instructions. Charging improperly or
at temperatures outside of the speci-
ed range may damage the battery and
increase the risk of re.
10. Have servicing performed by a
qualied repair person using only
identical replacement parts. This will
ensure that the safety of the product is
maintained.
11. Do not modify or attempt to repair
the appliance or the battery pack
except as indicated in the instruc-
tions for use and care.
SAVE THESE
INSTRUCTIONS.
This appliance is intended for commer-
cial use.
Symbols
The followings show the symbols used for
tool.
volts
direct current
Take particular care and
attention.
Never stand on the cleaner.
alternating current
amperes
hertz
Class II Construction

5 ENGLISH
Important safety
instructions for
battery cartridge
1.
Before using battery cartridge, read
all instructions and cautionary mark-
ings on (1) battery charger, (2) bat-
tery, and (3) product using battery.
2. Do not disassemble battery
cartridge.
3. If operating time has become
excessively shorter, stop operating
immediately. It may result in a risk
of overheating, possible burns and
even an explosion.
4. If electrolyte gets into your eyes,
rinse them out with clear water and
seek medical attention right away. It
may result in loss of your eyesight.
5. Do not short the battery cartridge:
(1) Do not touch the terminals with
any conductive material.
(2) Avoid storing battery cartridge
in a container with other metal
objects such as nails, coins, etc.
(3) Do not expose battery cartridge
to water or rain.
A battery short can cause a large
current ow, overheating, possible
burns and even a breakdown.
6. Do not store the tool and battery
cartridge in locations where the
temperature may reach or exceed 50
°C (122 °F).
7. Do not incinerate the battery car-
tridge even if it is severely damaged
or is completely worn out. The bat-
tery cartridge can explode in a re.
8. Be careful not to drop or strike
battery.
9. Do not use a damaged battery.
10. The contained lithium-ion batteries
are subject to the Dangerous Goods
Legislation requirements.
For commercial transports e.g. by
third parties, forwarding agents,
special requirement on packaging
and labeling must be observed.
For preparation of the item being
shipped, consulting an expert for
hazardous material is required.
Please also observe possibly more
detailed national regulations.
Tape or mask off open contacts and pack
up the battery in such a manner that it
cannot move around in the packaging.
11. Follow your local regulations relat-
ing to disposal of battery.
12. Use the batteries only with the prod-
ucts specied by Makita. Installing
the batteries to non-compliant products
may result in a re, excessive heat,
explosion, or leak of electrolyte.
SAVE THESE
INSTRUCTIONS.
CAUTION: Only use genuine Makita batteries.
Use of non-genuine Makita batteries, or batteries that
have been altered, may result in the battery bursting
causing res, personal injury and damage. It will
also void the Makita warranty for the Makita tool and
charger.
Tips for maintaining maximum
battery life
1. Charge the battery cartridge before completely
discharged. Always stop tool operation and
charge the battery cartridge when you notice
less tool power.
2.
Never recharge a fully charged battery cartridge.
Overcharging shortens the battery service life.
3. Charge the battery cartridge with room tem-
perature at 10 °C - 40 °C (50 °F - 104 °F). Let
a hot battery cartridge cool down before
charging it.
4. Charge the battery cartridge if you do not use
it for a long period (more than six months).
Important safety instructions for
wireless unit
1. Do not disassemble or tamper with the cleaner.
The wireless unit in the cleaner cannot be
removed.
2. Do not operate the wireless activation function
in places where medical instruments, heart
pace makers, or automated devices, such as
automatic doors and re alarms, are nearby.
3. Do not use the cleaner in places where the
temperature exceeds 50°C (122°F).
4. The wireless unit is an accurate instrument. Be
careful not to drop or strike the cleaner.
5. Do not leave the cleaner in a place where
static electricity or electrical noise could be
generated.

6 ENGLISH
PARTS DESCRIPTION
Model XCV14
(Cloth lter (for dry and wet dust) model)
2
3
4
5
1
► 1. Tank cover 2. Float 3. Float cage 4. Cloth lter
5. Tank
Model XCV15, XCV16
(Powder lter (for dry dust) model)
1
2
3
4
5
► 1. Tank cover 2. Powder lter (HEPA) 3. Damper
4. Prelter 5. Tank
FUNCTIONAL
DESCRIPTION
CAUTION: Always be sure that the tool is
switched off and the battery cartridge is removed
before adjusting or checking function on the tool.
Installing or removing battery
cartridge
CAUTION: Always switch off the tool before
installing or removing of the battery cartridge.
CAUTION: Hold the cleaner and the battery
cartridge rmly when installing or removing bat-
tery cartridge. Failure to hold the cleaner and the
battery cartridge rmly may cause them to slip off
your hands and result in damage to the cleaner and
battery cartridge and a personal injury.
CAUTION: Be careful not to pinch your n-
gers when opening or closing the battery cover.
Failure to do so may cause personal injury.
To install the battery cartridge, release the lock rst, and
then open the battery cover. After that, insert the battery
cartridge.
2
1
► 1. Lock 2. Battery cover
Align the tongue on the battery cartridge with the groove
in the housing and slip it into place. Insert it all the way
until it locks in place with a little click. Then lock the
battery cover.
1
► 1. Battery cartridge

7 ENGLISH
To remove the battery cartridge, slide it from the tool
while sliding the button in front of the cartridge.
CAUTION: Always install the battery cartridge
fully until the red indicator cannot be seen. If not,
it may accidentally fall out of the cleaner, causing
injury to you or someone around you.
CAUTION: Do not install the battery cartridge
forcibly. If the cartridge does not slide in easily, it is
not being inserted correctly.
NOTE: The cleaner does not work with only one
battery cartridge.
Indicating the remaining battery
capacity
Only for battery cartridges with the indicator
1
2
► 1. Indicator lamps 2. Check button
Press the check button on the battery cartridge to indi-
cate the remaining battery capacity. The indicator lamps
light up for a few seconds.
Indicator lamps Remaining
capacity
Lighted Off Blinking
75% to 100%
50% to 75%
25% to 50%
0% to 25%
Charge the
battery.
The battery
may have
malfunctioned.
NOTE: Depending on the conditions of use and the
ambient temperature, the indication may differ slightly
from the actual capacity.
Indicating the remaining battery
capacity
1
2
► 1. Battery indicator 2. Check button
Press the check button to indicate the remaining battery
capacities. The battery indicators correspond to each
battery.
Battery indicator status Remaining
battery
capacity
On
Off
Blinking
50% to 100%
20% to 50%
0% to 20%
Charge the
battery
NOTE: During the cleaner turned on with the stand-by
switch set to "AUTO", the battery indicator does not
work.

8 ENGLISH
Tool / battery protection system
The tool is equipped with a tool/battery protection sys-
tem. This system automatically cuts off power to the
motor to extend tool and battery life. The tool will auto-
matically stop during operation if the tool or battery is
placed under one of the following conditions:
Overload protection
When the tool is operated in a manner that causes it to
draw an abnormally high current, the tool automatically
stops without any indication. In this situation, turn the
tool off and stop the application that caused the tool to
become overloaded. Then turn the tool on to restart.
Overheat protection
On Blinking
When the tool is overheated, the tool stops automati-
cally, and the battery indicator blinks about 60 seconds.
In this situation, let the tool cool down before turning the
tool on again.
Overdischarge protection
When the battery capacity becomes low, the tool stops
automatically. If the product does not operate even
when the switches are operated, remove the batteries
from the tool and charge the batteries.
Switch action
2
13
► 1. Stand-by switch 2. Power button 3. Suction force
adjusting knob
To start the cleaner:
1. Set the stand-by switch to the "I" side. The cleaner
gets into stand-by state.
2. Press the power button.
To make the cleaner get into stand-by mode, press the
power button again.
To turn off the cleaner, set the stand-by switch to the
"O" side.
The suction power can be adjusted according to your
work need.
Suction power can be increased by turning the suc-
tion force adjusting knob from the
symbol to
the symbol.
NOTICE: Always set the stand-by switch to the "O"
side when not using the cleaner for long time. The
cleaner consumes power during stand-by state.
Auto-suction stop during wet
suction operation
Only for the cloth lter model
WARNING: Do not use for a long time while
the oat is at work. Using the cleaner with its oat at
work for a long time can cause overheat, resulting in
the cleaner deformation.
WARNING: Do not pick up foam or soapy
liquid. Picking up foam or soapy liquid can cause
foam to come out of air exit before the oat works.
Continuing to using in this condition may cause an
electric shock and breakage of the cleaner.
Auto-suction stop works only when using with the oat
and oat cage.
The cleaner has a oat mechanism that prevents water
from immersing into the motor when picking up more
than a certain amount of water. When the tank is full
and the cleaner no longer picks up water, switch off the
cleaner and empty the tank.
Locking or unlocking the caster
1
2
3
4
► 1. Caster 2. Stopper lever 3. FREE position
4. LOCK position
Locking the caster is convenient when storing the
cleaner, stopping the work on the way and keeping the
cleaner still.
To operate the stopper, move it by hand.
To lock the caster with a stopper, lower the stopper
lever and the caster no longer will rotate. To release the
caster from the locked position, raise the stopper lever.
NOTE: When moving the cleaner, make sure that
the caster is unlocked. Moving the cleaner with the
caster in the locked position may cause damage to
the caster.

9 ENGLISH
Carriage handle
When carrying the cleaner, carry it by holding the han-
dle on the head. The handle is retractable at the head
when not in use.
ASSEMBLY
CAUTION: Always be sure that the tool is
switched off and the battery cartridge is removed
before carrying out any work on the tool.
CAUTION: Always wear dust mask during
assembly or maintenance.
Installing the powder lter (HEPA)
and prelter (for dry dust)
Optional accessory for cloth lter model
CAUTION: Never pick up water or other liq-
uids or wet dusts when using the powder lter.
Picking up such things may cause the powder lter
breakage.
To use powder lter:
1. Remove the oat cage and oat by removing the
bolts.
2
1
► 1. Float 2. Float cage
2. Place the prelter in the tank with aligning the
mounting position markings.
3. Mount the damper on the powder lter and then
place them in the prelter with aligning the mounting
position markings.
4. Finally, mount the tank cover and lock it.
1
2
3
4
5
6
6
6
► 1. Tank cover 2. Powder lter (HEPA) 3. Damper
4. Prelter 5. Tank 6. Mounting position marking
NOTICE: Before using the powder lter, make
sure that prelter and damper are always used
together. It is not allowed to install powder lter
solely.
Installing the water lter
Optional accessory for cloth lter model
CAUTION: Never pick up water or wet dust
without the oat and the cloth lter or the water
lter.
CAUTION: For picking up wet dust, make
sure that the oat cage and the oat are installed
on the cleaner.
CAUTION: When installing the water lter on
the tank, set it tight at the opening of the tank so
that the hook of the water lter engages the tank
opening rmly and there is no space between the
water lter and the tank.

10 ENGLISH
To pick up water or wet dust only, the water lter is more
suitable than the cloth lter.
When installing the water lter, align its mounting posi-
tion mark with the one on the tank.
3
1
2
► 1. Water lter 2. Tank 3. Mounting position marking
NOTE: It is recommended using water lter when
picking up large amount of water repeatedly.
Otherwise vacuum ability may be reduced in case of
cloth lter.
Installing the paper pack
Optional accessory
WARNING: When using the paper pack, also
use the cloth lter or prelter together that is
preinstalled on the cleaner. Failure to use the cloth
lter / prelter together may cause unusual noise and
heat, resulting in a re.
CAUTION: (For the cloth lter model)
•
Never pick up water or other liquids or wet
dusts when using the paper pack. Picking up
such things may cause the paper pack breakage.
• Before using the paper pack, make sure that
powder lter (optional accessory), damper
(optional accessory) and prelter are always
used together.
CAUTION: (For the powder lter model)
• Before using the paper pack, make sure
that powder lter, damper and prelter are
always used together.
1. Remove the rubber holder.
1
► 1. Rubber holder
2. Extend the paper pack.
3. Align the paper pack opening with the dust suction
opening of the cleaner.
4. Insert the cardboard of the paper pack onto the
holder so that it is positioned at the end beyond the
detent protrusion.
1
2
► 1. Paper pack 2. Holder
Installing the polyethylene bag
Cleaner can also be used without polyethylene bag.
However, using polyethylene bag is easier to empty the
tank without letting your hands dirty.
Spread the polyethylene bag in the tank. Insert it
between the holder plate and the tank, and pull it to the
hose inlet.
2
1
► 1. Holder plate 2. Polyethylene bag

11 ENGLISH
Spread the bag around the top of the tank so that the
cloth lter / prelter edge can catch and hold the bag
securely.
1
► 1. Cloth lter / prelter
NOTE: A polyethylene bag available on the
market can be used. 0.04 mm or thicker one is
recommended.
NOTE: Too much dust will tear the bag easily, so
do not collect the dust more than the half of the bag
capacity.
Emptying the polyethylene bag
WARNING: Always make sure that the
cleaner is switched off and the battery cartridge is
removed before emptying the polyethylene bag.
Failure to do so may cause an electric shock and
serious personal injury.
CAUTION: Do not apply a great impact on the
oat cage and tank. Applying a great impact may
cause deformation and damage to the parts.
CAUTION: Empty the tank at least once a day
although this depends on picked-up dust volume
in the tank. Or, the suction force will weaken and the
motor may be broken.
CAUTION: Do not grab the hook when empty-
ing the tank. Grabbing the hook may cause the hook
to break.
Unhook and lift up the tank cover.
Shake off the dust from the cloth lter / prelter and then
take the polyethylene bag out of the tank.
NOTE: Take the polyethylene bag carefully out of the
tank so that the polyethylene bag cannot be caught
and torn by the protrusion inside the tank when emp-
tying it.
NOTE: Empty the polyethylene bag before it
becomes full. Too much dust in the tank may cause
the polyethylene bag to be torn.
Installing the tool box
1. Release the lock of the battery cover, and open
the battery cover.
2. Set the rails on the tool box along the grooves on
the housing.
3. Close the battery cover and apply the lock.
The tool box is convenient for carrying batteries, pipe,
or cuffs.
Connecting the hose
NOTICE: Never force the hose for bending or
stamp it. Never move the cleaner by a hose.
Forcing, stamping and pulling the hose may cause a
breakage or deformation of the hose.
NOTICE: When picking up large wastes such as
planer carvings, concrete dusts or similar other
than small wastes, use the 38 mm inner diameter
hose (optional accessory). Using the 28 mm inner
diameter hose (optional accessory) may cause a
hose stufng and damage.

12 ENGLISH
Insert the hose onto the mounting port of the tank and
turn it clockwise until it locks.
WIRELESS ACTIVATION
FUNCTION
For XCV16 only
What you can do with the wireless
activation function
The wireless activation function enables clean and
comfortable operation. By connecting a supported tool
to the cleaner, you can run the cleaner automatically
along with the switch operation of the tool.
NOTICE: Be sure to refer to the instruction man-
ual of the tool when using the cleaner with wire-
less activation function.
NOTICE: Do not disassemble or tamper with the
wireless unit.
NOTICE: Always close the lid of the wireless unit
in the tool when operating or storage.
NOTICE: Do not remove the wireless unit from
the tool while the power is being supplied to the
tool. Doing so may cause a malfunction of the wire-
less unit.
NOTICE: Do not press the wireless activation
button too hard and/or press the button with an
object with a sharp edge.
NOTE: Wireless activation needs Makita tools
equipped with the wireless unit.
NOTE: Prior to the initial use of the wireless activa-
tion function with each tool, the tool registration is
required. Once the registration is nished with the
tool, the re-registration is not required unless it is
cancelled.
NOTE: Before registration, be sure that the wireless
unit is properly inserted into the tool.
NOTE: One cleaner can register up to 10 tools. If
more than 10 tools are registered to the cleaner, the
tool registered earliest will be cancelled automatically.
NOTE: The position of the wireless activation button
varies depending on the tool.
NOTE: The cleaner also starts by pressing the power
button when the stand-by switch is set to "AUTO".
However the power button will not actuate when the
wireless activation function is used.
Tool registration for the cleaner
NOTE: A Makita tool supporting the wireless activa-
tion function is required for the tool registration.
NOTE: Finish installing the wireless unit to the tool
before starting the tool registration.
NOTE: During the tool registration, do not pull the
switch trigger on the tool or turn on the power switch
on the cleaner.
NOTE: Refer to the instruction manual of the tool, too.
If you wish to activate the cleaner along with the
switch operation of the tool, nish the tool registration
beforehand.
1. Install the batteries to the cleaner and the tool.
2. Set the stand-by switch on the cleaner to "AUTO".
1
► 1. Stand-by switch

13 ENGLISH
3. Press the wireless activation button on the cleaner
for 3 seconds until the wireless activation lamp blinks in
green. And then press the wireless activation button on
the tool in the same way.
21
21
► 1. Wireless activation button 2. Wireless activation
lamp
If the cleaner and the tool are linked successfully, the
wireless activation lamps will light up in green for 2
seconds and start blinking in blue.
NOTE: The wireless activation lamps nish blinking
in green after 20 seconds elapsed. Press the wireless
activation button on the tool while the wireless acti-
vation lamp on the cleaner is blinking. If the wireless
activation lamp does not blink in green, push the wire-
less activation button briey and hold it down again.
NOTE: When performing two or more tool registration
for the cleaner, nish the tool registration one by one.
Starting the wireless activation
function
NOTE: Finish the tool registration for the cleaner for
wireless activation.
NOTE: Always place the cleaner so that you can see
the status of the wireless activation lamp.
NOTE: Refer to the instruction manual of the tool, too.
After registering a tool to the cleaner, the cleaner will
automatically runs along with the switch operation of
the tool.
1. Install the wireless unit to the tool.
2. Connect the hose of the cleaner with the tool.
3. Set the stand-by switch on the cleaner to "AUTO".
1
► 1. Stand-by switch
4. Push the wireless activation button on the tool
briey. The wireless activation lamp will blink in blue.
2
1
► 1. Wireless activation button 2. Wireless activation
lamp
5. Pull the switch trigger of the tool. Check if the
cleaner runs while the switch trigger on the tool is being
pulled.
To stop the wireless activation, push the wireless activa-
tion button on the tool, or set the stand-by switch on the
cleaner to "I" or "O".

14 ENGLISH
NOTE: The wireless activation lamp on the tool will
stop blinking in blue when there is no operation for
2 hours. In this case, set the stand-by switch on the
cleaner to "AUTO" and press the wireless activation
button on the tool again.
NOTE: The cleaner starts/stops with a delay. There is
a time lag when the cleaner detects a switch opera-
tion of the tool.
NOTE: The transmission distance of the wireless unit
may vary depending on the location and surrounding
circumstances.
NOTE: When two or more tools are registered to one
cleaner, the cleaner may start running even if you
don't pull the switch trigger because other user is
using the wireless activation function.
Cancelling tool registration for the
cleaner
Perform the following procedure when cancelling the
tool registration for the cleaner.
1. Install the batteries to the cleaner and the tool.
2. Set the stand-by switch on the cleaner to "AUTO".
1
► 1. Stand-by switch
3. Press the wireless activation button on the cleaner
for 6 seconds. The wireless activation lamp blinks in
green and then become red. After that, press the wire-
less activation button on the tool in the same way.
21
21
►
1. Wireless activation button 2. Wireless activation lamp
If the cancellation is performed successfully, the wire-
less activation lamps will light up in red for 2 seconds
and start blinking in blue.
NOTE: The wireless activation lamps nish blinking in
red after 20 seconds elapsed. Press the wireless acti-
vation button on the tool while the wireless activation
lamp on the cleaner is blinking. If the wireless acti-
vation lamp does not blink in red, push the wireless
activation button briey and hold it down again.
Erasing all tool registrations
You can erase all tool registrations from the cleaner as follows.
3
2
1
► 1. Stand-by switch 2. Wireless activation button
3. Wireless activation lamp

15 ENGLISH
1. Install the batteries to the cleaner.
2. Set the stand-by switch to "AUTO".
3. Hold down the wireless activation button for about
6 seconds until the wireless activation lamp blinks in red
(about twice per one second).
4. When the wireless activation lamp starts blinking
in red, release your nger from the wireless activation
button. Thereafter, hold down the wireless activation
button again for about 6 seconds.
5. When the wireless activation lamp starts blinking
fast (about 5 times per one second) in red, release your
nger from the wireless activation button. When the
wireless activation lamp lights up in red and later lights
off, all tool registrations are erased.
NOTE: If the wireless activation lamp does not blink
in red, press the wireless activation button briey and
try again.
Description of the wireless activation lamp status
2
1
► 1. Wireless activation button 2. Wireless activation
lamp
The wireless activation lamp shows the status of the wireless activation function. Refer to the below table for the
meaning of the lamp status.
Status Wireless activation lamp Description
Color
On
Blinking
Duration
Standby Blue
Cleaner: con-
tinuing
Tool: 2 hours
Waiting for the tool registration or the wireless activation function
is available.
The lamp on the cleaner blinks when the stand-by switch is set in
AUTO. The lamp on the tool blinks when the wireless activation
button is pushed. The lamp on the tool will automatically turn off
when no operation is performed for 2 hours.
When the tool is
running.
The wireless activation of the cleaner is available and the tool is
running.
Tool
registration
Green
20 seconds Ready for the tool registration. Searching the tool to be registered.
2 seconds The tool registration has been nished. The wireless activation
lamp will start blinking in blue.
Cancelling/
erasing
tool
registration
Red
(slow: 2 times/sec.)
20 seconds Ready for the cancellation of the tool registration. Searching the
tool to be cancelled.
(fast: 5 times/sec.)
When the
wireless acti-
vation button is
pressed down.
Ready to erase all tool registrations.
2 seconds The tool registration has been cancelled/erased. The wireless
activation lamp will start blinking in blue.
Others Red
3 seconds The power is supplied to the wireless unit and the wireless activa-
tion function is starting up.
Off - - The stand-by switch is not set to "AUTO".

16 ENGLISH
Troubleshooting for wireless activation function
Before asking for repairs, conduct your own inspection rst. If you nd a problem that is not explained in the manual,
do not attempt to dismantle the tool. Instead, ask Makita Authorized Service Centers, always using Makita replace-
ment parts for repairs.
State of abnormality Probable cause (malfunction) Remedy
The wireless activation lamp does
not light/blink.
The wireless unit is not installed into
the tool.
The wireless unit is improperly installed
into the tool.
Install the wireless unit correctly in the tool.
The terminal of the wireless unit and/or
the slot is dirty.
Gently wipe off dust and dirt on the terminal of the
wireless unit and clean the slot of the tool.
The wireless activation button on the
tool has not been pushed.
Push the wireless activation button on the tool
briey.
The stand-by switch on the cleaner is
not set to "AUTO".
Set the stand-by switch on the cleaner to "AUTO".
No power supply Supply the power to the tool and the cleaner.
Cannot nish tool registration / can-
celling tool registration successfully.
The wireless unit is not installed into
the tool.
The wireless unit is improperly installed
into the tool.
Install the wireless unit correctly in the tool.
The terminal of the wireless unit and/or
the slot is dirty.
Gently wipe off dust and dirt on the terminal of the
wireless unit and clean the slot of the tool.
The stand-by switch on the cleaner is
not set to "AUTO".
Set the stand-by switch on the cleaner to "AUTO".
No power supply Supply the power to the tool and the cleaner.
Incorrect operation Push the wireless activation button briey and
perform the tool registration/cancellation procedures
again.
The tool and cleaner is away from each
other (out of the transmission range).
Get the tool and the cleaner closer to each other.
The maximum transmission distance is approxi-
mately 10 m however it may vary according to the
circumstances.
Before nishing the tool registration/
cancellation;
- the switch trigger on the tool is pulled
or;
- the power button on the cleaner is
turned on.
Push the wireless activation button briey and
perform the tool registration/cancellation procedures
again.
The tool registration procedures for the
tool or the cleaner has not nished.
Perform the tool registration procedures for the tool
and the cleaner at the same timing.
Radio disturbance by other appliances
which generate high-intensity radio
waves.
Keep the tool and the cleaner away from the appli-
ances such as Wi-Fi devices and microwave ovens.

17 ENGLISH
State of abnormality Probable cause (malfunction) Remedy
The cleaner does not run along with
the switch operation of the tool.
The wireless unit is not installed into
the tool.
The wireless unit is improperly installed
into the tool.
Install the wireless unit correctly in the tool.
The terminal of the wireless unit and/or
the slot is dirty.
Gently wipe off dust and dirt on the terminal of the
wireless unit and clean the slot of the tool.
The wireless activation button on the
tool has not been pushed.
Push the wireless activation button briey and make
sure that the wireless activation lamp is blinking
in blue.
The stand-by switch on the cleaner is
not set to "AUTO".
Set the stand-by switch on the cleaner to "AUTO".
More than 10 tools are registered to
the cleaner.
Perform the tool registration again.
If more than 10 tools are registered to the cleaner,
the tool registered earliest will be cancelled
automatically.
The cleaner erased all tool
registrations.
Perform the tool registration again.
No power supply Supply the power to the tool and the cleaner.
The tool and cleaner is away from each
other (out of the transmission range).
Get the tool and the cleaner closer to each other.
The maximum transmission distance is approxi-
mately 10 m however it may vary according to the
circumstances.
Radio disturbance by other appliances
which generate high-intensity radio
waves.
Keep the tool and the cleaner away from the appli-
ances such as Wi-Fi devices and microwave ovens.
The cleaner runs while the tool's
switch trigger is not pulled.
Other users are using the wireless acti-
vation of the cleaner with their tools.
Turn off the wireless activation button of the other
tools or cancel the tool registration of the other
tools.
Cannot erase all tool registrations in
the cleaner.
Pressing the wireless button on the tool. Press the wireless button on the cleaner for erasing
all tool registrations.
The stand-by switch on the cleaner is
not set to "AUTO".
Set the stand-by switch on the cleaner to "AUTO".
The wireless activation button is not
held down correctly.
Hold down the wireless activation button for more
than 6 seconds and then release it when the wire-
less activation lamp blinks in red. Hold down the
wireless activation button for more than 6 seconds
again until the wireless activation button rapidly
blinks in red and then release the button.
MAINTENANCE
CAUTION: Always be sure that the tool is
switched off and the battery cartridge is removed
before attempting to perform inspection or
maintenance.
NOTICE: Never use gasoline, benzine, thinner,
alcohol or the like. Discoloration, deformation or
cracks may result.
To maintain product SAFETY and RELIABILITY,
repairs, any other maintenance or adjustment should
be performed by Makita Authorized or Factory Service
Centers, always using Makita replacement parts.
Storage of accessories
The pipes can be placed into the pipe holder when not
using the cleaner for a short time.

18 ENGLISH
The hose can be stored around the tool by connecting
each ends.
Cleaning of cloth lter
Only for the cloth lter model
Clogged cloth lter causes poor suction performance.
Clean out the cloth lter from time to time.
To remove dust or particles adhering to the cloth lter,
shake the frame bottom quickly several times.
1
► 1. Cloth lter
Cleaning of powder lter (HEPA) and
prelter
Only for the powder lter model
Clogged powder lter, prelter and damper cause poor
suction performance. Clean out the lters and dampers
from time to time.
To remove dust or particles adhering to the lters, shake
the frame bottom quickly several times.
Occasionally wash the powder lter in water, rinse and
dry thoroughly in the shade before use. Never wash
lters in a washing machine.
NOTE: Do not rub or scratch the powder lter, the
prelter or the damper with hard objects such as a
brush and a paddle.
NOTE: The lters wear out in course of time. It is
recommended to have some spares for them.
OPTIONAL ACCESSORIES
CAUTION: These accessories or attachments
are recommended for use with your Makita tool
specied in this manual. The use of any other
accessories or attachments might present a risk of
injury to persons. Only use accessory or attachment
for its stated purpose.
If you need any assistance for more details regarding
these accessories, ask your local Makita Service Center.
• Hose
• Front cuff (22, 24, 38)
• Straight pipe
• Corner nozzle
• Round brush
• Powder lter, HEPA (for dry dust)
• Damper
• Prelter
• Nozzle assembly
• Bent pipe
• Polyethylene bag
• Paper pack
• Holder set
• Water Filter (option for the cloth lter model)
• Makita genuine battery and charger

19 ENGLISH
NOTE: Some items in the list may be included in the
tool package as standard accessories. They may
differ from country to country.
MAKITA LIMITED WARRANTY
Please refer to the annexed warranty sheet for the
most current warranty terms applicable to this product.
If annexed warranty sheet is not available, refer to the
warranty details set forth at below website for your
respective country.
United States of America: www.makitatools.com
Canada: www.makita.ca
Other countries: www.makita.com

20 ESPAÑOL
ESPAÑOL (Instrucciones originales)
ESPECIFICACIONES
Modelo: XCV14 XCV15 XCV16
Tipo de ltro estándar Filtro de tela
(para polvo seco y
húmedo)
Filtro de polvo (para polvo seco)
Volumen de aire máximo
(con BL1850B, manguera de ø38 mm (1-1/2″) x 2,5 m (98-1/2″))
2,1 m
3
/min (74 cu.ft/min)
Aspiradora (con BL1850B, manguera de ø38 mm
(1-1/2″) x 2,5 m (98-1/2″))
9,8 kPa
Capacidad recuperable Polvo 15 L (4,0 gal)
Agua 12 L (3,2 gal) -
Dimensiones (La x An x Al) 366 mm x 334 mm x 421 mm
(14-3/8″ x 13-1/8″ x 16-1/2″)
Tensión nominal 36 V c.c.
Peso neto 7,3 kg - 7,9 kg
(16,0 lbs - 17,4 lbs)
8,0 kg - 8,6 kg (17,6 lbs - 19,0 lbs)
Versión de Bluetooth
®
- 4,1
(Bluetooth Low Energy)
Banda de frecuencia -
2 402 MHz - 2 480 MHz
Potencia máxima de radiofrecuencia - 1,0 dBm (PIRE)
Rango de transmisión -
Aproximadamente 10 m
• Debido a nuestro continuo programa de investigación y desarrollo, las especicaciones aquí incluidas están
sujetas a cambio sin previo aviso.
• Las especicaciones y el cartucho de batería pueden variar de país a país.
• El peso incluye el o los cartuchos de batería, pero no los accesorios. La combinación de menor y mayor peso
del aparato y del o los cartuchos de batería se muestra en la tabla.
• Para polvo húmedo, se requieren el otador y el ltro de agua o de tela.
El término Bluetooth
®
así como su marca y logo son marcas registradas propiedad de Bluetooth SIG, Inc. y su uso
por parte de Makita está autorizado bajo licencia. Las demás marcas registradas y nombres comerciales pertenecen
a sus respectivos propietarios.
Cartucho de batería y cargador aplicables
Cartucho de batería
BL1815N / BL1820B / BL1830 / BL1830B / BL1840B / BL1850B / BL1860B
Cargador DC18RC / DC18RD / DC18RE / DC18SD / DC18SE / DC18SF
• Algunos de los cartuchos de batería y cargadores enumerados arriba podrían no estar disponibles depen-
diendo de su área de residencia.
ADVERTENCIA: Use únicamente los cartuchos de batería y los cargadores indicados arriba. El uso de
cualquier otro cartucho de batería y cargador podría ocasionar una lesión y/o un incendio.

21 ESPAÑOL
ADVERTENCIAS DE
SEGURIDAD
INSTRUCCIONES
IMPORTANTES DE
SEGURIDAD
Al usar cualquier aparato eléctrico,
siempre deben seguirse las precaucio-
nes básicas, incluyendo las siguientes:
GUARDE ESTAS
INSTRUCCIONES.
ADVERTENCIA
Para reducir el riesgo de incendio, des-
carga eléctrica o lesión:
1. No deje el aparato con la batería
puesta. Retire la batería del aparato
cuando no lo vaya a utilizar y antes
de dar servicio de mantenimiento.
2. No permita que sea utilizado como
un juguete. Preste mucha atención
cuando sea utilizado por niños o
cerca de ellos.
3.
Utilícelo solamente como se describe
en este manual. Sólo use aditamentos
recomendados por el fabricante.
4. No lo utilice con una batería dañada.
Si el aparato no está funcionando
como debiera, se ha dejado caer, se
ha dañado, se ha dejado a la intem-
perie o ha caído sobre agua, llévelo
a un centro de servicio.
5. No manipule la batería ni el aparato
con las manos mojadas.
6. No introduzca ningún objeto en las
aberturas. No lo utilice con ninguna
abertura bloqueada; manténgalo
libre de polvo, pelusa, cabello y
cualquier objeto que pueda reducir
el ujo de aire.
7. Mantenga el cabello, la ropa hol-
gada, los dedos y todas las partes
del cuerpo lejos de las aberturas y
piezas móviles.
8. Apague todos los controles antes
de retirar el cartucho de batería.
9. Tenga especial cuidado cuando lim-
pie en escaleras.
10. No lo utilice para recoger líquidos
inamables o combustibles, tal
como gasolina, ni en áreas donde
puedan estar presentes.
11. Utilice solamente el cargador sumi-
nistrado por el fabricante para
recargar.
12. No recoja nada que se esté que-
mando o desprenda humo, tal
como cigarros, fósforos o cenizas
calientes.
13. No lo utilice sin los ltros colocados
en su lugar. Reemplace cualquier
ltro dañado de inmediato.
14. No cargue la batería en exteriores.
15. (Para los modelos con ltro de polvo.)
No lo utilice sobre supercies
húmedas. No lo exponga a la lluvia.
Almacénelo en interiores.
16. (Para los modelos con ltro de
tela.) No lo exponga a la lluvia.
Almacénelo en interiores.
17. Instale siempre el otador antes de
cualquier operación para aspirar
objetos húmedos.
18. No utilice la aspiradora como banco
o mesa de trabajo. La máquina
podría caerse y ocasionar una
lesión personal.
19. No aspire los siguientes elementos:
• Líquidos inamables (quero-
seno, gasolina, disolventes
como bencina, diluyentes, etc.)
• Sustancias calientes que están
ardiendo o echando humo
(cigarrillos, cerillas, palitos de
incienso, velas, cenizas calien-
tes), chispas y polvo metálico
generados por el corte o el
lijado de metales, etc.
• Materiales inamables (tóner,
pinturas, aerosoles, etc.)
• Espumas, como limpiadores de
alfombras, etc. (pueden causar
explosiones o incendios)

22 ESPAÑOL
•
Sustancias explosivas o pirofó-
ricas (nitroglicerina, aluminio,
magnesio, titanio, zinc, fósforo
rojo, fósforo amarillo, celu-
loide, etc., y su polvo, gases o
vapores)
• Objetos alados (cristal, cubier-
tos, astillas de madera, meta-
les, piedras, clavos, cuchillas,
tachuelas, etc.)
• Polvo no conductor y solidi-
cante (polvo metálico o de
carbono)
• Deshumidicador
• Grandes cantidades de polvo
(harina, polvo de extintor de
incendios, etc.)
• Sustancias que causan sínto-
mas tóxicos
• Productos químicos agresivos
(ácidos, lixiviados, etc.)
• Basura líquida o húmeda, inclu-
yendo vómitos y heces
• Asbesto
• Pesticidas
Tal acción podría ocasionar un
incendio, lesiones y/o daños
materiales.
Para reducir la exposición a estas
sustancias químicas, utilice un
equipo de protección respiratoria
aprobado, tal como las máscaras
contra polvo que están especial-
mente diseñadas para ltrar partí-
culas microscópicas. No apunte la
salida de aire a la cara y al cuerpo.
NOTA: Lea el reglamento OSHA en
lo referente a polvo de sílice a n de
entender los requisitos necesarios
para reducir la exposición al polvo
de sílice en el puesto de trabajo.
Contiene normas especícas sobre
el taladrado, la demolición, el corte
y el lijado de materiales que con-
tienen sílice. Todos los requisitos
de la OSHA relacionados con la
reducción de polvo de sílice se pue-
den encontrar en el sitio web de la
OSHA: www.osha.gov.
20.
Este aparato no se destina para utili-
zarse por personas (incluyendo niños)
cuyas capacidades físicas, sensoria-
les o mentales sean diferentes o estén
reducidas o carezcan de experiencia o
de conocimiento, a menos que dichas
personas reciban una supervisión o
capacitación para el funcionamiento
del aparato por una persona respon-
sable de su seguridad.
21. Los niños deben supervisarse para
asegurar que ellos no empleen los
aparatos como juguete.
Uso y cuidado de la herramienta
a batería
1.
Evite un arranque accidental.
Asegúrese de que el interruptor esté
en la posición apagada antes de
conectar el paquete de baterías, levan-
tar el aparato o cargarlo. Cargar el apa-
rato con su dedo en el interruptor o pasar
energía al aparato con el interruptor
encendido puede propiciar accidentes.
2. Desconecte el paquete de baterías
del aparato antes de hacer cual-
quier ajuste, cambiar accesorios o
almacenar el aparato. Estas medidas
de seguridad preventivas reducen el
riesgo de poner en marcha el aparato
accidentalmente.
3.
Recargue sólo con el cargador espe-
cicado por el fabricante. Un cargador
que es adecuado para un solo tipo de
batería puede generar riesgo de incen-
dio al ser utilizado con otra batería.
4.
Use los aparatos únicamente con
los paquetes de baterías designados
especícamente para ellos. El uso
de otros paquetes de baterías puede
generar riesgo de lesiones e incendio.
5. Cuando no se esté usando la bate-
ría, manténgala alejada de otros
objetos metálicos, como sujeta-
papeles (clips), monedas, llaves,
clavos, tornillos u otros objetos
pequeños de metal los cuales pue-
den actuar creando una conexión
entre las terminales de la batería.
Originar un cortocircuito en las termi-
nales puede causar quemaduras o
incendios.

23 ESPAÑOL
6.
En condiciones abusivas, podrá
escapar líquido de la batería; evite
tocarlo. Si lo toca accidentalmente,
enjuague con agua. Si hay contacto
del líquido con los ojos, busque
asistencia médica. Puede que el
líquido expulsado de la batería cause
irritación o quemaduras.
7. No utilice un paquete de baterías
o aparato que esté dañado o haya
sido modicado. Las baterías daña-
das o modicadas podrían com-
portarse de manera impredecible
causando un incendio, explosión o
riesgo de lesión.
8. No exponga un paquete de baterías
o aparato al fuego o a una tempe-
ratura excesiva. La exposición al
fuego o una temperatura superior a
130 °C podría causar una explosión.
9. Siga todas las instrucciones rela-
tivas a la carga y no cargue el
paquete de baterías o el aparato
fuera del rango de temperatura
especicado en las instrucciones.
Cargar de manera inapropiada o a
temperaturas fuera del rango especi-
cado podría dañar la batería e incre-
mentar el riesgo de incendio.
10. Pida que el servicio lo realice un
técnico en reparaciones calicado
y que utilice únicamente piezas de
repuesto idénticas a las originales.
Esto garantizará que se mantenga la
seguridad del producto.
11. No modique ni intente reparar el
aparato ni el paquete de baterías
salvo como se indique en las ins-
trucciones para el uso y cuidado.
GUARDE ESTAS
INSTRUCCIONES.
Este aparato está diseñado para uso
comercial.
Símbolos
A continuación se muestran los símbolos
utilizados para la herramienta.
volts o voltios
corriente directa o continua
Ponga especial atención y
tenga cuidado.
Nunca se pare sobre la
aspiradora.
corriente alterna
amperes
hertz
Construcción clase II
Instrucciones
importantes de
seguridad para
el cartucho de
batería
1. Antes de utilizar el cartucho de bate-
ría, lea todas las instrucciones e
indicaciones de precaución en el (1)
el cargador de batería, (2) la batería,
y (3) el producto con el que se utiliza
la batería.
2. No desarme el cartucho de batería.
3. Si el tiempo de operación se ha
acortado en exceso, deje de ope-
rar de inmediato. Podría correrse
el riesgo de sobrecalentamiento,
posibles quemaduras e incluso
explosión.
4. En caso de que ingresen electrolitos
en sus ojos, enjuáguelos bien con
agua limpia y consulte de inmediato
a un médico. Esto podría ocasionar
pérdida de visión.

24 ESPAÑOL
5.
Evite cortocircuitar el cartucho de
batería:
(1) No toque las terminales con nin-
gún material conductor.
(2) Evite guardar el cartucho de
batería en un cajón junto con
otros objetos metálicos, tales
como clavos, monedas, etc.
(3) No exponga el cartucho de bate-
ría al agua o la lluvia.
Un cortocircuito en la batería
puede causar un ujo grande de
corriente, sobrecalentamiento,
posibles quemaduras e incluso una
descompostura.
6. No guarde la herramienta ni el car-
tucho de batería en lugares donde la
temperatura pueda alcanzar o exce-
der los 50°C (122°F).
7. Nunca incinere el cartucho de bate-
ría incluso en el caso de que esté
dañado seriamente o ya no sirva
en absoluto. El cartucho de batería
puede explotar si se tira al fuego.
8. Tenga cuidado de no dejar caer ni
golpear la batería.
9. No use una batería dañada.
10. Las baterías de ión de litio están
sujetas a los requisitos reglamen-
tarios en materia de bienes peligro-
sos.
Para el trasporte comercial, por
ej., mediante terceros o agentes
de transporte, se deben tomar en
cuenta los requisitos especiales
relativos al empaque y el etiquetado.
Para efectuar los preparativos
del artículo que se va a enviar, se
requiere consultar a un experto en
materiales peligrosos. Si es posible,
consulte además otras regulaciones
nacionales más detalladas.
Pegue o cubra con cinta adhesiva
los contactos abiertos y empaque
la batería de manera que ésta no
pueda moverse dentro del paquete.
11. Siga las regulaciones locales rela-
cionadas al desecho de las baterías.
12. Utilice las baterías únicamente con
los productos especicados por
Makita. Instalar las baterías en pro-
ductos que no cumplen con los requi-
sitos podría ocasionar un incendio, un
calentamiento excesivo, una explosión
o una fuga de electrolito.
GUARDE ESTAS
INSTRUCCIONES.
PRECAUCIÓN: Utilice únicamente baterías
originales de Makita. El uso de baterías no origina-
les de Makita, o de baterías alteradas, puede ocasio-
nar que las baterías exploten causando un incendio,
lesiones personales y daños. Asimismo, esto inva-
lidará la garantía de Makita para la herramienta y el
cargador Makita.
Consejos para alargar al máximo
la vida útil de la batería
1. Cargue el cartucho de batería antes de que
se descargue completamente. Pare siem-
pre la operación y cargue el cartucho de
batería cuando note menos potencia en la
herramienta.
2. No cargue nunca un cartucho de batería que
esté completamente cargado. La sobrecarga
acortará la vida de servicio de la batería.
3. Cargue el cartucho de batería a una tempera-
tura ambiente de 10 °C - 40 °C (50 °F - 104 °F).
Si un cartucho de batería está caliente, déjelo
enfriar antes de cargarlo.
4. Cargue el cartucho de batería si no va a utili-
zarlo durante un período prolongado (más de
seis meses).
Instrucciones importantes
de seguridad para la unidad
inalámbrica
1. No desarme ni modique la aspiradora. La
unidad inalámbrica en la aspiradora no puede
retirarse.
2. No utilice la función de activación inalámbrica
en lugares donde haya cerca instrumentos
médicos, marcapasos o dispositivos auto-
matizados tales como puertas automáticas y
alarmas contra incendios.
3. No utilice la aspiradora en lugares donde la
temperatura exceda los 50°C (122°F).
4. La unidad inalámbrica es un instrumento de
precisión. Tenga cuidado de no dejar caer ni
golpear la aspiradora.
5. No deje la aspiradora en un lugar donde
pueda generarse electricidad estática o ruido
eléctrico.

25 ESPAÑOL
DESCRIPCIÓN DE LAS
PIEZAS
Modelo XCV14
(Modelo con ltro de tela (para polvo seco y húmedo))
2
3
4
5
1
► 1. Cubierta del tanque 2. Flotador 3. Caja del ota-
dor 4. Filtro de tela 5. Tanque
Modelo XCV15, XCV16
(Modelo con ltro de polvo (para polvo seco))
1
2
3
4
5
► 1. Cubierta del tanque 2. Filtro de polvo (HEPA)
3. Amortiguador 4. Preltro 5. Tanque
DESCRIPCIÓN DEL
FUNCIONAMIENTO
PRECAUCIÓN: Asegúrese siempre de que la
herramienta esté apagada y el cartucho de batería
haya sido extraído antes de realizar cualquier
ajuste o comprobación en la herramienta.
Instalación o extracción del
cartucho de batería
PRECAUCIÓN:
Apague siempre la herramienta
antes de colocar o quitar el cartucho de batería.
PRECAUCIÓN: Sujete la aspiradora y el car-
tucho de batería con rmeza al colocar o quitar el
cartucho. Si no se sujeta con rmeza la aspiradora y
el cartucho de batería, puede ocasionar que se res-
balen de sus manos resultando en daños a la aspira-
dora y al cartucho, así como lesiones a la persona.
PRECAUCIÓN: Tenga cuidado de no pellizcar
sus dedos al abrir o cerrar la cubierta de la bate-
ría. El no hacerlo podría causar lesiones personales.
Para instalar el cartucho de batería, libere el seguro
primero y luego abra la cubierta de la batería. Después
de esto, inserte el cartucho de batería.
2
1
► 1. Seguro 2. Cubierta de la batería
Alinee la lengüeta en el cartucho de batería con la ranura en la
carcasa y deslícelo en su lugar. Insértelo por completo hasta
que quede asegurado en su lugar haciendo un pequeño clic.
Luego cierre con el seguro la cubierta de la batería.
1
► 1. Cartucho de batería

26 ESPAÑOL
Para quitar el cartucho de batería, sáquelo de la herra-
mienta mientras desliza el botón enfrente del cartucho.
PRECAUCIÓN: Siempre introduzca comple-
tamente el cartucho de batería hasta que el indi-
cador rojo no pueda verse. De lo contrario, podría
salirse accidentalmente de la aspiradora y ocasio-
narle lesiones a usted o a alguien a su alrededor.
PRECAUCIÓN: No instale el cartucho de
batería a la fuerza. Si el cartucho no se desliza al
interior fácilmente, se debe a que no está siendo
insertado correctamente.
NOTA: La aspiradora no funciona con un sólo cartu-
cho de batería.
Indicación de la capacidad restante
de la batería
Únicamente para cartuchos de batería con el
indicador
1
2
► 1. Luces indicadoras 2. Botón de vericación
Oprima el botón de vericación en el cartucho de la batería
para que indique la capacidad restante de la batería. Las
luces indicadoras se iluminarán por algunos segundos.
Luces indicadoras Capacidad
restante
Iluminadas Apagadas Parpadeando
75% a 100%
50% a 75%
25% a 50%
0% a 25%
Cargar la
batería.
La batería
pudo haber
funcionado
mal.
NOTA: Dependiendo de las condiciones de uso y
la temperatura ambiente, la indicación podrá diferir
ligeramente de la capacidad real.
Indicación de capacidad restante de
la batería
1
2
► 1. Indicador de batería 2. Botón de vericación
Oprima el botón de vericación para indicar las capa-
cidades restantes de la batería. Los indicadores de
batería corresponden a cada batería.
Estado del indicador de batería Capacidad
restante de la
batería
Encendido
Apagado
Parpadeando
50% a 100%
20% a 50%
0% a 20%
Cargar la
batería
NOTA: Si la aspiradora está encendida con el inte-
rruptor de modo en espera ajustado en “AUTO”, el
indicador de batería no funcionará.

27 ESPAÑOL
Sistema de protección para la
herramienta/batería
La herramienta está equipada con un sistema de pro-
tección de la herramienta/batería. Este sistema corta
en forma automática el suministro de energía al motor
para prolongar la vida útil de la herramienta y la batería.
La herramienta se detendrá automáticamente durante
la operación si la herramienta o la batería se someten a
una de las siguientes condiciones:
Protección contra sobrecarga
Cuando la herramienta se está utilizando de manera
que causa que consuma una cantidad de corriente
inusualmente alta, la herramienta se detiene auto-
máticamente sin que haya indicación alguna. En este
caso, apague la herramienta y detenga la aplicación
que causó que la herramienta se sobrecargara. Luego
encienda la herramienta para reiniciarla.
Protección contra
sobrecalentamiento
Encendido Parpadeando
Cuando la herramienta se sobrecalienta, ésta se
detiene automáticamente y el indicador de batería
parpadea alrededor de 60 segundos. En este caso,
espere a que la herramienta se enfríe antes de volver a
encenderla.
Protección contra sobredescarga
Cuando la capacidad de la batería se reduce, la herra-
mienta se detiene automáticamente. Si el producto
no funciona incluso cuando los interruptores están
siendo operados, retire las baterías de la herramienta
y cárguelas.
Accionamiento del interruptor
2
13
► 1. Interruptor de modo en espera 2. Botón de
encendido/apagado 3. Perilla de ajuste de la fuerza
de succión
Para arrancar la aspiradora:
1.
Ajuste el interruptor de modo en espera en el lado “I”. La
aspiradora se pondrá en el estado de modo en espera.
2. Oprima el botón de encendido/apagado.
Para poner la aspiradora en el modo en espera, oprima
nuevamente el botón de encendido/apagado.
Para apagar la aspiradora, ajuste el interruptor de modo
en espera en el lado “O”.
La potencia de succión se puede ajustar según sus
necesidades de trabajo.
La potencia de succión se puede incrementar girando
la perilla de ajuste de la fuerza de succión del sím-
bolo
al símbolo .
AVISO: Ajuste siempre el interruptor de modo en
espera en el lado “O” cuando no vaya a utilizar la
aspiradora durante un tiempo prolongado. La aspira-
dora consumirá energía durante el estado de modo
en espera.
Parada de succión automática
durante la operación para aspirar
objetos húmedos
Únicamente para el modelo con ltro de tela
ADVERTENCIA:
No utilice el aparato durante
un tiempo prolongado mientras el otador esté fun-
cionando. El usar la aspiradora con su otador funcio-
nando durante un tiempo prolongado podría causar un
sobrecalentamiento y la deformación de la aspiradora.
ADVERTENCIA: No aspire espuma ni jabón
líquido. El aspirar espuma o jabón líquido podría
causar que saliera espuma por la salida de aire antes
de que el otador comience a funcionar. Continuar
usando el aparato en estas condiciones podría
ocasionar una descarga eléctrica y la avería de la
aspiradora.
La parada de succión automática sólo funciona cuando
se usa con el otador y la caja del otador.
La aspiradora cuenta con un mecanismo de otación
que evita que se introduzca agua al motor cuando
se aspira más de cierta cantidad de agua. Cuando el
tanque se llena, la aspiradora deja de aspirar agua;
apague la aspiradora y vacíe el tanque.
Bloqueo o desbloqueo de la rueda
1
2
3
4
► 1. Rueda 2. Palanca del tope 3. Posición
LIBERADA 4. Posición BLOQUEADA

28 ESPAÑOL
Es conveniente bloquear la rueda para almacenar la
aspiradora, detener el trabajo momentáneamente y
mantener la aspiradora inmóvil.
Para usar el tope, muévalo manualmente.
Para bloquear la rueda con el tope, baje la palanca del
tope y la rueda ya no podrá girar. Para liberar la rueda
de la posición bloqueada, levante la palanca del tope.
NOTA: Cuando mueva la aspiradora, asegúrese de
que la rueda esté desbloqueada. El mover la aspi-
radora con la rueda en la posición bloqueada podría
causar daños a la rueda.
Mango de transporte
Cuando transporte la aspiradora, sosténgala del mango
ubicado en la cabeza. El mango en la cabeza es retrác-
til para guardarse cuando no se utilice.
MONTAJE
PRECAUCIÓN: Asegúrese siempre de que la
herramienta esté apagada y el cartucho de batería
haya sido extraído antes de realizar cualquier
trabajo en la misma.
PRECAUCIÓN: Utilice siempre una más-
cara contra el polvo durante el ensamblado o
mantenimiento.
Instalación del ltro de polvo (HEPA)
y el preltro (para polvo seco)
Accesorio opcional para el modelo con ltro de tela
PRECAUCIÓN: Nunca aspire agua ni otros
líquidos o polvo húmedo cuando utilice el ltro de
polvo. El aspirar este tipo de objetos podría causar la
avería del ltro de polvo.
Para usar el ltro de polvo:
1. Extraiga la caja del otador y el otador retirando
los pernos.
2
1
► 1. Flotador 2. Caja del otador
2. Coloque el preltro en el tanque alineando las
marcas de posición de montaje.
3. Instale el amortiguador en el ltro de polvo y luego
colóquelos en el preltro alineando las marcas de posi-
ción de montaje.
4. Por último, instale la cubierta del tanque y
asegúrela.
1
2
3
4
5
6
6
6
► 1. Cubierta del tanque 2. Filtro de polvo (HEPA)
3. Amortiguador 4. Preltro 5. Tanque 6. Marca de
posición de montaje
AVISO: Antes de usar el ltro de polvo, asegú-
rese de que el preltro y el amortiguador siempre
se utilicen juntos. El ltro de polvo no debe ser
instalado solo.

29 ESPAÑOL
Instalación del ltro de agua
Accesorio opcional para el modelo con ltro de tela
PRECAUCIÓN: Nunca aspire agua ni polvo
húmedo sin el otador y el ltro de tela o el ltro
de agua.
PRECAUCIÓN: Para aspirar polvo húmedo,
asegúrese de que la caja del otador y el otador
estén instalados en la aspiradora.
PRECAUCIÓN: Cuando instale el ltro de
agua en el tanque, fíjelo bien en la abertura del
tanque de manera que el gancho del ltro de agua
quede ensartado rmemente en la abertura del
tanque y no quede espacio entre el ltro de agua
y el tanque.
Para aspirar solamente agua o polvo húmedo, es más
conveniente usar el ltro de agua que el ltro de tela.
Cuando instale el ltro de agua, alinee su marca de
posición de montaje con la del tanque.
3
1
2
► 1. Filtro de agua 2. Tanque 3. Marca de posición de
montaje
NOTA: Se recomienda usar el ltro de agua cuando
vaya a aspirar una gran cantidad de agua de manera
repetida. De lo contrario, la capacidad de la aspira-
dora podría verse reducida si usa el ltro de tela.
Instalación de la bolsa de papel para
polvo
Accesorio opcional
ADVERTENCIA: Cuando use la bolsa de
papel para polvo, utilice también junto con ésta el
ltro de tela o el preltro preinstalado en la aspi-
radora. El no utilizar junto con ésta el ltro de tela/
preltro podría ocasionar un ruido y calentamiento
anormales provocando un incendio.
PRECAUCIÓN: (Para el modelo con ltro de
tela)
• Nunca aspire agua ni otros líquidos o polvo
húmedo cuando utilice la bolsa de papel
para polvo. El aspirar este tipo de objetos
podría causar la avería de la bolsa de papel
para polvo.
• Antes de usar la bolsa de papel para polvo,
asegúrese de que el ltro de polvo (acce-
sorio opcional), el amortiguador (accesorio
opcional) y el preltro se utilicen siempre
juntos.
PRECAUCIÓN: (Para el modelo con ltro de
polvo)
• Antes de usar la bolsa de papel para polvo,
asegúrese de que el ltro de polvo, el amor-
tiguador y el preltro se utilicen siempre
juntos.
1. Retire el sujetador de goma.
1
► 1. Sujetador de goma
2. Extienda la bolsa de papel para polvo.
3. Alinee la abertura de la bolsa de papel para polvo
con la abertura de succión de polvo de la aspiradora.
4. Inserte el cartón de la bolsa de papel para polvo
en el sujetador de manera que quede colocado en el
extremo más allá de la protuberancia del tope.
1
2
► 1. Bolsa de papel para polvo 2. Sujetador

30 ESPAÑOL
Instalación de la bolsa de polietileno
La aspiradora también se puede utilizar sin la bolsa
de polietileno. Sin embargo, con el uso de la bolsa de
polietileno resulta más fácil vaciar el tanque sin ensu-
ciarse las manos.
Extienda la bolsa de polietileno en el tanque. Insértela
entre la placa del sujetador y el tanque, y jálela hacia la
entrada para la manguera.
2
1
► 1. Placa del sujetador 2. Bolsa de polietileno
Extienda la bolsa alrededor de la parte superior del
tanque de manera que el borde del ltro de tela/preltro
pueda agarrar y sujetar la bolsa rmemente.
1
► 1. Filtro de tela/preltro
NOTA: Se puede utilizar cualquier bolsa de polieti-
leno disponible en el mercado. Se recomienda el uso
de una con un grosor de 0,04 mm o más.
NOTA: Si se recolecta demasiado polvo la bolsa
podría romperse fácilmente, por lo que debe evitar
recolectar más de la mitad de la capacidad de la
bolsa.
Vaciado de la bolsa de polietileno
ADVERTENCIA: Asegúrese siempre de que
la aspiradora esté apagada y que el cartucho de
batería haya sido extraído antes de vaciar la bolsa
de polietileno. El no hacerlo podría ocasionar una
descarga eléctrica y lesiones personales graves.
PRECAUCIÓN: Evite los impactos fuertes
sobre la caja del otador y el tanque. Un impacto
fuerte podría deformar y dañar las piezas.
PRECAUCIÓN: Vacíe el tanque por lo menos
una vez al día, aunque esto dependerá del volu-
men de polvo aspirado en el tanque. De lo contra-
rio, la fuerza de succión se vería reducida y el motor
podría averiarse.
PRECAUCIÓN: Evite agarrar el gancho mien-
tras vacía el tanque. El agarrar el gancho podría
ocasionar que éste se rompa.
Desenganche y levante la cubierta del tanque.
Sacuda el polvo del ltro de tela/preltro y luego retire
la bolsa de polietileno del tanque.
NOTA: Retire con cuidado la bolsa de polietileno del
tanque de manera que ésta no pueda quedar engan-
chada y romperse por la protuberancia en el interior
del tanque al vaciarla.
NOTA: Vacíe la bolsa de polietileno antes de que se
llene. Demasiado polvo en el tanque podría causar
que la bolsa de polietileno se rompa.
Instalación de la caja de
herramientas
1. Libere el seguro de la cubierta de la batería y
ábrala.
2. Coloque los rieles en la caja de herramientas a lo
largo de las ranuras en la carcasa.

31 ESPAÑOL
3. Cierre la cubierta de la batería y ponga el seguro.
La caja de herramientas resulta conveniente para guar-
dar baterías, tubos o bocas.
Conexión de la manguera
AVISO: Nunca fuerce la manguera para doblarla
o aplastarla. Nunca mueva la aspiradora tomán-
dola de la manguera. El forzar, aplastar y jalar la
manguera podría ocasionar que ésta se averíe o se
deforme.
AVISO: Cuando aspire residuos grandes tales
como los generados al tallar con cepillo, polvo de
concreto o similares que no sean residuos peque-
ños, utilice la manguera con diámetro interior de
38 mm (accesorio opcional). El usar la manguera
con diámetro interior de 28 mm (accesorio opcional)
podría causar obstrucciones y daños a la manguera.
Inserte la manguera en el puerto de montaje del tanque
y gírela en el sentido de las manecillas del reloj hasta
que quede asegurada.
FUNCIÓN DE
ACTIVACIÓN
INALÁMBRICA
Para el modelo XCV16 únicamente
Lo que puede hacer con la función
de activación inalámbrica
La función de activación inalámbrica permite una ope-
ración limpia y cómoda. Si conecta a la aspiradora una
herramienta compatible, podrá hacer que la aspiradora
funcione automáticamente al activar el interruptor de la
herramienta.
AVISO: Asegúrese de consultar el manual de
instrucciones de la herramienta cuando uti-
lice la aspiradora con la función de activación
inalámbrica.
AVISO: No desarme ni modique la unidad
inalámbrica.
AVISO: Cierre siempre la tapa de la unidad ina-
lámbrica en la herramienta durante la operación o
el almacenamiento.
AVISO: No retire la unidad inalámbrica de la
herramienta mientras se esté suministrando
energía a la herramienta. El hacerlo podría causar
una avería de la unidad inalámbrica.
AVISO: No oprima el botón de activación ina-
lámbrica demasiado fuerte ni lo haga con ningún
objeto que tenga un borde loso.

32 ESPAÑOL
NOTA:
La activación inalámbrica requiere que la unidad
inalámbrica esté equipada con herramientas Makita.
NOTA: Antes de usar por primera vez la función de
activación inalámbrica con cada herramienta, es
necesario registrar la herramienta. Una vez nalizado
el registro de la herramienta, éste no será necesario
de nuevo a menos que haya sido cancelado.
NOTA:
Antes del registro, asegúrese de que la unidad ina-
lámbrica haya sido insertada correctamente en la herramienta.
NOTA: Se puede registrar hasta 10 herramientas en
una aspiradora. Si más de 10 herramientas están
registradas en la aspiradora, la herramienta regis-
trada al principio se cancelará automáticamente.
NOTA: La posición del botón de activación inalám-
brica varía en función de la herramienta.
NOTA:
La aspiradora también puede ponerse en marcha
oprimiendo el botón de encendido/apagado cuando el
interruptor de modo en espera está ajustado en “AUTO”.
Sin embargo, el botón de encendido/apagado no se
activará cuando la función de activación inalámbrica
se esté utilizando.
Registro de herramientas para la
aspiradora
NOTA: Para el registro de la herramienta, se requiere
una herramienta Makita compatible con la función de
activación inalámbrica.
NOTA: Termine de instalar la unidad inalámbrica en
la herramienta antes de comenzar con el registro de
la herramienta.
NOTA: Durante el registro de la herramienta, no jale
el gatillo interruptor en la herramienta ni active el
interruptor de encendido/apagado en la aspiradora.
NOTA: Consulte también el manual de instrucciones
de la herramienta.
Si desea activar la aspiradora junto con el interruptor
de activación de la herramienta, termine antes con el
registro de la herramienta.
1. Instale las baterías en la aspiradora y en la
herramienta.
2. Ajuste el interruptor de modo en espera en la aspi-
radora en “AUTO”.
1
► 1. Interruptor de modo en espera
3. Oprima el botón de activación inalámbrica en la
aspiradora durante 3 segundos hasta que la luz indica-
dora de activación inalámbrica parpadee en verde. Y
luego oprima el botón de activación inalámbrica en la
herramienta de la misma manera.
21
21
► 1. Botón de activación inalámbrica 2. Luz indica-
dora de activación inalámbrica
Si la aspiradora y la herramienta han sido conectadas
exitosamente, las luces indicadoras de activación ina-
lámbrica se encenderán en verde durante 2 segundos y
comenzarán a parpadear en azul.
NOTA: Las luces indicadoras de activación inalám-
brica terminarán parpadeando en verde después de
un lapso de 20 segundos. Oprima el botón de acti-
vación inalámbrica en la herramienta mientras la luz
indicadora de activación inalámbrica en la aspiradora
esté parpadeando. Si la luz indicadora de activación
inalámbrica no parpadea en verde, oprima el botón
de activación inalámbrica durante un lapso breve y
vuelva a mantenerlo oprimido.
NOTA: Cuando realice dos o más registros de herra-
mientas para una aspiradora, termine el registro de
las herramientas de uno en uno.
Inicio de la función de activación
inalámbrica
NOTA: Termine con el registro de la herramienta en
la aspiradora para la activación inalámbrica.
NOTA: Coloque siempre la aspiradora de manera
que pueda ver el estado de la luz indicadora de acti-
vación inalámbrica.
NOTA: Consulte también el manual de instrucciones
de la herramienta.

33 ESPAÑOL
Después de registrar una herramienta en la aspiradora,
esta última se activará automáticamente junto con el
interruptor de activación de la herramienta.
1. Instale la unidad inalámbrica en la herramienta.
2. Conecte la manguera de la aspiradora a la
herramienta.
3. Ajuste el interruptor de modo en espera en la aspi-
radora en “AUTO”.
1
► 1. Interruptor de modo en espera
4. Oprima el botón de activación inalámbrica en la
herramienta durante un lapso breve. La luz indicadora
de activación inalámbrica parpadeará en azul.
2
1
► 1. Botón de activación inalámbrica 2. Luz indica-
dora de activación inalámbrica
5. Jale el gatillo interruptor de la herramienta.
Verique que la aspiradora funcione mientras jala el
gatillo interruptor en la herramienta.
Para detener la activación inalámbrica, oprima el botón
de activación inalámbrica en la herramienta, o ajuste el
interruptor de modo en espera en la aspiradora en “I”
o en “O”.
NOTA: La luz indicadora de activación inalámbrica en
la herramienta dejará de parpadear en azul cuando
no haya operación durante 2 horas. En este caso,
ajuste el interruptor de modo en espera en la aspi-
radora en “AUTO” y oprima el botón de activación
inalámbrica en la herramienta nuevamente.
NOTA: La aspiradora se pondrá en marcha/deten-
drá con un retraso. Existirá un desfase cuando la
aspiradora detecte la activación del interruptor de la
herramienta.
NOTA: La distancia de transmisión de la unidad
inalámbrica podrá variar en función del lugar y las
circunstancias de los alrededores.
NOTA: Cuando dos o más herramientas estén
registradas en una aspiradora, esta última podrá
comenzar a funcionar incluso si usted no jala el gatillo
interruptor debido a que otro usuario está utilizando
la función de activación inalámbrica.
Cancelación del registro de
herramientas para la aspiradora
Realice el siguiente procedimiento para cancelar el
registro de la herramienta para la aspiradora.
1. Instale las baterías en la aspiradora y en la
herramienta.
2. Ajuste el interruptor de modo en espera en la aspi-
radora en “AUTO”.
1
► 1. Interruptor de modo en espera

34 ESPAÑOL
3. Oprima el botón de activación inalámbrica en la
aspiradora durante 6 segundos. La luz indicadora de
activación inalámbrica parpadeará en verde y luego se
pondrá en rojo. Después de eso, oprima el botón de
activación inalámbrica en la herramienta de la misma
manera.
21
21
► 1. Botón de activación inalámbrica 2. Luz indica-
dora de activación inalámbrica
Si la cancelación se realiza exitosamente, las luces
indicadoras de activación inalámbrica se encenderán
en rojo durante 2 segundos y comenzarán a parpadear
en azul.
NOTA: Las luces indicadoras de activación inalám-
brica terminarán parpadeando en rojo después de un
lapso de 20 segundos. Oprima el botón de activación
inalámbrica en la herramienta mientras la luz indi-
cadora de activación inalámbrica en la aspiradora
esté parpadeando. Si la luz indicadora de activación
inalámbrica no parpadea en rojo, oprima el botón
de activación inalámbrica durante un lapso breve y
vuelva a mantenerlo oprimido.
Borrado de todos los registros de
herramientas
Usted puede borrar todos los registros de herramientas
de la aspiradora como se indica a continuación.
3
2
1
► 1. Interruptor de modo en espera 2. Botón de acti-
vación inalámbrica 3. Luz indicadora de activación
inalámbrica
1. Instale las baterías en la aspiradora.
2. Ajuste el interruptor de modo en espera en
“AUTO”.
3. Mantenga oprimido el botón de activación inalám-
brica durante aproximadamente 6 segundos hasta que
la luz indicadora de activación inalámbrica parpadee en
rojo (cerca de dos veces durante un segundo).
4. Cuando la luz indicadora de activación inalám-
brica comience a parpadear en rojo, suelte el botón
de activación inalámbrica. Posteriormente, vuelva a
mantener oprimido el botón de activación inalámbrica
alrededor de 6 segundos.
5. Cuando la luz indicadora de activación inalám-
brica comience a parpadear rápidamente en rojo (cerca
de 5 veces durante un segundo), suelte el botón de
activación inalámbrica. Cuando la luz indicadora de
activación inalámbrica se encienda en rojo y luego se
apague, todos los registros de herramientas se habrán
borrado.
NOTA: Si la luz indicadora de activación inalámbrica
no parpadea en rojo, oprima el botón de activación
inalámbrica durante un lapso breve e inténtelo
nuevamente.

35 ESPAÑOL
Descripción del estado de la luz indicadora de activación inalámbrica
2
1
► 1. Botón de activación inalámbrica 2. Luz indica-
dora de activación inalámbrica
La luz indicadora de activación inalámbrica muestra el estado de la función de activación inalámbrica. Consulte la
tabla a continuación para ver qué signica el estado de la luz indicadora.
Estado Luz indicadora de activación inalámbrica Descripción
Color
Encendida
Parpa-
deando
Duración
En espera Azul
Aspiradora:
continua
Herramienta: 2
horas
Se está esperando el registro de la herramienta o la función de
activación inalámbrica están disponibles.
La luz indicadora en la aspiradora parpadea cuando el interruptor
de modo en espera está ajustado en “AUTO”. La luz indicadora
en la herramienta parpadea cuando se presiona el botón de
activación inalámbrica. La luz indicadora en la herramienta se
apaga automáticamente cuando no se realiza ninguna operación
durante 2 horas.
Cuando la herra-
mienta está
funcionando.
La activación inalámbrica de la aspiradora está disponible y la
herramienta está funcionando.
Registro
de la
herramienta
Verde
20 segundos Ya se puede realizar el registro de la herramienta. Se está bus-
cando la herramienta que se va a registrar.
2 segundos El registro de la herramienta ha terminado. La luz indicadora de
activación inalámbrica comenzará a parpadear en azul.
Cancelación/
borrado del
registro de
herramientas
Rojo
(lento: 2 veces/s)
20 segundos Ya se puede cancelar el registro de la herramienta. Se está
buscando la herramienta que se va a cancelar.
(rápido: 5 veces/s)
Cuando el botón
de activación
inalámbrica es
presionado.
Ya se pueden borrar todos los registros de herramientas.
2 segundos El registro de la herramienta ha sido cancelado/borrado. La luz
indicadora de activación inalámbrica comenzará a parpadear
en azul.
Otros Rojo
3 segundos La energía es suministrada a la unidad inalámbrica y la función
de activación inalámbrica está arrancando.
Apagada
- - El interruptor de modo en espera no está ajustado en “AUTO”.

36 ESPAÑOL
Detección y solución de problemas para la función de activación inalámbrica
Antes de solicitar alguna reparación, primero realice una inspección por su cuenta. Si detecta algún problema que
no esté explicado en el manual, no intente desensamblar la herramienta. En vez de esto, solicite la reparación a un
centro de servicio autorizado de Makita, usando siempre piezas de repuesto Makita.
Estado de la anomalía Causa probable (avería) Remedio
La luz indicadora de activación ina-
lámbrica no enciende/parpadea.
La unidad inalámbrica no está instalada
en la herramienta.
La unidad inalámbrica está instalada
incorrectamente en la herramienta.
Instale la unidad inalámbrica de forma correcta en
la herramienta.
La terminal de la unidad inalámbrica y/o
la ranura está sucia.
Retire con cuidado el polvo y la suciedad en la
terminal de la unidad inalámbrica y limpie la ranura
de la herramienta.
El botón de activación inalámbrica en la
herramienta no se ha oprimido.
Oprima el botón de activación inalámbrica en la
herramienta durante un lapso breve.
El interruptor de modo en espera en la
aspiradora no está ajustado en “AUTO”.
Ajuste el interruptor de modo en espera en la
aspiradora en “AUTO”.
No hay suministro de energía. Suministre energía a la herramienta y a la
aspiradora.
No se puede terminar/cancelar
el registro de la herramienta
exitosamente.
La unidad inalámbrica no está instalada
en la herramienta.
La unidad inalámbrica está instalada
incorrectamente en la herramienta.
Instale la unidad inalámbrica de forma correcta en
la herramienta.
La terminal de la unidad inalámbrica y/o
la ranura está sucia.
Retire con cuidado el polvo y la suciedad en la
terminal de la unidad inalámbrica y limpie la ranura
de la herramienta.
El interruptor de modo en espera en la
aspiradora no está ajustado en “AUTO”.
Ajuste el interruptor de modo en espera en la
aspiradora en “AUTO”.
No hay suministro de energía. Suministre energía a la herramienta y a la
aspiradora.
Operación incorrecta Oprima el botón de activación inalámbrica durante
un lapso breve y realice los procedimientos de
registro/cancelación de la herramienta nuevamente.
La herramienta y la aspiradora están
lejos una de la otra (fuera del rango de
transmisión).
Acerque más la herramienta a la aspiradora. La
distancia máxima de transmisión es de aproxima-
damente 10 m, pero puede variar en función de las
circunstancias.
Antes de terminar el registro/cancela-
ción de la herramienta;
- el gatillo interruptor en la herramienta
se ha jalado; o
- el botón de encendido/apagado en la
aspiradora está activado.
Oprima el botón de activación inalámbrica durante
un lapso breve y realice los procedimientos de
registro/cancelación de la herramienta nuevamente.
Los procedimientos de registro para la
herramienta o la aspiradora no se han
terminado.
Realice los procedimientos de registro tanto para
la herramienta como para la aspiradora al mismo
tiempo.
La perturbación radioeléctrica generada
por otros aparatos que emiten ondas de
radio de alta intensidad.
Mantenga la herramienta y la aspiradora lejos de
aparatos tales como dispositivos Wi-Fi y hornos de
microondas.

37 ESPAÑOL
Estado de la anomalía Causa probable (avería) Remedio
La aspiradora no funciona junto con
el interruptor de activación de la
herramienta.
La unidad inalámbrica no está instalada
en la herramienta.
La unidad inalámbrica está instalada
incorrectamente en la herramienta.
Instale la unidad inalámbrica de forma correcta en
la herramienta.
La terminal de la unidad inalámbrica y/o
la ranura está sucia.
Retire con cuidado el polvo y la suciedad en la
terminal de la unidad inalámbrica y limpie la ranura
de la herramienta.
El botón de activación inalámbrica en la
herramienta no se ha oprimido.
Oprima el botón de activación inalámbrica durante
un lapso breve y asegúrese de que la luz indicadora
de activación inalámbrica esté parpadeando en
azul.
El interruptor de modo en espera en la
aspiradora no está ajustado en “AUTO”.
Ajuste el interruptor de modo en espera en la
aspiradora en “AUTO”.
Más de 10 herramientas están registra-
das en la aspiradora.
Vuelva a realizar el registro de la herramienta.
Si más de 10 herramientas están registradas en la
aspiradora, la herramienta registrada al principio se
cancelará automáticamente.
La aspiradora borró todos los registros
de herramientas.
Vuelva a realizar el registro de la herramienta.
No hay suministro de energía. Suministre energía a la herramienta y a la
aspiradora.
La herramienta y la aspiradora están
lejos una de la otra (fuera del rango de
transmisión).
Acerque más la herramienta a la aspiradora. La
distancia máxima de transmisión es de aproxima-
damente 10 m, pero puede variar en función de las
circunstancias.
La perturbación radioeléctrica generada
por otros aparatos que emiten ondas de
radio de alta intensidad.
Mantenga la herramienta y la aspiradora lejos de
aparatos tales como dispositivos Wi-Fi y hornos de
microondas.
La aspiradora funciona aun cuando
el gatillo interruptor de la herra-
mienta no ha sido jalado.
Otros usuarios están usando la activa-
ción inalámbrica de la aspiradora con
sus herramientas.
Apague el botón de activación inalámbrica de las
demás herramientas o cancele el registro de dichas
herramientas.
No se pueden borrar todos los
registros de herramientas en la
aspiradora.
El botón de activación inalámbrica en la
herramienta está oprimido.
Oprima el botón de activación inalámbrica en
la aspiradora para borrar todos los registros de
herramientas.
El interruptor de modo en espera en la
aspiradora no está ajustado en “AUTO”.
Ajuste el interruptor de modo en espera en la
aspiradora en “AUTO”.
El botón de activación inalámbrica no
se está manteniendo oprimido de forma
correcta.
Mantenga oprimido el botón de activación inalám-
brica durante más de 6 segundos y luego suéltelo
cuando la luz indicadora de activación inalámbrica
parpadee en rojo. Mantenga oprimido el botón de
activación inalámbrica durante más de 6 segundos
nuevamente hasta que el botón de activación
inalámbrica parpadee rápidamente en rojo y luego
suelte el botón.
MANTENIMIENTO
PRECAUCIÓN: Asegúrese siempre de que la
herramienta esté apagada y el cartucho de batería
extraído antes de intentar realizar una inspección
o mantenimiento.
AVISO: Nunca use gasolina, bencina, diluyente
(tíner), alcohol o sustancias similares. Puede que
esto ocasione grietas o descoloramiento.
Para mantener la SEGURIDAD y FIABILIDAD del pro-
ducto, las reparaciones, y cualquier otra tarea de man-
tenimiento o ajuste deberán ser realizadas en centros
de servicio autorizados o de fábrica Makita, empleando
siempre repuestos Makita.
Almacenamiento de los accesorios
Los tubos se pueden colocar en el portatubos cuando
no vaya a utilizar la aspiradora por poco tiempo.

38 ESPAÑOL
La manguera se puede guardar alrededor de la herra-
mienta conectando los extremos.
Limpieza del ltro de tela
Únicamente para el modelo con ltro de tela
La obstrucción del ltro de tela causa que el desem-
peño de la succión sea deciente.
Limpie el ltro de tela ocasionalmente.
Para eliminar el polvo o las partículas adheridos al ltro
de tela, sacuda con rapidez varias veces la parte infe-
rior del marco.
1
► 1. Filtro de tela
Limpieza del ltro de polvo (HEPA) y
el preltro
Únicamente para el modelo con ltro de polvo
La obstrucción del ltro de polvo, el preltro y el
amortiguador causa que el desempeño de la succión
sea deciente. Limpie los ltros y amortiguadores
ocasionalmente.
Para eliminar el polvo o las partículas adheridos a los
ltros, sacuda con rapidez varias veces la parte inferior
del marco.
De vez en cuando lave el ltro de polvo con agua,
enjuáguelo y séquelo bien a la sombra antes de usarlo.
Nunca lave los ltros en la lavadora.
NOTA: No frote ni raye el ltro de polvo, el preltro
o el amortiguador con objetos duros tales como un
cepillo y una pala.
NOTA: Los ltros se desgastan con el tiempo. Se
recomienda contar con piezas de repuesto.
ACCESORIOS
OPCIONALES
PRECAUCIÓN: Estos accesorios o aditamen-
tos están recomendados para utilizarse con su
herramienta Makita especicada en este manual.
El empleo de cualquier otro accesorio o aditamento
puede conllevar el riesgo de lesiones personales.
Utilice los accesorios o aditamentos solamente para
su n establecido.
Si necesita cualquier ayuda para más detalles en
relación con estos accesorios, pregunte a su centro de
servicio local Makita.
• Manguera
• Boca delantera (22, 24, 38)
• Tubo recto
• Boquilla para esquinas
• Cepillo redondo
• Filtro de polvo, HEPA (para polvo seco)
• Amortiguador
• Preltro
• Conjunto de boquillas
• Tubo curvo

39 ESPAÑOL
• Bolsa de polietileno
• Bolsa de papel para polvo
• Juego de sujetadores
• Filtro de agua (opcional para el modelo con ltro
de tela)
• Batería y cargador originales de Makita
NOTA: Algunos de los artículos en la lista pueden
incluirse en el paquete de la herramienta como acce-
sorios estándar. Éstos pueden variar de país a país.
GARANTÍA LIMITADA DE MAKITA
Ésta Garantía no aplica para México
Consulte la hoja de la garantía anexa para ver los
términos más vigentes de la garantía aplicable a este
producto. En caso de no disponer de esta hoja de
garantía anexa, consulte los detalles sobre la garantía
descritos en el sitio web de su país respectivo indicado
a continuación.
Estados Unidos de América: www.makitatools.com
Canadá: www.makita.ca
Otros países: www.makita.com

Some dust created by power sanding, sawing, grinding, drilling, and other
construction activities contains chemicals known to the State of California
to cause cancer, birth defects or other reproductive harm. Some examples
of these chemicals are:
• lead from lead-based paints,
• crystalline silica from bricks and cement and other masonry products, and
• arsenic and chromium from chemically-treated lumber.
Your risk from these exposures varies, depending on how often you do this
type of work. To reduce your exposure to these chemicals: work in a well
ventilated area, and work with approved safety equipment, such as those
dust masks that are specially designed to filter out microscopic particles.
WARNING
< USA only >
ADVERTENCIA
Algunos polvos creados por el lijado, aserrado, esmerilado, taladrado y
otras actividades de la construcción contienen sustancias químicas
reconocidas por el Estado de California como causantes de cáncer, defectos
de nacimiento y otros peligros de reproducción. Algunos ejemplos de estos
productos químicos son:
• plomo de pinturas a base de plomo,
• sílice cristalino de ladrillos y cemento y otros productos de albañilería, y
• arsénico y cromo de maderas tratadas químicamente.
El riesgo al que se expone varía, dependiendo de la frecuencia con la que
realice este tipo de trabajo. Para reducir la exposición a estos productos
químicos: trabaje en un área bien ventilada y póngase el equipo de seguridad
indicado, tal como las máscaras contra polvo que están especialmente
diseñadas para filtrar partículas microscópicas.
< Sólo en los Estados Unidos >
Makita Corporation
3-11-8, Sumiyoshi-cho,
Anjo, Aichi 446-8502 Japan
www.makita.com
885718-949
XCV14-1
EN, ESMX
20190206
-
 1
1
-
 2
2
-
 3
3
-
 4
4
-
 5
5
-
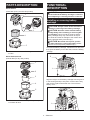 6
6
-
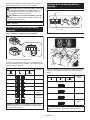 7
7
-
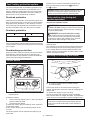 8
8
-
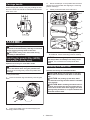 9
9
-
 10
10
-
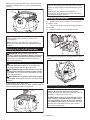 11
11
-
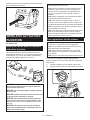 12
12
-
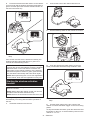 13
13
-
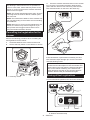 14
14
-
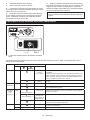 15
15
-
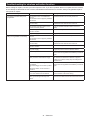 16
16
-
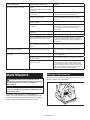 17
17
-
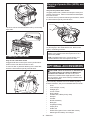 18
18
-
 19
19
-
 20
20
-
 21
21
-
 22
22
-
 23
23
-
 24
24
-
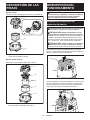 25
25
-
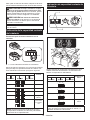 26
26
-
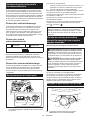 27
27
-
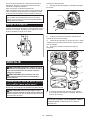 28
28
-
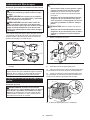 29
29
-
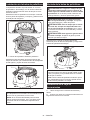 30
30
-
 31
31
-
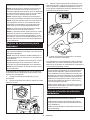 32
32
-
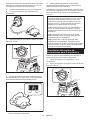 33
33
-
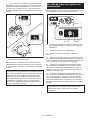 34
34
-
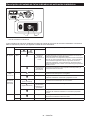 35
35
-
 36
36
-
 37
37
-
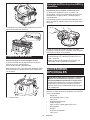 38
38
-
 39
39
-
 40
40


Makita XCV14 Manual de usuario
- Categoría
- Herramientas eléctricas
- Tipo
- Manual de usuario
en otros idiomas
- English: Makita XCV14 User manual
Artículos relacionados
-
Makita DVC865L Manual de usuario
-
Makita XCV20 Manual de usuario
-
Makita VC2211M Manual de usuario
-
-
Makita XCV07ZX Manual de usuario
-
-
-
-
-
Makita VC1310L Manual de usuario