Conair LPT31 Manual de usuario
- Categoría
- Cortapelos
- Tipo
- Manual de usuario
Este manual también es adecuado para

®
Instruction Guide
Mode l LT3R
IMPORTANT SAFETY
INSTRUCTIONS
When using an electrical appliance, basic
precautions should always be taken, including
the following:
READ ALL INSTRUCTIONS
BEFORE USING
FOR HOUSEHOLD USE ONLY
KEEP AWAY FROM WATER
To reduce the risk of electrical shock:
1. Do not reach for an appliance that has
fallen into water.
2. Do not use while bathing or in the shower.
3. Do not place or store appliance where it can
fall or be pulled into a tub or sink. Do not place
in or drop into water or other liquids.
WARNING – To reduce the risk of
burns, fire, electrical shock, or injury
to persons:
1. This appliance should not be used by, on,
or near children or by individuals with certain
disabilities.
2. Use this appliance only for its intended use as
described in this manual. Do not use attach-
ments not recommended by the manufacturer.
3. Never operate this appliance if it is not
working properly, if it has been dropped,
damaged, or dropped into water. Return the
appliance to service center for examination
and repair.
4. Never operate the appliance with the air
openings blocked or while on a soft surface,
such as a bed or couch, where the air openings
may be blocked. Keep the air openings free of
lint, hair and the like.
5. Never drop or insert any object into any
opening.
6. Do not use outdoors or operate where aerosol
(spray) products are being used or where oxy-
gen is being administered.
7. Do not place appliance on any surface while
it is operating.
8. Do not use this appliance with a damaged
or broken comb or with teeth missing from the
blades, as injury may occur.
9. Avoid skin contact with moving blades.
SAVE THESE
INSTRUCTIONS
OPERATING
INSTRUCTIONS
BEFORE USE
Prior to initial use, test trimmer on small area
of arm or leg. If any signs of allergic reaction
or sensitivity occur, discontinue use. Do not use
trimmer on ultra-sensitive or irritated skin. Keep
out of reach of children.
TO OPERATE TRIMMER
This trimmer comes with two trimming blades.
The larger blade can be used to trim body hair
and eyebrows. The smaller blade is ideal for
detailing.
It also comes with a comb
attachment that helps you
achieve an even cut when you
do not want to completely
remove the hair. The comb
attachment has two sides: the
long tooth is for body hair and the
short tooth is for eyebrow trimming. Aligning the
indicator with the L mark on the comb leaves
hair longer, while aligning with S mark leaves
hair shorter.
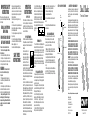
To use the comb attachment, be sure the unit is
in the OFF position and slide the comb over the
trimming blades. Make sure that the teeth of the
comb are facing in the same direction as the
trimming blade and that the top of the comb is
even with the top of the trimmer (see Fig. 1).
If you want to completely remove hair, use the
trimmer without the comb attachment.
To operate the trimmer, slide the ON switch
towards the trimming blades. When you are
finished trimming, slide the ON switch away
from the blades.
To store the trimmer, slide the comb
attachment cover over the trimming
blades. Be sure to align triangle sign on
the comb attachment with indicator on
the trimmer housing (see Fig. 2). Then
slide the protective cap over the comb
attachment so that the triangle sign on protec-
tive cap aligns with the triangle sign on the
handle tube (see
Fig. 3).
TRIMMING TIPS
1. Place the trimmer at a slight right angle to the
skin and trim in the direction of hair growth.
2. Continue trimming in the direction of growth.
Be careful not to apply excess pressure to the
blade. This may damage the blade, and can
result in injury to the skin during trimming.
3. Pull the skin firmly with one hand during the
trimming process to ensure the closest possible
shave.
REPLACING THE BATTERY
To replace battery, remove the lower housing
and remove/replace battery and reassemble to
cover housing. Dispose of battery properly after
use. Do not incinerate.
1. Be sure appliance is off, remove the protective
cap and then hold the upper part of the trimmer
firmly and pull off battery cover.
2. Insert 1 AAA battery. Pay close attention,
making sure that the battery is inserted in the
correct direction (+ / - poles). If you expect
that the trimmer will go unused for some time,
please remove the battery.
3. Slide the ON/OFF switch into the notch in the
battery cover when closing the trimmer.
Fig. 1
Long
tooth
Short
tooth
4. Clean the battery contacts and also those of
the device prior to battery installation.
5. Remove used batteries promptly.
6. Use only alkaline batteries.
Do not use in the shower or submerse unit in
water.
For best performance, AAA alkaline batteries are
recommended.
CARE AND MAINTENANCE
Do not use water to clean, and do not use the
trimmer in a damp room. Do not use harsh
cleansing products. Instead, use mild cleaning
agents to care for the trimmer.
1. Make sure the trimmer is in the OFF position.
2. To remove the blade, press the blade release
button away from the trimmer blade.
3. Carefully remove the blade from the trimmer.
4. Use a small brush to wipe away any hair or
dust. Never remove foreign matter with a sharp
object.
5. After cleaning, replace the blade. Make sure
unit is still in the OFF position when replacing
blade. Cover blade with protective cap for storage.
Fig. 2
Fig. 3
Protective Cap
Handle Tube
GET TO KNOW YOUR TRIMMER
Large
trimmer
blade
Blade
release
button
Comb attachment
Protective cap
Small
trimmer blade
LIMITED TWO YEAR WARRANTY
Conair will repair or replace (at our option) your unit
free of charge for 24 months from the date of pur-
chase if the appliance is defective in workmanship
or materials.
To obtain service under this warranty, return the defec-
tive product to the service center listed below, together
with your purchase receipt and $3.00 for postage and
handling. California residents need only provide proof of
purchase and should call 1-800-366-0937 for shipping
instructions. In the absence of a purchase receipt, the
warranty period shall be 24 months from the date
of manufacture.
ANY IMPLIED WARRANTIES, OBLIGATIONS, OR
LIABILITIES, INCLUDING BUT NOT LIMITED TO
THE IMPLIED WARRANTY OF MERCHANTABILITY
AND FITNESS FOR A PARTICULAR PURPOSE,
SHALL BE LIMITED IN DURATION TO THE 24-
MONTH DURATION OF THIS WRITTEN, LIMITED
WARRANTY. Some states do not allow limitations
on how long an implied warranty lasts, so the above
limitations may not apply to you.
IN NO EVENT SHALL CONAIR BE LIABLE FOR
ANY SPECIAL, INCIDENTAL, OR CONSEQUENTIAL
DAMAGES FOR BREACH OF THIS OR ANY OTHER
WARRANTY, EXPRESS OR IMPLIED, WHATSOEVER.
Some states do not allow the exclusion or limitation
of special, incidental, or consequential damages, so
the above limitation may not apply to you.
This warranty gives you specific legal rights, and you
may also have other rights, which vary from state
to state.
Please register this product at: www.conair.com/registration
Service Center
Conair Corporation
Service Department
7475 N. Glen Harbor Blvd.
Glendale, AZ 85307
©2013 Conair Corporation
Power switch
13PG139149 IB-11996
Dual Blade
Precision Trimmer

®
Instrucciones
Modelo LT3R
MEDIDAS DE
SEGURIDAD
IMPORTANTES
Siempre que use aparatos eléctricos, debe
tomar precauciones básicas de seguridad, entre
las cuales las siguientes:
LEA TODAS LAS
INSTRUCCIONES
ANTES DE USARLO
PARA USO DOMÉSTICO
SOLAMENTE
MANTÉNGALO ALEJADO
DEL AGUA
Para reducir el riesgo de electrocución:
1. No trate de alcanzar el aparato después
de que hubiese caído al agua.
2. No lo use en el baño o la ducha.
3. No coloque ni guarde el aparato donde pueda
caer o ser empujado a una bañera o un lavabo.
No coloque el aparato ni lo deje caer al agua u
otro líquido.
ADVERTENCIA – Para reducir
el riesgo de quemaduras, electrocución,
incendio o heridas:
1. Este aparato no debería ser usado por,
sobre o cerca de niños o personas con alguna
discapacidad.
2. Utilice este aparato únicamente con el
propósito para el cual fue diseñado y solamente
según las instrucciones. Sólo use accesorios
recomendados por el fabricante.
3. No utilice este aparato si el cordón o la
clavija estuviesen dañados, después de que
hubiese funcionado mal o que se hubiese
caído o si estuviese dañado. Regrese el
aparato a un centro de servicio autorizado
para su revisión y reparación.
4. Nunca bloquee las aberturas de aire ni
coloque el aparato sobre una superficie blanda,
como una cama o un sofá, donde se puedan
obstruir. Mantenga las aberturas libres de
pelusas, cabellos y elementos similares.
5. Nunca deje caer ni inserte ningún objeto en
ninguna de las aberturas del aparato.
6. No utilice el aparato en exteriores, ni lo haga
funcionar donde se estén usando productos en
aerosol (spray) o donde se esté administrando
oxígeno.
7. No coloque el aparato sobre ninguna
superficie mientras esté funcionando.
8. No utilice este aparato con guías o cuchillas
rotas o dañadas. Esto podría provocar una
herida.
9. Evite que las cuchillas toquen la piel cuando
están moviendo.
GUARDE ESTAS
INSTRUCCIONES
INSTRUCCIONES
DE OPERACIÓN
ANTES DEL USO
Antes del primer uso, pruebe la recortadora
en una zona pequeña del brazo o de la pierna.
Ante cualquier reacción alérgica o sensibilidad,
no utilice el aparato. No utilice el aparato si su
piel está irritada o muy sensible. Manténgalo
fuera del alcance de los niños.
FUNCIONAMIENTO
La recortadora cuenta con dos cuchillas. La
cuchilla grande puede usarse para cortar el vello
facial y las cejas. La cuchilla pequeña es ideal
para dar el acabado.
También cuenta con una guía
que permite cortar el vello
uniformemente, sin afeitarlo.
La guía tiene dos lados: un lado
con dientes largos, ideal para
los vellos del cuerpo y un lado
con dientes cortos, ideal para las cejas. Alinear
el indicador con la marca "L" deja el vello más
largo; alinearlo con la marca "S" deja el vello
más corto;
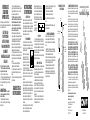
Asegúrese de que el aparato esté apagado e
instale la guía encima de la cuchilla. Asegúrese
de que los dientes de la guía estén en la misma
dirección que los dientes de la cuchilla y de que
la parte superior de la guía esté pareja con la
parte superior de la recortadora (Fig. 1).
Si desea afeitar el vello, utilice la recortadora
sin la guía.
Para encender el aparato, deslice el interruptor
hacia las cuchillas. Para apagar el aparato,
deslice el interruptor hacia abajo.
Para guardar el aparato, coloque el
protector de cuchillas encima de éstas.
Cerciórese de alinear el triángulo de la
guía con el indicador sobre el cuerpo
(Fig. 2). Después, deslice la cubierta
sobre la guía de manera que el triángulo
de la cubierta
coincida con
el triángulo del
mango (Fig. 3).
CONSEJOS
1. Sostenga la recortadora a un ángulo recto y
corte el vello en la dirección del crecimiento.
2. Siga cortando en la dirección del crecimiento
del vello Tenga cuidado de no ejercer mucha
presión sobre la cuchilla. Esto puede lastimar la
cuchilla y causar heridas.
3. Estire la piel firmemente con una mano para
garantizar un afeitado al ras.
CAMBIO DE LA PILA
Para cambiar la pila, abra el cuerpo del aparato,
instale una nueva pila y vuelva a cerrar el
cuerpo. Recicla la pila usada según las leyes
vigentes. No la queme.
1. Asegúrese de que el aparato esté apagado,
sostenga firmemente la parte superior del
cuerpo y jale la parte inferior hacia abajo.
2. Instale 1 pila AAA. Cerciórese de respetar los
signos de polaridad (+/-). Retire las pilas del
aparato si no lo va a usar durante un período
prolongado.
3. Para cerrar el cuerpo del aparato, deslice el
interruptor por la abertura en la cubierta del
compartimiento de la pila.
Fig. 1
Dientes
largos
Dientes
cortos
4. Limpie los contactos del aparato y los de la(s)
pila(s) antes de instalar ésta(s).
5. Retire las pilas usadas sin demora.
6. Utilice pilas alcalinas únicamente.
No lo utilice en la ducha y no lo sumerja en
agua.
Para garantizar un rendimiento óptimo, utilice
pilas alcalinas AAA.
LIMPIEZA Y MANTENIMIENTO
No limpie el aparato con agua y no lo utilice
en un lugar húmedo. No utilice limpiadores
abrasivos. Limpie el aparato con un limpiador
suave.
1. Asegúrese de que el aparato esté apagado.
2. Presione el botón de liberación de la cuchilla.
3. Retire cuidadosamente la cuchilla.
4. Limpie la cuchilla con un pequeño cepillo para
eliminar los recortes y el polvo. Nunca utilice un
objeto filoso para limpiar la cuchilla.
5. Después de limpiarla, vuelva a instalar la
cuchilla. Asegúrese de que el aparato esté
apagado antes de volver a instalar la cuchilla.
Cubrir la cuchilla con la cubierta protectora antes
de guardar el aparato.
Fig. 2
Fig. 3
Cubierta protectora
Mango
FAMILIARÍCESE CON SU
RECORTADORA
Cuchilla
grande
Botón de liberación
de la cuchilla
Guía
Cubierta protectora
Cuchilla pequeña
GARANTÍA LIMITADA DE DOS AÑOS
Conair reparará o remplazará (a su opción) su aparato
sin cargo por un período de 24 meses a partir de la
fecha de compra si presentara defectos de materiales
o fabricación.
Para obtener servicio técnico bajo esta garantía,
regrese su aparato al Centro de Servicio indicado a
continuación, junto con su recibo de compra y un
cheque o giro postal de US$3.00 por gastos de manejo
y envío. Los residentes de California sólo necesitan dar
una prueba de compra y deben llamar al 1-800-366-
0937 para recibir instrucciones de envío. En ausencia
del recibo de compra, el período de garantía será de 24
meses a partir de la fecha de fabricación.
CUALQUIER GARANTÍA, OBLIGACIÓN O
RESPONSABILIDAD IMPLÍCITAS, INCLUYENDO
PERO NO LIMITADAS A LA GARANTÍA IMPLÍCITA DE
COMERCIABILIDAD Y APTITUD PARA UN PROPÓSITO
ESPECÍFICO, ESTARÁN LIMITADAS POR LOS 24
MESES DE LA PRESENTE GARANTÍA ESCRITA.
Algunos Estados no permiten limitaciones sobre la
duración de una garantía implícita, de modo que las
limitaciones mencionadas pueden no regir para usted.
CONAIR NO SERÁ RESPONSABLE, EN NINGÚN
CASO, POR NINGÚN DAÑO ESPECIAL, INCIDENTAL
O CONSECUENTE DEBIDO AL INCUMPLIMIENTO DE
ESTA O CUALQUIER OTRA GARANTÍA, EXPRESA O
IMPLÍCITA. Algunos Estados no permiten la exclusión
o limitación de daños especiales, incidentales
o consecuentes, de modo que las limitaciones
mencionadas pueden no regir para usted.
Esta garantía le otorga derechos legales específicos
y usted puede tener otros derechos que varían de un
Estado a otro.
Para registrar su producto, visítenos en:
www.conair.com/registration
Centro de servicio
Conair Corporation Service Department
7475 N. Glen Harbor Blvd.
Glendale, AZ 85307
©2013 Conair Corporation
Botón de
encendido/
apagado
13PG139149 IB-11996
recortadora de precisión
con doble hoja
-
 1
1
-
 2
2


Conair LPT31 Manual de usuario
- Categoría
- Cortapelos
- Tipo
- Manual de usuario
- Este manual también es adecuado para
En otros idiomas
- English: Conair LPT31 User manual
Documentos relacionados
-
Conair MT3N Manual de usuario
-
-
-
-
-
Conair LT7R Manual de usuario
-
-
-
-
Conair GMT189GB Manual de usuario