Aiwa PX-E860U Instrucciones de operación
- Categoría
- Placa giratoria
- Tipo
- Instrucciones de operación
Este manual también es adecuado para

OPEWTINGlNSTRU~lONS
WNUA1 DEINSTRUCCIONES
MODEVEMP1OI
OWNER’S RECORD
For your convenience, record the model number and serial number
(VOUwill find them on the rear of vour set) in the s~ace wovided below.
m~m~~-m
A ~
@
/!
RISK OF ELECTRIC SHOCK
DO NOT OPEN )\
e
—i
o~~~~m
“CAUTION:TO REDUCE THE RISK OF:
ELECTRIC SHOCK,
DO NOT REMOVE COVER (OR BACK).
NO USEFi-SERVICEABLE F)ARTS INSIDE.
REFER SERVICING TO QUALIFIED
SERVICE PERSONNEL.”
~mm~~~-m
Please refer to them when you ‘contact’your AIWA dealer in case of
cliff
icultv.
Explanation of Graphical Symbols:
--
-,
Model No.
Serial No.
A
18
The lightning
flash with arrowhead symbol, within
an equilateral i.riangle, is intended to ;alert the
user tc} the presence of iuninsulated “dangerous
voltage” within
the prOdLICt’S enclosure that ima’f
be of sufficient magnitude to constitute a risk of
electri(: shock to persons.
The e~clamation point within an equilateral
triangle is intended to alert the user to the
presence of important operating and
maintenance (servicing) instructions in the
literature accompanying the appliance.
WARNING
TO REDUCE THE RISK OF FIRE OR ELECTRIC
SHOCK, DO NOT EXPOSE THIS APPLIANCE TO
A
+
RAIN OR MOISTURE.
Motor DC servo motor
Drive system
Belt dtive
Speed
33’/3 rpm, 45 rpm
Wow & flutter
0.25% (WRMS)
S/N ratio 45 dB (DIN-B)
Cartridge type VM type
stylus AIWAAN-11
Output level 200 mV (2.5 mV/sw. OFF)
Dimensions
Approx. 360x97x 358 mm
(w/h/d) (i
4’/4 X 37/0 X 14’14
in.)
Weight
Approx. 2.4 kg net
(5 Ibs. 5 OZ)
Power requirement
120 V AC, 60
Hz
Power consumption 3 watts
Accessory supplied
45 rpm adaptor
Design and specifications subject to change without
notice.
Motor
Servomotor de CC
Sietema de impulsion Por correa
Ve[ocidades
33’/3 rpm, 45 rpm
Fluctuation Ytremolo 0,25% (ponderacion eficaz)
Relation se~al/ruido
Tipo de capsula
Aguja
Nivel de salida
Dimensioned
Peso
Alimentacidm
Consumo
45 dB (DIN-B)
Tipo VM
AIWA AN-11
200 mV (2.5 mVfinterruptor
en OFF)
Aprox. 360 x 97 x 358 mm
(anlallpr)
Aprox. 2,4 kg neto
i
20 V CA, 60 Hz
3 vatios
Accesorios suministrados
Adaptador para 45 rpm
El diseho y Ias especificaciones estan sujetos a
cambios sin previo aviso.
Moteur
Mc)teur servo CC
Systeme d’entrainement
Entrainment par courroie
Vitesse 33’13Umn, 45 t/inn
Pleura,ge et scintillement
0,25°/0 (eff.)
Rapport signal sur bruit
45 dB (DIN-B)
Type de celiule
Type VM
Pointe de lecture
AIWA AN-11
Nweau de sortie
200 mV (2,5 mV/selecteur
OFF)
Dimensions
Environ 360 x 97 x 358 mnl
(Wllp)
Poids
Environ 2,4 kg net
Alimentation Secteur de 120 V, 160Hz
Consummation
3 watts
Accessoire fourni
Adaptateur 45 ffmn
Conception et caracteristiques sujettes a modi!ica-
Ilons saris preavis.

Q
A
Amplifier
\
Amplificador
EQUALIZER AMP.
Amplificateur
0
0
n
u
J
To an AC outlet
\
+ Auntomacorriente deCA
A une prise de courant
MID-l”s~stem* or a main system other than
the AIWA MIDI system,
set the (phono) EQUALIZER AMP. selector
as follows:
E
Note
If the sound heard is too low when the unit is
connected to PHONO jack, set the (phono)
EQUALIZER AMP. selector to ON.
Note on connections
Connect the red plug to the right-channel jack
(R), and the white plug to the left-channel jack
(L).
I
Cuando conecte esta unidad al sistema
MIDI AlWA* o a un sistema principal que no
sea MIDI AlWA,
ajuste el selector EQUALIZER AMP. (fono) de
la forma siguiente:
Si vous raccordez cet appareil au systeme
AIWA MIDI* ou a un systeme principal autre
que Ie systeme AIWA MIDI,
regler Ie selecteur EQUALIZER AMP. (phono)
comme suit:
[ Prise raccordee de I Position du I
Toma conectada
Position del
del amplificador
selector EQUAL-
I’amplificateur
selecteur
IZER AMP.
EQUALIZER AMP.
Nota
Si el sonido se oye demasiado bajo cuando
hava conectado la unidad a la toma PHONO,
po;ga el selector EQUALIZER AMP. (fono) en
ON,
Notas sobre Ias conexiones
Conecte la clavija roja a la toma para el canal
derecho (R), y la blancaa Iatoma para el canal
(L).
izquierdo (L).
Remarque
Si Ieson entendu est trop bas Iorsque I’appareil
est raccordr$ a la prise PHONO, regler Ie
selecteur EQUALIZER AMP. (phono) sur ON.
Remarque sur Ies connexions
Raccorder la fiche rouge a la prise du canal
droit (R), et la fiche blanche au canal gauche
❑
✎
m
1
2
3
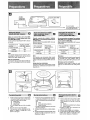
. Hold the ribbon tape which is attached to 1
the belt and loop the belt over the motor
pulley. Be sure it does not twist.
@ Ribbon tape
@ Turntable belt
@ Motor pulley
o Pull the ribbon tape out of the turntable
belt.
Place the mat on top of the platter.
The dust cover can be attached and de- 2
tached. To detach it, simply lift it up as
shown in the figure.
3
@ Cinta
~ Correa del plato giradiscos
@ Polea del motor
s Tire de la cinta hacia afuera de la correa
del plato giradiscos
Coloque la esterilla sobre el plato giradis-
Cos.
Latapa guardapolvo es desmontable. Para
quitarla, Ievantela simplemente como se
muestra en la figura.
2
3
tordue.
@ Ruban
@ Courroiede la platinetourne-disque
@ Axe du moteur
● Enlever Ie ruban de la courroie de la
platine tourne-disque.
Placer Ie couvre-plateau sur Ie plateau.
Le couvercle peut 6tre laisse en place ou
enleve. Pour I’enlever, il suffit de Ie sou-
Iever comme indique sur I’illustration.

2
‘-.
/
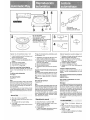
For 17 cm record
45 rpm adaptor (supplied)
Para discos de 17 cm
Adaptador de 45 rpm (suministrado
Pour les disques de 17 cm
Adaptateur 45 tours (fourni)
Operate the unit according to steps 1 to 5.
1
2
3
4
5
Unlock the attachment for the tonearm and
detach the stylus guard.
Place a record on the turntable.
For a 17 cm record, use the supplied 45 rpm
adaptor.
Choose the rotating speed.
Choose the size of the record.
Press START to begin play.
When the record has finished playing
When the tonearm reaches the end of the
record, it will automatically return to the arm
rest.
To lift the stylus during play
Press ~ Y.
To stop during play
Press CUT.
Note
If you move the tonearm close to the center
while the turntable is rotating, the tonearm may
return to the armrest. Do not resist this move-
ment, as this may damage the automatic re-
turn mechanism.
If the tonearm does not return to the armrest
during initial operation, press CUT. After this,
the tonearm automatically returns to the arm-
rest.
1 After step 4 above, press ~ Y,
2 Move the tonearm to the track which is to
be heard.
The turntable will now start rotating.
3 Press ~ Y.
The tonearm will now lower onto the record
and play will start.
/,
StykIS gUard
Protector de la aguja
Garde de pointe de lecture
Ponga en funcionamiento la unidad de acuerdo
con Ios pasos 1 a 5.
1
2
3
4
5
Desbloquee el enganche del brazo fono-
captor y quite el protector de la aguja.
Coloque un disco sobre el plato giradiscos.
Para discos de 17 cm, utlice el adaptador
de 45 rpm suministrado.
Elija la velocidad de rotation.
Elija el tamario del disco.
Presione START para iniciar la reproduc-
tion.
Cuando se hayaterminado la reproduction
del disco
Cuando el brazo fonocaptor Ilegue al final del
disco, volvera automaticamente a su estribo.
Para elevar al aguja durante la reproduc-
tion
Presione ~ Y.
Para dejar de reproducer
Presione CUT.
Nota
Si mueve el brazo fonocaptor hasta cerca del
centro mientras este girando el plate, el brazo
volvera al estribo. No fuerce el brazo cuando
haga este movimiento porque se podr[a dafiar
el mecanismo de retorno automatic,
Si el brazo fonocaptor no vuelve al estribo
durante la operation initial, presione el boton
CUT. Despues de hacerlo, el brazo volvera
automaticamente al estribo.
1
2
3
Despues del paso 4, presione ~ Y.
Mueva el brazo fonocaptor hasta la can-
cion que desee escuchar.
El plato comenzara a girar.
Presione ~ Y.
El brazo fonocaptor descenders sobre el
disco y se iniciara la reproduction.
5
START
C3
b
Explc~iterI’appareil en Suivarlt Ies etapes 1 a !5
1
2!
3
4
&J
Dbbloquer la fixation du bras de lecture let
df$tacher la garde de la pointe.
Placer un cfisque sur [e tourne-disque.
Pour
un disque de 17 cm, utilliser
I’adaptateur de 45 tours fourni,
Choisir la vitesse cie rotation.
Choisir la dimension du disque.
Appuyer sur START pour commencer la
lecture.
Lorwque Ie disque est termim$
Lorsciue Ie bras de lecture atteint la fin CIU
clisqule, il revient automatiquement sur scm
Supplm
F~ourrelever la pointe de lecture pendant Ila
reproduction
Appuyer sur ~ Y!.
F~ourarri5ter la reproduction en cwrs
Appuyer sur CUT.
F%emarque
Si I’on dbplace Ie bras de lecture a proximitb ch-J
centre alors que la platine tourne-disque est
en train de tourner, Ie bras de lecture peut
retourner surson support. Ne pas resister a ce
rnouvement car cela pourrait endommager Ie
rnecanisme de retour automatique:
Si Ie bras da lecture ne revient pas sur Ie
supporl de bm.sde lecture pendant I’operation
initiale, appuyer sur la touche CUT. Ensuite Ie
bras de lecture revient automatiquement sur
son support.
11
2
3
Apres I’elape 4 ci-dessus, appuyer sur
y Y?.
Placer Ie Ibras de lecture au-dessus de la
piste a ecouter. Ls plateau commence a
tcurner.
Appuyer sur ~ Y,
Le bras da lecture s’abaisse sur Ie disque
et la lecture commence.

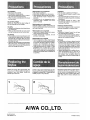
On installation
Avoid placing the turntable:
● On slanting or vibratile places
● Near electrical appliances such as a televi-
sion, hair dryer or fluorescent lamp
c Where is sunny, extremely cold or hot, dusty
and very moist
On operating voltage
Before use, check that the rated voltage of
your set matches the local voltage.
On safety
0 Unplug theunitwhen youdonotintend touse
it for a long time.
● When you disconnect the unit, pull out the
cord by the plug and not by the cord itself.
On cleaning
● Before playing arecord, clean thestyluswith
asoftbrush from backtofront. Do not touch
the stylus with your finger. When you use a
fluid stylus cleaner, make sure not to moisten
the stylus too much.
● Clean the cabinet and dust cover periodically
with a soft dry cloth. A mild detergent solution
may be used, but never use strong solvents
which can damage the surface.
Replace the stylus after approximately 400
hours of use. An AN-11 replacement stylus is
available at your AIWA dealer. Handle this
delicate stylus with care.
1
Relacionadas con la instalacion
Evite colocar el giradiscos:
● Sobre sitios inclinados o con vibraciones
● Sobre aparatos electricos tales como televi-
sors, secadores de pelo o Iamparas fluo-
rescences
. En sitios con sol, con temperatures extre-
madamente frias o calientes, con mucho
polvo o humedad
Relacionadas con la alimentacion
Antes de emplear la unidad, compruebe si la
tension de alimentacion de la misma coincide
con lade la red local.
Relacionadas con la seguridad
* Desenchufe el aparato cuando no 10vaya a
utilizar durante mucho tiempo.
* Cuando desconecte el aparato, tire del
enchufe y no dei cable.
Relacionadas con la Iimpieza
● Antes de reproducer un disco, Iimpie la aguja
con un cepillo suave desde la parte posterior
a la anterior. No toque la aguja con el dedo.
Cuando use Iimpiadores de .agujas,
asegtirese de no mojar demasiado la aguja.
● Limpie periodicamente el mueble y la tapa
guardapolvo con un pafio seco y suave.
Puede usarse una solution de detergence
suave, pero no debe usarnuncadetergentes
fuertes ya que podrian datiar el acabado de
la superficie.
Cambie la aguja aproximadamente cada 400
horasde USO.Su concesionario AIWAdispone
deaguiasdereDuestoAN-11. Manioulela con
cuid;do ya que es muy delicada.
2
%?!
/7
\
Installation
Eviter de placer la platine tourne-disque:
● Sur des endroits inclines ou soumis a des
vibrations
● Pres d’appareils electromenagers tels qu’un
televiseur, un seche-cheveux ou une Iampe
fluorescence
. Aux endroits exposes au soleil, a des
temperatures extri5mes, a la poussiere et a
beaucoup d’humidite
Tension de fonctionnement
Avant d’utiliser I’appareil, verifier si sa tension
nominale correspond a la tension locale.
Securite
● Debrancher I’appareil Iorsqu’il ne doit pas
@treutilise pendant Iongtemps.
● Lorsque I’on deconnecte I’appareil, debran-
cher Ie cordon en le tenant par la fiche et ne
pas tirer sur [e cordon Iui-m&me.
Nettoyage
● Avant de jouer un disque, nettoyer la pointe
de lecture avec une brosse deuce, de l’ar-
riere vers I’avant. Ne pastoucher la pointe de
lecture avec Ies doigts. Lorsque I’on utilise
un produit de nettoyage de pointe de lecture
Iiquide, faire attention a ne pas trop humidi-
fier la pointe de lecture.
. Nettoyer periodiquement Ie coffret et Ie cou-
vercle anti-poussiere avec un tissu sec et
doux. Une solution de detergent doux peut
~tre utilisee, mais ne jamais utiliser de
solvants forts sous peine d’endommager la
surface.
Remplacer la pointe de lecture apres approxi-
mativement 400 heures d’utilisation. Une po-
inte de lecture de replacement AN-11 est
disponible chez votre revendeur AlWA. Mani-
puler cette pointe de lecture delicate avec
soin.
AIWA CO., LTD.
-
 1
1
-
 2
2
-
 3
3
-
 4
4


Aiwa PX-E860U Instrucciones de operación
- Categoría
- Placa giratoria
- Tipo
- Instrucciones de operación
- Este manual también es adecuado para
en otros idiomas
- français: Aiwa PX-E860U Mode d'emploi
- English: Aiwa PX-E860U Operating instructions