
Un mensaje de Coolpad
¡Gracias por comprar tu teléfono móvil Coolpad Legacy
TM
! Por favor, sigue estas sencillas
– pero importantes – instrucciones para lograr un uso óptimo de tu nuevo teléfono.
Las características de las aplicaciones y las funciones pueden variar entre países, regiones
o especificaciones de hardware, y cualquier mal funcionamiento en las aplicaciones de
terceros es responsabilidad de esos fabricantes.
Ten cuidado si modificas las configuraciones del Registro de Usuario ya que puedes
causar problemas de compatibilidad o de funcionamiento de los cuales Coolpad no se
hará responsable.
Ofrecemos un servicio automático para los usuarios de nuestro dispositivo. Por favor
visita el sitio oficial de Coolpad Americas (en www.coolpad.us/) para más información de
los modelos disponibles. Información en el sitio web tiene prioridad.
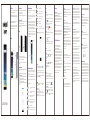
Diseño de tu teléfono
Configuraciones Inalámbricas
Conectarse con una Red Wi-Fi
En la pantalla de Inicio, desliza hacia arriba y luego pulsa para entrar a la pantalla
de Configuraciones. Luego escoge Redes e internet > Wi-Fi para activar o desactivar
Wi-Fi.
Arrastra el control deslizante a On, para que tu teléfono pueda buscar redes Wi-Fi
disponibles.
Pulsa el nombre de la red a la que deseas conectarte, ingresando la contraseña si
fuera necesario.
Nota: Tu teléfono se conectará automáticamente a las redes a las que hayas accedido
previamente y hayas guardado. Un usuario puede conectarse a una red y luego olvidarla,
eliminando su nombre de la lista de redes conocidas.
Llamadas Wi-Fi
Las llamadas Wi-Fi te permiten hacer y recibir llamadas y mensajes a través de una
conexión Wi-Fi.
¡Importante! Debes tener una dirección E911 registrada en tu cuenta para poder hacer
llamadas por Wi-Fi. Puedes registrar una dirección E911 a través de la aplicación
myMetro
®
Android™ que puede estar ya preinstalada en tu teléfono o disponible para
descargar en la tienda Google Play™. Si no tienes un smartphone Android, puedes llamar
al 611 para actualizar la dirección.
Servicio al cliente. Si tiene preguntas relacionadas con su Servicio o con información en
este Acuerdo, puede llamar a nuestro centro de activaciones al 1-888-8metro8
(1.888.863.8768).
Facturación de servicios Premium y de terceros
Solo residentes de California
Ciertos terceros, aparte de Metro, pueden aplicar cargos en tu factura por servicios
premium. Puedes acceder a estos servicios y autorizar que se apliquen los cargos a tu
factura, a través de tu teléfono o cuenta en línea. Metro también ofrece a sus clientes, sin
costo adicional, la opción de restringir la aplicación de cargos por servicios premium y de
terceros a tu cuenta. Comunícate con servicio al cliente o visita
www.metropcs.com/blocking para obtener más información.
Aplicaciones Google
Google proporciona aplicaciones para entretenimiento, redes sociales, y negocios.
La Tienda de Google Play es el sitio todo en uno de entretenimiento en Internet con
música, películas, libros, y aplicaciones.
Para mayores detalles, visita www.support.google.com/android.
Recibe actualizaciones
Obtén actualizaciones, guías de usuario y más información para tu Coolpad Legacy en
www.coolpad.us. Descubre qué está pasando ahora en las noticias de los celulares,
tendencias, técnica y otras cosas actuales, conectándote con nosotros a través de:
@CoolpadAmericas
Marcas comerciales y derechos de autor
©2019 Coolpad Technologies Inc. Coolpad
®
y Coolpad Legacy
TM
son marcas comerciales
registradas de Yulong Computer Telecommunication Scientific (Shenzhen) Co., Ltd. Todos
los derechos están reservados. Google y Android son marcas registradas de Google Inc.
Otras marcas y nombres comerciales son propiedad de sus respectivos dueños. Las
capturas de pantalla y las imágenes del producto son simuladas; pueden diferir del
producto real, y están sujetas a cambios. Queda prohibida la reproducción, transferencia
o distribución del contenido de este material en cualquier manera sin el permiso previo
por escrito de Coolpad Technologies, Inc. Coolpad Technologies, Inc. se reserva el
derecho de añadir, modificar o suprimir cualquiera de los contenidos en el presente
documento o retirar este documento en cualquier momento sin previo aviso y sin dar
razón alguna para dichas acciones.
Metro, MetroPCS y otras palabras, eslóganes, diseños y dispositivos son marcas
registradas o no registradas de T-Mobile USA, Inc. Copyright © 2019 T-Mobile USA, Inc.
Todas las otras marcas comerciales y propiedad intelectual pertenecen a sus respectivos
dueños.
1.
2.
3.
Carga de Batería
Inserta el extremo USB-C del cable de datos al puerto USB-C de tu dispositivo, que
está ubicado en la parte inferior de tu teléfono.
Conecta el extremo USB del cable al adaptador de viaje.
Conecte el adaptador de viaje a un tomacorriente eléctrico para cargar
completamente tu teléfono.
Encendido y Apagar tu Teléfono
La tecla de Encendido/Apagado se ubica en el lado superior derecho de tu teléfono.
Mantén presionada la tecla de Encendido/Apagado por unos segundos para
encender tu teléfono.
Para apagar tu teléfono, mantén presionada la tecla de Encendido/Apagado hasta
que aparezca el menú, y entonces selecciona Apagar.
Tarjeta SIM
1.
2.
3.
1.
2.
3.
4.
5.
1.
2.
3.
1.
2.
3.
4.
Cámara
posterior
Sensor de
reconocimiento
Luz
Altavoz
Inicio
Puerto USB-C
Recientes
Conector de auricular
Receptor
Cámara
frontal
Tecla de
Encendido/
Apagado
Sensor luz/
proximidad
Atrás
Tecla volumen
1.
2.
Inserta la clavija de eyección SIM en el agujero para abrir la bandeja de la tarjeta SIM.
Tira suavemente para sacar la bandeja de la tarjeta SIM. Coloca la tarjeta Nano SIM en
el alojamiento 1. Si tienes una tarjeta microSD (se vende por separado) colócala en el
alojamiento 2.
Nota: Por favor, usa siempre la clavija de eyección SIM para extraer la tarjeta SIM para
asegurarte de no dañar el dispositivo.
Un widget
Barra de estado
Carpeta de
aplicaciones
Personalizar tu Pantalla de Inicio
La pantalla de Inicio muestra widgets, aplicaciones favoritas y más elementos. Para ver
otros paneles, desliza hacia la derecha o la izquierda.
En la pantalla de Inicio, mantén presionada una zona vacía (cualquier zona que no sea un
widget, una aplicación o una carpeta de aplicaciones) para acceder a las opciones
disponibles, como cambiar las configuraciones de la pantalla de Inicio, cambiar fondos de
pantalla y agregar widgets.
Para añadir una aplicación, desliza hacia arriba para entrar a la pantalla de
Aplicaciones, pulsa y mantén presionada una aplicación y arrástrala a la pantalla de
Inicio. Para añadir widgets, mantén presionada una zona vacía de la pantalla de Inicio,
pulsa Widgets, mantén presionado un widget, y arrástralo a la pantalla de Inicio.
Para mover una aplicación, mantén presionado un ítem en la pantalla de Inicio, y
arrástralo a una nueva ubicación. Para mover el ítem a otro panel, arrástralo al
costado de la pantalla.
Para sacar un ítem, mantén presionado el ítem y arrástralo hasta Eliminar en la parte
superior de la pantalla.
Para crear una carpeta, mantén presionada una aplicación y arrástrala sobre otra;
suéltala cuando aparezca un recuadro alrededor de las aplicaciones; se crea una
nueva carpeta con las aplicaciones seleccionadas. Para añadir más aplicaciones,
mantén presionada otra aplicación y arrástrala a la carpeta.
Panel de Notificaciones y Configuraciones Rápidas
Las notificaciones te avisan la llegada de nuevos mensajes, eventos del calendario y
alarmas.
Desliza hacia abajo desde la parte superior de la pantalla para abrir el panel de
notificaciones y ver los detalles.
Cuando leíste una notificación, desliza hacia la derecha o la izquierda para
descartarla. Para eliminar todas las notificaciones, pulsa CLEAR ALL en la parte
inferior derecha de la lista de notificaciones.
Usa las Configuraciones Rápidas para acceder configuraciones usadas con frecuencia,
como por ejemplo para activar el modo Avión.
Para cambiar una configuración, simplemente pulsa el icono:
Teléfono
Hacer una Llamada
En la pantalla de Inicio, pulsa en la parte inferior o desliza hacia arriba y luego pulsa
para entrar a la pantalla de Teléfono.
Ingresa un número telefónico mediante el teclado para hacer una llamada. Si el
teclado no aparece en la pantalla, pulsa para abrirlo.
Pulsa , y luego elige alguien a quien llamar en tu lista de contactos. Para encontrar
un contacto, puedes deslizar hacia abajo, comenzar a escribir un nombre o usar la
opción de llamado por voz de Google.
Para hacer una llamada, pulsa el nombre del contacto.
Para ver las llamadas recientes, pulsa la lengüeta Historia de Llamadas .
Durante una llamada, puedes pulsar en la parte inferior de la pantalla para colgar.
Recibir una Llamada
La pantalla de Llamada Entrante aparece cuando entra una llamada, junto con la
identificación de quien te llama, y otra información que hayas ingresado en los Contactos.
Hay varias opciones disponibles cuando entra una llamada.
Para responder una llamada, desliza hacia arriba.
Para rechazar una llamada, desliza hacia abajo.
Para rechazar una llamada y enviar un mensaje SMS a quien llama, desliza hacia
arriba desde la parte inferior izquierda de la pantalla y pulsa uno de los mensajes
prefijados para enviarlo a la persona que llama.
Camera
Puedes usar la aplicación Cámara para tomar fotografías y grabar videos.
Tomar una Fotografía
En la pantalla de Inicio, pulsa o desliza hacia arriba y luego pulsa para entrar a
la pantalla de Cámara.
Enfoca tu sujeto mediante la pantalla de tu teléfono.
Pulsa para tomar una foto.
Crear un Video
En la pantalla de Inicio, pulsa o desliza hacia arriba y luego pulsa para entrar a
la pantalla de Cámara.
Desliza hacia la derecha para activar el modo de Video.
Pulsa para comenzar a grabar un video.
Pulsa para detener la cámara cuando hayas terminado de grabar.
Fotos
En la pantalla de Inicio, desliza hacia arriba y luego pulsa para entrar a la pantalla de
Fotos. Puedes ver y manejar las fotos y los videos almacenados en tu teléfono.
Cuando has ingresado a tu dispositivo mediante tu cuenta de Google, la aplicación de
Fotos te facilita respaldar automáticamente todas las fotos y videos que tomes,
organizarlos y compartirlos con tus amigos.
Para eliminar una imagen o un video, selecciona la imagen o el video, pulsa para
desecharla, y será eliminada luego de 60 días, o pulsa en la parte superior derecha
de la pantalla de Fotos, y pulsa Eliminar del dispositivo.
Para eliminar varias imágenes y videos, mantén presionada cualquier imagen o video
que desees eliminar, y luego pulsa otras imágenes o videos que quieras eliminar.
Aparecerá un icono de una marca de control. Luego pulsa para desecharlas o o
pulsa en la parte superior derecha de la pantalla de Fotos, y pulsa Eliminar.
Para editar una imagen, selecciona esa imagen, pulsa Editar , selecciona las
opciones deseadas y pulsa Guardar una copia.
Reconocimiento de Huella Dactilar
Además de destrabar tu teléfono, puedes usar también tu huella digital para autorizar
compras y acceder a ciertas aplicaciones.
Para registrar tu huella digital, desliza hacia arriba en la pantalla de Inicio y pulsa en
Configuraciones
>
Seguridad y Ubicación
>
Huella Digital
.
Ingresa tu contraseña de destrabado para continuar. Si no has definido la contraseña de
destrabado, deberás escoger primero un método de respaldo para destrabar la pantalla.
Coloca tu dedo sobre el sensor de reconocimiento de huella digital ubicado en la parte
trasera de tu teléfono y sigue las instrucciones dadas en la pantalla para registrar tu huella
digital.
Cuando tu huella digital ha quedado registrada, podrás usarla para destrabar la pantalla o
abrir aplicaciones.
Enciende o apaga Wi-Fi. Para abrir las configuraciones de Wi-Fi,
mantén presionado el icono “Wi-Fi”.
Enciende o apaga Bluetooth. Para abrir las configuraciones de
Bluetooth, mantén presionado el icono “Bluetooth”.
Enciende o apaga Ahorro de Batería. Mantén presionado el icono
“Ahorro de Batería” para ver la vida y uso de la batería.
Bloquea la orientación de tu dispositivo en modo retrato o
apaisado.
Wi-Fi
®
:
Bluetooth
®
:
Ahorro de Batería:
Rotación
automática:
Enciende o apaga el modo “No molestar”. Mantén presionado el
icono “No molestar” para acceder a las configuraciones.
Enciende o apaga la linterna.
Enciende o apaga el modo avión. El modo avión significa que tu
teléfono no se conectará al Wi-Fi o a una señal celular, aunque
estén disponibles.
No molestar:
Linterna:
Modo avión:
Enciende o apaga el servicio de ubicación.
Ver el uso de datos de tu celular y actívalos o desactívalos.
Captura una imagen de la pantalla actual.
Pulsa para encender o apagar la zona portátil de tu dispositivo.
Enciende o apaga el modo de Luz Nocturna.
Enciende o apaga la inversión de colores.
Enciende o apaga el Ahorro de Datos.
Comparte tu pantalla en otros dispositivos.
Explora en busca de servicios, lugares u otras cosas cercanas.
Desliza a la izquierda o la derecha para disminuir o aumentar el
brillo de tu pantalla.
Ubicación:
Datos del Celular:
Captura de
Pantalla:
Zona Portátil:
Luz Nocturna:
Invertir Colores:
Ahorro de Datos:
Proyección:
Cercanos:
Brillo de Pantalla:
1.
2.
3.
4.
Contactos
En la pantalla de Inicio, pulsa en la parte inferior o desliza hacia arriba y luego pulsa
para entrar a la pantalla de Contactos. Esta aplicación guarda fácilmente toda la
información importante de tus contactos.
Para buscar tus contactos, pulsa en la esquina superior derecha de la pantalla de
Contactos; ingresa palabras claves en la caja de búsqueda. El teléfono mostrará
automáticamente los resultados que coincidan con tu búsqueda.
Para añadir un nuevo contacto, pulsa en la esquina inferior derecha de la pantalla
de Contactos. Ingresa la información del contacto y pulsa GUARDAR.
Mensajes
En la pantalla de Inicio, pulsa en la parte inferior o desliza hacia arriba y luego pulsa
para entrar a la pantalla de Mensajes.
Creación de un Mensaje
En la pantalla de Mensajes, pulsa .
Ingresa el número del destinatario o selecciona un contacto en la lista de contactos.
Añade tu mensaje. Pulsa para adjuntar archivos de medios, tales como una
imagen, un contacto o un archivo.
Pulsa para enviar el mensaje.
Nota: Un mensaje se enviará como mensaje de medios, o MMS, cuando se incluyan en el
mismo otros archivos.
microSD
Nano SIM
Clavija de
eyección SIM
Compatibilidad con audífonos: este teléfono ha sido probado y calificado para el uso con
audífonos en algunas de las tecnologías de servicio celular que utiliza. Sin embargo, este
teléfono podría tener algunas tecnologías de servicio celular que no se han probado para
el uso con audífonos. Es importante que pruebes cuidadosamente las diferentes
funciones de este teléfono en distintas ubicaciones, con tus audífonos o tu implante
coclear, para determinar si escuchas alguna interferencia. Consulta con tu proveedor de
servicio o con el fabricante de este teléfono para obtener información sobre la
compatibilidad con audífonos. Si tienes preguntas sobre las políticas de cambio o
devolución, consulta a tu proveedor de servicio o al vendedor del teléfono.
El sistema GPS de tu teléfono está habilitado en forma predeterminada para permitir el
uso de futuros servicios; consulta el manual de tu teléfono para obtener instrucciones en
caso de que desees deshabilitar tu GPS para fines no asociados al 911.
Términos y Condiciones del Servicio de Metro
Para obtener la versión más reciente y actualizada de los Términos y condiciones de
servicio de Metro, los cuales deberá aceptar y a los que estará sujeto cuando active, use,
cambie o pague su servicio de Metro, visite metropcs.com/terms.
Bienvenido a Metro. Nos complace que nos haya elegido como su proveedor de servicio
celular. Nuestros Términos y condiciones de servicio están disponibles en
https://www.metropcs.com/terms-conditions/terms-conditions-service.html. Estos
Términos y condiciones de servicio se aplican a todos los dispositivos y servicios
celulares que nosotros le proporcionamos y constan de varias partes, las cuales podrán
ser modificadas ocasionalmente.
En caso de que los términos y condiciones relacionados con alguna función que pueda
haber seleccionado o que pueda estar incluida en su plan de tarifas cree conflicto con los
Términos y condiciones de servicio de Metro, regirán estos últimos.
Al: (a) proporcionarnos una firma escrita o electrónica o comunicarnos en forma verbal
que acepta los Términos y condiciones de servicio de Metro; (b) activar el Servicio (si es
un nuevo suscriptor); (c) usar su Servicio después de la activación del mismo o después
de realizar un cambio o una adición a su Servicio; (d) pagar su Servicio; o (e) no activar el
Servicio dentro de los 30 días posteriores a la compra de su dispositivo celular, a menos
que devuelva su dispositivo celular dentro del período de devolución correspondiente de
Metro, usted acepta los Términos y condiciones de servicio de Metro y los términos y
condiciones de servicio y uso relacionados con cualquier función que pueda haber
seleccionado o que pueda estar incluida en su plan de tarifas, incluyendo, a título
enunciativo:
Usted renuncia a su derecho a un juicio con jurado por disputas con Metro;
Sus disputas con Metro serán decididas por un árbitro;
Usted renuncia a su derecho de entablar o participar en litigios de demandas
colectivas contra Metro;
Usted proporcionará a Metro información fidedigna sobre usted;
Metro podrá comunicarse con usted ocasionalmente acerca de su Servicio;
Pagará todos los impuestos y tarifas reglamentarias aun si su plan de tarifas los
incluye; y
Metro podrá cancelar su Servicio si usted no lo paga a tiempo o si viola los Términos
y condiciones de servicio de alguna manera, incluyendo abuso del Servicio y
quebrantamiento de las leyes pertinentes.
Detalles de la cuenta:
Recordatorio por mensaje de texto. Metro envía un recordatorio por mensaje de
texto a tu teléfono antes del vencimiento del pago.
Resumen electrónico: mira tu resumen de cuenta en línea. (Solo disponible en ciertos
estados).
Detalle de llamadas: mira tu detalle de llamadas en línea para consultar un listado de
todas las llamadas locales realizadas durante el ciclo de servicio. (Se aplica cargo
adicional).
Opciones de pago:
Existen varias maneras de pagar tu servicio Metro.
Pago automático: se debita automáticamente de tu tarjeta de crédito o débito
dos días antes del vencimiento del pago.
Pago Express: paga en línea con tarjeta de crédito o débito en metropcs.com.
Por correo: coloca su número de cuenta y número de teléfono en su cheque o giro
postal y envíalo a: Metro by T-Mobile, P.O. Box 5119, Carol Stream, IL 60197-5119.
Por teléfono a través del sistema automatizado. Marque 1.888.8metro8 para pagar
con tarjeta de crédito o débito desde su teléfono de Metro. (Se aplica una tarifa de
conveniencia).
Terminal de pago en la tienda:* acepta efectivo y tarjeta de débito o crédito (con
PIN). (Se aplica una tarifa de conveniencia).
Pago en la tienda:*paga en una ubicación de pago autorizada con dinero en efectivo,
cheque o tarjeta de crédito o débito.
eWallet: suscríbete a Mi Cuenta en metropcs.com y crea tu propio eWallet seguro
donde puedes guardar tarjetas para pago rápido y configurar pagos automáticos.
Pago por mensaje de texto: la forma fácil y segura de pagar tu servicio mensual de
Metro. Registra tu tarjeta de crédito o débito en el servicio eWallet de Metro y
responde un mensaje de texto de PAYNOW (729699) para pagar.
* No disponible en todas las tiendas.
MyMetro
®
Administra tu cuenta de Metro directamente desde tu teléfono.
Marcando cualquiera de los teléfonos de servicio al cliente puedes cambiar tu plan de
tarifas, cambiar tus funciones y pagar tu factura. Solo sigue las instrucciones en tu
teléfono.
Para obtener ayuda:
Visita tu tienda Metro local o consulta las siguientes opciones si necesitas más ayuda.
Suscríbete a Mi cuenta para ver los detalles de la cuenta, verificar tu saldo, hacer un
pago, administrar eWallet y más.
Servicio automatizado al cliente de Metro desde cualquier teléfono 1.888.8metro8 y
sigue las instrucciones (1.888.863.8768)
Información en línea metropcs.com
Síguenos en:
@metrobytmobile
facebook.com/Metrobytmobile
Tu dispositivo podría no funcionar si alteras el software original. Este dispositivo solo
funcionará con versiones firmware cuyo uso haya sido aprobado por Metro y el fabricante
del dispositivo. Si se coloca un firmware no autorizado en el dispositivo, este no
funcionará.
Metro
®
by T-Mobile Servicio Información
Servicio
Necesitarás la siguiente información para activar el servicio:
Tu nombre, dirección y un número de ocho dígitos que utilizarás para acceder a tu
cuenta (tu número de identificación personal o "PIN").
Tu número de serie (IMEI) y número de tarjeta SIM. Para ubicar el número de serie,
retira el teléfono de la caja y quita la cubierta de la batería del mismo. El número de
serie está ubicado cerca del código de barras. Constará de 14 ó 18 dígitos. El número
de tarjeta SIM se puede encontrar debajo del código de barras detrás del portatarjeta
SIM. Si tu teléfono no tiene una batería extraíble, consulta la etiqueta de la caja o las
configuraciones del teléfono para ubicar el número de serie.
El plan y servicios de Metro que deseas, que incluyen planes de datos, llamadas y
textos ilimitados.
Sigue las instrucciones paso a paso que vienen en la Guía de usuario del teléfono para
instalar la batería, si corresponde, y la tarjeta SIM en tu nuevo teléfono.
Una vez que el teléfono esté encendido, marca 1.888.8metro8 (1.888.863.8768) para
comunicarte con un representante de activación que te ayudará a activar su teléfono.
También puedes activar tu teléfono en línea visitando metropcs.com. (Tan pronto
como se active el servicio, asegúrate de cargar completamente la batería del teléfono
antes de volver a usarlo).
No dudes en consultar a un representante de Metro para obtener más información sobre
las funciones y servicios adicionales o visita metropcs.com.
Guía Breve de Uso


 1
1
 2
2


coolpadcoolpad Legacy Metro PCS Manual de usuario
Coolpad CP3504L Guía del usuario
Coolpad CATALYST Manual de usuario
Coolpad Tattoo Guía de inicio rápido
Coolpad Diamante Guía de inicio rápido
Sprint Tracker + Safe & Found Guía de inicio rápido
Samsung Galaxy J2 Metro PCS Quick Start
 Manual de Galaxy J3 Prime Metro PCS Guía del usuario
 LG MS MS631 Metro PCS Guía de inicio rápido
 LG MS MS631 Metro PCS Guía de inicio rápido
HTC Desire 626S Metro PCS Guía de inicio rápido
Huawei metroPCS Guía de inicio rápido
LG MS323 Guía de inicio rápido
Motorola Cricket moto e5 supra Guía de inicio rápido


