
2-159-548-02 (1)
Tabletop Stand
2004 Sony Corporation Printed in Japan
SU-50FW
•
Mounting Instructions
Instructions de montage
Montageanleitung
Instrucciones de montaje
Instruzioni per il montaggio
2
2 1
•
•
•
SU-50FW FWD-50PX1
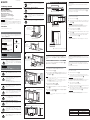
/ Dimensions / Dimensions
The SU-50FW is a Tabletop Stand exclusively for the FWD-50PX1/50PX1N
Flat Panel Displays.
Follow the instructions to assemble the Tabletop Stand and install your
display to it.
Assembling the Tabletop Stand
Align the screw holes on the Main Bracket with the corresponding holes on
the Stand. Secure the Main Bracket to the Stand using the screws.
A
Use nine +K6× 12 screws (supplied).
Installing the Flat Panel Display
Before installation, remove the Cable Cover on the display and connect all
the cables to the Flat Panel Display.
1 Remove the Cable Cover. B
2 Put four hooks on the rear of the display in the corresponding holes on
the Main Bracket of the Tabletop Stand, then slide the display straight
downward.
C
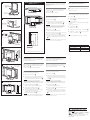
Warning
• Two persons should work together on the installation.
• Before securing the display to the Stand, check to make sure that all
hooks are properly hooked in the corresponding holes.
• Bundle the cables and draw them through the hole on the Stand.
3 Secure the display to the Stand. D
Use four +PSW 5×16 screws (supplied).
4 Route the cables inside of the Stand and attach the Cable Cover again,
then caps.
E
5 Anchor the Stand to a wall. Draw a wire (or the like) through the holes
in the Security attachments located on the upper part of the Main
Bracket and fix the wire to a wall. F
Warning
For details on how to protect the display from tipping over, contact your
authorized Sony dealer.
Français
mm/Unit: mm (inches)/Unité: mm (pouces)
SU-50FW FWD-50PX1
A
+K6 12 9
1 B
2
4
4
C
•
2
•
•
3 D
PSW 5 16 4
4
E
5
F
A
B
/Stand/Support
C
/
Main Bracket/
Console principale
D
E
/
Parts number / Numéro de pièce
English
/Screws/Vis
/Screws/Vis
( K6 12)
7-621-562-20
/Screws/Vis
( PSW 5 16)
7-682-973-49
/Hooks/Crochet
/Screws/Vis
F
/Security attachments/Fixations de sécurité
/
Cable Cover/
Protection des câbles
600 (23
5
/8)
200 (7
7
/8)
96.6 (3
13
/
16
)
482 (18
31
/32)
364 (14
11
/32)
430 (18
15
/
16
)
587.4 (23
1
/
8
)
320.6 (12
5
/8)
287.9 (11
11
/
32
)
727.8 (28
21
/
32
)
857.7 (33
25
/
32
)
Le SU-50FW est un support de téléviseur conçu exclusivement pour les
moniteurs à écran plat FWD-50PX1/50PX1N.
Suivez les instructions pour assembler le support de téléviseur et y installer
votre moniteur.
Assemblage du support de téléviseur
Alignez les orifices des vis de la console principale sur les orifices du
support correspondants. Fixez la console principale sur le support à l’aide
des vis.
A
Utilisez neuf vis +K6× 12 (fournies).
Installation du moniteur à écran plat
Avant l’installation, retirez la protection des câbles sur l’écran et raccordez
tous les câbles à l’écran plat.
1 Retirez la protection des câbles. B
2 Placez les quatre crochets à l’arrière du moniteur dans les orifices
correspondants sur la console principale du support de téléviseur, puis
faites glisser le moniteur directement vers le bas. C
Avertissement
• L’installation requiert l’intervention de deux personnes.
• Avant de fixer le moniteur au support, vérifiez que tous les crochets sont
correctement fixés dans les orifices correspondants.
• Rassemblez les câbles et faites-les passer par l’orifice du support.
3 Fixez le moniteur au support. D
Utilisez quatre vis +PSW 5×16 (fournies).
4 Faites passer les câbles à l’intérieur du support et fixez de nouveau la
protection des câbles, puis les caches. E
5 Fixez le support à un mur. Faites passer un câble (ou similaire) par les
orifices des fixations de sécurité situées sur la partie supérieure de la
console principale et fixez le câble à un mur. F
Avertissement
Pour plus de renseignements sur la façon d'empêcher le moniteur de
basculer, contactez votre revendeur Sony agréé.
/Caps/Caches
/Caps/Caches
2-187-462-01
/Cable Cover
on the Display/
Protection des câbles

Printed in Japan
Deutsch
Español
Italiano
Schrauben/Tornillos/Viti/
(+PSW 5× 16)
Teilenummer / Número de componentes / Numero dei componeti /
Einheit: mm/Unidad: mm (pulgadas)/Unità: mm/
Abmessungen / Dimensiones /
Dimensioni /
Schrauben/Tornillos/Viti/
(+K6× 12)
7-621-562-20
7-682-973-49
70% VOC
Printed on 70% or more recycled paper using VOC (Volatile
Organic Compound)-free vegetable oil based ink.
A
B
Ständer/Soporte/Supporto/
C
Haupthalterung/
Abrazadera principal/
Staffa principale/
D
E
Schrauben/
Tornillos/Viti/
Haken/Gancho/Gancio/
Schrauben/Tornillos/
Viti/
F
Sicherheitsbeschläge/Dispositivos adicionales de seguridad/
Attacchi di sicurezza/
Kabelabdeckung/
Cubierta del cable/
Copricavo/
600 (23
5
/8)
200 (7
7
/8)
96.6 (3
13
/
16
)
482 (18
31
/32)
364 (14
11
/32)
430 (18
15
/
16
)
587.4 (23
1
/
8
)
320.6 (12
5
/8)
287.9 (11
11
/
32
)
727.8 (28
21
/
32
)
857.7 (33
25
/
32
)
Der Tischständer SU-50FW ist ausschließlich für den Flachbildschirm FWD-
50PX1/50PX1N geeignet.
Bauen Sie den Tischständer wie in dieser Anleitung erläutert zusammen
und installieren Sie den Bildschirm darauf.
Zusammenbauen des Tischständers
Richten Sie die Bohrungen an der Haupthalterung an den entsprechenden
Bohrungen am Ständer aus. Befestigen Sie die Haupthalterung mit den
Schrauben am Ständer.
A
Verwenden Sie dazu neun +K6× 12-Schrauben (mitgeliefert).
Installieren des Flachbildschirms
Nehmen Sie vor der Installation die Kabelabdeckung vom Bildschirm ab
und schließen Sie alle Kabel an den Flachbildschirm an.
1 Nehmen Sie die Kabelabdeckung ab. B
2 Führen Sie die vier Haken an der Rückseite des Bildschirms in die
entsprechenden Öffnungen an der Haupthalterung des Tischständers
ein und senken Sie den Bildschirm dann gerade nach unten ab. C
Achtung
• Die Installation muss von zwei Personen ausgeführt werden.
• Überprüfen Sie, ob alle Haken richtig in den entsprechenden Öffnungen
sitzen, bevor Sie den Bildschirm am Ständer befestigen.
• Bündeln Sie die Kabel und ziehen Sie sie durch die Öffnung im Ständer.
3 Befestigen Sie den Bildschirm am Ständer. D
Verwenden Sie dazu vier +PSW 5×16-Schrauben (mitgeliefert).
4 Verlegen Sie die Kabel im Ständer und bringen Sie die
Kabelabdeckung und dann die Kappen wieder an. E
5 Verankern Sie den Ständer an einer Wand. Ziehen Sie einen Draht
oder etwas Ähnliches durch die Bohrungen in den
Sicherheitsbeschlägen am oberen Teil der Haupthalterung und
befestigen Sie den Draht an einer Wand. F
Achtung
Ihr autorisierter Sony-Händler informiert Sie gern darüber, wie Sie den
Bildschirm so sichern können, dass er nicht kippt oder herunterfällt.
Il supporto da tavolo SU-50FW è stato appositamente progettato per l’uso
con i monitor a schermo piatto FWD-50PX1/50PX1N.
Seguire le istruzioni per il montaggio del supporto da tavolo e per
l’installazione del monitor sul supporto stesso.
Montaggio del supporto da tavolo
Allineare i fori per le viti sulla staffa principale con i fori corrispondenti sul
supporto. Fissare la staffa principale al supporto utilizzando le viti.
A
Utilizzare nove viti +K6× 12 (in dotazione).
Installazione del monitor a schermo piatto
Prima di procedere all’installazione, rimuovere il copricavo del display e
collegare tutti i cavi al monitor a schermo piatto.
1 Rimuovere il copricavo. B
2 Applicare quattro ganci nella parte posteriore del display inserendoli
nei corrispondenti fori sulla staffa principale del supporto da tavolo,
quindi fare scorrere il display verso il basso mantenendolo in posizione
verticale. C
Attenzione
•È necessario che due persone effettuino l’installazione.
• Prima di fissare il display al supporto, assicurarsi di verificare che tutti i
ganci siano correttamente inseriti nei fori corrispondenti.
• Sistemare i cavi e farli passare attraverso il foro presente sul supporto.
3 Fissare il display al supporto. D
Utilizzare quattro viti +PSW 5×16 (in dotazione).
4 Fare passare i cavi all’interno del supporto, quindi applicare di nuovo il
copricavo, quindi i cappucci. E
5 Fissare il supporto ad una parete. Fare passare un cavo (o simili)
attraverso i fori presenti negli attacchi di sicurezza situati nella parte
superiore della staffa principale, quindi fissare il cavo ad una parete.
F
Attenzione
Per ulteriori informazioni su come evitare che il display cada, rivolgersi al
rivenditore autorizzato Sony di fiducia.
SU-50FW es un soporte de escritorio exclusivo para monitores de panel
plano FWD-50PX1/50PX1N.
Siga las instrucciones para montar el soporte de escritorio e instalar el
monitor sobre él.
Montaje del soporte de escritorio
Alinee los orificios de los tornillos de la abrazadera principal con los orificios
correspondientes del soporte. Fije la abrazadera principal al soporte
mediante los tornillos.
A
Utilice nueve tornillos +K6× 12 (suministrados).
Instalación del monitor de panel plano
Antes de la instalación, quite la cubierta del cable del monitor y conecte
todos los cables al monitor de panel plano.
1 Quite la cubierta del cable. B
2 Coloque cuatro ganchos en la parte posterior del monitor en los
orificios correspondientes de la abrazadera principal del soporte de
escritorio y, a continuación, deslice el monitor hacia abajo.
C
Advertencia
• Asegúrese de que sean dos personas las que realizan la instalación.
• Antes de fijar el monitor al soporte, compruebe que todos los ganchos
están colocados correctamente en los orificios correspondientes.
• Agrupe los cables y hágalos pasar por el orificio del soporte.
3 Fije el monitor en el soporte. D
Utilice cuatro tornillos +PSW 5×16 (suministrados).
4 Pase los cables por el interior del soporte y vuelva a colocar la cubierta
del cable y, a continuación, los capuchones.
E
5 Fije el soporte en una pared. Pase un cable (o similar) a través de los
orificios de los dispositivos adicionales de seguridad situados en la
parte superior de la abrazadera principal y fije el cable en una pared.
F
Advertencia
Para obtener más información sobre cómo evitar que el monitor se caiga,
póngase en contacto con su proveedor Sony autorizado.
Kappen/Capuchones/
Cappucci/
Kappen/Capuchones/Cappucci/
2-187-462-01
A
×
1 B
2
C
•
•
•
3 D
×
4 E
5
F
Kabelabdeckung am
Bildschirm/Cubierta del
cable del monitor/
Copricavo del display/
Transcripción de documentos
2-159-548-02 (1) スタンドに取り付けたディスプレイにぶら下がらない 外形寸法 / Dimensions / Dimensions English The SU-50FW is a Tabletop Stand exclusively for the FWD-50PX1/50PX1N スタンドが転倒して、大けが、死亡などの原因となること があります。 Flat Panel Displays. Follow the instructions to assemble the Tabletop Stand and install your Tabletop Stand 96.6 (3 13/16) display to it. 製品の上に乗らない、 重いものを乗せない 組み立て説明書 倒れたり、落ちたり、壊れたりして、けがの原因になるこ とがあります。 Align the screw holes on the Main Bracket with the corresponding holes on 600 (23 5/8) the Stand. Secure the Main Bracket to the Stand using the screws. A Use nine +K6× 12 screws (supplied). 電源コードを傷つけない Installing the Flat Panel Display 設置時に電源コードをふんだりはさみこまないでくださ い。電源コードを傷つけると、火災や感電の原因となるこ とがあります。 430 (18 /16) Before installation, remove the Cable Cover on the display and connect all 改造しない 安全のための注意事項を守らないと、人身事故になることが 改造するとテーブルトップスタンドの強度が低下し、ディ スプレイが転倒してけがの原因となることがあります。 あります。 the cables to the Flat Panel Display. 587.4 (23 1/8) お買い上げいただきありがとうございます。 200 (7 7/8) 15 Mounting Instructions Instructions de montage Montageanleitung Instrucciones de montaje Instruzioni per il montaggio 安装说明书 Assembling the Tabletop Stand 1 Remove the Cable Cover. B 2 Put four hooks on the rear of the display in the corresponding holes on the Main Bracket of the Tabletop Stand, then slide the display straight この組み立て説明書には、事故を防ぐための重要な注意事項と製品の取り downward. C 扱いかたを示してあります。この組み立て説明書をよくお読みのうえ、製 品を安全にお使いください。お読みになったあとは、いつでも見られると Warning A ころに必ず保管してください。 364 (14 /32) SU-50FW 2004 Sony Corporation • Two persons should work together on the installation. • Before securing the display to the Stand, check to make sure that all hooks are properly hooked in the corresponding holes. • Bundle the cables and draw them through the hole on the Stand. 11 482 (18 31/32) メインブラケット/ Main Bracket/ Console principale Printed in Japan 3 Use four +PSW 5×16 screws (supplied). 4 安全のために Route the cables inside of the Stand and attach the Cable Cover again, then caps. E ソニー製品は安全に充分に配慮して設計されています。しかし、まちがっ • 安全のための注意事項を守る。 スタンド/Stand/Support 287.9 (11 11/32) 注意を促す記号 組み立て説明書および製品では、 次のよ B うな表示をしています。表示の内容をよ く理解してから本文をお読みください。 727.8 (28 21/32) ネジ/Screws/Vis ことがあり、危険です。事故を防ぐために次のことを必ずお守りください。 857.7 (33 25/32) 5 た使いかたをすると、転倒などにより死亡や大けがなど人身事故につながる 警告表示の意味 Secure the display to the Stand. D Anchor the Stand to a wall. Draw a wire (or the like) through the holes in the Security attachments located on the upper part of the Main Bracket and fix the wire to a wall. F Warning For details on how to protect the display from tipping over, contact your authorized Sony dealer. 行為を禁止する記号 この表示の注意事項を守らないと、事故 などにより死亡や大けがなどにつな がることがあります。 ケーブルカバー/ Cable Cover/ Protection des câbles 320.6 (12 5/8) 単位:mm/Unit: mm (inches)/Unité: mm (pouces) この表示の注意事項を守らないと、 けが をしたり周辺の物品に損害を与えたり することがあります。 C 日本語 下記の注意事項を守らないと、 事故などにより、死亡や大けがの原因となります。 転倒防止についてはお買い上げ店またはソニーのサー ビス窓口に Le SU-50FW est un support de téléviseur conçu exclusivement pour les トップスタンドです。以下の手順に従って、組み立て、取り付けを行ってく moniteurs à écran plat FWD-50PX1/50PX1N. テーブルトップスタンドの組み立て 転倒防止については必ずお買い上げ店またはソニーのサー ビス窓口にお問い合わせください。不確実な設置を行う と、ディスプレイが転倒して、けがや火災・感電の原因と なります。 メインブラケットとスタンドのネジ穴を合わせ、ネジで固定する。 A 付属のネジ+K6×12(9本)を使います。 ディスプレイのケーブ ルカバー/Cable Cover on the Display/ Protection des câbles 下記の注意事項を守らないと、 けがをしたり周辺の物品に、損害を与えることがあります。 SU-50FWは、 フラットパネルディスプレイFWD-50PX1専用のテーブル ださい。 フック/Hooks/Crochet フラットパネルディスプレイの取り付け ディスプレイ側にはケーブル類はすべて装着しておいてください。 設置は、2人以上で行ってください。1人で行うと、腰を痛 めたり、けがの原因となることがあります。 Assemblage du support de téléviseur Alignez les orifices des vis de la console principale sur les orifices du support correspondants. Fixez la console principale sur le support à l’aide Utilisez neuf vis +K6× 12 (fournies). Installation du moniteur à écran plat 1 ケーブルカバーをはずす。 B tous les câbles à l’écran plat. 2 フラットパネルディスプレイ後面のフック(4か所) を、テーブルトップ 1 Retirez la protection des câbles. B スタンドのメインブラケットの穴 (4か所) に差し込み、まっすぐ下にお 2 Placez les quatre crochets à l’arrière du moniteur dans les orifices ろして固定する。 C correspondants sur la console principale du support de téléviseur, puis faites glisser le moniteur directement vers le bas. C 不安定な場所に設置しない ご注意 次のような場所に設置すると、倒れたり落ちたりして、け がの原因となることがあります。 •ぐらついた台の上 •傾いたところ •振動や衝撃のかかるところ また、設置・取り付け場所の強度を充分にお確かめください。 違うネジを使用すると、ゆるんだり、はずれたりしてけが の原因になることがあります。 votre moniteur. Avant l’installation, retirez la protection des câbles sur l’écran et raccordez 設置は、2人以上で行う 組み立てる際は必ず付属のネジを使う Suivez les instructions pour assembler le support de téléviseur et y installer des vis. A フラットパネルディスプレイのケーブルカバーをはずして、フラットパネル D Français • フラットパネルディスプレイをテーブルトップスタンドに取り付ける場 合は、必ず2人で作業を行ってください。 • ネジ止めする前に、フラットパネルディスプレイ後面のフックがテーブ ルトップスタンドのメインブラケットの穴にそれぞれ正しくはまってい ることを確認してください。 • ケーブル類は、束ねてスタンドの穴に通してください。 3 ネジ/Screws/Vis 4 ネジは確実にしめる 5 4 Faites passer les câbles à l’intérieur du support et fixez de nouveau la protection des câbles, puis les caches. E 5 Fixez le support à un mur. Faites passer un câble (ou similaire) par les orifices des fixations de sécurité situées sur la partie supérieure de la メインブラケット上部の転倒防止金具にワイヤーなどを通して壁に取り 付け、スタンドを固定する。 F ディスプレイを取り付ける前に、ネジのしめ付けを確認し てください。ネジのしめ付けが不充分な場合、ディスプレ イが落下してけがの原因になることがあります。 Fixez le moniteur au support. D Utilisez quatre vis +PSW 5×16 (fournies). コード類をスタンド内におさめ、ケーブルカバーとキャップを取り付 ける。 E キャップ/Caps/Caches 3 ディスプレイをネジで固定する。 D 付属のネジ+PSW 5×16 (4本)を使います。 E Avertissement • L’installation requiert l’intervention de deux personnes. • Avant de fixer le moniteur au support, vérifiez que tous les crochets sont correctement fixés dans les orifices correspondants. • Rassemblez les câbles et faites-les passer par l’orifice du support. console principale et fixez le câble à un mur. F Avertissement 転倒防止については、 必ずお買い上げ店、またはソニーのサービス窓口に Pour plus de renseignements sur la façon d'empêcher le moniteur de basculer, contactez votre revendeur Sony agréé. お問い合わせください。 設置は、手順に従って行う 組み立て説明書の手順以外の方法で設置を行うと転倒し て、けがの原因となります。 ディスプレイは指定の取り付け面に取り付ける 指定のディスプレイ取り付け面以外の面にディスプレイを 取り付けると、落下、転倒してけがの原因になることがあ ります。 F 転倒防止金具/Security attachments/Fixations de sécurité テーブルトップスタンドに確実に固定する ディスプレイは付属のネジを使ってテ−ブルトップスタン ドに確実に固定してください。確実に固定しないと、指を はさんだりディスプレイが落下してけがの原因となること があります。 SU-50FWはFWD-50PX1専用のテーブルトップスタン ドです 指定以外の機器を取り付けると、落下、転倒してけがの原 因になることがあります。 部品番号 / Parts number / Numéro de pièce ネジ/Screws/Vis (+K6×12) 7-621-562-20 ネジ/Screws/Vis (+PSW 5×16) 7-682-973-49 キャップ/Caps/Caches 2-187-462-01 Abmessungen / Dimensiones / Dimensioni / 尺寸 A Español SU-50FW es un soporte de escritorio exclusivo para monitores de panel SU-50FW 是 FWD-50PX1/50PX1N 平面显示器的专用桌面支架。 plano FWD-50PX1/50PX1N. 请按照以下步骤组装桌面支架并在其上安装平面显示器。 Siga las instrucciones para montar el soporte de escritorio e instalar el Haupthalterung/ Abrazadera principal/ Staffa principale/ 主托架 monitor sobre él. 96.6 (3 13/16) Montaje del soporte de escritorio 组装桌面支架 将主托架上的螺丝孔与支架上相应的孔对齐。用螺丝将主托架固定到支架上。 A Alinee los orificios de los tornillos de la abrazadera principal con los orificios 请使用 9 颗+K6× 12 螺丝(附带)。 correspondientes del soporte. Fije la abrazadera principal al soporte 200 (7 7/8) mediante los tornillos. A 600 (23 5/8) Schrauben/ Tornillos/Viti/ 螺丝 中文 Utilice nueve tornillos +K6× 12 (suministrados). 安装平面显示器 在安装之前,取下显示器上的电缆盖板,并将所有电缆连接到平面显示器。 Instalación del monitor de panel plano Ständer/Soporte/Supporto/支架 Antes de la instalación, quite la cubierta del cable del monitor y conecte todos los cables al monitor de panel plano. 587.4 (23 1/8) 430 (18 15/16) B 1 Quite la cubierta del cable. B 2 Coloque cuatro ganchos en la parte posterior del monitor en los orificios correspondientes de la abrazadera principal del soporte de escritorio y, a continuación, deslice el monitor hacia abajo. C Kabelabdeckung/ Cubierta del cable/ Copricavo/电缆盖板 Advertencia 364 (14 11/32) 482 (18 31/32) C 1 取下电缆盖板。B 2 将显示器后部的四个挂钩插入到桌面支架的主托架相应的孔中,然后笔直 向下滑动显示器。C 警告 • 安装过程应该由两个人协作进行。 • 在把显示器固定到支架之前,请务必检查以确认所有的挂钩已经正确地插入 到相应的孔中。 • 捆扎电缆,并将它们穿过支架上的孔。 • Asegúrese de que sean dos personas las que realizan la instalación. • Antes de fijar el monitor al soporte, compruebe que todos los ganchos están colocados correctamente en los orificios correspondientes. • Agrupe los cables y hágalos pasar por el orificio del soporte. 3 3 4 将电缆在支架内布线,并重新装上电缆盖板,然后装上盖帽螺丝。E 5 将支架固定在墙上。将一根绳子(或类似物)穿过位于主托架上部的安全 Fije el monitor en el soporte. D 将显示器固定到支架上。D 使用 4 颗+PSW 5× 16 螺丝(附带)。 Utilice cuatro tornillos +PSW 5×16 (suministrados). 4 Pase los cables por el interior del soporte y vuelva a colocar la cubierta del cable y, a continuación, los capuchones. E Kabelabdeckung am Bildschirm/Cubierta del cable del monitor/ Copricavo del display/ 显示器上的电缆盖板 727.8 (28 21/32) 287.9 (11 11/32) Haken/Gancho/Gancio/ 挂钩 857.7 (33 25/32) 5 配件中的孔,然后将绳子固定在墙上。F 警告 Fije el soporte en una pared. Pase un cable (o similar) a través de los orificios de los dispositivos adicionales de seguridad situados en la 关于如何防止显示器翻倒的详细说明,请与授权的 Sony 经销商联系。 parte superior de la abrazadera principal y fije el cable en una pared. F Advertencia Para obtener más información sobre cómo evitar que el monitor se caiga, póngase en contacto con su proveedor Sony autorizado. Teilenummer / Número de componentes / Numero dei componeti / 零部件号码 D 5 320.6 (12 /8) Schrauben/Tornillos/Viti/螺丝 (+K6× 12) 7-621-562-20 Schrauben/Tornillos/Viti/螺丝 (+PSW 5× 16) 7-682-973-49 Kappen/Capuchones/Cappucci/ 盖帽螺丝 2-187-462-01 Einheit: mm/Unidad: mm (pulgadas)/Unità: mm/单位:mm Deutsch Schrauben/Tornillos/ Viti/螺丝 Der Tischständer SU-50FW ist ausschließlich für den Flachbildschirm FWD- Il supporto da tavolo SU-50FW è stato appositamente progettato per l’uso 50PX1/50PX1N geeignet. con i monitor a schermo piatto FWD-50PX1/50PX1N. Bauen Sie den Tischständer wie in dieser Anleitung erläutert zusammen Seguire le istruzioni per il montaggio del supporto da tavolo e per und installieren Sie den Bildschirm darauf. l’installazione del monitor sul supporto stesso. Zusammenbauen des Tischständers E Kappen/Capuchones/ Cappucci/盖帽螺丝 Italiano Montaggio del supporto da tavolo Richten Sie die Bohrungen an der Haupthalterung an den entsprechenden Allineare i fori per le viti sulla staffa principale con i fori corrispondenti sul Bohrungen am Ständer aus. Befestigen Sie die Haupthalterung mit den supporto. Fissare la staffa principale al supporto utilizzando le viti. A Schrauben am Ständer. A Utilizzare nove viti +K6× 12 (in dotazione). Verwenden Sie dazu neun +K6× 12-Schrauben (mitgeliefert). Installazione del monitor a schermo piatto Installieren des Flachbildschirms Nehmen Sie vor der Installation die Kabelabdeckung vom Bildschirm ab Prima di procedere all’installazione, rimuovere il copricavo del display e collegare tutti i cavi al monitor a schermo piatto. und schließen Sie alle Kabel an den Flachbildschirm an. Sicherheitsbeschläge/Dispositivos adicionales de seguridad/ Attacchi di sicurezza/安全配件 Rimuovere il copricavo. B 2 Applicare quattro ganci nella parte posteriore del display inserendoli Nehmen Sie die Kabelabdeckung ab. B 2 Führen Sie die vier Haken an der Rückseite des Bildschirms in die nei corrispondenti fori sulla staffa principale del supporto da tavolo, entsprechenden Öffnungen an der Haupthalterung des Tischständers quindi fare scorrere il display verso il basso mantenendolo in posizione ein und senken Sie den Bildschirm dann gerade nach unten ab. C verticale. C Achtung F 1 1 Attenzione • Die Installation muss von zwei Personen ausgeführt werden. • Überprüfen Sie, ob alle Haken richtig in den entsprechenden Öffnungen sitzen, bevor Sie den Bildschirm am Ständer befestigen. • Bündeln Sie die Kabel und ziehen Sie sie durch die Öffnung im Ständer. • È necessario che due persone effettuino l’installazione. • Prima di fissare il display al supporto, assicurarsi di verificare che tutti i ganci siano correttamente inseriti nei fori corrispondenti. • Sistemare i cavi e farli passare attraverso il foro presente sul supporto. 3 3 Befestigen Sie den Bildschirm am Ständer. D Verwenden Sie dazu vier +PSW 5×16-Schrauben (mitgeliefert). 4 Verlegen Sie die Kabel im Ständer und bringen Sie die Utilizzare quattro viti +PSW 5×16 (in dotazione). 4 Kabelabdeckung und dann die Kappen wieder an. E 5 Verankern Sie den Ständer an einer Wand. Ziehen Sie einen Draht Fissare il display al supporto. D Fare passare i cavi all’interno del supporto, quindi applicare di nuovo il copricavo, quindi i cappucci. E 5 Fissare il supporto ad una parete. Fare passare un cavo (o simili) oder etwas Ähnliches durch die Bohrungen in den attraverso i fori presenti negli attacchi di sicurezza situati nella parte Sicherheitsbeschlägen am oberen Teil der Haupthalterung und superiore della staffa principale, quindi fissare il cavo ad una parete. befestigen Sie den Draht an einer Wand. F F Achtung Ihr autorisierter Sony-Händler informiert Sie gern darüber, wie Sie den Bildschirm so sichern können, dass er nicht kippt oder herunterfällt. Attenzione Per ulteriori informazioni su come evitare che il display cada, rivolgersi al rivenditore autorizzato Sony di fiducia. この説明書は、古紙70%以上の再生紙と、VOC (揮発性有機化 合物) ゼロ植物油型インキを使用しています。 Printed on 70% or more recycled paper using VOC (Volatile Organic Compound)-free vegetable oil based ink. Printed in Japan-
 1
1
-
 2
2


en otros idiomas
- français: Sony SU-50FW Le manuel du propriétaire
- italiano: Sony SU-50FW Manuale del proprietario
- English: Sony SU-50FW Owner's manual
- Deutsch: Sony SU-50FW Bedienungsanleitung
- 日本語: Sony SU-50FW 取扱説明書