
MANUALE D’ISTRUZIONE
user’s manual
notice d’utilisation
Bedienungsanleitung

2
Gentile Cliente,
Grazie per avere scelto un piano di cottura a induzione Foster.
Per ottenere il meglio dal Suo piano cottura, La preghiamo di leggere con attenzione le presenti
istruzioni, e di conservarle per un’eventuale consultazione futura.
INDICE
SICUREZZA .................................................................................................................................. 3
PRECAUZIONI PRIMA DEL PRIMO UTILIZZO ....................................................................................... 3
UTILIZZO DELL’APPARECCHIO ........................................................................................................ 3
PRECAUZIONI ONDE NON DANNEGGIARE L’APPARECCHIO ................................................................. 4
PRECAUZIONI IN CASO DI MALFUNZIONAMENTO DELL’APPARECCHIO .................................................. 5
ALTRE PRECAUZIONI ..................................................................................................................... 6
DESCRIZIONE DELL’APPARECCHIO ......................................................................................... 7
DATI TECNICI ................................................................................................................................ 7
PANNELLO DI CONTROLLO ............................................................................................................. 8
USO DELL’APPARECCHIO ......................................................................................................... 8
DISPLAY ...................................................................................................................................... 8
VENTILAZIONE .............................................................................................................................. 8
PRIMA ACCENSIONE E UTILIZZO DELL’APPARECCHIO ........................................................ 9
PRIMA DEL PRIMO UTILIZZO............................................................................................................ 9
PRINCIPIO DELL’INDUZIONE............................................................................................................ 9
TASTI A SFIORAMENTO .................................................................................................................. 9
ZONA “SLIDER” DI SELEZIONE POTENZA E REGOLAZIONE TIMER. ..................................................... 9
PER INIZIARE .............................................................................................................................. 10
IDENTIFICAZIONE DELLA PENTOLA ................................................................................................ 10
INDICATORE DI CALORE RESIDUO ................................................................................................. 10
FUNZIONE BOOSTER ................................................................................................................... 10
TIMER ....................................................................................................................................... 11
COTTURA AUTOMATICA ............................................................................................................... 12
FUNZIONE PAUSA ....................................................................................................................... 12
FUNZIONE RICHIAMO .................................................................................................................. 13
FUNZIONE « MANTENIMENTO CALORE » ....................................................................................... 13
BLOCCO DEL PANNELLO DI CONTROLLO ....................................................................................... 13
SUGGERIMENTI DI COTTURA .................................................................................................. 14
QUALITA DELLE PENTOLE ............................................................................................................ 14
DIMENSIONI DELLE PENTOLE ........................................................................................................ 14
ESEMPI DI REGOLAZIONE DELLA POTENZA ..................................................................................... 15
MANUTENZIONE E PULIZIA ...................................................................................................... 15
COSA FARE IN CASO DI PROBLEMI........................................................................................ 16
PROTEZIONE DELL’AMBIENTE ................................................................................................ 17
ISTRUZIONI DI INSTALLAZIONE .............................................................................................. 18
CONNESSIONE ELETTRICA ..................................................................................................... 19

3
SICUREZZA
Precauzioni prima del primo utilizzo
Sballare eliminando tutti i materiali di imballo.
L’installazione e connessione dell’apparecchio devono essere
effettuate da personale specializzato. Il Fabbricante declina ogni
responsabilità civile e penale per danni causati da installazione e/o
connessione non realizzate a regola d’arte.
Per essere utilizzato, l’apparecchio deve essere correttamente
installato in una cucina e su una superficie di lavoro idonea.
Questo elettrodomestico è progettato esclusivamente per la
cottura di cibo, con l’espressa esclusione di ogni altro uso
domestico, commerciale o industriale.
Rimuovere tutte le etichette adesive dal vetro.
Non apportare alcuna modifica o alterazione all’apparecchio.
La superficie in vetro dell’apparecchio non può essere utilizzata
come zona di appoggio o di lavoro.
L’apparecchio deve essere opportunamente messo a terra e
collegato alla rete elettrica secondo la normativa in vigore
localmente.
Non usare nessuna prolunga elettrica per collegare il cavo di
alimentazione.
L’apparecchio non può essere utilizzato sopra una lavastoviglie o
una asciugatrice: il vapour potrebbe danneggiare le componenti
elettroniche dell’apparecchio.
Questo apparecchio non è da utilizzare con un timer esterno o un
telecomando separato.
Utilizzo dell’apparecchio
Spegnere le piastre riscaldanti dopo l’uso.
Controllare le cotture che utilizzano grasso o olio: potrebbero
incendiarsi con facilità.
Fare attenzione a non ustionarsi durante o dopo l’uso
dell’apparecchio.
Verificare che nessun cablaggio di apparecchi fissi o mobili venga
in conatto con il vetro dell’apparecchio o con pentole bollenti.

4
Gli oggetti magnetici (carte di credito, floppy discs, calcolatrici) non
devono essere piazzati vicino all’apparecchio quando questo è
acceso.
Non piazzare alcun oggetto metallico, tranne le pentole,
sull’apparecchio. In caso di accensione involontaria, o di presenza
di calore residuo dopo la cottura, questi potrebbero sciogliersi o
anche incendiarsi.
Non coprire mai l’apparecchio con un panno o telo protettivo,
perché potrebbe surriscaldarsi e bruciare.
Questo apparecchio può essere usato da bambini con una età
minima di otto anni e da persone le cui capacità fisiche, sensoriali
o mentali sono ridotte, o le cui esperienze e conoscenze sono
inadatte, unicamente se sotto sorveglianza e dietro formazione
sull’uso dell’apparecchio, in condizioni di sicurezza e dopo essere
state informate sui rischi in cui potrebbero incorrere.
I bambini non devono giocare con l’apparecchio.
La pulizia e la manutenzione non possono essere affidate a
bambini senza la sorveglianza di un adulto.
Gli oggetti metallici quali coltelli, forchette, cucchiai e coperchi non
devono essere piazzati sull’apparecchio perché potrebbero
diventare incandescenti.
Precauzioni onde non danneggiare l’apparecchio
Pentole con fondo graffiato o danneggiato (non di ghisa smaltata)
possono danneggiare il vetro ceramico.
Sabbia o altre sostanze abrasive possono danneggiare il vetro
ceramico.
Evitare di far cadere oggetti, anche piccoli, sul vetro ceramico.
Assicurarsi che la ventilazione dell’apparecchio funzioni secondo
quanto previsto dalle istruzioni del fabbricante.
Non colpire i bordi del vetro con le pentole.
Non mettere o lasciare pentole vuote sul vetro ceramico.
Lo zucchero, i materiali sintetici e i fogli di alluminio non devono
venire a contatto con le piastre riscaldanti, perché possono
causare rotture o altre alterazioni del vetro ceramico durante il
raffreddamento. Nel caso, accendere immediatamente
l’apparecchio e rimuovere l’oggetto dalla piastra, prendendo le
opportune precauzioni per non ustionarsi.

5
Pericolo di incendio! Non appoggiare alcun oggetto sul piano di
cottura.
Non piazzare mai un contenitore bollente sul pannello di controllo.
Se sotto il piano cottura incassato c’è un cassetto, assicurarsi che
lo spazio tra il contenuto dello stesso e la parte inferiore
dell’apparecchio sia sufficiente (almeno 2 cm). Questo è
essenziale per garantire una corretta ventilazione.
Non mettere mai oggetti infiammabili (ad es. spray) nel cassetto
situato sotto l’apparecchio. Gli eventuali contenitori per posate
posti in cassetti sotto l’apparecchio devono essere resistenti al
calore.
Precauzioni in caso di malfunzionamento dell’apparecchio
Se si nota un difetto di funzionamento, spegnere l’apparecchio e
disconnetterlo dalla rete elettrica.
Se il vetro ceramico è rotto o crepato, disconnettere
immediatamente l’apparecchio dalla rete elettrica e chiamare
l’assistenza tecnica.
Qualsiasi riparazione deve essere compiuta esclusivamente da
personale qualificato. Non aprire l’apparecchio per nessun motivo.
ATTENZIONE: Se la superficie del vetro è crepata o rotta,
spegnere immediatamente l’apparecchio per evitare il rischio di
scosse elettriche.

6
Altre precauzioni
Assicurarsi che la pentola o padella sia sempre centrata sulla
piastra di cottura. Il fondo dell’utensile deve coprire il più possibile
la piastra di cottura.
Per gli utilizzatori di pace-makers: il campo magnetico
dell’apparecchio potrebbe influenzare il funzionamento del pace-
maker. Si raccomanda di richiedere preventivamente informazioni
al venditore dell’apparecchio e/o al medico curante.
Non utilizzare contenitori di alluminio o di materiali sintetici:
potrebbero fondere se appoggiati alle piastre accese o ancora
calde dopo l’uso.
Non utilizzare mai acqua per spegnere il fuoco. Disattivare la zona
di cottura. Soffocare le fiamme con un coperchio, una coperta
ignifuga o qualcosa di simile.
L’UTILIZZO DI PENTOLE NON IDONEE OPPURE DI
ACCESSORI RIMUOVIBILI POSTI TRA LA PENTOLA E
LA PIASTRA PER RISCALDARE PENTOLE NON
IDONEE ALL’INDUZIONE FA DECADERE LA
GARANZIA.
IL COSTRUTTORE NON PUÒ ESSERE CONSIDERATO
RESPONSABILE PER QUALSIASI DANNO AL PIANO
DI COTTURA OR DANNI CORRELATI.

7
DESCRIZIONE DELL’APPARECCHIO
Dati tecnici
Typo
7330240
7331240
7332240
7370240
Potenza totale
6700 W
6700 W
7400 W
7400 W
Consumo di energia del piano cottura
EC
hob
**
173.6 Wh/kg
176.6 Wh/kg
174.2 Wh/kg
176.5 Wh/kg
Posizione anteriore sinistra
Ø 200 mm
Ø 250 mm
Ø 250 mm
Ø 200 mm
Identificazione minimo
Ø 100 mm
Ø 110 mm
Ø 110 mm
Ø 100 mm
Potenza nominale *
2300 W
2300 W
2300 W
2300 W
Potenza booster *
3000 W
3000 W
3000 W
3000 W
Categoria standard di pentola **
C
D
D
C
Consumo di energia EC
cw
**
180.5 Wh/kg
182.7 Wh/kg
182.7 Wh/kg
180.5 Wh/kg
Posizione posteriore sinistra
-
-
Ø 180 mm
Ø 180 mm
Identificazione minimo
-
-
Ø 90 mm
Ø 90 mm
Potenza nominale *
-
-
1200 W
1200 W
Potenza booster *
-
-
1400 W
1400 W
Categoria standard di pentola **
-
-
B
B
Consumo di energia EC
cw
**
-
-
166.7 Wh/kg
166.7 Wh/kg
Posizione centro
Ø 160 mm
-
-
-
Identificazione minimo
Ø 90 mm
-
-
-
Potenza nominale *
1200 W
-
-
-
Potenza booster *
1400 W
-
-
-
Categoria standard di pentola **
B
-
-
-
Consumo di energia EC
cw
**
166.7 Wh/kg
-
-
-
Posizione posteriore destra
-
Ø 160 mm
Ø 160 mm
Ø 220 mm
Identificazione minimo
-
Ø 90 mm
Ø 90 mm
Ø 110 mm
Potenza nominale *
-
1200 W
1200 W
2300 W
Potenza booster *
-
1400 W
1400 W
3000 W
Categoria standard di pentola **
-
B
B
C
Consumo di energia EC
cw
**
-
166.7 Wh/kg
166.7 Wh/kg
173.7 Wh/kg
Posizione anteriore destra
Ø 250 mm
Ø 200 mm
Ø 200 mm
Ø 160 mm
Identificazione minimo
Ø 100 mm
Ø 100 mm
Ø 100 mm
Ø 90 mm
Potenza nominale *
2300 W
2300 W
2300 W
1400 W
Potenza booster *
3000 W
3000 W
3000 W
2000 W
Categoria standard di pentola **
D
C
C
A
Consumo di energia EC
cw
**
173.7 Wh/kg
180.5 Wh/kg
180.5 Wh/kg
185 Wh/kg
* La Potenza dichiarata può cambiare a seconda delle dimensioni e del material della pentola.
** metodo di misura delle prestazioni secondo la norma (EN60350-2)

8
Pannello di controllo
USO DELL’APPARECCHIO
Display
Display Descrizione Funzione
0 Zero La piastra è attivata.
1…9 Livello potenza Selezione del livello di potenza.
U Sensore pentola Pentola assente o non adatta
A Acceleratore riscaldamento Cottura automatica.
E Messaggio di errore Difetto elettronico
H Calore residuo La piastra è calda
P Booster La sovra-potenza è attivata.
L Blocco Blocco del pannello di controllo
U Mantenimento calore Mantiene automaticamente a 70°C.
II Pausa L’apparecchio è in pausa.
Ventilazione
Il sistema di raffreddamento è completamente automatico. La ventola entra in funzione a basso
regime di rotazione quando il calore interno raggiunge un determinate livello. La ventilazione
arriva ad elevati regimi di rotazione se l’apparecchio è utilizzato intensivamente. La ventola
rallenta e si spegne automaticamente quando la temperatura interna del circuito elettronico
scende sotto il livello prestabilito.
Tasto
Booster
Tasto
Pausa/Ripeti
Zona “SLIDER” di selezione Potenza e
impostazione timer
Tasto On/Off
Spia piastra
Spia timer
Display Timer
Spia
Pausa/Ripeti
Display potenza
Spia on/off
Tasto mantieni
caldo

9
PRIMA ACCENSIONE E UTILIZZO DELL’APPARECCHIO
Prima del primo utilizzo
Pulire l’apparecchio con uno straccio umido, indi asciugarlo accuratamente. Non utilizzare
detergenti che possano causare colorazioni anomale del vetro.
Principio dell’induzione
Sotto ogni piastra riscaldante si trova un magnete induttore. Quanto viene attivato, questo
produce un campo elettromagnetico che genera una corrente induttiva nel fondo ferromagnetico
della pentola. Il risultato è il riscaldamento della pentola posizionata sulla piastra.
Naturalmente, la pentola deve essere adatta:
Tutte le pentole in materiale ferromagnetico sono consigliate (verificare utilizzando una
calamita): pentole in ghisa, acciaio, smaltate e di acciaio inossidabile con fondo
ferromagnetico…
Da escludere: pentole in rame, acciaio inossidabile senza fondo ferromagnetico, alluminio,
vetro, legno, ceramica, terracotta…
La piastra a induzione si adatta automaticamente alla dimensione della pentola: se il diametro di
quest’ultima è troppo piccolo tuttavia, la piastra non funziona. Il diametro minimo varia in funzione
del diametro della piastra.
Se la pentola non è adatta al piano di cottura a induzione, il display mostrerà la lettera [ U ].
Tasti a sfioramento
Il vostro piano cottura a induzione è equipaggiato con controlli elettronici azionati tramite tasti a
sfioramento. Quando il dito tocca il tasto, il comando corrispondente viene attivato. L’attivazione
è confermata dalla spia relativa, o da una lettera o un numero sul display e/o da un segnale
acustico.
Nell’utilizzo normale premere unicamente un tasto per volta.
Zona “SLIDER” di selezione Potenza e regolazione timer.
Per selezionare la Potenza con lo slider, far scorrere il dito sullo slider stesso. Si può anche
scegliere direttamente la potenza appoggiando il dito nel punto che si desidera (senza farlo
scorrere).
Zona “SLIDER” di selezione Potenza e
regolazione timer
“SLIDER“
Accesso
diretto

10
Per iniziare
Accensione/spegnimento dell’apparecchio :
Azione Pannello di controllo Display
Per accendere premere [ 0/I ] [ 0 ] lampeggiano
Per arrestare premere [ 0/I ] niente o [ H ]
Accensione/Spegnimento di una piastra riscaldante:
Azione Pannello di controllo Display
Selezione piastra premere il display [ 0 ] selezionato [ 0 ] e spia accesa
Per regolare scorrere sullo “SLIDER“ da [ 0 ] a [ 9 ]
(regolare la potenza) a sinistra o a destra
Per arrestare scorrere fino a [ 0 ] sullo “SLIDER“ [ 0 ] o [ H ]
O premere su [ 0 ] [ 0 ] o [ H ]
Se nessuna regolazione è effettuata entro 20 secondi l’apparecchio torna in modalità di attesa.
Identificazione della pentola
L’identificazione della pentola assicura la totale sicurezza.
L’induzione non funziona:
Se non c’è pentola sulla piastra, o se la pentola non è adatta all’induzione. In questo caso
è impossibile aumentare la Potenza è il display mostra [ U ]. Questo simbolo scompare
quando si posiziona una pentola adatta sulla piastra.
Se la pentola viene rimossa dalla piastra di cottura: la cottura si arresta e il display mostra
[ U ]. Il simbolo [ U ] scompare quando la pentola è posizionata nuovamente sulla pistra.
La cottura ricomincia con il livello di potenza scelto precedentemente.
Dopo l'uso, spegnere la zona di riscaldamento. Non lasciare attivo il rilevamento della pentola
[ U ]
Indicatore di calore residuo
Dopo aver spento l’apparecchio, la piastra è ancora calda e il display indica [ H ].
Il simbolo [ H ] scompare quando la piastra può essere toccata senza pericolo di bruciature.
Finché la spia di calore residuo è accesa, non toccare la piastra né posizionarvi alcun oggetto
sensibile al calore: c’è rischio di bruciature o incendi.
Funzione Booster
La funzione Booster [ B ] garantisce un aumento di potenza alla piastra selezionata. Quando la
funzione viene attivata, la piastra funziona per dieci minuti ad una potenza molto elevata. Il
Booster serve ad esempio per riscaldare rapidamente grandi quantità d’acqua.
Accensione/Spegnimento della funzione Booster:
Azione Pannello di controllo Display
Selezione piastra premere [ 0 ] della zona scelta [ 0 ] e spia accesa
Attivare il booster premere il tasto [ B ] [ P ]
Arrestare il booster scorrere sullo “SLIDER“ da [ P ] a [ 0 ]
O premere [ B ] [ 9 ]

11
Gestione della potenza:
L’apparecchio ha un sistema di limitazione della potenza massima. Quando la funzione Booster è
attiva, al fine di non eccedere in potenza, il sistema elettronico riduce automaticamente la
potenza di una delle altre piastre. Il display lampeggia su [ 9 ] per qualche secondo e poi indica la
Potenza massima consentita:
Piastra selezionata L’altra piastra: (esempio: livello potenza 9)
Compare il simbolo[ P ] [ 9 ] diventa [ 6 ] o [ 8 ] a seconda del tipo di piastra coinvolta
Timer
Il timer può essere utilizzato con entrambe le piastre simultaneamente e con regolazioni diverse
(da 0 a 99 minuti) per ognuna di esse.
Regolazione e modifica del tempo di cottura :
Esempio: per 16 minuti a Potenza 7 :
Azione Pannello di controllo Display
Selezione piastra premere [ 0 ] per la piastra selezionata [ 0 ] e spia accesa
Selezionare il livello di potenza scorrere sullo “SLIDER“ a [ 7 ] [ 7 ]
Selezionare « Timer » premere display [ CL ] [ 00 ]
Impostare le unità scorrere sullo “SLIDER“ a [ 6 ] [ 0 fisso ] [6 lampeggia]
Convalidare le unità premere il display [ 06 ] [ 0 lampeggia] [6 fisso ]
Impostare le decine scorrere sullo “SLIDER“ a [ 1 ] [ 1 lampeggia] [ 6 fisso ]
Convalidare le decine premere il display [ 16 ] [ 16 ]
Il tempo è confermato e la cottura ha inizio.
Per arrestare il tempo di cottura
Esempio: per 13 minuti a Potenza 7 :
Azione Pannello di controllo Display
Selezione piastra premere il display [ 7 ] selezionato [ 7 ] e spia accesa
Selezionare « Timer » premere [ 13 ] [ 13 ]
Disattivare le unità scorrere sullo “SLIDER“ fino a [ 0 ] [ 1 fisso ] [0 lampeggia]
Convalidare le unità premere display [ 10 ] [ 1 lampeggia] [ 0 fisso ]
Disattivare le decine scorrere sullo “SLIDER“ a [ 0 ] [ 0 lampeggia] [ 0 fisso ]
Convalidare le decine premere display [ 00 ] [ 00 ]
Arresto automatico alla fine del tempo di cottura
Quando viene raggiunto il tempo impostato per la cottura, il display del timer lampeggia su [ 00 ],
viene prodotto un segnale acustico e la piastra si spegne. Per arrestare il segnale acustico è
sufficiente premere il tasto [ 00 ].

12
Funzione timer al di fuori della cottura:
Esempio: per 29 minutes :
Azione Pannello di controllo Display
Attivare l’apparecchio premere display [ 0/I ] spie piastra accese
Selezionare « Timer » premere il display [ CL ] [ 00 ]
Impostare le unità scoirrere sullo “SLIDER“ fino a [ 9 ] [ 0 fisso ] [9 lampeggia]
Convalidare le unità premere display [ 09 ] [ 0 lampeggia] [ 9 fisso ]
Impostare le decine scorrere sullo slider “SLIDER“ a [ 2 ] [ 2 lampeggia ] 9 fisso ]
Convalidare le decine premere il display [ 29 ] [ 29 ]
Dopo qualche secondo la spia smette di lampeggiare.
Appena il tempo impostato è esaurito i display del timer lampeggiano a [ 00] e si ode un segnale
acustico. Per arrestare il segnale acustico è sufficiente premere il display [ 00]. L’apparecchio si
spegne.
Cottura automatica
Tutte le piastre sono equipaggiate con una funzione automatica “stop and go” (partenza-arresto).
La piastra si accende a piena Potenza per un dato tempo, poi riduce automaticamente la
Potenza a un livello prestabilito.
Avvio:
Azione Pannello di controllo Display
Selezione piastra premere il display [ 0 ] selezionato [ 0 ] e spia accesa
Regolazione a piena potenza scorrere sullo “SLIDER“ a [ 9 ] va da [ 0 ] a [ 9 ]
Cottura automatica premere ancora display “SLIDER“ [ 9 ] [ 9 ] lampeggia con [ A ]
Selezione livello potenza scorrere sullo “SLIDER“ a [ 7 ] [ 9 ] passa a [ 8 ] [ 7 ]
(per esempio « 7 ») [ 7 ] lampeggia con [ A ]
Spegnere la cottura automatica :
Azione Pannello di controllo Display
Selezione piastra premere [ 7 ]della piastra [ 7 ] lampeggia con [ A ]
Selezione livello Potenza scorrere sullo “SLIDER“ da [ 1 ] a [ 9 ]
Funzione Pausa
Questa funzione arresta tutte le attività di cottura e permette di ri-attivarle in un secondo momento
con le stesse regolazioni.
Attivare / Disattivare la funzione pausa:
Azione Pannello di controllo Display
Attivare la pausa premere [ II ]per 2 secondi mostra [ II ] sul display
della piastra
Arrestare la pausa premere [ II ] per 2 secondi la spia della pausa
lampeggia
Premere un altro tasto o la spia della pausa si
Scorrere sullo “SLIDER“ spegne

13
Funzione Richiamo
Dopa ver spento l’apparecchio [ 0/I ], è possibile richiamare le ultime impostazioni.
Regolazioni di cottura di tutte le piastre (Potenza)
Minuti e secondi dei timer delle piastre
Funzione riscaldamento
La procedura di Richiamo è la seguente:
Premere il tasto [ 0/I ]
Indi premere il tasto [ II ] entro 6 secondi
La regolazione precedente viene attivata.
Funzione « Mantenimento calore »
Questa funzione permette di raggiungere e mantenere automaticamente la temperature di 70°C.
Questo impedirà il deborda mento di liquidi o di bruciare alimenti nelle pentole.
Per attivare la funzione «Mantenimento calore » :
Azione Pannello di controllo Display
Selezione zona premere il display [ 0 ] selezionato da [ 0 ] a [ 9 ] o [ H ]
Per attivare premere il tasto [ U ] sullo “SLIDER“ [ U ]
Per arrestare premere sul display [ U ] selezionato [ U ]
Scorrere sullo “SLIDER“ da [ 0 ] a [ 9 ] o [ H ]
Questa funzione può essere attivata indipendentemente su tutte le piastre.
Quando la pentola viene tolta dalla piastra, la funzione di Mantenimento calore resta attiva per
circa 10 minuti.
La durata massima della funzione di mantenimento calore è di due ore.
Blocco del Pannello di Controllo
Per evitare di modificare inavvertitamente una regolazione, in particolare durante le operazioni di
pulizia, il Pannello di controllo può essere bloccato (con l’eccezione del tasto On/Off [ 0/I ]).
Blocco :
Azione Pannello di controllo Display
Avvio premere [ 0/I ] [ 0 ] o [ H ] sul display
Blocco dell’apparecchio premere simultaneamente[ B ] e [ 0 ] nessuna modifica
Del display della zona ant. destra**
Premere di nuovo su display [ 0 ] appare [ L ] sul display
Sblocco :
Azione Pannello di controllo Display
Avvio premere su [ 0/I ] appare [ L ] sul display
Nei 5 secondi successive all’avvio :
Sblocco dell’apparecchio premere simultaneamente [ B ]e [ 0 ] o [ H ] sul display
[ L ] del display della zona ant. destra**
Premere su [ B ] nessuna spia sul display
** per il modello 7330/240 utilizzare il display della piastra posteriore destra

14
SUGGERIMENTI DI COTTURA
Qualità delle pentole
Materiali adatti: acciaio, acciaio smaltato, ghisa, acciaio con fondo magnetizzabile,
alluminio con fondo magnetizzabile
Materiali non adatti: alluminio e acciaio con fondo non magnetizzabile, rame, ottone, coccio,
porcellana
In via di massima, i fabbricanti indicano se i recipienti di cottura sono adatti per i piani ad induzione.
Per verificare se i recipienti di cottura sono indicati per il piano ad induzione.
Versare nella pentola un po’ d’acqua e collocarlo sulla zona di cottura ad induzione. Accendere
la zona e selezionare la gradazione [ 9 ]. L’acqua deve riscaldarsi in pochi secondi.
Toccare con una calamita il fondo della pentola. Se la calamita rimane attaccata, la
pentola è indicata per il piano ad induzione.
Alcuni recipienti possono generare rumori se vengono posti su una zona di cottura ad induzione.
Ciò non significa che il piano ad induzione sia difettoso o che funzioni in modo anomalo.
Le pentole devono essere certificate dal fabbricante come compatibili con l’induzione.
E’ tuttavia possibile che certe pentole, seppur dichiarate come compatibili, abbiano in
realtà caratteristiche inadatte all’uso con i piani a induzione.
Raccomandiamo di verificare al momento dell’acquisto che le pentole rispettino almeno le
seguenti condizioni:
Se il fondo della pentola (Ød) è significativamente più piccolo del diametro del
corpo (ØD) il rendimento ne è penalizzato e la pentola rischia di non essere
identificata dalla piastra

15
Dimensioni delle pentole
Le piastre di cottura si adattano automaticamente, entro un certo limite, al diametro delle pentole.
Tuttavia la pentola deve avere un diametro minimo, a seconda delle dimensioni della piastra.
Per ottenere l’efficienza migliore dal vostro apprecchio, posizionate la piastra nel centro della
piastra.
Esempi di regolazione della potenza
(I valori sotto sono indicativi)
Da 1 a 2
Sciogliere
Riscaldare
Salse, burro, cioccolata, gelatine
Piatti preparati in precedenza
Da 2 a 3
Cuocere a fuoco lento
Scongelare
Riso, budini, sciroppi di zucchero
Verdure liofilizzate, pesce, prodotti
congelati
Da 3 a 4
Vapore
Verdure, pesce, carne
Da 4 a 5
Acqua
Patate bollite, zuppe, pasta,
Verdure fresche
Da 6 a 7
Cottura media
Bollitura a fuoco lento
Carne, fegato, uova, salsicce
Goulash, arrosti, trippa
Da 7 a 8
Cottura
Patate, patatine fritte, wafers
9
Friggere, arrostire
Far bollire l’acqua
Bistecche, omelettes, piatti fritti
Acqua
P
Acqua bollente
Far bollire quantitativi significativi d’acqua
MANUTENZIONE E PULIZIA
Spegnere l’apparecchio prima di pulirlo.
Non pulire l’apparecchio se il vetro è troppo caldo: rischio di ustioni!
Rimuovere segni leggeri con uno straccio umido con liquido detergente diluito in acqua.
Risciacquare con acqua fredda e asciugare accuratamente la superficie.
Detergenti altamente abrasivi e corrosivi, che possono causare graffi, devono
assolutamente essere evitati.
Non utilizzare mai apparecchi a vapore o a pressione per pulire l’apparecchio.
Non utilizzare alcun oggetto che potrebbe graffiare il vetro ceramico.
Assicurarsi che la pentola sia asciutta e pulita. Assicurarsi che non vi siano granelli di
polvere sul vetro ceramico o sulla pentola. Far scivolare pentole con fondo irregolare può
causare graffi alla superficie del vetro ceramico.
Versamenti di zucchero, marmellata, conserve ecc devono essere rimossi
immediatamente, in modo da evitare danni alla superficie del vetro ceramico.

16
a
d
c
b
COSA FARE IN CASO DI PROBLEMI
Appare il simbolo [ E 4 ] :
L’apparecchio deve essere configurato secondo la procedura seguente:
I) Attenzione : prima di iniziare ogni pentola o utensile deve essere rimossa
dall’apparecchio.
II) Scollegare l’apparecchio dalla rete elettrica rimuovendo il fusibile o staccando la spina.
III) Collegare l’apparecchio nuovamente alla rete elettrica rimettendo il fusibile o collegando
la spina.
IV) Procedura : E’ necessario un contenitore con fondo ferromagnetico dal diametro
minimo di 16 cm.
* iniziare entro 2 minuti dopo il collegamento
dell’alimentazione
* Non usare il tasto [ O/I ].
V) Come cancellare la configurazione esistente:
1) Premere il tasto n° 2 e mantenere premuto
2) Comparirà il simbolo [ - ] su ogni display
3) con l’altra mano premere successivamente e
rapida successione (meno di 2 sec.) ogni tasto [ -
]. Iniziare dall’anteriore destro e procedere in senso antiorario, come descritto nella
figura (da a) fino a d)). Un doppio bip” segnala una sequenza errata, e sarà
necessario iniziare nuovamente dal punto 1.
4) Togliere tutte le dita dai tasti e premere indi nuovamente il tasto 1 per qualche
secondo fino a che non compare il simbolo [ E ] lampeggiante.
6) Attendere che [ E ] smetta di lampeggiare..
7) Dopo alcuni secondi i simboli [ E ] si trasformeranno automaticamente in [ C ] →
La configurazione è stata cancellata.
NOTA: per i piani cottura con tre piastre, visto che la piastra anteriore destra non
esiste, la procedura va iniziata dalla zona posteriore destra (b).
VI) Come configurare l’apparecchio?
1) Utilizzare una pentola da induzione adatta con un diametro minimo di 16 cm.
2) Selezionare la piastra di cottura premendo il corrispondente tasto [ C ].
3) Posizionare la pentola sulla piastra corrispondente.
4) Attendere fino a che il simbolo [ C ] cambia in [ - ]. La piastra è configurata.
5) Utilizzare la stessa procedura per ogni altra piastra che mostra il simbolo [ C ]
6) La configurazione è complete se tutte le piastre vengono identificate
correttamente e non compare alcun simbolo sul display .
Utilizzare la stessa pentola per configurare l’apparecchio.
Non mettere mai due o più pentole sulle piastre durante la configurazione.
Se compare il simbolo [ E 4 ] e rimane acceso, chiamare l’assistenza tecnica.
L’apparecchio non si accende
L’apparecchio non è collegato correttamente alla rete elettrica.
Il fusibile è assente o il circuito aperto
Il sistema di blocco è attivo
I tasti a sfioramento sono coperti da grasso o acqua.
Un oggetto è posizionato su uno dei tasti.
Compare il simbolo [ U ]
Manca la pentola sulla piastra.
La pentola non è compatibile con il piano cottura a induzione.
Il diametro del fondo della pentola è troppo piccolo.

17
Compare il simbolo [ C ] o [ E ]
Contattare l’assistenza tecnica.
Una delle piastre viene disattivata
È entrato in funzione il sistema di sicurezza.
Si è dimenticato di disattivare la piastra per un certo periodo.
Uno o più tasti a sfioramento sono coperti da qualcosa.
La pentola è vuota e il fondo si è surriscaldato.
Entrata in funzione della funzione automatica di riduzione o interruzione della potenza in
caso di surriscaldamento.
Ventilazione continua dopo lo spegnimento dell’apparecchio
Questo non è un difetto di funzionamento. La ventola continua ad andare per proteggere
le componenti elettroniche dal surriscaldamento.
La ventola si arresta automaticamente.
Il sistema di cottura automatica non parte :
La piastra è ancora calda [ H ].
È selezionato il livello di Potenza massima [ 9 ].
Il pannello di controllo indica [ L ] :
Vedere il capitolo riguardante il blocco del pannello di controllo.
Il pannello di controllo indica [ U ] :
Vedere il capitolo “Mantenimento calore”.
Il pannello di controllo indica [ II ] :
Vedere il capitol “Pausa“.
PROTEZIONE DELL’AMBIENTE
Il materiale dell’imballo è ecologico e deve essere riciclato.
L’apparecchio contiene alcuni metalli nobili. Contattare le autorità locali per informarsi sulle
modalità di riciclo o smaltimento dell’apparecchio al momento della sua dismissione.
Non gettare l’apparecchio nei rifiuti.
Contattare l’organizzazione del vostro comune
preposta al riciclaggio degli elettrodomestici.

18
ISTRUZIONI DI INSTALLAZIONE
L’installazione è di esclusiva responsabilità dell’installatore specializzato.
L’installatore è tenuto a rispettare la legislazione locale e le normative in vigore nel Paese in cui
viene installato l’apparecchio.
Come fissare la guarnizione
La guarnizione fornita con l’apparecchio serve a evitare le infiltrazioni di acqua o altri liquidi nel
mobile sottostante l’apparecchio.
La sua installazione deve essere fatta attentamente, seguendo il disegno qui sotto.
Inserimento – installazione
Le misure di incasso sono :
Articolo
Foro incasso
7330240
760 x 350 mm
7331240
560 x 490 mm
7332240
650 x 490 mm
7370240
560 x 490 mm
Assicurarsi che ci sia una distanza di almeno 50 mm tra l’apparecchio e il muro o le pareti o
paratie laterali.
L’apparecchio è classificato come classe “Y” di protezione dal calore. Idealmente
l’apparecchio dovrebbe essere installato con un ampio spazio da entrambi i lati. Ci può essere
un muro posteriormente e mobili alti o un muro su un lato. Sull’altro lato tuttavia, non deve
esserci un divisorio o un mobile più alto della posizione dell’apparecchio.
Il mobile o piano di lavoro sul quale l’apparecchio è installato, nonché i bordi dei mobili e/o
unità pensili, i rivestimenti laminati che li rivestono e la colla di assemblaggio, devono essere
in grado di resistere a temperature fino a 100 °C.
I supporti a muro devono essere resistenti al calore.
I materiali utilizzati per i piani di lavoro spesso tendono a gonfiarsi con l’umidità. Per
proteggere il foro di incasso dell’apparecchio, applicare uno strato di vernice o sigillante
apposito. Una particolare cura deve essere dedicata alla corretta applicazione della
guarnizione fornita con l’apparecchio, onde evitare qualsiasi infiltrazione nel mobile
sottostante. La guarnizione garantisce una corretta tenuta se utilizzata su superfici lisce.
Non installare l’apparecchio al di sopra di un forno non opportunamente ventilato, o di una
lavastoviglie.
Garantire la presenza di uno spazio di almeno 20 mm al di sotto della cassetta
dell’apparecchio, onde permettere una corretta areazione dell’apparecchio.
Se sotto l’apparecchio c’è un cassette, non riporvi oggetti infiammabili, come bombolette di
spray, od oggetti non resistenti al calore.
La distanza di sicurezza tra l’apparecchio e una eventuale cappa di aspirazione sovrastante
deve essere quello previsto dal fabbricante della cappa. In caso di mancanza di indiazioni in
merito, rispettare una distanza minima di 760 mm.
Il cavo di alimentazione, dopo l’installazione dell’apparecchio, non deve essere soggetto a
sollecitazioni meccaniche, come ad esempio schiacciamento a causa del movimento di
cassetti o altro.
ATTENZIONE: Usare soltanto protezioni per il piano di cottura realizzate dal produttore
dell'apparecchio o indicate dal produttore nelle istruzioni come idonee per l'utilizzo con
l'apparecchio o incorporate in esso. L'utilizzo di protezioni inappropriate può causare incidenti.
Incollare la guarnizione a (2) due mm
dal bordo inferior esterno del vetro,
dopo aver rimosso la protezione della
stessa (3).

19
CONNESSIONE ELETTRICA
L'installazione di questo dispositivo e il suo collegamento alla rete elettrica devono essere
eseguiti da un elettricista pienamente consapevole dei requisiti normativi.
Assicurare la protezione dalle parti in tensione dopo l'installazione.
I dati di connessione necessari si trovano sulla piastra di segnalazione e d'attacco sotto il
dispositivo.
Questo dispositivo deve'essere isolato dalla rete da un dispositivo di sezionamento onnipolare.
Quando è aperto (attivato), assicurare di mantenere una distanza di circa 3mm.
Il circuito elettrico dev'essere separato dalla rete da dispositivi appropriati, come interruttori,
fusibili, sezionatori e contattori.
Se il dispositivo non è dotata di una spina accessibile, devono essere inseriti mezzi di
scollegamento nell'installazione fissa in conformità con le disposizioni di installazione.
Il cavo di alimentazione dev'essere posizionato in modo che non tocchi le superfici calde del
piano di cottura.
Attenzione!
Questo apparecchio può solo essere collegato ad una rete elettrica a 230 V~ 50/60 Hz
Collegare sempre il cavo di terra.
Rispettare il diagramma di connessione.
Usare il cavo di connessione già fissato all’apparecchio.
I fili verde/giallo corrispondono alla messa a terra, il filo blu corrisponde al neutro e il filo marrone
corrisponde alla fase.
* Calcolato con il fattore di simultaneità secondo la norma EN 60 335-2-6
Connessione del piano cottura
Approntamento della configurazione:
Per i vari tipi di connessione, utilizzare i ponticelli di ottone forniti nella scatolina a fianco della
morsettiera.
Monofase 230V~1P+N
Inserire il primo ponticello tra i terminali 1e 2, e il secondo ponticello tra il 3 e il 4.
Collegare la terra al terminale “terra”, il neutro N al terminale 3 o 4, la fase L a uno dei terminali 1
o 2.
Bifase 400V~2P+N
Inserire un ponticello tra i terminali 3 e 4.
Collegare la terra al terminale “terra”, il neutro N al terminale 3 o 4, la fase L1 al terminale 1 e la
fase L2 al terminale 2.
Attenzione! Assicurarsi di aver fissato correttamente i cavi e i ponticelli e di aver serrato
correttamente le viti.
Il fab
Rete
Connessione
Diametro cavo
Cavo
Fusibile di
protezione
230V~ 50/60Hz
1 Phase + N
3 x 2,5 mm²
H 05 VV - F
H 05 RR - F
25 A *
400V~ 50/60Hz
2 Phases + N
4 x 1.5 mm²
H 05 VV - F
H 05 RR - F
16 A *
Il fabbricante declina qualsiasi responsabilità per ogni incidente risultante da
connessione sbagliata dell’apparecchio, incluso l’utilizzo di un apparecchio non
correttamente messo a terra, o connesso con una messa a terra difettosa.

20
Dear customer,
Thank you for having chosen our induction ceramic hob.
In order to make the best use of your appliance, we would advise you to read carefully the
following notes and to keep them for a later consulting.
SUMMARY
SAFETY ....................................................................................................................................... 21
PRECAUTIONS BEFORE USING ...................................................................................................... 21
USING THE APPLIANCE ................................................................................................................ 21
PRECAUTIONS NOT TO DAMAGE THE APPLIANCE ............................................................................ 22
PRECAUTIONS IN CASE OF APPLIANCE FAILURE .............................................................................. 23
OTHER PROTECTIONS ................................................................................................................. 23
DESCRIPTION OF THE APPLIANCE ......................................................................................... 24
TECHNICAL CHARACTERISTICS ..................................................................................................... 24
CONTROL PANEL ........................................................................................................................ 25
USE OF THE APPLIANCE .......................................................................................................... 25
DISPLAY .................................................................................................................................... 25
VENTILATION .............................................................................................................................. 25
STARTING-UP AND APPLIANCE MANAGEMENT ................................................................... 26
BEFORE THE FIRST USE ............................................................................................................... 26
INDUCTION PRINCIPLE ................................................................................................................. 26
SENSITIVE TOUCH ....................................................................................................................... 26
POWER SELECTION ZONE “SLIDER” AND TIMER SETTING ZONE ...................................................... 26
STARTING-UP ............................................................................................................................. 27
PAN DETECTION ......................................................................................................................... 27
RESIDUAL HEAT INDICATION ........................................................................................................ 27
BOOSTER FUNCTION ................................................................................................................... 27
TIMER ....................................................................................................................................... 28
AUTOMATIC COOKING ................................................................................................................. 29
PAUSE FUNCTION ....................................................................................................................... 29
RECALL FUNCTION ..................................................................................................................... 29
« KEEP WARM » FUNCTION ......................................................................................................... 29
CONTROL PANEL LOCKING ........................................................................................................... 30
COOKING ADVICES ................................................................................................................... 31
PAN QUALITY ............................................................................................................................. 31
PAN DIMENSION .......................................................................................................................... 32
EXAMPLES OF COOKING POWER SETTING ...................................................................................... 32
MAINTENANCE AND CLEANING .............................................................................................. 32
WHAT TO DO IN CASE OF A PROBLEM .................................................................................. 33
ENVIRONMENT PRESERVATION ............................................................................................. 34
INSTALLATION INSTRUCTIONS ............................................................................................... 35
ELECTRICAL CONNECTION ..................................................................................................... 36

21
SAFETY
Precautions before using
Unpack all the materials.
The installation and connecting of the appliance have to be
done by approved specialists. The manufacturer can not be
responsible for damage caused by building-in or connecting
errors.
To be used, the appliance must be well-equipped and installed
in a kitchen unit and an adapted and approved work surface.
This domestic appliance is exclusively for the cooking of food,
to the exclusion of any other domestic, commercial or industrial
use.
Remove all labels and self-adhesives from the ceramic glass.
Do not change or alter the appliance.
The cooking plate can not be used as freestanding or as
working surface.
The appliance must be grounded and connected conforming to
local standards.
Do not use any extension cable to connect it.
The appliance can not be used above a dishwasher or a
tumble-dryer: steam may damage the electronic appliances.
The appliance is not intended to be operated by means of
external timer or separate remote control system.
Using the appliance
Switch the heating zones off after using.
Keep an eye on the cooking using grease or oils: that may
quickly ignite.
Be careful not to burn yourself while or after using the
appliance.
Make sure no cable of any fixed or moving appliance contacts
with the glass or the hot saucepan.
Magnetically objects (credit cards, floppy disks, calculators)
should not be placed near to the engaged appliance.
Metallic objects such as knives, forks, spoons and lids should
not be placed on the hob surface since they can get hot.

22
In general do not place any metallic object except heating
containers on the glass surface. In case of untimely engaging or
residual heat, this one may heat, melt or even burn.
Never cover the appliance with a cloth or a protection sheet.
This is supposed to become very hot and catch fire.
This appliance can be used by children aged from 8 years and
above and persons with reduced physical, sensory or mental
capabilities or lack of experience and knowledge if they have
been given supervision or instruction concerning use of the
appliance in a safe way and understand the hazards involved.
Children shall not play with the appliance.
Cleaning and user maintenance shall not be made by children
without supervision.
Precautions not to damage the appliance
Raw pan bottoms or damaged saucepans (not enamelled cast
iron pots,) may damage the ceramic glass.
Sand or other abrasive materials may damage ceramic glass.
Avoid dropping objects, even little ones, on the vitroceramic.
Do not hit the edges of the glass with saucepans.
Make sure that the ventilation of the appliance works according
to the manufacturer’s instructions.
Do not put or leave empty saucepans on the vitroceramic hobs.
Sugar, synthetic materials or aluminium sheets must not
contact with the heating zones. These may cause breaks or
other alterations of the vitroceramic glass by cooling: switch on
the appliance and take them immediately out of the hot heating
zone (be careful: do not burn yourself).
WARNING: Danger of fire: do not store items on the cooking
surface.
Never place any hot container over the control panel.
If a drawer is situated under the embedded appliance, make
sure the space between the content of the drawer and the
inferior part of the appliance is large enough (2 cm). This is
essential to guaranty a correct ventilation.
Never put any inflammable object (ex. sprays) into the drawer
situated under the vitroceramic hob. The eventual cutlery
drawers must be resistant to heat.

23
Precautions in case of appliance failure
If a defect is noticed, switch on the appliance and turn off the
electrical supplying.
If the ceramic glass is cracked or fissured, you must unplug the
appliance and contact the after sales service.
Repairing has to be done by specialists. Do not open the
appliance by yourself.
WARNING: If the surface is cracked, switch off the appliance to
avoid the possibility of electric shock.
Other protections
Note sure that the container pan is always centred on the
cooking zone. The bottom of the pan must have to cover as
much as possible the cooking zone.
For the users of pacemaker, the magnetic field could influence
its operating. We recommend getting information to the retailer
or of the doctor.
Do not to use aluminium or synthetic material containers: they
could melt on still hot cooking zones.
NEVER try to extinguish a fire with water, but switch off the
appliance and then cover flame e.g. with a lid or a fire blanket.
THE USE OF EITHER POOR QUALITY POT OR ANY
INDUCTION ADAPTOR PLATE FOR NON-MAGNETIC
COOKWARE RESULTS IN A WARRANTY BREACH.
IN THIS CASE, THE MANUFACTURER CANNOT BE
HELD RESPONSIBLE FOR ANY DAMAGE CAUSED TO
THE HOB AND/OR ITS ENVIRONMENT.

24
DESCRIPTION OF THE APPLIANCE
Technical characteristics
Type
7330240
7331240
7332240
7370240
Total power
6700 W
6700 W
7400 W
7400 W
Energy consumption for the hob EC
hob
**
173.6 Wh/kg
176.6 Wh/kg
174.2 Wh/kg
176.5 Wh/kg
Front left heating zone
Ø 200 mm
Ø 250 mm
Ø 250 mm
Ø 200 mm
Minimum detection
Ø 100 mm
Ø 110 mm
Ø 110 mm
Ø 100 mm
Nominal power*
2300 W
2300 W
2300 W
2300 W
Booster power*
3000 W
3000 W
3000 W
3000 W
Standardised cookware category**
C
D
D
C
Energy consumption EC
cw
**
180.5 Wh/kg
182.7 Wh/kg
182.7 Wh/kg
180.5 Wh/kg
Rear left heating zone
-
-
Ø 180 mm
Ø 180 mm
Minimum detection
-
-
Ø 90 mm
Ø 90 mm
Nominal power*
-
-
1200 W
1200 W
Booster power*
-
-
1400 W
1400 W
Standardised cookware category**
-
-
B
B
Energy consumption EC
cw
**
-
-
166.7 Wh/kg
166.7 Wh/kg
Center heating zone
Ø 160 mm
-
-
-
Minimum detection
Ø 90 mm
-
-
-
Nominal power*
1200 W
-
-
-
Booster power*
1400 W
-
-
-
Standardised cookware category**
B
-
-
-
Energy consumption EC
cw
**
166.7 Wh/kg
-
-
-
Rear right heating zone
-
Ø 160 mm
Ø 160 mm
Ø 220 mm
Minimum detection
-
Ø 90 mm
Ø 90 mm
Ø 110 mm
Nominal power*
-
1200 W
1200 W
2300 W
Booster power*
-
1400 W
1400 W
3000 W
Standardised cookware category**
-
B
B
C
Energy consumption EC
cw
**
-
166.7 Wh/kg
166.7 Wh/kg
173.7 Wh/kg
Front right heating zone
Ø 250 mm
Ø 200 mm
Ø 200 mm
Ø 160 mm
Minimum detection
Ø 100 mm
Ø 100 mm
Ø 100 mm
Ø 90 mm
Nominal power*
2300 W
2300 W
2300 W
1400 W
Booster power*
3000 W
3000 W
3000 W
2000 W
Standardised cookware category**
D
C
C
A
Energy consumption EC
cw
**
173.7 Wh/kg
180.5 Wh/kg
180.5 Wh/kg
185 Wh/kg
* The given power may change according to the dimensions and material of the pan.
** calculated according to the method of measuring performance (EN 60350-2).

25
Control panel
USE OF THE APPLIANCE
Display
Display Designation Function
0 Zero The heating zone is activated.
1…9 Power level Selection of the cooking level.
U Pan detection No pan or inadequate pan.
A Heat accelerator Automatic cooking.
E Error message Electronic failure.
H Residual heat The heating zone is hot.
P Booster The boosted power is activated.
L Locking Control panel locking.
U Keep warm Maintain automatically of 70°C.
II Pause The hob is in pause.
Ventilation
The cooling system is fully automatic. The cooling fan starts with a low speed when the calories
brought out by the electronic system reach a certain level. The ventilation starts his high speed
when the hob is intensively used. The cooling fan reduces his speed and stops automatically
when the electronic circuit is cooled enough.
Booster
key
Pause/Recall
key
Power selection zone “SLIDER” and
timer setting zone
On/Off key
Control light
cooking zone
Control light timer
Timer display
Control light
Pause/Recall
Power display
Control light
on/off
Keep warm key

26
STARTING-UP AND APPLIANCE MANAGEMENT
Before the first use
Clean your hob with a damp cloth, and then dry the surface thoroughly. Do not use detergent
which risks causing blue-tinted colour on the glass surface.
Induction principle
An induction coil is located under each heating zone. When it is engaged, it produces a variable
electromagnetic field which produces inductive currents in the ferromagnetic bottom plate of the
pan. The result is a heating-up of the pan located on the heating zone.
Of course the pan has to be adapted:
All ferromagnetic pans are recommended (please verify it thanks a little magnet): cast iron
and steel pans, enamelled pans, stainless-steel pans with ferromagnetic bottoms…
Are excluded: cupper, pure stainless-steel, aluminium, glass, wood, ceramic, stoneware,…
The induction heating zone adapts automatically the size of the pan. With a too small diameter
the pan doesn’t work. This diameter is varying in function of the heating zone diameter.
If the pan is not adapted to the induction hob the display will show [ U ].
Sensitive touch
Your ceramic hob is equipped with electronic controls with sensitive touch keys. When your finger
presses the key, the corresponding command is activated. This activation is validated by a
control light, a letter or a number in the display and/or a “beep” sound.
In the case of a general use press only one key at the same time.
Power selection zone “SLIDER” and timer setting zone
To select the power with the slider, slide your finger on the “SLIDER” zone. You can already have
a direct access if you put your finger directly on the chosen level.
Power selection zone “SLIDER” and
timer setting zone
“SLIDER“
Direct access

27
Starting-up
Start up / switch off the hob:
Action Control panel Display
To start press key [ 0/I ] [ 0 ] are blinking
To stop press key [ 0/I ] nothing or [ H ]
Start up / switch off a heating zone:
Action Control panel Display
Zone selection press display [ 0 ] selected [ 0 ] and control light on
To set slide on the “SLIDER“ [ 0 ] to [ 9 ]
(adjust the power) to the right or to the left
To stop slide to [ 0 ] on “SLIDER“ [ 0 ] or [ H ]
or press on [ 0 ] [ 0 ] or [ H ]
If no action is made within 20 second the electronics returns in waiting position.
Pan detection
The pan detection ensures a perfect safety. The induction doesn’t work:
If there is no pan on the heating zone or if this pan is not adapted to the induction. In this
case it is impossible to increase the power and the display shows [ U ]. This symbol
disappears when a pan is put on the heating zone.
If the pan is removed from the heating zone the operation is stopped. The display shows [ U ].
The symbol [ U ] disappears when the pan is put back to the heating zone. The cooking
continues with the power level set before.
After use, switch the heat element off: don’t let the pan detection [ U ] active.
Residual heat indication
After the switch off of a heating zone or the complete stop of the hob, the heating zones are still
hot and indicates [ H ] on the display.
The symbol [ H ] disappears when the heating zones may be touched without danger.
As far as the residual heat indicators are on light, don’t touch the heating zones and don’t put any
heat sensitive object on them. There are risks of burn and fire.
Booster function
The booster function [ B ] grants a boost of power to the selected heating zone.
If this function is activated the heating zones work during 10 minutes with an ultra high power.
The booster is foreseen for example to heat up rapidly big quantities of water, like to cook
noodles.
Start up / Stop the booster function:
Action Control panel Display Zone
Zone selection press key [ 0 ] from the zone [ 0 ] and control light on
Start up the booster press key [ B ] [ P ]
Stop the booster slide on the “SLIDER“ [ P ] to [ 0 ]
or press on [ B ] [ 9 ]

28
Power management:
The hole cooking hob is equipped by a maximum of power. When the booster function is
activated, and not to exceed the maximum power, the electronic system orders to reduce
automatically the power level of an other heating zone. The display is blinking on [ 9 ] during a
few seconds and then shows the maximum of power allowed :
Heating zone selected The other heating zone: (example: power level 9)
[ P ] is displayed [ 9 ] goes to [ 6 ] or [ 8 ] depending the type of zone
Timer
The timer is able to be used simultaneous with all 3 or 4 heating zones and this with different time
settings (from 0 to 99 minutes) for each heating zone.
Setting and modification of the cooking time :
Example for 16 minutes at power 7 :
Action Control panel Display
Zone selection press display [ 0 ] selected [ 0 ] and control light on
Select the power level slide on the “SLIDER“ to [ 7 ] [ 7 ]
Select « Timer » press display [ CL ] [ 00 ]
Set the units slide on the “SLIDER“ to [ 6 ] [ 0 fixed ] [ 6 blinking ]
Valid the units press display [ 06 ] [ 0 blinking ] [ 6 fixed ]
Set the tens slide on the “SLIDER“ to [ 1 ] [ 1 blinking ] [ 6 fixed ]
Valid the tens press display [ 16 ] [ 16 ]
The time is confirmed and the cooking starts.
To stop the cooking time:
Example for 13 minutes at power 7 :
Action Control panel Display
Zone selection press display [ 7 ] selected [ 7 ] and control light on
Select « Timer » press key [ 13 ] [ 13 ]
Deactivate the units slide on the “SLIDER“ to [ 0 ] [ 1 fixed ] [ 0 blinking ]
Valid the units press display [ 10 ] [ 1 blinking ] [ 0 fixed ]
Deactivate the tens slide on the “SLIDER“ to [ 0 ] [ 0 blinking ] [ 0 fixed ]
Valid the tens press display [ 00 ] [ 00 ]
Automatic stop at the end of the cooking time:
As soon as the selected cooking time is finished the timer displays blinking [ 00 ] and a sound
rings.
To stop the sound and the blinking it is enough to press the key [ 00 ].
Egg timer function :
Example for 29 minutes :
Action Control panel Display
Activate the hob press display [ 0/I ] zone control lights are on
Select« Timer » press display [ CL ] [ 00 ]
Set the units slide on the “SLIDER“ to [ 9 ] [ 0 fixed ] [ 9 blinking ]
Valid the units press display [ 09 ] [ 0 blinking ] [ 9 fixed ]
Set the tens slide on the “SLIDER“ to [ 2 ] [ 2 blinking ] [ 9 fixed ]
Valid the tens press display [ 29 ] [ 29 ]
After a few seconds the control light stops with blinking.
As soon as the selected cooking time is finished the timer displays blinking [ 00 ] and a sound
rings.
To stop the sound and the blinking it is enough to press the display [ 00 ]. The hob switches off.

29
Automatic cooking
All the cooking zones are equipped with an automatic “go and stop” cooking device. The cooking
zone starts at full power during a certain time, then reduces automatically its power on the pre-
selected level.
Start-up :
Action Control panel Display
Zone selection press display [ 0 ] selected [ 0 ] and control light on
Full power setting slide on the “SLIDER“ to [ 9 ] pass from [ 0 ] to [ 9 ]
Automatic cooking re-press on display “SLIDER“ [ 9 ] [ 9 ] is blinking with [ A ]
Power level selection slide on the “SLIDER“ to [ 7 ] [ 9 ] pass to [ 8 ] [ 7 ]
(for example « 7 ») [ 7 ] is blinking with [ A ]
Switching off the automatic cooking :
Action Control panel Display
Zone selection press [ 7 ] from the zone [ 7 ] blinking with [ A ]
Power level selection slide on the “SLIDER“ [ 1 ] to [ 9 ]
Pause function
This function brakes all the hob’s cooking activity and allows restarting with the same settings.
Startup/stop the pause function :
Action Control panel Display
Engage pause press [ II ] key during 2s displays [ II ] in the
heating zone displays
Stop the pause press [ II ] key during 2s pause control light is blinking
press an other touch or pause control light is off
slide on the “SLIDER“
Recall Function
After switching off the hob [ 0/I ], it is possible to recall the last settings.
cooking stages of all cooking zones (power)
minutes and seconds of programmed cooking zone-related timers
Heat up function
The recall procedure is following:
Press the key [ 0/I ]
Then press the key [ II ] within 6 seconds
The precedent settings are activated.
« Keep warm » Function
This function allows to reach and maintain automatically a temperature of 70°C.
This will avoid liquids overflowing and fast burning at the bottom of the pan.
To engage, to start the function « Keep warm » :
Action Control panel Display
Zone selection press display [ 0 ] selected [ 0 ] to [ 9 ] or [ H ]
To engage press on key [ U ] on the “SLIDER“ [ U ]
To stop press on display [ U ] selected [ U ]
slide on the “SLIDER“ [ 0 ] to [ 9 ] or [ H ]
This function can be started independently on all the heating zones.
When the pan leaves the cooking zone of the "Keep warm" function remains active during
approximately 10 minutes.
The maximum duration of keeping warm is 2 hours.

30
Control panel locking
To avoid modifying a setting of cooking zones , in particular during of cleaning the control panel
can be locked (with exception to the On/Off key [ 0/I ]).
Locking :
Action Control panel Display
Start press on key [ 0/I ] [ 0 ] or [ H ] on displays
Hob locking press simultaneously [ B ] and [ 0 ] no modification
from the front right** zone display
re-press on display [ 0 ] [ L ] on displays
Unlocking :
Action Control panel Display
Start press on key [ 0/I ] [ L ] on displays
In the 5 seconds after start :
Unlocking the hob press simultaneously [ B ] and [ 0 ] or [ H ] on displays
[ L ] from the front right** zone display
press on key [ B ] no light on the displays
** for the 7330240 use the rear right zone display

31
COOKING ADVICES
Pan quality
Adapted materials : steel, enamelled steel, cast iron, ferromagnetic stainless-steel,
aluminium with ferromagnetic bottom.
Not adapted materials : aluminium and stainless-steel without ferromagnetic bottom,
cupper, brass, glass, ceramic, porcelain.
The manufacturers specify if their products are compatible induction.
To check if pans are compatibles :
Put a little water in a pan placed on an induction heating zone set at level [ 9 ].This water
must heat in a few seconds.
A magnet stucks on the bottom of the pan.
Certain pans can make noise when they are placed on an induction cooking zone. This noise
doesn’t mean any failure on the appliance and doesn’t influence the cooking operating.
The pans must be certified by the manufacturer as compatible with induction hobs.
However, it is possible that certain pans, even though declared compatible, may have
characteristics which are not adapted to be used with induction hobs.
We recommend to verify, when purchasing the pans, that they respect at least the following
conditions:
If the bottom of the pan (Ød) is significantly smaller than the diemeter of the body
(ØD) the performance will not be good, and the pan might not be identified
by the plate

32
Pan dimension
The cooking zones are, until a certain limit, automatically adapted to the diameter of the pan.
However the bottom of this pan must have a minimum of diameter according to the
corresponding cooking zone.
To obtain the best efficiency of your hob, please place the pan well in the centre of the cooking
zone.
Examples of cooking power setting
(the values below are indicative)
1 to 2
Melting
Reheating
Sauces, butter, chocolate, gelatine
Dishes prepared beforehand
2 to 3
Simmering
Defrosting
Rice, pudding, sugar syrup
Dried vegetables, fish, frozen products
3 to 4
Steam
Vegetables, fish, meat
4 to 5
Water
Steamed potatoes, soups, pasta,
fresh vegetables
6 to 7
Medium cooking
Simmering
Meat, lever, eggs, sausages
Goulash, roulade, tripe
7 to 8
Cooking
Potatoes, fritters, wafers
9
Frying, roosting
Boiling water
Steaks, omelettes, fried dishes
Water
P
Frying, roosting
Boiling water
scallops, steaks
Boiling significant quantities of water
MAINTENANCE AND CLEANING
Switch-off the appliance before cleaning.
Do not clean the hob if the glass is too hot because they are risk of burn.
Remove light marks with a damp cloth with washing up liquid diluted in a little water. Then
rinse with cold water and dry the surface thoroughly.
Highly corrosive or abrasive detergents and cleaning equipment likely to cause scratches
must be absolutely avoided.
Do not ever use any steam-cleaner or pressure washer
Do not use any object that may scratch the ceramic glass.
Ensure that the pan is dry and clean. Ensure that there are no grains of dust on your
ceramic hob or on the pan. Sliding rough saucepans will scratch the surface.
Spillages of sugar, jam, jelly, etc. must be removed immediately. You will thus prevent the
surface being damaged.

33
a
d
c
b
WHAT TO DO IN CASE OF A PROBLEM
When the symbol [ E 4 ] appears:
The table must be reconfigured. Please implement the following steps :
I) Important : before you start, make sure there is no more pot on the hob
II) Disconnect the appliance from the grid by removing the fuse or turning the circuit
breaker off
III) Reconnect the table to the grid
IV) Procedure : take a pot with a ferromagnetic bottom and a minimum diameter of 16 cm
* start the procedure within 2 minutes after reconnecting the hob to the grid
* don’t use the [ O/I ] touch
V) First step : cancel the existing configuration
1) Press the touch n°2 and hold down
2) The symbol [ - ] will appear on each display
3) With your other hand, press successively
and quickly (less than 2s) on each [ - ] display.
Begin from the front right side and turn
contrary clockwise, as described on the
picture (from a to d).
A double "beep" means an error occured. If so, start again from item 1).
4) Remove your fingers from the touch control, then push again on touch 1 during
few seconds, until blinking [ E ] symbols appear.
5) Wait until [ E ] symbols stop blinking.
6) After few seconds, [ E ] are automatically transformed in [ C ]. The existing setup
has been cancelled.
Note : For induction hobs with 3 cooking zones, as the right front zone doesn’t exist
in this case, begin the procedure with the right rear zone (b).
VI) Second step : new setup
1) Take a ferromagnetical pot with a minimum diameter of 16 cm
2) Select a cooking zone by pushing on the corresponding [ C ] display
3) Place the pot on the area to be set
4) Wait until the [ C ] display becomes a [ - ]. The selected cooking zone is now
configured.
5) Follow the same procedure for each cooking zone with a [ C ] display.
6) All the cooking zones are configured once all the displays are turned off.
Please use the same pot for the whole procedure.
Never put several pots together on the zones during the setup-process.
If [ E 4 ] displaying remains, please call the customer care
The hob or the cooking zone doesn’t start-up:
The hob is badly connected on the electrical network.
The protection fuse cut-off.
The looking function is activated.
The sensitive keys are covered of grease or water.
An object is put on a key.
The control panel displays [ U ]:
There is no pan on the cooking zone.
The pan is not compatible with induction.
The bottom diameter of the pan is too small.
The control panel displays [ C ] or [ E ]:
Call the After-sales Service.

34
One or all cooking zone cut-off:
The safety system functioned.
You forgot to cut-off the cooking zone for a long time.
One or more sensitive keys are covered.
The pan is empty and its bottom overheated.
The hob also has an automatic reduction of power level and breaking Automatic overheating
Continuous ventilation after cutting off the hob:
This is not a failure, the fan continuous to protect the electronic device.
The fan cooling stops automatically.
The automatic cooking system doesn’t start-up:
The cooking zone is still hot [ H ].
The highest power level is set [ 9 ].
The control panel displays [ L ]:
Refer to the chapter control panel locking page.
The control panel displays [ U ]:
Refer to the chapter “Keep warm“.
The control panel displays [ II ]:
Refer to the chapter “Pause“.
ENVIRONMENT PRESERVATION
The materials of packing are ecological and recyclable.
The electronic appliances are composed of recyclable, and sometimes harmful materials
for the environment, but necessary to the good running and the safety of the appliance.
Don't throw your appliance with the household refuses
Get in touch with the waste collection centre of your
commune that is adapted to the recycling of
the household appliances.

35
INSTALLATION INSTRUCTIONS
The installation comes under the exclusive responsibility of specialists.
The installer is held to respect the legislation and the standards enforce in his home country.
How to stick the gasket:
The gasket supplied with the hob avoids all infiltration of liquids in the cabinet.
His installation has to be done carefully, in conformity of the following drawing.
Fitting - installing:
The cut out sizes are:
Reference
Cut-size
7330240
760 x 350 mm
7331240
560 x 490 mm
7332240
650 x 490 mm
7370240
560 x 490 mm
Ensure that there is a distance of 50 mm between the hob and the wall or sides.
The hobs are classified as “Y” class for heat protection. Ideally the hob should be installed
with plenty of space on either side. There may be a wall at the rear and tall units or a wall
at one side. On the other side, however, no unit or divider must stand higher than
the hob.
The piece of furniture or the support in which the hob is to be fitted, as well as the edges of
furniture, the laminate coatings and the glue used to fix them, must be able to resist
temperatures of up to 100 °C.
The mural rods of edge must be heat-resisting.
Not to install the hob to the top of a not ventilated oven or a dishwasher.
To guarantee under the bottom of the hob casing a space of 20 mm to ensure a good air
circulation of the electronic device.
If a drawer is placed under the work, avoid to put into this drawer flammable objects
(for example: sprays) or not heat-resistant objects.
Materials which are often used to make worktops expand on contact with water. To protect
the cut out edge, apply a coat of varnish or special sealant. Particular care must be given
to applying the adhesive joint supplied with the hob to prevent any leakage into the
supporting furniture. This gasket guaranties a correct seal when used in conjunction with
smooth work top surfaces.
The safety gap between the hob and the cooker hood placed above must respect the
indications of the hood manufacturer. In case of absence of instructions respect a distance
minimum of 760 mm.
The connection cord should be subjected, after building, with no mechanical constraint,
such for example of the fact of the drawer.
WARNING: Use only hob guards designed by the manufacturer of the cooking appliance
or indicated by the manufacturer of the appliance in the instructions for use as suitable or
hob guards incorporated in the appliance. The use of inappropriate guards can cause
accidents.
Stick the gasket (2) two millimeters
from the external edge of the glass,
after removing the protection sheet (3).

36
ELECTRICAL CONNECTION
The installation of this appliance and the connection to the electrical network should be
entrusted only to an electrician perfectly to the fact of the normative regulations and which
respects them scrupulously.
Protection against the parts under tension must be ensured after the building-in.
The data of connection necessary are on the stickers place on the hob casing near the
connection box.
The connection to the main must be made using an earthed plug or via an omnipolar
circuit breaking device with a contact opening of at least 3 mm.
The electrical circuit must be separated from the network by adapted devices, for example:
circuit breakers, fuses or contactors.
If the appliance is not fitted with an accessible plug, disconnecting means must be
incorporated in the fixed installation, in accordance with the installation regulations.
The inlet hose must be positioned so that it does not touch any of the hot parts of the hob
or even.
Caution!
This appliance has only to be connected to a network 230 V~ 50/60 Hz.
Connect always the earth wire.
Respect the connection diagram.
The connection box is located underneath at the back of the hob casing. To open the cover use a
medium screwdriver. Place it in the slits and open the cover.
* calculated with the simultaneous factor following the standard EN 60 335-2-6
Connection of the hob
Setting up the configurations:
For the various kinds of connection, use the brass bridges which are in the box next the terminal
Monophase 230V~1P+N
Put the 1
st
bridge between terminal 1 and 2, the 2
nd
between 3 and 4.
Attach the earth to the terminate “earth”, the neutral N to terminal 3 or 4, the Phase L to one of
the terminals 1 or 2.
Biphase 400V~2P+N
Put a bridge between terminal 3 and 4.
Attach the earth to the terminate “earth”, the neutral N to terminal 3 or 4, the Phase L1 to the
terminals 1 and the Phase L2 to the terminal 2.
Caution! Be careful that the cables are correctly engaged and tightened.
Mains
Connection
Cable diameter
Cable
Protection calibre
230V~ 50/60Hz
1 Phase + N
3 x 2,5 mm²
H 05 VV - F
H 05 RR - F
25 A *
400V~ 50/60Hz
2 Phases + N
4 x 1.5 mm²
H 05 VV - F
H 05 RR - F
16 A *
We cannot be held responsible for any incident resulting from incorrect connection or
which could arise from the use of an appliance which has not been earthed or has been
equipped with a faulty earth connection.

37
Chère cliente,cher client,
Nous vous remercions de la confiance que vous nous avez accordée en choisissant notre table
de cuisson vitrocéramique à induction.
Afin de bien connaître cet appareil, nous vous recommandons de lire attentivement cette notice
d’utilisation dans son intégralité et de la conserver pour une consultation ultérieure.
SOMMAIRE
SECURITE ................................................................................................................................... 38
PRECAUTIONS AVANT UTILISATION EN CUISSON ............................................................................. 38
UTILISATION DE L’APPAREIL ......................................................................................................... 38
PRECAUTIONS POUR NE PAS DETERIORER L’APPAREIL ................................................................... 39
PRECAUTIONS EN CAS DE DEFAILLANCE DE L’APPAREIL .................................................................. 40
AUTRES PROTECTIONS ............................................................................................................... 41
DESCRIPTION DE L’APPAREIL ................................................................................................ 42
CARACTERISTIQUES TECHNIQUES ................................................................................................ 42
BANDEAU DE COMMANDE ............................................................................................................ 43
UTILISATION DE L’APPAREIL .................................................................................................. 43
AFFICHAGE ................................................................................................................................ 43
VENTILATION .............................................................................................................................. 43
MISE EN ROUTE ET GESTION DE L’APPAREIL ...................................................................... 44
AVANT LA PREMIERE UTILISATION ................................................................................................. 44
PRINCIPE DE L’INDUCTION ........................................................................................................... 44
TOUCHES SENSITIVES ................................................................................................................. 44
ZONE DE SELECTION DE PUISSANCE “ SLIDER “ ET DE REGLAGE DE LA MINUTERIE .......................... 44
MISE EN ROUTE .......................................................................................................................... 45
DETECTION DE RECIPIENT ........................................................................................................... 45
INDICATEUR DE CHALEUR RESIDUELLE .......................................................................................... 45
FONCTION BOOSTER ................................................................................................................... 46
FONCTION MINUTERIE ................................................................................................................. 46
PROGRAMMATION D’AUTOMATISME DE CUISSON ............................................................................ 47
FONCTION PAUSE ....................................................................................................................... 48
FONCTION RAPPEL ..................................................................................................................... 48
FONCTION « MAINTIEN AU CHAUD » ............................................................................................. 48
VERROUILLAGE DU BANDEAU DE COMMANDE ................................................................................. 49
CONSEILS DE CUISSON ........................................................................................................... 50
QUALITE DES CASSEROLES ......................................................................................................... 50
DIMENSION DES CASSEROLES ...................................................................................................... 51
EXEMPLES DE REGLAGE DES PUISSANCES DE CUISSON .................................................................. 51
ENTRETIEN ET NETTOYAGE .................................................................................................... 51
QUE FAIRE EN CAS DE PROBLEME ........................................................................................ 52
PROTECTION DE L’ENVIRONNEMENT .................................................................................... 53
INSTRUCTIONS D’INSTALLATION ........................................................................................... 54
CONNEXION ELECTRIQUE ....................................................................................................... 55

38
SECURITE
Précautions avant utilisation en cuisson
Retirez toutes les parties de l’emballage.
L’installation et le branchement électrique de l’appareil sont à
confier à des spécialistes agrées. Le fabricant ne saurait être
tenu responsable des dommages résultant d’une erreur
d’encastrement ou de raccordement.
L’appareil ne doit être utilisé que s’il est monté et installé dans
un meuble et un plan de travail homologué et adapté.
Son utilisation est uniquement destinée à l’usage domestique
habituel (préparation des aliments), à l’exclusion de toute autre
utilisation domestique, commerciale ou industrielle.
Enlevez toutes les étiquettes et autocollants du verre
vitrocéramique.
Ne pas transformer ou modifier l’appareil.
La table de cuisson ne doit pas servir de support ou de plan de
travail.
La sécurité n’est assurée que si l’appareil est raccordé à une
terre de protection conforme aux prescriptions en vigueur.
Pour le raccordement au réseau électrique n’utilisez pas de
rallonge.
L’appareil ne doit pas être utilisé au-dessus d’un lave-vaisselle
ou d’un sèche-linge : les vapeurs d’eau dégagées pourraient
détériorer l’électronique.
Ne faites pas fonctionner l'appareil avec un minuteur externe ou
un système de commande à distance.
Utilisation de l’appareil
Coupez toujours les foyers après utilisation.
Surveillez constamment les cuissons qui utilisent des graisses
et des huiles, car elles sont susceptibles de s’enflammer
rapidement.
Prenez garde aux risques de brûlures pendant et après
l’utilisation de l’appareil.

39
Assurez-vous qu’aucun câble électrique d’appareil fixe ou
mobile ne vienne en contact avec la vitre ou la casserole
chaude.
Les objets magnétisables (cartes de crédits, disquettes
informatiques, calculatrices) ne doivent pas se trouver à
proximité immédiate de l’appareil en fonction.
Les objets métalliques tels que des couteaux, des fourchettes,
des cuillères et des couvercles ne devraient pas être placés sur
la surface vitrée puisqu'ils peuvent devenir chauds.
De façon générale ne placez aucun objet métallique autre que
les récipients de chauffe sur la surface vitrée. En cas
d’enclenchement intempestif ou de chaleur résiduelle, celui-ci
risquerait selon le matériau de chauffer, de fondre ou de
commencer à brûler.
Ne jamais couvrir l’appareil d’un chiffon ou d’une feuille de
protection. Il pourrait devenir très chaud et prendre feu.
Cet appareil peut être utilisé par des enfants âgés de 8 ans et
plus et des personnes dont les capacités physiques,
sensorielles ou mentales sont réduites ou dont les expériences
et les connaissances sont inadaptées, uniquement si elles sont
surveillées, formées à l’utilisation de l’appareil en conditions de
sécurité et informées des risques susceptibles de se présenter.
Les enfants ne doivent pas jouer avec l’appareil.
Le nettoyage et l’entretien ne doivent pas être confiés à des
enfants sans surveillance d’adultes.
Précautions pour ne pas détériorer l’appareil
Les casseroles à semelles brutes (fonte non émaillée,…) ou
abîmées peuvent endommager la vitrocéramique.
La présence de sable ou d’autres matériaux abrasifs peut
endommager la vitrocéramique.
Evitez de faire chuter des objets, mêmes petits, sur la
vitrocéramique.
Ne heurtez pas les bords de la vitre avec les casseroles.
S’assurer que la ventilation de l’appareil se fasse suivant les
instructions du constructeur.
Ne posez pas ou ne pas laisser de casseroles vides sur la table
de cuisson.

40
Eviter que le sucre, les matières synthétiques ou une feuille
d’aluminium ne touchent les zones chaudes. Ces substances
peuvent au refroidissement provoquer des cassures ou d’autres
modifications de la surface vitrocéramique: Eteindre l’appareil
et enlevez-les immédiatement de la zone de cuisson encore
chaude (attention : risque de brûlures).
MISE EN GARDE: Risque d’incendie : ne pas entreposer
d’objets sur la surface de cuisson.
Ne placez jamais de récipients chauds au dessus de la zone de
commande.
Si un tiroir est situé sous l’appareil encastré, assurer un écart
suffisant (2 cm) entre le contenu de ce tiroir et la partie
inférieure de l’appareil afin d’assurer une bonne ventilation.
Ne déposez pas d’objets inflammables (ex. sprays) dans le
tiroir placé sous la table de cuisson. Les éventuels casiers à
couverts doivent être en matériau résistant à la chaleur.
Précautions en cas de défaillance de l’appareil
Si un défaut est constaté, il faut débrancher l’appareil et couper
l’alimentation électrique.
En cas de fêlure ou de fissure de la vitrocéramique il faut
impérativement débrancher l’appareil du réseau électrique et
prévenir le service après-vente.
Les réparations doivent être entreprises exclusivement par un
personnel spécialisé. N’ouvrez en aucun cas l’appareil vous-
même.
ATTENTION : Si la surface vitrée est fissurée, coupez
l’alimentation de l’appareil pour éviter une éventuelle décharge
électrique.

41
Autres protections
Assurez-vous que le récipient de cuisson soit toujours centré
sur la zone de cuisson. Le fond de la casserole doit autant que
possible couvrir la zone de cuisson.
Pour les utilisateurs portant un régulateur de rythme cardiaque,
le champ magnétique pourrait influencer son fonctionnement.
Nous recommandons de se renseigner auprès du revendeur ou
du médecin.
N’utilisez pas de récipients en matière synthétique ou en
aluminium : ils pourraient fondre sur des foyers encore chauds.
NE JAMAIS essayer d’éteindre un incendie avec de l’eau, mais
arrêter l’appareil puis couvrir les flammes par exemple avec un
couvercle ou une couverture anti-feu.
L’UTILISATION DE CASSEROLES NON ADAPTÉES,
OU D’ACCESSOIRES AMOVIBLES INTERMÉDIAIRES
POUR FAIRE CHAUFFER DES CASSEROLES NON
INDUCTIVES ENTRAÎNE UNE RUPTURE DE LA
GARANTIE.
LE FABRICANT NE SAURAIT ÊTRE TENU POUR
RESPONSABLE DES DÉTERIORATIONS DE LA TABLE
OU DE SON ENVIRONNEMENT.

42
DESCRIPTION DE L’APPAREIL
Caractéristiques techniques
Type
7330240
7331240
7332240
7370240
Puissance Totale
6700 W
6700 W
7400 W
7400 W
Consommation d’énergie de la table de
cuisson EC
hob
**
173.6 Wh/kg
176.6 Wh/kg
174.2 Wh/kg
176.5 Wh/kg
Foyer avant gauche
Ø 200 mm
Ø 250 mm
Ø 250 mm
Ø 200 mm
Détection minimum
Ø 100 mm
Ø 110 mm
Ø 110 mm
Ø 100 mm
Puissance nominale*
2300 W
2300 W
2300 W
2300 W
Puissance du booster*
3000 W
3000 W
3000 W
3000 W
Catégorie de la casserole standard**
C
D
D
C
Consommation d’énergie EC
cw
**
180.5 Wh/kg
182.7 Wh/kg
182.7 Wh/kg
180.5 Wh/kg
Foyer arrière gauche
-
-
Ø 180 mm
Ø 180 mm
Détection minimum
-
-
Ø 90 mm
Ø 90 mm
Puissance nominale*
-
-
1200 W
1200 W
Puissance du booster*
-
-
1400 W
1400 W
Catégorie de la casserole standard**
-
-
B
B
Consommation d’énergie EC
cw
**
-
-
166.7 Wh/kg
166.7 Wh/kg
Foyer central
Ø 160 mm
-
-
-
Détection minimum
Ø 90 mm
-
-
-
Puissance nominale*
1200 W
-
-
-
Puissance du booster*
1400 W
-
-
-
Catégorie de la casserole standard**
B
-
-
-
Consommation d’énergie EC
cw
**
166.7 Wh/kg
-
-
-
Foyer arrière droit
-
Ø 160 mm
Ø 160 mm
Ø 220 mm
Détection minimum
-
Ø 90 mm
Ø 90 mm
Ø 110 mm
Puissance nominale*
-
1200 W
1200 W
2300 W
Puissance du booster*
-
1400 W
1400 W
3000 W
Catégorie de la casserole standard**
-
B
B
C
Consommation d’énergie EC
cw
**
-
166.7 Wh/kg
166.7 Wh/kg
173.7 Wh/kg
Foyer avant droit
Ø 250 mm
Ø 200 mm
Ø 200 mm
Ø 160 mm
Détection minimum
Ø 100 mm
Ø 100 mm
Ø 100 mm
Ø 90 mm
Puissance nominale*
2300 W
2300 W
2300 W
1400 W
Puissance du booster*
3000 W
3000 W
3000 W
2000 W
Catégorie de la casserole standard**
D
C
C
A
Consommation d’énergie EC
cw
**
173.7 Wh/kg
180.5 Wh/kg
180.5 Wh/kg
185 Wh/kg
* la puissance peut varier en fonction des dimensions et des matériaux des casseroles.
** calculé selon la méthode de mesure de l’aptitude à la fonction (EN 60350-2).

43
Bandeau de commande
UTILISATION DE L’APPAREIL
Affichage
Affichage Désignation Fonction
0 Zéro La zone de chauffe est activée.
1…9 Niveau de puissance Choix du niveau de cuisson.
U Détection de casserole Récipient manquant ou inapproprié.
A Accélérateur de chauffe Cuisson automatique.
E Message d’erreur Défaut de circuit électronique.
H Chaleur résiduelle La zone de cuisson est chaude.
P Booster La puissance turbo est activée.
L Verrouillage La table est sécurisée.
U Maintien Chaud La cuisson est maintenue à 70°C.
II Pause La table est en pause.
Ventilation
Le ventilateur de refroidissement a un fonctionnement entièrement automatique. Il se met en
route à petite vitesse dès que les calories dégagées par l’électronique dépassent un certain seuil.
La ventilation enclenche sa seconde vitesse lorsque la table de cuisson est utilisée
intensivement. Le ventilateur réduit sa vitesse et s’arrête automatiquement dès que le circuit
électronique est suffisamment refroidi.
Touche
Booster
Touche
Pause/Rappel
Zone de sélection de puissance
« SLIDER » et de réglage de la minuterie
Touche
Marche/Arrêt
Voyant de sélection
de foyer
Voyants de sélection du
foyer pour minuterie
Affichage de la
minuterie
Voyant
Pause/Rappel
Affichage du niveau
de puissance
Voyant de mise
en marche
Touche maintien au
chaud

44
MISE EN ROUTE ET GESTION DE L’APPAREIL
Avant la première utilisation
Nettoyez votre appareil avec un chiffon humide, puis séchez-le. N’utilisez pas de détergent qui
risquerait de provoquer une coloration bleutée sur les surfaces vitrées.
Principe de l’induction
Une bobine d’induction se trouve sous chaque foyer de cuisson. Lorsque celle-ci est enclenchée,
elle produit un champ électromagnétique variable qui, à son tour produit des courants induits
dans le fond ferro-magnétique du récipient. Il en résulte un échauffement du récipient placé sur la
zone de chauffe.
Bien entendu le récipient doit être adapté :
Sont recommandés tous les récipients métalliques ferro-magnétiques (à vérifier
éventuellement avec un petit aimant) tels que : cocotte en fonte, poêle en fer noir,
casseroles métalliques émaillées, en inox à semelle ferro-magnétique…
Sont exclus les récipients en cuivre, inox, aluminium, verre, bois, céramique, grès, terre
cuite, inox non ferro-magnétique…
La zone de cuisson à induction prend automatiquement en compte la taille du récipient utilisé.
Avec un diamètre trop petit, le récipient ne fonctionne pas. Ce diamètre varie en fonction du
diamètre de la zone de cuisson.
Lorsque le récipient n’est pas adapté à la table de cuisson le symbole [ U ] reste affiché.
Touches sensitives
Votre appareil est équipé de touches sensitives permettant de commander les différentes
fonctions. Un effleurage de la touche active leur fonctionnement. Cette activation est validée par
un voyant, un affichage et/ou par un signal sonore.
Dans le cas d’une utilisation générale n’appuyez que sur une seule touche à la fois.
Zone de sélection de puissance “ SLIDER “ et de réglage de la minuterie
Pour la sélection de la puissance par le slider faire glisser votre doigt sur la zone “SLIDER“.
Vous bénéficiez également d’un accès direct en posant votre doigt directement sur le niveau
souhaité.
Zone de sélection de puissance
“SLIDER“ et de réglage de la minuterie
“SLIDER“
Accès direct

45
Mise en route
Enclencher / arrêter la table de cuisson :
Action Bandeau de commande Afficheur
Enclencher appuyer sur [ 0/I ] [ 0 ] clignotent
Arrêter appuyer sur [ 0/I ] aucun ou [ H ]
Réglage de la zone de chauffe :
Action Bandeau de commande Afficheur
Sélectionner la zone appuyer sur [ 0 ] de la zone [ 0 ] et voyant de zone
allumé
Régler glisser sur le “SLIDER“ [ 0 ] à [ 9 ]
(Ajuster la puissance) vers la droite ou la gauche
Arrêter glisser jusqu’à [ 0 ] sur le “SLIDER“ [ 0 ] ou [ H ]
ou appuyer sur [ 0 ] [ 0 ] ou [ H ]
Si aucun réglage n’est fait dans un délai de 20 secondes l’électronique revient en position
d’attente.
Détection de récipient
La détection de récipient assure une sécurité parfaite. L’induction ne fonctionne pas :
Lorsqu’il n’y a pas de récipient sur la zone de cuisson ou lorsque ce récipient est inadapté
à l’induction. Dans ce cas il est impossible d’augmenter la puissance et dans l’afficheur le
symbole [ U ] apparaît. Le [ U ] disparaît lorsqu’une casserole est posée sur le foyer de
cuisson.
Si en cours de cuisson le récipient est enlevé de la zone de cuisson, le fonctionnement est
interrompu. Dans l’afficheur le symbole [ U ] apparaît. Le [ U ] disparaît lorsque le récipient
est remis sur le foyer de cuisson. La cuisson reprend au niveau de puissance sélectionnée
au préalable.
Après utilisation, éteignez la zone de chauffe. Ne laissez pas la détection de casserole [ U ]
active.
Indicateur de chaleur résiduelle
Après l’arrêt des zones de cuisson ou l’arrêt complet de la table, les zones de cuissons sont
encore chaudes et sont signalées par le symbole [ H ].
Le symbole [ H ] s’éteint lorsque les zones de cuisson peuvent être touchées sans danger.
Tant que les témoins de chaleur résiduelle sont allumés, ne touchez pas les zones de cuisson et
ne posez aucun objet sensible à la chaleur. Risque de brûlure et d’incendie !

46
Fonction booster
La fonction booster [ B ] octroie un renforcement de puissance à la zone de cuisson
sélectionnée.
Si cette fonction est activée, ces zones de cuisson fonctionnent pendant 10 minutes avec une
puissance nettement plus élevée.
Le booster est conçu par exemple pour faire chauffer rapidement de grandes quantités d’eau,
comme pour la cuisson des pâtes.
Enclencher / arrêter la fonction booster :
Action Bandeau de commande Afficheur
Sélectionner la zone appuyer sur [ 0 ] de la zone [ 0 ] et voyant de zone
allumé
Enclencher le booster appuyer sur [ B ] [ P ]
Stopper le booster glisser sur le “SLIDER“ [ P ] à [ 0 ]
ou appuyer sur [ B ] [ 9 ]
Gestion de la puissance maximale :
L’ensemble de la table de cuisson est doté d’une puissance maximale. Lorsque la fonction
booster est activée, et pour ne pas excéder cette puissance maximale, la commande
électronique réduit automatiquement le niveau de cuisson d’une autre zone de chauffe.
Durant quelques secondes, l’afficheur de cette zone de cuisson en clignotant [ 9 ] puis affiche le
niveau de cuisson maximum possible :
Zone de cuisson sélectionnée Autre zone de cuisson ( exemple : puissance niveau 9 )
[ P ] est affiché [ 9 ] passe à [ 6 ] ou [ 8 ] suivant le type de foyer
Fonction minuterie
La minuterie peut être affectée simultanément aux 3 ou 4 foyers de cuisson et ceci avec des
réglages de temps de minuterie différents (de 0 à 99 minutes) pour chacune des zones.
Réglage ou modification de la durée de cuisson :
Exemple pour 16 minutes à puissance 7 :
Action Bandeau de commande Afficheur
Sélectionner la zone appuyer sur [ 0 ] de la zone [ 0 ] et voyant de zone
allumé
Sélectionner la puissance glisser sur le “SLIDER“ jusqu’à [ 7 ] [ 7 ]
Sélectionner « Minuterie » appuyer sur [ CL ] [ 00 ]
Réglage des unités glisser sur le “SLIDER“ jusqu’à [ 6 ] [ 0 fixe ] [ 6 clignotant ]
Valider les unités appuyer sur [ 06 ] [ 0 clignotant ] [ 6 fixe ]
Réglage des dizaines glisser sur le “SLIDER“ jusqu’à [ 1 ] [ 1 clignotant ] [ 6 fixe ]
Valider les dizaines appuyer sur [ 16 ] [ 16 ]
La durée est sélectionnée et le décompte démarre.

47
Arrêter la fonction minuterie cuisson :
Exemple pour 13 minutes restantes à puissance 7 :
Action Bandeau de commande Afficheur
Sélectionner la zone appuyer sur [ 7 ] de la zone [ 7 ] et voyant de zone
allumé
Sélectionner « Minuterie » appuyer sur [ 13 ] [ 13 ]
Désactiver les unités glisser sur le “SLIDER “jusqu’à [ 0 ] [ 1 fixe ] [ 0 clignotant ]
Valider les unités appuyer sur [ 10 ] [ 1 clignotant ] [ 0 fixe ]
Désactiver les dizaines glisser sur le “SLIDER “jusqu’à [ 0 ] [ 00 clignotant ][ 0 fixe ]
Valider les dizaines appuyer sur [ 00 ] [ 00 ]
Arrêt automatique en fin de cuisson :
Dès que le temps de cuisson sélectionné est écoulé la minuterie affiche en clignotant [ 00 ] et un
signal sonore retentit.
Pour stopper le son et le clignotement, il suffit d’appuyer sur la touche [ 00 ].
Minuterie utilisée hors cuisson :
Exemple pour 29 minutes :
Action Bandeau de commande Afficheur
Activer la table de cuisson appuyer sur [ 0/I ] voyants de zone allumés
Sélectionner « Minuterie » appuyer sur [ CL ] [ 00 ]
Réglage des unités glisser sur le “SLIDER“ jusqu’à [ 9 ] [ 0 fixe ] [ 9 clignotant ]
Valider les unités appuyer sur [ 09 ] [ 0 clignotant ] [ 9 fixe ]
Réglage des dizaines glisser sur le “SLIDER“ jusqu’à [ 2 ] [ 2 clignotant ] [ 9 fixe ]
Valider les dizaines appuyer sur [ 29 ] [ 29 ]
La durée est sélectionnée et le décompte démarre.
Dès que le temps de cuisson sélectionné est écoulé la minuterie affiche en clignotant [ 00 ] et un
signal sonore retentit.
Pour stopper le son et le clignotement, il suffit d’appuyer sur la touche [ 00 ].
La table s’éteint.
Programmation d’automatisme de cuisson
Toutes les zones de cuisson sont équipées d’un dispositif de cuisson automatique. La zone de
cuisson se met en marche à pleine puissance pendant un certain temps, puis réduit
automatiquement sa puissance sur le niveau présélectionné.
Mise en route de l’automatisme :
Action Bandeau de commande Afficheur
Sélectionner la zone appuyer sur [ 0 ] de la zone [ 0 ] et voyant de zone
allumé
Activer la pleine puissance glisser sur le “SLIDER“ passe de [ 0 ] à [ 9 ]
jusqu’à [ 9 ]
Activer l’automatisme ré appuyer sur [ 9 ] du “SLIDER“ [ 9 ] clignote avec [ A ]
Sélectionner niveau glisser sur le “SLIDER“ [ 9 ] passe à [ 8 ] [ 7 ]
(par exemple « 7 ») jusqu’à [ 7 ] [ 7 ] clignote avec [ A ]
Arrêt de l’automatisme :
Action Bandeau de commande Afficheur
Sélectionner la zone appuyer sur [ 7 ] de la zone [ 7 ] clignote
avec [ A ]
Sélectionner niveau glisser sur le “SLIDER“ [ 1 ] à [ 9 ]

48
Fonction Pause
Cette fonction permet d’interrompre ou de réactiver la cuisson avec les mêmes réglages de
puissances.
Enclencher, déclencher la fonction :
Action Bandeau de commande Afficheur
Activer la pause appuyer sur la touche [ II ] pendant 2s [ II ] sur les afficheurs
Stopper la pause appuyer sur la touche [ II ] pendant 2s le voyant “Pause/Rappel“
clignote
appuyer sur une autre touche ou le voyant “Pause/Rappel“
glisser sur le “SLIDER“ est éteint
Fonction rappel
Après avoir éteint la table (0/I), il est possible de rappeler les derniers réglages sélectionnés :
Etat de cuisson de toutes les zones de cuisson (puissance).
Minutes et secondes des zones de cuisson programmées par les minuteries.
Fonction “cuisson automatique”.
La procédure de rappel est la suivante :
Appuyer sur la touche [0/I].
Ensuite appuyer sur la touche [ II ] en moins de 6 secondes.
Les réglages précédents sont à nouveau actifs.
Fonction « Maintien au chaud »
Cette fonction de maintien au chaud permet d’atteindre et de maintenir automatiquement une
température de 70°C.
Ceci évitera aux liquides de déborder et aux mets d’attacher au fond de la casserole.
Activer, désactiver la fonction « Maintien au chaud » :
Action Bandeau de commande Afficheur
Sélectionner la zone appuyer sur [ 0 ] de la zone [ 0 ] à [ 9 ] ou [ H ]
Activer le maintien au chaud appuyer sur [ U ] du “SLIDER“ [ U ]
Arrêter le maintien au chaud appuyer sur [ U ] de la zone [ U ]
glisser sur le “SLIDER“ [ 0 ] à [ 9 ] ou [ H ]
Cette fonction peut être mise en route indépendamment sur tous les foyers.
Lorsque la casserole quitte la zone de cuisson la fonction « Maintien au chaud » reste active
pendant environ 10 minutes.
La durée maximale de maintien au chaud est de 2 heures.

49
Verrouillage du bandeau de commande
Pour éviter de modifier une sélection de la table de cuisson, notamment dans le cadre du
nettoyage de la vitre, le bandeau de commande (à l’exception de la touche marche/arrêt [ 0/I ])
peut être verrouillé.
Verrouillage :
Action Bandeau de commande Afficheur
Mise en route appuyer sur [ 0/I ] [ 0 ] ou [ H ] sur les
afficheurs
Verrouiller la table appuyer ensemble sur [ B ] et pas de changement
[ 0 ] de la zone avant droite**
ré appuyer sur [ 0 ] [ L ] sur les afficheurs
Déverrouillage :
Action Bandeau de commande Afficheur
Mise en route appuyer sur [ 0/I ] [ L ] sur les afficheurs
Dans les 5 secondes après la mise en route :
Déverrouiller la table appuyer ensemble sur [ B ] et [ 0 ] sur les afficheurs
[ L ] de la zone avant droite**
appuyer sur [ B ] les afficheurs
sont éteints
** pour la référence 7330240 utiliser l’afficheur de la zone arrière droite

50
CONSEILS DE CUISSON
Qualité des casseroles
Matériaux adaptés : acier, acier émaillé, fonte, inox à fond ferromagnétique,
aluminium à fond ferromagnétique.
Matériaux non adaptés : aluminium et inox à fond non ferromagnétique, cuivre, laiton, verre,
céramique, porcelaine.
Pour vérifier si des casseroles sont compatibles :
Placez un peu d’eau dans une casserole placée sur une zone de cuisson induction réglée
au niveau [ 9 ]. Cette eau doit chauffer en quelques secondes.
Placez un aimant sur le fond externe de la casserole, il doit rester collé.
Certaines casseroles peuvent faire du bruit lorsqu’elles sont placées sur une zone de cuisson à
induction. Ces bruits ne traduisent en aucun cas un défaut de l’appareil et n’influent nullement
sur son fonctionnement.
Les casseroles doivent être certifiées par le fabricant comme compatible avec l’induction.
Il est toutefois possible que certaines casseroles certifiées aient en réalité des
caractéristiques non adaptées.
Nous recommandons de vérifier au moment de l’achat que les casseroles respectent les
conditions suivantes :
Si le fond de la casserole (Ød) est significativement plus petit que son corps (ØD)
le rendement en est affecté et la casserole risque de ne pas être détectée.

51
Dimension des casseroles
Les zones de cuisson s’adaptent automatiquement à la dimension du fond de la casserole
jusqu’à une certaine limite. Le fond de cette casserole doit cependant avoir un diamètre minimum
en fonction du diamètre de la zone de cuisson correspondante.
Afin d’obtenir le rendement maximum de votre table de cuisson, veuillez placer la casserole bien
au centre de la zone de cuisson.
Exemples de réglage des puissances de cuisson
(Les valeurs ci-dessous sont indicatives)
1 à 2
Faire fondre
Réchauffer
Sauces, beurre, chocolat, gélatine
Plats pré-cuisinés
2 à 3
Gonfler
Décongélation
Riz, pudding et plats cuisinés
Légumes, poisson, produits congelés
3 à 4
Vapeur
Légumes, poissons, viande
4 à 5
Eau
Pommes de terre à l’eau, soupes, pâtes
Légumes frais
6 à 7
Cuire à feu doux
Viandes, foie, œufs, saucisses
Goulasch, roulades, tripes
7 à 8
Cuire, frire
Pommes de terre, beignets, galettes
9
Frire, porter à ébullition
Steaks, omelettes, eau
P
Frire, Porter à ébullition
Porter à ébullition des quantités importantes
d’eau
ENTRETIEN ET NETTOYAGE
Pour nettoyer il faut mettre l’appareil hors fonctionnement.
Laissez refroidir l’appareil, car risques de brûlures.
Nettoyez les restes de cuisson avec de l’eau additionnée de produit vaisselle ou un
produit du commerce conseillé pour la vitrocéramique.
N’utilisez en aucun cas d’appareils « à vapeur » ou « à pression ».
Ne pas utiliser d’objets qui risqueraient de rayer la vitrocéramique (tel que tampon abrasifs
ou pointe de couteau…).
N’utilisez pas de produits de nettoyage abrasifs qui pourraient endommager l’appareil.
Séchez l’appareil avec un chiffon propre.
Enlevez immédiatement le sucre et les mets contenant du sucre.

52
a
d
b
c
QUE FAIRE EN CAS DE PROBLEME
Le symbole [ E 4 ] s’affiche :
La table doit être reconfigurée suivant la procédure ci-dessous :
I) Attention : au départ ne pas mettre de récipients sur la table à induction.
II) Débrancher la table du réseau électrique : enlever le fusible ou couper le disjoncteur.
III) Rebrancher la table au réseau électrique : remettre le fusible ou rebrancher le
disjoncteur.
IV) Procédure : Vous munir d'un récipient à fond ferromagnétique de diamètre 16 cm
minimum.
* démarrer en moins de 2 minutes après branchement au réseau électrique.
* ne pas appuyer sur [ O/I ]
V) Il faut d'abord annuler la configuration existante
1) Appuyer sur la touche 2 et rester appuyé.
2) Sur chaque afficheur apparait un [ - ]
3) Avec un doigt de l'autre main appuyer
successivement et rapidement (en moins
de 2s) sur les [ - ].En partant de la zone
Avant-Droite et en tournant dans le sens
inverse des aiguilles d'une montre
(a -> b -> c -> d). Un double "bip" signifie
Une erreur de manipulation. Dans ce cas,
Refaire l'opération depuis l'étape n° 1.
4) Oter les doigts des touches et réappuyer sur la touche 1 pendant quelques
secondes jusqu'à ce que les [ E ] clignotants apparaissent.
5) Attendre que les [ E ] deviennent fixes.
6) Les [ E ] se transforment ensuite automatiquement en [ C ]. La configuration est
annulée.
Nota : Tables à induction avec 3 zones de cuisson : Démarrer avec la zone arrière
droite (b) ( la zone avant droite n'existant pas).
VI) Comment reconfigurer la table ?
1) Prendre un récipient ferro-magnétique de diamètre 16cm minimum.
2) Sélection la zone de cuisson en appuyant sur le [ C ] correspondant.
3) Poser le récipient sur la zone à configurer.
4) Attendre jusqu'à ce que [ C ] se transforme en [ - ]. La zone de cuisson est
configurée.
5) Procéder de la même manière pour toutes les zones de cuisson qui affichent [ C ].
6) Les zones de cuisson sont configurées lorsque toutes les zones auront été
détectées et que plus rien n'est affiché.
N'utilisez qu'un seul récipient pour effectuer la configuration.
Ne jamais poser plusieurs récipients sur les foyers pendant la configuration.
si l’affichage [ E 4 ] persiste appelez le Service Après-ventes.
La table de cuisson ou les zones de cuisson ne s’enclenchent pas :
La table est mal connectée au réseau électrique.
Le fusible de protection a sauté.
Vérifiez si le verrouillage n’est pas activé.
Les touches sensitives sont couvertes d’eau ou de graisse.
Un objet est posé sur les touches sensitives.

53
Le symbole [ U ] s’affiche :
Il n’y a pas de casserole sur la zone de cuisson.
Le récipient utilisé n’est pas compatible avec l’induction.
Le diamètre du fond de casserole est trop petit par rapport à la zone de cuisson.
Le symbole [ C ] ou [ E ] s’affiche :
Appelez le Service Après-ventes.
L’une des zones ou l’ensemble du plan de cuisson se déclenche :
Le déclenchement de sécurité a fonctionné.
Celui-ci s’actionne dans le cas ou vous avez oublié de couper une des zones de chauffe.
Il s’enclenche également lorsque une ou plusieurs touches sensitives sont couvertes.
Une des casseroles est vide et son fond a surchauffé.
La table dispose également d’un dispositif de réduction automatique de niveau de
puissance et de coupure automatique en cas de surchauffe.
La soufflerie de ventilation continue de tourner après l’arrêt de la table :
Ce n’est pas un défaut, le ventilateur continue de protéger l’électronique de l’appareil.
La soufflerie s’arrête automatiquement.
La commande de cuisson automatique ne s’enclenche pas :
La zone de cuisson est encore chaude [ H ].
Le niveau de cuisson maximum est enclenché [ 9 ].
La commande affiche [ L ]:
Se référer au chapitre verrouillage du bandeau de commande.
Le symbole [ U ] s’affiche :
Se référer au chapitre “Maintien chaud“.
Le symbole [ II ] s’affiche :
Se référer au chapitre “Pause“.
PROTECTION DE L’ENVIRONNEMENT
Les matériaux d’emballage sont écologiques et recyclables.
Les appareils électroniques sont composés de matériaux recyclables et parfois de
matériaux nocifs pour l’environnement, mais nécessaires au bon fonctionnement et à la
sécurité de l’appareil.
Ne jetez en aucun cas votre appareil avec les déchets
ménagers.
Faites appel au service d’enlèvement ou aux sites de
dépôt mis en place par votre commune et adaptés au
recyclage des appareils électroménagers.

54
INSTRUCTIONS D’INSTALLATION
Le montage relève de la compétence exclusive de spécialistes.
L’utilisateur est tenu de respecter la législation et les normes en vigueur dans son pays de
résidence.
Mise en place du joint d’étanchéité
Le joint adhésif fourni avec l’appareil permet d’éviter toute infiltration dans le meuble.
Sa mise en place doit être effectuée avec un grand soin suivant le croquis ci-dessous.
Encastrement
La découpe du plan de travail sera suivant le modèle de table de :
Appareil
Découpe
7330240
760 x 350 mm
7331240
560 x 490 mm
7332240
650 x 490 mm
7370240
560 x 490 mm
La distance entre la table de cuisson et le mur doit être au minimum de 50mm.
La table de cuisson est un appareil qui appartient à la classe de protection « Y ». Lors de
son encastrement, une paroi d’armoire haute ou un mur peut se trouver sur l’un des côtés
et sur la face arrière. Mais de l’autre côté, aucun meuble ni aucun appareil ne doit
être plus haut que le plan de cuisson.
Les placages et revêtements des plans de travail doivent être réalisés en matériaux
résistant à la chaleur (100°C).
Les baguettes de bord murales doivent être thermo résistantes.
Les matériaux des plans de travail peuvent gonfler au contact de l’humidité. Pour protéger
le chant de la découpe, appliquer un vernis ou une colle spéciale.
N’installer pas la table au dessus d’un four non ventilé ou d’un lave-vaisselle.
Garantir entre le fond du caisson de l’appareil un espace de 20 mm pour assurer une
bonne circulation de l’air de refroidissement de l’électronique.
Si un tiroir se trouve sous le plan de cuisson, éviter d’y ranger des objets inflammables
(par exemple : spray) et des objets non résistants à la chaleur.
L’écart de sécurité entre la table de cuisson et la hotte aspirante placée au-dessus d’elle
doit respecter les indications du fabricant de hottes. En cas d’absence d’instructions
respecter une distance minimum de 760 mm.
Le câble de raccordement ne doit être soumis, après encastrement, à aucune contrainte
mécanique, comme par exemple du fait d’un tiroir.
MISE EN GARDE: Utiliser uniquement les dispositifs de protection de table de cuisson
conçus par le fabricant de l’appareil de cuisson ou indiqués par le fabricant de l’appareil
dans les instructions d’utilisation comme adaptés ou les dispositifs de protection de table
de cuisson intégrés à l’appareil. L’utilisation de dispositifs de protection non appropriés
peut entrainer des accidents.
Coller le joint (2) sur le rebord de la
table à 2mm du bord externe, après
avoir ôté la feuille de protection (3).

55
CONNEXION ELECTRIQUE
L’installation de cet appareil et son branchement au réseau électrique ne doit être confiés
qu’à un électricien parfaitement au fait des prescriptions normatives.
La protection contre les pièces sous tension doit être assurée après le montage.
Les données de raccordement nécessaires se trouvent sur la plaque signalétique et la
plaque de branchement placées sous l’appareil.
Cet appareil doit être séparé du secteur par un dispositif de sectionnement omnipôles.
Lorsque celui-ci est ouvert (déclenché), un écartement de 3mm doit être assuré.
Le circuit électrique doit être séparé du réseau par des dispositifs appropriés, par exemple
les disjoncteurs, les fusibles, les disjoncteurs différentiels et les contacteurs.
Si l’appareil n’est pas muni d’une fiche accessible, des moyens de déconnection doivent
être incorporé à l’installation fixe conformément aux réglementations de l’installation.
Le câble d’alimentation doit être placé de sorte à ce qu’il ne touche pas de parties
chaudes de la table de cuisson.
Attention !
Cet appareil n’est conçu que pour une alimentation en 230 V~ 50/60 Hz.
Raccordez toujours le fil de terre de protection.
Respectez le schéma de raccordement.
Le boîtier de raccordement se situe sous la plaque de cuisson. Pour ouvrir le capot, servez-vous
d’un tournevis moyen. Placez le dans les 2 fentes situées à l’avant des 2 flèches.
Réseau
Raccordement
Diamètre câble
Câble
Calibre de protection
230V~ 50/60Hz
1 Phase + N
3 x 2.5 mm²
H 05 VV - F
H 05 RR - F
25 A *
400V~ 50/60Hz
2 Phases + N
4 x 1.5 mm²
H 05 VV - F
H 05 RR - F
16 A *
* calculé avec le coefficient de simultanéité suivant standard EN 60 335-2-6
Branchement de la table:
Pour vous adapter au réseau électrique (230V~1P+N ou 400V~2P+N) , veuillez utiliser les
pontets en laiton situés dans le boitier de connexion
Monophasé 230V~1P+N :
Mettre un pontet entre les plots 1 et 2, puis un pontet entre 3 et 4.
Visser le fil vert/jaune au plot prévu pour la mise à la terre.
Visser le neutre N au plot 3 ou 4.
Visser la phase L sur un des plots 1 ou 2.
Biphasé 400V~2P+N :
Mettre un pontet entre 3 et 4.
Visser le fil vert/jaune au plot prévu pour la mise à la terre.
Visser le neutre N au plot 3 ou 4.
Visser la phase L1 sur le plot 1 et la phase L2 sur le plot 2.
Attention ! Veillez à bien engager les fils et à bien serrer les vis.
Notre responsabilité ne saurait être engagée pour tout incident résultant d’un mauvais
branchement, ou qui pourrait survenir à l’usage d’un appareil non relié à la terre ou équipé
d’une terre défectueuse.

56
Sehr geehrte Kundin, sehr geehrter Kunde.
Wir danken Ihnen für das Vertrauen, das Sie uns gewährt haben, indem Sie unser
lnduktionskochfeld gewählt haben. Um dieses Gerät kennen zu lernen, empfehlen wir Ihnen, die
Gebrauchsanweisung vollständig und aufmerksam zu lesen.
Wir wünschen Ihnen viel Spaß mit diesem Gerät.
INHALTSVERZEICHNIS
SICHERHEIT ............................................................................................................................... 57
VORSICHTSMAßNAHME VOR DER INBETRIEBNAHME ........................................................................ 57
ALLGEMEINE SICHERHEITS-HINWEISE .......................................................................................... 58
SCHÜTZ VOR BESCHÄDIGUNG ...................................................................................................... 58
VORSICHTSMAßNAHMEN BEI GERÄTEAUSFALL ............................................................................... 60
SCHUTZ VOR WEITEREN GEFAHREN ............................................................................................. 60
GERÄTEBESCHREIBUNG ......................................................................................................... 61
TECHNISCHE BESCHREIBUNG ...................................................................................................... 61
BEDIENFELD .............................................................................................................................. 62
BEDIENUNG DES KOCHFELDES ............................................................................................. 62
ANZEIGE .................................................................................................................................... 62
BELÜFTUNG ............................................................................................................................... 62
INBETRIEBNAHME DES KOCHFELDES ................................................................................... 63
VOR DEM ERSTEN AUFHEIZEN ..................................................................................................... 63
INDUKTIONSPRINZIP .................................................................................................................... 63
FUNKTION DER SENSORSCHALTFELDER ....................................................................................... 63
" SLIDER " AUSWAHLZONE UND ZEITSCHALTUHR AUSWÄHLUNG ................................................... 63
KOCHFELD EIN UND AUSSCHALTEN ............................................................................................... 64
TOPFERKENNUNG ....................................................................................................................... 64
RESTWÄRMEANZEIGE ................................................................................................................. 64
POWERFUNKTION ....................................................................................................................... 64
ZEITSCHALTUHR ......................................................................................................................... 65
ANKOCHAUTOMATIK .................................................................................................................... 66
PAUSENFUNKTION ...................................................................................................................... 66
RÜCKRUFFUNKTION .................................................................................................................... 66
WARMHALTEFUNKTION ............................................................................................................... 66
VERRIEGELUNG DER KOCHMULDE ................................................................................................ 67
KOCH EMPFEHLUNGEN ........................................................................................................... 68
KOCHGESCHIRR ......................................................................................................................... 68
GESCHIRRGRÖßE ....................................................................................................................... 69
EINSTELLBEREICHE .................................................................................................................... 69
REINIGUNG UND PFLEGE ......................................................................................................... 69
WAS TUN WENN… ..................................................................................................................... 70
UMWELTSCHUTZ ....................................................................................................................... 71
MONTAGEHINWEISE ................................................................................................................. 72
ELEKTROANSCHLUSS .............................................................................................................. 73

57
SICHERHEIT
Vorsichtsmaßnahme vor der Inbetriebnahme
Alle Teile der Verpackung abnehmen.
Das Gerät darf nur von einem Elektrofachmann eingebaut und
angeschlossen werden. Der Hersteller kann nicht verantwortlich
gemacht werden für Schäden, die durch Fehler beim einbauen
oder anschließen verursacht werden. Benutzen Sie das Gerät
nur im eingebauten Zustand.
Das Gerät darf benutzt werden nur, wenn er aufgerichtet und in
einem Möbel installiert wird und ein bestätigter und angepaßter
Arbeitsplan benutzt wird.
Dieses Gerät darf nur für das haushaltübliche Kochen und
Braten von Speisen verwendet werden und ist nicht für
gewerbliche Zwecke bestimmt.
Alle Etiketten und Aufkleber des Glases wegnehmen.
Das Gerät darf nicht abgeändert werden.
Verwenden Sie das Kochfeld nicht als Arbeits- oder
Abstellfläche.
Die Sicherheit ist nur gewährleistet, wenn das Gerät mit einem
Schutzleiter verbunden ist, der den gültigen Vorschriften
entspricht.
Der Anschluß des Gerätes an das Elektronetz darf nicht über
ein Verlängerungskabel erfolgen.
Das Gerät darf nicht über einem Geschirrspüler oder einem
Wäschetrockner benutzt werden: die freigesetzten
Wasserdämpfe könnten die Elektronik beschädigen.
Schalten Sie das Gerät nicht über eine externe Zeitschaltuhr
oder eine separate Fernsteuerung ein.

58
Allgemeine Sicherheits-Hinweise
Schalten Sie nach jedem Gebrauch die Kochzonen aus.
Überhitzte Fette und Öle entzünden sich schnell. Wenn Sie
Speisen in Fett oder Öl (z.B. Pommes Frites) zubereiten, sollten
Sie den Kochvorgang beobachten.
Wenn Sie kochen und braten, werden die Kochzonen heiß.
Hüten Sie sich deshalb vor Verbrennungen während und nach
der Benutzung des Geräts.
Achten Sie darauf, daß kein elektrisches Kabel von einem
freistehenden oder eingebautem Gerät in Kontakt mit der
Scheibe oder der heißen Kochzone kommt.
Magnetische Gegenstände wie z. B. Kreditkarten, Disketten,
Taschenrechner, dürfen sich nicht in unmittelbarer Nähe des
eingeschalteten Gerätes befinden. Ihre Funktion könnte
beeinträchtigt werden.
Allgemein legen Sie keine metallischen Gegenstände (z. B.
Löffel, Topfdeckel usw.) auf die Induktionsfläche, da sich diese
bei Betrieb unter Umständen erwärmen können.
Bedecken Sie nie die Kochfläche mit einem Lappen oder einer
Schutzfolie; diese könnten sehr heiß werden und Feuer fangen.
Dieses Gerät kann von Kindern ab 8 Jahren und darüber sowie
von Personen mit verringerten physischen, sensorischen oder
mentalen Fähigkeiten oder Mangel an Erfahrung und Wissen
benutzt werden, wenn sie beaufsichtigt oder bezüglich des
sicheren Gebrauchs des Gerätes unterwiesen wurden und die
daraus resultierenden Gefahren verstehen.
Kinder dürfen nicht mit dem Gerät spielen.
Reinigung und Benutzer-Wartung dürfen nicht von Kindern ohne
Beaufsichtigung durchgeführt werden.
Metallische Gegenstände wie Messer, Gabeln, Löffel und
Topfdeckel sollen nicht auf dem Kochfeld abgelegt werden,
denn sie könnten heiß werden.
Schütz vor Beschädigung
Verwenden Sie keine Töpfe oder Pfannen mit ungeschliffenem
oder beschädigtem Boden (z.B. aus Guß). Diese können die
Glaskeramikscheiben verkratzen.

59
Beachten Sie, daß auch Sandkörner Kratzer verursachen
können.
Glaskeramik ist unempfindlich gegen Temperaturschocks und
sehr widerstandsfähig, jedoch nicht unzerbrechlich. Besonders
spitze und harte Gegenstände, die auf die Kochfläche fallen,
können sie beschädigen.
Töpfe und Ränder nicht an der Scheibe anstoßen.
Die Kochzonen nicht mit leerem Kochgeschirr benützen.
Vermeiden Sie Zucker, Kunstoff, oder Alufolie auf den heißen
Kochzonen. Diese Stoffe schmelzen, kleben fest und können
dadurch beim Abkühlen Risse, Brüche oder andere bleibende
Veränderungen in der Scheibe verursachen. Falls Sie trotzdem
auf die heißen Kochzonen gelangen, schalten Sie das Gerät
bitte aus, und entfernen Sie diese Stoffe noch im heißen
Zustand. Da die Kochzonen heiß sind, besteht
Verbrennungsgefahr.
Legen Sie keine Gegenstände auf dem Kochfeld ab.
Stellen Sie in keinem Fall heißes Kochgeschirr auf der
Steuerung ab. Die Elektronik unter dem Glas könnte beschädigt
werden.
Befindet sich unter dem eingebauten Gerät eine Schublade,
muß auf einen Mindestabstand von 2 cm zwischen der
Unterseite des Gerätes und dem Schubladeninhalt geachtet
werden, da sonst die Belüftung des Gerätes nicht gewährleistet
ist.
Es dürfen keine brennbaren Gegenstände (z.B. Spraydosen) in
dieser Schublade aufbewahrt werden. Die möglichen
Besteckkästen in der Schublade müssen aus hitzebeständigem
Material sein.
Erhitzen Sie keine geschlossenen Behälter (z.B.
Konservendosen) auf den Kochzonen. Durch den
entsprechenden Überdruck können die Behälter bzw. Dosen
platzen, und es besteht Verletzungsgefahr !

60
Vorsichtsmaßnahmen bei Geräteausfall
Sollte ein Fehler festgestellt werden, muß das Gerät
ausgeschaltet und vom Netz getrennt werden.
Wenn Brüche, Sprünge oder Risse auf dem Glas auftreten:
schalten Sie das Kochfeld sofort aus, schrauben Sie die
Sicherung für das Kochfeld ab bzw. nehmen Sie diese heraus,
und wenden Sie sich an unseren Kundendienst oder an Ihren
Fachhändler.
Reparaturen am Gerät dürfen nur von Fachkräften durchgeführt
werden.
WARNUNG: Wenn die Glasoberfläche gesprungen ist, ist das
Gerät auszuschalten um die Gefahr eines elektrischen Schlages
zu vermeiden.
Schutz vor weiteren Gefahren
Achten Sie darauf, daß das Kochgeschirr immer zentriert auf
der Kochzone plaziert ist. Der Pfannenboden, muß möglichst
viel von der Kochzone abdecken.
Für Personen mit einem Herzschrittmacher: in der Nähe des
eingeschalteten Gerätes entsteht ein elektromagnetisches Feld,
das eventuell den Herzschrittmacher beeinträchtigen würde.
Wenden Sie sich bitte im Zweifelsfall an den Hersteller des
Herzschrittmachers oder an Ihren Arzt.
Benutzen sie keinen syntetique oder aluminum Bereich: Sie
könnten auf der kochzone verschmelzen.
Versuchen Sie nicht einen Brand mit Wasser zu löschen,
sondern schalten Sie das Gerät aus und bedecken Sie die
Flamme mit einem Deckel oder einer Feuerlöschdecke.
DIE VERWENDUNG VON SCHLECHTEN TÖPFEN BZW.
VON ADAPTERSCHEIBE FÜR INDUKTION FÜHRT ZU
EINER VORZEITIGEN BEENDUNG DER GARANTIE.
DER HERSTELLER ÜBERNIMMT KEINE HAFTUNG
FÜR SCHÄDEN, DIE AUF DEM KOCHFELD ODER
SEINER UMGEBUNG AUFTRETEN KÖNNEN.

61
GERÄTEBESCHREIBUNG
Technische Beschreibung
Typ
7330240
7331240
7332240
7370240
Gesamt Leistung
6700 W
6700 W
7400 W
7400 W
Energieverbrauch der Kochmulde EC
hob
**
173.6 Wh/kg
176.6 Wh/kg
174.2 Wh/kg
176.5 Wh/kg
Kochzone vorne links
Ø 200 mm
Ø 250 mm
Ø 250 mm
Ø 200 mm
Minimal Topfboden Durchmesser
Ø 100 mm
Ø 110 mm
Ø 110 mm
Ø 100 mm
Nominal Leistung*
2300 W
2300 W
2300 W
2300 W
Booster Leistung*
3000 W
3000 W
3000 W
3000 W
Standardisiertes Kochgeschirr Kategorie**
C
D
D
C
Energieverbrauch EC
cw
**
180.5 Wh/kg
182.7 Wh/kg
182.7 Wh/kg
180.5 Wh/kg
Kochzone hinten links
-
-
Ø 180 mm
Ø 180 mm
Minimal Topfboden Durchmesser
-
-
Ø 90 mm
Ø 90 mm
Nominal Leistung*
-
-
1200 W
1200 W
Booster Leistung*
-
-
1400 W
1400 W
Standardisiertes Kochgeschirr Kategorie**
-
-
B
B
Energieverbrauch EC
cw
**
-
-
166.7 Wh/kg
166.7 Wh/kg
Kochzone central
Ø 160 mm
-
-
-
Minimal Topfboden Durchmesser
Ø 90 mm
-
-
-
Nominal Leistung*
1200 W
-
-
-
Booster Leistung*
1400 W
-
-
-
Standardisiertes Kochgeschirr Kategorie**
B
-
-
-
Energieverbrauch EC
cw
**
166.7 Wh/kg
-
-
-
Kochzone hinten rechts
-
Ø 160 mm
Ø 160 mm
Ø 220 mm
Minimal Topfboden Durchmesser
-
Ø 90 mm
Ø 90 mm
Ø 110 mm
Nominal Leistung*
-
1200 W
1200 W
2300 W
Booster Leistung*
-
1400 W
1400 W
3000 W
Standardisiertes Kochgeschirr Kategorie**
-
B
B
C
Energieverbrauch EC
cw
**
-
166.7 Wh/kg
166.7 Wh/kg
173.7 Wh/kg
Kochzone vorne rechts
Ø 250 mm
Ø 200 mm
Ø 200 mm
Ø 160 mm
Minimal Topfboden Durchmesser
Ø 100 mm
Ø 100 mm
Ø 100 mm
Ø 90 mm
Nominal Leistung*
2300 W
2300 W
2300 W
1400 W
Booster Leistung*
3000 W
3000 W
3000 W
2000 W
Standardisiertes Kochgeschirr Kategorie**
D
C
C
A
Energieverbrauch EC
cw
**
173.7 Wh/kg
180.5 Wh/kg
180.5 Wh/kg
185 Wh/kg
* Diese Leistungen können je nach Form, Größe und Qualität der Töpfe abweichen.
** nach der Methode zur Messung der Gebrauchseigenschaften (EN 60350-2) berechnet.

62
Bedienfeld
BEDIENUNG DES KOCHFELDES
Anzeige
Anzeige Benennung Funktion
0 Null Die Kochzone ist aktiviert
1…9 Leistungsstufe Einstellung der Leistung
U Topferkennung Topf nicht aufgesetzt oder nicht geeignet
A Ankochautomatik Höchste Leistung + Ankochen
E Fehleranzeige Fehler der Elektronik
H Restwärme Kochzone ist heiß
P Booster Die Booster Leistung ist aktiviert.
L Verriegelung Die Mulde ist abgesichert
U Warmhalte Das Kochen bleibt bei 70°C
II Pause Das Kochfeld ist in Pause.
Belüftung
Der Lüfter funktioniert automatisch. Er startet mit kleiner Geschwindigkeit, sobald die durch die
Elektronik freigesetzten Werte eine gewisse Schwelle überschreiten.
Die höhere Geschwindigkeit wird eingelegt, wenn die Induktionskochmulde intensiv benutzt wird.
Der Lüfter reduziert seine Geschwindigkeit und schaltet sich automatisch ab, sobald die
Elektronik genügend abgekühlt ist.
Booster
Taste
Pause /
Rückruf
Taste
Leuchten Kochzonen-
Selektion
Zeitschaltuhr Leuchten
Kochzonen Selektion
Zeitschaltuhr
Anzeige
"SLIDER" Leistung und Zeitschaltuhr
Auswahlzone
Pause/ Rückruf
Leuchte
Leistungs-Anzeige
Ein/Aus Leuchte
Ein/Aus Taste
Warmhalte Taste

63
INBETRIEBNAHME DES KOCHFELDES
Vor dem ersten Aufheizen
Zuerst Ihr Gerät mit einem feuchten Lappen reinigen, dann trockenreiben. Benutzen Sie kein
Reinigungsmittel, das eine bläuliche Färbung auf der verglasten Oberfläche verursachen könnte.
Induktionsprinzip
Unter jeder Kochzone befindet sich eine Induktionsspule. Wenn die Kochzone eingeschaltet wird,
erzeugt diese Spule ein Magnetfeld. Das Magnetfeld induziert im Topfboden, der magnetisch
sein muß, Wirbelströme. Dadurch erhitzt sich der Topfboden. Die Kochzone erwärmt sich nur
indirekt durch die vom Topf abgegebene Wärme.
Die Induktionskochzonen funktionieren nur, mit magnetischem Kochgeschirr:
Geeignetes Induktionskochgeschirr mit magnetischem Boden wie z.B. : Guß, Stahl,
emailliertem Stahl, Edelstahl mit magnetischem Boden.
Nicht geeignetes Induktionskochgeschirr: Kupfer, Aluminium, Glas, Holz, Steingut,
Keramik, nicht magnetisches Edelstahl.
Die Induktionskochzone wird automatisch an die Grösse des Kochgeschirrs angepaßt. Das
Kochgeschirr darf einen bestimmten Bodendurchmesser nicht unterschreiten, da sich die
Induktion sonst nicht einschaltet. Jeder Topfboden-Durchmesser muß je nach Kochzonengröße
eine Mindestgröße haben.
Wenn das Kochgeschirr der Induktion nicht geeignet ist, erscheint die Anzeige [ U ].
Funktion der Sensorschaltfelder
Das Kochfeld wird über Sensortasten gesteuert. Diese reagieren auf leichte Berührungen des
Glases mit dem Finger. Wenn Sie die Tasten etwa eine Sekunde lang berühren, werden die
Steuerbefehle ausgeführt. Jede Reaktion der Schaltfelder wird mit einem akustischen und/oder
visuellen Signal quittiert.
Im Falle eines allgemeinen Gebrauchs drücken Sie nur eine Taste zur gleichen Zeit.
" SLIDER " Auswahlzone und Zeitschaltuhr Auswählung
Für die Auswahl der Leistung durch den " SLIDER ", bewegen Sie Ihren Finger auf der “SLIDERZONE“.
Außerdem können Sie auch einen direkten Zugang haben indem Sie mit dem Finger die
gewünschte Leistung (Taste) berühren.
“SLIDER“
“SLIDER” und Zeitschaltuhr
Auswahlzone
Direkter Zugang

64
Kochfeld ein und ausschalten
Zuerst das Kochfeld und dann die Kochzone einschalten.
Kochfeld: einschalten/ ausschalten:
Betätigung Bedienfeld Anzeige
Einschalten : Auf [ 0/I ] drücken [ 0 ] blinkt
Ausschalten : Auf [ 0/I ] drücken Keine oder [ H ]
Kochzone: einschalten/ ausschalten:
Betätigung Bedienfeld Anzeige
Auswählen der Kochzone Auf den [ 0 ] drücken [ 0 ] und Leuchte « ein »
Leistung erhöhen Auf dem “SLIDER“ rutschen [ 0 ] bis [ 9 ]
Leistung verringern Auf dem “SLIDER“ rutschen [ 9 ] bis [ 1 ]
Ausschalten Auf dem “SLIDER“ rutschen bis zu 0 [ 0 ] oder [ H ]
oder gleich auf 0 drücken [ 0 ] oder [ H ]
Erfolgt keine weitere Eingabe, schaltet sich das Kochfeld aus Sicherheitsgründen nach ca. 20
Sekunden aus, und die Nullen erlöschen.
Topferkennung
Die Topferkennung gewährleistet eine vollkommene Sicherheit. Die Induktion funktioniert nicht :
Wenn sich kein Kochgeschirr auf der Kochzone befindet oder wenn ein nicht für die
Induktion geeigneter Topf benutzt wird. In diesem Fall kann die Leistungsstufe nicht erhöht
werden und das [ U ] Symbol erscheint in der Anzeige. Das [ U ] verschwindet wenn ein
Topf auf die Kochzone gesetzt wird.
Wird der Topf während des Kochens von der Kochzone genommen, schaltet sich die
Kochzone sofort aus und in der Anzeige erscheint das Zeichen [ U ]. Das [ U ]
verschwindet wenn ein Topf wieder auf die Kochzone gesetzt wird. Die Kochzone fährt mit
der vorher eingestellten Leistungsstufe weiter.
Befindet sich kein Kochgeschirr auf der Kochzone oder ein nicht induktionsgeeigneter Topf,
erscheint [ U ] in der Anzeige
Restwärmeanzeige
Nach dem Ausschalten der Kochzonen bzw. des Kochfeldes wird die Restwärme der noch
heißen Kochzonen mit einem [ H ] angezeigt. Das [ H ] erlischt, wenn die Kochzonen ohne
Gefahr berührt werden können. Solange die Restwärmeanzeige leuchtet, sollten die Kochzonen
nicht berührt und keine hitzeempfindlichen Gegenstände darauf abgelegt werden:
Verbrennungsgefahr!
Powerfunktion
Alle 3 oder 4 Kochzonen sind mit einer Powerfunktion, d.h. einer Leistungsverstärkung
ausgestattet.
Ist sie zugeschaltet, arbeiten diese Kochzonen für einen Zeitraum von 10 Minuten in der
Leistungsstufe [ P ] mit einer extrahohen Leistung. Der Power ist dafür gedacht, daß Sie z.B.,
große Mengen Wasser schnell erhitzen können, wie etwa zum Kochen von Nudelwasser.
Power einschalten/ ausschalten :
Betätigung Bedienfeld Anzeige
Auswählen der Kochzone Auf den [ 0 ] drücken [ 0 ] und Leuchte « ein »
Power einschalten Auf [ B ] drücken [ P ]
Power ausschalten Auf dem “SLIDER“ rutschen [ P ] bis [ 0 ]
oder auf [ B ] drücken [ 9 ]

65
Automatische Steuerung des “ Power“:
Die Kochmulde ist mit einer Höchstleistung ausgestattet. Um diese Höchstleistung nicht zu
überschreiten, reduziert die Elektronik automatisch das Kochniveau einer anderen Kochzone
wenn die Power-Funktion aktiviert ist. Diese Kochzone wird dann blinkend die reduzierte
Leistung [ 9 ] anzeigen.
Ausgewählte Kochzone Andere Kochzone (z.B. : Leistungsstufe 9)
[ P ] leuchtet [ 9 ] wird auf [ 6 ] oder [ 8 ] reduziert und blinkt
Zeitschaltuhr
Mit der integrierten Zeitschaltuhr kann auf allen vier Kochzonen eine Gardauer von 1 bis 99
Minuten eingestellt werden. Jede Kochzone kann eine andere Einstellung haben.
Einschalten oder Veränderung der Dauer:
Beispiel für 16 Minuten auf Leistung 7:
Betätigung Bedienfeld Anzeige
Auswählen der Kochzone Auf den [ 0 ] drücken [ 0 ] und Leuchte « ein »
Leistung auswählen Auf dem “SLIDER“ rutschen bis zu [ 7 ] [ 7 ]
Zeitschaltuhr auswählen Auf [ CL ] drücken [ 00 ]
Einstellung die Minuten Auf dem “SLIDER“ rutschen bis zu [ 6 ] [ 0 fest ] [ 6 blinkend ]
Minuten Bestätigung Auf [ 06 ] drücken [ 0 blinkend ] [ 6 fest ]
Einstellung der Zehnerminuten Auf dem “SLIDER“ rutschen bis zu [ 1 ] [ 1 blinkend ] [ 6 fest ]
Zehnerminuten Bestätigung Auf [ 16 ] drücken [ 16 ]
Die Dauer ist aktiviert und der Zeitablauf beginnt.
Zeitschaltuhr ausschalten:
Beispiel für 13 übrig gebliebene Minuten an Leistung 7:
Betätigung Bedienfeld Anzeige
Auswählen der Kochzone Auf den [ 7 ] drücken [ 7 ] und Leuchte « ein »
Zeitschaltuhr auswählen Auf [ 13 ] drücken [ 13 ]
Minuten abstellen Auf dem “SLIDER“ rutschen bis zu [ 0 ] [ 1 fest ] [ 0 blinkend ]
Minuten Bestätigung Auf [ 10 ] drücken [ 1 blinkend ] [ 0 fest ]
Zehnerminuten abstellen Auf dem “SLIDER“ rutschen bis zu [ 0 ] [ 0 blinkend ] [ 0 fest ]
Zehnerminuten Bestätigung Auf [ 00 ] drücken [ 00 ]
Automatisches Ausschalten:
Nach Ablauf der programmierten Kochdauer wird [ 00 ] blinkend angezeigt und ein akustisches
Signal wird erfolgen.
Um den Signalton und das blinken abzuschalten, brauchen Sie nur Taste [ 00 ] zu betätigen.
Zeitschaltuhr als Eieruhr:
Beispiel für 29 Minuten:
Betätigung Bedienfeld Anzeige
Einschalten der Kochmulde Auf [ 0/I ] drücken Kochzonen-Leuchte
Zeitschaltuhr auswählen Auf [ CL ] drücken [ 00 ]
Einstellung die Minuten Auf dem “SLIDER“ rutschen bis zu [ 9 ] [ 0 fest ] [ 9 blinkend ]
Minuten Bestätigung Auf [ 03 ] drücken [ 0 blinkend ] [ 9 fest ]
Einstellung der Zehnerminuten Auf dem “SLIDER“ rutschen bis zu [ 2 ] [ 2 blinkend ] [ 9 fest ]
Zehnerminuten Bestätigung Auf [ 29 ] drücken [ 29 ]
Nach einigen Sekunden beendet das blinken die Zeitschaltuhr-Leuchte und die
Kochzonenleuchten erlischen.
Nach Ablauf der Zeitschaltuhr erfolgt ein akustisches Signal, die Anzeige zeigt blinkend [ 00 ].
Um den Signalton und das blinken abzuschalten, brauchen Sie nur Taste [ 00 ] zu betätigen.

66
Ankochautomatik
Alle Kochzonen sind mit einer Ankochautomatik bestückt. Bei aktivierter Ankochautomatik heizt
die Kochzone automatisch mit höchster Leistung an und schaltet dann auf die von Ihnen
gewählte Fortkochstufe zurück. Die Ankochzeit hängt von der gewählten Fortkochstufe ab.
Aktivierung der Ankochautomatik:
Betätigung Bedienfeld Anzeige
Auswählen der Kochzone Auf den [ 0 ] drücken [ 0 ] oder [ 9 ] oder [ H ]
Hohe Leistung aktivieren Auf dem “SLIDER“ rutschen bis zu [ 9 ] von [ 0 ] bis [ 9 ]
Ankochautomatik aktivieren Auf [ 9 ] drücken [ 9 ] blinkt mit [ A ]
Leistung auswählen Auf dem “SLIDER“ rutschen [ 9 ] zurück auf [ 8 ] [ 7 ]
(z.B. « 7 ») bis daß [ 7 ] mit [ A ] blinkt
Abschalten der Ankochautomatik:
Betätigung Bedienfeld Anzeige
Auswählen der Kochzone Auf den [ 7 ] drücken [ 7 ] blinkt mit [ A ]
Leistung auswählen Auf dem “SLIDER“ rutschen [ 0 ] bis [ 9 ]
Pausenfunktion
Diese Funktion erlaubt, das Kochen mit denselben Krafteinstellungen zu unterbrechen oder zu
reaktivieren.
Die Funktion einlegen, auslösen:
Betätigung Bedienfeld Anzeige
Einschalte der funktion Drücken auf [ II ] während 2s [ II ] auf den Anzeiger
Ausschalte der funktion Drücken auf [ II ] während 2s Leucht blinkt
Auf den [ 0 ] drücken von eine Zone Leucht ist aus.
Rückruffunktion
Nachdem man der Kochmulde gelöscht hat, ist es möglich, an die letzten ausgewählten
Einstellungen zu erinnern:
Kochstand aller Kochzonen (Leistung).
Minuten und Sekunden der Kochzonen, die durch die Zeitmesser programmiert wurden.
Funktion ”Ankochautomatik“
Das Rückrufverfahren ist das folgende
Auf dem Anschlag unterstützen [ 0/I ]
Danach auf dem Anschlag [ II ] in weniger als 6 Sekunden zu unterstützen
Die vorhergehenden Einstellungen sind erneut aktiv.
Warmhaltefunktion
Diese Funktion wird Speisen auf 70°C warmhalten
Diese Funktion soll Überlauf und Verbrennen vermeiden.
Ein- und ausschalten:
Betätigung Bedienfeld Anzeige
Auswählen der Kochzone Auf den [ 0 ] drücken [ 0 ] und Leuchte « ein »
Warmehaltefunktion Auf dem “SLIDER“ rutschen bis zu [ U ] [ U ]
Ausschalten Auf dem “SLIDER“ rutschen [ 0 ] oder [H]
Diese Funktion kann auf alle Kochstellen verwendet werden.
Wenn der Top die Kochzone verläßt bleibt die Warmhaltefunktion während 2 Stunden aktiv.

67
Verriegelung der Kochmulde
Um eine Veränderung der Kochzoneneinstellung zu vermeiden, z.B. bei der Reinigung des
Glases, können die Bedienungstasten (außer der Taste[ 0/I ]) verriegelt werden.
Verriegelung aktivieren:
Betätigung Bedienfeld Anzeige
Einschalten der Mulde Auf [ 0/I ] drücken [ 0 ] oder [ H ]
Mulde verriegeln Gemeinsam auf [ P ] und Keine Änderung
[ 0 ] vorne rechts drücken**
Wieder drücken auf [ 0 ] [ L ]
Verriegelung abschalten:
Betätigung Bedienfeld Anzeige
Einschalten der Mulde Auf [ 0/I ] drücken [ L ] auf alle Anzeige
In den 5 Sekunden nach Einschalten der Mulde
Verriegelung abschalten Gemeinsam auf [ P ] und [ 0 ]
[ L ] vorne rechts drücken**
Auf [ P ] drücken Keine Anzeige
**Für 7330240 auf [ 0 ] oder [ L ] hinten rechts drücken

68
KOCH EMPFEHLUNGEN
Kochgeschirr
Geeignete Materialien: Stahl, emaillierter Stahl, Gusseisen, Stahl mit magnetisierbarem Boden,
Aluminium mit magnetisierbarem Boden
Nicht geeignete Materialien: Aluminium und Stahl mit nicht magnetisierbarem Boden,
Kupfer, Messing, Steingut, Porzellan
Im Allgemeinen geben die Hersteller an, ob ihrer Garbehälter sich zum Kochen auf
Induktionskochfeldern eignen.
Um zu prüfen, ob die Garbehälter für das Garen auf dem Induktionskochfeld geeignet sind:
Eine kleine Menge Wasser in den Topf geben und diesen auf die Induktionskochzone
stellen. Die Zone einschalten und die Stufe auswählen [ 9 ]. Das Wasser muss sich in
wenigen Sekunden erwärmen.
Mit einem Magnet den Topfboden berühren. Bleibt der Magnet haften, ist der Topf für das
Induktionskochfeld geeignet.
Einige Behälter können Geräusche verursachen, wenn sie auf einem Induktionskochfeld abgestellt
werden. Dies ist kein Hinweis darauf, dass das Induktionskochfeld defekt ist oder nicht korrekt arbeitet.
Die Töpfe müssen vom Hersteller als für Induktionsgaren geeignet bescheinigt sein.
Es kann dennoch vorkommen, dass einige Töpfe, auch wenn ihre Eignung bescheinigt
wurde, tatsächlich Eigenschaften besitzen, die nicht für den Gebrauch mit
Induktionskochfeldern geeignet sind.
Wir empfehlen Ihnen, beim Kauf der Töpfe zu prüfen, dass zumindest die folgenden
Bedingungen erfüllt werden:
Sollte der Boden des Topfes (Ød) bedeutend kleiner als der Durchmesser des
Körpers (ØD) sein, führt dies zu einer Leistungsminderung, und der Topf
könnte möglicherweise nicht vom Kochfeld erkannt werden

69
Geschirrgröße
Die Kochzonen passen sich automatisch an das Topfbodenmaß bis zu einer gewissen Grenze
an. Das Kochgeschirr darf einen bestimmten Bodendurchmesser nicht unterschreiten, da sich die
Induktion sonst nicht einschaltet.
Zentrieren Sie immer den Topf in die Mitte der Kochzone, um den besten Wirkungsgrad zu
erzielen.
Einstellbereiche
(diese Angaben sind Richtwerte)
1 bis 2
Schmelzen, Auflösen, Zubereitung
Saucen, Butter, Schokolade
GelatineYoghurt ,
2 bis 3
Quellen, Auftauen, Warmhalten
Reis, Gefrorene Gerichte,
Fisch, Gemüse
3 bis 4
Dampfgaren, Dünsten
Fisch, Gemüse, Obst
4 bis 5
Dünsten, Quellen, Auftauen
Fisch, Gemüse, Teigwaren, Getreide,
Hülsenfrüchte, Tiefkühlkost
6 bis 7
Ankochen, Fortkochen
Fleisch, Leber , Eier, Wurst
Gulasch, Rouladen
7 bis 8
Schonendes Braten
Fisch, Schnitzel, Bratwurst, Spiegeleier
9
Backen, Ankochen
Steaks, Omelett
Pfannkuchen, Linsen
P
Kochen
Grosse Wassermengen
REINIGUNG UND PFLEGE
Lassen Sie das Gerät abkühlen, es könnte Verbrennungsgefahr bestehen.
Reinigen Sie das verschmutzte Kochfeld immer regelmässig. Benützen Sie dazu ein feuchtes
Tuch und ein wenig Putzmittel.
Um das Gerät zu reinigen, muß es ausgeschaltet sein.
Die Reinigung des Gerätes mit einem Dampfreiniger oder Hochdruckdruckreiniger
ist aus Sicherheitsgründen nicht zugelassen.
Verwenden Sie in keinem Fall scheuernde oder aggressive Reinigungsmittel, wie z.B. Grill
und Backofensprays, Fleck oder Rostentferner, Scheuersande oder Schwämme mit
kratzenden Oberflächen
Danach reiben Sie das Kochfeld mit einem sauberen Tuch trocken.
Entfernen Sie sofort Zucker, Kunststoff oder Alufolien, nach Abschalten der Kochzonen.

70
a
d
c
b
WAS TUN WENN…
[ E4 ] in der Anzeige erscheint:
Das Kochfeld muss neu konfiguriert werden. Bitte folgen Sie nachstehende Hinweise :
I) Wichtig : entfernen Sie alle Töpfe von Ihrem Kochfeld
II) Das Kochfeld muss zuerst vom Stromnetz getrennt werden : nehmen Sie den
Anschlusskabel weg oder schalten Sie die Sicherung am Schalttafel ab.
III) Schalten Sie den Strom wieder ein
IV) Verfahren :
* nehmen Sie einen Topf mit magnetischem Boden (Durchmesser > 16 cm)
* verwenden Sie nicht den Hauptschalter
* starten Sie die Programmierung spätestens 2 Minuten nach dem Wiedereinschalten
V) Phase 1: löschen der existierenden Konfiguration
1) Drücken Sie auf die Taste 2 und halten Sie diese gedrückt
2) In der Anzeige erscheint [ - ]
3) Mit Ihrem anderen Finger drücken Sie
nacheinander, entegegen dem Uhrzeigersinn,
die Anzeigen [ - ] (vgl Bezeichnung)
Ein doppelter “Beep“ soll heissen, dass ein
Fehler Aufgetreten ist. In diesem Fall,
starten Sie erneut vom Punkt 1.
4) Lassen die Taste los. Dann drücken Sie wieder
auf die Taste 1, bis dass blinkende [ E ] Symbole angezeigt werden.
5) Erwarten bis die [ E ] fix bleiben
6) [ E ] werden dann automatisch [ C ]-Symbole. Das Löschprozess ist erledigt.
Bemerkung : bei Induktionskochfelder mit 3 Kochzonen : hinten rechts anfangen
(b) (die Kochzone vorne rechts gib es nicht).
VI) Phase 2 : Neukonfiguration des Kochfeldes
1) Nehmen Sie einen Topf mit magnetischem Boden (Durchmesser > 16 cm)
2) Wählen Sie eine Kochzone-Bedienung aus beim drücken auf dem [C]-Symbol.
3) Stellen Sie den Topf auf der entsprechenden Kochzone.
4) Warten bis [ C ] sich in [ - ] umwandelt. Die Kochzone ist konfiguriert.
5) Wiederholen Sie diesen Vorgang für jede Kochzone.
6) Die Kochzonen sind konfiguriert, sobald nichts mehr angezeigt wird.
Verwenden Sie den gleichen Topf um die gesamte Konfiguration durchzuführen.
Während der Konfiguration dürfen keine weitere Töpfe auf der Mulde liegen.
Falls die [ E4 ]-Anzeige bleibt, wenden Sie sich bitte an Ihrem Kundendienst.
Die Kochmulde oder die Kochzonen nicht einschalten:
Die Mulde ist falsch am Netz angeschlossen.
Die Sicherung der Hausinstallation ist nicht korrekt eingesetzt.
Die Kochmulde ist verriegelt.
Die Sensortasten sind mit Wasser oder Schmutz bedeckt.
Ein Kochgeschirr bedeckt die Tasten.
In der Anzeige erscheint [ U ]:
Das Kochgeschirr ist nicht auf der Kochzone.
Das Kochgeschirr ist nicht Induktiongeeignet
Der Topfboden-Durchmesser ist zu klein für diese Kochzone.
In der Anzeige erscheint [ C ] oder [ E ]:
Den Kundendienst anrufen.

71
Der Auftrag Anzeige [ L ]:
Finden Sie im Kapitel Verriegelung der Kochmulde.
Eine Kochzone oder die gesamte Mulde schaltet ab:
Die Sicherheits-Abschaltung hat es ausgelöst.
Diese ist aktiviert, wenn Sie vergessen haben eine Kochzone abzuschalten.
Diese Abschaltung ist aktiviert, wenn mehrere Tasten bedeckt sind.
Ein Topf ist leer und überhitzt.
Durch eine Überhitzung hat die Elektronik automatisch die Leistung reduziert oder auch
automatisch abgeschaltet
Das Kühlgebläse läuft nach dem Ausschalten weiter:
Das ist keine Störung, das Gebläse läuft so lange, bis das Gerät abgekühlt ist.
Das Gebläse schaltet automatisch ab.
Die Ankochautomatik schaltet nicht ein:
Die Kochzone ist noch heiß [ H ]
Die höchste Leistungsstufe ist eingeschaltet [ 9 ]
Der Auftrag Anzeige [ U ]:
Finden Sie im Kapitel Warmhaltefunktion.
Der Auftrag Anzeige [ II ]:
Finden Sie im Kapitel Pausenfunktion.
UMWELTSCHUTZ
Die Verpackungsmaterialen sind umweltfreundlich und recyclierbar.
Elektrische und elektronische Geräte enthalten noch wertvollen Materialen. Sie erhalten
aber auch noch schädliche Stoffe, die für ihrer Funktion und Sicherheit notwendig sind
Geben Sie Ihr Altgerät deshalb auf keinen Fall in den
Restmüll.
Nutzen Sie statt dessen die von Ihrer Kommune
eingerichtete Sammelstelle zur Rückgabe und
Verwertung elektrischer und elektronischer Altgeräte.

72
MONTAGEHINWEISE
Montage und Anschluß dürfen nur durch einen autorisierten Fachmann vorgenommen werden.
Der Benutzer muß darauf achten daß die in seinem Wohnsitz geltenden Normen eingehalten
werden.
Dichtung Einbau :
Einbau :
Typ
Einbaumasse
7330240
760 x 350 mm
7331240
560 x 490 mm
7332240
650 x 490 mm
7370240
560 x 490 mm
Der Abstand vom Ausschnitt bis zu einer Mauer und/oder einem Möbelstück muß
mindestens 50 mm betragen.
Dieses Gerät entspricht bezüglich des Schutzes gegen Feuergefahr dem Typ Y. Nur
Geräte dieses Typs dürfen einseitig an nebenstehende Hochschränke oder Wände
eingebaut werden. Aber von der andere Seite dürft keine möble oder gerät höher der
Kochmulde sein.
Die Arbeitsplatte soll mit hitzbeständigem Kleber (100 °C) verarbeitet sein.
Die Wandabschlußleisten müssen hitzbeständig sein
Das Kochfeld darf nicht über Herde ohne Lüfter, Geschirrspülern, Wasch- oder
Trockengeräten eingebaut werden.
Um eine ausreichende Belüftung der Elektronik im Kochfeld zu erzielen, ist unter der
Mulde ein Luftraum von 20 mm notwendig.
Befindet sich unter dem Kochfeld eine Schublade, dürfen in der Schublade keine
brennbaren Gegenstände, z.B. Spraydosen, aufbewahrt werden.
Zwischen dem Gerät und einer Dunstabzugshaube muß der vom Hersteller angegebene
Sicherheitsabstand eingehalten werden. Bei fehlenden Angaben muß dieser Abstand
mindestens 760 mm sein.
Es muß sichergestellt werden, daß das Anschlußkabel des Kochfeldes nach dem Einbau
keinen mechanischen Belastungen, z.B. durch Schublade, ausgesetzt ist.
Die Schnittflächen sollen mit speziellem Lack, Silikonkautschuk oder Giesharz versiegelt
werden, um ein aufquellen durch Feuchtigkeit zu verhindern. Beachten Sie, das
mitgelieferte Dichtungsband sorgfältig aufzukleben.
ACHTUNG: Benutzen Sie nur Schutzgitter, die vom Hersteller angeboten werden oder
von diesem für den Einsatz mit dem Kochfeld freigeben sind.
Die Dichtung (2) nach Abnehmen
der Schutzfolie (3) mit 2 mm
Abstand der Außer kannte des
Glases aufkleben.

73
ELEKTROANSCHLUSS
Zum Anschluß des Gerätes an das Elektronetz beauftragen Sie einen Elektrofachmann,
der die landesüblichen Vorschriften der örtlichen Elektroversorgungsunternehmen genau
kennt und sorgfältig beachtet.
Der Berührungsschutz betriebsisolierter Teile muß nach der Montage sichergestellt sein.
Ob die erforderlichen Anschlußdaten mit denen des Netzes übereinstimmen finden Sie auf
dem Typenschild.
Das Gerät muß durch Trenneinrichtungen allpolig vom Netz abgeschaltet werden können.
Im abgeschalteten Zustand muß ein Kontaktabstand von 3 mm vorhanden sein. Als
geeignete Trennvorrichtungen gelten LS-Schalter, Sicherungen und Schütze
Die Installation muß durch Sicherungen geschützt sein. Elektrische Kabel müssen perfekt
durch das Einbauen gedeckt sein.
Wenn das Gerät nicht mit einem zugänglichen Stecker ausgestattet ist, müssen beim
festen Einbau gemäß den Montageanweisungen andere Trennungsmöglichkeiten
berücksichtigt werden.
Das Zuleitungskabel muss so angebracht werden, dass die heißen Teile des Kochfelds
nicht berührt werden.
Achtung !
Dieses Gerät ist nur für eine Strom-Versorgung von 230 V~ 50/60 Hz ausgelegt.
Schließen Sie immer die Erde mit an.
Beachten Sie das Anschlußschema.
Der Anschlußkasten befindet sich auf der Unterseite des Gerätes. Um das Gehäuse zu öffnen,
benutzen Sie einen Schraubenzieher und schieben Sie ihn in den vorgesehenen Schlitzen.
( * ) laut EN 60 335-2-6 Norm
Anschluß des Kochfelds :
Verwenden Sie für die verschiedenen Anschlussmöglichkeiten die Polbrücken aus Messing, die
sich im Gehäuse befinden.
Monophasen 230V~1P+N
Bringen Sie eine Polbrücke zwischen Anschlussklemme 1 und 2 dann zwischen
Anschlussklemme 3 und 4.
Befestigen Sie die Erdung an die « Erde » Anschlussklemme, den Nullleiter an Anschlussklemme
3 oder 4, die Phase L an Anschlussklemme 1 oder 2.
Biphasen 400V~2P+N
Bringen Sie eine Polbrücke zwischen Anschlussklemme 3 und 4.
Befestigen Sie die Erdung an die « Erde » Anschlussklemme, den Nullleiter an Anschlussklemme
3 oder 4, die Phase L1 an Anschlussklemme 1 und die Phase L2 an Anschlussklemme 2.
Achtung ! Die Drähte korrekt hineinstecken. Die Schrauben fest anziehen.
Wir sind nicht verantwortlich für Zwischenfälle die durch falschen Anschluß, oder nicht
vorhandenen oder unrichtigem Erdungsanschluß entstehen.
Netz
Anschluß
Durchmesser
Kabel
Sicherung
230V~ 50/60Hz
1 Phase + N
3 x 2.5 mm²
H 05 VV - F
H 05 RR - F
25 A *
400V~ 50/60Hz
2 Phasen + N
4 x 1.5 mm²
H 05 VV - F
H 05 RR - F
16 A *


Foster spa
42041 Brescello (RE) - Italy
tel. +39.0522.687425 - tel. Servizio Assistenza +39.0522.684450
fax +39.0522.686019 - fax Servizio Ricambi +39.0522.962166
e-mail: [email protected]
www.fosterspa.com
13849-4
cod. 9606887

manual de instrucciones
руководство по эксплуатации
gebruikshandleiding

2
Apreciada clienta, apreciado cliente,
Le agradecemos la confianza que nos ha otorgado al elegir nuestra placa de cocción
vitrocerámica a inducción.
Con el fin de conocer bien este aparato, le recomendamos lea atentamente estas instrucciones
de utilización en su totalidad y las conserve para consultas posteriores.
RESUMEN
SEGURIDAD ................................................................................................................................. 3
PRECAUCIONES ANTES DE UTILIZARLA PARA COCINAR ..................................................................... 3
UTILIZACION DEL APARATO ............................................................................................................ 3
PRECAUCIONES PARA NO DETERIORAR EL APARATO ........................................................................ 4
PRECAUCIONES EN CASO DE FALLO DEL APARATO ........................................................................... 5
OTRAS PRECAUCIONES ................................................................................................................. 6
DESCRIPCIÓN DEL APARATO ................................................................................................... 7
CARACTERISTICAS TECNICAS ........................................................................................................ 7
ZONA DE MANDOS ........................................................................................................................ 8
UTILIZACIÓN DEL APARATO ..................................................................................................... 8
INDICACONES ............................................................................................................................... 8
VENTILACIÓN ............................................................................................................................... 8
PUESTA EN MARCHA Y GESTIÓN DEL APARATO .................................................................. 9
ANTES DE LA PRIMERA UTILIZACIÓN ................................................................................................ 9
PRINCIPIO DE LA INDUCCIÓN .......................................................................................................... 9
TECLAS TÁCTILES ......................................................................................................................... 9
ZONA DE SELECCIÓN DE POTENCIA “SLIDER” Y AJUSTE DE MINUTERO .............................................. 9
PUESTA EN MARCHA ................................................................................................................... 10
DETECCIÓN DEL RECIPIENTE ....................................................................................................... 10
INDICADOR DE CALOR RESIDUAL .................................................................................................. 10
FUNCIÓN „TURBO‟ ....................................................................................................................... 11
FUNCIÓN MINUTERO ................................................................................................................... 11
PROGRAMACIÓN DE LA COCCIÓN AUTOMÁTICA .............................................................................. 12
FUNCIÓN PAUSA ......................................................................................................................... 12
MEMORIZACIÓN DE FUNCIONES .................................................................................................... 13
FUNCIÓN “MANTENER CALIENTE” ................................................................................................. 13
BLOQUEO DE LA ZONA DE MANDOS ............................................................................................... 13
CONSEJOS DE COCCIÓN ......................................................................................................... 14
CALIDAD DE LAS CACEROLAS ....................................................................................................... 14
DIMENSIÓN DE LAS CACEROLAS ................................................................................................... 15
EJEMPLOS DE AJUSTE DE LAS POTENCIAS DE COCCIÓN .................................................................. 15
CONSERVACIÓN Y LIMPIEZA ................................................................................................... 15
QUÉ HACER EN CASO DE PROBLEMA ................................................................................... 16
PROTECCIÓN DEL MEDIO AMBIENTE..................................................................................... 17
INSTRUCCIONES DE INSTALACIÓN ........................................................................................ 18
CONEXIÓN ELÉCTRICA ............................................................................................................ 19

3
SEGURIDAD
Precauciones antes de utilizarla para cocinar
Retire todos los elementos del embalaje.
La instalación y el conexionado eléctrico del aparato deben
encargarse a un especialista autorizado. El fabricante no será
responsable de los daños resultantes de un error de
empotramiento o de conexionado.
El aparato sólo debe utilizarse si está montado e instalado en
un mueble y una superficie de trabajo homologados y
adaptados.
Su utilización va únicamente destinada a los usos domésticos
habituales (preparación de alimentos), con exclusión de
cualquier otra utilización doméstica, comercial o industrial.
Arranque todas las etiquetas y autoadhesivos del cristal
vitrocerámico.
No transforme ni modifique el aparato.
La placa de cocción no debe servir como soporte ni como
superficie de trabajo.
La seguridad sólo está asegurada si el aparato está conectado
a una toma de tierra de protección conforme a los reglamentos
vigentes.
No utilice alargaderas para la conexión a la red eléctrica.
El aparato no debe utilizarse encima de un lavavajillas o de una
secadora de ropa: los vapores de agua desprendidos podrían
deteriorar la electrónica.
Este aparato no está previsto para el funcionamiento con un
reloj temporizador externo o un mando a distancia.
Utilización del aparato
Apague siempre los fogones después de utilizarlos.
Vigile constantemente los guisos que utilizan grasas y aceites,
ya que son susceptibles de inflamarse rápidamente.
Tenga cuidado del riesgo de quemaduras durante y después
de la utilización del aparato.
Los niños no deben manipular el aparato.

4
Asegúrese de que ningún cable eléctrico, fijo o móvil, del
aparato toca el cristal o el recipiente caliente.
Los objetos magnetizables (tarjetas de crédito, disquetes
informáticos, calculadoras) no deben estar cerca del aparato en
funcionamiento.
Este aparato electrodoméstico puede ser usado por niños a
partir de 8 años e igualmente por personas con capacidades
físicas, sensoriales o mentales reducidas o que carezcan falta
de experiencia y conocimiento del producto si se les ha dado
la supervisión instrucción adecuada para el uso del mismo de
un modo seguro y entienden de igual manera los peligros que
puedan implicar.
Los niños no deben usar éste electrodoméstico para jugar.
La limpieza o el uso de éste aparato no debe realizarse por
niños sin supervisión.
Precauciones para no deteriorar el aparato
Las cacerolas con suelas sin pulir (fundición no esmaltada,…) o
estropeadas pueden dañar la vitrocerámica.
La presencia de arena u otros materiales abrasivos puede
dañar la vitrocerámica.
Evite dejar caer objetos, aunque sean pequeños, sobre la
vitrocerámica.
No dé golpes a los bordes del cristal con las cacerolas.
Asegúrese de que la ventilación del aparato se haga según las
instrucciones del fabricante.
No coloque ni deje cacerolas vacías sobre la placa de cocción.
Evite que azúcar, materiales sintéticos o papel de aluminio
toquen las zonas calientes. Estas substancias pueden, al
enfriarse, provocar roturas u otras modificaciones en la
superficie vitrocerámica: desconecte al aparato y retírelas
inmediatamente de la zona de cocción cuando aún está
caliente (atención: peligro de quemaduras).
No almacenar objetos sobre la placa de cocción
No coloque nunca recipientes calientes sobre la zona de los
mandos.

5
Si hay un cajón situado bajo el aparato empotrado, asegúrese
que hay distancia suficiente (2 cm) entre el contenido de este
cajón y la parte inferior del aparato con el fin de asegurar una
buena ventilación.
No deposite objetos inflamables (por ejemplo sprays) en el
cajón situado bajo la placa de cocción. Las eventuales
bandejas para cubiertos deben ser de material resistente al
calor.
Precauciones en caso de fallo del aparato
Si se constata una avería, es necesario desconectar el aparato
y desenchufar la línea de alimentación eléctrica.
En caso de desconchados o fisuras en la vitrocerámica es
imperativo desconectar el aparato de la red eléctrica y avisar al
servicio posventa.
Las reparaciones sólo pueden ser realizadas por personal
especializado. En ningún caso abra el aparato usted mismo.
ADVERTENCIA : Si la superficie es agrietada, apagar el
aparato para evitar la posibilidad de descargas eléctricas.

6
Otras precauciones
Asegúrese siempre de que el recipiente de cocción esté
centrado en la zona de cocción. El fondo de la cacerola debe
cubrir, tanto como sea posible, la zona de cocción.
Para usuarios que lleven un marcapasos, el campo magnético
puede influir en su funcionamiento. Le recomendamos se
asesore con el proveedor o el médico.
No utilice recipientes de material sintético o de aluminio:
podrían fundirse sobre los fogones aún calientes.
Los aparatos usados contienen metales preciosos. Consulte
con la administración de recuperación sobre las posibilidades
de reciclaje.
No apagar nunca con agua un fuego. Apagar la zona de
cocción. Sofocar con cuidado las llamas con una tapa, una tapa
extintora u otro medio similar.
LA GARANTÍA SE VENCE SI SE USAN OLLAS NO
IDÓNEAS O BIEN ACCESORIOS EXTRAÍBLES
COLOCADOS ENTRE LA OLLA Y LA PLANCHA PARA
CALENTAR OLLAS NO IDÓNEAS PARA LA
INDUCCIÓN.
EL FABRICANTE SE EXIME DE TODA
RESPONSABILIDAD POR CUALQUIER DAÑO A LA
PLACA DE COCCIÓN O POR DAÑOS RELACIONADOS
A LO ANTERIOR.

7
DESCRIPCIÓN DEL APARATO
Características técnicas
Modelo
7330240
7331240
7332240
7370240
Potencia total
6700 W
6700 W
7400 W
7400 W
Consumo energético para placas EC
hob
**
173.6 Wh/kg
176.6 Wh/kg
174.2 Wh/kg
176.5 Wh/kg
Fogón delantera izquierda
Ø 200 mm
Ø 250 mm
Ø 250 mm
Ø 200 mm
Diámetro mínimo
Ø 100 mm
Ø 110 mm
Ø 110 mm
Ø 100 mm
Potencia nominal *
2300 W
2300 W
2300 W
2300 W
Potencia de refuerzo *
3000 W
3000 W
3000 W
3000 W
Categoría estandarizada de utensilios de
cocina
C
D
D
C
Consumo energetico EC
cw
**
180.5 Wh/kg
182.7 Wh/kg
182.7 Wh/kg
180.5 Wh/kg
Fogón trasera izquierda
-
-
Ø 180 mm
Ø 180 mm
Diámetro mínimo
-
-
Ø 90 mm
Ø 90 mm
Potencia nominal *
-
-
1200 W
1200 W
Potencia de refuerzo *
-
-
1400 W
1400 W
Categoría estandarizada de utensilios de
cocina
-
-
B
B
Consumo energetico EC
cw
**
-
-
166.7 Wh/kg
166.7 Wh/kg
Fogón Centro
Ø 160 mm
-
-
-
Diámetro mínimo
Ø 90 mm
-
-
-
Potencia nominal *
1200 W
-
-
-
Potencia de refuerzo *
1400 W
-
-
-
Categoría estandarizada de utensilios de
cocina
B
-
-
-
Consumo energetico EC
cw
**
166.7 Wh/kg
-
-
-
Fogón trasera derecha
-
Ø 160 mm
Ø 160 mm
Ø 220 mm
Diámetro mínimo
-
Ø 90 mm
Ø 90 mm
Ø 110 mm
Potencia nominal *
-
1200 W
1200 W
2300 W
Potencia de refuerzo *
-
1400 W
1400 W
3000 W
Categoría estandarizada de utensilios de
cocina
-
B
B
C
Consumo energetico EC
cw
**
-
166.7 Wh/kg
166.7 Wh/kg
173.7 Wh/kg
Fogón delantera derecha
Ø 250 mm
Ø 200 mm
Ø 200 mm
Ø 160 mm
Diámetro mínimo
Ø 100 mm
Ø 100 mm
Ø 100 mm
Ø 90 mm
Potencia nominal *
2300 W
2300 W
2300 W
1400 W
Potencia de refuerzo *
3000 W
3000 W
3000 W
2000 W
Categoría estandarizada de utensilios de
cocina
D
C
C
A
Consumo energetico EC
cw
**
173.7 Wh/kg
180.5 Wh/kg
180.5 Wh/kg
185 Wh/kg
* la potencia puede variar en función de las dimensiones y de los materiales de las cacerolas.
** calculado según método de medida (EN 60350-2)

8
Zona de mandos
UTILIZACIÓN DEL APARATO
Indicacones
Indicación Designación Función
0 Cero Zona de calefacción activada
1…9 Nivel de potencia Elección nivel de cocción
U Detección de cacerola Falta recipiente o es inadecuado
A Acelerador de calentamiento Cocción automática
E Mensaje de error Defecto del circuito electrónico
H Calor residual La zona de cocción está caliente
P Refuerzo Activada la potencia „turbo‟
L Bloqueo La placa está protegida
II Pausa La pausa está activada
U Mantener caliente La placa mantiene el recipiente a
temperatura constante de 70ºC
Ventilación
El ventilador de enfriamiento tiene un funcionamiento totalmente automático. Se pone en marcha
a velocidad baja a partir del momento en que las calorías desprendidas por la electrónica
sobrepasan un cierto umbral. La ventilación conecta su velocidad alta cuando la placa de
cocción se usa de forma intensiva. El ventilador reduce su velocidad y se para automáticamente
cuando el circuito electrónico está suficientemente frío.
Indicador de
Selección del hogar
Tecla
Marcha/Parada
Tecla „turbo‟
Tecla Pausa
Indicator de
minutero
Pilotos de selección del
fogón para el minutero
Visualización
de la potencia
Zona de selección de potencia
“SLIDER” y ajuste de minutero
Tecla “Mantener
caliente”
Pilito de puesta
en marcha
Pilito Pausa

9
PUESTA EN MARCHA Y GESTIÓN DEL APARATO
Antes de la primera utilización
Limpie el aparato con un trapo húmedo y séquelo. No utilice detergente ya que podría provocar
una coloración azulada en las superficies vitrificadas.
Principio de la inducción
Debajo de cada placa de cocción hay una bobina de inducción. Cuando ésta está conectada,
produce un campo electromagnético variable el cual produce a su vez corrientes inducidos en el
fondo ferromagnético del recipiente. De ello resulta un calentamiento del recipiente colocado
sobre la zona de calentamiento.
Como es lógico, el recipiente debe ser adecuado:
Se recomiendan todos los recipientes metálicos ferro-magnéticos (a verificar
eventualmente con un pequeño imán) tales como: cazuelas de fundición, sartenes de
hierro negro, cacerolas metálicas esmaltadas, en acero inoxidable con suela ferro-
magnética…
Quedan excluidos los recipientes de cobre, inoxidable, aluminio, cristal, madera,
cerámica, gres, barro cocido, inoxidable no ferro-magnético…
La zona de cocción por inducción tiene automáticamente en cuenta el tamaño del recipiente
utilizado. Con un diámetro demasiado pequeño, el recipiente no funciona. Este diámetro varía en
función del diámetro de la zona de cocción.
Cuando el recipiente no es adecuado para la placa de cocción, queda encendido el símbolo [ U ].
Teclas táctiles
Su aparato está provisto de teclas táctiles que permiten controlar las distintas funciones. Un
pequeño roce con la tecla activa su funcionamiento. Esta activación queda confirmada por un
piloto, un indicador y/o por una señal sonora.
No toque una tecla más de una vez.
Zona de selección de potencia “SLIDER” y ajuste de minutero
Para la selección de potencia con el slider deslizar el dedo sobre la zona “SLIDER”.
Se beneficia de un acceso directo apoyando el dedo directamente en el nivel deseado.
Zona de selección de potencia
“SLIDER“ y ajuste de minutero
“SLIDER“
Acceso directo

10
Puesta en marcha
Conectar / Apagar la placa de cocción:
Acción Zona de mandos Indicador
Conectar pulsar [ 0/I ] [ 0 ] parpadear
Apagar pulsar [ 0/I ] ninguno o [ H ]
Conectar / Apagar una zona de calentamiento:
Acción Zona de mandos Indicador
Seleccionar la zona pulsar [ 0 ] de la zona [ 0 ] y piloto de zona
encendido
Ajuste la potencia deslizar en “SLIDER” [ 0 ] hasta [ 9 ]
hacia la derecha o la izquierda
Apagar deslizar hasta [ 0 ] en “SLIDER” [ 0 ] o [ H ]
o pulsar [ 0 ] [ 0 ] o [ H ]
Si no se realiza ningún ajuste en el plazo de 20 segundos, la electrónica vuelve a la posición de
espera.
Detección del recipiente
La detección del recipiente asegura una seguridad perfecta. La inducción no funciona:
Cuando no hay recipiente sobre la zona de cocción o cuando este recipiente no es
adecuado para la inducción. En este caso es imposible aumentar la potencia y aparece el
símbolo [ U ] en el indicador. La [ U ] desaparece cuando se coloca una cacerola en la
zona de cocción.
Si en el curso de la cocción se retira el recipiente de la zona de cocción, el funcionamiento
se interrumpe. Aparece el símbolo [ U ] en el indicador. La [ U ] desaparece cuando se
coloca de nuevo el recipiente en la zona de cocción. La cocción se reemprende en el
nivel de potencia seleccionado anteriormente.
Después la utilización de la placa, es necesario apagar la zona de cocción. No dejan activa la
detección de la cacerola.
Indicador de calor residual
Después de apagar las zonas de cocción o de apagar por completo la placa, las zonas de
cocción están aún calientes lo que se indica con el símbolo [ H ]
El símbolo [ H ] se apaga cuando las zonas de cocción se pueden tocar sin peligro.
Mientras los testigos de calor residual estén encendidos, no toque las zonas de cocción ni ponga
encima ningún objeto sensible al calor ¡Peligro de quemadura y de incendio!

11
Función „turbo‟
La función „turbo‟ [ B ] proporciona un refuerzo de potencia en la zona de cocción seleccionada.
Si se activa esta función, estas zonas de cocción funcionan durante 10 minutos con una potencia
notablemente más alta.
El „turbo‟ está destinado, por ejemplo, a calentar rápidamente grandes cantidades de agua,
como para cocer pasta.
Conectar / Apagar la función „turbo‟:
Acción Zona de mandos Indicador
Seleccionar la zona pulsar [ 0 ] de la zona [ 0 ] y piloto de zona
encendido
Conectar el „turbo‟ pulsar [ B ] [ P ]
Apagar el „turbo‟ deslizar en “SLIDER” [ P ] hasta [ 0 ]
o pulsar [ B ] [ 9 ]
Gestión de la potencia máxima:
El conjunto de la placa de cocción está dotado de una potencia máxima. Cuando está activada la
función „turbo‟, y para no sobrepasar esta potencia máxima, el mando electrónico reduce
automáticamente el nivel de cocción de otra zona de calentamiento.
Durante algunos segundos, el indicador de esta zona de cocción parpadea [ 9 ] y después queda
en el nivel de cocción más alto posible:
Zona de cocción seleccionada Otra zona de cocción (por ej.: cocción de nivel 9 )
[ P ] está indicado [ 9 ] pasa a [ 6 ] u [ 8 ] según el tipo de placa
Función minutero
El minutero puede asignarse simultáneamente a las placas de cocción y con ajustes diferentes
de tiempo en minutos (de 0 a 99 minutos) para cada una de las placas.
Ajuste o modificación de la duración de la cocción:
Ejemplo para 16 minutos hasta potencia 7 :
Acción Zona de mandos Indicador
Seleccionar la zona pulsar [ 0 ] de la zona [ 0 ] y piloto de zona
encendido
Seleccionar la potencia deslizar en “SLIDER” hasta [ 7 ] [ 7 ]
Seleccionar "Minutero" pulsar [ CL ] [ 00 ]
Ajuste de unidad deslizar en “SLIDER” hasta [ 6 ] [ 0 fijo ] [ 6 parpadear ]
Validar de unidad pulsar [ 06 ] [ 0 parpadear ] [ 6 fijo ]
Ajuste de decena deslizar en “SLIDER” hasta [ 1 ] [ 1 parpadear ] [ 6 fijo ]
Validar de decena pulsar [ 16 ] [ 16 ]
La duración queda seleccionada y se inicia la cuenta atrás.
Detener la función minutero de cocción:
Ejemplo para 13 minutos hasta potencia 7 :
Acción Zona de mandos Indicador
Seleccionar la zona pulsar [ 7 ] de la zona [ 7 ] y piloto de zona
encendido
Seleccionar "Minutero" pulsar [ 13 ] [ 13 ]
Desactivar de unidad deslizar en “SLIDER” hasta [ 0 ] [ 1 fijo ] [ 0 parpadear ]
Validar de unidad pulsar [ 10 ] [ 1 parpadear ] [ 0 fijo ]
Desactivar de decena deslizar en “SLIDER” hasta [ 0 ] [ 00 parpadear ] [ 0 fijo ]
Validar de decena pulsar [ 00 ] [ 00 ]

12
Paro automático al final de la cocción:
Cuando ha transcurrido el tiempo de cocción seleccionado, el minutero lo indica centelleando
[ 00 ] y produciendo una señal sonora.
Para parar el sonido y el parpadea, basta pulsar la tecla [ 00 ].
Minutero utilizado sin cocción:
Ejemplo para 29 minutos :
Acción Zona de mandos Indicador
Activar la placa de cocción pulsar [ 0/I ] [ 0 ]
Seleccionar "Minutero" pulsar [ CL ] [ 00 ]
Ajuste de unidad deslizar en “SLIDER” hasta [ 0 ] [ 0 fijo ] [ 9 parpadear ]
Validar de unidad pulsar [ 09 ] [ 0 parpadear ] [ 9 fijo ]
Ajuste de decena deslizar en “SLIDER” hasta [ 2 ] [ 2 parpadear ] [ 9 fijo ]
Validar de decena pulsar [ 29 ] [ 29 ]
El piloto de control parpadea y pasados algunos segundos se apaga.
Cuando ha transcurrido el tiempo seleccionado, el minutero lo indica parpadeando [ 00 ] y
produciendo una señal sonora.
Para parar el sonido y el parpadea, basta pulsar la tecla [ 00 ].
Programación de la cocción automática
Todas las zonas de cocción están equipadas con un dispositivo de cocción automática. La zona
de cocción se pone en marcha a maxima potencia durante un cierto tiempo y después reduce
automáticamente su potencia hasta el nivel preseleccionado.
Puesta en marcha del automatismo:
Acción Zona de mandos Indicador
Seleccionar la zona pulsar [ 0 ] de la zona [ 0 ] y piloto de zona
encendido
Activar la potencia total deslizar en “SLIDER” hasta [ 9 ] pasa de [ 0 ] a [ 9 ]
Activar el automatismo pulsar de nuevo [ 9 ] en “SLIDER” [ 9 ] parpadear con [ A ]
Seleccionar nivel deslizar en “SLIDER” [ 9 ] pasa a [ 8 ] [ 7 ] …
(por ejemplo "7") hasta [ 7 ] [ 7 ] parpadear con [ A ]
Parada del automatismo:
Acción Zona de mandos Indicador
Seleccionar la zona pulsar [ 7 ] de la zona [ 7 ] parpadear con [ A ]
Seleccionar nivel deslizar en “SLIDER” [ 1 ] … [ 9 ]
Función pausa
Esta función defiene todas las zonas de cocción activadas y permite reiniciarlas con la misma
configuración.
Conectar / apagar a función pausa
Acción Zona de mandos Indicador
Activar pausa pulsar [ II ] durante 2s [ II ]
Detener pausa pulsar [ II ] durante 2s Piloto pausa parpadear
pulsar una otro tecla o piloto pausa apagado
deslizar en “SLIDER”

13
Memorización de funciones
Después de apagar la placa [ 0/I ], es posible recordar los últimos ajustes.
Cocinar en todas las zonas de cocción (Potencia).
Minutos y segundos de cocción programados en el minutero.
Función de cocción automatica.
El procedimiento para recuperar la configuración precedente es el siguiente:
Pulse la tecla [ 0/I ].
A continuación, pulse la tecla [ II ] durante 6 segundos.
La configuración precedente queda activada.
Función “Mantener caliente”
Esta función permite alcanzar y mantener automáticamente una temperatura de 70°C.
Con ello se evitarán los derrames de líquidos sobre la placa y que se peguen en la parte inferior
del recipiente.
Iniciar / Detener la función Conservador de calor
Acción Zona de mandos Indicator
Seleccionar la zona pulsar [ 0 ] de la zona [ 0 ] … [ 9 ] o [ H ]
Activar “Mantener caliente” pulsar [ U ] en “SLIDER” [ U ]
Detener “Mantener caliente” pulsar [ U ] de zona [ U ]
deslizar en “SLIDER” [ 0 ] … [ 9 ] o [ H ]
Esta función puede ser usada independientemente en todas las zonas de cocción.
Cuando el recipiente se quita de la zona de cocción el conservador de calor permanece activo
durante 10 minutos.
El tiempo máximo de duración es de 2 horas.
Bloqueo de la zona de mandos
Para evitar que se modifique una selección de la placa de cocción, particularmente cuando se
limpia el cristal, la zona de mandos se puede bloquear (con la excepción de la tecla marcha/paro
[0/I]).
Bloqueo:
Acción Zona de mandos Indicador
Puesta en marcha Pulsar [ 0/I ] [ 0 ] o [ H ]
Bloquear la placa Pulsar a la vez [ B ] y [ 0 ] de la zona
delantera derecha** Sin cambio
pulsar de nuevo [ 0 ] [ L ]
Desbloqueo:
Acción Zona de mandos Indicador
Puesta en marcha pulsar [ 0/I ] [ L ]
En los 5 segundos
Desbloquear la placa pulsar a la vez [ B ] y [ L ] de la zona
delantera derecha** [ L ]
Pulsar de nuevo [ B ] Los indicadores se
apagan
** para una placa de cocción 7330240 utilizar el [ 0 ] o [ L ] de la zona trasera derecha

14
CONSEJOS DE COCCIÓN
Calidad de las cacerolas
Materiales adecuados: acero, acero esmaltado, fundición, inoxidable con fondo ferro-magnético,
aluminio con fondo ferro-magnético
Materiales no adecuados: aluminio e inoxidable con fondo no ferro-magnético, cobre, latón,
vidrio, cerámica, porcelana
Los fabricantes especifican si sus productos son compatibles con la inducción.
Para verificar si las cacerolas son compatibles:
Ponga un poco de agua en una cacerola colocada sobre una zona de cocción por
inducción regulada a nivel [ 9 ]. Este agua debe calentarse en algunos segundos.
Ponga un imán sobre el fondo externo de la cacerola; debe quedarse pegado.
Algunas cacerolas pueden hacer ruido al colocarlas sobre una zona de cocción por inducción.
Estos ruidos no representan en ningún caso un defecto en el aparato ni tienen influencia en su
funcionamiento.
Las cacerolas tienen que ser certificadas por el fabricante como adecuadas para la
inducción. Sin embargo es posible que algunas cacerolas, aunque indiquen que son
adecuadas, en realidad sean inadecuadas para utilizarlas con placas de inducción.
Os recomendamos que, en el momento de comprar las cacerolas, éstas respeten las siguientes
condiciones:
Si el fondo de la cacerola (Ød) es significativamente más pequeño que el diámetro
del cuerpo (ØD) el rendimiento se verá perjudicado y la cacerola podría no ser
identificada por la placa.

15
Dimensión de las cacerolas
Las zonas de cocción se adaptan automáticamente a la dimensión del fondo de la cacerola,
hasta un cierto límite. Por ello, el fondo de esta cacerola debe tener un diámetro mínimo en
función del diámetro de la zona de cocción correspondiente.
Para obtener el máximo rendimiento de la placa de cocción, coloque la cacerola bien centrada
en la zona de cocción.
Ejemplos de ajuste de las potencias de cocción
(los siguientes valores son indicativos)
1 a 2
Hacer fundir
Recalentar
Salsas, mantequilla, chocolate, gelatina
Platos precocinados
2 a 3
Hinchar
Descongelación
Arroz, puddings y platos cocinados
Legumbres, pescados, productos congelados
3 a 4
Vapor
Legumbres, pescados, carne
4 a 5
Agua
Patatas hervidas, sopas, pastas
Legumbres frescas
6 a 7
Cocer a fuego suave
Carnes, hígado, huevos, salchichas
Goulasch, filetes rellenos, callos
7 a 8
Cocer, Freír
Patatas, buñuelos, tortas
9
Freír, llevar a ebullición
Filetes, tortillas, agua
P
Freír,
Llevar a ebullición
Llevar a ebullición cantidades importantes de
agua
CONSERVACIÓN Y LIMPIEZA
Es necesario poner el aparato fuera de servicio para limpiarlo.
Deje enfriar el aparato, ya que hay riesgo de quemaduras.
Limpie los restos de cocción con agua a la que haya añadido un producto lavavajillas o un
producto comercial aconsejado para vitrocerámica.
No utilice productos de limpieza abrasivos que podrían dañar el aparato.
Seque el aparato con un trapo limpio.
Retire inmediatamente el azúcar o materiales que contengan azúcar.
No utilice en ningún caso aparatos "a vapor" o "a presión".
No utilice objetos que comporten riesgo de rayar la vitrocerámica (como estropajos
abrasivos o puntas de cuchillo …).

16
a
d
c
b
QUÉ HACER EN CASO DE PROBLEMA
EL símbolo [ E 4 ] aparece :
La placa debe ser reconfigurada segun el procedimiento descrito a continuación :
I) Cuidado : al principio no colocar recipientes sobre la placa.
II) Desconectar la placa de la corriente eléctrica : quitar el fusible o cortar el automático.
III) Volver a conectar la placa a la corriente eléctrica : poner el fusible o enchufar el
automático.
IV) Procedimiento : utilizar un recipiente ferromagnetico con un diametro de 16 cm como
minimo.
* poner en marcha en menos de 2 minutos tras la conexion a la corriente eléctrica.
* no presionar la tecla [ O/I ]
V) Debe anular la configuración.
1) Presionar la tecla 2 y mantener presionado.
2) En cada indicador aparece un [ - ]
3) Con un dedo de la otra mano presionar
sucesiva y rapidamente (en menos
de 2 segundos) las [ - ]. Partiendo de la zona
delantera derecha y girando en sentido contrario a
las agujas del reloj (a -> b -> c -> d).
Un doble "bip" significa un error de
manipulación. En este caso, volver a hacer
la operación desde el paso numero 1.
4) Retirar los dedos de las teclas y volver a presionar la tecla 1 durante algunos
segundos hasta que aparezcan las [ E ] parpadeantes.
5) Esperar hasta que las [ E ] permanezcan fijas.
6) Las [ E ] cambiaran automaticamente a [ C ]. La configuración ha sido anulada.
Nota : Para las placas de inducción con 3 zonas de cocción : poner en marcha con
la zona trasera derecha (b) (la zona delantera derecha no existe).
VI) Como reconfigurar la placa :
1) Utilzar un recipiente ferromagnético con un diametro minimo de 16cm.
2) Seleccionar la zona de cocción presionando la [ C ] correspondiente.
3) Poner el recipiente sobre la zona a configurar.
4) Esperar hasta que la [ C ] cambie a [ - ]. La zona de cocción se ha configurada.
5) Proceder de la misma forma para todas las zonas de cocción en las que
aparecen la [ C ].
6) Las zonas de cocción han sido configuradas
Utilizar solo un recipiente para efectuar la configuración.
Ne colocar jamás más recipiente sobre los fogones durante la configuración.
Si el indicador [ E 4 ] persiste, llame al Servicio Post-Venta.
La placa de cocción o las zonas de cocción no se encienden:
La placa está mal conectada a la red eléctrica
El fusible de protección ha saltado
Verifique que no esté activado el bloqueo
Las teclas táctiles están cubiertas de agua o de grasa
Hay un objeto encima de las teclas táctiles

17
No tirar nunca su aparato con los residuos
domésticos
Llame al servicio de retirada de electrodomésticos o
déjelo en los lugares de depósito establecidos por
su municipio y adaptados al reciclaje de los
aparatos electrodomésticos
El símbolo [ U ] se enciende:
No hay cacerola en la zona de cocción
El recipiente utilizado no es compatible con la inducción
El diámetro del fondo de la cacerola es demasiado pequeño respecto a la zona de
cocción
El símbolo [ E ] se enciende:
El sistema electrónico es defectuoso
Desconecte y vuelva a conectar el aparato
Una de las zonas o el conjunto de la placa de cocción se desconecta:
Ha funcionado la desconexión de seguridad
Ésta se acciona en caso que haya olvidado de apagar una de las zonas de calentamiento
Se conecta igualmente cuando una o varias teclas táctiles están tapadas
Una de las cacerolas está vacía y su fondo se ha sobrecalentado
La placa dispone igualmente de un dispositivo de reducción automática del nivel de
potencia y de corte automático en caso de sobrecalentamiento
La soplante de ventilación continúa girando después de parar la placa:
Esto no es un fallo, el ventilador continúa protegiendo la electrónica del aparato
La soplante se para automáticamente
El mando de cocción automática no se conecta:
La zona de cocción está aún caliente [ H ]
Está conectado el nivel máximo de cocción [ 9 ]
El nivel de cocción se ha conectado con la tecla [ - ]
El símbolo [ L ] se enciende:
Referirse al capítulo bloqueo de la venda de pedido.
El símbolo [ U ] se enciende:
Referirse al capítulo “Mantener caliente”
El símbolo [ II ] se enciende:
Referirse al capítulo “Pausa”
PROTECCIÓN DEL MEDIO AMBIENTE
Los materiales de embalaje son ecológicos y reciclables
Los aparatos electrónicos están formados por materiales reciclables y a veces de
materiales nocivos para el medio ambiente, pero necesarios para el buen funcionamiento
y la seguridad del aparato

18
INSTRUCCIONES DE INSTALACIÓN
El montaje es competencia exclusiva de especialistas.
El usuario está obligado a respetar la legislación y las normas en vigor en su país de residencia.
Colocación de la junta de estanqueidad
La junta adhesiva suministrada con el aparato permite evitar cualquier filtración en el mueble.
Su colocación debe efectuarse con gran cuidado según el croquis adjunto.
Encaje:
La abertura en la superficie de trabajo será, según el modelo, de:
Modelo
Abertura
7330240
760 x 350 mm
7331240
560 x 490 mm
7333240
650 x 490 mm
7370240
560 x 490 mm
La distancia entre la placa de cocción y la pared debe ser de 50 mm. como mínimo.
La placa de cocción es un aparato perteneciente a la clase de protección "Y". Cuando se
empotre, en la parte posterior y en uno de los lados puede haber una pared o un armario
alto. Pero en el otro lado no debe haber ningún mueble ni aparato que sea más alto
que la superficie de cocción
Las placas y revestimientos de las superficies de trabajo deben ser de materiales
resistentes al calor (100°C)
Los junquillos de los bordes de la pared deben ser termo-resistentes
Los materiales de las superficies de trabajo pueden hincharse en contacto con la
humedad. Para los cantos del corte, aplique un barniz o una cola especial.
No instale la placa encima de un horno sin ventilación ni de un lavavajillas
Garantice un espacio de 20 mm entre el fondo de la caja del aparato y la pared para
asegurar una buena circulación de aire para la refrigeración de la electrónica
Si hay un cajón debajo de la superficie de cocción, evite guardar en él objetos inflamables
(por ejemplo: sprays) y objetos que no resistan el calor
La distancia de seguridad entre la placa de cocción y la campana de aspiración situada
encima debe respetar las indicaciones del fabricante de la campana. En caso de falta de
instrucciones, respete una distancia mínima de 760 mm.
El cable de conexión no debe estar sometido, después de la colocación, a ninguna
tensión mecánica, como la causada por un cajón
ADVERTENCIA: Use sólo protectores de las placas fabricados por el fabricante del
electrodoméstico de cocción o en su defecto los que el mismo indique en su manual de
uso y que sean compatibles con los protectores incorporados en el aparato
electrodoméstico. El uso de protecciones inadecuadas puede causar accidentes.
Pegar la junta (2) sobre el reborde de la placa,
a 2 mm del borde exterior, después de haber
quitado la lámina de protección (3).

19
CONEXIÓN ELÉCTRICA
La instalación de este aparato y su conexión a la red eléctrica sólo deben confiarse a un
electricista que esté al día de las prescripciones reglamentarias.
La protección contra las piezas bajo tensión eléctrica debe asegurarse después del
montaje.
Los datos necesarios para la conexión se encuentran en la placa de características y en
la placa de conexión situadas debajo del aparato.
Este aparato debe poderse aislar del sector por medio de un dispositivo de
seccionamiento omnipolar. Cuando esté abierto (desconectado) debe asegurarse una
separación de 3 mm.
El circuito eléctrico debe estar separado de la red por dispositivos adecuados, por ejemplo
disyuntores, fusibles, interruptores diferenciales y contactores.
Si el aparato no esta provisto de una fiche accesible, otros medios de desconexión deben
incorporarse a la instalación fija segun las reglamentaciones de la instalación.
El cable de alimentación debe colocarse de manera que no toca las partes calientes de la
placa de cocción.
Atención!
Este aparato está diseñado sólo para una alimentación de 230 V~ 50/60 Hz
Conecte siempre el hilo de tierra de protección.
Siga el esquema de conexión.
La caja de conexión se encuentra debajo de la placa de cocción. Para abrir el capó, utilice un
destornillador medio. Colóquelo en las 2 ranuras situadas en la parte anterior de las 2 flechas.
Red
Conexión
Diámetro del cable
Cable
Calibre de protección
230 V~ 50/60 Hz
1 Fase + N
3 x 2,5 mm²
H 05 VV - F
H 05 RR - F
25 A *
400 V~ 50/60 Hz
2 Fases + N
4 x 1,5 mm²
H 05 VV - F
H 05 RR - F
16 A *
* calculado con el coeficiente de simultaneidad según la norma EN 60 335-2-6
Conexión de la encimera:
Para adaptarse a la red eléctrica (230 V~ 1 P+N o 400 V~ 2 P+N), utilice los puentes de latón
situados en la caja de conexión.
Monofásico 230 V~ 1 P+N:
Poner un puente entre los borne 1 y 2, y después un puente entre 3 y 4.
Atornillar el hilo verde/amarillo en el borne previsto para la puesta a tierra.
Atornillar el neutro N en el borne 3 ó 4.
Atornillar la fase L en uno de los borne 1 ó 2.
Bifásico 400 V~ 2 P+N:
Poner un puente entre 3 y 4.
Atornillar el hilo verde/amarillo en el borne previsto para la puesta a tierra.
Atornillar el neutro N en el borne 3 ó 4.
Atornillar la fase L1 en el borne 1 y la fase L2 en el borne 2.
Atención! Introduzca bien los hilos y apriete bien los tornillos.
No somos responsables de ningún incidente debido a una conexión incorrecta o que
pudiere ocurrir a causa del uso de un aparato no conectado a tierra o equipado con una
tierra defectuosa.

Уважаемые клиенты!
Благодарим Вас за то, что Вы выбрали нашу индукционную варочную панель со
стеклокерамической поверхностью.
Чтобы добиться максимальной отдачи от использования этого прибора, мы рекомендуем
Вам внимательно прочитать следующую информацию и сохранить буклет для
последующего использования.
СОДЕРЖАНИЕ
БЕЗОПАСНОСТЬ ...................................................................................................................... 21
МЕРЫ ПРЕДОСТОРОЖНОСТИ ПЕРЕД ИСПОЛЬЗОВАНИЕМ ............................................................... 21
ЭКСПЛУАТАЦИЯ ПРИБОРА .......................................................................................................... 21
МЕРЫ ПРЕДОСТОРОЖНОСТИ ДЛЯ ПРЕДОТВРАЩЕНИЯ ПОВРЕЖДЕНИЯ ПРИБОРА ............................. 22
МЕРЫ ПРЕДОСТОРОЖНОСТИ В СЛУЧАЕ ОТКАЗА ПРИБОРА В РАБОТЕ .............................................. 23
ДРУГИЕ МЕРЫ ПРЕДОСТОРОЖНОСТИ .......................................................................................... 24
ОПИСАНИЕ ПРИБОРА ............................................................................................................. 25
ТЕХНИЧЕСКИЕ СВЕДЕНИЯ ........................................................................................................... 25
ПАНЕЛЬ УПРАВЛЕНИЯ ................................................................................................................ 26
ПРИМЕНЕНИЕ ........................................................................................................................... 26
ДИСПЛЕЙ .................................................................................................................................. 26
ВЕНТИЛЯЦИЯ............................................................................................................................. 26
ЗАПУСК И УПРАВЛЕНИЕ ПРИБОРОМ ................................................................................... 27
ПЕРЕД ПЕРВЫМ ИСПОЛЬЗОВАНИЕМ ............................................................................................ 27
ИНДУКЦИОННЫЙ ПРИНЦИП РАБОТЫ ............................................................................................ 27
ЧУВСТВИТЕЛЬНОСТЬ СЕНСОРНОЙ ПАНЕЛИ .................................................................................. 27
ШКАЛА ВЫБОРА МОЩНОСТИ И УСТАНОВКИ ТАЙМЕРА .................................................................... 27
НАЧАЛО РАБОТЫ........................................................................................................................ 28
ОБНАРУЖЕНИЕ КАСТРЮЛИ ......................................................................................................... 28
ИНДИКАЦИЯ ОСТАТОЧНОГО ТЕПЛА .............................................................................................. 28
ФУНКЦИЯ УСИЛЕНИЯ МОЩНОСТИ ................................................................................................ 29
ТАЙМЕР .................................................................................................................................... 29
АВТОМАТИЧЕСКАЯ ГОТОВКА ....................................................................................................... 31
ФУНКЦИЯ ПАУЗЫ ........................................................................................................................ 31
ФУНКЦИЯ ПОВТОРНОГО ЗАПУСКА ................................................................................................ 31
ФУНКЦИЯ ПОДДЕРЖКИ ТЕПЛА ..................................................................................................... 32
БЛОКИРОВКА ПАНЕЛИ УПРАВЛЕНИЯ ............................................................................................ 32
СОВЕТЫ ПО ГОТОВКЕ ............................................................................................................. 33
КАЧЕСТВО КАСТРЮЛЬ................................................................................................................. 33
РАЗМЕРЫ КАСТРЮЛИ ................................................................................................................. 34
ПРИМЕРЫ НАСТРОЕК МОЩНОСТИ ............................................................................................... 34
ОБСЛУЖИВАНИЕ И ОЧИСТКА ................................................................................................ 34
ДЕЙСТВИЯ В СЛУЧАЕ ВОЗНИКНОВЕНИЯ ПРОБЛЕМ ........................................................ 35
ЗАЩИТА ОКРУЖАЮЩЕЙ СРЕДЫ .......................................................................................... 36
ИНСТРУКЦИИ ПО УСТАНОВКЕ ............................................................................................... 37
ПОДКЛЮЧЕНИЕ К ЭЛЕКТРОСЕТИ ......................................................................................... 38

21
БЕЗОПАСНОСТЬ
Меры предосторожности перед использованием
Снимите все упаковочные материалы.
Установку и подключение прибора должны проводить
квалифицированные специалисты. Производитель не несет
ответственности за ущерб, возникший в результате ошибок
при установке и подключении.
Прибор должен быть установлен в кухонную мебель с
правильно подобранной рабочей поверхностью.
Данный бытовой прибор предназначен исключительно для
приготовления пищи, использование в иных бытовых,
коммерческих или промышленных целях не допускается.
Удалите со стеклокерамики все этикетки и защитные
самоклеящиеся пленки.
Не изменять конструкцию и техническое устройство
прибора!
Варочную панель нельзя использовать как отдельно
стоящий прибор и как рабочую поверхность.
Прибор должен быть заземлен и подключен к электросети
согласно стандартам, действующим в стране
использования прибора.
Не использовать удлинители для подключения прибора к
электросети.
Прибор нельзя устанавливать над посудомоечной машиной
и сушильным аппаратом: пар может повредить
электронные устройства.
Прибор не предназначен для управления с помощью
внешнего таймера или внешней системы дистанционного
управления.
Эксплуатация прибора
После использования выключайте зоны нагрева.
Внимательно следите за приготовлением блюд с
использованием жиров и растительных масел: они могут
легко воспламениться.

22
Обращайтесь с прибором осторожно: не обожгитесь во
время или после приготовления пищи.
Убедитесь, что кабели каких-либо зафиксированных или
подвижных приборов не контактируют со стеклом или
горячей посудой.
Рядом с работающим прибором нельзя помещать
намагниченные предметы (кредитные карты, дискеты,
калькуляторы).
Не ставьте на прибор никакие металлические предметы,
кроме посуды, используемой для приготовления пищи. В
случае случайного включения и работы зоны нагрева или
остаточного тепла, оставленные на приборе предметы
могут нагреться, расплавиться или сгореть.
Никогда не накрывайте прибор скатертью или защитной
крышкой. Она может сильно нагреться и привести к пожару.
Этот прибор может использоваться детьми в возрасте от 8
лет и старше и лицами с ограниченными физическими,
сенсорными или психическими возможностями или
имеющие недостаточного опыта и знаний, если они
находятся под присмотром или им даны указания по
безопасному использованию прибора и осознающие
потенциальную опасность.
Дети не должны играть с прибором
Чистка и обслуживание должны не доверялись
оставленным без присмотра детям взрослых.
Не кладите металлические предметы (ножи, вилки, ложки,
крышки) на варочную поверхность, так как они могут
нагреться.
Меры предосторожности для предотвращения
повреждения прибора
Стеклокерамическую поверхность могут повредить: сырое
дно кастрюли или сковороды, поврежденные кастрюли
(неэмалированная чугунная посуда).
Стеклокерамическую поверхность может повредить песок и
другие абразивные материалы.
Избегайте падения предметов, даже небольших размеров,
на стеклокерамическую поверхность.

23
Не ударяйте края стеклокерамической поверхности
посудой.
Убедитесь, что вентиляция прибора осуществляется в
соответствии с указаниями производителя.
Не оставляйте пустые кастрюли на стеклокерамической
варочной поверхности.
Не допускайте контакта зон нагрева с сахаром,
синтетическими материалами и алюминиевыми листами.
Это может привести к расколу или другим повреждениям
стеклокерамической поверхности при остывании: включите
прибор и немедленно удалите эти материалы или
вещества с горячей зоны нагрева (осторожно: не
обожгитесь).
НИКОГДА не пытайтесь сбить пламя водой, но выключите
прибор, а затем накройте пламя, например, крышкой от
посуды или противопожарным одеялом.
Никогда не ставьте горячую посуду на панель управления.
Если под встроенным прибором расположен ящик
кухонного шкафа, убедитесь, что между содержимым ящика
и внутренней частью прибора есть достаточно большое
пространство (2 см). Это важно для обеспечения
необходимой вентиляции.
Никогда не кладите легко воспламеняющиеся предметы
(например, спреи) в ящик, расположенный под
стеклокерамической варочной поверхностью. В любом
случае ящики для столовых приборов должны быть
жаропрочными.
Меры предосторожности в случае отказа прибора в работе
Если вы заметили неисправность, выключите прибор и
отключите электропитание.
Если стеклокерамическая поверхность треснула или
раскололась, отключите прибор от электросети и
обратитесь в сервисный центр.
Ремонт прибора должен производиться специалистами. Не
вскрывайте прибор самостоятельно.

24
ВНИМАНИЕ: Если поверхность треснула, выключите
прибор, чтобы предотвратить возможность удара
электротоком.
Другие меры предосторожности
Всегда ставьте посуду в центр зоны нагрева. Дно посуды
должно по возможности максимально покрывать зону
нагрева.
Вниманию лиц с кардиостимулятором: магнитное поле
прибора может оказать влияние на его работу.
Рекомендуется получить более подробную информацию от
продавца прибора или врача.
Не используйте посуду из алюминия и синтетических
материалов. Они могут расплавиться на горячих зонах
нагрева.
ВНИМАНИЕ: Используйте только защитные ограждения
для варочной поверхности, разработанные производителем
прибора для приготовления пищи или указанные
производителем прибора в руководстве по эксплуатации в
качестве подходящего защитного устройства или защитные
ограждения для варочной поверхности, непосредственно
установленные на приборе. Использование неподходящих
защитных ограждений варочной поверхности может
привести к несчастному случаю.
ИСПОЛЬЗОВАНИЕ ПОСУДЫ НЕНАДЛЕЖАЩЕГО
КАЧЕСТВА И АДАПТЕРОВ ДЛЯ ИНДУКЦИОННЫХ
ПОВЕРХНОСТЕЙ ДЛЯ НЕМАГНИТНОЙ ПОСУДЫ
ПРИВОДИТ НАРУШЕНИЮ ГАРАНТИЙНЫХ
ОБЯЗАТЕЛЬСТВ.
В ЭТОМ СЛУЧАЕ ПРОИЗВОДИТЕЛЬ НЕ НЕСЕТ
ОТВЕСТВЕННОСТИ ЗА ЛЮБОЙ УЩЕРБ,
ПРИЧИНЕННЫЙ ВАРОЧНОЙ ПОВЕРХНОСТИ И/ИЛИ
ОКРУЖАЮЩЕЙ СРЕДЕ.

25
ОПИСАНИЕ ПРИБОРА
Технические сведения
Тип
7330240
7331240
7332240
7370240
Полная мощность
6700 Вт
6700 Вт
7400 Вт
7400 Вт
Потребление энергии поверхностью
EC
hob
**
173.6 Втч/кг
176.6 Втч/кг
174.2 Втч/кг
176.5 Втч/кг
Спереди слева pасположение конфорок
Ø 200 мм
Ø 250 мм
Ø 250 мм
Ø 200 мм
Минимальный обнаруживаемый диаметр
Ø 100 мм
Ø 110 мм
Ø 110 мм
Ø 100 мм
Номинальная мощность*
2300 Вт
2300 Вт
2300 Вт
2300 Вт
Мощность в режиме быстрого нагрева*
3000 Вт
3000 Вт
3000 Вт
3000 Вт
Категория стандартного оборудования **
C
D
D
C
Потребление энергии EC
cw
**
180.5 Втч/кг
182.7 Втч/кг
182.7 Втч/кг
180.5 Втч/кг
Задняя pасположение конфорок
-
-
Ø 180 мм
Ø 180 мм
Минимальный обнаруживаемый диаметр
-
-
Ø 90 мм
Ø 90 мм
Номинальная мощность*
-
-
1200 Вт
1200 Вт
Мощность в режиме быстрого нагрева*
-
-
1400 Вт
1400 Вт
Категория стандартного оборудования **
-
-
B
B
Потребление энергии EC
cw
**
-
-
166.7 Втч/кг
166.7 Втч/кг
Переднее pасположение конфорок
Ø 160 мм
-
-
-
Минимальный обнаруживаемый диаметр
Ø 90 мм
-
-
-
Номинальная мощность*
1200 Вт
-
-
-
Мощность в режиме быстрого нагрева*
1400 Вт
-
-
-
Категория стандартного оборудования **
B
-
-
-
Потребление энергии EC
cw
**
166.7 Втч/кг
-
-
-
Переднее pасположение конфорок
-
Ø 160 мм
Ø 160 мм
Ø 220 мм
Минимальный обнаруживаемый диаметр
-
Ø 90 мм
Ø 90 мм
Ø 110 мм
Номинальная мощность*
-
1200 Вт
1200 Вт
2300 Вт
Мощность в режиме быстрого нагрева*
-
1400 Вт
1400 Вт
3000 Вт
Категория стандартного оборудования **
-
B
B
C
Потребление энергии EC
cw
**
-
166.7 Втч/кг
166.7 Втч/кг
173.7 Втч/кг
Переднее pасположение конфорок
Ø 250 мм
Ø 200 мм
Ø 200 мм
Ø 160 мм
Минимальный обнаруживаемый диаметр
Ø 100 мм
Ø 100 мм
Ø 100 мм
Ø 90 мм
Номинальная мощность*
2300 Вт
2300 Вт
2300 Вт
1400 Вт
Мощность в режиме быстрого нагрева*
3000 Вт
3000 Вт
3000 Вт
2000 Вт
Категория стандартного оборудования **
D
C
C
A
Потребление энергии EC
cw
**
173.7 Втч/кг
180.5 Втч/кг
180.5 Втч/кг
185 Втч/кг
* Указанная мощность может изменяться в зависимости от размеров и материала посуды.
** рассчитано согласно методике измерений (EN 60350-2).

26
Панель управления
ПРИМЕНЕНИЕ
Дисплей
Дисплей
Обозначение
Функция
0
Ноль
Активирована зона нагревания
1 … 9
Уровень мощности
Выбор уровня готовки
U
Обнаружение кастрюли
Кастрюля отсутствует или не подходит
A
Усилитель мощности
нагрева
Автоматическая готовка
E
Сообщение об ошибке
Отказ электроники
H
Остаточное тепло
Зона нагревания горячая
P
Усилитель мощности
Активирован усилитель мощности
L
Блокировка
Блокировка панели управления
U
Поддержание тепла
Автоматическое поддержание
температуры 70
0
C
II
Пауза
Работа варочной панели приостановлена
Вентиляция
Система охлаждения действует полностью автоматически. Охлаждающий вентилятор
запускается на низкой скорости, когда уровень тепла, выделяемого электронной системой,
достигает определенного уровня. Вентиляция начинает работать на высокой скорости при
интенсивном использовании варочной панели. Охлаждающий вентилятор снижает
скорость и автоматически останавливается, когда электронный контур достаточно
охладится.

27
ЗАПУСК И УПРАВЛЕНИЕ ПРИБОРОМ
Перед первым использованием
Очистить варочную панель влажной тканью, затем тщательно высушить панель.
Запрещается использовать моющие средства – они могут привести к появлению
синеватого оттенка стеклокерамической поверхности.
Индукционный принцип работы
Под каждой зоной нагревания находится индукционная катушка. При ее включении катушка
вырабатывает переменное электромагнитное поле, производящее индуктивный ток в
ферримагнитной нижней пластине кастрюли. В результате происходит нагревание
кастрюли, находящейся в зоне нагревания.
Естественно, следует использовать специально предназначенные кастрюли.
Рекомендуется использовать все ферримагнитные кастрюли (пригодность
подтверждает значок маленького магнита): чугунные, стальные, эмалированные, из
нержавеющей стали и ферримагнитным днищем и т. п.
Исключается использование: медных, из чистой нержавеющей стали, алюминиевых,
стеклянных, деревянных, керамических, каменных и т. п.
Индукционная зона нагревания автоматически адаптируется к размеру кастрюли. При
слишком маленьком диаметре кастрюли она не сработает. Диаметр варьируется в
зависимости от функции диаметра зоны нагревания. Если кастрюля не адаптирована к
использованию на индукционной варочной панели, на дисплее отобразится знак [ U ].
Чувствительность сенсорной панели
Ваша стеклокерамическая варочная панель оборудована электронными приборами
управления с чувствительными сенсорными кнопками. При прикосновении к кнопкам
активируется соответствующая команда. Эта активация подтверждается контрольной
лампочкой, загорающейся на дисплее цифрой или буквой и/или звуком зуммера.
При общем использовании следует прикасаться только к одной кнопке за раз.
Шкала выбора мощности и установки таймера
Чтобы выбрать мощность с помощью шкалы, проведите пальцем по зоне «Шкала». Также
вы можете установить определенную мощность, если дотронетесь пальцем до желаемого
уровня мощности.

28
Начало работы
Включение/выключение варочной панели:
Действие
Панель управления
Дисплей
Запуск
Нажать кнопку [ 0/I ]
[ 0 ] мигает
Выключение
Нажать кнопку [ 0/I ]
Ничего или [ H ]
Включение/выключение зоны нагревания:
Действие
Панель управления
Дисплей
Выбор зоны
Нажать на дисплее [ 0 ]
[ 0 ] и включение
контрольной лампочки
Регулировка мощности
Провести по шкале справа
налево
от [ 0 ] до [ 9 ]
Выключение
Провести по шкале до [ 0 ]
или нажмите [ 0 ]
[ 0 ] или [ Н ]
[ 0 ] или [ Н ]
Если в течение 20 минут не выбрана ни одна настройка, варочная панель вернется в
режим ожидания.
Обнаружение кастрюли
Функция обнаружения кастрюли обеспечивает абсолютную безопасность работы.
Индукция не срабатывает:
Если в зоне нагревания нет кастрюли, или кастрюля не подходит для
индукционного режима. В этом случае будет невозможно повысить мощность, а на
дисплее отобразится [ U ]. Этот символ исчезнет, когда в зону нагревания будет
помещена кастрюля.
Если кастрюлю убрать из зоны нагревания, работа прекратится. На дисплее
отобразится [ U ]. Символ [ U ] исчезнет, когда кастрюля снова будет помещена в
зону нагревания. Готовка продолжится на ранее выбранном уровне мощности.
После использования, следует выключить конфорку: не рекомендуется оставлять режим [
U ] обнаружения посуды.
Индикация остаточного тепла
После выключения зоны нагревания или полного отключения варочной панели зоны
нагревания останутся горячими, а на дисплее будет отображаться символ [ H ]. Символ
[ H ] исчезнет, когда к зоне нагревания можно будет безопасно прикасаться.
До тех пор, пока горит индикатор остаточного тепла, запрещается прикасаться к
нагревательной зоне и помещать на нее теплочувствительные предметы. Существует
угроза возгорания и пожара.

29
Функция усиления мощности
Функция усиления мощности [ B ] обеспечивает усиление мощности в выбранной зоне
нагревания.
Если эта функция активирована, то зона нагревания в течение 10 минут будет работать на
сверхвысокой мощности. Усилитель предусмотрен, например, для быстрого нагревания
большого объема воды при приготовлении лапши.
Включение / выключение функции усиления мощности
Действие
Панель управления
Дисплей
Выбор зоны
Нажать кнопку [ 0 ]
[ 0 ] и включение
контрольной лампочки
Включение усиления
мощности
Нажать кнопку [ B ]
[ P ]
Выключение усиления
мощности
Провести по Шкале или
нажать [ B ]
[ 9 ]
Управление мощностью
Варочная поверхность оборудована системой ограничения мощности. Когда активируется
система усиления мощности, чтобы не превышать максимальный уровень мощности,
система дает команду автоматически снизить уровень мощности в другой зоне нагревания.
На дисплее несколько секунд мигает сигнал [ 9 ], а потом на нем отображается
максимальная допустимая мощность.
Выбранная зона нагревания
Другая зона нагревания (пример: уровень мощности 9)
Отображается [ P ]
[ 9 ] превращается в [ 6 ] или [ 8 ] в зависимости от
типа зоны
Таймер
Таймер может одновременно использоваться со всеми 3 или 4 зонами нагревания и
устанавливать разные настройки (от 0 до 99 минут) для каждой зоны нагревания.
Настройка и изменение времени готовки
Например, 16 минут при уровне мощности 7
Действие
Панель управления
Дисплей
Выбрать зону
нагревания
Нажать кнопку [ 0 ]
[ 0 ] и включение
контрольной лампочки
Выбрать уровень
мощности
Провести по Шкале до [ 7 ]
[ 7 ]
Выбрать функцию
«Таймер»
Нажать кнопку [ CL ]
[ 00 ]
Установить значение
Провести по Шкале до [ 6 ]
[0 горит ] [6 мигает ]
Подтвердить значение
Нажать на дисплей [06]
[ 0 мигает ] [ 6 горит ]
Установить
десятизначное значение
Провести по Шкале до [ 1 ]
[ 1 мигает ] [ 6 горит ]
Подтвердить
десятизначное значение
Нажать на дисплей [ 16 ]
[ 16 ]
Настройка времени подтверждена; начинается готовка.

30
Чтобы остановить время готовки
Например, 13 минут при уровне мощности 7:
Действие
Панель управления
Дисплей
Выбрать зону
нагревания
Нажать на дисплей [ 7 ]
[ 7 ] и включение
контрольной лампочки
Выбрать функцию
«Таймер»
Нажать кнопку [ 13 ]
[ 13 ]
Отменить установленное
значение
Провести по Шкале до [ 0 ]
[ 1 горит ] [ 0 мигает ]
Подтвердить
установленное значение
Нажать на дисплей [ 10 ]
[ 1 мигает ] [ 0 горит ]
Отменить десятизначное
значение
Провести по Шкале до [ 0 ]
[ 0 мигает ] [ 0 горит ]
Подтвердить
десятизначное значение
Нажать на дисплей [ 00 ]
[ 00 ]
Автоматическое выключение по окончании времени готовки
Как только истечет выбранное время готовки, на дисплее начнет мигать сообщение [ 00 ], и
прозвучит звуковой сигнал. Чтобы отключить сигнал и мигание дисплея, следует нажать
кнопку [ 00 ].
Функция секундомера
Например, на 29 минут:
Действие
Панель управления
Дисплей
Активировать варочную
панель
Нажать кнопку [ 0/I ]
загорелись лампочки
управления зоной
Выбрать функцию
«Таймер»
Нажать кнопку [ CL ]
[ 00 ] минут
Установить значение
Провести по Шкале до [ 9 ]
[ 0 ] горит [ 9 мигает]
Подтвердить значение
Нажать на дисплей
[ 09 ]
[ 0 ] мигает [ 9 ] горит
Установить
десятизначное значение
Провести по Шкале до [ 2 ]
[ 2 ] мигает [ 9 ] горит
Подтвердить
десятизначное значение
Нажать на дисплей
[ 29 ]
[ 29 ]
Через несколько секунд контрольная лампочка перестанет мигать. После выбора времени
готовки на дисплее таймера замигает значение [ 00 ] и прозвенит зуммер. Для его
отключения и мигания нажмите на дисплей [ 00 ]. Варочная плита отключится.

31
Автоматическая готовка
Все зоны готовки оснащены автоматическим устройством готовки «включения и
отключения». Зона готовки работает на полной мощности определенное время, затем
автоматически снижает мощность до предустановленного уровня.
Запуск:
Действие
Панель управления
Дисплей
Выбор зоны готовки
Нажать на дисплей [ 0 ]
[ 0 ] и включение
контрольной лампочки
Установки полной
мощности
Провести по Шкале до [ 9 ]
От [ 0 ] [ 9 ]
Автоматическая готовка
Провести по Шкале
повторно [ 9 ]
[ 9 ] мигает, значение [ A ]
Выбор уровня мощности
(например «7»)
Провести по Шкале до [ 7 ]
От [ 9 ] до [ 8 ] [ 7 ]
[ 7 ] мигает, значение [ A ]
Отключение автоматической готовки:
Действие
Панель управления
Дисплей
Выбор зоны готовки
Нажмите [ 7 ] из зоны
готовки
[ 7 ] мигает, значение [ A ]
Выбор уровня мощности
Провести по Шкале
От [ 1 ] до [ 9 ]
Функция паузы
Данная функция отключает варочную плиту и допускает повторный запуск с теми же
значениями.
Запуск/ выключение функции паузы:
Действие
Панель управления
Дисплей
Включить функцию
паузы
Нажать кнопку [ II ] в
течение 2 секунд
На дисплее отображается
[ II ] в зоне готовки
Отключить функцию
паузы
Нажать кнопку [ II ] в
течение 2 секунд
Контрольная лампочка
паузы мигает
Нажать еще раз или
провести по Шкале
Контрольная лампочка
паузы гаснет
Функция повторного запуска
После отключения варочной плиты [ 0/I ] можно восстановить последние значения.
Этапы готовки всех зон готовки (мощность)
Минуты и секунды, установленные на таймерах соответствующих зон готовки
Функция нагрева
Необходимо сделать следующее:
Нажать кнопку [ 0/I ]
Затем нажать кнопку [ II ] в течение 6 секунд.
Включаются последние значения.

32
Функция поддержки тепла
Данная функция позволяет автоматически поддерживать температуру 70
0
C.
Это позволит избежать переливания жидкости и пригорания.
Для включения функции «Поддержки тепла»:
Действие
Панель управления
Дисплей
Выбор зоны готовки
Нажать на дисплее [ 0 ]
От [ 0 ] до [ 9 ] или [ H ]
Включение функции
Нажать кнопку [ U ] на
Шкале
[ U ]
Отключение функции
Нажать на дисплее [ U ]
Провести по Шкале
[ U ]
От [ 0 ] до [ 9 ] или [ H ]
Эту функцию можно запустить независимо на всех зонах нагревания.
При снятии кастрюли с зоны готовки, функция «Поддержки тепла» работает еще примерно
в течение 10 минут.
Максимальная продолжительность функции «Поддержки тепла» - 2 часа.
Блокировка панели управления
Чтобы избежать изменения настроек конфорок, в частности, во время их очистки, панель
управления можно заблокировать (кроме кнопки включения/выключения [ 0/I ]).
Блокировка
Действие
Панель управления
Дисплей
Запуск
Нажать кнопку [ 0/I ]
На дисплее отображается [ 0 ]
или [ H ]
Блокировка варочной
панели
Нажать одновременно
[ B ] и [ 0 ] с дисплея
передней правой** зоны
Нажать на дисплей [ 0 ]
повторно
Нет изменений
На дисплее отображается [ L ]
Снятие блокировки
Действие
Панель управления
Дисплей
Запуск
Нажать кнопку [ 0/I ]
На дисплее отображается [ L ]
Через 5 секунд после
запуска:
Снятие блокировки
варочной панели
Нажать одновременно
[ B ] и [ 0 ] с дисплея
передней правой** зоны
Нажать на дисплей [ B ]
На дисплее отображается [ 0 ]
или [ H ]
Лампочка блокировки не горит
На дисплее ничего не
отображается
** для модели 7330240 используйте дисплей задней правой зоны

33
СОВЕТЫ ПО ГОТОВКЕ
Качество кастрюль
Подходящие материалы: сталь, эмалированная сталь, чугун, сталь с
намагничивающимся дном, алюминий с намагничивающимся дном
Не подходящие материалы: алюминий и сталь с не намагничивающимся дном, медь,
латунь, глина, фарфор
Чаще всего изготовители указывают, подходит ли посуда для индуктивной плиты.
Способ проверки, подходит ли посуда для индуктивной печи.
Залить в кастрюлю немного воды и поместить еѐ в варочной зоне индуктивной
плиты. Включить зону и выбрать интенсивность [ 9 ]. Вода должна нагреться за
несколько минут.
Коснуться магнитом дна кастрюли. Если магнит притянется, кастрюля подходит для
индукционной плиты.
Некоторая посуда может создавать шумы, при установке в варочную зону индуктивной
печи. Это не означает, что индукционная печь имеет повреждения или сбои в работе.
Кастрюли должны быть сертифицированы изготовителем, как подходящие для индукции.
Тем не менее, возможно, что некоторые кастрюли, даже если заявленные как
совместимые, на самом деле не имеют подходящих характеристик для
использования на индукционных плитах.
Рекомендуем проверить при приобретении, что кастрюли соответствуют хотя бы
следующим условиям:
Дно кастрюли (Ød) значительно меньше диаметра корпуса (ØD) КПД
понижается и кастрюля может быть не идентифицирована плитой

34
Размеры кастрюли
Конфорки до определенного предела автоматически адаптируются к диаметру кастрюли.
Однако днище кастрюли должно соответствовать минимальному диаметру
соответствующей конфорки.
Чтобы добиться максимально эффективной работы своей варочной поверхности,
кастрюлю следует ставить в центр конфорки.
Примеры настроек мощности
(Приведенные ниже значения являются ориентировочными).
от 1 до 2
Растапливание
Разогревание
Соусы, масло, шоколад, желатин
Блюда должны быть заранее
подготовлены
от 2 до 3
Тушение
Размораживание
Рис, пудинг, сахарный сироп
Сушеные овощи, рыба,
замороженные продукты
от 3 до 4
Обработка паром
Овощи, рыба, мясо
от 4 до 5
Вода
Картофель на пару, супы,
макаронные изделия, свежие овощи
от 6 до 7
Готовка при средней
температуре
Тушение
Мясо, печенка, яйца, колбасные
изделия
Гуляш, рулет, рубец
от 7 до 8
Готовка
Картофель, блюда во фритюре,
вафли
9
Жарка, запекание
Кипячение воды
Стейк, омлет, жареные блюда
Вода
Р
Жарка, запекание
Кипячение воды
Эскалоп, стейк, кипячение большого
объема воды
ОБСЛУЖИВАНИЕ И ОЧИСТКА
Перед очисткой отключить прибор.
Запрещается очищать варочную панель, если стеклокерамическая поверхность слишком
горячая: угроза ожога.
Удалить слабые загрязнения влажной тканью, смоченной в воде с разведенным в
ней моющим средством. Затем ополоснуть холодной водой и тщательно
высушить поверхность.
Запрещается использовать высококоррозионные или абразивные моющие
средства и чистящее оборудование, которые могут нанести царапины.
Запрещается применять паровые или компрессорные чистящие устройства.
Запрещается применять предметы, которые могут поцарапать
стеклокерамическую поверхность.
Следить за тем, чтобы кастрюля была сухой и чистой. Следить, чтобы на
варочной панели или кастрюли не оставалось частиц загрязнений. Если тащить
тяжелые сковороды по поверхности, на ней появятся царапины.
Рассыпанный сахар и пролитое варенье, желе и т. п. следует немедленно
удалить. Так можно предотвратить повреждение поверхности.

35
ДЕЙСТВИЯ В СЛУЧАЕ ВОЗНИКНОВЕНИЯ ПРОБЛЕМ
На дисплее отображается символ [ E4 ]:
Конфигурация варочной панели должна быть настроена в соответствии со
следующей процедурой.
I) Внимание: перед началом настройки следует убрать с панели все кастрюли.
II) Отключить варочную панель от источника питания: вытащить плавкий
предохранитель или отключить контурный прерыватель.
III) Подключить варочную панель к источнику питания.
IV) Процедура: взять контейнер с ферримагнитным днищем диаметром как минимум 16 см.
* Начать работу в течение 2 минут после подключения к источнику питания
* Не использовать кнопку [ 0/I ].
V) Отмена существующей конфигурации:
1) Нажать кнопку блокировки и подержать на ней палец.
2) На каждом дисплее появится символ [ - ].
3) Пальцем другой руки по очереди быстро активировать (менее чем за 2 секунды)
кнопки [ - ]. Начните с верхней правой зоны и продолжайте двигаться против
часовой стрелки, как показано на картинке (от a до d). Два сигнала зуммера
укажут, что в манипуляции произошел сбой, и следует вернуться к пункту 1.
4) Снять пальцы с клавиатуры и снова нажать кнопку [ 1 ] на несколько секунд,
пока не появится сообщение [ Е ].
5) Подождите пока символ [ Е ] не мигнет.
6) Через несколько секунд сообщение [ Е ] автоматически преобразится в [ С ]→.
Данная конфигурация была отменена.
Примечание: для индукционных варочных плит с тремя зона готовки, у которых
нет верхней правой зоны, начните процедуру с нижней правой зоны (b).
VI) Следующий шаг: установка новой конфигурации.
1) Использовать подходящую индукционную кастрюлю с минимальным
иаметром дна 16 см.
2) Выбрать зону нагревания, нажав соответствующую кнопку [ C ].
3) Поставить кастрюлю в соответствующую зону нагревания.
4) Подождать, пока сообщение [ С ] не преобразится в [ - ]. Конфигурация зоны
установлена.
5) Использовать одну и ту же процедуру для каждой зоны нагревания, в которой
отображается [ С ].
6) Конфигурация задана, если обнаружены все зоны, и не отображаются никакие
сообщения.
Для установки конфигурации использовать только 1 кастрюлю.
Во время установки конфигурации запрещается ставить в зоны нагревания две и
более кастрюли.
Если сообщение [ Е4 ] не исчезнет, связаться с отделом послепродажного обслуживания.
Варочная панель или конфорка не включается
Варочная панель некачественно подключена к электросети.
Защитный предохранитель отсечен.
Активирована функция блокировки.
Сенсорные кнопки покрыты жиром или водой.
На кнопке находится какой-то предмет.

36
На дисплее отображается символ [ U ]
На конфорке нет кастрюли.
Кастрюля не подходит для индукционного режима.
Диаметр дна кастрюли слишком мал.
На дисплее отображается символ [ С ] или [ Е ]
Связаться с отделом послепродажного обслуживания.
Одна или все конфорки блокированы
Сработала система безопасности.
Конфорка долгое время не блокировалась.
Одна или несколько сенсорных кнопок загрязнены.
Кастрюля пуста, и ее дно перегрелось.
Варочная панель оборудована функцией автоматического снижения уровня
мощности и автоматически отключается при перегреве
Долгая работа вентиляции после отключения варочной панели
Это не сбой; работа вентилятора защищает электроприбор.
Охлаждающий вентилятор отключится автоматически.
Система автоматической готовки не запускается:
Зона готовки еще горячая [ H ].
Установлен наиболее высокий уровень мощности [ 9 ].
На панели управления отображается символ [ L ]:
Смотрите главу блокировки панели управления.
На панели управления отображается символ [ U ]:
Смотрите главу «Поддержка тепла».
На панели управления отображается символ [ II ]:
Смотрите главу «Пауза».
ЗАЩИТА ОКРУЖАЮЩЕЙ СРЕДЫ
Упаковочный материал экологически чист и может быть переработан.
Электронные приборы состоят из перерабатываемых и иногда веществ, вредных
для окружающей среды, но необходимых для нормальной работы и безопасности
использования таких приборов.
Запрещается выбрасывать прибор с бытовым
мусором.
Связаться с центром по вывозу мусора своего
района, который занимается переработкой бытовых
приборов.

37
ИНСТРУКЦИИ ПО УСТАНОВКЕ
За установку отвечают исключительно специалисты.
Устанавливающее лицо обязано соблюдать законодательство и стандарты, действующие
в его стране.
Как устанавливать уплотнитель
Уплотнитель, поставляемый вместе с варочной панелью, позволяет избежать
проникновения жидкостей в шкаф.
Его установка должна быть выполнена тщательно, в соответствии с приведенной ниже
схемой.
Установить уплотнитель (2) на
расстоянии двух миллиметров от
внешней крмки стеклокерамической
поверхности, предварительно сняв с
него защитную пленку (3).
Подгонка – установка
Размеры вырезаемого отверстия:
Прибор
Отверстие
7330240
760 x 350 мм
7331240
560 x 490 мм
7332240
650 x 490 мм
7370240
560 x 490 мм
Проследить за тем, чтобы расстояние от варочной панели до ближайшей стены или
стенки шкафа составляло 50 мм.
Класс тепловой защиты варочной панели – Y. В идеале, варочная панель должна
быть установлена так, чтобы со всех сторон было достаточно места. Сзади или сбоку
от нее может находиться стена и высокая мебель. Однако с другой стороны никакие
предметы или перегородки не могут по высоте превышать панель.
Предмет мебели или опора, на которую будет установлена варочная панель, а также
края мебели, ламинационное покрытие и используемый для его крепления клей
должны быть способны выдержать температуры до 100ºС.
Декоративные панели кромки должны быть термостойкими.
Запрещается устанавливать варочную поверхность поверх невентилируемой духовки
или посудомоечной машины.
Необходимо проследить, чтобы под прибором было оставлено свободное место на 20
мм, чтобы обеспечить циркуляцию воздуха в электроприборе.
Если под панелью установлен ящик, не следует помещать в него легко
воспламеняемые предметы (например, аэрозольные баллончики) или
нетермостойкие предметы.
Материалы, часто используемые при производстве столешниц, обычно расширяются
при контакте с водой. Чтобы защитить срезанную кромку, следует нанести на нее
слой лака или специального герметика. Особое внимание следует уделить
размещению липкого уплотнителя стыков, поставляемого вместе с варочной панелью,
чтобы предотвратить любые утечки в основание. Этот уплотнитель гарантирует
герметизацию при использовании в сочетании с гладкой поверхностью столешницы.
Предохранительные зазор между варочной панелью и вытяжкой над ней должен
соответствовать указаниям производителя вытяжки. В случае отсутствия указаний
минимальное расстояние должно составлять 760 мм.
После встраивания на соединительный кабель не должно оказываться механическое
воздействие, например, в результате движения ящика.

38
ВНИМАНИЕ: Используйте только защитные ограждения для варочной поверхности,
разработанные производителем прибора для приготовления пищи или указанные
производителем прибора в руководстве по эксплуатации в качестве подходящего защитного
устройства или защитные ограждения для варочной поверхности, непосредственно
установленные на приборе. Использование неподходящих защитных ограждений варочной
поверхности может привести к несчастному случаю.
ПОДКЛЮЧЕНИЕ К ЭЛЕКТРОСЕТИ
Установка оборудования и его подключение оборудования к сети электропитания
должно выполняться только квалифицированными специалистами, которые должны
неукоснительно соблюдать действующие нормы и стандарты.
После встраивания оборудования, необходимо обеспечить защиту от воздействия
напряжения.
Информация об электрических соединениях указана на наклейке, находящейся на
корпусе устройства рядом с клеммной коробкой.
Подключение к сети электропитания должно осуществляться с помощью
заземленного штепселя или многополярного выключателя с контактным отверстием
шириной не менее 3 мм.
Электрическая цепь должна быть отделена от сети с помощью специальных
устройств, таких, как предохранители и замыкатели.
Если устройство не оснащено штепселем, при установке необходимо предусмотреть
возможность его отключения в соответствии с действующими правилами.
Воздушный шланг не должен касаться горячих частей варочной панели или плиты.
Осторожно!
Данный прибор может быть подключен только к сети на 230 В ~ 50/60 Гц.
Подключение всегда выполнять при помощи провода заземления.
Выполнять схему подключения.
Распределительная коробка находится под корпусом варочной панели в задней части.
Чтобы открыть корпус используйте отвертку среднего размера. Используйте ее чтобы
открыть крышку варочной плиты.
Сеть
Подключение
Диаметр
кабеля
Кабель
Калибр
защиты
230 В ~ 50/60 Гц
1 фаза + N
3 х 2.5 мм²
H 05 VV – F
H 05 RR – F
25 А*
400 В ~ 50/60 Гц
2 фазы + N
4 х 1.5 мм²
H 05 VV – F
H 05 RR – F
16 А*
* рассчитано с фактором одновременности в соответствии со стандартом EN 60 335-2-6

39
Подключение варочной плиты
Установка конфигурации:
Для различных типов подключения использовать перемычки из латуни, которые находятся
в ящике рядом с контактным терминалом.
Однофазный 230 В ~ 1P + N
Установить первую перемычку между контактами 1 и 2, вторую – между 3 и 4.
Заземлите устройство, провод нейтрали N к контакту 3 или 4, фазу L к одному из контактов
1 или 2.
Двухфазный 400 В ~ 2P + N
Установить перемычку между контактами 3 и 4.
Заземлите устройство, провод нейтрали N к контакту 3 или 4, фазу L к контакту 1, а фазу
L2 к контакту 2.
Внимание! Убедиться в правильности подключения проводов и перемычек и плотно
затянуть винты.
Мы не будем нести ответственность за любые несчастные случаи,
наступившие в результате неправильного подключения или использования
незаземленного прибора или прибора с некачественным заземлением.

40
Geachte klant
Bedankt voor de beslissing om onze inductie kookplaat aan te schaffen
Teneinde er voor te zorgen dat u optimaal gebruik kunt maken van deze apparatuur, adviseren
wij om deze handleiding nauwkeurig te lezen en te bewaren voor eventueel later gebruik.
SAMENVATTING
VEIILIGHEID ................................................................................................................................ 41
VOORZORGMAATREGELEN VÓÓR HET GEBRUIK ............................................................................. 41
GEBRUIK VAN DE APPARATUUR .................................................................................................... 41
HET VERMIJDEN VAN BESCHADIGINGEN AAN HET APPARAAT ........................................................... 42
HOE TE HANDELEN BIJ HET NIET FUNCTIONEREN VAN DE APPARATUUR ............................................ 43
ANDERE VOORZORGEN ............................................................................................................... 44
OMSCHRIJVING VAN DE APPARATUUR ................................................................................. 45
TECHNISCHE SPECIFICATIES ........................................................................................................ 45
BEDIENINGSPANEEL .................................................................................................................... 46
IN GEBRUIK NEMEN .................................................................................................................. 46
DISPLAY .................................................................................................................................... 46
VENTILATIE ................................................................................................................................ 46
IN GEBRUIK NEMEN .................................................................................................................. 47
VÓÓR HET EERSTE GEBRUIK ........................................................................................................ 47
INDUCTIE PRINCIPE ..................................................................................................................... 47
TOUCH CONTROL ........................................................................................................................ 47
IN HET GEVAL VAN EEN ALGEMEEN GEBRUIK, DRUKT U SLECHTS EEN TOETS TEGELIJK. ...................... 47
VERMOGENSINSTELLING ZONE “SLIDER” EN TIMER INSTELLING ..................................................... 47
BEGINNEN ................................................................................................................................. 48
PAN HERKENNING ....................................................................................................................... 48
RESTWARMTE INDICATIE ............................................................................................................. 48
BOOSTER FUNCTIE ..................................................................................................................... 48
TIMER ....................................................................................................................................... 49
AUTOMATISCH KOKEN ................................................................................................................. 50
PAUZE FUNCTIE .......................................................................................................................... 50
OPVRAAG FUNCTIE ..................................................................................................................... 51
« WARMHOUD » FUNCTIE ............................................................................................................ 51
VERGRENDELING BEDIENINGSPANEEL .......................................................................................... 51
KOOK ADVIEZEN ....................................................................................................................... 52
PAN KWALITEIT ........................................................................................................................... 52
PAN AFMETINGEN ....................................................................................................................... 53
VOORBEELDEN VAN INSTELLING VAN HET VERMOGEN .................................................................... 53
ONDERHOUD EN REINIGING .................................................................................................... 53
WAT TE DOEN ALS EEN PROBLEEM ZICH VOORDOET ....................................................... 54
BESCHERMING VAN DE OMGEVING ....................................................................................... 55
INSTALLATIE INSTRUCTIES ..................................................................................................... 56
ELEKTRISCHE AANSLUITING .................................................................................................. 57

41
VEIILIGHEID
Voorzorgmaatregelen vóór het gebruik
pak alle materialen uit
de installatie en het aansluiten van de apparatuur dient door
een erkend vakman te worden gedaan. De fabrikant is niet
verantwoordelijk voor beschadigingen of anderzijds die
veroorzaakt zijn door installatiefouten
de apparatuur moet op de juiste manier worden geïnstalleerd
en op een degelijke ondergrond geplaatst
dit apparaat is exclusief ontworpen voor het bereiden van
voedsel en mag niet toegepast worden voor commercieel en/of
industrieel gebruik
verwijder alle stickers en labels van het keramische glas
wijzig niets aan de apparatuur
de kookplaat kan niet gebruikt worden als vrijstaande unit of als
werk oppervlak
de apparatuur moet geaard en aangesloten worden conform de
lokale voorschriften
gebruik geen verlengde kabels voor de aansluiting
de apparatuur kan niet gebruikt worden boven een
afwasmachine, of een wasdroger; stoom kan de elektronica
beschadigen
Dit apparaat is niet bestemd voor gebruik met een externe
tijdschakelklok of een afstandsbediening.
Gebruik van de apparatuur
schakel de kookzones uit na gebruik
houd het koken in de gaten indien gebruik wordt gemaakt van
oliën en vetten; deze kunnen snel vlam vatten
wees voorzichtig jezelf niet te branden tijdens of na het gebruik
van de apparatuur
overtuig jezelf dat er geen kabels of andere materialen in
contact komen met het glas of hete pannen
magnetische voorwerpen (credit cards, floppy discs,
rekenmachines) moeten niet in de nabijheid van de apparatuur
worden geplaatst

42
gebruik geen metalen voorwerpen, behalve daarvoor geschikte
schalen. In het geval van oververhitting kunnen deze smelten of
zelfs verbranden
bedek het apparaat nooit met kleding of een
beschermingsdeken. Deze kunnen erg heet worden en in brand
vliegen
Kinderen jonger dan 8 jaar, personen van wie de psychische en
of mentale capaciteit vermindert zijn en personen van wie de
kennis onaangepast is, kunnen dit toestel enkel onder toezicht
gebruiken of indien zij opgeleid zijn om dit toestel te gebruiken
in veilige omstandigheden.
Zij dienen daarbij op de hoogte te zijn van de mogelijke risico‟s
die zich kunnen voordoen. Kinderen mogen niet met dit toestel
spelen.
Zonder toezicht van een volwassene kan het reinigen en
onderhoud van dit toestel niet aan kinderen toevertrouwd
worden.
metalen voorwerpen zoals messen, vorken, lepels en deksels
mogen niet op het oppervlak worden geplaatst omdat deze heel
heet kunnen worden
Het vermijden van beschadigingen aan het apparaat
Ruwe pannenbodems, of beschadigde pannen (niet
geëmailleerde gietijzeren pannen) kunnen het keramische glas
beschadigen.
Zand of andere krassende materialen kunnen het keramische
glas beschadigen
vermijd het vallen van voorwerpen, zelfs kleine op het
keramische glas
overtuig uzelf dat de ventilatie van het apparaat functioneert
zoals door de fabrikant aangegeven.
Stoot niet met pannen tegen de hoeken van het glas.
Laat geen lege pannen achter op de keramische kookplaat.

43
Suiker, synthetische materialen of aluminium vellen mogen niet
in contact komen met de kookzones. Deze kunnen breuk en
wijzigingen veroorzaken van het glas door afkoeling; schakel
het apparaat direct uit en verwijder de voorwerpen van de hete
zones (voorzichtig dat je jezelf niet brand).
Risico van brand! Geen voorwerpen op de kookplaat leggen.
Plaats nooit een hete pan op het bedieningspaneel.
Indien een lade onder de ingebouwde apparatuur is geplaatst,
zorg er dan voor dat de tussenruimte groot genoeg is (2 cm).
Dit is essentieel om een correcte ventilatie te garanderen.
Plaats nooit brandbare materialen in de lade (sprays) onder de
kookplaat. Eventuele automatische laden moeten
hittebestendig zijn-
Hoe te handelen bij het niet functioneren van de apparatuur
Als een defect zich voordoet moet het apparaat direct worden
uitgeschakeld en de stroomtoevoer worden onderbroken.
Is het keramische glas gebroken of gescheurd, dan moet het
apparaat worden uitgeschakeld en contact worden genomen
met de service afdeling.
Reparaties moeten worden gedaan door specialisten. Open zelf
nooit de apparatuur
WAARSCHUWING: als het oppervlak is gebroken, schakel het
apparaat uit ter voorkoming van elektrische schokken.

44
Andere voorzorgen
Overtuig u dat de pan altijd op het midden van de kookzone is
geplaatst. De bodem dient zo veel mogelijk de hele kookzone te
bedekken.
Gebruikers van een pacemaker dienen er rekening mee te
houden dat het magnetische veld van invloed kan zijn op de
werking. We adviseren om informatie te vragen bij de
leverancier of uw arts.
Gebruik nooit aluminium of synthetische pannen; ze kunnen
smelten op de hete kookzones.
Vuur nooit blussen met water. Schakel de kookzone uit.
Vlammen voorzichtig met een deksel, smoordeksel of iets
dergelijks verstikken.
HET GEBRUIK VAN NIET GESCHIKTE POTTEN EN
PANNEN OF VAN VERWIJDERBARE ACCESSOIRES OM
POTTEN, NIET GESCHIKT VOOR INDUCTIE, OP TE
WARMEN, VALT NIET ONDER DE
GARANTIEVOORWAARDEN.
DE FABRIKANT KAN NIET VERANTWOORDELIJK
GEHOUDEN WORDEN VOOR BESCHADIGINGEN AAN
DE KOOKPLAAT EN HAAR OMGEVING DIE HIERVAN
HET GEVOLG KUNNEN ZIJN.

45
OMSCHRIJVING VAN DE APPARATUUR
Technische specificities
Type
7330240
7331240
7332240
7370240
Total vermogen
6700 W
6700 W
7400 W
7400 W
Energieverbruik van de kookplaat EChob**
173.6 Wh/kg
176.6 Wh/kg
174.2 Wh/kg
176.5 Wh/kg
Vóórzijde links zone
Ø 200 mm
Ø 250 mm
Ø 250 mm
Ø 200 mm
Detectie kookpan
Ø 100 mm
Ø 110 mm
Ø 110 mm
Ø 100 mm
Normaal*
2300 W
2300 W
2300 W
2300 W
Met Booster*
3000 W
3000 W
3000 W
3000 W
Gestandaardiseerde categorie van het
kookgerei**
C
D
D
C
Energieverbruik EC
cw
**
180.5 Wh/kg
182.7 Wh/kg
182.7 Wh/kg
180.5 Wh/kg
Achter links zone
-
-
Ø 180 mm
Ø 180 mm
Detectie kookpan
-
-
Ø 90 mm
Ø 90 mm
Normaal*
-
-
1200 W
1200 W
Met Booster*
-
-
1400 W
1400 W
Gestandaardiseerde categorie van het
kookgerei**
-
-
B
B
Energieverbruik EC
cw
**
-
-
166.7 Wh/kg
166.7 Wh/kg
Midden zone
Ø 160 mm
-
-
-
Detectie kookpan
Ø 90 mm
-
-
-
Normaal*
1200 W
-
-
-
Met Booster*
1400 W
-
-
-
Gestandaardiseerde categorie van het
kookgerei**
B
-
-
-
Energieverbruik EC
cw
**
166.7 Wh/kg
-
-
-
Achter rechts zone
-
Ø 160 mm
Ø 160 mm
Ø 220 mm
Detectie kookpan
-
Ø 90 mm
Ø 90 mm
Ø 110 mm
Normaal*
-
1200 W
1200 W
2300 W
Met Booster*
-
1400 W
1400 W
3000 W
Gestandaardiseerde categorie van het
kookgerei**
-
B
B
C
Energieverbruik EC
cw
**
-
166.7 Wh/kg
166.7 Wh/kg
173.7 Wh/kg
Vóórzijde rechts zone
Ø 250 mm
Ø 200 mm
Ø 200 mm
Ø 160 mm
Detectie kookpan
Ø 100 mm
Ø 100 mm
Ø 100 mm
Ø 90 mm
Normaal*
2300 W
2300 W
2300 W
1400 W
Met Booster*
3000 W
3000 W
3000 W
2000 W
Gestandaardiseerde categorie van het
kookgerei**
D
C
C
A
Energieverbruik EC
cw
**
173.7 Wh/kg
180.5 Wh/kg
180.5 Wh/kg
185 Wh/kg
* het vermogen kan variëren in functie van de afmetingen en het materiaal van de kookpotten
** berekend volgens de methoden voor het meten van de gebruikseigenschappen(EN 60350-2)

46
Bedieningspaneel
IN GEBRUIK NEMEN
Display
display aanduiding functie
0 nul de kookzone is geactiveerd.
1…9 vermogensniveau selectie van het vermogensniveau.
U pan herkenning geen pan of een ongeschikte pan
A warmte versneller automatisch koken.
E foutmelding elektronica fout.
H restwarmte de kookzone is heet.
P booster de booster is geactiveerd.
L vergrendeling bedieningspaneel vergrendeling.
U warmhoud automatische warmhoud van 70°
II pauze de kookplaat staat op pauze.
Ventilatie
Het koelsysteem is volautomatisch. De koelventilator start op een lage snelheid wanneer de
warmte die het elektronische systeem detecteert een bepaald niveau bereikt. De ventilator
versnelt als de plaat intensiever wordt gebruikt. De koelventilator vertraagt de snelheid en stopt
automatisch als het elektronische circuit voldoende afgekoeld is.
booster
toets
pauze/herstart
toets
vermogen selector “SLIDER” en timer
instel zone
Aan/Uit toets
controlelampje
kookzone
controlelampje timer
Timer display
controlelampje
pauze/herstart
vermogen display
controlelampje
Aan/Uit
warmhoudtoets

47
IN GEBRUIK NEMEN
Vóór het eerste gebruik
Reinig de kookplaat met een vochtige doek en droog daarna het oppervlak grondig. Gebruik
geen middelen die het risico hebben dat een blauwe sluier op het glas achterblijft.
Inductie principe
Onder iedere kookzone bevindt zich een inductiespoel. Wanneer deze wordt geactiveerd,
produceert het een variabel elektromagnetisch veld die een inductiestroming verzorgt in de
speciaal ferromagnetische bodem van de pan. Het resultaat is verhitting van de pan die op de
zone staat.
Natuurlijk moet de pan aangepast zijn:
alle ferromagnetische pannen worden aanbevolen (controleerbaar met een kleine
magneet): gietijzeren en stalen pannen, geëmailleerde pannen, roestvaststalen
pannen met ferromagnetische bodems………..
uitgezonderd zijn: koper, pure rvs, aluminium, glas, hout, keramisch, aardewerk…..
De inductie kookzone past zich automatisch aan, aan de grootte van de pan. Met een te kleine
pandiameter werkt het niet. Deze diameter varieert in functie aan de diameter van de kookzone.
als de pan niet aangepast is aan de inductie kookplaat toont de display [ U ].
Touch control
Uw keramische kookplaat is uitgevoerd met touch control toetsen. Als u een vinger op de toets
legt wordt de daarmee corresponderende actie uitgevoerd. Deze actie wordt aangegeven door
een controle lampje, een letter of nummer in de display en/of een pieptoon.
In het geval van een algemeen gebruik, drukt u slechts een toets tegelijk.
Vermogensinstelling zone “SLIDER” en timer instelling
Om het vermogen te selecteren schuif je met je vinger over de “SLIDER” zone. Je kunt ook je
vinger direct op het gekozen vermogen niveau plaatsen
vermogen selector “SLIDER” en timer
instel zone
“SLIDER“
directe
toegang

48
Beginnen
Start/uitschakelen van de kookplaat:
Actie Bedieningspaneel Display
Starten druk toets [ 0/I ] [ 0 ] knippert
Stoppen druk toets [ 0/I ] niets of [ H ]
Start/uitschakelen van de kookzone:
Actie Bedieningspaneel Display
Zone keuze druk op display [ 0 ] selectie [ 0 ] controlelampje gaat aan
Instellen sleep op de “SLIDER“ [ 0 ] tot [ 9 ]
(vermogen aanpassen) naar rechts of links
Stoppen sleep naar [ 0 ] op de “SLIDER“ [ 0 ] of [ H ]
of druk op [ 0 ] [ 0 ] of [ H ]
Als er binnen 20 seconden geen keuze is gemaakt gaat de kookplaat terug naar de rustpositie
Pan herkenning
De pan herkenning garandeert een veilig gebruik.
De inductie werkt niet:
als er geen pan op de kookzone staat, of als de pan niet geschikt is voor inductie. In
dat geval is het onmogelijk om het vermogen op te voeren en de display toont (U) Dit
symbool verdwijnt wanneer er een geschikte pan op de kookzone wordt geplaatst.
als de pan van de kookzone wordt afgehaald stopt het proces. De display toont (U) Het
symbool [U] verdwijnt wanneer de pan terug wordt gezet op de kookzone. Het
kookproces gaat op hetzelfde vermogen verder als daarvoor.
Schakel de kookzone uit na gebruick. De pantedectie [ U ] blijft dan niet actief.
Restwarmte indicatie
Na het uitzetten van de kookplaat, is de zone nog heet en de display toont (H)
Het H symbol verdwijnt nadat de zone zonder gevaar aangeraakt kan worden
Zolang de restwarmte indicatie brandt, mag de kookzone niet worden aangeraakt, noch warmte
gevoelige materialen worden geplaatst.
Booster functie
De booster functie (P) geeft een vermogens injectie aan de geselecteerde kookzone.
Als deze functie is geactiveerd werkt de kookzone gedurende 10 minuten op een extra hoog
vermogen. De booster is bijvoorbeeld toepasbaar al er snel een grote hoeveelheid water moet
worden verwarmd
Start / Stop de booster functie:
Actie Bedieningspaneel Display
Zone keuze druk toets [ + ] van de zone [ 0 ]
Start de booster druk toets [ B ] [ P ] gedurende 10 min stop de
Booster druk toets [ - ] [ 9 ]
of druk toets [ B ] [ 9 ]

49
Vermogen controle:
De gehele kookplaat is uitgevoerd met een maximaal vermogen. Wanneer de booster functie is
ingeschakeld, zorgt het elektronische systeem ervoor dat het vermogen van de andere zones
wordt gereduceerd en dat het totale vermogen niet wordt overschreden. De display knippert op
[ 9 ] gedurende een paar seconden en toont dan het maximale toegestane vermogen [ 6 ] or [ 8 ].
geselecteerde kookzone de andere kookzone (voorbeeld: vermogensstand 9)
[ P ] wordt getoond [ 9 ] gaat naar [ 7 ] of [ 8 ] afhankelijk van de zone
Timer
De timer kan tegelijkertijd gebruikt worden voor 3 of 4 kookzones en met verschillende
tijdsinstellingen (van 0 tot 99 minuten) voor elke zone.
Instellen en wijzigen van de kooktijd
Voorbeeld 16 minuten op vermogen 7:
Actie Bedieningspaneel Display
Zone keuze selecteer op de display [ 0 ] [ 0 ] en controlelampje aan
Kies het vermogen sleep de “SLIDER“ naar [ 7 ] [ 7 ]
Selecteer « Timer» druk op display [ CL ] [ 00 ]
Stel de unit in sleep de “SLIDER“ naar [ 6 ] [ 0 bevestigd ] [ 6 knippert ]
Bevestig de units druk op display [ 06 ] [ 0 knippert] [ 6 bevestigd ]
Stel de tientallen in druk op de “SLIDER“ naar [ 1 ] [ 1 knippert ] [ 6 bevestigd ]
Bevestig de tientallen druk op display [ 16 ] [ 16 ]
De tijd is bevestigd en het koken begint.
De kooktijd stoppen:
Voorbeeld 13 minuten op vermogen 7 :
Actie Bedieningspaneel Display
Zone keuze druk op display [ 7 ] geselecteerd [ 7] en controlelampje aan
Selecteer « Timer » druk op toets [ 13 ] [ 13 ]
Deactiveer de units sleep de “SLIDER“ to [ 0 ] [ 1 bevestigd ] [ 0 knippert ]
Bevestig de units druk op display [ 10 ] [ 1 knippert ] [ 0 bevestigd ]
Deactiveer de tientallen sleep de “SLIDER“ to [ 0 ] [ 0 knippert ] [ 0 bevestigd ]
Bevestig de tientallen druk op display [ 00 ] [ 00 ]
Automatisch stoppen aan het eind van de kooktijd:
Zodra de geselecteerde kooktijd is beëindigd toont de display (00) en een geluidssignaal en de
kookzone schakelt uit. Om het lichtsignaal en geluid uit te schakelen volstaat het indrukken van de
knop [ 00 ].

50
Eiwekker functie :
Voorbeeld voor 29 minuten:
Actie Bedieningspaneel Display
Activeer de kookplaat druk op display [ 0/I ] zone controlelampjes aan
Selecteer « Timer » druk op display [ CL ] [ 00 ]
Stel de unit in sleep de “SLIDER“ naar [ 9 ] [ 0 bevestigd] [ 9 knippert ]
Bevestig de units druk op display [ 09 ] [ 0 knippert ] [ 9 bevestigd ]
Stel de tientallen in sleep de “SLIDER“ naar [ 2 ] [ 2 knippert ] [ 9 bevestigd ]
Bevestig de tientallen druk op display [ 29 ] [ 29 ]
Na een paar seconden stopt het controlelampje met knipperen.
Zodra de geselecteerde kooktijd is beëindigd toont de display (00) en een geluidssignaal en de
kookzone schakelt uit. Om het lichtsignaal en geluid uit te schakelen volstaat het indrukken van de
knop [ 00 ]. De kookplaat schakelt uit.
Automatisch koken
Alle kookzones zijn voorzien van een automatische “go en stop” functie: de kookzone start op vol
vermogen gedurende een bepaalde tijd en reduceert automatisch haar vermogen op het eerder
ingestelde niveau.
Starten :
Actie Bedieningspaneel Display
Zone keuze druk op display [ 0 ] geselecteerd [ 0 ] en controlelampje aan
Vol vermogen instelling sleep de “SLIDER“ naar [ 9 ] ga van [ 0 ] naar [ 9 ]
Automatisch koken herdruk op display “SLIDER“ [ 9 ] [ 9 ] knippert met [ A ]
Vermogensniveau keuze sleep de “SLIDER“ naar [ 7 ] [ 9 ] ga van [ 8 ] [ 7 ]
(bijvoorbeeld « 7 ») [ 7 ] knippert met [ A ]
Het automatisch koken uitschakelen :
Actie Bedieningspaneel Display
Zone keuze druk [ 7 ] van de zone [ 7 ] knippert
met [ A ]
Vermogensniveau keuze sleep de “SLIDER“ [ 1 ] naar [ 9 ]
Pauze functie
Deze functie onderbreekt alle kookplaat activiteiten en biedt de mogelijkheid om te herstarten
met dezelfde instellingen.
Starten/Stoppen van de pauze functie :
Actie Bedieningspaneel Display
Stel de pause in druk [ II ] toets gedurende 2s toont [ II ] in de
kook zone display
Stop de pauze druk [ II ] toets gedurende 2s pauze controlelampje
knippert
druk op een andere toets of
sleep de “SLIDER“ pauze controlelampje is uit

51
Opvraag functie
Nadat de kookplaat is uitgeschakeld[ 0/I ], is het mogelijk de laatste instellingen op te vragen.
kook trajecten van alle kookzones (vermogen)
minuten en seconden van geprogrammeerde kookzone gerelateerde timers
opwarm functie
de opvraag functie werkt als volgt:
druk op toets [ 0/I ]
druk dan op toets [ II ] gedurende 6 seconden
De voorgaande instellingen zijn geactiveerd.
« Warmhoud » functie
Deze functie maakt het mogelijk om automatisch een temperatuur van 70°C. te bereiken en vast
te houden.
Dit voorkomt het overkoken van vloeistoffen enf het aanbranden van de panbodem.
Het starten van de « warmhoud » functie :
Actie Bedieningspaneel Display
Zone keuze druk op display [ 0 ] geselecteerd [ 0 ] naar [ 9 ] of [ H ]
Instellen druk op toets [ U ] op de “SLIDER“ [ U ]
Stoppen druk op display [ U ] geselecteerd [ U ] sleep de “SLIDER“ van
[ 0 ] naar [ 9 ] of [ H ]
Deze functie kan onafhankelijk gestart worden voor alle kookzones.
Als de pan van de kookzone wordt afgehaald blijft de "warmhoud" functie gedurende ongeveer
10 minuten geactiveerd
De maximum warmhoud tijd is 2 uur.
Vergrendeling bedieningspaneel
Om te voorkomen dat een instelling van een kookzone wordt veranderd, met name tijdens het
reinigen, kan de bediening worden vergrendeld (met uitzondering van de Aan/Uit knop [ 0/I ]).
Vergrendelen :
Actie Bedieningspaneel Display
Start druk op toets [ 0/I ] [ 0 ] of [ H ] wordt getoond
Kookplaat vergrendeling druk tegelijkertijd [ B ] en [ 0 ] geen verandering
van de rechter vóórzijde** zone display
e-druk op de display [ 0 ] [ L ] aan wordt getoond
Ontgrendelen :
Actie Bedieningspaneel Display
Start druk op toets [ 0/I ] [ L ] aan wordt getoond
Binnen 5 sec. na start :
Pntgrendelen van druk tegelijkertijd [ B ] en [ 0 ] of [ H ] aan wordt getoond
de kookplaat [ L ] from the front right** zone display geen verlichte display‟s
druk op toets [ B ]
** voor de7330240 gebruik de rechtsachter zone display

52
KOOK ADVIEZEN
Pan kwaliteit
Toepasbare materialen: staal, geëmailleerd staal, gietijzer, ferromagnetische roestvrij staal,
aluminium met ferromagnetische bodem
Niet aangepaste materialen: aluminium en roestvrij staal zonder ferromagnetische bodem,
koper, messing, glas, keramiek, porselein.
De fabrikanten geven het aan als hun producten geschikt zijn voor inductie
Om te controleren of de pannen geschikt zijn :
doe een beetje water in een pan en plaats deze op een inductie kookzone op niveau
[ 9 ]. Dit water moet binnen een paar seconden koken
een stuk magneet op de bodem van de pan
Sommige pannen maken geluid als ze op een inductie zone worden geplaatst. Dit geluid
betekent niet dat er iets niet in order is en heeft geen invloed op het kookproces.
De pannen moeten geschikt zijn om te gebruiken met inductie kookplaten. Alhoewel er
altijd mogelijkheid aanwezig is dat men dat wel aangeeft, maar dat de pannen in
werkelijkheid een slecht resultaat geven.
Om die reden adviseren wij om voor de aankoop de volgende zaken te controleren:
Als de bodem van de pan (0) aanmerkelijk kleiner is dan de diameter van de pan
zelf (0), zal het resultaat minder zijn en wordt de pan mogelijk niet herkend
door de kookplaat zone.

53
Pan afmetingen
De kookzones zijn, tot een bepaalde limiet, automatisch aangepast aan de diameter van de pan.
Alhoewel de bodem van de pan minimaal dezelfde diameter moet hebben als de kookzone
Om het beste resultaat uit de kookplaat te halen, moet de pan in het centrum van de kookzone
geplaatst worden.
Voorbeelden van instelling van het vermogen
(de onderstaand waarden zijn een indicatie)
1 tot 2
smelten
opwarmen
sausen, boter, chocolade, gelatine
kant en klare maaltijden
2 tot 3
ontdooien
rijst, pudding, suiker, siroop
gedroogde groenten, vis, ingevroren
producten
3 tot 4
stoom
groenten, vis, vlees
4 tot 5
water
gestoomde aardappelen, soepen, pasta.
verse groenten
6 tot 7
medium koken
sudderen
vlees, lever, eieren, worstjes, goulash,
rollade,
roulade, pens
7 tot 8
koken
aardappelen, beignets, wafels
9
bakken, roosteren
water koken
steaks, omeletten, gefrituurde gerechten
water
P
water koken
koken van aanzienlijke hoeveelheden
water
ONDERHOUD EN REINIGING
Schakel het apparaat uit voordat gereinigd wordt
Reinig de kookplaat niet als het glas te heet is: verbrandingsrisico
verwijder lichte vlekken met een vochtige doek, voorzien van een beetje reinigingsmiddel
verdund met water. Neem daarna het oppervlak met koud water af en droog het .
schadelijke en agressieve middelen dienen te worden vermeden om het gevaar voor
krassen te voorkomen
gebruik nooit hogedruk of stoom apparatuur
gebruik nooit materialen die krassen in het glas kunnen veroorzaken
verzeker je ervan dat de pan droog en schoon is. Het schuiven over het glas van ruwe
pannen zal het oppervlak beschadigen
het morsen van suiker, jam, stroop enz. moet direct worden verwijderd. Op die manier
wordt voorkomen dat de plaat wordt beschadigd.

54
a
d
c
b
WAT TE DOEN ALS EEN PROBLEEM ZICH VOORDOET
Wanneer het [ E 4 ] symbool verschijnt:
De plaat moet worden geconfigureerd. Onderneem de volgende stappen :
I) Belangrijk : overtuig je dat er geen pannen meer op de kookplaat staan.
II) Ontkoppel het apparaat van het elektriciteitsnet door het verwijderen van de zekering of
het onderbreken van de stroomtoevoer.
III) Sluit de plaat aan op het elektriciteitsnet
IV) Procedure: neem een pan met een ferromagnetische bodem en een minimale diameter
van 16 cm
* start the procedure na 2 minuten nadat de plaat opnieuw aangesloten is op het net
* gebruik niet de [ O/I ] toets
V) Eerste stap: hef de bestaande configuratie op
1) druk op toetst nr. 2 en houdt deze ingedrukt
2) het symbool [ - ] verschijnt in ieder display
3) druk met je andere hand snel en
achtereenvolgens (minder dan 2 sec.)
op iedere [ - ] display.
Begin aan vóórzijde rechts en ga tegen de klok
in, zoals aangegeven op de tekening
(van a naar d).
Een dubbele "piep" betekent dat het fout ging. In dat geval begin opnieuw vanaf (1).
4) haal je vingers van de touch control af, druk opnieuw op toets 1 gedurende een
paar minuten totdat het [ E ] symbool verschijnt en knippert.
5) wacht tot het [ E ] symbool stopt te knipperen.
6) na een paar seconden wordt [ E ] automatisch omgezet in [ C ]. De bestaande
instelling is daarmee opgeheven.
Note : Voor kookplaten met 3 zones wordt de procedure gestart met de zone
rechtsachter (b). ; dit vanwege het ontbreken van de zone aan de rechter vóórzijde.
VI) Tweede stap: nieuwe instelling
1) neem een ferromagnetische pan met een minimale diameter van 16 cm
2) selecteer een kookzone door te drukken op de overeenkomende [ C ] display
3) plaats de pan op de in te stellen zone.
4) wacht tot de getoonde [ C ] verandert in [ - ]. De geselecteerde kookzone is nu
geconfigureerd.
5) volg dezelfde procedure voor elke zone waar een [ C ] wordt getoond.
6) alle kookzones zijn geconfigureerd zodra de display‟s worden uitgeschakeld.
Gebruik altijd dezelfde pan voor de hele procedure.
Gebruik nooit meerdere pannen tegelijkertijd gedurende het instel proces.
als [ E 4 ] getoond blijft, dient de servicedienst geraadpleegd te worden.
De kookplaat of de kookzone start niet:
de kookplaat is niet goed aangesloten op het elektriciteitsnet.
de zekering is kapot.
de kijk functie is geactiveerd.
de sensor gevoelige toetsen zijn afgedekt of vochtig.
een object is op een toets gelegd.
Het bedieningspaneel toont [ U ]:
er staat geen pan op de kookzone.
de pan is niet geschikt voor inductie.
de diameter van de bodem is te klein.

55
Het bedieningspaneel toont [ C ] of [ E ]:
neem contact met de servicedienst.
Een of alle kookzones zijn uitgeschakeld:
het beveiliging systeem is ingeschakeld.
u bent vergeten om de kookzone enige tijd terug uit te schakelen.
een of meerdere toetsen zijn afgedekt.
de pan is leeg en de bodem is oververhit.
de kookplaat heeft een automatische reductie van het vermogen om oververhitting te
voorkomen.
doorlopende ventilatie na uitschakeling van de kookplaat
dit is geen mankement, de ventilator beschermt de elektronica
de koelventilator stopt automatisch
het automatisch kook systeem start niet:
de kookzone is nog heet [ H ].
het hoogste vermogen is ingeschakeld [ 9 ].
het bedieningspaneel toont [ L ]:
raadpleeg het hoofdstuk bedieningspaneel vergrendeling.
het bedieningspaneel toont [ U ]:
raadpleeg het hoofdstuk “warm houden“.
het bedieningspaneel toont [ II ]:
raadpleeg het hoofdstuk “pauze“.
BESCHERMING VAN DE OMGEVING
het verpakkingsmateriaal is ecologisch en kan worden hergebruikt
verouderde apparaten bevatten sommige edele metalen. Informeer bij de plaatselijke
overheid inzake de recycle mogelijkheden
Gooi de afgedankte materialen niet bij het huisvuil.
Neem contact met de plaatselijke overheid i.v.m. de
geldende regels inzake het inzamelen van
huishoudelijke apparaten

56
INSTALLATIE INSTRUCTIES
De installatie valt onder de exclusieve verantwoordelijkheid van specialisten.
De installateur is gehouden aan de wettelijke voorschriften en geldende regels in het betreffende
land
Hoe moet de pakking geplaatst worden
De bijgeleverde pakking voorkomt het binnendringen van vocht in de behuizing.
Het installeren ervan moet punctueel en conform de navolgende tekening worden uitgevoerd.
Installatie voorschriften
de uitsnijmaten zijn:
referentie
uitsnijmaten
7330240
760 x 350 mm
7331240
560 x 490 mm
7332240
650 x 490 mm
7370240
560 x 490 mm
Overtuig uzelf dat er een afstand is van 50 mm tussen de kookplaat en de muur, of
zijkanten
De kookplatenhebben een Y classificatie m.b.t. hitte beveiling.Het meest ideale is om de
kookplaat te installeren met voldoende ruimte aan alle zijden.
Er mag een muur aan de achterzijde, of een muur aan 1 zijde staan.
Het werkblad, de hoeken van het meubel alsmede de afwerking en gebruikte lijm dienen
bestand te zijn tegen temperaturen boven de 100 °C
Werkbladen die van materiaal zijn gemaakt die kunnen worden aangetast door water
dienen alsvolgt te worden behandeld: om de hoeken van de uitsparingen te beschermen
moet een speciale vernis of kit worden gebruikt. Speciale aandacht moet worden gegeven
aan de zelfklevende strip die ervoor zorgt dat er geen water in het blad kann lekken. Deze
pakking garandeert een correcte afdichting wanneer met zachte bladmaterialen worden
gewerkt.
De kookplaat mag niet boven een ventilerende oven of afwasmachine worden geplaatst.
Zorg voor een ruimte van 20 mm. onder de bodem van de kookplaat om een goede
luchtcirculatie van de electronika te garanderen.
Indien een lade onder de kookplaat is gemonteerd dient voorkomen te worden dat daarin
ontvlambare materialen, zoals spray‟s worden gelegd.
De veiligheids ruimte tussen de kookplaat en de afzuigkap moet conform de aanwijzingen
van de afzuigkap fabrikant worden gerespecteerd. Bij twijfel, of bij het ontbreken van
montage voorschriften moet een minimale afstand van 760 mm. worden aangehouden.
het aansluitsnoer moet na de montage vrij zijn en niet belemmerd worden bijvoorbeeld
door de lade.
Waarschuwing: Gebruik alleen kookplaat beschermrekken ontworpen door de fabrikant
van de kookplaat, rekken die door de fabrikant aangeduid zijn als geschikt of
beschermrekken geïntegreerd in het apparaat. Het gebruik van ongeschikte rekken kan
ongelukken veroorzaken.
Plaats de pakking (2) twee millimeter
van de buitenste hoek van het glas, na
verwijdering van de afdekfolie(3).
Stick the gasket (2) two millimeters
from the external edge of the glass,
after removing the protection sheet (3).

57
ELEKTRISCHE AANSLUITING
De installatie en de aansluiting op het elektrisch net mogen enkel worden toevertrouwd aan
een vakman (elektricien) die op de hoogte is van de voorgeschreven normen.
Na de montage mag geen contact mogelijk zijn met onderdelen die bij het gebruik onder
spanning staan.
Of de vereiste aansluitgegevens met die van het elektrisch net overeenstemmen, ziet u op
het typeplaatje.
Het apparaat dient door middel van een meerpolige stroomonderbreker van het net kunnen
worden gescheiden. Staat deze open (niet aangesloten) moet de contactopening minstens
3 mm bedragen. Geschikte scheidingsinstallaties zijn beveiligingsschakelaars, zekeringen,
differntiële schakelaars en contactoren.
De installatie moet door zekeringen beveiligd zijn. Elektrische kabels moeten door
inbouwelementen afgedekt zijn.
Als het apparaat niet met een bereikbare stekker is uitgerust, moeten bij een vaste inbouw
in overeenstemming met de montageaanwijzingen andere onderbrekingsmiddelen worden
voorzien.
De toevoerkabel moet zo worden gelegd dat hij niet met de hete onderdelen van de
kookplaat in aanraking komt.
Opgelet!
Dit apparaat mag uitsluitend worden aangesloten op een elektriciteitsnet met 230 V~ 50/60 Hz.
Sluit altijd de aarddraad aan.
Respecteer het aansluitschema.
De aansluitbox bevindt zich onder aan de achterzijde van de behuizing. Gebruik om het te
openen een medium schroevendraaier. Steek deze in de uitsparingen en open het
* berekend met de gelijktijdige factor volgens de standaard TN 60 335-2-6
Aansluiten van de kookplaat
Stel de configuratie in:
Voor de verschillende aansluit,mogelijkheden, gebruik de koperen bruggen die in de box zitten
naast de blokjes
Monofase 230V~1P+N
Steek de 1e brug tussen blokje 1 en 2, de 2
e
tussen 3 en 4.
Verbind de aarde met het blokje “aarde”, de neutrale N aan blokje 3 of 4, de fase L naar 1 van de
blokjes 1 of 2.
Biofase 400V~2P+N
Plaats een brug tussen blokje 3 en 4.
Attach the earth to the terminate “earth”, the neutral N to terminal 3 or 4, the Phase L1 to the
terminals 1 and the Phase L2 to the terminal 2.
Attentie: overtuig u ervan dat de kabels correct en goed zijn aangesloten.
voeding
aansluiting
kabel diameter
kabel
zekering
230V~ 50/60Hz
1 fase + N
3 x 2,5 mm²
H 05 VV - F
H 05 RR - F
25 A *
400V~ 50/60Hz
2 fases + N
4 x 1.5 mm²
H 05 VV - F
H 05 RR - F
16 A *
Wij kunnen niet verantwoordelijk worden gesteld voor welk incident dan ook voorkomende
uit een niet correcte aardverbinding van de apparatuur.


Foster spa
42041 Brescello (RE) - Italy
tel. +39.0522.687425 - tel. Servizio Assistenza +39.0522.684450
fax +39.0522.686019 - fax Servizio Ricambi +39.0522.962166
e-mail: [email protected]
www.fosterspa.com
14316-3
cod. 9606887
Transcripción de documentos
MANUALE D’ISTRUZIONE user’s manual notice d’utilisation Bedienungsanleitung Gentile Cliente, Grazie per avere scelto un piano di cottura a induzione Foster. Per ottenere il meglio dal Suo piano cottura, La preghiamo di leggere con attenzione le presenti istruzioni, e di conservarle per un’eventuale consultazione futura. INDICE SICUREZZA .................................................................................................................................. 3 PRECAUZIONI PRIMA DEL PRIMO UTILIZZO ....................................................................................... 3 UTILIZZO DELL’APPARECCHIO ........................................................................................................ 3 PRECAUZIONI ONDE NON DANNEGGIARE L’APPARECCHIO ................................................................. 4 PRECAUZIONI IN CASO DI MALFUNZIONAMENTO DELL’APPARECCHIO .................................................. 5 ALTRE PRECAUZIONI ..................................................................................................................... 6 DESCRIZIONE DELL’APPARECCHIO ......................................................................................... 7 DATI TECNICI ................................................................................................................................ 7 PANNELLO DI CONTROLLO ............................................................................................................. 8 USO DELL’APPARECCHIO ......................................................................................................... 8 DISPLAY ...................................................................................................................................... 8 VENTILAZIONE .............................................................................................................................. 8 PRIMA ACCENSIONE E UTILIZZO DELL’APPARECCHIO ........................................................ 9 PRIMA DEL PRIMO UTILIZZO............................................................................................................ 9 PRINCIPIO DELL’INDUZIONE............................................................................................................ 9 TASTI A SFIORAMENTO .................................................................................................................. 9 ZONA “SLIDER” DI SELEZIONE POTENZA E REGOLAZIONE TIMER. ..................................................... 9 PER INIZIARE .............................................................................................................................. 10 IDENTIFICAZIONE DELLA PENTOLA ................................................................................................ 10 INDICATORE DI CALORE RESIDUO ................................................................................................. 10 FUNZIONE BOOSTER ................................................................................................................... 10 TIMER ....................................................................................................................................... 11 COTTURA AUTOMATICA ............................................................................................................... 12 FUNZIONE PAUSA ....................................................................................................................... 12 FUNZIONE RICHIAMO .................................................................................................................. 13 FUNZIONE « MANTENIMENTO CALORE » ....................................................................................... 13 BLOCCO DEL PANNELLO DI CONTROLLO ....................................................................................... 13 SUGGERIMENTI DI COTTURA .................................................................................................. 14 QUALITA DELLE PENTOLE ............................................................................................................ 14 DIMENSIONI DELLE PENTOLE........................................................................................................ 14 ESEMPI DI REGOLAZIONE DELLA POTENZA ..................................................................................... 15 MANUTENZIONE E PULIZIA ...................................................................................................... 15 COSA FARE IN CASO DI PROBLEMI........................................................................................ 16 PROTEZIONE DELL’AMBIENTE ................................................................................................ 17 ISTRUZIONI DI INSTALLAZIONE .............................................................................................. 18 CONNESSIONE ELETTRICA ..................................................................................................... 19 2 SICUREZZA Precauzioni prima del primo utilizzo Sballare eliminando tutti i materiali di imballo. L’installazione e connessione dell’apparecchio devono essere effettuate da personale specializzato. Il Fabbricante declina ogni responsabilità civile e penale per danni causati da installazione e/o connessione non realizzate a regola d’arte. Per essere utilizzato, l’apparecchio deve essere correttamente installato in una cucina e su una superficie di lavoro idonea. Questo elettrodomestico è progettato esclusivamente per la cottura di cibo, con l’espressa esclusione di ogni altro uso domestico, commerciale o industriale. Rimuovere tutte le etichette adesive dal vetro. Non apportare alcuna modifica o alterazione all’apparecchio. La superficie in vetro dell’apparecchio non può essere utilizzata come zona di appoggio o di lavoro. L’apparecchio deve essere opportunamente messo a terra e collegato alla rete elettrica secondo la normativa in vigore localmente. Non usare nessuna prolunga elettrica per collegare il cavo di alimentazione. L’apparecchio non può essere utilizzato sopra una lavastoviglie o una asciugatrice: il vapour potrebbe danneggiare le componenti elettroniche dell’apparecchio. Questo apparecchio non è da utilizzare con un timer esterno o un telecomando separato. Utilizzo dell’apparecchio Spegnere le piastre riscaldanti dopo l’uso. Controllare le cotture che utilizzano grasso o olio: potrebbero incendiarsi con facilità. Fare attenzione a non ustionarsi durante o dopo l’uso dell’apparecchio. Verificare che nessun cablaggio di apparecchi fissi o mobili venga in conatto con il vetro dell’apparecchio o con pentole bollenti. 3 Gli oggetti magnetici (carte di credito, floppy discs, calcolatrici) non devono essere piazzati vicino all’apparecchio quando questo è acceso. Non piazzare alcun oggetto metallico, tranne le pentole, sull’apparecchio. In caso di accensione involontaria, o di presenza di calore residuo dopo la cottura, questi potrebbero sciogliersi o anche incendiarsi. Non coprire mai l’apparecchio con un panno o telo protettivo, perché potrebbe surriscaldarsi e bruciare. Questo apparecchio può essere usato da bambini con una età minima di otto anni e da persone le cui capacità fisiche, sensoriali o mentali sono ridotte, o le cui esperienze e conoscenze sono inadatte, unicamente se sotto sorveglianza e dietro formazione sull’uso dell’apparecchio, in condizioni di sicurezza e dopo essere state informate sui rischi in cui potrebbero incorrere. I bambini non devono giocare con l’apparecchio. La pulizia e la manutenzione non possono essere affidate a bambini senza la sorveglianza di un adulto. Gli oggetti metallici quali coltelli, forchette, cucchiai e coperchi non devono essere piazzati sull’apparecchio perché potrebbero diventare incandescenti. Precauzioni onde non danneggiare l’apparecchio Pentole con fondo graffiato o danneggiato (non di ghisa smaltata) possono danneggiare il vetro ceramico. Sabbia o altre sostanze abrasive possono danneggiare il vetro ceramico. Evitare di far cadere oggetti, anche piccoli, sul vetro ceramico. Assicurarsi che la ventilazione dell’apparecchio funzioni secondo quanto previsto dalle istruzioni del fabbricante. Non colpire i bordi del vetro con le pentole. Non mettere o lasciare pentole vuote sul vetro ceramico. Lo zucchero, i materiali sintetici e i fogli di alluminio non devono venire a contatto con le piastre riscaldanti, perché possono causare rotture o altre alterazioni del vetro ceramico durante il raffreddamento. Nel caso, accendere immediatamente l’apparecchio e rimuovere l’oggetto dalla piastra, prendendo le opportune precauzioni per non ustionarsi. 4 Pericolo di incendio! Non appoggiare alcun oggetto sul piano di cottura. Non piazzare mai un contenitore bollente sul pannello di controllo. Se sotto il piano cottura incassato c’è un cassetto, assicurarsi che lo spazio tra il contenuto dello stesso e la parte inferiore dell’apparecchio sia sufficiente (almeno 2 cm). Questo è essenziale per garantire una corretta ventilazione. Non mettere mai oggetti infiammabili (ad es. spray) nel cassetto situato sotto l’apparecchio. Gli eventuali contenitori per posate posti in cassetti sotto l’apparecchio devono essere resistenti al calore. Precauzioni in caso di malfunzionamento dell’apparecchio Se si nota un difetto di funzionamento, spegnere l’apparecchio e disconnetterlo dalla rete elettrica. Se il vetro ceramico è rotto o crepato, disconnettere immediatamente l’apparecchio dalla rete elettrica e chiamare l’assistenza tecnica. Qualsiasi riparazione deve essere compiuta esclusivamente da personale qualificato. Non aprire l’apparecchio per nessun motivo. ATTENZIONE: Se la superficie del vetro è crepata o rotta, spegnere immediatamente l’apparecchio per evitare il rischio di scosse elettriche. 5 Altre precauzioni Assicurarsi che la pentola o padella sia sempre centrata sulla piastra di cottura. Il fondo dell’utensile deve coprire il più possibile la piastra di cottura. Per gli utilizzatori di pace-makers: il campo magnetico dell’apparecchio potrebbe influenzare il funzionamento del pacemaker. Si raccomanda di richiedere preventivamente informazioni al venditore dell’apparecchio e/o al medico curante. Non utilizzare contenitori di alluminio o di materiali sintetici: potrebbero fondere se appoggiati alle piastre accese o ancora calde dopo l’uso. Non utilizzare mai acqua per spegnere il fuoco. Disattivare la zona di cottura. Soffocare le fiamme con un coperchio, una coperta ignifuga o qualcosa di simile. L’UTILIZZO DI PENTOLE NON IDONEE OPPURE DI ACCESSORI RIMUOVIBILI POSTI TRA LA PENTOLA E LA PIASTRA PER RISCALDARE PENTOLE NON IDONEE ALL’INDUZIONE FA DECADERE LA GARANZIA. IL COSTRUTTORE NON PUÒ ESSERE CONSIDERATO RESPONSABILE PER QUALSIASI DANNO AL PIANO DI COTTURA OR DANNI CORRELATI. 6 DESCRIZIONE DELL’APPARECCHIO Dati tecnici Typo Potenza totale Consumo di energia del piano cottura EChob** 7330240 6700 W 7331240 6700 W 7332240 7400 W 7370240 7400 W 173.6 Wh/kg 176.6 Wh/kg 174.2 Wh/kg 176.5 Wh/kg Posizione anteriore sinistra Identificazione minimo Potenza nominale * Potenza booster * Categoria standard di pentola ** Consumo di energia ECcw** Ø 200 mm Ø 100 mm 2300 W 3000 W C 180.5 Wh/kg Ø 250 mm Ø 110 mm 2300 W 3000 W D 182.7 Wh/kg Ø 250 mm Ø 110 mm 2300 W 3000 W D 182.7 Wh/kg Ø 200 mm Ø 100 mm 2300 W 3000 W C 180.5 Wh/kg Posizione posteriore sinistra Identificazione minimo Potenza nominale * Potenza booster * Categoria standard di pentola ** Consumo di energia ECcw** - - Ø 180 mm Ø 90 mm 1200 W 1400 W B 166.7 Wh/kg Ø 180 mm Ø 90 mm 1200 W 1400 W B 166.7 Wh/kg Posizione centro Identificazione minimo Potenza nominale * Potenza booster * Categoria standard di pentola ** Consumo di energia ECcw** Ø 160 mm Ø 90 mm 1200 W 1400 W B 166.7 Wh/kg - - - Posizione posteriore destra Identificazione minimo Potenza nominale * Potenza booster * Categoria standard di pentola ** Consumo di energia ECcw** - Ø 160 mm Ø 90 mm 1200 W 1400 W B 166.7 Wh/kg Ø 160 mm Ø 90 mm 1200 W 1400 W B 166.7 Wh/kg Ø 220 mm Ø 110 mm 2300 W 3000 W C 173.7 Wh/kg Posizione anteriore destra Identificazione minimo Potenza nominale * Potenza booster * Categoria standard di pentola ** Consumo di energia ECcw** Ø 250 mm Ø 100 mm 2300 W 3000 W D 173.7 Wh/kg Ø 200 mm Ø 100 mm 2300 W 3000 W C 180.5 Wh/kg Ø 200 mm Ø 100 mm 2300 W 3000 W C 180.5 Wh/kg Ø 160 mm Ø 90 mm 1400 W 2000 W A 185 Wh/kg * La Potenza dichiarata può cambiare a seconda delle dimensioni e del material della pentola. ** metodo di misura delle prestazioni secondo la norma (EN60350-2) 7 Pannello di controllo Spia timer Display Timer Display potenza Spia piastra Tasto mantieni caldo Spia Pausa/Ripeti Spia on/off Tasto On/Off Zona “SLIDER” di selezione Potenza e impostazione timer Tasto Booster Tasto Pausa/Ripeti USO DELL’APPARECCHIO Display Display 0 1…9 U A E H P L U II Descrizione Zero Livello potenza Sensore pentola Acceleratore riscaldamento Messaggio di errore Calore residuo Booster Blocco Mantenimento calore Pausa Funzione La piastra è attivata. Selezione del livello di potenza. Pentola assente o non adatta Cottura automatica. Difetto elettronico La piastra è calda La sovra-potenza è attivata. Blocco del pannello di controllo Mantiene automaticamente a 70°C. L’apparecchio è in pausa. Ventilazione Il sistema di raffreddamento è completamente automatico. La ventola entra in funzione a basso regime di rotazione quando il calore interno raggiunge un determinate livello. La ventilazione arriva ad elevati regimi di rotazione se l’apparecchio è utilizzato intensivamente. La ventola rallenta e si spegne automaticamente quando la temperatura interna del circuito elettronico scende sotto il livello prestabilito. 8 PRIMA ACCENSIONE E UTILIZZO DELL’APPARECCHIO Prima del primo utilizzo Pulire l’apparecchio con uno straccio umido, indi asciugarlo accuratamente. Non utilizzare detergenti che possano causare colorazioni anomale del vetro. Principio dell’induzione Sotto ogni piastra riscaldante si trova un magnete induttore. Quanto viene attivato, questo produce un campo elettromagnetico che genera una corrente induttiva nel fondo ferromagnetico della pentola. Il risultato è il riscaldamento della pentola posizionata sulla piastra. Naturalmente, la pentola deve essere adatta: Tutte le pentole in materiale ferromagnetico sono consigliate (verificare utilizzando una calamita): pentole in ghisa, acciaio, smaltate e di acciaio inossidabile con fondo ferromagnetico… Da escludere: pentole in rame, acciaio inossidabile senza fondo ferromagnetico, alluminio, vetro, legno, ceramica, terracotta… La piastra a induzione si adatta automaticamente alla dimensione della pentola: se il diametro di quest’ultima è troppo piccolo tuttavia, la piastra non funziona. Il diametro minimo varia in funzione del diametro della piastra. Se la pentola non è adatta al piano di cottura a induzione, il display mostrerà la lettera [ U ]. Tasti a sfioramento Il vostro piano cottura a induzione è equipaggiato con controlli elettronici azionati tramite tasti a sfioramento. Quando il dito tocca il tasto, il comando corrispondente viene attivato. L’attivazione è confermata dalla spia relativa, o da una lettera o un numero sul display e/o da un segnale acustico. Nell’utilizzo normale premere unicamente un tasto per volta. Zona “SLIDER” di selezione Potenza e regolazione timer. Per selezionare la Potenza con lo slider, far scorrere il dito sullo slider stesso. Si può anche scegliere direttamente la potenza appoggiando il dito nel punto che si desidera (senza farlo scorrere). Zona “SLIDER” di selezione Potenza e regolazione timer “SLIDER“ Accesso diretto 9 Per iniziare Accensione/spegnimento dell’apparecchio : Azione Pannello di controllo Display Per accendere Per arrestare premere [ 0/I ] premere [ 0/I ] [ 0 ] lampeggiano niente o [ H ] Accensione/Spegnimento di una piastra riscaldante: Azione Pannello di controllo Display Selezione piastra Per regolare (regolare la potenza) Per arrestare premere il display [ 0 ] selezionato scorrere sullo “SLIDER“ a sinistra o a destra scorrere fino a [ 0 ] sullo “SLIDER“ O premere su [ 0 ] [ 0 ] e spia accesa da [ 0 ] a [ 9 ] [0]o[H] [0]o[H] Se nessuna regolazione è effettuata entro 20 secondi l’apparecchio torna in modalità di attesa. Identificazione della pentola L’identificazione della pentola assicura la totale sicurezza. L’induzione non funziona: Se non c’è pentola sulla piastra, o se la pentola non è adatta all’induzione. In questo caso è impossibile aumentare la Potenza è il display mostra [ U ]. Questo simbolo scompare quando si posiziona una pentola adatta sulla piastra. Se la pentola viene rimossa dalla piastra di cottura: la cottura si arresta e il display mostra [ U ]. Il simbolo [ U ] scompare quando la pentola è posizionata nuovamente sulla pistra. La cottura ricomincia con il livello di potenza scelto precedentemente. Dopo l'uso, spegnere la zona di riscaldamento. Non lasciare attivo il rilevamento della pentola [U] Indicatore di calore residuo Dopo aver spento l’apparecchio, la piastra è ancora calda e il display indica [ H ]. Il simbolo [ H ] scompare quando la piastra può essere toccata senza pericolo di bruciature. Finché la spia di calore residuo è accesa, non toccare la piastra né posizionarvi alcun oggetto sensibile al calore: c’è rischio di bruciature o incendi. Funzione Booster La funzione Booster [ B ] garantisce un aumento di potenza alla piastra selezionata. Quando la funzione viene attivata, la piastra funziona per dieci minuti ad una potenza molto elevata. Il Booster serve ad esempio per riscaldare rapidamente grandi quantità d’acqua. Accensione/Spegnimento della funzione Booster: Azione Pannello di controllo Display Selezione piastra Attivare il booster Arrestare il booster premere [ 0 ] della zona scelta premere il tasto [ B ] scorrere sullo “SLIDER“ O premere [ B ] [ 0 ] e spia accesa [P] da [ P ] a [ 0 ] [9] 10 Gestione della potenza: L’apparecchio ha un sistema di limitazione della potenza massima. Quando la funzione Booster è attiva, al fine di non eccedere in potenza, il sistema elettronico riduce automaticamente la potenza di una delle altre piastre. Il display lampeggia su [ 9 ] per qualche secondo e poi indica la Potenza massima consentita: Piastra selezionata Compare il simbolo[ P ] L’altra piastra: (esempio: livello potenza 9) [ 9 ] diventa [ 6 ] o [ 8 ] a seconda del tipo di piastra coinvolta Timer Il timer può essere utilizzato con entrambe le piastre simultaneamente e con regolazioni diverse (da 0 a 99 minuti) per ognuna di esse. Regolazione e modifica del tempo di cottura : Esempio: per 16 minuti a Potenza 7 : Azione Pannello di controllo Display Selezione piastra Selezionare il livello di potenza Selezionare « Timer » Impostare le unità Convalidare le unità Impostare le decine Convalidare le decine [ 0 ] e spia accesa [7] [ 00 ] [ 0 fisso ] [6 lampeggia] [ 0 lampeggia] [6 fisso ] [ 1 lampeggia] [ 6 fisso ] [ 16 ] premere [ 0 ] per la piastra selezionata scorrere sullo “SLIDER“ a [ 7 ] premere display [ CL ] scorrere sullo “SLIDER“ a [ 6 ] premere il display [ 06 ] scorrere sullo “SLIDER“ a [ 1 ] premere il display [ 16 ] Il tempo è confermato e la cottura ha inizio. Per arrestare il tempo di cottura Esempio: per 13 minuti a Potenza 7 : Azione Selezione piastra Selezionare « Timer » Disattivare le unità Convalidare le unità Disattivare le decine Convalidare le decine Pannello di controllo premere il display [ 7 ] selezionato premere [ 13 ] scorrere sullo “SLIDER“ fino a [ 0 ] premere display [ 10 ] scorrere sullo “SLIDER“ a [ 0 ] premere display [ 00 ] Display [ 7 ] e spia accesa [ 13 ] [ 1 fisso ] [0 lampeggia] [ 1 lampeggia] [ 0 fisso ] [ 0 lampeggia] [ 0 fisso ] [ 00 ] Arresto automatico alla fine del tempo di cottura Quando viene raggiunto il tempo impostato per la cottura, il display del timer lampeggia su [ 00 ], viene prodotto un segnale acustico e la piastra si spegne. Per arrestare il segnale acustico è sufficiente premere il tasto [ 00 ]. 11 Funzione timer al di fuori della cottura: Esempio: per 29 minutes : Azione Pannello di controllo Display Attivare l’apparecchio premere display [ 0/I ] spie piastra accese Selezionare « Timer » premere il display [ CL ] [ 00 ] Impostare le unità scoirrere sullo “SLIDER“ fino a [ 9 ] [ 0 fisso ] [9 lampeggia] Convalidare le unità premere display [ 09 ] [ 0 lampeggia] [ 9 fisso ] Impostare le decine scorrere sullo slider “SLIDER“ a [ 2 ] [ 2 lampeggia ] 9 fisso ] Convalidare le decine premere il display [ 29 ] [ 29 ] Dopo qualche secondo la spia smette di lampeggiare. Appena il tempo impostato è esaurito i display del timer lampeggiano a [ 00] e si ode un segnale acustico. Per arrestare il segnale acustico è sufficiente premere il display [ 00]. L’apparecchio si spegne. Cottura automatica Tutte le piastre sono equipaggiate con una funzione automatica “stop and go” (partenza-arresto). La piastra si accende a piena Potenza per un dato tempo, poi riduce automaticamente la Potenza a un livello prestabilito. Avvio: Azione Pannello di controllo Display Selezione piastra premere il display [ 0 ] selezionato [ 0 ] e spia accesa Regolazione a piena potenza scorrere sullo “SLIDER“ a [ 9 ] va da [ 0 ] a [ 9 ] Cottura automatica premere ancora display “SLIDER“ [ 9 ] [ 9 ] lampeggia con [ A ] Selezione livello potenza scorrere sullo “SLIDER“ a [ 7 ] [ 9 ] passa a [ 8 ] [ 7 ] (per esempio « 7 ») [ 7 ] lampeggia con [ A ] Spegnere la cottura automatica : Azione Selezione piastra Selezione livello Potenza Pannello di controllo premere [ 7 ]della piastra scorrere sullo “SLIDER“ Display [ 7 ] lampeggia con [ A ] da [ 1 ] a [ 9 ] Funzione Pausa Questa funzione arresta tutte le attività di cottura e permette di ri-attivarle in un secondo momento con le stesse regolazioni. Attivare / Disattivare la funzione pausa: Azione Attivare la pausa Pannello di controllo premere [ II ]per 2 secondi Arrestare la pausa premere [ II ] per 2 secondi Premere un altro tasto o Scorrere sullo “SLIDER“ 12 Display mostra [ II ] sul display della piastra la spia della pausa lampeggia la spia della pausa si spegne Funzione Richiamo Dopa ver spento l’apparecchio [ 0/I ], è possibile richiamare le ultime impostazioni. Regolazioni di cottura di tutte le piastre (Potenza) Minuti e secondi dei timer delle piastre Funzione riscaldamento La procedura di Richiamo è la seguente: Premere il tasto [ 0/I ] Indi premere il tasto [ II ] entro 6 secondi La regolazione precedente viene attivata. Funzione « Mantenimento calore » Questa funzione permette di raggiungere e mantenere automaticamente la temperature di 70°C. Questo impedirà il deborda mento di liquidi o di bruciare alimenti nelle pentole. Per attivare la funzione «Mantenimento calore » : Azione Pannello di controllo Display Selezione zona premere il display [ 0 ] selezionato da [ 0 ] a [ 9 ] o [ H ] Per attivare premere il tasto [ U ] sullo “SLIDER“ [U] Per arrestare premere sul display [ U ] selezionato [U] Scorrere sullo “SLIDER“ da [ 0 ] a [ 9 ] o [ H ] Questa funzione può essere attivata indipendentemente su tutte le piastre. Quando la pentola viene tolta dalla piastra, la funzione di Mantenimento calore resta attiva per circa 10 minuti. La durata massima della funzione di mantenimento calore è di due ore. Blocco del Pannello di Controllo Per evitare di modificare inavvertitamente una regolazione, in particolare durante le operazioni di pulizia, il Pannello di controllo può essere bloccato (con l’eccezione del tasto On/Off [ 0/I ]). Blocco : Azione Pannello di controllo Display Avvio premere [ 0/I ] [ 0 ] o [ H ] sul display Blocco dell’apparecchio premere simultaneamente[ B ] e [ 0 ] nessuna modifica Del display della zona ant. destra** Premere di nuovo su display [ 0 ] appare [ L ] sul display Sblocco : Azione Pannello di controllo Display Avvio premere su [ 0/I ] appare [ L ] sul display Nei 5 secondi successive all’avvio : Sblocco dell’apparecchio premere simultaneamente [ B ]e [ 0 ] o [ H ] sul display [ L ] del display della zona ant. destra** Premere su [ B ] nessuna spia sul display ** per il modello 7330/240 utilizzare il display della piastra posteriore destra 13 SUGGERIMENTI DI COTTURA Qualità delle pentole Materiali adatti: acciaio, acciaio smaltato, ghisa, acciaio con fondo magnetizzabile, alluminio con fondo magnetizzabile Materiali non adatti: alluminio e acciaio con fondo non magnetizzabile, rame, ottone, coccio, porcellana In via di massima, i fabbricanti indicano se i recipienti di cottura sono adatti per i piani ad induzione. Per verificare se i recipienti di cottura sono indicati per il piano ad induzione. Versare nella pentola un po’ d’acqua e collocarlo sulla zona di cottura ad induzione. Accendere la zona e selezionare la gradazione [ 9 ]. L’acqua deve riscaldarsi in pochi secondi. Toccare con una calamita il fondo della pentola. Se la calamita rimane attaccata, la pentola è indicata per il piano ad induzione. Alcuni recipienti possono generare rumori se vengono posti su una zona di cottura ad induzione. Ciò non significa che il piano ad induzione sia difettoso o che funzioni in modo anomalo. Le pentole devono essere certificate dal fabbricante come compatibili con l’induzione. E’ tuttavia possibile che certe pentole, seppur dichiarate come compatibili, abbiano in realtà caratteristiche inadatte all’uso con i piani a induzione. Raccomandiamo di verificare al momento dell’acquisto che le pentole rispettino almeno le seguenti condizioni: Se il fondo della pentola (Ød) è significativamente più piccolo del diametro del corpo (ØD) il rendimento ne è penalizzato e la pentola rischia di non essere identificata dalla piastra 14 Dimensioni delle pentole Le piastre di cottura si adattano automaticamente, entro un certo limite, al diametro delle pentole. Tuttavia la pentola deve avere un diametro minimo, a seconda delle dimensioni della piastra. Per ottenere l’efficienza migliore dal vostro apprecchio, posizionate la piastra nel centro della piastra. Esempi di regolazione della potenza (I valori sotto sono indicativi) Da 1 a 2 Da 2 a 3 Sciogliere Riscaldare Cuocere a fuoco lento Scongelare Da 3 a 4 Da 4 a 5 Vapore Acqua Da 6 a 7 Cottura media Bollitura a fuoco lento Cottura Friggere, arrostire Far bollire l’acqua Acqua bollente Da 7 a 8 9 P Salse, burro, cioccolata, gelatine Piatti preparati in precedenza Riso, budini, sciroppi di zucchero Verdure liofilizzate, pesce, prodotti congelati Verdure, pesce, carne Patate bollite, zuppe, pasta, Verdure fresche Carne, fegato, uova, salsicce Goulash, arrosti, trippa Patate, patatine fritte, wafers Bistecche, omelettes, piatti fritti Acqua Far bollire quantitativi significativi d’acqua MANUTENZIONE E PULIZIA Spegnere l’apparecchio prima di pulirlo. Non pulire l’apparecchio se il vetro è troppo caldo: rischio di ustioni! Rimuovere segni leggeri con uno straccio umido con liquido detergente diluito in acqua. Risciacquare con acqua fredda e asciugare accuratamente la superficie. Detergenti altamente abrasivi e corrosivi, che possono causare graffi, devono assolutamente essere evitati. Non utilizzare mai apparecchi a vapore o a pressione per pulire l’apparecchio. Non utilizzare alcun oggetto che potrebbe graffiare il vetro ceramico. Assicurarsi che la pentola sia asciutta e pulita. Assicurarsi che non vi siano granelli di polvere sul vetro ceramico o sulla pentola. Far scivolare pentole con fondo irregolare può causare graffi alla superficie del vetro ceramico. Versamenti di zucchero, marmellata, conserve ecc devono essere rimossi immediatamente, in modo da evitare danni alla superficie del vetro ceramico. 15 COSA FARE IN CASO DI PROBLEMI Appare il simbolo [ E 4 ] : L’apparecchio deve essere configurato secondo la procedura seguente: I) Attenzione : prima di iniziare ogni pentola o utensile deve essere rimossa dall’apparecchio. II) Scollegare l’apparecchio dalla rete elettrica rimuovendo il fusibile o staccando la spina. III) Collegare l’apparecchio nuovamente alla rete elettrica rimettendo il fusibile o collegando la spina. IV) Procedura : E’ necessario un contenitore con fondo ferromagnetico dal diametro minimo di 16 cm. * iniziare entro 2 minuti dopo il collegamento dell’alimentazione c b * Non usare il tasto [ O/I ]. V) Come cancellare la configurazione esistente: d a 1) Premere il tasto n° 2 e mantenere premuto 2) Comparirà il simbolo [ - ] su ogni display 3) con l’altra mano premere successivamente e rapida successione (meno di 2 sec.) ogni tasto [ ]. Iniziare dall’anteriore destro e procedere in senso antiorario, come descritto nella figura (da a) fino a d)). Un doppio bip” segnala una sequenza errata, e sarà necessario iniziare nuovamente dal punto 1. 4) Togliere tutte le dita dai tasti e premere indi nuovamente il tasto 1 per qualche secondo fino a che non compare il simbolo [ E ] lampeggiante. 6) Attendere che [ E ] smetta di lampeggiare.. 7) Dopo alcuni secondi i simboli [ E ] si trasformeranno automaticamente in [ C ] → La configurazione è stata cancellata. NOTA: per i piani cottura con tre piastre, visto che la piastra anteriore destra non esiste, la procedura va iniziata dalla zona posteriore destra (b). VI) Come configurare l’apparecchio? 1) Utilizzare una pentola da induzione adatta con un diametro minimo di 16 cm. 2) Selezionare la piastra di cottura premendo il corrispondente tasto [ C ]. 3) Posizionare la pentola sulla piastra corrispondente. 4) Attendere fino a che il simbolo [ C ] cambia in [ - ]. La piastra è configurata. 5) Utilizzare la stessa procedura per ogni altra piastra che mostra il simbolo [ C ] 6) La configurazione è complete se tutte le piastre vengono identificate correttamente e non compare alcun simbolo sul display . Utilizzare la stessa pentola per configurare l’apparecchio. Non mettere mai due o più pentole sulle piastre durante la configurazione. Se compare il simbolo [ E 4 ] e rimane acceso, chiamare l’assistenza tecnica. L’apparecchio non si accende L’apparecchio non è collegato correttamente alla rete elettrica. Il fusibile è assente o il circuito aperto Il sistema di blocco è attivo I tasti a sfioramento sono coperti da grasso o acqua. Un oggetto è posizionato su uno dei tasti. Compare il simbolo [ U ] Manca la pentola sulla piastra. La pentola non è compatibile con il piano cottura a induzione. Il diametro del fondo della pentola è troppo piccolo. 16 Compare il simbolo [ C ] o [ E ] Contattare l’assistenza tecnica. Una delle piastre viene disattivata È entrato in funzione il sistema di sicurezza. Si è dimenticato di disattivare la piastra per un certo periodo. Uno o più tasti a sfioramento sono coperti da qualcosa. La pentola è vuota e il fondo si è surriscaldato. Entrata in funzione della funzione automatica di riduzione o interruzione della potenza in caso di surriscaldamento. Ventilazione continua dopo lo spegnimento dell’apparecchio Questo non è un difetto di funzionamento. La ventola continua ad andare per proteggere le componenti elettroniche dal surriscaldamento. La ventola si arresta automaticamente. Il sistema di cottura automatica non parte : La piastra è ancora calda [ H ]. È selezionato il livello di Potenza massima [ 9 ]. Il pannello di controllo indica [ L ] : Vedere il capitolo riguardante il blocco del pannello di controllo. Il pannello di controllo indica [ U ] : Vedere il capitolo “Mantenimento calore”. Il pannello di controllo indica [ II ] : Vedere il capitol “Pausa“. PROTEZIONE DELL’AMBIENTE Il materiale dell’imballo è ecologico e deve essere riciclato. L’apparecchio contiene alcuni metalli nobili. Contattare le autorità locali per informarsi sulle modalità di riciclo o smaltimento dell’apparecchio al momento della sua dismissione. Non gettare l’apparecchio nei rifiuti. Contattare l’organizzazione del vostro comune preposta al riciclaggio degli elettrodomestici. 17 ISTRUZIONI DI INSTALLAZIONE L’installazione è di esclusiva responsabilità dell’installatore specializzato. L’installatore è tenuto a rispettare la legislazione locale e le normative in vigore nel Paese in cui viene installato l’apparecchio. Come fissare la guarnizione La guarnizione fornita con l’apparecchio serve a evitare le infiltrazioni di acqua o altri liquidi nel mobile sottostante l’apparecchio. La sua installazione deve essere fatta attentamente, seguendo il disegno qui sotto. Incollare la guarnizione a (2) due mm dal bordo inferior esterno del vetro, dopo aver rimosso la protezione della stessa (3). Inserimento – installazione Le misure di incasso sono : Articolo Foro incasso 7330240 760 x 350 mm 7331240 560 x 490 mm 7332240 650 x 490 mm 7370240 560 x 490 mm Assicurarsi che ci sia una distanza di almeno 50 mm tra l’apparecchio e il muro o le pareti o paratie laterali. L’apparecchio è classificato come classe “Y” di protezione dal calore. Idealmente l’apparecchio dovrebbe essere installato con un ampio spazio da entrambi i lati. Ci può essere un muro posteriormente e mobili alti o un muro su un lato. Sull’altro lato tuttavia, non deve esserci un divisorio o un mobile più alto della posizione dell’apparecchio. Il mobile o piano di lavoro sul quale l’apparecchio è installato, nonché i bordi dei mobili e/o unità pensili, i rivestimenti laminati che li rivestono e la colla di assemblaggio, devono essere in grado di resistere a temperature fino a 100 °C. I supporti a muro devono essere resistenti al calore. I materiali utilizzati per i piani di lavoro spesso tendono a gonfiarsi con l’umidità. Per proteggere il foro di incasso dell’apparecchio, applicare uno strato di vernice o sigillante apposito. Una particolare cura deve essere dedicata alla corretta applicazione della guarnizione fornita con l’apparecchio, onde evitare qualsiasi infiltrazione nel mobile sottostante. La guarnizione garantisce una corretta tenuta se utilizzata su superfici lisce. Non installare l’apparecchio al di sopra di un forno non opportunamente ventilato, o di una lavastoviglie. Garantire la presenza di uno spazio di almeno 20 mm al di sotto della cassetta dell’apparecchio, onde permettere una corretta areazione dell’apparecchio. Se sotto l’apparecchio c’è un cassette, non riporvi oggetti infiammabili, come bombolette di spray, od oggetti non resistenti al calore. La distanza di sicurezza tra l’apparecchio e una eventuale cappa di aspirazione sovrastante deve essere quello previsto dal fabbricante della cappa. In caso di mancanza di indiazioni in merito, rispettare una distanza minima di 760 mm. Il cavo di alimentazione, dopo l’installazione dell’apparecchio, non deve essere soggetto a sollecitazioni meccaniche, come ad esempio schiacciamento a causa del movimento di cassetti o altro. ATTENZIONE: Usare soltanto protezioni per il piano di cottura realizzate dal produttore dell'apparecchio o indicate dal produttore nelle istruzioni come idonee per l'utilizzo con l'apparecchio o incorporate in esso. L'utilizzo di protezioni inappropriate può causare incidenti. 18 CONNESSIONE ELETTRICA L'installazione di questo dispositivo e il suo collegamento alla rete elettrica devono essere eseguiti da un elettricista pienamente consapevole dei requisiti normativi. Assicurare la protezione dalle parti in tensione dopo l'installazione. I dati di connessione necessari si trovano sulla piastra di segnalazione e d'attacco sotto il dispositivo. Questo dispositivo deve'essere isolato dalla rete da un dispositivo di sezionamento onnipolare. Quando è aperto (attivato), assicurare di mantenere una distanza di circa 3mm. Il circuito elettrico dev'essere separato dalla rete da dispositivi appropriati, come interruttori, fusibili, sezionatori e contattori. Se il dispositivo non è dotata di una spina accessibile, devono essere inseriti mezzi di scollegamento nell'installazione fissa in conformità con le disposizioni di installazione. Il cavo di alimentazione dev'essere posizionato in modo che non tocchi le superfici calde del piano di cottura. Attenzione! Questo apparecchio può solo essere collegato ad una rete elettrica a 230 V~ 50/60 Hz Collegare sempre il cavo di terra. Rispettare il diagramma di connessione. Usare il cavo di connessione già fissato all’apparecchio. I fili verde/giallo corrispondono alla messa a terra, il filo blu corrisponde al neutro e il filo marrone corrisponde alla fase. Fusibile di Rete Connessione Diametro cavo Cavo protezione H 05 VV - F 230V~ 50/60Hz 1 Phase + N 3 x 2,5 mm² 25 A * H 05 RR - F H 05 VV - F 400V~ 50/60Hz 2 Phases + N 4 x 1.5 mm² 16 A * H 05 RR - F * Calcolato con il fattore di simultaneità secondo la norma EN 60 335-2-6 Connessione del piano cottura Approntamento della configurazione: Per i vari tipi di connessione, utilizzare i ponticelli di ottone forniti nella scatolina a fianco della morsettiera. Monofase 230V~1P+N Inserire il primo ponticello tra i terminali 1e 2, e il secondo ponticello tra il 3 e il 4. Collegare la terra al terminale “terra”, il neutro N al terminale 3 o 4, la fase L a uno dei terminali 1 o 2. Bifase 400V~2P+N Inserire un ponticello tra i terminali 3 e 4. Collegare la terra al terminale “terra”, il neutro N al terminale 3 o 4, la fase L1 al terminale 1 e la fase L2 al terminale 2. Attenzione! Assicurarsi di aver fissato correttamente i cavi e i ponticelli e di aver serrato correttamente le viti. Il fabbricante declina qualsiasi responsabilità per ogni incidente risultante da Il fabconnessione sbagliata dell’apparecchio, incluso l’utilizzo di un apparecchio non correttamente messo a terra, o connesso con una messa a terra difettosa. 19 Dear customer, Thank you for having chosen our induction ceramic hob. In order to make the best use of your appliance, we would advise you to read carefully the following notes and to keep them for a later consulting. SUMMARY SAFETY ....................................................................................................................................... 21 PRECAUTIONS BEFORE USING...................................................................................................... 21 USING THE APPLIANCE ................................................................................................................ 21 PRECAUTIONS NOT TO DAMAGE THE APPLIANCE ............................................................................ 22 PRECAUTIONS IN CASE OF APPLIANCE FAILURE.............................................................................. 23 OTHER PROTECTIONS ................................................................................................................. 23 DESCRIPTION OF THE APPLIANCE ......................................................................................... 24 TECHNICAL CHARACTERISTICS ..................................................................................................... 24 CONTROL PANEL ........................................................................................................................ 25 USE OF THE APPLIANCE .......................................................................................................... 25 DISPLAY .................................................................................................................................... 25 VENTILATION .............................................................................................................................. 25 STARTING-UP AND APPLIANCE MANAGEMENT ................................................................... 26 BEFORE THE FIRST USE............................................................................................................... 26 INDUCTION PRINCIPLE ................................................................................................................. 26 SENSITIVE TOUCH....................................................................................................................... 26 POWER SELECTION ZONE “SLIDER” AND TIMER SETTING ZONE ...................................................... 26 STARTING-UP ............................................................................................................................. 27 PAN DETECTION ......................................................................................................................... 27 RESIDUAL HEAT INDICATION ........................................................................................................ 27 BOOSTER FUNCTION ................................................................................................................... 27 TIMER ....................................................................................................................................... 28 AUTOMATIC COOKING ................................................................................................................. 29 PAUSE FUNCTION ....................................................................................................................... 29 RECALL FUNCTION ..................................................................................................................... 29 « KEEP WARM » FUNCTION ......................................................................................................... 29 CONTROL PANEL LOCKING ........................................................................................................... 30 COOKING ADVICES ................................................................................................................... 31 PAN QUALITY ............................................................................................................................. 31 PAN DIMENSION.......................................................................................................................... 32 EXAMPLES OF COOKING POWER SETTING...................................................................................... 32 MAINTENANCE AND CLEANING .............................................................................................. 32 WHAT TO DO IN CASE OF A PROBLEM .................................................................................. 33 ENVIRONMENT PRESERVATION ............................................................................................. 34 INSTALLATION INSTRUCTIONS ............................................................................................... 35 ELECTRICAL CONNECTION ..................................................................................................... 36 20 SAFETY Precautions before using Unpack all the materials. The installation and connecting of the appliance have to be done by approved specialists. The manufacturer can not be responsible for damage caused by building-in or connecting errors. To be used, the appliance must be well-equipped and installed in a kitchen unit and an adapted and approved work surface. This domestic appliance is exclusively for the cooking of food, to the exclusion of any other domestic, commercial or industrial use. Remove all labels and self-adhesives from the ceramic glass. Do not change or alter the appliance. The cooking plate can not be used as freestanding or as working surface. The appliance must be grounded and connected conforming to local standards. Do not use any extension cable to connect it. The appliance can not be used above a dishwasher or a tumble-dryer: steam may damage the electronic appliances. The appliance is not intended to be operated by means of external timer or separate remote control system. Using the appliance Switch the heating zones off after using. Keep an eye on the cooking using grease or oils: that may quickly ignite. Be careful not to burn yourself while or after using the appliance. Make sure no cable of any fixed or moving appliance contacts with the glass or the hot saucepan. Magnetically objects (credit cards, floppy disks, calculators) should not be placed near to the engaged appliance. Metallic objects such as knives, forks, spoons and lids should not be placed on the hob surface since they can get hot. 21 In general do not place any metallic object except heating containers on the glass surface. In case of untimely engaging or residual heat, this one may heat, melt or even burn. Never cover the appliance with a cloth or a protection sheet. This is supposed to become very hot and catch fire. This appliance can be used by children aged from 8 years and above and persons with reduced physical, sensory or mental capabilities or lack of experience and knowledge if they have been given supervision or instruction concerning use of the appliance in a safe way and understand the hazards involved. Children shall not play with the appliance. Cleaning and user maintenance shall not be made by children without supervision. Precautions not to damage the appliance Raw pan bottoms or damaged saucepans (not enamelled cast iron pots,) may damage the ceramic glass. Sand or other abrasive materials may damage ceramic glass. Avoid dropping objects, even little ones, on the vitroceramic. Do not hit the edges of the glass with saucepans. Make sure that the ventilation of the appliance works according to the manufacturer’s instructions. Do not put or leave empty saucepans on the vitroceramic hobs. Sugar, synthetic materials or aluminium sheets must not contact with the heating zones. These may cause breaks or other alterations of the vitroceramic glass by cooling: switch on the appliance and take them immediately out of the hot heating zone (be careful: do not burn yourself). WARNING: Danger of fire: do not store items on the cooking surface. Never place any hot container over the control panel. If a drawer is situated under the embedded appliance, make sure the space between the content of the drawer and the inferior part of the appliance is large enough (2 cm). This is essential to guaranty a correct ventilation. Never put any inflammable object (ex. sprays) into the drawer situated under the vitroceramic hob. The eventual cutlery drawers must be resistant to heat. 22 Precautions in case of appliance failure If a defect is noticed, switch on the appliance and turn off the electrical supplying. If the ceramic glass is cracked or fissured, you must unplug the appliance and contact the after sales service. Repairing has to be done by specialists. Do not open the appliance by yourself. WARNING: If the surface is cracked, switch off the appliance to avoid the possibility of electric shock. Other protections Note sure that the container pan is always centred on the cooking zone. The bottom of the pan must have to cover as much as possible the cooking zone. For the users of pacemaker, the magnetic field could influence its operating. We recommend getting information to the retailer or of the doctor. Do not to use aluminium or synthetic material containers: they could melt on still hot cooking zones. NEVER try to extinguish a fire with water, but switch off the appliance and then cover flame e.g. with a lid or a fire blanket. THE USE OF EITHER POOR QUALITY POT OR ANY INDUCTION ADAPTOR PLATE FOR NON-MAGNETIC COOKWARE RESULTS IN A WARRANTY BREACH. IN THIS CASE, THE MANUFACTURER CANNOT BE HELD RESPONSIBLE FOR ANY DAMAGE CAUSED TO THE HOB AND/OR ITS ENVIRONMENT. 23 DESCRIPTION OF THE APPLIANCE Technical characteristics Type Total power Energy consumption for the hob EChob** 7330240 6700 W 173.6 Wh/kg 7331240 6700 W 176.6 Wh/kg 7332240 7400 W 174.2 Wh/kg 7370240 7400 W 176.5 Wh/kg Front left heating zone Minimum detection Nominal power* Booster power* Standardised cookware category** Energy consumption ECcw** Ø 200 mm Ø 100 mm 2300 W 3000 W C 180.5 Wh/kg Ø 250 mm Ø 110 mm 2300 W 3000 W D 182.7 Wh/kg Ø 250 mm Ø 110 mm 2300 W 3000 W D 182.7 Wh/kg Ø 200 mm Ø 100 mm 2300 W 3000 W C 180.5 Wh/kg Rear left heating zone Minimum detection Nominal power* Booster power* Standardised cookware category** Energy consumption ECcw** - - Ø 180 mm Ø 90 mm 1200 W 1400 W B 166.7 Wh/kg Ø 180 mm Ø 90 mm 1200 W 1400 W B 166.7 Wh/kg Center heating zone Minimum detection Nominal power* Booster power* Standardised cookware category** Energy consumption ECcw** Ø 160 mm Ø 90 mm 1200 W 1400 W B 166.7 Wh/kg - - - Rear right heating zone Minimum detection Nominal power* Booster power* Standardised cookware category** Energy consumption ECcw** - Ø 160 mm Ø 90 mm 1200 W 1400 W B 166.7 Wh/kg Ø 160 mm Ø 90 mm 1200 W 1400 W B 166.7 Wh/kg Ø 220 mm Ø 110 mm 2300 W 3000 W C 173.7 Wh/kg Front right heating zone Minimum detection Nominal power* Booster power* Standardised cookware category** Energy consumption ECcw** Ø 250 mm Ø 100 mm 2300 W 3000 W D 173.7 Wh/kg Ø 200 mm Ø 100 mm 2300 W 3000 W C 180.5 Wh/kg Ø 200 mm Ø 100 mm 2300 W 3000 W C 180.5 Wh/kg Ø 160 mm Ø 90 mm 1400 W 2000 W A 185 Wh/kg * The given power may change according to the dimensions and material of the pan. ** calculated according to the method of measuring performance (EN 60350-2). 24 Control panel Control light timer Timer display Power display Control light cooking zone Keep warm key Control light Pause/Recall Control light on/off On/Off key Power selection zone “SLIDER” and timer setting zone Booster key Pause/Recall key USE OF THE APPLIANCE Display Display 0 1…9 U A E H P L U II Designation Zero Power level Pan detection Heat accelerator Error message Residual heat Booster Locking Keep warm Pause Function The heating zone is activated. Selection of the cooking level. No pan or inadequate pan. Automatic cooking. Electronic failure. The heating zone is hot. The boosted power is activated. Control panel locking. Maintain automatically of 70°C. The hob is in pause. Ventilation The cooling system is fully automatic. The cooling fan starts with a low speed when the calories brought out by the electronic system reach a certain level. The ventilation starts his high speed when the hob is intensively used. The cooling fan reduces his speed and stops automatically when the electronic circuit is cooled enough. 25 STARTING-UP AND APPLIANCE MANAGEMENT Before the first use Clean your hob with a damp cloth, and then dry the surface thoroughly. Do not use detergent which risks causing blue-tinted colour on the glass surface. Induction principle An induction coil is located under each heating zone. When it is engaged, it produces a variable electromagnetic field which produces inductive currents in the ferromagnetic bottom plate of the pan. The result is a heating-up of the pan located on the heating zone. Of course the pan has to be adapted: All ferromagnetic pans are recommended (please verify it thanks a little magnet): cast iron and steel pans, enamelled pans, stainless-steel pans with ferromagnetic bottoms… Are excluded: cupper, pure stainless-steel, aluminium, glass, wood, ceramic, stoneware,… The induction heating zone adapts automatically the size of the pan. With a too small diameter the pan doesn’t work. This diameter is varying in function of the heating zone diameter. If the pan is not adapted to the induction hob the display will show [ U ]. Sensitive touch Your ceramic hob is equipped with electronic controls with sensitive touch keys. When your finger presses the key, the corresponding command is activated. This activation is validated by a control light, a letter or a number in the display and/or a “beep” sound. In the case of a general use press only one key at the same time. Power selection zone “SLIDER” and timer setting zone To select the power with the slider, slide your finger on the “SLIDER” zone. You can already have a direct access if you put your finger directly on the chosen level. Power selection zone “SLIDER” and timer setting zone “SLIDER“ Direct access 26 Starting-up Start up / switch off the hob: Action Control panel To start press key [ 0/I ] To stop press key [ 0/I ] Display [ 0 ] are blinking nothing or [ H ] Start up / switch off a heating zone: Action Control panel Display Zone selection press display [ 0 ] selected [ 0 ] and control light on To set slide on the “SLIDER“ [ 0 ] to [ 9 ] (adjust the power) to the right or to the left To stop slide to [ 0 ] on “SLIDER“ [ 0 ] or [ H ] or press on [ 0 ] [ 0 ] or [ H ] If no action is made within 20 second the electronics returns in waiting position. Pan detection The pan detection ensures a perfect safety. The induction doesn’t work: If there is no pan on the heating zone or if this pan is not adapted to the induction. In this case it is impossible to increase the power and the display shows [ U ]. This symbol disappears when a pan is put on the heating zone. If the pan is removed from the heating zone the operation is stopped. The display shows [ U ]. The symbol [ U ] disappears when the pan is put back to the heating zone. The cooking continues with the power level set before. After use, switch the heat element off: don’t let the pan detection [ U ] active. Residual heat indication After the switch off of a heating zone or the complete stop of the hob, the heating zones are still hot and indicates [ H ] on the display. The symbol [ H ] disappears when the heating zones may be touched without danger. As far as the residual heat indicators are on light, don’t touch the heating zones and don’t put any heat sensitive object on them. There are risks of burn and fire. Booster function The booster function [ B ] grants a boost of power to the selected heating zone. If this function is activated the heating zones work during 10 minutes with an ultra high power. The booster is foreseen for example to heat up rapidly big quantities of water, like to cook noodles. Start up / Stop the booster function: Action Control panel Zone selection press key [ 0 ] from the zone Start up the booster press key [ B ] Stop the booster slide on the “SLIDER“ or press on [ B ] 27 Display Zone [ 0 ] and control light on [P] [ P ] to [ 0 ] [9] Power management: The hole cooking hob is equipped by a maximum of power. When the booster function is activated, and not to exceed the maximum power, the electronic system orders to reduce automatically the power level of an other heating zone. The display is blinking on [ 9 ] during a few seconds and then shows the maximum of power allowed : Heating zone selected [ P ] is displayed The other heating zone: (example: power level 9) [ 9 ] goes to [ 6 ] or [ 8 ] depending the type of zone Timer The timer is able to be used simultaneous with all 3 or 4 heating zones and this with different time settings (from 0 to 99 minutes) for each heating zone. Setting and modification of the cooking time : Example for 16 minutes at power 7 : Action Control panel Zone selection press display [ 0 ] selected Select the power level slide on the “SLIDER“ to [ 7 ] Select « Timer » press display [ CL ] Set the units slide on the “SLIDER“ to [ 6 ] Valid the units press display [ 06 ] Set the tens slide on the “SLIDER“ to [ 1 ] Valid the tens press display [ 16 ] Display [ 0 ] and control light on [7] [ 00 ] [ 0 fixed ] [ 6 blinking ] [ 0 blinking ] [ 6 fixed ] [ 1 blinking ] [ 6 fixed ] [ 16 ] The time is confirmed and the cooking starts. To stop the cooking time: Example for 13 minutes at power 7 : Action Control panel Zone selection press display [ 7 ] selected Select « Timer » press key [ 13 ] Deactivate the units slide on the “SLIDER“ to [ 0 ] Valid the units press display [ 10 ] Deactivate the tens slide on the “SLIDER“ to [ 0 ] Valid the tens press display [ 00 ] Display [ 7 ] and control light on [ 13 ] [ 1 fixed ] [ 0 blinking ] [ 1 blinking ] [ 0 fixed ] [ 0 blinking ] [ 0 fixed ] [ 00 ] Automatic stop at the end of the cooking time: As soon as the selected cooking time is finished the timer displays blinking [ 00 ] and a sound rings. To stop the sound and the blinking it is enough to press the key [ 00 ]. Egg timer function : Example for 29 minutes : Action Control panel Display Activate the hob press display [ 0/I ] zone control lights are on Select« Timer » press display [ CL ] [ 00 ] Set the units slide on the “SLIDER“ to [ 9 ] [ 0 fixed ] [ 9 blinking ] Valid the units press display [ 09 ] [ 0 blinking ] [ 9 fixed ] Set the tens slide on the “SLIDER“ to [ 2 ] [ 2 blinking ] [ 9 fixed ] Valid the tens press display [ 29 ] [ 29 ] After a few seconds the control light stops with blinking. As soon as the selected cooking time is finished the timer displays blinking [ 00 ] and a sound rings. To stop the sound and the blinking it is enough to press the display [ 00 ]. The hob switches off. 28 Automatic cooking All the cooking zones are equipped with an automatic “go and stop” cooking device. The cooking zone starts at full power during a certain time, then reduces automatically its power on the preselected level. Start-up : Action Control panel Display Zone selection press display [ 0 ] selected [ 0 ] and control light on Full power setting slide on the “SLIDER“ to [ 9 ] pass from [ 0 ] to [ 9 ] Automatic cooking re-press on display “SLIDER“ [ 9 ] [ 9 ] is blinking with [ A ] Power level selection slide on the “SLIDER“ to [ 7 ] [ 9 ] pass to [ 8 ] [ 7 ] (for example « 7 ») [ 7 ] is blinking with [ A ] Switching off the automatic cooking : Action Control panel Display Zone selection press [ 7 ] from the zone [ 7 ] blinking with [ A ] Power level selection slide on the “SLIDER“ [ 1 ] to [ 9 ] Pause function This function brakes all the hob’s cooking activity and allows restarting with the same settings. Startup/stop the pause function : Action Control panel Display Engage pause press [ II ] key during 2s displays [ II ] in the heating zone displays Stop the pause press [ II ] key during 2s pause control light is blinking press an other touch or pause control light is off slide on the “SLIDER“ Recall Function After switching off the hob [ 0/I ], it is possible to recall the last settings. cooking stages of all cooking zones (power) minutes and seconds of programmed cooking zone-related timers Heat up function The recall procedure is following: Press the key [ 0/I ] Then press the key [ II ] within 6 seconds The precedent settings are activated. « Keep warm » Function This function allows to reach and maintain automatically a temperature of 70°C. This will avoid liquids overflowing and fast burning at the bottom of the pan. To engage, to start the function « Keep warm » : Action Control panel Display Zone selection press display [ 0 ] selected [ 0 ] to [ 9 ] or [ H ] To engage press on key [ U ] on the “SLIDER“ [U] To stop press on display [ U ] selected [U] slide on the “SLIDER“ [ 0 ] to [ 9 ] or [ H ] This function can be started independently on all the heating zones. When the pan leaves the cooking zone of the "Keep warm" function remains active during approximately 10 minutes. The maximum duration of keeping warm is 2 hours. 29 Control panel locking To avoid modifying a setting of cooking zones , in particular during of cleaning the control panel can be locked (with exception to the On/Off key [ 0/I ]). Locking : Action Control panel Display Start press on key [ 0/I ] [ 0 ] or [ H ] on displays Hob locking press simultaneously [ B ] and [ 0 ] no modification from the front right** zone display re-press on display [ 0 ] [ L ] on displays Unlocking : Action Control panel Display Start press on key [ 0/I ] [ L ] on displays In the 5 seconds after start : Unlocking the hob press simultaneously [ B ] and [ 0 ] or [ H ] on displays [ L ] from the front right** zone display press on key [ B ] no light on the displays ** for the 7330240 use the rear right zone display 30 COOKING ADVICES Pan quality Adapted materials : steel, enamelled steel, cast iron, ferromagnetic stainless-steel, aluminium with ferromagnetic bottom. Not adapted materials : aluminium and stainless-steel without ferromagnetic bottom, cupper, brass, glass, ceramic, porcelain. The manufacturers specify if their products are compatible induction. To check if pans are compatibles : Put a little water in a pan placed on an induction heating zone set at level [ 9 ].This water must heat in a few seconds. A magnet stucks on the bottom of the pan. Certain pans can make noise when they are placed on an induction cooking zone. This noise doesn’t mean any failure on the appliance and doesn’t influence the cooking operating. The pans must be certified by the manufacturer as compatible with induction hobs. However, it is possible that certain pans, even though declared compatible, may have characteristics which are not adapted to be used with induction hobs. We recommend to verify, when purchasing the pans, that they respect at least the following conditions: If the bottom of the pan (Ød) is significantly smaller than the diemeter of the body (ØD) the performance will not be good, and the pan might not be identified by the plate 31 Pan dimension The cooking zones are, until a certain limit, automatically adapted to the diameter of the pan. However the bottom of this pan must have a minimum of diameter according to the corresponding cooking zone. To obtain the best efficiency of your hob, please place the pan well in the centre of the cooking zone. Examples of cooking power setting (the values below are indicative) 1 to 2 2 to 3 3 to 4 4 to 5 6 to 7 7 to 8 9 P Melting Reheating Simmering Defrosting Steam Water Sauces, butter, chocolate, gelatine Dishes prepared beforehand Rice, pudding, sugar syrup Dried vegetables, fish, frozen products Vegetables, fish, meat Steamed potatoes, soups, pasta, fresh vegetables Meat, lever, eggs, sausages Goulash, roulade, tripe Potatoes, fritters, wafers Steaks, omelettes, fried dishes Water scallops, steaks Boiling significant quantities of water Medium cooking Simmering Cooking Frying, roosting Boiling water Frying, roosting Boiling water MAINTENANCE AND CLEANING Switch-off the appliance before cleaning. Do not clean the hob if the glass is too hot because they are risk of burn. Remove light marks with a damp cloth with washing up liquid diluted in a little water. Then rinse with cold water and dry the surface thoroughly. Highly corrosive or abrasive detergents and cleaning equipment likely to cause scratches must be absolutely avoided. Do not ever use any steam-cleaner or pressure washer Do not use any object that may scratch the ceramic glass. Ensure that the pan is dry and clean. Ensure that there are no grains of dust on your ceramic hob or on the pan. Sliding rough saucepans will scratch the surface. Spillages of sugar, jam, jelly, etc. must be removed immediately. You will thus prevent the surface being damaged. 32 WHAT TO DO IN CASE OF A PROBLEM When the symbol [ E 4 ] appears: The table must be reconfigured. Please implement the following steps : I) Important : before you start, make sure there is no more pot on the hob II) Disconnect the appliance from the grid by removing the fuse or turning the circuit breaker off III) Reconnect the table to the grid IV) Procedure : take a pot with a ferromagnetic bottom and a minimum diameter of 16 cm * start the procedure within 2 minutes after reconnecting the hob to the grid * don’t use the [ O/I ] touch V) First step : cancel the existing configuration c b 1) Press the touch n°2 and hold down 2) The symbol [ - ] will appear on each display 3) With your other hand, press successively d a and quickly (less than 2s) on each [ - ] display. Begin from the front right side and turn contrary clockwise, as described on the picture (from a to d). A double "beep" means an error occured. If so, start again from item 1). 4) Remove your fingers from the touch control, then push again on touch 1 during few seconds, until blinking [ E ] symbols appear. 5) Wait until [ E ] symbols stop blinking. 6) After few seconds, [ E ] are automatically transformed in [ C ]. The existing setup has been cancelled. Note : For induction hobs with 3 cooking zones, as the right front zone doesn’t exist in this case, begin the procedure with the right rear zone (b). VI) Second step : new setup 1) Take a ferromagnetical pot with a minimum diameter of 16 cm 2) Select a cooking zone by pushing on the corresponding [ C ] display 3) Place the pot on the area to be set 4) Wait until the [ C ] display becomes a [ - ]. The selected cooking zone is now configured. 5) Follow the same procedure for each cooking zone with a [ C ] display. 6) All the cooking zones are configured once all the displays are turned off. Please use the same pot for the whole procedure. Never put several pots together on the zones during the setup-process. If [ E 4 ] displaying remains, please call the customer care The hob or the cooking zone doesn’t start-up: The hob is badly connected on the electrical network. The protection fuse cut-off. The looking function is activated. The sensitive keys are covered of grease or water. An object is put on a key. The control panel displays [ U ]: There is no pan on the cooking zone. The pan is not compatible with induction. The bottom diameter of the pan is too small. The control panel displays [ C ] or [ E ]: Call the After-sales Service. 33 One or all cooking zone cut-off: The safety system functioned. You forgot to cut-off the cooking zone for a long time. One or more sensitive keys are covered. The pan is empty and its bottom overheated. The hob also has an automatic reduction of power level and breaking Automatic overheating Continuous ventilation after cutting off the hob: This is not a failure, the fan continuous to protect the electronic device. The fan cooling stops automatically. The automatic cooking system doesn’t start-up: The cooking zone is still hot [ H ]. The highest power level is set [ 9 ]. The control panel displays [ L ]: Refer to the chapter control panel locking page. The control panel displays [ U ]: Refer to the chapter “Keep warm“. The control panel displays [ II ]: Refer to the chapter “Pause“. ENVIRONMENT PRESERVATION The materials of packing are ecological and recyclable. The electronic appliances are composed of recyclable, and sometimes harmful materials for the environment, but necessary to the good running and the safety of the appliance. Don't throw your appliance with the household refuses Get in touch with the waste collection centre of your commune that is adapted to the recycling of the household appliances. 34 INSTALLATION INSTRUCTIONS The installation comes under the exclusive responsibility of specialists. The installer is held to respect the legislation and the standards enforce in his home country. How to stick the gasket: The gasket supplied with the hob avoids all infiltration of liquids in the cabinet. His installation has to be done carefully, in conformity of the following drawing. Stick the gasket (2) two millimeters from the external edge of the glass, after removing the protection sheet (3). Fitting - installing: The cut out sizes are: Reference 7330240 7331240 7332240 7370240 Cut-size 760 x 350 mm 560 x 490 mm 650 x 490 mm 560 x 490 mm Ensure that there is a distance of 50 mm between the hob and the wall or sides. The hobs are classified as “Y” class for heat protection. Ideally the hob should be installed with plenty of space on either side. There may be a wall at the rear and tall units or a wall at one side. On the other side, however, no unit or divider must stand higher than the hob. The piece of furniture or the support in which the hob is to be fitted, as well as the edges of furniture, the laminate coatings and the glue used to fix them, must be able to resist temperatures of up to 100 °C. The mural rods of edge must be heat-resisting. Not to install the hob to the top of a not ventilated oven or a dishwasher. To guarantee under the bottom of the hob casing a space of 20 mm to ensure a good air circulation of the electronic device. If a drawer is placed under the work, avoid to put into this drawer flammable objects (for example: sprays) or not heat-resistant objects. Materials which are often used to make worktops expand on contact with water. To protect the cut out edge, apply a coat of varnish or special sealant. Particular care must be given to applying the adhesive joint supplied with the hob to prevent any leakage into the supporting furniture. This gasket guaranties a correct seal when used in conjunction with smooth work top surfaces. The safety gap between the hob and the cooker hood placed above must respect the indications of the hood manufacturer. In case of absence of instructions respect a distance minimum of 760 mm. The connection cord should be subjected, after building, with no mechanical constraint, such for example of the fact of the drawer. WARNING: Use only hob guards designed by the manufacturer of the cooking appliance or indicated by the manufacturer of the appliance in the instructions for use as suitable or hob guards incorporated in the appliance. The use of inappropriate guards can cause accidents. 35 ELECTRICAL CONNECTION The installation of this appliance and the connection to the electrical network should be entrusted only to an electrician perfectly to the fact of the normative regulations and which respects them scrupulously. Protection against the parts under tension must be ensured after the building-in. The data of connection necessary are on the stickers place on the hob casing near the connection box. The connection to the main must be made using an earthed plug or via an omnipolar circuit breaking device with a contact opening of at least 3 mm. The electrical circuit must be separated from the network by adapted devices, for example: circuit breakers, fuses or contactors. If the appliance is not fitted with an accessible plug, disconnecting means must be incorporated in the fixed installation, in accordance with the installation regulations. The inlet hose must be positioned so that it does not touch any of the hot parts of the hob or even. Caution! This appliance has only to be connected to a network 230 V~ 50/60 Hz. Connect always the earth wire. Respect the connection diagram. The connection box is located underneath at the back of the hob casing. To open the cover use a medium screwdriver. Place it in the slits and open the cover. Mains Connection Cable diameter 230V~ 50/60Hz 1 Phase + N 3 x 2,5 mm² 400V~ 50/60Hz 2 Phases + N 4 x 1.5 mm² Cable H 05 VV - F H 05 RR - F H 05 VV - F H 05 RR - F Protection calibre 25 A * 16 A * * calculated with the simultaneous factor following the standard EN 60 335-2-6 Connection of the hob Setting up the configurations: For the various kinds of connection, use the brass bridges which are in the box next the terminal Monophase 230V~1P+N Put the 1st bridge between terminal 1 and 2, the 2nd between 3 and 4. Attach the earth to the terminate “earth”, the neutral N to terminal 3 or 4, the Phase L to one of the terminals 1 or 2. Biphase 400V~2P+N Put a bridge between terminal 3 and 4. Attach the earth to the terminate “earth”, the neutral N to terminal 3 or 4, the Phase L1 to the terminals 1 and the Phase L2 to the terminal 2. Caution! Be careful that the cables are correctly engaged and tightened. We cannot be held responsible for any incident resulting from incorrect connection or which could arise from the use of an appliance which has not been earthed or has been equipped with a faulty earth connection. 36 Chère cliente,cher client, Nous vous remercions de la confiance que vous nous avez accordée en choisissant notre table de cuisson vitrocéramique à induction. Afin de bien connaître cet appareil, nous vous recommandons de lire attentivement cette notice d’utilisation dans son intégralité et de la conserver pour une consultation ultérieure. SOMMAIRE SECURITE ................................................................................................................................... 38 PRECAUTIONS AVANT UTILISATION EN CUISSON ............................................................................. 38 UTILISATION DE L’APPAREIL ......................................................................................................... 38 PRECAUTIONS POUR NE PAS DETERIORER L’APPAREIL ................................................................... 39 PRECAUTIONS EN CAS DE DEFAILLANCE DE L’APPAREIL .................................................................. 40 AUTRES PROTECTIONS ............................................................................................................... 41 DESCRIPTION DE L’APPAREIL ................................................................................................ 42 CARACTERISTIQUES TECHNIQUES ................................................................................................ 42 BANDEAU DE COMMANDE ............................................................................................................ 43 UTILISATION DE L’APPAREIL .................................................................................................. 43 AFFICHAGE ................................................................................................................................ 43 VENTILATION .............................................................................................................................. 43 MISE EN ROUTE ET GESTION DE L’APPAREIL ...................................................................... 44 AVANT LA PREMIERE UTILISATION ................................................................................................. 44 PRINCIPE DE L’INDUCTION ........................................................................................................... 44 TOUCHES SENSITIVES ................................................................................................................. 44 ZONE DE SELECTION DE PUISSANCE “ SLIDER “ ET DE REGLAGE DE LA MINUTERIE .......................... 44 MISE EN ROUTE .......................................................................................................................... 45 DETECTION DE RECIPIENT ........................................................................................................... 45 INDICATEUR DE CHALEUR RESIDUELLE .......................................................................................... 45 FONCTION BOOSTER ................................................................................................................... 46 FONCTION MINUTERIE ................................................................................................................. 46 PROGRAMMATION D’AUTOMATISME DE CUISSON ............................................................................ 47 FONCTION PAUSE....................................................................................................................... 48 FONCTION RAPPEL ..................................................................................................................... 48 FONCTION « MAINTIEN AU CHAUD » ............................................................................................. 48 VERROUILLAGE DU BANDEAU DE COMMANDE................................................................................. 49 CONSEILS DE CUISSON ........................................................................................................... 50 QUALITE DES CASSEROLES ......................................................................................................... 50 DIMENSION DES CASSEROLES...................................................................................................... 51 EXEMPLES DE REGLAGE DES PUISSANCES DE CUISSON .................................................................. 51 ENTRETIEN ET NETTOYAGE .................................................................................................... 51 QUE FAIRE EN CAS DE PROBLEME ........................................................................................ 52 PROTECTION DE L’ENVIRONNEMENT .................................................................................... 53 INSTRUCTIONS D’INSTALLATION ........................................................................................... 54 CONNEXION ELECTRIQUE ....................................................................................................... 55 37 SECURITE Précautions avant utilisation en cuisson Retirez toutes les parties de l’emballage. L’installation et le branchement électrique de l’appareil sont à confier à des spécialistes agrées. Le fabricant ne saurait être tenu responsable des dommages résultant d’une erreur d’encastrement ou de raccordement. L’appareil ne doit être utilisé que s’il est monté et installé dans un meuble et un plan de travail homologué et adapté. Son utilisation est uniquement destinée à l’usage domestique habituel (préparation des aliments), à l’exclusion de toute autre utilisation domestique, commerciale ou industrielle. Enlevez toutes les étiquettes et autocollants du verre vitrocéramique. Ne pas transformer ou modifier l’appareil. La table de cuisson ne doit pas servir de support ou de plan de travail. La sécurité n’est assurée que si l’appareil est raccordé à une terre de protection conforme aux prescriptions en vigueur. Pour le raccordement au réseau électrique n’utilisez pas de rallonge. L’appareil ne doit pas être utilisé au-dessus d’un lave-vaisselle ou d’un sèche-linge : les vapeurs d’eau dégagées pourraient détériorer l’électronique. Ne faites pas fonctionner l'appareil avec un minuteur externe ou un système de commande à distance. Utilisation de l’appareil Coupez toujours les foyers après utilisation. Surveillez constamment les cuissons qui utilisent des graisses et des huiles, car elles sont susceptibles de s’enflammer rapidement. Prenez garde aux risques de brûlures pendant et après l’utilisation de l’appareil. 38 Assurez-vous qu’aucun câble électrique d’appareil fixe ou mobile ne vienne en contact avec la vitre ou la casserole chaude. Les objets magnétisables (cartes de crédits, disquettes informatiques, calculatrices) ne doivent pas se trouver à proximité immédiate de l’appareil en fonction. Les objets métalliques tels que des couteaux, des fourchettes, des cuillères et des couvercles ne devraient pas être placés sur la surface vitrée puisqu'ils peuvent devenir chauds. De façon générale ne placez aucun objet métallique autre que les récipients de chauffe sur la surface vitrée. En cas d’enclenchement intempestif ou de chaleur résiduelle, celui-ci risquerait selon le matériau de chauffer, de fondre ou de commencer à brûler. Ne jamais couvrir l’appareil d’un chiffon ou d’une feuille de protection. Il pourrait devenir très chaud et prendre feu. Cet appareil peut être utilisé par des enfants âgés de 8 ans et plus et des personnes dont les capacités physiques, sensorielles ou mentales sont réduites ou dont les expériences et les connaissances sont inadaptées, uniquement si elles sont surveillées, formées à l’utilisation de l’appareil en conditions de sécurité et informées des risques susceptibles de se présenter. Les enfants ne doivent pas jouer avec l’appareil. Le nettoyage et l’entretien ne doivent pas être confiés à des enfants sans surveillance d’adultes. Précautions pour ne pas détériorer l’appareil Les casseroles à semelles brutes (fonte non émaillée,…) ou abîmées peuvent endommager la vitrocéramique. La présence de sable ou d’autres matériaux abrasifs peut endommager la vitrocéramique. Evitez de faire chuter des objets, mêmes petits, sur la vitrocéramique. Ne heurtez pas les bords de la vitre avec les casseroles. S’assurer que la ventilation de l’appareil se fasse suivant les instructions du constructeur. Ne posez pas ou ne pas laisser de casseroles vides sur la table de cuisson. 39 Eviter que le sucre, les matières synthétiques ou une feuille d’aluminium ne touchent les zones chaudes. Ces substances peuvent au refroidissement provoquer des cassures ou d’autres modifications de la surface vitrocéramique: Eteindre l’appareil et enlevez-les immédiatement de la zone de cuisson encore chaude (attention : risque de brûlures). MISE EN GARDE: Risque d’incendie : ne pas entreposer d’objets sur la surface de cuisson. Ne placez jamais de récipients chauds au dessus de la zone de commande. Si un tiroir est situé sous l’appareil encastré, assurer un écart suffisant (2 cm) entre le contenu de ce tiroir et la partie inférieure de l’appareil afin d’assurer une bonne ventilation. Ne déposez pas d’objets inflammables (ex. sprays) dans le tiroir placé sous la table de cuisson. Les éventuels casiers à couverts doivent être en matériau résistant à la chaleur. Précautions en cas de défaillance de l’appareil Si un défaut est constaté, il faut débrancher l’appareil et couper l’alimentation électrique. En cas de fêlure ou de fissure de la vitrocéramique il faut impérativement débrancher l’appareil du réseau électrique et prévenir le service après-vente. Les réparations doivent être entreprises exclusivement par un personnel spécialisé. N’ouvrez en aucun cas l’appareil vousmême. ATTENTION : Si la surface vitrée est fissurée, coupez l’alimentation de l’appareil pour éviter une éventuelle décharge électrique. 40 Autres protections Assurez-vous que le récipient de cuisson soit toujours centré sur la zone de cuisson. Le fond de la casserole doit autant que possible couvrir la zone de cuisson. Pour les utilisateurs portant un régulateur de rythme cardiaque, le champ magnétique pourrait influencer son fonctionnement. Nous recommandons de se renseigner auprès du revendeur ou du médecin. N’utilisez pas de récipients en matière synthétique ou en aluminium : ils pourraient fondre sur des foyers encore chauds. NE JAMAIS essayer d’éteindre un incendie avec de l’eau, mais arrêter l’appareil puis couvrir les flammes par exemple avec un couvercle ou une couverture anti-feu. L’UTILISATION DE CASSEROLES NON ADAPTÉES, OU D’ACCESSOIRES AMOVIBLES INTERMÉDIAIRES POUR FAIRE CHAUFFER DES CASSEROLES NON INDUCTIVES ENTRAÎNE UNE RUPTURE DE LA GARANTIE. LE FABRICANT NE SAURAIT ÊTRE TENU POUR RESPONSABLE DES DÉTERIORATIONS DE LA TABLE OU DE SON ENVIRONNEMENT. 41 DESCRIPTION DE L’APPAREIL Caractéristiques techniques Type Puissance Totale Consommation d’énergie de la table de cuisson EChob** 7330240 6700 W 7331240 6700 W 7332240 7400 W 7370240 7400 W 173.6 Wh/kg 176.6 Wh/kg 174.2 Wh/kg 176.5 Wh/kg Foyer avant gauche Détection minimum Puissance nominale* Puissance du booster* Catégorie de la casserole standard** Consommation d’énergie ECcw** Ø 200 mm Ø 100 mm 2300 W 3000 W C 180.5 Wh/kg Ø 250 mm Ø 110 mm 2300 W 3000 W D 182.7 Wh/kg Ø 250 mm Ø 110 mm 2300 W 3000 W D 182.7 Wh/kg Ø 200 mm Ø 100 mm 2300 W 3000 W C 180.5 Wh/kg Foyer arrière gauche Détection minimum Puissance nominale* Puissance du booster* Catégorie de la casserole standard** Consommation d’énergie ECcw** - - Ø 180 mm Ø 90 mm 1200 W 1400 W B 166.7 Wh/kg Ø 180 mm Ø 90 mm 1200 W 1400 W B 166.7 Wh/kg Foyer central Détection minimum Puissance nominale* Puissance du booster* Catégorie de la casserole standard** Consommation d’énergie ECcw** Ø 160 mm Ø 90 mm 1200 W 1400 W B 166.7 Wh/kg - - - Foyer arrière droit Détection minimum Puissance nominale* Puissance du booster* Catégorie de la casserole standard** Consommation d’énergie ECcw** - Ø 160 mm Ø 90 mm 1200 W 1400 W B 166.7 Wh/kg Ø 160 mm Ø 90 mm 1200 W 1400 W B 166.7 Wh/kg Ø 220 mm Ø 110 mm 2300 W 3000 W C 173.7 Wh/kg Foyer avant droit Détection minimum Puissance nominale* Puissance du booster* Catégorie de la casserole standard** Consommation d’énergie ECcw** Ø 250 mm Ø 100 mm 2300 W 3000 W D 173.7 Wh/kg Ø 200 mm Ø 100 mm 2300 W 3000 W C 180.5 Wh/kg Ø 200 mm Ø 100 mm 2300 W 3000 W C 180.5 Wh/kg Ø 160 mm Ø 90 mm 1400 W 2000 W A 185 Wh/kg * la puissance peut varier en fonction des dimensions et des matériaux des casseroles. ** calculé selon la méthode de mesure de l’aptitude à la fonction (EN 60350-2). 42 Bandeau de commande Voyants de sélection du foyer pour minuterie Affichage de la minuterie Affichage du niveau de puissance Voyant de sélection de foyer Touche maintien au chaud Voyant Pause/Rappel Voyant de mise en marche Touche Marche/Arrêt Zone de sélection de puissance « SLIDER » et de réglage de la minuterie Touche Booster Touche Pause/Rappel UTILISATION DE L’APPAREIL Affichage Affichage 0 1…9 U A E H P L U II Désignation Zéro Niveau de puissance Détection de casserole Accélérateur de chauffe Message d’erreur Chaleur résiduelle Booster Verrouillage Maintien Chaud Pause Fonction La zone de chauffe est activée. Choix du niveau de cuisson. Récipient manquant ou inapproprié. Cuisson automatique. Défaut de circuit électronique. La zone de cuisson est chaude. La puissance turbo est activée. La table est sécurisée. La cuisson est maintenue à 70°C. La table est en pause. Ventilation Le ventilateur de refroidissement a un fonctionnement entièrement automatique. Il se met en route à petite vitesse dès que les calories dégagées par l’électronique dépassent un certain seuil. La ventilation enclenche sa seconde vitesse lorsque la table de cuisson est utilisée intensivement. Le ventilateur réduit sa vitesse et s’arrête automatiquement dès que le circuit électronique est suffisamment refroidi. 43 MISE EN ROUTE ET GESTION DE L’APPAREIL Avant la première utilisation Nettoyez votre appareil avec un chiffon humide, puis séchez-le. N’utilisez pas de détergent qui risquerait de provoquer une coloration bleutée sur les surfaces vitrées. Principe de l’induction Une bobine d’induction se trouve sous chaque foyer de cuisson. Lorsque celle-ci est enclenchée, elle produit un champ électromagnétique variable qui, à son tour produit des courants induits dans le fond ferro-magnétique du récipient. Il en résulte un échauffement du récipient placé sur la zone de chauffe. Bien entendu le récipient doit être adapté : Sont recommandés tous les récipients métalliques ferro-magnétiques (à vérifier éventuellement avec un petit aimant) tels que : cocotte en fonte, poêle en fer noir, casseroles métalliques émaillées, en inox à semelle ferro-magnétique… Sont exclus les récipients en cuivre, inox, aluminium, verre, bois, céramique, grès, terre cuite, inox non ferro-magnétique… La zone de cuisson à induction prend automatiquement en compte la taille du récipient utilisé. Avec un diamètre trop petit, le récipient ne fonctionne pas. Ce diamètre varie en fonction du diamètre de la zone de cuisson. Lorsque le récipient n’est pas adapté à la table de cuisson le symbole [ U ] reste affiché. Touches sensitives Votre appareil est équipé de touches sensitives permettant de commander les différentes fonctions. Un effleurage de la touche active leur fonctionnement. Cette activation est validée par un voyant, un affichage et/ou par un signal sonore. Dans le cas d’une utilisation générale n’appuyez que sur une seule touche à la fois. Zone de sélection de puissance “ SLIDER “ et de réglage de la minuterie Pour la sélection de la puissance par le slider faire glisser votre doigt sur la zone “SLIDER“. Vous bénéficiez également d’un accès direct en posant votre doigt directement sur le niveau souhaité. Zone de sélection de puissance “SLIDER“ et de réglage de la minuterie “SLIDER“ Accès direct 44 Mise en route Enclencher / arrêter la table de cuisson : Action Enclencher Arrêter Bandeau de commande appuyer sur [ 0/I ] appuyer sur [ 0/I ] Réglage de la zone de chauffe : Action Bandeau de commande Sélectionner la zone appuyer sur [ 0 ] de la zone Afficheur [ 0 ] clignotent aucun ou [ H ] Afficheur [ 0 ] et voyant de zone allumé [0]à[9] glisser sur le “SLIDER“ vers la droite ou la gauche glisser jusqu’à [ 0 ] sur le “SLIDER“ [ 0 ] ou [ H ] ou appuyer sur [ 0 ] [ 0 ] ou [ H ] Si aucun réglage n’est fait dans un délai de 20 secondes l’électronique revient en position d’attente. Régler (Ajuster la puissance) Arrêter Détection de récipient La détection de récipient assure une sécurité parfaite. L’induction ne fonctionne pas : Lorsqu’il n’y a pas de récipient sur la zone de cuisson ou lorsque ce récipient est inadapté à l’induction. Dans ce cas il est impossible d’augmenter la puissance et dans l’afficheur le symbole [ U ] apparaît. Le [ U ] disparaît lorsqu’une casserole est posée sur le foyer de cuisson. Si en cours de cuisson le récipient est enlevé de la zone de cuisson, le fonctionnement est interrompu. Dans l’afficheur le symbole [ U ] apparaît. Le [ U ] disparaît lorsque le récipient est remis sur le foyer de cuisson. La cuisson reprend au niveau de puissance sélectionnée au préalable. Après utilisation, éteignez la zone de chauffe. Ne laissez pas la détection de casserole [ U ] active. Indicateur de chaleur résiduelle Après l’arrêt des zones de cuisson ou l’arrêt complet de la table, les zones de cuissons sont encore chaudes et sont signalées par le symbole [ H ]. Le symbole [ H ] s’éteint lorsque les zones de cuisson peuvent être touchées sans danger. Tant que les témoins de chaleur résiduelle sont allumés, ne touchez pas les zones de cuisson et ne posez aucun objet sensible à la chaleur. Risque de brûlure et d’incendie ! 45 Fonction booster La fonction booster [ B ] octroie un renforcement de puissance à la zone de cuisson sélectionnée. Si cette fonction est activée, ces zones de cuisson fonctionnent pendant 10 minutes avec une puissance nettement plus élevée. Le booster est conçu par exemple pour faire chauffer rapidement de grandes quantités d’eau, comme pour la cuisson des pâtes. Enclencher / arrêter la fonction booster : Action Sélectionner la zone Bandeau de commande appuyer sur [ 0 ] de la zone Enclencher le booster Stopper le booster appuyer sur [ B ] glisser sur le “SLIDER“ ou appuyer sur [ B ] Afficheur [ 0 ] et voyant de zone allumé [P] [P]à[0] [9] Gestion de la puissance maximale : L’ensemble de la table de cuisson est doté d’une puissance maximale. Lorsque la fonction booster est activée, et pour ne pas excéder cette puissance maximale, la commande électronique réduit automatiquement le niveau de cuisson d’une autre zone de chauffe. Durant quelques secondes, l’afficheur de cette zone de cuisson en clignotant [ 9 ] puis affiche le niveau de cuisson maximum possible : Zone de cuisson sélectionnée [ P ] est affiché Autre zone de cuisson ( exemple : puissance niveau 9 ) [ 9 ] passe à [ 6 ] ou [ 8 ] suivant le type de foyer Fonction minuterie La minuterie peut être affectée simultanément aux 3 ou 4 foyers de cuisson et ceci avec des réglages de temps de minuterie différents (de 0 à 99 minutes) pour chacune des zones. Réglage ou modification de la durée de cuisson : Exemple pour 16 minutes à puissance 7 : Action Bandeau de commande Sélectionner la zone appuyer sur [ 0 ] de la zone Sélectionner la puissance Sélectionner « Minuterie » Réglage des unités Valider les unités Réglage des dizaines Valider les dizaines glisser sur le “SLIDER“ jusqu’à [ 7 ] appuyer sur [ CL ] glisser sur le “SLIDER“ jusqu’à [ 6 ] appuyer sur [ 06 ] glisser sur le “SLIDER“ jusqu’à [ 1 ] appuyer sur [ 16 ] La durée est sélectionnée et le décompte démarre. 46 Afficheur [ 0 ] et voyant de zone allumé [7] [ 00 ] [ 0 fixe ] [ 6 clignotant ] [ 0 clignotant ] [ 6 fixe ] [ 1 clignotant ] [ 6 fixe ] [ 16 ] Arrêter la fonction minuterie cuisson : Exemple pour 13 minutes restantes à puissance 7 : Action Bandeau de commande Afficheur Sélectionner la zone appuyer sur [ 7 ] de la zone Sélectionner « Minuterie » Désactiver les unités Valider les unités Désactiver les dizaines Valider les dizaines appuyer sur [ 13 ] glisser sur le “SLIDER “jusqu’à [ 0 ] appuyer sur [ 10 ] glisser sur le “SLIDER “jusqu’à [ 0 ] appuyer sur [ 00 ] [ 7 ] et voyant de zone allumé [ 13 ] [ 1 fixe ] [ 0 clignotant ] [ 1 clignotant ] [ 0 fixe ] [ 00 clignotant ][ 0 fixe ] [ 00 ] Arrêt automatique en fin de cuisson : Dès que le temps de cuisson sélectionné est écoulé la minuterie affiche en clignotant [ 00 ] et un signal sonore retentit. Pour stopper le son et le clignotement, il suffit d’appuyer sur la touche [ 00 ]. Minuterie utilisée hors cuisson : Exemple pour 29 minutes : Action Bandeau de commande Afficheur Activer la table de cuisson appuyer sur [ 0/I ] voyants de zone allumés Sélectionner « Minuterie » appuyer sur [ CL ] [ 00 ] Réglage des unités glisser sur le “SLIDER“ jusqu’à [ 9 ] [ 0 fixe ] [ 9 clignotant ] Valider les unités appuyer sur [ 09 ] [ 0 clignotant ] [ 9 fixe ] Réglage des dizaines glisser sur le “SLIDER“ jusqu’à [ 2 ] [ 2 clignotant ] [ 9 fixe ] Valider les dizaines appuyer sur [ 29 ] [ 29 ] La durée est sélectionnée et le décompte démarre. Dès que le temps de cuisson sélectionné est écoulé la minuterie affiche en clignotant [ 00 ] et un signal sonore retentit. Pour stopper le son et le clignotement, il suffit d’appuyer sur la touche [ 00 ]. La table s’éteint. Programmation d’automatisme de cuisson Toutes les zones de cuisson sont équipées d’un dispositif de cuisson automatique. La zone de cuisson se met en marche à pleine puissance pendant un certain temps, puis réduit automatiquement sa puissance sur le niveau présélectionné. Mise en route de l’automatisme : Action Bandeau de commande Afficheur Sélectionner la zone appuyer sur [ 0 ] de la zone [ 0 ] et voyant de zone allumé Activer la pleine puissance glisser sur le “SLIDER“ passe de [ 0 ] à [ 9 ] jusqu’à [ 9 ] Activer l’automatisme ré appuyer sur [ 9 ] du “SLIDER“ [ 9 ] clignote avec [ A ] Sélectionner niveau glisser sur le “SLIDER“ [ 9 ] passe à [ 8 ] [ 7 ] (par exemple « 7 ») jusqu’à [ 7 ] [ 7 ] clignote avec [ A ] Arrêt de l’automatisme : Action Bandeau de commande Afficheur Sélectionner la zone appuyer sur [ 7 ] de la zone [ 7 ] clignote avec [ A ] Sélectionner niveau glisser sur le “SLIDER“ [1]à[9] 47 Fonction Pause Cette fonction permet d’interrompre ou de réactiver la cuisson avec puissances. Enclencher, déclencher la fonction : Action Bandeau de commande Activer la pause appuyer sur la touche [ II ] pendant 2s Stopper la pause appuyer sur la touche [ II ] pendant 2s appuyer sur une autre touche ou glisser sur le “SLIDER“ les mêmes réglages de Afficheur [ II ] sur les afficheurs le voyant “Pause/Rappel“ clignote le voyant “Pause/Rappel“ est éteint Fonction rappel Après avoir éteint la table (0/I), il est possible de rappeler les derniers réglages sélectionnés : Etat de cuisson de toutes les zones de cuisson (puissance). Minutes et secondes des zones de cuisson programmées par les minuteries. Fonction “cuisson automatique”. La procédure de rappel est la suivante : Appuyer sur la touche [0/I]. Ensuite appuyer sur la touche [ II ] en moins de 6 secondes. Les réglages précédents sont à nouveau actifs. Fonction « Maintien au chaud » Cette fonction de maintien au chaud permet d’atteindre et de maintenir automatiquement une température de 70°C. Ceci évitera aux liquides de déborder et aux mets d’attacher au fond de la casserole. Activer, désactiver la fonction « Maintien au chaud » : Action Bandeau de commande Afficheur Sélectionner la zone appuyer sur [ 0 ] de la zone [ 0 ] à [ 9 ] ou [ H ] Activer le maintien au chaud appuyer sur [ U ] du “SLIDER“ [U] Arrêter le maintien au chaud appuyer sur [ U ] de la zone [U] glisser sur le “SLIDER“ [ 0 ] à [ 9 ] ou [ H ] Cette fonction peut être mise en route indépendamment sur tous les foyers. Lorsque la casserole quitte la zone de cuisson la fonction « Maintien au chaud » reste active pendant environ 10 minutes. La durée maximale de maintien au chaud est de 2 heures. 48 Verrouillage du bandeau de commande Pour éviter de modifier une sélection de la table de cuisson, notamment dans le cadre du nettoyage de la vitre, le bandeau de commande (à l’exception de la touche marche/arrêt [ 0/I ]) peut être verrouillé. Verrouillage : Action Mise en route Verrouiller la table Déverrouillage : Action Mise en route Bandeau de commande appuyer sur [ 0/I ] appuyer ensemble sur [ B ] et [ 0 ] de la zone avant droite** ré appuyer sur [ 0 ] Bandeau de commande appuyer sur [ 0/I ] Dans les 5 secondes après la mise en route : Déverrouiller la table appuyer ensemble sur [ B ] et [ L ] de la zone avant droite** appuyer sur [ B ] ** pour la référence 7330240 utiliser l’afficheur de la zone arrière droite 49 Afficheur [ 0 ] ou [ H ] sur les afficheurs pas de changement [ L ] sur les afficheurs Afficheur [ L ] sur les afficheurs [ 0 ] sur les afficheurs les afficheurs sont éteints CONSEILS DE CUISSON Qualité des casseroles Matériaux adaptés : acier, acier émaillé, fonte, inox à fond ferromagnétique, aluminium à fond ferromagnétique. Matériaux non adaptés : aluminium et inox à fond non ferromagnétique, cuivre, laiton, verre, céramique, porcelaine. Pour vérifier si des casseroles sont compatibles : Placez un peu d’eau dans une casserole placée sur une zone de cuisson induction réglée au niveau [ 9 ]. Cette eau doit chauffer en quelques secondes. Placez un aimant sur le fond externe de la casserole, il doit rester collé. Certaines casseroles peuvent faire du bruit lorsqu’elles sont placées sur une zone de cuisson à induction. Ces bruits ne traduisent en aucun cas un défaut de l’appareil et n’influent nullement sur son fonctionnement. Les casseroles doivent être certifiées par le fabricant comme compatible avec l’induction. Il est toutefois possible que certaines casseroles certifiées aient en réalité des caractéristiques non adaptées. Nous recommandons de vérifier au moment de l’achat que les casseroles respectent les conditions suivantes : Si le fond de la casserole (Ød) est significativement plus petit que son corps (ØD) le rendement en est affecté et la casserole risque de ne pas être détectée. 50 Dimension des casseroles Les zones de cuisson s’adaptent automatiquement à la dimension du fond de la casserole jusqu’à une certaine limite. Le fond de cette casserole doit cependant avoir un diamètre minimum en fonction du diamètre de la zone de cuisson correspondante. Afin d’obtenir le rendement maximum de votre table de cuisson, veuillez placer la casserole bien au centre de la zone de cuisson. Exemples de réglage des puissances de cuisson (Les valeurs ci-dessous sont indicatives) 1à2 3à4 4à5 Faire fondre Réchauffer Gonfler Décongélation Vapeur Eau 6à7 Cuire à feu doux 7à8 9 P Cuire, frire Frire, porter à ébullition Frire, Porter à ébullition 2à3 Sauces, beurre, chocolat, gélatine Plats pré-cuisinés Riz, pudding et plats cuisinés Légumes, poisson, produits congelés Légumes, poissons, viande Pommes de terre à l’eau, soupes, pâtes Légumes frais Viandes, foie, œufs, saucisses Goulasch, roulades, tripes Pommes de terre, beignets, galettes Steaks, omelettes, eau Porter à ébullition des quantités importantes d’eau ENTRETIEN ET NETTOYAGE Pour nettoyer il faut mettre l’appareil hors fonctionnement. Laissez refroidir l’appareil, car risques de brûlures. Nettoyez les restes de cuisson avec de l’eau additionnée de produit vaisselle ou un produit du commerce conseillé pour la vitrocéramique. N’utilisez en aucun cas d’appareils « à vapeur » ou « à pression ». Ne pas utiliser d’objets qui risqueraient de rayer la vitrocéramique (tel que tampon abrasifs ou pointe de couteau…). N’utilisez pas de produits de nettoyage abrasifs qui pourraient endommager l’appareil. Séchez l’appareil avec un chiffon propre. Enlevez immédiatement le sucre et les mets contenant du sucre. 51 QUE FAIRE EN CAS DE PROBLEME Le symbole [ E 4 ] s’affiche : La table doit être reconfigurée suivant la procédure ci-dessous : I) Attention : au départ ne pas mettre de récipients sur la table à induction. II) Débrancher la table du réseau électrique : enlever le fusible ou couper le disjoncteur. III) Rebrancher la table au réseau électrique : remettre le fusible ou rebrancher le disjoncteur. IV) Procédure : Vous munir d'un récipient à fond ferromagnétique de diamètre 16 cm minimum. * démarrer en moins de 2 minutes après branchement au réseau électrique. * ne pas appuyer sur [ O/I ] V) Il faut d'abord annuler la configuration existante 1) Appuyer sur la touche 2 et rester appuyé. 2) Sur chaque afficheur apparait un [ - ] c b 3) Avec un doigt de l'autre main appuyer successivement et rapidement (en moins a de 2s) sur les [ - ].En partant de la zone d Avant-Droite et en tournant dans le sens inverse des aiguilles d'une montre (a -> b -> c -> d). Un double "bip" signifie Une erreur de manipulation. Dans ce cas, Refaire l'opération depuis l'étape n° 1. 4) Oter les doigts des touches et réappuyer sur la touche 1 pendant quelques secondes jusqu'à ce que les [ E ] clignotants apparaissent. 5) Attendre que les [ E ] deviennent fixes. 6) Les [ E ] se transforment ensuite automatiquement en [ C ]. La configuration est annulée. Nota : Tables à induction avec 3 zones de cuisson : Démarrer avec la zone arrière droite (b) ( la zone avant droite n'existant pas). VI) Comment reconfigurer la table ? 1) Prendre un récipient ferro-magnétique de diamètre 16cm minimum. 2) Sélection la zone de cuisson en appuyant sur le [ C ] correspondant. 3) Poser le récipient sur la zone à configurer. 4) Attendre jusqu'à ce que [ C ] se transforme en [ - ]. La zone de cuisson est configurée. 5) Procéder de la même manière pour toutes les zones de cuisson qui affichent [ C ]. 6) Les zones de cuisson sont configurées lorsque toutes les zones auront été détectées et que plus rien n'est affiché. N'utilisez qu'un seul récipient pour effectuer la configuration. Ne jamais poser plusieurs récipients sur les foyers pendant la configuration. si l’affichage [ E 4 ] persiste appelez le Service Après-ventes. La table de cuisson ou les zones de cuisson ne s’enclenchent pas : La table est mal connectée au réseau électrique. Le fusible de protection a sauté. Vérifiez si le verrouillage n’est pas activé. Les touches sensitives sont couvertes d’eau ou de graisse. Un objet est posé sur les touches sensitives. 52 Le symbole [ U ] s’affiche : Il n’y a pas de casserole sur la zone de cuisson. Le récipient utilisé n’est pas compatible avec l’induction. Le diamètre du fond de casserole est trop petit par rapport à la zone de cuisson. Le symbole [ C ] ou [ E ] s’affiche : Appelez le Service Après-ventes. L’une des zones ou l’ensemble du plan de cuisson se déclenche : Le déclenchement de sécurité a fonctionné. Celui-ci s’actionne dans le cas ou vous avez oublié de couper une des zones de chauffe. Il s’enclenche également lorsque une ou plusieurs touches sensitives sont couvertes. Une des casseroles est vide et son fond a surchauffé. La table dispose également d’un dispositif de réduction automatique de niveau de puissance et de coupure automatique en cas de surchauffe. La soufflerie de ventilation continue de tourner après l’arrêt de la table : Ce n’est pas un défaut, le ventilateur continue de protéger l’électronique de l’appareil. La soufflerie s’arrête automatiquement. La commande de cuisson automatique ne s’enclenche pas : La zone de cuisson est encore chaude [ H ]. Le niveau de cuisson maximum est enclenché [ 9 ]. La commande affiche [ L ]: Se référer au chapitre verrouillage du bandeau de commande. Le symbole [ U ] s’affiche : Se référer au chapitre “Maintien chaud“. Le symbole [ II ] s’affiche : Se référer au chapitre “Pause“. PROTECTION DE L’ENVIRONNEMENT Les matériaux d’emballage sont écologiques et recyclables. Les appareils électroniques sont composés de matériaux recyclables et parfois de matériaux nocifs pour l’environnement, mais nécessaires au bon fonctionnement et à la sécurité de l’appareil. Ne jetez en aucun cas votre appareil avec les déchets ménagers. Faites appel au service d’enlèvement ou aux sites de dépôt mis en place par votre commune et adaptés au recyclage des appareils électroménagers. 53 INSTRUCTIONS D’INSTALLATION Le montage relève de la compétence exclusive de spécialistes. L’utilisateur est tenu de respecter la législation et les normes en vigueur dans son pays de résidence. Mise en place du joint d’étanchéité Le joint adhésif fourni avec l’appareil permet d’éviter toute infiltration dans le meuble. Sa mise en place doit être effectuée avec un grand soin suivant le croquis ci-dessous. Coller le joint (2) sur le rebord de la table à 2mm du bord externe, après avoir ôté la feuille de protection (3). Encastrement La découpe du plan de travail sera suivant le modèle de table de : Appareil 7330240 7331240 7332240 7370240 Découpe 760 x 350 mm 560 x 490 mm 650 x 490 mm 560 x 490 mm La distance entre la table de cuisson et le mur doit être au minimum de 50mm. La table de cuisson est un appareil qui appartient à la classe de protection « Y ». Lors de son encastrement, une paroi d’armoire haute ou un mur peut se trouver sur l’un des côtés et sur la face arrière. Mais de l’autre côté, aucun meuble ni aucun appareil ne doit être plus haut que le plan de cuisson. Les placages et revêtements des plans de travail doivent être réalisés en matériaux résistant à la chaleur (100°C). Les baguettes de bord murales doivent être thermo résistantes. Les matériaux des plans de travail peuvent gonfler au contact de l’humidité. Pour protéger le chant de la découpe, appliquer un vernis ou une colle spéciale. N’installer pas la table au dessus d’un four non ventilé ou d’un lave-vaisselle. Garantir entre le fond du caisson de l’appareil un espace de 20 mm pour assurer une bonne circulation de l’air de refroidissement de l’électronique. Si un tiroir se trouve sous le plan de cuisson, éviter d’y ranger des objets inflammables (par exemple : spray) et des objets non résistants à la chaleur. L’écart de sécurité entre la table de cuisson et la hotte aspirante placée au-dessus d’elle doit respecter les indications du fabricant de hottes. En cas d’absence d’instructions respecter une distance minimum de 760 mm. Le câble de raccordement ne doit être soumis, après encastrement, à aucune contrainte mécanique, comme par exemple du fait d’un tiroir. MISE EN GARDE: Utiliser uniquement les dispositifs de protection de table de cuisson conçus par le fabricant de l’appareil de cuisson ou indiqués par le fabricant de l’appareil dans les instructions d’utilisation comme adaptés ou les dispositifs de protection de table de cuisson intégrés à l’appareil. L’utilisation de dispositifs de protection non appropriés peut entrainer des accidents. 54 CONNEXION ELECTRIQUE L’installation de cet appareil et son branchement au réseau électrique ne doit être confiés qu’à un électricien parfaitement au fait des prescriptions normatives. La protection contre les pièces sous tension doit être assurée après le montage. Les données de raccordement nécessaires se trouvent sur la plaque signalétique et la plaque de branchement placées sous l’appareil. Cet appareil doit être séparé du secteur par un dispositif de sectionnement omnipôles. Lorsque celui-ci est ouvert (déclenché), un écartement de 3mm doit être assuré. Le circuit électrique doit être séparé du réseau par des dispositifs appropriés, par exemple les disjoncteurs, les fusibles, les disjoncteurs différentiels et les contacteurs. Si l’appareil n’est pas muni d’une fiche accessible, des moyens de déconnection doivent être incorporé à l’installation fixe conformément aux réglementations de l’installation. Le câble d’alimentation doit être placé de sorte à ce qu’il ne touche pas de parties chaudes de la table de cuisson. Attention ! Cet appareil n’est conçu que pour une alimentation en 230 V~ 50/60 Hz. Raccordez toujours le fil de terre de protection. Respectez le schéma de raccordement. Le boîtier de raccordement se situe sous la plaque de cuisson. Pour ouvrir le capot, servez-vous d’un tournevis moyen. Placez le dans les 2 fentes situées à l’avant des 2 flèches. Réseau Raccordement Diamètre câble 230V~ 50/60Hz 1 Phase + N 3 x 2.5 mm² 400V~ 50/60Hz 2 Phases + N 4 x 1.5 mm² Câble H 05 VV - F H 05 RR - F H 05 VV - F H 05 RR - F Calibre de protection 25 A * 16 A * * calculé avec le coefficient de simultanéité suivant standard EN 60 335-2-6 Branchement de la table: Pour vous adapter au réseau électrique (230V~1P+N ou 400V~2P+N) , veuillez utiliser les pontets en laiton situés dans le boitier de connexion Monophasé 230V~1P+N : Mettre un pontet entre les plots 1 et 2, puis un pontet entre 3 et 4. Visser le fil vert/jaune au plot prévu pour la mise à la terre. Visser le neutre N au plot 3 ou 4. Visser la phase L sur un des plots 1 ou 2. Biphasé 400V~2P+N : Mettre un pontet entre 3 et 4. Visser le fil vert/jaune au plot prévu pour la mise à la terre. Visser le neutre N au plot 3 ou 4. Visser la phase L1 sur le plot 1 et la phase L2 sur le plot 2. Attention ! Veillez à bien engager les fils et à bien serrer les vis. Notre responsabilité ne saurait être engagée pour tout incident résultant d’un mauvais branchement, ou qui pourrait survenir à l’usage d’un appareil non relié à la terre ou équipé d’une terre défectueuse. 55 Sehr geehrte Kundin, sehr geehrter Kunde. Wir danken Ihnen für das Vertrauen, das Sie uns gewährt haben, indem Sie unser lnduktionskochfeld gewählt haben. Um dieses Gerät kennen zu lernen, empfehlen wir Ihnen, die Gebrauchsanweisung vollständig und aufmerksam zu lesen. Wir wünschen Ihnen viel Spaß mit diesem Gerät. INHALTSVERZEICHNIS SICHERHEIT ............................................................................................................................... 57 VORSICHTSMAßNAHME VOR DER INBETRIEBNAHME ........................................................................ 57 ALLGEMEINE SICHERHEITS-HINWEISE .......................................................................................... 58 SCHÜTZ VOR BESCHÄDIGUNG...................................................................................................... 58 VORSICHTSMAßNAHMEN BEI GERÄTEAUSFALL............................................................................... 60 SCHUTZ VOR WEITEREN GEFAHREN ............................................................................................. 60 GERÄTEBESCHREIBUNG ......................................................................................................... 61 TECHNISCHE BESCHREIBUNG ...................................................................................................... 61 BEDIENFELD .............................................................................................................................. 62 BEDIENUNG DES KOCHFELDES ............................................................................................. 62 ANZEIGE .................................................................................................................................... 62 BELÜFTUNG ............................................................................................................................... 62 INBETRIEBNAHME DES KOCHFELDES................................................................................... 63 VOR DEM ERSTEN AUFHEIZEN ..................................................................................................... 63 INDUKTIONSPRINZIP .................................................................................................................... 63 FUNKTION DER SENSORSCHALTFELDER ....................................................................................... 63 " SLIDER " AUSWAHLZONE UND ZEITSCHALTUHR AUSWÄHLUNG ................................................... 63 KOCHFELD EIN UND AUSSCHALTEN ............................................................................................... 64 TOPFERKENNUNG....................................................................................................................... 64 RESTWÄRMEANZEIGE ................................................................................................................. 64 POWERFUNKTION ....................................................................................................................... 64 ZEITSCHALTUHR ......................................................................................................................... 65 ANKOCHAUTOMATIK.................................................................................................................... 66 PAUSENFUNKTION ...................................................................................................................... 66 RÜCKRUFFUNKTION .................................................................................................................... 66 WARMHALTEFUNKTION ............................................................................................................... 66 VERRIEGELUNG DER KOCHMULDE ................................................................................................ 67 KOCH EMPFEHLUNGEN ........................................................................................................... 68 KOCHGESCHIRR ......................................................................................................................... 68 GESCHIRRGRÖßE ....................................................................................................................... 69 EINSTELLBEREICHE .................................................................................................................... 69 REINIGUNG UND PFLEGE......................................................................................................... 69 WAS TUN WENN… ..................................................................................................................... 70 UMWELTSCHUTZ ....................................................................................................................... 71 MONTAGEHINWEISE ................................................................................................................. 72 ELEKTROANSCHLUSS.............................................................................................................. 73 56 SICHERHEIT Vorsichtsmaßnahme vor der Inbetriebnahme Alle Teile der Verpackung abnehmen. Das Gerät darf nur von einem Elektrofachmann eingebaut und angeschlossen werden. Der Hersteller kann nicht verantwortlich gemacht werden für Schäden, die durch Fehler beim einbauen oder anschließen verursacht werden. Benutzen Sie das Gerät nur im eingebauten Zustand. Das Gerät darf benutzt werden nur, wenn er aufgerichtet und in einem Möbel installiert wird und ein bestätigter und angepaßter Arbeitsplan benutzt wird. Dieses Gerät darf nur für das haushaltübliche Kochen und Braten von Speisen verwendet werden und ist nicht für gewerbliche Zwecke bestimmt. Alle Etiketten und Aufkleber des Glases wegnehmen. Das Gerät darf nicht abgeändert werden. Verwenden Sie das Kochfeld nicht als Arbeits- oder Abstellfläche. Die Sicherheit ist nur gewährleistet, wenn das Gerät mit einem Schutzleiter verbunden ist, der den gültigen Vorschriften entspricht. Der Anschluß des Gerätes an das Elektronetz darf nicht über ein Verlängerungskabel erfolgen. Das Gerät darf nicht über einem Geschirrspüler oder einem Wäschetrockner benutzt werden: die freigesetzten Wasserdämpfe könnten die Elektronik beschädigen. Schalten Sie das Gerät nicht über eine externe Zeitschaltuhr oder eine separate Fernsteuerung ein. 57 Allgemeine Sicherheits-Hinweise Schalten Sie nach jedem Gebrauch die Kochzonen aus. Überhitzte Fette und Öle entzünden sich schnell. Wenn Sie Speisen in Fett oder Öl (z.B. Pommes Frites) zubereiten, sollten Sie den Kochvorgang beobachten. Wenn Sie kochen und braten, werden die Kochzonen heiß. Hüten Sie sich deshalb vor Verbrennungen während und nach der Benutzung des Geräts. Achten Sie darauf, daß kein elektrisches Kabel von einem freistehenden oder eingebautem Gerät in Kontakt mit der Scheibe oder der heißen Kochzone kommt. Magnetische Gegenstände wie z. B. Kreditkarten, Disketten, Taschenrechner, dürfen sich nicht in unmittelbarer Nähe des eingeschalteten Gerätes befinden. Ihre Funktion könnte beeinträchtigt werden. Allgemein legen Sie keine metallischen Gegenstände (z. B. Löffel, Topfdeckel usw.) auf die Induktionsfläche, da sich diese bei Betrieb unter Umständen erwärmen können. Bedecken Sie nie die Kochfläche mit einem Lappen oder einer Schutzfolie; diese könnten sehr heiß werden und Feuer fangen. Dieses Gerät kann von Kindern ab 8 Jahren und darüber sowie von Personen mit verringerten physischen, sensorischen oder mentalen Fähigkeiten oder Mangel an Erfahrung und Wissen benutzt werden, wenn sie beaufsichtigt oder bezüglich des sicheren Gebrauchs des Gerätes unterwiesen wurden und die daraus resultierenden Gefahren verstehen. Kinder dürfen nicht mit dem Gerät spielen. Reinigung und Benutzer-Wartung dürfen nicht von Kindern ohne Beaufsichtigung durchgeführt werden. Metallische Gegenstände wie Messer, Gabeln, Löffel und Topfdeckel sollen nicht auf dem Kochfeld abgelegt werden, denn sie könnten heiß werden. Schütz vor Beschädigung Verwenden Sie keine Töpfe oder Pfannen mit ungeschliffenem oder beschädigtem Boden (z.B. aus Guß). Diese können die Glaskeramikscheiben verkratzen. 58 Beachten Sie, daß auch Sandkörner Kratzer verursachen können. Glaskeramik ist unempfindlich gegen Temperaturschocks und sehr widerstandsfähig, jedoch nicht unzerbrechlich. Besonders spitze und harte Gegenstände, die auf die Kochfläche fallen, können sie beschädigen. Töpfe und Ränder nicht an der Scheibe anstoßen. Die Kochzonen nicht mit leerem Kochgeschirr benützen. Vermeiden Sie Zucker, Kunstoff, oder Alufolie auf den heißen Kochzonen. Diese Stoffe schmelzen, kleben fest und können dadurch beim Abkühlen Risse, Brüche oder andere bleibende Veränderungen in der Scheibe verursachen. Falls Sie trotzdem auf die heißen Kochzonen gelangen, schalten Sie das Gerät bitte aus, und entfernen Sie diese Stoffe noch im heißen Zustand. Da die Kochzonen heiß sind, besteht Verbrennungsgefahr. Legen Sie keine Gegenstände auf dem Kochfeld ab. Stellen Sie in keinem Fall heißes Kochgeschirr auf der Steuerung ab. Die Elektronik unter dem Glas könnte beschädigt werden. Befindet sich unter dem eingebauten Gerät eine Schublade, muß auf einen Mindestabstand von 2 cm zwischen der Unterseite des Gerätes und dem Schubladeninhalt geachtet werden, da sonst die Belüftung des Gerätes nicht gewährleistet ist. Es dürfen keine brennbaren Gegenstände (z.B. Spraydosen) in dieser Schublade aufbewahrt werden. Die möglichen Besteckkästen in der Schublade müssen aus hitzebeständigem Material sein. Erhitzen Sie keine geschlossenen Behälter (z.B. Konservendosen) auf den Kochzonen. Durch den entsprechenden Überdruck können die Behälter bzw. Dosen platzen, und es besteht Verletzungsgefahr ! 59 Vorsichtsmaßnahmen bei Geräteausfall Sollte ein Fehler festgestellt werden, muß das Gerät ausgeschaltet und vom Netz getrennt werden. Wenn Brüche, Sprünge oder Risse auf dem Glas auftreten: schalten Sie das Kochfeld sofort aus, schrauben Sie die Sicherung für das Kochfeld ab bzw. nehmen Sie diese heraus, und wenden Sie sich an unseren Kundendienst oder an Ihren Fachhändler. Reparaturen am Gerät dürfen nur von Fachkräften durchgeführt werden. WARNUNG: Wenn die Glasoberfläche gesprungen ist, ist das Gerät auszuschalten um die Gefahr eines elektrischen Schlages zu vermeiden. Schutz vor weiteren Gefahren Achten Sie darauf, daß das Kochgeschirr immer zentriert auf der Kochzone plaziert ist. Der Pfannenboden, muß möglichst viel von der Kochzone abdecken. Für Personen mit einem Herzschrittmacher: in der Nähe des eingeschalteten Gerätes entsteht ein elektromagnetisches Feld, das eventuell den Herzschrittmacher beeinträchtigen würde. Wenden Sie sich bitte im Zweifelsfall an den Hersteller des Herzschrittmachers oder an Ihren Arzt. Benutzen sie keinen syntetique oder aluminum Bereich: Sie könnten auf der kochzone verschmelzen. Versuchen Sie nicht einen Brand mit Wasser zu löschen, sondern schalten Sie das Gerät aus und bedecken Sie die Flamme mit einem Deckel oder einer Feuerlöschdecke. DIE VERWENDUNG VON SCHLECHTEN TÖPFEN BZW. VON ADAPTERSCHEIBE FÜR INDUKTION FÜHRT ZU EINER VORZEITIGEN BEENDUNG DER GARANTIE. DER HERSTELLER ÜBERNIMMT KEINE HAFTUNG FÜR SCHÄDEN, DIE AUF DEM KOCHFELD ODER SEINER UMGEBUNG AUFTRETEN KÖNNEN. 60 GERÄTEBESCHREIBUNG Technische Beschreibung Typ Gesamt Leistung Energieverbrauch der Kochmulde EChob** 7330240 6700 W 173.6 Wh/kg 7331240 6700 W 176.6 Wh/kg 7332240 7400 W 174.2 Wh/kg 7370240 7400 W 176.5 Wh/kg Kochzone vorne links Minimal Topfboden Durchmesser Nominal Leistung* Booster Leistung* Standardisiertes Kochgeschirr Kategorie** Energieverbrauch ECcw** Ø 200 mm Ø 100 mm 2300 W 3000 W C 180.5 Wh/kg Ø 250 mm Ø 110 mm 2300 W 3000 W D 182.7 Wh/kg Ø 250 mm Ø 110 mm 2300 W 3000 W D 182.7 Wh/kg Ø 200 mm Ø 100 mm 2300 W 3000 W C 180.5 Wh/kg Kochzone hinten links Minimal Topfboden Durchmesser Nominal Leistung* Booster Leistung* Standardisiertes Kochgeschirr Kategorie** Energieverbrauch ECcw** - - Ø 180 mm Ø 90 mm 1200 W 1400 W B 166.7 Wh/kg Ø 180 mm Ø 90 mm 1200 W 1400 W B 166.7 Wh/kg Kochzone central Minimal Topfboden Durchmesser Nominal Leistung* Booster Leistung* Standardisiertes Kochgeschirr Kategorie** Energieverbrauch ECcw** Ø 160 mm Ø 90 mm 1200 W 1400 W B 166.7 Wh/kg - - - Kochzone hinten rechts Minimal Topfboden Durchmesser Nominal Leistung* Booster Leistung* Standardisiertes Kochgeschirr Kategorie** Energieverbrauch ECcw** - Ø 160 mm Ø 90 mm 1200 W 1400 W B 166.7 Wh/kg Ø 160 mm Ø 90 mm 1200 W 1400 W B 166.7 Wh/kg Ø 220 mm Ø 110 mm 2300 W 3000 W C 173.7 Wh/kg Kochzone vorne rechts Minimal Topfboden Durchmesser Nominal Leistung* Booster Leistung* Standardisiertes Kochgeschirr Kategorie** Energieverbrauch ECcw** Ø 250 mm Ø 100 mm 2300 W 3000 W D 173.7 Wh/kg Ø 200 mm Ø 100 mm 2300 W 3000 W C 180.5 Wh/kg Ø 200 mm Ø 100 mm 2300 W 3000 W C 180.5 Wh/kg Ø 160 mm Ø 90 mm 1400 W 2000 W A 185 Wh/kg * Diese Leistungen können je nach Form, Größe und Qualität der Töpfe abweichen. ** nach der Methode zur Messung der Gebrauchseigenschaften (EN 60350-2) berechnet. 61 Bedienfeld Zeitschaltuhr Leuchten Kochzonen Selektion Zeitschaltuhr Anzeige Leistungs-Anzeige Leuchten KochzonenSelektion Warmhalte Taste Pause/ Rückruf Leuchte Ein/Aus Leuchte Ein/Aus Taste "SLIDER" Leistung und Zeitschaltuhr Auswahlzone Booster Taste Pause / Rückruf Taste BEDIENUNG DES KOCHFELDES Anzeige Anzeige Benennung Funktion 0 1…9 U A E H P L U II Null Leistungsstufe Topferkennung Ankochautomatik Fehleranzeige Restwärme Booster Verriegelung Warmhalte Pause Die Kochzone ist aktiviert Einstellung der Leistung Topf nicht aufgesetzt oder nicht geeignet Höchste Leistung + Ankochen Fehler der Elektronik Kochzone ist heiß Die Booster Leistung ist aktiviert. Die Mulde ist abgesichert Das Kochen bleibt bei 70°C Das Kochfeld ist in Pause. Belüftung Der Lüfter funktioniert automatisch. Er startet mit kleiner Geschwindigkeit, sobald die durch die Elektronik freigesetzten Werte eine gewisse Schwelle überschreiten. Die höhere Geschwindigkeit wird eingelegt, wenn die Induktionskochmulde intensiv benutzt wird. Der Lüfter reduziert seine Geschwindigkeit und schaltet sich automatisch ab, sobald die Elektronik genügend abgekühlt ist. 62 INBETRIEBNAHME DES KOCHFELDES Vor dem ersten Aufheizen Zuerst Ihr Gerät mit einem feuchten Lappen reinigen, dann trockenreiben. Benutzen Sie kein Reinigungsmittel, das eine bläuliche Färbung auf der verglasten Oberfläche verursachen könnte. Induktionsprinzip Unter jeder Kochzone befindet sich eine Induktionsspule. Wenn die Kochzone eingeschaltet wird, erzeugt diese Spule ein Magnetfeld. Das Magnetfeld induziert im Topfboden, der magnetisch sein muß, Wirbelströme. Dadurch erhitzt sich der Topfboden. Die Kochzone erwärmt sich nur indirekt durch die vom Topf abgegebene Wärme. Die Induktionskochzonen funktionieren nur, mit magnetischem Kochgeschirr: Geeignetes Induktionskochgeschirr mit magnetischem Boden wie z.B. : Guß, Stahl, emailliertem Stahl, Edelstahl mit magnetischem Boden. Nicht geeignetes Induktionskochgeschirr: Kupfer, Aluminium, Glas, Holz, Steingut, Keramik, nicht magnetisches Edelstahl. Die Induktionskochzone wird automatisch an die Grösse des Kochgeschirrs angepaßt. Das Kochgeschirr darf einen bestimmten Bodendurchmesser nicht unterschreiten, da sich die Induktion sonst nicht einschaltet. Jeder Topfboden-Durchmesser muß je nach Kochzonengröße eine Mindestgröße haben. Wenn das Kochgeschirr der Induktion nicht geeignet ist, erscheint die Anzeige [ U ]. Funktion der Sensorschaltfelder Das Kochfeld wird über Sensortasten gesteuert. Diese reagieren auf leichte Berührungen des Glases mit dem Finger. Wenn Sie die Tasten etwa eine Sekunde lang berühren, werden die Steuerbefehle ausgeführt. Jede Reaktion der Schaltfelder wird mit einem akustischen und/oder visuellen Signal quittiert. Im Falle eines allgemeinen Gebrauchs drücken Sie nur eine Taste zur gleichen Zeit. " SLIDER " Auswahlzone und Zeitschaltuhr Auswählung Für die Auswahl der Leistung durch den " SLIDER ", bewegen Sie Ihren Finger auf der “SLIDERZONE“. Außerdem können Sie auch einen direkten Zugang haben indem Sie mit dem Finger die gewünschte Leistung (Taste) berühren. “SLIDER” und Zeitschaltuhr Auswahlzone “SLIDER“ Direkter Zugang 63 Kochfeld ein und ausschalten Zuerst das Kochfeld und dann die Kochzone einschalten. Kochfeld: einschalten/ ausschalten: Betätigung Einschalten : Ausschalten : Bedienfeld Auf [ 0/I ] drücken Auf [ 0/I ] drücken Anzeige [ 0 ] blinkt Keine oder [ H ] Kochzone: einschalten/ ausschalten: Betätigung Auswählen der Kochzone Leistung erhöhen Leistung verringern Ausschalten Bedienfeld Anzeige Auf den [ 0 ] drücken [ 0 ] und Leuchte « ein » Auf dem “SLIDER“ rutschen [ 0 ] bis [ 9 ] Auf dem “SLIDER“ rutschen [ 9 ] bis [ 1 ] Auf dem “SLIDER“ rutschen bis zu 0 [ 0 ] oder [ H ] oder gleich auf 0 drücken [ 0 ] oder [ H ] Erfolgt keine weitere Eingabe, schaltet sich das Kochfeld aus Sicherheitsgründen nach ca. 20 Sekunden aus, und die Nullen erlöschen. Topferkennung Die Topferkennung gewährleistet eine vollkommene Sicherheit. Die Induktion funktioniert nicht : Wenn sich kein Kochgeschirr auf der Kochzone befindet oder wenn ein nicht für die Induktion geeigneter Topf benutzt wird. In diesem Fall kann die Leistungsstufe nicht erhöht werden und das [ U ] Symbol erscheint in der Anzeige. Das [ U ] verschwindet wenn ein Topf auf die Kochzone gesetzt wird. Wird der Topf während des Kochens von der Kochzone genommen, schaltet sich die Kochzone sofort aus und in der Anzeige erscheint das Zeichen [ U ]. Das [ U ] verschwindet wenn ein Topf wieder auf die Kochzone gesetzt wird. Die Kochzone fährt mit der vorher eingestellten Leistungsstufe weiter. Befindet sich kein Kochgeschirr auf der Kochzone oder ein nicht induktionsgeeigneter Topf, erscheint [ U ] in der Anzeige Restwärmeanzeige Nach dem Ausschalten der Kochzonen bzw. des Kochfeldes wird die Restwärme der noch heißen Kochzonen mit einem [ H ] angezeigt. Das [ H ] erlischt, wenn die Kochzonen ohne Gefahr berührt werden können. Solange die Restwärmeanzeige leuchtet, sollten die Kochzonen nicht berührt und keine hitzeempfindlichen Gegenstände darauf abgelegt werden: Verbrennungsgefahr! Powerfunktion Alle 3 oder 4 Kochzonen sind mit einer Powerfunktion, d.h. einer Leistungsverstärkung ausgestattet. Ist sie zugeschaltet, arbeiten diese Kochzonen für einen Zeitraum von 10 Minuten in der Leistungsstufe [ P ] mit einer extrahohen Leistung. Der Power ist dafür gedacht, daß Sie z.B., große Mengen Wasser schnell erhitzen können, wie etwa zum Kochen von Nudelwasser. Power einschalten/ ausschalten : Betätigung Bedienfeld Auswählen der Kochzone Auf den [ 0 ] drücken Power einschalten Auf [ B ] drücken Power ausschalten Auf dem “SLIDER“ rutschen oder auf [ B ] drücken 64 Anzeige [ 0 ] und Leuchte « ein » [P] [ P ] bis [ 0 ] [9] Automatische Steuerung des “ Power“: Die Kochmulde ist mit einer Höchstleistung ausgestattet. Um diese Höchstleistung nicht zu überschreiten, reduziert die Elektronik automatisch das Kochniveau einer anderen Kochzone wenn die Power-Funktion aktiviert ist. Diese Kochzone wird dann blinkend die reduzierte Leistung [ 9 ] anzeigen. Ausgewählte Kochzone [ P ] leuchtet Andere Kochzone (z.B. : Leistungsstufe 9) [ 9 ] wird auf [ 6 ] oder [ 8 ] reduziert und blinkt Zeitschaltuhr Mit der integrierten Zeitschaltuhr kann auf allen vier Kochzonen eine Gardauer von 1 bis 99 Minuten eingestellt werden. Jede Kochzone kann eine andere Einstellung haben. Einschalten oder Veränderung der Dauer: Beispiel für 16 Minuten auf Leistung 7: Betätigung Bedienfeld Auswählen der Kochzone Auf den [ 0 ] drücken Leistung auswählen Auf dem “SLIDER“ rutschen bis zu [ 7 ] Zeitschaltuhr auswählen Auf [ CL ] drücken Einstellung die Minuten Auf dem “SLIDER“ rutschen bis zu [ 6 ] Minuten Bestätigung Auf [ 06 ] drücken Einstellung der Zehnerminuten Auf dem “SLIDER“ rutschen bis zu [ 1 ] Zehnerminuten Bestätigung Auf [ 16 ] drücken Die Dauer ist aktiviert und der Zeitablauf beginnt. Zeitschaltuhr ausschalten: Beispiel für 13 übrig gebliebene Minuten an Leistung 7: Betätigung Bedienfeld Auswählen der Kochzone Auf den [ 7 ] drücken Zeitschaltuhr auswählen Auf [ 13 ] drücken Minuten abstellen Auf dem “SLIDER“ rutschen bis zu [ 0 ] Minuten Bestätigung Auf [ 10 ] drücken Zehnerminuten abstellen Auf dem “SLIDER“ rutschen bis zu [ 0 ] Zehnerminuten Bestätigung Auf [ 00 ] drücken Anzeige [ 0 ] und Leuchte « ein » [7] [ 00 ] [ 0 fest ] [ 6 blinkend ] [ 0 blinkend ] [ 6 fest ] [ 1 blinkend ] [ 6 fest ] [ 16 ] Anzeige [ 7 ] und Leuchte « ein » [ 13 ] [ 1 fest ] [ 0 blinkend ] [ 1 blinkend ] [ 0 fest ] [ 0 blinkend ] [ 0 fest ] [ 00 ] Automatisches Ausschalten: Nach Ablauf der programmierten Kochdauer wird [ 00 ] blinkend angezeigt und ein akustisches Signal wird erfolgen. Um den Signalton und das blinken abzuschalten, brauchen Sie nur Taste [ 00 ] zu betätigen. Zeitschaltuhr als Eieruhr: Beispiel für 29 Minuten: Betätigung Bedienfeld Anzeige Einschalten der Kochmulde Auf [ 0/I ] drücken Kochzonen-Leuchte Zeitschaltuhr auswählen Auf [ CL ] drücken [ 00 ] Einstellung die Minuten Auf dem “SLIDER“ rutschen bis zu [ 9 ] [ 0 fest ] [ 9 blinkend ] Minuten Bestätigung Auf [ 03 ] drücken [ 0 blinkend ] [ 9 fest ] Einstellung der Zehnerminuten Auf dem “SLIDER“ rutschen bis zu [ 2 ] [ 2 blinkend ] [ 9 fest ] Zehnerminuten Bestätigung Auf [ 29 ] drücken [ 29 ] Nach einigen Sekunden beendet das blinken die Zeitschaltuhr-Leuchte und die Kochzonenleuchten erlischen. Nach Ablauf der Zeitschaltuhr erfolgt ein akustisches Signal, die Anzeige zeigt blinkend [ 00 ]. Um den Signalton und das blinken abzuschalten, brauchen Sie nur Taste [ 00 ] zu betätigen. 65 Ankochautomatik Alle Kochzonen sind mit einer Ankochautomatik bestückt. Bei aktivierter Ankochautomatik heizt die Kochzone automatisch mit höchster Leistung an und schaltet dann auf die von Ihnen gewählte Fortkochstufe zurück. Die Ankochzeit hängt von der gewählten Fortkochstufe ab. Aktivierung der Ankochautomatik: Betätigung Bedienfeld Anzeige Auswählen der Kochzone Auf den [ 0 ] drücken [ 0 ] oder [ 9 ] oder [ H ] Hohe Leistung aktivieren Auf dem “SLIDER“ rutschen bis zu [ 9 ] von [ 0 ] bis [ 9 ] Ankochautomatik aktivieren Auf [ 9 ] drücken [ 9 ] blinkt mit [ A ] Leistung auswählen Auf dem “SLIDER“ rutschen [ 9 ] zurück auf [ 8 ] [ 7 ] (z.B. « 7 ») bis daß [ 7 ] mit [ A ] blinkt Abschalten der Ankochautomatik: Betätigung Bedienfeld Anzeige Auswählen der Kochzone Auf den [ 7 ] drücken [ 7 ] blinkt mit [ A ] Leistung auswählen Auf dem “SLIDER“ rutschen [ 0 ] bis [ 9 ] Pausenfunktion Diese Funktion erlaubt, das Kochen mit denselben Krafteinstellungen zu unterbrechen oder zu reaktivieren. Die Funktion einlegen, auslösen: Betätigung Bedienfeld Anzeige Einschalte der funktion Drücken auf [ II ] während 2s [ II ] auf den Anzeiger Ausschalte der funktion Drücken auf [ II ] während 2s Leucht blinkt Auf den [ 0 ] drücken von eine Zone Leucht ist aus. Rückruffunktion Nachdem man der Kochmulde gelöscht hat, ist es möglich, an die letzten ausgewählten Einstellungen zu erinnern: Kochstand aller Kochzonen (Leistung). Minuten und Sekunden der Kochzonen, die durch die Zeitmesser programmiert wurden. Funktion ”Ankochautomatik“ Das Rückrufverfahren ist das folgende Auf dem Anschlag unterstützen [ 0/I ] Danach auf dem Anschlag [ II ] in weniger als 6 Sekunden zu unterstützen Die vorhergehenden Einstellungen sind erneut aktiv. Warmhaltefunktion Diese Funktion wird Speisen auf 70°C warmhalten Diese Funktion soll Überlauf und Verbrennen vermeiden. Ein- und ausschalten: Betätigung Bedienfeld Anzeige Auswählen der Kochzone Auf den [ 0 ] drücken [ 0 ] und Leuchte « ein » Warmehaltefunktion Auf dem “SLIDER“ rutschen bis zu [ U ] [ U ] Ausschalten Auf dem “SLIDER“ rutschen [ 0 ] oder [H] Diese Funktion kann auf alle Kochstellen verwendet werden. Wenn der Top die Kochzone verläßt bleibt die Warmhaltefunktion während 2 Stunden aktiv. 66 Verriegelung der Kochmulde Um eine Veränderung der Kochzoneneinstellung zu vermeiden, z.B. bei der Reinigung des Glases, können die Bedienungstasten (außer der Taste[ 0/I ]) verriegelt werden. Verriegelung aktivieren: Betätigung Bedienfeld Anzeige Einschalten der Mulde Auf [ 0/I ] drücken [ 0 ] oder [ H ] Mulde verriegeln Gemeinsam auf [ P ] und Keine Änderung [ 0 ] vorne rechts drücken** Wieder drücken auf [ 0 ] [L] Verriegelung abschalten: Betätigung Bedienfeld Anzeige Einschalten der Mulde Auf [ 0/I ] drücken [ L ] auf alle Anzeige In den 5 Sekunden nach Einschalten der Mulde Verriegelung abschalten Gemeinsam auf [ P ] und [0] [ L ] vorne rechts drücken** Auf [ P ] drücken Keine Anzeige **Für 7330240 auf [ 0 ] oder [ L ] hinten rechts drücken 67 KOCH EMPFEHLUNGEN Kochgeschirr Geeignete Materialien: Stahl, emaillierter Stahl, Gusseisen, Stahl mit magnetisierbarem Boden, Aluminium mit magnetisierbarem Boden Nicht geeignete Materialien: Aluminium und Stahl mit nicht magnetisierbarem Boden, Kupfer, Messing, Steingut, Porzellan Im Allgemeinen geben die Hersteller an, ob ihrer Garbehälter sich zum Kochen auf Induktionskochfeldern eignen. Um zu prüfen, ob die Garbehälter für das Garen auf dem Induktionskochfeld geeignet sind: Eine kleine Menge Wasser in den Topf geben und diesen auf die Induktionskochzone stellen. Die Zone einschalten und die Stufe auswählen [ 9 ]. Das Wasser muss sich in wenigen Sekunden erwärmen. Mit einem Magnet den Topfboden berühren. Bleibt der Magnet haften, ist der Topf für das Induktionskochfeld geeignet. Einige Behälter können Geräusche verursachen, wenn sie auf einem Induktionskochfeld abgestellt werden. Dies ist kein Hinweis darauf, dass das Induktionskochfeld defekt ist oder nicht korrekt arbeitet. Die Töpfe müssen vom Hersteller als für Induktionsgaren geeignet bescheinigt sein. Es kann dennoch vorkommen, dass einige Töpfe, auch wenn ihre Eignung bescheinigt wurde, tatsächlich Eigenschaften besitzen, die nicht für den Gebrauch mit Induktionskochfeldern geeignet sind. Wir empfehlen Ihnen, beim Kauf der Töpfe zu prüfen, dass zumindest die folgenden Bedingungen erfüllt werden: Sollte der Boden des Topfes (Ød) bedeutend kleiner als der Durchmesser des Körpers (ØD) sein, führt dies zu einer Leistungsminderung, und der Topf könnte möglicherweise nicht vom Kochfeld erkannt werden 68 Geschirrgröße Die Kochzonen passen sich automatisch an das Topfbodenmaß bis zu einer gewissen Grenze an. Das Kochgeschirr darf einen bestimmten Bodendurchmesser nicht unterschreiten, da sich die Induktion sonst nicht einschaltet. Zentrieren Sie immer den Topf in die Mitte der Kochzone, um den besten Wirkungsgrad zu erzielen. Einstellbereiche (diese Angaben sind Richtwerte) 1 bis 2 Schmelzen, Auflösen, Zubereitung 2 bis 3 Quellen, Auftauen, Warmhalten 3 bis 4 4 bis 5 Dampfgaren, Dünsten Dünsten, Quellen, Auftauen 6 bis 7 Ankochen, Fortkochen 7 bis 8 9 Schonendes Braten Backen, Ankochen P Kochen Saucen, Butter, Schokolade GelatineYoghurt , Reis, Gefrorene Gerichte, Fisch, Gemüse Fisch, Gemüse, Obst Fisch, Gemüse, Teigwaren, Getreide, Hülsenfrüchte, Tiefkühlkost Fleisch, Leber , Eier, Wurst Gulasch, Rouladen Fisch, Schnitzel, Bratwurst, Spiegeleier Steaks, Omelett Pfannkuchen, Linsen Grosse Wassermengen REINIGUNG UND PFLEGE Lassen Sie das Gerät abkühlen, es könnte Verbrennungsgefahr bestehen. Reinigen Sie das verschmutzte Kochfeld immer regelmässig. Benützen Sie dazu ein feuchtes Tuch und ein wenig Putzmittel. Um das Gerät zu reinigen, muß es ausgeschaltet sein. Die Reinigung des Gerätes mit einem Dampfreiniger oder Hochdruckdruckreiniger ist aus Sicherheitsgründen nicht zugelassen. Verwenden Sie in keinem Fall scheuernde oder aggressive Reinigungsmittel, wie z.B. Grill und Backofensprays, Fleck oder Rostentferner, Scheuersande oder Schwämme mit kratzenden Oberflächen Danach reiben Sie das Kochfeld mit einem sauberen Tuch trocken. Entfernen Sie sofort Zucker, Kunststoff oder Alufolien, nach Abschalten der Kochzonen. 69 WAS TUN WENN… [ E4 ] in der Anzeige erscheint: Das Kochfeld muss neu konfiguriert werden. Bitte folgen Sie nachstehende Hinweise : I) Wichtig : entfernen Sie alle Töpfe von Ihrem Kochfeld II) Das Kochfeld muss zuerst vom Stromnetz getrennt werden : nehmen Sie den Anschlusskabel weg oder schalten Sie die Sicherung am Schalttafel ab. III) Schalten Sie den Strom wieder ein IV) Verfahren : * nehmen Sie einen Topf mit magnetischem Boden (Durchmesser > 16 cm) * verwenden Sie nicht den Hauptschalter * starten Sie die Programmierung spätestens 2 Minuten nach dem Wiedereinschalten V) Phase 1: löschen der existierenden Konfiguration 1) Drücken Sie auf die Taste 2 und halten Sie diese gedrückt 2) In der Anzeige erscheint [ - ] 3) Mit Ihrem anderen Finger drücken Sie c b nacheinander, entegegen dem Uhrzeigersinn, die Anzeigen [ - ] (vgl Bezeichnung) d a Ein doppelter “Beep“ soll heissen, dass ein Fehler Aufgetreten ist. In diesem Fall, starten Sie erneut vom Punkt 1. 4) Lassen die Taste los. Dann drücken Sie wieder auf die Taste 1, bis dass blinkende [ E ] Symbole angezeigt werden. 5) Erwarten bis die [ E ] fix bleiben 6) [ E ] werden dann automatisch [ C ]-Symbole. Das Löschprozess ist erledigt. Bemerkung : bei Induktionskochfelder mit 3 Kochzonen : hinten rechts anfangen (b) (die Kochzone vorne rechts gib es nicht). VI) Phase 2 : Neukonfiguration des Kochfeldes 1) Nehmen Sie einen Topf mit magnetischem Boden (Durchmesser > 16 cm) 2) Wählen Sie eine Kochzone-Bedienung aus beim drücken auf dem [C]-Symbol. 3) Stellen Sie den Topf auf der entsprechenden Kochzone. 4) Warten bis [ C ] sich in [ - ] umwandelt. Die Kochzone ist konfiguriert. 5) Wiederholen Sie diesen Vorgang für jede Kochzone. 6) Die Kochzonen sind konfiguriert, sobald nichts mehr angezeigt wird. Verwenden Sie den gleichen Topf um die gesamte Konfiguration durchzuführen. Während der Konfiguration dürfen keine weitere Töpfe auf der Mulde liegen. Falls die [ E4 ]-Anzeige bleibt, wenden Sie sich bitte an Ihrem Kundendienst. Die Kochmulde oder die Kochzonen nicht einschalten: Die Mulde ist falsch am Netz angeschlossen. Die Sicherung der Hausinstallation ist nicht korrekt eingesetzt. Die Kochmulde ist verriegelt. Die Sensortasten sind mit Wasser oder Schmutz bedeckt. Ein Kochgeschirr bedeckt die Tasten. In der Anzeige erscheint [ U ]: Das Kochgeschirr ist nicht auf der Kochzone. Das Kochgeschirr ist nicht Induktiongeeignet Der Topfboden-Durchmesser ist zu klein für diese Kochzone. In der Anzeige erscheint [ C ] oder [ E ]: Den Kundendienst anrufen. 70 Der Auftrag Anzeige [ L ]: Finden Sie im Kapitel Verriegelung der Kochmulde. Eine Kochzone oder die gesamte Mulde schaltet ab: Die Sicherheits-Abschaltung hat es ausgelöst. Diese ist aktiviert, wenn Sie vergessen haben eine Kochzone abzuschalten. Diese Abschaltung ist aktiviert, wenn mehrere Tasten bedeckt sind. Ein Topf ist leer und überhitzt. Durch eine Überhitzung hat die Elektronik automatisch die Leistung reduziert oder auch automatisch abgeschaltet Das Kühlgebläse läuft nach dem Ausschalten weiter: Das ist keine Störung, das Gebläse läuft so lange, bis das Gerät abgekühlt ist. Das Gebläse schaltet automatisch ab. Die Ankochautomatik schaltet nicht ein: Die Kochzone ist noch heiß [ H ] Die höchste Leistungsstufe ist eingeschaltet [ 9 ] Der Auftrag Anzeige [ U ]: Finden Sie im Kapitel Warmhaltefunktion. Der Auftrag Anzeige [ II ]: Finden Sie im Kapitel Pausenfunktion. UMWELTSCHUTZ Die Verpackungsmaterialen sind umweltfreundlich und recyclierbar. Elektrische und elektronische Geräte enthalten noch wertvollen Materialen. Sie erhalten aber auch noch schädliche Stoffe, die für ihrer Funktion und Sicherheit notwendig sind Geben Sie Ihr Altgerät deshalb auf keinen Fall in den Restmüll. Nutzen Sie statt dessen die von Ihrer Kommune eingerichtete Sammelstelle zur Rückgabe und Verwertung elektrischer und elektronischer Altgeräte. 71 MONTAGEHINWEISE Montage und Anschluß dürfen nur durch einen autorisierten Fachmann vorgenommen werden. Der Benutzer muß darauf achten daß die in seinem Wohnsitz geltenden Normen eingehalten werden. Dichtung Einbau : Die Dichtung (2) nach Abnehmen der Schutzfolie (3) mit 2 mm Abstand der Außer kannte des Glases aufkleben. Einbau : Typ 7330240 7331240 7332240 7370240 Einbaumasse 760 x 350 mm 560 x 490 mm 650 x 490 mm 560 x 490 mm Der Abstand vom Ausschnitt bis zu einer Mauer und/oder einem Möbelstück muß mindestens 50 mm betragen. Dieses Gerät entspricht bezüglich des Schutzes gegen Feuergefahr dem Typ Y. Nur Geräte dieses Typs dürfen einseitig an nebenstehende Hochschränke oder Wände eingebaut werden. Aber von der andere Seite dürft keine möble oder gerät höher der Kochmulde sein. Die Arbeitsplatte soll mit hitzbeständigem Kleber (100 °C) verarbeitet sein. Die Wandabschlußleisten müssen hitzbeständig sein Das Kochfeld darf nicht über Herde ohne Lüfter, Geschirrspülern, Wasch- oder Trockengeräten eingebaut werden. Um eine ausreichende Belüftung der Elektronik im Kochfeld zu erzielen, ist unter der Mulde ein Luftraum von 20 mm notwendig. Befindet sich unter dem Kochfeld eine Schublade, dürfen in der Schublade keine brennbaren Gegenstände, z.B. Spraydosen, aufbewahrt werden. Zwischen dem Gerät und einer Dunstabzugshaube muß der vom Hersteller angegebene Sicherheitsabstand eingehalten werden. Bei fehlenden Angaben muß dieser Abstand mindestens 760 mm sein. Es muß sichergestellt werden, daß das Anschlußkabel des Kochfeldes nach dem Einbau keinen mechanischen Belastungen, z.B. durch Schublade, ausgesetzt ist. Die Schnittflächen sollen mit speziellem Lack, Silikonkautschuk oder Giesharz versiegelt werden, um ein aufquellen durch Feuchtigkeit zu verhindern. Beachten Sie, das mitgelieferte Dichtungsband sorgfältig aufzukleben. ACHTUNG: Benutzen Sie nur Schutzgitter, die vom Hersteller angeboten werden oder von diesem für den Einsatz mit dem Kochfeld freigeben sind. 72 ELEKTROANSCHLUSS Zum Anschluß des Gerätes an das Elektronetz beauftragen Sie einen Elektrofachmann, der die landesüblichen Vorschriften der örtlichen Elektroversorgungsunternehmen genau kennt und sorgfältig beachtet. Der Berührungsschutz betriebsisolierter Teile muß nach der Montage sichergestellt sein. Ob die erforderlichen Anschlußdaten mit denen des Netzes übereinstimmen finden Sie auf dem Typenschild. Das Gerät muß durch Trenneinrichtungen allpolig vom Netz abgeschaltet werden können. Im abgeschalteten Zustand muß ein Kontaktabstand von 3 mm vorhanden sein. Als geeignete Trennvorrichtungen gelten LS-Schalter, Sicherungen und Schütze Die Installation muß durch Sicherungen geschützt sein. Elektrische Kabel müssen perfekt durch das Einbauen gedeckt sein. Wenn das Gerät nicht mit einem zugänglichen Stecker ausgestattet ist, müssen beim festen Einbau gemäß den Montageanweisungen andere Trennungsmöglichkeiten berücksichtigt werden. Das Zuleitungskabel muss so angebracht werden, dass die heißen Teile des Kochfelds nicht berührt werden. Achtung ! Dieses Gerät ist nur für eine Strom-Versorgung von 230 V~ 50/60 Hz ausgelegt. Schließen Sie immer die Erde mit an. Beachten Sie das Anschlußschema. Der Anschlußkasten befindet sich auf der Unterseite des Gerätes. Um das Gehäuse zu öffnen, benutzen Sie einen Schraubenzieher und schieben Sie ihn in den vorgesehenen Schlitzen. Netz Anschluß Durchmesser 230V~ 50/60Hz 1 Phase + N 3 x 2.5 mm² 400V~ 50/60Hz 2 Phasen + N 4 x 1.5 mm² Kabel H 05 VV - F H 05 RR - F H 05 VV - F H 05 RR - F Sicherung 25 A * 16 A * ( * ) laut EN 60 335-2-6 Norm Anschluß des Kochfelds : Verwenden Sie für die verschiedenen Anschlussmöglichkeiten die Polbrücken aus Messing, die sich im Gehäuse befinden. Monophasen 230V~1P+N Bringen Sie eine Polbrücke zwischen Anschlussklemme 1 und 2 dann zwischen Anschlussklemme 3 und 4. Befestigen Sie die Erdung an die « Erde » Anschlussklemme, den Nullleiter an Anschlussklemme 3 oder 4, die Phase L an Anschlussklemme 1 oder 2. Biphasen 400V~2P+N Bringen Sie eine Polbrücke zwischen Anschlussklemme 3 und 4. Befestigen Sie die Erdung an die « Erde » Anschlussklemme, den Nullleiter an Anschlussklemme 3 oder 4, die Phase L1 an Anschlussklemme 1 und die Phase L2 an Anschlussklemme 2. Achtung ! Die Drähte korrekt hineinstecken. Die Schrauben fest anziehen. Wir sind nicht verantwortlich für Zwischenfälle die durch falschen Anschluß, oder nicht vorhandenen oder unrichtigem Erdungsanschluß entstehen. 73 cod. 9606887 Foster spa 42041 Brescello (RE) - Italy tel. +39.0522.687425 - tel. Servizio Assistenza +39.0522.684450 fax +39.0522.686019 - fax Servizio Ricambi +39.0522.962166 e-mail: [email protected] www.fosterspa.com 13849-4 manual de instrucciones руководство по эксплуатации gebruikshandleiding Apreciada clienta, apreciado cliente, Le agradecemos la confianza que nos ha otorgado al elegir nuestra placa de cocción vitrocerámica a inducción. Con el fin de conocer bien este aparato, le recomendamos lea atentamente estas instrucciones de utilización en su totalidad y las conserve para consultas posteriores. RESUMEN SEGURIDAD ................................................................................................................................. 3 PRECAUCIONES ANTES DE UTILIZARLA PARA COCINAR ..................................................................... 3 UTILIZACION DEL APARATO ............................................................................................................ 3 PRECAUCIONES PARA NO DETERIORAR EL APARATO ........................................................................ 4 PRECAUCIONES EN CASO DE FALLO DEL APARATO ........................................................................... 5 OTRAS PRECAUCIONES ................................................................................................................. 6 DESCRIPCIÓN DEL APARATO ................................................................................................... 7 CARACTERISTICAS TECNICAS ........................................................................................................ 7 ZONA DE MANDOS ........................................................................................................................ 8 UTILIZACIÓN DEL APARATO ..................................................................................................... 8 INDICACONES ............................................................................................................................... 8 VENTILACIÓN ............................................................................................................................... 8 PUESTA EN MARCHA Y GESTIÓN DEL APARATO .................................................................. 9 ANTES DE LA PRIMERA UTILIZACIÓN ................................................................................................ 9 PRINCIPIO DE LA INDUCCIÓN .......................................................................................................... 9 TECLAS TÁCTILES ......................................................................................................................... 9 ZONA DE SELECCIÓN DE POTENCIA “SLIDER” Y AJUSTE DE MINUTERO .............................................. 9 PUESTA EN MARCHA ................................................................................................................... 10 DETECCIÓN DEL RECIPIENTE ....................................................................................................... 10 INDICADOR DE CALOR RESIDUAL .................................................................................................. 10 FUNCIÓN „TURBO‟ ....................................................................................................................... 11 FUNCIÓN MINUTERO ................................................................................................................... 11 PROGRAMACIÓN DE LA COCCIÓN AUTOMÁTICA .............................................................................. 12 FUNCIÓN PAUSA ......................................................................................................................... 12 MEMORIZACIÓN DE FUNCIONES.................................................................................................... 13 FUNCIÓN “MANTENER CALIENTE” ................................................................................................. 13 BLOQUEO DE LA ZONA DE MANDOS ............................................................................................... 13 CONSEJOS DE COCCIÓN ......................................................................................................... 14 CALIDAD DE LAS CACEROLAS ....................................................................................................... 14 DIMENSIÓN DE LAS CACEROLAS ................................................................................................... 15 EJEMPLOS DE AJUSTE DE LAS POTENCIAS DE COCCIÓN .................................................................. 15 CONSERVACIÓN Y LIMPIEZA................................................................................................... 15 QUÉ HACER EN CASO DE PROBLEMA ................................................................................... 16 PROTECCIÓN DEL MEDIO AMBIENTE..................................................................................... 17 INSTRUCCIONES DE INSTALACIÓN ........................................................................................ 18 CONEXIÓN ELÉCTRICA ............................................................................................................ 19 2 SEGURIDAD Precauciones antes de utilizarla para cocinar Retire todos los elementos del embalaje. La instalación y el conexionado eléctrico del aparato deben encargarse a un especialista autorizado. El fabricante no será responsable de los daños resultantes de un error de empotramiento o de conexionado. El aparato sólo debe utilizarse si está montado e instalado en un mueble y una superficie de trabajo homologados y adaptados. Su utilización va únicamente destinada a los usos domésticos habituales (preparación de alimentos), con exclusión de cualquier otra utilización doméstica, comercial o industrial. Arranque todas las etiquetas y autoadhesivos del cristal vitrocerámico. No transforme ni modifique el aparato. La placa de cocción no debe servir como soporte ni como superficie de trabajo. La seguridad sólo está asegurada si el aparato está conectado a una toma de tierra de protección conforme a los reglamentos vigentes. No utilice alargaderas para la conexión a la red eléctrica. El aparato no debe utilizarse encima de un lavavajillas o de una secadora de ropa: los vapores de agua desprendidos podrían deteriorar la electrónica. Este aparato no está previsto para el funcionamiento con un reloj temporizador externo o un mando a distancia. Utilización del aparato Apague siempre los fogones después de utilizarlos. Vigile constantemente los guisos que utilizan grasas y aceites, ya que son susceptibles de inflamarse rápidamente. Tenga cuidado del riesgo de quemaduras durante y después de la utilización del aparato. Los niños no deben manipular el aparato. 3 Asegúrese de que ningún cable eléctrico, fijo o móvil, del aparato toca el cristal o el recipiente caliente. Los objetos magnetizables (tarjetas de crédito, disquetes informáticos, calculadoras) no deben estar cerca del aparato en funcionamiento. Este aparato electrodoméstico puede ser usado por niños a partir de 8 años e igualmente por personas con capacidades físicas, sensoriales o mentales reducidas o que carezcan falta de experiencia y conocimiento del producto si se les ha dado la supervisión instrucción adecuada para el uso del mismo de un modo seguro y entienden de igual manera los peligros que puedan implicar. Los niños no deben usar éste electrodoméstico para jugar. La limpieza o el uso de éste aparato no debe realizarse por niños sin supervisión. Precauciones para no deteriorar el aparato Las cacerolas con suelas sin pulir (fundición no esmaltada,…) o estropeadas pueden dañar la vitrocerámica. La presencia de arena u otros materiales abrasivos puede dañar la vitrocerámica. Evite dejar caer objetos, aunque sean pequeños, sobre la vitrocerámica. No dé golpes a los bordes del cristal con las cacerolas. Asegúrese de que la ventilación del aparato se haga según las instrucciones del fabricante. No coloque ni deje cacerolas vacías sobre la placa de cocción. Evite que azúcar, materiales sintéticos o papel de aluminio toquen las zonas calientes. Estas substancias pueden, al enfriarse, provocar roturas u otras modificaciones en la superficie vitrocerámica: desconecte al aparato y retírelas inmediatamente de la zona de cocción cuando aún está caliente (atención: peligro de quemaduras). No almacenar objetos sobre la placa de cocción No coloque nunca recipientes calientes sobre la zona de los mandos. 4 Si hay un cajón situado bajo el aparato empotrado, asegúrese que hay distancia suficiente (2 cm) entre el contenido de este cajón y la parte inferior del aparato con el fin de asegurar una buena ventilación. No deposite objetos inflamables (por ejemplo sprays) en el cajón situado bajo la placa de cocción. Las eventuales bandejas para cubiertos deben ser de material resistente al calor. Precauciones en caso de fallo del aparato Si se constata una avería, es necesario desconectar el aparato y desenchufar la línea de alimentación eléctrica. En caso de desconchados o fisuras en la vitrocerámica es imperativo desconectar el aparato de la red eléctrica y avisar al servicio posventa. Las reparaciones sólo pueden ser realizadas por personal especializado. En ningún caso abra el aparato usted mismo. ADVERTENCIA : Si la superficie es agrietada, apagar el aparato para evitar la posibilidad de descargas eléctricas. 5 Otras precauciones Asegúrese siempre de que el recipiente de cocción esté centrado en la zona de cocción. El fondo de la cacerola debe cubrir, tanto como sea posible, la zona de cocción. Para usuarios que lleven un marcapasos, el campo magnético puede influir en su funcionamiento. Le recomendamos se asesore con el proveedor o el médico. No utilice recipientes de material sintético o de aluminio: podrían fundirse sobre los fogones aún calientes. Los aparatos usados contienen metales preciosos. Consulte con la administración de recuperación sobre las posibilidades de reciclaje. No apagar nunca con agua un fuego. Apagar la zona de cocción. Sofocar con cuidado las llamas con una tapa, una tapa extintora u otro medio similar. LA GARANTÍA SE VENCE SI SE USAN OLLAS NO IDÓNEAS O BIEN ACCESORIOS EXTRAÍBLES COLOCADOS ENTRE LA OLLA Y LA PLANCHA PARA CALENTAR OLLAS NO IDÓNEAS PARA LA INDUCCIÓN. EL FABRICANTE SE EXIME DE TODA RESPONSABILIDAD POR CUALQUIER DAÑO A LA PLACA DE COCCIÓN O POR DAÑOS RELACIONADOS A LO ANTERIOR. 6 DESCRIPCIÓN DEL APARATO Características técnicas Modelo 7330240 Potencia total 6700 W Consumo energético para placas EChob** 173.6 Wh/kg 7331240 6700 W 176.6 Wh/kg 7332240 7400 W 174.2 Wh/kg 7370240 7400 W 176.5 Wh/kg Fogón delantera izquierda Diámetro mínimo Potencia nominal * Potencia de refuerzo * Categoría estandarizada de utensilios de cocina Consumo energetico ECcw** Ø 200 mm Ø 100 mm 2300 W 3000 W Ø 250 mm Ø 110 mm 2300 W 3000 W Ø 250 mm Ø 110 mm 2300 W 3000 W Ø 200 mm Ø 100 mm 2300 W 3000 W C 180.5 Wh/kg D 182.7 Wh/kg D 182.7 Wh/kg C 180.5 Wh/kg Fogón trasera izquierda Diámetro mínimo Potencia nominal * Potencia de refuerzo * Categoría estandarizada de utensilios de cocina Consumo energetico ECcw** - - Ø 180 mm Ø 90 mm 1200 W 1400 W Ø 180 mm Ø 90 mm 1200 W 1400 W - - B 166.7 Wh/kg B 166.7 Wh/kg Fogón Centro Diámetro mínimo Potencia nominal * Potencia de refuerzo * Categoría estandarizada de utensilios de cocina Consumo energetico ECcw** Ø 160 mm Ø 90 mm 1200 W 1400 W - - - B 166.7 Wh/kg - - - Fogón trasera derecha Diámetro mínimo Potencia nominal * Potencia de refuerzo * Categoría estandarizada de utensilios de cocina Consumo energetico ECcw** - Ø 160 mm Ø 90 mm 1200 W 1400 W Ø 160 mm Ø 90 mm 1200 W 1400 W Ø 220 mm Ø 110 mm 2300 W 3000 W - B 166.7 Wh/kg B 166.7 Wh/kg C 173.7 Wh/kg Fogón delantera derecha Diámetro mínimo Potencia nominal * Potencia de refuerzo * Categoría estandarizada de utensilios de cocina Consumo energetico ECcw** Ø 250 mm Ø 100 mm 2300 W 3000 W Ø 200 mm Ø 100 mm 2300 W 3000 W Ø 200 mm Ø 100 mm 2300 W 3000 W Ø 160 mm Ø 90 mm 1400 W 2000 W D 173.7 Wh/kg C 180.5 Wh/kg C 180.5 Wh/kg A 185 Wh/kg * la potencia puede variar en función de las dimensiones y de los materiales de las cacerolas. ** calculado según método de medida (EN 60350-2) 7 Zona de mandos Pilotos de selección del fogón para el minutero Indicator de minutero Indicador de Selección del hogar Visualización de la potencia Tecla “Mantener caliente” Pilito de puesta en marcha Pilito Pausa Tecla Marcha/Parada Zona de selección de potencia “SLIDER” y ajuste de minutero Tecla „turbo‟ Tecla Pausa UTILIZACIÓN DEL APARATO Indicacones Indicación 0 1…9 U A E H P L II U Designación Cero Nivel de potencia Detección de cacerola Acelerador de calentamiento Mensaje de error Calor residual Refuerzo Bloqueo Pausa Mantener caliente Función Zona de calefacción activada Elección nivel de cocción Falta recipiente o es inadecuado Cocción automática Defecto del circuito electrónico La zona de cocción está caliente Activada la potencia „turbo‟ La placa está protegida La pausa está activada La placa mantiene el recipiente a temperatura constante de 70ºC Ventilación El ventilador de enfriamiento tiene un funcionamiento totalmente automático. Se pone en marcha a velocidad baja a partir del momento en que las calorías desprendidas por la electrónica sobrepasan un cierto umbral. La ventilación conecta su velocidad alta cuando la placa de cocción se usa de forma intensiva. El ventilador reduce su velocidad y se para automáticamente cuando el circuito electrónico está suficientemente frío. 8 PUESTA EN MARCHA Y GESTIÓN DEL APARATO Antes de la primera utilización Limpie el aparato con un trapo húmedo y séquelo. No utilice detergente ya que podría provocar una coloración azulada en las superficies vitrificadas. Principio de la inducción Debajo de cada placa de cocción hay una bobina de inducción. Cuando ésta está conectada, produce un campo electromagnético variable el cual produce a su vez corrientes inducidos en el fondo ferromagnético del recipiente. De ello resulta un calentamiento del recipiente colocado sobre la zona de calentamiento. Como es lógico, el recipiente debe ser adecuado: Se recomiendan todos los recipientes metálicos ferro-magnéticos (a verificar eventualmente con un pequeño imán) tales como: cazuelas de fundición, sartenes de hierro negro, cacerolas metálicas esmaltadas, en acero inoxidable con suela ferromagnética… Quedan excluidos los recipientes de cobre, inoxidable, aluminio, cristal, madera, cerámica, gres, barro cocido, inoxidable no ferro-magnético… La zona de cocción por inducción tiene automáticamente en cuenta el tamaño del recipiente utilizado. Con un diámetro demasiado pequeño, el recipiente no funciona. Este diámetro varía en función del diámetro de la zona de cocción. Cuando el recipiente no es adecuado para la placa de cocción, queda encendido el símbolo [ U ]. Teclas táctiles Su aparato está provisto de teclas táctiles que permiten controlar las distintas funciones. Un pequeño roce con la tecla activa su funcionamiento. Esta activación queda confirmada por un piloto, un indicador y/o por una señal sonora. No toque una tecla más de una vez. Zona de selección de potencia “SLIDER” y ajuste de minutero Para la selección de potencia con el slider deslizar el dedo sobre la zona “SLIDER”. Se beneficia de un acceso directo apoyando el dedo directamente en el nivel deseado. Zona de selección de potencia “SLIDER“ y ajuste de minutero “SLIDER“ Acceso directo 9 Puesta en marcha Conectar / Apagar la placa de cocción: Acción Conectar Apagar Zona de mandos pulsar [ 0/I ] pulsar [ 0/I ] Indicador [ 0 ] parpadear ninguno o [ H ] Conectar / Apagar una zona de calentamiento: Acción Seleccionar la zona Zona de mandos pulsar [ 0 ] de la zona Ajuste la potencia deslizar en “SLIDER” hacia la derecha o la izquierda deslizar hasta [ 0 ] en “SLIDER” o pulsar [ 0 ] Apagar Indicador [ 0 ] y piloto de zona encendido [ 0 ] hasta [ 9 ] [0]o[H] [0]o[H] Si no se realiza ningún ajuste en el plazo de 20 segundos, la electrónica vuelve a la posición de espera. Detección del recipiente La detección del recipiente asegura una seguridad perfecta. La inducción no funciona: Cuando no hay recipiente sobre la zona de cocción o cuando este recipiente no es adecuado para la inducción. En este caso es imposible aumentar la potencia y aparece el símbolo [ U ] en el indicador. La [ U ] desaparece cuando se coloca una cacerola en la zona de cocción. Si en el curso de la cocción se retira el recipiente de la zona de cocción, el funcionamiento se interrumpe. Aparece el símbolo [ U ] en el indicador. La [ U ] desaparece cuando se coloca de nuevo el recipiente en la zona de cocción. La cocción se reemprende en el nivel de potencia seleccionado anteriormente. Después la utilización de la placa, es necesario apagar la zona de cocción. No dejan activa la detección de la cacerola. Indicador de calor residual Después de apagar las zonas de cocción o de apagar por completo la placa, las zonas de cocción están aún calientes lo que se indica con el símbolo [ H ] El símbolo [ H ] se apaga cuando las zonas de cocción se pueden tocar sin peligro. Mientras los testigos de calor residual estén encendidos, no toque las zonas de cocción ni ponga encima ningún objeto sensible al calor ¡Peligro de quemadura y de incendio! 10 Función „turbo‟ La función „turbo‟ [ B ] proporciona un refuerzo de potencia en la zona de cocción seleccionada. Si se activa esta función, estas zonas de cocción funcionan durante 10 minutos con una potencia notablemente más alta. El „turbo‟ está destinado, por ejemplo, a calentar rápidamente grandes cantidades de agua, como para cocer pasta. Conectar / Apagar la función „turbo‟: Acción Seleccionar la zona Zona de mandos pulsar [ 0 ] de la zona Conectar el „turbo‟ Apagar el „turbo‟ pulsar [ B ] deslizar en “SLIDER” o pulsar [ B ] Indicador [ 0 ] y piloto de zona encendido [P] [ P ] hasta [ 0 ] [9] Gestión de la potencia máxima: El conjunto de la placa de cocción está dotado de una potencia máxima. Cuando está activada la función „turbo‟, y para no sobrepasar esta potencia máxima, el mando electrónico reduce automáticamente el nivel de cocción de otra zona de calentamiento. Durante algunos segundos, el indicador de esta zona de cocción parpadea [ 9 ] y después queda en el nivel de cocción más alto posible: Zona de cocción seleccionada [ P ] está indicado Otra zona de cocción (por ej.: cocción de nivel 9 ) [ 9 ] pasa a [ 6 ] u [ 8 ] según el tipo de placa Función minutero El minutero puede asignarse simultáneamente a las placas de cocción y con ajustes diferentes de tiempo en minutos (de 0 a 99 minutos) para cada una de las placas. Ajuste o modificación de la duración de la cocción: Ejemplo para 16 minutos hasta potencia 7 : Acción Seleccionar la zona Zona de mandos pulsar [ 0 ] de la zona Seleccionar la potencia Seleccionar "Minutero" Ajuste de unidad Validar de unidad Ajuste de decena Validar de decena deslizar en “SLIDER” hasta [ 7 ] pulsar [ CL ] deslizar en “SLIDER” hasta [ 6 ] pulsar [ 06 ] deslizar en “SLIDER” hasta [ 1 ] pulsar [ 16 ] Indicador [ 0 ] y piloto de zona encendido [7] [ 00 ] [ 0 fijo ] [ 6 parpadear ] [ 0 parpadear ] [ 6 fijo ] [ 1 parpadear ] [ 6 fijo ] [ 16 ] La duración queda seleccionada y se inicia la cuenta atrás. Detener la función minutero de cocción: Ejemplo para 13 minutos hasta potencia 7 : Acción Seleccionar la zona Zona de mandos pulsar [ 7 ] de la zona Seleccionar "Minutero" Desactivar de unidad Validar de unidad Desactivar de decena Validar de decena pulsar [ 13 ] deslizar en “SLIDER” hasta [ 0 ] pulsar [ 10 ] deslizar en “SLIDER” hasta [ 0 ] pulsar [ 00 ] 11 Indicador [ 7 ] y piloto de zona encendido [ 13 ] [ 1 fijo ] [ 0 parpadear ] [ 1 parpadear ] [ 0 fijo ] [ 00 parpadear ] [ 0 fijo ] [ 00 ] Paro automático al final de la cocción: Cuando ha transcurrido el tiempo de cocción seleccionado, el minutero lo indica centelleando [ 00 ] y produciendo una señal sonora. Para parar el sonido y el parpadea, basta pulsar la tecla [ 00 ]. Minutero utilizado sin cocción: Ejemplo para 29 minutos : Acción Activar la placa de cocción Seleccionar "Minutero" Ajuste de unidad Validar de unidad Ajuste de decena Validar de decena Zona de mandos pulsar [ 0/I ] pulsar [ CL ] deslizar en “SLIDER” hasta [ 0 ] pulsar [ 09 ] deslizar en “SLIDER” hasta [ 2 ] pulsar [ 29 ] Indicador [0] [ 00 ] [ 0 fijo ] [ 9 parpadear ] [ 0 parpadear ] [ 9 fijo ] [ 2 parpadear ] [ 9 fijo ] [ 29 ] El piloto de control parpadea y pasados algunos segundos se apaga. Cuando ha transcurrido el tiempo seleccionado, el minutero lo indica parpadeando [ 00 ] y produciendo una señal sonora. Para parar el sonido y el parpadea, basta pulsar la tecla [ 00 ]. Programación de la cocción automática Todas las zonas de cocción están equipadas con un dispositivo de cocción automática. La zona de cocción se pone en marcha a maxima potencia durante un cierto tiempo y después reduce automáticamente su potencia hasta el nivel preseleccionado. Puesta en marcha del automatismo: Acción Zona de mandos Seleccionar la zona pulsar [ 0 ] de la zona Activar la potencia total Activar el automatismo Seleccionar nivel (por ejemplo "7") deslizar en “SLIDER” hasta [ 9 ] pulsar de nuevo [ 9 ] en “SLIDER” deslizar en “SLIDER” hasta [ 7 ] Parada del automatismo: Acción Zona de mandos Seleccionar la zona pulsar [ 7 ] de la zona Seleccionar nivel deslizar en “SLIDER” Indicador [ 0 ] y piloto de zona encendido pasa de [ 0 ] a [ 9 ] [ 9 ] parpadear con [ A ] [ 9 ] pasa a [ 8 ] [ 7 ] … [ 7 ] parpadear con [ A ] Indicador [ 7 ] parpadear con [ A ] [1]…[9] Función pausa Esta función defiene todas las zonas de cocción activadas y permite reiniciarlas con la misma configuración. Conectar / apagar a función pausa Acción Zona de mandos Activar pausa pulsar [ II ] durante 2s Detener pausa pulsar [ II ] durante 2s pulsar una otro tecla o deslizar en “SLIDER” 12 Indicador [ II ] Piloto pausa parpadear piloto pausa apagado Memorización de funciones Después de apagar la placa [ 0/I ], es posible recordar los últimos ajustes. Cocinar en todas las zonas de cocción (Potencia). Minutos y segundos de cocción programados en el minutero. Función de cocción automatica. El procedimiento para recuperar la configuración precedente es el siguiente: Pulse la tecla [ 0/I ]. A continuación, pulse la tecla [ II ] durante 6 segundos. La configuración precedente queda activada. Función “Mantener caliente” Esta función permite alcanzar y mantener automáticamente una temperatura de 70°C. Con ello se evitarán los derrames de líquidos sobre la placa y que se peguen en la parte inferior del recipiente. Iniciar / Detener la función Conservador de calor Acción Zona de mandos Seleccionar la zona pulsar [ 0 ] de la zona Activar “Mantener caliente” pulsar [ U ] en “SLIDER” Detener “Mantener caliente” pulsar [ U ] de zona deslizar en “SLIDER” Indicator [0]…[9]o[H] [U] [U] [0]…[9]o[H] Esta función puede ser usada independientemente en todas las zonas de cocción. Cuando el recipiente se quita de la zona de cocción el conservador de calor permanece activo durante 10 minutos. El tiempo máximo de duración es de 2 horas. Bloqueo de la zona de mandos Para evitar que se modifique una selección de la placa de cocción, particularmente cuando se limpia el cristal, la zona de mandos se puede bloquear (con la excepción de la tecla marcha/paro [0/I]). Bloqueo: Acción Puesta en marcha Bloquear la placa Desbloqueo: Acción Puesta en marcha En los 5 segundos Desbloquear la placa Zona de mandos Pulsar [ 0/I ] Pulsar a la vez [ B ] y [ 0 ] de la zona delantera derecha** pulsar de nuevo [ 0 ] Indicador [0]o[H] Zona de mandos pulsar [ 0/I ] Indicador [L] pulsar a la vez [ B ] y [ L ] de la zona delantera derecha** Pulsar de nuevo [ B ] ** para una placa de cocción 7330240 utilizar el [ 0 ] o [ L ] de la zona trasera derecha 13 Sin cambio [L] [L] Los indicadores se apagan CONSEJOS DE COCCIÓN Calidad de las cacerolas Materiales adecuados: acero, acero esmaltado, fundición, inoxidable con fondo ferro-magnético, aluminio con fondo ferro-magnético Materiales no adecuados: aluminio e inoxidable con fondo no ferro-magnético, cobre, latón, vidrio, cerámica, porcelana Los fabricantes especifican si sus productos son compatibles con la inducción. Para verificar si las cacerolas son compatibles: Ponga un poco de agua en una cacerola colocada sobre una zona de cocción por inducción regulada a nivel [ 9 ]. Este agua debe calentarse en algunos segundos. Ponga un imán sobre el fondo externo de la cacerola; debe quedarse pegado. Algunas cacerolas pueden hacer ruido al colocarlas sobre una zona de cocción por inducción. Estos ruidos no representan en ningún caso un defecto en el aparato ni tienen influencia en su funcionamiento. Las cacerolas tienen que ser certificadas por el fabricante como adecuadas para la inducción. Sin embargo es posible que algunas cacerolas, aunque indiquen que son adecuadas, en realidad sean inadecuadas para utilizarlas con placas de inducción. Os recomendamos que, en el momento de comprar las cacerolas, éstas respeten las siguientes condiciones: Si el fondo de la cacerola (Ød) es significativamente más pequeño que el diámetro del cuerpo (ØD) el rendimiento se verá perjudicado y la cacerola podría no ser identificada por la placa. 14 Dimensión de las cacerolas Las zonas de cocción se adaptan automáticamente a la dimensión del fondo de la cacerola, hasta un cierto límite. Por ello, el fondo de esta cacerola debe tener un diámetro mínimo en función del diámetro de la zona de cocción correspondiente. Para obtener el máximo rendimiento de la placa de cocción, coloque la cacerola bien centrada en la zona de cocción. Ejemplos de ajuste de las potencias de cocción (los siguientes valores son indicativos) 1a2 3a4 4a5 Hacer fundir Recalentar Hinchar Descongelación Vapor Agua 6a7 Cocer a fuego suave 7a8 9 P Cocer, Freír Freír, llevar a ebullición Freír, Llevar a ebullición 2a3 Salsas, mantequilla, chocolate, gelatina Platos precocinados Arroz, puddings y platos cocinados Legumbres, pescados, productos congelados Legumbres, pescados, carne Patatas hervidas, sopas, pastas Legumbres frescas Carnes, hígado, huevos, salchichas Goulasch, filetes rellenos, callos Patatas, buñuelos, tortas Filetes, tortillas, agua Llevar a ebullición cantidades importantes de agua CONSERVACIÓN Y LIMPIEZA Es necesario poner el aparato fuera de servicio para limpiarlo. Deje enfriar el aparato, ya que hay riesgo de quemaduras. Limpie los restos de cocción con agua a la que haya añadido un producto lavavajillas o un producto comercial aconsejado para vitrocerámica. No utilice productos de limpieza abrasivos que podrían dañar el aparato. Seque el aparato con un trapo limpio. Retire inmediatamente el azúcar o materiales que contengan azúcar. No utilice en ningún caso aparatos "a vapor" o "a presión". No utilice objetos que comporten riesgo de rayar la vitrocerámica (como estropajos abrasivos o puntas de cuchillo …). 15 QUÉ HACER EN CASO DE PROBLEMA EL símbolo [ E 4 ] aparece : La placa debe ser reconfigurada segun el procedimiento descrito a continuació n: I) Cuidado : al principio no colocar recipientes sobre la placa. II) Desconectar la placa de la corriente eléctrica : quitar el fusible o cortar el automático. III) Volver a conectar la placa a la corriente eléctrica : poner el fusible o enchufar el automático. IV) Procedimiento : utilizar un recipiente ferromagnetico con un diametro de 16 cm como minimo. * poner en marcha en menos de 2 minutos tras la conexion a la corriente eléctrica. * no presionar la tecla [ O/I ] V) Debe anular la configuración. 1) Presionar la tecla 2 y mantener presionado. 2) En cada indicador aparece un [ - ] c b 3) Con un dedo de la otra mano presionar sucesiva y rapidamente (en menos d a de 2 segundos) las [ - ]. Partiendo de la zona delantera derecha y girando en sentido contrario a las agujas del reloj (a -> b -> c -> d). Un doble "bip" significa un error de manipulación. En este caso, volver a hacer la operación desde el paso numero 1. 4) Retirar los dedos de las teclas y volver a presionar la tecla 1 durante algunos segundos hasta que aparezcan las [ E ] parpadeantes. 5) Esperar hasta que las [ E ] permanezcan fijas. 6) Las [ E ] cambiaran automaticamente a [ C ]. La configuración ha sido anulada. Nota : Para las placas de inducción con 3 zonas de cocción : poner en marcha con la zona trasera derecha (b) (la zona delantera derecha no existe). VI) Como reconfigurar la placa : 1) Utilzar un recipiente ferromagnético con un diametro minimo de 16cm. 2) Seleccionar la zona de cocción presionando la [ C ] correspondiente. 3) Poner el recipiente sobre la zona a configurar. 4) Esperar hasta que la [ C ] cambie a [ - ]. La zona de cocción se ha configurada. 5) Proceder de la misma forma para todas las zonas de cocción en las que aparecen la [ C ]. 6) Las zonas de cocción han sido configuradas Utilizar solo un recipiente para efectuar la configuración. Ne colocar jamás más recipiente sobre los fogones durante la configuración. Si el indicador [ E 4 ] persiste, llame al Servicio Post-Venta. La placa de cocción o las zonas de cocción no se encienden: La placa está mal conectada a la red eléctrica El fusible de protección ha saltado Verifique que no esté activado el bloqueo Las teclas táctiles están cubiertas de agua o de grasa Hay un objeto encima de las teclas táctiles 16 El símbolo [ U ] se enciende: No hay cacerola en la zona de cocción El recipiente utilizado no es compatible con la inducción El diámetro del fondo de la cacerola es demasiado pequeño respecto a la zona de cocción El símbolo [ E ] se enciende: El sistema electrónico es defectuoso Desconecte y vuelva a conectar el aparato Una de las zonas o el conjunto de la placa de cocción se desconecta: Ha funcionado la desconexión de seguridad Ésta se acciona en caso que haya olvidado de apagar una de las zonas de calentamiento Se conecta igualmente cuando una o varias teclas táctiles están tapadas Una de las cacerolas está vacía y su fondo se ha sobrecalentado La placa dispone igualmente de un dispositivo de reducción automática del nivel de potencia y de corte automático en caso de sobrecalentamiento La soplante de ventilación continúa girando después de parar la placa: Esto no es un fallo, el ventilador continúa protegiendo la electrónica del aparato La soplante se para automáticamente El mando de cocción automática no se conecta: La zona de cocción está aún caliente [ H ] Está conectado el nivel máximo de cocción [ 9 ] El nivel de cocción se ha conectado con la tecla [ - ] El símbolo [ L ] se enciende: Referirse al capítulo bloqueo de la venda de pedido. El símbolo [ U ] se enciende: Referirse al capítulo “Mantener caliente” El símbolo [ II ] se enciende: Referirse al capítulo “Pausa” PROTECCIÓN DEL MEDIO AMBIENTE Los materiales de embalaje son ecológicos y reciclables Los aparatos electrónicos están formados por materiales reciclables y a veces de materiales nocivos para el medio ambiente, pero necesarios para el buen funcionamiento y la seguridad del aparato No tirar nunca su aparato con los residuos domésticos Llame al servicio de retirada de electrodomésticos o déjelo en los lugares de depósito establecidos por su municipio y adaptados al reciclaje de los aparatos electrodomésticos 17 INSTRUCCIONES DE INSTALACIÓN El montaje es competencia exclusiva de especialistas. El usuario está obligado a respetar la legislación y las normas en vigor en su país de residencia. Colocación de la junta de estanqueidad La junta adhesiva suministrada con el aparato permite evitar cualquier filtración en el mueble. Su colocación debe efectuarse con gran cuidado según el croquis adjunto. Pegar la junta (2) sobre el reborde de la placa, a 2 mm del borde exterior, después de haber quitado la lámina de protección (3). Encaje: La abertura en la superficie de trabajo será, según el modelo, de: Modelo Abertura 7330240 760 x 350 mm 7331240 560 x 490 mm 7333240 650 x 490 mm 7370240 560 x 490 mm La distancia entre la placa de cocción y la pared debe ser de 50 mm. como mínimo. La placa de cocción es un aparato perteneciente a la clase de protección "Y". Cuando se empotre, en la parte posterior y en uno de los lados puede haber una pared o un armario alto. Pero en el otro lado no debe haber ningún mueble ni aparato que sea más alto que la superficie de cocción Las placas y revestimientos de las superficies de trabajo deben ser de materiales resistentes al calor (100°C) Los junquillos de los bordes de la pared deben ser termo-resistentes Los materiales de las superficies de trabajo pueden hincharse en contacto con la humedad. Para los cantos del corte, aplique un barniz o una cola especial. No instale la placa encima de un horno sin ventilación ni de un lavavajillas Garantice un espacio de 20 mm entre el fondo de la caja del aparato y la pared para asegurar una buena circulación de aire para la refrigeración de la electrónica Si hay un cajón debajo de la superficie de cocción, evite guardar en él objetos inflamables (por ejemplo: sprays) y objetos que no resistan el calor La distancia de seguridad entre la placa de cocción y la campana de aspiración situada encima debe respetar las indicaciones del fabricante de la campana. En caso de falta de instrucciones, respete una distancia mínima de 760 mm. El cable de conexión no debe estar sometido, después de la colocación, a ninguna tensión mecánica, como la causada por un cajón ADVERTENCIA: Use sólo protectores de las placas fabricados por el fabricante del electrodoméstico de cocción o en su defecto los que el mismo indique en su manual de uso y que sean compatibles con los protectores incorporados en el aparato electrodoméstico. El uso de protecciones inadecuadas puede causar accidentes. 18 CONEXIÓN ELÉCTRICA La instalación de este aparato y su conexión a la red eléctrica sólo deben confiarse a un electricista que esté al día de las prescripciones reglamentarias. La protección contra las piezas bajo tensión eléctrica debe asegurarse después del montaje. Los datos necesarios para la conexión se encuentran en la placa de características y en la placa de conexión situadas debajo del aparato. Este aparato debe poderse aislar del sector por medio de un dispositivo de seccionamiento omnipolar. Cuando esté abierto (desconectado) debe asegurarse una separación de 3 mm. El circuito eléctrico debe estar separado de la red por dispositivos adecuados, por ejemplo disyuntores, fusibles, interruptores diferenciales y contactores. Si el aparato no esta provisto de una fiche accesible, otros medios de desconexión deben incorporarse a la instalación fija segun las reglamentaciones de la instalación. El cable de alimentación debe colocarse de manera que no toca las partes calientes de la placa de cocción. Atención! Este aparato está diseñado sólo para una alimentación de 230 V~ 50/60 Hz Conecte siempre el hilo de tierra de protección. Siga el esquema de conexión. La caja de conexión se encuentra debajo de la placa de cocción. Para abrir el capó, utilice un destornillador medio. Colóquelo en las 2 ranuras situadas en la parte anterior de las 2 flechas. Red Conexión Diámetro del cable 230 V~ 50/60 Hz 1 Fase + N 3 x 2,5 mm² 400 V~ 50/60 Hz 2 Fases + N 4 x 1,5 mm² Cable Calibre de protección H 05 VV - F 25 A * H 05 RR - F H 05 VV - F 16 A * H 05 RR - F * calculado con el coeficiente de simultaneidad según la norma EN 60 335-2-6 Conexión de la encimera: Para adaptarse a la red eléctrica (230 V~ 1 P+N o 400 V~ 2 P+N), utilice los puentes de latón situados en la caja de conexión. Monofásico 230 V~ 1 P+N: Poner un puente entre los borne 1 y 2, y después un puente entre 3 y 4. Atornillar el hilo verde/amarillo en el borne previsto para la puesta a tierra. Atornillar el neutro N en el borne 3 ó 4. Atornillar la fase L en uno de los borne 1 ó 2. Bifásico 400 V~ 2 P+N: Poner un puente entre 3 y 4. Atornillar el hilo verde/amarillo en el borne previsto para la puesta a tierra. Atornillar el neutro N en el borne 3 ó 4. Atornillar la fase L1 en el borne 1 y la fase L2 en el borne 2. Atención! Introduzca bien los hilos y apriete bien los tornillos. No somos responsables de ningún incidente debido a una conexión incorrecta o que pudiere ocurrir a causa del uso de un aparato no conectado a tierra o equipado con una tierra defectuosa. 19 Уважаемые клиенты! Благодарим Вас за то, что Вы выбрали нашу индукционную варочную панель со стеклокерамической поверхностью. Чтобы добиться максимальной отдачи от использования этого прибора, мы рекомендуем Вам внимательно прочитать следующую информацию и сохранить буклет для последующего использования. СОДЕРЖАНИЕ БЕЗОПАСНОСТЬ ...................................................................................................................... 21 МЕРЫ ПРЕДОСТОРОЖНОСТИ ПЕРЕД ИСПОЛЬЗОВАНИЕМ ............................................................... 21 ЭКСПЛУАТАЦИЯ ПРИБОРА .......................................................................................................... 21 МЕРЫ ПРЕДОСТОРОЖНОСТИ ДЛЯ ПРЕДОТВРАЩЕНИЯ ПОВРЕЖДЕНИЯ ПРИБОРА ............................. 22 МЕРЫ ПРЕДОСТОРОЖНОСТИ В СЛУЧАЕ ОТКАЗА ПРИБОРА В РАБОТЕ .............................................. 23 ДРУГИЕ МЕРЫ ПРЕДОСТОРОЖНОСТИ .......................................................................................... 24 ОПИСАНИЕ ПРИБОРА ............................................................................................................. 25 ТЕХНИЧЕСКИЕ СВЕДЕНИЯ ........................................................................................................... 25 ПАНЕЛЬ УПРАВЛЕНИЯ ................................................................................................................ 26 ПРИМЕНЕНИЕ ........................................................................................................................... 26 ДИСПЛЕЙ .................................................................................................................................. 26 ВЕНТИЛЯЦИЯ............................................................................................................................. 26 ЗАПУСК И УПРАВЛЕНИЕ ПРИБОРОМ ................................................................................... 27 ПЕРЕД ПЕРВЫМ ИСПОЛЬЗОВАНИЕМ ............................................................................................ 27 ИНДУКЦИОННЫЙ ПРИНЦИП РАБОТЫ ............................................................................................ 27 ЧУВСТВИТЕЛЬНОСТЬ СЕНСОРНОЙ ПАНЕЛИ .................................................................................. 27 ШКАЛА ВЫБОРА МОЩНОСТИ И УСТАНОВКИ ТАЙМЕРА .................................................................... 27 НАЧАЛО РАБОТЫ........................................................................................................................ 28 ОБНАРУЖЕНИЕ КАСТРЮЛИ ......................................................................................................... 28 ИНДИКАЦИЯ ОСТАТОЧНОГО ТЕПЛА .............................................................................................. 28 ФУНКЦИЯ УСИЛЕНИЯ МОЩНОСТИ ................................................................................................ 29 ТАЙМЕР .................................................................................................................................... 29 АВТОМАТИЧЕСКАЯ ГОТОВКА ....................................................................................................... 31 ФУНКЦИЯ ПАУЗЫ ........................................................................................................................ 31 ФУНКЦИЯ ПОВТОРНОГО ЗАПУСКА ................................................................................................ 31 ФУНКЦИЯ ПОДДЕРЖКИ ТЕПЛА ..................................................................................................... 32 БЛОКИРОВКА ПАНЕЛИ УПРАВЛЕНИЯ ............................................................................................ 32 СОВЕТЫ ПО ГОТОВКЕ............................................................................................................. 33 КАЧЕСТВО КАСТРЮЛЬ................................................................................................................. 33 РАЗМЕРЫ КАСТРЮЛИ ................................................................................................................. 34 ПРИМЕРЫ НАСТРОЕК МОЩНОСТИ ............................................................................................... 34 ОБСЛУЖИВАНИЕ И ОЧИСТКА ................................................................................................ 34 ДЕЙСТВИЯ В СЛУЧАЕ ВОЗНИКНОВЕНИЯ ПРОБЛЕМ ........................................................ 35 ЗАЩИТА ОКРУЖАЮЩЕЙ СРЕДЫ .......................................................................................... 36 ИНСТРУКЦИИ ПО УСТАНОВКЕ ............................................................................................... 37 ПОДКЛЮЧЕНИЕ К ЭЛЕКТРОСЕТИ ......................................................................................... 38 БЕЗОПАСНОСТЬ Меры предосторожности перед использованием Снимите все упаковочные материалы. Установку и подключение прибора должны проводить квалифицированные специалисты. Производитель не несет ответственности за ущерб, возникший в результате ошибок при установке и подключении. Прибор должен быть установлен в кухонную мебель с правильно подобранной рабочей поверхностью. Данный бытовой прибор предназначен исключительно для приготовления пищи, использование в иных бытовых, коммерческих или промышленных целях не допускается. Удалите со стеклокерамики все этикетки и защитные самоклеящиеся пленки. Не изменять конструкцию и техническое устройство прибора! Варочную панель нельзя использовать как отдельно стоящий прибор и как рабочую поверхность. Прибор должен быть заземлен и подключен к электросети согласно стандартам, действующим в стране использования прибора. Не использовать удлинители для подключения прибора к электросети. Прибор нельзя устанавливать над посудомоечной машиной и сушильным аппаратом: пар может повредить электронные устройства. Прибор не предназначен для управления с помощью внешнего таймера или внешней системы дистанционного управления. Эксплуатация прибора После использования выключайте зоны нагрева. Внимательно следите за приготовлением блюд с использованием жиров и растительных масел: они могут легко воспламениться. 21 Обращайтесь с прибором осторожно: не обожгитесь во время или после приготовления пищи. Убедитесь, что кабели каких-либо зафиксированных или подвижных приборов не контактируют со стеклом или горячей посудой. Рядом с работающим прибором нельзя помещать намагниченные предметы (кредитные карты, дискеты, калькуляторы). Не ставьте на прибор никакие металлические предметы, кроме посуды, используемой для приготовления пищи. В случае случайного включения и работы зоны нагрева или остаточного тепла, оставленные на приборе предметы могут нагреться, расплавиться или сгореть. Никогда не накрывайте прибор скатертью или защитной крышкой. Она может сильно нагреться и привести к пожару. Этот прибор может использоваться детьми в возрасте от 8 лет и старше и лицами с ограниченными физическими, сенсорными или психическими возможностями или имеющие недостаточного опыта и знаний, если они находятся под присмотром или им даны указания по безопасному использованию прибора и осознающие потенциальную опасность. Дети не должны играть с прибором Чистка и обслуживание должны не доверялись оставленным без присмотра детям взрослых. Не кладите металлические предметы (ножи, вилки, ложки, крышки) на варочную поверхность, так как они могут нагреться. Меры предосторожности для предотвращения повреждения прибора Стеклокерамическую поверхность могут повредить: сырое дно кастрюли или сковороды, поврежденные кастрюли (неэмалированная чугунная посуда). Стеклокерамическую поверхность может повредить песок и другие абразивные материалы. Избегайте падения предметов, даже небольших размеров, на стеклокерамическую поверхность. 22 Не ударяйте края стеклокерамической поверхности посудой. Убедитесь, что вентиляция прибора осуществляется в соответствии с указаниями производителя. Не оставляйте пустые кастрюли на стеклокерамической варочной поверхности. Не допускайте контакта зон нагрева с сахаром, синтетическими материалами и алюминиевыми листами. Это может привести к расколу или другим повреждениям стеклокерамической поверхности при остывании: включите прибор и немедленно удалите эти материалы или вещества с горячей зоны нагрева (осторожно: не обожгитесь). НИКОГДА не пытайтесь сбить пламя водой, но выключите прибор, а затем накройте пламя, например, крышкой от посуды или противопожарным одеялом. Никогда не ставьте горячую посуду на панель управления. Если под встроенным прибором расположен ящик кухонного шкафа, убедитесь, что между содержимым ящика и внутренней частью прибора есть достаточно большое пространство (2 см). Это важно для обеспечения необходимой вентиляции. Никогда не кладите легко воспламеняющиеся предметы (например, спреи) в ящик, расположенный под стеклокерамической варочной поверхностью. В любом случае ящики для столовых приборов должны быть жаропрочными. Меры предосторожности в случае отказа прибора в работе Если вы заметили неисправность, выключите прибор и отключите электропитание. Если стеклокерамическая поверхность треснула или раскололась, отключите прибор от электросети и обратитесь в сервисный центр. Ремонт прибора должен производиться специалистами. Не вскрывайте прибор самостоятельно. 23 ВНИМАНИЕ: Если поверхность прибор, чтобы предотвратить электротоком. треснула, выключите возможность удара Другие меры предосторожности Всегда ставьте посуду в центр зоны нагрева. Дно посуды должно по возможности максимально покрывать зону нагрева. Вниманию лиц с кардиостимулятором: магнитное поле прибора может оказать влияние на его работу. Рекомендуется получить более подробную информацию от продавца прибора или врача. Не используйте посуду из алюминия и синтетических материалов. Они могут расплавиться на горячих зонах нагрева. ВНИМАНИЕ: Используйте только защитные ограждения для варочной поверхности, разработанные производителем прибора для приготовления пищи или указанные производителем прибора в руководстве по эксплуатации в качестве подходящего защитного устройства или защитные ограждения для варочной поверхности, непосредственно установленные на приборе. Использование неподходящих защитных ограждений варочной поверхности может привести к несчастному случаю. ИСПОЛЬЗОВАНИЕ ПОСУДЫ НЕНАДЛЕЖАЩЕГО КАЧЕСТВА И АДАПТЕРОВ ДЛЯ ИНДУКЦИОННЫХ ПОВЕРХНОСТЕЙ ДЛЯ НЕМАГНИТНОЙ ПОСУДЫ ПРИВОДИТ НАРУШЕНИЮ ГАРАНТИЙНЫХ ОБЯЗАТЕЛЬСТВ. В ЭТОМ СЛУЧАЕ ПРОИЗВОДИТЕЛЬ НЕ НЕСЕТ ОТВЕСТВЕННОСТИ ЗА ЛЮБОЙ УЩЕРБ, ПРИЧИНЕННЫЙ ВАРОЧНОЙ ПОВЕРХНОСТИ И/ИЛИ ОКРУЖАЮЩЕЙ СРЕДЕ. 24 ОПИСАНИЕ ПРИБОРА Технические сведения Тип Полная мощность Потребление энергии поверхностью EChob ** 7330240 6700 Вт 7331240 6700 Вт 7332240 7400 Вт 7370240 7400 Вт 173.6 Втч/кг 176.6 Втч/кг 174.2 Втч/кг 176.5 Втч/кг Спереди слева pасположение конфорок Минимальный обнаруживаемый диаметр Номинальная мощность* Мощность в режиме быстрого нагрева* Категория стандартного оборудования ** Потребление энергии ECcw ** Ø 200 мм Ø 100 мм 2300 Вт 3000 Вт C 180.5 Втч/кг Ø 250 мм Ø 110 мм 2300 Вт 3000 Вт D 182.7 Втч/кг Ø 250 мм Ø 110 мм 2300 Вт 3000 Вт D 182.7 Втч/кг Ø 200 мм Ø 100 мм 2300 Вт 3000 Вт C 180.5 Втч/кг Задняя pасположение конфорок Минимальный обнаруживаемый диаметр Номинальная мощность* Мощность в режиме быстрого нагрева* Категория стандартного оборудования ** Потребление энергии ECcw ** - - Ø 180 мм Ø 90 мм 1200 Вт 1400 Вт B 166.7 Втч/кг Ø 180 мм Ø 90 мм 1200 Вт 1400 Вт B 166.7 Втч/кг Переднее pасположение конфорок Минимальный обнаруживаемый диаметр Номинальная мощность* Мощность в режиме быстрого нагрева* Категория стандартного оборудования ** Потребление энергии ECcw ** Ø 160 мм Ø 90 мм 1200 Вт 1400 Вт B 166.7 Втч/кг - - - Переднее pасположение конфорок Минимальный обнаруживаемый диаметр Номинальная мощность* Мощность в режиме быстрого нагрева* Категория стандартного оборудования ** Потребление энергии ECcw ** - Ø 160 мм Ø 90 мм 1200 Вт 1400 Вт B 166.7 Втч/кг Ø 160 мм Ø 90 мм 1200 Вт 1400 Вт B 166.7 Втч/кг Ø 220 мм Ø 110 мм 2300 Вт 3000 Вт C 173.7 Втч/кг Переднее pасположение конфорок Минимальный обнаруживаемый диаметр Номинальная мощность* Мощность в режиме быстрого нагрева* Категория стандартного оборудования ** Потребление энергии ECcw ** Ø 250 мм Ø 100 мм 2300 Вт 3000 Вт D 173.7 Втч/кг Ø 200 мм Ø 100 мм 2300 Вт 3000 Вт C 180.5 Втч/кг Ø 200 мм Ø 100 мм 2300 Вт 3000 Вт C 180.5 Втч/кг Ø 160 мм Ø 90 мм 1400 Вт 2000 Вт A 185 Втч/кг * Указанная мощность может изменяться в зависимости от размеров и материала посуды. ** рассчитано согласно методике измерений (EN 60350-2). 25 Панель управления ПРИМЕНЕНИЕ Дисплей Дисплей 0 1…9 U A E H P L U Обозначение Ноль Уровень мощности Обнаружение кастрюли Усилитель мощности нагрева Сообщение об ошибке Остаточное тепло Усилитель мощности Блокировка Поддержание тепла II Пауза Функция Активирована зона нагревания Выбор уровня готовки Кастрюля отсутствует или не подходит Автоматическая готовка Отказ электроники Зона нагревания горячая Активирован усилитель мощности Блокировка панели управления Автоматическое поддержание температуры 700C Работа варочной панели приостановлена Вентиляция Система охлаждения действует полностью автоматически. Охлаждающий вентилятор запускается на низкой скорости, когда уровень тепла, выделяемого электронной системой, достигает определенного уровня. Вентиляция начинает работать на высокой скорости при интенсивном использовании варочной панели. Охлаждающий вентилятор снижает скорость и автоматически останавливается, когда электронный контур достаточно охладится. 26 ЗАПУСК И УПРАВЛЕНИЕ ПРИБОРОМ Перед первым использованием Очистить варочную панель влажной тканью, затем тщательно высушить панель. Запрещается использовать моющие средства – они могут привести к появлению синеватого оттенка стеклокерамической поверхности. Индукционный принцип работы Под каждой зоной нагревания находится индукционная катушка. При ее включении катушка вырабатывает переменное электромагнитное поле, производящее индуктивный ток в ферримагнитной нижней пластине кастрюли. В результате происходит нагревание кастрюли, находящейся в зоне нагревания. Естественно, следует использовать специально предназначенные кастрюли. Рекомендуется использовать все ферримагнитные кастрюли (пригодность подтверждает значок маленького магнита): чугунные, стальные, эмалированные, из нержавеющей стали и ферримагнитным днищем и т. п. Исключается использование: медных, из чистой нержавеющей стали, алюминиевых, стеклянных, деревянных, керамических, каменных и т. п. Индукционная зона нагревания автоматически адаптируется к размеру кастрюли. При слишком маленьком диаметре кастрюли она не сработает. Диаметр варьируется в зависимости от функции диаметра зоны нагревания. Если кастрюля не адаптирована к использованию на индукционной варочной панели, на дисплее отобразится знак [ U ]. Чувствительность сенсорной панели Ваша стеклокерамическая варочная панель оборудована электронными приборами управления с чувствительными сенсорными кнопками. При прикосновении к кнопкам активируется соответствующая команда. Эта активация подтверждается контрольной лампочкой, загорающейся на дисплее цифрой или буквой и/или звуком зуммера. При общем использовании следует прикасаться только к одной кнопке за раз. Шкала выбора мощности и установки таймера Чтобы выбрать мощность с помощью шкалы, проведите пальцем по зоне «Шкала». Также вы можете установить определенную мощность, если дотронетесь пальцем до желаемого уровня мощности. 27 Начало работы Включение/выключение варочной панели: Действие Запуск Выключение Панель управления Нажать кнопку [ 0/I ] Нажать кнопку [ 0/I ] Включение/выключение зоны нагревания: Действие Панель управления Выбор зоны Нажать на дисплее [ 0 ] Регулировка мощности Дисплей [ 0 ] мигает Ничего или [ H ] Дисплей [ 0 ] и включение контрольной лампочки от [ 0 ] до [ 9 ] Провести по шкале справа налево Выключение Провести по шкале до [ 0 ] [ 0 ] или [ Н ] или нажмите [ 0 ] [ 0 ] или [ Н ] Если в течение 20 минут не выбрана ни одна настройка, варочная панель вернется в режим ожидания. Обнаружение кастрюли Функция обнаружения кастрюли обеспечивает абсолютную безопасность работы. Индукция не срабатывает: Если в зоне нагревания нет кастрюли, или кастрюля не подходит для индукционного режима. В этом случае будет невозможно повысить мощность, а на дисплее отобразится [ U ]. Этот символ исчезнет, когда в зону нагревания будет помещена кастрюля. Если кастрюлю убрать из зоны нагревания, работа прекратится. На дисплее отобразится [ U ]. Символ [ U ] исчезнет, когда кастрюля снова будет помещена в зону нагревания. Готовка продолжится на ранее выбранном уровне мощности. После использования, следует выключить конфорку: не рекомендуется оставлять режим [ U ] обнаружения посуды. Индикация остаточного тепла После выключения зоны нагревания или полного отключения варочной панели зоны нагревания останутся горячими, а на дисплее будет отображаться символ [ H ]. Символ [ H ] исчезнет, когда к зоне нагревания можно будет безопасно прикасаться. До тех пор, пока горит индикатор остаточного тепла, запрещается прикасаться к нагревательной зоне и помещать на нее теплочувствительные предметы. Существует угроза возгорания и пожара. 28 Функция усиления мощности Функция усиления мощности [ B ] обеспечивает усиление мощности в выбранной зоне нагревания. Если эта функция активирована, то зона нагревания в течение 10 минут будет работать на сверхвысокой мощности. Усилитель предусмотрен, например, для быстрого нагревания большого объема воды при приготовлении лапши. Включение / выключение функции усиления мощности Действие Панель управления Дисплей Выбор зоны Нажать кнопку [ 0 ] [ 0 ] и включение контрольной лампочки Включение усиления Нажать кнопку [ B ] [P] мощности Выключение усиления Провести по Шкале или [ 9 ] мощности нажать [ B ] Управление мощностью Варочная поверхность оборудована системой ограничения мощности. Когда активируется система усиления мощности, чтобы не превышать максимальный уровень мощности, система дает команду автоматически снизить уровень мощности в другой зоне нагревания. На дисплее несколько секунд мигает сигнал [ 9 ], а потом на нем отображается максимальная допустимая мощность. Выбранная зона нагревания Отображается [ P ] Другая зона нагревания (пример: уровень мощности 9) [ 9 ] превращается в [ 6 ] или [ 8 ] в зависимости от типа зоны Таймер Таймер может одновременно использоваться со всеми 3 или 4 зонами нагревания и устанавливать разные настройки (от 0 до 99 минут) для каждой зоны нагревания. Настройка и изменение времени готовки Например, 16 минут при уровне мощности 7 Действие Панель управления Выбрать зону Нажать кнопку [ 0 ] нагревания Выбрать уровень Провести по Шкале до [ 7 ] мощности Выбрать функцию Нажать кнопку [ CL ] «Таймер» Установить значение Провести по Шкале до [ 6 ] Подтвердить значение Нажать на дисплей [06] Установить Провести по Шкале до [ 1 ] десятизначное значение Подтвердить Нажать на дисплей [ 16 ] десятизначное значение Настройка времени подтверждена; начинается готовка. 29 Дисплей [ 0 ] и включение контрольной лампочки [7] [ 00 ] [0 горит ] [6 мигает ] [ 0 мигает ] [ 6 горит ] [ 1 мигает ] [ 6 горит ] [ 16 ] Чтобы остановить время готовки Например, 13 минут при уровне мощности 7: Действие Выбрать зону нагревания Выбрать функцию «Таймер» Отменить установленное значение Подтвердить установленное значение Отменить десятизначное значение Подтвердить десятизначное значение Панель управления Нажать на дисплей [ 7 ] Нажать кнопку [ 13 ] Дисплей [ 7 ] и включение контрольной лампочки [ 13 ] Провести по Шкале до [ 0 ] [ 1 горит ] [ 0 мигает ] Нажать на дисплей [ 10 ] [ 1 мигает ] [ 0 горит ] Провести по Шкале до [ 0 ] [ 0 мигает ] [ 0 горит ] Нажать на дисплей [ 00 ] [ 00 ] Автоматическое выключение по окончании времени готовки Как только истечет выбранное время готовки, на дисплее начнет мигать сообщение [ 00 ], и прозвучит звуковой сигнал. Чтобы отключить сигнал и мигание дисплея, следует нажать кнопку [ 00 ]. Функция секундомера Например, на 29 минут: Действие Активировать варочную панель Выбрать функцию «Таймер» Установить значение Подтвердить значение Панель управления Нажать кнопку [ 0/I ] Нажать кнопку [ CL ] Провести по Шкале до [ 9 ] Нажать на дисплей [ 09 ] Провести по Шкале до [ 2 ] Дисплей загорелись лампочки управления зоной [ 00 ] минут [ 0 ] горит [ 9 мигает] [ 0 ] мигает [ 9 ] горит Установить [ 2 ] мигает [ 9 ] горит десятизначное значение Подтвердить Нажать на дисплей [ 29 ] десятизначное значение [ 29 ] Через несколько секунд контрольная лампочка перестанет мигать. После выбора времени готовки на дисплее таймера замигает значение [ 00 ] и прозвенит зуммер. Для его отключения и мигания нажмите на дисплей [ 00 ]. Варочная плита отключится. 30 Автоматическая готовка Все зоны готовки оснащены автоматическим устройством готовки «включения и отключения». Зона готовки работает на полной мощности определенное время, затем автоматически снижает мощность до предустановленного уровня. Запуск: Действие Выбор зоны готовки Панель управления Нажать на дисплей [ 0 ] Установки полной мощности Автоматическая готовка Провести по Шкале до [ 9 ] Выбор уровня мощности (например «7») Провести по Шкале повторно [ 9 ] Провести по Шкале до [ 7 ] Дисплей [ 0 ] и включение контрольной лампочки От [ 0 ] [ 9 ] [ 9 ] мигает, значение [ A ] От [ 9 ] до [ 8 ] [ 7 ] [ 7 ] мигает, значение [ A ] Отключение автоматической готовки: Действие Выбор зоны готовки Выбор уровня мощности Панель управления Нажмите [ 7 ] из зоны готовки Провести по Шкале Дисплей [ 7 ] мигает, значение [ A ] От [ 1 ] до [ 9 ] Функция паузы Данная функция отключает варочную плиту и допускает повторный запуск с теми же значениями. Запуск/ выключение функции паузы: Действие Панель управления Дисплей Включить функцию Нажать кнопку [ II ] в На дисплее отображается паузы течение 2 секунд [ II ] в зоне готовки Отключить функцию Нажать кнопку [ II ] в Контрольная лампочка паузы течение 2 секунд паузы мигает Нажать еще раз или Контрольная лампочка провести по Шкале паузы гаснет Функция повторного запуска После отключения варочной плиты [ 0/I ] можно восстановить последние значения. Этапы готовки всех зон готовки (мощность) Минуты и секунды, установленные на таймерах соответствующих зон готовки Функция нагрева Необходимо сделать следующее: Нажать кнопку [ 0/I ] Затем нажать кнопку [ II ] в течение 6 секунд. Включаются последние значения. 31 Функция поддержки тепла Данная функция позволяет автоматически поддерживать температуру 700C. Это позволит избежать переливания жидкости и пригорания. Для включения функции «Поддержки тепла»: Действие Выбор зоны готовки Включение функции Отключение функции Панель управления Нажать на дисплее [ 0 ] Нажать кнопку [ U ] на Шкале Нажать на дисплее [ U ] Провести по Шкале Дисплей От [ 0 ] до [ 9 ] или [ H ] [U] [U] От [ 0 ] до [ 9 ] или [ H ] Эту функцию можно запустить независимо на всех зонах нагревания. При снятии кастрюли с зоны готовки, функция «Поддержки тепла» работает еще примерно в течение 10 минут. Максимальная продолжительность функции «Поддержки тепла» - 2 часа. Блокировка панели управления Чтобы избежать изменения настроек конфорок, в частности, во время их очистки, панель управления можно заблокировать (кроме кнопки включения/выключения [ 0/I ]). Блокировка Действие Запуск Панель управления Нажать кнопку [ 0/I ] Блокировка варочной панели Нажать одновременно [ B ] и [ 0 ] с дисплея передней правой** зоны Нажать на дисплей [ 0 ] повторно Дисплей На дисплее отображается [ 0 ] или [ H ] Нет изменений На дисплее отображается [ L ] Снятие блокировки Действие Запуск Через 5 секунд после запуска: Снятие блокировки варочной панели Панель управления Нажать кнопку [ 0/I ] Нажать одновременно [ B ] и [ 0 ] с дисплея передней правой** зоны Нажать на дисплей [ B ] Дисплей На дисплее отображается [ L ] На дисплее отображается [ 0 ] или [ H ] Лампочка блокировки не горит На дисплее ничего не отображается ** для модели 7330240 используйте дисплей задней правой зоны 32 СОВЕТЫ ПО ГОТОВКЕ Качество кастрюль Подходящие материалы: сталь, эмалированная сталь, чугун, сталь с намагничивающимся дном, алюминий с намагничивающимся дном Не подходящие материалы: алюминий и сталь с не намагничивающимся дном, медь, латунь, глина, фарфор Чаще всего изготовители указывают, подходит ли посуда для индуктивной плиты. Способ проверки, подходит ли посуда для индуктивной печи. Залить в кастрюлю немного воды и поместить еѐ в варочной зоне индуктивной плиты. Включить зону и выбрать интенсивность [ 9 ]. Вода должна нагреться за несколько минут. Коснуться магнитом дна кастрюли. Если магнит притянется, кастрюля подходит для индукционной плиты. Некоторая посуда может создавать шумы, при установке в варочную зону индуктивной печи. Это не означает, что индукционная печь имеет повреждения или сбои в работе. Кастрюли должны быть сертифицированы изготовителем, как подходящие для индукции. Тем не менее, возможно, что некоторые кастрюли, даже если заявленные как совместимые, на самом деле не имеют подходящих характеристик для использования на индукционных плитах. Рекомендуем проверить при приобретении, что кастрюли соответствуют хотя бы следующим условиям: Дно кастрюли (Ød) значительно меньше диаметра корпуса (ØD) КПД понижается и кастрюля может быть не идентифицирована плитой 33 Размеры кастрюли Конфорки до определенного предела автоматически адаптируются к диаметру кастрюли. Однако днище кастрюли должно соответствовать минимальному диаметру соответствующей конфорки. Чтобы добиться максимально эффективной работы своей варочной поверхности, кастрюлю следует ставить в центр конфорки. Примеры настроек мощности (Приведенные ниже значения являются ориентировочными). от 1 до 2 Растапливание Соусы, масло, шоколад, желатин Разогревание Блюда должны быть заранее подготовлены от 2 до 3 Тушение Рис, пудинг, сахарный сироп Размораживание Сушеные овощи, рыба, замороженные продукты от 3 до 4 Обработка паром Овощи, рыба, мясо от 4 до 5 Вода Картофель на пару, супы, макаронные изделия, свежие овощи от 6 до 7 Готовка при средней Мясо, печенка, яйца, колбасные температуре изделия Тушение Гуляш, рулет, рубец от 7 до 8 Готовка Картофель, блюда во фритюре, вафли 9 Жарка, запекание Стейк, омлет, жареные блюда Кипячение воды Вода Р Жарка, запекание Эскалоп, стейк, кипячение большого Кипячение воды объема воды ОБСЛУЖИВАНИЕ И ОЧИСТКА Перед очисткой отключить прибор. Запрещается очищать варочную панель, если стеклокерамическая поверхность слишком горячая: угроза ожога. Удалить слабые загрязнения влажной тканью, смоченной в воде с разведенным в ней моющим средством. Затем ополоснуть холодной водой и тщательно высушить поверхность. Запрещается использовать высококоррозионные или абразивные моющие средства и чистящее оборудование, которые могут нанести царапины. Запрещается применять паровые или компрессорные чистящие устройства. Запрещается применять предметы, которые могут поцарапать стеклокерамическую поверхность. Следить за тем, чтобы кастрюля была сухой и чистой. Следить, чтобы на варочной панели или кастрюли не оставалось частиц загрязнений. Если тащить тяжелые сковороды по поверхности, на ней появятся царапины. Рассыпанный сахар и пролитое варенье, желе и т. п. следует немедленно удалить. Так можно предотвратить повреждение поверхности. 34 ДЕЙСТВИЯ В СЛУЧАЕ ВОЗНИКНОВЕНИЯ ПРОБЛЕМ На дисплее отображается символ [ E4 ]: Конфигурация варочной панели должна быть настроена в соответствии со следующей процедурой. I) Внимание: перед началом настройки следует убрать с панели все кастрюли. II) Отключить варочную панель от источника питания: вытащить плавкий предохранитель или отключить контурный прерыватель. III) Подключить варочную панель к источнику питания. IV) Процедура: взять контейнер с ферримагнитным днищем диаметром как минимум 16 см. * Начать работу в течение 2 минут после подключения к источнику питания * Не использовать кнопку [ 0/I ]. V) Отмена существующей конфигурации: 1) Нажать кнопку блокировки и подержать на ней палец. 2) На каждом дисплее появится символ [ - ]. 3) Пальцем другой руки по очереди быстро активировать (менее чем за 2 секунды) кнопки [ - ]. Начните с верхней правой зоны и продолжайте двигаться против часовой стрелки, как показано на картинке (от a до d). Два сигнала зуммера укажут, что в манипуляции произошел сбой, и следует вернуться к пункту 1. 4) Снять пальцы с клавиатуры и снова нажать кнопку [ 1 ] на несколько секунд, пока не появится сообщение [ Е ]. 5) Подождите пока символ [ Е ] не мигнет. 6) Через несколько секунд сообщение [ Е ] автоматически преобразится в [ С ]→. Данная конфигурация была отменена. Примечание: для индукционных варочных плит с тремя зона готовки, у которых нет верхней правой зоны, начните процедуру с нижней правой зоны (b). VI) Следующий шаг: установка новой конфигурации. 1) Использовать подходящую индукционную кастрюлю с минимальным иаметром дна 16 см. 2) Выбрать зону нагревания, нажав соответствующую кнопку [ C ]. 3) Поставить кастрюлю в соответствующую зону нагревания. 4) Подождать, пока сообщение [ С ] не преобразится в [ - ]. Конфигурация зоны установлена. 5) Использовать одну и ту же процедуру для каждой зоны нагревания, в которой отображается [ С ]. 6) Конфигурация задана, если обнаружены все зоны, и не отображаются никакие сообщения. Для установки конфигурации использовать только 1 кастрюлю. Во время установки конфигурации запрещается ставить в зоны нагревания две и более кастрюли. Если сообщение [ Е4 ] не исчезнет, связаться с отделом послепродажного обслуживания. Варочная панель или конфорка не включается Варочная панель некачественно подключена к электросети. Защитный предохранитель отсечен. Активирована функция блокировки. Сенсорные кнопки покрыты жиром или водой. На кнопке находится какой-то предмет. 35 На дисплее отображается символ [ U ] На конфорке нет кастрюли. Кастрюля не подходит для индукционного режима. Диаметр дна кастрюли слишком мал. На дисплее отображается символ [ С ] или [ Е ] Связаться с отделом послепродажного обслуживания. Одна или все конфорки блокированы Сработала система безопасности. Конфорка долгое время не блокировалась. Одна или несколько сенсорных кнопок загрязнены. Кастрюля пуста, и ее дно перегрелось. Варочная панель оборудована функцией автоматического снижения уровня мощности и автоматически отключается при перегреве Долгая работа вентиляции после отключения варочной панели Это не сбой; работа вентилятора защищает электроприбор. Охлаждающий вентилятор отключится автоматически. Система автоматической готовки не запускается: Зона готовки еще горячая [ H ]. Установлен наиболее высокий уровень мощности [ 9 ]. На панели управления отображается символ [ L ]: Смотрите главу блокировки панели управления. На панели управления отображается символ [ U ]: Смотрите главу «Поддержка тепла». На панели управления отображается символ [ II ]: Смотрите главу «Пауза». ЗАЩИТА ОКРУЖАЮЩЕЙ СРЕДЫ Упаковочный материал экологически чист и может быть переработан. Электронные приборы состоят из перерабатываемых и иногда веществ, вредных для окружающей среды, но необходимых для нормальной работы и безопасности использования таких приборов. Запрещается выбрасывать прибор с бытовым мусором. Связаться с центром по вывозу мусора своего района, который занимается переработкой бытовых приборов. 36 ИНСТРУКЦИИ ПО УСТАНОВКЕ За установку отвечают исключительно специалисты. Устанавливающее лицо обязано соблюдать законодательство и стандарты, действующие в его стране. Как устанавливать уплотнитель Уплотнитель, поставляемый вместе с варочной панелью, позволяет избежать проникновения жидкостей в шкаф. Его установка должна быть выполнена тщательно, в соответствии с приведенной ниже схемой. Установить уплотнитель (2) на расстоянии двух миллиметров от внешней кр мки стеклокерамической поверхности, предварительно сняв с него защитную пленку (3). Подгонка – установка Размеры вырезаемого отверстия: Прибор Отверстие 7330240 760 x 350 мм 7331240 560 x 490 мм 7332240 650 x 490 мм 7370240 560 x 490 мм Проследить за тем, чтобы расстояние от варочной панели до ближайшей стены или стенки шкафа составляло 50 мм. Класс тепловой защиты варочной панели – Y. В идеале, варочная панель должна быть установлена так, чтобы со всех сторон было достаточно места. Сзади или сбоку от нее может находиться стена и высокая мебель. Однако с другой стороны никакие предметы или перегородки не могут по высоте превышать панель. Предмет мебели или опора, на которую будет установлена варочная панель, а также края мебели, ламинационное покрытие и используемый для его крепления клей должны быть способны выдержать температуры до 100ºС. Декоративные панели кромки должны быть термостойкими. Запрещается устанавливать варочную поверхность поверх невентилируемой духовки или посудомоечной машины. Необходимо проследить, чтобы под прибором было оставлено свободное место на 20 мм, чтобы обеспечить циркуляцию воздуха в электроприборе. Если под панелью установлен ящик, не следует помещать в него легко воспламеняемые предметы (например, аэрозольные баллончики) или нетермостойкие предметы. Материалы, часто используемые при производстве столешниц, обычно расширяются при контакте с водой. Чтобы защитить срезанную кромку, следует нанести на нее слой лака или специального герметика. Особое внимание следует уделить размещению липкого уплотнителя стыков, поставляемого вместе с варочной панелью, чтобы предотвратить любые утечки в основание. Этот уплотнитель гарантирует герметизацию при использовании в сочетании с гладкой поверхностью столешницы. Предохранительные зазор между варочной панелью и вытяжкой над ней должен соответствовать указаниям производителя вытяжки. В случае отсутствия указаний минимальное расстояние должно составлять 760 мм. После встраивания на соединительный кабель не должно оказываться механическое воздействие, например, в результате движения ящика. 37 ВНИМАНИЕ: Используйте только защитные ограждения для варочной поверхности, разработанные производителем прибора для приготовления пищи или указанные производителем прибора в руководстве по эксплуатации в качестве подходящего защитного устройства или защитные ограждения для варочной поверхности, непосредственно установленные на приборе. Использование неподходящих защитных ограждений варочной поверхности может привести к несчастному случаю. ПОДКЛЮЧЕНИЕ К ЭЛЕКТРОСЕТИ Установка оборудования и его подключение оборудования к сети электропитания должно выполняться только квалифицированными специалистами, которые должны неукоснительно соблюдать действующие нормы и стандарты. После встраивания оборудования, необходимо обеспечить защиту от воздействия напряжения. Информация об электрических соединениях указана на наклейке, находящейся на корпусе устройства рядом с клеммной коробкой. Подключение к сети электропитания должно осуществляться с помощью заземленного штепселя или многополярного выключателя с контактным отверстием шириной не менее 3 мм. Электрическая цепь должна быть отделена от сети с помощью специальных устройств, таких, как предохранители и замыкатели. Если устройство не оснащено штепселем, при установке необходимо предусмотреть возможность его отключения в соответствии с действующими правилами. Воздушный шланг не должен касаться горячих частей варочной панели или плиты. Осторожно! Данный прибор может быть подключен только к сети на 230 В ~ 50/60 Гц. Подключение всегда выполнять при помощи провода заземления. Выполнять схему подключения. Распределительная коробка находится под корпусом варочной панели в задней части. Чтобы открыть корпус используйте отвертку среднего размера. Используйте ее чтобы открыть крышку варочной плиты. Сеть Подключение Диаметр кабеля 230 В ~ 50/60 Гц 1 фаза + N 3 х 2.5 мм² 400 В ~ 50/60 Гц 2 фазы + N 4 х 1.5 мм² Кабель H 05 VV – F H 05 RR – F H 05 VV – F H 05 RR – F Калибр защиты 25 А* 16 А* * рассчитано с фактором одновременности в соответствии со стандартом EN 60 335-2-6 38 Подключение варочной плиты Установка конфигурации: Для различных типов подключения использовать перемычки из латуни, которые находятся в ящике рядом с контактным терминалом. Однофазный 230 В ~ 1P + N Установить первую перемычку между контактами 1 и 2, вторую – между 3 и 4. Заземлите устройство, провод нейтрали N к контакту 3 или 4, фазу L к одному из контактов 1 или 2. Двухфазный 400 В ~ 2P + N Установить перемычку между контактами 3 и 4. Заземлите устройство, провод нейтрали N к контакту 3 или 4, фазу L к контакту 1, а фазу L2 к контакту 2. Внимание! Убедиться в правильности подключения проводов и перемычек и плотно затянуть винты. Мы не будем нести ответственность за любые несчастные случаи, наступившие в результате неправильного подключения или использования незаземленного прибора или прибора с некачественным заземлением. 39 Geachte klant Bedankt voor de beslissing om onze inductie kookplaat aan te schaffen Teneinde er voor te zorgen dat u optimaal gebruik kunt maken van deze apparatuur, adviseren wij om deze handleiding nauwkeurig te lezen en te bewaren voor eventueel later gebruik. SAMENVATTING VEIILIGHEID................................................................................................................................ 41 VOORZORGMAATREGELEN VÓÓR HET GEBRUIK ............................................................................. 41 GEBRUIK VAN DE APPARATUUR .................................................................................................... 41 HET VERMIJDEN VAN BESCHADIGINGEN AAN HET APPARAAT ........................................................... 42 HOE TE HANDELEN BIJ HET NIET FUNCTIONEREN VAN DE APPARATUUR ............................................ 43 ANDERE VOORZORGEN ............................................................................................................... 44 OMSCHRIJVING VAN DE APPARATUUR ................................................................................. 45 TECHNISCHE SPECIFICATIES ........................................................................................................ 45 BEDIENINGSPANEEL.................................................................................................................... 46 IN GEBRUIK NEMEN .................................................................................................................. 46 DISPLAY .................................................................................................................................... 46 VENTILATIE ................................................................................................................................ 46 IN GEBRUIK NEMEN .................................................................................................................. 47 VÓÓR HET EERSTE GEBRUIK ........................................................................................................ 47 INDUCTIE PRINCIPE ..................................................................................................................... 47 TOUCH CONTROL........................................................................................................................ 47 IN HET GEVAL VAN EEN ALGEMEEN GEBRUIK, DRUKT U SLECHTS EEN TOETS TEGELIJK. ...................... 47 VERMOGENSINSTELLING ZONE “SLIDER” EN TIMER INSTELLING ..................................................... 47 BEGINNEN ................................................................................................................................. 48 PAN HERKENNING ....................................................................................................................... 48 RESTWARMTE INDICATIE ............................................................................................................. 48 BOOSTER FUNCTIE ..................................................................................................................... 48 TIMER ....................................................................................................................................... 49 AUTOMATISCH KOKEN ................................................................................................................. 50 PAUZE FUNCTIE .......................................................................................................................... 50 OPVRAAG FUNCTIE ..................................................................................................................... 51 « W ARMHOUD » FUNCTIE ............................................................................................................ 51 VERGRENDELING BEDIENINGSPANEEL .......................................................................................... 51 KOOK ADVIEZEN ....................................................................................................................... 52 PAN KWALITEIT ........................................................................................................................... 52 PAN AFMETINGEN ....................................................................................................................... 53 VOORBEELDEN VAN INSTELLING VAN HET VERMOGEN .................................................................... 53 ONDERHOUD EN REINIGING .................................................................................................... 53 WAT TE DOEN ALS EEN PROBLEEM ZICH VOORDOET ....................................................... 54 BESCHERMING VAN DE OMGEVING ....................................................................................... 55 INSTALLATIE INSTRUCTIES ..................................................................................................... 56 ELEKTRISCHE AANSLUITING .................................................................................................. 57 40 VEIILIGHEID Voorzorgmaatregelen vóór het gebruik pak alle materialen uit de installatie en het aansluiten van de apparatuur dient door een erkend vakman te worden gedaan. De fabrikant is niet verantwoordelijk voor beschadigingen of anderzijds die veroorzaakt zijn door installatiefouten de apparatuur moet op de juiste manier worden geïnstalleerd en op een degelijke ondergrond geplaatst dit apparaat is exclusief ontworpen voor het bereiden van voedsel en mag niet toegepast worden voor commercieel en/of industrieel gebruik verwijder alle stickers en labels van het keramische glas wijzig niets aan de apparatuur de kookplaat kan niet gebruikt worden als vrijstaande unit of als werk oppervlak de apparatuur moet geaard en aangesloten worden conform de lokale voorschriften gebruik geen verlengde kabels voor de aansluiting de apparatuur kan niet gebruikt worden boven een afwasmachine, of een wasdroger; stoom kan de elektronica beschadigen Dit apparaat is niet bestemd voor gebruik met een externe tijdschakelklok of een afstandsbediening. Gebruik van de apparatuur schakel de kookzones uit na gebruik houd het koken in de gaten indien gebruik wordt gemaakt van oliën en vetten; deze kunnen snel vlam vatten wees voorzichtig jezelf niet te branden tijdens of na het gebruik van de apparatuur overtuig jezelf dat er geen kabels of andere materialen in contact komen met het glas of hete pannen magnetische voorwerpen (credit cards, floppy discs, rekenmachines) moeten niet in de nabijheid van de apparatuur worden geplaatst 41 gebruik geen metalen voorwerpen, behalve daarvoor geschikte schalen. In het geval van oververhitting kunnen deze smelten of zelfs verbranden bedek het apparaat nooit met kleding of een beschermingsdeken. Deze kunnen erg heet worden en in brand vliegen Kinderen jonger dan 8 jaar, personen van wie de psychische en of mentale capaciteit vermindert zijn en personen van wie de kennis onaangepast is, kunnen dit toestel enkel onder toezicht gebruiken of indien zij opgeleid zijn om dit toestel te gebruiken in veilige omstandigheden. Zij dienen daarbij op de hoogte te zijn van de mogelijke risico‟s die zich kunnen voordoen. Kinderen mogen niet met dit toestel spelen. Zonder toezicht van een volwassene kan het reinigen en onderhoud van dit toestel niet aan kinderen toevertrouwd worden. metalen voorwerpen zoals messen, vorken, lepels en deksels mogen niet op het oppervlak worden geplaatst omdat deze heel heet kunnen worden Het vermijden van beschadigingen aan het apparaat Ruwe pannenbodems, of beschadigde pannen (niet geëmailleerde gietijzeren pannen) kunnen het keramische glas beschadigen. Zand of andere krassende materialen kunnen het keramische glas beschadigen vermijd het vallen van voorwerpen, zelfs kleine op het keramische glas overtuig uzelf dat de ventilatie van het apparaat functioneert zoals door de fabrikant aangegeven. Stoot niet met pannen tegen de hoeken van het glas. Laat geen lege pannen achter op de keramische kookplaat. 42 Suiker, synthetische materialen of aluminium vellen mogen niet in contact komen met de kookzones. Deze kunnen breuk en wijzigingen veroorzaken van het glas door afkoeling; schakel het apparaat direct uit en verwijder de voorwerpen van de hete zones (voorzichtig dat je jezelf niet brand). Risico van brand! Geen voorwerpen op de kookplaat leggen. Plaats nooit een hete pan op het bedieningspaneel. Indien een lade onder de ingebouwde apparatuur is geplaatst, zorg er dan voor dat de tussenruimte groot genoeg is (2 cm). Dit is essentieel om een correcte ventilatie te garanderen. Plaats nooit brandbare materialen in de lade (sprays) onder de kookplaat. Eventuele automatische laden moeten hittebestendig zijnHoe te handelen bij het niet functioneren van de apparatuur Als een defect zich voordoet moet het apparaat direct worden uitgeschakeld en de stroomtoevoer worden onderbroken. Is het keramische glas gebroken of gescheurd, dan moet het apparaat worden uitgeschakeld en contact worden genomen met de service afdeling. Reparaties moeten worden gedaan door specialisten. Open zelf nooit de apparatuur WAARSCHUWING: als het oppervlak is gebroken, schakel het apparaat uit ter voorkoming van elektrische schokken. 43 Andere voorzorgen Overtuig u dat de pan altijd op het midden van de kookzone is geplaatst. De bodem dient zo veel mogelijk de hele kookzone te bedekken. Gebruikers van een pacemaker dienen er rekening mee te houden dat het magnetische veld van invloed kan zijn op de werking. We adviseren om informatie te vragen bij de leverancier of uw arts. Gebruik nooit aluminium of synthetische pannen; ze kunnen smelten op de hete kookzones. Vuur nooit blussen met water. Schakel de kookzone uit. Vlammen voorzichtig met een deksel, smoordeksel of iets dergelijks verstikken. HET GEBRUIK VAN NIET GESCHIKTE POTTEN EN PANNEN OF VAN VERWIJDERBARE ACCESSOIRES OM POTTEN, NIET GESCHIKT VOOR INDUCTIE, OP TE WARMEN, VALT NIET ONDER DE GARANTIEVOORWAARDEN. DE FABRIKANT KAN NIET VERANTWOORDELIJK GEHOUDEN WORDEN VOOR BESCHADIGINGEN AAN DE KOOKPLAAT EN HAAR OMGEVING DIE HIERVAN HET GEVOLG KUNNEN ZIJN. 44 OMSCHRIJVING VAN DE APPARATUUR Technische specificities Type Total vermogen Energieverbruik van de kookplaat EChob** 7330240 6700 W 173.6 Wh/kg 7331240 6700 W 176.6 Wh/kg 7332240 7400 W 174.2 Wh/kg 7370240 7400 W 176.5 Wh/kg Vóórzijde links zone Detectie kookpan Normaal* Met Booster* Gestandaardiseerde categorie van het kookgerei** Energieverbruik ECcw** Ø 200 mm Ø 100 mm 2300 W 3000 W Ø 250 mm Ø 110 mm 2300 W 3000 W Ø 250 mm Ø 110 mm 2300 W 3000 W Ø 200 mm Ø 100 mm 2300 W 3000 W C 180.5 Wh/kg D 182.7 Wh/kg D 182.7 Wh/kg C 180.5 Wh/kg Achter links zone Detectie kookpan Normaal* Met Booster* Gestandaardiseerde categorie van het kookgerei** Energieverbruik ECcw** - - Ø 180 mm Ø 90 mm 1200 W 1400 W Ø 180 mm Ø 90 mm 1200 W 1400 W - - B 166.7 Wh/kg B 166.7 Wh/kg Midden zone Detectie kookpan Normaal* Met Booster* Gestandaardiseerde categorie van het kookgerei** Energieverbruik ECcw** Ø 160 mm Ø 90 mm 1200 W 1400 W - - - B 166.7 Wh/kg - - - Achter rechts zone Detectie kookpan Normaal* Met Booster* Gestandaardiseerde categorie van het kookgerei** Energieverbruik ECcw** - Ø 160 mm Ø 90 mm 1200 W 1400 W Ø 160 mm Ø 90 mm 1200 W 1400 W Ø 220 mm Ø 110 mm 2300 W 3000 W - B 166.7 Wh/kg B 166.7 Wh/kg C 173.7 Wh/kg Vóórzijde rechts zone Detectie kookpan Normaal* Met Booster* Gestandaardiseerde categorie van het kookgerei** Energieverbruik ECcw** Ø 250 mm Ø 100 mm 2300 W 3000 W Ø 200 mm Ø 100 mm 2300 W 3000 W Ø 200 mm Ø 100 mm 2300 W 3000 W Ø 160 mm Ø 90 mm 1400 W 2000 W D 173.7 Wh/kg C 180.5 Wh/kg C 180.5 Wh/kg A 185 Wh/kg * het vermogen kan variëren in functie van de afmetingen en het materiaal van de kookpotten ** berekend volgens de methoden voor het meten van de gebruikseigenschappen(EN 60350-2) 45 Bedieningspaneel controlelampje timer Timer display vermogen display controlelampje kookzone warmhoudtoets controlelampje pauze/herstart controlelampje Aan/Uit Aan/Uit toets vermogen selector “SLIDER” en timer instel zone booster toets pauze/herstart toets IN GEBRUIK NEMEN Display display 0 1…9 U A E H P L U II aanduiding nul vermogensniveau pan herkenning warmte versneller foutmelding restwarmte booster vergrendeling warmhoud pauze functie de kookzone is geactiveerd. selectie van het vermogensniveau. geen pan of een ongeschikte pan automatisch koken. elektronica fout. de kookzone is heet. de booster is geactiveerd. bedieningspaneel vergrendeling. automatische warmhoud van 70° de kookplaat staat op pauze. Ventilatie Het koelsysteem is volautomatisch. De koelventilator start op een lage snelheid wanneer de warmte die het elektronische systeem detecteert een bepaald niveau bereikt. De ventilator versnelt als de plaat intensiever wordt gebruikt. De koelventilator vertraagt de snelheid en stopt automatisch als het elektronische circuit voldoende afgekoeld is. 46 IN GEBRUIK NEMEN Vóór het eerste gebruik Reinig de kookplaat met een vochtige doek en droog daarna het oppervlak grondig. Gebruik geen middelen die het risico hebben dat een blauwe sluier op het glas achterblijft. Inductie principe Onder iedere kookzone bevindt zich een inductiespoel. Wanneer deze wordt geactiveerd, produceert het een variabel elektromagnetisch veld die een inductiestroming verzorgt in de speciaal ferromagnetische bodem van de pan. Het resultaat is verhitting van de pan die op de zone staat. Natuurlijk moet de pan aangepast zijn: alle ferromagnetische pannen worden aanbevolen (controleerbaar met een kleine magneet): gietijzeren en stalen pannen, geëmailleerde pannen, roestvaststalen pannen met ferromagnetische bodems……….. uitgezonderd zijn: koper, pure rvs, aluminium, glas, hout, keramisch, aardewerk….. De inductie kookzone past zich automatisch aan, aan de grootte van de pan. Met een te kleine pandiameter werkt het niet. Deze diameter varieert in functie aan de diameter van de kookzone. als de pan niet aangepast is aan de inductie kookplaat toont de display [ U ]. Touch control Uw keramische kookplaat is uitgevoerd met touch control toetsen. Als u een vinger op de toets legt wordt de daarmee corresponderende actie uitgevoerd. Deze actie wordt aangegeven door een controle lampje, een letter of nummer in de display en/of een pieptoon. In het geval van een algemeen gebruik, drukt u slechts een toets tegelijk. Vermogensinstelling zone “SLIDER” en timer instelling Om het vermogen te selecteren schuif je met je vinger over de “SLIDER” zone. Je kunt ook je vinger direct op het gekozen vermogen niveau plaatsen vermogen selector “SLIDER” en timer instel zone “SLIDER“ directe toegang 47 Beginnen Start/uitschakelen van de kookplaat: Actie Bedieningspaneel Starten druk toets [ 0/I ] Stoppen druk toets [ 0/I ] Display [ 0 ] knippert niets of [ H ] Start/uitschakelen van de kookzone: Actie Bedieningspaneel Zone keuze druk op display [ 0 ] selectie Instellen sleep op de “SLIDER“ (vermogen aanpassen) naar rechts of links Display [ 0 ] controlelampje gaat aan [ 0 ] tot [ 9 ] sleep naar [ 0 ] op de “SLIDER“ [ 0 ] of [ H ] of druk op [ 0 ] [ 0 ] of [ H ] Als er binnen 20 seconden geen keuze is gemaakt gaat de kookplaat terug naar de rustpositie Stoppen Pan herkenning De pan herkenning garandeert een veilig gebruik. De inductie werkt niet: als er geen pan op de kookzone staat, of als de pan niet geschikt is voor inductie. In dat geval is het onmogelijk om het vermogen op te voeren en de display toont (U) Dit symbool verdwijnt wanneer er een geschikte pan op de kookzone wordt geplaatst. als de pan van de kookzone wordt afgehaald stopt het proces. De display toont (U) Het symbool [U] verdwijnt wanneer de pan terug wordt gezet op de kookzone. Het kookproces gaat op hetzelfde vermogen verder als daarvoor. Schakel de kookzone uit na gebruick. De pantedectie [ U ] blijft dan niet actief. Restwarmte indicatie Na het uitzetten van de kookplaat, is de zone nog heet en de display toont (H) Het H symbol verdwijnt nadat de zone zonder gevaar aangeraakt kan worden Zolang de restwarmte indicatie brandt, mag de kookzone niet worden aangeraakt, noch warmte gevoelige materialen worden geplaatst. Booster functie De booster functie (P) geeft een vermogens injectie aan de geselecteerde kookzone. Als deze functie is geactiveerd werkt de kookzone gedurende 10 minuten op een extra hoog vermogen. De booster is bijvoorbeeld toepasbaar al er snel een grote hoeveelheid water moet worden verwarmd Start / Stop de booster functie: Actie Bedieningspaneel Display Zone keuze Start de booster Booster druk toets [ + ] van de zone druk toets [ B ] druk toets [ - ] of druk toets [ B ] [0] [ P ] gedurende 10 min stop de [9] [9] 48 Vermogen controle: De gehele kookplaat is uitgevoerd met een maximaal vermogen. Wanneer de booster functie is ingeschakeld, zorgt het elektronische systeem ervoor dat het vermogen van de andere zones wordt gereduceerd en dat het totale vermogen niet wordt overschreden. De display knippert op [ 9 ] gedurende een paar seconden en toont dan het maximale toegestane vermogen [ 6 ] or [ 8 ]. geselecteerde kookzone de andere kookzone (voorbeeld: vermogensstand 9) [ P ] wordt getoond [ 9 ] gaat naar [ 7 ] of [ 8 ] afhankelijk van de zone Timer De timer kan tegelijkertijd gebruikt worden voor 3 of 4 kookzones en met verschillende tijdsinstellingen (van 0 tot 99 minuten) voor elke zone. Instellen en wijzigen van de kooktijd Voorbeeld 16 minuten op vermogen 7: Actie Bedieningspaneel Display Zone keuze Kies het vermogen Selecteer « Timer» Stel de unit in Bevestig de units Stel de tientallen in Bevestig de tientallen selecteer op de display [ 0 ] sleep de “SLIDER“ naar [ 7 ] druk op display [ CL ] sleep de “SLIDER“ naar [ 6 ] druk op display [ 06 ] druk op de “SLIDER“ naar [ 1 ] druk op display [ 16 ] [ 0 ] en controlelampje aan [7] [ 00 ] [ 0 bevestigd ] [ 6 knippert ] [ 0 knippert] [ 6 bevestigd ] [ 1 knippert ] [ 6 bevestigd ] [ 16 ] De tijd is bevestigd en het koken begint. De kooktijd stoppen: Voorbeeld 13 minuten op vermogen 7 : Actie Bedieningspaneel Display Zone keuze Selecteer « Timer » Deactiveer de units Bevestig de units Deactiveer de tientallen Bevestig de tientallen druk op display [ 7 ] geselecteerd druk op toets [ 13 ] sleep de “SLIDER“ to [ 0 ] druk op display [ 10 ] sleep de “SLIDER“ to [ 0 ] druk op display [ 00 ] [ 7] en controlelampje aan [ 13 ] [ 1 bevestigd ] [ 0 knippert ] [ 1 knippert ] [ 0 bevestigd ] [ 0 knippert ] [ 0 bevestigd ] [ 00 ] Automatisch stoppen aan het eind van de kooktijd: Zodra de geselecteerde kooktijd is beëindigd toont de display (00) en een geluidssignaal en de kookzone schakelt uit. Om het lichtsignaal en geluid uit te schakelen volstaat het indrukken van de knop [ 00 ]. 49 Eiwekker functie : Voorbeeld voor 29 minuten: Actie Bedieningspaneel Display Activeer de kookplaat Selecteer « Timer » Stel de unit in Bevestig de units Stel de tientallen in Bevestig de tientallen druk op display [ 0/I ] druk op display [ CL ] sleep de “SLIDER“ naar [ 9 ] druk op display [ 09 ] sleep de “SLIDER“ naar [ 2 ] druk op display [ 29 ] zone controlelampjes aan [ 00 ] [ 0 bevestigd] [ 9 knippert ] [ 0 knippert ] [ 9 bevestigd ] [ 2 knippert ] [ 9 bevestigd ] [ 29 ] Na een paar seconden stopt het controlelampje met knipperen. Zodra de geselecteerde kooktijd is beëindigd toont de display (00) en een geluidssignaal en de kookzone schakelt uit. Om het lichtsignaal en geluid uit te schakelen volstaat het indrukken van de knop [ 00 ]. De kookplaat schakelt uit. Automatisch koken Alle kookzones zijn voorzien van een automatische “go en stop” functie: de kookzone start op vol vermogen gedurende een bepaalde tijd en reduceert automatisch haar vermogen op het eerder ingestelde niveau. Starten : Actie Bedieningspaneel Display Zone keuze Vol vermogen instelling Automatisch koken Vermogensniveau keuze (bijvoorbeeld « 7 ») druk op display [ 0 ] geselecteerd sleep de “SLIDER“ naar [ 9 ] herdruk op display “SLIDER“ [ 9 ] sleep de “SLIDER“ naar [ 7 ] [ 0 ] en controlelampje aan ga van [ 0 ] naar [ 9 ] [ 9 ] knippert met [ A ] [ 9 ] ga van [ 8 ] [ 7 ] [ 7 ] knippert met [ A ] Het automatisch koken uitschakelen : Actie Bedieningspaneel Display Zone keuze druk [ 7 ] van de zone [ 7 ] knippert met [ A ] [ 1 ] naar [ 9 ] Vermogensniveau keuze sleep de “SLIDER“ Pauze functie Deze functie onderbreekt alle kookplaat activiteiten en biedt de mogelijkheid om te herstarten met dezelfde instellingen. Starten/Stoppen van de pauze functie : Actie Bedieningspaneel Display Stel de pause in druk [ II ] toets gedurende 2s Stop de pauze druk [ II ] toets gedurende 2s toont [ II ] in de kook zone display pauze controlelampje knippert druk op een andere toets of sleep de “SLIDER“ 50 pauze controlelampje is uit Opvraag functie Nadat de kookplaat is uitgeschakeld[ 0/I ], is het mogelijk de laatste instellingen op te vragen. kook trajecten van alle kookzones (vermogen) minuten en seconden van geprogrammeerde kookzone gerelateerde timers opwarm functie de opvraag functie werkt als volgt: druk op toets [ 0/I ] druk dan op toets [ II ] gedurende 6 seconden De voorgaande instellingen zijn geactiveerd. « Warmhoud » functie Deze functie maakt het mogelijk om automatisch een temperatuur van 70°C. te bereiken en vast te houden. Dit voorkomt het overkoken van vloeistoffen enf het aanbranden van de panbodem. Het starten van de « warmhoud » functie : Actie Bedieningspaneel Display Zone keuze Instellen Stoppen druk op display [ 0 ] geselecteerd druk op toets [ U ] op de “SLIDER“ druk op display [ U ] geselecteerd [ 0 ] naar [ 9 ] of [ H ] [U] [ U ] sleep de “SLIDER“ van [ 0 ] naar [ 9 ] of [ H ] Deze functie kan onafhankelijk gestart worden voor alle kookzones. Als de pan van de kookzone wordt afgehaald blijft de "warmhoud" functie gedurende ongeveer 10 minuten geactiveerd De maximum warmhoud tijd is 2 uur. Vergrendeling bedieningspaneel Om te voorkomen dat een instelling van een kookzone wordt veranderd, met name tijdens het reinigen, kan de bediening worden vergrendeld (met uitzondering van de Aan/Uit knop [ 0/I ]). Vergrendelen : Actie Bedieningspaneel Start Kookplaat vergrendeling druk op toets [ 0/I ] [ 0 ] of [ H ] wordt getoond druk tegelijkertijd [ B ] en [ 0 ] geen verandering van de rechter vóórzijde** zone display e-druk op de display [ 0 ] [ L ] aan wordt getoond Display Ontgrendelen : Actie Bedieningspaneel Display Start druk op toets [ 0/I ] [ L ] aan wordt getoond Binnen 5 sec. na start : Pntgrendelen van druk tegelijkertijd [ B ] en [ 0 ] of [ H ] aan wordt getoond de kookplaat [ L ] from the front right** zone display geen verlichte display‟s druk op toets [ B ] ** voor de7330240 gebruik de rechtsachter zone display 51 KOOK ADVIEZEN Pan kwaliteit Toepasbare materialen: staal, geëmailleerd staal, gietijzer, ferromagnetische roestvrij staal, aluminium met ferromagnetische bodem Niet aangepaste materialen: aluminium en roestvrij staal zonder ferromagnetische bodem, koper, messing, glas, keramiek, porselein. De fabrikanten geven het aan als hun producten geschikt zijn voor inductie Om te controleren of de pannen geschikt zijn : doe een beetje water in een pan en plaats deze op een inductie kookzone op niveau [ 9 ]. Dit water moet binnen een paar seconden koken een stuk magneet op de bodem van de pan Sommige pannen maken geluid als ze op een inductie zone worden geplaatst. Dit geluid betekent niet dat er iets niet in order is en heeft geen invloed op het kookproces. De pannen moeten geschikt zijn om te gebruiken met inductie kookplaten. Alhoewel er altijd mogelijkheid aanwezig is dat men dat wel aangeeft, maar dat de pannen in werkelijkheid een slecht resultaat geven. Om die reden adviseren wij om voor de aankoop de volgende zaken te controleren: Als de bodem van de pan (0) aanmerkelijk kleiner is dan de diameter van de pan zelf (0), zal het resultaat minder zijn en wordt de pan mogelijk niet herkend door de kookplaat zone. 52 Pan afmetingen De kookzones zijn, tot een bepaalde limiet, automatisch aangepast aan de diameter van de pan. Alhoewel de bodem van de pan minimaal dezelfde diameter moet hebben als de kookzone Om het beste resultaat uit de kookplaat te halen, moet de pan in het centrum van de kookzone geplaatst worden. Voorbeelden van instelling van het vermogen (de onderstaand waarden zijn een indicatie) 1 tot 2 smelten opwarmen 2 tot 3 ontdooien 3 tot 4 4 tot 5 stoom water 6 tot 7 medium koken sudderen 7 tot 8 9 koken bakken, roosteren water koken water koken P sausen, boter, chocolade, gelatine kant en klare maaltijden rijst, pudding, suiker, siroop gedroogde groenten, vis, ingevroren producten groenten, vis, vlees gestoomde aardappelen, soepen, pasta. verse groenten vlees, lever, eieren, worstjes, goulash, rollade, roulade, pens aardappelen, beignets, wafels steaks, omeletten, gefrituurde gerechten water koken van aanzienlijke hoeveelheden water ONDERHOUD EN REINIGING Schakel het apparaat uit voordat gereinigd wordt Reinig de kookplaat niet als het glas te heet is: verbrandingsrisico verwijder lichte vlekken met een vochtige doek, voorzien van een beetje reinigingsmiddel verdund met water. Neem daarna het oppervlak met koud water af en droog het . schadelijke en agressieve middelen dienen te worden vermeden om het gevaar voor krassen te voorkomen gebruik nooit hogedruk of stoom apparatuur gebruik nooit materialen die krassen in het glas kunnen veroorzaken verzeker je ervan dat de pan droog en schoon is. Het schuiven over het glas van ruwe pannen zal het oppervlak beschadigen het morsen van suiker, jam, stroop enz. moet direct worden verwijderd. Op die manier wordt voorkomen dat de plaat wordt beschadigd. 53 WAT TE DOEN ALS EEN PROBLEEM ZICH VOORDOET Wanneer het [ E 4 ] symbool verschijnt: De plaat moet worden geconfigureerd. Onderneem de volgende stappen : I) Belangrijk : overtuig je dat er geen pannen meer op de kookplaat staan. II) Ontkoppel het apparaat van het elektriciteitsnet door het verwijderen van de zekering of het onderbreken van de stroomtoevoer. III) Sluit de plaat aan op het elektriciteitsnet IV) Procedure: neem een pan met een ferromagnetische bodem en een minimale diameter van 16 cm * start the procedure na 2 minuten nadat de plaat opnieuw aangesloten is op het net * gebruik niet de [ O/I ] toets V) Eerste stap: hef de bestaande configuratie op 1) druk op toetst nr. 2 en houdt deze ingedrukt c b 2) het symbool [ - ] verschijnt in ieder display 3) druk met je andere hand snel en d a achtereenvolgens (minder dan 2 sec.) op iedere [ - ] display. Begin aan vóórzijde rechts en ga tegen de klok in, zoals aangegeven op de tekening (van a naar d). Een dubbele "piep" betekent dat het fout ging. In dat geval begin opnieuw vanaf (1). 4) haal je vingers van de touch control af, druk opnieuw op toets 1 gedurende een paar minuten totdat het [ E ] symbool verschijnt en knippert. 5) wacht tot het [ E ] symbool stopt te knipperen. 6) na een paar seconden wordt [ E ] automatisch omgezet in [ C ]. De bestaande instelling is daarmee opgeheven. Note : Voor kookplaten met 3 zones wordt de procedure gestart met de zone rechtsachter (b). ; dit vanwege het ontbreken van de zone aan de rechter vóórzijde. VI) Tweede stap: nieuwe instelling 1) neem een ferromagnetische pan met een minimale diameter van 16 cm 2) selecteer een kookzone door te drukken op de overeenkomende [ C ] display 3) plaats de pan op de in te stellen zone. 4) wacht tot de getoonde [ C ] verandert in [ - ]. De geselecteerde kookzone is nu geconfigureerd. 5) volg dezelfde procedure voor elke zone waar een [ C ] wordt getoond. 6) alle kookzones zijn geconfigureerd zodra de display‟s worden uitgeschakeld. Gebruik altijd dezelfde pan voor de hele procedure. Gebruik nooit meerdere pannen tegelijkertijd gedurende het instel proces. als [ E 4 ] getoond blijft, dient de servicedienst geraadpleegd te worden. De kookplaat of de kookzone start niet: de kookplaat is niet goed aangesloten op het elektriciteitsnet. de zekering is kapot. de kijk functie is geactiveerd. de sensor gevoelige toetsen zijn afgedekt of vochtig. een object is op een toets gelegd. Het bedieningspaneel toont [ U ]: er staat geen pan op de kookzone. de pan is niet geschikt voor inductie. de diameter van de bodem is te klein. 54 Het bedieningspaneel toont [ C ] of [ E ]: neem contact met de servicedienst. Een of alle kookzones zijn uitgeschakeld: het beveiliging systeem is ingeschakeld. u bent vergeten om de kookzone enige tijd terug uit te schakelen. een of meerdere toetsen zijn afgedekt. de pan is leeg en de bodem is oververhit. de kookplaat heeft een automatische reductie van het vermogen om oververhitting te voorkomen. doorlopende ventilatie na uitschakeling van de kookplaat dit is geen mankement, de ventilator beschermt de elektronica de koelventilator stopt automatisch het automatisch kook systeem start niet: de kookzone is nog heet [ H ]. het hoogste vermogen is ingeschakeld [ 9 ]. het bedieningspaneel toont [ L ]: raadpleeg het hoofdstuk bedieningspaneel vergrendeling. het bedieningspaneel toont [ U ]: raadpleeg het hoofdstuk “warm houden“. het bedieningspaneel toont [ II ]: raadpleeg het hoofdstuk “pauze“. BESCHERMING VAN DE OMGEVING het verpakkingsmateriaal is ecologisch en kan worden hergebruikt verouderde apparaten bevatten sommige edele metalen. Informeer bij de plaatselijke overheid inzake de recycle mogelijkheden Gooi de afgedankte materialen niet bij het huisvuil. Neem contact met de plaatselijke overheid i.v.m. de geldende regels inzake het inzamelen van huishoudelijke apparaten 55 INSTALLATIE INSTRUCTIES De installatie valt onder de exclusieve verantwoordelijkheid van specialisten. De installateur is gehouden aan de wettelijke voorschriften en geldende regels in het betreffende land Hoe moet de pakking geplaatst worden De bijgeleverde pakking voorkomt het binnendringen van vocht in de behuizing. Het installeren ervan moet punctueel en conform de navolgende tekening worden uitgevoerd. Plaats de pakking (2) twee millimeter van de buitenste hoek van het glas, na verwijdering van de afdekfolie(3). Installatie voorschriften de uitsnijmaten zijn: referentie 7330240 7331240 7332240 7370240 uitsnijmaten 760 x 350 mm 560 x 490 mm 650 x 490 mm 560 x 490 mm Overtuig uzelf dat er een afstand is van 50 mm tussen de kookplaat en de muur, of zijkanten De kookplatenhebben een Y classificatie m.b.t. hitte beveiling.Het meest ideale is om de kookplaat te installeren met voldoende ruimte aan alle zijden. Er mag een muur aan de achterzijde, of een muur aan 1 zijde staan. Het werkblad, de hoeken van het meubel alsmede de afwerking en gebruikte lijm dienen bestand te zijn tegen temperaturen boven de 100 °C Werkbladen die van materiaal zijn gemaakt die kunnen worden aangetast door water dienen alsvolgt te worden behandeld: om de hoeken van de uitsparingen te beschermen moet een speciale vernis of kit worden gebruikt. Speciale aandacht moet worden gegeven aan de zelfklevende strip die ervoor zorgt dat er geen water in het blad kann lekken. Deze pakking garandeert een correcte afdichting wanneer met zachte bladmaterialen worden gewerkt. De kookplaat mag niet boven een ventilerende oven of afwasmachine worden geplaatst. Zorg voor een ruimte van 20 mm. onder de bodem van de kookplaat om een goede luchtcirculatie van de electronika te garanderen. Indien een lade onder de kookplaat is gemonteerd dient voorkomen te worden dat daarin ontvlambare materialen, zoals spray‟s worden gelegd. De veiligheids ruimte tussen de kookplaat en de afzuigkap moet conform de aanwijzingen van de afzuigkap fabrikant worden gerespecteerd. Bij twijfel, of bij het ontbreken van montage voorschriften moet een minimale afstand van 760 mm. worden aangehouden. het aansluitsnoer moet na de montage vrij zijn en niet belemmerd worden bijvoorbeeld door de lade. Waarschuwing: Gebruik alleen kookplaat beschermrekken ontworpen door de fabrikant van de kookplaat, rekken die door de fabrikant aangeduid zijn als geschikt of beschermrekken geïntegreerd in het apparaat. Het gebruik van ongeschikte rekken kan ongelukken veroorzaken. 56 ELEKTRISCHE AANSLUITING De installatie en de aansluiting op het elektrisch net mogen enkel worden toevertrouwd aan een vakman (elektricien) die op de hoogte is van de voorgeschreven normen. Na de montage mag geen contact mogelijk zijn met onderdelen die bij het gebruik onder spanning staan. Of de vereiste aansluitgegevens met die van het elektrisch net overeenstemmen, ziet u op het typeplaatje. Het apparaat dient door middel van een meerpolige stroomonderbreker van het net kunnen worden gescheiden. Staat deze open (niet aangesloten) moet de contactopening minstens 3 mm bedragen. Geschikte scheidingsinstallaties zijn beveiligingsschakelaars, zekeringen, differntiële schakelaars en contactoren. De installatie moet door zekeringen beveiligd zijn. Elektrische kabels moeten door inbouwelementen afgedekt zijn. Als het apparaat niet met een bereikbare stekker is uitgerust, moeten bij een vaste inbouw in overeenstemming met de montageaanwijzingen andere onderbrekingsmiddelen worden voorzien. De toevoerkabel moet zo worden gelegd dat hij niet met de hete onderdelen van de kookplaat in aanraking komt. Opgelet! Dit apparaat mag uitsluitend worden aangesloten op een elektriciteitsnet met 230 V~ 50/60 Hz. Sluit altijd de aarddraad aan. Respecteer het aansluitschema. De aansluitbox bevindt zich onder aan de achterzijde van de behuizing. Gebruik om het te openen een medium schroevendraaier. Steek deze in de uitsparingen en open het voeding aansluiting kabel diameter 230V~ 50/60Hz 1 fase + N 3 x 2,5 mm² 400V~ 50/60Hz 2 fases + N 4 x 1.5 mm² kabel H 05 VV - F H 05 RR - F H 05 VV - F H 05 RR - F zekering 25 A * 16 A * * berekend met de gelijktijdige factor volgens de standaard TN 60 335-2-6 Aansluiten van de kookplaat Stel de configuratie in: Voor de verschillende aansluit,mogelijkheden, gebruik de koperen bruggen die in de box zitten naast de blokjes Monofase 230V~1P+N Steek de 1e brug tussen blokje 1 en 2, de 2e tussen 3 en 4. Verbind de aarde met het blokje “aarde”, de neutrale N aan blokje 3 of 4, de fase L naar 1 van de blokjes 1 of 2. Biofase 400V~2P+N Plaats een brug tussen blokje 3 en 4. Attach the earth to the terminate “earth”, the neutral N to terminal 3 or 4, the Phase L1 to the terminals 1 and the Phase L2 to the terminal 2. Attentie: overtuig u ervan dat de kabels correct en goed zijn aangesloten. Wij kunnen niet verantwoordelijk worden gesteld voor welk incident dan ook voorkomende uit een niet correcte aardverbinding van de apparatuur. 57 cod. 9606887 Foster spa 42041 Brescello (RE) - Italy tel. +39.0522.687425 - tel. Servizio Assistenza +39.0522.684450 fax +39.0522.686019 - fax Servizio Ricambi +39.0522.962166 e-mail: [email protected] www.fosterspa.com 14316-3-
 1
1
-
 2
2
-
 3
3
-
 4
4
-
 5
5
-
 6
6
-
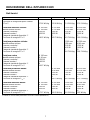 7
7
-
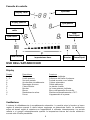 8
8
-
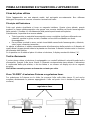 9
9
-
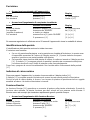 10
10
-
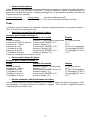 11
11
-
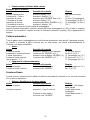 12
12
-
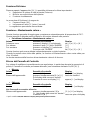 13
13
-
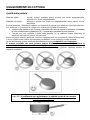 14
14
-
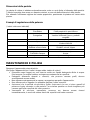 15
15
-
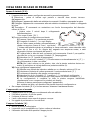 16
16
-
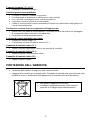 17
17
-
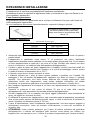 18
18
-
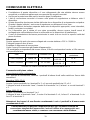 19
19
-
 20
20
-
 21
21
-
 22
22
-
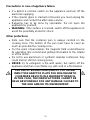 23
23
-
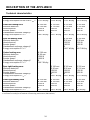 24
24
-
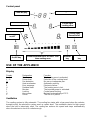 25
25
-
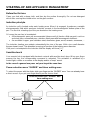 26
26
-
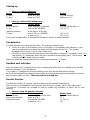 27
27
-
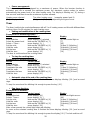 28
28
-
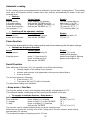 29
29
-
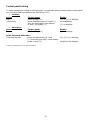 30
30
-
 31
31
-
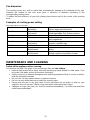 32
32
-
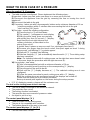 33
33
-
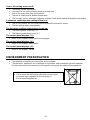 34
34
-
 35
35
-
 36
36
-
 37
37
-
 38
38
-
 39
39
-
 40
40
-
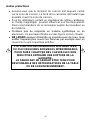 41
41
-
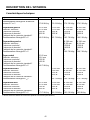 42
42
-
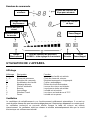 43
43
-
 44
44
-
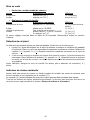 45
45
-
 46
46
-
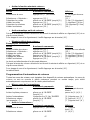 47
47
-
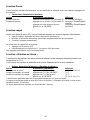 48
48
-
 49
49
-
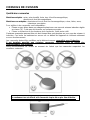 50
50
-
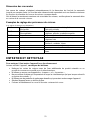 51
51
-
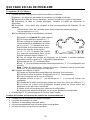 52
52
-
 53
53
-
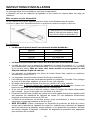 54
54
-
 55
55
-
 56
56
-
 57
57
-
 58
58
-
 59
59
-
 60
60
-
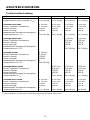 61
61
-
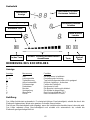 62
62
-
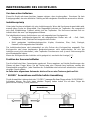 63
63
-
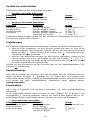 64
64
-
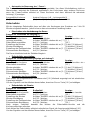 65
65
-
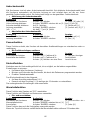 66
66
-
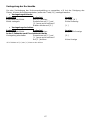 67
67
-
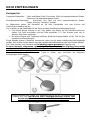 68
68
-
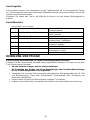 69
69
-
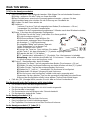 70
70
-
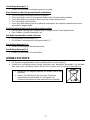 71
71
-
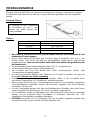 72
72
-
 73
73
-
 74
74
-
 75
75
-
 76
76
-
 77
77
-
 78
78
-
 79
79
-
 80
80
-
 81
81
-
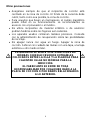 82
82
-
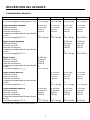 83
83
-
 84
84
-
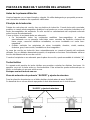 85
85
-
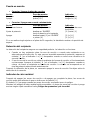 86
86
-
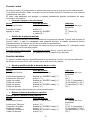 87
87
-
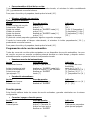 88
88
-
 89
89
-
 90
90
-
 91
91
-
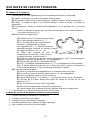 92
92
-
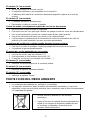 93
93
-
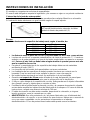 94
94
-
 95
95
-
 96
96
-
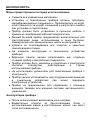 97
97
-
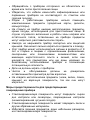 98
98
-
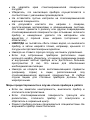 99
99
-
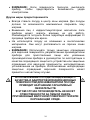 100
100
-
 101
101
-
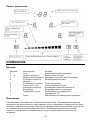 102
102
-
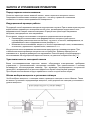 103
103
-
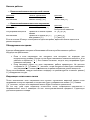 104
104
-
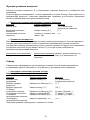 105
105
-
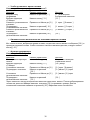 106
106
-
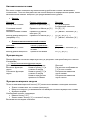 107
107
-
 108
108
-
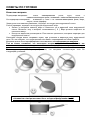 109
109
-
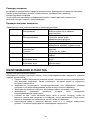 110
110
-
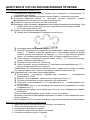 111
111
-
 112
112
-
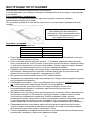 113
113
-
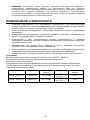 114
114
-
 115
115
-
 116
116
-
 117
117
-
 118
118
-
 119
119
-
 120
120
-
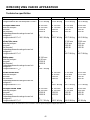 121
121
-
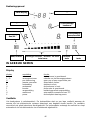 122
122
-
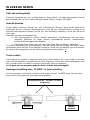 123
123
-
 124
124
-
 125
125
-
 126
126
-
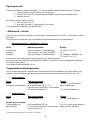 127
127
-
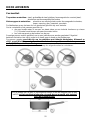 128
128
-
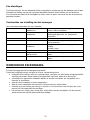 129
129
-
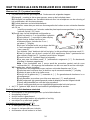 130
130
-
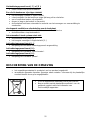 131
131
-
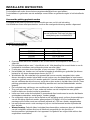 132
132
-
 133
133
-
 134
134
-
 135
135
-
 136
136


Foster 7330240 Manual de usuario
- Categoría
- Encimeras
- Tipo
- Manual de usuario
en otros idiomas
- français: Foster 7330240 Manuel utilisateur
- italiano: Foster 7330240 Manuale utente
- English: Foster 7330240 User manual
- Deutsch: Foster 7330240 Benutzerhandbuch
- русский: Foster 7330240 Руководство пользователя
- Nederlands: Foster 7330240 Handleiding
Artículos relacionados
Otros documentos
-
Valberg IH 3 TB C AF El manual del propietario
-
 HIGHONE 948151 El manual del propietario
-
-
-
-
Candy CDI32B Manual de usuario
-
-
-
Blaupunkt 5IX60290 Manual de usuario
-
Valberg VH 2 B 067F Manual de usuario
