
SPEED BREW OWNER’S MANUAL
For models: BT, CSB, GR & SB

2
Since 1957, restaurants and cafés have chosen BUNN
®
as their trusted coffeemaker. For over 60 years, we’ve
built our business with a very simple mission: to create the best coffee experience possible by building the best
coffeemakers possible. What we started then we continue today, by ensuring quality in the cup for every cup.
We’re proud to be a company based on honesty and hard work, and a passion for great coffee wherever it is
served — your home included!
You’re about to enjoy years and years of better coffee. How, you ask? It’s called The BUNN Difference: a
nely-tuned calibration of time, temperature and turbulence that extracts maximum avor from coffee in the
optimal amount of time.
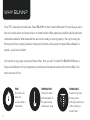
WHY BUNN?
TURBULENCE
Created in the brew
funnel as water
uniformly showers over
coffee, resulting in
smooth avor.
TEMPERATURE
Internal hot water
tank heats water to
the optimal brew
temperature range.
TIME
Quick 4-minute
brew time
ensures coffee is
never bitter.

3
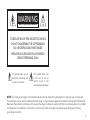
This symbol alerts you to
important operating and
service instructions.
This symbol alerts you
to the risk of re or
electric shock in the
accompanying message.
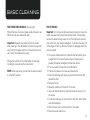
TO REDUCE RISK OF FIRE OR ELECTRIC SHOCK
DO NOT DISASSEMBLE THE COFFEEMAKER
NO USER-SERVICEABLE PARTS INSIDE
REPAIR SHOULD BE DONE BY AUTHORIZED
SERVICE PERSONNEL ONLY
WARNING
RISK OF FIRE OR ELECTRICAL SHOCK
NOTE: The short power-supply cord provided reduces the risk of becoming entangled in or tripping over a longer cord.
If an extension cord is used, its marked electrical rating must be at least as great as the electrical rating of the coffeemaker.
Make sure the extension cord does not hang over the edge of a table or counter and that it cannot be pulled on by children
or tripped over. The extension cord must be a 3-wire cord of the 3-pronged, 3-socketed, grounding type (including
grounding conductor).

4
GETTING STARTED ...........................................................................................................5
SAFEGUARDING ...............................................................................................................7
COFFEEMAKER FEATURES ..............................................................................................8
INITIAL SETUP .................................................................................................................10
HOW TO BREW ...............................................................................................................12
CARE & CLEANING ........................................................................................................14
TROUBLESHOOTING .....................................................................................................19
WARRANTY .....................................................................................................................22
TABLE OF CONTENTS

5
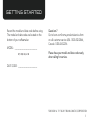
GETTING STARTED
Record the model and date code before using.
The model and date code are located on the
bottom of your coffeemaker.
MODEL: __________________________
DATE CODE: ______________________
Questions?
Go to bunn.com/home-products/service-form
or call customer service USA 1-800-352-2866,
Canada 1-800-263-2256
Please have your model and date code ready
when calling for service.
BT, CSB, GR, or SB
53883.0001A 7/17 © 2017 BUNN-O-MATIC CORPORATION

6
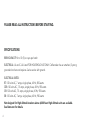
PLEASE READ ALL INSTRUCTIONS BEFORE STARTING.
SPECIFICATIONS
BREW CAPACITY: 4 to 10 (5) oz. cups per batch
ELECTRICAL: UL and C-UL Listed FOR HOUSEHOLD USE ONLY. Coffeemaker has an attached, 3-prong
grounded cord set and requires 2-wire service with ground.
ELECTRICAL RATED:
BT: 120 volts AC, 7 amps, single phase, 60 Hz, 850-watts
CSB: 120 volts AC, 7.5 amps, single phase, 60 Hz, 900-watts
GR: 120 volts AC, 7.5 amps, single phase, 60 Hz, 900-watts
SB: 120 volts AC, 7 amps, single phase, 60 Hz, 900-watts
Not designed for High Altitude locations above 4,000 feet. High Altitude units are available.
See Bunn.com for details.

7
SAFEGUARDING
FOR HOUSEHOLD USE ONLY
SAVE THESE INSTRUCTIONS
IMPORTANT
Follow basic safety precautions when using electrical
appliances to reduce the risk of re, electric shock and
personal injury.
• READ ALL THE INSTRUCTIONS IN THIS MANUAL.
• Use caution. This coffeemaker produces hot liquids: hot
liquids can burn you
• Place and use coffeemaker on a level surface.
• Do not touch hot surfaces. Use handles.
• Do not tip the coffeemaker.
• To protect against electric shock, do not place cord,
plugs or coffeemaker in water or other liquids.
• Do not open lid during brewing.
• Close supervision is necessary when coffeemaker is used
around children.
• Internal hot water tank contains hot water. Before
cleaning, removing or replacing parts, press power switch
off, unplug coffeemaker and let it cool (up to 2 hours.)
• Do not operate coffeemaker with a damaged
cord or plug, or any other malfunction or damage.
Return appliance to an authorized service facility for
examination, repair or adjustment.
• Using an accessory not evaluated for use with this
coffeemaker may cause injury.
• Use coffeemaker indoors only.
• Do not let cord hang over edge of table or counter.
• Do not place coffeemaker in or near a hot gas or electric
burner, in a heated oven, or in any other heated area.
• Do not use carafe on a range top or in a microwave.
• Do not use coffeemaker for any purpose other than its
intended use.
• Do not remove brew funnel or carafe while brewing.
• Do not set a hot carafe on a cold surface.
• Do not use a cracked carafe or a carafe with a loose or
weakened handle.
• Do not pour any liquid into the internal hot water tank
other than water or vinegar for cleaning, as specied in
this manual.
• Do not clean carafe with cleansers, steel wool pads, or
other abrasive materials.
• When coffeemaker is not in use, keep lid in the closed
position.
• To disconnect, turn any control to the OFF position, then
unplug from wall outlet.

8
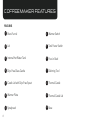
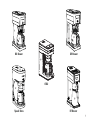
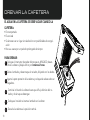
FEATURES
Brew Funnel
Lid
Internal Hot Water Tank
Drip-Free Glass Carafe
Carafe Lid with Drip-Free Spout
Warmer Plate
Sprayhead
Warmer Switch
Tank Power Switch
Pour-In Bowl
Deliming Tool
Thermal Carafe
Thermal Carafe Lid
Base
COFFEEMAKER FEATURES
3
2
1
4
5
6
7
8
9
10
11
12
13
14

9
BX Brewer
10
9
8
7
6
5
4
3
2
1
GR Brewer
WARMER/RECHAUD
I
O
10
9
8
7
6
5
4
3
2
1
BT Brewer
12
13
14
9
7
3
2
1
Speed Brew
2
10
9
8
7
6
5
4
3
1
CSB2
8
7
6
5
4
3
2
1

10
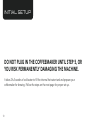
INITIAL SETUP
DO NOT PLUG IN THE COFFEEMAKER UNTIL STEP 5, OR
YOU RISK PERMANENTLY DAMAGING THE MACHINE.
It takes 2 full carafes of cold water to ll the internal hot water tank and prepare your
coffeemaker for brewing. Follow the steps on the next page for proper set up.

11
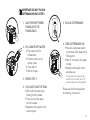
1. SLIDE THE EMPTY BREW
FUNNEL INTO THE
FUNNEL RAILS
2. FILL CARAFE WITH WATER
• Pour water into the
coffeemaker
• Position carafe on the
warmer plate
• Close the lid
• Wait 4 minutes
3. REPEAT STEP 2
4. YOU HAVE FILLED THE TANK
• Wait until the water stops
owing into the carafe
• Then pour out the water
from the carafe
• Reposition the carafe on the
warmer plate
5. PLUG IN COFFEEMAKER
6. TURN COFFEEMAKER ON
• Press the tank power switch
on the side of the base to the
ON position
• Wait 15 minutes for the water
to heat
• Keep the tank switch on for
everyday use
(If the machine is not going to be
used for 4 or more days, turn it off.
For extended nonuse, see page 18.)
Please see the following section
for brewing instructions.
IMPORTANT: DO NOT PLUG IN
COFFEEMAKER UNTIL STEP 5.

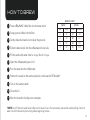
HOW TO BREW

13
Place a BUNN
®
coffee lter into the brew funnel
Scoop ground coffee into the lter
Gently shake the brew funnel to level the grounds
Slide the brew funnel into the coffeemaker’s funnel rails
Fill the carafe with water: 20oz for 4 cups, 50oz for 10 cups.
Open the coffeemaker’s pour-in lid
Pour the water into the coffeemaker
Position the carafe on the warmer plate (or on the base for BT Models*)
Turn on the warmer switch
Close the lid
Wait 4 minutes for the drip-out to complete
*NOTE: Your BT thermal carafe holds coffee hot for about 2 hours. For best results, preheat the carafe by lling it with hot
water, let sit for 30 seconds, then empty before beginning to brew.
HOW TO BREW
3
2
1
4
5
6
7
8
9
10
11
BREWING CHART
WATER COFFEE
Cups Ounces Grams Tablespoons
4 20 32.5 4-5
6 30 48.7 6-7
8 40 64.9 8-9
10 50 81.1 10-11

14
CARE & CLEANING

15
FOR BT MODEL:
Important: Do not use an abrasive cleaning device to clean the
carafe, because it will scratch the stainless steel. Occasionally,
remove the brew through valve on the Thermal Carafe Lid and
clean with mild, non abrasive detergent. To remove the valve, lift
at the edge and pull up. Be sure to clean the passage where the
valve is located.
• To remove coffee stains from inside the thermal carafe, place
a paper lter in the brew funnel and pour 2 teaspoons of
powder dishwasher detergent into the brew funnel.
• Pour one carafe of water into the coffeemaker.
• Position the carafe on the base and close the lid.
• When the brewing cycle stops, remove the brew funnel and
discard the lter.
• Rinse the funnel.
• Allow the carafe to sit for about 15 minutes.
• Use a soft bristled brush to clean the inside and outer rim of
the carafe.
• Scrub the carafe pour lip and lid with a soft cloth, warm water
and mild detergent.
• When nished, pour out the solution in the carafe.
• Rinse the carafe and the lid.
BASIC CLEANING
FOR SPEED BREW MODELS: (Excluding BT)
• Wash the brew funnel and glass carafe after each use.
• Both are top rack dishwasher safe.
Important: Separate the carafe lid from the carafe
when washing in the dishwasher, and use the top shelf
only for both the glass and the lid. If washing by hand,
use a mild, non-abrasive dish soap.
• Wipe the outside of the coffeemaker occasionally,
including the area above the brew funnel.
NOTE: After wipe down, ensure that the warmer switch
is in the OFF position.

16
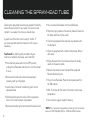
CLEANING THE SPRAYHEAD TUBE
Cleaning the sprayhead tube removes deposits formed by
natural mineral content in your water. The more mineral
content in your water, the more you should clean.
A good rule of thumb is to do it every 3 months. If
you have very hard water then twice a month may be
necessary.
You’ll need: the deliming tool provided with your
machine, a toothpick, dish soap, and a soft cloth.
• Press the tank power switch to the OFF position,
unplug the coffeemaker and allow it to cool for at least
2 hours.
• Remove the funnel and unscrew the sprayhead,
loosening with your ngertips.
• Insert all but 2 inches of the deliming tool into the
sprayhead tube.
• Slide the deliming tool in and out of the sprayhead
tube 5 or 6 times to loosen any deposits.
• Remove the deliming tool and reinsert the brew funnel.
• Pour a carafe of fresh water into the coffeemaker.
• Place the empty carafe on the warmer plate and close the
lid. Water will ow into the carafe.
• Check the sprayhead holes and clear any deposits with
the toothpick.
• Clean the sprayhead with a cloth and dish soap. Rinse it
with water.
• Empty the water from the carafe and place the empty
carafe on the warmer plate.
• Remove the brew funnel and reinstall the sprayhead.
Reinsert the brew funnel.
• Plug in the coffeemaker. Press the tank power switch to
the ON position.
• Wait 15 minutes for the water in the tank to reach brew
temperature.
• Your machine is again ready for brewing.
*NOTE: For a replacement sprayhead or deliming tool call customer
service at 1-800-352-2866 (USA) or 1-800-263-2256 (Canada).

17
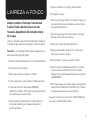
DEEP CLEANING
Deep cleaning your coffeemaker removes mineral
deposits in your internal hot water tank and will prolong
the life of your coffeemaker.
You’ll need: 1 quart (32oz) of white vinegar, a toothpick
and dish soap.
• Slide the brew funnel into the funnel rails.
• Place the carafe on the coffeemaker.
• Open the lid and pour the vinegar into the
coffeemaker.
• Close the lid. Empty the carafe when liquid stops
owing.
• Flip the tank switch to the OFF position and unplug
the coffeemaker. Allow the vinegar to sit in the
coffeemaker for at least 2 hours.
Deep clean your coffeemaker at least every
3 months. More frequency may be needed,
depending on the mineral content in your water.
• Remove the brew funnel and unscrew the sprayhead.
Check the sprayhead holes and clear any deposits
with the toothpick.
• Clean the sprayhead with a cloth and dish soap.
• Rinse with water.
• Pour a carafe of fresh water into the coffeemaker. Place
the carafe on the warmer plate and reinsert the brew
funnel.
• Close the lid (the water will begin to ush out the
vinegar from the internal hot water tank).
• Empty the carafe when the liquid has stopped owing.
• Repeat the process of cycling fresh cold water 3 or
more times or until you no longer smell vinegar.
• Remove the brew funnel and reattach the sprayhead.
• Replace the brew funnel and place the carafe on the
warmer plate. Plug in the coffeemaker. Flip the tank
switch to the ON position.
• Allow the water in the tank to reach brewing
temperature (which should take about 15 minutes).
Your coffeemaker is again ready for brewing.
Questions? Contact customer service at 1-800-352-2866 (USA)
or 1-800-263-2256 (Canada).

18
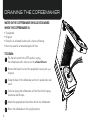
WATER IN THE COFFEEMAKER SHOULD BE DRAINED
WHEN THE COFFEEMAKER IS:
• Transported
• Shipped
• Stored in an unheated location with a chance of freezing
• Not to be used for an extended period of time
TO DRAIN:
Flip the tank switch to the OFF position, unplug
the coffeemaker and it allow to cool for at least 2 hours.
Remove the brew funnel and the sprayhead, loosening with your
ngertips.
Grasp the back of the coffeemaker and turn it upside down over
a sink.
Continue tipping the coffeemaker until the ow from the spray-
head tube and lid stops.
Attach the sprayhead and insert brew funnel into coffeemaker.
Return the coffeemaker to the upright position.
DRAINING THE COFEEMAKER
3
2
1
4
55
6

19
TROUBLESHOOTING

20
COFFEE DOESN’T COME OUT
• Were at least 20oz of water poured into the coffeemaker?
Between 20oz and 50oz of water must be poured in for
proper brewing (see page 13, Step 5).
• Is the pour-in lid closed? Water is not released from the
reservoir into the tank until the lid is closed.
• Has the coffeemaker been left on for an extended period
without being used? If so, then the water tank may need
to be topped off. Press power switch OFF, unplug the
machine, and go through the setup process until water
begins to ow (see page 11). If water begins to ow in
Step 2, then skip Step 3.
• Has the coffeemaker been in storage? Go through the
entire initial setup process (see page 11).
• Is there water still in the pour-in reservoir? If so, the
sprayhead may be clogged. Press power switch OFF and
unplug the machine. Let cool for two hours. Then clean
the sprayhead and sprayhead tube as per instructions on
page 17. Plug the machine back in.
DELIMING TOOL DOESN’T GO IN ALL THE WAY
• Follow the sprayhead tube cleaning guidelines.
(see page 18)
MACHINE ONLY PARTIALLY BREWED
• Has the coffeemaker been left on for an extended
period without being used? If so, then the water tank
may have needed to be topped off. Now that the tank
has been relled, brewing should provide the same
volume as normal.
NOTE: there will always be slightly less volume
of brewed coffee than water poured in to the
coffeemaker. This is because some of the water is
absorbed by the coffee grounds.
COFFEE IS NOT STAYING HOT
• [For coffeemakers using glass decanters] Is the warmer
switch on? If not, turn it on.
• [For BT coffeemakers using a thermal carafe] Is the
Thermal Carafe being pre-heated? See the note on
page 13.
COFFEE IS COLD
• Is the coffeemaker unplugged and/or is the tank
power switch in the OFF position? Make sure that the
coffeemaker is plugged in and that the tank power
switch is in the ON position. Allow 15 minutes for the
water to reheat.
TROUBLESHOOTING

21
FUNNEL IS OVERFLOWING
• What kind of lters are you using? Your lters may be
of the wrong porosity or size. Use BUNN lters: you
can order more lters at bunn.com.
• Is your sprayhead in place? If the sprayhead is missing,
the funnel will overow.
• What kind of coffee are you using? What kind of
water do you have? If you brew decaf or ne grind
coffee, or if you use soft water, you may need a special
ow restrictor sprayhead. One can be obtained by
completing an online form at bunn.com/home-products/
parts-form or by calling 1-800-352-2866 (USA), 1-800-
263-2256 (Canada).
COFFEEMAKER MAKES RUMBLING NOISE
• Does this occur after a brew, and then intermittently
throughout the day? This occurs normally as the water
in the tank reheats to brew temperature and should last
just a few minutes.
• Has the sprayhead tube been cleaned recently? If not,
follow the instructions as found on page 16.
TROUBLESHOOTING
WATER FLOWS BEFORE LID IS CLOSED
• Make sure lid is completely open to activate the
rubber stopper in the pour-in-bowl.
• The coffeemaker is not designed to hold water in the
pour-in-bowl overnight.
• Remove the top lid to ensure that the rubber stopper
is in place and the area is clean.
COFFEEMAKER LEAKS
• 1-800-352-2866 (USA), 1-800-263-2256 (Canada) or
visit bunn.com/home-products/service-form.
NEVER DISASSEMBLE THE COFFEEMAKER.
THERE ARE NO USER SERVICEABLE PARTS
INSIDE.

22
Bunn-O-Matic Corporation (“BUNN”) warrants the
BUNN
®
Speed Brew Coffee Coffeemaker, except glass
carafe, to be free from defects in materials and workmanship
existing at the time of manufacture and appearing within the
later of the following warranty periods:
a) Three (3) years from the date of original purchase of a NEW
Coffeemaker with delivery of a valid receipt evidencing such
purchase or, in the absence of such a receipt, from the date
of manufacture; or
b) One (1) year from the date a REPAIRED OR REPLACEMENT
Coffeemaker is received by customer, in the case BUNN
determined a coffeemaker returned within the NEW
Coffeemaker warranty period required repair or replacement.
If such a defect appears during the warranty period, we will (at
our sole option) repair or replace the defective Coffeemaker
with no charge for service or parts, provided Coffeemaker is
delivered at the customer’s expense to one of our authorized
service centers (see page 6 for customer service info).
Warranty does not cover claims resulting from misuse, failure
to follow instructions on installation and use, use with water
having a high mineral content, neglect, use of unauthorized
attachments, commercial use, use on a current or voltage
other than specied on the Coffeemaker, or unauthorized
service during the warranty period on conditions otherwise
covered by warranty.
THIS WARRANTY SHALL BE EXCLUSIVE AND SHALL BE
IN LIEU OF ANY OTHER WARRANTY, WRITTEN, ORAL,
OR IMPLIED INCLUDING BUT NOT LIMITED TO ANY
IMPLIED WARRANTY OF MERCHANTABILITY OR FITNESS
FOR A PARTICULAR PURPOSE. In any event, the duration
of any warranties implied by law, including but not limited
to any implied warranties of merchantability or tness for
a particular purpose, is expressly limited to the duration
of this limited warranty. Some states do not allow time
limitations on implied warranties, so the above limitation
may not apply to you.
WARRANTY

23
THE CUSTOMER’S EXCLUSIVE REMEDY FOR BREACH OF
THIS WARRANTY OR OF ANY IMPLIED WARRANTY, OR
OF ANY OTHER OBLIGATION ARISING BY OPERATION
OF LAW OR OTHERWISE, SHALL BE LIMITED AS
SPECIFIED HEREIN TO REPAIR OR REPLACEMENT, AT
OUR SOLE OPTION. IN ANY EVENT, RESPONSIBILITY
FOR SPECIAL, INCIDENTAL AND CONSEQUENTIAL
DAMAGES IS EXPRESSLY EXCLUDED. Some states do not
allow limitation or exclusion of incidental or consequential
damages, so the above limitation or exclusion may not
apply to you.
This warranty gives you specic legal rights; you may have
other rights, which vary from state to state.
TRADEMARKS
BUNN Pour-O-Matic, BUNN, BUNN with the
stylized red line, The Horizontal Red Line, Bunn-OMatic, Bunn-
O-Matic, Velocity Brew, My Café, Speed Brew, Phase Brew,
trifecta, Air Infusion, Quality Beverage Equipment Worldwide,
The Mark of Quality in Beverage Equipment Worldwide, A
Partner You Can Count On, Brew Better Not Bitter, Brew
better, not bitter., Coffee At Its Best, Nothing Brews Like a
BUNN, Respect Earth, Respect Earth with the stylized leaf
and coffee cherry design, are either trademarks or registered
trademarks of Bunn-O-Matic Corporation.
WARRANTY

ENJOY

MANUAL DE USUARIO SPEED BREW
Para modelos: BT, CSB, GR y SB

2
Desde 1957, los restaurantes y los caféshan elegido BUNN
®
como su cafetera de conanza. Por más de 60
años, hemos construido nuestro negocio con una misión muy simple: crear la mejor experiencia de café posible
construyendo las mejores cafeteras posibles. Lo qué comenzamos entonces continuamos hoy, asegurando calidad
en la taza para cada taza. ¡Somos orgullosos de ser una compañía basada en honradez y trabajo duro, y una
pasión para un gran café dondequiera que se sirva - ¡incluyendo su hogar!
Usted está a punto de gozar de años y años de un mejor café. ¿Cómo, se pregunta? Se llama la Diferencia de
BUNN : una calibración na del tiempo, temperatura y de turbulencia que extrae el máximo sabor del café en
la cantidad óptima de tiempo.
TURBULENCIA
Creado en el embudo
de preparación con un
rociado de agua de
manera uniforme sobre
el café, lo cual resulta en
sabor suave.
TEMPERATURA
El tanque interno
calienta el agua al
rango de temperatura
óptimo.
TIEMPO
Una percolación
rápida de 4 minutos
asegura que el
café nunca estará
amargo.
¿POR QUÉ BUNN?

3
Este símbolo le
advierte de importantes
instrucciones operativas
y de servicio.
Este símbolo le advierte
del riesgo de incendio o
descarga eléctrica en el
mensaje que lo acompaña.
ADVERTENCIA: PARA DISMINUIR EL RIESGO
DE FUEGO O DESCARGA ELÉCTRICA
NO DESARME LA CAFETERA NO CONTIENE PIEZAS
QUE EL USUARIO PUEDA REPARAR
LA REPARACIÓN SÓLO DEBE SER EFECTUADA
POR PERSONAL AUTORIZADO
ADVERTENCIA
RIESGO DE FUEGO O DESCARGA ELÉCTRICA
NOTA: El cable corto para corriente que se provee reduce el riesgo de enredarse o tropezar. Si un cable de extensión se
utiliza, su rango eléctrico deberá ser por lo menos tan potente como el rango eléctrico de la cafetera. Asegúrese de que el
cordón eléctrico no cuelgue en el borde de una mesa o del estante, y que no pueda ser estirado o convertirse en fuente de
tropiezo para niños, la extensión eléctrica deberá ser de tres entradas para una conexión, con un de ellas a piso.
TO REDUCE RISK OF FIRE OR ELECTRIC SHOCK
DO NOT DISASSEMBLE THE COFFEEMAKER
NO USER-SERVICEABLE PARTS INSIDE
REPAIR SHOULD BE DONE BY AUTHORIZED
SERVICE PERSONNEL ONLY
WARNING
RISK OF FIRE OR ELECTRICAL SHOCK

4
INICIAR ..............................................................................................................................5
PRECUACIONES ...............................................................................................................7
CARACTERÍSTICAS DE LA CAFETERA .............................................................................8
CONFIGURACIÓN INICIAL .............................................................................................10
CÓMO PERCOLAR ..........................................................................................................12
CUIDADO Y LIMPIEZA ....................................................................................................14
SOLUCIÓN DE PROBLEMAS ..........................................................................................19
GARANTÍA ......................................................................................................................22
INDICE

5
INICIAR
Antes de usar, anote el Modelo y el Código de
Fecha. El Modelo y el Código de Fecha están
situadas en la parte inferior de su cafetera.
MODELO: _________________________
CÓDIGO DE FECHA: _______________
¿Preguntas?
Vaya a bunn.com/home-products/service-form
o llame al:
EE.UU. 1-800-352-2866,
Canadá 1-800-263-2256
Por favor tenga su Modelo y Código de Fecha a
la mano al llamar por servicio.
BT, CSB, GR, o SB
53883.0001A 7/17 © 2017 BUNN-O-MATIC CORPORATION

6
POR FAVOR LEA TODAS ESTAS INSTRUCCIONES ANTES DE INICIAR.
ESPECIFICACIONES
Capacidad de Percolación: 4 a 10 tazas de 5 onzas por lote
Eléctricas: EL UL y C-UL son para USO EN EL HOGAR SOLAMENTE. La cafetera tiene un cordón de
3 terminales con uno a tierra.
Eléctricas:
BT: 120 voltios CA, 7 amperios, una fase, 60 Hz, 850-vatios
CSB: 120 voltios CA, 7.5 amperios, una fase, 60 Hz, 900-vatios
GR: 120 voltios CA, 7.5 amperios, una fase, 60 Hz, 900-vatios
SB: 120 voltios CA, 7 amperios, una fase, 60 Hz, 900-vatios
No diseñado para lugares de gran altitud por encima de 4,000 pies. Unidades para Grandes
Altitudes están disponibles. Ver Bunn.com para más detalles.

7
PRECUACIONES
EXCLUSIVAMENTE PARA USO EN CASA
GUARDE ESTAS INSTRUCCIONES
IMPORTANTE
Siga precauciones básicas de seguridad cuando use
aparatos eléctricos para reducir el riesgo de incendio,
descarga eléctrica y lesiones personales.
• LEA TODAS LAS INSTRUCCIONES EN ESTE MANUAL.
• Use precaución. Esta cafetera produce líquidos calientes:
líquidos calientes pueden quemar
• Coloque y utilice la cafetera en una supercie nivelada.
• No toque las supercies calientes. Utilice las manijas.
• No incline la cafetera.
• Para protegerse contra descargas eléctricas, no coloque
el cable, enchufes o cafetera en agua u otros líquidos.
• No abra la tapa durante la percolación.
• Se requiere supervisión cercana cuando la cafetera se
utiliza alrededor de niños.
• El tanque interno de agua caliente contiene agua cali-
ente. Antes de limpiar, quitar o remplazar partes, coloque
el interruptor en apagado, desenchufe la cafetera y déjela
enfriar (hasta 2 horas.)
• No use la cafetera con un cable o enchufe dañado o
cualquier imperfecto o daño. Devuelva el aparato a un
centro de servicio autorizado para su examen, reparación
o ajuste.
• Utilizar un accesorio no evaluado para el uso con esta cafe-
tera puede causar lesiones.
• Solamente use la cafetera en interiores.
• No deje que el cable cuelgue sobre el borde de la mesa o
del mostrador.
• No coloque la cafetera adentro ni cerca de una hornilla de
gas o eléctrica caliente o en un horno caliente, o en cual-
quier otra área caliente.
• No use la jarra sobre una estufa o en un microondas.
• No use la cafetera para cualquier nalidad que no sea su
uso intencionado.
• No retire el embudo de percolación o la jarra mientras se
está percolando.
• No coloque una jarra caliente sobre una supercie fría.
• No use una jarra rajada o una jarra con un asa debilitada.
• No vierta ningún líquido en el tanque de agua caliente que
no sea agua o vinagre para la limpieza, como se indica en
este manual.
• No limpie la jarra con productos de limpieza, estropajos de
acero u otros materiales abrasivos.
• Cuando la cafetera no esté en uso, mantenga la tapa
cerrada.
• Para desconectar, gire cualquier control a la posición
APAGADO, luego desenchúfelo de la toma de corriente.

8
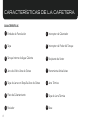
CARACTERÍSTICAS
Embudo de Percolación
Tapa
Tanque Interno de Agua Caliente
Jarra de Vidrio Libre de Goteo
Tapa de Jarra con Boquilla Libre de Goteo
Plato de Calentamiento
Rociador
Interruptor de Calentador
Interruptor de Poder del Tanque
Recipiente de Verter
Herramienta Anticalcáreo
Jarra Térmica
Tapa de Jarra Térmica
Base
CARACTERÍSTICAS DE LA CAFETERA
3
2
1
4
5
6
7
8
9
10
11
12
13
14

9
Percoladora BX
10
9
8
7
6
5
4
3
2
1
Percoladora GR
WARMER/RECHAUD
I
O
10
9
8
7
6
5
4
3
2
1
Percoladora BT
12
13
14
9
7
3
2
1
Speed Brew
2
10
9
8
7
6
5
4
3
1
CSB2
8
7
6
5
4
3
2
1

10
CONFIGURACIÓN INICIAL
NO ENCHUFE LA CAFETERA HASTA EL PASO 5, O
CORRE EL RIESGO DE DAÑAR PERMANENTEMENTE LA
MÁQUINA.
Toma 2 jarras llenas de agua fría para llenar el tanque interno de agua caliente y preparar la
cafetera para la percolación. Siga los pasos en la siguiente página para una conguración
correcta.

11
1. DESLICE EL VACÍO
EMBUDO EN LOS
RIELES DE EMBUDO
2. LLENE LA JARRA CON AGUA
• Vierta agua en la cafetera
• Coloque la jarra sobre la
placa calentadora
• Cierre la tapa
• Espere 4 minutos
3. REPITA EL PASO 2.
4. HAN LLENADO EL TANQUE
• Espere hasta que el agua deje
de uir en la jarra
• luego vierta el agua
de la jarra
• Vuelva a colocar la jarra sobre
la placa calentadora
5. ENCHUFE LA CAFETERA
6 . ENCIENDA LA CAFETERA
• Presione el interruptor de
poder del tanque en el lado
de la base a la posición de
ENCENDIDO.
• Espere 15 minutos para que
se caliente el agua
• Mantenga el interruptor del
tanque en encendido para
uso diario
(Si la máquina no va a ser utilizada
por cuatro días o más, apaguela. Para
el desuso prolongado, consulte la
página 18.)
Por favor consulte la siguiente
sección para obtener instrucciones
de percolación.
IMPORTANTE: NO ENCHUFE LA
CAFETERA HASTA EL PASO 5.

CÓMO PERCOLAR

13
Coloque un ltro de café BUNN
®
en el embudo de percolación
Coloque café molido en el ltro
Agite suavemente el embudo de percolación para nivelar el café
Deslice el embudo de percolación en los rieles de embudo de la cafetera
Llene la jarra con agua: 20oz para 4 tazas, 50oz para 10 tazas.
Abra la tapa de verter de la cafetera
Vierta el agua en la cafetera
Coloque la jarra sobre la placa caliente (o en la base para los modelos BT*)
Encienda el interruptor del calentador
Cierre la tapa
Espere 4 minutos para que termine el goteo
*NOTA: Su jarra BT mantiene el café caliente durante 2 horas. Para mejores resultados, pre-caliente la jarra llenándola con
agua caliente, deje reposar 30 segundos y vacíe antes de empezar a percolar.
CÓMO PERCOLAR
3
2
1
4
5
6
7
8
9
10
11
TABLA DE PERCOLACIÓN
AGUA CAFÉ
Tazas Onzas Gramos Cucharadas
4 20 32.5 4-5
6 30 48.7 6-7
8 40 64.9 8-9
10 50 81.1 10-11

14
CUIDADO Y LIMPIEZA

15
LIMPIEZA BÁSICA
PARA LOS MODELOS SPEED BREW: (Excepto BT)
• Lave el embudo de pecolación y la jarra de vidrio
después de cada uso.
• Ambos son lavables en la rejilla superior del
lavavajillas.
Importante: separe la tapa de la jarra de la jarra al
lavarse en el lavavajillas y use el estante superior solo
para el vidrio y la tapa. Si se lava a mano, use un jabón
de platos suave, no abrasivo.
• Limpie el exterior de la cafetera de vez en cuando,
incluyendo el área sobre el embudo de percolación.
NOTA: Después de limpiar asegúrese de que el inter-
ruptor del calentador está en la posición de APAGADO.
PARA EL MODELO BT:
Importante: No utilice un dispositivo de limpieza abrasivo
para limpiar la jarra, ya que rayará el acero inoxidable. De vez
en cuando, retire la válvula de paso de café en la tapa de la
jarra térmica y limpie con un detergente suave, no abrasivo.
Para quitar la válvula, levante en el borde y tire hacia arriba.
Asegúrese de limpiar el paso donde se encuentra la válvula.
• Para quitar las manchas de café del interior de la jarra,
coloque un ltro de papel en el embudo de percolación y
vierta 2 cucharaditas de detergente lavavajillas en polvo en
el embudo de percolación.
• Vierta una jarra de agua en la cafetera.
• Coloque la jarra sobre la base y cierre la tapa.
• Cuando termine el ciclo de percolación quite el embudo de
percolación y tire el ltro.
• Enjuague el embudo.
• Deje la jarra reposar unos 15 minutos.
• Use un cepillo de cerdas suaves para limpiar la orilla interior
y exterior del la jarra.
• Friegue la boquilla de verter de la jarra y la tapa con un paño
suave, agua tibia y un detergente suave.
• Cuando haya terminado, vierta la solución de la jarra.
• Enjuague la jarra y la tapa.

16
LIMPIAR EL TUBO DEL ROCIADOR
Limpiar el tubo del rociador quita depósitos formados por
el contenido mineral natural de sus agua. Entre mayor sea el
contenido mineral en su el agua, más tendrá que limpiar.
Una buena regla general es hacerlo cada 3 meses. Si tienes
agua demasiado dura, entonces puede ser necesario hacerlo
dos veces al mes.
Usted necesitará: la herramienta anticalcáreo suministrada
con su máquina, un palillo de dientes, jabón y un paño suave.
• Coloque el interruptor de poder del tanque en
APAGADO, desenchufe la cafetera y déjela enfriar por lo
menos
2 horas.
• Quite el embudo y desenrosque el rociador, aojando con
los dedos.
• Insertar todo menos 2 pulgadas de la herramienta
anticalcáreo en el tubo del rociador.
• Deslice la herramienta anticalcáreo dentro y fuera del tubo
del rociador 5 o 6 veces para aojar cualquier depósito.
• Quite la herramienta anticalcáreo y vuelva a insertar el
embudo de percolación.
• Vierta una jarra de agua fresca en la cafetera.
• Coloque la jarra vacía sobre la placa calentadora y cierre la
tapa. Agua uirá en la jarra.
• Revise los oricios del rociador y quite cualquier depósito con
el palillo de dientes.
• Limpie el rociador con un paño y jabón de platos. Enjuaguelo
con agua.
• Vacíe el agua de la jarra y coloque la jarra sobre la placa
calentadora.
• Quite el embudo y vuelva a colocar el rociador. Vuelva a
insertar el embudo de percolación.
• Enchufe la cafetera Presione el interruptor de poder del
tanque a la posición de ENCENDIDO.
• Espere aproximadamente 15 minutos para que el agua en el
tanque llegue a la temperatura de percolación.
• Su maquina esta lista de nuevo para percolar.
*NOTA: Para un rociador o una herramienta anticalcáreo de
repuesto llame a servicio al cliente 1-800-352-2866 (Estados Unidos)
o 1-800-263-2256 (Canadá).

17
LIMPIEZA A FONDO
Limpiar su cafetera a fondo elimina los depósitos minerales en
su tanque de agua caliente y prolongará la vida de su cafetera.
Necesitará: 1 cuarto de galón (32 onzas) de vinagre blanco, un
palillo de dientes y jabón de platos.
• Deslice el embudo de percolación en los rieles de embudo.
• Coloque la jarra en la cafetera.
• Abra la tapa y vierta el vinagre en la cafetera.
• Cierre la tapa. Vacía la jarra cuando el líquido deje de uir.
• Coloque el interruptor del tanque a APAGADO y
desenchufe la cafetera. Permita que el vinagre permanezca
en la cafetera por lo menos 2 horas.
• Quite el embudo y desenrosque el rociador. Revise los
oricios del rociador y quite cualquier depósito con
el palillo de dientes.
Limpie su cafetera a fondo por lo menos cada
3 meses. Puede necesitarse hacer con más
frecuencia, dependiendo del contenido mineral
de su agua.
• Limpie el rociador con un paño y jabón de platos.
• Enjuaguelo con agua.
• Vierta una jarra de agua fresca en la cafetera. Coloque la
jarra vacía sobre la placa calentadora y vuelva a insertar
el embudo de percolación.
• Cierre la tapa (el agua comenzará a eliminar el vinagre
del tanque interno de agua caliente).
• Vacía la jarra cuando el líquido deje de uir.
• Repita el proceso del ciclar agua fría 3 o más veces o
hasta que ya no huela a vinagre.
• Quite el embudo y vuelva a colocar el rociador.
• Vuelva a colocar el embudo de percolación y coloque
la jarra en la placa calentadora. Enchufe la cafetera
Coloque el interruptor de poder del tanque a la posición
de ENCENDIDO.
• Permita que el agua en el tanque llegue a la temperatura
de percolación (deberá tomar alrededor de 15 minutos).
Su maquina esta lista de nuevo para percolar.
¿Preguntas? Contacte al servicio al cliente 1-800-352-2866 (Esta-
dos Unidos) o 1-800-263-2256 (Canadá).

18
EL AGUA EN LA CAFETERA SE DEBE VACIAR CUANDO LA
CAFETERA:
• Es transportada
• Es enviada
• Se almacena en un lugar sin calefacción con posibilidades de congel-
ación
• No va a usarse por un período prolongado de tiempo
PARA DRENAR:
Coloque el interruptor de poder del tanque en APAGADO, desen-
chufe la cafetera y déjela enfriar por lo menos 2 horas.
• Quite el embudo y desenrosque el rociador, aojando con los dedos.
Agarre la parte posterior de la cafetera y coloque de cabeza sobre un
fregadero.
Continúe inclinando la cafetera hasta que el ujo del tubo del ro-
ciador y de la tapa se detengan.
Coloque el rociador e inserte el embudo en la cafeter.
Devuelva la cafetera a la posición vertical.
DRENAR LA CAFETERA
3
2
1
4
55
6

19
SOLUCIÓN DE PROBLEMAS

20
EL CAFÉ NO SALE
• ¿Se vertieron por lo menos 20oz de agua en la cafetera?
Se deben verter entre 20 onzas y 50 onzas de agua para
una percolación correcta(ver página 13, paso 5).
• ¿Está cerrada la tapa del verter? No se libera agua de la
reserva al tanque hasta que la tapa esté cerrada.
• ¿Se ha dejado la cafetera durante un periodo prolongado
sin usarse? Si es así, el tanque de agua deba ser
rellenado. Coloque el interruptor de poder en APAGADO,
desenchufe la máquina y lleve a cabo el proceso de
conguración hasta que el agua comience a uir (ver
página 11). Si el agua comienza a uir en el Paso 2, salte el
Paso 3.
• ¿Ha estado en en almacenamiento la cafetera? Lleve a
cabo todo el proceso de conguración (ver página 11).
• ¿Aun hay agua en la de verter? Si es así, el rociador
puede estar tapado. Coloque el interruptor de poder en
APAGADO, desenchufe la máquina. Deja enfriar por dos
horas. Después, limpie el rociador y el tubo del rociador
según las instrucciones en la página 17. Vuelva a enchufar
la máquina.
LA HERRAMIENTA ANTICALCÁREO NO ENTRA HASTA EL
FONDO
• Siga las instrucciones de limpieza del tubo del rociador
(vea la página 18)
LA MÁQUINA SÓLO PERCOLÓ EN PARTE
• ¿Se ha dejado la cafetera durante un periodo prolongado
sin usarse? Si es así, el tanque de agua puede necesitar ser
rellenado. Ahora que se ha rellenado el tanque, percolar
debe proporcionar el mismo volumen normal.
NOTA: siempre habrá levemente menos volumen de café
percolado que el agua vertida en la cafetera. Esto se debe a
que un poco de agua es absorbida por el café molido.
EL CAFÉ NO PERMANECE CALIENTE
• [Para las cafeteras usar las jarras de cristal] ¿Está encendida
la placa calentadora? Si no, enciéndala.
• [Para cafeteras de BT usando una jarra térmica] ¿Está pre-
calentando la Jarra Térmica ? Vea la nota en la página 13.
EL CAFÉ ESTÁ FRÍO
• ¿Está desenchufada la cafetera y/o está en la posición de
APAGADO el interruptor de poder del tanque? Asegúrese
de que la cafetera está enchufada y de que el interruptor de
poder del tanque está en la posición ENCENDIDO. Espere
15 minutos para que se vuelva a calentar el agua.
SOLUCIÓN DE PROBLEMAS

21
EL EMBUDO SE ESTÁ DESBORDANDO
• ¿Qué tipo de ltros está usando? Los ltros pueden ser
de la porosidad o el tamaño incorrecto. Utilice ltros
BUNN: puede pedir más ltros en bunn.com.
• ¿Está el rociador en su lugar? El embudo se desbordará si
el rociador hace falta.
• ¿Qué tipo de café está usando? ¿Qué tipo de agua tiene?
Si percola café descafeinado o de molido no, o si utiliza
agua suave, es posible que necesite un rociador restrictor
de ujo especial. Puede obtener uno completando un
formulario en línea en bunn.com/home-products/parts-
form o llamando al 1-800-352-2866 (USA), 1-800-263-
2256 (Canadá).
LA CAFETERA HACE RUIDO RETUMBANTE
• ¿Esto ocurre después de percolar y luego
intermitentemente durante todo el día? Esto ocurre
normalmente como el agua en el tanque se vuelve a
calentar a la temperatura de percolación y sólo debería
durar unos minutos.
• Ha limpiado del tubo del rociador recientemente. Si no,
siga las instrucciones que se encuentran en la página 16.
EL AGUA FLUYE ANTES DE CERRAR LA TAPA
• Asegúrese de que la tapa esté totalmente abierta para
activar el tapón de hule en el tazón de verter.
• La cafetera no se diseña para sostener agua en el
tazón de verter fuente durante la noche.
• Quite la tapa superior para asegurarse de que el
tapón de hule está en su lugar y que el área está
limpia.
LA CAFETERA TIENE FUGAS
• Puede obtener uno completando un formulario en
línea en bunn.com/home-products/parts-form o
llamando al 1-800-352-2866 (USA), 1-800-263-2256
(Canadá).
NUNCA DESARME LA CAFETERA.
NO HAY PARTES REPARABLES POR EL USUARIO
ADENTRO.
SOLUCIÓN DE PROBLEMAS

22
Bunn-O-Matic Corporation (“BUNN”) garantiza la Cafetera
Speed Brew Coffee
®
, con excepción de la jarra de vidrio, de
estar libre de defectos de material y de manufactura en el
momento de su manufactura y que aparezcan dentro del
último período de garantía a continuación:
a) Tres 3 años desde la fecha original de compra de una
cafetera NUEVA con entrega de un documento válido que
compruebe dicha compra o, en ausencia de tal recibo, desde
la fecha de fabricación; o
b) Un (1) año desde la fecha en que un cliente recibe una
Cafetera de REPARADA O DE REMPLAZO, en el caso que
BUNN haya determinado que una cafetera devuelta dentro
del período de Garantía de Cafetera NUEVA requería
reparación o remplazo.
Si tal defecto aparece durante el período de garantía,
nosotros (a nuestra discreción) repararemos o remplazaremos
la cafetera defectuosa sin cargo por servicio o partes, siempre
y cuando la cafetera se entregue por cuenta del cliente a uno
de nuestros centros de servicio autorizados (ver página 6
para información de servicio al cliente).
La garantía no cubre reclamos resultantes del uso
indebido, el incumplimiento de las instrucciones de
instalación y uso, uso con agua con un alto contenido de
minerales, negligencia, uso de accesorios no autorizados,
uso comercial, uso en una corriente o voltaje diferente
al especicado en la cafetera, o servicio no autorizado
durante el período de garantía por condiciones cubiertos
por la garantía.
ESTA GARANTÍA ES EXCLUSIVA Y ESTÁ EN LUGAR
DE CUALQUIER OTRA GARANTÍA, ESCRITA U
ORAL, EXPRESA O IMPLÍCITA, INCLUYENDO, SIN
LIMITACIÓN, CUALQUIER GARANTÍA IMPLÍCITA
DE COMERCIALIZACIÓN O IDONEIDAD PARA UN
PROPÓSITO PARTICULAR. En cualquier caso, la duración
de las garantías implícitas por la ley, incluyendo pero no
limitado a cualquier garantía implícita de comercializad
o idoneidad para un propósito en particular, se limita
expresamente a la duración de esta garantía limitada.
Algunos Estados no permiten limitaciones de tiempo en
garantías implícitas, por lo que la limitación anterior puede
no aplicarse a usted.
GARANTÍA

23
EL RECURSO EXCLUSIVE DEL COMPRADOR POR EL
INCUMPLIMIENTO DE ESTA GARANTÍA O CUALQUIER
GARANTÍA IMPLÍCITA O CUALQUIERA OTRA QUE
SURJA POR OPERACIÓN DE LEY CUALQUIER OTRA,
ESTARÁ LIMITADA SEGÚN SE ESPECIFICA AQUÍ
A LA REPARACIÓN O EL REMPLAZO, A NUESTRA
ÚNICA OPCIÓN. EN CUALQUIER CASO, SE EXCLUYE
EXPRESAMENTE LA RESPONSABILIDAD POR DAÑOS
ESPECIALES, INCIDENTALES Y CONSECUENTES. Algunos
Estados no permiten limitaciones o exclusiones por daños
incidentales o consecuentes, por lo que la limitación o
exclusión anterior puede no aplicarle.
Esta garantía le otorga derechos legales especícos, a los
que pueden sumarse otros derechos legales que varían de
un estado a a estado.
MARCAS COMERCIALES
BUNN Pour-O-Matic, BUNN, BUNN with the
stylized red line, The Horizontal Red Line, Bunn-OMatic, Bunn-
O-Matic, Velocity Brew, My Café, Speed Brew, Phase Brew,
trifecta, Air Infusion, Quality Beverage Equipment Worldwide,
The Mark of Quality in Beverage Equipment Worldwide, A
Partner You Can Count On, Brew Better Not Bitter, Brew
better, not bitter., Coffee At Its Best, Nothing Brews Like a
BUNN, Respect Earth, Respect Earth with the stylized leaf
and coffee cherry design, son marcas comerciales o marcas
registradas de Corporación Bunn-O-Matic.
GARANTÍA

DISFRUTE
-
 1
1
-
 2
2
-
 3
3
-
 4
4
-
 5
5
-
 6
6
-
 7
7
-
 8
8
-
 9
9
-
 10
10
-
 11
11
-
 12
12
-
 13
13
-
 14
14
-
 15
15
-
 16
16
-
 17
17
-
 18
18
-
 19
19
-
 20
20
-
 21
21
-
 22
22
-
 23
23
-
 24
24
-
 25
25
-
 26
26
-
 27
27
-
 28
28
-
 29
29
-
 30
30
-
 31
31
-
 32
32
-
 33
33
-
 34
34
-
 35
35
-
 36
36
-
 37
37
-
 38
38
-
 39
39
-
 40
40
-
 41
41
-
 42
42
-
 43
43
-
 44
44
-
 45
45
-
 46
46
-
 47
47
-
 48
48


