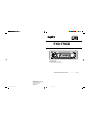
Sanyo FXD-770GD Operating Instructions Manual
- Categoría
- Receptores de medios de coche
- Tipo
- Operating Instructions Manual

GB
F
D
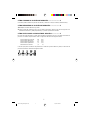
FXD-770GD
OPERATING INSTRUCTIONS ......................... 1~18
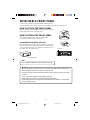
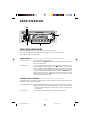
Full Panel Detachable
High Power FM/AM Stereo Receiver
Compact Disc Player
ISO Mounting with Removable Trim Ring
AUD
LO/DX
LOUD
VOL
BAND
ATP
CD
PWR
MUTE
REL
FM/AM RECEIVER FXD-770GD 40W X 4
TUN
TRK
RPTSHF
DISP
LOUD ST LOC
BASS MANU TRE
SCAN
SHF
RPT
FRONT
PRESET
TRACK
L
R
R
F
CD
AMII
FMIII
SANYO Electric Co., Ltd.
Printed in Singapore
Issue date 03-01
288F0150
FXD-770GD_Cover(English) 3/7/01, 5:56 PM1

1
GB
E
F
D
CONTENTS
COMPACT DISC CARE ...........................................................................................................................2
DIGITAL DISPLAY .................................................................................................................................... 3
DETACHABLE FRONT PANEL ................................................................................................................ 4
GENERAL OPERATION...........................................................................................................................5
RADIO OPERATION ................................................................................................................................8
CD OPERATION.....................................................................................................................................10
ERROR SIGNS....................................................................................................................................... 12
HINTS FOR PROPER AND SAFE OPERATION...................................................................................13
TROUBLESHOOTING............................................................................................................................14
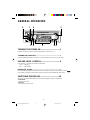
ACCESSORIES AND HARDWARE .......................................................................................................15
INSTALLATION .......................................................................................................................................15
UNIT REMOVAL .....................................................................................................................................16
ELECTRICAL CONNECTIONS..............................................................................................................17
LINE OUT CONNECTIONS ...................................................................................................................18
CAUTION
• This unit is designed to operate on 12 volts DC, NEGATIVE ground electrical systems only.
• When fuse replacement is necessary, use only a 10 amp fuse. Do not replace with a higher rated fuse. If
the fuse blows often, carefully check all electrical connections for any short circuits and have your car’s
voltage regulator checked also.
• Do not install the unit where it will be exposed to direct sunlight or hot air discharged from the car heater.
• Do not expose the unit to water or moisture.
• To avoid damaging the unit, never insert anything other than a compact disc into the disc slot.
• This unit should not be adjusted or repaired by anyone except qualified service personnel.
If servicing is required, return the unit to an authorized SANYO mobile audio dealer.
• Use the Controls or adjustments or performance of procedures other than those specified herein may
result in hazardous radiation exposure.
• Changes or modifications not expressly approved by Sanyo may void the user’s authority to operate this
equipment.
FXD-770GD_Ebody(P01-18) 3/7/01, 5:57 PM1

2
GB
E
F
D
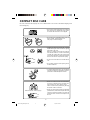
• To prevent warping the disc, do not expose
it to direct sunlight, high humidity or high tem-
peratures for extended periods of time.
• Fingerprints and dust should be carefully
wiped off the signal surface of the disc (glossy
side) with a soft cloth.
Wipe in a straight motion from the inside to
the outside of the disc. Unlike conventional
records, the compact disc has no grooves to
collect dust and debris. Small dust particles
will have no effect on reproduction quality.
• Do not insert a disc which is cracked into the
unit.
• Do not apply paper or write anything on the
surface of the disc.
• Do not use non-conventional discs such as
heart- shaped, octagonal discs, etc.
The player could be damaged.
Benzene Thinner Cleaning spray
• Never use chemicals such as record clean-
ing sprays, antistatic sprays or fluids, ben-
zene or thinner to clean compact discs.
These chemicals will permanently damage
the plastic surface of the disc.
• When not using the disc player for extended
periods of time, remove the compact disc and
return it to the plastic storage case. This will
protect the disc from dust and exposure to
the sun.
• This unit has been designed to play compact
discs bearing the identification logo shown
on the left. No other discs can be played.
COMPACT DISC CARE
Dirt, dust, scratches and warpage can cause a deterioration in the sound or intermittent skipping some
tracks during play.
FXD-770GD_Ebody(P01-18) 3/7/01, 5:57 PM2

3
GB
E
F
D
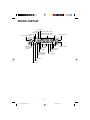
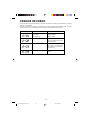
DIGITAL DISPLAY
LOUD ST LOC
BASS MANU TRE
SCAN
SHF
RPT
FRONT
PRESET
TRACK
L
R
R
F
CD
AMII
FMIII
Radio Frequency, Time,
CD Track Number, Audio
Control Selected Mode
Audio Position
Shuffle Play
Repeat Play
Scan
Disc IN
AM Bands
FM Bands
Loudness
CD Mode
Preset No.
Track No.
Mute
Volume/Audio
Control Level
Indicator
FM Stereo
Local/DX
BASS
TREBLE
Tuning Indicator
CD running indicator
Radio Preset
Channel Number,
Track Number
Manual Tuning
FXD-770GD_Ebody(P01-18) 3/7/01, 5:57 PM3

4
GB
E
F
D
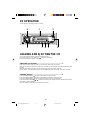
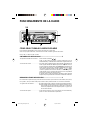
DETACHABLE FRONT PANEL
The front panel is designed to be removable for antitheft purposes.
It is recommended that you remove and carry the front panel with you when you leave your car.
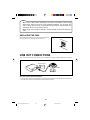
HOW TO ATTACH THE FRONT PANEL
Align the right side of the panel with the stopper, and then push the
left side of the panel into the unit until it clicks.
HOW TO DETACH THE FRONT PANEL
Press the release button (REL) to release the front panel.
Pull the entire panel to remove it from the unit.
RETURNING TO THE INITIAL SETTINGS
When the reset button is pressed, the microcomputer of the unit re-
turns to the initial settings. If the display window is not properly shown
or the unit malfunctions, press the reset button with the point of a
sharp object such as a ball-point pen.
Note
The unit will not operate if it is installed incorrectly.
CAUTION
• Do not attempt to remove the panel in a manner other than that described above.
• When installing the panel, do not force it into the unit.
• Do not touch the connection terminals of the panel or the unit. It may cause poor
contact.
• Use a clean, dry cloth when cleaning the terminals.
• Keep the panel out of direct sunlight and high temperatures.
• Prevent the panel from coming into contact with benzene, thinner, or insecticides.
• Do not drop the panel.
Release button
AUD
LO/DX
LOUD
VOL
BAND
ATP
CD
PWR
MUTE
REL
FM/AM RECEIVER FXD-770GD 40W X 4
TUN
TRK
RPTSHF
DISP
LOUD ST LOC
BASS MANU TRE
SCAN
SHF
RPT
FRONT
PRESET
TRACK
L
R
R
F
CD
AMII
FMIII
Reset Button
FXD-770GD_Ebody(P01-18) 3/7/01, 5:57 PM4

5
GB
E
F
D
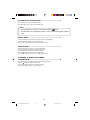
GENERAL OPERATION
AUD
LO/DX
LOUD
VOL
BAND
ATP
CD
PWR
MUTE
REL
FM/AM RECEIVER FXD-770GD 40W X 4
TUN
TRK
RPTSHF
DISP
LOUD ST LOC
BASS MANU TRE
SCAN
SHF
RPT
FRONT
PRESET
TRACK
L
R
R
F
CD
AMII
FMIII
TURNING THE POWER ON ......................................1
Install the front panel and press the PWR MUTE button 1 when ACC is on.
TURNING THE POWER OFF ............................................................. 1
Press the PWR MUTE button for more than 2 seconds. Display will revert to clock indication.
VOLUME LEVEL CONTROL.....................................6
Press the VOL +/– buttons 6 to adjust the volume level.
VOL + : Volume up
VOL – : Volume down
MUTING THE SOUND ........................................................................ 1
Press the PWR MUTE button 1 while the receiver is on. While muting the sound, the MUTE indicator
on the display is blinking. To restore the previous volume level, press PWR MUTE button again.
SWITCHING THE DISPLAY.....................................10
Each time you press the DISP button 10, the display window will change as shown below ;
• Radio mode
Frequency and Clock
• CD mode
Elapsed track time and Clock
7
6
9
4
5
3
110
2
FXD-770GD_Ebody(P01-18) 3/7/01, 5:57 PM5

6
GB
E
F
D
ADJUSTING THE SOUND
CHARACTERISTICS .....................................2,4,5,6,7
1.Each time you press the AUD button 4 until the desired mode is displayed.
2.Press the following buttons to adjust the selected item. Make the adjustment within 5 seconds after
selecting. After 5 seconds, the display window will revert to display priority.
Adjustment Range
BASS / BASS –7 BASS 7 /
TREBLE / TREB –7 TREB 7 /
BAL L9 (Full left) R9 (Full right)
FAD F9 (Full front) R9 (Full rear)
MUTE LEVEL – 0 –80
LOUDNESS EFFECT ......................................................................... 9
When listening to music at low volume levels, this feature will boost the extremes of the bass and treble
ranges to compensate for the negative characteristics of human hearing.
Press the LO/DX LOUD button 9. The “LOUD” indicator appears in the display window.
Pressing the button again will cancel this feature.
LOCAL/DISTANT (LO/DX) SELECTION ........................................... 9
This feature is used to select the strength of the signals at which the radio will stop during Automatic
Tuning. Press the LO/DX LOUD button 9 for more than 2 seconds to select the Local (LO) setting and only
the strongest (local) stations will be received. The “LOC” indicator appears in the display window.
Pressing again for 2 seconds will select the Distant setting and the radio will stop at a wider range of
signals, including weaker more distant stations. The “LOC” indicator will go out on the display window.
SETTING THE CLOCK ...................................10,5,7,2
The clock uses a 24-hour display system.
1.Press the DISP button 10 for more than 2 seconds.
2.Press the following buttons to set the clock.
/ : Adjust the hour and minutes.
: To activate Hour blink.
: To activate Minute blink.
BAND ATP : Adjust the minutes to zero.
(Example) 12:29 → 12:00
12:30 → 13:00
3.Press the DISP button 10 to activate the clock.
IGNITION-OFF CLOCK RECALL ........................4,10
Press the DISP button 10 while the ignition switch is in the “OFF” position.
The display will illuminate showing the time and then automatically shut off after 5 seconds.
FXD-770GD_Ebody(P01-18) 3/7/01, 5:57 PM6

7
GB
E
F
D
ADJUSTING THE SOUND STAGE............................3
You can adjust the position of sound stage to best serve a particular seat.
TO MEMORY THE SOUND STAGE.................................................... 3
1.Adjust the BALANCE & FADER.
2.Press the appropriate Preset buttons 3 for more than 2 seconds. The balance & fader indicator blinks
and adjusted sound stage is stored.
TO CALL THE SOUND STAGE .......................................................... 3
Press the appropriate Preset buttons 3 to call the desired sound stage during the BALANCE & FADER
adjustment mode. The Preset buttons are factory-set to the following conditions.
P 1 : For the left seat (R2 R4)
P 2 : For the front seat ( 0 R4)
P 3 : For the right seat (L2 R4)
P 4 : For the rear seat ( 0 F4)
P 5 : For all the seat ( 0 0)
Each time you press the preset buttons in the BALANCE & FADER adjustment mode, the audio position
indicator changes as follows ;
1
2 3
4/SHF
5/RPT
FXD-770GD_Ebody(P01-18) 3/7/01, 5:57 PM7

8
GB
E
F
D
RADIO OPERATION
AUD
LO/DX
LOUD
VOL
BAND
ATP
CD
PWR
MUTE
REL
FM/AM RECEIVER FXD-770GD 40W X 4
TUN
TRK
RPTSHF
DISP
LOUD ST LOC
BASS MANU TRE
SCAN
SHF
RPT
FRONT
PRESET
TRACK
L
R
R
F
CD
AMII
FMIII
SELECTING RADIO MODE
Press the BAND ATP button 1 to switch from CD mode to the radio mode.
Each time the BAND ATP button is pressed, the selected band changes as shown below.
FM I ➔ FM II ➔ FM III ➔ AM I ➔ AM II
RADIO TUNING .................................................................................. 2
• Automatic tuning .............Press the TUN/TRK or Button 2.
When the button is pressed, the system will start automatic tuning and stop at
the next receivable station.
• Manual tuning..................To select higher frequency station, press the button for more than 0.5 sec-
onds. The “MANU” indicator appears in the display window. To select lower
frequency stations, press the button for more than 0.5 seconds. To quickly
scan up or down in frequency, press and hold the TUN/TRK or button.
Release the button when the display approaches the desired frequency, then
press and release the button repeatedly until the desired frequency is dis-
played. After 4 seconds of completing Manual Tuning, the tuning control will
revert to the Automatic Tuning mode.
STORING PRESET STATIONS .......................................................... 3
The preset buttons 3 can be used to store 6 stations in each band (FM 1, FM 2, FM 3 and AM 1, AM 2) for
convenient access to your favorite stations.
• Programming stations .....1.Select the desired band, then tune in the station you want to store in memory.
2.Press and hold one of the preset buttons for more than 2 seconds until the
frequency indicator flashes twice. Repeat steps 1. and 2. to program addi-
tional stations.
• Quick tuning ....................Select the desired band, then press one of the six preset buttons.
1
2
3
54
FXD-770GD_Ebody(P01-18) 3/7/01, 5:57 PM8

9
GB
E
F
D
ATP (AUTO TRAVEL PRESET) OPERATION.................................... 1
The Auto Travel Preset function searches for and memorizes the 6 strong stations in one of the two bands
(FM 3, AM 2) in order of signal strength.
This feature is useful when you are driving in an unfamiliar location and want to memorize local stations
without changing the standard preset stations.
A total of 12 stations (6 FM and 6 AM) can be programmed.
• To set the stations .................... Select the desired band. Press and hold the BAND ATP button for more
than 2 seconds.
• Quick tuning of ATP stations.....Select the desired band, then press one of the six preset buttons.
Note
This function is available for FM 3 and AM 2.
SCAN OPERATION ............................................................................ 4
1.Press the BAND ATP button to select the desired band.
2.Press the button 4. The system will select and receive each station for 8 seconds.
3.To stop scanning and retain the station currently selected, press the button again.
PRESET SCAN OPERATION ............................................................ 5
This function scans each of the preset stations stored in the selected band (both manual preset and auto
travel presets).
1.Press the BAND ATP button to select the desired band.
2.Press the button 5. The system will select and receive each preset station.
3.To stop scanning and retain the station currently selected, press the button 5 again.
FXD-770GD_Ebody(P01-18) 3/7/01, 5:57 PM9

10
GB
E
F
D
CD OPERATION
The compact disc player will accept 5” CD only.
AUD
LO/DX
LOUD
VOL
BAND
ATP
CD
PWR
MUTE
REL
FM/AM RECEIVER FXD-770GD 40W X 4
TUN
TRK
RPTSHF
DISP
LOUD ST LOC
BASS MANU TRE
SCAN
SHF
RPT
FRONT
PRESET
TRACK
L
R
R
F
CD
AMII
FMIII
LOADING AND EJECTING THE CD
Insert a disc into the CD slot 1 and the CD player will start.
The system remains in CD mode and “ ” appears in the display.
Press the eject button 2 to eject a disc.
SWITCHING TO CD MODE ................................................................ 3
Press the CD button 3 with the power on to switch from radio mode to CD mode.
When the CD mode is switched on while a disc is loaded, play resumes from the point at which play was
stopped.
When the entire disc has played, the unit returns to the first track and play resumes.
The CD player continues playing the disc until the BAND ATP button is pressed, or the disc is ejected.
SKIPPING TRACKS ........................................................................... 4
Press the TUN/TRK button 4 to skip to the beginning of the next track.
Press the TUN/TRK button 4 to skip to the beginning of the track currently playing.
Press the TUN/TRK button 4 twice to skip to the beginning of the previous track.
Press and hold the TUN/TRK or button 4 for more than 0.5 seconds to search quickly (with sound) in
the reverse or forward direction.
When the button is released, the CD resumes normal play.
1
2
34
5
6
7
8
FXD-770GD_Ebody(P01-18) 3/7/01, 5:57 PM10

11
GB
E
F
D
PLACING THE CD IN PAUSE MODE................................................. 5
While playing a CD, press the Preset 6 button 5.
To resume playing, press the Preset 6 button again.
Notes
• During playback of a CD, the CD running indicator spins.
• The unit will turn-on automatically when a CD is inserted if the ignition switch is
“ON”.
REPEAT MODE .................................................................................. 6
Press the Preset 5 (RPT) button 6 to play the current track repeatedly.
The “RPT” indicator appears in the display window.
To cancel this mode, press the Preset 5 (RPT) button 6 again.
SHUFFLE MODE................................................................................ 7
This function plays the tracks on a CD in random order.
Press the Preset 4 (SHF) button 7 to begin shuffle play.
The “SHF” indicator appears in the display window.
Press the button 4 to select another random track.
To cancel this mode, press the Preset 4 (SHF) button 7 again.
SCAN MODE (PLAYING THE BEGINNING
OF EACH TRACK).............................................................................. 8
This function plays the first 10 seconds of each track sequentially.
Press the button 8 to begin the scan mode.
The “SCAN” indicator appears in the display window.
To cancel this mode, press the button 8 again.
FXD-770GD_Ebody(P01-18) 3/7/01, 5:57 PM11

12
GB
E
F
D
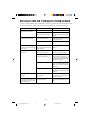
ERROR SIGNS
If a problem should occur while operating the CD player, one of the following error signs may be displayed.
Refer to the table below to identify the problem, then take the suggested corrective action. If the error
persists, contact your nearest dealer.
Message Remedy
Clean the disc.
Replace the disc.
Check the disc.
Try ejecting and re-inserting un-
der normal temperature condi-
tions.
Under normal temperature con-
ditions, eject and insert clean,
undamaged disc properly.
Eject and re-insert.
Cause
Dirty disc.
Scratched disc.
Up-side-down.
Focus error.
Data and focus error.
Mechanical problem.
FXD-770GD_Ebody(P01-18) 3/7/01, 5:57 PM12

13
GB
E
F
D
HINTS FOR PROPER AND SAFE OPERATION
• Condensation
Moisture can condense on the optical lens of the CD player during humid or rainy days, or after the car
heater is turned on. If this occurs the disc player may not function properly. To remedy the situation,
remove the disc from the unit and wait approximately one hour. This should allow the moisture to evapo-
rate and restore normal operation.
• Temperature Consideration
The unit may not operate correctly in extremely hot or cold temperatures. Avoid exposing the unit to
extremely high or low temperatures.
• Interruptions in the sound (skipping)
When the car is driven on very rough surfaces, the sound from the CD player may skip and be inter-
rupted. This will not cause any damage to the disc or the player. If this occurs, wait for the road surface to
improve before using the CD player.
• Safety
For safer driving, keep the volume at a moderate level to enable you to hear outside sounds (such as
emergency vehicle sirens).
• Cleaning the unit
Clean the unit with a soft, dry cloth. Stains should be removed by wiping the surfaces with a soft cloth
immersed in lukewarm water and wrung dry. Never use strong chemicals or solvents. These will damage
the finish of the unit.
• Disc care
When not using the disc player for extended periods, remove the compact disc and return it to the plastic
storage case. Do not leave a disc partially ejected from the player. If an ejected disc remains in the
loading slot for approximately 10 seconds, the player will reload the disc to prevent damage.
• Servicing
Should a problem develop, do not open the unit or try to repair it yourself. If servicing is required, bring the
unit to a Sanyo Authorized Service Center.
FXD-770GD_Ebody(P01-18) 3/7/01, 5:57 PM13

14
GB
E
F
D
TROUBLESHOOTING
Sometimes a simple operational error or a mistake in the wiring can appear to be a problem with the unit.
Before having the unit serviced, refer to the troubleshooting chart below.
The compact disc does not
play when inserted into the
unit.
No power.
The unit does not work prop-
erly (Eject, Load, Play)
The sound from the CD player
skips.
No radio reception.
The radio does not stop on any
stations when automatic tun-
ing is used.
The volume control is turned
down.
The power connections are
not wired correctly.
The vehicle ignition is
switched off.
The fuse is blown.
The microcomputer has been
affected by electrical noise.
The road surface is rough.
The unit is not mounted se-
curely.
The disc is defective.
The disc is dirty.
The antenna cable is not con-
nected.
The signal are weak.
Turn up the volume control.
Check the +12V and ground con-
nections.
Switch the ignition to the “ON” or
“ACC” position.
Replace the fuse with another
10A fuse.
Eject the disc, then insert it
again.
Wait for the road surface to im-
prove before playing a disc.
Install the unit securely. Be sure
to use the rear strap if the vehi-
cle does not provide support for
the rear of the unit. (See page
16)
Try another disc.
If it plays properly, the first disc
may be defective.
Clean the disc as explained on
page 2.
Insert the antenna cable firmly
into the antenna jack on the unit.
Select a station using manual
tuning.
Symptom Cause Solution
FXD-770GD_Ebody(P01-18) 3/7/01, 5:57 PM14

15
GB
E
F
D
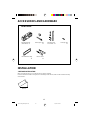
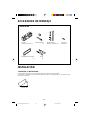
ACCESSORIES AND HARDWARE
INSTALLATION
INSTALLATION
1. BEFORE INSTALLATION
When mounting the unit in a car, keep the unit as level as possible.
If the unit must be mounted at an angle, due to the design of the vehicle, make sure the unit does not tilt by
more than 30°.
max. 30°
Mounting Bracket
(Half Sleeve) × 1
Bushing & Screw
× 1
Mounting Strap
and Screws × 1
Locking Screw
× 1
Removable Trim Ring
× 1
Unlock Levers
× 2
FXD-770GD_Ebody(P01-18) 3/7/01, 5:57 PM15

16
GB
E
F
D
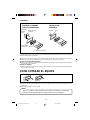
2. INSTALLATION PROCEDURES
MOUNTING STRAP USE BUSHING USE
When mounting the unit into a DIN–standard cutout (182 × 53 mm) in the dashboard or console, attach the
provided Removable Trim Ring to the unit.
1.Insert the mounting bracket into the DIN-standard cutout (182 × 53 mm) in the dashboard or console.
2.Bend the mounting bracket stopper outward until the bracket fits snugly in the cutout.
Mounting Strap Use
3.Attaching the Mounting Strap to the underside of the dash board, using screw. Attach the back of the
unit to the Mounting Strap using support stem bolt and hardware.
Bushing Use
3.As shown in the figure above, securely fasten the screw, which has been inserted into the bush, to the
rear of the unit.
UNIT REMOVAL
1.Insert the unlock levers into the slots on each side of the unit until they click into place.
2.Pull the levers to remove the unit.
Notes
• Handle the unlock levers carefully to avoid injuring your fingers.
• Keep the unlock levers in a safe place for future use.
DASH BOARD
OR CONSOLE
Mounting
Bracket
Removable
Trim Ring
FIRE WALL
Mounting Strap
Screw
Bushing
FXD-770GD_Ebody(P01-18) 3/7/01, 5:57 PM16

17
GB
E
F
D
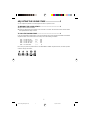
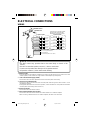
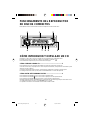
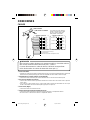
ELECTRICAL CONNECTIONS
WIRING
(White)
(White/Black)
(Gray)
(Gray/Black)
(Green)
(Green/Black)
(Violet
(Violet/Black)
Left
Speaker
Right
Speaker
Do Not
Connect
Front Left
Speaker
Front Right
Speaker
Rear Left
Speaker
Rear Right
Speaker
(White)
(White/Black)
(Gray)
(Gray/Black)
(Green)
(Green/Black)
(Violet
(Violet/Black)
Do Not
Connect
2-speaker System4-speaker System
+12V Constant Power Supply (Yellow)
+12V Accessory/Switched (Red)
Ground Wire (Black)
Power Antenna/Amplifier Turn On (Blue)
ANTENNA PLUG
ANTENNA SOCKET
In the case of a 2-speaker system,
tape the ends of unconnected
terminals to prevent short circuit
CAUTION
• DO NOT connect any speaker wires to the metal body or chassis of the
vehicle.
• DO NOT connect the speaker common (–) wires to each other.
• Connect each speaker wire directly to each speaker terminal.
• All speaker common (–) wires must remain floating.
1 Antenna socket
• Insert the plug from the antenna installed in your vehicle into this socket. (If your vehicle has a dual
antenna system, a dual antenna to single antenna cable adaptor may be required.)
2 + 12V Constant Power Supply (Yellow)
• Connect this wire to the +12V power terminal which receives power continuously.
3 +12V Accessory/Switched (Red)
• Connect this wire to the terminal which receives power while the ignition switch is ON or in the
ACCESSORY position.
• If the ignition switch does not have on ACC position, connect this wire to a +12V power terminal which
receives power continuously. (Same as item 2.)
4 Ground wire (Black)
• Connect this wire to the vehicle chassis.
5 Power Antenna/Amplifier Turn On (Blue)
• Connect this wire to the control terminal of a Power Antenna or an external amplifier.
• When not using a Power Antenna or an external amplifier, this wire is not connected.
FXD-770GD_Ebody(P01-18) 3/7/01, 5:57 PM17

18
GB
E
F
D
Notes
• When using a two-speaker installation, the Green, Green/Black, Violet, Violet/
Black wires, which are used for a four-speaker installation, are not used. The
ends of these wires must be covered with electrical tape to prevent them from
shorting to the unit or the vehicle chassis.
• When using a two-speaker installation, set the FADER control to the center po-
sition.
REPLACING THE FUSE
When fuse replacement is necessary remove the blown fuse
by using pliers. Then install the new 10 amp. fuse.
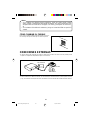
LINE OUT CONNECTIONS
• The unit has a line out terminals. You can use a separate rear channel amplifier to upgrade your system.
External Amplifier
Rear Speaker
White (Left)
Red (Right)
RCA Line-out Jacks
RCA Line- out Jacks (For Rear Speakers)
• Connect a patch cable (not supplied) from the White (left rear channel) and Red (right rear channel) RCA
line output jacks to the line input terminals of the external amplifier.
FXD-770GD_Ebody(P01-18) 3/7/01, 5:57 PM18

FXD-770GD
LIBRITO DE INSTRUCCIONES........................ 1~18
Panel frontal totalmente extraíble
Sintonizador estéreo AM/FM de gran potencia
Reproductor de discos compactos
Montaje ISO con embellecedor extraíble
AUD
LO/DX
LOUD
VOL
BAND
ATP
CD
PWR
MUTE
REL
FM/AM RECEIVER FXD-770GD 40W X 4
TUN
TRK
RPTSHF
DISP
LOUD ST LOC
BASS MANU TRE
SCAN
SHF
RPT
FRONT
PRESET
TRACK
L
R
R
F
CD
AMII
FMIII
SANYO Electric Co., Ltd.
Printed in Singapore
Issue date 03-01
288F0160
FXD-770GD_Cover(Spanish) 3/7/01, 5:52 PM1

1
ÍNDICE
CÓMO TRATAR LOS DISCOS COMPACTOS......................................................................................... 2
PANTALLA DIGITAL .................................................................................................................................3
FRONTAL EXTRAÍBLE ............................................................................................................................4
FUNCIONAMIENTO BÁSICO ..................................................................................................................5
FUNCIONAMIENTO DE LA RADIO .........................................................................................................8
FUNCIONAMIENTO DEL REPRODUCTOR DE DISCOS COMPACTOS ............................................10
CÓDIGOS DE ERROR........................................................................................................................... 12
INSTRUCCIONES DE MANTENIMIENTO Y SEGURIDAD................................................................... 13
RESOLUCIÓN DE POSIBLES PROBLEMAS .......................................................................................14
ACCESORIOS DE MONTAJE................................................................................................................15
INSTALACIÓN ........................................................................................................................................ 15
CÓMO EXTRAER EL EQUIPO..............................................................................................................16
CONEXIONES........................................................................................................................................17
CONEXIONES EXTERNAS ...................................................................................................................18
PRECAUCIÓN
• Este equipo se ha diseñado para que funcione únicamente en sistemas eléctricos de corriente continua de
12 V con toma a tierra NEGATIVA.
• Si tiene que cambiar el fusible, utilice únicamente uno que tenga el amperaje indicado (10 A), nunca mayor.
Si el fusible se funde a menudo, inspeccione minuciosamente todas las conexiones eléctricas para detec-
tar posibles cortocircuitos y haga que le revisen el regulador de tensión del vehículo.
• Evite montarlo en lugares que queden expuestos a la luz del sol directa o al aire caliente que sale de la
calefacción.
• No deje que el equipo se moje ni lo exponga a la humedad.
• Para no estropear el equipo, no introduzca nunca por la ranura ningún objeto que no sea un disco compac-
to.
• Si tiene que arreglar el equipo, llévelo siempre a un servicio técnico cualificado. Acuda siempre a un
distribuidor oficial de equipos de sonido para coches SANYO en caso de reparación.
• El uso de los mandos o la realización de ajustes o procedimientos que no estén explicados en este manual
puede provocar una exposición peligrosa a la radiación.
• Cualquier cambio o alteración del aparato no autorizados expresamente por SANYO puede prohibir al
usuario la utilización del equipo.
FXD-770GD_Sbody(P01-18) 3/7/01, 5:50 PM1

2
• Para evitar que los discos se deformen, no
los exponga a la luz directa del sol ni a
temperaturas o humedad altas durante mucho
tiempo.
•
Limpie con cuidado las huellas y el polvo que
pueda haber en la superficie en la que está
grabada la señal (el lado brillante) con un paño
suave.
Para hacerlo, limpie del centro hacia fuera,
pero no de forma circular. Los discos com-
pactos no son como los antiguos, en los que
podía acumularse el polvo y la suciedad en
los microsurcos. Las pequeñas partículas de
polvo no afectan a la calidad del sonido re-
producido.
• No introduzca discos rotos en la unidad.
• No adhiera nada ni escriba en la superficie
del disco.
• No utilice discos de formas extrañas para no
dañar el reproductor.
Benceno Disolvente Spray limpiador
• Nunca utilice substancias químicas como
sprays para limpiar discos de vinilo, líquidos
o sprays antiestáticos, benceno o disolvente
para limpiar los discos compactos, ya que
pueden dañar la superficie de plástico del dis-
co irreversiblemente.
• Si no va a utilizar el reproductor de discos
compactos durante un período de tiempo pro-
longado, saque el disco del aparato y coló-
quelo en la caja de plástico correspondiente
para evitar que se llene de polvo o que le dé
la luz directa del sol.
• Este equipo ha sido exclusivamente diseña-
do para la reproducción de discos compactos
que lleven este indicativo. No intente reprodu-
cir otros discos.
CÓMO TRATAR LOS DISCOS COMPACTOS
Si el disco está sucio, tiene polvo o está rayado o doblado el sonido puede verse afectado y saltar en
algunas pistas.
Lado impreso
FXD-770GD_Sbody(P01-18) 3/7/01, 5:50 PM2

3
PANTALLA DIGITAL
LOUD ST LOC
BASS MANU TRE
SCAN
SHF
RPT
FRONT
PRESET
TRACK
L
R
R
F
CD
AMII
FMIII
Radiofrecuencia, hora,
nº de pista de CD, modo
de control de sonido se-
leccionado
Posición de audición
Reproducción aleatoria
Reproducción repetida
Exploración
Indicador de disco
Nº de banda AM
Nº de banda FM
Loudness
Modo CD
Nº de presintonía
Nº de pista
Silenciador
Indicador de volumen/
nivel de control del
sonido
Emisora FM
estéreo
Local/Distante
Graves
Agudos
Indicador de sintoni-
zación
Indicador de funciona-
miento del CD
Número de canal
de presintonía, nú-
mero de pista
Sintonización manual
FXD-770GD_Sbody(P01-18) 3/7/01, 5:50 PM3

4
Botón de liberación
AUD
LO/DX
LOUD
VOL
BAND
ATP
CD
PWR
MUTE
REL
FM/AM RECEIVER FXD-770GD 40W X 4
TUN
TRK
RPTSHF
DISP
LOUD ST LOC
BASS MANU TRE
SCAN
SHF
RPT
FRONT
PRESET
TRACK
L
R
R
F
CD
AMII
FMIII
FRONTAL EXTRAÍBLE
El panel frontal se puede extraer para evitar que lo roben.
Le recomendamos que lo extraiga y lo lleve consigo cada vez que abandone el coche.
CÓMO COLOCAR EL FRONTAL
EXTRAÍBLE
Coloque la parte derecha del frontal extraíble de manera que encaje
en el extremo que queda fijo; posteriormente presione ligeramente
la parte izquierda del frontal hasta que quede bien enganchado.
CÓMO SACAR EL FRONTAL
EXTRAÍBLE
Pulse el botón de liberación (REL) y tire de todo el frontal para ex-
traerlo del equipo.
REINICIALIZACIÓN DEL EQUIPO
Si se acciona el botón de reinicialización, el microprocesador del
equipo anulará los cambios y volverá a los valores de fábrica. Si la
pantalla no muestra bien la información o el equipo no funciona bien,
pulse el botón de reinicialización con un objeto puntiagudo como,
por ejemplo, la punta de un bolígrafo.
Nota
El equipo no funcionará si no se instala correctamente.
PRECAUCIÓN
• Siga el procedimiento explicado anteriormente para extraer el frontal.
• Cuando lo vuelva a colocar, tenga cuidado de no forzarlo.
• No toque los terminales de conexión del frontal o del equipo, ya que podría
impedir que hiciesen buen contacto.
• Utilice siempre un paño seco y limpio para limpiar los terminales.
• No deje el frontal expuesto a la luz directa del sol ni a altas temperaturas.
• Evite que el frontal entre en contacto con benceno, disolvente o insecticidas.
• Tenga cuidado de no dejarlo caer.
Botón de reinicialización
FXD-770GD_Sbody(P01-18) 3/7/01, 5:50 PM4

5
FUNCIONAMIENTO BÁSICO
AUD
LO/DX
LOUD
VOL
BAND
ATP
CD
PWR
MUTE
REL
FM/AM RECEIVER FXD-770GD 40W X 4
TUN
TRK
RPTSHF
DISP
LOUD ST LOC
BASS MANU TRE
SCAN
SHF
RPT
FRONT
PRESET
TRACK
L
R
R
F
CD
AMII
FMIII
CÓMO ENCENDER EL EQUIPO ..............................1
Coloque el frontal extraíble y pulse el botón PWR MUTE cuando la llave de contacto esté en posición ACC.
CÓMO APAGAR EL EQUIPO ............................................................ 1
Pulse el botón PWR MUTE durante más de 2 segundos; la pantalla volverá a mostrar la hora.
CONTROL DEL NIVEL DE VOLUMEN .....................6
Pulse el botón 6 (VOL +/-) hasta encontrar el nivel de volumen deseado.
VOL + : aumenta el volumen
VOL – : disminuye el volumen
SILENCIADOR DE SONIDO EN CASO DE LLAMADA .................... 1
Pulse el botón 1 (PWR MUTE) con el equipo encendido. Mientras esté activado el silenciador parpadeará
en pantalla el indicador . Para volver a oír el sonido al mismo volumen de antes, pulse de nuevo el
botón PWR MUTE.
CÓMO ALTERNAR ENTRE PANTALLAS ..............10
Si pulsa el botón 10 (DISP), alternará entre las dos pantallas siguientes:
• Modo radio
Frecuencia y reloj
• Modo CD
Tiempo transcurrido de reproducción y reloj
7
6
9
4
5
3
110
2
FXD-770GD_Sbody(P01-18) 3/7/01, 5:50 PM5

6
CÓMO CAMBIAR LAS CARACTERÍSTICAS DEL
SONIDO .........................................................2,4,5,6,7
1.Pulse el botón 4 (AUD) hasta ver en pantalla el modo deseado.
2.Pulse los siguientes botones para cambiar las características del modo de sonido seleccionado. Tiene
cinco segundos para hacerlo. Después de los cinco segundos, la pantalla volverá a mostrar la infor-
mación prioritaria.
Serie de Ajustes
BASS / BASS –7 BASS 7 /
TREBLE / TREB –7 TREB 7 /
BAL L9 (
totalmente a la izquierda
) R9 (
totalmente a la derecha
)
FAD F9 (
totalmente hacia los alt. frontales
) R9 (
totalmente hacia los alt. traseros
)
MUTE LEVEL – 0 –80
LOUDNESS ........................................................................................ 9
Si el nivel de volumen es bajo, el oído humano no puede percibir los graves y agudos más sutiles; la
función loudness los aumenta hasta que resultan audibles.
Pulse el botón 9 (LO/DX LOUD). En la pantalla aparecerá el indicador “LOUD”. Para desactivar esta
función no tiene más que volver a pulsar el botón.
SELECTOR DE SINTONIZACIÓN LOCAL/DISTANTE (LO/DX) ....... 9
Esta función le permite seleccionar la intensidad de la señal captada por la radio en modo de búsqueda
automática. Pulse el botón 9 (LO/DX LOUD) durante más de 2 segundos para seleccionar el modo LO
para que el equipo sólo se detenga en las emisoras con mayor intensidad de señal (las locales). En
pantalla aparecerá el indicador “LOC”.
Pulse de nuevo el botón durante dos segundos para seleccionar el modo DX; el equipo buscará además
emisoras de distinta intensidad de señal, incluidas las más alejadas o débiles. El indicador “LOC” desapa-
recerá de la pantalla.
PUESTA EN HORA DEL RELOJ ...................10,5,7,2
El reloj funciona en formato de 24 horas.
1.Pulse el botón 10 (DISP) durante más de dos segundos.
2.Pulse los siguientes botones para cambiar las horas y los minutos:
/ : Cambia la hora y los minutos
: Para que parpadee la hora
: Para que parpadeen los minutos
BAND ATP : Poner a cero los minutos
(Ejemplo) 12:29 → 12:00
12:30 → 13:00
3.Pulse el botón 10 (DISP) para activar el reloj.
CÓMO CONSULTAR LA HORA CON EL
COCHE APAGADO ..............................................4,10
Pulse el botón 10 (DISP) con el motor del coche apagado.
La pantalla quedará iluminada durante cinco segundos, mientras muestra la hora, y después se apagará
automáticamente.
FXD-770GD_Sbody(P01-18) 3/7/01, 5:50 PM6

7
CÓMO CAMBIAR LA POSICIÓN DE AUDICIÓN .............................. 3
Si lo desea puede modificar la posición de audición y adecuarla a un(os) asiento(s) determinado(s).
CÓMO MEMORIZAR LA POSICIÓN DE AUDICIÓN......................... 3
1.Modifique los niveles de balance y fáder.
2.Pulse el botón de presintonía (3) en el que desee memorizarla durante más de dos segundos. Los
indicadores de balance y fáder parpadearán y la posición quedará memorizada.
CÓMO SELECCIONAR LA POSICIÓN DE AUDICIÓN..................... 3
En modo de ajuste de balance y fáder, pulse el botón de presintonía (3) en el que esté memorizada la
posición. Los botones de presintonía vienen configurados de fábrica del siguiente modo:
P 1 : Asiento del conductor (
R
2 R4)
P 2 : Asientos delanteros ( 0 R4)
P 3 : Asiento del pasajero (L2 R4)
P 4 : Asientos posteriores ( 0 F4)
P 5 : Todos los asientos ( 0 0)
Cada vez que pulse los botones de presintonía en modo de ajuste de balance y fáder, el indicador de
posición de audición cambiará del siguiente modo:
1
2 3
4/SHF
5/RPT
FXD-770GD_Sbody(P01-18) 3/7/01, 5:50 PM7

8
1
FUNCIONAMIENTO DE LA RADIO
AUD
LO/DX
LOUD
VOL
BAND
ATP
CD
PWR
MUTE
REL
FM/AM RECEIVER FXD-770GD 40W X 4
TUN
TRK
RPTSHF
DISP
LOUD ST LOC
BASS MANU TRE
SCAN
SHF
RPT
FRONT
PRESET
TRACK
L
R
R
F
CD
AMII
FMIII
CÓMO SELECCIONAR EL MODO DE RADIO
Pulse el botón 1 (BAND ATP) para cambiar de modo CD a modo radio.
Cada vez que pulse este botón, la banda seleccionada cambiará siguiendo este orden:
FM I ➔ FM II ➔ FM III ➔ AM I ➔ AM II
SINTONIZACIÓN DE EMISORAS...................................................... 2
• Búsqueda automática de emisoras ....
Pulse el botón 2 (TUN/TRK o ).
Cada vez que pulse este botón, el equipo empezará a buscar
automáticamente y se detendrá en la frecuencia de la siguiente emisora.
• Sintonización manual .........................
Para seleccionar la siguiente emisora, pulse el botón durante más de
medio segundo. El indicador “MANU” aparecerá en la pantalla. Para se-
leccionar la emisora anterior pulse el botón , también durante más de
medio segundo. Para avanzar o retroceder rápidamente por las emiso-
ras del dial, mantenga pulsado el botón TUN/TRK o y suéltelo
cuando se aproxime a la frecuencia deseada; a continuación, pulse y
suelte el botón en una u otra dirección hasta que vea en la pantalla la
frecuencia de la emisora que quiera escuchar.
El equipo volverá a modo de búsqueda automática cuatro segundos
después de que haya terminado de sintonizar manualmente la emisora.
MEMORIZACIÓN DE PRESINTONÍAS.............................................. 3
En los botones de presintonía (3) podrá memorizar 6 emisoras para cada una de las bandas (FM 1, FM 2,
FM 3 y AM 1, AM 2); de este modo podrá acceder a ellas posteriormente con la máxima comodidad.
• Programación de emisoras:................ 1.
Seleccione la banda y sintonice la emisora que quiera memorizar.
2.Pulse el botón de presintonía en el que quiera almacenar la emi-
sora durante más de dos segundos, hasta que el indicador de
frecuencia parpadee dos veces. Repita los pasos 1 y 2 para me-
morizar más emisoras.
• Sintonización rápida: .......................... Seleccione la banda en la que se encuentre la emisora deseada y
pulse uno de los seis botones de presintonía.
2
3
5
4
FXD-770RDS
FXD-770GD_Sbody(P01-18) 3/7/01, 5:50 PM8

9
FUNCIÓN ATP
(SINTONIZACIÓN AUTOMÁTICA DE EMISORAS EN RUTA) .......... 1
La función ATP busca y memoriza automáticamente las seis emisoras de señal más fuerte por orden de
intensidad en una de las dos bandas siguientes: FM 3 ó AM 2.
Esta función le resultará útil cuando esté lejos de viaje, ya que podrá almacenar las emisoras locales sin
perder las presintonías ya memorizadas.
Puede programar hasta 12 emisoras (6 FM y 6 AM).
• Para memorizar las emisoras ........................ Seleccione la banda y pulse el botón BAND ATP durante
más de 2 segundos.
• Memorización rápida de las emisoras ATP ... Seleccione la banda y pulse uno de los seis botones de
presintonía.
Nota
Esta función sólo se puede utilizar con las bandas FM 3 y AM 2.
EXPLORACIÓN DE EMISORAS........................................................ 4
1.Seleccione la banda pulsando el botón BAND ATP.
2.Pulse el botón 4 . El equipo se detendrá en cada emisora que encuentre durante 8 segundos.
3.Para detener la exploración cuando escuche una emisora que le guste sólo tiene que volver a pulsar el
botón .
EXPLORACIÓN DE PRESINTONÍAS MEMORIZADAS .................... 5
Esta exploración se limita a las presintonías que ya están almacenadas en la banda seleccionada, tanto
las memorizadas manualmente como con la función ATP.
1.Seleccione la banda pulsando el botón BAND ATP.
2.Pulse el botón 5 . El equipo se detendrá en cada emisora presintonizada.
3.Para detener la exploración cuando escuche una emisora que le guste sólo tiene que volver a pulsar el
botón 5 .
FXD-770GD_Sbody(P01-18) 3/7/01, 5:50 PM9

10
FUNCIONAMIENTO DEL REPRODUCTOR
DE DISCOS COMPACTOS
Este aparato funciona únicamente con discos compactos convencionales de 5".
AUD
LO/DX
LOUD
VOL
BAND
ATP
CD
PWR
MUTE
REL
FM/AM RECEIVER FXD-770GD 40W X 4
TUN
TRK
RPTSHF
DISP
LOUD ST LOC
BASS MANU TRE
SCAN
SHF
RPT
FRONT
PRESET
TRACK
L
R
R
F
CD
AMII
FMIII
CÓMO INTRODUCIR Y EXPULSAR UN CD
Introduzca un disco por la ranura; el equipo iniciará la reproducción automáticamente.
El equipo permanece en modo CD y aparece en pantalla el indicador “ ”.
Pulse el botón de expulsión (2) para sacar el disco del equipo.
CÓMO CAMBIAR A MODO CD ......................................................... 3
Pulse el botón 3 (CD) con el equipo encendido para pasar de modo radio a modo CD.
Si cambia a modo CD y el equipo tiene un disco compacto introducido, la reproducción continuará a partir
del punto en que se detuvo.
Si se había reproducido el disco entero, la reproducción empezará a partir de la primera pista.
El CD seguirá sonando hasta que se pulse el botón BAND ATP o el botón de expulsión.
CÓMO OMITIR DETERMINADAS PISTAS ........................................ 4
Pulse el botón 4 (TUN/TRK ) para ir al inicio de la siguiente pista.
Pulse el botón 4 (TUN/TRK ) para ir al inicio de la pista que se está reproduciendo.
Pulse el botón 4 (TUN/TRK ) dos veces para ir al principio de la pista anterior.
Mantenga pulsado el botón 4 (TUN/TRK o ) durante más de medio segundo para retroceder o avan-
zar respectivamente por el disco sin que se deje de oír el sonido.
La reproducción volverá a la velocidad normal cuando suelte el botón.
12
3
4
567
8
FXD-770GD_Sbody(P01-18) 3/7/01, 5:50 PM10

11
CÓMO ACTIVAR LA PAUSA.............................................................. 5
Pulse el botón 6 de presintonías (5) durante la reproducción del disco.
Para reanudar la reproducción, vuelva a pulsar el mismo botón.
Notas
• Durante la reproducción del disco, el indicador empieza a girar.
• El equipo se pondrá en marcha automáticamente cuando el coche esté encen-
dido y se introduzca un CD por la ranura.
REPRODUCCIÓN REPETIDA............................................................ 6
Pulse el botón 5 (RPT) de presintonías (6) para que el equipo reproduzca ininterrumpidamente la pista
actual.
En la pantalla aparecerá el mensaje “RPT”.
Pulse de nuevo el mismo botón para cancelar esta función.
REPRODUCCIÓN ALEATORIA ......................................................... 7
Esta función hace que el equipo reproduzca todas las piezas del disco compacto sin seguir ningún orden
concreto.
Pulse el botón 4 (SHF) de presintonías (7) para activar la reproducción aleatoria.
En la pantalla aparecerá el mensaje “SHF”.
Pulse el botón 4 ( ) para que el equipo seleccione aleatoriamente otra pista.
Pulse el botón 4 (SHF) de presintonías (7) para cancelar esta función.
EXPLORACIÓN DE CD (REPRODUCCIÓN DEL INICIO
DE CADA PISTA) ............................................................................... 8
Esta función reproduce los primeros 10 segundos de cada pista (en orden).
Pulse el botón 8 ( ) para activar este modo.
En la pantalla aparecerá el mensaje “SCAN”.
Pulse de nuevo el mismo botón para cancelar esta función.
FXD-770GD_Sbody(P01-18) 3/7/01, 5:50 PM11

12
CÓDIGOS DE ERROR
Cuando se produce alguna anomalía en la reproducción de discos compactos puede aparecer un mensa-
je de error en la pantalla.
Consulte la tabla que se muestra a continuación para saber a qué se debe el problema y siga el consejo
que se le da. Si el error persiste póngase en contacto con el distribuidor más cercano.
Mensaje Recomendación
Límpielo.
Ponga otro disco.
Dele la vuelta.
Saque y vuelva a introducir el
disco en condiciones normales
de temperatura.
Saque el disco e introduzca
uno limpio y en buen estado
en condiciones normales de
temperatura.
Saque y vuelva a introducir el
disco.
Posible causa
Disco sucio.
Disco rayado.
Disco del revés.
Error de enfoque.
Error de enfoque y de datos.
Problema del mecanismo.
FXD-770GD_Sbody(P01-18) 3/7/01, 5:50 PM12

13
INSTRUCCIONES DE MANTENIMIENTO Y
SEGURIDAD
• Condensación
La humedad puede condensarse en la lente del lector óptico de discos compactos en días húmedos o
lluviosos o tras encender la calefacción, lo que puede hacer que el reproductor no funcione con normali-
dad. Para evitarlo, saque el disco del equipo y espere aproximadamente una hora para que la humedad se
evapore completamente.
• Temperatura
Es posible que el equipo no funcione correctamente a temperaturas extremas; por ello, evite exponerlo al
calor o frío intensos.
• Interrupciones del sonido
Si conduce por firmes muy irregulares es posible que el disco compacto “salte” y se detenga el sonido. No
se trata de ninguna anomalía, ya que no daña el disco ni el reproductor. Espere a que el camino se allane
antes de volver a poner en marcha el CD.
• Seguridad
Para que la conducción resulte segura, modere siempre el volumen para poder oír los sonidos externos
(como, por ejemplo, la sirena de los servicios de emergencia).
• Limpieza del equipo
Limpie el equipo con un paño suave y seco. Si está manchado, límpielo con un paño sumergido en agua
tibia y bien escurrido. No utilice nunca sustancias químicas ni disolventes, ya que podrían estropearlo.
• Cuidados de los discos compactos
Si no va a utilizar el reproductor de discos compactos durante un período de tiempo prolongado, saque el
disco del aparato y colóquelo en la caja de plástico correspondiente. Nunca deje un disco parcialmente
expulsado en el equipo, ya que transcurridos 10 segundos el equipo volverá a introducirlo automáticamente
para evitar que se estropee.
• Reparaciones
Si el equipo se estropea, no intente abrirlo y repararlo por su cuenta. Llévelo siempre a un centro de
servicio técnico autorizado Sanyo.
FXD-770GD_Sbody(P01-18) 3/7/01, 5:50 PM13

14
RESOLUCIÓN DE POSIBLES PROBLEMAS
A veces, un simple problema de funcionamiento o un fallo en la conexión de algún cable puede parecer
una anomalía del equipo; por ello, antes de llevarlo al servicio técnico, consulte la siguiente tabla.
El disco compacto no suena al
introducirlo en el equipo.
El equipo no se enciende.
El equipo no funciona bien (al
expulsar, cargar, reproducir los
discos, etc.)
El disco a veces deja de so-
nar (salta).
No se recibe ninguna emisora
de radio.
El equipo no encuentra ningu-
na emisora al hacer una bús-
queda automática.
El volumen está al mínimo.
Las conexiones de alimenta-
ción no están bien hechas.
El coche está apagado.
El fusible se ha fundido.
El microprocesador del equi-
po se ha visto afectado por
ruido eléctrico.
La superficie por la que con-
duce es muy irregular.
El equipo no ha quedado bien
sujeto en la instalación.
El disco está defectuoso.
El disco está sucio.
No se ha conectado el cable
de la antena.
La señal es débil.
Aumente el volumen.
Compruebe las conexiones de
los cables de +12 V y de la toma
a tierra.
Ponga la llave de contacto en po-
sición “ON” o “ACC”.
Cambie el fusible por otro de 10
A.
Expulse el disco y vuelva a in-
sertarlo.
Espere a que mejore el firme
antes de reproducir el disco.
Sujete bien el equipo. Utilice la
banda metálica perforada si no
el equipo no tiene ningún punto
de sujeción en la parte posterior.
(Véase la página 16).
Introduzca otro disco y, si éste
funciona correctamente, es po-
sible que el primero estuviera
defectuoso.
Limpie el disco siguiendo el pro-
cedimiento que se explica en la
página 2.
Introduzca el cable de la antena
con firmeza en el conector de
antena del equipo.
Sintonice manualmente una emi-
sora.
Problema Posible causa Solución
FXD-770GD_Sbody(P01-18) 3/7/01, 5:50 PM14

15
ACCESORIOS DE MONTAJE
INSTALACIÓN
INSTALACIÓN
1. ANTES DE LA INSTALACIÓN
Cuando instale el equipo en el coche, sujételo lo más horizontal que le sea posible.
Si la unidad se instala en ángulo, debido al diseño del vehículo, asegúrese de que la unidad no esté
inclinada en más de 30°.
máximo 30º
Carcasa
(media estructura) × 1
Arandela y perno
× 1
Banda metálica
perforada y tornillos × 1
Tornillo de
bloqueo × 1
Embellecedor (extraíble)
× 1
Llaves
× 2
FXD-770GD_Sbody(P01-18) 3/7/01, 5:50 PM15

16
2.MONTAJE
MONTAJE CON BANDA MONTAJE CON
METÁLICA PERFORADA ARANDELA
Si instala el equipo en un espacio para radiocassettes homologado DIN (de 182 × 53 mm), colóquele el
embellecedor extraíble suministrado.
1.Introduzca la carcasa en el hueco para radiocassettes (de 182 × 53 mm) del salpicadero o la consola.
2.Doble hacia adentro las pestañas de la carcasa hasta que quede sujeta en el hueco.
Montaje con banda metálica perforada
3.Fije la banda metálica a la parte interna del salpicadero con tornillos. Sujete la parte trasera del equipo
con el fijador y los accesorios.
Montaje con arandela
3.Como se muestra en la ilustración superior, apriete firmemente el tornillo de la arandela que sujeta la
parte posterior del equipo.
CÓMO EXTRAER EL EQUIPO
1.Introduzca una llave de desbloqueo a cada lado del equipo hasta que queden encajadas (se oirá un
chasquido).
2.Tire de las llaves para sacar el equipo.
Notas
• Vaya con cuidado, ya que podría hacerse daño en los dedos con las llaves.
• Guarde la llaves de desbloqueo en lugar seguro para no perderlas.
Perno
Arandela
Embellecedor extraíble
Carcasa
SALPICADERO
O CONSOLA
Banda metálica
perforada
PARED DE
PROTEC-
CIÓN
FXD-770GD_Sbody(P01-18) 3/7/01, 5:50 PM16

17
CONEXIONES
CABLES
(Blanco)
(Blanco/Negro)
(Gris)
(Gris/Negro)
(Verde)
(Verde/Negro)
(Violet)
(Violet/Negro)
(Blanco)
(Blanco/Negro)
(Gris)
(Gris/Negro)
(Verde)
(Verde/Negro)
(Violet)
(Violet/Negro)
Altavoz
frontal
izquierdo
Altavoz
frontal
derecho
Altavoz
trasero
izquierdo
Altavoz
trasero
derecho
Altavoz
izquierdo
Altavoz
derecho
No
conectar
No
conectar
Sistema de 4 altavoces Sistema de 2 altavoces
Alimentación de corriente continua (+12V) (Amarillo)
Accesorios/conmutado +12V (Rojo)
Toma a tierra (Negro)
Antena eléctrica/encendido del amplificador (Azul)
CONECTOR DE LA ANTENNA
TOMA DE ANTENA
Si el sistema es de dos altavoces,
encinte los exremos de los cables
que no se vayan a utilizar para
evitar posibles cortocircuitos.
PRECAUCIÓN
• NO conecte los cables de altavoz a la estructura metálica o chasis del vehículo.
• NO conecte cables de altavoz del mismo polo (–) entre sí.
• Conecte directamente los cables de altavoz al terminal correspondiente.
• Aísle de tierra todos los cables de altavoz del mismo polo (–).
1 Toma de la antena
• Introduzca en esta toma la clavija de la antena del vehículo. (Si el vehículo está dotado de un sistema de
doble antena es posible que tenga que utilizar un adaptador de antena doble a antena simple).
2 Alimentación de corriente continua (+12 V) (Amarillo)
• Conecte este cable al terminal que recibe la alimentación de +12 V de forma ininterrumpida.
3 Accesorios/conmutado +12 V (Rojo)
• Conecte este cable al terminal que recibe alimentación cuando la llave de contacto está en posición
“ON” o “ACC”.
• Si el contacto no tiene posición “ACC”, conecte este cable al terminal de alimentación de +12 V que
recibe la alimentación de forma ininterrumpida (igual que en el punto 2).
4 Toma a tierra (Negro)
• Conecte este cable al chasis del vehículo.
5 Antena eléctrica/encendido del amplificador (Azul)
• Conecte este cable al terminal de control de la antena eléctrica o al amplificador externo.
• No lo conecte si no tiene antena eléctrica o amplificador externo.
FXD-770GD_Sbody(P01-18) 3/7/01, 5:50 PM17

18
Notas
• Si el sistema sólo dispone de dos altavoces, anule los cables verde, verde/
negro, violeta y violeta/negro. Recuerde encintarlos con cinta aislante para evi-
tar que entren en contacto con el equipo o el chasis y provoquen un cortocircui-
to.
• Si el sistema sólo utiliza dos altavoces, ponga el control del fáder en posición
central.
CÓMO CAMBIAR EL FUSIBLE
Para sacar el fusible fundido tendrá que utilizar unos alica-
tes. Sustituya siempre el fusible por uno de 10 amperios.
CONEXIONES EXTERNAS
• El equipo dispone de terminales de salida. Si desea que el sistema de sonido sea más potente puede
emplear un amplificador independiente para el canal trasero.
Amplificador externo
Altavoces traseros
Blanco (izq.)
Rojo (der.)
Tomas de salida RCA
Tomas de salida RCA (para los altavoces traseros)
• Conecte mediante un cable de conexión (no suministrado) los terminales blanco (canal izquierdo trasero)
y rojo (canal derecho trasero) de las tomas de salida RCA a los terminales de entrada del altavoz externo.
FXD-770GD_Sbody(P01-18) 3/7/01, 5:50 PM18
-
 1
1
-
 2
2
-
 3
3
-
 4
4
-
 5
5
-
 6
6
-
 7
7
-
 8
8
-
 9
9
-
 10
10
-
 11
11
-
 12
12
-
 13
13
-
 14
14
-
 15
15
-
 16
16
-
 17
17
-
 18
18
-
 19
19
-
 20
20
-
 21
21
-
 22
22
-
 23
23
-
 24
24
-
 25
25
-
 26
26
-
 27
27
-
 28
28
-
 29
29
-
 30
30
-
 31
31
-
 32
32
-
 33
33
-
 34
34
-
 35
35
-
 36
36
-
 37
37
-
 38
38


Sanyo FXD-770GD Operating Instructions Manual
- Categoría
- Receptores de medios de coche
- Tipo
- Operating Instructions Manual
en otros idiomas
- English: Sanyo FXD-770GD
Artículos relacionados
Otros documentos
-
Blaupunkt RPD 540 Manual de usuario
-
-
-
-
Audiovox UMP9020 Manual de usuario
-
Insignia IN-MP101 Manual de usuario
-
-
-
JENSEN VOYAGER MCD4030 El manual del propietario
-