La página se está cargando...

2
2
segirodad
safety
When using electrical appliances, basic safety precautions
should always be followed, including the following:
• READ ALL INSTRUCTIONS, PRODUCT LABELS AND
WARNINGS BEFORE USING THE TOASTER OVEN.
• Do not touch hot surfaces. The temperature of the door or
the outer surface may be high when the toaster oven is
operating. Always use oven mitts when handling hot
materials, and allow metal parts to cool before cleaning.
Allow the unit to cool thoroughly before putting in or taking
off parts. Always use the oven handles when moving the unit.
• When the unit is not in use and before cleaning, unplug
the Toaster Oven from the wall outlet.
NOTE: Make sure the oven is turned off before unplugging.
• To protect against risk of electrical shock, do not immerse
the appliance or plug in water or other liquids.
• Close supervision is always necessary when this or any
appliance is used near children. This appliance is not for
use by children.
• Do not operate this or any appliance with a frayed or
damaged cord or plug or after the appliance malfunctions or
is dropped or has been damaged in any manner. It must be
replaced by the manufacturer or the authorized service facility
or a similarly qualified person in order to avoid a hazard.
• Do not use attachments not recommended by the
manufacturer; they may cause fire, electric shock or injury.
• Do not store any materials, other than manufacturer’s
recommended accessories, in this unit when not in use.
• Do not use outdoors or for commercial purposes. Do not use
this appliance for other than intended use.
• Do not let the cord dangle over the edge of table or counter.
• Do not place the appliance near a hot gas or electric burner
or in a heated oven.
IMPORTANT SAFEGUARDS
PRECAUCIONES IMPORTANTES
Cuando use algún aparato eléctrico siempre deben de seguirse
precauciones básicas de seguridad incluyendo las siguientes:
• LEA CUIDADOSAMENTE TODAS LAS INSTRUCCIONES,
LAS ETIQUETAS DEL PRODUCTO Y LAS ADVERTENCIAS
ANTES DE USAR EL HORNO TOSTADOR.
• No toque las superficies calientes. La temperatura de la puerta o de
la superficie externa del aparato puede ser muy alta cuando el horno
tostador se encuentra en funcionamiento. Siempre use los guantes
resistente al calor cuando maneje materiales calientes. Permita que
las partes metálicas se enfríen antes de limpiar. Permita que la unidad
se enfríe completamente antes de poner o quitar partes.
Siempre utilice las asas del horno cuando mueva la unidad.
• Desconecte el Horno Tostador de la toma de corriente cuando
la unidad no se encuentre en uso y antes de limpiarla. NOTA:
Verifique que el horno esté apagado antes de desconectar.
• Para protegerse contra una descarga eléctrica, no sumerja el aparato
o el enchufe en agua o en otros líquidos.
• Es siempre necesaria la supervisión cercana cuando este aparato sea
utilizado cerca de niños. Este aparato no debe ser usado por niños.
• No opere este y ningún aparato si el cable o el enchufe están
quemados o dañados, o después de que el aparato ha funcionado
inadecuadamente, se ha caído o ha sido dañado en cualquier manera.
El horno debe ser reemplazado por el fabricante o por un centro de
servicio autorizado o por una persona similar calificada. Lo anterior
con el fin de evitar cualquier peligro potencial.
• El uso de accesorios o aditamentos que no sean los recomendados por
el fabricante pueden causar incendios, descargas eléctricas o lesiones.
• Cuando esta unidad no se encuentre en uso, no almacene ningún otro
material que no sean los accesorios recomendados por el fabricante.
• No use en exteriores o para propósitos comerciales.
No use este aparato mas que para lo que ha sido diseñado.
• No permita que el cable cuelgue de la orilla de la mesa
o del mostrador.
• No coloque este aparato cerca de quemadores de estufas
de gas o eléctricas, o dentro de un horno caliente.

3
3
seguridad
• Debe tener extremo cuidado cuando use contenedores que no estén
hechos de metal o de vidrio.
• Puede ocurrir un incendio si el Horno Tostador está en funcionamiento
y se encuentra en contacto o cubierto con materiales inflamables,
incluyendo cortinas, tapicerías, paredes, etc. No coloque ningún objeto
sobre el aparato cuando éste se encuentre en operación.
• No coloque dentro del horno ningún material inflamable, tal como papel,
cartón, plástico o cualquier material que pueda incendiarse o derretirse.
• No cubra con papel aluminio la bandeja para migas o ninguna otra parte
del horno. Este causará que el aparato se sobre caliente.
• El pan puede quemarse. Por lo tanto el horno tostador no debe
usarse cerca o debajo de las cortinas y otros materiales combustibles.
Deben observarse cuidadosamente.
• Los alimentos grandes o utensilios metálicos no deben introducirse
en el Horno Tostador ya que pueden crear el riesgo de incendio
o de descarga eléctrica.
• Cuando ase alimentos, tenga mucho cuidado cuando saque la bandeja
o deseche grasa caliente.
• No limpie el aparato con fibras metálicas abrasivas. Se pueden romper
pequeños pedazos de las fibras y pueden entrar en contacto con las partes
eléctricas, lo anterior puede ocasionar una descarga eléctrica.
• Para apagar este aparato, coloque todos los controles en la posición
de apagado “OFF” o bien, gírelos completamente en sentido contrario
de las manecillas del reloj.
Este Producto Es Sólo para Uso Doméstico
GUARDE ESTAS
INSTRUCCIONES
• Extreme caution should be used when using containers
not constructed of metal or glass.
• A fire may occur if the Toaster Oven is covered or
touching flammable materials, including curtains,
draperies, walls, etc., when in operation. Do not store
any items on top of the appliance when in operation.
• Do not place any flammable materials in oven, such
as paper, cardboard, plastic or any materials that
may catch fire or melt.
• Do not cover crumb tray or any part of the oven with
metal foil. This will cause overheating of the appliance.
• Bread may burn. Therefore the toaster oven must not
be used near or below curtains and other combustible
materials. They must be watched.
• Oversize foods or metal utensils must not be inserted
in the Toaster Oven as they may create a fire or risk of
electrical shock.
• When broiling, use extreme caution when removing tray
or disposing of hot grease.
• Do not clean with metal scouring pads. Pieces can break
off of the pad and touch electrical parts involving a risk
of electrical shock.
• To turn this appliance off, return all controls to the “OFF”
position or fully counter-clockwise.
This Product Is for Household Use Only
SAVE THESE
INSTRUCTIONS
safety

4
4
O
ff
O
n
your toaster oven
1. Temperature Control Dial
2. 60-Minute Timer with Auto Off
3. Cool Touch Handles
4. Toast Color Dial
5. Toast Button
6. Indicator Light
7. Heavy-Duty Baking Pan
and Broiling Tray
8. Crumb Tray
9. Removable Wire Rack
10. Non-Stick Interior Walls
Learning About Your 6-Slice Toaster Oven
5
7
1
2
10
9
8
4
3
6
O
ff
O
n
su horno tostador
1. Disco de Control de Temperatura
2. 60 Minutos con Apagado
Automático
3. Asas Frías al Tacto
4. Disco del Nivel de Tostado
5. Botón para Tostar
6. Luz Indicadora
7. Recipiente para Hornear y Bandeja
para Asar Muy Resistentes
8. Bandeja para Migas
9. Parrilla Removible de Alambre
10. Paredes con Interior Antiadherente
Conociendo de Su Horno Tostador para 6 Rebanadas
5
7
1
2
10
9
8
4
3
6

FEATURES OF YOUR 6-SLICE TOASTER OVEN
LIGHT INDICATOR
• Light is on when the oven is plugged in and is heating.
• Light will also remain on in the broiling and toasting functions as well.
TEMPERATURE
CONTROL DIAL
• Controls the temperature when baking, broiling and toasting.
Permits selection of functions.
• Turn the dial clockwise to your desired setting.
60-MINUTE TIMER WITH AUTO OFF
Timer can be set for up to 60 minutes and will automatically turn the oven
OFF when your set time expires.
NOTE: The timer must be set
(from 1 – 60 minutes)
to begin heating
the oven.
TOAST COLOR DIAL
Turn the dial clockwise to select toast color.
TOAST BUTTON
Push the button (after setting the Temperature Control Dial to the “Toast”
setting) and the oven will automatically turn off when toasting is complete.
HEAVY-DUTY BAKING PAN AND BROILING TRAY
Use for all your baking, broiling and grilling needs.
“COOL TOUCH” SIDE HANDLES
For ease of transportation.
FUNCIONES DE S
U HORNO TOSTADOR
PARA
6 REBANADAS
LUZ INDICADORA
• Cuando el Horno está conectado y en proceso de calentamiento,
la luz está encendida.
• La luz también permanecerá encendida durante las funciones de asar
y tostar.
DISCO DE CONTROL DE TEMPERATURA
• Controla la temperatura al hornear, asar y tostar.
Permite la selección de las funciones.
• Gire el disco en sentido de las manecillas del reloj para seleccionar
que desea utilizar.
RELOJ CON 60 MINUTOS Y APAGADO AUTOMÁTICO
El reloj puede programarse hasta 60 minutos y apagará el horno
automáticamente cuando el tiempo programado en el reloj haya expirado.
NOTA: Para iniciar el calentamiento del horno debe programar el reloj
(de 1 a 60 minutos).
DISCO DEL NIVEL DE TOSTADO
Gire el disco en sentido de las manecillas del reloj para seleccionar el nivel
de tostado.
BOTÓN PARA TOSTAR
Presione el botón (después de seleccionar la función de tostar “Toast” con
el Disco de Control de Temperatura) y el horno se apagará automáticamente
cuando se haya completado el tostado.
R
ECIPIENTE PARA HORNEAR Y BANDEJA PARA ASAR MUY RESISTENTES
Úselas para hornear y asar sus alimentos.
ASAS LATERALES “COOL TOUCH” FRÍAS AL TACTO
Para transportarlo fácilmente.
5
5

6
6
C
ONVENIENT CRUMB TRAY
For crumb or waste collection, pull tray out and discard contents.
NON-STICK INTERIOR WALLS
Allows for easy cleaning.
REMOVABLE WIRE RACK
The Removable Wire Rack has three different settings.
Congratulations on your purchase of a SUNBEAM
®
6-Slice Toaster Oven!
Sunbeam has designed your Toaster Oven to provide the utmost in quality,
ease of use and convenience.
Before you use the Toaster Oven for the first time, separate the rack,
baking pan and broiling tray. Wash in warm, soapy water. Rinse and
dry well.
H
OW TO USE
60-M
INUTE TIMER
IMPORTANT: The Timer Dial must be used with the Temperature Control
Dial for the oven to heat. The timer dial does not work in conjunction
with the Toast Color Dial.
1. Turn the Temperature Control Dial to the desired temperature setting
for defrosting, baking or broiling.
2. Turn the Timer Dial to the appropriate time for the food being cooked
(up to 60 minutes). A bell will signal when the time has expired.
The Oven will stop heating when the Timer reaches “OFF”.
3. When finished, turn the Temperature Control Dial to “O”.
CÓMODA BANDEJA PARA MIGAS
Para recolectar las migas o residuos de alimentos, jálela hacia afuera
y deseche el contenido.
PAREDES CON INTERIOR ANTIADHERENTE
Permite el limpiar más facil.
PARRILLA REMOVIBLE DE ALAMBRE
La Parrilla Removible tiene tres tipos diferentes.
¡Felicitaciones por la compra de su Horno Tostador para 6 Rebanadas
SUNBEAM
®
!
Sunbeam ha diseñado su Horno Tostador para ofrecerle la mejor calidad,
facilidad de uso y conveniencia.
Antes de utilizar su Horno Tostador por primera vez, quite la rejilla,
el recipiente para hornear y la parrilla para asar. Lave en agua caliente
y jabonosa. Enjuague y seque bien.
C
ÓMO UTILIZAR
RELOJ DE 60 MINUTOS
IMPORTANTE: El disco del reloj debe usarse con el Disco de control
de temperatura para que el horno caliente. El disco del reloj no trabajará
con el disco de nivel de tostado.
1. Gire el disco de control de temperatura al nivel deseado
de temperatura para descongelar, hornear o asar.
2. Gire el disco del reloj al tiempo adecuado para que los alimentos
comiencen a cocinarse (hasta 60 minutos). Una señal será emitida cuando
el tiempo haya expirado. El horno dejará de calentar cuando el reloj
alcance la posición de apagado “OFF”.
3. Cuando haya terminado, gire el disco de control de temperatura
a la posición de “0”.

7
7
T
OASTING/TOP BROWNING
1. For best results, turn the 3-Position Slide Rack over and slide it into
the Oven in the higher position.
2. Turn the Temperature Control Dial to the “TOAST” position.
3. Select the toast color setting and press the Toast Button. The Oven
will automatically shut off when the desired toast cycle is done.
NOTE:
Always use the Baking Pan when melting, crisping and top
browning.
4. To stop toasting or top browning, in the middle of a cycle, open the
door beyond the first notch position. To resume toasting, shut the door
and press the Toast Button again.
DEFROSTING
1. When defrosting, remove all plastic/paper wrappings and rewrap in
aluminum foil. Do not preheat.
2. Turn the Temperature Control Dial to the 200°F mark.
3. Set the Timer Dial to 15 to 20 minutes per side for meats/fish 1/2-inch
or thicker to defrost. Always cook foods promptly after thawing.
4. When finished, turn the Temperature Control Dial to “O”.
BAKING
1. Set the 3-Position Slide Rack. It can be in a higher or lower position,
depending on the food. For thin foods like cookies, use the higher
position; for foods like frozen entrées, use the lower position.
2. Turn the Temperature Control Dial to the desired temperature setting.
Always preheat 5 minutes and use the Baking Pan.
3. Turn the Timer Dial to the appropriate cooking time.
4. The upper and lower heating elements will cycle on and off to maintain
the temperature and the Indicator Light may become brighter. The Oven
will automatically shut off when the set time has expired or if the door
is opened beyond the first notch. To continue operating, close the door.
Watch for doneness.
5. When finished, turn the Temperature Control Dial to “O”.
TOSTANDO/DORANDO
1. Para mejores resultados, voltee la rejilla deslizable de 3 posiciones
y deslícela dentro del horno colocándola en su posición mas alta.
2. Gire el Disco de Control de Temperatura a la posición de
la función para tostar “TOAST”.
3. Seleccione el nivel de tostado y presione el botón para tostar.
El horno se apagará automáticamente cuando el ciclo de tostado
deseado haya concluido.
NOTA:
Siempre use el recipiente para hornear cuando derrita,
tueste y dore alimentos.
4. Para detener el tostado o el dorado a la mitad de un ciclo, abra la puerta
pasando la posición de la primera ranura. Para continuar tostado,
cierre la puerta y presione una vez mas el botón para tostar.
DESCONGELANDO
1. Cuando descongele alimentos, quite todos los empaques de plástico
y/o papel del alimento y envuélvalo con papel aluminio. No caliente
previamente el horno.
2.
Gire el Disco de Control de Temperatura y colóquelo en la marca de 200°F.
3. Para descongelar carnes o pescado de 1/2 pulgada de grosor descongele
de 15 a 20 minutos por cada lado. Siempre cocine los alimentos
inmediatamente después de descongelarlos.
4. Cuando haya terminado, gire el Disco de Control de Temperatura
a la posición de “0”.
HORNEANDO
1. Coloque la rejilla deslizable de 3 posiciones. Puede estar en una posición
alta o baja, dependiendo del tamaño del alimento que va a cocinar.
Para alimentos delgados como galletas, use la posición mas alta,
para alimentos como comidas congeladas, use la posición mas baja.
2.
Gire el Disco de Control de Temperatura al nivel de temperatura deseada.
Siempre caliente el horno previamente durante 5 minutos y utilice
el recipiente para hornear.
3. Gire el disco del reloj al tiempo adecuado de cocción.
4.
Los elementos calefactores superior e inferior funcionarán de manera cíclica
encendiéndose y apagándose para mantener la temperatura y la luz
indica
dora
puede iluminarse un poco más. El horno se apagará
automáticamente
cuando el tiempo seleccionado haya expirado o bien,
si
abre la puerta mas allá de la posición de la primera ranura. Para continuar
operando, cierre la puerta. Observe si los alimentos están listos.
5. Cuando termine, gire el Disco de Control de Temperatura la posición
de apagado “O”.

8
8
B
ROILING
1. Always use the Baking Pan and Broil Tray together. Place the 3-Position
Slide Rack in a higher position inside the Oven.
2. Turn the Temperature Control Dial to “BROIL” and open the door
to the first notch.
3. Turn the Timer Dial to the desired broil time.
4. Only the upper heating elements will glow when broiling; the heating
elements will cycle on and off.
5.
Watch food carefully and remove when finished broiling.
A bell will sound
when your preset time has expired and the heating elements will shut off.
When finished broiling, turn the Temperature Control Dial to “O”.
BAKING PAN AND BROIL TRAY TIPS
• Use Upper Broil Tray Position for faster browning and broiling.
Allow at least 1 inch between food arid heating elements.
• Do not cover Broil Tray with aluminum foil, as this prevents fats
and juices from dripping into the Baking Pan.
CLEANING THE TOASTER OVEN
Before cleaning Toaster Oven, unplug it and allow it to cool. To clean,
wipe with a damp cloth. DO NOT IMMERSE IN WATER! Make sure
to use only mild, soapy water. Abrasive cleansers, scrubbing brushes
and chemical cleaners will damage the non-stick coating on this unit.
Before re-using the unit, make sure it is completely dry.
STORAGE AND MAINTENANCE
Allow the appliance to cool completely before storing. Store the Toaster
Oven in a dry location such as on a table or countertop or in a cupboard
shelf. Wind the electrical cord around the cord storage bracket. Other than
the recommended cleaning, no further user maintenance should be necessary.
Return the Toaster Oven to the Service Center for servicing or repairs.
ASANDO
1. Siempre use juntos el recipiente para hornear y la parrilla para asar.
Coloque dentro del horno la rejilla deslizable de 3 posiciones en
su posición más alta.
2. Gire el Disco de Control de Temperatura a la posición de la función
para asar “BROIL” y deje abierta la puerta hasta la primera ranura.
3. Gire el disco del reloj y seleccione el tiempo deseado para asar.
4. Cuando ase, solamente los elementos calefactores superiores se encenderán;
éstos se encenderán y apagarán cíclicamente.
5. Observe los alimentos cuidadosamente y sáquelos cuando haya terminado
de asarlos. Cuando el tiempo que usted seleccionó haya expirado,
sonará una campana y el elemento calefactor se apagará. Cuando
haya terminado de asar, gire el Disco de Control de Temperatura
a la posición de apagado “O”.
CONSEJOS PARA
USAR EL RECIPIENTE PARA
HORNEAR
YLA
PARRILLA PARA ASAR
• Utilice la posición superior de la parrilla para asar para dorar y asar
alimentos mas rápidamente. Permita que haya un espacio de por lo
menos 1 pulgada entre los alimentos y los elementos calefactores.
• No cubra la parrilla para asar con papel aluminio ya que esto no permitirá
que las grasas y jugos escurran dentro del recipiente para hornear.
LIMPIANDO EL HORNO TOSTADOR
Antes de limpiar el Horno Tostador, desconéctelo y permita que se enfríe.
Límpielo con un paño húmedo.
¡NO LO SUMERJA EN AGUA!
Asegúrese de usar solamente agua y jabón suave. Los limpiadores abrasivos,
los cepillos para tallar y los limpiadores químicos pueden dañar la unidad.
Antes de usar nuevamente el horno, verifique que esté completamente seco.
ALMACENAMIENTO Y MANTENIMIENTO
Permita que el horno se enfríe completamente antes de almacenarlo. Guarde
el horno en un lugar seco como la superficie de una mesa o mostrador o sobre
una repisa. Enrolle el cable eléctrico alrededor del soporte para almacenar el
cable. No es necesario otro mantenimiento mas que la limpieza que se indica
en este manual. Regrese su Horno Tostador a un Centro de Servicio para
su reparación o servicio.

9
9
warranty
One-Year Limited Warranty
Sunbeam Products, Inc. (“Sunbeam”) warrants that for a period of ONE year
from the date of purchase, this product will be free from defects in material
and workmanship. Sunbeam, at its option, will repair or replace this product
or any component of the product found to be defective during this warranty
period. Replacement will be made with a new or remanufactured product
or component. If the product is no longer available, replacement may
be made with a similar product of equal or greater value. This is your
exclusive warranty.
This warranty is valid for the original retail purchaser from the date of
initial
retail purchase and is not transferable. Keep the original sales receipt.
Proof of
purchase is required to obtain warranty performance. Sunbeam
dealers,
service centers or retail stores selling Sunbeam products do not have
the right
to alter, modify or any way change the terms and conditions of this
warranty.
This warranty does not cover normal wear of parts or damage resulting
from any of the following: negligent use or misuse of the product, use on
improper voltage or current, use contrary to the operating instructions,
disassembly, repair or alteration by anyone other than Sunbeam or an
Authorized Sunbeam Service Center. Further, the warranty does not cover
Acts of God or acts of nature, such as fire, flood, hurricanes and tornadoes.
Sunbeam shall not be liable for any incidental or consequential damages
caused by the breach of any express or implied warranty. Except to the extent
prohibited by applicable law, any implied warranty of merchantability or
fitness for a particular purpose is limited in duration to the duration of the
above warranty. Some states, provinces or jurisdictions do not allow the
exclusion or limitation of incidental or consequential damages or limitations
on how long an implied warranty lasts, so the above limitations of exclusion
may not apply to you. This warranty gives you specific legal rights, and you
may also have other rights that vary from state to state or province to province.
N
OTE
:
For products acquired outside the United States, please see country
specific warranty insert.
How to Obtain Warranty Service
Take your oven to an Authorized Sunbeam Service Center.
You can find the nearest Authorized Sunbeam Service Center
by calling 1-800-458-8407 or visit our Website at www.sunbeam.com.
DO NOT RETURN THIS PRODUCT TO THE PLACE OF PURCHASE
garantía
Garantía Limitada de 1 Año
Sunbeam Products Inc. (“Sunbeam”) garantiza que, por un período de UN año
a
partir de la fecha de compra, este producto estará libre de defectos en el material
y en su fabricación. Bajo la opinión de Sunbeam, reparará o repondrá este
producto o cualquier componente del mismo si se encuentra defectuoso durante
el período de garantía. La reposición se hará con un producto o un componente
nuevo o refabricado. Si el producto ya no está disponible, la reposición se hará
con un producto similar de igual o mayor valor. Esta es su garantía exclusiva.
Esta garantía es válida para el comprador original a partir de la fecha de compra
inicial y no es transferible. Guarde el recibo de compra original. La prueba
de
compra es requerida para obtener los servicios de garantía. Los vendedores
de
productos Sunbeam, los centros de servicio o tiendas que vendan productos
Sunbeam no tienen el derecho de alterar, modificar o realizar ningún otro
cambio a los términos y condiciones de esta garantía.
Esta garantía no cubre el desgaste por uso normal o daños de partes como
resultado de lo siguiente: uso negligente o mala utilización del producto,
uso con una corriente eléctrica o un voltaje inadecuados, uso contrario
a las instrucciones de operación, desensambles, reparaciones o alteraciones
que no sean hechas por Sunbeam o por un Centro de Servicio Autorizado
Sunbeam. Además, lla garantía no cubre factores imprevisibles tales como
incendio, inundaciones, huracanes y tornados.
Sunbeam Products Inc. no se hace responsable por ningún daño emergente
o incidental causado por el rompimiento de cualquier garantía expresa o implícita.
Excepto al alcance prohibido por la ley aplicable, cualquier garantía implícita de
comercialización o arreglo para un propósito particular, está limitada en duración
de la garantía antes mencionada
. Algunos estados, provincias o jurisdicciones
no permiten la exclusión o limitación de los daños incidentales o consecuentes
ni las limitaciones en la duración de una garantía implícita, por lo tanto
las limitaciones o exclusiones anteriores pueden no aplicarse en su caso.
Esta garantía le otorga derechos legales específicos y usted también puede tener
otros derechos que varían de un estado a otro o de una provincia a otra.
N
OTA
:
Para productos adquiridos fuera de los Estados Unidos, por favor revise
la tarjeta de garantía incluida por el distribuidor autorizado.
Cómo Obtener Servicio de la Garantía
Lleve su horno tostador a un Centro de Servicio de Productos Sunbeam Autorizado.
Puede obtener una lista de centros de servicio y otras instrucciones de
reparación/reemplazo llamando al teléfono: 1-800-458-8407 o envíe un
mensaje por correo electrónico a: Consumeraffairs@consumer.sunbeam.com.
NO REGRESE ESTE PRODUCTO AL LUGAR DE COMPRA

NO DEVUELVA ESTE PRODUCTO AL LUGAR DONDE FUE ADQUERIDO
Para preguntas sobre los productos:
Sunbeam Consumer Service
P. O. Box 948389
Maitland, FL 32794-8389
1.800.458.8407
consumeraffairs@consumer.sunbeam.com
N
O
E
NVÍE EL
P
RODUCTO A LA
D
IRECCIÓN
A
NTERIOR
©2002 Sunbeam Products, Inc. Todos los derechos reservados.
SUNBEAM
®
es una marca registrada de Sunbeam Inc
.
P.N. 109520
DO NOT SEND THIS PRODUCT TO THE PLACE OF PURCHASE
For product questions:
Sunbeam Consumer Service
P.O. Box 948389
Maitland, FL 32794-8389
1.800.458.8407
consumeraffairs@consumer.sunbeam.com
D
O
N
OT
S
END
P
RODUCT TO THE
A
BOVE
A
DDRESS
©2002 Sunbeam Products, Inc. All rights reserved.
SUNBEAM
®
is a registered trademark of Sunbeam Products, Inc.
P.N. 109520

Manual
del
Usuario
6-SLICE TOASTER OVEN
Model 6191
User
Manual
HORNO TOSTADOR PARA 6 REBADADAS
Modelo 6191

2
2
segirodad
safety
When using electrical appliances, basic safety precautions
should always be followed, including the following:
• READ ALL INSTRUCTIONS, PRODUCT LABELS AND
WARNINGS BEFORE USING THE TOASTER OVEN.
• Do not touch hot surfaces. The temperature of the door or
the outer surface may be high when the toaster oven is
operating. Always use oven mitts when handling hot
materials, and allow metal parts to cool before cleaning.
Allow the unit to cool thoroughly before putting in or taking
off parts. Always use the oven handles when moving the unit.
• When the unit is not in use and before cleaning, unplug
the Toaster Oven from the wall outlet.
NOTE: Make sure the oven is turned off before unplugging.
• To protect against risk of electrical shock, do not immerse
the appliance or plug in water or other liquids.
• Close supervision is always necessary when this or any
appliance is used near children. This appliance is not for
use by children.
• Do not operate this or any appliance with a frayed or
damaged cord or plug or after the appliance malfunctions or
is dropped or has been damaged in any manner. It must be
replaced by the manufacturer or the authorized service facility
or a similarly qualified person in order to avoid a hazard.
• Do not use attachments not recommended by the
manufacturer; they may cause fire, electric shock or injury.
• Do not store any materials, other than manufacturer’s
recommended accessories, in this unit when not in use.
• Do not use outdoors or for commercial purposes. Do not use
this appliance for other than intended use.
• Do not let the cord dangle over the edge of table or counter.
• Do not place the appliance near a hot gas or electric burner
or in a heated oven.
IMPORTANT SAFEGUARDS
PRECAUCIONES IMPORTANTES
Cuando use algún aparato eléctrico siempre deben de seguirse
precauciones básicas de seguridad incluyendo las siguientes:
• LEA CUIDADOSAMENTE TODAS LAS INSTRUCCIONES,
LAS ETIQUETAS DEL PRODUCTO Y LAS ADVERTENCIAS
ANTES DE USAR EL HORNO TOSTADOR.
• No toque las superficies calientes. La temperatura de la puerta o de
la superficie externa del aparato puede ser muy alta cuando el horno
tostador se encuentra en funcionamiento. Siempre use los guantes
resistente al calor cuando maneje materiales calientes. Permita que
las partes metálicas se enfríen antes de limpiar. Permita que la unidad
se enfríe completamente antes de poner o quitar partes.
Siempre utilice las asas del horno cuando mueva la unidad.
• Desconecte el Horno Tostador de la toma de corriente cuando
la unidad no se encuentre en uso y antes de limpiarla. NOTA:
Verifique que el horno esté apagado antes de desconectar.
• Para protegerse contra una descarga eléctrica, no sumerja el aparato
o el enchufe en agua o en otros líquidos.
• Es siempre necesaria la supervisión cercana cuando este aparato sea
utilizado cerca de niños. Este aparato no debe ser usado por niños.
• No opere este y ningún aparato si el cable o el enchufe están
quemados o dañados, o después de que el aparato ha funcionado
inadecuadamente, se ha caído o ha sido dañado en cualquier manera.
El horno debe ser reemplazado por el fabricante o por un centro de
servicio autorizado o por una persona similar calificada. Lo anterior
con el fin de evitar cualquier peligro potencial.
• El uso de accesorios o aditamentos que no sean los recomendados por
el fabricante pueden causar incendios, descargas eléctricas o lesiones.
• Cuando esta unidad no se encuentre en uso, no almacene ningún otro
material que no sean los accesorios recomendados por el fabricante.
• No use en exteriores o para propósitos comerciales.
No use este aparato mas que para lo que ha sido diseñado.
• No permita que el cable cuelgue de la orilla de la mesa
o del mostrador.
• No coloque este aparato cerca de quemadores de estufas
de gas o eléctricas, o dentro de un horno caliente.

3
3
seguridad
• Debe tener extremo cuidado cuando use contenedores que no estén
hechos de metal o de vidrio.
• Puede ocurrir un incendio si el Horno Tostador está en funcionamiento
y se encuentra en contacto o cubierto con materiales inflamables,
incluyendo cortinas, tapicerías, paredes, etc. No coloque ningún objeto
sobre el aparato cuando éste se encuentre en operación.
• No coloque dentro del horno ningún material inflamable, tal como papel,
cartón, plástico o cualquier material que pueda incendiarse o derretirse.
• No cubra con papel aluminio la bandeja para migas o ninguna otra parte
del horno. Este causará que el aparato se sobre caliente.
• El pan puede quemarse. Por lo tanto el horno tostador no debe
usarse cerca o debajo de las cortinas y otros materiales combustibles.
Deben observarse cuidadosamente.
• Los alimentos grandes o utensilios metálicos no deben introducirse
en el Horno Tostador ya que pueden crear el riesgo de incendio
o de descarga eléctrica.
• Cuando ase alimentos, tenga mucho cuidado cuando saque la bandeja
o deseche grasa caliente.
• No limpie el aparato con fibras metálicas abrasivas. Se pueden romper
pequeños pedazos de las fibras y pueden entrar en contacto con las partes
eléctricas, lo anterior puede ocasionar una descarga eléctrica.
• Para apagar este aparato, coloque todos los controles en la posición
de apagado “OFF” o bien, gírelos completamente en sentido contrario
de las manecillas del reloj.
Este Producto Es Sólo para Uso Doméstico
GUARDE ESTAS
INSTRUCCIONES
• Extreme caution should be used when using containers
not constructed of metal or glass.
• A fire may occur if the Toaster Oven is covered or
touching flammable materials, including curtains,
draperies, walls, etc., when in operation. Do not store
any items on top of the appliance when in operation.
• Do not place any flammable materials in oven, such
as paper, cardboard, plastic or any materials that
may catch fire or melt.
• Do not cover crumb tray or any part of the oven with
metal foil. This will cause overheating of the appliance.
• Bread may burn. Therefore the toaster oven must not
be used near or below curtains and other combustible
materials. They must be watched.
• Oversize foods or metal utensils must not be inserted
in the Toaster Oven as they may create a fire or risk of
electrical shock.
• When broiling, use extreme caution when removing tray
or disposing of hot grease.
• Do not clean with metal scouring pads. Pieces can break
off of the pad and touch electrical parts involving a risk
of electrical shock.
• To turn this appliance off, return all controls to the “OFF”
position or fully counter-clockwise.
This Product Is for Household Use Only
SAVE THESE
INSTRUCTIONS
safety

4
4
O
ff
O
n
your toaster oven
1. Temperature Control Dial
2. 60-Minute Timer with Auto Off
3. Cool Touch Handles
4. Toast Color Dial
5. Toast Button
6. Indicator Light
7. Heavy-Duty Baking Pan
and Broiling Tray
8. Crumb Tray
9. Removable Wire Rack
10. Non-Stick Interior Walls
Learning About Your 6-Slice Toaster Oven
5
7
1
2
10
9
8
4
3
6
O
ff
O
n
su horno tostador
1. Disco de Control de Temperatura
2. 60 Minutos con Apagado
Automático
3. Asas Frías al Tacto
4. Disco del Nivel de Tostado
5. Botón para Tostar
6. Luz Indicadora
7. Recipiente para Hornear y Bandeja
para Asar Muy Resistentes
8. Bandeja para Migas
9. Parrilla Removible de Alambre
10. Paredes con Interior Antiadherente
Conociendo de Su Horno Tostador para 6 Rebanadas
5
7
1
2
10
9
8
4
3
6

FEATURES OF YOUR 6-SLICE TOASTER OVEN
LIGHT INDICATOR
• Light is on when the oven is plugged in and is heating.
• Light will also remain on in the broiling and toasting functions as well.
TEMPERATURE
CONTROL DIAL
• Controls the temperature when baking, broiling and toasting.
Permits selection of functions.
• Turn the dial clockwise to your desired setting.
60-MINUTE TIMER WITH AUTO OFF
Timer can be set for up to 60 minutes and will automatically turn the oven
OFF when your set time expires.
NOTE: The timer must be set
(from 1 – 60 minutes)
to begin heating
the oven.
TOAST COLOR DIAL
Turn the dial clockwise to select toast color.
TOAST BUTTON
Push the button (after setting the Temperature Control Dial to the “Toast”
setting) and the oven will automatically turn off when toasting is complete.
HEAVY-DUTY BAKING PAN AND BROILING TRAY
Use for all your baking, broiling and grilling needs.
“COOL TOUCH” SIDE HANDLES
For ease of transportation.
FUNCIONES DE S
U HORNO TOSTADOR
PARA
6 REBANADAS
LUZ INDICADORA
• Cuando el Horno está conectado y en proceso de calentamiento,
la luz está encendida.
• La luz también permanecerá encendida durante las funciones de asar
y tostar.
DISCO DE CONTROL DE TEMPERATURA
• Controla la temperatura al hornear, asar y tostar.
Permite la selección de las funciones.
• Gire el disco en sentido de las manecillas del reloj para seleccionar
que desea utilizar.
RELOJ CON 60 MINUTOS Y APAGADO AUTOMÁTICO
El reloj puede programarse hasta 60 minutos y apagará el horno
automáticamente cuando el tiempo programado en el reloj haya expirado.
NOTA: Para iniciar el calentamiento del horno debe programar el reloj
(de 1 a 60 minutos).
DISCO DEL NIVEL DE TOSTADO
Gire el disco en sentido de las manecillas del reloj para seleccionar el nivel
de tostado.
BOTÓN PARA TOSTAR
Presione el botón (después de seleccionar la función de tostar “Toast” con
el Disco de Control de Temperatura) y el horno se apagará automáticamente
cuando se haya completado el tostado.
R
ECIPIENTE PARA HORNEAR Y BANDEJA PARA ASAR MUY RESISTENTES
Úselas para hornear y asar sus alimentos.
ASAS LATERALES “COOL TOUCH” FRÍAS AL TACTO
Para transportarlo fácilmente.
5
5

6
6
C
ONVENIENT CRUMB TRAY
For crumb or waste collection, pull tray out and discard contents.
NON-STICK INTERIOR WALLS
Allows for easy cleaning.
REMOVABLE WIRE RACK
The Removable Wire Rack has three different settings.
Congratulations on your purchase of a SUNBEAM
®
6-Slice Toaster Oven!
Sunbeam has designed your Toaster Oven to provide the utmost in quality,
ease of use and convenience.
Before you use the Toaster Oven for the first time, separate the rack,
baking pan and broiling tray. Wash in warm, soapy water. Rinse and
dry well.
H
OW TO USE
60-M
INUTE TIMER
IMPORTANT: The Timer Dial must be used with the Temperature Control
Dial for the oven to heat. The timer dial does not work in conjunction
with the Toast Color Dial.
1. Turn the Temperature Control Dial to the desired temperature setting
for defrosting, baking or broiling.
2. Turn the Timer Dial to the appropriate time for the food being cooked
(up to 60 minutes). A bell will signal when the time has expired.
The Oven will stop heating when the Timer reaches “OFF”.
3. When finished, turn the Temperature Control Dial to “O”.
CÓMODA BANDEJA PARA MIGAS
Para recolectar las migas o residuos de alimentos, jálela hacia afuera
y deseche el contenido.
PAREDES CON INTERIOR ANTIADHERENTE
Permite el limpiar más facil.
PARRILLA REMOVIBLE DE ALAMBRE
La Parrilla Removible tiene tres tipos diferentes.
¡Felicitaciones por la compra de su Horno Tostador para 6 Rebanadas
SUNBEAM
®
!
Sunbeam ha diseñado su Horno Tostador para ofrecerle la mejor calidad,
facilidad de uso y conveniencia.
Antes de utilizar su Horno Tostador por primera vez, quite la rejilla,
el recipiente para hornear y la parrilla para asar. Lave en agua caliente
y jabonosa. Enjuague y seque bien.
C
ÓMO UTILIZAR
RELOJ DE 60 MINUTOS
IMPORTANTE: El disco del reloj debe usarse con el Disco de control
de temperatura para que el horno caliente. El disco del reloj no trabajará
con el disco de nivel de tostado.
1. Gire el disco de control de temperatura al nivel deseado
de temperatura para descongelar, hornear o asar.
2. Gire el disco del reloj al tiempo adecuado para que los alimentos
comiencen a cocinarse (hasta 60 minutos). Una señal será emitida cuando
el tiempo haya expirado. El horno dejará de calentar cuando el reloj
alcance la posición de apagado “OFF”.
3. Cuando haya terminado, gire el disco de control de temperatura
a la posición de “0”.

7
7
T
OASTING/TOP BROWNING
1. For best results, turn the 3-Position Slide Rack over and slide it into
the Oven in the higher position.
2. Turn the Temperature Control Dial to the “TOAST” position.
3. Select the toast color setting and press the Toast Button. The Oven
will automatically shut off when the desired toast cycle is done.
NOTE:
Always use the Baking Pan when melting, crisping and top
browning.
4. To stop toasting or top browning, in the middle of a cycle, open the
door beyond the first notch position. To resume toasting, shut the door
and press the Toast Button again.
DEFROSTING
1. When defrosting, remove all plastic/paper wrappings and rewrap in
aluminum foil. Do not preheat.
2. Turn the Temperature Control Dial to the 200°F mark.
3. Set the Timer Dial to 15 to 20 minutes per side for meats/fish 1/2-inch
or thicker to defrost. Always cook foods promptly after thawing.
4. When finished, turn the Temperature Control Dial to “O”.
BAKING
1. Set the 3-Position Slide Rack. It can be in a higher or lower position,
depending on the food. For thin foods like cookies, use the higher
position; for foods like frozen entrées, use the lower position.
2. Turn the Temperature Control Dial to the desired temperature setting.
Always preheat 5 minutes and use the Baking Pan.
3. Turn the Timer Dial to the appropriate cooking time.
4. The upper and lower heating elements will cycle on and off to maintain
the temperature and the Indicator Light may become brighter. The Oven
will automatically shut off when the set time has expired or if the door
is opened beyond the first notch. To continue operating, close the door.
Watch for doneness.
5. When finished, turn the Temperature Control Dial to “O”.
TOSTANDO/DORANDO
1. Para mejores resultados, voltee la rejilla deslizable de 3 posiciones
y deslícela dentro del horno colocándola en su posición mas alta.
2. Gire el Disco de Control de Temperatura a la posición de
la función para tostar “TOAST”.
3. Seleccione el nivel de tostado y presione el botón para tostar.
El horno se apagará automáticamente cuando el ciclo de tostado
deseado haya concluido.
NOTA:
Siempre use el recipiente para hornear cuando derrita,
tueste y dore alimentos.
4. Para detener el tostado o el dorado a la mitad de un ciclo, abra la puerta
pasando la posición de la primera ranura. Para continuar tostado,
cierre la puerta y presione una vez mas el botón para tostar.
DESCONGELANDO
1. Cuando descongele alimentos, quite todos los empaques de plástico
y/o papel del alimento y envuélvalo con papel aluminio. No caliente
previamente el horno.
2.
Gire el Disco de Control de Temperatura y colóquelo en la marca de 200°F.
3. Para descongelar carnes o pescado de 1/2 pulgada de grosor descongele
de 15 a 20 minutos por cada lado. Siempre cocine los alimentos
inmediatamente después de descongelarlos.
4. Cuando haya terminado, gire el Disco de Control de Temperatura
a la posición de “0”.
HORNEANDO
1. Coloque la rejilla deslizable de 3 posiciones. Puede estar en una posición
alta o baja, dependiendo del tamaño del alimento que va a cocinar.
Para alimentos delgados como galletas, use la posición mas alta,
para alimentos como comidas congeladas, use la posición mas baja.
2.
Gire el Disco de Control de Temperatura al nivel de temperatura deseada.
Siempre caliente el horno previamente durante 5 minutos y utilice
el recipiente para hornear.
3. Gire el disco del reloj al tiempo adecuado de cocción.
4.
Los elementos calefactores superior e inferior funcionarán de manera cíclica
encendiéndose y apagándose para mantener la temperatura y la luz
indica
dora
puede iluminarse un poco más. El horno se apagará
automáticamente
cuando el tiempo seleccionado haya expirado o bien,
si
abre la puerta mas allá de la posición de la primera ranura. Para continuar
operando, cierre la puerta. Observe si los alimentos están listos.
5. Cuando termine, gire el Disco de Control de Temperatura la posición
de apagado “O”.

8
8
B
ROILING
1. Always use the Baking Pan and Broil Tray together. Place the 3-Position
Slide Rack in a higher position inside the Oven.
2. Turn the Temperature Control Dial to “BROIL” and open the door
to the first notch.
3. Turn the Timer Dial to the desired broil time.
4. Only the upper heating elements will glow when broiling; the heating
elements will cycle on and off.
5.
Watch food carefully and remove when finished broiling.
A bell will sound
when your preset time has expired and the heating elements will shut off.
When finished broiling, turn the Temperature Control Dial to “O”.
BAKING PAN AND BROIL TRAY TIPS
• Use Upper Broil Tray Position for faster browning and broiling.
Allow at least 1 inch between food arid heating elements.
• Do not cover Broil Tray with aluminum foil, as this prevents fats
and juices from dripping into the Baking Pan.
CLEANING THE TOASTER OVEN
Before cleaning Toaster Oven, unplug it and allow it to cool. To clean,
wipe with a damp cloth. DO NOT IMMERSE IN WATER! Make sure
to use only mild, soapy water. Abrasive cleansers, scrubbing brushes
and chemical cleaners will damage the non-stick coating on this unit.
Before re-using the unit, make sure it is completely dry.
STORAGE AND MAINTENANCE
Allow the appliance to cool completely before storing. Store the Toaster
Oven in a dry location such as on a table or countertop or in a cupboard
shelf. Wind the electrical cord around the cord storage bracket. Other than
the recommended cleaning, no further user maintenance should be necessary.
Return the Toaster Oven to the Service Center for servicing or repairs.
ASANDO
1. Siempre use juntos el recipiente para hornear y la parrilla para asar.
Coloque dentro del horno la rejilla deslizable de 3 posiciones en
su posición más alta.
2. Gire el Disco de Control de Temperatura a la posición de la función
para asar “BROIL” y deje abierta la puerta hasta la primera ranura.
3. Gire el disco del reloj y seleccione el tiempo deseado para asar.
4. Cuando ase, solamente los elementos calefactores superiores se encenderán;
éstos se encenderán y apagarán cíclicamente.
5. Observe los alimentos cuidadosamente y sáquelos cuando haya terminado
de asarlos. Cuando el tiempo que usted seleccionó haya expirado,
sonará una campana y el elemento calefactor se apagará. Cuando
haya terminado de asar, gire el Disco de Control de Temperatura
a la posición de apagado “O”.
CONSEJOS PARA
USAR EL RECIPIENTE PARA
HORNEAR
YLA
PARRILLA PARA ASAR
• Utilice la posición superior de la parrilla para asar para dorar y asar
alimentos mas rápidamente. Permita que haya un espacio de por lo
menos 1 pulgada entre los alimentos y los elementos calefactores.
• No cubra la parrilla para asar con papel aluminio ya que esto no permitirá
que las grasas y jugos escurran dentro del recipiente para hornear.
LIMPIANDO EL HORNO TOSTADOR
Antes de limpiar el Horno Tostador, desconéctelo y permita que se enfríe.
Límpielo con un paño húmedo.
¡NO LO SUMERJA EN AGUA!
Asegúrese de usar solamente agua y jabón suave. Los limpiadores abrasivos,
los cepillos para tallar y los limpiadores químicos pueden dañar la unidad.
Antes de usar nuevamente el horno, verifique que esté completamente seco.
ALMACENAMIENTO Y MANTENIMIENTO
Permita que el horno se enfríe completamente antes de almacenarlo. Guarde
el horno en un lugar seco como la superficie de una mesa o mostrador o sobre
una repisa. Enrolle el cable eléctrico alrededor del soporte para almacenar el
cable. No es necesario otro mantenimiento mas que la limpieza que se indica
en este manual. Regrese su Horno Tostador a un Centro de Servicio para
su reparación o servicio.

9
9
warranty
One-Year Limited Warranty
Sunbeam Products, Inc. (“Sunbeam”) warrants that for a period of ONE year
from the date of purchase, this product will be free from defects in material
and workmanship. Sunbeam, at its option, will repair or replace this product
or any component of the product found to be defective during this warranty
period. Replacement will be made with a new or remanufactured product
or component. If the product is no longer available, replacement may
be made with a similar product of equal or greater value. This is your
exclusive warranty.
This warranty is valid for the original retail purchaser from the date of
initial
retail purchase and is not transferable. Keep the original sales receipt.
Proof of
purchase is required to obtain warranty performance. Sunbeam
dealers,
service centers or retail stores selling Sunbeam products do not have
the right
to alter, modify or any way change the terms and conditions of this
warranty.
This warranty does not cover normal wear of parts or damage resulting
from any of the following: negligent use or misuse of the product, use on
improper voltage or current, use contrary to the operating instructions,
disassembly, repair or alteration by anyone other than Sunbeam or an
Authorized Sunbeam Service Center. Further, the warranty does not cover
Acts of God or acts of nature, such as fire, flood, hurricanes and tornadoes.
Sunbeam shall not be liable for any incidental or consequential damages
caused by the breach of any express or implied warranty. Except to the extent
prohibited by applicable law, any implied warranty of merchantability or
fitness for a particular purpose is limited in duration to the duration of the
above warranty. Some states, provinces or jurisdictions do not allow the
exclusion or limitation of incidental or consequential damages or limitations
on how long an implied warranty lasts, so the above limitations of exclusion
may not apply to you. This warranty gives you specific legal rights, and you
may also have other rights that vary from state to state or province to province.
N
OTE
:
For products acquired outside the United States, please see country
specific warranty insert.
How to Obtain Warranty Service
Take your oven to an Authorized Sunbeam Service Center.
You can find the nearest Authorized Sunbeam Service Center
by calling 1-800-458-8407 or visit our Website at www.sunbeam.com.
DO NOT RETURN THIS PRODUCT TO THE PLACE OF PURCHASE
garantía
Garantía Limitada de 1 Año
Sunbeam Products Inc. (“Sunbeam”) garantiza que, por un período de UN año
a
partir de la fecha de compra, este producto estará libre de defectos en el material
y en su fabricación. Bajo la opinión de Sunbeam, reparará o repondrá este
producto o cualquier componente del mismo si se encuentra defectuoso durante
el período de garantía. La reposición se hará con un producto o un componente
nuevo o refabricado. Si el producto ya no está disponible, la reposición se hará
con un producto similar de igual o mayor valor. Esta es su garantía exclusiva.
Esta garantía es válida para el comprador original a partir de la fecha de compra
inicial y no es transferible. Guarde el recibo de compra original. La prueba
de
compra es requerida para obtener los servicios de garantía. Los vendedores
de
productos Sunbeam, los centros de servicio o tiendas que vendan productos
Sunbeam no tienen el derecho de alterar, modificar o realizar ningún otro
cambio a los términos y condiciones de esta garantía.
Esta garantía no cubre el desgaste por uso normal o daños de partes como
resultado de lo siguiente: uso negligente o mala utilización del producto,
uso con una corriente eléctrica o un voltaje inadecuados, uso contrario
a las instrucciones de operación, desensambles, reparaciones o alteraciones
que no sean hechas por Sunbeam o por un Centro de Servicio Autorizado
Sunbeam. Además, lla garantía no cubre factores imprevisibles tales como
incendio, inundaciones, huracanes y tornados.
Sunbeam Products Inc. no se hace responsable por ningún daño emergente
o incidental causado por el rompimiento de cualquier garantía expresa o implícita.
Excepto al alcance prohibido por la ley aplicable, cualquier garantía implícita de
comercialización o arreglo para un propósito particular, está limitada en duración
de la garantía antes mencionada
. Algunos estados, provincias o jurisdicciones
no permiten la exclusión o limitación de los daños incidentales o consecuentes
ni las limitaciones en la duración de una garantía implícita, por lo tanto
las limitaciones o exclusiones anteriores pueden no aplicarse en su caso.
Esta garantía le otorga derechos legales específicos y usted también puede tener
otros derechos que varían de un estado a otro o de una provincia a otra.
N
OTA
:
Para productos adquiridos fuera de los Estados Unidos, por favor revise
la tarjeta de garantía incluida por el distribuidor autorizado.
Cómo Obtener Servicio de la Garantía
Lleve su horno tostador a un Centro de Servicio de Productos Sunbeam Autorizado.
Puede obtener una lista de centros de servicio y otras instrucciones de
reparación/reemplazo llamando al teléfono: 1-800-458-8407 o envíe un
mensaje por correo electrónico a: Consumeraffairs@consumer.sunbeam.com.
NO REGRESE ESTE PRODUCTO AL LUGAR DE COMPRA

NO DEVUELVA ESTE PRODUCTO AL LUGAR DONDE FUE ADQUERIDO
Para preguntas sobre los productos:
Sunbeam Consumer Service
P. O. Box 948389
Maitland, FL 32794-8389
1.800.458.8407
consumeraffairs@consumer.sunbeam.com
N
O
E
NVÍE EL
P
RODUCTO A LA
D
IRECCIÓN
A
NTERIOR
©2002 Sunbeam Products, Inc. Todos los derechos reservados.
SUNBEAM
®
es una marca registrada de Sunbeam Inc
.
P.N. 109520
DO NOT SEND THIS PRODUCT TO THE PLACE OF PURCHASE
For product questions:
Sunbeam Consumer Service
P.O. Box 948389
Maitland, FL 32794-8389
1.800.458.8407
consumeraffairs@consumer.sunbeam.com
D
O
N
OT
S
END
P
RODUCT TO THE
A
BOVE
A
DDRESS
©2002 Sunbeam Products, Inc. All rights reserved.
SUNBEAM
®
is a registered trademark of Sunbeam Products, Inc.
P.N. 109520
Transcripción de documentos
segirodad PRECAUCIONES IMPORTANTES Cuando use algún aparato eléctrico siempre deben de seguirse precauciones básicas de seguridad incluyendo las siguientes: Para protegerse contra una descarga eléctrica, no sumerja el aparato o el enchufe en agua o en otros líquidos. • Desconecte el Horno Tostador de la toma de corriente cuando la unidad no se encuentre en uso y antes de limpiarla. NOTA: Verifique que el horno esté apagado antes de desconectar. • No toque las superficies calientes. La temperatura de la puerta o de la superficie externa del aparato puede ser muy alta cuando el horno tostador se encuentra en funcionamiento. Siempre use los guantes resistente al calor cuando maneje materiales calientes. Permita que las partes metálicas se enfríen antes de limpiar. Permita que la unidad se enfríe completamente antes de poner o quitar partes. Siempre utilice las asas del horno cuando mueva la unidad. • LEA CUIDADOSAMENTE TODAS LAS INSTRUCCIONES, LAS ETIQUETAS DEL PRODUCTO Y LAS ADVERTENCIAS ANTES DE USAR EL HORNO TOSTADOR. • Do not place the appliance near a hot gas or electric burner or in a heated oven. Es siempre necesaria la supervisión cercana cuando este aparato sea utilizado cerca de niños. Este aparato no debe ser usado por niños. • • Do not let the cord dangle over the edge of table or counter. • • No opere este y ningún aparato si el cable o el enchufe están quemados o dañados, o después de que el aparato ha funcionado inadecuadamente, se ha caído o ha sido dañado en cualquier manera. El horno debe ser reemplazado por el fabricante o por un centro de servicio autorizado o por una persona similar calificada. Lo anterior con el fin de evitar cualquier peligro potencial. Do not use outdoors or for commercial purposes. Do not use this appliance for other than intended use. El uso de accesorios o aditamentos que no sean los recomendados por el fabricante pueden causar incendios, descargas eléctricas o lesiones. • • Do not store any materials, other than manufacturer’s recommended accessories, in this unit when not in use. Cuando esta unidad no se encuentre en uso, no almacene ningún otro material que no sean los accesorios recomendados por el fabricante. • • Do not use attachments not recommended by the manufacturer; they may cause fire, electric shock or injury. No use en exteriores o para propósitos comerciales. No use este aparato mas que para lo que ha sido diseñado. • • Do not operate this or any appliance with a frayed or damaged cord or plug or after the appliance malfunctions or is dropped or has been damaged in any manner. It must be replaced by the manufacturer or the authorized service facility or a similarly qualified person in order to avoid a hazard. When the unit is not in use and before cleaning, unplug the Toaster Oven from the wall outlet. No permita que el cable cuelgue de la orilla de la mesa o del mostrador. • • • Close supervision is always necessary when this or any appliance is used near children. This appliance is not for use by children. Do not touch hot surfaces. The temperature of the door or the outer surface may be high when the toaster oven is operating. Always use oven mitts when handling hot materials, and allow metal parts to cool before cleaning. Allow the unit to cool thoroughly before putting in or taking off parts. Always use the oven handles when moving the unit. No coloque este aparato cerca de quemadores de estufas de gas o eléctricas, o dentro de un horno caliente. • • • To protect against risk of electrical shock, do not immerse the appliance or plug in water or other liquids. READ ALL INSTRUCTIONS, PRODUCT LABELS AND WARNINGS BEFORE USING THE TOASTER OVEN. 2 2 • NOTE: Make sure the oven is turned off before unplugging. • When using electrical appliances, basic safety precautions should always be followed, including the following: safety IMPORTANT SAFEGUARDS seguridad Puede ocurrir un incendio si el Horno Tostador está en funcionamiento y se encuentra en contacto o cubierto con materiales inflamables, incluyendo cortinas, tapicerías, paredes, etc. No coloque ningún objeto sobre el aparato cuando éste se encuentre en operación. • This Product Is for Household Use Only Debe tener extremo cuidado cuando use contenedores que no estén hechos de metal o de vidrio. • SAVE THESE INSTRUCTIONS • Extreme caution should be used when using containers not constructed of metal or glass. Este Producto Es Sólo para Uso Doméstico • Para apagar este aparato, coloque todos los controles en la posición de apagado “OFF” o bien, gírelos completamente en sentido contrario de las manecillas del reloj. A fire may occur if the Toaster Oven is covered or touching flammable materials, including curtains, draperies, walls, etc., when in operation. Do not store any items on top of the appliance when in operation. • • No limpie el aparato con fibras metálicas abrasivas. Se pueden romper pequeños pedazos de las fibras y pueden entrar en contacto con las partes eléctricas, lo anterior puede ocasionar una descarga eléctrica. Do not place any flammable materials in oven, such as paper, cardboard, plastic or any materials that may catch fire or melt. • • Cuando ase alimentos, tenga mucho cuidado cuando saque la bandeja o deseche grasa caliente. Do not cover crumb tray or any part of the oven with metal foil. This will cause overheating of the appliance. • • Los alimentos grandes o utensilios metálicos no deben introducirse en el Horno Tostador ya que pueden crear el riesgo de incendio o de descarga eléctrica. Bread may burn. Therefore the toaster oven must not be used near or below curtains and other combustible materials. They must be watched. • • El pan puede quemarse. Por lo tanto el horno tostador no debe usarse cerca o debajo de las cortinas y otros materiales combustibles. Deben observarse cuidadosamente. Oversize foods or metal utensils must not be inserted in the Toaster Oven as they may create a fire or risk of electrical shock. • • No cubra con papel aluminio la bandeja para migas o ninguna otra parte del horno. Este causará que el aparato se sobre caliente. When broiling, use extreme caution when removing tray or disposing of hot grease. • • No coloque dentro del horno ningún material inflamable, tal como papel, cartón, plástico o cualquier material que pueda incendiarse o derretirse. • Do not clean with metal scouring pads. Pieces can break off of the pad and touch electrical parts involving a risk of electrical shock. • To turn this appliance off, return all controls to the “OFF” position or fully counter-clockwise. 3 GUARDE ESTAS INSTRUCCIONES safety 3 su horno tostador Conociendo de Su Horno Tostador para 6 Rebanadas 1. Disco de Control de Temperatura 7. Recipiente para Hornear y Bandeja para Asar Muy Resistentes 9. Parrilla Removible de Alambre 8. Bandeja para Migas 2. 60 Minutos con Apagado Automático 5 3. Asas Frías al Tacto 6 4 Off 4. Disco del Nivel de Tostado 4 7 8 9 3 On 10. Paredes con Interior Antiadherente 5. Botón para Tostar 6. Luz Indicadora 1 2 10 10 2 1 6. Indicator Light 10. Non-Stick Interior Walls 9. Removable Wire Rack Off On 3 9 8. Crumb Tray 7. Heavy-Duty Baking Pan and Broiling Tray 4 8 7 6 5. Toast Button 4. Toast Color Dial 3. Cool Touch Handles 2. 60-Minute Timer with Auto Off 1. Temperature Control Dial your toaster oven Learning About Your 6-Slice Toaster Oven 5 4 5 For ease of transportation. “COOL TOUCH” SIDE HANDLES Use for all your baking, broiling and grilling needs. HEAVY-DUTY BAKING PAN AND BROILING TRAY Push the button (after setting the Temperature Control Dial to the “Toast” setting) and the oven will automatically turn off when toasting is complete. FUNCIONES DE SU HORNO PARA 6 REBANADAS TOSTADOR LUZ INDICADORA • • Cuando el Horno está conectado y en proceso de calentamiento, la luz está encendida. La luz también permanecerá encendida durante las funciones de asar y tostar. DISCO DE CONTROL DE TEMPERATURA Gire el disco en sentido de las manecillas del reloj para seleccionar que desea utilizar. • Turn the dial clockwise to select toast color. Controla la temperatura al hornear, asar y tostar. Permite la selección de las funciones. • TOAST BUTTON TOAST COLOR DIAL RELOJ NOTE: The timer must be set (from 1 – 60 minutes) to begin heating the oven. Timer can be set for up to 60 minutes and will automatically turn the oven OFF when your set time expires. 60-MINUTE TIMER WITH AUTO OFF CON 60 MINUTOS Y APAGADO AUTOMÁTICO El reloj puede programarse hasta 60 minutos y apagará el horno automáticamente cuando el tiempo programado en el reloj haya expirado. NOTA: Para iniciar el calentamiento del horno debe programar el reloj (de 1 a 60 minutos). DISCO DEL NIVEL DE TOSTADO BOTÓN • Gire el disco en sentido de las manecillas del reloj para seleccionar el nivel de tostado. Controls the temperature when baking, broiling and toasting. Permits selection of functions. • Turn the dial clockwise to your desired setting. TEMPERATURE CONTROL DIAL • Light is on when the oven is plugged in and is heating. • Light will also remain on in the broiling and toasting functions as well. LIGHT INDICATOR FEATURES OF YOUR 6-SLICE TOASTER OVEN PARA TOSTAR Presione el botón (después de seleccionar la función de tostar “Toast” con el Disco de Control de Temperatura) y el horno se apagará automáticamente cuando se haya completado el tostado. RECIPIENTE PARA HORNEAR Y BANDEJA PARA ASAR MUY RESISTENTES Úselas para hornear y asar sus alimentos. ASAS LATERALES “COOL TOUCH” FRÍAS AL TACTO Para transportarlo fácilmente. 5 CÓMODA BANDEJA PARA 6 MIGAS Para recolectar las migas o residuos de alimentos, jálela hacia afuera y deseche el contenido. PAREDES CON INTERIOR ANTIADHERENTE Permite el limpiar más facil. PARRILLA REMOVIBLE DE ALAMBRE La Parrilla Removible tiene tres tipos diferentes. ¡Felicitaciones por la compra de su Horno Tostador para 6 Rebanadas SUNBEAM®! Sunbeam ha diseñado su Horno Tostador para ofrecerle la mejor calidad, facilidad de uso y conveniencia. Antes de utilizar su Horno Tostador por primera vez, quite la rejilla, el recipiente para hornear y la parrilla para asar. Lave en agua caliente y jabonosa. Enjuague y seque bien. CÓMO UTILIZAR RELOJ DE 3. When finished, turn the Temperature Control Dial to “O”. 2. Turn the Timer Dial to the appropriate time for the food being cooked (up to 60 minutes). A bell will signal when the time has expired. The Oven will stop heating when the Timer reaches “OFF ”. 1. Turn the Temperature Control Dial to the desired temperature setting for defrosting, baking or broiling. IMPORTANT: The Timer Dial must be used with the Temperature Control Dial for the oven to heat. The timer dial does not work in conjunction with the Toast Color Dial. 60-MINUTE TIMER HOW TO USE Before you use the Toaster Oven for the first time, separate the rack, baking pan and broiling tray. Wash in warm, soapy water. Rinse and dry well. 60 MINUTOS IMPORTANTE: El disco del reloj debe usarse con el Disco de control de temperatura para que el horno caliente. El disco del reloj no trabajará con el disco de nivel de tostado. 1. Gire el disco de control de temperatura al nivel deseado de temperatura para descongelar, hornear o asar. 2. Gire el disco del reloj al tiempo adecuado para que los alimentos comiencen a cocinarse (hasta 60 minutos). Una señal será emitida cuando el tiempo haya expirado. El horno dejará de calentar cuando el reloj alcance la posición de apagado “OFF”. 3. Cuando haya terminado, gire el disco de control de temperatura a la posición de “0”. Congratulations on your purchase of a SUNBEAM® 6-Slice Toaster Oven! Sunbeam has designed your Toaster Oven to provide the utmost in quality, ease of use and convenience. The Removable Wire Rack has three different settings. REMOVABLE WIRE RACK Allows for easy cleaning. NON-STICK INTERIOR WALLS For crumb or waste collection, pull tray out and discard contents. CONVENIENT CRUMB TRAY 6 7 TOSTANDO/DORANDO 2. 4. The upper and lower heating elements will cycle on and off to maintain the temperature and the Indicator Light may become brighter. The Oven will automatically shut off when the set time has expired or if the door is opened beyond the first notch. To continue operating, close the door. Watch for doneness. 1. 5. When finished, turn the Temperature Control Dial to “O”. 3. 3. Turn the Timer Dial to the appropriate cooking time. 2. Turn the Temperature Control Dial to the desired temperature setting. Always preheat 5 minutes and use the Baking Pan. 1. Set the 3-Position Slide Rack. It can be in a higher or lower position, depending on the food. For thin foods like cookies, use the higher position; for foods like frozen entrées, use the lower position. BAKING 4. When finished, turn the Temperature Control Dial to “O”. 3. Set the Timer Dial to 15 to 20 minutes per side for meats/fish 1/2-inch or thicker to defrost. Always cook foods promptly after thawing. 2. Turn the Temperature Control Dial to the 200°F mark. 1. When defrosting, remove all plastic/paper wrappings and rewrap in aluminum foil. Do not preheat. DEFROSTING 4. To stop toasting or top browning, in the middle of a cycle, open the door beyond the first notch position. To resume toasting, shut the door and press the Toast Button again. NOTE: Always use the Baking Pan when melting, crisping and top browning. 3. Select the toast color setting and press the Toast Button. The Oven will automatically shut off when the desired toast cycle is done. 2. Turn the Temperature Control Dial to the “TOAST” position. 1. For best results, turn the 3-Position Slide Rack over and slide it into the Oven in the higher position. TOASTING/TOP BROWNING 4. Para mejores resultados, voltee la rejilla deslizable de 3 posiciones y deslícela dentro del horno colocándola en su posición mas alta. Gire el Disco de Control de Temperatura a la posición de la función para tostar “TOAST”. Seleccione el nivel de tostado y presione el botón para tostar. El horno se apagará automáticamente cuando el ciclo de tostado deseado haya concluido. NOTA: Siempre use el recipiente para hornear cuando derrita, tueste y dore alimentos. Para detener el tostado o el dorado a la mitad de un ciclo, abra la puerta pasando la posición de la primera ranura. Para continuar tostado, cierre la puerta y presione una vez mas el botón para tostar. DESCONGELANDO 1. Cuando descongele alimentos, quite todos los empaques de plástico y/o papel del alimento y envuélvalo con papel aluminio. No caliente previamente el horno. 2. Gire el Disco de Control de Temperatura y colóquelo en la marca de 200°F. 3. Para descongelar carnes o pescado de 1/2 pulgada de grosor descongele de 15 a 20 minutos por cada lado. Siempre cocine los alimentos inmediatamente después de descongelarlos. 4. Cuando haya terminado, gire el Disco de Control de Temperatura a la posición de “0”. HORNEANDO 1. Coloque la rejilla deslizable de 3 posiciones. Puede estar en una posición alta o baja, dependiendo del tamaño del alimento que va a cocinar. Para alimentos delgados como galletas, use la posición mas alta, para alimentos como comidas congeladas, use la posición mas baja. 2. Gire el Disco de Control de Temperatura al nivel de temperatura deseada. Siempre caliente el horno previamente durante 5 minutos y utilice el recipiente para hornear. 3. Gire el disco del reloj al tiempo adecuado de cocción. 4. Los elementos calefactores superior e inferior funcionarán de manera cíclica encendiéndose y apagándose para mantener la temperatura y la luz indicadora puede iluminarse un poco más. El horno se apagará automáticamente cuando el tiempo seleccionado haya expirado o bien, si abre la puerta mas allá de la posición de la primera ranura. Para continuar operando, cierre la puerta. Observe si los alimentos están listos. 5. Cuando termine, gire el Disco de Control de Temperatura la posición de apagado “O”. 7 8 ASANDO 1. 2. 3. 4. 5. Siempre use juntos el recipiente para hornear y la parrilla para asar. Coloque dentro del horno la rejilla deslizable de 3 posiciones en su posición más alta. Gire el Disco de Control de Temperatura a la posición de la función para asar “BROIL” y deje abierta la puerta hasta la primera ranura. Gire el disco del reloj y seleccione el tiempo deseado para asar. Cuando ase, solamente los elementos calefactores superiores se encenderán; éstos se encenderán y apagarán cíclicamente. Observe los alimentos cuidadosamente y sáquelos cuando haya terminado de asarlos. Cuando el tiempo que usted seleccionó haya expirado, sonará una campana y el elemento calefactor se apagará. Cuando haya terminado de asar, gire el Disco de Control de Temperatura a la posición de apagado “O”. CONSEJOS PARA USAR EL RECIPIENTE Y LA PARRILLA PARA ASAR PARA HORNEAR • Utilice la posición superior de la parrilla para asar para dorar y asar alimentos mas rápidamente. Permita que haya un espacio de por lo menos 1 pulgada entre los alimentos y los elementos calefactores. • No cubra la parrilla para asar con papel aluminio ya que esto no permitirá que las grasas y jugos escurran dentro del recipiente para hornear. LIMPIANDO EL HORNO TOSTADOR Do not cover Broil Tray with aluminum foil, as this prevents fats and juices from dripping into the Baking Pan. Antes de limpiar el Horno Tostador, desconéctelo y permita que se enfríe. Límpielo con un paño húmedo. ¡NO LO SUMERJA EN AGUA! Asegúrese de usar solamente agua y jabón suave. Los limpiadores abrasivos, los cepillos para tallar y los limpiadores químicos pueden dañar la unidad. Antes de usar nuevamente el horno, verifique que esté completamente seco. MAINTENANCE TOASTER OVEN • BROIL TRAY TIPS Y AND THE Use Upper Broil Tray Position for faster browning and broiling. Allow at least 1 inch between food arid heating elements. AND ALMACENAMIENTO Allow the appliance to cool completely before storing. Store the Toaster Oven in a dry location such as on a table or countertop or in a cupboard shelf. Wind the electrical cord around the cord storage bracket. Other than the recommended cleaning, no further user maintenance should be necessary. Return the Toaster Oven to the Service Center for servicing or repairs. STORAGE Before re-using the unit, make sure it is completely dry. Before cleaning Toaster Oven, unplug it and allow it to cool. To clean, wipe with a damp cloth. DO NOT IMMERSE IN WATER! Make sure to use only mild, soapy water. Abrasive cleansers, scrubbing brushes and chemical cleaners will damage the non-stick coating on this unit. CLEANING • BAKING PAN 5. Watch food carefully and remove when finished broiling. A bell will sound when your preset time has expired and the heating elements will shut off. When finished broiling, turn the Temperature Control Dial to “O”. 4. Only the upper heating elements will glow when broiling; the heating elements will cycle on and off. MANTENIMIENTO Permita que el horno se enfríe completamente antes de almacenarlo. Guarde el horno en un lugar seco como la superficie de una mesa o mostrador o sobre una repisa. Enrolle el cable eléctrico alrededor del soporte para almacenar el cable. No es necesario otro mantenimiento mas que la limpieza que se indica en este manual. Regrese su Horno Tostador a un Centro de Servicio para su reparación o servicio. 3. Turn the Timer Dial to the desired broil time. 2. Turn the Temperature Control Dial to “BROIL” and open the door to the first notch. 1. Always use the Baking Pan and Broil Tray together. Place the 3-Position Slide Rack in a higher position inside the Oven. BROILING 8 9 DO NOT RETURN THIS PRODUCT TO THE PLACE OF PURCHASE Take your oven to an Authorized Sunbeam Service Center. You can find the nearest Authorized Sunbeam Service Center by calling 1-800-458-8407 or visit our Website at www.sunbeam.com. How to Obtain Warranty Service Sunbeam shall not be liable for any incidental or consequential damages caused by the breach of any express or implied warranty. Except to the extent prohibited by applicable law, any implied warranty of merchantability or fitness for a particular purpose is limited in duration to the duration of the above warranty. Some states, provinces or jurisdictions do not allow the exclusion or limitation of incidental or consequential damages or limitations on how long an implied warranty lasts, so the above limitations of exclusion may not apply to you. This warranty gives you specific legal rights, and you may also have other rights that vary from state to state or province to province. N OTE : For products acquired outside the United States, please see country specific warranty insert. This warranty does not cover normal wear of parts or damage resulting from any of the following: negligent use or misuse of the product, use on improper voltage or current, use contrary to the operating instructions, disassembly, repair or alteration by anyone other than Sunbeam or an Authorized Sunbeam Service Center. Further, the warranty does not cover Acts of God or acts of nature, such as fire, flood, hurricanes and tornadoes. This warranty is valid for the original retail purchaser from the date of initial retail purchase and is not transferable. Keep the original sales receipt. Proof of purchase is required to obtain warranty performance. Sunbeam dealers, service centers or retail stores selling Sunbeam products do not have the right to alter, modify or any way change the terms and conditions of this warranty. Sunbeam Products, Inc. (“Sunbeam”) warrants that for a period of ONE year from the date of purchase, this product will be free from defects in material and workmanship. Sunbeam, at its option, will repair or replace this product or any component of the product found to be defective during this warranty period. Replacement will be made with a new or remanufactured product or component. If the product is no longer available, replacement may be made with a similar product of equal or greater value. This is your exclusive warranty. warranty One-Year Limited Warranty garantía Garantía Limitada de 1 Año Sunbeam Products Inc. (“Sunbeam”) garantiza que, por un período de UN año a partir de la fecha de compra, este producto estará libre de defectos en el material y en su fabricación. Bajo la opinión de Sunbeam, reparará o repondrá este producto o cualquier componente del mismo si se encuentra defectuoso durante el período de garantía. La reposición se hará con un producto o un componente nuevo o refabricado. Si el producto ya no está disponible, la reposición se hará con un producto similar de igual o mayor valor. Esta es su garantía exclusiva. Esta garantía es válida para el comprador original a partir de la fecha de compra inicial y no es transferible. Guarde el recibo de compra original. La prueba de compra es requerida para obtener los servicios de garantía. Los vendedores de productos Sunbeam, los centros de servicio o tiendas que vendan productos Sunbeam no tienen el derecho de alterar, modificar o realizar ningún otro cambio a los términos y condiciones de esta garantía. Esta garantía no cubre el desgaste por uso normal o daños de partes como resultado de lo siguiente: uso negligente o mala utilización del producto, uso con una corriente eléctrica o un voltaje inadecuados, uso contrario a las instrucciones de operación, desensambles, reparaciones o alteraciones que no sean hechas por Sunbeam o por un Centro de Servicio Autorizado Sunbeam. Además, lla garantía no cubre factores imprevisibles tales como incendio, inundaciones, huracanes y tornados. Sunbeam Products Inc. no se hace responsable por ningún daño emergente o incidental causado por el rompimiento de cualquier garantía expresa o implícita. Excepto al alcance prohibido por la ley aplicable, cualquier garantía implícita de comercialización o arreglo para un propósito particular, está limitada en duración de la garantía antes mencionada. Algunos estados, provincias o jurisdicciones no permiten la exclusión o limitación de los daños incidentales o consecuentes ni las limitaciones en la duración de una garantía implícita, por lo tanto las limitaciones o exclusiones anteriores pueden no aplicarse en su caso. Esta garantía le otorga derechos legales específicos y usted también puede tener otros derechos que varían de un estado a otro o de una provincia a otra. N OTA : Para productos adquiridos fuera de los Estados Unidos, por favor revise la tarjeta de garantía incluida por el distribuidor autorizado. Cómo Obtener Servicio de la Garantía Lleve su horno tostador a un Centro de Servicio de Productos Sunbeam Autorizado. Puede obtener una lista de centros de servicio y otras instrucciones de reparación/reemplazo llamando al teléfono: 1-800-458-8407 o envíe un mensaje por correo electrónico a: [email protected]. NO REGRESE ESTE PRODUCTO AL LUGAR DE COMPRA 9 A BOVE A DDRESS P LACE OF P URCHASE AL TO THE TO THE NO DEVUELVA ESTE PRODUCTO P. N. 109520 ©2002 Sunbeam Products, Inc. All rights reserved. SUNBEAM® is a registered trademark of Sunbeam Products, Inc. D O N OT S END P RODUCT [email protected] For product questions: Sunbeam Consumer Service P. O. Box 948389 Maitland, FL 32794-8389 1.800.458.8407 D O N OT S END T HIS P RODUCT LUGAR DONDE FUE ADQUERIDO Para preguntas sobre los productos: Sunbeam Consumer Service P. O. Box 948389 Maitland, FL 32794-8389 1.800.458.8407 [email protected] NO ENVÍE EL PRODUCTO A LA DIRECCIÓN ANTERIOR ©2002 Sunbeam Products, Inc. Todos los derechos reservados. SUNBEAM® es una marca registrada de Sunbeam Inc. P. N. 109520 HORNO TOSTADOR PARA 6 REBADADAS Manual Modelo 6191 del Usuario User Manual Model 6191 6-SLICE TOASTER OVEN 2 When using electrical appliances, basic safety precautions should always be followed, including the following: safety IMPORTANT SAFEGUARDS No coloque este aparato cerca de quemadores de estufas de gas o eléctricas, o dentro de un horno caliente. READ ALL INSTRUCTIONS, PRODUCT LABELS AND WARNINGS BEFORE USING THE TOASTER OVEN. • • No permita que el cable cuelgue de la orilla de la mesa o del mostrador. • • Do not touch hot surfaces. The temperature of the door or the outer surface may be high when the toaster oven is operating. Always use oven mitts when handling hot materials, and allow metal parts to cool before cleaning. Allow the unit to cool thoroughly before putting in or taking off parts. Always use the oven handles when moving the unit. No use en exteriores o para propósitos comerciales. No use este aparato mas que para lo que ha sido diseñado. When the unit is not in use and before cleaning, unplug the Toaster Oven from the wall outlet. • • Cuando esta unidad no se encuentre en uso, no almacene ningún otro material que no sean los accesorios recomendados por el fabricante. NOTE: Make sure the oven is turned off before unplugging. • To protect against risk of electrical shock, do not immerse the appliance or plug in water or other liquids. El uso de accesorios o aditamentos que no sean los recomendados por el fabricante pueden causar incendios, descargas eléctricas o lesiones. • • • No opere este y ningún aparato si el cable o el enchufe están quemados o dañados, o después de que el aparato ha funcionado inadecuadamente, se ha caído o ha sido dañado en cualquier manera. El horno debe ser reemplazado por el fabricante o por un centro de servicio autorizado o por una persona similar calificada. Lo anterior con el fin de evitar cualquier peligro potencial. Close supervision is always necessary when this or any appliance is used near children. This appliance is not for use by children. • • Es siempre necesaria la supervisión cercana cuando este aparato sea utilizado cerca de niños. Este aparato no debe ser usado por niños. Do not operate this or any appliance with a frayed or damaged cord or plug or after the appliance malfunctions or is dropped or has been damaged in any manner. It must be replaced by the manufacturer or the authorized service facility or a similarly qualified person in order to avoid a hazard. • Do not use attachments not recommended by the manufacturer; they may cause fire, electric shock or injury. Para protegerse contra una descarga eléctrica, no sumerja el aparato o el enchufe en agua o en otros líquidos. • • Do not store any materials, other than manufacturer’s recommended accessories, in this unit when not in use. Desconecte el Horno Tostador de la toma de corriente cuando la unidad no se encuentre en uso y antes de limpiarla. NOTA: Verifique que el horno esté apagado antes de desconectar. • • Do not use outdoors or for commercial purposes. Do not use this appliance for other than intended use. No toque las superficies calientes. La temperatura de la puerta o de la superficie externa del aparato puede ser muy alta cuando el horno tostador se encuentra en funcionamiento. Siempre use los guantes resistente al calor cuando maneje materiales calientes. Permita que las partes metálicas se enfríen antes de limpiar. Permita que la unidad se enfríe completamente antes de poner o quitar partes. Siempre utilice las asas del horno cuando mueva la unidad. • • Do not let the cord dangle over the edge of table or counter. LEA CUIDADOSAMENTE TODAS LAS INSTRUCCIONES, LAS ETIQUETAS DEL PRODUCTO Y LAS ADVERTENCIAS ANTES DE USAR EL HORNO TOSTADOR. • 2 • Do not place the appliance near a hot gas or electric burner or in a heated oven. Cuando use algún aparato eléctrico siempre deben de seguirse precauciones básicas de seguridad incluyendo las siguientes: • segirodad PRECAUCIONES IMPORTANTES 3 seguridad SAVE THESE INSTRUCTIONS • Debe tener extremo cuidado cuando use contenedores que no estén hechos de metal o de vidrio. This Product Is for Household Use Only • Puede ocurrir un incendio si el Horno Tostador está en funcionamiento y se encuentra en contacto o cubierto con materiales inflamables, incluyendo cortinas, tapicerías, paredes, etc. No coloque ningún objeto sobre el aparato cuando éste se encuentre en operación. • No coloque dentro del horno ningún material inflamable, tal como papel, cartón, plástico o cualquier material que pueda incendiarse o derretirse. No cubra con papel aluminio la bandeja para migas o ninguna otra parte del horno. Este causará que el aparato se sobre caliente. El pan puede quemarse. Por lo tanto el horno tostador no debe usarse cerca o debajo de las cortinas y otros materiales combustibles. Deben observarse cuidadosamente. Los alimentos grandes o utensilios metálicos no deben introducirse en el Horno Tostador ya que pueden crear el riesgo de incendio o de descarga eléctrica. Cuando ase alimentos, tenga mucho cuidado cuando saque la bandeja o deseche grasa caliente. No limpie el aparato con fibras metálicas abrasivas. Se pueden romper pequeños pedazos de las fibras y pueden entrar en contacto con las partes eléctricas, lo anterior puede ocasionar una descarga eléctrica. Para apagar este aparato, coloque todos los controles en la posición de apagado “OFF” o bien, gírelos completamente en sentido contrario de las manecillas del reloj. • To turn this appliance off, return all controls to the “OFF” position or fully counter-clockwise. Do not clean with metal scouring pads. Pieces can break off of the pad and touch electrical parts involving a risk of electrical shock. • • When broiling, use extreme caution when removing tray or disposing of hot grease. • • Oversize foods or metal utensils must not be inserted in the Toaster Oven as they may create a fire or risk of electrical shock. • • Bread may burn. Therefore the toaster oven must not be used near or below curtains and other combustible materials. They must be watched. • • • • • • Este Producto Es Sólo para Uso Doméstico GUARDE ESTAS INSTRUCCIONES 3 Do not cover crumb tray or any part of the oven with metal foil. This will cause overheating of the appliance. Do not place any flammable materials in oven, such as paper, cardboard, plastic or any materials that may catch fire or melt. A fire may occur if the Toaster Oven is covered or touching flammable materials, including curtains, draperies, walls, etc., when in operation. Do not store any items on top of the appliance when in operation. • Extreme caution should be used when using containers not constructed of metal or glass. • safety 4 8 4 8. Bandeja para Migas 3 On 9. Parrilla Removible de Alambre Off 4. Disco del Nivel de Tostado 7. Recipiente para Hornear y Bandeja para Asar Muy Resistentes 9 3. Asas Frías al Tacto 5 2. 60 Minutos con Apagado Automático 6 1. Disco de Control de Temperatura 7 su horno tostador Conociendo de Su Horno Tostador para 6 Rebanadas 10. Paredes con Interior Antiadherente 5. Botón para Tostar 6. Luz Indicadora 1 2 10 10 1 2 6. Indicator Light 7. Heavy-Duty Baking Pan and Broiling Tray your toaster oven Learning About Your 6-Slice Toaster Oven 5 1. Temperature Control Dial 4 6 8. Crumb Tray 7 2. 60-Minute Timer with Auto Off 9. Removable Wire Rack 4 8 3. Cool Touch Handles 10. Non-Stick Interior Walls 9 4. Toast Color Dial 3 5. Toast Button Off On 5 FUNCIONES DE SU HORNO TOSTADOR PARA 6 REBANADAS LUZ INDICADORA • Cuando el Horno está conectado y en proceso de calentamiento, la luz está encendida. • La luz también permanecerá encendida durante las funciones de asar y tostar. DISCO DE CONTROL DE TEMPERATURA For ease of transportation. “COOL TOUCH” SIDE HANDLES Use for all your baking, broiling and grilling needs. HEAVY-DUTY BAKING PAN AND BROILING TRAY Push the button (after setting the Temperature Control Dial to the “Toast” setting) and the oven will automatically turn off when toasting is complete. TOAST BUTTON • Controla la temperatura al hornear, asar y tostar. Permite la selección de las funciones. Turn the dial clockwise to select toast color. • Gire el disco en sentido de las manecillas del reloj para seleccionar que desea utilizar. TOAST COLOR DIAL RELOJ CON 60 MINUTOS Y APAGADO AUTOMÁTICO El reloj puede programarse hasta 60 minutos y apagará el horno automáticamente cuando el tiempo programado en el reloj haya expirado. NOTA: Para iniciar el calentamiento del horno debe programar el reloj (de 1 a 60 minutos). DISCO DEL NIVEL DE TOSTADO NOTE: The timer must be set (from 1 – 60 minutes) to begin heating the oven. Timer can be set for up to 60 minutes and will automatically turn the oven OFF when your set time expires. 60-MINUTE TIMER • Gire el disco en sentido de las manecillas del reloj para seleccionar el nivel de tostado. • BOTÓN PARA TOSTAR Presione el botón (después de seleccionar la función de tostar “Toast” con el Disco de Control de Temperatura) y el horno se apagará automáticamente cuando se haya completado el tostado. RECIPIENTE PARA HORNEAR Y BANDEJA PARA ASAR MUY RESISTENTES Úselas para hornear y asar sus alimentos. ASAS LATERALES “COOL TOUCH” FRÍAS AL TACTO Para transportarlo fácilmente. 5 WITH AUTO OFF Turn the dial clockwise to your desired setting. Controls the temperature when baking, broiling and toasting. Permits selection of functions. TEMPERATURE CONTROL DIAL Light will also remain on in the broiling and toasting functions as well. • Light is on when the oven is plugged in and is heating. • LIGHT INDICATOR FEATURES OF YOUR 6-SLICE TOASTER OVEN 6 CÓMODA BANDEJA PARA MIGAS Para recolectar las migas o residuos de alimentos, jálela hacia afuera y deseche el contenido. 60 MINUTOS IMPORTANTE: El disco del reloj debe usarse con el Disco de control de temperatura para que el horno caliente. El disco del reloj no trabajará con el disco de nivel de tostado. 1. Gire el disco de control de temperatura al nivel deseado de temperatura para descongelar, hornear o asar. 2. Gire el disco del reloj al tiempo adecuado para que los alimentos comiencen a cocinarse (hasta 60 minutos). Una señal será emitida cuando el tiempo haya expirado. El horno dejará de calentar cuando el reloj alcance la posición de apagado “OFF”. 3. Cuando haya terminado, gire el disco de control de temperatura a la posición de “0”. NON-STICK INTERIOR WALLS DE Allows for easy cleaning. RELOJ REMOVABLE WIRE RACK CÓMO UTILIZAR The Removable Wire Rack has three different settings. ¡Felicitaciones por la compra de su Horno Tostador para 6 Rebanadas SUNBEAM®! Sunbeam ha diseñado su Horno Tostador para ofrecerle la mejor calidad, facilidad de uso y conveniencia. Antes de utilizar su Horno Tostador por primera vez, quite la rejilla, el recipiente para hornear y la parrilla para asar. Lave en agua caliente y jabonosa. Enjuague y seque bien. Congratulations on your purchase of a SUNBEAM® 6-Slice Toaster Oven! Sunbeam has designed your Toaster Oven to provide the utmost in quality, ease of use and convenience. La Parrilla Removible tiene tres tipos diferentes. Before you use the Toaster Oven for the first time, separate the rack, baking pan and broiling tray. Wash in warm, soapy water. Rinse and dry well. ALAMBRE HOW TO USE DE 60-MINUTE TIMER PARRILLA REMOVIBLE IMPORTANT: The Timer Dial must be used with the Temperature Control Dial for the oven to heat. The timer dial does not work in conjunction with the Toast Color Dial. Permite el limpiar más facil. 1. Turn the Temperature Control Dial to the desired temperature setting for defrosting, baking or broiling. ANTIADHERENTE 2. Turn the Timer Dial to the appropriate time for the food being cooked (up to 60 minutes). A bell will signal when the time has expired. The Oven will stop heating when the Timer reaches “OFF ”. CON INTERIOR 3. When finished, turn the Temperature Control Dial to “O”. PAREDES For crumb or waste collection, pull tray out and discard contents. CONVENIENT CRUMB TRAY 6 7 TOSTANDO/DORANDO 1. Para mejores resultados, voltee la rejilla deslizable de 3 posiciones y deslícela dentro del horno colocándola en su posición mas alta. 2. Gire el Disco de Control de Temperatura a la posición de la función para tostar “TOAST”. 3. Seleccione el nivel de tostado y presione el botón para tostar. El horno se apagará automáticamente cuando el ciclo de tostado deseado haya concluido. NOTA: Siempre use el recipiente para hornear cuando derrita, tueste y dore alimentos. 4. Para detener el tostado o el dorado a la mitad de un ciclo, abra la puerta pasando la posición de la primera ranura. Para continuar tostado, cierre la puerta y presione una vez mas el botón para tostar. DESCONGELANDO 1. Cuando descongele alimentos, quite todos los empaques de plástico y/o papel del alimento y envuélvalo con papel aluminio. No caliente previamente el horno. 2. Gire el Disco de Control de Temperatura y colóquelo en la marca de 200°F. 3. Para descongelar carnes o pescado de 1/2 pulgada de grosor descongele de 15 a 20 minutos por cada lado. Siempre cocine los alimentos inmediatamente después de descongelarlos. 4. Cuando haya terminado, gire el Disco de Control de Temperatura a la posición de “0”. HORNEANDO 1. Coloque la rejilla deslizable de 3 posiciones. Puede estar en una posición alta o baja, dependiendo del tamaño del alimento que va a cocinar. Para alimentos delgados como galletas, use la posición mas alta, para alimentos como comidas congeladas, use la posición mas baja. 2. Gire el Disco de Control de Temperatura al nivel de temperatura deseada. Siempre caliente el horno previamente durante 5 minutos y utilice el recipiente para hornear. 3. Gire el disco del reloj al tiempo adecuado de cocción. 4. Los elementos calefactores superior e inferior funcionarán de manera cíclica encendiéndose y apagándose para mantener la temperatura y la luz indicadora puede iluminarse un poco más. El horno se apagará automáticamente cuando el tiempo seleccionado haya expirado o bien, si abre la puerta mas allá de la posición de la primera ranura. Para continuar operando, cierre la puerta. Observe si los alimentos están listos. 5. Cuando termine, gire el Disco de Control de Temperatura la posición de apagado “O”. 7 5. When finished, turn the Temperature Control Dial to “O”. 4. The upper and lower heating elements will cycle on and off to maintain the temperature and the Indicator Light may become brighter. The Oven will automatically shut off when the set time has expired or if the door is opened beyond the first notch. To continue operating, close the door. Watch for doneness. 3. Turn the Timer Dial to the appropriate cooking time. 2. Turn the Temperature Control Dial to the desired temperature setting. Always preheat 5 minutes and use the Baking Pan. 1. Set the 3-Position Slide Rack. It can be in a higher or lower position, depending on the food. For thin foods like cookies, use the higher position; for foods like frozen entrées, use the lower position. BAKING 4. When finished, turn the Temperature Control Dial to “O”. 3. Set the Timer Dial to 15 to 20 minutes per side for meats/fish 1/2-inch or thicker to defrost. Always cook foods promptly after thawing. 2. Turn the Temperature Control Dial to the 200°F mark. 1. When defrosting, remove all plastic/paper wrappings and rewrap in aluminum foil. Do not preheat. DEFROSTING 4. To stop toasting or top browning, in the middle of a cycle, open the door beyond the first notch position. To resume toasting, shut the door and press the Toast Button again. NOTE: Always use the Baking Pan when melting, crisping and top browning. 3. Select the toast color setting and press the Toast Button. The Oven will automatically shut off when the desired toast cycle is done. 2. Turn the Temperature Control Dial to the “TOAST” position. 1. For best results, turn the 3-Position Slide Rack over and slide it into the Oven in the higher position. TOASTING/TOP BROWNING 8 ASANDO Use Upper Broil Tray Position for faster browning and broiling. Allow at least 1 inch between food arid heating elements. BAKING PAN AND BROIL TRAY TIPS 5. Watch food carefully and remove when finished broiling. A bell will sound when your preset time has expired and the heating elements will shut off. When finished broiling, turn the Temperature Control Dial to “O”. 4. Only the upper heating elements will glow when broiling; the heating elements will cycle on and off. 3. Turn the Timer Dial to the desired broil time. 2. Turn the Temperature Control Dial to “BROIL” and open the door to the first notch. 1. Always use the Baking Pan and Broil Tray together. Place the 3-Position Slide Rack in a higher position inside the Oven. Permita que el horno se enfríe completamente antes de almacenarlo. Guarde el horno en un lugar seco como la superficie de una mesa o mostrador o sobre una repisa. Enrolle el cable eléctrico alrededor del soporte para almacenar el cable. No es necesario otro mantenimiento mas que la limpieza que se indica en este manual. Regrese su Horno Tostador a un Centro de Servicio para su reparación o servicio. • MANTENIMIENTO Do not cover Broil Tray with aluminum foil, as this prevents fats and juices from dripping into the Baking Pan. Y • ALMACENAMIENTO TOASTER OVEN Antes de limpiar el Horno Tostador, desconéctelo y permita que se enfríe. Límpielo con un paño húmedo. ¡NO LO SUMERJA EN AGUA! Asegúrese de usar solamente agua y jabón suave. Los limpiadores abrasivos, los cepillos para tallar y los limpiadores químicos pueden dañar la unidad. Antes de usar nuevamente el horno, verifique que esté completamente seco. THE HORNO TOSTADOR CLEANING EL Before cleaning Toaster Oven, unplug it and allow it to cool. To clean, wipe with a damp cloth. DO NOT IMMERSE IN WATER! Make sure to use only mild, soapy water. Abrasive cleansers, scrubbing brushes and chemical cleaners will damage the non-stick coating on this unit. LIMPIANDO Before re-using the unit, make sure it is completely dry. • Utilice la posición superior de la parrilla para asar para dorar y asar alimentos mas rápidamente. Permita que haya un espacio de por lo menos 1 pulgada entre los alimentos y los elementos calefactores. • No cubra la parrilla para asar con papel aluminio ya que esto no permitirá que las grasas y jugos escurran dentro del recipiente para hornear. MAINTENANCE HORNEAR AND PARA STORAGE CONSEJOS PARA USAR EL RECIPIENTE Y LA PARRILLA PARA ASAR Allow the appliance to cool completely before storing. Store the Toaster Oven in a dry location such as on a table or countertop or in a cupboard shelf. Wind the electrical cord around the cord storage bracket. Other than the recommended cleaning, no further user maintenance should be necessary. Return the Toaster Oven to the Service Center for servicing or repairs. 1. Siempre use juntos el recipiente para hornear y la parrilla para asar. Coloque dentro del horno la rejilla deslizable de 3 posiciones en su posición más alta. 2. Gire el Disco de Control de Temperatura a la posición de la función para asar “BROIL” y deje abierta la puerta hasta la primera ranura. 3. Gire el disco del reloj y seleccione el tiempo deseado para asar. 4. Cuando ase, solamente los elementos calefactores superiores se encenderán; éstos se encenderán y apagarán cíclicamente. 5. Observe los alimentos cuidadosamente y sáquelos cuando haya terminado de asarlos. Cuando el tiempo que usted seleccionó haya expirado, sonará una campana y el elemento calefactor se apagará. Cuando haya terminado de asar, gire el Disco de Control de Temperatura a la posición de apagado “O”. BROILING 8 garantía Garantía Limitada de 1 Año Sunbeam Products Inc. (“Sunbeam”) garantiza que, por un período de UN año a partir de la fecha de compra, este producto estará libre de defectos en el material y en su fabricación. Bajo la opinión de Sunbeam, reparará o repondrá este producto o cualquier componente del mismo si se encuentra defectuoso durante el período de garantía. La reposición se hará con un producto o un componente nuevo o refabricado. Si el producto ya no está disponible, la reposición se hará con un producto similar de igual o mayor valor. Esta es su garantía exclusiva. Esta garantía es válida para el comprador original a partir de la fecha de compra inicial y no es transferible. Guarde el recibo de compra original. La prueba de compra es requerida para obtener los servicios de garantía. Los vendedores de productos Sunbeam, los centros de servicio o tiendas que vendan productos Sunbeam no tienen el derecho de alterar, modificar o realizar ningún otro cambio a los términos y condiciones de esta garantía. Esta garantía no cubre el desgaste por uso normal o daños de partes como resultado de lo siguiente: uso negligente o mala utilización del producto, uso con una corriente eléctrica o un voltaje inadecuados, uso contrario a las instrucciones de operación, desensambles, reparaciones o alteraciones que no sean hechas por Sunbeam o por un Centro de Servicio Autorizado Sunbeam. Además, lla garantía no cubre factores imprevisibles tales como incendio, inundaciones, huracanes y tornados. Sunbeam Products Inc. no se hace responsable por ningún daño emergente o incidental causado por el rompimiento de cualquier garantía expresa o implícita. Excepto al alcance prohibido por la ley aplicable, cualquier garantía implícita de comercialización o arreglo para un propósito particular, está limitada en duración de la garantía antes mencionada. Algunos estados, provincias o jurisdicciones no permiten la exclusión o limitación de los daños incidentales o consecuentes ni las limitaciones en la duración de una garantía implícita, por lo tanto las limitaciones o exclusiones anteriores pueden no aplicarse en su caso. Esta garantía le otorga derechos legales específicos y usted también puede tener otros derechos que varían de un estado a otro o de una provincia a otra. N OTA : Para productos adquiridos fuera de los Estados Unidos, por favor revise la tarjeta de garantía incluida por el distribuidor autorizado. Cómo Obtener Servicio de la Garantía Lleve su horno tostador a un Centro de Servicio de Productos Sunbeam Autorizado. Puede obtener una lista de centros de servicio y otras instrucciones de reparación/reemplazo llamando al teléfono: 1-800-458-8407 o envíe un mensaje por correo electrónico a: [email protected]. NO REGRESE ESTE PRODUCTO AL LUGAR DE COMPRA 9 9 DO NOT RETURN THIS PRODUCT TO THE PLACE OF PURCHASE Take your oven to an Authorized Sunbeam Service Center. You can find the nearest Authorized Sunbeam Service Center by calling 1-800-458-8407 or visit our Website at www.sunbeam.com. How to Obtain Warranty Service Sunbeam shall not be liable for any incidental or consequential damages caused by the breach of any express or implied warranty. Except to the extent prohibited by applicable law, any implied warranty of merchantability or fitness for a particular purpose is limited in duration to the duration of the above warranty. Some states, provinces or jurisdictions do not allow the exclusion or limitation of incidental or consequential damages or limitations on how long an implied warranty lasts, so the above limitations of exclusion may not apply to you. This warranty gives you specific legal rights, and you may also have other rights that vary from state to state or province to province. N OTE : For products acquired outside the United States, please see country specific warranty insert. This warranty does not cover normal wear of parts or damage resulting from any of the following: negligent use or misuse of the product, use on improper voltage or current, use contrary to the operating instructions, disassembly, repair or alteration by anyone other than Sunbeam or an Authorized Sunbeam Service Center. Further, the warranty does not cover Acts of God or acts of nature, such as fire, flood, hurricanes and tornadoes. This warranty is valid for the original retail purchaser from the date of initial retail purchase and is not transferable. Keep the original sales receipt. Proof of purchase is required to obtain warranty performance. Sunbeam dealers, service centers or retail stores selling Sunbeam products do not have the right to alter, modify or any way change the terms and conditions of this warranty. Sunbeam Products, Inc. (“Sunbeam”) warrants that for a period of ONE year from the date of purchase, this product will be free from defects in material and workmanship. Sunbeam, at its option, will repair or replace this product or any component of the product found to be defective during this warranty period. Replacement will be made with a new or remanufactured product or component. If the product is no longer available, replacement may be made with a similar product of equal or greater value. This is your exclusive warranty. warranty One-Year Limited Warranty P. N. 109520 ©2002 Sunbeam Products, Inc. All rights reserved. SUNBEAM® is a registered trademark of Sunbeam Products, Inc. D O N OT S END P RODUCT TO THE A BOVE A DDRESS [email protected] For product questions: Sunbeam Consumer Service P. O. Box 948389 Maitland, FL 32794-8389 1.800.458.8407 P URCHASE Sunbeam Consumer Service P. O. Box 948389 Maitland, FL 32794-8389 1.800.458.8407 [email protected] NO ENVÍE EL PRODUCTO A LA DIRECCIÓN ANTERIOR ©2002 Sunbeam Products, Inc. Todos los derechos reservados. SUNBEAM® es una marca registrada de Sunbeam Inc. P. N. 109520 OF Para preguntas sobre los productos: P LACE LUGAR DONDE FUE ADQUERIDO TO THE AL D O N OT S END T HIS P RODUCT NO DEVUELVA ESTE PRODUCTO-
 1
1
-
 2
2
-
 3
3
-
 4
4
-
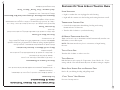 5
5
-
 6
6
-
 7
7
-
 8
8
-
 9
9
-
 10
10
-
 11
11
-
 12
12
-
 13
13
-
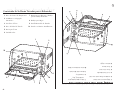 14
14
-
 15
15
-
 16
16
-
 17
17
-
 18
18
-
 19
19
-
 20
20


