Powerfix Profi PPR 4 B2 Operating Instructions Manual
- Tipo
- Operating Instructions Manual


ES Instrucciones de uso Página 1
IT / MT Istruzioni per l‘uso Pagina 7
GB / MT Operating instructions Page 13
DE / AT / CH Bedienungsanleitung Seite 19
Antes de empezar a leer abra la página que contiene las imágenes y, en seguida, familiarícese con todas
las funciones del dispositivo.
Prima di leggere aprire la pagina con le immagini e prendere confi denza con le diverse funzioni
dell’apparecchio.
Before reading, unfold the page containing the illustrations and familiarise yourself with all functions of
the device.
Klappen Sie vor dem Lesen die Seite mit den Abbildungen aus und machen Sie sich anschließend mit allen
Funktionen des Gerätes vertraut.


- 2 -
Desatascador de aire
comprimido
¡Felicidades!
Ha optado por la compra de un producto de alta
calidad. Antes de la primera puesta en servicio, fami-
liaricese con el producto. Lea para ello detenida-
mente las siguientes instrucciones de uso. Utilice el
producto como se describe y para los ámbitos de
aplicación indicados. Guarde convenientemente
estas instrucciones. Entregue todos los documentos
cuando transfiera el producto a terceros.
Uso conforme al previsto
El desatascador de aire comprimido sirve para la
limpieza no contaminante y libre de productos químicos
de desagües, tuberías y otros puntos inaccesibles,
por medio de aire comprimido.
Este aparato está indicado para el uso privado, no
lo utilice para fines comerciales o industriales.
Indicaciones de seguridad
¡Peligro de lesiones!
• Nunca dirija el aparato a animales o personas.
• No permita utilizar el aparato a personas (incluidos
los niños) cuyas facultades físicas, sensoriales
o mentales, así como su falta de conocimientos
o de experiencia, les impida hacer un uso seguro
del mismo si no están bajo vigilancia o han sido
instruidos correctamente acerca del uso del aparato.
• Vigile a los niños para asegurarse de que no
juegan con el aparato.
• Para evitar vapores nocivos, no utilice gasolina,
alcohol, productos de limpieza que contengan
carbono o similares. Este aparato funciona
exclusivamente con aire comprimido, sin adición
de productos químicos.
¡Advertencia de daños materiales!
• Retire todas las piezas sueltas del fregadero,
como, por ejemplo, el filtro de suciedad y tape
todas las aberturas del propio tubo, como, p. ej.
el rebosadero, con un paño mojado o similar.
De este modo se evita el manchado debido a las
salpicaduras que el golpe de presión provoca.
• Utilice el aparato sólo en desagües que puedan
soportar presión. Las tuberías atornilladas soportan
mejor la presión que las tuberías de encaje.
¡Apoye los sifones inestables contra el suelo!
De otro modo, el golpe de presión puede dañar
el sifón.
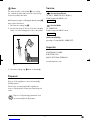
Volumen de suministro
Desatascador de aire comprimido
Cabezal para WC
Cabezal para ducha
Cabezales de Ø 6 cm y Ø 5 cm
Cierre de rebosadero
Instrucciones de uso
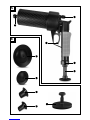
Descripción del aparato
Figura A:
1Válvula de purga de aire
2Cápsula de cierre
3Bomba
4Disparador de golpe de presión
5Orificio de salida de aire
Figura B:
6Cabezal para WC
7Cabezal para ducha
8Cabezal de Ø 6 cm
9Cabezal de Ø 5 cm
0Cierre de rebosadero

- 3 -
Características técnicas
Presión
de funcionamiento máx.: 4 bares
Cabezales: Cabezal de Ø 6 cm
Cabezal de Ø 5 cm
Cabezal para WC
Cabezal para ducha
Empleo
1. Seleccione el cabezal 6/7/8/9adecuado
para el desagüe atascado y encájelo en el orificio
de salida de aire 5. Asegúrese de que está bien
encajado.
2. Retire los filtros u otros accesorios del sifón.
3. Cierre todas las aberturas, como, por ejemplo,
rebosaderos, de la tubería que desea limpiar.
Utilice para los rebosadero el cierre para re-
bosadero 0:
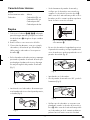
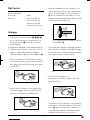
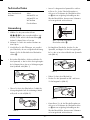
• En los rebosaderos redondos presione y mantenga
presionado el pasador de tensado de modo que
pueda plegar la palanca de cierre y disponga
de una prolongación del pasador de tensado
(fig. 1).
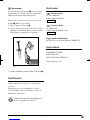
Fig. 1
• Introduzcalo en el rebosadero. Al momento que
toca la palanca de cierre sobre la pared posterior,
se levanta (fig. 2).
Fig. 2
• Suelte lentamente el pasador de tensado y
verifique que el rebosadero esta cerrado por
completo. Los bordes del cierre de rebose 0
debe cerrar de lo más uniforme posible en el re-
bosadero ya de lo contrario podrían expulsarse
hacia el exterior restos de suciedad.
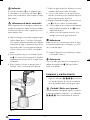
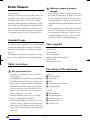
Fig. 3: Cierre de rebosadero colocado
correctamente 0
• En caso de rebosaderos longitudinales presione
el pasador de tensado y vuelque la palanca de
cierre de modo que quede perpendicular con el
pasador de tensado (fig. 4).
Fig. 4
• Introduzcalo en el rebosadero.
• Gire el pasador de tensado unos 90° y sueltelo
lentamente (fig. 5).
Fig. 5
• Verifique que el rebosadero se encuentre com-
pletamente cerrado. Los bordes del cierre de re-
bose 0debe cerrar de lo más uniforme posible
en el rebosadero ya de lo contrario podrían ex-
pulsarse hacia el exterior restos de suciedad.

- 4 -
Indicación:
El cierre de rebosadero 0no se adapta a todos
los rebosaderos. Si el cierre de rebosadero 0no
puede cerrar el rebosadero, utilice un paño o similar
para cerrarlo.
¡Advertencia de daños materiales!
Utilice el aparato sólo en desagües y tuberías que
puedan soportar presión. ¡Apoye los sifones inestables
contra el suelo! De otro modo, el golpe de presión
puede dañar el sifón.
4. Obture el desagüe con un tapón y agregue agua
caliente (hasta aprox. 7 cm sobre el desagüe).
Sólo cuando la tubería atascada esté completa-
mente llena de agua, se alcanza el mejor efecto
de presión posible. Si no hay agua en la tubería,
el efecto de la presión se reduce considerable-
mente.
5. Presurice primero un poco accionando la bom-
ba 33 o 4 veces de forma rápida. Si bombea
demasiado lento puede volver a escapar el aire
del aparato.
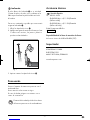
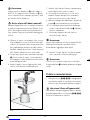
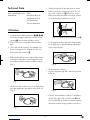
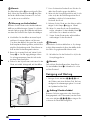
6. Retire el tapón y coloque el aparato sobre el
desagüe, como se representa en la figura 6.
Fig. 6
7. Realice un golpe de presión. Al hacerlo, presione
el aparato firmemente contra el desagüe.
8. Si no se suelta el atasco y está seguro que las
tuberías soportan la presión, aumente la presión
para el siguiente golpe de presión.
9. Extraiga el aparato del agua y accione la bom-
ba 3a 10 veces apróx. de forma rápida.
10. Si desea bajar un poco la presión del aparato,
afloje la válvula de purga de aire 1. Vuelva
a apretarla después.
11. Vuelva a colocar el aparato de nuevo en el
desagüe y accione el golpe de presión.
Advertencia:
Repita este proceso sólo mientras el nivel de agua
se encuentre todavía sobre el desagüe. Si es nece-
sario, vierta más agua.
12. Repita el golpe de presión hasta que se haya
solucionado el atasco.
Advertencia:
Si no es posible generar presión, compruebe la
válvula de purga de aire 1. Enrósquela firme-
mente en el aparato.
Limpieza y mantenimiento
• Limpie los cabezales 6/7/8/9y la carcasa
con un paño húmedo. En caso de suciedad en-
durecida, añada al paño un detergente suave.
¡Cuidado! ¡Daños en el aparato!
No utilice productos de limpieza agresivos o químicos
ni lejías para limpiar el aparato o los cabezales
6/7/8/9. Éstos podrían dañar la superficie.

- 5 -
Indicación:
El polvo blanco de la bomba 3no es suciedad.
Se trata de polvos de talco, que se utilizan en la
fábrica para realizar la primera lubricación de
la bomba.
Tras un uso continuado es posible que sea necesario
engrasar la bomba 3:
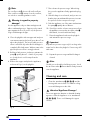
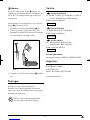
1. Afloje la cápsula de cierre 2.
2. Aplique unas gotas de aceite de silicona en el asa.
Si utiliza otros aceites, las juntas o plásticos
pueden resultar dañados.
Fig. 7
3. Apriete a mano la cápsula de cierre 2.
Evacuación
Evacue el aparato de manera respetuosa con el
medioambiente.
Preste atención a las normas en vigor.
En caso de dudas póngase en contacto con su
centro de evacuación.
El material de embalaje debe desecharse
de forma respetuosa con el medioambiente.
Asistencia técnica
Servicio España
Tel.: 902 59 99 22
(0,08 EUR/Min. + 0,11 EUR/llamada
(tarifa normal))
(0,05 EUR/Min. + 0,11 EUR/llamada
(tarifa reducida))
E-Mail: k[email protected]
Disponibilidad de la línea de atención al cliente:
de lunes a viernes de 8.00 a 20.00 h (CET)
Importador
KOMPERNASS GMBH
BURGSTRASSE 21
44867 BOCHUM, GERMANY
www.kompernass.com
IAN 89562


- 8 -
Stura tubi ad aria
compressa
Congratulazioni!
Con il suo acquisto, ha scelto un prodotto di alta
qualità. Si familiarizzi con il prodotto prima della
prima messa in funzione. Legga attentamente il pre-
sente manuale di istruzioni per l'uso. Utilizzi il pro-
dotto solo come descritto e per i campi di impiego
indicati. Conservi con cura il manuale. In caso di
cessione del prodotto a terzi, consegni anche tutta
la documentazione relativa.
Uso conforme
Il turbinetta ad aria compressa per tubazioni per la
pulizia ecologica, senza uso di sostanze chimiche, di
scarichi, tubazioni e altri punti non accessibili,
tramite la pressione dell'aria.
L'apparecchio è destinato unicamente all'uso privato,
e non è idoneo a fini commerciali o industriali.
Avvertenze di sicurezza
Pericolo di lesioni!
• Non dirigere mai l'apparecchio verso animali
o persone.
• Questo apparecchio non è indicato per l'uso da
parte di persone (inclusi bambini) con limitate
capacità fisiche, sensoriali o mentali o prive del-
l'esperienza e/o della conoscenza necessaria,
a meno che tali persone non vengano sorvegliate
da un responsabile per la sicurezza o abbiano
ricevuto indicazioni sull'impiego dell'apparecchio.
• Sorvegliare i bambini per assicurarsi che non
giochino con l'apparecchio.
• Non utilizzare benzina, alcoli, detergenti al carbone,
o simili, per evitare la formazione di vapori nocivi.
Questo apparecchio funziona esclusivamente
con aria compressa, senza alcun impiego di
sostanze chimiche.
Avviso su possibili danni materiali!
• Rimuovere tutte le parti mobili, come ad es. filtri
antisporco, dal lavandino, e chiudere tutte le
aperture della tubatura, ad es. fori di troppopieno,
con un panno bagnato o simili. Ciò serve a impedire
che lo sporco spruzzi all'esterno a causa della
pressione dell'aria.
• Utilizzare l'apparecchio solo con scarichi in grado
di sopportare la pressione dell'aria. Le tubazioni
avvitate sono più resistenti di quelle semplicemente
collegate per inserimento. Supportare i sifoni
malposizionati contro il pavimento! In caso con-
trario, la pressione potrebbe danneggiare il sifone.
Fornitura
Stura tubi ad aria compressa
Accessorio per WC
Accessorio per doccia
Accessori Ø 6 cm e Ø 5 cm
Tappo per il foro di trabocco
Istruzioni per l'uso
Descrizione dell'apparecchio
Figura A:
1Valvola per lo scarico dell'aria
2Tappo di chiusura
3Pompa
4Dispositivo per il "colpo d'ariete"
5Foro di fuoriuscita dell'aria
Figura B:
6Accessorio per WC
7Accessorio per doccia
8Accessorio Ø 6 cm
9Accessorio Ø 5 cm
0Tappo per il foro di trabocco

- 9 -
Dati tecnici
Pressione massima
di esercizio: 4 bar
Accessori: Accessorio Ø 6 cm
Accessorio Ø 5 cm
Accessorio per WC
Accessorio per doccia
Impiego
1. Selezionare l'accessorio adatto 6/7/8/9
per lo scarico da sturare e inserirlo sul foro di
fuoriuscita dell'aria 5. Verificarne il corretto
posizionamento.
2. Rimuovere eventuali filtri o altri elementi dal sifone.
3. Chiudere tutte le aperture, come ad es. i fori di
trabocco, relative alla tubazione da pulire.
Utilizzare l'apposito tappo per i fori di trabocco 0:
• Per i fori di trabocco rotondi, premere e mante-
nere il perno rotondo per poter aprire la leva di
bloccaggio che si trova in prolunga con il perno
rotondo (ill 1.).
Ill. 1
• Inserirlo nel foro di trabocco. Non appena la
leva di bloccaggio si blocca contro la parete
posteriore, il dispositivo è installato (ill 2.).
Ill. 2
• Rilasciare lentamente il perno cilindrico e con-
trollare che il foro di trabocco sia completamente
chiuso. I bordi del tappo per il foro di trabocco
0devono chiudere il foro di trabocco con la
massima uniformità, altrimenti potrebbe verificar-
si la fuoriuscita di resti di sporco.
Ill. 3: Tappo per il foro di trabocco inserito
correttamente 0
• In presenza di fori di trabocco allungati, premere il
perno cilindrico e ribaltare la leva di bloccaggio
in modo tale che essa sia posizionata ad angolo
retto rispetto al perno cilindrico (ill. 4).
Ill. 4
• Inserirlo nel foro di trabocco.
• Ruotare il perno cilindrico di 90° e rilasciarlo
lentamente (ill. 5).
Ill. 5
• Controllare che il foro di trabocco sia completa-
mente chiuso. I bordi del tappo per il foro di tra-
bocco 0devono chiudere il foro di trabocco
con la massima uniformità, altrimenti potrebbe
verificarsi la fuoriuscita di resti di sporco.

- 10 -
Avvertenza:
il tappo per il foro di trabocco 0non è adatto a
tutti i fori. Se il tappo per il foro di trabocco 0non
riesce a chiudere il foro, utilizzare un panno o simili
per chiudere il foro di trabocco.
Avviso di possibili danni materiali!
Utilizzare l'apparecchio solo con scarichi e tubazioni
in grado di sopportare la pressione dell'aria. Soste-
nere i sifoni malposizionati contro il pavimento! In
caso contrario, la pressione potrebbe danneggiare
il sifone.
4. Chiudere lo scarico con un tappo e fare scorrere
acqua calda (fino a circa 7 cm al di sopra dello
scarico). Solo quando il tubo otturato viene riem-
pito completamente di acqua è possibile ottenere
un effetto ottimale di pressione. Senza acqua nel
tubo, l'effetto della pressione è molto ridotto.
5. Creare un po' di pressione azionando la pompa
3circa 3-4 volte di seguito. Se si pompa trop-
po lentamente, l'aria potrebbe fuoriuscire nuova-
mente dall'apparecchio.
6. Estrarre il tappo e inserire l'apparecchio nello
scarico come descritto nell'illustrazione 6.
Ill. 6
7. Svitare il colpo d'ariete. Premere contemporanea-
mente l'apparecchio contro lo scarico.
8. Se l'ingorgo non si sblocca e si è certi che le
tubature resistano alla pressione, aumentare
la pressione al successivo colpo d'ariete.
9. Rimuovere l'apaprecchio dall'acqua e azionare la
pompa 3consecutivamente per circa 10 volte.
10. Se si desidera ridurre la pressione dall'appa-
recchio, svitare la valvola dell'aria 1. Riavvitare
di nuovo saldamente.
11. Ricollocare l'apparecchio sullo scarico e
azionare il colpo d'ariete.
Avvertenza:
ripetere il procedimento solo fino a quando il livello
dell'acqua si trova al di sopra dello scarico.
Eventualmente aggiungere altra acqua.
12. Ripetere il "colpo d'ariete" solo fino a quando
non si ottiene la risoluzione dell'ingorgo.
Avvertenza:
se non si riesce a ridurre la pressione, controllare
la valvola dell'aria 1. Avvitarla saldamente sull'appa-
recchio.
Pulizia e manutenzione
• Pulire gli accessori 6/7/8/9e l'alloggiamento
con un panno umido. In caso di sporco resistente,
versare un po' di detergente delicato sul panno.
Attenzione! Danni all'apparecchio!
Non utilizzare detergenti aggressivi chimici o abrasivi,
per pulire l'apparecchio o i suoi accessori 6/7/8/9.
Essi possono attaccare le superfici.

- 11 -
Avvertenza:
la polvere bianca sulla pompa 3non è sporcizia.
Si tratta di polvere di talco che viene applicata in
fabbrica al momento della lubrificazione.
Dopo un uso frequente, può succedere che la
pompa 3debba essere oliata:
1. Aprire il tappo di chiusura 2.
2. Inserire qualche goccia di olio di silicone nell'im-
pugnatura. Non utilizzare altri oli, poiché potrebbero
danneggiare le guarnizioni o le plastiche.
Ill. 7
3. Avvitare saldamente a mano il tappo di chiusura 2.
Smaltimento
Smaltire l'apparecchio in modo ecologicamente
conforme.
Rispettare le prescrizioni attualmente in vigore.
In caso di dubbi mettersi in contatto con l'ente di
smaltimento competente.
Smaltire tutti i materiali dell'imballaggio in
modo ecologicamente conforme.
Assistenza
Assistenza Italia
Tel.: 02 36003201
E-Mail: k[email protected]
Assistenza Malta
Tel.: 80062230
E-Mail: k[email protected]
Raggiungibilità della hotline:
dal lunedì al venerdì, dalle 8.00 alle 20.00 (CET)
Importatore
KOMPERNASS GMBH
BURGSTRASSE 21
44867 BOCHUM, GERMANY
www.kompernass.com
IAN 89562
IAN 89562


- 14 -
Drain Cleaner
Congratulations!
With your purchase you have decided in favour of
a quality product. Familiarise yourself with the pro-
duct before taking it into use. To do this, read the
following operating instructions attentively. Use the
product only as described and only for the specified
areas of application. Retain these instructions for
future reference. In addition, pass these documents
on, together with the product, to any future owner.
Intended Usage
This Drain cleaner is intended for the environmentally
friendly and chemical-free cleaning of drainpipes,
pipes and other difficult to reach places, using air
pressure.
This appliance is intended for domestic use only, do
not use it for commercial or industrial applications.
Safety instructions
Risk of personal injury!
• Never direct the appliance at people or other
living creatures.
• This appliance is not intended for use by individuals
(including children) with restricted physical,
physiological or intellectual abilities or deficiences
in experience and/or knowledge unless they are
supervised by a person responsible for their
safety or receive from this person instruction in
how the appliance is to be used.
• Children should be supervised to ensure that
they do not play with the appliance.
• To avoid potentionally noxious fumes, do not use
solvents, alcohols, carbon-based detergents or
similar agents. This appliance works exclusively
with compressed air and without the addition of
chemicals.
Warning in regard to property
damage!
• Remove all loose parts, for example particle sieves,
from the bowl and seal all openings on the same
pipe, for example overflows, with a wet cloth or
something similar. This will avoid soiling from the
sprays which may be generated by the compressive
splice.
• Use this appliance only on drains able to withstand
pressure. Screwed pipes are able to bear more
pressure than inserted pipes. Support poorly
seated pipes against the floor! If you do not, the
compressive splice could damage the pipe.
Items supplied
Drain Cleaner
WC attachment
Shower attachment
Attachments Ø 6 cm and Ø 5 cm
Overflow seal
Operating instructions
Description of the appliance
Figure A:
1Air release valve
2Sealing cap
3Pump
4Compressive splice actuator
5Air exit opening
Figure B:
6WC attachment
7Shower attachment
8Attachment Ø 6 cm
9Attachment Ø 5 cm
0Overflow seal

- 15 -
Technical Data
Max. operating pressure: 4 bar
Attachments: Attachment Ø 6 cm
Attachment Ø 5 cm
WC Attachment
Shower attachment
Utilisation
1. Select the most suitable attachment 6/7/8/9
for the blocked pipe and place it on the air exit
opening 5. Ensure that it is firmly secured.
2. Remove the sieve or any other inserts from the
pipe.
3. Close and seal all openings, for example over-
flows, on the pipe to be cleared. Use the over-
flow seal for the overflows 0:
• With round overflows, press and hold the roll pin
so that the locking lever can be flapped in such
a way that it stands in extension with the roll pin
(Fig. 1).
Fig. 1
• Guide it into the overflow. As soon as the locking
lever hits against the rear wall, it opens itself out
(Fig. 2).
Fig. 2
• Slowly release the roll pin and check to ensure
that the overflow is completely closed. The ed-
ges of the overflow seal 0must close as uni-
formly as possible around the overflow, otherwi-
se residual soiling could be pressed out.
Fig. 3: Correctly inserted overflow seal 0
• For elongated overflows, press the roll pin and tip
the locking lever so that it stands at right angles
to the roll pin (Fig. 4).
Fig. 4
• Guide it into the overflow.
• Turn the roll pin through 90° and slowly release
it (Fig. 5).
Fig. 5
• Check to ensure that the overflow is completely
closed. The edges of the overflow seal 0must
close as uniformly as possible around the overflow,
otherwise residual soiling could be pressed out.

- 16 -
Note:
The overflow seal 0does not fit in all overflows.
If the overflow seal 0cannot close the overflow,
use a cloth or something similar to seal it.
Warning in regard to property
damage!
Use this appliance only on drains and pipeworks
able to withstand pressure. Support poorly seated
pipes against the floor! If you do not, the pressure
surge could damage the pipe.
4. Close the plughole with a stopper and and pour
some warm water into the bowl (up to about 7 cm
above the plughole). The best possible pressure
effect is achieved only when the blocked pipe is
completely filled with water. Without water in the
pipe the pressure effect is strongly reduced.
5. Build up a little pressure, in that you activate the
pump 3quickly about 3 - 4 times. If you pump
too slowly, the air could escape from the
appliance.
6. Remove the stopper and place the appliance,
as shown in Fig. 6, on the plughole .
Fig. 6
7. Then release the pressure surge. When doing
this, press the appliance firmly against the plug-
hole.
8. If the blockage is not released, and you are sure
that the pipe can withstand the pressure, increase
the pressure for the next pressure surge.
9. Take the appliance out of the water and activate
the pump 3rapidly about 10 times.
10. Should you wish to release some pressure from
the appliance, unscrew the air release valve 1.
Afterwards, screw it back down firmly.
11. Place the appliance back onto the plughole
and activate the pressure surge.
Important:
Repeat these pressure surges only for as long as the
water level is above the plughole. If necessary, refill
with water.
12. Repeat the pressure surge until the blockage is
cleared.
Note:
Should you not be able to build up pressure, check
the air release valve 1. Ensure that it is firmly screwed
onto the appliance.
Cleaning and care
• Clean the attachments 6/7/8/9and the
housing with a moist cloth. For stubborn soiling
use a mild detergent on the cloth.
Attention! Appliance Damage!
Do not use aggressive, abrasive or chemical cleaning
agents to clean the appliance or its attachments
6/7/8/9. These could damage the upper
surfaces.

- 17 -
Note:
The white powder on the pump 3is not soiling.
It is a talcum powder that was used in the factory
for the first pump lubrication.
After frequent usage it could happen that the pump 3
may require lubrication:
1. Unscrew the sealing cap 2.
2. Insert a few drops of silicon oil into the handgrip.
Other oils could damage the seals or the plastic.
Fig. 7
3. Screw the sealing cap 2back on hand-tight.
Disposal
Dispose of the appliance in an environmentally-
friendly manner.
Observe the currently applicable regulations.
In case of doubt, please contact your waste disposal
centre.
Dispose of all packaging materials in an
environmentally friendly manner.
Service
Service Great Britain
Tel.: 0871 5000 720 (£ 0.10/Min.)
E-Mail: k[email protected]
Service Malta
Tel.: 80062230
E-Mail: k[email protected]
Hotline availability:
Monday to Friday 08:00 - 20:00 (CET)
Importer
KOMPERNASS GMBH
BURGSTRASSE 21
44867 BOCHUM, GERMANY
www.kompernass.com
IAN 89562
IAN 89562


- 20 -
Pressluft-Rohrreiniger
Herzlichen Glückwunsch!
Mit Ihrem Kauf haben Sie sich für ein hochwertiges
Produkt entschieden. Machen Sie sich vor der er-
sten Inbetriebnahme mit dem Produkt vertraut. Lesen
Sie hierzu aufmerksam die nachfolgende Bedie-
nungsanleitung. Benutzen Sie das Produkt nur wie
beschrieben und für die angegebenen Einsatzberei-
che. Bewahren Sie diese Anleitung gut auf. Händi-
gen Sie alle Unterlagen bei Weitergabe des Pro-
dukts an Dritte ebenfalls mit aus.
Bestimmungsgemäßer
Gebrauch
Der Pressluft-Rohrreiniger dient der umweltfreund-
lichen und chemikalienfreien Reinigung von Abflüs-
sen, Rohren und anderen unzugänglichen Stellen
durch Luftdruck.
Dieses Gerät ist für den privaten Gebrauch be-
stimmt, nutzen Sie es nicht gewerblich oder für indu-
strielle Zwecke.
Sicherheitshinweise
Verletzungsgefahr!
• Richten Sie das Gerät niemals auf Tiere oder an-
dere Personen.
• Dieses Gerät ist nicht dafür bestimmt, durch
Personen (einschließlich Kinder) mit einge-
schränkten physischen, sensorischen oder
geistigen Fähigkeiten oder mangels Erfahrung
und/oder mangels Wissen benutzt zu werden,
es sei denn, sie werden durch eine für ihre
Sicherheit zuständige Person beaufsichtigt oder
erhielten von ihr Anweisungen, wie das Gerät
zu benutzen ist.
• Kinder sollten beaufsichtigt werden, um sicherzu-
stellen, dass sie nicht mit dem Gerät spielen.
• Benutzen Sie keine Benzine, Alkohole, karbon-
haltige Reinigungsmittel oder ähnliches, um
schädliche Dämpfe zur vermeiden. Dieses Gerät
arbeitet ausschließlich mit Pressluft, ohne Zusatz
von Chemie.
Warnung vor Sachschäden!
• Entfernen Sie alle losen Teile, wie zum Beispiel
Schmutz-Siebe aus dem Becken und dichten Sie
alle Öffnungen des selben Rohres, wie z.B.
Überläufe, mit einem nassen Tuch o.ä. ab. Dies
verhindert Verschmutzungen durch Spritzer, die
durch den Druckstoß entstehen.
• Benutzen Sie das Gerät nur bei druckbelastba-
ren Abflüssen. Verschraubte Rohre sind druckbe-
lastbarer als gesteckte Rohre. Stützen Sie
schlecht sitzende Siphons gegen den Fußboden
ab! Ansonsten kann der Druckstoß den Siphon
beschädigen.
Lieferumfang
Pressluft-Rohrreiniger
WC-Aufsatz
Dusch-Aufsatz
Aufsätze Ø 6 cm und Ø 5 cm
Überlaufverschluß
Bedienungsanleitung
Gerätebeschreibung
Abbildung A:
1Luftablass-Ventil
2Verschluss-Kappe
3Pumpe
4Druckstoß-Auslöser
5Luft-Austrittsöffnung
Abbildung B:
6WC-Aufsatz
7Dusch-Aufsatz
8Aufsatz Ø 6 cm
9Aufsatz Ø 5 cm
0Überlaufverschluss

- 21 -
Technische Daten
max. Betriebsdruck: 4 bar
Aufsätze: Aufsatz Ø 6 cm
Aufsatz Ø 5 cm
WC-Aufsatz
Dusch-Aufsatz
Anwendung
1. Wählen Sie den passenden Aufsatz
6/7/8/9für den verstopften Abfluss und
stecken Sie ihn auf die Luft-Austrittsöffnung 5.
Achten Sie darauf, dass er fest sitzt.
2. Nehmen Sie Siebe oder andere Einsätze aus
dem Siphon.
3. Verschließen Sie alle Öffnungen, wie zum Bei-
spiel Überläufe, der zur reinigenden Rohrleitung.
Nutzen Sie für die Überläufe den Überlaufver-
schluss 0:
• Bei runden Überläufen, drücken und halten Sie
den Spannstift, so dass sich der Verriegelungshe-
bel so klappen lässt, dass er in Verlängerung mit
dem Spannstift steht (Abb. 1).
Abb. 1
• Führen Sie ihn in den Überlauf ein. Sobald der
Verriegelungshebel auf die rückwärtige Wand
stößt, stellt er sich auf (Abb. 2).
Abb. 2
• Lassen Sie langsam den Spannstift los und kon-
trollieren Sie, ob der Überlauf komplett ver-
schlossen ist. Die Kanten des Überlaufverschlus-
ses 0müssen möglichst gleichmäßig um den
Überlauf abschließen, da ansonsten Schmutzre-
ste herausgedrückt werden können.
Abb. 3: Korrekt eingesetzter
Überlaufverschluss 0
• Bei länglichen Überläufen, drücken Sie den
Spannstift, und kippen Sie den Verriegelungshe-
bel so, dass er im rechten Winkel zum Spannstift
steht (Abb. 4).
Abb. 4
• Führen Sie ihn in den Überlauf ein.
• Drehen Sie den Spannstift um 90° und lassen
Sie ihn langsam los (Abb. 5).
Abb. 5
• Kontrollieren Sie, ob der Überlauf komplett ver-
schlossen ist. Die Kanten des Überlaufverschlus-
ses 0müssen möglichst gleichmäßig um den
Überlauf abschließen, da ansonsten Schmutzre-
ste herausgedrückt werden können.

- 22 -
Hinweis:
Der Überlaufverschluss 0passt nicht in alle Über-
läufe. Wenn der Überlaufverschluss 0den Über-
lauf nicht schließen kann, benutzen Sie ein Tuch
o.ä., um diesen zu verschließen.
Warnung vor Sachschäden!
Benutzen Sie das Gerät nur bei druckbelastbaren
Abflüssen und Rohrleitungen. Stützen Sie schlecht
sitzende Siphons gegen den Fußboden ab! Anson-
sten kann der Druckstoß den Siphon beschädigen.
4. Verschließen Sie den Abfluss mit einem Stöpsel
und lassen Sie warmes Wasser ein (bis etwa
7 cm über dem Abfluss). Nur wenn das verstopfte
Rohr komplett mit Wasser gefüllt ist, wird die best-
mögliche Druckwirkung erzielt. Ohne Wasser im
Rohr wird die Druckwirkung stark reduziert.
5. Bauen Sie ein wenig Druck auf, indem Sie die
Pumpe 3ca. 3-4 mal zügig betätigen. Wenn
Sie zu langsam pumpen, kann die Luft wieder
aus dem Gerät entweichen.
6. Ziehen Sie den Stöpsel heraus und setzen Sie das
Gerät, wie in Abb. 6 dargestellt, auf den Abfluss.
Abb. 6
7. Lösen Sie dann den Druckstoß aus. Drücken Sie
dabei das Gerät fest gegen den Abfluss.
8. Wenn sich die Verstopfung nicht löst und Sie sich
sicher sind, dass die Rohrleitungen dem Druck
standhalten, erhöhen Sie beim nächsten
Druckstoß den Druck.
9. Nehmen Sie das Gerät aus dem Wasser und be-
tätigen Sie die Pumpe 3zügig ca. 10 mal.
10. Wenn Sie etwas Druck vom Gerät ablassen
wollen, schrauben Sie das Luftablass-Ventil 1
auf. Drehen Sie es danach wieder fest.
11. Setzen Sie das Gerät wieder auf den Abfluss
und betätigen Sie den Druckstoß.
Hinweis:
Wiederholen Sie diesen Ablauf nur so oft, solange
sich der Wasserstand noch über dem Abfluss befin-
det. Füllen Sie gegebenenfalls Wasser nach.
12. Wiederholen Sie den Druckstoß so oft, bis die
Verstopfung gelöst ist.
Hinweis:
Falls sich kein Druck aufbauen lässt, kontrollieren
Sie das Luftablass-Ventil 1. Schrauben Sie es fest
auf das Gerät auf.
Reinigung und Wartung
• Reinigen Sie die Aufsätze 6/7/8/9und
das Gehäuse mit einem feuchten Tuch. Bei hart-
näckigeren Verschmutzungen geben Sie ein mil-
des Spülmittel auf das Tuch.
Achtung! Geräteschäden!
Benutzen Sie keine aggressiven oder chemischen
Reinigungsmittel oder Scheuermittel, um das Gerät
oder seine Aufsätze 6/7/8/9zu reinigen. Die-
se können die Oberflächen angreifen.

- 23 -
Hinweis:
Der weiße Staub an der Pumpe 3ist keine Ver-
schmutzung. Es handelt sich dabei um Talkumpuder,
der für die erste Pumpenschmierung im Werk ver-
wendet wird.
Nach häufiger Verwendung kann es sein, dass die
Pumpe 3geölt werden muss:
1. Schrauben Sie die Verschluss-Kappe 2ab.
2. Geben Sie einige Tropfen Silikon-Öl in den
Handgriff. Bei anderen Ölen können Dichtungen
oder Kunststoffe beschädigt werden.
Abb. 7
3. Schrauben Sie die Verschluss-Kappe 2handfest
auf.
Entsorgen
Entsorgen Sie das Gerät umweltgerecht.
Beachten Sie die aktuell geltenden Vorschriften.
Setzen Sie sich im Zweifelsfall mit Ihrer Entsorgungs-
einrichtung in Verbindung.
Führen Sie alle Verpackungsmaterialien
einer umweltgerechten Entsorgung zu.
Service
Service Deutschland
Tel.: 01805 772 033 (0,14 EUR/Min. aus dem dt.
Festnetz, Mobilfunk max. 0,42 EUR/Min.)
E-Mail: k[email protected]
Service Österreich
Tel.: 0820 201 222 (0,15 EUR/Min.)
E-Mail: k[email protected]
Service Schweiz
Tel.: 0842 665566 (0,08 CHF/Min.,
Mobilfunk max. 0,40 CHF/Min.)
E-Mail: k[email protected]
Erreichbarkeit Hotline:
Montag bis Freitag von 8:00 Uhr - 20:00 Uhr (MEZ)
Importeur
KOMPERNASS GMBH
BURGSTRASSE 21
44867 BOCHUM, DEUTSCHLAND
www.kompernass.com
IAN 89562
IAN 89562
IAN 89562

-
 1
1
-
 2
2
-
 3
3
-
 4
4
-
 5
5
-
 6
6
-
 7
7
-
 8
8
-
 9
9
-
 10
10
-
 11
11
-
 12
12
-
 13
13
-
 14
14
-
 15
15
-
 16
16
-
 17
17
-
 18
18
-
 19
19
-
 20
20
-
 21
21
-
 22
22
-
 23
23
-
 24
24
-
 25
25
-
 26
26
-
 27
27


Powerfix Profi PPR 4 B2 Operating Instructions Manual
- Tipo
- Operating Instructions Manual
en otros idiomas
- italiano: Powerfix Profi PPR 4 B2
- English: Powerfix Profi PPR 4 B2
- Deutsch: Powerfix Profi PPR 4 B2