Premium Levella PPN21 Manual de usuario
- Categoría
- Sandwicheras
- Tipo
- Manual de usuario


Panini Maker
MODEL: PPN21
For your safety and continued enjoyment of this product, read
this instructions manual before using.
1

IMPORTANT SAFEGUARDS
When using electrical appliances, basic safety precautions
should always be followed including the following:
1 Read all instructions.
2 DO NOT touch hot surfaces. Use handles or knobs.
3 To protect against electrical hazards, DO NOT immerse
cord, plugs, or the appliance in water or any other liquid.
4 Close supervision is necessary when any appliance is
used by or near children.
5 Unplug from outlet when not in use and before cleaning.
Allow to cool before putting on or taking off parts, and
before cleaning the appliance.
6 DO NOT operate any appliance with a damaged cord or
plug or after the appliance malfunctions or has been
damaged in any manner. Return appliance to an
authorized service location for examination, repair, or
adjustment.
7 All servicing should be performed by an authorized
service representative.
8 The use of accessories or attachments not
recommended by the manufacturer may cause hazards.
9 DO NOT use outdoors.
10 DO NOT let the cord hang over the edge of the table or
counter, or touch hot surfaces.
11 DO NOT place on or near a hot gas or electric burner, or
in a heated oven.
12 Extreme caution must be used when moving an
appliance containing hot liquids. DO NOT move the unit
when it is still hot.
13 This appliance is for Household Use Only. DO NOT use
appliance for other than its intended use.
14 DO NOT leave unit unattended while in use.
15 DO NOT touch the metallic parts of the unit while the
appliance is operating. These can become very hot.
16 Always unplug the appliance immediately after using
and allow to cool before cleaning and storing.
17 Always place the Panini Maker on a heat resistant
surface. Never place anything between the grill plate
2

and the food i.e.: dish, aluminum foil, etc.
18 CAUTION: This appliance generates heat during use.
Proper precautions must be taken to prevent the risk of
burns, fires or other damage to property caused by
touching the sides or top while in use or during cooling.
SAVE THESE INSTRUCTIONS
HOUSEHOLD USE ONLY
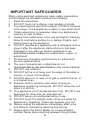
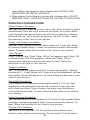
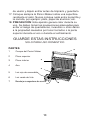
PARTS
1 Grill Housing
2 Top Grill Plate
3 Bottom Grill Plate
4 Handle
5 Red 8Power9 Light
6 Green 8Ready9 Light
7 Oil tray
4
2
1
3
5
6
7
3

BEFORE FIRST USE
1 Carefully unpack your Panini Maker. Remove all packaging
materials.
2 Place the Panini Maker on a flat, level surface close to a 120volt wall
outlet. Open the Panini Maker lid.
3 Wipe off both cooking plates with a damp cloth so that they are
clean and free of any manufacturing oils that may be left on the
surface.
4 Wipe the outside of the Panini Maker housing with a soft damp cloth.
NEVER immerse the Panini Maker, power cord, or plug in water or
any other liquid.
5 Close the Panini Maker.
6 Plug into the wall outlet and heat for 10 minutes. This will burn off
any residue from the manufacturing process.
NOTE: There may be a small amount of smoke or odor during this time
but it will not last longer than a few minutes.
HOW TO USE
1 Place your Panini Maker on a flat dry surface close to
a 120volt wall outlet.
2 Close the Panini Maker and plug into a 120volt A.C.
outlet. The red 8Power9 light will illuminate as soon as the
Panini Maker is plugged into the wall outlet and it will start to
heat up. When the green 8Ready9 light comes on, the Panini
Maker has reached the correct temperature to start cooking.
3 Open the Panini Maker and place your sandwich on
the bottom grill plate. Close the lid and press down gently.
The floating hinge will adjust to the height of the sandwich
and the weight of the top grill plate will gradually and evenly
press the sandwich down during cooking.
NOTE: The green 8Ready9 light will turn on and off as the
Panini Maker cycles to keep the correct cooking
temperature.
4 Grill until food is done to your taste. The toasting time
will depend on the type and thickness of bread and personal
taste. Check doneness during toasting by lifting the top plate
by the handle.
NOTE: Check the progress about every 2 minutes as food
cooks rapidly from both the top and bottom.
NOTE: All parts of the Panini Maker, except the handle,
4

will be very hot during and after toasting. DO NOT touch
any parts of the Panini Maker except the handle until the
unit cools.
IMPORTANT:
Steam may escape from around the edges. Use oven mitts
when opening and closing the Panini Maker.
DO NOT cut food on the non-stick grill plates.
1 When toasting is complete, lift the top cooking plate by
the handle and remove the sandwich using a plastic spatula.
Never use metal utensils as they may scratch the non-stick
cooking plates
2 When finished grilling, unplug the Panini Maker and
remove the food.
IMPORTANT: DO NOT leave an empty Panini Maker
plugged in.
HELPFUL GRILLING HINTS
1 Always preheat the Panini Maker until the green 8Ready9 light
illuminates.
2 It is not necessary to use butter or margarine on the outside of
sandwiches although a thin coating of butter or margarine on the
outer surfaces of the bread will speed up browning and enhance
flavor.
3 Most types of bread can be used. Breads with a high sugar content
will brown more quickly.
4 DO NOT use fresh fruit in fillings.
5 DO NOT use non-stick cooking sprays.
6 Sandwich fillings can get very hot. Be careful when biting into
sandwiches.
CARE AND CLEANING
1 Unplug the Panini Maker from the wall outlet and allow it to cool
completely.
2 Wipe the cooking plates with a sponge or cloth dampened in warm
soapy water. For stubborn spots, cover with a small amount of
cooking oil and leave on for several minutes. Remove with a paper
5

towel. Wipe cooking plates with a damp cloth. DO NOT USE
ABRASIVES OR METAL UTENSILS.
3 Wipe exterior Panini Maker surfaces with a damp cloth. DO NOT
IMMERSE GRILL HOUSING IN WATER OR ANY OTHER LIQUID.
SANDWICH SUGGESTIONS
Grilled Cheese Sandwich
Spread butter or margarine on one side of two slices of white or whole
wheat bread. Place one slice, buttered side down, on a plate. Add a
slice of processed cheese and cover with the second slice of bread,
buttered side up. Use a spatula to place on the grill. To toast, follow
the directions in the 8How to Use9 section.
Turkey and Cheese Sandwich
Spread 2 tbsp. mayonnaise on a whole wheat roll. Layer with sliced
or shaved smoked turkey, 2 slices of mozzarella cheese and tomato
slices. To toast, follow the directions in the 8How to Use9 section.
Tuna Delight
Drain 1 can of tuna. Chop 2 tbsp. (30 ml) hot peppers and 2 tbsp. (30
ml) black olives. Mix tuna, peppers, olives and 2 tbsp. (30 ml)
mayonnaise. Spread on a focaccia bread. To toast, follow the
directions in the 8How to Use9 section.
Veggie Sandwich
Mix 1/4 cup (85 ml) mayonnaise with 1 clove minced garlic. Spread
mixture on 3 – 4 split Kaiser rolls. Layer with grilled vegetables, lettuce,
and tomato. Cover with top of roll. To toast, follow the directions in the
8How to Use9 section.
Roast Beef Sandwich
Cut a baguette into sandwich size lengths, about 6= (15 cm). Split
lengthwise and spread both pieces with mustard. Layer one side
with sliced roast beef, Swiss cheese, red onion rings and lettuce.
Cover with top of bread. To toast, follow the directions in the 8How to
Use9 section.
Italian Sausage Sandwich
Split soft bread rolls in half lengthwise. Fill each roll with cooked Italian
sausage, roasted red peppers and a slice of mozzarella cheese. To
heat, follow the directions in the 8How to Use9 section.
Chicken Pita Sandwich
Split pitas to form pockets. Fill with grilled chicken breast slices,
tzatziki sauce, lettuce and tomatoes. Do not overfill. To heat, follow
6

the directions in the 8How to Use9 section.
NOTE: A short supply cord is provided to reduce the hazards
of becoming entangled in or tripping over a long cord.
Extension cords may be used if care is exercised in their use.
If an extension cord is used, the marked electrical rating of
the detachable power-supply cord or extension cord should
be at least as great as the electrical rating of the appliance. If
the appliance is of the grounded type, the extension cord
should be a grounded 3-wire cord. The extension cord
should be arranged so that it will not drape over the
countertop or tabletop, where it can be pulled on by children
or tripped over.
Rating:120V,1000W
7

Panini Maker
MODELO: PPN21
Para su seguridad y disfrute continuo de este producto, lea este
manual de instrucciones antes de usar.
8

MEDIDAS IMPORTANTES DE SEGURIDAD
Al usar aparatos eléctricos, siempre se deben seguir las
precauciones básicas de seguridad, incluidas las
siguientes:
1. Lea todas las instrucciones.
2. NO toque las superficies calientes. Utilice las asas o
pomos.
3. Para protegerse contra peligros eléctricos, NO sumerja
el cable, los enchufes ni el aparato en agua ni en ningún
otro líquido.
4. Es necesaria una estrecha supervisión cuando cualquier
aparato es utilizado por niños o cerca de ellos.
5. Desenchufe del tomacorriente cuando no esté en uso y
antes de limpiar. Deje enfriar antes de poner o quitar
piezas y antes de limpiar el aparato.
6. NO opere ningún electrodoméstico con un cable o
enchufe dañado o después de que el electrodoméstico
haya fallado o haya sido dañado de alguna manera.
Devuelva el aparato a un lugar de servicio autorizado
para que lo examinen, reparen o ajusten.
7. Todo el servicio debe ser realizado por un representante
de servicio autorizado.
8. El uso de accesorios o aditamentos no recomendados
por el fabricante puede causar peligros.
9. NO lo use al aire libre.
10. NO permita que el cable cuelgue del borde de la mesa o
mostrador, ni toque superficies calientes.
11. NO lo coloque sobre o cerca de un quemador de gas o
eléctrico caliente, ni en un horno caliente.
12. Se debe tener mucho cuidado al mover un aparato que
contenga líquidos calientes. NO mueva la unidad cuando
aún esté caliente.
13. Este electrodoméstico es solo para uso doméstico. NO
use el aparato para otro uso que no sea el indicado.
14. NO deje la unidad desatendida mientras esté en uso.
15. NO toque las partes metálicas de la unidad mientras el
aparato está en funcionamiento. Estos pueden
calentarse mucho.
16. Desenchufe siempre el aparato inmediatamente después
9

de usarlo y déjelo enfriar antes de limpiarlo y guardarlo.
17. Coloque siempre la Panini Maker sobre una superficie
resistente al calor. Nunca coloque nada entre la parrilla y
la comida, por ejemplo: plato, papel de aluminio, etc.
18. PRECAUCIÓN: Este aparato genera calor durante su
uso. Se deben tomar las precauciones adecuadas para
evitar el riesgo de quemaduras, incendios u otros daños
a la propiedad causados por tocar los lados o la parte
superior durante el uso o durante el enfriamiento.
GUARDE ESTAS INSTRUCCIONES
SOLO PARA USO DOMESTICO
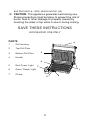
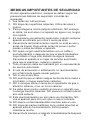
PARTES
1 Cuerpo del Panini Maker
2 Placa superior
3 Placa inferior
4 Asa
5 Luz roja de encendido
6 Luz verde de listo
7 Bandeja recogedora de aceite
4
2
1
3
5
6
7
10

ANTES DEL PRIMER USO
1 Desempaque con cuidado su Panini Maker. Retire todos los
materiales de embalaje.
2 Coloque la Panini Maker en una superficie plana y nivelada cerca de
una toma de corriente de 120 voltios. Abra la tapa del Panini Maker.
3 Limpie ambas placas de cocción con un paño húmedo para que
estén limpias y libres de aceites de fabricación que puedan quedar
en la superficie.
4 Limpie el exterior de la carcasa de la Panini Maker con un paño
suave húmedo. NUNCA sumerja la Panini Maker, el cable de
alimentación o el enchufe en agua o cualquier otro líquido.
5 Cierre el Panini Maker.
6 Conéctelo al tomacorriente de la pared y caliente durante 10 minutos.
Esto quemará cualquier residuo del proceso de fabricación.
NOTA: Puede haber una pequeña cantidad de humo u olor durante
este tiempo, pero no durará más de unos minutos.
COMO USAR
1 Coloque su Panini Maker sobre una superficie plana y
seca cerca de una toma de corriente de 120 voltios.
2 Cierre la Panini Maker y conéctela a un tomacorriente de
CA de 120 voltios. La luz roja de "Encendido" se iluminará
tan pronto como la Panini Maker esté enchufada a la toma
de corriente y comenzará a calentarse. Cuando se enciende
la luz verde de "Listo", la Panini Maker ha alcanzado la
temperatura correcta para comenzar a cocinar.
3 Abra la Panini Maker y coloque su sándwich en la parrilla
inferior. Cierre la tapa y presione suavemente. La bisagra
flotante se ajustará a la altura del sándwich y el peso de la
placa superior de la parrilla presionará el sándwich hacia
abajo de manera gradual y uniforme durante la cocción.
NOTA: La luz verde de "Listo" se encenderá y apagará a
medida que la Panini Maker realiza ciclos para mantener la
temperatura de cocción correcta.
4 Tueste hasta que la comida esté cocida a su gusto. El
tiempo de tostado dependerá del tipo y grosor del pan y del
gusto personal. Compruebe que esté cocido durante el
tostado levantando la placa superior por el asa.
NOTA: Verifique el progreso aproximadamente cada 2
minutos a medida que los alimentos se cocinan rápidamente
11

tanto desde arriba como desde abajo.
NOTA: Todas las partes de la Panini Maker, excepto el
asa, estarán muy calientes durante y después de tostar.
NO toque ninguna parte de la Panini Maker excepto el
asa hasta que la unidad se enfríe.
IMPORTANTE:
Puede salir vapor por los bordes. Use guantes de cocina al
abrir y cerrar la Panini Maker.
NO corte alimentos en las placas de parrilla antiadherentes.
1 Cuando termine de tostar, levante la placa de cocción
superior por el asa y retire el sándwich con una espátula de
plástico. Nunca use utensilios de metal, ya que pueden
rayar las placas de cocción antiadherentes.
2 Cuando termine de tostar, desenchufe la Panini Maker y
retire la comida.
IMPORTANTE: NO deje una Panini Maker vacía enchufada.
CONSEJOS PARA UN MEJOR USO
1 Siempre precaliente la Panini Maker hasta que se encienda la luz
verde de "Listo".
2 No es necesario utilizar mantequilla o margarina en el exterior de
los sándwiches, aunque una capa fina de mantequilla o margarina
en la superficie exterior del pan acelerará el dorado y mejorará el
sabor.
3 Se pueden utilizar la mayoría de los tipos de pan. Los panes con
un alto contenido de azúcar se dorarán más rápidamente.
4 NO use fruta fresca en los rellenos.
5 NO use aerosoles para cocinar antiadherentes.
6 Los rellenos de sándwich pueden calentarse mucho. Tenga
cuidado al morder los sándwiches tostados.
CUIDADO Y LIMPIEZA
1 Desenchufe la Panini Maker del tomacorriente y deje que se enfríe
por completo.
2 Limpie las placas de cocción con una esponja o paño humedecido
en agua tibia y jabón. Para las manchas rebeldes, cúbralas con una
pequeña cantidad de aceite de cocina y dejar actuar durante varios
minutos. Retire con una toalla de papel. Limpie las placas de
12

cocción con un paño húmedo. NO USE ABRASIVOS NI
UTENSILIOS METÁLICOS.
3 Limpie las superficies exteriores de la Panini Maker con un paño
húmedo. NO Sumerja la carcasa de la parrilla en agua ni en ningún
otro líquido.
ALGUNOS SANDWICHES
Sandwich de queso fundido
Unte mantequilla o margarina en un lado de dos rebanadas de pan
de trigo integral o blanco. Coloque una rebanada, con la mantequilla
hacia abajo, en un plato. Agregue una rebanada de queso procesado
y cubra con la segunda rebanada de pan, con la mantequilla hacia
arriba. Use una espátula para colocar en la parrilla. Para tostar, siga
las instrucciones de la sección "Cómo usar".
Sandwich de pavo y queso
Unte 2 cucharadas. mayonesa en un bollo de pan de trigo integral.
Cubra con pavo ahumado en rodajas, 2 rodajas de queso mozzarella
y rodajas de tomate. Para tostar, siga las instrucciones de la sección
"Cómo usar".
Delicia de atún
Escurra 1 lata de atún. Corte 2 cucharadas. (30 ml) de pimientos
picantes y 2 cdas. (30 ml) de aceitunas negras. Mezcle el atún, los
pimientos, las aceitunas y 2 cucharadas (30 ml) de mayonesa. Unte
sobre un pan tipo focaccia. Para tostar, siga las instrucciones de la
sección "Cómo usar".
Sándwich de verduras
Mezcle 1/4 de taza (85 ml) de mayonesa con 1 diente de ajo picado.
Unte la mezcla en 3 - 4 bollos de pan tipo Kaiser cortados. Cubra con
verduras asadas, lechuga y tomate. Cubra con la parte superior del
bollo de pan. Para tostar, siga las instrucciones de la sección "Cómo
usar".
Sándwich de rosbif
Corte una barra de pan en trozos del tamaño de un sándwich, de
unos 15 cm (6 pulgadas). Divida a lo largo y unte ambas piezas con
mostaza. Cubra un lado con rosbif en rodajas, queso suizo, aros de
cebolla roja y lechuga. Cubra con la parte superior del pan. Para
tostar, siga las instrucciones de la sección "Cómo usar".
Sándwich de salchicha italiana
Corte panecillos blandos por la mitad a lo largo. Rellene cada
panecillo con salchicha italiana cocida, pimientos rojos asados y una
13

rodaja de queso mozzarella. Para calentar, siga las instrucciones de
la sección "Cómo usar".
Sándwich De Pollo en pan Pita
Corte las pitas para formar bolsillos. Rellene con rodajas de pechuga
de pollo a la parrilla, salsa tzatziki, lechuga y tomates. No llene
demasiado. Para calentar, siga las instrucciones de la sección
"Cómo usar".
NOTA: Se proporciona un cable de suministro eléctrico corto
para reducir el riesgo de enredarse o tropezarse con un
cable largo. Se pueden usar cables de extensión si se tiene
cuidado en su uso. Si se utiliza un cable de extensión, la
clasificación eléctrica marcada del cable de alimentación
desmontable o del cable de extensión debe ser al menos tan
alta como la clasificación eléctrica del aparato. Si el aparato
es del tipo con conexión a tierra, el cable de extensión debe
ser un cable de 3 hilos con conexión a tierra. El cable de
extensión debe colocarse de manera que no caiga sobre el
tope o la mesa, donde los niños puedan tirar de él o tropezar
con él.
Clasificación:120V,1000W
14

-
 1
1
-
 2
2
-
 3
3
-
 4
4
-
 5
5
-
 6
6
-
 7
7
-
 8
8
-
 9
9
-
 10
10
-
 11
11
-
 12
12
-
 13
13
-
 14
14
-
 15
15
-
 16
16


Premium Levella PPN21 Manual de usuario
- Categoría
- Sandwicheras
- Tipo
- Manual de usuario
en otros idiomas
- English: Premium Levella PPN21 User manual
Otros documentos
-
Bella 13267 Panini Grill Manual de usuario
-
HOLSTEIN HOUSEWARES HH-0910601 Manual de usuario
-
Silvercrest 286211 El manual del propietario
-
West Bend L5789 Manual de usuario
-
Silvercrest 72222 Operation Manuals
-
George Foreman PN2035B El manual del propietario
-
Cuisinart GR-11P1 El manual del propietario
-
Cuisinart GR-6S El manual del propietario
-