® ® ®
Installation Instructions for 70-1720T Installation Instructions for 70-1720T Installation Instructions for 70-1720T
REV. 4/10/17 REV. 4/10/17 REV. 4/10/17
- The World’s best kits.
™
• metraonline.com - The World’s best kits.
™
• metraonline.com - The World’s best kits.
™
• metraonline.com
®
®
®
© COPYRIGHT 2017 METRA ELECTRONICS CORPORATION © COPYRIGHT 2017 METRA ELECTRONICS CORPORATION © COPYRIGHT 2017 METRA ELECTRONICS CORPORATION
• Incorporates the factory keyless-entry security
system into the aftermarket installation
• Incorporates the factory keyless-entry security
system into the aftermarket installation
• Incorporates the factory keyless-entry security
system into the aftermarket installation
HARNESS FEATURES HARNESS FEATURES HARNESS FEATURES
Honda Civic 1996-1998
Keyless Entry Retention
Honda Civic 1996-1998
Keyless Entry Retention
Honda Civic 1996-1998
Keyless Entry Retention
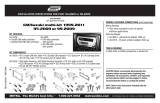
• A) Wiring harness • A) Wiring harness • A) Wiring harness
HARNESS COMPONENTS HARNESS COMPONENTS HARNESS COMPONENTS
• Phillips screwdriver • 8mm socket wrench • Phillips screwdriver • 8mm socket wrench • Phillips screwdriver • 8mm socket wrench
TOOLS REQUIRED TOOLS REQUIRED TOOLS REQUIRED
1. Remove (2) Phillips screws from the bottom edge of the glove box
door, and then remove the door.
2.
Remove (3) Phillips screws from
the lower steering column panel
.
3. Remove (2) Phillips screws
under the climate control panel.
4. Remove (4) Phillips screws from
the lower dash location.
5.
Remove (2) 8mm screws securing
the rear of the radio, and then remove and unplug the radio
.
Disassembly Disassembly Disassembly
Kit Assembly Kit Assembly Kit Assembly
CAUTION!
All accessories, switches, climate controls panels, and especially air bag
indicator lights must be connected before cycling the ignition. Also, do not remove the
factory radio with the key in the on position, or while the vehicle is running.
CAUTION!
All accessories, switches, climate controls panels, and especially air bag
indicator lights must be connected before cycling the ignition. Also, do not remove the
factory radio with the key in the on position, or while the vehicle is running.
CAUTION!
All accessories, switches, climate controls panels, and especially air bag
indicator lights must be connected before cycling the ignition. Also, do not remove the
factory radio with the key in the on position, or while the vehicle is running.
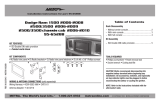
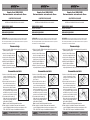
1.
Remove the (2) Phillips screws securing
the rear support bracket to the back of the
factory radio, and then remove. (Figure A)
2.
Re-route the factory wiring harness behind
the lower console and plug the female
end of the Metra harness into the factory
harness. Plug the green security plug into
position “A”, and then plug the male end
of the Metra harness into position “B” in
the back of the factory radio. (Figure A)
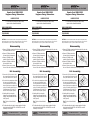
3.
Carefully slide the factory radio
between the metal support brackets
and place the radio behind the lower
dash. (Figure B)
Note: The face of the radio should
point up.
4.
Test the radio and keyless entry for proper operation. Using the
instructions found in the 99-7891 or 89-30-7891, secure the
assembly to the sub-dash.
1.
Remove the (2) Phillips screws securing
the rear support bracket to the back of the
factory radio, and then remove. (Figure A)
2.
Re-route the factory wiring harness behind
the lower console and plug the female
end of the Metra harness into the factory
harness. Plug the green security plug into
position “A”, and then plug the male end
of the Metra harness into position “B” in
the back of the factory radio. (Figure A)
3.
Carefully slide the factory radio
between the metal support brackets
and place the radio behind the lower
dash. (Figure B)
Note: The face of the radio should
point up.
4.
Test the radio and keyless entry for proper operation. Using the
instructions found in the 99-7891 or 89-30-7891, secure the
assembly to the sub-dash.
(Figure A) (Figure A) (Figure A)
(Figure B) (Figure B) (Figure B)

® ® ®
REV. 4/10/17 REV. 4/10/17 REV. 4/10/17
- The World’s best kits.
™
• metraonline.com - The World’s best kits.
™
• metraonline.com - The World’s best kits.
™
• metraonline.com
®
®
®
© COPYRIGHT 2017 METRA ELECTRONICS CORPORATION © COPYRIGHT 2017 METRA ELECTRONICS CORPORATION © COPYRIGHT 2017 METRA ELECTRONICS CORPORATION
Instrucciones de instalación para 70-1720TInstrucciones de instalación para 70-1720TInstrucciones de instalación para 70-1720T
• Incorpora el sistema de seguridad de entrada sin llave
de fábrica en la instalación del mercado secundario
• Incorpora el sistema de seguridad de entrada sin llave
de fábrica en la instalación del mercado secundario
• Incorpora el sistema de seguridad de entrada sin llave
de fábrica en la instalación del mercado secundario
CARACTERÍSTICAS DEL ARNÉS CARACTERÍSTICAS DEL ARNÉS CARACTERÍSTICAS DEL ARNÉS
Honda Civic 1996-1998
Retención de entrada sin llave
Honda Civic 1996-1998
Retención de entrada sin llave
Honda Civic 1996-1998
Retención de entrada sin llave
• A) Arnés de cableado • A) Arnés de cableado • A) Arnés de cableado
COMPONENTES DEL ARNÉS COMPONENTES DEL ARNÉS COMPONENTES DEL ARNÉS
• Destornillador Phillips • llave de tubo 8mm • Destornillador Phillips • llave de tubo 8mm • Destornillador Phillips • llave de tubo 8mm
HERRAMIENTAS REQUERIDAS HERRAMIENTAS REQUERIDAS HERRAMIENTAS REQUERIDAS
1. Quite los (2) tornillos Phillips del borde inferior de la puerta de la
guantera y quite la puerta.
2.
Quite (3) tornillos Phillips del panel
inferior de la columna de dirección
.
3.
Quite (2) tornillos Phillips que están
debajo del panel de control de clima
.
4. Quite (4) tornillos Phillips de la
ubicación inferior del tablero.
5.
Quite los (2) tornillos de 8 mm que
sujetan la parte trasera del radio y luego retire y desconecte la radio
.
Desmontaje Desmontaje Desmontaje
Ensamble del kit Ensamble del kit Ensamble del kit
¡PRECAUCIÓN!
Todos los accesorios, interruptores, paneles de controles de clima y
especialmente las luces del indicador de las bolsas de aire deben estar conectados
antes ciclar la ignición. Además, no quite el radio de fábrica con la llave en la posición o
de encendido ni con el vehículo funcionando.
1.
Quite los (2) tornillos Phillips que sujetan
el soporte de apoyo trasero a la parte
posterior de la radio de fábrica, y luego
quite. (Figura A)
2.
Vuelva a enrutar el arnés de cables de
fábrica detrás de la consola inferior y
conecte el extremo hembra del arnés
Metra al arnés de la fábrica. Enchufe el
enchufe de seguridad verde en la posición
“A” y luego enchufe el extremo macho del
arnés Metra en la posición “B” en la parte
posterior de la radio de fábrica. (Figura A)
3.
Con cuidado, deslice la radio de
fábrica entre los soportes metálicos de
soporte y coloque la radio detrás del
tablero inferior. (Figura B)
Nota: La cara de la radio debe apuntar hacia arriba.
4.
Pruebe la radio y la entrada sin llave para el funcionamiento
correcto. Utilizando las instrucciones que se encuentran en el 99-
7891 o 89-30-7891, asegure el ensamblado al sub-tablero.
(Figura A) (Figura A) (Figura A)
(Figura B) (Figura B) (Figura B)
-
 1
1
-
 2
2