
『安全へのこころがけ』および『ご使用にあたって』を必ずお読みください。
Make sure to read the “PRECAUTIONS” on page 6 and the “Before you use” on page 7.
Assurez-vous de lire la section “PRÉCAUTIONS” à la page 10
et la section “Avant d'utiliser l'instrument” à la page 11.
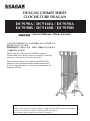
DEAGAN CHIMES SERIES
CLOCHE-TUBE DEAGAN
DC9190A / DC9160A / DC9150A
DC9190B / DC9160B / DC9150B
取扱説明書
/ Owner’s Manual / Mode d’emploi
このたびは DEAGAN チャイムをお買い上げいただきまして
誠にありがとうございます。
取扱説明書をご一読いただき、末長くご愛用いただきますよ
うお願い申し上げます。
Thank you for selecting the DEAGAN chimes.
Please read this owner’s manual carefully, and truly
enjoy this instrument for years to come.
Merci d’avoir choisi d’un cloche-tube DEAGAN.
Veuillez lire ce mode d’emploi attentivement an
d’utiliser agréablement cet instrument pendant de
longues années.

2
チャイムを使用する前に、以下の指示と取扱説明書をよく読んでください。
設置上の注意
楽器をぐらついた台の上や傾いた所など、不安定な場所に置かないでください。落ちたり倒れたりして、けがの原因となります。
取扱い上の注意
楽器にもたれかかったり、乗ったりしないでください。楽器が倒れて、大けがをすることがあります。
楽器のまわりで遊ばないでください。身体をぶつけてけがをするおそれがあります。楽器の転倒の原因にもなります。
お子様が楽器のまわりで遊ばないよう注意してください。
地震による強い揺れにより、楽器が移動したり転倒するおそれがあります。地震の際は楽器に近づかないようにしてください。
移動の際の注意
チャイムを移動する場合は、必ずダンパーをかけ、キャスターのロックをすべて解除し
てください。
キャスタ−のロックがかかったままで動かすと、転倒することがあります。
● キャスターを利用しての移動は、滑らかな平坦面でのみ行なってください。
傾いた所や凹凸のある道、じゃり道は避けてください。チャイムが倒れたり暴走して
大けがをします。
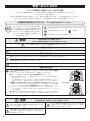
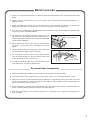
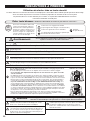
2 人で右図のようにサイドコラムをささえ、間口の方向へゆっくりと押してください。
走らないでください。楽器が止まらなくなり、壁にぶつかるなどして大けがをします。
● 重量は、DC9190 がおよそ 76kg、DC9160/9150 が 57kg です。持ち上げて
移動しなければならない時は、できるだけ多人数で、ケガ等のないよう十分に注意し
てください。その際は、必ずベース部分を持ちサイドコラムを支えながら、ハンガー
部 ( サウンドコラムの吊るしてある側 ) が上になるようにして持ち上げます。ベース
がハンガー部より上になるような持ち上げ方は、絶対に避けてください。サウンドコ
ラムが落ちます。
● 楽器を組み立てた状態で、階段を登り降りをして運ばないでください。部品が落下し
たり、バランスを崩して倒れたりして危険です。必ず分解した状態で運んでください。
人身傷害の危険を防止するには
〜以下の指示を必ず守ってください〜
警告
注意(危険・警告を含む)を促す内容があることを告げるものです。
禁止の行為を告げるものです。 例 : →分解禁止
行為を強制したり指示する内容を告げるものです。
注意
この表示を無視して誤った取扱いをすると、人が障害を負ったり、
財産が損害を受ける危険のおそれがある内容を示しています。
組み立てや分解の際、金属部品の角や端面で指などをケガし
ないように注意してください。
ハンマーは演奏以外には使用しないでください。けがや事故
の原因となります。お子様が人の身体をたたくなど、危険な
行為をしないように注意してください。
この表示を無視して誤った取扱いをすると、
人が死亡又は重傷を負う危険のおそれがある内容を示しています。
この「安全へのこころがけ」は製品を安全に
正しくお使いいただき、お客様や他の人々
への危害や財産への損害を未然に防止する
ために、いろいろな絵表示を使って説明し
ています。絵表示の意味をよく理解してか
ら、本文をお読みください。
安全へのこころがけ
チャイムを安全にご利用いただくためのご注意
チャイムはご家庭や学校内で、お子様から専門家まで幅広い方々にご愛用いただいております。
チャイムは大きくて重い楽器です。
室内での置き場所や日常の取り扱いについて、安全にご使用いただくため、下記の注意を必ず守ってください。
特に小さなお子様には、最初にご家族の方、または指導者から取り扱い方法を指導してください。
絵表示に
ついて
頻繁に移動するような場合は、各部のボルト類がゆるむこと
があります。移動後には、ゆるみをチェックし、ゆるんでい
る場合は締めてください。
キャスター使用時
持ち上げる場合

3
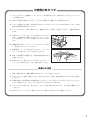
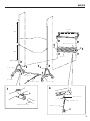
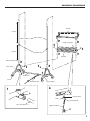
ヘッドプラグ
サウンドコラム
ダンパーアジャスター
1 サウンドコラムに、金属製のハンマーやマレットを使用することは、絶対に避けてください。サウンドコ
ラムが破損します。
2 床が水平な場所で使用してください。水平でない場所では、機能が十分に発揮されません。
3 スタンドを組み立てる時は、各部の取り付けをしっかり行なって、ねじれやゆがみがないように、また各
蝶ネジ部も確実に締め付けてください。
4 ダンパーペダルは、つま先で操作します。体重をかけたり、乗ることは避けてください。破損の原因にな
ります。
5 右図のダンパーアジャスターには、触れないようにしてく
ださい。工場出荷時に調整してあります。ダンパーアジャ
スターを動かすと、ダンパーが作動しなくなることがあり
ます。
6 演奏使用する時は、キャスターにしっかりとブレーキをか
け、動き出さないようにしてください。
7 演奏の際は、ヘッドプラグを叩いてください。サウンドコ
ラム(パイプ部)はハンマーで叩かないでください。
8 高音・多湿の場所で保管すると、楽器の寿命を縮めますの
で避けてください。
9 普段の手入れは、柔らかい布でカラ拭きしてください。シ
ンナーやミガキ粉等で拭くことは、絶対に避けてください。
1 運搬・移動の際には、楽器に衝撃を与えないよう、十分に注意してください。
2 サウンドコラム ( 音管 ) に傷がついたり、曲がったりすると、音程・音色が損なわれますので特にご注意し
てください。
3 長時間の移動、特に車両等での移動の際は、必ずサウンドコラムをスタンドから外して行なってください。
スタンドが変形したり、サウンドコラムの吊りひもが切れることがあります。
4 サウンドコラムの取り付け・取り外しは、スタンドや他の物に当たらないよう、広い場所で慎重に行なっ
てください。
5 取り外したサウンドコラムは、傷がつかないように柔らかい布等でくるんで運搬してください。
ご使用にあたって
運搬上の注意

4
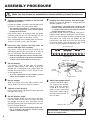
1
ベース(左・右)とペダル Ass'y を接続します。
右図の配置になるようにベース(左・右 ) と ペ ダ ル
Ass'y を用意します。
* 以下組立は、手前が奏者側になる向きで行ないます。
ネジ
A
を十分ゆるめてから、連結用穴にペダル Ass'y
のパイプを止まるまで差し込み、ネジ
A
を締めて固定
します。
接続したら、キャスターをロックします(左右)。
2
ベース左右にサイドコラムを差し込みます。
ネジ
B
を十分ゆるめてから、パイプ端に穴がある側を
下にして、連結用穴にサイドコラムを止まるまで差し
込みます(左右共)。
* サイドコラムは左右同部品です。
* ダンパーおよびハンガーのセットをスムーズにするた
め、ここではまだネジ
B
は締め付けません。
3
ダンパーをセットします。
ネジ
C
を十分ゆるめてから、ダンパーロッドが右側に
来る向きで、サイドコラム上部からダンパーを差し込み
ます。ダンパーはダンパーレストの位置まで下げます。
* ハンガーのセットをスムーズにするため、ここではま
だネジ
C
は締め付けません。
4
ハンガーをセットします。
サイドコラム上部にハンガーを差し込みます。根元ま
でしっかりと差し込んでください。
5
ネジ
B
およびネジ
C
を締めます。
ネジ
B
およびネジ
C
を左右ともしっかりと締めて固定
します。
6
ダンパーペダルをセットします。
ダンパーペダルを手前に引き出し、プルロッド ( 上 ) の
フック部分をダンパーロッドに引っ掛けます。このと
きプルロッドノブを一旦押し下げた状態で引っ掛け、
その後プルロッドノブを離します。
* ダンパーペダルは踏まないでください。ダンパーがか
かり、サウンドコラムがセットできなくなります。
7
サウンドコラムをハンガーにセットします。
ダンパーが解除されている(ダンパーストッパーがか
かっている)ことを確認します。
* ダンパーがかかっている場合は、ペダルを踏み込んだ
状態でダンパーストッパーを押し下げ、そのままペダ
ルを離してダンパーストッパーをかけます。
組立方法
組み立ておよび分解作業は、必ず二人以上で行なってください。
分解する場合は、組み立てる時と反対の手順で行
ないます。
派生音側
幹音側
サウンドコラム
丸リベット
吊りひも
ハンガーピン
ハンガーピン
テフロンチューブ
ダンパーペダル
D
下図のように派生音側〜幹音側の順に取り付けま
す。音名の刻印を前面にして、片方のハンガーピ
ンの溝に吊りひもを掛け、次にハンガー上部の丸
リベットに掛けてから、もう一方のハンガーピン
の溝に吊りひもを通します。このとき、吊りひも
の結び目が丸リベットにかからないようにしてく
ださい。
8
ダンパーペダルを調整します。
ネジ
D
をゆるめ、ダンパーペダル
の踏み込み具合を調整したら、ネジ
D
を締めて固定します。ペダルを踏
み込んで止まる位置が床面より少
し浮いた状態が最適です。

5
ダンパー
ダンパーレスト
長い
ベース(左)
ハンガー
組立方法
サイドコラム
ベース(右)
1
1
1
キャスター
A
ペダル Ass'y のパイプ
2
2
短い
B
B
5
5
目印穴
C
5
C
5
3
3
4
4
ダンパーストッパー
フック
ダンパーロッド
プルロッドノブ
ダンパーペダル
6
プルロッド ( 上 )
D
ペダルAss'y

6
Caution
Injury or handicaps to persons caused by the disregard of warnings with this mark
or, misuse of the instrument, may result in the loss of personal property.
When assembling or disassembling the instrument, be
careful around the sides or ends of metal parts so as to
prevent injury to ngers, etc.
Do not use the hammer for anything other than playing
the instrument. It may be the cause of injury or accidents.
Do not let children strike other, etc., with the hammer. Do
not allow such dangerous behavior to take place.
Before you use the chime, carefully read the instructions listed below and the owner’s manual.
Cautions when setting the instrument.
Never place the instrument on an sloping, unstable, etc., platform. The instrument may fall or overturn and result in injury.
Cautions for treatment of the instrument.
Never lean on or climb onto the instrument. The instrument may fall and result in injury.
Do not play or roughhouse around the instrument. Bumping into the instrument may result in injury.
It may also cause instrument may also fall over. Keep children away from the instrument.
If an earthquake occurs, strong shocks caused by the earthquake may overturn the instrument or cause it to move about.
Stay away from the instrument during earthquakes.
Cautions when moving the instrument.
Warning
Disregard of the warnings with this mark or misuse may
result in death or personal injury.
When transporting the chimes, make sure that the damper is engaged and all caster
locks are released.
The chimes can overturn if moved with the caster locks engaged.
•
The chimes should only be moved across smooth, flat surfaces when using the casters.
Never move the chimes on a sloped, unstable, or gravel surface. Doing so can cause
the chimes to overturn or run out of control resulting in serious injury.
Always move the chimes slowly, with two persons supporting the side columns as
shown in the illustration on the right. Never run. Doing so can result in the chimes run-
ning out of control and hitting an obstacle or wall causing serious injury.
•
The weight of the DC9190 is approximately 76kg and the DC9160/9150 approximately
57kg. If the chimes must be lifted when being moved, lift them carefully, using as many per-
sons as possible to avoid injury. At this time, lift the chimes by holding the base section
and supporting the side column making sure that the hanger section (from which the sound
columns hang) remains in an upright position. Never lift the base section higher than the
hanger section. Doing so can result in the sound columns coming off the hanger.
• Moving the instrument up or down stairs should never be done with the instrument as-
sembled. Doing so is a danger as parts can fall off, or you can loose balance causing
the instrument to fall over. Only move the instrument after it has been disassembled.
PRECAUTIONS
Using the Chimes Safely
The chimes are a large and heavy instrument that gets used in various places by persons of all ages,
so please obey the following instructions regarding their regular care and placement.
Especially in the case of children, a responsible adult should provide proper instruction on
how to use and treat the chimes before use.
Preventing Injuries
—Make sure that all precautions described below are obeyed—
This icon urges you to pay caution (includes dangers and warnings).
This icon indicates actions that are prohibited.
This icon indicates special instructions that should be strictly followed.
Icons are used in this section to pro-
mote the safe use of this product,
and to prevent you and others from
harm and property damage. Please
fully understand the meaning of the
icons before reading the manual.
About
the
Icons
If the instrument is often moved, bolts, parts, etc., may
become loose. After moving the instrument, check and
make sure all bolts, parts, etc., are rmly fastened. Firm-
ly tighten all loose items.
When using
the casters
When lifting
For example:
Do not disassemble.

7
1 Never use a metal type hammer or mallets to strike the sound column with. The sound column will
break.
2 Always use the instrument on a at, level surface. The instrument will not function properly on a
sloped surface.
3 When assembling the stand, make sure each part is rmly attached, and there is no twisting or
disgurement in the frame. Also, make sure that all wing nuts are rmly tightened.
4 Use your toes to operate the damper pedal. Do not stand on or put your weight on the pedal. Do-
ing so may cause the pedal to break.
5 Do not touch the damper adjuster (shown in the il-
lustration left). The adjuster has been adjusted at the
factory. Moving the adjuster may reault in the damper
not functioning properly.
6 When playing the chime, make sure the caster brakes
are rmly set and the chime stand does not move
about.
7 Hit the Head Plug when playing the chime. Never hit
the sound column (pipe) with the hammer.
8
Do not keep the chime in a place where high tempera-
tures and high humidity are present. Doing so will result
in the shortening of the instruments life.
9 For regular cleaning, wipe with a soft, dry cloth.
Never
wipe with thinner, or polishing preparations.
Before you use
1 When transporting or moving the instrument, do not subject it to strong shocks.
2
The sound column’s pitch and/or tone may change if the columns are scratched or bent. Be careful.
3
When the instrument is to be transported over long distances, especially by vehicle, do so with the sound
columns removed from the stand. The shape of the stand may change and the column’s wire/strings may
be cut if the columns are not removed.
4 When attaching or removing the sound columns, do so in a place where there is sufcient room so
that the columns do not come into contact with other objects.
5 After the sound columns are removed, wrap them in a soft cloth, etc., to prevent scratching, and
then transport.
Be careful when transporting
Head Plug
Sound Column
Damper Adjuster

8
ASSEMBLY PROCEDURE
Make sure the chimes are assembled or disassembled by at least two persons.
1
Connect the pedal assembly to the left and
right base sections.
Position the pedal assembly and left/right base
sections as shown in the illustration right.
* The following procedure is carried out to en-
sure that the performer faces forward when
playing the instrument.
Fully loosen screws A, and then slide the pedal
assembly pipe all the way into the hole on the
base section. Tighten screws A to secure.
After connecting the assembly pipe to the base
sections, lock the casters (left and right).
2
Insert the side columns into the holes on
the left and right base sections.
Fully loosen screws B and insert the end of the
side column pipe with the small hole on its side, all
the way into the left and right side base sections.
* Both left and right side columns are the same.
*
To make attachment of the damper and hanger
sections easier, do not tighten screws B yet.
3
Set the damper.
Fully loosen screws C and slide the damper
onto the side columns from above so that the
damper rod is positioned on the right. Slide the
damper down the columns until it comes to rest
on the damper rests.
* To make attachment of the hanger section
easier, do not tighten screws C yet.
4
Set the hanger.
Slide the hanger onto the side columns from
above. Slide it all the way onto the columns.
5
Tighten screws B and C.
Firmly tighten screws B and C on both right and
left sides and secure.
6
Set the damper pedal.
Pull the damper pedal out to the front, and then
hook the hook on the end of the pull rod onto
the damper rod. At this time, pull down on the
pull rod knob to hook onto the damper rod, then
release the pull rod knob.
* Do not press down on the damper pedal. Do-
ing so engages the damper and the sound
columns cannot be hung.
7
Hanging the sound columns from the hanger.
Make sure that the damper is disengaged (the
damper stopper is set).
* If the damper is engaged, press down on the
damper pedal, then push down on the damp-
er stopper and release the damper pedal to
engage the damper stopper.
Hang the sound columns starting with the ac-
cidental tones before hanging the natural tones.
Make sure that the pitch name is facing forward
then place the string into the guides on the
hanger pins and hook the string on the round
head rivet. Make sure that the knot in the string
is not in contact with the round head rivet.
8
Adjust the damper pedal.
Loosen screw D to adjust
the angle of the damper
pedal, and then tighten
screw D to secure. The
pedal is best positioned
when it lies slightly above
the oor when pressed all
the way down.
Disassembly is performed simply by revers-
ing the assembly order.
Accidental tones
Natural tones
Sound
Column
Round Head
Rivet
String
Hanger Pin
Hanger Pin
Teon Tube
Damper Pedal
D

9
Damper
Damper Rest
Longer
Base (Left)
Hanger
ASSEMBLY PROCEDURE
Side Column
Base (Right)
1
1
1
Caster
A
Pipe of Pedal Ass’y
2
2
Shorter
B
B
5
5
Hall for Mark
C
5
C
5
3
3
4
4
Damper Stopper
Hook
Damper Rod
Pull Rod Knob
Damper Pedal
6
Upper Pull Rod
D
Pedal Ass’y

10
Utilisation des roulettes
Soulever l’instrument
Attention
Si vous négligez les avertissements signalés par ce symbole, vous pourriez infliger des
blessures ou des handicaps à des personnes ou causer la perte de biens matériels.
Lors du montage ou du démontage de l’instrument, faites
attention à ne pas vous blesser les doigts, etc. sur les
bords ou les extrémités des parties métalliques.
Si vous déplacez souvent l’instrument, les boulons ou
certaines pièces peuvent se dévisser. Après avoir déplacé
l’instrument, vériez que tous les boulons, toutes les
pièces, etc. soient bien xés. Serrez solidement tous les
éléments desserrés.
Avant d’utiliser le carillon, lisez attentivement les instructions ci-dessous et celles du mode d’emploi.
Précautions lors de la mise en place de l’instrument.
Ne placez jamais l’instrument sur un sol en pente, instable, etc. L’instrument risquerait de tomber ou de se reverser entraî-
nant des blessures.
Précautions concernant la manipulation de l’appareil
.
Ne vous appuyez ni ne montez jamais sur l’instrument. L’instrument risquerait de tomber entraînant des blessures.
Ne jouez pas ni ne vous chamaillez autour de l’instrument. Heurter l’instrument peut entraîner des blessures.
L’instrument pourrait aussi se renverser. Gardez les enfants hors de la portée de l’instrument.
Si un tremblement de terre se produit, des chocs violents causés par le tremblement de terre peuvent renverser l’instrument
ou le faire bouger. Éloignez-vous de l’instrument lors des tremblements de terre.
Précautions lors du déplacement de l’instrument.
Avertissement
Si vous négligez les avertissements signalés par ce symbole,
il peut en résulter mort d’homme ou blessures.
Lors du déplacement du cloche-tube, assurez-vous que l'étouffoir soit engagé et que tous les
freins des roulettes libérés.
Le cloche-tube peut se renverser s’il est déplacé avec les freins des roulettes engagés.
• Le cloche-tube doit uniquement être déplacé sur une surface douce, plane et en utili-
sant les roulettes.
Ne déplacez jamais le cloche-tube sur une pente, une surface instable ou rugueuse. Il pour-
rait se renverser ou vous pourriez perdre son contrôle et entraîner des blessures. Déplacez
toujours le cloche-tube doucement, avec deux personnes maintenant, chacune un montant
latéral comme montré sur l’illustration de droite. Ne courez jamais. Vous pourriez perdre le
contrôle du cloche-tube et celui-ci pourrait heurter un obstacle et entraîner des blessures.
• Le poids du DC9190 est d’environ 76kg et celui du DC9160/9150 d’environ 57kg. Si le
cloche-tube doit être soulevé pendant son déplacement, soulevez-le avec précaution avec
l’aide d’autant de personnes que possible pour éviter les blessures. Pour cela, soulevez le
cloche-tube en le tenant à sa base et en soutenant et les montants latéraux et en veillant à
ce que le montant de suspension (à partir du quel les cloches tubulaires pendent) reste dans
une position verticale. Ne soulevez jamais la base de l’instrument plus haut que le montant
de suspension. Les cloches tubulaires pourraient se détacher.
• Vous ne devez jamais déplacer l’instrument monté, dans un escalier. Cela pourrait être
dangereux car des pièces pourraient tomber ou vous pourriez perdre l’équilibre et renverser
l’instrument. Déplacez l’instrument uniquement après l’avoir démonté.
Éviter toute blessure
—Veillez à l’observation de toutes les précautions ci-dessous—
Cette icône vous engage à être attentif
(et peut signaler des dangers et avertissements)
Cette icône signale des actions interdites.
Ce signale donne des instructions spéciales qui
doivent être absolument suivies.
Des icônes sont utilisées dans cette
section pour rendre plus claires les
instructions de sécurité permettant
d’éviter les risques de blessure et
de dégâts matériels. Veuillez bien
lire les consignes et comprendre le
sens de chaque icône avant de lire
le reste de ce mode d’emploi.
À
propos
des
icônes
N’utilisez pas le marteau pour autre chose que de jouer
sur l’instrument. Cela pourrait entraîner des blessure ou
des acci-dents. Ne laissez pas des enfants frapper sur
d’autre chose, etc. avec le marteau. N’autorisez pas ce
type de comportement dangereux.
Exemple :
Ne pas démonter.
PRÉCAUTIONS A PRENDRE
Utilisation du cloche-tube en toute sécurité
Le cloche-tube est un instrument volumineux et lourd qui peut s’utiliser dans divers endroits par des personnes de tout âge.
Aussi vous devez respecter les instructions suivantes à propos de son entretien et de sa mise en place.
En particulier, dans le cas de l’utilisation par un enfant, un responsable adulte doit donner les bonnes
instructions d’utilisation avant de jouer.

11
1 N’utilisez jamais de marteau de type métallique ni de maillet pour frapper une cloche tubulaire. La
cloche tubulaire pourrait se casser.
2 Utilisez toujours l’instrument sur une surface plane et ferme. L’instrument ne fonctionnera pas
correctement sur une surface en pente.
3 Lors du montage du support, assurez-vous que chaque partie soit xée solidement et qu’il n’y ait
pas de torsion ou de déformation du cadre. Assurez-vous aussi que toutes les vis papillon sont
serrés solidement.
4 Utilisez votre talon pour manipuler la pédale de l’étouffoir. Ne montez pas sur la pédale, n’appuyez
trop fort dessus. Cela pourrait la casser.
5 Ne touchez pas pas le dispositif d’ajustement de
l’étouffoir (illustration à gauche). Le dispositif d’ajuste-
ment a été ajusté à l’usine. Si vous bougez le dispo-
sitif d’ajustement, l’étouffoir peut ne pas fonctionner
correctement.
6 Lorsque vous jouez du cloche-tube, assurez-vous que
les freins des roulettes sont engagées solidement et
que le support sur lequel repose le cloche-tube ne
bouge pas.
7 Frappez uniquement la tête de la cloche tubulaire. Ne
frappez jamais le corps de la cloche tubulaire avec le
marteau.
8 Ne stockez pas le cloche-tube dans un endroit trop
chaud ou trop humide. Cela pourrait réduire la vie de
l’instrument.
9 Pour un nettoyage régulier, essuyez avec un chiffon doux et sec. Ne frottez jamais avec un diluant
ou un agent de polissage.
Avant d’utiliser l’instrument
1 Lors du transport ou du déplacement de l’instrument, ne le soumettez pas à des chocs importants.
2 La justesse ou la sonorité des cloches tubulaires peut changer si les tubes sont rayés ou tordus.
Soyez prudent.
3 Quand l’instrument doit être transporté sur une grande distance, et plus particulièrement dans un
véhicule, retirez d’abord les cloches tubulaires du support. La forme du support peut changer et les
ls/ cordes peuvent se rompre si les tubes ne sont pas retirés.
4 Lors de la xation ou du retrait des cloches tubulaires, faites ces manipulations dans un endroit
sufsamment spacieux de façon à ce que les cloches tubulaires ne rentrent pas en contact avec
d’autres objets.
5 Après avoir retiré les cloches tubulaires et an de les transporter facilement, enroulez-les dans un
chiffon doux, pour éviter les rayures et les chocs.
Précaution lors du transport
Tête
Corps de la
cloche tubulaire
Dispositif
d’ajustement de
l’étouffoir

12
MONTAGE
Assurez-vous que le clche-tube soit monté au moins par deux personnes.
1
Raccordez le dispositif de la pédale aux
montants des roulettes (gauche/droit).
Positionnez le dispositif de la pédale et les
montants des roulettes (gauche/droit) comme
montré sur l’illustration à droite.
*
La procédure suivante suppose que l’interprète
est tourné vers l’avant quand il joue à l’instrument.
Dévissez complètement les vis A, puis faites
glisser le tube du dispositif de la pédale complè-
tement dans le trou du montant des roulettes.
Serrez solidement la vis A.
Après avoir raccordé le tube du dispositif aux
montants des roulettes, verrouillez les roulettes
(gauche et droite).
2
Insérez les montants latéraux dans les trous
des montants des roulettes (gauche et droit).
Desserrez complètement les vis B et insérez
l’extrémité de montant latéral avec un petit trou
sur le côté, complètement dans montants des
roulettes gauche et droite.
* Les mantants latéraux gauche et droit sont
les mêmes.
* Pour pouvoir fixer plus facilement le disposi-
tif l’étouffoir et le montant de suspension, ne
serrez pas de suite les vis B.
3
Fixez l’étouffoir.
Desserrez complètement les vis C et faites glis-
ser l’étouffoir sur les montants latéraux par des-
sus, de façon à ce que la tige de l’étouffoir soit
positionnée sur la droite. Faites glisser l’étoufoir
vers le bas jusqu’à ce qu’il rentre en contact
avec les butées de l’étouffoir.
* Pour pouvoir fixer plus facilement la montant
de suspension, ne serrez pas encore les vis C.
4
Fixez le
montant
de suspension.
Faites glisser le montant de suspension sur les
montants latéraux par dessus. Faites la glisser
complètement sur les montants.
5
Serrez les vis B et C.
Serrez solidement les vis B et C des deux côtés
droit et gauche.
6
Fixez la pédale de l’étouffoir.
Tirez la pédale de l’étouffoir vers l’avant, puis
accrochez le crochet de l’extrémité de la tige de
traction sur la tige de l’étouffoir. Puis tirez sur la
poignée de la tige de traction pour l’accrocher
à la tige de l’étouffoir, puis relâchez la tige de
traction.
*
N’appuyez pas sur la pédale de l’étouffoir. Si vous
le faites, l’étouffoir est engagé et les cloches
tubulaires ne peuvent pas être accrochées.
7
Accrochage des coches tubulaires au
montant de suspension.
Assurez-vous que l’étouffoir ne soit pas engagé
(frein de l’étouffoir en place).
* Si l’étouffoir est engagé, appuyez sur la
pédale, puis poussez vers le bas le frein de
l’étouffoir et relâchez la pédale pour engager
le frein de l’étouffoir.
Accrochez les cloches tubulaires en commen-
çant par les notes altérées avant d’accrocher
celles des notes naturelles.
Assurez-vous que le nom de la note est tourné
vers l’avant puis placez la corde dans les guides
sur les broches de suspension et accrochez la
corde sur le rivet à tête ronde. Assurez-vous que
le noeud de la corde ne soit pas en contact avec
le rivet à tête ronde.
8
Ajustez la pédale de l’étouffoir.
Desserrez la vis D pour
ajuster l’angle de la pé-
dale, puis serrez solide-
ment la vis D.
La meilleure position de la
pédale est celle où elle est
légèrement au-dessus du
sol quand elle est enfon-
cée complètement.
Le démontage est réalisé facilement en
inversant l’ordre de montage.
Côté tonalité altérée
Côté tonalité naturelle
Cloche
tubulaire
Rivet à tête
ronde
Corde
Broche de suspension
Broche de
suspension
Tube en téon
Pédale de l’étouffoir
D

13
Etouffoir
Butée
de l’étouffoir
Plus long
Montant roulettes
(gauche)
Montant de suspension
MONTAGE
Montants latéraux
Montant roulettes
(droit)
1
1
1
Roulette
A
Tube du dispositif
de la pédale
2
2
Plus court
B
B
5
5
Trou de repère
C
5
C
5
3
3
4
4
Frein de l’étouffoir
Crochet
Tige de
l’étouffoir
Poignée de la
tige de traction
Pédale de
l’étouffoir
6
Tige de traction
supérieure
D
Dispositif de
la pédale

14
Memo

15
Memo

Printed in JapanWJ56570 1602 R2
Transcripción de documentos
DEAGAN CHIMES SERIES CLOCHE-TUBE DEAGAN DC9190A / DC9160A / DC9150A DC9190B / DC9160B / DC9150B 取扱説明書 / Owner’s Manual / Mode d’emploi このたびは DEAGAN チャイムをお買い上げいただきまして 誠にありがとうございます。 取扱説明書をご一読いただき、末長くご愛用いただきますよ うお願い申し上げます。 Thank you for selecting the DEAGAN chimes. Please read this owner’s manual carefully, and truly enjoy this instrument for years to come. Merci d’avoir choisi d’un cloche-tube DEAGAN. Veuillez lire ce mode d’emploi attentivement afin d’utiliser agréablement cet instrument pendant de longues années. 『安全へのこころがけ』および『ご使用にあたって』を必ずお読みください。 Make sure to read the “PRECAUTIONS” on page 6 and the “Before you use” on page 7. Assurez-vous de lire la section “PRÉCAUTIONS” à la page 10 et la section “Avant d'utiliser l'instrument” à la page 11. 安全へのこころがけ チャイムを安全にご利用いただくためのご注意 チャイムはご家庭や学校内で、お子様から専門家まで幅広い方々にご愛用いただいております。 チャイムは大きくて重い楽器です。 室内での置き場所や日常の取り扱いについて、安全にご使用いただくため、下記の注意を必ず守ってください。 特に小さなお子様には、最初にご家族の方、または指導者から取り扱い方法を指導してください。 人身傷害の危険を防止するには 〜以下の指示を必ず守ってください〜 絵表示に ついて この「安全へのこころがけ」は製品を安全に 正しくお使いいただき、お客様や他の人々 への危害や財産への損害を未然に防止する ために、いろいろな絵表示を使って説明し ています。絵表示の意味をよく理解してか ら、本文をお読みください。 警告 注意(危険・警告を含む)を促す内容があることを告げるものです。 禁止の行為を告げるものです。 例: →分解禁止 行為を強制したり指示する内容を告げるものです。 この表示を無視して誤った取扱いをすると、 人が死亡又は重傷を負う危険のおそれがある内容を示しています。 チャイムを使用する前に、以下の指示と取扱説明書をよく読んでください。 設置上の注意 楽器をぐらついた台の上や傾いた所など、不安定な場所に置かないでください。落ちたり倒れたりして、けがの原因となります。 取扱い上の注意 楽器にもたれかかったり、乗ったりしないでください。楽器が倒れて、大けがをすることがあります。 楽器のまわりで遊ばないでください。身体をぶつけてけがをするおそれがあります。楽器の転倒の原因にもなります。 お子様が楽器のまわりで遊ばないよう注意してください。 地震による強い揺れにより、楽器が移動したり転倒するおそれがあります。地震の際は楽器に近づかないようにしてください。 移動の際の注意 チャイムを移動する場合は、必ずダンパーをかけ、キャスターのロックをすべて解除し てください。 キャスタ−のロックがかかったままで動かすと、転倒することがあります。 ● キャスターを利用しての移動は、滑らかな平坦面でのみ行なってください。 傾いた所や凹凸のある道、じゃり道は避けてください。チャイムが倒れたり暴走して 大けがをします。 2 人で右図のようにサイドコラムをささえ、間口の方向へゆっくりと押してください。 走らないでください。楽器が止まらなくなり、壁にぶつかるなどして大けがをします。 ● 重量は、DC9190 がおよそ 76kg、DC9160/9150 が 57kg です。持ち上げて 移動しなければならない時は、できるだけ多人数で、ケガ等のないよう十分に注意し てください。その際は、必ずベース部分を持ちサイドコラムを支えながら、ハンガー 部 ( サウンドコラムの吊るしてある側 ) が上になるようにして持ち上げます。ベース がハンガー部より上になるような持ち上げ方は、絶対に避けてください。サウンドコ ラムが落ちます。 ● 楽器を組み立てた状態で、階段を登り降りをして運ばないでください。部品が落下し たり、バランスを崩して倒れたりして危険です。必ず分解した状態で運んでください。 注意 持ち上げる場合 この表示を無視して誤った取扱いをすると、人が障害を負ったり、 財産が損害を受ける危険のおそれがある内容を示しています。 組み立てや分解の際、金属部品の角や端面で指などをケガし ないように注意してください。 頻繁に移動するような場合は、各部のボルト類がゆるむこと があります。移動後には、ゆるみをチェックし、ゆるんでい る場合は締めてください。 2 キャスター使用時 ハンマーは演奏以外には使用しないでください。けがや事故 の原因となります。お子様が人の身体をたたくなど、危険な 行為をしないように注意してください。 ご使用にあたって 1 サウンドコラムに、金属製のハンマーやマレットを使用することは、絶対に避けてください。サウンドコ ラムが破損します。 2 床が水平な場所で使用してください。水平でない場所では、機能が十分に発揮されません。 3 スタンドを組み立てる時は、各部の取り付けをしっかり行なって、ねじれやゆがみがないように、また各 蝶ネジ部も確実に締め付けてください。 4 ダンパーペダルは、つま先で操作します。体重をかけたり、乗ることは避けてください。破損の原因にな ります。 5 右図のダンパーアジャスターには、触れないようにしてく ださい。工場出荷時に調整してあります。ダンパーアジャ スターを動かすと、ダンパーが作動しなくなることがあり ます。 6 演奏使用する時は、キャスターにしっかりとブレーキをか け、動き出さないようにしてください。 7 演奏の際は、ヘッドプラグを叩いてください。サウンドコ ラム(パイプ部)はハンマーで叩かないでください。 8 高音・多湿の場所で保管すると、楽器の寿命を縮めますの で避けてください。 9 普段の手入れは、柔らかい布でカラ拭きしてください。シ ンナーやミガキ粉等で拭くことは、絶対に避けてください。 ダンパーアジャスター ヘッドプラグ サウンドコラム 運搬上の注意 1 運搬・移動の際には、楽器に衝撃を与えないよう、十分に注意してください。 2 サウンドコラム ( 音管 ) に傷がついたり、曲がったりすると、音程・音色が損なわれますので特にご注意し てください。 3 長時間の移動、特に車両等での移動の際は、必ずサウンドコラムをスタンドから外して行なってください。 スタンドが変形したり、サウンドコラムの吊りひもが切れることがあります。 4 サウンドコラムの取り付け・取り外しは、スタンドや他の物に当たらないよう、広い場所で慎重に行なっ てください。 5 取り外したサウンドコラムは、傷がつかないように柔らかい布等でくるんで運搬してください。 3 組立方法 組み立ておよび分解作業は、必ず二人以上で行なってください。 1 下図のように派生音側〜幹音側の順に取り付けま す。音名の刻印を前面にして、片方のハンガーピ ンの溝に吊りひもを掛け、次にハンガー上部の丸 リベットに掛けてから、もう一方のハンガーピン の溝に吊りひもを通します。このとき、吊りひも の結び目が丸リベットにかからないようにしてく ださい。 ベース(左・右)とペダル Ass'y を接続します。 右 図 の 配 置 に な る よ う に ベ ー ス( 左・ 右 ) と ペ ダ ル Ass'y を用意します。 * 以下組立は、手前が奏者側になる向きで行ないます。 ネジ A を十分ゆるめてから、連結用穴にペダル Ass'y のパイプを止まるまで差し込み、ネジ A を締めて固定 します。 接続したら、キャスターをロックします(左右)。 2 派生音側 ベース左右にサイドコラムを差し込みます。 ネジ B を十分ゆるめてから、パイプ端に穴がある側を 下にして、連結用穴にサイドコラムを止まるまで差し 込みます(左右共)。 幹音側 * サイドコラムは左右同部品です。 * ダンパーおよびハンガーのセットをスムーズにするた め、ここではまだネジ B は締め付けません。 3 ハンガーピン 吊りひも ダンパーをセットします。 ネジ C を十分ゆるめてから、ダンパーロッドが右側に 来る向きで、サイドコラム上部からダンパーを差し込み ます。ダンパーはダンパーレストの位置まで下げます。 サウンドコラム * ハンガーのセットをスムーズにするため、ここではま だネジ C は締め付けません。 4 丸リベット ハンガーピン テフロンチューブ ハンガーをセットします。 サイドコラム上部にハンガーを差し込みます。根元ま でしっかりと差し込んでください。 5 ネジ B およびネジ C を締めます。 6 ダンパーペダルをセットします。 ネジ B およびネジ C を左右ともしっかりと締めて固定 します。 8 ダンパーペダルを調整します。 ネジ D をゆるめ、ダンパーペダル の踏み込み具合を調整したら、ネジ D を締めて固定します。ペダルを踏 み込んで止まる位置が床面より少 し浮いた状態が最適です。 D ダンパーペダルを手前に引き出し、プルロッド ( 上 ) の フック部分をダンパーロッドに引っ掛けます。このと きプルロッドノブを一旦押し下げた状態で引っ掛け、 その後プルロッドノブを離します。 * ダンパーペダルは踏まないでください。ダンパーがか かり、サウンドコラムがセットできなくなります。 ダンパーペダル 7 サウンドコラムをハンガーにセットします。 ダンパーが解除されている(ダンパーストッパーがか かっている)ことを確認します。 * ダンパーがかかっている場合は、ペダルを踏み込んだ 状態でダンパーストッパーを押し下げ、そのままペダ ルを離してダンパーストッパーをかけます。 4 分解する場合は、組み立てる時と反対の手順で行 ないます。 組立方法 ハンガー 長い サイドコラム 4 5 ダンパーストッパー 4 C 短い ダンパーレスト C5 3 3 ダンパー 目印穴 2 5 B5 ベース(左) 1 2 B 1 ペダル Ass'y キャスター ダンパーペダル ベース(右) 6 1 A ダンパーロッド フック プルロッドノブ ペダル Ass'y のパイプ プルロッド ( 上 ) D 5 PRECAUTIONS Using the Chimes Safely The chimes are a large and heavy instrument that gets used in various places by persons of all ages, so please obey the following instructions regarding their regular care and placement. Especially in the case of children, a responsible adult should provide proper instruction on how to use and treat the chimes before use. Preventing Injuries —Make sure that all precautions described below are obeyed— About the Icons Icons are used in this section to promote the safe use of this product, and to prevent you and others from harm and property damage. Please fully understand the meaning of the icons before reading the manual. This icon urges you to pay caution (includes dangers and warnings). This icon indicates actions that are prohibited. For example: Do not disassemble. This icon indicates special instructions that should be strictly followed. Warning Disregard of the warnings with this mark or misuse may result in death or personal injury. Before you use the chime, carefully read the instructions listed below and the owner’s manual. Cautions when setting the instrument. Never place the instrument on an sloping, unstable, etc., platform. The instrument may fall or overturn and result in injury. Cautions for treatment of the instrument. Never lean on or climb onto the instrument. The instrument may fall and result in injury. Do not play or roughhouse around the instrument. Bumping into the instrument may result in injury. It may also cause instrument may also fall over. Keep children away from the instrument. If an earthquake occurs, strong shocks caused by the earthquake may overturn the instrument or cause it to move about. Stay away from the instrument during earthquakes. Cautions when moving the instrument. When transporting the chimes, make sure that the damper is engaged and all caster locks are released. When using the casters The chimes can overturn if moved with the caster locks engaged. • The chimes should only be moved across smooth, flat surfaces when using the casters. Never move the chimes on a sloped, unstable, or gravel surface. Doing so can cause the chimes to overturn or run out of control resulting in serious injury. Always move the chimes slowly, with two persons supporting the side columns as shown in the illustration on the right. Never run. Doing so can result in the chimes running out of control and hitting an obstacle or wall causing serious injury. • The weight of the DC9190 is approximately 76kg and the DC9160/9150 approximately 57kg. If the chimes must be lifted when being moved, lift them carefully, using as many persons as possible to avoid injury. At this time, lift the chimes by holding the base section and supporting the side column making sure that the hanger section (from which the sound columns hang) remains in an upright position. Never lift the base section higher than the hanger section. Doing so can result in the sound columns coming off the hanger. • Moving the instrument up or down stairs should never be done with the instrument assembled. Doing so is a danger as parts can fall off, or you can loose balance causing the instrument to fall over. Only move the instrument after it has been disassembled. Caution Injury or handicaps to persons caused by the disregard of warnings with this mark or, misuse of the instrument, may result in the loss of personal property. When assembling or disassembling the instrument, be careful around the sides or ends of metal parts so as to prevent injury to fingers, etc. If the instrument is often moved, bolts, parts, etc., may become loose. After moving the instrument, check and make sure all bolts, parts, etc., are firmly fastened. Firmly tighten all loose items. 6 When lifting Do not use the hammer for anything other than playing the instrument. It may be the cause of injury or accidents. Do not let children strike other, etc., with the hammer. Do not allow such dangerous behavior to take place. Before you use 1 Never use a metal type hammer or mallets to strike the sound column with. The sound column will break. 2 Always use the instrument on a flat, level surface. The instrument will not function properly on a sloped surface. 3 When assembling the stand, make sure each part is firmly attached, and there is no twisting or disfigurement in the frame. Also, make sure that all wing nuts are firmly tightened. 4 Use your toes to operate the damper pedal. Do not stand on or put your weight on the pedal. Doing so may cause the pedal to break. 5 Do not touch the damper adjuster (shown in the illustration left). The adjuster has been adjusted at the factory. Moving the adjuster may reault in the damper not functioning properly. Damper Adjuster 6 When playing the chime, make sure the caster brakes are firmly set and the chime stand does not move about. 7 Hit the Head Plug when playing the chime. Never hit the sound column (pipe) with the hammer. 8 Do not keep the chime in a place where high temperatures and high humidity are present. Doing so will result in the shortening of the instruments life. Head Plug Sound Column 9 For regular cleaning, wipe with a soft, dry cloth. Never wipe with thinner, or polishing preparations. Be careful when transporting 1 When transporting or moving the instrument, do not subject it to strong shocks. 2 The sound column’s pitch and/or tone may change if the columns are scratched or bent. Be careful. 3 When the instrument is to be transported over long distances, especially by vehicle, do so with the sound columns removed from the stand. The shape of the stand may change and the column’s wire/strings may be cut if the columns are not removed. 4 When attaching or removing the sound columns, do so in a place where there is sufficient room so that the columns do not come into contact with other objects. 5 After the sound columns are removed, wrap them in a soft cloth, etc., to prevent scratching, and then transport. 7 ASSEMBLY PROCEDURE Make sure the chimes are assembled or disassembled by at least two persons. 1 Connect the pedal assembly to the left and right base sections. 7 Position the pedal assembly and left/right base sections as shown in the illustration right. Make sure that the damper is disengaged (the damper stopper is set). * If the damper is engaged, press down on the damper pedal, then push down on the damper stopper and release the damper pedal to engage the damper stopper. * The following procedure is carried out to ensure that the performer faces forward when playing the instrument. Hang the sound columns starting with the accidental tones before hanging the natural tones. Make sure that the pitch name is facing forward then place the string into the guides on the hanger pins and hook the string on the round head rivet. Make sure that the knot in the string is not in contact with the round head rivet. Fully loosen screws A, and then slide the pedal assembly pipe all the way into the hole on the base section. Tighten screws A to secure. After connecting the assembly pipe to the base sections, lock the casters (left and right). 2 Hanging the sound columns from the hanger. Insert the side columns into the holes on the left and right base sections. Accidental tones Fully loosen screws B and insert the end of the side column pipe with the small hole on its side, all the way into the left and right side base sections. * Both left and right side columns are the same. Natural tones * To make attachment of the damper and hanger sections easier, do not tighten screws B yet. 3 Hanger Pin 5 6 Fully loosen screws C and slide the damper onto the side columns from above so that the damper rod is positioned on the right. Slide the damper down the columns until it comes to rest on the damper rests. Set the hanger. Slide the hanger onto the side columns from above. Slide it all the way onto the columns. Tighten screws B and C. Firmly tighten screws B and C on both right and left sides and secure. Set the damper pedal. Pull the damper pedal out to the front, and then hook the hook on the end of the pull rod onto the damper rod. At this time, pull down on the pull rod knob to hook onto the damper rod, then release the pull rod knob. * Do not press down on the damper pedal. Doing so engages the damper and the sound columns cannot be hung. 8 Round Head Rivet Set the damper. Sound Column Hanger Pin * To make attachment of the hanger section easier, do not tighten screws C yet. 4 String Teflon Tube 8 Adjust the damper pedal. Loosen screw D to adjust the angle of the damper pedal, and then tighten screw D to secure. The pedal is best positioned when it lies slightly above the floor when pressed all the way down. D Damper Pedal Disassembly is performed simply by reversing the assembly order. ASSEMBLY PROCEDURE Hanger Longer Side Column 4 5 Damper Stopper 4 C Shorter Damper Rest C5 3 3 Damper Hall for Mark Base (Left) 2 5 B5 1 Pedal Ass’y 2 B 1 Caster Damper Pedal Base (Right) 6 1 A Damper Rod Hook Pull Rod Knob Pipe of Pedal Ass’y Upper Pull Rod D 9 PRÉCAUTIONS A PRENDRE Utilisation du cloche-tube en toute sécurité Le cloche-tube est un instrument volumineux et lourd qui peut s’utiliser dans divers endroits par des personnes de tout âge. Aussi vous devez respecter les instructions suivantes à propos de son entretien et de sa mise en place. En particulier, dans le cas de l’utilisation par un enfant, un responsable adulte doit donner les bonnes instructions d’utilisation avant de jouer. Éviter toute blessure —Veillez à l’observation de toutes les précautions ci-dessous— À propos des icônes Des icônes sont utilisées dans cette section pour rendre plus claires les instructions de sécurité permettant d’éviter les risques de blessure et de dégâts matériels. Veuillez bien lire les consignes et comprendre le sens de chaque icône avant de lire le reste de ce mode d’emploi. Avertissement Cette icône vous engage à être attentif (et peut signaler des dangers et avertissements) Cette icône signale des actions interdites. Exemple : Ne pas démonter. Ce signale donne des instructions spéciales qui doivent être absolument suivies. Si vous négligez les avertissements signalés par ce symbole, il peut en résulter mort d’homme ou blessures. Avant d’utiliser le carillon, lisez attentivement les instructions ci-dessous et celles du mode d’emploi. Précautions lors de la mise en place de l’instrument. Ne placez jamais l’instrument sur un sol en pente, instable, etc. L’instrument risquerait de tomber ou de se reverser entraînant des blessures. Précautions concernant la manipulation de l’appareil. Ne vous appuyez ni ne montez jamais sur l’instrument. L’instrument risquerait de tomber entraînant des blessures. Ne jouez pas ni ne vous chamaillez autour de l’instrument. Heurter l’instrument peut entraîner des blessures. L’instrument pourrait aussi se renverser. Gardez les enfants hors de la portée de l’instrument. Si un tremblement de terre se produit, des chocs violents causés par le tremblement de terre peuvent renverser l’instrument ou le faire bouger. Éloignez-vous de l’instrument lors des tremblements de terre. Précautions lors du déplacement de l’instrument. Lors du déplacement du cloche-tube, assurez-vous que l'étouffoir soit engagé et que tous les freins des roulettes libérés. Le cloche-tube peut se renverser s’il est déplacé avec les freins des roulettes engagés. • Le cloche-tube doit uniquement être déplacé sur une surface douce, plane et en utilisant les roulettes. Ne déplacez jamais le cloche-tube sur une pente, une surface instable ou rugueuse. Il pourrait se renverser ou vous pourriez perdre son contrôle et entraîner des blessures. Déplacez toujours le cloche-tube doucement, avec deux personnes maintenant, chacune un montant latéral comme montré sur l’illustration de droite. Ne courez jamais. Vous pourriez perdre le contrôle du cloche-tube et celui-ci pourrait heurter un obstacle et entraîner des blessures. • Le poids du DC9190 est d’environ 76kg et celui du DC9160/9150 d’environ 57kg. Si le cloche-tube doit être soulevé pendant son déplacement, soulevez-le avec précaution avec l’aide d’autant de personnes que possible pour éviter les blessures. Pour cela, soulevez le cloche-tube en le tenant à sa base et en soutenant et les montants latéraux et en veillant à ce que le montant de suspension (à partir du quel les cloches tubulaires pendent) reste dans une position verticale. Ne soulevez jamais la base de l’instrument plus haut que le montant de suspension. Les cloches tubulaires pourraient se détacher. • Vous ne devez jamais déplacer l’instrument monté, dans un escalier. Cela pourrait être dangereux car des pièces pourraient tomber ou vous pourriez perdre l’équilibre et renverser l’instrument. Déplacez l’instrument uniquement après l’avoir démonté. Attention Soulever l’instrument Si vous négligez les avertissements signalés par ce symbole, vous pourriez infliger des blessures ou des handicaps à des personnes ou causer la perte de biens matériels. Lors du montage ou du démontage de l’instrument, faites attention à ne pas vous blesser les doigts, etc. sur les bords ou les extrémités des parties métalliques. N’utilisez pas le marteau pour autre chose que de jouer sur l’instrument. Cela pourrait entraîner des blessure ou des acci-dents. Ne laissez pas des enfants frapper sur d’autre chose, etc. avec le marteau. N’autorisez pas ce type de comportement dangereux. 10 Utilisation des roulettes Si vous déplacez souvent l’instrument, les boulons ou certaines pièces peuvent se dévisser. Après avoir déplacé l’instrument, vérifiez que tous les boulons, toutes les pièces, etc. soient bien fixés. Serrez solidement tous les éléments desserrés. Avant d’utiliser l’instrument 1 N’utilisez jamais de marteau de type métallique ni de maillet pour frapper une cloche tubulaire. La cloche tubulaire pourrait se casser. 2 Utilisez toujours l’instrument sur une surface plane et ferme. L’instrument ne fonctionnera pas correctement sur une surface en pente. 3 Lors du montage du support, assurez-vous que chaque partie soit fixée solidement et qu’il n’y ait pas de torsion ou de déformation du cadre. Assurez-vous aussi que toutes les vis papillon sont serrés solidement. 4 Utilisez votre talon pour manipuler la pédale de l’étouffoir. Ne montez pas sur la pédale, n’appuyez trop fort dessus. Cela pourrait la casser. 5 Ne touchez pas pas le dispositif d’ajustement de l’étouffoir (illustration à gauche). Le dispositif d’ajustement a été ajusté à l’usine. Si vous bougez le dispositif d’ajustement, l’étouffoir peut ne pas fonctionner correctement. 6 Lorsque vous jouez du cloche-tube, assurez-vous que les freins des roulettes sont engagées solidement et que le support sur lequel repose le cloche-tube ne bouge pas. Dispositif d’ajustement de l’étouffoir Tête 7 Frappez uniquement la tête de la cloche tubulaire. Ne frappez jamais le corps de la cloche tubulaire avec le marteau. 8 Ne stockez pas le cloche-tube dans un endroit trop chaud ou trop humide. Cela pourrait réduire la vie de l’instrument. Corps de la cloche tubulaire 9 Pour un nettoyage régulier, essuyez avec un chiffon doux et sec. Ne frottez jamais avec un diluant ou un agent de polissage. Précaution lors du transport 1 Lors du transport ou du déplacement de l’instrument, ne le soumettez pas à des chocs importants. 2 La justesse ou la sonorité des cloches tubulaires peut changer si les tubes sont rayés ou tordus. Soyez prudent. 3 Quand l’instrument doit être transporté sur une grande distance, et plus particulièrement dans un véhicule, retirez d’abord les cloches tubulaires du support. La forme du support peut changer et les fils/ cordes peuvent se rompre si les tubes ne sont pas retirés. 4 Lors de la fixation ou du retrait des cloches tubulaires, faites ces manipulations dans un endroit suffisamment spacieux de façon à ce que les cloches tubulaires ne rentrent pas en contact avec d’autres objets. 5 Après avoir retiré les cloches tubulaires et afin de les transporter facilement, enroulez-les dans un chiffon doux, pour éviter les rayures et les chocs. 11 MONTAGE Assurez-vous que le clche-tube soit monté au moins par deux personnes. 1 Raccordez le dispositif de la pédale aux montants des roulettes (gauche/droit). 7 Accrochage des coches tubulaires au montant de suspension. Positionnez le dispositif de la pédale et les montants des roulettes (gauche/droit) comme montré sur l’illustration à droite. Assurez-vous que l’étouffoir ne soit pas engagé (frein de l’étouffoir en place). * Si l’étouffoir est engagé, appuyez sur la pédale, puis poussez vers le bas le frein de l’étouffoir et relâchez la pédale pour engager le frein de l’étouffoir. * La procédure suivante suppose que l’interprète est tourné vers l’avant quand il joue à l’instrument. Dévissez complètement les vis A, puis faites glisser le tube du dispositif de la pédale complètement dans le trou du montant des roulettes. Serrez solidement la vis A. Après avoir raccordé le tube du dispositif aux montants des roulettes, verrouillez les roulettes (gauche et droite). 2 Accrochez les cloches tubulaires en commençant par les notes altérées avant d’accrocher celles des notes naturelles. Assurez-vous que le nom de la note est tourné vers l’avant puis placez la corde dans les guides sur les broches de suspension et accrochez la corde sur le rivet à tête ronde. Assurez-vous que le noeud de la corde ne soit pas en contact avec le rivet à tête ronde. Insérez les montants latéraux dans les trous des montants des roulettes (gauche et droit). Desserrez complètement les vis B et insérez l’extrémité de montant latéral avec un petit trou sur le côté, complètement dans montants des roulettes gauche et droite. Côté tonalité altérée * Les mantants latéraux gauche et droit sont les mêmes. * Pour pouvoir fixer plus facilement le dispositif l’étouffoir et le montant de suspension, ne serrez pas de suite les vis B. 3 Côté tonalité naturelle Broche de suspension 5 6 Desserrez complètement les vis C et faites glisser l’étouffoir sur les montants latéraux par dessus, de façon à ce que la tige de l’étouffoir soit positionnée sur la droite. Faites glisser l’étoufoir vers le bas jusqu’à ce qu’il rentre en contact avec les butées de l’étouffoir. Fixez le montant de suspension. Faites glisser le montant de suspension sur les montants latéraux par dessus. Faites la glisser complètement sur les montants. Serrez les vis B et C. Serrez solidement les vis B et C des deux côtés droit et gauche. Fixez la pédale de l’étouffoir. Tirez la pédale de l’étouffoir vers l’avant, puis accrochez le crochet de l’extrémité de la tige de traction sur la tige de l’étouffoir. Puis tirez sur la poignée de la tige de traction pour l’accrocher à la tige de l’étouffoir, puis relâchez la tige de traction. * N’appuyez pas sur la pédale de l’étouffoir. Si vous le faites, l’étouffoir est engagé et les cloches tubulaires ne peuvent pas être accrochées. 12 Rivet à tête ronde Fixez l’étouffoir. Cloche tubulaire * Pour pouvoir fixer plus facilement la montant de suspension, ne serrez pas encore les vis C. 4 Corde Broche de suspension Tube en téflon 8 Ajustez la pédale de l’étouffoir. Desserrez la vis D pour ajuster l’angle de la pédale, puis serrez solidement la vis D. La meilleure position de la pédale est celle où elle est légèrement au-dessus du sol quand elle est enfoncée complètement. D Pédale de l’étouffoir Le démontage est réalisé facilement en inversant l’ordre de montage. MONTAGE Montant de suspension Plus long Montants latéraux 4 5 Frein de l’étouffoir 4 C Butée de l’étouffoir Plus court Trou de repère Montant roulettes (gauche) C5 3 Etouffoir 3 2 5 B5 1 Dispositif de 2 B 1 la pédale Roulette Pédale de l’étouffoir Montant roulettes (droit) 6 1 A Tige de l’étouffoir Crochet Poignée de la tige de traction Tube du dispositif de la pédale Tige de traction supérieure D 13 Memo 14 Memo 15 WJ56570 1602 R2 Printed in Japan-
 1
1
-
 2
2
-
 3
3
-
 4
4
-
 5
5
-
 6
6
-
 7
7
-
 8
8
-
 9
9
-
 10
10
-
 11
11
-
 12
12
-
 13
13
-
 14
14
-
 15
15
-
 16
16


Yamaha DC9190A El manual del propietario
- Tipo
- El manual del propietario
En otros idiomas
- français: Yamaha DC9190A Le manuel du propriétaire
- italiano: Yamaha DC9190A Manuale del proprietario
- English: Yamaha DC9190A Owner's manual
- Deutsch: Yamaha DC9190A Bedienungsanleitung
- русский: Yamaha DC9190A Инструкция по применению
- Nederlands: Yamaha DC9190A de handleiding
- português: Yamaha DC9190A Manual do proprietário
- dansk: Yamaha DC9190A Brugervejledning
- polski: Yamaha DC9190A Instrukcja obsługi
- čeština: Yamaha DC9190A Návod k obsluze
- svenska: Yamaha DC9190A Bruksanvisning
- 日本語: Yamaha DC9190A 取扱説明書
- Türkçe: Yamaha DC9190A El kitabı
- suomi: Yamaha DC9190A Omistajan opas
- română: Yamaha DC9190A Manualul proprietarului
