
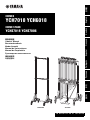
CHIMES
YCH7018 YCH6018
CHIME STAND
YCHS7018 YCHS7006
Owner’s Manual
Benutzerhandbuch
Mode d’emploi
Manual de instrucciones
Manual do Proprietário
Руководство пользователя
EnglishDeutschFrançaisEspañolPortuguêsPусский
JA EN DE FR ES PT RU ZH KO
YCH7018YCHS7006

2•YCH7018 YCH6018 YCHS7018 YCHS7006 Owner’s Manual
PRECAUTIONS
PLEASE READ CAREFULLY BEFORE PROCEEDING
Please keep this manual in a safe and handy place for future reference.
WARNING
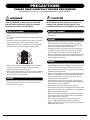
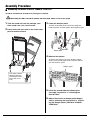
Always follow the basic precautions listed below to
avoid the possibility of serious injury or even death
from the chimes overturning, falling, the assembly
running out of control or the parts falling.
• Lock the casters except when moving or transporting the
chimes.
• Use a sufficient number of people when moving or transporting
the chimes.
• The chimes should only be moved across smooth, flat surfaces
when using the casters. Always move the chimes slowly,
supporting the side frames as shown in the illustration. Never
move the chimes on a sloped, unstable, or gravel surface.
• Never run when moving or transporting the chimes. Doing so
can result in the chimes running out of control, hitting an
obstacle or wall and causing serious injury.
• With the sound tubes attached, do not lift the chimes and do not
go up or down stairs with the chimes. Only move the chimes
after the unit has been disassembled.
• Do not go near the chimes during an earthquake. Strong shaking
during an earthquake could cause the chimes to move or tip
over, possibly causing injury.
CAUTION
Always follow the basic precautions listed below to avoid
the possibility of physical injury to you or others, or
damage to the instrument or other property. These
precautions include, but are not limited to, the following:
• When transporting the chimes, make sure that all caster locks
are released.
• When removing the chimes from the package, raising the chimes
and assembling the stand, always use two or more people.
Failure to do so might result in damage to the chimes or the
chimes overturning, and possibly causing injury.
• Assemble the chimes in the proper sequence by following the
assembly instructions in this manual. Failure to do so might
result in chimes overturning, and possibly causing injury.
• Make sure to tighten the screws or bolts regularly. Failure to do
so might result in misalignment of the chimes during playing,
noises, possibly causing injury.
• Make sure to confirm that the wire is not damaged before every
playing. Replace the wire if it is damaged. Failure to do so might
result in the sound tubes falling, and possibly causing injury.
• Do not recklessly swing the chime mallets. It may injure people
or damage surrounding objects.
• Make sure to periodically check that the screws and bolts are not
loose. Use the included hex key of the YCHS7006. For models
other than YCHS7006, use the hex key you own or consult
qualified Yamaha service personnel.
• Keep small parts (such as wires, wire caps, screws or bolts)
away from small children who might accidentally swallow them.
• Replace the wire cap if it is damaged.
• Do not directly touch the frayed wire with your hand.
• Before playing, make sure to check that the tops of all the sound
tubes are in line. Failure to do so might result in the sound tubes
falling, and possibly causing injury.
• Make sure to check that the wires are properly secured before
every playing. Failure to do so might result in the sound tubes
falling, and possibly causing injury.
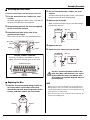
• Do not insert your finger, hand or foot in any gaps on the
casters, height adjustment mechanism or active part of
dampers. Doing so can result in pinching your finger/hand/foot,
and possibly causing injury.
Moving the instrument
Handling
Moving the instrument
Assembly
Handling

YCH7018 YCH6018 YCHS7018 YCHS7006 Owner’s Manual•3
NOTICE
• When transporting the chimes, remove all sound tubes from
the chime stand. After the sound tubes are removed, wrap
them in a soft cloth, etc., to prevent scratching while
transporting.
• When attaching or removing the sound tubes, do so in a
place where there is sufficient room, so that the tubes do not
come into contact with other objects.
• When transporting or moving the instrument, do not subject it
to strong shocks.
• The sound tube’s pitch and/or tone may change if the tubes
are scratched or bent. Be careful to avoid this.
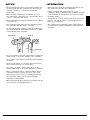
• Hit the Head cap when playing the chime. Never directly hit
the sound tube with the chime mallet. Failure to do so might
result in damage to the sound tube.
• Do not use hammers other than chime mallets for playing the
chimes. Doing so can result in damage to the sound tube.
• Do not use the chime mallets for anything other than playing
the chimes.
• Always use the chimes on a flat, level surface. The chimes
will not function properly on a sloped surface.
• Do not rest your weight, or place heavy objects on the
damper pedal. Doing so can result in damage to the damper.
• When not playing the chimes, contact the damper with the
sound tubes. Doing so prevents resonance of the sound
tubes from the acoustic sound of surrounding instruments.
• Do not keep the chimes in an environment with high
temperature or high humidity.
• When cleaning the product, wipe with a soft and dry cloth. Do
not use thinners or polishing preparations.
INFORMATION
• When exposed to the air, the sound tubes may discolor over
time, but this does not affect the sound quality.
• Use the sound tube and chime stand in the correct
combination. When a sound tube for the YCH6018 is attached
to the YCHS7018, the reverberation cannot be shortened by
the damper pedal.
• The illustrations as shown in this manual are for instructional
purposes only, and may appear somewhat different from
those on your instrument.
• The company names and product names in this manual are
the trademarks or registered trademarks of their respective
companies.
Chime mallet
Sound tube
Head cap

4•YCH7018 YCH6018 YCHS7018 YCHS7006 Owner’s Manual
Introduction
Thank you for purchasing the Yamaha YCH series chimes.
Accessories
• Chime mallet x2 (included in YCH7018 and YCH6018)
• Spare wire x1 (included in YCH7018 and YCH6018)
• Dust cover x1 (included in YCH7018 and YCH6018)
• Tuning key x1 (included in YCH7018 and YCHS7018)
• Hex key 5 mm x1 (included in YCHS7006)
• Owner’s Manual x1 (this book)
• Yamaha representative or the authorized distributor list x1
Part Names
YCHS7006
Base bar
Base (right)
Base (left)
Guide plate
Hanger
Side frame
(left)
Side frame
(right)
YCH7018 YCH6018 YCHS7018
The illustration shows the YCH7018, but the information applies to all models (except where indi-
cated).
Side frame
(right)
Side frame
(left)
Damper unit
Hanger
Sound tubes
(YCH7018, YCH6018 only)
Lock nut
Base (left)
Caster
Pedal rod
Fixing bolt
Damper rod
Base (right)
Bolt cap
Caster
Stopper
YCH7018, YCHS7018
only
Stopper
Damper Pedal

YCH7018 YCH6018 YCHS7018 YCHS7006 Owner’s Manual•5
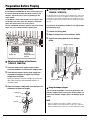
Assembly Procedure
Assembling the Stand: YCH7018, YCH6018, YCHS7018
YCH7018, YCH6018 and YCHS7018 are packaged assembled.
When taking the chimes out from the package and raising them, always use two or more people.
1.Take the stand out from the package, and
then stand it on a flat, level surface.
2.Press down with your foot on the caster stop-
pers to lock the casters.
3.Lower the damper pedal.
To lower the damper pedal, loosen the fixing bolt,
lower the pedal, and then tighten the fixing bolt again.
4.Release the damper.
To release the damper, push the damper stopper
while pressing the damper pedal, and then release
your foot from the pedal.
5.Install the sound tubes by following the
assembly instructions in “Attaching the
Sound Tubes.”
6.Adjust the amount of damper pedal depres-
sion by following the instructions in “Adjust-
ing the Damper Pedal (YCH7018, YCH6018,
YCHS7018).”
CAUTION
This stopper switches
between locking and
unlocking the casters.
(Press down on it to
lock.)
Damper pedal
Fixing bolt
Damper stopper

6•YCH7018 YCH6018 YCHS7018 YCHS7006 Owner’s Manual
Assembly Procedure
Assembling the Stand: YCHS7006
When assembling the chimes, always use two or more people.
1.Link the left and right bases with the base
bar.
Insert the base bar into the holes of the bases firmly
all the way, and then tighten with the included bolts to
secure using the included hex key.
2.Lock the stoppers of the left and right cast-
ers.
3.Insert the side frames into the bases so that
the hanger, guide plate and casters with
stopper are on the player side.
Align the bolt holes on the side frame with bolt holes
on the bases, and then temporarily fix with the
included bolts.
4.Tighten the two bolts temporarily fixed in
step 3.
5.Attach the sound tubes to the frame accord-
ing to the “Attaching the Sound Tubes” (page
7).
CAUTION
Base (left)
Base bar
Base (right)
Bolt
Bolt
Switching the stopper
ON
(lock)
OFF
(unlock)
Side frame
Side frame
Guide plate
Base
Base
Bolt holes
Hanger
Player side
Bolts

YCH7018 YCH6018 YCHS7018 YCHS7006 Owner’s Manual•7
Assembly Procedure
Attaching the Sound Tubes
Install the sound tubes with the damper released.
1.Put the sound tubes on a stable, flat, level
surface.
To prevent damage to the tubes, place a soft cloth on
the floor where the tubes will be placed.
2.Remove the protective film that was applied
to the sound tube surface.
3.Hook both end balls of the wire in the
grooves of the hanger.
At this time, turn the note name toward the player.
Replacing the Wire
1.Hold the sound tube while being careful not
to contact other sound tubes and stand,
detach the end balls from the grooves of the
hanger, and then remove the sound tube.
2.Put the sound tubes on a stable, flat, level
surface.
To prevent damage to the tubes, place a soft cloth on
the floor where the tubes will be placed.
3.Remove the wire caps.
When removing the wire cap, pass the wire through
the slit of the wire cap.
4.Replace the wire.
5.Attach the wire caps to the sound tube.
The wire is structured by multiple strands of thin
metal wires. When a thin metal wire is cut, replace
the wire with a wire which is not damaged. If the
wire is broken, the sound tube might fall, and possi-
bly causing injury.
NOTE
• Replace the wire cap if it is damaged. If you keep using the
damaged wire cap, the wire will be easily damaged. Please
contact qualified Yamaha service personnel about the wire cap
(sold separately) for replacement.
• Since the wire caps are very small and can be easily lost, be
careful when handling them.
End ball
End ball
Hanger
Hanger
Note name
Accidental tone side
YCH7018, YCH6018, YCHS7018
Generally, arrange the sound tubes as shown
below. The places filled with gray are not used.
Natural
tone side
Long tube Short tube
End ball
End ball
Wire cap
Slit
Wire
Wire cap
Slit
Wire
CAUTION

8•YCH7018 YCH6018 YCHS7018 YCHS7006 Owner’s Manual
Preparation Before Playing
Play the chimes on a flat, level surface.
In YCH7018 and YCHS7018, if some sound tubes are
in contact with the damper felt while releasing the
damper, adjust the four casters according to the
steps below.
In YCH6018, if some sound tubes are in contact with
the damper felt even while the damper is released,
place the chimes on a flat, level surface.
For the YCHS7006, place the chimes where all sound
tubes are not in contact with the guide plate.
Adjusting the Height of the Casters
(YCH7018, YCHS7018)
1.Turn the lock nut on upper of the caster
counterclockwise to release the height lock.
2.Turn the bolt cap of each caster using the
included tuning key to adjust the chimes
height from the floor.
Turning it clockwise raises the height away from the
floor, while turning it counterclockwise lowers it
toward the floor.
3.After the height is adjusted, turn the lock nut
clockwise to lock the height.
Adjusting the Damper Pedal (YCH7018,
YCH6018, YCHS7018)
The damper holds the sound tubes with the damper felt to shorten the
reverberation of the chime sound. While pressing the damper pedal,
the damper is released and reverberations are heard. When you stop
pressing the damper pedal, the damper will work and the reverberation
will stop.
The position of the damper pedal can be adjusted by
the following steps.
1.Loosen the fixing bolt.
2.Adjust the position of the damper pedal.
3.Tighten the fixing bolt to fix the damper
pedal.
Using the damper stopper
You can keep the damper release by pushing in the
damper stopper while pressing the damper pedal. To
release the damper stopper, press the damper pedal
again.
NOTE
• When the depth of pressing the pedal is insufficient, the
damper stopper cannot be pushed in. In this case, adjust the
damper pedal position so that you can fully depress the pedal.
Sound tube
Damper felt
In contact
Height adjustment
required
Tuning key
Bolt cap
Lock nut
Damper pedal
Damper stopper
Fixing bolt

YCH7018 YCH6018 YCHS7018 YCHS7006 Owner’s Manual•9
Troubleshooting
The damper does not release
Stop pressing the damper pedal while pressing the damper stopper.
When the depth of pressing the damper pedal is insufficient, the damper stopper cannot be pushed in. In this case, adjust the
damper pedal position so that you can fully depress the pedal.
Noise, poor sound
Place the chimes on a flat, level surface.
(YCH7018, YCHS7018 only) When the floor is not a level surface, adjust the height of the four casters.
When the wire cap is damaged, replace it with a wire cap which is not damaged. Please contact qualified Yamaha service per-
sonnel about the wire cap (sold separately) for replacement.
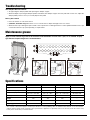
Maintenance grease
Apply a small amount of grease to the locations indicated below at least once a year, or as needed. A spray
type lithium soap based grease is recommended.
Specifications
* The contents of this manual apply to the latest specifications as of the publishing date. To obtain the latest manual, access the Yamaha
website and then download the manual file. Since specifications, equipment or separately sold accessories may not be the same in every
locale, please check with your Yamaha dealer.
YCH7018 YCH6018 YCHS7018 YCHS7006
Range
C52–F69 C52–F69 – –
Tube diameter (mm)
38.1 31.8 – –
Dimensions (cm) W × D × H
81 × 71 × 177–181 81 × 71 × 167 81 × 71 × 175–179 56 × 68 × 181
Pitch (Hz)
A=442 A=442 – –
Damper
Ye s Ye s Ye s –
Hight adjustment mechanism
Ye s – Ye s –
Weight (kg)
85 63 30 15

ZY03810
Manual Development Group
©2019 Yamaha Corporation
Published 09/2019
2019
11
POTO-A0
-
 1
1
-
 2
2
-
 3
3
-
 4
4
-
 5
5
-
 6
6
-
 7
7
-
 8
8
-
 9
9
-
 10
10


Yamaha YCHS7081 El manual del propietario
- Tipo
- El manual del propietario
en otros idiomas
- français: Yamaha YCHS7081 Le manuel du propriétaire
- italiano: Yamaha YCHS7081 Manuale del proprietario
- English: Yamaha YCHS7081 Owner's manual
- Deutsch: Yamaha YCHS7081 Bedienungsanleitung
- русский: Yamaha YCHS7081 Инструкция по применению
- Nederlands: Yamaha YCHS7081 de handleiding
- português: Yamaha YCHS7081 Manual do proprietário
- dansk: Yamaha YCHS7081 Brugervejledning
- polski: Yamaha YCHS7081 Instrukcja obsługi
- čeština: Yamaha YCHS7081 Návod k obsluze
- română: Yamaha YCHS7081 Manualul proprietarului
Artículos relacionados
-
Yamaha YCH-585 El manual del propietario
-
-
-
-
-
-
-
