Kenmore 116-33720201 El manual del propietario
- Categoría
- Aspiradoras
- Tipo
- El manual del propietario

Owner'sManual
ManualDelPropietario
VacuumCleaner
Aspiradora
Model, Modelo
116,33720
116.33721
116.3472O
116.34721
CAUTION:
Read and follow all
safety and operating
instructions before first
use of this product.
CUIDADO:
Lea y sigue todas las
instrucciones de operaci6n
y seguridad antes del uso de
este producto.
Sears, Roebuck and Co., Hoffman Estates, IL 60179 U.S.A.
www.sears.com
Part No. CQ1ZCAF3QUQG-KCO1ZCAF3QUQ
Printed in Mexico
Impreso en M_xico

Before UsingYour New Vacuum ........ 2
KenmoraVacuum Cleaner Warranty .... 2
ImportantSafety Instructions ........... 3
Parts and Features ................... 4
AssemblyInstructions ............... 5-6
Operating Instructions ................. 7
Pile HeightSelection and Setting ........ 7
Releasingthe Handle ................. 8
ON/OFF Switch ..................... 8
Attachments ..................... 9-10
AttachmentUse Chart ............... 10
VacuumingTips .................... 11
PerformanceFeatures ............... 11
Vacuum Cleaner Care ............... 12
Vacuum Storage ................... 12
Cleaning Exteriorand Attachments ..... 12
Dust BinCleaning ................ 13-14
Secondary FilterCleaning ............ 14
FilterChanging/Cleaning ............. 15
BeltChangingand AgitatorCleaning.. 16-17
Clog Removat ..................... 18
Motor Protector ..................... 18
AgitatorServicing................... 19
AgitatorAssembly .................. 19
LightBulb Changing ................. 20
Troubleshooting ..................... 21
Notes ............................... 22
Please read this guide. It will help you assemble and operate your new Kenmore vacuum in
the safest and most effective way.
For more information about vacuum cleaner care and operation, call your nearest Sears store.
You will need the complete model and serial numbers when requesting information. Your vacu-
um's model and serial numbers are located on the Model and Serial Number Plate.
Use the space below to record the model number and serial number of your new Kenmore
vacuum.
Model No.
Serial No.
Date of Purchase
Keep this book and your sales check (receipt) in a safe place for future reference.
LIMITED ONE YEAR WARRANTY ON KENMORE VACUUM CLEANER
This warranty is for one year from the date of purchase, and includes only private household
vacuum cleaner use. During the warranty year, when this vacuum cleaner is operated and
maintained according to the owner's manual instructions, Sears will repair any defects in
materiar or workmanship free of charge.
This warranty excludes vacuum bags, belts, light bulbs, and filters, which are expendable parts
and become worn during normal use.
For warrantyservice,retum this vacuum cleaner tothe nearest Sears Service Center in the
UnitedStates.
This warranty applies only while this product is in use in the United States. This warranty gives
you specific legal rights, and you may also have other rights which vary from state to state.
Seam, Roebuckand Co., D/817 WA, Hoffman Estates, IL 60179
2

Your safety is importantto us. To reduce the riskof fire, electricalshock, injuryto per-
sons ordamage when usingyour vacuum cleaner, follow basic safety precautions
including the following:
Reed this manual before assembling or
using your vacuum cleaner.
Use your cleaner only as described in
this manual. Use only with Sears recom-
mended attachments.
To reduce the risk of electrical shock -
Do not use outdoors or on wet surfaces.
Disconnect electrical supply before any
servicing or cleaning. Failure to do so
could result in electrical shock or per-
sonal injury.
Always turn cleaner off before unplug-
ging.
Do not unplug by pulling on cord. To
unplug, grasp the plug, not the cord.
Do not use with damaged cord or plug. If
cleaner is not working as it should, has
been dropped, damaged, left outdoors,
or dropped into water, return it to a
Sears Service Center.
Do not pull or carry by cord, use cord as
a handle, close door on cord, or pull
cord around sharp edges or corners.
Do not run cleaner over cord. Keep cord
away from heated surfaces.
Do not leave cleaner when plugged in.
Unplug from outlet when not in use and
before servicing.
Do not allow to be used as a toy. Close
attention is necessary when used by or
near children.
Do not handle plug or cleaner with wet
hands.
Do not put any objects into openings.
Do not use with any opening blocked;
keep free of dust, lint, hair and anything
that may reduce air flow.
Keep hair, loose clothing, fingers, and all
parts of body away from openings and
moving parts.
Do not use cleaner without dust bin
and/or filters in place.
Always clean the dust bin after vacuum-
ing carpet cleaners or freshener, pow-
ders and fine dust. These products clog
the filters, reduce airflow and can cause
damage to the cleaner. Failure to clean
the dust bin could cause permanent
damage to the cleaner.
Do not use the cleaner to pick up sharp
hard objects, small toys, pins, paper
clips, etc. They may damage the clean-
er or dust bin.
Do not pick up anything that is burning
or smoking, such as cigarettes, match-
es, or hot ashes.
Do not use cleaner to pick up flammable
or combustible liquids (gasoline, clean-
ing fluids, perfumes, etc.), or use in
areas where they may be present. The
fumes from these substances can create
a fire hazard or explosion.
Use extra care when cleaning on stairs.
Do not put on chairs, tables, etc. Keep
on floor.
You are responsible for making sure that
your vacuum cleaner is not used by any-
one unable to operate it properly.
SAVE THESE INSTRUCTIONS
Proper assembly and safe use of your vacuum cleaner are your responsibilities. Your
cleaner is intended only for household use. Read this Owner's Manual carefully for
important use and safety information. This guide contains safety statements under
warning and caution symbols. Please pay special attention to these boxes and follow
any instructions given. WARNING statements alert you to such dangers as fire, elec-
trical shock, burns and personal injury. CAUTION statements alert you to such dan-
gers as personal injury and/or property damage.
3

It is important to know your vacuum cleaner's parts and features to assure its proper and safe
use. Review these before using your cleaner.
Item Part No. Part No.
In U.S. In Canada
Belt 20-5275 20-40096
Headlight Bulb 20-5240 20-40600
Primary Filter 20-82720
Exhaust Filter 20-86889 20o86889C
Hose
Dust Bin
Release
Handle --
Power
Cord.
Screw
Filter
Hose (Inside)
Holder
Cord Hook
Nozzle
Cover
Brush
Wand
Furniture
Guard
Retainer/
Carry Handle
-Dust
Bin
Exhaust
(Inside)
(Some Models)
Nozzle
Base
Nozzle Cover
Retainers
On/Off
Switch
Handle
Release
Model/Serial
Numbers
Tool
Motor
Protector
Sho_
Hose
EXTENSION HOSE KITS
SOME MODELS
Extension Hose
SOME NI()[)_ELS-
_FI _Adaptor
oor Brush
Wand
4

Before assembling vacuum, check the
PACKING LIST on the cover of the separate
Repair Parts List. Use this list to verify that
you have received all the components of
your new Kenmore vacuum.
ElectricalShock Hazard
Do not plugintothe electricalsupply
untilthe assembly iscomplete. Failure
to do so could result in electdcal shock
orinjury.
HANDLE ASSEMBLY
Remove the screw located just below the
top edge of the back of the vacuum.
Position the handle as shown in the illustra-
tion below.
While holding the power cord out of the way,
slide the handle into the opening at the top
of the vacuum.
Handle
Handle
Screw
Hole
Insert the screw so it passes through the
handle into the vacuum.
Begin to tighten the screw with your fingers.
It may be necessary to adjust the handle
slightly.
5

CAUTION
Do notovertighten.
Overtighteningcould stdp the screw
holes.
Do notoperate the cleaner withoutthe
screw in place.
Using a screw-
driver, tighten
the screw.
CORD ASSEMBLY
Make sure the quick release cord hook is in
the upright position. Remove the wire tie
from the power cord.
Lock the cord into
place by forcing it
into the locking
notch on the body Lockin
of the quick Notch
release cord hook
as shown. This
helps keep the
power cord out
from under the Power
vacuum cleaner
agitator.
Quick
Release
Curd
Power
Lower
Cord
Wrap the
power cord
around the
quick release
cord hook
and lower
cord retainer,
then lock the
power cord
plug onto the
power cord.
ATTACHMENT STORAGE
After the handle has been assembled to the
body and the power cord has been wrapped
around the cord hooks, the attachments can
be placed in their holders.
1. Snap the suction inlet end of the hose
into the back of the vacuum cleaner.
2. Place the hose behind the handle and
over the hose holder.
3. Place the hose in the front slot of the
tool holder, twisting and pushing down over
the short hose to assure a good connection.
4. Place the extension wand in the rear slot
of the tool holder.
5. Slide the crevice tool into the slot beside
the wand.
6. Place the dusting brush or combination
brush on the wand with the brush portion
up.
Handle-
Hose
Dusting
Brush
Extension
Wand
Q
Inlet
Tool
Holder
Tool

HOWTO START
Quick
Release
Hook
1.Turn the quick
release cord
hook to either
side and down
to release the
power cord.
2. Release the power cord plug from the
power cord and pull the cord off the quick
release cord hook. Check to be sure the
power cord is still locked into the locking
notch in the quick release cord hook.
NOTE: To reduce the risk of electric shock,
this vacuum cleaner has a polarized plug;
one blade is wider than the other. This plug
will fit in a polarized outlet only one way. If
the plug does not fit fully in the outlet,
reverse the plug. If it still does not fit, con-
tact a qualified technician to install the prop-
er outlet. Do not change the plug in any
way.
Personal Injury and Product
Damage Hazard
• DO NOT plugin if switchis inthe
ON position.Personal injuryor
damage couldresult.
• DO NOT use outletsabove coun-
ters. Damage from cordto items in
surroundingarea couldoccur.
3. Plug the polarized power cord into a
120 Volt outlet located near the floor.
Models with no selector adjust automatically
for varying carpet heights.
SOME MODELS
To select a pile height setting:
Turn off cleaner. Select a pile height setting
by tilting the cleaner back until front wheels
are lifted slightly off the floor as illustrated.
Slide the adjustment lever to the correct
setting.
SUGGESTED PILE HEIGHT SETTINGS
You may need to raise the height to make
some jobs easier, such as scatter rugs and
longer pile carpets. Suggested settings are:
Models withtwo (2) positions:
HIGH: medium to long pile.
LOW: short to mediumpile.
Models with four (4) positions:
HIGH: shag carpet, long pile, plush, scatter
rugs
MED: medium to long pile.
LOW: short to medium pile.
EX LOW: very low pile.
Place unit in "HIGH" when usingattach-
ments to prevent possiblefloordamage.
AI-I'ENTION: Special care is required when
vacuuming certain types of carpet or floor
covering. Always check the carpet or floor
covering manufacturer's recommended
cleaning instructions before vacuuming.

Releasethehandlebyplacingyourfooton
thefootrestandpullbackonthehandle
untilit releasesfromitsuprightposition.
Foot Rest For
Handlq
SOME MODELS
Release the handle by pressing down on
the handle release pedal with your foot and
pulling back and down on the handle with
your hand.
r-7
Handle
Release Pedal
To start the vacuum cleaner, step on the
ON/OFF switch located on the back of the
vacuum. To stop the vacuum cleaner, step
on the switch a second time.
On/Off
8

PersonalInjuryHazard and Property
Hazard
DO NOT place hands or feet under-
neath the unitat any time. When using
attachments,the agitatorcontinues
rotating. Do notallow the cleaner to
remain in just one place for a periodof
time as the agitatormay damage the
floor surface. Avoid placingthe cleaner
on furniture, the fdnged area of rugs,
deep pile carpeting,or carpeted stairs.
The ideal positionforthe cleaner when
usingattachments is for the unitto be
on a level area with the handle in the
f_ position.
TO USE ATrACHMENTS
I CAUTION
DO NOT tip vacuum cleaner forwards or
sideways when using attachments.
The attachments will fit on the hose or the
wand. In addition, the dusting brush or
combination brush will also fit on the crevice
tool.
The hose and wand can be pulled off the
short hose by grasping the cuff and twisting
while pulling up.
! CAUTION
DO NOT pull the vacuum cleaner
around the room by the hose.
Property damage could result.
The attachments can be added to the hose
if the item to be cleaned is not far from the
creaner. The hose on some moders will
expand.
NOTE: When cleaner is turned on, the hose
on some models will have a tendency to
collapse due to suction of the cleaner.
if more reach is needed, the wand can be
attached to the hose and the attachments
can be added to the wand.
When using attachments, be careful
not to overextend the hose length
when reaching. Trying to reach
beyond the hose reach could cause
the cleaner to tip over.
SOME MODELS
An extra wand, without tabs, is included.
This extra wand can be added to the
wand with tabs for extra reach. Insert
wand and twist a quarter of a turn to
secure fit.
Crov, o,-- o,-
_Dusting Brush Wand
(Some Models) _
Combination
Brush (Some
Models)
If the dusting brush/combination brush is
being used and more distance is
needed, the crevice tool can be added to
the wand, then the dusting
brush/combination brush can be added
to the crevice tool.
TO STORE
A'I-FACHMENTS
Return the hose to its position on the
short hose and the attachments to their
holders.
Attachmentsused in dirtyareas, such
as under a refrigerator,shouldnot be
used on othersurfaces untilthey are
washed. They could leave marks.
9

When using the regular hose or with
the extension hose attached, the
cleaner should be on a solid surface
on the same level or below the level of
the user's feet. DO NOT use the hoses
when the cleaner Is above the level of
I the user's feet.
I
EXTENSION HOSE
SOME MODELS
Some models include an extra hose which
connects to the stretch hose on the vacuum
for a longer cleaning reach.
Unit Hose _ Extension Hose
Insert the two tabs on the end of the
extension hose into the two "J" shaped slots
on the unit hose and twist to connect.
All attachments and the wand can be
attached to the open end of the hose.
FLOOR BRUSH AND WAND
SOME MODELS
Some models have an extra brush and wand
for cleaning bare floors. Twist one end of the
adaptor into the floor brush and the other
end into the straight wand. Connect the
straight wand to the telescopic wand and
then to the vacuum hose or extension hose.
(}J
A'I-FACHMENT
DUSTING BRUSH <_
CREVICE TOOL ¢_ _
COMBINATION BRUSH
Handi-Mate ® Jr.
Fumiture*
X
X
X
X
CLEANING AREA
Between
Cushions*
X
Drapes* Stairs
X X
X
X X
X
Walls
X
The motor protector may open when using attachments or when cleaning new carpet due to
reduced air flow caused by the attachments themselves or by new carpet fuzz filling the bag
quickly.
*Always clean attachments before using on fabrics.
10

Personal InjuryHazard
Use care Ifvacuum cleaner Is placed
on stairs.If itfalls, personal injuryor
propertydamage couldresult.
Carpet edges
Guide either side or the front of the nozzle
along a baseboard. The full length brushes
help remove trapped dirt at carpet edges.
Stairs
Put handle in ful! upright position. Use the
crevice tool or dusting brush. Set the On/Off
switch to ON.
MOTOR PROTECTION
SYSTEM
Thermal Protector
This vacuum has a thermal protector which
automatically trips to protect the vacuum
from overheating. If a clog prevents the
normal flow of air to the motor, the thermal
protector turns the motor off automatically to
allow the motor to cool in order to prevent
possible damage to the vacuum.
To correct problem: Ifthis occurs, turn the
vacuum off and unplug the power cord from
the outlet to allow the vacuum to cool and
the thermal protector to reset. Check for
and removeclogs, ifnecessary. Alsocheck
and clean/replace any cloggedfilters. Wait
approximatelythirty (30) minutesand plug
the vacuum in and turn back on to see ifthe
motorprotectorhas reset.The motor
protectorwill not reset if the vacuum is not
tumed offeven if the vacuum hascooled
down.
PERFORMANCE
INDICATOR
SOME MODELS
When the unit is running with normal air
flow, the light on the performance indicator
is off. The light comes on whenever the
airflow becomes blocked. If that occurs,
check the dust bin, clean/replace clogged
filters, and check other possible clog
locations shown in CLOG REMOVAL.
To correct problem: See the TROUBLE-
SHOOTING chart.
NOT,Te f
light may
also come on
when using
attachments,
due to
reduced
airflow
through the
attachment.
11

Alwaysfollowallsafetyprecautionswhen
cleaningandservicingthevacuum
cleaner.
ElectricalShockAndPersonalInjury
Hazard
Disconnectelectricalsupplybefore
servicingor cleaningthe unit.Failure
to do so could resuRin electricalshock
or personal injuryfrom cleanersud-
denlystarUng.
Gather the power cord and wrap it loosely
around the quick release cord hook and
lower cord retainer.
Store the cleaner in a
dry, indoor area, on
the floor with the
Quick
Release handle locked in the
Cord upright
Hook _ position.
Power
Lower
Cord
Unplug cord from wail outlet.
WARNING
dcal Shock And Personal Injury
Hazard
Wrappingthe cord too tightly puts
stresson the cord and can cause cord
damage. A damaged cord isan electri-
cal shockhazard and could cause per-
sonal injuryor damage.
DO NOT ddpwater on cleaner.
To reduce static electricity and dust build-
up, wipe outer surface of cleaner using a
clean, soft cloth that has been dipped in a
solution of mild liquid detergent and water,
then wrung dry. Wipe dry after cleaning.
Wash attachments in warm soapy water,
rinse and air dry. Do not clean in dishwash-
or.
Do not use attachments if they are
wet. Attachments used in dirty areas,
such as under a refrigerator, should
not be used on other surfaces until
they are washed. They could leave
marks.
12

Alwaysemptythe dust binwhen dirtlevel
reachesthe "MAX FILL" line.
TO REMOVE DUST BIN
! WARNING
Always unplugpower cord fromelectri-
cal outletbefore performingany ser-
vice on vacuum.
Lift dust bin han- DustBin _h_
Release
die located at the Handle --
top of the dust
bin. Dust
Bin --
J
Pull the handle
forward and lift
dust bin up and
out of the vacu-
um cleaner.
Seoondar,I
Remove any
clogs that
might be
located in the
dust bin port
or the sec-
ondary filter.
TO EMPTY DUST BIN
Turn This Direction Closed
To Open For Emptying (for Use)
Open
(For Emptying)
Rotate dust bin lid assembly counterclock-
wise as indicated on the lid and lift off.
Pour dust bin contents
into a trash container.
TO CLEAN FILTER
The filter may be
cleaned by
tapping it on a firm
surface or by
rinsing it under a
faucet. See Filter
Changing/Cleaning
section Rinse with
water only, do not
use any detergent or
_ Filter
Cover
soap. Allow the filter to dry for 24 hours
before putting it back into the vacuum.
13

TOREPLACEDUSTBIN
Turn This Direction Open
TO Close For Use (For Emptying)
Closed
(ForUse)
Place dust bin lid assembly back onto top of
dust bin. Align lid marks with bin marks as
shown above in Open (For Emptying).
Rotate lid clockwise while pressing down-
ward so that marks align as shown in
Closed (For Use).
Place dust bin
back into vacuum
cleaner by insert-
ing the bottom first
and tilt back with
the dust bin han-
dle raised.
Dust Bin
Release
Dust
Bin
Push forward and
lower the dust bin
handle to lock
dust bin in place.
Check secondary filter 'frequently and clean
when dirty.
Remove the dust bin as outlined in the
DUST BIN CLEANING section.
To clean filter screen wipe screen with a dry
cloth.
NOTE: Filter screen is not removable.
Replace the dust bin as outined in the
DUST BIN CLEANING section.
Secondary
14

WARNING
PRIMARY FILTER
Check primary filter frequently and clean
when dirty.
TO REMOVE PRIMARY FILTER
Remove the dust bin and dust bin lid
assembly as outlined in the DUST BIN
CLEANING section. While holding the pri-
mary filter over a trash container grasp filter,
rotate and lift off.
Clean primary filter by
gently tapping over a trash
container. Locking
Tap on several
sides to
ensure best
cleaning. Cover
Slot
Rinsewith water onlyas needed (see Dust
Bin Cleaning).
When cleaning the filter no longer restores
vacuum suction to full power you need to
replace the filter.
TO REPLACE PRIMARY FILTER
Make sure that the slots
of the filter line up with
the locking tabs on the
filter cover. Replace filter
and rotate filter until
slots lock onto tabs
in cover.
Cover
Slot
Tab
Note: Under normal use and care, your filter
can be expected to last up to 3 years.
Re-attach the filter cover and filter to dust
bin (see Dust Bin Cleaning). Place dust bin
back into cleaner.
EXHAUST FILTER
FOAM
Press inward on each side of
exhaust filter cover and pull out
to remove from vacuum
Press
cleaner. Inward
Exhaust
Exhaust
Remove the
frame and filter.
Push only on
filter frame, not
on filter itself.
Filter
Frame
Filter
Wash the exhaust filter in warm soapy
water; rinse and dry thoroughly by squeez-
ing the filter in your hand and letting it air
dry.
DO NOT wash in the dishwasher.
DO NOT installdamp.
Replace the exhaust filter, carefullyposition-
ing it so that it fits into the frame.
Exhaust
Filter
Cover
\
Replace the
exhaust filter
cover by placing
tabs in slots and
pushing in until
cover snaps into
place.
15

WARNING
ElectricalShock Or Personal Injury
Hazard
Disconnectelectrical supplybefore
servicingor cleaningthe unit. Failure
to do so couldresultin electricalshock
or personal injuryfrom cleaner sud-
denlystarting.
Frequently check and remove hair, string
and lint build-up in the brush area. If build-
up becomes excessive, follow the steps
below. Should the belt become loose or
should it break, follow the Belt Removal
Instructions.
TO REMOVE NOZZLE COVER
Disconnect electrical supply.
To protect the floor surface, always place
paper under the nozzle any time the nozzle
cover is removed.
Release the nozzle c_)ver by rotating the
nozzle cover retainerg to the UNLOCK
position. Grasp back of nozzle on each side
and lift up to remove it from nozzle cover.
Nozzle
Cover
Carefully remove any residue that may exist
in the belt area.
Personal InjuryHazard
Always unplugthe vacuum cleaner
before cleaningthe brusharea as agi-
tator may suddenlyrestart. Failureto
do so can resultin personal injury.
TO REMOVE BELT/CLEAN
AGITATOR
Agitator
Position hands on the agitator. If the belt is
still attached to the agitator, there will be
tension on it.
Carefully lift the right end of the agitator and
then lift the left end.
Remove the worn or broken belt from the
motor drive shaft.
Personal Injury Hazard
Be careful when removingthe agitator
as the belt tensionis high.Failure to
do so could resultin personalinjury
fromthe agitator releasingquicklyand
snappingaway.
16

Remove the agitator to check for string and
hair build-up.
NOTE: In order to keep cleaning efficiency
high and to prevent damage to your vacu-
um, the agitator must be cleaned every time
the belt is changed,
The agitator must also be cleaned accord-
ing to the following schedule:
Vacuum Use
HEAVY -
(used daily)
MODERATE-
(used 2-3 times/week)
LIGHT-
(used 1time/week)
Clean Aaitator
every week
every month
every 2months
Cap
Cut oft any carpet
pile, hair or lint
entangled around
the agitator and
remove any string
or debris located
near the end
caps.
TO REPLACE BELT
Shaft
_"New
Belt
Belt
Pulley
Seat left end of agitator into nozzle base. To
seat agitator end, place rounded portion of agi-
tator end cap down into slot in nozzle base.
Loop the new belt on the motor shaft.
NOTE: Use Belt #20-5275
Loop the other end of belt onto the belt
pulley on the right end of agitator.
Pull right end of agitator forward and seat it
into nozzle base
Agitator Nozzle
Base
End
Cap
--Base
Slot
Press firmly, checking to see that each
end is completely inserted.
Agitator
Check to see that the belt is centered on the
belt pulley and that the agitator turns freely.
Nozzle I
Cover
\
Nozzle Cover
Retainers
Make sure the nozzle cover retainers are in
the UNLOCK position. Hook the front of the
nozzle cover on to the nozzle base and
rotate downward. Once in place, rotate the
nozzle cover retainers to the LOCK position.
17

Electrical Shock Or Personal Injury
Hazard
Disconnectelectdcal supplybefore
servicingor cleaningthe unit, Failure
to do so couldresult in electricalshock
or personal injuryfrom cleaner sud-
denly starUng.
Always follow all safety precautions when
cleaning and servicing the vacuum cleaner.
If the cleaner does not seem to have ade-
quate suction, first check if the dust bin is
full or if a filter is clogged. See DUST BIN
CLEANING and FILTER CLEANING /
CHANGING.
If the dust bin and filter areas are free of
clogs, check the hose area. Remove the
suction inlet by depressing the two tabs that
secure it to the back of the vacuum and
check for clogging in this area.
Hose
Tabs
Inlet
Tool
Motor
Hose
Replace the suction inlet and remove the
other end of the hose from the tool holder.
Plug in the vacuum and turn it on. While
running the vacuum cleaner, stretch the
hose in and out to remove the clog.
Turn the unit off and unplug the unit.
If the clog still exists, pull the short hose out
of the tool holder and inspect the short
hose.
Remove any visible clogs.
Motor _-_ 1
Protector _ ;___
NOTE: Do not block motor protector.
This vacuum has a motor protector by-pass
valve which automatically opens to provide
cooling air to the motor when a clog
prevents the normal flow of air. If the by-
pass valve opens to prevent motor
overheating and possible damage to the
vacuum, a change of sound will be noticed
as air rushes through the valve opening. If
this occurs, turn the vacuum off and unplug
the power cord from the outlet. Then check
for clogs as described under the CLOG
REMOVAL section.
The motor protector by-pass valve may open
when using attachments or when cleaning
new carpet, due to reduced air flow caused
by the attachments themselves or by new
carpet fuzz filling the dust bin quickly.
18

ElectricalShockOr PersonalInjury
Hazard
Disconnectelectricalsupplybeforeser-
vicingor cleaningthe unit. Failureto do
socould result inelectricalshockor
personalinjuryfromcleanersuddenly
starting,
TO CHECK AGITATOR
Base Belt Guard
Turn the vacuum
over to check for
worn brushes.
When brushes are
worn to the level of
the base belt guard,
replace the agitator.
TO REPLACE AGITATOR
Remove the nozzle cover and agitator. See
BELT CHANGING AND AGITATOR
CLEANING.
Replace agitator with a new one.
Reassemble the belt, agitator and nozzle
cover. See BELT CHANGING AND
AGITATOR CLEANING.
Belt Pulley
t
End Cap
Agitator Unit
End Cap
19

SOME MODELS
CAUTION
ElectricalShock Or Personal Injury
Hazard
Disconnectelectrical supplybefore
servicingor cleaningthe unit. Failure
to doso couldresultin electricalshock
or personal injuryfrom cleaner sud-
denlystarting.
Disconnect electrical supply.
To access the light bulb, remove the screw
which secures the light lens to the vacuum.
Remove the lens.
Screw Push Here
ToRemove
Remove the light bulb by pushing the bulb in
while turning counterclockwise to release
from the slot. Pull the light bulb straight out.
\
Do notuse e bulb rated over 130 V
AC-15 W. Duringextended use, heat
from the bulbcouldoverheat surround-
ing plasticparts.
To replace the light bulb, carefully insert and
turn clockwise to fit securely into slot.
NOTE: See Parts and Features for Bulb
number.
I CAUTION
Do not plug in or turn on until corn-
pletely reassembled.
Position the light lens back on the vacuum.
Replace the light lens screw.
20

Reviewthischarttofinddo-it-yourselfsolutionsforminorperformanceproblems.Anyservice
needed,otherthanthosedescribedinthisowner'smanual,shouldbe performedataSears
servicecenter.
WARNING EZ ,calShoCkHazard
Disconnectelectrical supplybefore servicingor cleaning the unit. Failure to do
so could resultin electricalshock or personal injury.
Cleaner won'trun.
2.Trippedcircuit breaker/bk
Poorjob ofdirt pick-up.
Cleaner picksup
moveable rugsor
pushes too hard.
Agitatordoesnotturn.
Performanceindicator,
some models,isred.
Airflow restricted
withattachmentuse.
Soundchanges.
1. Unplugged at wall outlet.
vnfuse
at household service panel.
3. On/off switch not turned on.
4. Thermal protector tripped.
1. Full or clogged dust bin.
2. Wrongpileheightset[Irlg.(somemodels)
3. Worn agitator.
4. Clogged nozzle or dust bin port.
5. Clogged hose.
6. Hole in hose.
7. Broken/misplaced belt.
8. Hose not inserted fully.
S. Motor protection system activated.
10. Dirty filters.
1. Wrongpileheightset_ng,(somemodels)
1. Broken belt.
2. Belt installedincorrectly.
1. Full or clogged dust bin.
2. Dirty filters.
3. Clogged aidlow passage.
4. Certain attachment tools.
1. Attachment use restricts air flow.
2. New carpet fuzz clogged air path.
1. Plug infirmly, pushon/offswitch to on.
2. Reset circuitbreakeror replacefuse.
3. Push on/off switch to on,
4. Reset thermalprotector,(page 11)
1. Clean dust bin, (pages 13, 14).
2. Adjust setting, (page 7).
3. Replace agitator, (page 19).
4. Check CLOG REMOVAL, (page 18).
5. Check for clogs, (page 18).
6. Replace hose.
7. Replace/fix belt, (pages 16, 17).
8. Inserthose fully, (page).
9. Check for clogs,(page 18).
10. Clean/change filters,(page 15).
1. Adjust setting, (page 7).
1. Replace belt, (pages 16, 17).
2. Check BELT CHANGING AND
AGITATORCLEANING,(pages16, 17).
1. Clean dust bin, (pages13, 14),
2. Clean/change filters, (page 15).
3. Clear clog from airflow passage,
(page 18).
4. This is normal. Light should go off
when tool is removed.
1. Check ATTACHMENTS, (page 9).
2. Check CLOG REMOVAL and clean
hose, (page 18).
21

22

Antesde usarsu aspiradoranueva ....... 1
GaranUade laaspiradorade Kenmore..... 1
Instrucclonesimportantesde
seguddad ............................. 2
Piezasy caracterfsticas................. 3
Instruccionesde ensamble ............. 4-8
Instruccionesde operaci6n ............... 6
Ajuste y selecciSnde nivelde pelo de la
alfombra ............................ 6
Desprendimientodel mango .............. 7
]nterruptor de encendido/apagado......... 7
Acoesorios ......................... 8-9
Cuadro de usode losaccesorios.......... 9
Sugerenciaspara aspirar ............... 10
Caracteristicasde rendimiento ........... 10
Cuidado de la aspimdora ............... 11
Almacenamientode la aspiradora ........ 11
Limpiezadelexteriory delos accesorios... 11
Limpiandoel cubode labasura........ 12-13
Limpiezadel filtro secundafio ........... 13
Cambio/limpiedelfiltros ............... 14
Cambiode lacorreay limpiezadel
agitador ......................... 18-20
C6moeliminarlosresiduosdebasura
en losconductos..................... 17
Protectorde motor .................... 17
Cuidadodelagitador .................. 18
Ensambledel agitador................. 18
Cambiolabombilla .................... 19
Reconocimiento de pmblemas ........... 2o
Notas ................................. 21
Porfavor lea esta guia que le ayudaraa assemblary operar su aspiradora nuevade Kenmore en una manera
mas seguray effectiva.
Para mas informacionacerca del cuidado y operacionde esta aspirador, Ilame a su tienda Sears mas cercana.
Cuandoprequnte por informaci6n usted necisitara el n,',merocompleto de serie y modelo de la aspiradora que
est& Iocado en la placa de los n0meros de modeloy serie.
Use el espacio de abajo para registrar el nOmerode modeloy serie para su nueva aspiradorade Kenmore.
N0merode Modelo
N0mero de Serie
Fecha de Compra
Malenga este libro y su recibo en u lugar seguro para referenciasfuturas.
GARANT[ALIMITADADE UN AI_IODE LA ASPIRADORAKENMORE
Esta garantiaes pot un afio desde la fecha de compra,e incluyesolamente el usode la aspiradoraen
hogares privados.Duranteel aflo de garantia, cuando la aspiradoraes operada y mantenida de acoerdo al
manualde instruccionesdel duefio, Sears reparara cualquier defectoen materiales o fabricaciSnlibrede
cargo.
Esta garantia excluyelasbolsas de coleccisn, correas, lamparillas,y filtros, lascuales sonpartes gastables
que se deteriorancon el usonormal.
Para el serviciodegarantfa, retome esta aspiradoraal Centro de Servicio Sears mztscercano en los Estados
Unidos.
Estagarantia se aplica solamentemientras este producto esta en uso en los EstaclosUnidos.Esta garantia
le da a usted derechos legales especfficos,y ustedpuede tenet tambien otros derechos los cuales variande
estado a estado.
Sears, Roebuck andCo., D/817WA, Hoffman Estates, IL 60179
1

Su seguridades muyimportanteparanosotros.Para reducirel riesgode incendio,choqueeldctdco,
lesi6ncorporalodailos al utilizar su aspiradora,act_e deacuerdoconprecaucionesb_icas de
seguridad,entreelias:
Leaeste manualantes de armar o utilizarsu
aspiradora.
Use su aspiradora0nicamente en la forma
descritaen este manual. Use L_nicamentecon
accesorios recomendados pot Sears.
Para reducirel riesgode choque electrico, no use
su aspiradoraal aire libre ni sobresuperficies
rnojadas.
Desconectela fuente de electricidad antes de dar
servicioo limpiar. DeIo contrario podrfa causar
un choqueel_ctrico o lesi6ncorporal.
Siempredebe apagar su aspiradora antes de
desconectarla.
Nodesconecte la aspiradoratiraedo del cord6n
electrico.Paradesconectarla, jale el enchufe, no
el cord6n.
No usela aspiradorasi el cordon o el enchufe
est&daSado.Si la aspiradora no esta
funcionando adecuadamenteo si se ha dejado
caer, esta daSada,s_ ha dejado expuesta a la
intemperie o seha dejado caer en agua,devuel-
vala a un Centro de servicio de Sears.
Nojale ni transporte la aspiradora por el cord6n;
no useel cord6ncomo mango; no cierre puertas
sobreel cord6n; no jale el cord6n sobre rebordes
agudosni esquinas.No pasela aspiradorasobre
el cord6n.Mantenga el cord6n alejado de superfi-
cies calientes.
Noabandone laaspiradoracuando este conec-
tada.Desconectelacuando no la este usandoy
antes de dade servicio.
NOpermita que sea utilizada como juguete. Se
requiere tener mayorcuidado cuando sea
utilizadaen la proximidad de niSoso per niSos.
Notoque la aspiradorani el enchufe con las
manes mojadas.
No coloqueobjetosen lasaberturas.
NOutilice la aspiradorasi alguna aberturaesta
bloqueada;mant_ngala libre de polvo,pelusa,
cabellosy cualquieracosa que podrfadisminuir
el flujode aire.
Mantengael cabello,ropa suelta, dedosy todas
las partesdel cuerpoalejadosde las aberturas y
piezasmecanicas.
No usela aspiradorasintenetinstaladalacubo
delabasura y/olosfiltros.
Lirnpiesiempreel cubo de la basuradespu_s de
aspirarde la alfombra limpiadoreso refrescant-
es, polvos y dep6sitosfinos. Estosproductos
tapan losfiltros, reducen el flujo de aire y pueden
causar dane a la limpiadora.
NOuse la aspiraclorapara levantarobjetosagu-
dos, juguetespequeSos,alfileres,sujetapapeles,
etc. PodrfandaSarla aspiradorao la cubede la
basura.
NOlevanteninguna cosa que se est_ quemando
oemitiendo humo,come cigarrillos, cerillos o
cenizas calientes.
No usela aspiradorapara aspirar Ifquidos
inflamableso combustibles(gasolina,Ifquidos
paralimpieza,perfumes, etc.) ni la useen
lugaresdonde estos podrfan estar presentes.Los
vapores de estas sustanciaspueden crear un
peligro de incendio o explosi6n.
Tengacuidadoespecialal utilizar laaspiradora
en escalones. Nola coloquesobre sillas,mesas,
etc. Mantengalaen el piso.
Ustedes responsablede asegurar que suaspira-
dora no sea utilizada por ningunapersonaqueno
pueda manejarlacorrectamente.
GUARDE ESTAS INSTRUCClONES
El armadoy useseguro de suaspiradora son su responsabilidad.Esta aspiradoraha sido disefiada
exclusivamentepara uso domestico.Laaspiradora debera almacenarseen un lugar seco yen elinte-
rior.Lea este Manualdel propietario cletenidamente,pues contiene informaci6nimportantesobre segu-
ridad y uso. Esta quia contiene informacion sobreseguridaddebajo de simbolosde advertiencia
cuidado. Porfavor ponga atencion especial a estas instruccionesdadas. Adverteneia:Este informaci6n
le alertara con el peligro de fuego, choques electricos,quemadas y lesiones. Cuidado: Este
informaci6n le alertara a peligros como lesiones y dafios de propiedad.

Es importanteconcer las piezas y caracter[sticas de su aspiradoraparaasegurar su uso adecuadoy seguro.
Examinerasantes de usarsu aspiradora.
Objeto Pieza N° Pieza N"
en EUA en Canadd
Bombilla 20-5240 20-40600
Correa 20-5275 20-40096
Filtro primario 20-82720
Filtro de escape 20-86889 20-86889C
Manguera
Soporte para
Manija de
soltar el
cubo de la
basura
liberaci6n
Cordon rapide del primario
el_ctrioo _ cordbn (dentro)
Tornillo
de mango -
sacudir
Tubo
la basura
escape
(dentro)
Luz
Cubierta (algunos
de la modelos)
boquilla
Interruptor d( - Herramienta
encendido/ para tapices
apagado Protector
de motor
Pedal de
liberaci6n
del mango
..,.
N_meros de
series del modelo
inferior para
el cord6n/Mango
para transportar
Protector Base de
de meubles boquilla
Manguera
oorta
Soportes de la ] I
cubierta de boquilla
JUE NGUERA
DE EX'I'ENSI6N
ALGUNOS MODELOS
Manguera de extensi6n
_ I
I([l([l(ll(ll(lll[llll([l[r
ALGUNOS
MODELOS
_ Adaptador
epillo paraTPi::s
o )})
3

Antesde armar la aspiradora, chequee la LISTA
DE EMBALAJE en la cubierta separada de la Lista
de Partes para Reparaci6n. Useesta lista para veri-
ficar que ha recibido todas las cornponentesde su
nuevaaspiradora Kenmore.
Peligrode choqueel(_tdco
Noconectela aspiradorahastaque termine
de armada.DeIo contrario podffacausarun
choqueeldctricoo lesi6ncorporal.
MONTAJEDEL MANGO
Quite el tornillo del mango Iocalizadojusto debajo
del borde superior de la parte posterior de la aspi-
radora,ver ilustraci6n de arriba.
Coloqueel mango come se ve en el diagrama
abajo.
AI mantener la manguera de maneraque no inter-
fiera, mueva el mangoa la abertura en la parte
superior de la aspiradora.
Inserte el tornillo para que pasepar el mangode la
aspiradora.
Empiece a apretar el tornillo con losdedos. Quiz&
sea necesario ajustar un poco el mango.
4

No apfietedemasiadoeltomillo.
SiIo aprietademasiadopodrfaarruinarlosori-
ficios para eltomillo.
No operelaaspiradorasintener instaladoel
tomillo.
Apriete el tornillocon un destornillador.
COLOCAClON DEL CORDON
Asegurese de que el sujetadorsuperior del cord6n
de liberaciOnr_lpidaseencuentreen posiciOnverti-
cal. Quiteel alambrecon el que esta atado el cordon
electrico.
Fije eJcord6nen
posiciOn,forzandolo
en la ranurade
bloqueo ubicadaen el
cuerpodel sujetador
de liberaciOnrapida
del cordSn,como se
muestra.Esto ayudaa
que e]cordon no se
enrededebajo del
agitadorde la
aspiradora.
bloqueo
el_ctrico _
Sujetador de
liberaciOn
rapide del
eldctrico
miento
inferior para
el cordon
AI mantener el
cordon el_ctrico de
una maneraque
no interfera,ponga
el cordon electrico
alrededor del suje-
tador de liberai6n
rapida del cord6n y
alrededor del
Compartimiento
inferiorpara eJ
cord6n y luego
cierre el enchufe
del cord6nelectri-
co en efcord6n
electrico.
COLOCACl0N DE LOS
ACCESORIOS
Unavezque hayacolocado el mangoen la unidad,y
el cordonhayasido enrollacloen lossujetadores,
podra proceder a colocar los accesorios en sus
respectivosreceptaculos.
1. Cierre el fin para aspiraciOnde la mangueraenla
parte trasera de la aspiradora.
2. Coloquela manguera detr_lsdel mangoy encima
del soporte de manguera.
3. Coloquela manguera en la ranura delanteraen
el soporte de herramientas,girando y empujando
hacia abajo hacia la mangueracorta para asegurar
una conexci6n buena.
4. Coloqueel tubo de extensionen la ranura
detrasera en el soporte de herramientas.
5. Mueva laherramientapara hendidurashacia la
ranura al lado del tubo.
6. Conecte el cepillo de polvoo el cepillo de usos
multiplescon el tubo con los cepillos haciaarriba.
Man
Soporte para
manguera
Manguera
- Cepillo para
sacudir
®
Abertura de
aspiraciOn
Tenador de
herramientas
-Tube
-Herramienta
para tapices
corta
5

PARA COMENZAR
] Sujetadorde 1. Gire el
)_liberaci6n sujetador del
._-_ r_pida del cordon de
/__c°////__c°_ d6n ladoa Iadoy
hacia abajo
para liberar
el cord6n
electrico.
2. Desprenda el enchufe del cord6n electrico y quite
el cord6n del sujetador superior. Compruebe que el
cord6n electricosigue fijado en la ranura de bloqueo
del sujetador superior.
NOTA: Parareducir el riesgo de choqueelectrico,
esta aspiradoracuenta con una clavija polarizada,
uno de loscontaotos es mas ancho que el otto. La
clavija s61opuede introducirsede una manera en el
enchufe.Si la clavija no cabe bien en el enchufe,
inviertala.Si alanno cabe, Ilame a un electricista
para que instale un enchufe correcto. Noaltere la
clavijade ninguna manera.
ADVERTENCIA
'eligrode lesion personaly da_oal producto
• NO conectela aspiradoraai elinterruptorest_
enla posid6nON. Podrfaresultaren lesi6n
_ersonalodaSo.
, NOuselosenchufesIocalizadossobrelos
nuebles.Los objetoscercanospodffanresultar
dailados.
3. Conecteel cord6n electrico polarizado enun
enchufe de 120 voltiosque se encuentre cerca del
piso.
ALGUNOS MODF LOS
Paraseteccionar un ajuste de nivel de pelo de la
alfombra:
Apague la aspiradora.Seleccione un nivel de ajuste
inclinandola aspiradora hacia atras hasta que las
ruedasdelanteras est6n un poco despegadas dee
piso.
Deslice lapalancade ajuste de nivelde pelo de la
alfombraa la posici6ndeseada.
Los modelos sin selector ajustan automaticamente
para el pelusode alfombra de varias alturas.
SUGERENCIASDE AJUSTEDE NIVEL DE PELO
ALFOMBRA
Paraque se le faciliten algunas tareasdelimpieza,
como por ejemplo tapetes aueltos y alfombrasde
pelo large, puede que sea necesario elevarajuste
de nivel de pelo de la alfombra.Los ajustessugeri-
dos son lossuguientes.
Los modelosde dos (2) posiciones:
HIGH:pelocorto o mediano.
LOW: pelo meidanoo poco large.
Los modalosde cuatro(4) posiciones:
HIGH: peloaspero y lanudo,pelolargo,felpa, alfom-
bras o tapetes irregulares.
MED: pelo medianoo poco largo.
LOW: pelo corto o meiano.
EX LOW:pelo muy corto.
6
Pongala unidaden =HIGH"cuando utilice losacce-
soriosparaprevenirposibles da_osal piso,
Atenci6n:Se requiere el cuidadoespecial cuando
pasa la aspiradorasobre ciertas clases de alfombra
o cubierta de piso.Siempre revise lasinstrucciones
de la limpieza recomendada de fabricantepara la
alfombra o la cubierta de pisoantes de pasarla
aspiradora.

Suelteelmangoporpisarenelpedaldeliberaci6n
ytirarlohaciaatrashastaqueliberedesuposici6n
vertical.
Pedal de la
liberaci6n
ALGUNOS MODELOS
Suelteel mangopor apretar hacia abajo con el pie
en el pedal de liberaci6ny tirar del mango hacia
atr&sy hacia abajo con la mano.
Pedal de liberaci6n
del mango
Paraencender la aspiradora, pise en el control de
ON/OFF colocado en la parte detrasera de la aspi-
radora. Paraapagar la aspiradora, pise en el con-
trolotra vez.
Interruptor de
encendido/
7

v
Paligrodechoqueel_ctdcoo lesi6ncorporal
Nopongalasmanoso lospiesdebajode la
mdquinacuandoar3adelamanguera.Mientras
se osanlosaccesodos,la agitadorempiezaa
girar.No dejequa la aspiradorase quede en
uns61olugarporun periodoextendido,porque
laagitadorpuedehacerdaitoa lasuperficie
delsualo.No pongalaaspiradoraencimado
muebles,en elfiecodo laalfombra, anuna
alfombradepelolargo,ni enescaleras
alfombradas. La posici6nidealpara la
aspiradoracuandose usanlosaccesorios
estdan undrea planaconel mangoen la
posici6nvertical.
COMOUTILIZARLOS
ACCESORIOS
Coloquela aspiradoraenuna superficieplana y pon-
ga el graduadorde altura en HIGH.
Losaccesorios podr&ncolocarse en la manguera o
en el tuba.Adem&s,el ce_illo para polvo tambi_n
podracolocarseen la boquilla para huecos reduci-
dos.
Lamanguerayel tubopueden sacarsede la man-
gueracortatomandotosporel extremoy tirandoha-
ciaarriba.
! CUIDADO
NO tire dela aspiradora porla mangueraan
la habitaci6n.Podrfanocurrirdal_osa sueper-
tanancias.
Losaccesoriosse pueden conectar a la manguerasi
el objetoque sedesea limpiarno esta lejosde la
aspiradora.La manguera,en algunosmodelos, se
expandir._.
NOTA:Cuando la aspiradoraeste prendida, la
manguera,en algunos modelos,tenderaa caerse
debidoa lasuccionde la aspiradora.
Si deseamas extensi6n, puede conectar eltube a la
mangueray los accesorios al tubo.
CUIDADO
AI utilizar los accesodospara limpiar, tenga
cuidado de no sobrepasarel alcance de la
manguera.Si Iohace, podrfaocasionarque la
aspiradoraae caiga.
ALGUNOS MODELOS
Se incluye untubeextra,sin pestaSas,para un ma-
yor alcance.El tubo extra sepuede conectaral tubo
con pestaSaspara Iograrun mayoralcance.Intro-
duzca el tuboy d_leun cuarto de vueltapara asegu-
rarlo.
Herramientapara hendiduras
Cepillo para sacudir Tubo
m/m (Algunos modetos) , i
(Algunos modelos) L-J Cepillo
Si utiliza el cepillopara polvo/cepillopara
combinaci6n y necesitamas alcance,puedeconec-
tar la boquilla para huecos reducidosal tubo y el ce-
pillo para polvo/cepilloparacombinaci6nen la boqui-
Ila parahuecos reducidos.
ALMACENAJEDELOS
ACCESORIOS
Devuelvala mangueraa su lugar en la manguera
corta y las herramientasa susoporte.
CUIDADO
Asegt_resede limpiarlos accesodosdespuds
do utilizadosen dreassucias,debajo del
refrigerador, antes de usariosenotrassuperfi-
cies, ya qua podrian dejar marcas.
8

Cuandousela mangueraenformanormalo
conla manguerade extensi6n instalada,la
espiradora debemantenersesobreunasuperfi-
de firmeal mismoniveloa un nivelinfedor
que lospiesdelusuario.NO uselesmangue-
ms cuandola espiradoraestda un nivelm_
altoque Io6piesdelusuario.
MANGUERA DE EXTENSI6N
ALGUNOS MODELOS
Unos modelos incluyen una mangueraauxiliar que
conectacon la manguerade estirar en la aspiradora
para una extensiSnmas larga para limpiar.
Manguerade launidad Manguerade extensibn
Inserte lasdos leng0etas en el extremode la
manguerade extensi6n en las dos ranurasformadas
como la letraJ enla aspiradoray girepara conectar.
Se puede conectartodas las herramientasy el tubo
con el extremoabierto de la manguera.
CEPILLO PAPA PISOS Y TUBO
ALGUNOS MODELOS
Unos modelos tienenun cepillo y untubeauxiliares
para limpiar lossuelos sin alfombras.Gire el exlremo
del adaptador haciael cepillode sueloy el otto
extremohacia el tubo recto.Conecteel tuborecto
con el tubo telesc6pico y luego con la mangueraen
la aspiradorao con la manguerade extensi6n.
01
AREA A LIMPIAR
Entre
ACCESORIO Muebies* coijines* Cortinas* Escalones Paredes
CEPILLOPAPA SACUDIR <_ X X X X
HERRAMIENTA PAPA
HENDIDURAS _ X X X
CEPILLOPApA
COMBINACION _ X X X
HandI-Mate® Jr. 1_ x x
Lavalvula de desviacionpuede estar abierta mientrasse usan los accesorios o para limpiar una alfombra
nueva a causa de un flujo reduciclode aire por los accesorios mismos o pot la pelusa de la alfombraque Ilene
la bolsa rapidamente.
• Siempre limpie los accesorios antes de usar sobre telas.
9

ADVERTENCIA
Peligrode lesi6npersonal
AcbJeconprecauci6nsicolocala aspiradora
sobreesca]ones.Sise cae, podr|acausar
lesi6npersonalo da_o a laproptedad.
Orillasde alfombras.
Gule uno de loscostadoso laparte antertor de la
boquilla a Io largo del borde de la pared Los cept-
Ilos largosayudan a aspirar la tterraatrapadaen las
onllasde las alfombras
Escalones.
Coloque el mango enla postctonverttcal Use la
herram=entapara hendtduraso el cepdlopara
sacudJrColoque el tnterruptorde encendtdo/apaga-
do en ON
I
CARACTER|SITCAS DE P No !MI
SISTEMA DE PROTECTION
DE MOTOR
ProtectorTermal
Estaasptradoratteneun protector termal que se
ajusta automattcamentepara proteger ala
asptradoradel sobrecalentam_entoSt una
obstrucc=Sn_mptdeel flulOnormal de alre al motor, el
protectorterma] apaga el motor automahcamente
para permthrque el motor se enfrre a fin de ewtar
posJblesdaSosala asptradora
Pareoorregirelproblema: Stesto ocurre, apague la
asp_radoray desenchufe_1cord6n del tomacomente
para perm_hrque laasp=radorase enfne y que el
protectortermal se reajuste Busquey saque las
obstrucciones,si es necesario. Examinetambidn y
reemplace/llmpiecualquierfiltro obstruido. Espere
aproximadamentetreinta (30) minutosy enehufela
espiradoray voltdela para ver st el protectordel
motor se ha reajustado. El protectordel motorno se
reajustardsi no se ha apagado la aspiradora aun
cuandola aspiradorase haya enfriado.
INDICADOR DE RENDIMIENTO
ALGUNOS MODELOS
Cuando la untdad este func=onando con el flujo
normal de atre, el tnd_cador de rendtmJento est_
apagado Se encJende la luz cuando el flujo de
aire este obstruido St eso ocurre, chequee el
cubo de la basura, hmpte/reemplace flltros
tapados, y chequee otros lugares postbtes de
atascaduras que se muestran en COMO
ELIMINAR LOS RESIDUOS DE BASURA EN
LOS CONDUCTOS
Para corregir
el problema:
Vease el
d_agrama
RECONOCI-
MIENTO DE
PROBLE-
MAS
NOTA: Es
poslble que la
luz enctenda al
usar los
aocesorlos
porque el fluJo
de alre es
reduc_do pot
los accesonos
10

÷
S_gas=empretodas ]as mstrucclonesde segundad
al I[mplary darle serv_cloa su asplradora
Peligrodechoqueeldctdcoo lesi6ncorporal
Desconectela unidadantesde limpiarlao
darleservicto.De1ocontrarlopodrfaprodu-
cirseunchoqueeldctdcoo causarlesi6ncor-
poraJ sJla aspiradomarranca de manera
imprewsta.
r
Recoja el cordonelectrlco y pbngaEosueltamente
alrededor del soporte de hberaclonra.plday alrede-
dot del soporte _nferlorpara el cordon
Su]etador de !
hberacion
rapide del
cordbn
Guarde la asp_rado-
ra bajo techo en un
lugar seco, con el
mango en postc=6n
vertical
electrico
miento
inferior para
el cordon
Peligrode choqueel_trico olesi_ corporal
Si enrollael cord6nmuyapretadopuede ten-
sadomuchoy causarleda_os.DedaSarse,el
cord6npodrfacausardescargasel_tdcas y le-
sioneso daSospersonales.
t
Desenchufe el cord6n del tomacorriente en
la pared
NO derrame agua sobreel limpiador.
Para reducer la electric=dad estatica y la
acumulaciSn de poivo, frote la superfic_e
exterior de la asptradora con un pa5o blan-
do que ha sldo mmerso en una soluc_6n de
detergente liquido suave y agua, entonces
exprimalo seco. Frote seco despues de
hmplar
No uselosaccesoriessiestanmojados.
Losaccesodosquese utilicenen dreas
sucias,debajodel refrigerador,nodeben
usarseenotrassuperficiessinantesser
lavados.Podr[andejarmarcas.
Lave los accesor[os en agua jabonosa
cahente, enjuague y sequelos al aJre. No
los IJmp=een un lavaplatos
11

Siemprevac[eel cubode labasuracuandoelnivel
de basuraalcanzalaI[nea"MAX FILL."
PAPASACARELCUBO DE LA BASURA:
Siempredesconecteelcord6n61ectricoantes
de repararalgunapartede laaspiradora.
Levante la man_- Manija de
Ia del cubo de la soltarel cubo
basura ubtcada dela basur,
al topedel cubo
de labasura Cubo de
/a
Po_#_ del
cubo de
basura_
Fdtro
secundario --
T_rede la man=ja
hacta ade[ante y
levante el cubo de
la basura hac_a
arr=bay afuera
de la asp_radora
Remueva
cualqu_er
obstEiculoque
pueda estar
Iocahzadoen
la entrada del
cubo de la
basura o en el
flltro secun-
dano
l
PAPA VACIARELCUBO DE LABASUFIA:
Torne en esta Abierto
direcci6n para abrir y vaciar (Para vaciar)
Cerrado
(Parausar)
Rote el montaje de la tapadel canastode basura
contra las agujasdel reloj comoesta =ndlcadoen la
tapay [evantelahaoa afuera
Vacie el contenidodel
cubo de la basuraadentro
del tarro de basura
PAPA LIMPIAR EL PRE-FILTRO
Elflltropuede
Ilmplarse Cublerta
golpeandolo
solore una
superficle flrme
o enjuagandolo
bajo una Harede
agua Enjuagar
conagua
solamente, no
uhhzar
detergente o
jabon Dejarque
el filtro se sequepor 24 horasantes de ponerde
regreso en la asp=rdora
12

PAPA REEMPLAZARELCUBO DELA BASURA
Tomeen esta Abierto
direcci6n (Para vaciar)
Cerrado
(Para usar)
Coloque la tapa del canastode basura sobre el
canasto de basura. Alinee las marcas como se
muestra bajo ,4bietto(Para Vaclar).Rote la tapa en
sentido de las agujas del reloj presionandohacia
abajo hasta alinear lasmarcas comose muestra
arriba de Cerrado (Para Usar).
Ponga el cubo de la
basurade vuelta aden-
tro de la aspiradora
insertando el fondo
primero e inclinando
atr_lscon la manija del
cubo de la basura lev-
antada.
Manija de _/ _j
Sd:l_ar_JCUrbaW _
Cubo de
la basura --_
Baje la manija
del cubode la
basura para
ajustar el cubo
de la basura en
su lugar
Revisar frecuentemente el filtro secundario y
limpiarlo cuando este sucio.
Remueva el cubo para basura como en la ilus-
traci6n en la secci6n de LIMPIEZA DEL CUBO
PARA BASURA.
Para limpiar la cubierta del filtro, limpiela con un
trapo seco.
NOTA: La cubierta delfiltro es removible.
Reemp]ace el cubode basura como en la ilus-
traci6n en la secci6n de LIMPIEZA DEL CUBO
PARA BASURA.
Filtro
secundario
13

Peligrode choqueek_tdco
Desenchufeel cablede poderdel tomacorri-
ente. No operela limpiadorasmelfilt_opn-
mariooel filtro de escape. Est6seguroque el
filtrosest6instaladopropiamenteparaprevanir
_la delmotory/o sacudidaal_ctnca.
FILTRO PRIMARIO
Examtneel hltropr=manodevez en cuando y hmpte
cuandoeste suc=o
PARA SACAR EL FILTRO PRIMARIO
Saque el montaje de la tapa
del canastode
basura corno Tabulaci6n
se muestra en E/Bloquear
la secc=6n
LIMPIEZA DEL
CANASTO DE
BASUR CLEAN- Cublerta
ING section oarF#/tro
Ranura
Mtentras mant_ene el hltropnmarto sobre un
reclptentede basuratome el filtro,r6teloy levEintelo
LtmpJeel ftltro pnmano golpeandolo suavemente
sobre un rectp=entede b_asura
Golpee en vanos lados para asegurar la melor
Itmp=eza
Enjuagua con agua solamentecomo sea nece-
sano (ver Ltmpteza del Canasto de Basura)
Cuando I=mpJandoe] filtro no se reestablece la
succt6n de vaeio a su poder totaL,usted necestta
reemplazar el filtro.
PAPA REEMPLAZAR EL FILTRO PRIMARIO
Est_ seguroque las ranuras
del flltro estan almeadas con Fslrro--_.._
las lenguetas de c,erre en la _/_//f_
cublerta del filtro. _.////z_./J7
Reemplace el f,ltro y .r4_._,_ _¢_"
hagalo rotar hasta que t_ "Y_"_X'_B _..
ranuras calzan _ .'_\ '_
P_anura
las
con las lencluetas Cuble.na_'*'._'Taburac,6n
DeÁ Ftltro
en la cubterta ElBloquear
Nota: Bajo uso normal y cu_dado,su filtro puede
durar hasta 3 aifios
Reajuste la cub_erta del filtro y el filtro al canasto
de basura (ver Ltmp=ezadel Canasto de Basura)
Ponga el canasto de basura de vuelta en la
asptradora
FILTRO DE ESCAPE
Este cartucho del hltroescape se tteneque camb_ar
este suc_o Debecamb=arsepertod=camentesegun
lascond_c=onesde uso
El filtro no se puedelavarpuesperded&sucapaci-
dad para atraparaltraparpolvo.
Aprlete hac_aaden- Aprtete
frode cada lado de hacla adentro
la cubtertadel filtro Cub_erta
de escape y t=re delf#ltro
hac=aafuera para
remover de ta asp=-
radora de polvo.
Remuevael cartucho del flltro de escape
F#ltro de
Reemplace el ftltro de
escape,pos=clonando-
Iocutdadosamente
para que quepa dentro
del marco
El lado blanco
debe encararse Capitulo
hac_ael oper- DelFiltro
ador
F#ltro
Lave el _tro del escapeen agua jabonosa tJbta,
enjuague y seque a rondoexpnmlendo el filtro en
su mano, dejandolo secar al a=re
NO lavar en ellavaplatos automatico.
NO mstale humedo.
Empuje un_camenleel cartucho de filtro, no el hltro
mlsmo
Cubierta
del hltro
de escape
\
Reemplacela
cublerta del filtro
de escape pon_en-
do las lenguetas
en las ranurasy
empujando aden-
frohastaque la
cub_ertacalza en
su lugar
14

Peligrodechoqueel(_tdcoo lesi6ncorporal
Desconectelaunidadantesde limpiarlao
darleservicio.DeIocontrariopodrfaprodu-
cirseunchoqueel_'tricoo causarlesi_ cor-
poralsilaaspiradoraarrancademanera
imprevista.
Frecuentementereviseel area del cepillo y quite
todo pelo, cord6no pelusa que se hayaacumulado.
Di la acumulaci6nes excesiva,siga las instruc-
clones a continuaci6n. Si la correa se aflojara o
rompiera, siga las instrucciones para quitar la cor-
rea.
PARA QUITAR LA CUBIERTA DE LA
BOQUILLA
Desenchufela unidad de la corriente electrica.
Paraprotegerla superficiedel suelo, siempre ponga
papeEdebajo de la boca de la m&quinacuandose
saca la cubierta de la boquilla.
Libere la cubierta de boquilla pot girar lossoportes
de la cubierta de boquilla a la posici6n UNLOCK,
Agarre ambos lados la parte trasera de la boquilla y
levante la cubiertapara quitarla de la base de la
boquiila.
I I
Soportes de la
cubiertade
boquilla
Cubierta
de/a
Cepilleo quitecualquier residueque esteen al area
de correas.
Peligro de lesi6n personal
Siempredesenchufela aspimdomantesde
limpiareldrea delcepillo,ya que dstepodrfa
empezara funcionarrepentinamente.No
hacedopodrfaresultaren unalesi6npersonal.
PARAQUITARI.A CORREN
LIMPIARELAGITADOR
Coloque lasmanes enel agitador. Si la correa ya
esta instafadaen el agitador, babra tensi6nen el
agitador. Tengacuidado cuando levantael agitador
de la boquilla.
Quite lacorrea desgastada o rotadel eje de trans-
misi6n del motor.
Quite toda basura o restosdel area que recorrela
correa o del _rea del cepillo cilindrico.
ADVERTENCIA
Peligrode lesi6npersonal
Tengacuidadoal quitarel cepilloillnddco,
latensi6nde lacorreaes grande. Sino
tieneprecauck_npodrfasufdrunalesi6n
personalsiel cepillose liberardpidamente
y saledisparado.
15

Concuidadoquitelaagitadorparaversisehan
acumuladohilosypelo.
NOTA:Para mantener una alta eficiencia de
limpiezay evitar el dafio a la aspiradora,
limoiar el agitador cada vez oue se cambi_,la
correa.
Tambienhay que limpiar el agitadorseg_n el sigu-
ientehoratio:
Elusode la
Frecuente - cadasemana
(usadadirariamente)
Moderado - cada mes
(usada2 o 3 veces
por semana)
Ugero - cada 2 meses
(usada 1 vez por semana)
extremo
Corte pelusa, el
pelo o la borra
enredados en el
agitador y guite el
hilo o los restos
ubicacados en las
tapas del extremo.
PARA CAMBIAR t=.ACORREA
Eje de
transmisi6n
del motor
rrea
Polea para
correa
Inserteel lado izquierdo de agitador en la base de
la boquilla.Parainsertar el agitador, coloque la parte
redondade la tapa del extremo, presionandolo hacia
dentro de la ranura de labase de la boquilla.
Coloquela nuevacorreaalrededor del eje de
transmisionde motor.
Nota:Consulte lasREZASANDCARACTER[STICAS
paradeterminar el N_.de correa.
Insertela correa alrededordel extremoderecho del
agitador.
__ iiiurTiI de la
Agltador Base
Inserte el agitator por insertar la parte redondade la
tapa en la ranurade la basede la boquilla.
Correa
Agitador
Haga presionfirmemente, asegurandosede que ha-
yan entradobien ambos extremos.
Verifiqueque la correa este centrada en el polea
para correa y que el cepillo cilindricogire libremente.
Cubierta
dela
boquilla
X
Soportes de la
cubierta de boquilla
Asegurese de que los soportes de la cubierta de la
boquilla esten en la posici6n UNLOCK. Conecte la
parte delanterade cubierta de boquilla con la base
de la boquilla y gire hacia abajo. Cuandoesteen su
lugar apropiado,gire lossoportes de la cubierta de
la boquilla a la posicion LOCK.
Tiredel agitadory asienteloen la base de la
boquilla.

Peligrodechoqueel_ctdcoo lesidncorporal
Desconectelaunidadantesde limpiarlao
darleservicio.De Iocontrafiopodrfaprodu-
clrseunchoqueeldctdcoocausarlesi_ cop
poralsilaaspiradoraarrancademanera
Imprevista.
Procedasiempre con precaucionesde seguridad al
limpiary dar servicio la aspiradora.
Si consideraque la aspiradoranoaspira bien
aseg_rese primerode que la bolsa no este Ilenay
dequeel filtro noesteatascado.Consulte lasins-
truecionessobreLIMPIANDOELCUBO DE LA
BASURA y CAMBIO/LIMPIEDESFILTROS.
Si las zonasdelfiltro y la cubo de la basura no est&n
atascadas,examine la zona de la manguera. Quile
la abertura de aspiraci6n por apretar lasdos
lengSetasque la aseguran a la partetraserade la
aspiradoray revisesi hayresiduos en el area.
de
aspiraci6n
Protector herramientas
corta
Reemplazala abertura de aspiraci6n y saque el
otro fin de la manguera del soporte de herramien-
tas. Enchufe la aspiradora y enciendala. Con la
aspiradoraencendida, est[re lamanguerapara
quitar el residuo. Apague la aspiradora y des-
enchLifela.
Si todavla hay residuos,quite la mangueracorta de
su soporte y revisela mangueracorta.
Quite los residuos visibles.
de motor _-
NOTE: No obstruye el protector de motor.
Estaaspiradoratiene unavalvula de desviaci6n
que sirve como protectorde motor que se abre
M
automaticamente para proveerun flujo de aire al
motor cuando un zueco impidaquecircule el
aire al motor.Si se abre la v_,lvulabypass para
impedirque se recaliente el motory que no
haga dafio a la aspiradora, se notara uncambio
de sonido mientrasel aire pasa pot la abertura
de la valvula.Cuandoocurre, apague la
aspiradora ydesenchufe efcord6ndel toma
corriente. Despues,inspecci6nelapara encontrar
zuecoscomo se describe bajo la seccibnCOMO
ELIMINARLOS RESIDUOS DEBASURA EN
LOSCONDUCTOS.
La valvula de desviaci6n puede estar abierta
mientrasse usanlos accesorios o para limpiar
una alfombranuevaacausa de un flujo reducido
de aire pot los accesorios mismos o por la
pelusa de la alfombraque Ilenela cubode la
basura rapidamente.
17

Peligrodechoqueeldctricoolesi6n corporal
Desconectelaunidadantesdelimpiadao
darleservicio.De Iocontrariopodrl'aprodu-
cirseunchoqueel_'tricoo causarlesi6ncor-
poralsilaasptradoraarrancade manera
imprevista.
PAPA EXAMINAREL AGITADOR
Protector de la
correa de la base
Coloque la
-- asplradora conla
base haota arrtba
para revtsarsl los
ceptlios esten en
malas condlctones
Cuandolos ceptllos
esten gastados al
ntveldel protectorde
base, reemp]azca el
agltador
PAPA QUITAR ELAGITADOR
Ou=tela cubterta de la boqu=llay el agitador Vease
CAMBIO DE LACORREAY LIMPIEZADEL
AGITADOR
Reemplazca el agttadorcon un nuevo.
Rearme la correa, el agttador y la cubLertade la
boqudla Vease CAMBIO DE LA CORREAY
LIMPIEZA DELAGITADOR
ENSAMBLEDELAGITADOR
Polea para correa
Tapa del
extremo
Unidad del agitador
t
Tapa del
extremo
18

ALGUNOS MODELOS
Peligrodechoqueel_'trico olesi6n corporal
Desconectelaunidadantesde limpiarlao
dadeservicio.DeIo contradopodrfaprodu-
cirseunchoqueek_tdco o causarlesi6ncop
poralsilaaspiradoraarrancade manera
imprevista.
Desenchufela unidad de la corriente el6ctrica.
Para alzar la bombilla, quiteel tornillo que asegura el
lente a la aspiradora. Quite el rente.
Tornillo , Empuje aqui
para sacar
Remuevala bombillaempujandola y valladandola
vuelta para la izquierdaparasacarla de la abertura.
Despuessaque la bombilla para afuera.
\
CUIDADO
No useuna ampolletade mdsde 130 V AC-
15 W. Duranteusoextendido,elcalorde la
ampolletapuedesobrecalentarlaspartesde
pldstJcocercanas.
Parareemplazar labombilla, cuidadosamente
inserte y de vuelta hacialaderecha hasta aseguaria
en la abertura.
Nota:Mire PIEZASY CARACTERISTICASpara el
numerode la bombilla.
! CUIDADO
No laenchufeni la prendasinohastaque
la hayavueltoa armarpor
completo.
Coloque otravez el lenteen laaspiradora.
Coloqueotra vez el tornillo.
19

Consulteestecuadroparaencontrarsolucionesqueustedmismopuederealizercuandotengaproblemas
menoresderendimiento.Cualquierservicioquenecesiteapartedeotrosdescritosenestemanualtienenque
serhechospotunrepresetantedeservicioautorizadoSears.
!
Desconectela aspiradoraantesdedadeservicioo limpiarla. De Iocontrariopodr{aprodu-
cirseunchoqueel_trico ocauserlesi6n corporal.
as_m_'a no_nc_a.
Noaspiresatislactonarnonte.
1. Est_ desconectada.
2.
3.
4.
Cortacircuitosdetado ofusiblequemadeen
eltablerodeserviciode la residenoia.
Interruptor de encen@d_apagado no
esla en la posici6n ON.
Protector termal activado
1. Cubo de la basura Ileno o atascado
2. Ajuste in¢orreclo de nivel de pelo de la alfombra.
3. Agilador desgastado.
4. Boquilla, o portillo de la cubo de la basura
atascada
5. Manguere atascado,
6. Manguera rota.
7. Correa rota.
8. La manguera no est_ bien insertada.
9. Activacion del sistema de protectibn del molor
10. Fitlros de seguridad.
1, Conecte bien, oprima selector de
encendido/apagado ala posJcibnON.
2. Restablezca el corlaeircudes o
earnble el fusible,
3. Coloque el interruplor tie encendido/apagade
en la posicibn ON.
4. Reajusle el protector termal, (pagina 10).
1. Cubode la basuralimpio,(paginas12,13).
2. Ajuste elnivel,(pagina 6).
3. Cambleel agitador,(p_igina18).
4. ReviseCOM_ ELIMINARLOSRESIDUOSDE
BASURAEN LOSCONDUCTOS,(pagina17).
5. Limpiarrudeparela mugre,(p&gina17),
6. Cambiela manguera.
7. Cambiela correa,(p&ginas15,16).
5. Inserte bienla manguera,(pagina6).
9, Determinesiexistenbloqueos,(pagina 17).
10. Limpie]cambieelfillros, (p_gina14)
La _piradera levanta _ 1. Ajuste ir_orrecto de nivel de pelo de la alfombra. 1. Ajuste el nivel, (pdgina 6).
o eS diflcul empujar,
El ensa,mble del agitador 1. Correa rota t. Cambie la correa, (p_ginas 14, 15)
no gira. 2- Selector de piso con alfombra y piso sin 2. Cambie el seleclor en la selecci6n
alfombra en la selecc_bnde piso sin alfombra con alfombra, (paglna 6).
3. Correainstaladeincorreclamente. 3. ReviseCAMBIODELACORREAY
LIMPiEZA DEL CEPILLO. (paginas 15-16).
FIb_lcedorderefldimlento. 1. Cubodelabasurallenooalascado 1, Cubodelabasura{impio,(p&ginas12, 13)
elgunos modelos, esl,_ rojo. 2. Filtros de segurided. 2, Limpie/cambie el fillros, (p&gina 14)
3, Conduclo de flujo de aire alascado. 3, Retire el material bloqueanle del conduclo
de aire, (p_gina17),
4. Ciertos a¢cesonos, 4, Eslo es normal. La luz debe apagarse al
quitar la herramienta,
Restticbldn del flujo de el 1. El uso de los accesorios Limila el flujo de aire. 1. Revise USO DE LOS ACCESORIOS, (pagina 9)
uso de Io8 accesodos. 2. La pelusa de una atfombra nueva 2. Revise C(_)MO EUMINAR LOS RESIDUOS
Camblo de so_ldo, obstruye el paso de aire DE BASURA EN LOS CONDUCTOS
y limpie la manguera, (p_gina 17)
2O

21

Get it fixed, at your home or ours!
Your Home
For repair - in your home - of all major brand appliances,
lawn and garden equipment, or heating and cooling systems,
no matter who made it, no matter who sold it!
For the replacement parts, accessories and
owner's manuals that you need to do-it-yourself.
For Sears professional installation of home appliances
and items like garage door openers and water heaters.
1-800-4-MY-HOME ® Anytime,day or n_ght
(1-800-469-4663) (U S A and Canada)
www.sears.com www.sears.ca
Our Home
For repair of carry-_n products hke vacuums, lawn equipment,
_nd electronics, call or go on-line for the nearest
Sears Parts and Repair Center.
1-800-488-1222 Anytime, day or night (U S A only)
www.sears.com
To purchase a protection agreement (U.S.A)
or maintenance agreement (Canada) on a product serviced by Sears:
1-800-827-6655 (u s A ) 1-800-361-6665 (Canada)
Para pealerserv_c_ode reparaclen
a domlclho, y para ordenar plezas
1-888-SU-HOGAR sM
(1-888-784-6427)
Au Canada pour service en fran_ats
1-80O-LE-FOYERuc
(1-800-533-6937)
www sears ca
SEARS
© Sears, Roebuck and Co
® Reglslered Trademark / TMTrademark / s_ Service Mark ol Sears, Roebuck and Co
® Marca Reg=strada / TMMarca de Fabrlca / SMMarca de ServlclO de Sears Roebuck and Co
MCMarque de commerce / uo Marque deposee de Sears, Roebuck and Co
-
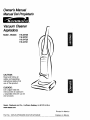 1
1
-
 2
2
-
 3
3
-
 4
4
-
 5
5
-
 6
6
-
 7
7
-
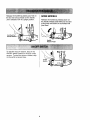 8
8
-
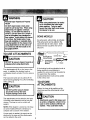 9
9
-
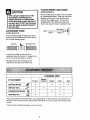 10
10
-
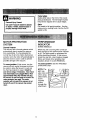 11
11
-
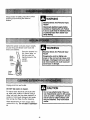 12
12
-
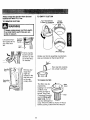 13
13
-
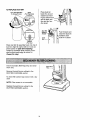 14
14
-
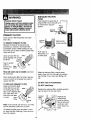 15
15
-
 16
16
-
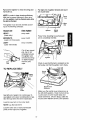 17
17
-
 18
18
-
 19
19
-
 20
20
-
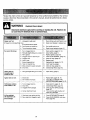 21
21
-
 22
22
-
 23
23
-
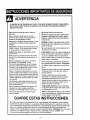 24
24
-
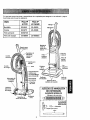 25
25
-
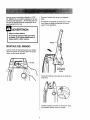 26
26
-
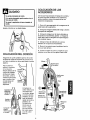 27
27
-
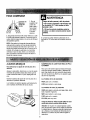 28
28
-
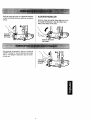 29
29
-
 30
30
-
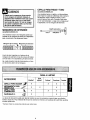 31
31
-
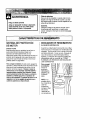 32
32
-
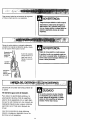 33
33
-
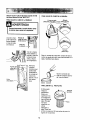 34
34
-
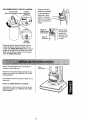 35
35
-
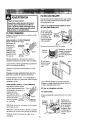 36
36
-
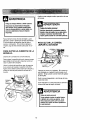 37
37
-
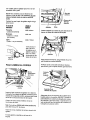 38
38
-
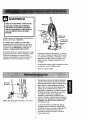 39
39
-
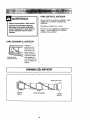 40
40
-
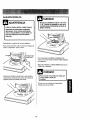 41
41
-
 42
42
-
 43
43
-
 44
44


Kenmore 116-33720201 El manual del propietario
- Categoría
- Aspiradoras
- Tipo
- El manual del propietario
en otros idiomas
- English: Kenmore 116-33720201 Owner's manual
Artículos relacionados
-
Kenmore 116.35725 El manual del propietario
-
-
-
-
-
-
-
-
-