Generac 1642-0 El manual del propietario
- Categoría
- Generadores de poder
- Tipo
- El manual del propietario
Este manual también es adecuado para

Portable Generator Owner's Manual
A his is the safety alert symbol. It isusedto alert you to potential personal injury hazards.Obey all safety messagesthat follow this symbol to avoid possible injury or death.
Questions? Help is just a moment away!
Call: Generac Generator Helpline - 1-800-270-1408 M-F 8-5 CT; Sat.8-4 CT
Web: www.generac-portables.com or www.briggsandstratton.com
Model No. 1642-0 (5,500Watt AC Generator) Manual No. 189027 Revision 2 (06/01/2001)

EQUIPMENT
DESCRIPTION
This generator isan engine-driven, revolving field,alternating
current (AC) generator. It was designedto supply electrical
power for operating compatible electrical lighting, appliance,
tool and motor loads.
This manualcontains informationfor a generator that
operates 120and/or 240Volt AC, singlephase,60Hz devices
that require up to 5,500watts (5.5 kW) of power that pull
up to 45.8 Amps at 120Vottsor 22.9Amps at 240Volts.
CAUTION! Do Not exceed the generator's
wattage/amperage capacity.Add up the rated watts of all
devicesyou will connect to generator receptacles at one
time.This total should not be greater than 5,500 watts for
this generator. Review"Don't Overload the Generator" on
page 9.
The generator's revolving field isdriven at about 3,600 rpm
by a single-cylinder engine.
Every effort hasbeen madeto ensure that informationin
this manualisaccurate and current However, Generac
reservesthe right to change,alter or otherwise improvethe
product and this document at anytime without prior
notice.
_ AUTION! Do Not tamper with engine
governed speed.High operating speeds are
dangerousand increaserisk of personal injuryor
damageto equipment.The generator supplies
correct rated frequency and voltage only when
running at proper governed speed.Incorrect
frequency and/or voltage can damagesome
connected electrical loads.Operating at excessively
low speedsimposesa heavy load.When adequate
engine power isnot availableengine life may be
shortened.
The Emission Control System for this generator is
warranted for standards set by the Environmental
Protection Agency.For warranty informationrefer to the
engine owner's manual.
SAFETY RULES
Thisgenerator set was designed and manufactured for
specific applications. Do Not attempt to modify the unitor
use it for anyapplication it was not designedfor. If you have
anyquestions about your generator's application, askyour
dealer or consult the factory.
The manufacturer could not possibly anticipate every
circumstance that might involvea hazard.For that reason
warnings in the manualand warnings on tags or decals
affixed to the unit are not all-inclusive. If you intendto
handle,operate or service the unit by a procedure or
method not specifically recommended by the manufacturer,
first make sure that such a procedure or method will not
render this equipment unsafeor pose a threat to you and
others.
Read this manual carefully and become familiar
with your generator set. Know its applications, its
limitations and any hazards involved.
_, ARNING! You must isolatethe generator
from the electric utility usingapproved transfer
equipment ifthis unit isused for backup power.
Failure to isolate the generator from the
power utility may result in injury or death to
electric utility workers and damage to the
generator due to a backfeed of electrical energy.
Whenever the unit isproviding backup power, the
electric utility must be notified.
_|k DANGER! Generator exhaust gases contain
DEADLY carbon monoxide gas. If breathed in
sufficient concentrations, carbon monoxide
can cause unconsciousness or death. Operate
this equipment outdoors where adequate ventilation
isavailable.
/
2

• The generator produces avery powerful voltage that can
cause serious injury or death by electrocution. Never
touch bare wires or receptacles.Never permit a child or
any unqualified person to operate the generator.
• Never handle any kind of electrical cord or devicewhile
standing in water, while barefoot or while hands or feet
are wet Death or serious injury from electrocution may
result.
• Use aground fault circuit interrupter (GFCI) in any damp
or highly conductive area (such as metal decking or steel
work).
• Never useworn, bare,frayed or otherwise damaged
electrical cords with the generator. Death, serious injury
and property damagefrom electrical shock may result
• Gasoline is highly FLAMMABLE and its vapors are
EXPLOSIVE. Never allow smoking, open flames,
sparks or heat in the vicinity while handling
gasoline. Avoid spielinggasolineon a hot engine.Comply
with all laws regulating storage and handlingof gasoline.
• Do Not overfill the fuel tank.Always allow room for fuel
expansion.If tank is overfllled, fuel can overflow
onto a hot engine and cause a FIRE or an
EXPLOSION.
• Never store a generator with fuel in the tank where
gasolinevapors might reach an open flame,spark or pilot
light (ason a furnace, water heater,clothes dryer). FIRE
or an EXPLOSION may result.
• The unit requires anadequateflow of cooling air for its
continued proper operation. Never operate the unit
inside anyroom or enclosure where the free flow of
cooling air intoand out of the unit might be obstructed.
Allow at least2 feet of clearanceon all sidesof generator,
evenwhile operating unit outdoors, or you could damage
the unit
• Never start, or stop the unit with electrical loads
connected to receptacles with the connected devices
turned ON. Start the engine and let it stabilize before
connecting any electrical loads. Disconnect all electrical
loads before shutting down the generator.
• Do Not insert anyobject through cooling slots of the
engine.Youcould damagethe unit or injure yourself.
• Never operate the generator:
in rain; in any enclosed compartment; when connected
electrical devices overheat; if electrical output is lost; if
engine or generator sparks; if flame or smoke is observed
while unit is running; if unit vibrates excessively.
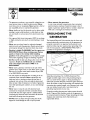
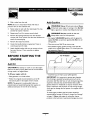
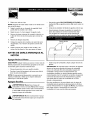
GROUNDING THE
G EN ERATO R
The National Electrical Code requires that the frame and
external electrically conductive parts of this generator be
properly connected to an approved earth ground. Local
electrical codes may also require proper grounding of the
unit. For that purpose, a GROUNDING WING NUT is
provided on the generator end (Figure I).
Generally,connecting a No. 12AWG (American Wire
Gauge) stranded copper wire to the grounding wing nut
and to an earth-driven copper or brassgrounding rod
(electrode) provides adequateprotection againstelectrical
shock. Be careful to keep the grounding wire attached after
connecting the stranded copper wire. However, local codes
may vary widely.Consult with a local electrician for
grounding requirements in your area.
Properly grounding the generator helps prevent electrical
shock if a ground fault condition exists in the generator or
in connected electrical devices.Proper grounding also helps
dissipatestatic electricity, which often builds up in
ungrounded devices.
/
3

Yourgeneratorrequiressomeassemblyandisready for
use after it hasbeen properly serviced with the
recommended oil and fuel.
If you have any problems with the assembly of your
generator, please call the generator helpline at
1-800-270-1408.
IMPORTANT: Any attempt to run the unit before it has
been serviced with the recommended oil will result in an
engine failure.
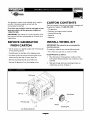
REMOVE G EN ERATOR
FROM CARTON
• Set the carton on a rigid flat surfacewith "This Side Up"
arrows pointing upward.
• Carefully open the top flaps of the shippingcarton.
• Cut down corners at one end of carton from top to
bottom and laythat side of carton down flat
• Removeall packing material, carton fillers, etc.
• Removethe generator from the shipping carton.
CARTON CONTENTS
Check all contents. If anyparts are missingor damaged,call
the generator helpline at 1-800-270-1408.
• The generator
• Generator and engine owner's manuals
• Locking 30Amp plug
• Engineoil
• Wheel kit
INSTALL WHEEL KIT
IMPORTANT:This wheel kit is not intended for
over-the-road use.
To installyour wheel kit you need the followingtools:
• Two 13mmbox,openend,or socket wrenches
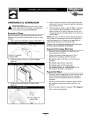
Install Wheel Kit as follows:
I. Placethe bottom of the generator cradle on a flat,
even surface.Temporarily place uniton blocks to ease
assembly.
2. Slide axle through both axle mounting brackets on
cradle frame, as shown in Figure 2.
Cap Screw
\
\
Handle Assembly
\
\
Hex
FlatWasher
Mounting Leg J
Use Existing Fasteners
Axle
/
Wheel
O_
/
F
/
Retaining Pin
/
4

3. Slideawheel over the axle.
NOTE: Be sure to installboth wheelswith the air
pressure valve on the outboard side.
4. Retain wheel on axle with the retaining pin.You may
acidthe fiat washer if desired.
5. Repeat step 3 and 4 to secure second wheel.
6. Removethe existing hardware from the vibration
mounts with 13mm wrench. Use the same hardware to
attach the mounting leg.
7. Removethe temporary blocks.
8. Center the handle bracket on generator frame at
control panel end of cradle.
9. Attach handle bracket with two cap screws and two
hex nuts. Use two 13mm wrenches to tighten
hardware.
BEFORE STARTING THE
ENGINE
Add Oil
CAUTION! Any attempt to crank or start the engine
before it has been properly filled with the recommended
oil may result in an engine failure.
To fill your engine with oil:
• Place generator on a level surface.
• Follow the oil grade recommendations and oil fill
instructions given in the engine owner's manual.
NOTE:The generator's revolving field rides on a
prelubricated and sealed ball bearing that requires no
additional lubrication for the life of the bearing.
Add Gasoline
_hL WARNING! Never fill fuel tank indoors. Never
fill fuel tank when engine is running or hot. Do Not
light a cigarette or smoke when filling the fuel tank.
_ WARNING! Do Not overfill the fuel tank.
Always allow room for fuel expansion.
• Use regular UNLEADED gasolinewith the generator
engine.Do Not use premium gasoline. Do Not mix oil
with gasoline.
• Clean areaaround fuel fill cap,remove cap.
• Add unleaded regular gasoline,slowly to fuel tank. Be
careful not to overfill.Allow about I/2" of tank spacefor
fuel expansion (Figure 3).
1/2" Air Space Tank
• Install fuel cap and wipe up any spilled gasoline.
IMPORTANT: It is important to prevent gum deposits
from forming in essential fuel system parts, such asthe
carburetor, fuel filter, fuel hose or tank during storage.Also,
experience indicates that alcohol-blended fuels (called
gasohol, ethanol or methanol) can attract moisture, which
leads to separation and formation of acids during storage.
Acidic gas can damage the fuel system of an engine while in
storage.
To avoid engine problems, the fuel system should be
emptied before storage of 30 days or longer. See "Storage"
on page I I. Never use engine or carburetor cleaner
products in the fuel tank or permanent damage may occur.
/
5

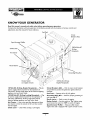
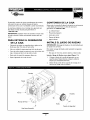
KNOWYOUR GENERATOR
Read this owner's manual and safety rules before operating your generator.
Compare the illustrations with your generator, to familiarize yourself with the locations of various controls and
adjustments. Save this manual for future reference.
FuelTank
Circuit
Breakers (AC)
SparkArrester Muffler
Choke Lever
Air Cleaner
120/240Volt AC,
30 Amp
Receptacle
Recoil Starter
Grounding Wing Nut
Rocker Switch
(on engine shroud)
120Volt AC, 20 Amp
Duplex Receptacles
120Volt AC, 20 Amp, Duplex Receptacles -- May be
usedto supply electrical power for the operation of
120Volt AC, 20 Amp, singlephase,60 Hz electrical lighting,
appliance,toot and motor loads.
120/240 Volt AC, 30 Amp Locking Receptacle -- May
be usedto supply electrical power for the operation of
120and/or 240Volt AC, 30Amp, singlephase,60 Hz
electrical lighting,appliance,tool and motor loads.
Air Cleaner -- Uses a dry type filter element and foam
pre-cteaner to limitthe amount of dirt and dust sucked
into the engine.
Choke Lever -- Used when starting a cold engine.
Circuit Breakers (AC) -- Pushto reset circuit breakers
are provided to protect the generator againstelectrical
overload.
Fuel Tank -- Capacity of five (5) U.S.gallons.
GroundingWing Nut -- Used for proper grounding of
unit (seepage 3).
Recoil starter -- Used to start the engine.
Rocker Switch -- Set this switch to "On" before using
recoil starter. Set switch to "Off" to switch off engine.
Spark Arrester Muffler -- Exhaust muffler lowers
engine noise and isequipped with a spark arrester screen.
/
6

OPERATING THE
G EN ERATO R
,_ CAUTION! Never start or stop the engine with
electrical loadsconnectedto the receptaclesAND
with the connected devices turned ON.
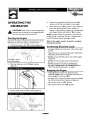
Starting the Engine
Disconnect all electrical loadsfrom the generator. Use the
following start instructionsteps by numerical order:
I. Turn the fuel valve to the "On" position (Figure 4).
FuelValveisshown
in the On position
2. Placethe choke leverin the "Choke" position
(Figure5).
mu
4. Grasp the recoil handle and pull slowly untilslight
resistance isfelt.Then pull rapidly to start engine.
5. Move choke leverto "Run" position a short distanceat
a time over severalsecondsin warm weather or
minutes in cold weather.Let engine run smoothly before
eachchange.Operate with choke in"Run" position.
NOTE: If engine still fails to start after 3 pulls,check for
proper oil level in crankcase.This unit isequipped with a
Low Oil Shutdown System.Seeengine manual.
Refer to the engine owner's manual for complete
starting instructions.
Connecting Electrical Loads
• Let enginestabilize andwarm upfor a few minutes after
starting.
• Plugin and turn on the desired 120 and/or 240 VottAC,
singlephase,60 Hz electrical loads.
• Do Not connect 240Volt loadsto the 120Volt duplex
receptacles.
• Do Not connect 3_hase loadsto the generator.
• Do Not connect 50 Hz loads to the generator.
• DO NOT OVERLOADTHE GENERATOR. See
"Don't Overload the Generator" on page9.
Stopping the Engine
• Unplug all electrical loads from generator panel
receptacles.Never start or stop engine with electrical
devicesplugged in and turned ON.
• Let enginerun at no-load for several minutes to stabilize
the internal temperatures of engine andgenerator.
• Move rocker switch to "Off" position.
• Move the fuel valve to the "Off" position.
3. Set the rocker switch to "On" position (Figure 6).
in On
I
7

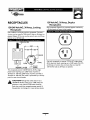
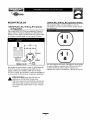
RECEPTACLES
120/240 Volt AC, 30 Amp, Locking
Receptacle
Use a NEMA LI4-30 plug with this receptacle.Connect a
4-wire cord set rated for 250Volt AC loads at 30 Amps (or
greater) (Figure 7).You can usethe same 4-wire cord if you
_lanto run a 120Volt load.
120 Volt AC, 20 Amp, Duplex
Receptacles
Eachreceptacle (Figure8) isprotected against overload by
a 20 Amp push-to-reset circuit breaker.
4-Wire CordSet
Y (Hot) X (H_)
Ground
NEMA L14=30 (Green)
This receptacle powers 120/240Volt AC, 60 Hz,single
phaseloads requiring up to 3,600 watts of power at
30 Amps for 120Volts;5,500 watts of power (5.5 kW) at
30 Amps for 240Volts.The outlet isprotected bya 20 Amp
push-to-reset circuit breaken
_, AUTION! Although this outlet states it has a
120/240 Volt 30 Amp rating (up to 7,200 watts), the
generator isonly rated for 5,500 watts. Powering
loads that exceed the wattage/amperage capacity of
the generator can damage it or cause serious injuries.
Use each receptacle to operate 120Volt AC, single-phase,
60 Hz electrical loadsrequiring up to 2,400 watts (2.4 kW)
at 20Amps of current. Use cord sets that are rated for
125Volt AC loadsat 20Amps (or greater).
/
8

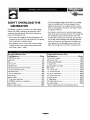
DON'T OVERLOAD TH E
G EN ERATO R
Overloading a generator in excess of its rated wattage
capacity can result in damageto the generator and/or
connected electrical devices.Observe the following, to
prevent overloading the unit:
• Add up the total wattage of all electrical devicesto be
connected at one time.This total should NOT be greater
than the generator's wattage capacity.
• If the appliance,tool or motor does not give wattage,
multiply 120Volts times ampere rating to determine
watts (volts x amps = watts).
The rated wattageof lights can be taken from wattage
listed on the lightbulbs.The rated wattageof tools,
appliancesand motors can usually be found on a data
plate or decal affixed to the device.Use Figure 9 below
asa general reference.
Someelectric motors, such asinductiontypes, require
about three times more watts of power for starting than
for running.This surge of power lastsfor only a few
secondswhen starting such motors. Be sure you allow
for this high starting wattage when selectingelectrical
devicesto connect to your generator. First figure the
watts needed to start the largest motor.Add to that
figure the running watts of all other connected loads.
Recreational/Home Uses
Tool/Appliance .................................................... Watts
AM/FM clock radio ....................................................................50
Light bulb....................................................................................100
Fan................................................................................................200
20" color TV ..............................................................................400
*Deep freezer ...........................................................................500
Personal computer and 15" monitor ...................................800
*1/3 hp furnace fan blower ....................................................800
Microwave oven ........................................................................800
*18 cu ft refrigerator ...............................................................800
Sump pump ..............................................................................1000
Electric skillet ..........................................................................1250
*Y2 hp water well pump .......................................................1400
*12,000 Btu window air conditioner ................................1400
Space heater ............................................................................1800
Electric water heater ............................................................4000
Professional/Contractor Uses
Tool/Appliance .................................................... Watts
"1/3 hp airless sprayer ............................................................600
3/8" hammer drill .....................................................................600
Variable speed Sawzall® .........................................................960
Y2" power drill ........................................................................1000
Quartz-halogen work light ..................................................1000
Belt sander ...............................................................................1200
7 ¼" circular saw ...................................................................1500
7 ¼" worm drive saw ...........................................................1600
*1/2 hp air compressor ........................................................1800
* I 0" power miter saw ...........................................................1800
6" bench grinder .....................................................................1800
*6" table planer.......................................................................1800
* I 0" table/radial arm saw .....................................................2000
Wire feed welder ...................................................................2400
* allow 3 times listed watts for starting this device
I
9

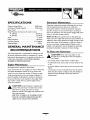
SPECIFICATIONS
Maximum SurgeWatts ................. 8,500 watts
Continuous Wattage Capacity ........... 5,500 watts
Power Factor .............................. 1.0
Rated Maximum Continuous AC Load Current:
At 120Volts ....................... 45.8Amps
At 240 Volts ....................... 22.9Amps
Phase................................. I-phase
Rated Frequency ....................... 60 Hertz
FuelTank Capacity................... 5 U.S.gallons
ShippingWeight ......................... 148 Ibs.
GENERAL MAINTENANCE
RECOMMENDATIONS
The Owner/Operator is responsible for making sure that
all periodic maintenance tasks are completed on atimely
basis;that all discrepancies are corrected; and that the unit
is kept clean and properly stored. Never operate a
damaged or defective generator.
Engine Maintenance
See engine owner's manual for instructions.
If you need service for your engine, you need to determine
the engine identification number.To do so, remove the
rocker arm cover hood, item number 55 shown on page
16, by removing the four nuts and washers holding it in
place.The engine model-type-trim number is stamped on
the side of the inner cover attached to the engine. Have
this number in hand when you call the engine service
center for assistance.
_, AUTION! Avoid prolonged or repeated skincontact with usedmotor oil. Used motor oil has
been shown to cause skin cancer in certain
laboratory animals.Thoroughly wash exposed areas
with soap and water.
KEEPOUT OF REACH OF CHILDREN. DON'T
POLLUTE.CONSERVERESOURCES.RETURN
USED OIL TO COLLECTION CENTERS.
Generator Maintenance
Generator maintenance consists of keeping the unit clean
and dry. Operate and store the unit in a clean dry
environment where it will not be exposed to excessive
dust, dirt, moisture or any corrosive vapors. Cooling air
slots in the generator must not become clogged with snow,
leaves or any other foreign material.
NOTE: Do Not use a garden hose to clean generator.
Water can enter engine fuel system and cause problems. In
addition, if water enters generator through cooling air slots,
some of the water wilt be retained in voids and cracks of
the rotor and stator winding insulation.Water and dirt
buildup on the generator internal windings will eventually
decrease the insulation resistance of these windings.
To Clean the Generator
_, AUTION! Never insertanyobject or tool
through the air cooling slots, even ifthe engine is
not running.
• Use a damp cloth to wipe exterior surfaces clean.
• A soft bristle brush may be used to loosen caked on dirt
or oil.
• A vacuum cleaner may be used to pick up loose dirt and
debris.
• Low pressure air (not to exceed 25 psi) may be used to
blow awaydirt. Inspect cooling air slots and opening on
generator.These openings must be kept clean and
unobstructed.
/
10

STO RAG E
The generator should be started at least once every seven
days and allowed to run at least 30 minutes. If this cannot
be done and you must store the unit for more than
30 days,usethe following guidelinesto prepare it for
storage.
Generator Storage
• Clean the generator asoutlined in"To Clean the
Generator"
• Check that cooling air slots and openings on generator
are open and unobstructed.
_ CAUTION! Storage covers can be flammable.
Oo Not place a storage cover over a hot
generator. Let the unit cool for a sufficient time
before placingthe cover on the unit.
Engine Storage
Seeengine owner's manualfor instructions.
Other Storage Tips
• Do Not store gasolinefrom one seasonto another.
• Replacegasolinecan if it starts to rust. Rust and/or dirt
in gasolinecan causeproblems when that fuel is used
with this unit.
• Store in clean anddry area.
/
II

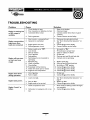
TROUBLESHOOTING
Problem
Engine is running, but
no AC output is
available.
Engine runs good but
bogs clown when
loads are connected.
Engine will not start;
or starts and runs
rough.
Cause
I. Circuit breaker is open.
2. Poor connection or defective cord set.
3. Connected device is bad.
4. Fault ingenerator.
I. Short circuit in a connected load.
2. Generator is overloaded.
3. Engine speed istoo slow.
4. Shorted generator circuit.
I. Rocker switch set to "Off'.
2. Low oil level.
3. Dirty air cleaner.
4. Out of gasoline.
5. Stalegasoline.
6. Sparkplug wire not connected to
spark plug.
7. Badspark plug.
8. Water in gasoline.
9. Overchoking.
10. Excessivelyrich fuel mixture.
I I. Intake valve stuck open or closed.
12. Enginehaslostcompression.
Solution
I. Resetcircuitbreaker.
2. Check and repair.
3. Connect another device that isingood
condition.
4. Contact Generac servicefacility.
I. Disconnectshorted electrical load.
2. See"Don't Overload the Generator" on
page9.
3. Contact Briggsservice facility.
4. Contact Generac servicefacility.
I. Setswitch to "On".
2. Fill crankcaseto proper level.
3. Cleanor replace air cleaner.
4. Fillfuel tank.
5. Drain gastank and fill with fresh fuel.
6. Connect wire to spark plug.
7. Replacespark plug.
8. Drain gastank; fill with fresh fuel.
9. Setchoke to "Off' position.
10. Contact Briggsservice facility.
I I. Contact Briggsservice facility.
12. Contact Briggsservice facility.
Engine shuts down I. Out of gasoline. I. Fill fuel tank.
during operation. 2. Fault in engine. 2. Contact Briggs service facility.
I. Load istoo high. See "Don't Overload the Generator" on
page 9.
Engine lacks power. 2. Dirty air filter. Replace air filter.
3. Engine needs to be serviced. Contact Briggs service facility.
I. Choke is opened too soon.
2. Carburetor is running too rich or too
lean.
Engine "hunts" or
falters.
I.
2.
3.
I.
2.
Move choke to halfway position till engine
runs smoothly.
Contact Briggs service facility.
/
12

NOTES
/
13

÷
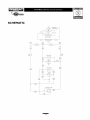
SCHEMATIC
BRIDGE
RECTIFIER
BLUE (2)
RED (6)
(i>
EXCITATION
(4)
BLUE
BLUE
(ii>
RED
RED
(22)
FIELD
GRAY
(44)
GRAY
(44)
CB
2OA
BLUE
(IIA)
(22)
120V/20A
BLUE_
(IIA)
BLUE
(IIA)
RED
(22)
GREEN
(0)
RED
(22)
BLUE
(IIA)
120/240V/30A
(22)
GRAY
(44A)
/
14

÷
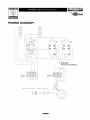
WIRING DIAGRAM
CIRCUIT
BREAKER
)
20A
ii IIA
CIRCUIT
BREAKER
SIX LUG
CONNECTOR
HOU£ING
120V
20A
22
WARNING!
TAB MUSTNOT BE BROKEN
NDTE_ POSITIVE BRUSH [2 CLOSEST TO BEARING
_ _LUE
RED (2)
(6)
/
15

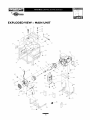
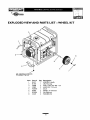
EXPLODED VIEW
45
\
- MAIN UNIT
57
56
68
\
N
41
59
\
65
\
62
27
37
29
15
26
28
6
\
3O
10
5
57
8 7,
$
18 17 _
16_ _9
61
_55
46
/47
33
23
21
67
J65
64
/
16

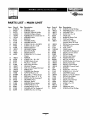
PARTS LIST - MAIN UNIT
Item Part#
I BI89010
2 B92531
3 B92731
4 66365G
5 187746
6 187745
7 65791
8 96796
9 22129
10 86307
II 99383
12 92609
13 189127
14 92532
15 188551
16 66476
17 188213
18 60706
19 83083
20 81917
21 67989
22 189027
23 189160
24 JI89011
25 66825B
26 74908
27 86308A
28 84409
29 22695
30 84242
31 188826
32 91825
33 66849
34 B4871
35 22769
36 86494
Qty
2
4
I
2
I
I
I
2
I
2
I
I
8
I
4
I
I
4
4
I
I
I
I
I
2
I
I
I
Description
CRADLE
SUPPORT,Engine
SUPPORT,Engine& Muffler
HOUSING, EngineAdapter
ASSEMBLY,Rotor (Inclds Item 7)
ASSEMBLY,Stator
BEARING
WASHER, M8 Flat
WASHER, M8 Lock
SCREW,5/16-24 x 3/4 SEMS
SCREW,5/I 6-24 x 7-3/8
MOUNT, Vibration
GROMMET,Rubber
BRACKET,Muffler
GASKET,Exhaust
SCREW,M6-1 x 12w/Lock
Washer
MUFFLER
SCREW,5/16 - 18x 3/4"
SCREEN,SparkArrest
PIN,4mm x 10 Roll
NUT, FlangeSerrated
MANUAL, Owners
NUT, 5/16-18, FlangedSerrated
SHIELD,Heat
CARRIER,Rear Bearing
TAPTITE,M5-0.8 x 10
BOLT,M6-1 x 145mm Stator
SLEEVING,Flexo, I/2" X 15"
FASTEN,On TabHousing 6P
GROMMET,Plastic
MANUAL, Engine
ASSEMBLY,Brush Holder
TAPTITE,M5-0.8 x 16
COVER, Bearing Carrier
WASHER,#10 Int. Shakeproof
SCREW,M6-1.0 x 16Wing
Item Part# Qty
37 B2153 13
38 189155 4
39 188973 4
40 189156 4
41 80270 I
42 78299 I
43 85134 I
44 188817 I
45 189235
46 22097
47 22127
48 14353621
49 26850
50 B4986
51 92982
52 189153
53 B5072
54 BB3061
55 187330
56 189025
57 189024
58 189018
59 NSP
60 39414
61 22142
62 67022
63 189186
64 77816
65 43438
66 73054
67 20566
68 30340
69 48031C
70 J189297
71 86292
Description
SCREW,# I0 SelfDrilling
WASHER,Flat,6.6 x 21.6 x 1.9
GROMMET,Tank
HHCS, M6-1.0 x 25
VALVE,Tank
BUSHING, PlasticTank
CAP,Fuel Gauge
TANK, Fuel,5 Gallon
(Includes Items 41 & 42)
DECAL, Start Instructions
WASHER,Lock
NUT, I/4-20
WIRE, Ground
WASHER,M6 Shakeproof
DECAL, Ground, Green
DECAL, Danger
DECAL, Heat Shield
MOUNT, Vibration
BOTTLE,Oil, 28 oz
HOOD, Rocker Arm Cover
DECAL, Panel,Side
DECAL, Control Panel
ASSEMBLY,Control Panel
ENGINE
HHCS, M8 - 1.25x 35
SCREW,5//16 - 18x 3/4"
GROMMET,Rubber
DECAL, Cover,Air Cleaner
DECAL, Hot Muffler
PLUG, 250V,30A
DECAL, Shut-Off, Fuel
DECAL, 1-800#
HOSE, I/4" x 7.5"
CLAMP
STRAP,Tank,Fuel
SCREW,# I0 SelfDrilling
/
17

EXPLODEDVIEWAND PARTS LIST-WHEEL KIT
3
/
5
e/ c_"
6 /
7
USE EXISTING FASTENERS
TO SECURE ITEM #2
Item Part # Qty Description
I B4217 I ASSEMBLY,Handle
2 BI764 I LEG,Mounting
3 52858 2 NUT, Locking Hex M8 - 1.25
4 39287 2 HHCS, M8 - 1.25x 45
5 93693H I AXLE
6 B4966 2 WHEEL, 10" Diameter
7 87005A 2 PIN, Retaining
8 22247 2 WASHER, Flat
/
18

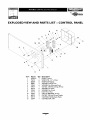
EXPLODED VIEW AND PARTS LIST- CONTROL PANEL
11
9
9
\
\ 7
8
3
10 13
5
8
7
9
1
\
\_ 2
3
Item
I
2
3
4
5
6
7
8
9
10
II
12
13
Part#
BI89015
75475
82308
82881
23365
43437
38150
22264
51715
75207
68759
81919
22694
Qty Description
I PANEL,Control
6 SCREW,M4 - 0.7 x 10mm
6 SCREW,SelfTapping
2 WASHER, InternalLock
6 WASHER, No. 8 Serrated Lock
I OUTLET, 120/240 Locking,30 Amp
6 WASHER, No. 8 Flat
6 WASHER, No. 8 Lock
6 NUT, M4 0.7 Hex
2 CIRCUIT BREAKER,20 amp
2 OUTLET, 120Volt, 20 amp Duplex
I CONTROL PANEL,Back.Plastic
I CONNECTOR, 6-Pin
/
19

DESCRIPCION DEL EQUIPO
Este generador funciona en basea un motor, de campo el_ctrico
giratorio y de corriente alterna (AC). Fue disefiado con la
finalidad de proveer energia el_ctrica para luces el_ctricas,
aparatos,herramientas compatibles y cargas de motor.
Este manual contiene la informaci6n para un generador que opera
120y/o 240Voltios de corriente alterna (AC), de fase sencilla,
aparatos de 60Hz que requieren hasta5,500 vatios (5.5 kW) de
energia y que necesitan hasta45.8Amps a 120Voltios o
22.9Amperios a 240Voltios.
|PRECAUCION! No sobrepase la capacidadde vatale y
amperaie del generador. Sumea lavez,todos losratios de los
aparatos que usted estar_conectando algenerador. Estetotal no
deberia pasar de 5,500 vatios para estegenerador en particular.
Revise"No sobrecargue el Generador" en la p_gina27.
El campo giratorio del generador funciona a una velocidad de
3,6000 rpm usando un motor con un solo cilindro.
Se ha hecho cada esfuerzo posible para asegurarse que la
informaci6n que aparece en este manual es exacta y se encuentra
actualizada. Sin embargo, Generac se reserva el derecho a
cambiar, alterar o de otra manera mejorar, el producto y este
documento en cualquier momento, sin previo aviso.
_IL iPRECAUCI_N! No intente modificar la velocidad
que produce el moto_ Lasvelocidades altas de operaci6n
son muy peligrosas,y aumentan el riesgo de accidentes
personales o daffo al equipo. Elgenerador suministra una
frecuencia correcta y el voltaje solamente cuando funciona
a lavelocidad adecuada.Lafrecuencia incorrecta y el
voltaje incorrecto pueden daffaralgunascargasel_ctricas
conectadas al mismo.Sial generador sele hace funcionar a
velocidades excesivamente baias,sele estar_ sometiendo a
unacargamuy pesada.Cuando la energtaadecuadadel
motor no seencuentra disponible, sepuede acortar la
vida fitil del motor.
El Sistema de Control de Emisiones para este generador est_
garantizado para juegos est_ndares por la Agencia de Protecci6n
Ambiental. Para mayor informaci6n acerca de la garantla, consulte
con el manual del propietario del motor.
INSTRUCCIONES DE SEGURIDAD
Estegenerador rue dise_ado y fabricadopara usosespecificos. No
intente modificar la unidad o usarla para otro uso para el cualno
rue disefiado.Si usted tiene alguna pregunta acercadel uso del
generador,preg_ntele a su vendedor o consulte con elfabricante.
No esposible que el fabricante pueda predecir cadacircunstancia
que pueda representar un peligro. Por esta raz6n, lasadvertencias
colocadasen el manual yen las etiquetas, o calcomaniascolocadas
en la unidad, no son inclusivas.Si usted intenta manejar,operar, o
hacerle servicio a la unidad mediante un procedimiento o m_todo
que no es recomendado especiflcamente por el fabricante,
primeramente asegfireseque eseprocedimiento o m_todo no
har_ que la unidad seainsegura o que represente un peligro para
usted y los demos.
Lea este manual de manera cuidadosa y familiaricese con
su generador. Conozca sus usos, sus limitaciones y
cualquier peligro relacionado con el mismo.
_ iPELIGRO! Siesta unidad se usapara energta de
refuerzo, usted debe aislar elgenerador de cualquier
utilidad el_ctrica usando un equipo de transferencia
aprobado. Si no se aisla de la manera adecuada,
puede resultar en un accidente e inclusive la
muerte para los electricistas que trabajen alli y pot
Io tanto, dafio al generador debido ala
retroalimentaci6n de energtael_ctriea.Entodo momento
que launidadest_ proveyendo energiade refuerzo, la
compa_tael_ctricade utilidadesdebe ser notificada.
_ PELIGRO! Los gases provenientes del generadorcontienen mon6xido de carbono, el cual puede
causar la MUERTE. Si se respira en
concentraciones sufidentes, el mon6xido de
carbono puede hacer que la persona quede
inconsciente o a_n pierda la vida. Opere este equipo
al aire fibre donde haya bastante ventilaci6n.
I
20

El generador produce un voltaje muy alto, el cual puede
ocasionar descargasel_ctricas extremamente peligrosas.Evite
el contacto con terminales, alambres pelados o sin
recubrimiento, etc. Nunca permita que personas no
calificadasoperen o proporcionen servicio al generador.
Nunca manipule dispositivos o cordones el_ctricos cuando
se encuentre parado en agua,descalzoo con los pieso las
manos moiadas.
Use un interruptor de circuito de fallaa tierra en _reas
h_medas o de alta conductividad (como en pisos met_licos o
estructuras de acero).
Nunca utilice en el generador juegos de cordones el_ctricos
que est_n desgastados,pelados,raidos o da_ados de cualquier
manera.
La gasolina es altamente INFLAMABLE y susvapores
son EXPLOSIVOS. No permita que lumen, que
existan llamas abiertas, chispas o calor a su alrededor
cuando manipule gasolina. Evite regar gasolina sobre
un motor caliente. Cumpla con todas las regulacionesque
requieran almacenamiento y manejo de gasolina.
No Ilene el tanque de combustible excesivamente.Siempre
permita que exista espacio para la expansi6n del combustible.
Si el tanque estg demasiado Ileno, el combustible
podria rebosarse y caer sobre el motor caliente y
ocasionar un INCENDIO o una EXPLOSION.
Nunca almacene el generador con combustible en el tanque,
donde los vapores de la gasolinapuedan entrar en contacto
con llamasabiertas, chispaso luces de piloto (como en
hornos, calentadores de agua o secadoras de ropa). Podrian
ocurrir iNCENDIOS o EXPLOSIONES.
El motor-generador requiere de un fluio de aire de
enfriamento adecuado para tener un funcionamiento continuo
adecuado.Nunca opere la unidad en el interior de
habitaciones o recintos encerrados donde el fluio de aire que
entra o sale de la unidad pueda ser obstruido. Deie por Io
menos 2 pies de distancia alrededor del generador,incluso
cuando la unidad est_ funcionando en exteriores, de otra
forma podrta dahar la unidad.
Nunca arranque o detenga el motor-generador cuando tenga
cargas el_ctricas conectadas a los tomacorrientes y los
dispositivos conectados est_n ENCENDtDOS.Arranque el
motor y permita que se estabilice antes de conectar las cargas
el_ctricas. Oesconecte todas las cargas el_ctricas antes de
apagarel generador.
No introduzcaobietos a trav_s de las ranuras de
enfriamiento del motor-generador.
Nunca opere el generador:
en la Iluvia;en compartimiento encerrados; si se recalientan
los dispositivos el_ctricos conectados; si se pierde la salida
el_ctrica; si se presentan chispasen el motor o generador; si
seobservan llamaso humo cuando la unidad est_
funcionando; si la unidad vibra excesivamente.
CONEXION ATIERRA DEL
GENERADOR
ElC6digo Nacional de Electricidadexige que el marco y las
partes exteriores del generador conductoras de electricidad,
est_n conectadas a tierra adecuadamente.Los cbdigos el_ctricos
locales tambi_n pueden exigir que la unidad est_ conectada a
tierra correctamente. Paratal propbsito, se ha instaladouna
tuerca mariposa para conexibn a tierra en la basedel bastidor
(Figura 10).
Por Io general,la conexibn de un alambre de cobre trenzado No.
12AWG (American Wire Gauge) a la aleta de conexibn atierra y
a unabarra de conexibn a tierra de cobre o bronce (electrodo)
proporciona una protecci6n adecuadacontra las descargas
el_ctricas. Sinembargo, los cbdigos locales pueden variar
substancialmente.Consulte con un electricista local para conocer
los requisitos de conexi6n a tierra de su _rea.
La conexi6n a tierra adecuadadel generador ayudar_a evitar las
descargasel_ctricas en el caso de que exista unacondici6n de
fallaa tierra en el generador o en los dispositivos el_ctricos
conectados. La conexibn a tierra adecuadatambi_n ayudaa
disipar la electricidad est_tica,la cual se acumula frecuentemente
en dispositivos no conectados a tierra.
/
21

Sugeneradorrequieredeciertosprocedimientosdemontajey
soloestar_listoparaserutilizadodespu_sdehaberle
suministradoservicioconelcombustibleyaceiterecomendados.
Siustedtieneproblemasconelmontajedesugenerador,por
favorIlamealaIfneadeayudaparageneradoresal
1-800-270-1408.
IMPORTANTE: Cualquier intentode encender el motor antes
de haber colocado el aceite recomendado resultar_ da_o del
motor.
PARA RETIRAR EL GENERADOR
DE LA CAJA
Coloque la caja sobre una superficie planay rigida, con las
flechasque dicen "this side up" haciaarriba.
Abra con cuidado lastapas superiores de la cajade envio.
Corte de arriba a abajo las esquinasde uno de los lados de la
caja y coloque ese lado de la caja sobre el suelo.
Retire todo el material de empaque,relleno, etc.
Saque elgenerador de la cajade envto.
CONTENIDO DE LA CAJA
Revisetodo el contenido. Si alguna de laspartes no est_ presente
o es_ da_ada,por favor Ilamea la linea de ayuda para
generadores al 1-800-270-1408.
La unidad principal
Manual del propietario
Aceite para motor
Tapones de fijaci6n
Juegode Ilantas
INSTALE EL JUEGO DE RUEDAS
IMPORTANTE: EsteJuegode Ruedasno ha sidodisehado para
ser usado en la cari_etera.
Para instalarsu Juegode Ruedas,usted necesitar_ lassiguientes
herramientas:
Dos cajasde 13rambox, extremo abierto, o Ilave de tubo.
Instale el Juego de Ruedas como sigue (Figura I I):
I. Coloque el fondo de lacamilla del generadoren una
superficie plana.Temporalmente, coloque la unidad en
bloques para ensamblarla f_cilmente.
2. Deslice el eje a trav_s de los soportes de montaje, en el
marco de la camilla,como semuestra.
_ lib i'_,_ll'l_ll_,,m _.llt"_m
Tornillos
\
Manilla
\
\
\
Montaje de Patas/
/
Use PiezasExistentes
/
Eie
Rueda
Arandela
/
/
Pasador de Seguridad
I
22

3. Deslice una rueda en el eie.
NOTA: Aseg_rese de instalarambas ruedas con lav_lvulade aire
hacia el lado de afuera.
4. Suiete la rueda al eje con el pas_dor de seguridad.Usted
puede a_adir la arandela si asfIo desea.
5. Repita los pasos3 y 4 para asegurar la segundarueda.
6. Remuevalas piezasexistentes del montaje de vibraci6n con
la Ilavede 13mm.Use lasmismas piezaspara conectar las
patas.
7. Remuevalos bloques temporales.
8. Coloque los soportes de la manilla en el centro del marco
del generador y en el extremo del panel de control de la
camilla.
9. Sujete el soporte de la manilla con dos tornillos y dos
tuercas. Usedos Ilavesde 13mm para apretar las piezas.
ANTES DE DARLE ARRANQUE AL
MOTOR
Agregar Aceite al Motor
CAUTION! Cualquier intento para arancarel motor antes de
haberle proporcionado el mantenimiento apropiado con el aceite
recomendado, podrta ocasionar la falla del motor.
Coloque la generador sobre una superficie nivelada.
Consulte el manual del propietario del motor para ahadir al
motor el aceite recomendado.
NOTA: El campo giratorio del generador se encuentra en un
coiinete pre-lubricado y sellado que no requiere lubricacibn
adicional por la vida atil del coiinete.
Agregue Gasolina
_ ADVERTENCIA! Nunca Ileneel tanque delcombustible en recintos cerrados. Nunca Ilene el tanque
del combustible cuando el motor est_ en funcionamiento
o caliente. No encienda cigarrillos o fume cuando est_
Ilenando el tanque del combustible.
_ iADVERTENCIAt No Ilene excesivamente eltanque
de combustible. Deje suficiente espacio para la expansi6n
del combustible.
Use gasolinaregular SIN CONTENIDO DE PLOMO en
el generador.No use gasolina premium. No mezcle aceite con
gasolina.
Limpie el _rea alrededor del Ilenado de gasolina;retire la tapa.
Llene lentamente el tanque con gasolinasin contenido de
plomo. Seacuidadoso de no Ilenar excesivamente. Deje
I/2" de espacio en el tanque para que la expansibn del
combustible, como semuestra en esta ilustraci6n (Figura 12).
Espacio de Aire
de I/2" Tanque
Instalela tapa del combustibley limpie cualquier derrame de
gasolina.
IRPORTANTE: Esimportante evitar la formacibn de dep6sitos
de goma en laspartes esencialesdel sistema de combustible
como en el carburador, filtro del combustible, manguera del
combustible o tanque, durante sualmacenamiento. Los
combustibles mezclados con alcohol (llamados gasohol,etanol o
metanol) pueden atraer la humedad,la cual produce la separacibn
y formaci6n de _cidosdurante el almacenamiento. Lagasolina
_cida puede da_ar el sistema de combustible de un motor
durante sualmacenamiento.
Paraevitar problemas en el motor, deber_ vaciar el sistema de
combustible antes de pertodos de almacenamiento de 30 dias o
m_s.Vea"Almacenamiento" en lap_gina 28. Nunca useproductos
para limpiar motores o carburadores en el tanque del
combustible; si Io haceocurrir_n dahos permanentes.
/
23

CONOZCA SU GENERADOR
LEA ESTE MANUAl DE/PROPIETARIOY LAS REGLAS DE SEGURIDAD ANTES DE OPERAR SU GENERADOR.
Compare las ilustracionescon su Generador para familiarizarse con lasubicaciones de los diferentes controles y ajustes.Conserve este
manual para referencias futuras.
Tanque de Combustible
Silenciador
Apagachispas
Cortacircuitos
Palancadel Cebador
Tomacorrientes con
Dispositivo de
Seguridad de
120/240Voltios AC,
30 Amp
Depurador de
Aire
Culatazo el Principio
Tuerca Mariposa
para Conexibn
aTierra
lnterruptor
B_landn
Tomacorrientes Doble de
120Voltios AC, 20 Amp
Cortacireuitos (AC) -- Cada tomacorriente posee un
cortacircuito para proteger el generador contra sobrecargas
el_ctricas. Los cortacircuitos son del tipo "oprimir para
reposicionar".
Culatazo el Principio -- Us6 para comenzar motor.
Depurador deAire -- Filtra el aire de entrada a medida que
penetra en el motor.
Interruptor Balancin -- Deber_ estar en la posicibn "On" (En)
para darle arranque al moto_ Colbquelo en la posicibn "Off'
(Apagado) para detener un motor en funcionamiento.
Palanca del Cebador -- Us_dacuando seest_ dando arranque
a un motor frio.
Sileneiador Apagachispas -- El silenciador disminuye el ruido
del motor y est_ equipado con una pantalla apagachispas.
Tanque del Combustible -- El tanque tiene unacapacidad de
5 galones americanos de gasolina sin contenido de plomo.
TomacorHente Dobles de 120VoltiosAC, 20Amp --
Puedenser utilizados para suministrar alimentaci6n el_ctrica para
el funcionamiento de cargas del motor, herramientas, aparatos
especialese iluminaci6n el_ctrica de 120Voltios AC a
20Amperios, monof_sica de 60 Hz.
Tomacorriente con Dispositivo de Seguridad de
1201240 Voltios, 30 Amp -- Puede set utilizadopara
suministrar alimentaci6n el_ctrica para el funcionamiento de
cargasdel motor, herramientas, aparatosespecialese iluminaci6n
el_ctrica de 120y/o 240Voltios AC a 30Amperios, monofLsica de
60 Hz.
Tuerca Mariposa para Conexi6n aTierra -- Usado para
apropiado moli6 de la unidad (veap_gina21).
I
24

OPERANDO EL GENERADOR
_ iPRECAUCI_N! Nunca encienda o pare el motor
con las cargas el_etricas coneetadas a los recept_culosY
con los aparatos conectados ENCENDIDOS.
Encienda el Motor
Desconectetodas las cargasel_ctricas del generador. Use las
siguientes instrucciones para encender,pasopor paso,en orden
num_rico.
I. Gire la v_lvula del combustible a la posici6n "On" (Rgura 13).
Vglvula del Combustible
en posici6n "On"
2. Coloque la palancade choke en la posid6n "Choke"
(Rgura 14).
m|
3. Coloque el interruptor balandn a la posicibn"On"
(Figura 15).
4. Agarre la manilla de retroceso y hale lentamente hastaque
puede sentir un poco de resistencia.Luego hale r_pidamente
para encender el moto_
5. Mueva la palancade choke a la posicibn "Run" una distancia
corta a la vez por algunos segundos en un clima c_lido, o
algunos minutos en un clima frio. Deje que el motor corra
suavementeantes de cadacambio. Opere con el choke en la
posicibn"Run".
NOTA: Si el motor atln falla en encender despu_sde halartres
veces,verifique el nivel adecuado del aceite en el cig_iehaLEsta
unidad est_ equipada con un Sistema que se apagacuando el
aceite est_ bajo. Consulte con el manualdel moton
Consulte con el manual del propietario del motor para
las instrucciones completas de encendido.
Conexion De Cargas Electricas
Deje que el motor se estabilice y se caliente pot unos
minutos despu_s del arranque.
Conecte y encienda lascargas el_ctricas de 120y/o
240Voltios AC monof_sicas de 60 Hz que desse.
No conecte cargasde 240Voltios atomacorrientes de
120Voltios.
No conecte cargastrif_sicas algenerador.
No conecte cargasde 50 Hz al generador.
NO SOBRECARGUE EL GENERADOR.Vea "No
Sobrecargueel Generador" en la p_gina 27.
Parado Del Motor
Desconecte todas las cargasel_ctricas de los tomaco-rrientes
del paneldel generador.Nunca de arranque o detenga el
motor con todos los dispositivos el&ctricos conectados y
encendidos.
Deje que el motor funcione sin cargaspor algunos minutos
para estabilizar lastemperaturas internas del motor y el
generador.
Mueva el interruptor balanctna la posicibn"Off" (Apagado).
Cierre la vdlvula del combustible.
/
25

RECEPTACULOS
120/240 Voltios AC, 30 Amp, Recept_culo
de Seguridad
Use un tap6n NEMA LI4-30 con este receptSculo.Conecte un
juego de cable de 4 alambres, clasificadocomo 250Voltios AC a
30Amps (o mayor) (Figura 16).Usted puede usar el mismo cable
de 4-alambres si planeatrabajar con una carga de 120Voltios.
120 Volt AC, 20 Amp, Receptgculos Dobles
Cada recept_culo (Figura 17)est5 protegido en contra de
sobrecargas por un corto-circuitos de 20 Amp, del tipo "empuie
para reposicionar".
240V-_>
120V--><,-120V-->
_ ___, (Neutro)
(Ca rgado)
Tierra
NEMA L14-30 F_ (Verde)
EstereceprSculo le provee poder a cargasde 120/240Voltios AC,
de 60 Hz, fasesencilla,que requieren hasta 3,600 vatios de
energia a 30Amps, para 120Voltios;5,500 vatios de energia
(5.5 kW) a 30Amps para 240Voltios. La salidaesr5 protegida por
un corto*circuito de 30Amp, del tipo "empuje para reposicionar".
_ PRECAUCI(_N! Aunque esta salidatiene una
clasificacibn de 120/240Voltios 30Amps (hasta
7,200 ratios), el generador est_ clasificado solamente para
5,500 ratios. Cargasque pasenla capacidadde amperaje y
vataje del generador pueden daharlo o causaraccidentes
muy serios.
Use cada recept_culo para operar 120Voltios AC, de fase sencilla,
de cargas de 60Hz que requieren hasta 2,400 vatios (2.4 kW) a
corrientes de 20 Amps.Use los juegos de cables que son
calificados para cargasde 125Voltios AC, a 20 Amps (o mayores).
/
26

NO SOBRECARGUE EL
GENERADOR
Sobrecargar el generador m_s allg de su capacidadde vatiaie
puede ocasionar daSosal mismo y a los dispositivos el_ctricos
conectados. Siga1assiguientes instruccionespara evitar
sobrecargar launidad:
Sume el vatiaje total de todos losdispositivos el_ctricos que
van a ser conectados al mismo tiempo. Estetotal NO deber_
ser mayor que la capacidadde vatiaie del generador.
Si el aparato especial,herramienta o motor no suministra el
vatiaje,multiplique los voltios pot la clasificaci6n de amperaie
para determinar los vatios (voltios x amperios = ratios).
El vatiaje nominal de las luces puede ser tomado de los
bombillos. El vatiaie nominal de herramientas, aparatos
especialesy motores se puede encontrar, por Io general,en la
calcomantao placa de datos del dispositivo (Figura 18).
Algunos motores el_ctricos, como los de induccibn,requieren
aproximadamente tres veces m_svatios de poder para su
arranque que para su funcionamiento. Esta onda irrupdvade
poder dura tan solo unos segundos durante el arranque de
dichos motores.Aseg_rese de tener en cuenta este alto
vatiaie de arranque cuando seleccione los dispositivos
el_ctricos que va aconectar a su generador. Primero, conozca
la cantidad de ratios necesarios para dar arranque al motor
m_s grande. Sumelea ese n_mero los vatios de
funcionamiento de todas lasotras cargasconectadas.
Uso Recreativo/Dom6stico
H erramientaJAr tefacto ....................... Watts
RadioAM/FM con reloi................................. 50
Bombillo de luz...................................... 100
Vendlador .......................................... 200
Televisor de color, 20" . ............................... 400
*Congeladora ....................................... 500
Computadora personal y monitor de 15". ................ 800
*Ventilador de homo de I/3 hp ......................... 800
Homo de microondas ................................ 800
*Refrigeradora de 18pies c_bicos ....................... 800
Bomba de sumidero ................................. 1000
Sart_n el_ctrica ..................................... 1250
*Bomba de aguade pozo de I/2 hp..................... 1400
*Acondicionador de aire tipo ventana,12.000Btu ......... 1400
Calefactor de ambiente .............................. 1800
Calentador el_ctrico de agua.......................... 4000
Uso de Profesiona|es/Contratistas
Herramienta/Ar tefacto ....................... Watts
*Pulverizador no neum_tico de 113 hp ................... 600
Taladro de percusi6n de 3/8". .......................... 600
Sawzall® de velocidad variable .......................... 960
Taladro el_ctrico de 112" . ............................ 1000
L_mpara de trabaio de cuarzo-halSgeno ................. 1000
Lijadora de correa .................................. 1200
Sierra circular de 7.1/4". ............................. 1500
Sierra a tornillo sin fin de 7. I/4" . ...................... 1600
*Compresor de aire de I.I/2 hp ....................... 1800
*Sierra el_ctrica tipo inglete de 10". .................... 1800
Amoladora de banco de 6" . .......................... 1800
*Cepilladora de mesa de 6". .......................... 1800
*Sierra de brazo radiallde mesa de 10". ................. 2000
Soldadora de alambre ................................ 2400
*para el arranque de este dispositivo, tome en cuenta 3 veces los
watts listados
/
27

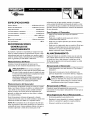
ESPECIFICAClONES
Potencia M_xima..................... 8,500Vatios (8.5 kW)
Potencia de Sobretensibn .............. 5,500Vatios (5.5 kW)
Voltaie Nominal AC ....................... 120/240Voltios
Corriente M_xima a 240Voltios ............... 22.9Amperios
Corriente M_xima a 120Voltios ............... 45.8 Amperios
Frecuencia Nominal ...................... 60Hz a 3600 rpm
Fase ...................................... Monof_sica
Tanque del Combustible .............. 5 GalonesAmericanos
Peso que Embarca............................... 148Ibs.
RECOMENDACIONES
GENERALES DE
MANTENIMIENTO
El propietario / operador es responsable por asegurarse de que
todos los trabaios peri6dicos de mantenimiento se Ileven a cabo
adecuadamente;quetodos los problemas son resueltos; y que la
unidad se mantiene limpia y adecuadamente almacenada.Nunca
opere un generador que est6 da_ado o defectuoso.
Mantenimiento del Motor
Consulte el manual del propietario del motor para las
instruccionesde cbmo mantener adecuadamente el motor.
_ iPRECAUCI_N! Eviteel contacto prolongado o
repetido de pielcon aceite usadode motor. El aceite usado
del motor hasido mostrado al cancer de la piel de la causa
en ciertos animales del laboratorio. Completamente lavado
expuso greascon el iabbn y elagua.
MANTENGA FUERADEALCANCE DE Nli_OS. NO
CONTAMINE. CONSERVElos RECURSOS.VUELVA
ACEtTE USADO A la COLECCION CENTRA.
Mantenimiento del Generador
El mantenimiento del generador consiste en conservar la unidad
limpia y seca.Opere y almacenela unidad en un ambiente limpio
y seco donde no ser_ expuesta al polvo, suciedad,humedad o
vapores corrosivos. Lasranuras del aire de enfriamiento del
generador no deben estar tapadas con nieve,hoias,o cualquier
otro material extrahos.
Revisefrecuentemente la limpieza del generador y limpielo
cuando est6 con polvo, sucio, con aceite,humedad,o cuando otras
substancias extra_as seanvisibles en su superficie exterio_
NOTA: No recomendamos el uso de manguerasde jardIn para
limpiar el generador. El agua podria introducirseen el sistema de
combustible del motor y causar problemas.Adem_s, si el aguase
introduceal generador atrav6s de las ranuras para aire de
enfriamiento, algo del aguaquedar_ retenida en los espacios
vactosy grietas del aislamiento del devanado del estator y rotor.
La acumulacibn de aguay suciedad en los devanadosinternos del
generador disminuir_ eventualmente la resistencia del aislamiento
de estos devanados.
Para Limpiar el Generador
Utilice un trapo h_medo para limpiar las superficies
exteriores.
Puede usar un cepillo de cerdas suavespara reti_r la
sudedad endurecida,aceite, etc.
Puede usar unam_quinaaspiradora para eliminar suciedad y
residuos sueltos.
Puede usar aire a baja presi6n (que no exceda los 25 psi) para
eliminar la suciedad,tnspeccione las ranuras para aire de
enfriamiento y la apertura del generado_ Estasaperturas
deber_n mantenerse limpias y despejadas.
ALMACENAMIENTO
Elgeneradordeber_ ser encendido al menos unavez cada siete
dtasy deber_ dejarlo funcionar al menos durante 30 minutos. Si
no puede hacer esto y debe almacenar la unidad por mgs de
30 dtas,sigalassiguientes instruccionespara preparar su unidad
para almacenamiento.
Almacenando el Generador
Limpieel generador como est_ descrito en ("Para Limpiarel
Generador").
Reviseque las ranuras para el aire de enfriamiento y las
aperturas del generador se encuentren abiertas y despejadas.
_ PRECAUCION! Lascubiertas para almacenamiento
pueden ser inflamables.No coloque una cubierta encima
de ungenerador caliente. Deje que la unidad seenfrle Io
suficientemente antes de que le coloque la cubierta.
Almacenando el Motor
Consulte el manualdel propietario del motor para las
instruccionesde cbmo preparar adecuadamente el motor para su
almacenamiento.
Otras Sugerencias Para el Almacenando
No almacene gasoiina de una es_ci6n aotra.
Reemplacela canecadegasolinasi comienza a oxidarse. El
bxido y/o la suciedad en la gasolina le causar_ problemas.
Almacene la unidad en un _rea limpia y seca.
i
28

NOTAS
/
29

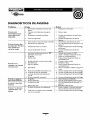
DIAGNOSITICOS DE AVERJAS
Problemo
El motor est_
funcionando pero no
existe salida de AC
disponsible.
El motor funciona bien
sin carga pero "funciona
mar' cuando se le
contectan cargas.
El motor no se
enciende; o se enciende
y funciona mal.
Causa
I, El interruptor autom_tico de circuito est_
abierto.
2. Conexi6n mal o defectuosa del juego de
cables.
3. El dispositivo conectado est_ dahado.
4, Aver_ en el generador.
I, Corto circuitoen unade lascargasconectadas.
2, Elgeneradorest_ sobrecarga.
3. Velocidad del motor es muy lenta.
4, Circuito del generador en corto.
I. Interruptor RunlStop poscioando en "Off'.
2, Depurador de aire sucio.
3. Sin gasolina.
4. Gasolina vieja.
5. Elcable de la bulia no est_ en malasla bulia.
6. Buiiadefectuosa.
7. Agua en lagasolina.
8. Sobrecebado.
9,
10.
II.
12.
I.
2.
I.
Mezcla de combustible excesivamente rica.
La v_Ivula de corte de combustible.
La v_Ivula de entrada est_ atascada est_
cerrada.
El motor ha perdido compresi6n.
Sin gasolina.
Nivel de aceite balo.
La carga es muy alta.
El motor se apaga en
pleno funcionamiento.
AI motor le hace falta
potencia. 2. Filtro de aire sucio. 2.
I. El cebador fue abierto muy r_pidamente. I.
El motor "no funciona
contirluamente" 0 se
detiene.
2, Carburador con mezclade aire-combustible
muy rica o muy pobre.
Accion
I. Reposicione el interruptor.
2. Revise y repare.
3. Conecte otro dispositivo que est_ buenas
condiciones.
4. Contacte el Departmento de Servicio
Generac.
I. Desconecte la carga el_ctrica en corto.
2. Vea"No Sobrerecarque el Generador" en la
p_gina27.
3. Contacte el Departmento de Servicio Briggs
andStratton.
4. Contacte el Departmento de Servicio
Generac.
I. Coloque del interruptor en "On".
2. Limpie o reemplace el depurador de aire.
3. Ll_nelo con combustible fresco.
4. Drene el tanque de gasolina; ll_nelo con
combustible fresco.
5. Conecte el cable a la bujia.
6. Reemplace la bujia.
7. Drene el tanque de gasolina; ll_nelo con
combustible fresco.
8. Abra por completo el cebador y haga girar el
motor.
9. Contacte el Departmento de Servicio Briggs.
I0. Contacte el Depar tmento de Servico Briggs.
I I. Contacte el Departmento de Servicio Briggs.
12.
I.
2.
I.
Contacte el Departmento de Servicio Bri_s.
Llene el tanque de combustible.
Llene de caja del cig_iehal al nivel correcto.
Vea "No Sobrerecarque el Generador" la
p_gina 27.
Reemplace el filtro de aire.
Mueva el cebador a la posici6n intermedia
hasta que el motor funcione suavemente.
Contacte el Departmento de Servicio Briggs.
2.
I
30

GARANTiA LIM ITADA
PARA GENERADORES PORTATILES
Los ProductosPort,tiles Generac (referidos aqufcomo la COMPAI_iA) garantiza al comprador original que el alternador para su
generador port_til estar_n libres de defectos en los materiales o la mano de obra para las piezasy el perfodo establecido a partir de la
fecha de compra original. Esta garantfano incluyelos motores de gasolina cuando seencuentran anexados o comprados, porque tales
motores se encuentran cubiertos solamente por los fabricantes de dichos motores. Estagarantia no estransferible y seaplica
_nicamente a los generadores port,tiles impulsadospor el motor garantizado motor de arriba de la v_lvula.
Horatio De la Garantia_
CONSUMIDOR* COMERCIAL*
Motor Solamente por los fabricantes de dichos motores
Todo 2 ahos (el sugundo a_o unicamente partes) I aho
*NOTA: Las unidadesde alquiler, para demostracibn, usos comerciales,tales como de construccibn o productores de ingresos,se
encuentran garantizadaspor 90 dfas.Las unidadesde alquiler, para demostracibn, o usos comerciales tales como para la construccibn o
de utilidades, lascuales hansido vendidas de nuevo,no se encuentran cubiertas bajo esta garantta por laCOMPANiA. Cualquier
garantta,bien sea expresadao implicada,es responsabilidad _nica del vendedor.
Durante el periodo de la garantia mencionada,la COMPANiA, a suopcibn, reparar_ o reemplazar_ cualquier parte, que despu_sde ser
examinada,se hayadeterminado que posee un defecto bajo un uso y servicio normaI.Todos losgastos de transporte bajo la garantta,
incluyendopara regresarlo a la COMPAI_iA, si esnecesario,ser_ responsabilidad del comprador y pagadosde antemano por el
comprador. Estagarantia no incluyeel mantenimiento nominal y el servicio, y no se aplicaal juego del generador, o partes, las cualeshart
sido sometidas a una instalacibninadecuadao no autorizada, mal uso, negligencia,accidentes, sobrecarga,exceso de velocidad,
mantenimiento inadecuado,reparacibn o almacenamiento,que seg_n el punto de vista de la COMPANiA, afecte de una manera negativa
su rendimiento y flabilidad.
NO EXISTEOTRA GARANTiA EXPRESA.LA COMPANiA POR LO TANTO, NIEGA CUALQUIER O TODAS LAS
GARANTiAS IMPLICADAS, INCLUYENDO PERONO LIMITADAS A AQUELLAS DE MERCADEO Y ESTADO
FiSICO PARA UN PROP_SITO EN PARTICULARA LA EXTENSION DE LA LE'fiLA DURACI_N DE
CUALESQUIERA GARANTiAS IMPLtCADAS,LAS CUALES NO PUEDEN SERDESCARGADAS DE
RESPONSABtLIDAD,ESTA LIMITADA AL PERIODO ESPECtFICADO EN LA GARANTiA EXPRESA.
RESPONSABtLIDAD POR DAI_OS INCIDENTES, CONSECUENTES, O ESPECIALESBAJO CUALQUIER O TODAS
LAS GARANTiAS EST', EXCLUIDA HASTA LA EXTENSION DE LA LE_ LA COMPANiATAMBIEN NO SEHACE
RESPONSABLEPOR DANOS INCIDENTES O CONSECUENTES TALES COMO PERDIDA DE TIEMPO O EL USO
DEL EQUIPO DE ENERGiA, O CUALQUIER PERDIDA COMERCIAL DEBIDO A LA FALLA DEL EQUIPO;Y
CUALESQUIERA GARANTiAS IMPLICADASSEENCUENTRAN LIMITADAS A LA DURACI_N DE ESTA
GARANTiA ESCRITA.
AIgunos estados no permiten limitaciones en el tiempo que una garantia implicadadura, o las exclusiones o limitaciones de los da_os
incidenteso consecuentes, por Io que las limitaciones y exclusiones mencionadasarriba, es posible que no se apliquen a usted.Esta
garantta le da austed derechos legalesespectficos yes posible que por otro lado usted tenga otros derechos legales,los cuales pueden
variar de estado a estado.
Estagarantta seaplica para todos los productos fabricados despu_s de iunio de 1998,y sustituye todas lasgarantias anteriores de la
COMPANiA.
Para servicio, contacte su centro de servicio de garantta autorizado de laCOMPANiA, o Ilameal 1-877-544-0982. O la mirada en el
internet en www.generac-potables.com. El servicio de garantia puede ser Ilevado acabo solamente por un centro de servicio autorizado
por la COMPANiA.AI momento de solicitar un servicio de garantta,se debe presentar evidencia de la compra original del producto.
PRODUCTOS PORTATILES GENERAC
Jefferson,Wisconsin U.S.A.

PORTABLE GENERATOR LIMITED WARRANTY
GENERAC PORTABLEPRODUCTS (hereafter referred to as the COMPANY) warrants to the original purchaser that the
components in its portable generator will be free from defects in materials or workmanship for the itemsand period set
forth below from the date of original purchase.This warranty does not includethe gasolineengine when furnished or
attached becausesuch engine iscovered solely by the engine manufacturer's warranty. Starting batteries are not warranted
by the COMPANY.The term "original purchaser" means the person for whom the generator is originally purchased.This
warranty isnot transferable and appliesonly to portable generators driven by an overhead valve engine.
Warranty Schedule:
Consumer* Commercial*
Engine Warranted solely by the engine manufacturer
All other parts 2 years (2rid year parts only) I Year
With the exception of European Community Countries, all unitsbound for export shall be warranted for One (I)
Yearin Consumer applications, and 90 daysin Commercial applications as defined below.
*NOTE: For the purpose of this warranty "consumer use" means personal residential household use by
original purchaser.This warranty does not apply to units used for Prime Power in place of utility.
"Commercial Use" means all other uses, including rental, construction, commercial and income producing
purposes. Once a generator has experienced commercial use, it shall thereafter be considered a
commercial use generator for the purposes of this warranty.
During saidwarranty period, the COMPANY will, at isoption, repair or replace any part which, upon examination by the
COMPANY, is found to be defective under normal useand service**.AII transportation costs under warranty, including
return to the factory if necessary,are to be borne by the purchaser and prepaid by the purchaser.This warranty does not
cover normal maintenance and service and does not apply to a generator set,alternator, or parts which havebeen
subjected to improper or unauthorized installation or alteration, misuse,negligence,accident,overloading, overspeeding,
improper maintenance, repair or storage so as,in the COMPANY's judgement, to adverselyaffect its performance and
reliability.
**NORMAL WEAR: As with all mechanical devices, the generator needs periodic parts service and
replacement to perform well.This warranty will not cover repair when normal use has exhausted the life of
a part or generator.
THERE ISNO OTHER EXPRESSWARRANTY.THECOMPANY HEREBYDISCLAIMSANYANDALL
IMPLIEDWARRANTIES, INCLUDING BUT NOT LIMITEDTOTHOSE OF MERCHANTABILITY AND
FITNESSEORA PARTICULAR PURPOSETOTHE EXTENT PERMITTED BY LAW.THE DURATION OF
ANY IMPLIEDWARRANTIESWHICH CANNOT BE DISCLAIMED IS LIMITEDTOTHETIME PERIODAS
SPECIFIEDIN THE EXPRESSWARRANTY. LIABILITY FOR CONSEQUENTIAL, INCIDENTAL OR SPECIAL
DAMAGES UNDER ANY AND ALLWARRANTIES ISEXCLUDED. THE COMPANY ALSO DISCLAIMSANY
RESPONSIBILITYFOR INCIDENTAL OR CONSEQUENTIAL DAMAGES,SUCHASTHE LOSSOETIME OR
THE USEOETHE POWER EQUIPMENT,ORANY COMMERCIAL LOSSDUETOTHE FAILUREOETHE
EQUIPMENT:AND ANY IMPLIEDWARRANTIESARE LIMITEDTOTHE DURATION OETHISWRITTEN
WARRANTY.
Some states do not allow limitations on how long an implied warranty lasts, or the exclusion or limitation of incidental or
consequential damages, so the above limitations or exclusions may not apply to you.This warranty gives you specific legal
rights and you may also have other rights, which vary from state to state.
For service, see your nearest COMPANY authorized warranty service facility or call 1-877-544-0982. Or look on the
internet at www.generac-portables.com.Warranty service can be performed only by a COMPANY authorized service
facility.This warranty will not apply to service at any other facility.At the time of requesting warranty service, evidence of
original purchase date must be presented.
GENERAC PORTABLE PRODUCTS
Jefferson,Wisconsin U.S.A.
-
 1
1
-
 2
2
-
 3
3
-
 4
4
-
 5
5
-
 6
6
-
 7
7
-
 8
8
-
 9
9
-
 10
10
-
 11
11
-
 12
12
-
 13
13
-
 14
14
-
 15
15
-
 16
16
-
 17
17
-
 18
18
-
 19
19
-
 20
20
-
 21
21
-
 22
22
-
 23
23
-
 24
24
-
 25
25
-
 26
26
-
 27
27
-
 28
28
-
 29
29
-
 30
30
-
 31
31
-
 32
32


Generac 1642-0 El manual del propietario
- Categoría
- Generadores de poder
- Tipo
- El manual del propietario
- Este manual también es adecuado para
en otros idiomas
- English: Generac 1642-0 Owner's manual