
Read through carefully and understand these instructions before use.
Leer cuidadosamente y comprender estas instrucciones antes del uso.
Handling instructions
Instrucciones de manejo
Random Orbit Sander
Lijadora roto-orbital
SV13YA
∙
SV 13YB

1
12
1
2
3
4
5
A
B
34
6
56
7
7

2
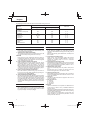
English Español
1
Sanding paper Papel eseneril
2
Pad Sttotkussen
3
Dust gate Boca de salida del serrín
4
Dust bag Bolsa celector de polvo
5
Dust outlet Salida del polvo
6
Dial Dial
7
Polyester buff Pulidor de poliéster

3
English
GENERAL POWER TOOL SAFETY WARNINGS
WARNING
Read all safety warnings and all instructions.
Failure to follow the warnings and instructions may result in
electric shock, fi re and/or serious injury.
Save all warnings and instructions for future reference.
The term “power tool” in the warnings refers to your
mains-operated (corded) power tool or battery-operated
(cordless) power tool.
1) Work area safety
a) Keep work area clean and well lit.
Cluttered or dark areas invite accidents.
b) Do not operate power tools in explosive
atmospheres, such as in the presence of
fl ammable liquids, gases or dust.
Power tools create sparks which may ignite the dust
or fumes.
c) Keep children and bystanders away while
operating a power tool.
Distractions can cause you to lose control.
2) Electrical safety
a) Power tool plugs must match the outlet.
Never modify the plug in any way.
Do not use any adapter plugs with earthed
(grounded) power tools.
Unmodifi ed plugs and matching outlets will reduce
risk of electric shock.
b) Avoid body contact with earthed or grounded
surfaces, such as pipes, radiators, ranges and
refrigerators.
There is an increased risk of electric shock if your
body is earthed or grounded.
c)
Do not expose power tools to rain or wet conditions.
Water entering a power tool will increase the risk of
electric shock.
d) Do not abuse the cord. Never use the cord for
carrying, pulling or unplugging the power tool.
Keep cord away from heat, oil, sharp edges or
moving parts.
Damaged or entangled cords increase the risk of
electric shock.
e) When operating a power tool outdoors, use an
extension cord suitable for outdoor use.
Use of a cord suitable for outdoor use reduces the
risk of electric shock.
f) If operating a power tool in a damp location
is unavoidable, use a residual current device
(RCD) protected supply.
Use of an RCD reduces the risk of electric shock.
3) Personal safety
a) Stay alert, watch what you are doing and use
common sense when operating a power tool.
Do not use a power tool while you are tired
or under the infl uence of drugs, alcohol or
medication.
A moment of inattention while operating power tools
may result in serious personal injury.
b) Use personal protective equipment. Always
wear eye protection.
Protective equipment such as dust mask, non-skid
safety shoes, hard hat, or hearing protection used for
appropriate conditions will reduce personal injuries.
c) Prevent unintentional starting. Ensure the
switch is in the off -position before connecting
to power source and/or battery pack, picking
up or carrying the tool.
Carrying power tools with your fi nger on the switch
or energising power tools that have the switch on
invites accidents.
d) Remove any adjusting key or wrench before
turning the power tool on.
A wrench or a key left attached to a rotating part of
the power tool may result in personal injury.
e) Do not overreach. Keep proper footing and
balance at all times.
This enables better control of the power tool in
unexpected situations.
f) Dress properly. Do not wear loose clothing or
jewellery. Keep your hair, clothing and gloves
away from moving parts.
Loose clothes, jewellery or long hair can be caught
in moving parts.
g) If devices are provided for the connection of
dust extraction and collection facilities, ensure
these are connected and properly used.
Use of dust collection can reduce dust related hazards.
4) Power tool use and care
a) Do not force the power tool. Use the correct
power tool for your application.
The correct power tool will do the job better and
safer at the rate for which it was designed.
b) Do not use the power tool if the switch does not
turn it on and off .
Any power tool that cannot be controlled with the
switch is dangerous and must be repaired.
c) Disconnect the plug from the power source
and/or the battery pack from the power tool
before making any adjustments, changing
accessories, or storing power tools.
Such preventive safety measures reduce the risk of
starting the power tool accidentally.
d) Store idle power tools out of the reach of
children and do not allow persons unfamiliar
with the power tool or these instructions to
operate the power tool.
Power tools are dangerous in the hands of untrained
users.
e) Maintain power tools. Check for misalignment
or binding of moving parts, breakage of parts
and any other condition that may aff ect the
power tool's operation.
If damaged, have the power tool repaired
before use.
Many accidents are caused by poorly maintained
power tools.
f) Keep cutting tools sharp and clean.
Properly maintained cutting tools with sharp cutting
edges are less likely to bind and are easier to control.
g) Use the power tool, accessories and tool bits
etc. in accordance with these instructions,
taking into account the working conditions and
the work to be performed.
Use of the power tool for operations diff erent from
those intended could result in a hazardous situation.
5) Service
a)
Have your power tool serviced by a qualifi ed repair
person using only identical replacement parts.
This will ensure that the safety of the power tool is
maintained.
PRECAUTION
Keep children and infi rm persons away.
When not in use, tools should be stored out of reach
of children and infi rm persons.

4
English
SPECIFICATIONS
Model SV13YA SV13YB
Voltage (by areas)* (110 V, 120 V, 127 V, 220 V, 230 V, 240 V)
Power input 230 W*
No-load speed 7000 – 12000 min
–1
12000 min
–1
Sanding pad size (Outer diameter) 125 mm
Sanding paper size (Outer diameter) 125 mm
Weight (without cord) 1.4 kg
* Be sure to check the nameplate on product as it is subject to change by areas.
STANDARD ACCESSORIES
○ Sanding paper ............................................................1
○ Dust bag ......................................................................1
Standard accessories are subject to change without notice.
OPTIONAL ACCESSORIES (sold separately)
1. Sanding paper
Grain: AA40, AA60, AA80, AA120, AA180, AA240,
AA320, AA400
2. Polyester buff
Optional accessories are subject to change without notice.
APPLICATIONS
○ Roughing or fi nishing of woodwork and metal surfaces.
○ Preliminary sanding of woodwork and metal surfaces
before painting.
○ Paint removal.
○ Rust removal.
PRIOR TO OPERATION
1. Power source
Ensure that the power source to be utilized conforms
to the power requirements specifi ed on the product
nameplate.
2. Power switch
Ensure that the power switch is in the OFF positon. If
the plug is connected to a receptacle while the power
switch is in the ON position, the power tool will start
operating immediately, which could cause a serious
accident.
3. Extension cord
When the work area is removed from the power source,
use an extension cord of suffi cient thickness and rated
capacity. The extension cord should be kept as short as
practicable.
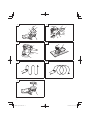
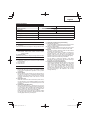
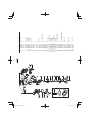
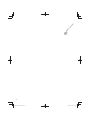
4. Installing the sanding paper
Since the attachment is a hook-and-loop type, the
sanding paper can be installed easily by just pressing
it onto the pad. When installing the sanding paper, in
order to match it to the holes in the pad, gently fold it
along the axis of two holes as shown in Fig. 1.
Next, use the holes along the fold as a guide to match
the sanding paper and the pad. Finally, press the entire
sanding paper uniformly onto the pad.
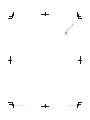
5. Attaching and Removing the Dust Bag
(1) Attaching the Dust Bag
As shown in Fig. 2, hold the dust gate and push it in the
direction of Arrow A to attach it to the dust outlet.
(2) Removing the Dust Bag
As shown in Fig. 2, hold the dust gate and pull it in the
direction of Arrow B to remove it from the dust outlet.
CAUTION
Prior to the sanding operation, make sure the material
of surface you are going to sand.
If the surface under sanding operation is expected to
generate harmful / toxic dusts such as lead painted
surface, make sure the dust bag or appropriate dust
extraction system is connected with dust outlet tightly.
Wear the dust mask additionally, if available.
Do not inhale or touch the harmful / toxic dusts
generated in sanding operation, the dust can endanger
the health of yourself and bystanders.
6. Adjustment of speed (SV13YA only)
The SV13YA is equipped with the electric control circuit
which enables non-step speed control. To adjust the
speed, turn the dial shown in Fig. 3. When the dial is
set to “1”, the sander operates at the minimum speed
(7000 min
–1
). When the dial set to “6”, the sander
operates at the maximum speed (12000 min
–1
). Adjust
the speed according to the material to be cut and
working effi ciency.

5
English
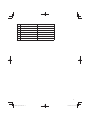
By adjusting the dial, match the speed to the material and type of work.
Material
Grain
Dial scale
Rough grinding Fine grinding
Paintwork:
Sanding
Repairs
(scratches, rust spots)
Stripping
180
120
40
400
240
80
3 – 6
2 – 4
2 – 4
Wood:
Softwood
Hardwood
Veneers
60 – 80
60
240
240
180
320
3 – 6
3 – 5
2 – 4
Metals:
Aluminium
Steel
Stainless steel
80
60
120
240
240
240
2 – 4
3 – 6
3 – 6
Note: Please use this table as a standard.
PRACTICAL OPERATING PROCEDURES
CAUTION
Never apply water or grinding fl uid when sanding. This
could result in electrical shock.
1. Switching the sander ON and OFF
The power can be turned on by setting the lever to ON
(1) and turned off by setting the lever to OFF (0).
CAUTION
Never turn the power switch ON when the sander is
contacting the surface to be sanded. This is necessary
to preclude damage to the material. The same applies
when switching the power OFF.
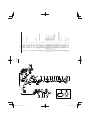
2. How to hold the random orbit sander
While gripping the housing, lightly press the sander
against the surface to be sanded so that the sanding
paper uniformly contacts the surface, as shown in
Fig. 4. DO NOT apply excessive pressure to the sander
while sanding. Excessive-pressure may cause overload
of the motor, reduced service life of the sanding paper,
and lowered sanding or polishing effi ciency.
3. How to move the random orbit sander
Move the sander by either moving it up and down or
by moving it in circles while gradually progressing in a
sideways direction (Figs. 5 and 6).
4. After installing new sanding paper
Movement of the sander may tend to become unsteady
after new sanding paper has been installed, because of
the new, coarse grain of the paper. This can be avoided
by slightly tilting the sander forward or backward during
sanding or polishing. Sander movement will become
steady as the sanding paper surface becomes properly
abraded.
MOUNTING THE OPTIONAL ACCESSORIES
○ Mounting the polyester buff
Since the attachment is a hook-and-loop type as with
the sanding paper, the polyester buff can be mounted
by just pressing it onto the pad (Fig. 7).
MAINTENANCE AND INSPECTION
1. Empting and cleaning the Dust Bag
If the dust bag contains too much saw dust, dust
collection will be aff ected. Empty the dust bag when it
gets full.
Remove the dust bag, open the fastener, and dispose of
the contents.
2. Inspecting the sanding paper
Since use of worn-out sanding paper will degrade
effi ciency and cause possible damage to the pad,
replace the sanding paper as soon a excessive
abrasion is noted.
3. Inspecting the mounting screws
Regularly inspect all mounting screws and ensure that
they are properly tightened. Should any of the screws
be loose, retighten them immediately. Failure to do so
could result in serious hazard.
4. Maintenance of the motor
The motor unit winding is the very “heart” of the power
tool.
Exercise due care to ensure the winding does not
become damaged and/or wet with oil or water.
5. Replacing supply cord
If the supply cord of Tool is damaged, the Tool must be
returned to HiKOKI Authorized Service Center for the
cord to be replaced.
6. Servicing
Consult an authorized Service Agent in the event of
power tool failure.
7. Service parts list
A: Item No.
B: Code No.
C: No. Used
D: Remarks
CAUTION
Repair, modifi cation and inspection of HiKOKI Power
Tools must be carried out by a HiKOKI Authorized
Service Center.
This Parts List will be helpful if presented with the tool to
the HiKOKI Authorized Service Center when requesting
repair or other maintenance.
In the operation and maintenance of power tools, the
safety regulations and standards prescribed in each
country must be observed.

6
English
MODIFICATIONS
HiKOKI Power Tools are constantly being improved
and modifi ed to incorporate the latest technological
advancements.
Accordingly, some parts (i.e. code numbers and/or
design) may be changed without prior notice.
NOTE
Due to HiKOKI’s continuing program of research and
development, the specifi cations herein are subject to
change without prior notice.

7
Español
ADVERTENCIAS DE SEGURIDAD GENERAL DE
LA HERRAMIENTA ELÉCTRICA
ADVERTENCIA
Lea todas las instrucciones y advertencias de seguridad.
Si no se siguen las advertencias e instrucciones, podría
producirse una descarga eléctrica, un incendio y/o daños graves.
Guarde todas las advertencias e instrucciones para
futura referencia.
El término “herramienta eléctrica” en las advertencias hace
referencia a la herramienta eléctrica que funciona con la
red de suministro (con cable) o a la herramienta eléctrica
que funciona con pilas (sin cable).
1) Seguridad del área de trabajo
a)
Mantenga la zona de trabajo limpia y bien iluminada.
Las zonas desordenadas u oscuras pueden
provocar accidentes.
b) No utilice las herramientas eléctricas en entornos
explosivos como, por ejemplo, en presencia de
líquidos infl amables, gases o polvo.
Las herramientas eléctricas crean chispas que
pueden infl amar el polvo o los humos.
c) Mantenga a los niños y transeúntes alejados
cuando utilice una herramienta eléctrica.
Las distracciones pueden hacer que pierda el control.
2) Seguridad eléctrica
a) Los enchufes de las herramientas eléctricas
tienen que ser adecuados a la toma de corriente.
No modifi que el enchufe.
No utilice enchufes adaptadores con
herramientas eléctricas conectadas a tierra.
Si no se modifi can los enchufes y se utilizan tomas
de corriente adecuadas se reducirá el riesgo de
descarga eléctrica.
b) Evite el contacto corporal con superfi cies
conectadas a tierra como tuberías, radiadores
y frigorífi cos.
Hay mayor riesgo de descarga eléctrica si su
cuerpo está en contacto con el suelo.
c) No exponga las herramientas eléctricas a la
lluvia o a la humedad.
La entrada de agua en una herramienta eléctrica
aumentará el riesgo de descarga eléctrica.
d) No utilice el cable incorrectamente. No utilice el
cable para transportar, tirar de la herramienta
eléctrica o desenchufarla.
Mantenga el cable alejado del calor, del aceite,
de bordes afi lados o piezas móviles.
Los cables dañados o enredados aumentan el
riesgo de descarga eléctrica.
e) Cuando utilice una herramienta eléctrica al aire
libre, utilice un cable prolongador adecuado
para utilizarse al aire libre.
La utilización de un cable adecuado para usarse al
aire libre reduce el riesgo de descarga eléctrica.
f) Si no se puede evitar el uso de una herramienta
eléctrica en un lugar húmedo, utilice un
suministro protegido mediante un dispositivo
de corriente residual (RCD).
El uso de un RCD reduce el riesgo de descarga eléctrica.
3) Seguridad personal
a) Esté atento, preste atención a lo que hace y
utilice el sentido común cuando utilice una
herramienta eléctrica.
No utilice una herramienta eléctrica cuando
esté cansado o esté bajo la infl uencia de
drogas, alcohol o medicación.
La distracción momentánea cuando utiliza
herramientas eléctricas puede dar lugar a
importantes daños personales.
b) Utilice un equipo de protección. Utilice siempre
una protección ocular.
El equipo de protección como máscara para el
polvo, zapatos de seguridad antideslizantes, casco
o protección para oídos utilizado para condiciones
adecuadas reducirá los daños personales.
c) Evite un inicio involuntario. Asegúrese de que
el interruptor está en “off ” antes de conectar la
herramienta a una fuente de alimentación y/o
batería, cogerla o transportarla.
El transporte de herramientas eléctricas con el dedo en
el interruptor o el encendido de herramientas eléctricas
con el interruptor encendido puede provocar accidentes.
d) Retire las llaves de ajuste antes de encender la
herramienta eléctrica.
Si se deja una llave en una pieza giratoria de la
herramienta eléctrica podrían producirse daños
personales.
e) No se extralimite. Mantenga un equilibrio
adecuado en todo momento.
Esto permite un mayor control de la herramienta
eléctrica en situaciones inesperadas.
f) Vístase adecuadamente. No lleve prendas
sueltas o joyas. Mantenga el pelo, la ropa y los
guantes alejados de las piezas móviles.
La ropa suelta, las joyas y el pelo largo pueden
pillarse en las piezas móviles.
g) Si se proporcionan dispositivos para
la conexión de extracción de polvo e
instalaciones de recogida, asegúrese de que
están conectados y se utilizan adecuadamente.
La utilización de un sistema de recogida de polvo
puede reducir los riesgos relacionados con el polvo.
4) Utilización y mantenimiento de las herramientas
eléctricas
a) No fuerce la herramienta eléctrica. Utilice
la herramienta eléctrica correcta para su
aplicación.
La herramienta eléctrica correcta trabajará mejor y
de forma más segura si se utiliza a la velocidad para
la que fue diseñada.
b) No utilice la herramienta eléctrica si el
interruptor no la enciende y apaga.
Las herramientas eléctricas que no pueden
controlarse con el interruptor son peligrosas y
deben repararse.
c) Desconecte el enchufe de la fuente eléctrica
y/o la batería de la herramienta eléctrica
antes de hacer ajustes, cambiar accesorios o
almacenar herramientas eléctricas.
Estas medidas de seguridad preventivas reducen el
riesgo de que la herramienta eléctrica se ponga en
marcha accidentalmente.
d) Guarde las herramientas eléctricas que no
se utilicen para que no las cojan los niños
y no permita que utilicen las herramientas
eléctricas personas no familiarizadas con las
mismas o con estas instrucciones.
Las herramientas eléctricas son peligrosas si son
utilizadas por usuarios sin formación.
e) Mantenimiento de las herramientas eléctricas.
Compruebe si las piezas móviles están mal
alineadas o unidas, si hay alguna pieza
rota u otra condición que pudiera afectar al
funcionamiento de las herramientas eléctricas.
Si la herramienta eléctrica está dañada, llévela
a reparar antes de utilizarla.

8
Español
Se producen muchos accidentes por no realizar
un mantenimiento correcto de las herramientas
eléctricas.
f) Mantenga las herramientas de corte afi ladas y
limpias.
Las herramientas de corte correctamente
mantenidas con los bordes de corte afi lados son
más fáciles de controlar.
g) Utilice la herramienta eléctrica, los accesorios
y las brocas de la herramienta, etc. de acuerdo
con estas instrucciones, teniendo en cuenta
las condiciones laborales y el trabajo que se va
a realizar.
La utilización de la herramienta eléctrica para
operaciones diferentes a aquellas pretendidas
podría dar lugar a una situación peligrosa.
5) Revisión
a) Lleve su herramienta a que la revise un experto
cualifi cado que utilice sólo piezas de repuesto
idénticas.
Esto garantizará el mantenimiento de la seguridad
de la herramienta eléctrica.
PRECAUCIÓN
Mantenga a los niños y a las personas enfermas
alejadas.
Cuando no se utilicen, las herramientas deben
almacenarse fuera del alcance de los niños y de las
personas enfermas.
ESPECIFICACIONES
Modelo SV13YA SV13YB
Voltaje (por áreas)* (110 V, 120 V, 127 V, 220 V, 230 V, 240 V)
Acometida 230 W*
Velocidad de marcha en vacío 7000 – 12000 min
–1
12000 min
–1
Medida del disco esmerilado (Diámetro externo) 125 mm
Medida del papel esmeril (Diámetro externo) 125 mm
Peso (sin cable) 1,4 kg
* Verifi car indefectiblemente los datos de la placa de características de la máquina, pues varían de acuerdo al país de
destino.
ACCESORIO ESTANDARD
○ Papel de lija ................................................................1
○ Bolsa colector de polvo ..............................................1
El accesorio estándard está sujeto a cambios sin previo
aviso.
ACCESORIOS FACULTATIVOS
(de venta por separado)
1. Papel de lija
Grano: AA40, AA60, AA80, AA120, AA180, AA240,
AA320, AA400
2. Pulidor de poliéster
Los accessorios facultativos están sujetos a cambios sin
previo aviso.
APLICACIONES
○ Desbastado o acabado de superfi cies de madera y de
metal.
○ Lijado preliminar de superfi cies de madera y metal
antes de pintar.
○ Eliminación de pintura.
○ Eliminación de óxido.
ANTES DE LA PUESTA EN MARCHA
1. Alimentación
Asegurarse de que la alimentación de red que ha de
ser utilizada responda a las exigencias de corriente
especifi cadas en la placa de características del
producto.
2. Conmutador de alimentación
Asegurarse de que el conmutador de alimentación
esté en la posición OFF (desconectado). Si la clavija
está conectada en la caja del enchufe mientras
el conmutador de alimentación esté pocisión ON
(conectado) las herramientas eléctricas empezarán
a trabajar inmedìatamente, provocando un serio
accidente.
3. Cable de prolongación
Cuando está alejada el área de trabajo de la red de
alimentación, usar un cable de prolongación de un
grosor de potencia nominal y sufi ciente. El cable de
prolongación debe ser mantenido lo más corto posible.
4. Instalación del papel de lija
Como la fi jación es de tipo gancho y bucle, el papel
de lija podrá instalarse fácilmente presionándolo
simplemente en la almohadilla. Cuando instale el papel
de lija, para hacerlo coincidir con los orifi cios de la
almohadilla, dóblelo suavemente a lo largo del eje de
dos orifi cios como se muestra en la Fig. 1.
A continuación, utilice los orifi cios a lo largo de la
doblez como guía para adaptar el papel de lija a la
almohadilla. Finalmente, presione todo el papel de lija
uniformemente contra la almohadilla.
5. Fijación y extracción de la bolsa colectora de
polvo
(1) Fijación de la bolsa colectora de polvo
Como se muestra en la Fig. 2, sujete la entrada del
polvo y presiónela en el sentido de la fl echa A para
fi jarla a la salida del polvo.

9
Español
(2) Extracción de la bolsa colectora de polvo
Como se muestra en la Fig. 2, sujete la entrada del
polvo y presiónela en el sentido de la fl echa B para
extraerla de la salida del polvo.
PRECAUCIÓN
Antes de la operación de lijado, compruebe si es
posible que el material de la superfi cie que vaya a lijar
produzca polvos nocivos o tóxicos.
Si es posible que la superfi cie que se vaya a lijar
produzca polvos nocivos o tóxicos, como en el caso
de una superfi cie con pintura al plomo, fi je la bolsa de
polvo u otro sistema apropiado de extracción del polvo
a la salida de polvo.
Además, si dispone de ella, utilice la máscara de
protección contra el polvo.
No inhale ni toque los polvos nocivos o tóxicos
generados en la operación de lijado, ya que podría
suponer un riesgo para su salud y la de las personas
cercanas.
6. Ajuste de la velocidad (SV13YA)
El modelo SV13YA está equipado con un circuito
eléctrico de control que permite controlar la velocidad
sin ir paso a paso. Para ajustar la velocidad, girar
el selector como se muestra en la Fig. 3. Cuando
el selector indica “1”, la lijadora funciona a la
mínima velocidad (7000 min
–1
). Cuando el selector
indique “6”, la lijadora funciona a la máxima velocidad
(12000 min
–1
). Adjustar la velocidad de acuerdo al
material a cortar y a la efi ciencia de trabajo.
Ajustando el dial, adapte la velocidad al material y al tipo de la pieza de trabajo.
Material
Grano
Escala del dial
Esmerilado tosco Esmerilado fi no
Pintura:
Esmerilar
Reparaciones con lijado
(rajaduras, puntos de óxido)
Desbarbado
180
120
40
400
240
80
3 – 6
2 – 4
2 – 4
Madera:
Madera blanda
Madera dura
Chapa
60 – 80
60
240
240
180
320
3 – 6
3 – 5
2 – 4
Metales:
Aluminio
Acero
Acero inoxidable
80
60
120
240
240
240
2 – 4
3 – 6
3 – 6
Nota: Utilice esta tabla como norma.
PROCEDIMIENTOS PRACTICOS OPERATIVOS
PRECAUCION
No aplicar runca agua ni fl uido abrasivo cuando se está
lijando. Esto podría causar una descarga eléctrica.
1. Encendido y apagado de la lijadora
La alimentación puede encenderse poniendo la
palanca en la posición ON (1) y apagarse poniéndola
en la posición OFF (0).
PRECAUCIÓN
No encender nunca la lijadora cuando esté en contacto
con la superfi cie a lijar. Esto es para prevenir daños en
la pieza a trabajar.
Lo mismo puede aplicarse al apagar la lijadora.
2. Cómo sujetar la lijadora roto-orbital
Mientras se agarra la lijadora, apretarla ligeramente
contra la superfi cie a lijar de forma que el papel de lija
toque uniformemente la superfi cie, como se muestra
en la Fig. 4. No aplicar una fuerza excesiva sobre la
lijadora al efectuar el trabajo. Una presión excesiva
podría causar sobrecalentamientos en el motor, reducir
la duración de servicio del papel de lija y disminuir la
efi ciencia del trabajo.
3. Forma de sujetar la lijadora
Mueva la lijadora hacia arriba y hacia abajo o en
círculos avanzando gradualmente en sentido lateral
(Figs. 5 y 6).
4. Después de la instalación de un papel de lija nuevo
Debido a que el papel de lija nuevo tendrá los granos
más bastos, el movimiento de la lijadora tenderá
a ser irregular después de haberlo colocado. Esto
puede evitarse inclinando ligeramente la lijadora
hacia adelante y hacia atrás durante los trabajos
de lijado o pulido. El movimiento de la lijadora más
uniforme después de que la superfi cie del papel esté
apropiadamente desgastada.
MONTAJE DE ACCESORIOS FACULTATIVOS
○ Montaje del pulidor de poliéster
Como la fi jación es de tipo gancho y bucle, como en
el caso de papel de lija, el pulidor de poliéster podrá
montarse presionándolo en la almohadilla (Fig. 7).
MANTENIMIENTO E INSPECCION
1. Vaciar y limpiar el celector de polvo
Si la bolsa para el serrín contiene demasiado serrín la
recolección de serrín será defi ciente. Vacíe la bolsa de
serrín cuando se llene.
Extraiga la bolsa para el serrín, abra la cremallera, y
vacíe el serrín.

10
Español
2. Inspección del papel de lija
Cambiar el papel de lija tan pronto como se note en él
una abrasión excesiva. La utilización de un papel de lija
desgastado disminuirá la efi ciencia del trabajo y podría
dañar la almohadilla.
3. Inspeccionar los tornillos de montaje
Regularmente inspeccionar todos los tornillos de
montaje y asegurarse de que estén apretados
fi rmemente. Si cualquier tornillo estuviera suelto,
volver a apretarlo inmediatamente. El no hacer esto
provocaría un riesgo serio.
4. Mantenimiento del motor
La unidad de bobinado del motor es el verdadero
“corazón” de las herramientas eléctricas.
Prestar el mayor cuidado y asegurarse de que el
bobinado no se dañe y/o se humedezca con aceite o
agua.
5. Reemplazo del cable de alimentación
Si el cable de alimentación de la herramienta está
dañado, envíe la herramienta al Centro de Servicio
Autorizado de HiKOKI para que le cambien el cable de
alimentación.
6. Servicio
Consultar a un representante de servicio autorizado en
caso de fallo de la herramienta eléctrica.
7. Lista de repuestos
A: N°. ítem
B: N°. código
C: N°. usado
D: Observaciones
PRECAUCIÓN
La reparación, modifi cación e inspección de las
herramientas eléctricas HiKOKI deben ser realizadas
por un Centro de Servicio Autorizado de HiKOKI.
Esta lista de repuestos será de utilidad si es presentada
junto con la herramienta al Centro de Servicio
Autorizado de HiKOKI, para solicitar la reparación o
cualquier otro tipo de mantenimiento.
En el manejo y el mantenimiento de las herramientas
eléctricas, se deberán observar las normas y
reglamentos vigentes en cada país.
MODIFICACIONES
HiKOKI Power Tools introduce constantemente
mejoras y modifi caciones para incorporar los últimos
avances tecnológicos.
Por consiguiente, algunas partes (por ejemplo, números
de códigos y/o diseño) pueden ser modifi cadas sin
previo aviso.
OBSERVACION
Debido al programa continuo de investigación y desarrollo
de HiKOKI éstas especifi caciones están sujetas a cambio
sin previo aviso.

11
SV13YA
ABCD
1 324-249 1
2 301-653 7 D4 × 20
3 993-195 1
4 324-207 1
5 ––––––– 1
6 937-631 1
7 984-750 2 D4 × 16
8-1 324-245 1 110V
8-2 324-248 1 220V
8-3 324-244 1 230V
8-4 324-247 1 240V
9 959-140 1
10 938-307 1
11 311-948 1
12 ––––––– 1
13 324-206 1
14 ––––––– 1
15 953-327 1 D8.8
16 322-764 1
17 322-761 1
18 626-VVM 1 626VVC2PS2L
19 322-763 1
20 322-762 1
21 930-483 2
22 999-041 2
23-1 340-616C 1 110V
23-2 340-616E 1 220V-230V
23-3 340-616F 1 240V
23-4 340-616D 1 120V
24-1 360-696C 1 110V
24-2 360-696E 1 220V-230V
24-3 360-696F 1 240V
24-4 360-696U 1 120V
25 629-VVM 1 629VVC2PS2L
26 324-521 1
27 324-208 1
28 324-212 1
29 600-2DW 1 6002DDWCMPS2L
30 309-422 1
31 993-244 1 M4 × 12
32 324-210 1
33 324-211 1
34 324-209 1
35 307-109 3 M4 × 16
36 930-039 1
501 310-339 1
502 308-519 1 A-P120
503 324-613 1

12
SV13YB
ABCD
1 324-214 1
2 301-653 7 D4 × 20
3 993-195 1
4 324-207 1
5 ––––––– 1
6 984-750 2 D4 × 16
7 937-631 1
8 930-039 1
9 938-307 1
10 311-948 1
11 ––––––– 1
12 324-206 1
13 ––––––– 1
14 953-327 1 D8.8
15 322-764 1
16 322-761 1
17 626-VVM 1 626VVC2PS2L
18 322-763 1
19 322-762 1
20 930-483 2
21 999-041 2
22-1 340-618C 1 110V
22-2 340-618E 1 220V-230V
22-3 340-618F 1 240V
22-4 340-618D 1 120V-127V
23-1 360-698C 1 110V
23-2 360-698E 1 220V-230V
23-3 360-698F 1 240V
23-4 360-698U 1 120V-127V
24 629-VVM 1 629VVC2PS2L
25 324-521 1
26 324-208 1
27 324-212 1
28 600-2DW 1 6002DDWCMPS2L
29 309-422 1
30 993-244 1 M4 × 12
31 324-210 1
32 324-211 1
33 324-209 1
34 307-109 3 M4 × 16
501 310-339 1
502 308-519 1 A-P120

13

14

806
Code No. C99249341
G
Printed in China
Issued by
Shinagawa Intercity Tower A, 15-1, Konan 2-chome,
Minato-ku, Tokyo 108-6020, Japan
Distribuido por
Calle Isaac Newton No.286, 2do Piso, Col. Polanco V Sección,
Del. Miguel Hidalgo, C. P. 11560
Ciudad de México, México.
-
 1
1
-
 2
2
-
 3
3
-
 4
4
-
 5
5
-
 6
6
-
 7
7
-
 8
8
-
 9
9
-
 10
10
-
 11
11
-
 12
12
-
 13
13
-
 14
14
-
 15
15
-
 16
16


Hikoki SV13YB Manual de usuario
- Categoría
- Lijadoras eléctricas
- Tipo
- Manual de usuario
en otros idiomas
- English: Hikoki SV13YB User manual