
HELLO
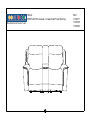
PX9019-02CP2 Loveseat - Console Dual Power Reclining
SKU:
11290171
11290195
11290183
Manufactured for Rooms To Go
1

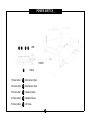
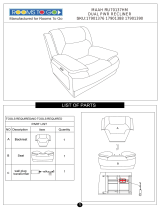
LIST OF PARTS
2
TOOL REQUIRED: NO TOOL REQUIRED
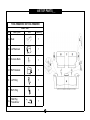
PART LIST
No. Description Item Quantity
ASeat 1
BLAF Backrest 1
CConsole Back 1
D RAF Backrest 1
ELAF Wing 1
F RAF Wing 1
GWall Plug
Transformer 1

LIST OF PARTS
3
ASSEMBLY INSTRUCTION
3
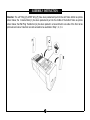
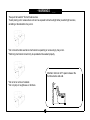
Attention: The LAF Wing (E) & RAF Wing (F) have been packed and put into the arm frame bottom as picture
shown below; the Console Back (C) has been packed and put into the middle of the bottom frame as picture
shown below; the Wall Plug Transformer (G) has been packed in a box and tied to one side of the floor rail as
picture shown below. Take them out and set aside to be used later in Step 1, 2, 3, 4.

LIST OF PARTS
4
ASSEMBLY INSTRUCTION
4
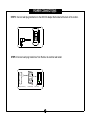
STEP 1: Attaching the KD Backs (B, C & D)
Before attaching the LAF Back (B) & RAF Back (D) to the Seat (A), connect the power headrest lead wires located at the
bottom of each back to the matching lead wires found at the rear of each seat as seen below. Be sure to close the clip locks
to prevent the connections from coming loose during use.
Then attach the two backs to the seat by positioning the female metal receiver brackets over the male metal posts. Ensure
that female metal receiver brackets on each side of the backrest are positioned over the seat metal posts, push down the
female brackets over the male posts simultaneously until each side is locked into place with an audile "click" is heard.
Then attach the Console (C) to the Seat (A), by positioning the female metal receiver brackets over the male metal posts.
Ensure that female metal receiver brackets on each side of the backrest are positioned over the seat metal posts, push
down the female brackets over the male posts simultaneously until each side is locked into place with an audile "click" is
heard.
STEP 2: Attaching the KD Wings (E & F)
Insert the LAF Wing & RAF Wing (E&F) separately to the side of the LAF & RAF Backrest (B & D) , make sure they are
secured in position.

POWER CONNECTIONS
STEP 3: Connect wall plug transformer to the LED DC adapter that located at the back of the recliner.
STEP 4: Connect wall plug transformer from Recliner to electrical wall outlet.
5
Wall Plug Transformer plug Electrical Wall Oulet Green LED lit up

POWER SWITCH
1.Press button 1Mechanism Open.
2.Press button 2Mechanism Close.
3.Press button 3Headrest Open.
4.Press button 4Headrest Close.
5.Home button 5All Close.
6
USB
4 3 2 1
FRONT
5USB-C

WARNINGS
*Keep unit at least 24" from all heat sources.
*Avoid placing unit in areas where unit can be exposed to direct sunlight other powerful light sources,
as fading or discoloration may occur.
*Do not reach under seat when mechanism is operating or serious injury may occur.
*Reclining mechanism should only be operated while seated properly.
*Do not sit on arms or backrest.
*Do not jump or roughhouse on furniture.6''
Maintain minimum of 6'' space between the
furniture backs and wall.
7

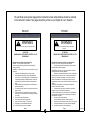
The electrical warning label page/product instruction sheet outlined below should be included
in the instruction manual. Two pages should be printed, one in English & one in Spanish.
ENGLISH
IMPORTANT SAFETY INSTRUCTIONS
29 VDC/2.0A
JIANGSU MULIN INTELLIGENCE ELECTRIC CO.,LTD
ZB-H290020A-C
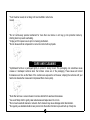
Read all instructions before using this furnishing.
DANGER – To reduce the risk of electric shock:
1.Always unplug this furnishing from the electrical outlet before
cleaning or servicing.
WARNING – To reduce the risk of burns, fire, electric shock, or injury
to persons:
1. Unplug from outlet before putting on or taking off parts.
2. Never operate this furnishing if it has a damaged electrical
cord or plug, if it is not working properly, or if the electrical cord
or plug has been damaged or dropped into water. Stop using
this furnishing and call a service center for examination and
repair.
3. Keep the electrical cord and plug away from heated surfaces
and other heat sources.
4. To disconnect, turn all controls to the off position, then remove
plug from outlet.
5. When operating, ensure that electrical cord is not under the
base, legs, or motion mechanism to avoid damage to electrical
cord or plug.
6. Do not strain or stretch electrical cord.
7. Do not use extension cords or power strips.
8. Keep out of reach of children. This is not a toy.
9 . Plugdirectly into a compatible electrical socket.
10. Do not modify the plug or usde any adapters.
Page “x
SPANISH
INSTRUCCIONES DE SEGURIDAD IMPORANTES
29 VDC/2.0A
JIANGSU MULIN INTELLIGENCE ELECTRIC CO.,LTD
ZB-H290020A-C
Leer todas las instrucciones antes de usar este mobiliario.
PELIGRO – Para reducir el riesgo de descarga electrica:
1. Siempre desenchufe este accesorio de la toma de corriente
eléctrica antes de limpiarlo o repararlo.
ADVERTENCIA: para reducir el riesgo de quemaduras, incendios,
descargas eléctricas o lesiones a personas:
1. Desenchufe del tomacorriente antes de colocar o quitar partes.
2.Nunca opere este accesorio si tiene un cable o enchufe eléctrico
dañado, si no funciona correctamente, o si el cable o el enchufe
eléctrico se ha dañado o se ha caído al agua. Deje de usar este
equipamiento y llame a un centro de servicio para que lo examinen y lo
reparen.
3.Mantenga el cable eléctrico y el enchufe lejos de superficies
calientes y otras fuentes de calor.
4. Para desconectar, gire todos los controles a la posición de
apagado, luego retire el enchufe del tomacorriente.
5.Al operar, asegúrese de que el cable eléctrico no esté debajo de la
base, las patas o el mecanismo de movimiento para evitar dañar el
cable eléctrico o el enchufe.
6. No fuerce ni estire el cable eléctrico.
7. No utilizar cables de extensión o tomas de corriente.
8. Mantener fuera del alcance de los niños. Esto no es un juguete.
9. Enchufar directamente a una toma de corriente compatible.
10. No modifique el enchufe ni utilice adaptadores.
Page “x Not To Scale
WARNING
Misuse can result in FIRE or DEATH by ELECTRICAL SHOCK
WARNING
El mal uso puede provocar INCENDIO o MUERTE por DESCARGA
ELÉCTRICA
8

*If unit must be moved, do not drag. Unit must be lifted in order to be
moved.
*Do not continuously operate mechanism for more than one minute or unit may go into protection mode by
shutting down to prevent overheating.
*Unplug unit from power source prior to cleaning mechanism.
*Do not allow electrical components to come into contact with any liquids.
*Upholstered furniture is packaged tightly to protect it during transit. This packaging can sometimes cause
creases or misshaped cushions when the furniture comes out of the packaging. These issues will correct
themselves over time as the fibers of the cushions are exposed to air.However, shaping the cushions with your
hands can alleviate the creases and compressed fibers more quickly.
*Dust often and use a vacuum cleaner to remove debris from seams and crevasses.
*Use a soft damp cloth to gently clean soiled areas and wipe clean. Do not rub.
*Do not use household cleaners or solvents. Such cleaners may cause damage and/or discoloration.
*Do regularly use dedicated leather care product onto the leather furniture to prevent built up of body oils.
CARE AND CLEANING
9

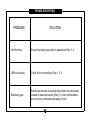
TROUBLESHOOTING
PROBLEM SOLUTION
Not Reclining Ensure that wall power outlet is operational Step 3,4
USB not working Check all the connections Step 1, 3, 4
Backrests gaps
Ensure the backrest is properly clipped into the male posts
located on seat mechanism (Step 1). Check that brackets
are not loose, positioned improperly or bent.
10
-
 1
1
-
 2
2
-
 3
3
-
 4
4
-
 5
5
-
 6
6
-
 7
7
-
 8
8
-
 9
9
-
 10
10


ROOMS TO GO 11290171 Assembly Instructions
- Tipo
- Assembly Instructions
en otros idiomas
- English: ROOMS TO GO 11290171
Artículos relacionados
Otros documentos
-
 cindy crawford 17901388 Assembly Instructions
-
HoMedics EL-200 Instruction book
-
Human Touch HT-3010 Manual de usuario
-
-
 Kuka KM.012 Manual de usuario
-
 La-Z-Boy 444773 Manual de usuario
-
-
 La-Z-Boy U48724 Manual de usuario
-


