Batavia CROC LOCK compact Manual de usuario
- Tipo
- Manual de usuario

Model: BT–CL002
Item-No.: 7061991
www.bataviapower.com
CROC LOCK COMPACT
Work & clamping system
Arbeits- & Klemmsystem
Système de travail & de serrage
Werk- & klemsysteem
Sistema di lavoro e ssaggio
Banco de trabajo y sujeción
Sistema de trabalho e xação
Stół roboczy z imadłem
Operating instructions
Bedienungsanleitung (Original)
Mode d'emploi
Gebruiksaanwijzing
Istruzioni di Funzionamento
Manual de usuario
Instruções de funcionamento
Instrukcja


A
9
12
13
11
10
124
3
7
5
6
8

2
Overview
1. Fixed jaw
2. Fixed jaw pad
3. Moving jaw pad
4. Moving jaw
5. Rear leg lock lever
6. Rear leg
7. Front foot
8. Rubber anti-slip pad
9. Front legs
10. Foot pedal
11. Foot pedaI lock
12. Front leg locks
13. Lock/unlock switch
14. Moving jaw locking tab
Übersicht
1. Feststehende Klemmbacke
2. Auage feststehende Klemmbacke
3. Auage bewegliche Klemmbacke
4. Bewegliche Klemmbacke
5. Arretierhebel hinteres Standbein
6. Hinteres Standbein
7. Vordere Standbeinfüße
8. Rutschfeste Gummi Auage
9. Vordere Standbeine
10. Fußpedal
11. Fußpedalarretierung
12. Arretierung vordere Standbeine
13. Arretierungs-/Entsperrschalter
14. Verschlusslasche
Aperçu
1. Mâchoire fixe
2. Patin de mâchoire fixe
3. Patin de mâchoire de serrage
4. Mâchoire de serrage
5. Levier de verrouillage de la patte arrière
6. Patte arrière
7. Pied pour patte avant
8. Semelle en caoutchouc antidérapant
9. Patte avant
10. Pédale à pied
11. Mécanisme de verrouillage de la pédale
à pied
12. Mécanisme de verrouillage de la patte
avant
13. Manette de verrouillage/déverrouillage
14. Mâchoire verrouillant
Overzicht
1. Vaste klauw
2. Schoen vaste klauw
3. Schoen beweegbare klauw
4. Beweegbare klauw
5. Vergrendelhendel achterpoot
6. Achterpoot
7. Voet voorpoten
8. Rubberen anti-slipzool
9. Voorpoten
10. Voetpedaal
11. Vergrendeling voetpedaal
12. Vergrendeling t.b.v. voorpoten
13. Vergrendel/ontgrendelknop
14. Ontgrendelschijf

3
Panoramica
1. Ganascia ssa
2. Cuscinetto ganascia ssa
3. Cuscinetto ganascia mobile
4. Ganascia mobile
5. Leva di bloccaggio della gamba
posteriore
6. Gamba posteriore
7. Piede anteriore
8. Cuscinetto in gomma antiscivolo
9. Gambe anteriori
10. Pedale
11. Blocco del pedale
12. Blocchi delle gambe anteriori
13. Interruttore di blocco/sblocco
14. Linguetta di bloccaggio della ganascia
mobile
Resumen
1. Mordaza ja
2. Almohadilla de la mordaza ja
3. Almohadilla de la mordaza móvil
4. Mordaza móvil
5. Palanca de bloqueo de la pata trasera
6. Pata trasera
7. Base de soporte delantera
8. Almohadilla antideslizante de goma
9. Patas delanteras
10. Pedal
11. Seguro de pedal
12. Seguros de las patas delanteras
13. Botón de apertura/cierre
1.1 Lengüeta de bloqueo de la mordaza
móvil
Visão geral
1. Maxila xa
2. Almofada da maxila xa
3. Almofada da maxila móvel
4. Maxila móvel
5. Alavanca de bloqueio da perna traseira
6. Perna traseira
7. Pé dianteiro
8. Almofada antiderrapante de borracha
9. Pernas dianteiras
10. Pedal do pé
11. Bloqueio do pedal do pé
12. Bloqueios da perna dianteira
13. Interruptor de bloqueio/desbloqueio
14. Aba de travamento da garra móvel
Przegląd
1. Szczęka nieruchoma
2. Podkładka szczęki nieruchomej
3. Podkładka szczęki ruchomej
4. Szczęka ruchoma
5. Dźwignia blokady tylnej nogi
6. Tylna noga
7. Przednia stopa
8. Gumowa podkładka antypoślizgowa
9. Przednie nogi
10. Pedał nożny
11. Blokada pedału nożnego
12. Blokady przednich nóg
13. Przycisk blokady/odblokowania
14. Zaczep blokujący szczękę ruchomą

4
Contents
1. Explanation of the symbols . . . . 6
2. Safety notes . . . . . . . . 6
3. Before the rst use . . . . . . 7
4. Contents of packing . . . . . . 7
5. Intended use . . . . . . . . 7
6. Assembly . . . . . . . . . 7
7. Folding . . . . . . . . . . 7
8. Operation . . . . . . . . . 7
9. Cleaning and maintenance . . . . 8
10. Storage . . . . . . . . . . 8
11. Technical data. . . . . . . . 8
12. Disposal . . . . . . . . . 8
Inhaltsverzeichnis
1. Erläuterung der Symbole . . . . 9
2. Sicherheitshinweise . . . . . . 9
3. Vor dem ersten Gebrauch . . . .10
4. Lieferumfang . . . . . . . .10
5. Bestimmungsgemäße Verwendung .10
6. Montage . . . . . . . . .10
7. Zusammenklappen . . . . . .10
8. Gebrauch . . . . . . . . .11
9. Reinigung und Wartung . . . . .12
10. Aufbewahrung. . . . . . . .12
11. Technische Daten. . . . . . .12
12. Entsorgung . . . . . . . .12
Table des matières
1. Explication des symboles . . . .13
2. Consignes de sécurité . . . . .13
3. Avant la première utilisation. . . .14
4. Contenu de l’emballage . . . . .14
5. Utilisation prévue . . . . . . .14
6. Assemblage . . . . . . . .14
7. Pliage . . . . . . . . . .14
8. Fonctionnement . . . . . . .15
9. Nettoyage et entretien . . . . .15
10. Nettoyage/Stockage . . . . . .16
11. Fiche technique . . . . . . .16
12. Élimination et recyclage . . . . .16
Inhoudsopgave
1. Uitleg van de symbolen . . . . .17
2. Veiligheidsvoorschriften . . . . .17
3. Voor het eerste gebruik . . . . .18
4. Inhoud van de verpakking . . . .18
5. Beoogd gebruik . . . . . . .18
6. Montage . . . . . . . . .18
7. Inklappen . . . . . . . . .18
8. Bediening . . . . . . . . .19
9. Reiniging en onderhoud . . . . .19
10. Opslag . . . . . . . . . .19
11. Technische gegevens . . . . 20
12. Afvalverwerking en hergebruik . . 20

5
Contenuto
1. Spiegazione dei simboli . . . . 21
2. Note di sicurezza . . . . . . 21
3. Operazioni preliminari al primo uso
del prodotto . . . . . . . 22
4. Contenuto della confezione . . . 22
5. Destinazione d'uso . . . . . 22
6. Montaggio . . . . . . . . 22
7. Chiusura . . . . . . . . 22
8. Uso . . . . . . . . . . 23
9. Pulizia e manutenzione . . . . 23
10. Conservare il prodotto . . . . 23
11. Dati tecnici . . . . . . . . 24
12. Smaltimento . . . . . . . 24
Índice
1. Explicación de los símbolos. . . 25
2. Instrucciones de seguridad . . . 25
3. Antes de usar por primera vez . . 26
4. Contenido del paquete . . . . 26
5. Uso previsto . . . . . . . 26
6. Montaje . . . . . . . . 26
7. Plegado . . . . . . . . 26
8. Utilización . . . . . . . . 27
9. Limpieza y mantenimiento . . . 27
10. Almacenamiento . . . . . . 28
11. Datos técnicos . . . . . . 28
12. Eliminación . . . . . . . 28
Índice
1. Explicação dos símbolos . . . 29
2. Notas de segurança . . . . . 29
3. Antes da primeira utilização. . . 30
4. Conteúdo da embalagem . . . 30
5. Utilização prevista . . . . . 30
6. Montagem . . . . . . . . 30
7. Encartamento . . . . . . . 30
8. Operação . . . . . . . . 31
9. Limpeza e manutenção . . . . 31
10. Armazenamento . . . . . . 31
11. Dados técnicos . . . . . . 32
12. Eliminação . . . . . . . . 32
Spis treści
1. Objaśnienie symboli . . . . . 33
2. Wskazówki dotyczące
bezpieczeństwa . . . . . . 33
3. Przed pierwszym użyciem . . . 34
4. Zawartość opakowania . . . . 34
5. Przeznaczenie. . . . . . . 34
6. Montaż . . . . . . . . . 34
7. Składanie . . . . . . . . 34
8. Obsługa . . . . . . . . 35
9. Czyszczenie i konserwacja . . . 35
10. Przechowywanie . . . . . . 36
11. Dane techniczne . . . . . . 36
12. Utylizacja . . . . . . . . 36

English
6
Dear customer
Please familiarize yourself with the proper
usage of the device by reading and following
each chapter of this manual, in the order
presented. Keep these operating instruc-
tions for further reference.
Please read all safety instructions!
This manual contains important information
on operating and handling the device. Keep
these operating instructions for further
reference. Please pass it on along with the
unit if it is handed over to a third party.
1. Explanation of the symbols
The following symbols are used in the user
manual or on the product:
Warning! To reduce the risk of
injury, the user must read the
instruction manual.
Denotes risk of personal injury, loss
of life or damage to the tool in case
of non-observance of the instruc-
tions in this manual.
Wear safety glasses.
Wear safety gloves.
Recycle.
2. Safety notes
Please note the following safety
notes to avoid malfunctions, dam-
age or physical injury:
• Dispose of the packaging materials care-
fully; the plastic bags may become a
deadly toy for children.
• Keep work area clean and well lit. Clut-
tered and dark areas invite accidents.
• Stay alert, watch what you are doing and
use common sense when operating a
power tool. Do not use a work bench
while you are tired or under the inuence
of drugs, alcohol or medication.
• Use safety equipment. Always wear eye
protection. Safety equipment such as
dust mask, non-skid safety shoes, hard
hat, or hearing protection used for appro-
priate conditions will reduce personal
injuries.
• Do not overreach. Keep proper footing
and balance at all times.
• Maintain the work bench. Check for mis-
alignment or binding of moving parts,
breakage of parts and any other condi-
tion that may affect the work bench
operation. If damaged, have the work
bench repaired before use. Many acci-
dents are caused by poorly maintained
tools.
• Use the workbench in accordance with
these instructions and in the manner
intended for the particular type of tool,
taking into account the working condi-
tions and the work to be performed. Use
of the tool for operations different from
intended could result in a hazardous
situation.
• Do not wear loose-tting clothing or
jewellery; these may get caught while
working with the work bench.
• Use the work bench only for its intended
purpose. Do not use the work bench as
scaffold, ladder, stool or similar.
• Keep bystanders and obstacles away
from the work area.
• Use the work bench on a solid level
ground and make sure the ground can
carry the weight of the work bench plus
the weight of the workpiece.
• Do not exceed the mentioned maximum
load capacities of the work bench. Refer
to the technical data.
• When working on heavy or large work-
pieces please consider getting assis-
tance from another person.
• Do not use the work bench if any parts
are damaged or bent.
• Do not drop the work bench, throw it, or
otherwise misuse the work bench.
• Check if all xing screws and knobs are
tight. Make sure the legs are locked
before you use the Croc Lock.
• Pay attention to the risk of tilting. The
Croc Lock can tilt when working with
large and heavy workpieces. Always
ensure that the workpiece is well
supported.

7
English
• Use the Croc Lock only for the intended
purposes. Any other use is considered an
abuse. The manufacturer is not liable for
damage or injury caused by misuse.
• Only use accessories as recommended
in the user manual, the use of other
accessories can lead to injury.
• Store the workbench in a dry place that
is protected from dust, dirt and frost.
Keep the workbench out of the reach of
children.
3. Before the rst use
Before mounting, please check all parts for
completeness. If parts are missing, do not
return back the work bench but contact our
support department.
Dispose of packaging materials or store it
out of reach of children. Plastic bags etc.
may become a deadly toy for children.
4. Contents of packing
1× Croc Lock Compact
1× Instruction manual
5. Intended use
The Croc Lock is a multifunctional work-
bench for many applications such as clamp-
ing of doors, frames, fencing, ceiling plates,
bicycles, car parts and all kinds of other
materials.
6. Assembly
6.1 Place the Croc Lock upside down on the
ground, unlock the rear leg lock lever (5)
and slide the rear leg (6) from the stor-
age position in the direction as shown.
6.2 Fully fold out the rear leg.
6.3 Slide the rear leg into position and lock
the rear leg locking lever (5).
6.4 Fold out the foot pedal (10) until it clicks
into position.
6.5 Fold out the front legs (9) until they click
into position.
6.6 Place the Croc Lock upright. Check if all
legs are rmly and in the correct posi-
tion and check if everything is locked.
6.7 Rotate the moving jaw locking tab (14)
to the horizontal position and the Croc
Lock is now ready for use.
7. Folding
Enter the assembly instructions in reverse
order from:
7.1 Ensure that the lock / release switch
(13) is in the “unlock position”
7.2 The moving jaw locking tab (14) is in
the “vertical” position to prevent the jaw
from sliding out
7.3 Place the Croc Lock upside down on the
ground. Unlock the front leg locks (12)
and fold in the front legs.
7.4 Unlock the foot pedal lock (11) and fold
the foot pedal in.
7.5 Unlock the rear leg lock lever (5) and
place the rear leg (6) in the storage
position and lock the rear leg lock lever
again.
7.6 The rear leg (6) can be used to lift the
Croc Lock in the folded position.
8. Operation
8.1 Clamping / locking
• Check that the moving jaw locking tab
(14) is set to the horizontal position and
push the moving jaw (4) back until your
workpiece ts between the jaws.
• Place the workpiece against the xed jaw
(1) on the front.
• Slide the moving jaw (4) against the
workpiece. The moving jaw can be
moved by hand or with the foot pedal.
• Slide the lock / unlock button (13) down
to lock.
• Press the foot pedal (10) down to secure
the workpiece securely.
8.2 Loosening / unlocking
• Slide the lock / unlock button (13) up.
• Press the foot pedal (10) down until it
“clicks”
• Slide the moving jaw (4) back.
Note: Apply the same pressure on the foot
pedal when unlocking as when locking.
Warning: Support the workpiece so that it
does not fall when the workpiece is
unlocked.
8.3 Clamping on one side of the jaw
Large workpieces or workpieces with a
different shape can in some cases only be

English
8
xed on one side of the jaws. Avoid exces-
sive use of the clamping force.
8.4 Clamping square workpieces
The jaw pads (2, 3) are equipped with hori-
zontal and vertical grooves for clamping
square tubes and angled workpieces.
8.5 Clamping large objects
(clamping range> 450 mm)
For clamping large workpieces, the moving
jaw can be reversed so that the clamping
range is increased to 956 mm:
• Set the lock / release switch (13) to the
“release” position and ensure that the
foot pedal is released.
• Check that the moving jaw locking tab
(14) is in the horizontal position.
• Slide the moving jaw (4) out of the rail.
• Turn the moving jaw 180° and slide the
jaw back into the rail.
• The clamping range between 450 mm
and 500 mm must be bridged by means
of a spool of at least 50 mm wide, for
example a piece of wood or similar solid
material.
Warning: When clamping workpieces up to
the maximum clamping range, the work-
piece must rest on the moving jaw and
remain parallel.
Ensure sufcient stability when working
with long or large workpieces.
8.6 Tips:
— Use a soft material between the work-
piece and the jaws if necessary to prevent
damage to the workpiece.
— Do not apply too much pressure on the
workpiece.
— Ensure that the workpiece is in balance.
9. Cleaning and maintenance
Check the product for damage over worn
parts before each use. Do not use the
device if there are damaged or worn parts.
Contact your supplier or manufacturer for
spare parts.
10. Storage
Store the Croc Lock and the accessories in
a dry and frost-free place.
11. Technical data
Max. weight: . . . . . . . . . . . . . . .100 kg
Footprint (standing):. . . . .95 × 88 × 86 cm
Dimensions (folded): . . . 82 × 24,5 × 31 cm
Working height: . . . . . . . . . . . . . 86 cm
Clamping range: . . . . . . . . . 0 – 956 mm
Clamping force: . . . . . . . . . . . . 1000 kg
Product weight without accessories: 14.8 kg
12. Disposal
Dispose of the packaging by sorting
into single type materials. Dispose
of cardboard and carton as waste
paper and foils via the recyclable material
collection service.
12.1 Disposing of the product
Dispose of the product in accordance with
the applicable laws and regulations for your
country.
The product and the user manual may be
subject to changes. Technical data may be
changed without prior notice.

9
Deutsch
Sehr geehrte Damen und Herren
Bitte machen Sie sich in der Reihenfolge der
Kapitel mit dem Gerät vertraut und bewah-
ren Sie diese Bedienungsanleitung für spä-
tere Zwecke gut auf.
Bitte beachten Sie die
Sicherheitshinweise!
Diese Bedienungsanleitung enthält wichtige
Hinweise zur Inbetriebnahme und Handha-
bung. Legen Sie die Anleitung dem Produkt
bei, wenn Sie es an Dritte weitergeben.
1. Erläuterung der Symbole
Folgende Symbole werden im Benutzer-
handbuch oder auf dem Produkt verwendet:
WARNUNG - Zur Verringerung des
Verletzungsrisikos Bedienungsan-
leitung lesen.
Allgemeines Warnzeichen – Seien
Sie aufmerksam und beachten Sie
allgemeine Gefahren.
Tragen Sie eine Schutzbrille.
Gute und widerstandsfähige Hand-
schuhe tragen.
Recyceln.
2. Sicherheitshinweise
Bitte beachten Sie die folgenden
Sicherheitshinweise, um Fehlfunk-
tionen, Schäden oder Verletzun-
gen zu vermeiden:
• Entsorgen Sie die Verpackungsmateria-
lien sorgfältig; die Kunststoffbeutel
können für Kinder zu einem tödlichen
Spielzeug werden.
• Halten Sie Ihren Arbeitsbereich sauber,
und sorgen Sie für ausreichende
Beleuchtung. Unordnung und dunkle
Arbeitsbereiche können zu Unfällen
führen.
• Verwenden Sie das Gerät aufmerksam
und vernünftig. Arbeiten Sie nicht an der
Werkbank, wenn Sie müde sind oder
unter dem Einuss von Drogen, Alkohol
oder Medikamenten stehen.
• Verwenden Sie Sicherheitsausrüstung.
Tragen Sie stets eine Schutzbrille.
Sicherheitsausrüstung wie Staub-
maske, rutschfeste Sicherheitsschuhe,
Schutzhelm oder Gehörschutz, die in
geeigneter Weise verwendet wird, min-
dert die Verletzungsgefahr.
• Beugen Sie sich nicht zu weit nach
vorne über. Achten Sie auf einen siche-
ren Stand, um in jeder Arbeitsposition
das Gleichgewicht zu halten.
• Instandhaltung der Werkbank. Überprü-
fen Sie die Ausrichtung oder Verbindung
von beweglichen Teilen, ob Teile defekt
sind sowie alle anderen Umstände, die
den Gebrauch der Werkbank beein-
trächtigen können. Lassen Sie die Werk-
bank vor Gebrauch reparieren, wenn Sie
eine Beschädigung feststellen. Die
Ursache zahlreicher Unfälle sind
schlecht gewartete Werkzeuge.
• Verwenden Sie die Werkbank gemäß
dieser Anleitung und in der für den
jeweiligen Werkzeugtyp vorgesehenen
Weise. Berücksichtigen Sie dabei die
Arbeitsbedingungen und die auszufüh-
renden Arbeiten. Die Verwendung des
Werkzeugs für andere als die vorgese-
henen Arbeiten kann mit Gefahren ver-
bunden sein.
• Tragen Sie keine lose sitzende Kleidung
oder Schmuck, da sich diese bei der
Arbeit an der Werkbank verfangen
können.
• Verwenden Sie die Werkbank nur für
den bestimmungsgemäßen Zweck.
Verwenden Sie die Werkbank nicht als
Gerüst, Leiter, Hocker o.Ä.
• Halten Sie umstehende Personen und
Hindernisse vom Arbeitsbereich fern.
• Verwenden Sie die Werkbank auf einem
festen, ebenen Untergrund und stellen
Sie sicher, dass der Untergrund das
Gewicht der Werkbank mit dem Gewicht
des Werkstücks tragen kann.
• Die angegebene Tragfähigkeit der Werk-
bank darf nicht überschritten werden.
Beachten Sie die technischen Daten.
• Bei Arbeiten an schweren oder großen
Werkstücken sollten Sie sich unter

Deutsch
10
Umständen von einer anderen Person
unterstützen lassen.
• Verwenden Sie die Werkbank nicht,
wenn Teile beschädigt oder verbogen
sind.
• Lassen Sie die Werkbank nicht fallen,
werfen Sie nicht mit ihr und verwenden
Sie sie nicht in anderer Weise
unsachgemäß.
• Überprüfen Sie, ob alle Befestigungs-
schrauben und -knöpfe fest angezogen
sind. Vergewissern Sie sich, dass die
Beine verriegelt sind, bevor Sie die Croc
Lock verwenden.
• Beachten Sie die Kippgefahr. Die Croc
Lock kann bei der Bearbeitung großer
und schwerer Werkstücke kippen. Ach-
ten Sie immer auf eine gute Unterstüt-
zung des Werkstücks.
• Verwenden Sie die Croc Lock nur für die
bestimmungsgemäßen Zwecke. Jeder
andere Gebrauch wird als unsachge-
mäß betrachtet. Der Hersteller haftet
nicht für Schäden oder Verletzungen,
die durch unsachgemäßen Gebrauch
entstehen.
• Verwenden Sie nur das in der
Gebrauchsanleitung empfohlene Zube-
hör. Die Verwendung von anderem
Zubehör kann Verletzungen zur Folge
haben.
• Bewahren Sie die Werkbank an einem
trockenen, vor Staub, Schmutz und
Frost geschützten Ort auf. Halten Sie
die Werkbank von Kindern fern.
3. Vor dem ersten Gebrauch
Prüfen Sie vor der Montage, ob alle Teile
vollständig vorhanden sind. Falls Teile feh-
len, geben Sie die Werkbank nicht zurück,
sondern wenden Sie sich an unsere
Kundendienstabteilung.
Entsorgen Sie Verpackungsmaterial oder
lagern Sie es für Kinder unzugänglich.
Kunststoffbeutel usw. können für Kinder zu
einem tödlichen Spielzeug werden.
4. Lieferumfang
1× Croc Lock Compact
1× Bedienungsanleitung
5. Bestimmungsgemäße
Verwendung
Croc Lock ist eine multifunktionale Werk-
bank für viele Anwendungen wie das Auf-
spannen von Türen, Rahmen, Zäunen,
Deckenplatten, Fahrrädern, Autoteilen und
Werkstücken aller Art.
6. Montage
6.1 Stellen Sie die Croc Lock kopfüber auf
den Boden, entriegeln Sie den Verriege-
lungshebel (5) für das hintere Bein und
schieben Sie das hintere Bein (6) aus
der Aufbewahrungsposition in die ange-
gebene Richtung (siehe Abb. B).
6.2 Klappen Sie das hintere Bein vollständig
aus.
6.3 Schieben Sie das hintere Bein in Posi-
tion und verriegeln Sie den Verriege-
lungshebel (5).
6.4 Klappen Sie das Fußpedal (10) aus, bis
es einrastet.
6.5 Klappen Sie die Vorderbeine (9) aus, bis
sie einrasten.
6.6 Stellen Sie die Crock Lock richtig herum
auf. Prüfen Sie, ob alle Beine fest und in
der richtigen Position sind und ob alles
verriegelt ist.
6.7 Die Verschlusslasche (14) an der
beweglichen Backe in horizontale Posi-
tion drehen. Jetzt ist die Croc Lock
einsatzbereit.
7. Zusammenklappen
Gehen Sie die Montageanleitung in umge-
kehrter Reihenfolge durch:
7.1 Es ist sicher zu stellen, dass der Ver-, /
Entriegelungsschalter (13) sich in der
Entriegelungsposition bendet
7.2 Die Verschlusslasche (14) für die
bewegliche Backe wird senkrecht
gestellt, damit die Backe nicht heraus-
gleiten kann.
7.3 Stellen Sie die Croc Lock umgekehrt auf
den Boden. Entriegeln Sie die Verriege-
lungen (12) der Vorderbeine und klap-
pen Sie die Vorderbeine ein.
7.4 Entriegeln Sie die Fußpedalverriegelung
(11) und klappen Sie das Fußpedal ein.

11
Deutsch
7.5 Entriegeln Sie den Verriegelungshebel
(5) des hinteren Beins, bringen Sie das
hintere Bein (6) in die Aufbewahrungs-
position und verriegeln Sie den Verrie-
gelungshebel des hinteren Beins wieder.
7.6 Die zusammengeklappte Croc Lock
kann am hinteren Bein (6) angehoben
werden.
8. Gebrauch
8.1 Einspannen/Verriegeln
• Kontrollieren, dass die Verschlussla-
sche (14) sich in horizontaler Position
bendet und dann wird die bewegliche
Klemmbacke (4) zurück geschoben, bis
dass das Werkstück zwischen die
Backen passt.
• Legen Sie das Werkstück gegen die
feste Spannbacke (1) auf der
Vorderseite.
• Schieben Sie die bewegliche Spannba-
cke (4) gegen das Werkstück. Die
bewegliche Spannbacke kann von Hand
oder mit dem Fußpedal bewegt werden.
• Schieben Sie den Verriegelungs-/Entrie-
gelungsknopf (13) zum Verriegeln nach
unten.
• Drücken Sie das Fußpedal (10) nach
unten, um das Werkstück sicher zu
xieren.
8.2 Lösen/Entriegeln
• Schieben Sie den Verriegelungs-/Entrie-
gelungsknopf (13) nach oben.
• Drücken Sie das Fußpedal (10) nach
unten, bis es „klickt“.
• Schieben Sie die bewegliche Spannba-
cke (4) zurück.
Hinweis: Drücken Sie beim Entriegeln
genauso stark auf das Fußpedal wie beim
Verriegeln.
Warnung: Halten Sie das Werkstück fest,
damit es beim Entriegeln nicht herunterfällt.
8.3 Einspannen auf einer Seite der Backe
Große oder ungleichmäßig geformte Werk-
stücke können unter Umständen nur auf
einer Seite der Spannbacken xiert werden.
Setzen Sie nicht übermäßig viel Spannkraft
ein.
8.4 Einspannen von quadratischen
Werkstücken
Die Spannbacken (2, 3) sind mit horizonta-
len und vertikalen Nuten zum Einspannen
von Vierkantrohren und winkligen Werkstü-
cken ausgestattet.
8.5 Einspannen von großen Objekten
(Spannbereich > 450 mm)
Zum Einspannen großer Werkstücke kann
die bewegliche Spannbacke umgedreht
werden, sodass der Spannbereich auf 956
mm vergrößert wird:
• Der Ver-, / Entriegelungsschalter (13)
wird in Entriegelungspositon gestellt
und sichergestellt, dass das Fußpedal
frei ist.
• Kontrollieren, dass die Verriegelungsla-
sche (14) für die bewegliche Klemmba-
cke sich in horizontaler Position
bendet.
• Schieben Sie die bewegliche Spannba-
cke (4) aus der Schiene.
• Drehen Sie die bewegliche Spannbacke
um 180° und schieben Sie sie wieder in
die Schiene ein.
• Der Spannbereich zwischen 450 mm
und 500 mm muss mit einem Distanz-
stück von mindestens 50 mm Breite,
z.B. einem Holzstück oder ähnlichem
Vollmaterial, überbrückt werden.
Warnung: Beim Einspannen von Werkstü-
cken bis zum maximalen Spannbereich
muss das Werkstück an der beweglichen
Spannbacke anliegen und parallel bleiben.
Achten Sie beim Bearbeiten langer oder
großer Werkstücke auf ausreichende
Standstabilität.
8.6 Tipps:
— Geben Sie bei Bedarf ein weiches Material
zwischen das Werkstück und die Spann-
backen, um Beschädigungen am Werk-
stück zu vermeiden.
— Spannen Sie das Werkstück nicht zu fest
ein.
— Achten Sie darauf, dass sich das Werk-
stück im Gleichgewicht bendet.

Deutsch
12
9. Reinigung und Wartung
Überprüfen Sie das Produkt vor jedem
Gebrauch auf Beschädigungen und ver-
schlissene Teile. Verwenden Sie die Werk-
bank nicht, wenn Teile beschädigt oder
verschlissen sind. Wenden Sie sich für den
Bezug von Ersatzteilen an den Lieferanten
oder Hersteller.
10. Aufbewahrung
Bewahren Sie die Croc Lock und das Zube-
hör an einem trockenen und frostsicheren
Ort auf.
11. Technische Daten
Belastbar bis:. . . . . . . . . . . . . . .100 kg
Standäche (stehend): . . . 95 × 88 × 86 cm
Maße (zusammengeklappt):
. . . . . . . . . . . . . . . . 82 × 24,5 × 31 cm
Arbeitshöhe: . . . . . . . . . . . . . . . 86 cm
Klemmbereich:. . . . . . . . . . 0 – 956 mm
Klemmkraft: . . . . . . . . . . . . . . 1000 kg
Produktgewicht ohne Zubehör: . . . 14,8 kg
12. Entsorgung
Entsorgen Sie die Verpackung sor-
tenrein. Geben Sie Pappe und Kar-
ton zum Altpapier, Folien in die
Wertstoff-Sammlung.
12.1 Produkt entsorgen
Entsorgen Sie das Produkt gemäß der in
Ihrem Land geltenden Bestimmungen und
Gesetze.

13
Français
Cher client
Les manuels d’utilisation contiennent des
consignes importantes pour la manipulation
de votre nouveau produit. Ils vous per-
mettent d’utiliser toutes les fonctions, d’évi-
ter des erreurs de compréhension et de
prévenir les dommages. Veuillez prendre le
temps de lire tranquillement ce manuel
d’utilisation et conservez-le jalousement
pour une consultation ultérieure.
Lisez toutes les consignes de sécurité!
Ce manuel contient des informations impor-
tantes sur l’utilisation et l’entretien de l’appa-
reil. Gardez ce manuel, car vous pourriez
avoir besoin de le relire. Ce manuel doit
accompagner l’appareil si son propriétaire
change.
1. Explication des symboles
Les symboles suivants sont utilisés dans le
manuel d’utilisation ou apposés sur le
produit:
AVERTISSEMENT : pour réduire les
risques de blessures, veuillez lire le
mode d‘emploi.
Indique un risque de blessures, un
danger mortel ou un risqué d’en-
dommagement de l’outil en cas du
non-respect des consignes de ce
mode d’emploi.
Portez des lunettes de protection.
Portez des gants de protection.
Recycler.
2. Consignes de sécurité
Il convient de respecter les
consignes de sécurité ci-dessous
pour éviter tout dysfonctionne-
ment, dommage ou blessure:
• Les matériaux d’emballage doivent être
éliminés avec précaution; les sacs en
plastique peuvent devenir un jouet mor-
tel pour les enfants.
• Maintenez la zone de travail propre et
bien éclairée. Un lieu de travail en
désordre ou mal éclairé augmente le
risque d’accidents.
• Restez vigilant, surveillez ce que vous
faites. Faites preuve de bon sens quand
vous utilisez un outil électroportatif.
N’utilisez pas un établi lorsque vous
êtes fatigué ou sous l’influence de dro-
gues, d’alcool ou de médicaments.
• Utilisez des équipements de sécurité.
Portez toujours des lunettes de protec-
tion. L’équipement de sécurité, notam-
ment un masque anti-poussière, des
chaussures de sécurité antidérapantes,
un casque de protection ou une protec-
tion auditive, utilisé dans des conditions
appropriées réduira les risques de bles-
sures corporelles.
• Adoptez une position confortable.
Adoptez une position stable et gardez
votre équilibre en permanence.
• Entretenez l’établi Vérifiez le désaligne-
ment ou la liaison des pièces mobiles,
la rupture des pièces et toute autre
condition pouvant affecter le fonction-
nement de l’établi. S’il est endommagé,
faites réparer l’établi avant de l’utiliser.
De nombreux accidents sont causés
par des outils mal entretenus.
• Utilisez l’établi conformément à ces
instructions et de la manière prévue
pour le type d’outil particulier, en tenant
compte des conditions de travail et du
travail à effectuer. L’utilisation de l’outil
pour des opérations différentes de
celles prévues pourrait entraîner une
situation dangereuse.
• Ne portez pas de vêtements amples ou
de bijoux qui pourraient se coincer en
travaillant sur l’établi.
• N’utilisez l’établi que pour l’usage
auquel il est destiné. N’utilisez pas l’éta-
bli comme échafaudage, échelle, tabou-
ret ou similaire.
• Tenez les personnes présentes et les
obstacles éloignés de la zone de travail.
• Utilisez l’établi sur un sol plat et solide
et assurez-vous que le sol peut suppor-
ter son poids ajouté à celui de la pièce.
• Ne dépassez pas les capacités de
charge maximales de l’établi mention-

Français
14
nées. Référez-vous aux caractéristiques
techniques.
• Lorsque vous travaillez sur des pièces
lourdes ou de grande taille, pensez à
demander l’aide d’une autre personne.
• N’utilisez pas l’établi si des pièces sont
endommagées ou pliées.
• Ne laissez pas tomber l’établi, ne le jetez
pas et ne l’utilisez pas à mauvais
escient.
• Vérifiez si toutes les vis de fixation et les
boutons sont bien serrés. Assurez-vous
que les pieds sont verrouillés avant
d’utiliser le Croc Lock.
• Faites attention au risque de bascule-
ment. Le Croc Lock peut basculer
lorsque vous travaillez avec des pièces
lourdes et de grande taille. Veillez tou-
jours à ce que la pièce à usiner soit bien
soutenue.
• N’utilisez le Croc Lock qu’aux fins pré-
vues. Toute autre utilisation est consi-
dérée comme un abus. Le fabricant
n’est pas responsable des dommages
ou blessures causés par une mauvaise
utilisation.
• N’utilisez que les accessoires recom-
mandés dans le manuel d’utilisation,
l’utilisation d’autres accessoires peut
entraîner des blessures.
• Rangez l’établi dans un endroit sec, à
l’abri de la poussière, de la saleté et du
gel. Gardez l’établi hors de portée des
enfants.
3. Avant la première utilisation
Avant le montage, veuillez vérifier que
toutes les pièces sont complètes. S’il
manque des pièces, ne retournez pas l’éta-
bli, mais contactez notre service
d’assistance.
Jetez le matériel d’emballage usagé ou
rangez-le hors de portée des enfants. Les
sachets en plastique, etc., peuvent devenir
des objets mortels entre les mains des
enfants.
4. Contenu de l’emballage
1× Croc Lock Compact
1× Guide d’utilisation
5. Utilisation prévue
Le Croc Lock est un établi multifonctionnel
destiné à de nombreuses applications telles
que le verrouillage de portes, cadres, clô-
tures, plaques de plafond, vélos, pièces
automobiles et toutes sortes d’autres
matériaux.
6. Assemblage
6.1 Placez le Croc Lock à l’envers sur le sol,
déverrouillez le levier de blocage du
pied arrière (5) et faites glisser le pied
arrière (6) de la position de rangement
dans la direction indiquée (voir Fig. B).
6.2 Dépliez complètement le pied arrière.
6.3 Faites glisser le pied arrière en position
et bloquez le levier de blocage du pied
arrière (5).
6.4 Dépliez la pédale (10) jusqu’à ce qu’elle
s’enclenche.
6.5 Dépliez les pieds avant (9) jusqu’à ce
qu’elles s’enclenchent.
6.6 Placez le Croc Lock à la verticale. Véri-
fiez que tous les pieds sont fermement
et correctement positionnés et vérifiez
que tout est bien verrouillé.
6.7 Tourner la mâchoire verrouillant (14) à
la position horizontaux et Croc Lock est
maintenant prêt à utiliser.
7. Pliage
Saisissez les instructions de montage dans
l’ordre inverse à partir de:
7.1 S’assurer que la serrure / le commuta-
teur de relâchement (13) est dans la
position verrouillée.
7.2 L’étiquette de la mâchoire en mouve-
ment verrouillant (14) est dans la posi-
tion (verticale) d’empêcher le glisse-
ment du mâchoire.
7.3 Placez le Croc Lock à l’envers sur le sol.
Déverrouillez les verrous des pieds
avant (12) et pliez les pieds avant.
7.4 Déverrouillez le verrou de la pédale (11)
et pliez la pédale.

15
Français
7.5 Déverrouillez le levier de blocage du
pied arrière (5) et placez le pied arrière
(6) en position de rangement et verrouil-
lez à nouveau le levier de blocage du
pied arrière.
7.6 Le pied arrière (6) peut être utilisé pour
soulever le Croc Lock en position pliée.
8. Fonctionnement
8.1 Serrage/blocage
• Vérier que la mâchoire en mouvement
verrouillant l’étiquette (14) est réglé à la
position horizontale et pousse la
mâchoire en mouvement (4) a l’arrière
jusqu’à ce que votre pièce de fabrication
soit entre les mâchoires.
• Placez la pièce à usiner contre la
mâchoire fixe (1) à l’avant.
• Faites glisser la mâchoire mobile (4)
contre la pièce à usiner. La mâchoire
mobile peut être déplacée à la main ou
à l’aide de la pédale.
• Faites glisser le bouton de blocage/
déblocage (13) vers le bas pour bloquer.
• Appuyez sur la pédale de commande
(10) vers le bas pour fixer solidement la
pièce à usiner.
8.2 Desserrage/déblocage
• Faites glisser le bouton de blocage/
déblocage (13) vers le haut.
• Appuyez sur la pédale (10) jusqu’à ce
qu’elle s’enclenche.
• Faites glisser la mâchoire mobile (4)
vers l’arrière.
Remarque: Appliquez la même pression
sur la pédale lors du déblocage que lors du
blocage.
Avertissement: Soutenez la pièce à usiner
de manière à ce qu’elle ne tombe pas lors-
qu’elle est débloquée.
8.3 Serrage d’un côté de la mâchoire
Dans certains cas, les pièces à usiner de
grandes dimensions ou de formes diffé-
rentes ne peuvent être fixées que d’un seul
côté des mâchoires. Éviter l’utilisation
excessive de la force de serrage.
8.4 Serrage de pièces à usiner carrées
Les mâchoires (2, 3) sont équipées de rai-
nures horizontales et verticales pour le
serrage de tubes carrés et de pièces
coudées.
8.5 Serrage d’objets de grande taille
(plage de serrage > 450mm)
Pour le serrage de pièces à usiner de grande
taille, la mâchoire mobile peut être inversée
de sorte que la plage de serrage est aug-
mentée à 956mm:
• Régler la serrure/ le
commutateur de relâchement (13) à la
position de (relâchement) et s’assure
que la pédale de pied est relâchée.
• Vérier que la mâchoire en mouvement
verrouillant l’étiquette (14) est dans la
position horizontale.
• Faites glisser la mâchoire mobile (4)
hors du rail.
• Tournez la mâchoire mobile de 180° et
faites-la glisser dans le rail.
• La plage de serrage entre 450mm et
500mm doit être franchie au moyen
d’une bobine d’au moins 50mm de
large, par exemple un morceau de bois
ou un matériau massif similaire.
Avertissement: Lors du serrage de pièces
à usiner jusqu’à la plage de serrage maxi-
male, la pièce doit reposer sur la mâchoire
mobile et rester parallèle.
Veillez à une stabilité suffisante lors de
l’usinage de pièces longues ou de grande
taille.
8.6 Astuces:
— Utilisez un matériau souple entre la pièce
à usiner et les mâchoires si nécessaire
pour éviter d’endommager la pièce à
usiner.
— N’appliquez pas trop de pression sur la
pièce à usiner.
— Assurez-vous que la pièce à usiner est en
équilibre.
9. Nettoyage et entretien
Avant chaque utilisation, vérifiez l’absence
de dommages sur les pièces usées. N’utili-
sez pas l’appareil s’il contient des pièces
endommagées ou usées. Contactez votre
fournisseur ou fabricant pour les pièces de
rechange.

Français
16
10. Nettoyage/Stockage
Rangez le Croc Lock et les accessoires
dans un endroit sec et à l’abri du gel.
11. Fiche technique
Max. capacité d’accueil: . . . . . . . .100 kg
Pied (debout): . . . . . . . . 95 × 88 × 86 cm
Pied (plié): . . . . . . . . . 82 × 24,5 × 31 cm
Hauteur de travail: . . . . . . . . . . . 86 cm
Capacité de serrage: . . . . . . 0 – 956 mm
Force de serrage: . . . . . . . . . . . 1000 kg
Poids du produit sans accessoires: 14,8 kg
12. Élimination et recyclage
Triez l‘emballage en le mettant au
rebut. Le papier et le carton doivent
être jetés avec le papier usagé,
tandis que les films plastiques sont à jeter
avec les matériaux recyclables.
12.1 Mise au rebut le produit
Mettre le produit au rebut conformément
aux dispositions et lois en vigueur dans
votre pays.

17
Nederlands
Geachte klant
Gebruikershandleidingen verstrekken nut-
tige tips m.b.t. gebruik van uw nieuwe appa-
raat. Ze helpen u alle functies te gebruiken,
misverstanden te voorkomen en beschadi-
ging te vermijden. Neem de tijd deze hand-
leiding zorgvuldig te lezen en bewaar het als
naslagwerk.
Lees alstublieft alle
veiligheidsinstructies!
Deze handleiding bevat belangrijke informa-
tie over het bedienen en hanteren van het
apparaat. Bewaar deze gebruiksaanwijzing
voor verdere verwijzing. Gelieve het samen
met het toestel door te geven als deze aan
derden wordt overhandigd.
1. Uitleg van de symbolen
De volgende symbolen worden gebruikt in
de gebruikershandleiding of op het product:
WAARSCHUWING – Lees de
gebruiksaanwijzing om het risico
op letsel te verminderen.
Gevaar voor lichamelijk letsel of
materiële schade wanneer de
instructies in deze handleiding niet
worden opgevolgd.
Draag een veiligheidsbril.
Draag veiligheidshandschoenen.
Recycle.
2. Veiligheidsvoorschriften
Let op de volgende veiligheidsin-
structies om storingen, schade of
lichamelijk letsel te voorkomen:
• Gooi de verpakkingsmaterialen zorgvul-
dig weg; de plastic zakken kunnen
dodelijk speelgoed voor kinderen
worden.
• Zorg voor een opgeruimde en goed
verlichte werkomgeving. Rommelige en
donkere werkomgevingen leiden tot
ongelukken.
• Blijf altijd alert, kijk goed wat u doet en
gebruik uw gezonde verstand wanneer
u de werkbank gebruikt. Gebruik de
werkbank niet wanneer u moe bent, of
drugs, alcohol of medicijnen hebt
gebruikt.
• Gebruik veiligheidsvoorzieningen. Draag
altijd een veiligheidsbril. Een gepast
gebruik van veiligheidsvoorzieningen,
zoals een stofmasker, speciale werk-
schoenen met antislip-zolen, een veilig-
heidshelm en gehoorbescherming ver-
kleinen de kans op persoonlijk letsel.
• Zorg dat u nooit uw evenwicht kunt
verliezen; houd altijd twee voeten stevig
op de vloer.
• Zorg voor een goed onderhoud van de
werkbank. Controleer of de bewegende
delen op de juiste wijze zijn vastgezet.
Controleer ook of er geen onderdelen
defect zijn of dat er andere omstandig-
heden zijn die van invloed kunnen zijn
op de werking van het gereedschap.
Laat het gereedschap bij beschadigin-
gen repareren vóór gebruik. Veel onge-
lukken worden veroorzaakt door slecht
onderhoud van het gereedschap.
• Gebruik de werkbank zoals aangegeven
in deze instructies en op de wijze waar-
voor het gereedschap is ontworpen.
Houd daarbij rekening met de werkom-
standigheden en de uit te voeren taak.
Gebruik van de werkbank voor handelin-
gen die afwijken van de taken waarvoor
het apparaat is ontworpen kunnen lei-
den tot gevaarlijke situaties.
• Draag geen loszittende kleding of siera-
den; deze kunnen vast komen te zitten
tijdens het werken met de werkbank.
• Gebruik de werkbank alleen voor het
beoogde doel. Gebruik de werkbank niet
als steiger, ladder of kruk.
• Houd omstanders en obstakels uit de
buurt van het werkgebied.
• Gebruik de werkbank op een stevige
vlakke ondergrond en zorg ervoor dat
de grond het gewicht van de werkbank
plus het gewicht van het werkstuk kan
dragen.
• Overschrijd de genoemde maximale
draagvermogen van de werkbank niet.
Raadpleeg de technische gegevens.

Nederlands
18
• Schakel bij het werken met zware of
grote werkstukken de hulp van een
andere persoon in.
• Gebruik de werkbank niet als er onder-
delen beschadigd of verbogen zijn.
• Laat de werkbank niet vallen, gooi er
niet mee en gebruik de werkbank niet
anderszins.
• Controleer of alle bevestiging schroeven
en knoppen stevig vast zitten. Contro-
leer of de poten zijn vergrendeld voordat
u de Croc Lock in gebruik neemt.
• Let op het risico van kantelen. Bij het
bewerken van grote en zware werkstuk-
ken kan de Croc Lock gaan kantelen.
Zorg er altijd voor dat het werkstuk
goed ondersteund wordt.
• Gebruik de Croc Lock alleen voor de
bestemde doeleinden. Elk ander gebruik
wordt als misbruik beschouwd. De
fabrikant is niet aansprakelijk voor
beschadiging of letsel als gevolg van
misbruik.
• Gebruik alleen accessoires zoals aanbe-
volen in de gebruikershandleiding, het
gebruik van andere accessoires kan
leiden tot letsel.
• Bewaar de werkbank op een droge
plaats die is beschermd tegen stof, vuil
en vorst. Bewaar de werkbank buiten
het bereik van kinderen.
3. Voor het eerste gebruik
Controleer, voor de montage, alle onderde-
len op volledigheid. Als er onderdelen ont-
breken, stuur de werkbank dan niet terug
maar neem contact op met onze
supportafdeling.
Gooi verpakkingsmateriaal weg of bewaar
het buiten bereik van kinderen. Plastic zak-
ken enz. kunnen dodelijk speelgoed voor
kinderen worden.
4. Inhoud van de verpakking
1× Croc Lock Compact
1× Gebruiksaanwijzing
5. Beoogd gebruik
De Croc Lock is een multifunctionele werk-
bank voor veel toepassingen zoals het klem-
men van deuren, kozijnen, hekwerken, pla-
fondplaten, etsen, auto-onderdelen en
allerlei andere materialen.
6. Montage
6.1 Plaats de Croc Lock ondersteboven op
de grond, draai de achterpoot vergren-
delhendel (5) los en schuif de achter-
poot (6) uit de opbergpositie in de rich-
ting als afgebeeld.
6.2 Klap de achterpoot volledig uit.
6.3 Schuif de achterpoot in positie en draai
de achterpoot vergrendelhendel (5)
vast.
6.4 Klap het voetpedaal (10) uit totdat deze
in positie klikt.
6.5 Klap de voorpoten (9) uit tot ze
vastklikken.
6.6 Plaats de Croc Lock rechtop. Controleer
of alle poten stevig en de correcte posi-
tie bevinden en controleer of alles goed
vergrendeld is.
6.7 Draai nu de ontgrendelschijf (14) in de
horizontale positie en de Croc Lock is
klaar voor gebruik.
7. Inklappen
Voer de montage instructies in omgekeerde
volgorde uit:
7.1 Let hierbij op dat de ver- / ontgrendel-
kop (13) op de ontgrendelde positie
staat.
7.2 Zet de ontgrendelschijf (14) verticaal
om de beweegbare klembek te zekeren.
7.3 Plaats de Croc Lock ondersteboven op
de grond. Ontgrendel de vergrendeling-
schuiven (12) van de voorpoten en klap
de voorpoten in.
7.4 Ontgrendel de vergrendeling (11) van
het voetpedaal en klap het voetpedaal
in.
7.5 Draai de achterpoot vergrendelhendel
(5) los en plaats de achterpoot (6) in de
opbergpositie en draai de achterpoot
vergrendelhendel weer vast.

19
Nederlands
7.6 De achterpoot (6) kan gebruikt worden
om de Croc Lock in ingeklapte positie te
tillen.
8. Bediening
8.1 Inklemmen / vergrendelen
• Controleer dat de vergrendelschijf (14)
in de horizontale positie staat. Schuif nu
de beweegbare klauw (4) naar achteren
totdat het werkstuk tussen de klembek-
ken past.
• Plaats het werkstuk tegen de vaste
klauw (1) op de voorzijde.
• Schuif de beweegbare klauw (4) tegen
het werkstuk. De beweegbare klauw kan
met de hand of met het voetpedaal
worden verschoven.
• Schuif de vergrendel/ontgrendelknop
(13) omlaag om te vergrendelen.
• Druk het voetpedaal (10) omlaag om
het werkstuk goed vast te klemmen.
8.2 Losmaken / ontgrendelen
• Schuif de vergrendel/ongrendelknop
(13) omhoog.
• Druk het voetpedaal (10) omlaag totdat
deze “klikt”
• Schuif de beweegbare klauw (4) naar
achteren.
Opmerking: Pas dezelfde druk toe op het
voetpedaal bij het ontgrendelen als bij het
vergrendelen.
Waarschuwing: Ondersteun het werkstuk
zodat het niet valt wanneer het werkstuk
wordt ontgrendeld.
8.3 Inklemmen op één zijde van de klauw
Grote werkstukken of werkstukken met een
afwijkende vorm kunnen in sommige geval-
len maar op één zijde van de klauwen wor-
den vastgezet. Vermijd hierbij overmatig
gebruik van de klemkracht.
8.4 Vierkante werkstukken inklemmen
De klauwen (2, 3) zijn voorzien van horizon-
tale en verticale groeven voor het klemmen
van vierkante buizen en gehoekte
werkstukken.
8.5 Inklemmen grote voorwerpen
(klembereik > 450mm)
Voor het inklemmen van grote werkstukken
kan de bewegende klauw omgekeerd wor-
den zodat het klembereik wordt vergroot tot
956mm:
• De ver- / ontgrendelknop (13) wordt in
de ontgrendel positie gezet, zodat het
voetpedaal in z’n vrij staat.
• Controleer dat de vergrendelschijf (14)
in de horizontale positie staat.
• Schuif de beweegbare klauw (4) uit de
rail.
• Draai de beweegbare klauw 180° en
schuif de klauw weer in de rail.
• Het klembereik tussen de 450mm en
500mm moeten worden overbrugd
door middel van een klos van minimaal
50mm breed, bijvoorbeeld een stuk
hout of dergelijk vast materiaal.
Waarschuwing: Bij het inklemmen van
werkstukken tot op het maximale klembe-
reik, moet het werkstuk op de bewegende
klauw rusten en parallel blijven.
Zorg bij het werken met lange of grote werk-
stukken voor voldoende stabiliteit.
8.6 Tips:
— Gebruik wanneer nodig een zacht materi-
aal tussen het werkstuk en de klauwen
om beschadiging aan het werkstuk te
voorkomen.
— Oefen niet teveel druk op het werkstuk uit.
— Zorg dat het werkstuk in balans is.
9. Reiniging en onderhoud
Controleer het product op schade over ver-
sleten onderdelen voor elk gebruik. Gebruik
het apparaat niet als er schade of versleten
onderdelen zijn. Neem contact op met uw
leverancier of fabrikant voor
reserveonderdelen.
10. Opslag
Bewaar de Croc Lock en de accessoires op
een droge en vorstvrije plek.

Nederlands
20
11. Technische gegevens
Max. belasting:. . . . . . . . . . . . . .100 kg
Afmetingen (staand): . . . . 95 × 88 × 86 cm
Afmetingen (ingeklapt):. .82 × 24,5 × 31 cm
Werkhoogte: . . . . . . . . . . . . . . . 86 cm
Klembereik:. . . . . . . . . . . . 0 – 956 mm
Klemkracht: . . . . . . . . . . . . . . 1000 kg
Gewicht zonder accessoires: . . . . 14,8 kg
12. Afvalverwerking en hergebruik
Voer de verpakking gescheiden af.
Doe papier en karton bij het oud
papier, folie in de
recycling-container.
12.1 Product afvoeren
Voer het product af overeenkomstig de
wetten en bepalingen van uw land.
Het product en de gebruiksaanwijzing kun-
nen wijzigen. De technische gegevens kun-
nen zonder voorafgaande aankondiging
worden gewijzigd.

21
Italiano
Gentile cliente
Leggendo accuratamente tutti i capitoli del
presente manuale nell'ordine presentato,
potrà acquisire dimestichezza con il cor-
retto uso del dispositivo. La invitiamo a
conservare queste istruzioni di utilizzo per
successive consultazioni.
Leggere tutte le istruzioni di sicurezza.
Il presente manuale contiene informazioni
importanti sull'utilizzo e la gestione del
dispositivo. La invitiamo a conservare que-
ste istruzioni di utilizzo per successive con-
sultazioni. In caso di trasferimento dell'unità
a terzi, dovrà essere ceduto anche il
manuale.
1. Spiegazione dei simboli
I seguenti simboli sono utilizzati nel
manuale di istruzioni e sul prodotto:
Avviso! Per ridurre il rischio di
lesioni, l'utente deve leggere le
istruzioni del presente manuale.
Indica il rischio di lesioni personali,
morte o danni all'apparecchio deri-
vante dal mancato rispetto delle
istruzioni contenute nel presente
manuale.
Indossare occhiali di sicurezza.
Indossare guanti di sicurezza.
Riciclaggio.
2. Note di sicurezza
Si raccomanda di prendere visione
delle seguenti note di sicurezza al
ne di evitare malfunzionamenti,
danni o lesioni siche:
• Smaltire i materiali di imballaggio con la
massima attenzione; i sacchetti in pla-
stica possono essere pericolosi per i
bambini.
• Assicurarsi che l'area di lavoro sia sem-
pre pulita e ben illuminata. Aree di lavoro
disordinate e buie favoriscono il gene-
rarsi di incidenti.
• Prestare attenzione, concentrarsi e usare
il buon senso quando si usa un utensile
elettrico. Non usare il banco da lavoro
quando si è stanchi o sotto l'inuenza di
droghe o farmaci.
• Usare i dispositivi di sicurezza. Indossare
sempre una protezione per gli occhi.
L'uso di dispositivi di protezione adeguati,
quali maschere antipolvere, scarpe anti-
scivolo, casco antinfortunistico o dispo-
sitivi per la protezione dell'udito, ridurrà il
rischio di lesioni siche.
• Non sporgersi. Mantenere sempre una
posizione e un equilibrio adeguati.
• Mantenere sempre il banco da lavoro in
buone condizioni. Vericare l'assenza di
disallineamenti o blocchi delle parti in
movimento, rotture e qualsiasi altra con-
dizione che possa inuire sul funziona-
mento del banco da lavoro. Se danneg-
giato, fare riparare il banco da lavoro
prima di utilizzarlo. Molti incidenti sono
causati da utensili in cattivo stato di
manutenzione.
• Usare il banco da lavoro nel rispetto delle
presenti istruzioni e secondo le modalità
di utilizzo previste per questo particolare
utensile, tenendo conto delle condizioni
di lavoro e del tipo di intervento da ese-
guire. L'uso dell'utensile per applicazioni
diverse da quelle previste può generare
situazioni pericolose.
• Non indossare abiti larghi o gioielli, in
quanto possono rimanere impigliati nel
banco da lavoro durante l'uso.
• Utilizzare il banco da lavoro solo per l'uso
previsto. Non utilizzare il banco da lavoro
come ponteggio, scala, sgabello o altro.
• Tenere gli astanti ed eventuali ostacoli
lontano dall'area di lavoro.
• Utilizzare il banco da lavoro su un terreno
stabile e livellato, assicurandosi che
possa sostenere il peso del banco da
lavoro e del pezzo da lavorare.
• Non superare le capacità di carico mas-
sime specicate per il banco da lavoro.
Fare riferimento ai dati tecnici.
• Quando si lavora su pezzi pesanti o di
grandi dimensioni, si raccomanda di
richiedere l'intervento di un'altra persona.

Italiano
22
• Non utilizzare il banco da lavoro se pre-
senta parti danneggiate o piegate.
• Non far cadere il banco da lavoro, non
lanciarlo e non utilizzarlo in modo
improprio.
• Vericare che tutte le vite di ssaggio e le
manopole siano ben strette. Assicurarsi
che le gambe siano bloccate in posizione
prima di utilizzare il Croc Lock.
• Fare attenzione durante l'uso, poiché vi è
il rischio di ribaltamento. Il Croc Lock può
ribaltarsi se si lavora su pezzi pesanti e di
grandi dimensioni. Assicurarsi sempre
che il pezzo da lavorare sia ssato e
sostenuto correttamente.
• Utilizzare il Croc Lock solo per gli usi
previsti. Ogni altro utilizzo sarà conside-
rato un uso improprio. Il produttore non
sarà responsabile per eventuali danni o
lesioni derivanti da un uso improprio.
• Utilizzare solo gli accessori raccoman-
dati nel manuale dell'utente; l'uso di
accessori diversi può causare lesioni.
• Riporre il banco da lavoro in un ambiente
asciutto e al riparo da polvere, sporco e
gelo. Tenere il banco da lavoro fuori dalla
portata dei bambini.
3. Operazioni preliminari al primo
uso del prodotto
Prima del montaggio, vericare che siano
presenti tutte le parti. In caso di parti man-
canti, non restituire il banco da lavoro ma
contattare il servizio assistenza.
Smaltire correttamente il materiale e tenerlo
fuori dalla portata dei bambini. I sacchetti di
plastica, ecc. possono diventare un gioco
pericoloso per i bambini.
4. Contenuto della confezione
1 Croc Lock Compact
1 manuale di istruzioni
5. Destinazione d'uso
Il Croc Lock è un banco da lavoro multifun-
zione per diverse applicazioni, quali il ssag-
gio di porte, cornici, recinzioni, piastre a
softto, biciclette, parti di automobili e altri
tipi di materiali.
6. Montaggio
6.1 Capovolgere il Croc Lock a terra, sbloc-
care la leva di bloccaggio (5) della
gamba posteriore e fare scorrere la
gamba posteriore (6) estendendola
dalla posizione di inutilizzo nella dire-
zione indicata.
6.2 Estrarre e aprire completamente la
gamba posteriore.
6.3 Una volta raggiunta la posizione deside-
rata, bloccare la leva di bloccaggio (5)
della gamba posteriore.
6.4 Aprire il pedale (10) no a farlo scattare
in posizione.
6.5 Piegare le gambe anteriori (9) nché
non scattano in posizione.
6.6 Mettere il Croc Lock in posizione verti-
cale. Controllare che tutte le gambe
siano ben salde e posizionate corretta-
mente e vericare che ogni compo-
nente sia bloccato.
6.7 Ruotare la linguetta di bloccaggio della
ganascia mobile (14) in posizione oriz-
zontale e il Croc Lock è ora pronto per
l’uso.
7. Chiusura
Seguire le istruzioni di assemblaggio in
ordine inverso:
7.1 Assicurarsi che l’interruttore di blocco/
sblocco (13) sia in “posizione di
sblocco”.
7.2 La linguetta di bloccaggio della gana-
scia mobile (14) è in posizione “verti-
cale” per evitare che la ganascia scivoli
fuori.
7.3 Capovolgere il Croc Lock a terra. Sbloc-
care i blocchi (12) delle gambe anteriori
e richiuderle.
7.4 Sbloccare il blocco del pedale (11) e
richiudere il pedale.
7.5 Sbloccare la leva di bloccaggio (5) della
gamba posteriore e portare la gamba
posteriore (6) in posizione di inutilizzo,
quindi bloccare nuovamente la leva di
bloccaggio della gamba posteriore.
7.6 La gamba posteriore (6) può essere
utilizzata per sollevare il Croc Lock una
volta richiuso.

23
Italiano
8. Uso
8.1 Fissaggio/Bloccaggio
• Vericare che la linguetta di bloccaggio
della ganascia mobile (14) sia impostata
in posizione orizzontale e spingere indie-
tro la ganascia mobile (4) nché il pezzo
da lavorare non si inserisce tra le
ganasce.
• Posizionare il pezzo da lavorare contro la
ganascia ssa (1) nella parte anteriore.
• Far scorrere la ganascia mobile (4) con-
tro il pezzo da lavorare. La ganascia
mobile può essere spostata manual-
mente o con il pedale.
• Far scorrere il pulsante di blocco/sblocco
(13) verso il basso per bloccarlo.
• Spingere il pedale (10) verso il basso per
ssare saldamente il pezzo dal lavorare.
8.2 Allentamento/Sblocco
• Fare scorrere il pulsante di blocco/
sblocco (13) verso l'alto.
• Spingere il pedale (10) verso il basso e
farlo scattare in posizione.
• Fare scorrere all'indietro la ganascia
mobile (4).
Nota: applicare la stessa pressione sul
pedale sia per sbloccarlo sia per bloccarlo.
Avvertenza: sostenere il pezzo da lavorare
in modo che non cada quando non è
bloccato.
8.3 Fissaggio su un lato della ganascia
I pezzi da lavorare di grandi dimensioni o di
forme diverse possono in alcuni casi essere
ssati solo su un lato delle ganasce. Evitare
di applicare una forza di serraggio
eccessiva.
8.4 Fissaggio di pezzi da lavorare quadrati
I cuscinetti delle ganasce (2, 3) sono dotati
di scanalature orizzontali e verticali per il
ssaggio di tubi quadrati e pezzi da lavorare
angolari.
8.5 Fissaggio di oggetti di grandi
dimensioni
(intervallo di ssaggio > 450 mm)
Se occorre ssare pezzi di grandi dimen-
sioni, la ganascia mobile può essere capo-
volta, in modo da aumentare l'intervallo di
ssaggio no a 956 mm:
• Impostare l’interruttore di blocco/
sblocco (13) in posizione “rilascio” e
assicurarsi che il pedale sia rilasciato.
• Vericare che la linguetta di bloccaggio
della ganascia mobile (14) sia in posi-
zione orizzontale.
• Far scorrere la ganascia mobile (4) fuori
dalla guida.
• Ruotare la ganascia mobile di 180° e
farla scorrere nuovamente sulla guida.
• Se l'intervallo di ssaggio è compreso tra
450 mm e 500 mm, occorre creare un
ponte di collegamento di almeno 50 mm,
ad esempio utilizzando un pezzo di legno
o un materiale solido simile.
Avvertenza: Per ssare pezzi da lavorare
che raggiungono l'intervallo massimo di
ssaggio, il pezzo deve essere appoggiato
sulla ganascia mobile in modo che sia
parallelo.
Garantire una stabilità sufciente quando si
lavora su pezzi lunghi o larghi.
8.6 Suggerimenti:
— Se necessario, inserire un materiale mor-
bido tra il pezzo da lavorare e le ganasce,
per evitare di danneggiare il pezzo da
lavorare.
— Non esercitare una pressione eccessiva
sul pezzo da lavorare.
— Assicurarsi che il pezzo da lavorare sia
stabile.
9. Pulizia e manutenzione
Prima di ogni utilizzo, vericare che non vi
siano parti danneggiate o usurate. Non
utilizzare il dispositivo se sono presenti parti
danneggiate o usurate. Contattare il forni-
tore o il produttore per richiedere i pezzi di
ricambio.
10. Conservare il prodotto
Riporre il Croc Lock e gli accessori in un
ambiente asciutto e al riparo dal gelo.

Italiano
24
11. Dati tecnici
Peso massimo: . . . . . . . . . . . . .100 kg
Ingombro (in piedi): . . . . . 95 × 88 × 86 cm
Dimensioni (chiuso):. . . .82 × 24,5 × 31 cm
Altezza di lavoro:. . . . . . . . . . . . .86 cm
Intervallo di ssaggio:. . . . . . 0 – 956 mm
Forza di serraggio:. . . . . . . . . . .1000 kg
Peso prodotto senza accessori:. . . 14,8 kg
12. Smaltimento
Smaltire l'imballaggio differen-
ziando i singoli materiali. Smaltire il
cartone e la carta con i normali
riuti e le pellicole attraverso il servizio di
raccolta di materiale riciclabile.
12.1 Smaltimento del prodotto
Smaltire il prodotto in conformità con le
leggi e le normative applicabili nel paese di
utilizzo.
Il prodotto e il manuale dell'utente possono
essere soggetti a modiche. I dati tecnici
possono essere modicati senza preavviso.

25
Español
Estimado cliente:
Familiarícese con el uso adecuado del apa-
rato leyendo todos los capítulos de este
manual en el orden en el que se presentan.
Conserve estas instrucciones para poder
consultarlas con posterioridad.
¡Lea todas las instrucciones de seguridad!
Esta manual contiene información impor-
tante acerca de cómo operar y manipular el
aparato. Conserve estas instrucciones para
poder consultarlas con posterioridad. Si le
cede el aparato a un tercero, entréguele
también este manual.
1. Explicación de los símbolos
Los símbolos siguientes aparecen en el
manual de usuario o en el producto:
¡Advertencia! Lea el manual de
instrucciones para reducir el riesgo
de lesiones personales.
Indica el riesgo de lesiones perso-
nales, muerte o daño de la herra-
mienta en caso de no observar las
instrucciones recogidas en este
manual.
Utilizar gafas de seguridad.
Utilizar guantes de seguridad.
Reciclar.
2. Instrucciones de seguridad
Tenga en cuenta las siguientes
instrucciones de seguridad para
evitar un mal funcionamiento,
daños o lesiones personales:
• Elimine cuidadosamente el material de
embalaje: las bolsas de plástico entrañan
un peligro mortal para los niños.
• Mantenga el área de trabajo limpia y bien
iluminada. Las zonas desordenadas y
oscuras suponen una invitación a los
accidentes.
• Manténgase alerta, preste atención a lo
que hace y use el sentido común al usar
una herramienta eléctrica. No utilice un
banco de trabajo si está cansado o bajo
los efectos del alcohol, medicamentos o
drogas.
• Utilice equipos de seguridad apropiados.
Utilice protección ocular en todo
momento. Los equipos de seguridad
como las mascarillas antipolvo, los zapa-
tos de seguridad antideslizantes, los
cascos o los protectores auditivos utili-
zados en condiciones adecuadas redu-
cen el riesgo de lesiones personales.
• No se extralimite al usar una herramienta
eléctrica. Mantenga un buen punto de
apoyo y equilibrio en todo momento.
• Mantenga el banco de trabajo en buen
estado. Compruebe que no haya desali-
neación, atascamientos, roturas ni cual-
quier otra condición desfavorable en las
piezas móviles que puedan afectar el
funcionamiento del banco de trabajo. En
caso de avería, haga reparar el banco de
trabajo antes de usarlo. Muchos acciden-
tes son debidos a un mal mantenimiento
de las herramientas.
• Utilice el banco de trabajo según lo reco-
gido en estas instrucciones y de la forma
prevista para el tipo particular de herra-
mienta, teniendo en cuenta las condicio-
nes de trabajo y el trabajo que se ha de
realizar. El uso de la herramienta en apli-
caciones diferentes a las previstas puede
dar lugar a situaciones peligrosas.
• No utilice ropa holgada ni joyas, ya que
podrían quedar atrapadas mientras usa
el banco de trabajo.
• Utilice el banco de trabajo solo para los
nes previstos. No utilice el banco de
trabajo como andamio, escalera, tabu-
rete, etc.
• Mantenga el área de trabajo libre de
transeúntes y obstáculos.
• Utilice el banco de trabajo sobre un suelo
rme, nivelado y que soporte el peso del
banco de trabajo más el peso de la pieza
de trabajo.
• No exceda la carga máxima especicada
para el banco de trabajo. Consulte la
cha de datos técnicos.
• Al trabajar con piezas pesadas o gran-
des, considere la posibilidad de contar
con otra persona para que le ayude.

Español
26
• No utilice el banco de trabajo si cual-
quiera de sus partes está dañada o
doblada.
• Evite golpear el banco de trabajo al mani-
pularlo y utilícelo de forma adecuada.
• Compruebe que todos los tornillos de
jación y los botones estén bien apreta-
dos. Asegúrese de que las patas estén
bloqueadas antes de usar el banco de
trabajo Croc Lock.
• Tenga en cuenta el riesgo de inclinación.
El banco de trabajo Croc Lock podría
inclinarse durante la realización de un
trabajo debido a una pieza muy grande y
pesada. Siempre asegúrese de que la
pieza de trabajo esté bien asegurada.
• Utilice el banco de trabajo Croc Lock
solo para los nes previstos. Cualquier
otro uso se considera como un trato
incorrecto. El fabricante no se hace res-
ponsable de ningún daño o lesión que se
derive de un uso indebido.
• Utilice únicamente los accesorios reco-
mendados en el manual de usuario; el
uso de otros accesorios puede dar lugar
a lesiones personales.
• Siempre guarde el banco de trabajo en
un lugar seco y al resguardo del polvo, la
suciedad y las heladas. Mantenga el
banco de trabajo fuera del alcance
de los niños.
3. Antes de usar por primera vez
Antes de proceder al montaje, compruebe
que dispone de todas las piezas. En caso de
faltar alguna pieza, en lugar de devolver el
banco de trabajo, póngase en contacto con
el Departamento de Asistencia.
Elimine el material de embalaje o guárdelo
fuera del alcance de los niños. Los materia-
les como las bolsas plásticas entrañan un
riesgo de muerte para los niños que jue-
guen con ellas.
4. Contenido del paquete
1 banco de trabajo Croc Lock Compact
1 manual de instrucciones
5. Uso previsto
El banco de trabajo multifuncional Croc
Lock se puede usar en diversas aplicacio-
nes, por ejemplo, para la sujeción de puer-
tas, marcos, cercas, placas de techo, partes
de vehículos y todo tipo de materiales.
6. Montaje
6.1 Coloque el banco de trabajo Croc Lock
bocabajo sobre el suelo, desbloquee la
palanca de bloqueo de la pata trasera
(5) y deslice la pata trasera (6), desde la
posición de almacenamiento, en la
dirección que se muestra.
6.2 Despliegue completamente la pata
trasera.
6.3 Deslice la pata trasera hasta colocarla
en posición y bloquéela mediante la
palanca de bloqueo (5).
6.4 Despliegue el pedal (10) hasta oír un
clic indicativo de que ha calzado en
posición.
6.5 Despliegue las patas delanteras (9)
hasta que encajen en su posición.
6.6 Coloque el banco de trabajo Croc Lock
de pie, sobre sus patas. Compruebe
que todas las patas estén rmes y en
posición correcta. Compruebe también
que todo esté bien asegurado.
6.7 Gire la lengüeta de bloqueo de la mor-
daza móvil (14) a la posición horizontal
y el Croc Lock ahora está listo para
usar.
7. Plegado
Siga las instrucciones de montaje en orden
inverso:
7.1 Asegúrese de que el interruptor de blo-
queo/liberación (13) esté en la “posición
de desbloqueo”.
7.2 La lengüeta de bloqueo de la mordaza
móvil (14) está en posición “vertical”
para evitar que la mordaza se deslice
hacia afuera.
7.3 Coloque el banco de trabajo bocabajo
sobre el suelo. Libere los seguros de las
patas delanteras (12) y pliéguelas.
7.4 Libere el seguro de pedal (11) y
pliéguelo.

27
Español
7.5 Desbloquee la palanca de bloqueo de la
pata trasera (5), coloque la pata trasera
(6) en posición de almacenamiento y,
seguidamente, vuelva a bloquear la
palanca de bloqueo de la pata trasera.
7.6 La pata trasera (6) puede usarse para
levantar el banco de trabajo Croc Lock y
plegarlo.
8. Utilización
8.1 Sujeción/bloqueo
• Verique que la lengüeta de bloqueo de
la mordaza móvil (14) esté en posición
horizontal y empuje la mordaza móvil (4)
hacia atrás hasta que la pieza de trabajo
encaje entre las mordazas.
• Coloque la pieza de trabajo contra la
mordaza ja (1) ubicada en la parte
frontal.
• Deslice la mordaza móvil (4) contra la
pieza de trabajo. La mordaza móvil
puede moverse con la mano o mediante
el pedal.
• Deslice el seguro (13) hacia abajo para
bloquear.
• Pise el pedal (10) para asegurar la pieza
de trabajo.
8.2 Aojamiento/desbloqueo
• Deslice el seguro (13) hacia arriba.
• Pise el pedal (10) hasta oír un clic.
• Deslice la mordaza móvil (4) hacia atrás.
Nota: Aplique la misma presión en el pedal
para desbloquear y bloquear.
Advertencia: Sujete la pieza de trabajo, de
manera que no se caiga al liberarla de las
mordazas.
8.3 Sujeción en un lado de la mordaza
En algunos casos, las piezas de trabajo
grandes o con formas diferentes solo pue-
den asegurarse en un lado de las mordazas.
Evite el uso de una fuerza excesiva de
sujeción.
8.4 Sujeción de piezas de trabajo
cuadradas
Las almohadillas (2, 3) de las mordazas
están equipadas con ranuras horizontales y
verticales para sujetar tubos cuadrados y
piezas de trabajo en ángulo.
8.5 Sujeción de objetos grandes
(Intervalo de sujeción > 450 mm)
Para sujetar piezas de trabajo grandes, la
mordaza móvil puede invertirse para
aumentar el intervalo de sujeción hasta
956mm:
• Coloque el interruptor de bloqueo/libera-
ción (13) en la posición de “liberación” y
asegúrese de que el pedal esté liberado.
• Vericar que la lengüeta de bloqueo de la
mordaza móvil (14) esté en posición
horizontal.
• Deslice la mordaza móvil (4) hasta
extraerla del riel.
• Gire la mordaza móvil 180º y deslícela
nuevamente en el riel.
• El intervalo de sujeción entre 450mm y
500mm debe cubrirse mediante un
carrete de al menos 50mm de ancho,
por ejemplo, una pieza de madera o un
material sólido similar.
Advertencia: Al sujetar piezas de trabajo
hasta el intervalo de sujeción máximo, la
pieza de trabajo debe descansar sobre la
mordaza móvil y permanecer paralela a ella.
Asegúrese de que el banco de trabajo esté
debidamente estabilizado al trabajar con
piezas de trabajo largas o grandes.
8.6 Consejos:
— Si fuera necesario utilice un material
suave entre la pieza de trabajo y las mor-
dazas para evitar dañar la pieza de
trabajo.
— No aplique demasiada presión sobre la
pieza de trabajo.
— Asegúrese de que la pieza de trabajo esté
bien equilibrada.
9. Limpieza y mantenimiento
Revise el producto en busca de daños en
piezas desgastadas antes de cada uso. No
utilice el banco de trabajo si alguna de sus
piezas está dañada o desgastada. Póngase
en contacto con su distribuidor o el fabri-
cante para hacer el pedido de los recambios
necesarios.

Español
28
10. Almacenamiento
Guarde el banco de trabajo Croc Lock y sus
accesorios en un lugar seco y protegido de
las heladas.
11. Datos técnicos
Peso máx.: . . . . . . . . . . . . . . . .100 kg
Dimensiones (de pie): . . . . . 95 × 88 × 86 cm
Dimensiones (plegado): . . . 82 × 24,5 × 31 cm
Altura de trabajo: . . . . . . . . . . . . 86 cm
Intervalo de sujeción: . . . . . . . 0-956mm
Fuerza de sujeción: . . . . . . . . . . 1000 kg
Peso del producto sin accesorios: . 14,8 kg
12. Eliminación
Deseche el embalaje clasicándolo
por tipos de materiales. Deseche el
cartón de la misma forma que el
papel de desecho mediante el correspon-
diente servicio de recolección de material
reciclable.
12.1 Eliminación del producto
Elimine el producto de conformidad con las
leyes y reglamentos aplicables en su país.
Tanto el producto como el manual de usua-
rio están sujetos a cambios. Los datos téc-
nicos pueden cambiar sin previo aviso.

29
Português
Estimado cliente
Familiarize-se com a utilização adequada
do dispositivo através da leitura e cumpri-
mento de cada capítulo deste manual, pela
ordem apresentada. Guarde estas instru-
ções de utilização para consulta futura.
Leia todas as instruções relacionadas
com a segurança!
Este manual contém informações impor-
tantes sobre a utilização e manuseamento
do dispositivo. Guarde estas instruções de
utilização para consulta futura. Entregue-as
juntamente com a unidade caso empreste o
equipamento a terceiros.
1. Explicação dos símbolos
O seguintes símbolos são utilizados no
manual do utilizador ou no produto:
Aviso! Para reduzir o risco de
lesões, o utilizador deve ler o
manual de instruções.
Indica risco de lesões corporais,
morte ou danos no equipamento no
caso de não observância das ins-
truções neste manual.
Utilize óculos de proteção.
Utilize luvas de proteção.
Recicle.
2. Notas de segurança
Tenha em atenção as seguintes
notas de segurança para evitar
avarias, danos ou ferimentos:
• Elimine os materiais de embalamento
com cuidado; os sacos de plástico
podem ser um brinquedo fatal para as
crianças.
• Mantenha a área de trabalho limpa e
bem iluminada. Zonas desorganizadas e
escuras propiciam a ocorrência de
acidentes.
• Mantenha-se alerta, veja aquilo que está
a fazer e aplique bom senso sempre que
utilizar uma ferramenta elétrica. Não
utilize uma bancada de trabalho se esti-
ver cansado ou sob a inuência de
álcool, drogas ou medicação.
• Utilize equipamento de segurança. Utilize
sempre proteção ocular. O equipamento
de segurança, como máscaras antipó,
calçado de segurança antiderrapante,
capacete de proteção ou proteção audi-
tiva utilizados em condições adequadas,
reduzirão a ocorrência de ferimentos.
• Não tente alcançar locais fora do seu
alcance. Mantenha sempre uma posição
rme e pleno equilíbrio.
• Realize a manutenção da bancada de
trabalho. Verique se existem desalinha-
mentos ou retenção das peças móveis,
peças partidas e quaisquer outras condi-
ções que possam afetar a operação da
bancada de trabalho. Se danicada,
solicite a reparação da bancada de tra-
balho antes da sua utilização. Muitos
acidentes são causados pela má manu-
tenção das ferramentas.
• Utilize a bancada de trabalho de acordo
com estas instruções e da forma pre-
vista para o tipo de ferramenta em ques-
tão, tendo em conta as condições de
trabalho e a tarefa a realizar. A utilização
da ferramenta para outras operações
que não as previstas pode resultar numa
situação perigosa.
• Não utilize roupa larga ou joias, pois
podem enredar-se enquanto trabalha na
bancada de trabalho.
• Utilize a bancada de trabalho apenas
para o seu m previsto. Não utilize a
bancada de trabalho como escadote,
escada, banco ou semelhantes.
• Mantenha as pessoas nas imediações e
obstáculos afastados da área de
trabalho.
• Utilize a bancada de trabalho num piso
sólido e nivelado, e certique-se de que
consegue transportar o peso da ban-
cada de trabalho mais o peso da peça a
trabalhar.
• Não exceda as capacidades de carga
máxima mencionadas para a bancada
de trabalho. Consulte os dados técnicos.

Português
30
• Quando trabalhar com peças pesadas
ou de grandes dimensões pondere solici-
tar a ajuda de outra pessoa.
• Não utilize a bancada de trabalho se
alguma peça estiver danicada ou
dobrada.
• Não deixe cair nem atire com a bancada
de trabalho, nem a sujeite a qualquer tipo
de utilização incorreta.
• Verique se todos os parafusos de xa-
ção e manípulos estão apertados. Certi-
que-se de que as pernas estão bloquea-
das antes de usar o Croc Lock.
• Tenha em atenção o risco de inclinação.
O Croc Lock pode pender quando traba-
lha com peças pesadas e de grandes
dimensões. Garanta sempre que a peça
de trabalho está bem apoiada.
• Utilize o Croc Lock apenas para o seu
m previsto. Qualquer outro uso é consi-
derado incorreto. O fabricante não é
responsável por danos ou ferimentos
causados por algum uso incorreto.
• Utilize os acessórios apenas conforme
recomendado no manual do utilizador; a
utilização de outros acessórios pode
resultar em ferimentos.
• Guarde a bancada de trabalho num local
seco, protegido do pó, da sujidade e do
gelo. Mantenha a bancada de trabalho
fora do alcance das crianças.
3. Antes da primeira utilização
Antes da montagem, verique se todas as
peças estão completas. Se existem peças
em falta, não devolva a bancada de trabalho
e contacte o nosso departamento de
suporte técnico.
Elimine os materiais de embalamento utili-
zados ou guarde-os fora do alcance das
crianças. Os sacos de plástico, etc., podem
constituir um perigo fatal para as crianças.
4. Conteúdo da embalagem
1× Croc Lock Compact
1x Manual de instruções
5. Utilização prevista
O Croc Lock é uma bancada de trabalho
multifuncional para diversas aplicações
como, por exemplo, o aperto de portas,
estruturas, cercas, placas de tetos, bicicle-
tas, peças automóveis e todo o tipo de
materiais.
6. Montagem
6.1 Coloque o Croc Lock virado ao contrá-
rio no chão, desbloqueie a alavanca de
bloqueio da perna traseira (5) e faça
deslizar a perna traseira (6) a partir da
posição de armazenamento, na direção
indicada.
6.2 Estenda completamente a perna
traseira.
6.3 Faça deslizar a perna traseira para a
sua posição e bloqueie a alavanca de
bloqueio da perna traseira (5).
6.4 Estenda o pedal de pé (10) até encaixar
na sua posição.
6.5 Dobre as pernas dianteiras (9) até
encaixarem na posição.
6.6 Coloque o Croc Lock na vertical. Veri-
que se todas as pernas estão rmes e
na posição correta e verique se tudo
está bloqueado (ver Fig. H).
6.7 Gire a aba de travamento da garra
móvel (14) para a posição horizontal e o
Croc Lock está pronto para uso.
7. Encartamento
Aplique as instruções de montagem na
ordem inversa:
7.1 Certique-se de que o interruptor de
bloqueio/desbloqueio (13) está na
“posição de desbloqueio”
7.2 A aba de travamento da garra móvel
(14) está na posição “vertical” para
evitar que a garra deslize para fora.
7.3 Coloque o Croc Lock virado ao contrá-
rio no chão. Desbloqueie os bloqueios
da perna dianteira (12) e dobre as per-
nas dianteiras.
7.4 Desbloqueie o bloqueio do pedal de pé
(11) e dobre o pedal de pé para dentro.
7.5 Desbloqueie a alavanca de bloqueio da
perna traseira (5) e coloque a perna
traseira (6) na posição de armazena-

31
Português
mento, e bloqueie novamente a ala-
vanca de bloqueio da perna traseira.
7.6 A perna traseira (6) pode ser usada
para levantar o Croc Lock da posição
dobrada.
8. Operação
8.1 Fixação/bloqueio
• Verique se a aba de travamento da
garra móvel (14) está na posição hori-
zontal e empurre a garra móvel (4) para
trás até que a peça de trabalho se
encaixe entre as garras.
• Coloque a peça de trabalho encostada à
maxila xa (1) na parte dianteira.
• Faça deslizar a maxila móvel (4) contra a
peça de trabalho. A maxila móvel pode
ser movida manualmente ou com o
pedal do pé.
• Deslize o botão de bloqueio/desbloqueio
(13) para baixo, para bloquear.
• Prima o pedal do pé (10) para xar a
peça de trabalho rmemente.
8.2 Soltar/desbloquear
• Faça deslizar o botão de bloqueio/des-
bloqueio (13) para cima.
• Prima o pedal do pé (10) até ouvir um
"clique".
• Faça deslizar a maxila móvel (4) para
trás.
Nota: aplique a mesma pressão no pedal do
pé quando desbloquear ou bloquear.
Aviso: apoie a peça de trabalho para que
esta não caia quando não estiver
bloqueada.
8.3 Fixação num dos lados da maxila
Peças de trabalho de grandes dimensões
ou com uma forma distinta podem, em
alguns casos, ser xadas apenas num dos
lados da maxila. Evite aplicar uma força de
aperto excessiva.
8.4 Fixação de peças de trabalho
quadradas
As almofadas das maxilas (2, 3) estão equi-
padas com ranhuras horizontais e verticais
para xação de tubos quadrados e peças
de trabalho com ângulos.
8.5 Fixação de objetos de grandes
dimensões
(intervalo de xação> 450 mm)
Para xar peças de trabalho, a maxila móvel
pode ser invertida para que o intervalo de
xação aumente para 956 mm:
• Coloque o interruptor de bloqueio/des-
bloqueio (13) na posição “soltar” e certi-
que-se de que o pedal está solto.
• Verique se a aba de travamento da
garra móvel (14) está na posição
horizontal.
• Faça deslizar a maxila móvel (4) para
fora da calha.
• Gire a maxila móvel em 180° e faça desli-
zar a maxila novamente para a calha.
• O intervalo de xação entre 450 e 500
mm tem de ser transposto por meio de
um rolo com uma largura de, pelo
menos, 50 mm, por exemplo, uma peça
de madeira ou de um material sólido
semelhante.
Aviso: Ao xar peças de trabalho até ao
intervalo máximo de xação, a peça de
trabalho tem de se apoiar na maxila móvel,
mantendo-se paralela.
Certique-se de que tem suciente estabili-
dade quando trabalha com peças compri-
das ou de grandes dimensões.
8.6 Sugestões:
— Se necessário, utilize um material macio
entre a peça de trabalho e as maxilas
para prevenir danos na peça de trabalho.
— Não aplique demasiada pressão sobre a
peça de trabalho.
— Certique-se de que a peça de trabalho
está equilibrada.
9. Limpeza e manutenção
Antes de cada utilização, verique se o
produto apresenta danos ou peças desgas-
tadas. Não utilize o dispositivo se as peças
estiverem danicadas ou gastas. Contacte
o seu fornecedor ou fabricante para obter
peças sobresselentes.
10. Armazenamento
Guarde o Croc Lock e os acessórios num
local seco e sem gelo.

Português
32
11. Dados técnicos
Peso máx.: . . . . . . . . . . . . . . . .100 kg
Pegada (de pé): . . . . . . . . . 95 × 88 × 86 cm
Dimensões (dobrado): . . . .82 × 24,5 × 31 cm
Altura de trabalho:. . . . . . . . . . . .86 cm
Intervalo de xação:. . . . . . . 0 – 956 mm
Força de xação: . . . . . . . . . . . 1000 kg
Peso do produto sem acessórios: . 14,8 kg
12. Eliminação
Eliminação da embalagem por
separação individual por tipos de
material. Elimine o cartão junta-
mente com o lixo de papel e as películas
metalizadas através do serviço de recolha
de material reciclável.
12.1 Eliminação do produto
Elimine o produto de acordo com a legisla-
ção e regulamentos aplicáveis do seu país.
O produto e o manual do utilizador podem
ser sujeitos a alterações. Os dados técnicos
podem ser alterados sem aviso prévio.

33
Polski
Szanowny Kliencie!
Prosimy o zapoznanie się z prawidłowym
użyciem urządzenia poprzez przeczytanie
każdego z poniższych rozdziałów instrukcji,
w podanej kolejności. Zachować instrukcję
obsługi do wykorzystania w przyszłości.
Należy przeczytać wszystkie instrukcje
dotyczące bezpieczeństwa!
Niniejsza instrukcja zawiera najważniejsze
informacje dotyczące bezpiecznej obsługi i
korzystania z urządzenia. Zachować
instrukcję obsługi do wykorzystania w przy-
szłości. Prosimy o dołączenie instrukcji do
urządzenia w przypadku przekazywania
urządzenia innej osobie.
1. Objaśnienie symboli
W instrukcji obsługi lub na produkcie stoso-
wane są następujące symbole:
Ostrzeżenie! W celu zredukowania
ryzyka obrażeń użytkownik musi
przeczytać instrukcję obsługi.
Wskazuje na zagrożenie zranie-
niem ciała, utratą życia lub uszko-
dzeniem narzędzia w przypadku
nieprzestrzegania zaleceń zawar-
tych w niniejszej instrukcji.
Nosić okulary ochronne.
Nosić rękawice ochronne.
Oddać do recyklingu.
2. Wskazówki dotyczące
bezpieczeństwa
Należy przestrzegać poniższych
ogólnych wskazówek dotyczących
bezpieczeństwa, aby uniknąć
awarii, szkód lub obrażeń ciała.
• Zadbać o należytą utylizację materiałów
opakowań; plastikowy worek może stać
się śmiertelnie niebezpieczną zabawką
dla dziecka.
• Miejsce pracy powinno być uprzątnięte i
dobrze oświetlone. Nieuporządkowane i
nieoświetlone miejsca pracy sprzyjają
występowaniu wypadków.
• Podczas korzystania z narzędzia elek-
trycznego należy zachować czujność,
skoncentrować się na wykonywanych
czynnościach i postępować rozważnie.
Nie należy korzystać ze stołu roboczego,
gdy jest się zmęczonym, pod wpływem
narkotyków, alkoholu lub leków.
• Stosować środki ochrony osobistej.
Zawsze stosować ochronę oczu. Stoso-
wanie odpowiednich do okoliczności
środków ochrony osobistej, takich jak
maski przeciwpyłowe, obuwie antypośli-
zgowe, kask lub ochrona słuchu redukuje
ryzyko obrażeń.
• Nie wspinać się na palce. Zawsze należy
prawidłowo ustawiać stopy i zachować
równowagę.
• Stół roboczy należy konserwować.
Sprawdzać urządzenie pod kątem nie-
prawidłowego ustawienia lub blokady
ruchomych części, uszkodzenia jego
elementów i innych czynników, które
mogą wpływać na funkcjonowanie stołu
roboczego. W razie uszkodzenia należy
przed użyciem naprawić stół roboczy.
Wiele wypadków powodowanych jest
przez narzędzia, które są niewłaściwie
konserwowane.
• Stół roboczy należy użytkować zgodnie z
niniejszą instrukcją obsługi, w sposób
przewidziany dla danego rodzaju narzę-
dzia, uwzględniając warunki robocze i
planowane prace. Użycie narzędzia do
czynności niezgodnych z jego przezna-
czeniem może spowodować zagrożenie.
• Do pracy z użyciem stołu roboczego nie
należy zakładać luźnej odzieży ani biżu-
terii, które mogą zostać przytrzaśnięte
przez narzędzie w czasie pracy.
• Stołu roboczego należy używać tylko
zgodnie z przeznaczeniem. Nie używać
stołu roboczego jako rusztowania, dra-
biny, stołka itp.
• Zadbać o to, by osoby postronne lub
przeszkody nie znajdowały się w pobliżu
miejsca pracy.
• Stołu roboczego używać na wytrzyma-
łym, płaskim podłożu i upewnić się, że
podłoże jest w stanie przenieść ciężar

Polski
34
stołu roboczego oraz obrabianego
przedmiotu.
• Nie przekraczać podanych maksymal-
nych obciążeń stołu roboczego. Spraw-
dzić parametry techniczne stołu.
• Podczas pracy z ciężkimi lub dużymi
przedmiotami skorzystać z pomocy innej
osoby.
• Nie używać stołu roboczego, jeżeli któ-
ryś z jego elementów jest uszkodzony
lub wygięty.
• Chronić stół roboczy przed upadkiem,
nie rzucać nim ani nie używać go nie-
zgodnie z przeznaczeniem.
• Sprawdzić, czy wszystkie śruby i pokrę-
tła mocujące są poprawnie dokręcone.
Przed użyciem stołu Croc Lock upewnić
się, że jego nogi są zablokowane.
• Mieć na uwadze ryzyko przechylenia się
stołu. Stół Croc Lock może się przechy-
lić, gdy obrabiane są na nim duże i cięż-
kie przedmioty. Zawsze dbać o należyte
podparcie obrabianego przedmiotu.
• Stołu Croc Lock używać tylko zgodnie z
przeznaczeniem. Wszelkie inne użycia
uznawane są za użycia niezgodne z
przeznaczeniem. Producent nie ponosi
odpowiedzialności za szkody lub obraże-
nia ciała wynikające z użycia stołu nie-
zgodnie z przeznaczeniem.
• Należy używać wyłącznie akcesoriów
zalecanych w instrukcji obsługi, użycie
akcesoriów innego rodzaju może prowa-
dzić do obrażeń.
• Stół roboczy należy przechowywać w
suchym miejscu, chronionym przed
pyłem, zabrudzeniami i mrozem. Stół
roboczy należy przechowywać w miej-
scu niedostępnym dla dzieci.
3. Przed pierwszym użyciem
Przed montażem sprawdzić kompletność
elementów urządzenia. Jeżeli brakuje
jakichś elementów, nie odsyłać stołu robo-
czego, ale skontaktować się z naszym dzia-
łem wsparcia.
Materiał opakowania starannie zutylizować
lub przechowywać w miejscu niedostęp-
nym dla dzieci. Worki plastikowe itp., mogą
być śmiertelnie niebezpieczne dla dzieci.
4. Zawartość opakowania
1× Croc Lock Compact
1× instrukcja obsługi
5. Przeznaczenie
Croc Lock to wielofunkcyjny stół roboczy o
wielu zastosowaniach, takich jak unierucha-
mianie drzwi, ram, płotów, płyt sutowych,
rowerów, części samochodowych i wszel-
kich innych materiałów.
6. Montaż
6.1 Umieścić stół Croc Lock na podłożu do
góry nogami, odblokować dźwignię
blokady tylnej nogi (5) i przestawić tylną
nogę (6) (ustawioną w położeniu maga-
zynowym) w kierunku wskazanym na
ilustracji.
6.2 Całkowicie rozłożyć tylną nogę.
6.3 Przesunąć tylną nogę w położenie
robocze i zablokować dźwignię blokady
tylnej nogi (5).
6.4 Rozłożyć pedał nożny (10), aby zatrza-
snąć go we właściwym położeniu.
6.5 Rozłóż przednie nóżki (9), aż zatrzasną
się na swoim miejscu.
6.6 Ustawić stół Croc Lock w pozycji piono-
wej. Sprawdzić, czy wszystkie nogi są
stabilne i znajdują się we właściwym
położeniu oraz czy wszystko jest
zablokowane.
6.7 Obróć zaczep blokujący szczękę
ruchomą (14) do pozycji poziomej, a
Croc Lock będzie gotowy do użycia.
7. Składanie
Przeprowadzić procedurę montażu w
odwrotnej kolejności.
7.1 Upewnij się, że przełącznik blokady/
odblokowania (13) znajduje się w „pozy-
cji odblokowania”.
7.2 Klapka blokująca ruchomej szczęki (14)
znajduje się w pozycji „pionowej”, aby
zapobiec wysuwaniu się szczęki.
7.3 Umieścić stół Croc Lock na podłożu do
góry nogami. Odblokować blokady
przednich nóg (12) i złożyć przednie
nogi.
7.4 Odblokować blokadę pedału nożnego
(11) i złożyć pedał nożny.

35
Polski
7.5 Odblokować dźwignię blokady tylnej
nogi (5) i ustawić tylną nogę (6) w poło-
żeniu magazynowym, a następnie
zablokować dźwignię blokady tylnej
nogi.
7.6 Tylna noga (6) może służyć do przeno-
szenia stołu Croc Lock w pozycji złożo-
nej (magazynowej).
8. Obsługa
8.1 Zaciskanie/unieruchamianie
• Sprawdź, czy zatrzask blokujący szczęki
ruchomej (14) jest ustawiony w pozycji
poziomej i popchnij szczękę ruchomą (4)
do tyłu, aż obrabiany przedmiot znajdzie
się między szczękami.
• Umieścić obrabiany przedmiot, dosuwa-
jąc go do nieruchomej szczęki (1) z
przodu.
• Dosunąć ruchomą szczękę (4) do obra-
bianego przedmiotu. Ruchomą szczękę
można przesunąć ręką lub za pomocą
pedału nożnego.
• Przesunąć przycisk blokady/odblokowa-
nia (13) do dołu, aby zablokować.
• Nacisnąć pedał nożny (10) do dołu, aby
dobrze zacisnąć obrabiany przedmiot.
8.2 Zwalnianie zacisku/odblokowanie
• Przesunąć przycisk blokady/odblokowa-
nia (13) do góry.
• Nacisnąć pedał nożny (10) do dołu, aby
go zatrzasnąć.
• Odsunąć ruchomą szczękę (4) do tyłu.
Uwaga: Podczas odblokowania i blokowa-
nia naciskać pedał nożny z tą samą siłą.
Ostrzeżenie: zabezpieczyć obrabiany
przedmiot, aby nie spadł w momencie
odblokowania zacisku.
8.3 Zaciskanie przy bocznej szczęce
Duże przedmioty lub przedmioty o specy-
cznym kształcie można zamocować za
pomocą jednej z bocznych szczęk. Nie
wywierać nadmiernej siły ściskającej.
8.4 Mocowanie przedmiotów o przekroju
kwadratu
Podkładki szczęk (2, 3) posiadają poziome i
pionowe rowki służące do zaciskania kwa-
dratowych rur i przedmiotów kątowych.
8.5 Zaciskanie dużych przedmiotów
(rozstaw zacisków > 450 mm)
W przypadku mocowania dużych przedmio-
tów ruchoma szczęka może zostać obró-
cona, aby zwiększyć rozstaw zacisków do
956 mm.
• Ustaw przełącznik blokady/odblokowa-
nia (13) w pozycji „zwolnienie” i upewnij
się, że pedał nożny jest zwolniony.
• Sprawdź, czy płytka blokująca ruchome
szczęki (14) znajduje się w pozycji
poziomej.
• Zsunąć ruchomą szczękę (4) z szyny.
• Obrócić ruchomą szczękę o 180° i wsu-
nąć ją na szynę.
• Rozstaw szczęk z zakresu od 450 mm
do 500 mm wymaga umieszczenia
dodatkowego przedmiotu o szerokości
przynajmniej 50 mm, na przykład
kawałka drewna lub materiału o podob-
nej twardości.
Ostrzeżenie: Gdy mocowany jest przedmiot
wymagający maksymalnego rozsunięcia
szczęk, obrabiany przedmiot musi spoczy-
wać na ruchomej szczęce i być do niej
równoległy.
Zapewnić odpowiednią stabilność podczas
pracy z długimi lub dużymi obrabianymi
przedmiotami.
8.6 Wskazówki:
— Pomiędzy szczęką a obrabianym przed-
miotem, gdy jest to konieczne, można
umieszczać wyłącznie miękkie przed-
mioty, aby zapobiec uszkodzeniu obrabia-
nego przedmiotu.
— Nie należy stosować nadmiernego naci-
sku na obrabiany przedmiot.
— Zapewnić prawidłowe wyważenie obra-
bianego przedmiotu.
9. Czyszczenie i konserwacja
Przed każdym użyciem sprawdzić produkt,
abywykryć zużyte lubuszkodzone części.
Nie używać stołu, jeżeli jego elementy są
zużyte lub uszkodzone. Zgłosić się do
dostawcy lub producenta w celu uzyskania
części zamiennych.

Polski
36
10. Przechowywanie
Stół Croc Lock i jego akcesoria przechowy-
wać w suchym miejscu chronionym przed
mrozem.
11. Dane techniczne
Maks. ciężar: . . . . . . . . . . . . . . .100 kg
Obrys (stojący): . . . . . . . 95 × 88 × 86 cm
Wymiary (złożony): . . . . 82 × 24,5 × 31 cm
Wysokość robocza: . . . . . . . . . . . 86 cm
Rozstaw zacisków: . . . . . . . . 0–956 mm
Siła zaciskania: . . . . . . . . . . . . 1000 kg
Ciężar urządzenia bez akcesoriów: . 14,8 kg
12. Utylizacja
Zutylizować opakowania, sortując
je na poszczególne materiały. Kar-
ton traktować jak makulaturę, a
folię zutylizować z pomocą odpowiednich
służb.
12.1 Utylizacja produktu
Utylizacja produktu powinna być przepro-
wadzona zgodnie z przepisami obowiązują-
cymi w danym kraju.
Produkt i instrukcja obsługi mogą ulec
zmianie. Dane techniczne mogą zostać
zmienione bez wcześniejszego
powiadomienia.


www.bataviapower.com
2 YEAR WARRANTY
This product has got a 2 year warranty
Dear Client, if for any reason this product is not working, please ensure you contact our
Client Service Centre. Ensure you have your original receipt of purchase. This warranty
covers all defects in workmanship or materials in this Batavia product for a two year period
from the date of purchase. The warranty does not cover any malfunction, or defect resulting
from misuse, neglect, alteration, or repair.
Dieses Produkt hat 2 Jahre Garantie
Sehr geehrter Kunde, unsere Produkte unterliegen einer strengen Qualitätskontrolle. Sollte dieses
Gerät nicht einwandfrei sein, so wenden Sie sich bitte immer zuerst an unseren Kunden-Service.
Bitte bewahren Sie unbedingt den Kaufbeleg auf. Die Garantieleistung gilt nur für Material-oder
Fabrikationsfehler. Ausgeschlossen sind Mängel die durch häugen Gebrauch, missbräuchlicher
und unsachgemäßer Behandlung oder Gewalteinwirkung verursacht worden sind.
Ce produit a 2 ans de garantie
Cher client, Si pour une raison quelconque, ce produit ne fonctionne pas, veuillez contacter
notre Centre de service après-vente. Conservez le bon d’achat original. Cette garantie couvre
tous les défauts de matériau et de main d’œuvre constatés sur ce produit Batavia pendant
une période de deux ans à compter de la date d’achat. Les défauts de fonctionnement et
autres résultant d’abus ou de mauvais emploi, de négligence, de modifications ou
réparations non autorisées sont exclus de la garantie.
Dit product heeft 2 jaar garantie
Geachte klant, onze producten ondergaan een streng kwaliteitscontrole proces.
Wanneer dit product niet correct functioneert, wend u zich alstublieft altijd eerst
tot onze klantenservice. Bewaar altijd uw aankoopbewijs. De garantieservice is
alleen van toepassing op materiaal- of productiefouten. Uitgesloten zijn
gebreken veroorzaakt door intensief gebruik, misbruik en incorrecte
behandeling of extern geweld.
Europe / Europa / L’Europe / أوروبا
Customer Service / Kunden-Service / Service clientèle /
Klantenservice / Servizio clienti / Servicio de atención al cliente /
Serviço ao cliente / Obsługa klienta / خدمة العملاء
service@batavia.eu
Monday till Friday / Lundi jusqu’à Vendredi / Maandag t/m vrijdag/
Dal lunedì al venerdì / De lunes a viernes / Segunda a sexta-
feira / Od poniedziałku do piątku / من الاثنين إلى الجمعة
08.00 — 17.00
(DE) 0800 664 7740
(EUR) 00800 664 774 00
BATAVIA B.V. | Weth. Wassebaliestraat 6d | 7951SN Staphorst | Netherlands
WARRANTY
2 YEARS

www.bataviapower.com
BATAVIA B.V. | Weth. Wassebaliestraat 6d | 7951SN Staphorst | Netherlands
7061991/2
2 YEAR WARRANTY
Questo prodotto è garantito per 2 anni
Gentile Cliente, se per una qualche ragione il prodotto non funziona, La invitiamo a mettersi
in contatto con il nostro Centro Assistenza Clienti. Si accerti di avere la ricevuta originale
dell’acquisto. La garanzia copre tutti i difetti di fabbricazione o di materiale in questo prodotto
Batavia per un periodo di 2 anni dalla data di acquisto. La garanzia non copre malfunzionamenti
o difetti derivanti da uso inappropriato, improprio, da modiche o riparazioni.
Este producto tiene dos años de garantía
Estimado cliente: si por cualquier razón este producto no funciona, póngase en contacto con
nuestro Centro de Atención al Cliente. Asegúrese de tener a mano la factura de compra original.
Esta garantía cubre todos los defectos de mano de obra o materiales de este producto de Batavia
por un período de dos años a partir de la fecha de compra. La garantía no cubre ningún mal
funcionamiento o defectos resultantes del mal uso, negligencia, alteración o reparación.
Este produto tem uma garantia de 2 anos
Estimado Cliente, se, por qualquer motivo, este produto não estiver a funcionar devidamente,
contacte o nosso Centro de Apoio ao Cliente. Certique-se de que possui a prova de compra
original. Esta garantia cobre todos os defeitos de fabrico ou materiais do produto Batavia
durante um período de dois anos, a contar da data de compra. A garantia não cobre
quaisquer avarias ou defeitos resultantes de um uso indevido, negligência, modicações
ou reparações.
Produkt posiada 2-letnią gwarancję.
Szanowny Kliencie! Jeśli z jakiegokolwiek powodu niniejszy produkt nie działa, prosimy
skontaktować się z naszym Centrum obsługi serwisowej. Upewnij się, że posiadasz
oryginalny dowód zakupu. Niniejsza gwarancja obejmuje wszystkie wady
produkcyjne i materiałowe w produktach Batavia przez okres dwóch lat od daty
zakupu. Gwarancja nie obejmuje żadnych usterek lub uszkodzeń wynikających z
nieprawidłowego użycia, zaniedbania, modykacji lub naprawy.
Europe / Europa / L’Europe / أوروبا
Customer Service / Kunden-Service / Service clientèle /
Klantenservice / Servizio clienti / Servicio de atención al cliente /
Serviço ao cliente / Obsługa klienta / خدمة العملاء
service@batavia.eu
Monday till Friday / Lundi jusqu’à Vendredi / Maandag t/m vrijdag/
Dal lunedì al venerdì / De lunes a viernes / Segunda a sexta-
feira / Od poniedziałku do piątku / من الاثنين إلى الجمعة
08.00 — 17.00
(DE) 0800 664 7740
(EUR) 00800 664 774 00
WARRANTY
2 YEARS
-
 1
1
-
 2
2
-
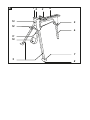 3
3
-
 4
4
-
 5
5
-
 6
6
-
 7
7
-
 8
8
-
 9
9
-
 10
10
-
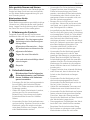 11
11
-
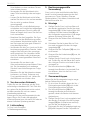 12
12
-
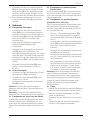 13
13
-
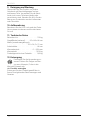 14
14
-
 15
15
-
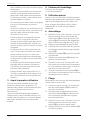 16
16
-
 17
17
-
 18
18
-
 19
19
-
 20
20
-
 21
21
-
 22
22
-
 23
23
-
 24
24
-
 25
25
-
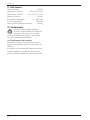 26
26
-
 27
27
-
 28
28
-
 29
29
-
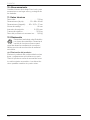 30
30
-
 31
31
-
 32
32
-
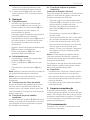 33
33
-
 34
34
-
 35
35
-
 36
36
-
 37
37
-
 38
38
-
 39
39
-
 40
40
-
 41
41
-
 42
42


Batavia CROC LOCK compact Manual de usuario
- Tipo
- Manual de usuario
En otros idiomas
- français: Batavia CROC LOCK compact Manuel utilisateur
- italiano: Batavia CROC LOCK compact Manuale utente
- English: Batavia CROC LOCK compact User manual
- Deutsch: Batavia CROC LOCK compact Benutzerhandbuch
- Nederlands: Batavia CROC LOCK compact Handleiding
- português: Batavia CROC LOCK compact Manual do usuário
- polski: Batavia CROC LOCK compact Instrukcja obsługi
Documentos relacionados
Otros documentos
-
ANGELES HOME 8CK-35TL139 Guía del usuario
-
Triton SJA100E Manual de usuario
-
-
Beta 3910 Instrucciones de operación
-
Keter Folding Work Table Manual de usuario
-
ELU MTS24 Manual de usuario
-
Ferm WLM1002 - FHB940 El manual del propietario
-
DeWalt DW872 Manual de usuario
-
-