
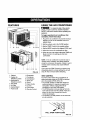
Owner's Manual
Manual del Propietario
®
ROOM AIR CONDITIONER
ACONDICIONADOR DE AIRE DE VENTANA
Model, Modelo 580.74121
Sears, Roebuck and Co., Hoffman Estates, IL 60179 U.S.A.
www.sears.com

TABLE OF CONTENTS ........................2
WARRANTY ..............................................2
SAFETY .....................................................3
ImportantSafety Instructions...................... 3
ELECTRICAL REQUIREMENTS .......4
INSTALLATION ........................................ 5
Installation Requirements ......................... 5
Installation ................................................ 6
How to Install............................................ 6
Removalfrom Window................................. 8
OPERATION ............................................. 9
How and Why ........................................... 9
Normal Sounds ........................................ 9
Capacity and Running Time ..................... 9
Features ................................................. 10
Using the Air Conditioner ....................... 10
Display ................................................... 11
Air Direction Adjustment......................... 11
Remote Control ...................................... 12
HowtoInsertBatteriesIntoRemoteControl--..12
MAINTENANCE .....................................13
Air Filter Cleaning ................................... 13
Air Conditioner Cleaning ........................ 13
How to Remove the Front Grille.................. 13
How to Replace the Front Grille .................. 13
TROUBLESHOOTING .........................14
Before Calling for Service ...................... 14
ESPAI_IOL ................................................15
SERVICE NUMBERS ............BackCover
FULL ONE YEAR WARRANTY ON
ROOM AIR CONDITIONER
For one year from the date of purchase, when this
air conditioner is operated and maintained for
normal room cooling according to instructions in this
owner's manual, Sears will repair this air
conditioner, free of charge, if defective in material or
workmanship.
FULL FIVE-YEAR WARRANTY ON
SEALED REFRIGERATION SYSTEM
For five years from the date of purchase, when this
air conditioner is operated and maintained for
normal room cooling according to instructions in this
owner's manual, Sears will repair the sealed
refrigeration system (consisting of refrigerant,
connecting tubing, and compressor), free of charge,
if defective in material or workmanship.
WARRANTY SERVICE IS AVAILABLE BY
CONTACTING SEARS SERVICE AT
1-800-4-MY-HOME °
Warranty coverage applies onlyto air conditioners
used for non-commercial, private household
purposes.
This warranty applies only while this product is in
use in the United States.
This warranty gives you specific legal rights, and
you may also have other rightwhich vary from state
to state.
Sears, Roebuck and Co., D/817WA,
Hoffman Estates, IL 60179 U.S.A.
-2-

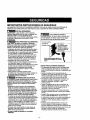
IMPORTANT SAFETY INSTRUCTIONS
The safety instructionsbelow will tell you how to use your room air conditioner to avoid harm to yourself or
damagetoyour ROOM AIR CONDITIONER.
FOR YOUR SAFETY
Do not store or use gasoline or other flammable
vapors and liquids in the vicinity of this or any other
appliance. Read product labels for flammability and
other warnings.
PREVENT ACCIDENTS
To reduce the risk of fire, electrical shock, or injury
to persons when using your air conditioner, follow
basic precautions, including the following:
• Be sure the eloctdcal service is adequate for the
model you have chosen.
• If the air conditioner is to be installed in a window,
you will probably want to clean both sides of the
glass first. If the window is a triple-track type with a
screen panel included, you may want to remove
the screen completely before installation.
• Be sure the air conditioner has been securely and
correctly installed according to the separate
installation instructions provided with this manual.
Save this manual and installation instructions for
possible future use in removing or reinstalling this
unit.
• Usegloves when handlingthe air conditioner.Becareful
to avoid cutsfrom sharp metalfins onfront and rear coils.
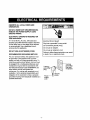
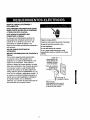
_ ELECTRICAL INFORMATION
The complete electrical rating of your new room air
conditioner is stated on the serial plate. Refer tothe
rating when checking the electrical requirements.
• Be sure the air conditioner is properly grounded.
To minimize shookand fire hazards, proper
groundingis important. The power cord is
equipped with a three-prong grounding plug for
protection against shock hazards.
• Your air conditioner must be plugged into in a
properly grounded wall receptacle. If the wall
receptacle you intend to use is not adequately
grounded or protected by a time delay fuse or
circuit breaker, have a qualified electrician install
the proper receptacle.
• Do not run air conditioner with a protective
covering. This could result in mechanical damage
within the air conditioner.
• Do not use an extension cord or an adapter
plug.
_ Avoid fire hazard or electric shock.
Do not use an extension cord or an adapter plug.
Do not remove any prong from the power cord.
Grounding type
Do not, under any
circumstances, cut,
remove, or bypass
the grounding prong
from this plug.
Power supply cord _,L
with 3-prong _,_,
grounding plug
ENERGY SAVING IDEAS
• The capacity of the room air conditioner must fit
the room size for efficient and satisfactory
operation.
• Install the room air conditioner on the shady side
of your home. A window that faces north is best
because it isshaded most of the day.
• Do not block air flow inside with blinds, curtains, or
furniture, or outside with shrubs, enclosures, or
other buildings.
• Close the floor and wall registers and the fireplace
damper so cool air does not escape up the
chimney and into the duct work.
• Keep blinds and drapes in other windows closed
during the sunniest part of the day.
• Clean the air filter as recommended in the
MAINTENANCE section of this manual.
• Proper insulation and weather stripping in your
home will help keep warm air out and cool air in.
• External house shading with trees, plants or
awnings will help reduce the air conditioner's work
load.
• Operate heat producing appliances such as
ranges, washers, dryers, and dishwashers during
the coolest part of the day.
-3-

OBSERVE ALL LOCAL CODES AND
ORDINANCES.
DO NOT, UNDER ANY CIRCUMSTANCES,
REMOVETHEPOWERSUPPLYCORD
GROUND PRONG.
ELECTRICALGROUNDISREQUIRED ON
THISAPPLIANCE.
A 115-volt 60 Hz, AC only, 15A fused and
properly grounded electrical supply is required.
A time delay fuse or time delay circuit breaker
is recommended. Use a dedicated circuit,
serving only this appliance.
DO NOT USE AN EXTENSION CORD.
RECOMMENDED GROUNDING METHOD
For your personal safety, this appliance must
be grounded. This appliance has a power
supply cord with a 3-prong grounding plug. To
minimize possible shock hazard, the cord must
be plugged into a mating grounding type wall
receptacle and grounded in accordance with
the National Electrical Code (ANSI/NFPA 70)
latest edition and all local codes and
ordinances. If a mating wall receptacle is not
available, it is the personal responsibility and
obligation of the customer to have a properly
grounded 3-prong wall receptacle installed by a
qualified electrician.
Electrical Shock Hazard
Plug into a grounded 3 prong outlet.
Do not remove ground prong.
Do not use an adapter.
Do not use an extension cord.
Failure to follow these instructions can result
in death, fire, or electrical shock.
_3-prong
A _ I1_- I grounding
_-prong _ _
• type wall
grounding receptacle
plug
N Ground
Power _ prong
supply
cord
-4-

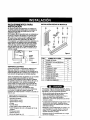
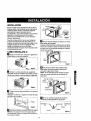
INSTALLATION REQUIREMENTS
Yourairconditionerwillinstallintostandarddoublehung
windowswithactualclearopeningwidthsof27to39 inches
(686turnto990ram)(FIG. 1).
Lower sash must open sufficiently to allow a clear
vertical opening of 16 inches (406mm). Side louvers
and the rear of the air conditioner must have clear .
air space to allow enough airflow through the
condenser for heat removal. The rear of the unit
must be outdoors, not inside a building or garage.
n i Sash
27"tO39"
16"rain.Innersill Window
[_; _ Extedor
Interiorwall '-.J _.o" FIG, 1
ELECTRICAL SERVICE
Check your available electrical service. The power
supply available must be the same as that shown
on the unit nameplate (foundonrightsideof cabinet).
All models are equipped with a 3-prong service plug
to provide proper service and safe positive
grounding. Do not change plug inany way. Do not
use an adapter plug. If your present wall outlet does
not match your plug, call a qualified electrician to
make the necessary corrections.
SAVE CARTON and this OWNER'S MANUAL for
future reference. The carton is the best way to store
unit during winter or when not in use.
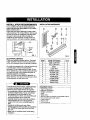
INSTALLATION HARDWARE
FIG. 2
ITEM NAME OF PARTS Q'TY
A SIDE CURTAIN 2
B SILL SUPPORT 2
C BOLT 2
D LOCK NUT 2
E SCREW: 25/64" 13
F SCREW: 5/8" 3
G SCREW: 5/8" 5
H FOAM SEAL 1
I FOAM STRIP 1
J L BRACKET 1
K DRAIN PIPE 1
REQUIRED TOOLS:To avoid risk ofpersonalinjury, properly damage,
or product damagedue to theweightofthis
device and sharp edgesthat may be exposed:
• Airconditioners coveredinthis manualposean
excessive weight hazard. Two or more people
are needed to move and install the unit.
To prevent injuryor strain, use properlifting and
carrying techniques whenmoving unit.
• Carefully inspect locationwhereair conditioner
will be installed.Be sure it willsupport the
weight of the unit overan extendedperiod of
time.
• Handleair conditioner with care. Wear
protective gloves whenever lifting or carrying the
unit. AVOID the sharp metalfins offront and
rear coils.
• Makesure airconditionerdoes notfall during
installation.
• Tight Fitting gloves
• Standard screwdriver
• Phillips screwdriver
• Pliers
• Sharp knife
• 3/8-inch open end wrench or adjustable wrench
• 1/4-inch hex socket and ratchet
• Tape measure
• Electric drill
• 1/4-inch drill bit
-5-

INSTALLATION
Pick a location which willallow you to blow the cold
air intothe area you want. Windows used for
installation must be strong enough to support the
weight of the air conditioner, Good installation with
special attention tothe proper position ofthe unit
will lessen the chance that service will be needed,
When cooling more than one room, installation
location isvery important. If air conditioner is
blocked by a storm window frame, see step 19 on
page 8 before beginning to install. To cool your
rooms, cold air must be blown from the air
conditioner in a straight path.
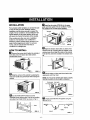
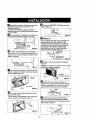
HOW TO INSTALL
_1 Remove the screws which fasten the cabinet at
both sides and at the back. Save side screws.
Discard back screws.
M Insed the side curtain(ITEM A) intothe upper
guide and lowerguide of the airconditioner.Fasten
the curtainstothe unitwith screws (ITEM E).
IL_ open the window. Mark a line on center of the
window inner sill. Carefully place the cabinet on the
window inner sill and align the center of the cabinet
front with the center line marked in the window inner
sill.
Windowsill
FIG. 7
FIG. 3
_ Slide the unit out ofthe cabinet by gripping the
base pan handle and pull forward while bracing the
cabinet.
FIG. 4
IV"! Cut the FOAM STRIP (ITEM I) to fit the
underside of the window sash. Peel off the backing
and attach the FOAM STRIP as shown in Fig. 5.
r_Pull the bottom window sash down behind the
upper guide untilthey meet.
NOTE: Do not pull the window sash down so tightly
that the movement of side curtain is restricted.
Formst_
_'-_ Loosely assemble the sill supports using the
parts in FIG. 9.
FIG. 5
.DO.OR 0 O0 OOR
_-_" ITEMDITEMB
ITEMC
FIG. 9
-6-

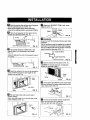
_J Select the positionthat will placethe sillsupports
near the outermost point on sill(FIG. 10).
Attach the sillsupportstothe cabinet track hole
closestto the selected positionusing screw (ITEM E).
_1 Place the sill supportswith the cabinet on the
window sill's selected position (FIG. 10).
ITEME ,1
Lowe_gulde s_. "'_ ,
Ca_net
,,o.,o
[]The cabinet should be installedwith a very
slight tilt (about 1/4") downward to the outside
(FIG, 11).
Adjust the bolts and the nuts of sillsupports to level
the cabinet.
_1 Attach the L BRACKET (ITEM J) with screw
(ITEM G). (FIG. 14)
_ FIG. 14
[] DRAINAGE
Be sure to insert the drain pipe into base pan before
installation.
The air conditioner must be installed with a slight tilt
downward tothe outside for proper water drainage.
The air conditionerwill drain the excess condensed
water through the drain pipe. (FIG. 15)
DRAIN PiPE
FIG. 11
FIG.15
]Slide thechassisintothecabinet. (FIG. 16)
CAUTION: Forsecuritypurposes,reinstallside
screwsyouremovedin step1.
_ Attach the cabinet to the inner sill by driving the
screws (ITEM F) through the front angle into the
window inner sill (FIG. 12).
ITEMB
Track
LowerGuide
ITEMF
FIG. 12
]Pull each side curtain fully to each side of
window opening.
Attach each side curtain to the window sash using
screws (ITEM G). (FIG. 13)
Screw
Screw FIG. 16
]Cut the foam seal (ITEM H) to the proper length
and insert between the upper window sash and the
lower window sash. (FIG. 17)
FIG. 17
_The vent control handle must be straightened
before the decorative front isattached.
__3 Pulldown part (_)to align with part _).
,. Part
FIG. 18
-7-

_t FRONT INSTALLATION
Install the front grille (packed separately) onto the
cabinet as follows:
• Hook upper tabs of front grille into slots on the
cabinet top. (FIG. 19)
• Push front gdlle's tips towards the cabinet in order
to snap side tabs into the cabinet. (FIG. 19)
• Open the inlet grille. (FIG. 20)
• Install the screw (ITEM E) through the front grille.
(Fig. 20)
• Close filter door. (Fig. 21)
Front Installation FIG. 19
_rille
Front Installation FIG. 20
Front Installation FIG. 21
_'] IF AIR CONDITIONER IS BLOCKED BY
STORM WINDOW FRAME
• If storm window presents interference,fasten a 2"
wide wood strip to the inner window sill across the full
width of the sill The wood strip should be thick
enough to raise the height of the window sill so that
the unit can be installed without interference from the
the storm window frame. See FIG. 22.
Top ofwoodstripshouldbe approximately3/4"
higher than the stormwindowframe to help
condensationtodrain properlytothe outside.
• Install a secondwood strip(approximately6" long by
11/2"wideand samethicknessas firststrip)in the
center ofthe outersillflush againstthe backof the
innersill.Screw the L bracketsintothisstdp.
Thiswill raisethe L bracketas shownin FIG. 22.
1 1/2" rain,
WOOD STRIP MOUNTED (38mm)
ON TOP OF INNER SILL _ 3/4"
_ CLgARANCE
_jJlIl-_-- STORM"
_'R ILFBR;Ro_LK_:RS,NSIDE _AAT__ 'NDOw
INNER FRAME
SILL
OUTER
SILL
TSIDE
FIG. 22
REMOVAL FROM WINDOW
• Turnoffandunplugthe air conditioner.
• Removethe front ghlle. See HOWTO REMOVE THE
FRONT GRILLE.Referto page 13.
• Unscrew the side screwsthat you installedin Step 15.
• Slide the air conditioner out of the cabinet.
BE CAREFUL NOT TO DROP IT. Holdonto it firmly the
whole wayeliding it out.Once removed, set itsafety out
of the way.
• Removethe Lbracket from window frameand the sash
seal from betweenthe windows.
• Unscrew the side curtains from the windowframe. Fold
them back to the sidesofthe cabinet.
• Removescrews attachingcabinetto inner sill. Be careful
not to let cabinetfall oncescrews are removed.
• Removecabinet fromwindow opening.
• Placeair conditioner into cabinet. Reinstallside screws
and Front Grille.
• Placeunit and all assemblyhardware in airconditioner
shipping carton,and storein clean,dry place.
• Airconditionerscovered in this manualpose an
excessiveweight hazard.Two or morepeople
are needed to moveand installthe unit.
To prevent injuryor strain, useproperliftingand
carrying techniqueswhen moving unit.
•When handlingtheair conditioner,be careful to
avoidcuts from sharpmetal fins on front and
rear coils.
• Makesureair conditionerdoes notfallduring
removal.
-8-

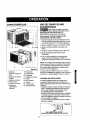
HOW AND WHY
Your room air conditioner provides the following
functions to make hot weather livingmore
comfortable:
• Cools and circulates room air.
• Lowers humidity by removing excess moisture.
• Filters out summertime dust, dirt, and some
airborne impurities.
The air conditioner performs these functions by
drawing room air through a filter which traps dust
and dirt particles. The air then passes over a
cooling coil which refrigerates the air and removes
excess moisture. The same air is then returned to
the room- cooler, drier, and cleaner. Moisture
removed from the room air is carried to the outside
and evaporated.
Your air conditioner is designed to be easy to
operate and to provide plenty of cooling power.
NORMAL SOUNDS FIG.23
Aside from the regular fan motorand compressor
sounds coming from your air conditioner, you will
once in a while hear a pinging sound. This isthe
result of moisture being picked up from the air in the
room and thrown against the air conditioner'sfan.
This is normal and should notbe cause for concern.
Also, do not be alarmed if you hear a slight hissing
or gurgling sound coming from your air conditioner
after it is off.These are normal coolant noises.
CAPACITY AND RUNNING TIME
Proper unit size is important indeciding the desired
comfort for the area you want to cool. An
undersized unit will not have the capability to cool,
leaving the area uncomfortably warm. The proper
size is determined by the number of square feet in
the area to be cooled, indoor and outdoor
temperature and humidity.
Whenever the heat or humidity load is above normal
the air conditioner must run longer and more often
to keep the desired temperature you have selected,
Under heavy heat load conditions the air conditioner
may need to run constantly to keep the temperature
you want.
At times using the MED FAN setting to circulate the
room air may make it comfortable even though the
air is not being cooled. This will decrease your cost
of use.
i ompressor
The modern high efficiency
compressor may have a high
pitchedhum or pulsating
noise that cycles on and off.
Unit Vibration
The unitmay vibrate
and make noise
because of poor wall
or window construction.
Fan
You may hear air
movement from
the fan.
You may hear droplets of water hitting
the condenser causing a pinging or
clicking sound.
FIG. 23
-9-

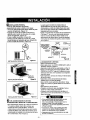
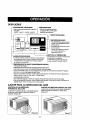
FEATURES
1 14 155
1. Cabinet
2. Vertical Air
Direction Louvers
3. Horizontal air
Direction Louvers
4. Inlet Grille
5. Air Filter
6. Control Board
7. Power Cord
4 63213
10 11 9 12 16
FIG. 24
8. Evaporator
9. Condenser
10. Compressor
11. Base pan
12. Brace
13. Upper Guide
14. Curtain
15. Front Grille
16. Remote Control
USING THE AIR CONDITIONER
To reduce the risk of fire, electric
shock, or injuryto persons, read the important
SAFETY instructionssection before operating this
appliance
To begin operating the air conditioner after
installation, follow these steps:
1. Plug in the air conditioner.(To prevent electrical
hazards, do not use an extension cord or an
adapter plug.)
2. Set the exhaust vent to the CLOSE position.
3. Set the TEMP Control to the coolest setting.
4. Set the MODE control at the highest COOL level.
5. Adjust the louvers for comfortable air flow.
6. Once the room has cooled, adjust the TEMP and
Mode Control to the setting you find most
comfortable.
NOTE : If the air conditioner is turned off, wait 3
minutes before restarting. This allows pressure
inside the compressor to equalize. Failure to wait 3
minutes before restarting may cause inefficient
operation.
If you move the TEMP Control to a warmer, then
immediately back to a cooler setting, the unit will
shut off. Wait 3 minutes before restarting.
VENT CONTROL
The Vent Control allows the air conditioner to
either recirculate inside air (CLOSE) or exhaust
air to the outside (OPEN). (FIG. 25)
• The CLOSE position is used when maximum
cooling is desired. It may also be used for air
recirculation without cooling when the air
conditioner is set in the FAN position.
• The OPEN position removes stale air from the
room and exhausts it to the outside. Fresh air is
drawn into the room through your home's
normal air passages.
• The OPEN or CLOSE position can be used with
any fan selection.
PULL OPEN / PUSH CLOSE
FIG. 25
-10-

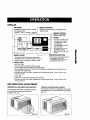
DISPLAY
- FAN SPEED
• Everytimeyoupushthisbutton,itadvances
thesettingasfollows:
{High(F3)_ Low(F1) +Med(F2)-*High(F3)}
• TEMP
- DISPLAY COOL/FAN
EverytJmeyoupushthisbutton,itwilltogglebetween
COOLand FAN.
SIGNAL RECEIVER
ENERGY SAVER
• Thefanstopswhenthecompressorstopscooling.
Approximetelyevery3minutesthefanwillturnonand
checkthe roomair todetermineif cootingisneeded.
• TotumtheairconditionerON,
pushthebutton.Toturnthe
airconditionerOFF,push
thebuttonagain.
• Thisb_ takespdodtyover
anyotherbuttons.
• Whenyoufirstturniton,the
J airconditioneris onthe
HighcoolmodeandtheTemp.
at72°F.
TEMPERATURE SE'n'ING
•Use thisbuttontoautomaticsttycontrot
the temperature of the room,
The temperature can be set withina
range of 60°F to 86°F by I°F.
ON/OFF TIMER
- SHUT-OFFTIME
• Youwillusuallyuseshut-ofttimewhileyousleep.
• Ifunit is running,Timersetsnumberofhwdrsunti_shut-oft.
• For yoursleepingcomfort,once Time is set,the Temperaturesettingwill raise2°Fafter 30 min.,and
onceagainafter another 30rain.
• Everytime you pushTimer button, it advancesthe Timer setting asfollows:1 Hour _.2 Hours t,etc._.
12 Hoursmaximum.
-START TIME
• If unit isoff, Timersets numberof hours before unitstarts.
• Everytime you pushTimer button,it advancesthe Timer settingasfollows: I Hour I.2 Hours i, etc._.
12 Hoursmaximum.
AIR DIRECTION ADJUSTMENT
HORIZONTAL AIR DIRECTION CONTROL
The horizontal air direction is adiusted by moving
the vertical louvers right and left with your
fingertips. (FIG. 26)
VERTICAL AIR DIRECTION CONTROL
The vertical air direction isadjusted by moving the
horizontal louvers up and down with your fingertips.
(FIG. 27)
FIG. 26
FIG. 27
-11-

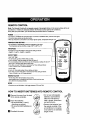
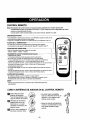
REMOTE CONTROL
Note= The Remote Control will not operate properly if strong lightshines on the sensor window ofthe Air
Conditioner or ifthere are obstacles between the Remote Control and the Air Conditioner.
Every time you push button, you will hear beep sound from the Air Conditioner.
POWER
• TotumtheairconditionerON, pushthe button.Toturntheair conditionerOFF,pushthebuttonagain.
• Thisbuttontakespriorityoveranyotherbutton.
• Whenyoufirstturniton,the unitisincoolmode,Highfan speed,Temperaturesettingat 72"F.
TEMPERATURE SE'R'ING
• Usethisbuttontoautomaticallycontrolthetemperatureofthe room.
Thetemperaturecanbesetwithina rangeof 60°Fto86°F byI°F.
FAN SPEED
• Everytimeyoupushthisbuttonitadvancesthesettingasfollows:
{High(F3)-,Low(Ft)-_ Med(F2)_ High(F3)}
ON/OFFTIMER
- SHUT-OFFTIME
• Youwillusuallyuseshut-offtime whileyou sleep.
• Ifunitisrunning,Timersetsnumberofhoursuntilshut-off.
• Foryoursleepingcomfort,onceTimeisset,theTemperaturesettingwillraise2"F
after30 min.,and onceagainafteranother30rain.
• EverytimeyoupushTimerbutton,itadvancestheTimersettingasfollows:
1Hour _ 2Hours vetc. •12 Hoursmaximum.
- STARTTIME
• If unitisoff,Timersetsnumberofhoursbeforeunitstarts.
• EverytimeyoupushTimerbutton,itadvancesthe Timersettingasfollows:
1Hour_2 Hours• etc._12 Hoursmaximum.
ENERGY SAVER
• The fan stops when the compressor stopscooling.
Approximately every 3 minutes the fan willturn on and check the room
air to determine if cooling is needed,
MODE
• Everytimeyoupushthisbutton,itwilltogglebetweenCOOLandFAN.
HOW TO INSERT BATTERIES INTO REMOTE CONTROL
• Be sure that the (+) and (-)
directions are correct.
• Be sure that both batteries are
new.
ill Remove the cover from the back (_
of the remote controller.
_'J_ Insert two batteries.
®
IL_ Re-attach the cover.
• Do not use rechargeable _
batteries. Such batteries
differ from standard dry
cells in shape, dimensions, i.
and performance.
• Remove the batteries from
the remote controller if the
41-
air conditioner is not going
to be used for an extended
length of time.
-12-

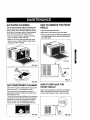
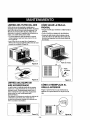
AIR FILTER CLEANING
The Air Filter will become dirty as it removes dust
from the inside air. It should be washed at least
even 2 weeks. If the Air Filter remains full of dust,
the air flow will decrease and the cooling capacity
will be reduced, possibly damaging the unit.
• Pull the inletgrille forward, grasping both tabs,
then pull outthe air filter. (FIG. 28)
• Wash the Air Filter under the faucet with warm
water. Be sure to shake off all the water before
replacing the filter. (FIG.29)
FIG. 28
FIG. 29
AIR CONDITIONER CLEANING
Clean the front grille and inlet grille by wiping with a
cloth dampened in a mild detergent solution.
The cabinet may be washed with mild soap or
detergent and lukewarm water, then polished with
liquid appliance wax.
To ensure continued peak efficiency, the condenser
coils (outdoor side of the unit) should be checked
periodically and cleaned if they become clogged
with soot or did from the atmosphere. Brush or
vacuum exterior coils to remove debris from fins.
FIG. 30
HOW TO REMOVE THE FRONT
GRILLE
• Open the inlet grille downward.
• Remove the screw securing the Front Gdlle.
• Push the grille up from the bottom and pullthe top
of the grille away from the case to liftthe top tabs
out of their slots.
Inlet Grille
_ FrontGrille
FIG. 31
HOW TO REPLACE THE
FRONT GRILLE
Attach the front grille to the cabinet by insertingthe
tabs on the grille into the tabs on the front of the
cabinet. Push the grille in until it snaps into place.
FIG. 32
-13-

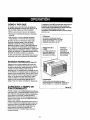
BEFORE CALLING FOR SERVICE
Check the following listto be sure a service call is really necessary. A quick reference to this manual may
help you avoid an unneeded service call.
THE AIR CONDITIONER WILL NOT OPERATE
Check if... Then...
Wallplugdisconnected.
Housefuseblownorcircuitbreakertripped.
PowerisOFF.
Unitwasfumedoffandthenantonquickly.
TEMPControlsetwarmerthanroomtemperature.
Pushplugflrn_ intowalloutlet.
Replacefusewithitmedelaytypeorresetcircuitbreaker.
Pushthepowerbutton.
Setunitoffandwait3 minutesbeforerestarting,
SetTEMPControltoalowernumber.
AIR FROM UNIT DOES NOT FEEL COLD ENOUGH.
Check if... Then...
FANSPEEDsetat LOW.
TEMPConlrolset"_owarm.
Roomtemperaturebelow70°F(21°C).
Temperaturesensingtubetouchingevaporatorcoil,
locatedbehindfrontgnlle.
PushFANSPEEDb_ tosetatHI.
SetTEMPControltoa lowertemperature.
Coolingmayantoccurunitlroomtemperaturerisesabove70°F(21°C).
Straightentubeawayfromevapora_rcoil.
THEAIRCONDnlONERC00UNG,BUTROOMISTOOWARM- iCEFORMINGONC00MNGCOILBEHINDINLETGRILLE.
Check if... Then...
Outdoortemperaturebelow70°F(21°C). Todefrostt_ecoil,settheMODEtoFAN.
Airfiltermaybedirty. Cleanairfilter.RefertoMaintenancesectionofowner'smanual.
TEMPControlsettonlowerfornight-timecooling. Todefrostthecoil,settheMODEtoFANor"HighCool"withthe
TEMPcontroltoahighernumber.
11_EAIRCONDITIONERCOOUNG,BUTROOMISTOOWARM
Check if...
Dirtyairtilter- airrestricted.
TEMPControlsettoowarm.
Frontofunitisblockedbydrapes,blinds,fumifure,etc.
Airdistributionisrestricted.
Doors,windows,registers,etc open,Coldairescapes.
Unitrecentlyturnedonin hotroom.
Then...
Cleanairfilter,RefertoMaintenance_ ofowner'smanual.
SetTEMPControltoa lowernumber,
Clearblockageinfrontofunit.
Closedoors,windows,_isters, etc.
Allowadditional_metoremovestoredheatfromwalls,ceiling,floor,andfumiture.
THE AIR CONDITIONER TURNS ON AND OFF RAPIDLY.
Check if... Then...
I Outsidetemp ratureisextremelyhot. I SetFANSPEEDonHItobrlngairpastcoolingcoilsfaster. I
NOISE WHEN UNIT IS COOLING.
Check if... Then...
i Soundoffanhittingwater-fromthemoistureremovalsystem. Thisisnormaiwhenhumidityishi_h.Closedoors,windows,andregisters
Windowvibration- poor nstaaton. Reerto nstaationnstructionsorcheckwithnstaer.
WATER DRIPPING INSIDE ROOM WHEN UNIT IS COOLING.
Check if... Then...
ITheairconditionerisimpropedyinstalled. I _s_ta_[`_°°nediitr_tnr°erCisiingh°t_rtuhectec_k_u_idietnst_r_ww_terdrainage_Refertu_
WATER DRIPPING OUTSIDE WHEN UNIT IS COOLING.
Check if... Then...
I Theanitlsrein°ring largequantitiesofmaisturefromhumidroom. I I
I Thisisnormalduringexcessivelyhumiddays.
-14-

INDICE DE MATERIAS ............................. 15
GARANT|A ................................................ 15
SEGURIDAD .............................................. 16
Importantesinstruccionesde segufidad.....16
REQU ERIMIENTOS EU_CTRICOS ......... 17
INSTALACI6N ........................................... 18
Requedmientos para instalaci6n .......... 18
Installaci6n ............................................ 19
C6mo instalarlo ..................................... 19
C6mo sacar el equipo de aire
acondicionado de la ventana--:.............. 21
OPERACI6N .............................................. 22
C6mo y por qu8 ..................................... 22
Sonidos norrnales.................................. 22
Capacidad y tiempo de funcionamiento-..22
Caracteristicas ..................................... 23
Uso del equipo de aire acondicionado --23
Despliegue ............................................ 24
Ajuste para la direccion del aire ............ 24
Control Remoto ..................................... 25
Come a Baterias de Adicion en el
Control Remoto ..................................... 25
MANTENIMIENTO .................................... 26
Limpieza del filtro del aire...................... 26
Umpiezadelequipode aJreaoondicionade-.--26
C6mo sacar la rejilla frontal ................... 26
C6mo a reemplaza el grille anterior ...... 26
CORRECCION DE FALLAS ...................... 27
AntesdeUamarparaservicio...................... 27
PARA PEDIR SERVICIO .......Cubierta Trasera
GARANT[A DE UN ANO POR EL
EQUIPO DE AIRE ACONDICIONADO
DE HABITACl6N
Duranteun afio completoa partirde la fecha de
compra, sieste equipo de aire acondicionado recibe
mantenimiento y se utitizapara el enfriamiento
normal de habitaci6n segL_nlasinstrucciones
indicadas en este manual del propietario, Sears
reparar_ gratuitamente este equipo de aire
acondicionado, si tiene algL_ndefecto en materiales
o fabricacibn.
GARANT[A TOTAL DE ClNCO ANOS
POR E.LSISTEMA DE REFRIGERACION
HERMETICAMENTE SELLADO
Durante cinco afios a partir de la fecha de compra,
si este equipo de aire acondicionado recibe
mantenimiento y se utiliza para el enfriamiento
normal de habitaci6n segun las instrucciones
indicadas en este manual de[ propietario, Sears
reparard gratuitamente el sistema de refrigeracibn
hermeticamente sellado (que consiste en el agente
refrigerante, los tubos de conexibn y el compresor),
si tiene alg_n defecto en materiales o fabricacion.
EL SERVIClO DE GARANT[A ESTA A SU
DISPOSICI(SN CON SOLO PONERSE EN
CONTACTO EL CENTRO DE SEARS AL
1-80O-4-MY-HOME ®
La proteccion de garantia cubre unicamente a los
equipos de aire acondicionado usados para uso
domestico y no para uso comercial.
Esta garantia s61o tiene validez mientras el producto
se est6 usando en los Estados Unidos.
Esta garantia le da derechos legales especfficos y
usted puede tener otros derechos que varian de
estado en estado.
Sears, Roebuck and Co., D/817WA,
Hoffman Estates, IL 60179 U.S.A.
-15-

IMPORTANTES INSTRUCClONES DE SEGURIDAD
Las siguientes instrucciones de seguddad le indicar_n cbmo usar su equipo de aire acondicionado de
habitacibn para evitar daSos para usted mismo y para su EQUIPO DE AIRE ACONDICIONADO.
POR SU SEGURIDAD
No almacene ni use gasolina u otros vapores y
Ifquidos inflamables cerca de _ste o cualquier otro
electrodomdstico. Lea las etiquetas de los
productos para ver sicontienen advertencias sobre
el cardcter inflamable de los mismos y otras
advertencias.
PARA PREVENIR ACCIDENTES
Para reducir el desgo de incendios, descargas
eldctricas o lesiones personales al usar su equipo
de aire acondicionado, tome las precauciones
bdsicas, entre las que estdn las siguientes:
• Aseg0rese de que la alimentaci6n el_ctrica sea la
apropiada para el modelo que usted ha elegido.
• Si el equipo de aire acondicionado debe instalarse
en una ventana, a usted probablemente le
conviene limpiar primero ambos lados del vidrio.
Si la ventana es del tipo de tres paneles con un
panel incluido de pantalla, le conviene sacar la
ventana completamente antes de la instalacibn.
• Asegt_rese de que el equipo de aire
acondicionado ha sido instalado correctamente y
con seguridad segt_n se seSala en las
instrucciones separadas de instalaci6n que vienen
en este manual. Conserve este manual y las
instrucciones de instalacibn para usarlos
posiblemente eo el futuro al sacar o volver a
instalar esta unidad.
• Utitice guantes al manejar el equipode aire
acondicionado, tenga cuidado para evitar cortadas con
las afiladas aletas rnetdlicasque se hallanen los
serpentines frontales y posteriores.
INFORMACI6N ELECTRICA
En la placa de serie del fabricante se indica cudl es
lacapaddad elL=ctdcanominalcompletade sunuevo
equipode aireacondicionadeparahabitaci6n.Consulte
osta placacuandowya a verificarlosrequedmientos
eldctricos.
• Aseg0resede que elequipodeaireacondicionado
tenga unaconexibn correctaa tierra.Parareduciral
mfnimo losdesgosde descar_asel_,ctdcase incendio,
es importanteconectarelequ_pocorrectamenteatierra.
Elcord6n de alimentacibnel_trica estdequipadocon
unenchufede tresespigascon conexi6na tierrapare
protegedecontrafiesgos dedescargasel_'tdcas.
• Su equidede aireacondicionadedebe enchufarseen
unatomade cordente de paredquetongaunaconexi6n
correcta a tierra.Si latomade cornentede paredque
ostedpiensausarnoestaconectadacorrectamentea
tierrao noesta pmtegidaconunfusiblede acoi6n
retardadao conuninterruptordecircoito,hagaque un
electdcistacalificadoleinstalelatomade cordentede
pared en forma correcta.
• No opare el aireacondicionadocon unacubierta de
proteoci6n. Esto podr[aocasionarda,fiosmecdnicos
dentro del aire acondicionade.
• No use un cable de extensi6n ni un enchufe
adaptador.
Evitelos peligrosdeincendiosy
descargasel_=ctncas.Nouseuncable deextensibnni un
enchufeadaptader.Noelimineningunade lasespigas
delenchufedelcordSndealimentacibnelg=ctnca.
Tomade corriente
de paredcon En ninguna
conexi6natierra, circunstancia code,
extraigao intente
eliminar laespiga de
conexi6n atierra de
este enchufe.
Cord6ndealinmrtamYnelec'gP,acon %
enchufedetres_ concone._n
alJerra.
IDEAS PARA AHORRAR ENERG|A
• La capacidad del equipo de aire acondicionado
debe corresponder al tama_o de la habitacibn
para el funcionamiento eficiente y satisfactorio del
equipo.
• Instale el equipo de aire acondicionado de
habitaci6n en el lado sombreado de su hogar. Una
ventana orientada hacia el norte es la mejor
porque tiene sombra la mayor parte del dfa.
• No bloquee el flujo de aire hacia el interior con
persianas, cortinas o muebles; o la parte de
afuera con arbustos, paredes u otras
construcciones.
• Cierre el regulador de tire de la chimenea, las
rejillas de calefaccibn del piso y la pared, de tal
modo que el aire frfo no se escape ni por la
chimenea ni por los conductos.
• Mantenga las persianas y las cortinas de otras
ventanas cerradas durante la parte rods soleada
del dia.
• Limpie el filtro del aire como se recomienda en la
seccibn "MANTENIMIENTO" de este manual.
• El aislamiento correcto y las juntas herm@ticas en
puertas y ventanas en su hogar le ayudardn a
mantener el aire caliente afuera y el aire frio
adentro.
• AI darle sombra externamente a la casa con
_.rboles, piantas o toldos ayudar_ a reducir la
carga de trabajo del equipo de aire acondicionado.
• Opere los aparatos que producen calor como, pot
ejemplo, homes, lavadoras, secadoras y
lavaplatos durante la parte m_s fria del die.
-16-

RESPETE TODOS LOS C(_DIGOS Y
REGLAMENTOS.
BAJO NINGUNA ClRCUNSTANCIA CORTE,
QUITE O EVITE EL USO DE LA CONEXI6N
A TIERRA DE ESTA CLAVIJA.
ESTE APARATO NECESITA SER
CONECTADO A TIERRA.
Se requiera una alimentacibn el_ctrica CA,
adecuadamente conectada a tierra con un
fusible de 15 A, de 60 Hz y de 115 V. Se
recomienda un fusible de retardo o un
disyuntor de circuito que alimente solamente a
este aparato.
NO USE CABLE EL[=CTRICO DE
EXTENSION.
MF:TODO RECOMENDADO DE (_ONEXl6N A
TIERRA
Por su propiasegufidad este aparato debe
conectarse a tierra. Este aparato viene
equipado con un cable de alimentacibn y una
clavijade tres terminales. Para reduciral
maximo el peligro de choque el6ctrico, el cable
debe estar conectado a una conexibn de pared
con conexi6n a tierra, y esta conexibndebe
hacerse de acuerdo con la _ltima edicibn del
Cbdigo Electrico Nacional (ANSI/NFPA 70), as{
como con losc6digos y reglamentos locales. Si
no existe una conexi6n de pared adecuada, el
cliente tiene la responsabilidady la obligacion
de mandar instalar, con un electricista
calificado, una conexibn de pared adecuada de
tres terminales con conexi6n a tierra.
Peligrodechoqueel_trico
Conecteen unaconexi6nde paredde 3terminales
Noquitelaterminaldeconexi6na tierra
No useadaptadores
NousecableelL,ctricodeextensi6n
Sinosesiguenestasinstrucciones,puede
ocasionarsela muerte,unincendioo unchoque
eldctrico.
Cable den
alimentacibn con
clavija dotada de
conexibn a tierra
de 3 terminales. .__
Toma de corriente _"_,_
de pared con _ t]_l[I
conexi6n a tierra. " )111
Terminal de
r [I conexibn a tierra.
Bajo ninguna
circunstancia corte, quite o
evite el uso de la conexion
a tierra de esta clavija.
-17-

REQUERIMIENTOS PARA
INSTALACION
Su equipo de aire acondicionado se instalard en
ventanas estdndar de doble panel con anchos de
abertura libre de 686 mm a 990 mm (27 a 39
_ulgadas). (Figura 1)
i su equipo de aire acondicionado es instalado por
la pared, el tamano del agu ero en la pared tiene
que reed r 15 23/32"x 24 1/4"(sinla guia superior).
El marco inferior debe abdrse Io suficiente para
permitir una abertura vertical libre de 406 mm
(16 pulgadas). Las rejillas desviadoras laterales y la
parte posterior del equipo de aire acondicionado
deben tenet un espacio libre de aire para permitir
suficiente flujo de aire a trav6s del condensador
para asi eliminar el calor. La parte posterior de la
unidad debe quedar al aire libra, no dentro de un
edificio o garaje,
F Ventana
Paredinterior Flgura I
SERVIClO ELECTRICO
Compruebe cudl es la alimentacibn el_ctrica que
Ilega a su domicilio. La alimentaci6n eldctdca
disponible debe ser la misma que se muestra en la
placa de_fabricante de la unidad (que se halla en el
lado derecho del gabinete de cordente alterna).
Todos los modelos estan equipados con un enchufe
de tres espigas para suministrar un servicio
correcto y una conexi6n a tierra segura y positiva.
No cambie el enchufe de ninguna forma. No use un
enchufe adaptador. Si su toma de cordente de
pared actual no puede usarse con el enehufa del
equipo, llame a un electdcista calificado para que
efect_e las correcciones necesarias.
CONSERVE LA CAJA y este MANUAL DEL
PROPIETARIO para que le sirva como referencia
en el futuro, La caJa es la mejor manera de
oonservar la unidad durante el invierno o cuando no
estd en uso.
HERRAMIENTAS REQUERIDAS
• Guantes apretados
• Destornillador normal
• Destornillador Phillips
• Pinsas
• Cuchillo filoso
• Uave inglesa o Ilave abierta de 3/8"
• Llave hexagonal de cubo y trinquete de 1/4 de
pulgada
• Cinta para medir
• Taladro electrico
• Broca de taladro de 1/4"
INSTALACI6N PIEZAS DE MONTAJE
Rgum 2
r'FEM NOMBRE DE LA PIEZA CANTIDAD
A PANEL DE GU|A 2
B SOPORTE DE ANTEPECHO 2
C PERNO 2
D TUERCA 2
E TORNILLO: 25/64" 13
F TORNILLO: 5/8" 3
G TORNILLO: 5/8" 5
H CINTA DE ESPUMA 1
I CINTA DE ESPUMA 1
J PARI_NTESIS L 1
K TUBO DE DRENAJE 1
Para evitar el riesgo de lesionespersonales, danos a
su propiedad, o danosal producto debido al peso de
este equipo y losfilos aqua seran expuestos:
• El aireacondicionado del quese hablaen este
manual afirma peligro de pesoexcesivo.
Dos o mas personas se requiere para movere
instalar la unidad. Para evitar heddas o
agotamlento, use tecnioasapropiadas para levntar
y mover la unidad.
• Cuidadosamente inspeccioneel lugar donde el aire
acondicionado serapuesto. AsegOresede que
soportara el peso de la unidad durante un periodo
extendido de tiempo.
• Mantenga su aire acondicionado con cuidado. Use
guantesprotectores cuando levante o mueva la
unidad. EVITE lasaletas filosas de metal en el
serpentin delantero y de arras.
• Asegurese que elaire acondicionado no secaiga
durante la instalacion.
-18-

INSTALACION
Escoja un lugar que le permita Ilevar el aire fr{oal
drea que desea. Las ventanas que se usen para la
instalacibn deben tenet la resistencia suficiente
para soportar el peso del equipo de aire
acondicionado. Una buena instalacibn con atencibn
especial a la correcta posicibn de la unidad
disminuir_,la pmbabilidad de que sea necesario
efectuar reparaciones.
Cuando se desea enfriar ma.sde una habitaci6n,
Si el aira acondicionado estd bloqueado pot un
bastidor de ventana de tormenta, yea el paso 19 en
la pdgina 8 antes de iniciar la instalacibn. Para
enfriar sus habitaciones, el aire frio debe
desplazame desde el equipo de aire acondicionado
en una trayectoda recta.
COMO INSTALARLO
B Saque los tornillos que aseguran el gabinete en
ambos lades yen la parte posterior.
B Deslice la unidad sac&ndola de su gabinete
agarrando el asa del recipiente de la base y tirando
de ella hacia delante mientras sostiene el gabinete.
Figura6
IL_ Abra la ventana. Marque una linea en el centre
de la repisa de la ventana.
Coloque cuidadosamente la cabina sobre el afeizal
interna de la ventana y alinee el centro de la cabina
de frente con la I[nea central marcada en el afeizal
interna de la ventana.
J
Gu{a
supenor[
I
_de laventana
Rgura7
Ir_ Tire del marco inferior de la ventana hacia
abajo detr#.s de la gu(a superior hasta que se
encuentre la guia con el marco.
NOTA: No tire del marco de la ventana tan hacia
abajo que quede restringido el movimiento del
)anel guia.
Rgura 4
_l Corte la cinta de espuma(iTEM I) a la extension
apropiada.
Despegue el refuerzo y peguelo en el lado de abajo
del marco de la ventana.
s_upInserte los paneles de gu{a (iTEM A) en la guia
erior y las gu{as de marco del equipo de aire
acondicionado. Sujete las cortinas en la unidad con
los tornillos (iTEM E).
Marcode la ventana
Franja
impreso,.
Gabinete
Cortina lateral
Rgura 8
I_1 Monte sin apretar el soporte de antepecho
usando las piezas indicadas en la Figura 9.
INTERIOR _ [t_,---t_ EXTERIOR
I MB
ITEMD
{TEM c
Rgum 9
-19-

Jr_JSeleccionelapoaici6nenla quecolocar_elsoporte
de antepechocercadelpuntomdsexlemo en el
antepecho(Figura10).
Fijeelsoportede antepechoal orificiodelcarrildel
gabinetee,nrelaei6nconla posici6nseleccionadausando
el tomillo(ITEM E).
_1 Coloque el soporte de antepecho conel gabinete en
la posici6nseleccionadadel antepecho de ventana.
ITEM E
II ®
'===°=,u.,o
_r'_ La cabinadebeser insta]adocon unainclinaci6n
muy ligera (unos 1/4") hacia abajo para afuera (Figural 1).
Ajuste el pernoy la tuerca del soportede antepecho para
equilibrar elgabinete.
[TEMB Rgum 11
_'1 Fijeel soporte de antepecho alorificiodel carrildel
gabinete en relacibncon laposici6n seleccionade usando
el tornillo (iTEM B) (Figura 12).
marco
ITEM F
baja
Figure12
fTEM B
_'_ Estirecadacortinadel lade completamente a cada
lade de abrir de ventana.
Fijecada panel guia completamente acada marco de la
ventana usando tornillos (iTEM G). (Figura 13)
iTEM G
Figure13
_1_ ConecteelPARC'NTESISL(iTEMJ)coneltomilo
(iTEMG).(Figure14)
Rgum14
_JDRENAJE
Primero, asegdresede insertarel tubede drenaje en el
recipiente de base antes de la instalaci6n. El sire
acondicionade deba set instaladecon una inclinacibn
muy lgera hacia abajo para afuerapara el drenaje de
agua apropiado. Per Io general, elequipo deaire
acondicionadopuede drenar elague condensadaa
tray,s de la tubeda de drenaje. (Figura 15)
PARTEPC_TERIOR
TUBO DE DEL RECIPIENTE
ORENAJE DE BASE
PARTE INFERIOR DEL
_ASE Rgum15
_1_'t Desliceelchasismeti_ndolo dentro delgabinete.
(Figura16)
CUIDADO: Paragarantizar laseguridad, vuelva a instalar
los tornillos en los lades dal gabinete.
.Cord6n de
alimentaci6nelectrica
Rgura16
_1_ Despu_s de volvera instalarla unidad enel
gabinete, habr_,un espacio libra entre la care inferiorde
la unidad.y el antepechode laventana. Use la cinta de
espuma(ITEM H) provistapara cubrir esta abertura.
Rgura 17
_"_Se debeinstalarel asaantesde montarelpanel
decorativo.Antesdeusarlacaracter(slicade ventilacJ6n,
hagaunkitdeven£1aci6n,primero,tirede _aparteAhastala
lineahorizontalconlapadeB.
Parte B
Flgura18
- 20 -

_1"_ INSTALACI(_N FRONTAL
Instale la rejilla delantera (empacada
separadamente) sobre la cabina como sigue :
• Tire de la rejilla frontal hacia debajo desde la parte
superior de! gabinete (Figura 19)
• Empuje las puntas de la rejilla frontal hacia el
gabinete para insertar las leng etas de la rejilla
dentro del gabinete. (Figura 19)
• I Abra la rejilla de admisibn (Figura 20)
• Apriete el tornillo (ITEM E) a trav_s de la rejilla
frontal fij_,ndolo al recipiente de base (Figura 20)
Cierre la rejilla de admisi6n (Figura 21)
,3
lii|
INSTALACION FRONTAL
Figura19
INSTALACION FRONTAL
ilia de
admission
Rgura 20
INSTALACION FRONTAL Figura 21
_'] SI ELACONDICIONADORDE AIREESTA
BLOQUEADOPOREL MARCODELACONTRAVENTANA
• Si lacontraventanainterfiere, fije unlist6n de madera de
2" de ancho al alf_izar interiorde la ventana, que
atraviese la anchura total delalf_izar. El list6nde
madera debeser suficientemente gruesopara levantar
la altura del alf_izarde laventanade talmanera quela
unidad pueda ser instaladasin lainterferencia del marco
de la contraventana. Vea la Figura22.
La parle supedor dellist6n de madera debeser
aproximadamente3/4" mdsaltoque elmarcode la
contraventana o el list6nde madera(fuera de la casa)
para queel vapor emanado de launidad pueda drenar
adecoadarnente hacia el exterior.
• Instaleun segundolist6nde madera(deaproximadamente
6" de largoy 1"de anchoy delmisrnogrosordelprimer
liston)en el centrodel alfeizarexteriorniveladocon la
parteposteriordel affeizarinterior.AtornillelossoporleeL
entre lafaja. Estolevantarael soporleLcomose muestra
en laFigura22.
1 1/2"rain. S/4-PULG
(38ram) DE SEPARACION
FRANJA DE MADERA
MONTADASOBRE_ _"1 _=-
LA PARTE SUPERIOR
DELOESCAN_
INTERIOR _VENTANA DE
HOJA DOBLE
ANTEPECHO
INTERIOR
ANTEPECHO
ERIOR
Figura22
La ELIMINACIONDE laVENTANA
•Apagueelacondicionadoraereo
•QuiteelgrilleanteriorVeaCOMOA REEMPLAZAELGRILLE
ANTERIORRefieraseapagina37.
• Destornilleeltornillodel]adoqueustedinstal6enelPaso15
• DesliceelacondicionadoraereofueradelgabineteTENGA
CUIDADOnoA laGOTATengaenIofirmernentelamanera
enteraquedeslizafueraUnavezquitado,Iopusoseguridad
fueradelarnanera
• QuiteelpareetesisLdelmarcodeventanayelsellodebanda
deentreelwindows
• Destornillelascortinasdelladodelmarcodeventana
Doblelosapoyanalosladosdelgabinete
• QuiteeltornilloconectargabinetealalfeizalinteriorTenga
cuidadonoa permiti6quegabinetefallaraunaveztornillosse
quitae
• Quitegabinetedeabrirdeventana
• ColoqueelacondicionadoraereoenelgabineteVueIvaa
instalarlos tornillosdelladoyGrilleAnterior.
•Coloquela unidady todaferreteriadela asambleaenel
carl6na_reodelenviodelacondiclonador,yen latiendaen
limpia,secael lugar.
• El aire acondicionadodel que se hablaen este
manual afirma peligro de pesoexcesivo.
Dos o mas personas se requiere para movere
instalar la unidad. Para evitar heridas o
agotamlonto, use tecnicas apropiadaspara levntar
y mover la unidad.
• AI manejar la unidad,tenga cuidado para evitar
cortarse con las alertas metalicasafiladas que
estan en losserpentinesfrontal y posterior.
• Asegurese que elaire acondicionadono se caiga
durante la instalaclon.
-21 -

C(SMO Y POR QUE
Su equipo de aire acondicionado de habitacibn
brinda las siguientes funciones para hacer que la
vida en climas cdlidossea mds confortable:
• Enfrfa y hace circular el aire por la habitacibn
• Disminuye la humedad eliminando la humedad
excesiva.
• Filtra el polvo, el sucio y algunas impurezas
transportadas en el aire del clima veraniego.
El equipo de aire acondicionado realiza estas
funciones haciendo pasar el aire del medio
ambiente a trav_s de un filtro que atrapa las
particulas de polvo y sucio. El aire pasa entonces
por un serpentfn de enfriamiento que refrigera el
aire y elimina el exceso de humedad. El mismo aire
regresa entonces al enfriador, secador y limpiador
del aire del ambiente. La humedad _xtrafda del aire
ambiente es Ilevada al exterior y evaporada.
Su aire acondicionado esta diseSado para operar y
suministrar una enorme potenoia de enfriamiento.
SONIDOS NORMALES Figura 23
Adem_s de los sonidos regulares del motor del
ventilador y el compresor que salen de su equipo
de aire acondicionado, usted escuchard de vez en
cuando un sonido met&lico. Este sonido es
producido por la humedad que es recogida del aire
en el ambiente yes lanzada contra el ventilador del
equipo de aire acondicionado. Esto es algo normal
que no debe ser motivo de preocupacibn. De igual
modo, no se alarme si usted escucha un ligero
sonido de silbido o borboteo proveniente de su
equipo de aire acondicionado despu_s que Io
apaga. Estos son ruidos normales del refrigerante.
CAPACIDAD Y TIEMPO DE
FUNCIONAMIENTO
AIdecidircua[debesetlacornodidaddeseadaparaelareaque
ustedquiereenfnar,esimpodantedeterminareltamaSocorrecto
dela unidad.Unaunidadpequeeanotendrala capaddadpara
enfriar,dejandelaareacaluroea.Eltama5oadecuadoes
determinadeporel numerodemetroscuadradosquetieneel
areaquesedeseaenfriar,asicomopotlatemperaturainteriory
exteriory porlahumedad.
Siemprequelacargaterm_adelventiladerest_potencimade
Ionormal,elequipodeaireacondicionadedebefuncionarmas
tiempoparamantenerlatemperaturadeseadeqeaustedha
seleccioeade.Bajocondicionesdeunaeargatermicamuy
peeada,puedesetnecesarioqueelequipodeaire
acondicionadefunoioneconstantementeparamantenerla
temperaturadeseada.
En_, elusodeMEDFANparahaeardrcu4arelairepor
la habitacibnhacequeelambienteseam_.confortableaun
cuandeelequiponoest__ elaire.Mientrasrn_s_mpo
yc_nmayorfrecuenciafunooneal equipodeaire
acondidonade,rn_selectriddadconsumi_y mayoresser'_nlos
costeadesuuso.
i ompresor
El moderno compresor de gran
eficiencia puede producir un ruido
agudo de murmullo o un ruido de
pulsaci6n que viene y se va.
Ventilador --
Usted puede
escuchar el
movimiento del
aire proveniente
del ventilador
Condensador
Usted puede escuchar gotas de agua
que caen sobre el condensador causando un
sonido metalico o un sonido de chasquido,
Figura 23
- 22 -

CARACTER TICAS
1 14 155 4 63213
7 1011 9 12 16
Flgum 24
1. Gabinete
2. Deflector vertical de
aire
3. Deflector horizontal
de aire
4. Rejrila de entrada
5. Filtro del aire
6. Tablero de control.
7. CordSn de
alimentaci6n
8. Evaporador
9. Condensador
10. Compresor
11. Recipiente de base
12. Puntal
13. Guia superior
14. Cortina
15. Parrilla frontal
16. Control Remoto
eldctrica
USO DEL EQUIPO DE AIRE
ACONDIClONADO
Para reducir el riesgo de incendio,
ctrica o lesiones personales, lea las
IMPORTANTES INSTRUCClONES DE
SEGURIDAD antes de operar este aparato.
Para comenzar a utilizar el equipo de aire
acondicionado, slga estos pasos:
1. Enchufe el equipo de aire acondicionado. (Para
prevenir desgos de descargas eldotricas, no use
un cable de extensi6n ni un enohufe adaptador.)
2. Ajuste el extractor de aire en la posici6n CLOSE.
3. Ajuste el control de MODE al mas alto nivel
fresco.
4. Ajuste el controldel ventilador al mds alto nivel.
5. Ajuste las persianas para el flujo de aire
comfortable.
6. Una vez que la habitaci6n se haya enfriado,
ajuste el control de temperatura TEMP a la
graduacibn que usted considere mds confortable.
NOTA: Si se apaga el aire acondicionado, espere 3
minutos antes de volver a encenderlo. Esto permite
que se estabilice la presibn dentro del compresor.
Si no sigue estas instrucciones, el equipo podda
funcionar con poca eficiencia.
Si usted mueve el TEMP el control a un warmer,
entonces inmediatamente espalda a una colocacibn
m_.sfresca, la unidad apagard. Espere 3 minutos.
CONTROL DE VENTILACI6N
Elcontroldevenrilaci6npermitequeel equipodeaire
acondidonadohagarecircularelaireen elinteriordela
habitaci6n(CLOSE)o saqueelaire haciaelextenor(OPEN).
(Figura25)
• LaposiciOnCLOSEsiwe cuandosedeseaunenfriamiento
mdximo.Tambidnpuedeusarsepara hacerrecircularel
airesin enfriarla habitadOncuandeelequipodeaire
acondicionadose ajustaen lapo,_ci6nFAN.
• Laposici6nOPENextraeel aimestancadede lahabitaciOn
y Ioexpulsahadafuera.Elairefrescoes Ilevadohaciael
interiorde la habitaci6natray,s de lospasajesnormalesde
aireque sehaJlanen loshogares.
• Lapo_ciOnOPENoCLOSEpuedeusarseconcualquier
selecoi6nde ventilador.
PULL
(TIRAR PARAABRIRI EMPUJARPARACERRAR)
- 23 -

DESPLIEGUE
-- VELOCIDAD DEL VENTILADOR
•Cadavezqueprasioneestebet6n,elajustees
comosigue
{Alto(F3)-+Baio(F1)_ Alto(F2)-, Alto(F3)}
i FRI'ONENTILADOR
Cadsvezquepresioneestebetbn,
Iss palabrasFRiOy VENTILADOR
aparecer_naltemadamente
•Para ENCENDER el sietemaprasione
el bot6n,y parsAPAGARLO presione
el betbn otravez
• Este betbn liene priondedsobretodos
losotrosbetones
• Cuando Ud Io enciendeporprimera
vez, e_sietema est_ en e_y la
temperaturaesde 72"F
- AHORRADOR DE ENERGiA
Elventiladorsedetienecuandeelcompressornosigueenfriande,
• Aproximadamentecada3minutoselventiladorseencendera,
ynecesitaraverificarlatemperaturadelcuartoparssabersi
esnecesariomasenfdamiento.
AJUSTE DE LA TEMPERATURA
• Use este botbnparscontralarautom_ticamente
la temperaturade la habitaci6n
La temperaturase puede ajustar de grado
en grade, desde 60'F hasta 86'F cada I'F.
TEMPORIZADOR DE ON/OFF (ENCENDIDO/APAGADO)
-OPERACI(_NDE PARADA:
•I Utilizar_lrecuentementeel tiempode apagaomientrasustedduerme
• Silaunidadcorra eln0merode conjuntoede Relojdehorashastaapago
• I ParasucomfortablesueSounavez seafijadola Hora,elajustede la Temperaturaaumentard2°F deepues
de 30 min y unavezmasdespuesde otros30 rain
•Cada vezquepresioneestebot6ncuandoelsistemaest_operandoelmarcadorde tiemposeajustar_dela
siguientemanera:1Hora _,2Horas=,etc_'12 Horasm_imo
OPERACIONDEINICIACl6N:
• Silaunidedest&apagadaeln0merodeconjuntosde Relojdehorasantesdecomienzosdeunidad
•Cada vezquepresioneestebot6ncuandoelsistemaeet_operandoelmarcadordetiemposaajustar&de la
siguientemanera:1Hora_2 Horse• etc _12 Horaemdximo
AJUSTE PARA LA DIRECCION DEL AIRE
CONTROL DE LA DIRECCI(SN CONTROL DE DIRECCI(_N VERTICAL DEL AIRE
HORIZONTAL DEL AIRE La direcci6n vertical del aire se alusta moviendo la
La direccibn horizontal del aire es ajustada rotando rejilla horizontal hacia delante o hacia atrds
la palanca vertical hacia la derecha o hacia la (Figura 27)
izquierda (Figura 26)
Figura 26
Figura 27
- 24-

CONTROL REMOTO
Nora: El dispositivo de control remoto nofuncionard adecuadamente si la ventana sensora del
acondicionador de aire es expuesta a luz fuerte, o si hay obstdculos entre el dispositivo de control
remoto y el acondicionador de aire.
Cuando opere el aire acondicionado con el control remoto, deberd oir un pito.
ENECNDIDO/APAGADO
• Para ENCENDER el sistema presione el bot6n, ypara APAGARLO presione el bot6n otravez
• Este bot6ntiene prioridadsobre todos los otros botoees
• Cuando Ud Io enciende pot primera vez, el sistema est_ en el y la temperatura es de 72"F
AJUSTE DE LA TEMPERATURA
• useestebot6nparacontrolarautomaticamentelatemperaturadelahabitaci6n
Latemperaturasepuedeajustarde gradeengrade,desde60"Fhasta86"FcadaI"F
VELOClDADDELVENTILADOR
• Cada vez que presioneestebotbn,el ajustees comesigue.
(Alto(F3) _ Bajo(F1) _ Alto(F2)_ Alto(F3)}
CRON(_METROON/OFF(ENCENDIDO/APAGADO)
OPERACION DE PARADA:
• I Utilizara freeuentemente eltiempo de apagao mientras usted duerme
• Si launidad corre el n_mero de conjuntos de Reloj de horas hasta apag6
• I Para su comfortable sueSo unavez sea fijado la Hora el ajuste de la Temperatura
aumentar_ 2°F despues de 30 min y una vez m_s despues de otros 30 min
• Cada vez que presione este bot6n cuando el sistema este operando el marcador detiempo
se ajustara de la siguiente manera: 1Hora =.2 Horas i.etc • 12 Horas maximo
OPERACION DE INIClACI(_N:
• Si launidad esteiapagada, el numero de conjuntosde Relojde horas antes de comienzos
de unidad
• Cada vez que presione este bot6n, cuando el sistema este operando el marcador de tiempo
se ajuetara de la siguiente manera: 1Hora _.2 Horas i. etc ='12Horas m_imo
AHORRADORDEENERGiA
T)MER
Ir.I I
ENERGY
• Elventiladorse detienecuando elcompressor no sigue enfnando
Aproximadamente carla 3 minutos el ventilador se encendera y necesitara verificar
la temperatura del euartopara saber si esnecesario m&s enfnamiento
MODO
• Cadavezquepresioneestebot6n,laspalabrasFRJOy VENTILADORaparecertm
atternadamente.
FAN SPEED
MODE
COMO A BATERIAS DE ADICION EN EL CONTROL REMOTO
tl Quite la tapa de la parte
posterior del telemando
Para ello haga deslizar la tapa
segSn la direcci6n del la flecha
IEII Introduzca las dos baterias
asegur_mdose de que las
direcciones (+) y () est_n
colocadas correctament Use
®
bater(as nuevas
IL_ Volver a cerrar, resbalando la
tapa hasta la posici6n inicial
• No utilice bateris recargables,
_stas son diferentes de forma, de
dimensi6n y uso respecto a las
baterias secas usuales
• Seque las baterias del telemando
cuando el acondicionador no vaya
a ser usado durante un largo
per/odo
41-
25

LIMPIEZA DEL FILTRO DEL AIRE
Elfiltrodelairese iraensuciandoa medidaqueva
atrapando el poivoprovenientedelaire interior.Esprecise
lavar elfiltrodelaire alrnenoscada dossemanas.Si el
filtro delaire permaneceIlenode polvo,elflujode aire
disminuirayse reducirdla capecidadde enfriamientodei
equipo,conposibiesdaSosparala unidad.
• Tire haciaadelantela rejillade admission,tomando
ambas lengfietas,luegohale haciaafuera elfiltro de
aire.(Figura28)
• Lave elfiltro delaire en aguatibiaa. Aseg_resede
eliminartodaelagua sacudiendoelflltroantesde volver
a ponerloensu posici6n.(Figura29)
Figura 28
Figura 29
LIMPIEZA DEL EQUIPO DE
AIRE ACONDIClONADO
La rejillafrontal y la rejillade entradadelairepueden
lavarsecon unpasohumedecidoen unasoluci6nde
detergentesuave.El gabinetepuedelavarsecon un
jab6n o detergentesuaveyaguatibia,seguidamente
puedepulirseconcera I{quidaespecialpara
electrodomesticos.
Para assgurarla eficienciapicocontinua,lasbobinasdel
condensador (lado externa de la unidad)debe ser
revisado periodicamentey limpiado si es obturado con
hollin o suciedad de la atm6sfera.
Figura30
-26-
COMO SACAR LA REJILLA
FRONTAL
• Saque el tornillo que mantiene la rejillafrontal en
posici6n.
• Quite el tomillo que asegura le reja delantera.
• Empuje la rejilla hacia arriba de abajo yjale la
parte de arriba de la rejilla lejos de la base para
levantar las lenguetas de arriba hacia afuera de
las ranuras.
Rejillade entrada
_ _'_ Rejilla
\\ oon,er,or
Figura 31
COMO A REEMPLAZA EL
GRILLE ANTERIOR
Pegue el panel frontal a la caja insertando los
fijadores en el panel adentro los del panel de la
caja.
Figura 32

ANTES DE LLAMAR PARA SERVIClO
Cheque la siguiente lista para asegurarse si en realidad es necesario Ilamar para servicio, Una referencia rapida a
este manual pueqe evitar una namada para servicio innecesaria.
EL EQUIPO DE AIRE ACONDIClONADO NO FUNClONA.
Elenchufenoest_conectadoenlatomadecomentedeI:_red.
Elfusibleest_quemadooetinterruptordecircuitosehadisparado.
B selectordelven_ POWERestden_aposick_deOFF.
Lau_idadseap_g6y sevot,,_aencenderdemasiadordpido.
ElcontroldetemperaturaTEMPseajuslorndscalidoquela
temperaturaambiente.
Conecteelenchufef_nementeenlatomadecorrienledepared.
_ eHus_Beda_adoconunlusibledeaccP3nretardadaoreajusteel
intenuptordedrcuito.
pongaelse_:tu enlaposickmdeCOOL
Ajustelaunidady espere3minutosantesdevelveraencenderla
Ajusteelc_Y_ deTEMPERATURAaunnumerorn_ bajo.
EL AIRE DE LA UNIDAD NO SALE BASTANTE FRiO.
Disminuyala VELOCIDADDELVENTILADOR.. Empujeel_ deVELOCIDADDELVENTILADORhasta_avelocidadalia,
Cdequeelcont_deTEMP_TURA enunnumemrn_sa_to. Ajusteel controldeTEMPERATURAaunn_merorn_sbap.
Latempera_raambienteest_potdebajodelos70°F(21°C) Nopuedeprodudrseelenfdamientobasraquelatemperaturaambientesuba
porendmadelos70°F (21°C).
E]tubosensordelatemperaturatocandola bobinadeevaporador, Endemceeltuboalejdndolodelserpentin.
ubicadodetrdsdelarejilladelantera.
ELAIREACONDiaONADOB4FR_PEROLAHABITACIONSESIENTEDEMASlADOCAUDA;SEFORMAHIELOENELSERPENTINDEENFRIAMIENTO
DETP,J_DELPANELDECORATIVOFRONTAL
Latanper_uraambieflleenelexteriores_po,debajodelos70°F(21°C}. Paradescongelarlabobina,coloqueelMODEen"VENTILADOR".
Elfiltrodelairepuedeestarsucio.
Paraelen[fiamientonocturno,pono_elcontroldeTEMPERATURAa
_ _e_ rn_sbajo.
IJmpieel filtro.Consultelaseccibn"Mantenimiento".Paradescongelar,Ileveel
selectorala pesick3nFAN.
Paradescongelarlabobina,cokxiueelMODEen"FAN"oseleccione.
"EnfriamientoELwado",usandounnemerorn_saltoenelcont_ de
TEMPERATURA.
ELAIREACONDICIONADOENFR_PEROLAHABITACI_NSESIENTEDEMASIADOC/i,UDA;NOSEFORMAHIELOENELSERPENTI"NDE
ENFRiAMIENTOD_ DELPANELDECORA"I1VOFRONTAL.
Elfi'¢ode_airees_sucoconb queserestdngeelflujodelaire, UmpieelBtrodeiaim.Consuitela_ "Mantenimiento'.
ElcortmoldetemperaturaTEMPsegradu6en_ demasiadoc_Jida. AjusteelconlrddeTEMPERATURAaunnOmerornasbajo.
Lapartefrontaldelaunidadest_bloquead8potcortinas,pers_anas_ Elimineetbloqueoenfmntedelaunidad.
mueblesetc.querestnngentadist_ delaJre.
Laspuertas,ventanas,rejilbsdecalefacd6n,etc_tera,est_na_iertascon Cierrelaspuedas,ventanas,rejinasdecalefacci6n,etc_ter_
IoqueseperrniteelescapedelaJrefrio.
Launidadacabadeen_ enunahabitac_nc_liente. Permitaquetranscurraun_ _ deIJernpoparaeliminarel"caloralrnacenado"
enlasparades,eltecho,elpisoy I_srnuebles.
ELEQUIPO DE AIREACONDICIONADO SEAPAGAY SE ENCIENDER#.PIDAMENTE.
I Latemperaturaexterioresextrernadamentecaliente. I Ajuste_aVELOCIDADDELVENTILADORen"Alto",parapermitirel pasom_.
frecuentedeairealm_s delasbdoinasenfdadoras, I
I
I
SE ESCUCHAN RUIDOS CUANDO LA UNIDAD ESTA ENFRIANDO.
Sonidode[ventJladugolpeandoelagua- delsisternadeextmccibndela Estoesnormalcuandola humedadesalia.Cierrelaspuertas,wntanasy rejHlas
humedad.
decalefac_,6n.
V't_raci_ndelaventana;instalaci6ndeFK_,ente. LealasinstruccionesdenstaJaci6noconsultea_nstalador.
GOTEO DE AGUADENTRO DE LA HABITACI(_NCUANDOLA UNIDAD ESTA ENFRIANDO
I Instabd_inadecuada. _e rgaarnente_equpodea_ea_ndduadohada_pa_exter_P_aPam_aI
ci_a_ed_agu_tL__sm_nes dehs_a_dnocom_e_mt_dor, j
EL AGUA GOTEA AFUERA CUANDOLA UNIDAD ESTA ENFRIANDO.
I Launidadest_exlrayendograndescanlidadesdehumedaddeuna ! Estoesalgonorrn_durantelosdiasexc_s_vamenteh_rnedes.
habitaci6nh_meda.
- 27 -

Your Home
For repair - in your home-of all major brand appliances,
lawn and garden equipment, or heating and cooling systems,
no matter who made it, no matter who sold it!
For the replacement parts, accessories and
owner's manuals that you need to do-it-yourself.
For Sears professional installation of home appliances
and items like garage door openers and water heaters.
1-800-4-MY-HOME ® (1-800-469-4663)
Call anytime, day or night (U.S.A. and Canada)
www,sears.com www.sears.ca
Our Home
For repair of carry-in items like vacuums, lawn equipment,
and electronics, call or go on-line for the location of your nearest
Sears Parts & Repair Center.
1-800-488-1222
Call anytime, day or night (U.S.A. only)
www.sears.com
To purchase a protection agreement on a product serviced by Sears:
1-800-827-6655 (U.S.A.) 1-800-361-6665 (Canada)
Para pedir servicio de reparaci6n
a domicilio, y para ordenar piezas:
1-888-SU-HOGAR _
(1-888-784-6427)
Au Canada pour service en fran_ais:
1-800-LE-FOYER Mc
(1-800-533-6937)
www.sears.ca
® Registered Trademark / rMTrademark / s_ Service MaYKof Sears, Roebuck and Co
® Marca Regist rada / TMMarca de Fabdca / s_ Marca de Servicio de Sears, ROebuck and Co
MCMarque de commerce / Mo Marque ddposee de Sears, Roebuck and Co. ® Sears, Roebuck and Co
Part No.: 3828A20292C
-
 1
1
-
 2
2
-
 3
3
-
 4
4
-
 5
5
-
 6
6
-
 7
7
-
 8
8
-
 9
9
-
 10
10
-
 11
11
-
 12
12
-
 13
13
-
 14
14
-
 15
15
-
 16
16
-
 17
17
-
 18
18
-
 19
19
-
 20
20
-
 21
21
-
 22
22
-
 23
23
-
 24
24
-
 25
25
-
 26
26
-
 27
27
-
 28
28


Kenmore 580.74121300 El manual del propietario
- Tipo
- El manual del propietario
- Este manual también es adecuado para
en otros idiomas
- English: Kenmore 580.74121300 Owner's manual
Artículos relacionados
-
Kenmore 75151 15,000 El manual del propietario
-
Kenmore 58072124200 El manual del propietario
-
Kenmore 580.72124300 El manual del propietario
-
-
-
-
-
-
Kenmore 580.73089300 El manual del propietario
-
