
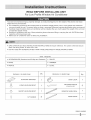
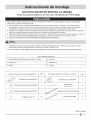
READ BEFORE INSTALLING UNIT
For Low Profile Window Air Conditioner
To avoid risk of personal injury, property damage, or product damage due to the weight of this device and sharp
edges that may be exposed:
Air conditioners covered in this manual pose an excessive weight hazard. Two or more people are needed to
move and install the unit. To prevent injury or strain, use proper lifting and carrying techniques when moving unit.
Carefully inspect location where air conditioner will be installed. Be sure it will support the weight of the unit over
an extended period of time.
Handle air conditioner with care. Wear protective gloves whenever lifting or carrying the unit. AVOID the sharp
metal fins of front and rear coils.
Make sure air conditioner does not fall during installation.
• SAVE CARTON and these INSTALLATION INSTRUCTIONS for future reference. The carton is the best way to
store unit during winter, or when not in use.
o DO NOT USE ANY SCREWS OTHER THAN THOSE SPECIFIED IN THESE INSTRUCTIONS.
Tools Required
® SCREWDRIVER (Standard and Phillips and Flathead) o RULER
• KNIFE • HAMMER
o PENCIL • LEVEL
Hardware ( in plastic bag)
SUPPORT BRACKET
SHORT LEVELING BOLT 1
LONG LEVELING BOLT 1
1/2" SCREW
Qty.
Hardware ( in plastic bag)
SASH LOCK
WEATHER SEALS
(6"X3/4"X 1/12")
WINDOW SASH SEAL
FOAM STRIP
Qty.
5
2020211A2592

How to install the unit
1. To prevent vibration and noise, make sure the unit is installed
securely and firmly.
2. Install the unit a little slanted so the back is slightly lower than the
front (about 1/4"). This will force condensed water to flow to the
outside.
CAUTION: All side louvers of the cabinet must remain exposed to
the outside of the structure.
Install
Left + Right Filler Panel Assembly
7
[
ut 1/4"
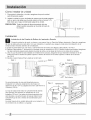
Place unit on floor, a bench or a table. There is a Left and Right side Filler Panels - be sure to use the proper
panel for each side. When installed, the flange for securing the panel in place to the window sill will be facing
into the room.
A. Hold the side panel in one hand and gently pull back the center to free the open end. See FIG. 1.
B. Slide the free end "1" section of the panel into the cabinet as shown in FIG. 2. Slide the panel down. Be sure to
leave enough space to slip the top and bottom of the frame into the rails on the cabinet.
C. Once the panel has been installed on the side of the cabinet, make sure it sits securely inside the frame channel by
making slight adjustments. Slide the top and bottom ends of the frame into the top and bottom rails of the cabinet, see FIG.3.
D. Slide the panel all the way in and repeat on the other side.
FIG.1 __--_'1"section FIG.2
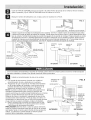
Your air conditioner is designed to install in standard double
hung windows with opening widths of 26.5 to 41.5 inches
(673 mm to 1054 mm) (FIG. 4).
Lower sash must open sufficiently to allow a clear vertical
opening of 12.4 inches (315 mm ). Side louvers and the rear
of the air conditioner must have clear air space to allow
enough airflow through the condenser, for heat removal.
The rear of the unit must be outdoors, not inside a building
or garage.
OFf ;ET
vZt.,°
Wooden Windows

CuttheFOAMSTRIPtofittheundersideofthewindowsash.Openthewindow,peeloffthebackandattach
theFOAMSTRIPasshowninFIG.5
Markcenterlinewithpencilonthecenteroftheinnersill,asshowninFIG.6
screw
inner
winnow.
sill
FOAM
STRIP
FiG. 5
FIG. 6
CENTER LINE INNER SILL
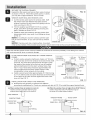
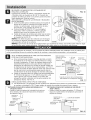
Install support bracket on window sill. See FIG.7. Install leveling bolt up through bottom side of support bracket.
You can choose a short bolt or a long one according to window type. Also, you should select the position of
hole on bracket. Position bracket on sill of center line of window (See FIG.7). Fasten bracket loosely to sill
with screws provided. Adjust leveling bolt so that the air conditioner will be installed with a very slight tilt
(about 1/4") downward toward the outside for proper drainage. (See FIG.8). Tighten bracket screws.
close-up view
bracket
adjustmentslot
'nne ,s'"si[ew a"uil'"
INDO0 OR '
Fail to securely install support bracket may result in unit falling from window if window sash is raised after unit is
installed. This could result in personal injury.
Install the air conditioner in the window
. With the aid of an assistant, carefully lift the air
conditioner and slide it into the open window.
Make sure that support bracket is inserted in the pocket
under base fan, and that filler panels guide is stopped
by stopper on the support bracket as shown in FIG.9.
NOTE: When unit is properly centered and pushed
outward to correct bracket location, you will feel unit sit
securely in place on the support bracket. Hold unit
firmly during this procedure. After proper installation, make
window sash ---__
top channel_ J
,ndoor
section _
sure the air conditioner is tilted 2-4 ° downward to the outside,
condensate should not drain from the overflow drain hole
during normal use,correct the slope otherwise.
Lower top window sash all the way down so that sash
sits firmly in top channel of unit and expandable
curtain frames.
CAUTION: While performing the steps above, hold unit
firmly until window sash is lowered to top channel behind
filler panels. Personal injury or property damage may result
if unit falls from window.
FIG. 9
outdoor
section
support
bracket
pocket
' Fstopper support
innersill---4 ___-- DracKe_
"---_ _---_k - leveling bolt
L_] _-.--outer sill
INDOOR I I_l OUTDOOR

SECURE THE CURTAIN FRAMES:
Expand the filler panels and secure them using 4 screws
as shown in FIG.10. When filler panels opens or closes,
you may feel a slight resistance. This is normal.
WINDOW SASH SEALAND WINDOW LOCK:
Cut the window sash seal to the window width. Stuff
the window sash seal between the glass and the
window to prevent air and insect from getting into the
room, as shown in FIG.10.
Trim the weather seal (6"X3/4"X1/12") to a proper
length, peel off the protective backing and plug any
gaps if needed as shown FIG.10.
Install the sash lock bracket to prevent window from
being raised which may result in unit falling.as shown °...
in FIG.10. .."
NOT151 : It is difficult to lock the windows with the sash
lock for some windows, so you can use lock by window
itself.
NOTE#-: If window sash has a metal surface. Use sheet
metal screws instead of the provided wood screws. Obtain sheet metal screws at local hardware store.
Sash lock and filler panels screws must be installed as instructed to avoid the possibility of unit falling from window
and causing personal injury or property damage.
IF AIR CONDITIONER IS BLOCKED BY STORM WINDOW
FRAME:
If storm window presents interference, fasten a 2" (51 mm)
wide wood strip to the inner window sill across the full width
of the sill. The wood strip should be thick enough to raise
the height of the window sill so that unit can be installed
without interference from the storm window frame, See
FIG.11. Top of wood strip should be approximately 7/8°'
(22mm) higher than the storm window frame to help
condensation to drain properly to the outside.
Install a second wood strip (approximately 6" (152mm)long
by 1-1/2" (38mm) wide and same thickness as the first strip)
in the center of the outer sill flush against the back of the
inner sill. See FIG.11.
INSTALLATION FOR OTHER TYPE WINDOWS:
Dimensions and geometry of windows are different
wood strip
mounted on
top of inner sill
1-1/2" min. 7/8" (22mm)
(38mm) clearance
i
frame _'
window
storm
iNDOOR OUTDOOR
When storm window
frame is located on outer silt
FIG. 11
according to manufacturer's. Check your window and refer to FIG. 12 to install the support bracket firmly.
(a) When window frame is located on inner sill.
• Installa wood strip (window width longand
window frame heighthigh) on the inner sill.
(b) When the window frame is higher than 23/32"(18mm).
• Install a wood strip (about 4"(102mm)long) on
the outer sill to raise support bracket.
SASH WINDOW ..............................
WINDOW FRAME.....................
FIG. 12

REMOVAL FROM WINDOW:
Turn off and unplug the air conditioner.
Unscrew the side screws that you installed in step 6 and 7.
Close the filler panels and remove window sash seal and sash lock from windows.
Keep a firm grip on the air conditoner as your sash.
Lift the air conditioner from the window.
Remove the support bracket from window frame.
NOTE: When cooling season is over, unit is removed from window for cleaning and storage. There may still be some
condensation water in the basepan. Remove the unit carefully to avoid water being spilled out on floor. Always store
unit flat on its base. Remove bracket and window sash seal from window and save. Window can not close if support
bracket remains installed.
Air conditioners covered in this manual pose an excessive weight hazard. Two or more people are needed to
move and install the unit. To prevent injury or strain, use proper lifting and carrying techniques when moving unit.
When handling the air conditioner, be careful to avoid cuts from sharp metal fins on front and rear coils.
Mark sure air conditioner does not fall during removal.

BLANKPAG

LEA ESTO ANTES DE MONTAR LA UNIDAD
Para Acondicionadores de Aire de Ventanas de Perfil Bajo
Para evitar el riesgo de lesiones, de dados materiales y de dados al equipo debido a su peso y a los bordes
afilados que puedan quedar expuestos:
Los aparatos de aire acondicionado detallados en este manual suponen un peligro pot su excesivo peso.
Es necesaria la intervenci6n de dos o mas personas para mover e instalar el equipo. Para evitar lesiones y
problemas musculares, emplee t6cnicas adecuadas de levantamiento y desplazamiento del mismo.
Inspeccione cuidadosamente la Iocalizaci6n donde piensa instalar el equipo de aire acondicionado. AsegOrese
de que es capaz de soportar el peso del mismo durante un largo periodo de tiempo.
Manipule el aparato de aire acondicionado con cuidado. Utilice guantes protectores cuando necesite levantarlo
o moverlo. EVlTE tocar las afiladas aletas metalicas que existen en el frontal yen la parte posterior.
Evite que el aparato de aire acondicionado se caiga durante la instalaci6n.
• GUARDE LA CAJA y estas INSTRUCCIONES de INSTALACION para futura referencia. La caja es la mejor
manera de guardar la unidad durante el invierno o cuando no est6 en uso.
o NO UTILIZAR OTROS TORNILLOS QUE NO SEAN LOS ESPEClFICADOS EN ESTAS INSTRUCClONES.
Herramientas Necesarias
® DESTORNILLADOR (Estandar, Philips y Piano) o REGLA
• CUCHILLO • MARTILLO
o LAPIZ • NIVEL
Ferreteria (dentro de la bolsa de plastico) Cant. Ferreteria (dentro de la bolsa de plastico) Cant.
SOPORTE DE MONTAJE 1 _ BLOQUEO DE VENTANA 1
BURLETESPERNO DE NIVELACION LARGO 1 (6"X3/4"X1/12") 5
1 BURLETE PARA LA VENTANA
PERNO DE NIVELACION
1
CORTO
TORNILLO DE 1/2" 8 S TIRA DE ESPUMA 1
2020211A2592

C6mo instalar la unidad
,
,
Para evitar la vibraci6n y el ruido, asegOrese de que la unidad
est_ firmemente sujeta.
Instale la unidad un poco inclinada de manera que la parte posterior
este un poco m_s abajo que la parte anterior (m_s o menos 1/4").
Esto har_ que el agua condensada salga de la unidad.
PRECAUClON: Todas las palas de direccionamiento del aire
deben quedar expuestas en la parte de fuera de
la carcasa.
Instalaci6n
_$2_$2_ i
,
7 ,'
= [
t'
[
t'
re 1/4"
Instalacion de los Paneles de Relleno de Izquierda y Derecha
Ponga la unidad en el suelo, un banco o una mesa. Hay un Panel de Relleno Izquierdo y Derecho, aseg0rese
de usar el adecuado para cada lado. Una vez instalados, la pestada que asegura cada panel al antepecho de la
ventana estara mirando adentro de la habitaci6n.
A. Sujete el panel lateral con una mano y suavemente tire del centro para liberar el lado abierto. Vet FIG.1.
B. Deslice el lado abierto 'T' del panel en la carcasa como se muestra en la FIG.2. Deslice el panel hacia abajo. Aseg0rese
de dejar suficiente espacio para deslizar la parte de arriba y la de abajo del marco en los railes de la carcasa.
C. Una vez que el panel ha sido instalado en el lateral de la carcasa, asegOrese de que esta bien insertado en el rail
interior del marco. Deslice las partes superior e inferior del marco en los railes superior e inferior de la carcasa.
Vet FIG.3.
D. Deslice el panel hasta el final y repita en el otto lado.
FIG.1 /-Isecci6n en 'T' FIG.2 FIG.3
Su acondicionador de aire esta disedado para su
instalaci6n en ventanas estandar de dos hojas con
aberturas de 26.5 a 41.5 pulgadas de ancho (de 673mm a
1054mm) (FIG.4).
La hoja de abajo debe estar Io suficientemente abierta
para permitir una apertura sin obstaculos de 12.4
pulgadas (315mm). Las palas de direccionamiento del
aire laterales y la parte trasera del equipo deben tenet
suficiente flujo de aire a trav6s del condensador para
enfriarlo.
La parte trasera de la unidad debe estar en el exterior, no
en el interior de un edificio o un garaje.
Fig. 4
VIERTEAGUAS
PARED
Ventanas de Madera

CortelaTIRADEESPUMAparequeseajustealaparteinferiordelahojadelaventana.Abralaventana,
quiteelprotectoryfijelaTIRADEESPUMAcomoseindicaenlaFIG.5.
MarqueelcentrodelantepechoconunlapizcomosemuestraenlaFIG.6.
FiG. 5
FiG. 6
LINEACENTRAL ANTEPECHO INTERIOR
Instale el soporte de montaje en el antepecho de la ventana. Ver FIG.7. Instale el perno de nivelaci6n hacia arriba
a trav6s de la parte de abajo del soporte de montaje. Puede elegir entre el perno corto o el largo dependiendo de su
tipo de ventana. Tambi6n debera elegir la posici6n del agujero en el soporte de montaje. Ponga el soporte en centro
del antepecho (Ver FIG.7). Atornille ligeramente el soporte al antepecho con los tornillos provistos. Ajuste el perno
nivelador de manera que el acondicionador de aire est6 un poco inclinado (alrededor de 1/4") pare abajo hacia el
exterior pare que desag0e correctamente. (Ver FIG.8). Apriete los tornillos del soporte de montaje.
antepecho tornillo soportede alrededor
interior montaje de 1/ "
L onivo,aci4
INTERIOR II [ EXTERIOR
FIG. 8
Si no se instala correctamente el soporte de montaje puede caerse la unidad cuando se abra la ventana despu6s
de haber instalado la unidad. Esto puede ocasionar dahos personales.
Instalar el acondicionador de aire en la ventana
• antepecho de-_
Con ayuda de otra persona, levante con cutdado el la ventana
acondicionador de aire y deslicelo en la ventana.
Aseg0rese de que el soporte de montaje est_fiinsertado canalsunerior
en el z6calo debajo del ventilador y que la guia de los '- _ [ ..........................................................................................
paneles laterales esta bloqueada por el bloqueo en el _ _T.j_ secci6n
soporte de montaje como se muestra en la FIG.9 ..... ;_,_ f--q , _::::::::::::'_ exterior
NOTA: Cuando la unidad est6 centrada adecuadamente e de nteror/_: ] :::::::::::::::::::::::::::::
insertada completamente pare corregir la posici6n del _:'_I :::::::::::::::::::::::::::I::
soporte senttra que la untdad encaja sohdamente en el mtsmo, f_ I
Sujete la unidad firmemente durante este procedimiento. Ii l- z6cato del
soporte de
Despu6s de hacer la instalaci6n, aseg0rese de que el aire !_ I _ _ montaje
..... o . . . \ L _ __y____
acondtctonado este mchnado 2-4 hacta aba]o al extertor, el ...........................
condensado no debe drenar por el orificio de drenaje durante de
el uso normal en caso Io contrario, corrija la inclinaci6n.
Baje a ventana todo o pos b e de manera que a hoja
se apoye firmemente en el canal superior de la unidad
y los marcos de los paneles de relleno.
PRECAUClON: Mientras Ileva a cabo los pesos anteriores,
sujete la unidad firmemente haste que la hoja de la ventana
sea bajada haste el canal superior detras de los paneles de
relleno. La caida de la unidad desde la ventana puede
....................................................."1 "o'r soporte
j,,,_ Doquea(] montaje
antepecho--_
interior _ °_ pemo de
] L \ nivetaci6n
L__ I__--- antepecho
I I _] exterior
FIG. 9

BLOQUEE LOS MARCOS DE LOS PANELES DE
RELLENO LATERALES:
Expanda los paneles de relleno y bloqu6elos usando los
4 tomillos como se muestra en la FIG.10. Cuando los
paneles de relleno se abren o se cierran puede encontrar
cierta resistencia. Esto es normal.
SELLADO DE LA HOJA DE LA VENTANA Y BLOQUEO
DE LA VENTANA:
Corte el burlete para la ventana para que se ajuste al
ancho de la ventana. Introduzca el burlete entre el
cristal y la ventana para evitar que entren el aire y
los insectos, como muestra en la FIG.10.
Corte el burlete (6"X3/4"X1/12") a una Iongitud
adecuada, retire el protector y rellene cualquier
posible hueco como se muestra en la FIG.10.
Instale el bloqueo de ventana para evitar que se suba
la ventana y asi evitar que se caiga la unidad, como
se muestra en la FIG.10.
NOTAI : Es dificil bloquear las ventanas con el bloqueo
de ventana en algunas ventanas de manera que puede
usar el propio cerrojo de la ventana, burlete
NOTA2: Si el marco de la hoja de la ventana tiene una su3erficie de metal, use tornillos para metal en lugar
de los tomillos para madera provistos. Obtenga tomillos para metal en su ferreteria mas cercana.
Los tornillos del bloqueo de ventana y de los paneles de relleno laterales deben ser instalados como se indica para
evitar la posibilidad de que la unidad se caiga de la ventana y cause dados personales o a la propiedad.
SI ELACONDICIONADOR DE AIRE ESTA BLOQUEADO
POR UNA CONTRAVENTANA:
Si la contraventana impide el montaje atornille un list6n
de madera de 2" (51mm) a la ventana interior a Io largo
de todo el antepecho. El list6n de madera deberia ser Io
suficientemente grueso como para elevar la altura del
antepecho de manera que la unidad se pueda instalar sin
la interferencia del marco de la contraventana, ver FIG.11.
La parte de arriba del list6n deberia medir 7/8" (22mm) mas
que el marco de la contraventana para permitir que la
condensaci6n de la Iluvia desagOe de manera adecuada.
Instale un segundo list6n de madera (de aproximadamente
6" (152mm) de largo por 1-1/2" (38mm) de ancho y del
mismo grosor que el primer list6n) en el centro del
antepecho exterior y alin6elo con la parte posterior del
antepecho interior. Vet FIG.11.
INSTALACION PARA OTRO TIPO DE VENTANAS:
liston de madera
instalado en la parte 1-1/2" min. espacio libre
de arriba del (38mm) de 7/8" (22mm)
antepecho interior _ _
i
T
Cuando el marco de la contraventana
est6 situado en el antepecho exterior
FIG. 11
Las dimensiones y la geometria de las ventanas son diferentes de acuerdo con el fabricante. Compruebe
su ventana y chequee la FIG.12 para instalar el soporte de montaje de manera firme y segura.
(a) Cuando el marco de la ventana esta situado en el
antepecho interior.
• Instateun list6n de madera (de la Iongitud de la anchura
de laventana y de la altura del marco de la ventana) en
el antepecho interior.
(b) Cuando el marco de la ventana es mas alto de
32/23" (18ram).
• Instate un list6n de madera (alrededor 4" (102mm) de
largo) en la parte exterior det antepecho para alzar et
soporte de montaje.
MARCO DE LA
HOJA DE LA
VENTANA
MARCO DE LA ::
FIG. 12

EXTRAER DE LA VENTANA:
Apagar y desenchufar el acondicionador de aire.
Desatornillar los tornillos laterales que instal6 en los pasos 6 y 7.
Cierre los paneles de relleno y remueva el burlete de ventana y el bloqueo de ventana de la ventana.
Sujete firmemente el acondicionador de aire y la hoja de la ventana.
Levante el acondicionador de aire de la ventana.
Quite el soporte de montaje del marco de la ventana.
NOTA: Cuando se acabe la temporada de utilizar el aparato, la unidad es retirada de la ventana para set limpiada y
almacenada. Puede que siga habiendo agua condensada en la base. Retire la unidad con cuidado para evitar que el
agua se derrame. Guarde la unidad siempre en una superficie plana sobre su base. Retire el soporte de montaje y el
bloqueo de ventana y guardelos. La ventana no se podra cerrar si no se desinstala el soporte de montaje.
Los acondicionadores de aire que se cubren en este manual suponen un peligro pot su elevado peso. Se
necesitan dos personas para mover e instalar la unidad. Para prevenir lesiones utilice t6cnicas adecuadas de
levantamiento y acarreo de peso mientras mueva la unidad.
Cuando maneje la unidad, tenga cuidado para evitar cortes producidos pot bordes de metal cortantes en el
frontal o en la parte trasera.
AsegOrese de que el acondicionador de aire no se cae durante su retirada.

BLANKPAGE
-
 1
1
-
 2
2
-
 3
3
-
 4
4
-
 5
5
-
 6
6
-
 7
7
-
 8
8
-
 9
9
-
 10
10
-
 11
11
-
 12
12


Kenmore Elite 25376062410 Guía de instalación
- Tipo
- Guía de instalación
- Este manual también es adecuado para
en otros idiomas
Artículos relacionados
Otros documentos
-
Kenmore 580.74121300 El manual del propietario
-
-
Kenmore 580.72124300 El manual del propietario
-
-
-
Kenmore 58074259400 El manual del propietario
-
-
Kenmore 75101 10,000 El manual del propietario
-
 GREAT STUFF 162848 Guía de instalación
