La página se está cargando...

20" Digital LCDTV
built-in DVD Player
Owner's Manual
LD200SL9
inch
Disc ONLY
eN.A_CeD_FI_ITIO._LEVlSIO.
ITI DOLBY
DIGITAL I
\
\
TO RECEIVE DIGITAL/ANALOG SIGNAL, YOU MUST CONNECT ANTENNA.
© 2008 Funai Electric Co., Ltd.
iiiiiiiii!iiiii!iii!i!!!i!!i!i!i!i!i!i!i!i!i!i!i!i!ili!ilil

WARNING:TO REDUCE THE RISK OF FIRE OR ELECTRIC SHOCK, DO NOT EXPOSE THIS
APPLIANCE TO RAIN OR MOISTURE.
CAUTION
CAUTION: TO REDUCETHE RISKOF ELECTRICSHOCK,
DO NOT REMOVECOVER(ORBACK).NO USERSERVICEABLE
PARTSINSIDE.REFERSERVICINGTO QUALIFIED SERVICE
PERSONNEL.
Theimportantnote islocatedontherearofthecabinet.
Important Safeguards
1,, READ INSTRUCTIONS - All the safety and operating instructions should be
read before the appliance is operated.
2 RETAIN INSTRUCTIONS - The safety and operating instructions should be
retained for future reference.
3 HEED WARNINGS - All warnings on the appliance and in the operating
instructions should be adhered to.
4 FOLLOW INSTRUCTIONS- All operating and use instructions should be
followed.
5 CLEANING - Unplug TV from the wall outlet before cleaning. Do not use
liquid cleaners or aerosol cleaners. Use a damp cloth for cleaning.
EXCEPTION: A product that is meant for uninterrupted service and, that for
some specific reason, such as the possibility of the loss of an authorization
code for a CATV converter, is not intended to be unplugged by the user for
cleaning or any other purpose, may exclude the reference to unplugging the
appliance in the cleaning description otherwise required in item 5.
6 ATTACHMENTS- Do not use attachments not recommended by the TV
manufacturer as they may cause hazards.
7 WATER AND MOISTURE - Do not use this TV near water, for example, near a
bath tub, wash bowl, kitchen sink, or laundry tub, in a wet basement, or near
a swimming pool, and the like.
8° ACCESSORIES - Do not place this TVon an unstable cart,
stand, tripod, bracket, or table. The TV may fall, causing
serious injury to someone, and serious damage to the
appliance. Use only with a cart, stand, tripod, bracket, or table
recommended by the manufacturer, or sold with the TV.
Any mounting of the appliance should follow the
manufacturer's instructions and should use a mounting
accessory recommended by the manufacturer. An
appliance and cart combination should be moved with care. Quick stops,
excessive force, and uneven surfaces may cause the appliance and cart
combination to overturn.
AMEUBLES - Cet appareil ne dolt _tre plac_ que sur un
meuble (avec ou sans roulettes) recommand_ par le
fabricant. Si vous I'installez sur un meuble _ roulettes,
d_placez les deux ensembles avec precaution. Un arr_t
brusque, I'utilisation d'une force excessive et des surfaces
irr_gulieres risquent de d_stabiliser I'ensemble et de le
renverser.
9., VENTILATION - Slots and openings in the cabinet and the back or bottom
are provided for ventilation and to ensure reliable operation of the TV and to
protect it from overheating, these openings must not be blocked or covered.
The openings should never be blocked by placing the TV on a bed, sofa, rug,
or other similar surface.This TV should never be placed near or over a radiator
or heat register. This TV should not be placed in a built-in installation such as
a bookcase or rack unless proper ventilation is provided or the manufacturer'
s instructions have been adhered to.
10_ POWER SOURCES -This TV should be operated only from the type of power
source indicated on the marking label. If you are not sure of the type of
power supply to your home, consult your appliance dealer or local power
company. For TVs intended to operate from battery power, or other sources,
refer to the operating instructions.
11 _ GROUNDING OR POLARIZATION -This TV is equipped with a polarized
alternating-current line plug (a plug having one blade wider than the other).
This plug will Fit into the power outlet only one way. This is a safety feature.
If you are unable to insert the plug fully into the outlet, try reversing the
plug. If the plug should still fail to fit, contact your electrician to replace your
obsolete outlet. Do not defeat the safety purpose of the polarized plug.
12_ POWER-CORD PROTECTION - Power-supply cords should be routed so
that they are not likely to be walked on or pinched by items placed upon
or against them, paying particular attention to cords at plugs, convenience
receptacles, and the point where they exit from the appliance.
13 OUTDOOR ANTENNA GROUNDING - If an outside antenna or cable system
is connected to the TV, be sure the antenna or cable system is grounded so
as to provide some protection against voltage surges and built-up static
charges. Article 810 of the National Electrical Code, ANSI/NFPA No. 70,
provides information with respect to proper grounding of the mast and
EN
THIS SYMBOL INDICATES THAT DANGEROUS
VOLTAGE CONSTITUTING A RISK OF ELECTRIC
SHOCK IS PRESENT WITHIN THIS UNIT.
THIS SYMBOL INDICATES THATTHERE ARE
IMPORTANT OPERATING AND MAINTENANCE
INSTRUCTIONS IN THE LITERATURE
ACCOMPANYING THE APPLIANCE.
supporting structure, grounding of the lead-in wire to an antenna discharge
unit, size of grounding conductors, location of antenna-discharge unit,
connection to grounding electrodes, and requirements for the grounding
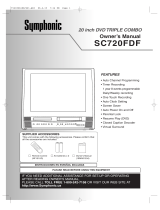
electrode. (Fig. A)
FIGUREA
EXAMPLEOF ANTENNAGROUNDINGASPER
NATIONALELECTRICALCODE
GROUND
NEC NATIONAL ELECTRICAL CODE
I {N[c SECTION 810 2O)
UNDING CONDUC
(N[C SECTION 810 21)
_ GROUND CLAMPS
POVVERSERVICE GROUNDING
ELECTRODE SYSTEM
{N CART 0, ARTH)
14_ LIGHTNING - For added protection for this TV receiver during a lightning
storm, or when it is left unattended and unused for long periods of time,
unplug it from the wall outlet and disconnect the antenna or cable system.
This will prevent damage to the TV due to lightning and powerdine surges.
15_ POWER LINES - An outside antenna system should not be located in the
vicinity of overhead power lines or other electric light of power circuits, or
where it can fall into such power lines or circuits. When installing an outside
antenna system, extreme care should be taken to keep from touching such
power lines or circuits as contact with them might be fatal.
16_ OVERLOADING - Do not overload wall outlets and extension cords as this
can result in a risk of fire or electric shock.
17_ OBJECT AND LIQUID ENTRY - Never push objects of any kind into this TV
through openings as they may touch dangerous voltage points or short out
parts that could result in afire or electric shock. Never spill liquid of any kind
on the TV.
18_ SERVICING - Do not attempt to service this TV yourself as opening or
removing covers may expose you to dangerous voltage or other hazards.
Refer all servicing to qualified service personnel.
19_ DAMAGE REQUIRING SERVICE - Unplug this TV from the wall outlet and
refer servicing to qualified service personnel under the following conditions:
a. When the power supply cord or plug is damaged or frayed.
b. If liquid has been spilled, or objects have fallen into the TV.
c. If the TV has been exposed to rain or water.
d. If the TV does not operate normally by following the operating
instructions. Adjust only those controls that are covered by the operating
instructions, as improper adjustment of other controls may result in
damage and will often require extensive work by a qualified technician
to restore the TV to its normal operation.
e. IftheTVhas been dropped or damaged in anyway.
f. When the TV exhibits a distinct change in performance, this indicates a
need for service.
20_ REPLACEMENT PARTS -When replacement parts are required, be sure the
service technician uses replacement parts specified by the manufacturer that
have the same characteristics as the original part. Unauthorized substitutions
may result in fire, electric shock, injury to persons or other hazards.
21 _ SAFETY CHECK - Upon completion of any service or repairs to this TV, ask
the service technician to perform routine safety checks to determine that the
TV is in proper operating condition.
22_ HEAT - This TV product should be situated away from heat sources such as
radiators, heat registers, stoves, or other products (including amplifiers) that
produce heat.

[] Precautions
Do not place the unit on the furniture that is capable of being tilted by a child and an adult leaning, pulling, standing or climbing
on it. A falling unit can cause serious injury or even death.
(_ LAMP IN LCD CONTAINS MERCURY, DISPOSE ACCORDING TO LOCAL, STATE OR FEDERAL LAW.
CAUTION: TO PREVENT,ELECTRIC SHOCK,, MATCH WIDE BLADE OF PLUG TO WIDE SLOT, FULLY INSERT. LA
ATTENTION: POUR EVITER LES CHOCS ELECTRIQUES, INTRODUIRE LA LAME LA PLUS LARGE DE LA FICHE DANS
BORNE CORRESPONDANTE DE LA PRISE ET POUSSER JUSQU'AU FOND.
FCC WARNING This equipment may generate or use radio frequency energy. Changes or modifications to this equipment I
may cause harmful interference unless the modifications are expressly approved in the manual. The user
cou dose the authority to operate this equipment if an unauthorized change or modification ismade.
RADIO-TV INTERFERENCE
This equipment has been tested and found to comply with the limits for a Class B digital device, pursuant to Part 15 of the
FCCRules. These limits are designed to provide reasonable protection against harmful interference in a residential installation.
This equipment generates, uses, and can radiate radio frequency energy and, if not installed and used in accordance with the
instructions, may cause harmful interference to radio communications. However, there is no guarantee that interference will not
occur in a particular installation. If this equipment does cause harmful interference to radio or television reception, which can be
determined by turning the equipment off and on, the user is encouraged to try to correct the interference by one or more of the
following measures:
1) Reorient or relocate the receiving antenna.
2) Increase the separation between the equipment and receiver.
3) Connect the equipment into an outlet on a circuit different from that to which the receiver is connected.
4) Consult the dealer or an experienced radio/TV technician for help.
This Class B digital apparatus complies with Canadian ICES-O03.
Cet appareil numbrique de la classe B est conforme _ la norme NMB-O03 du Canada.
Note to CATV system installer: I
This reminder is provided to call the CATV system installer's attention to Article 820-40 of the NEC that provides guidelines I
for proper grounding and, in particular, specifies that the cable ground should be connected to the grounding system of the
building as close to the point of cable entry as practical.
LASER SAFETY
This unit employs a laser. Only a qualified service person should remove the cover or attempt to service this device, due to
possible eye injury.
CAUTION: USE OF CONTROLS OR ADJUSTMENTS OR PERFORMANCE OF PROCEDURES OTHER THAN THOSE SPECIFIED
HEREIN MAY RESULT IN HAZARDOUS RADIATION EXPOSURE.
CAUTION: VISIBLE AND INVISIBLE LASER RADIATION WHEN OPEN AND INTERLOCK DEFEATED. DO NOT STARE INTO BEAM.
LOCATION: INSIDE, NEAR THE DECK MECHANISM.
IMPORTANT COPYRIGHT INFORMATION
Unauthorized copying, broadcasting, public performance and lending of discs are prohibited. This product incorporates
copyright protection technology that is protected by U.S. patents and other intellectual property rights. Use of this copy-
right protection technology must be authorized by Macrovision, and is intended for home and other limited viewing uses
only unless otherwise authorized by Macrovision. Reverse engineering or disassembly is prohibited.
i!iii!!
EN

LOCATION
For safeoperation and satisfactory performance of the unit, keep the following in mind when selecting a place for its installation:
• Shield it from direct sunlight and keep it away from sourcesof intense heat.
• Avoid dusty or humid places.
• Avoid places with insufficient ventilation for proper heat dissipation. Do not block the ventilation holes at the top and bottom of the
unit. Do not place the unit on a carpet because this will block the ventilation holes.
• Install the unit in a horizontal position.
• Avoid locations subject to strong vibration.
• Do not place the unit near strong magnetic fields.
• Avoid moving the unit to locations where temperature differences are extreme.
• Besure to unplug the AC power cord from the outlet before carrying the unit.
TO AVOID THE HAZARDS OF ELECTRICAL SHOCK AND FIRE
• Do not handle the power cord with wet hands.
• Do not pull on the power cord when disconnecting it from an ACoutlet. Grasp it by the plug.
• If,by accident, water is spilled on the unit, unplug the power cord immediately and take the unit to our authorized service center for
servicing.
• Do not place anything directly on top of the unit.
MOISTURE WARNING
• Moisture condensation may occur inside the unit when it is moved from a cold place to a warm place, or after heating a cold
room or under conditions of high humidity.
When the condensation occurs inside the unit, turn the unit on and leave it at least 2 hours to dry out.
The serial number of this product may be found on the back of the unit. No others have the same serial number as yours. You
should record the number and other vital information here and retain this book as a permanent record of your purchase to aid
identification in case of theft.
date of purchase dealer phone N01 serial No.
dealerpurchasefrom model No. dealer address
Note about recycling: I
This product's packaging materials are recyclable and can be reused. Please dispose of any materials in accordance with your I
local recycling regulations. I
Batteries should never be thrown away or incinerated but disposed of in accordance with your local regulations concerning
chemical wastes.
[] Supplied Accessories
owner's manual remote control
(1EMN23980) _ (NF603UD)
batteries
(AAx 2)
• If you need to replace these accessories, please refer to the part No. with the illustrations and call our toll free
customer support line found on the cover of this manual.
• Depending on your antenna system, you may need different types of combiners (mixers) or separators (splitters).
Contact your local electronics store for these items.
[] Tilt Stand
You can adjust the stand to change the angle
of the TV (-2.5 ° to 10°).
I i I
till ,
, ,// /
17/
I '
[] Symbols Used in this Manual
The following is the description for the symbols used
in this manual.
Description refers to:
iivl ill _Ill i [e]__ IDlvlDlill _[q i [el__t
: Analog TV
operation
: Digital TV
operation
• If neither symbol appears
under the function
heading, operation is
applicable to both.
: Playback of
DVD-video
: Playback of
audio CD
: Playback of
CD-RW/-R with
MP3 files
• If no symbol appears
under the function
heading, operation is
applicable to all.
EN

[] Contents
NTROIDUCTON
ImportantSafeguards............................................. 2
Precautions...................................................... 3
SuppliedAccessories.............................................. 4
TiltStand........................................................ 4
SymbolsUsedinthisManual....................................... 4
Features......................................................... 6
RemoteControlFunction.......................................... 7
InstallingtheBatteries............................................ 7
ControlPanel..................................................... 8
RearPanel....................................................... 8
CON NIECTON
BasicConnection.................................................. 9
ExternalDeviceConnection....................................... 10
TV Functions
NIT All,,,,,,,SEWNG
InitialSetup..................................................... 12
MainMenu...................................................... 13
AutoChannelScan............................................... 13
LanguageSelection.............................................. 14
WATCI"""ING TV
ChannelSelection................................................ 15
VolumeAdjustment.............................................. 15
SwitchingEachMode............................................. 16
SwitchingAudioMode........................................... 16
ScreenInformation .............................................. 17
TVScreenDisplayMode........................................... 18
SleepTimer..................................................... 18
OIF:::>TONAL SIE:W NG
ChannelAdd/Delete.............................................. 19
PictureAdjustment.............................................. 19
ClosedCaption................................................... 20
DTVClosedCaption............................................... 21
DTVCCStyle..................................................... 21
BackLightSetting............................................... 22
ColorTemperature............................................... 23
V-chip.......................................................... 23
DVD Functions
....] r"""''') _
OI I::::::::II_ATNGIDVD
PlayableMedia.................................................. 26
UnplayableMedia............................................... 26
Playback........................................................ 27
DVDMenu...................................................... 27
ResumePlayback................................................ 27
Pause.......................................................... 27
Step-by-stepPlayback............................................ 28
FastForward/ FastReverse....................................... 28
SlowForward/SlowReverse...................................... 28
Zoom........................................................... 28
MP3Playback................................................... 29
SearchFunctions................................................. 30
RepeatPlayback................................................. 31
RepeatA-BPlayback............................................. 31
ProgrammedPlayback........................................... 32
RandomPlayback................................................ 32
On-screenDisplay................................................ 33
SpecialSettings.................................................. 34
P' I......
h,,,,,}Vh,,,,,}SETT NG
DVDLanguageSetting ........................................... 37
DisplaySetting.................................................. 38
DVDAudioSetting............................................... 39
ParentalSetting................................................. 40
Others.......................................................... 41
ResettotheDefaultSetting....................................... 42
LanguageCodeList.............................................. 42
TROU IBLESHOOT NG
TroubleshootingGuide........................................... 43
NIF::::::OIF:::::(MATON
i
i
J
i?
iii_iill
ii:i
iiii!!i__
Glossary........................................................ 45
Maintenance.................................................... 45
CableChannelDesignations....................................... 46
GeneralSpecifications............................................ 46
ElectricalSpecification............................................ 46
OtherSpecifications.............................................. 46
LimitedWarranty........................................ Backcover
{} 2008 Funai Electric Co., Ltd.
All rights reserved. No part of this manual may be reproduced, copied, transmitted, disseminated, transcribed, downloaded or stored in
any storage medium, in any form or for any purpose without the express prior written consent of Funai.
Furthermore, any unauthorized commercial distribution of this manual or any revision hereto is strictly prohibited.
Information in this document is subject to change without notice. Funai reserves the right to change the content herein without the
obligation to notify any person or organization of such changes.
FUNA[ with the _ design is a registered trademark of Funai Electric Co., Ltd and may not be used in any way without the express written
consent of Funai. All other trademarks used herein remain the exclusive property of their respective owners. Nothing contained in this
manual should be construed as granting, by implication or otherwise, any license or right to use any of the trademarks displayed herein.
Misuse of any trademarks or any other content in this manual is strictly prohibited. Funai shall aggressively enforce its intellectual property
rights to the fullest extent of the law.
ii_iZ
EN

[] Features
TV
• DTV/TV/CATV
- You can use your remote control to select channels
which are broadcast in digital, conventional analog,
standard definition. Also, cable subscribers can
access their cable TV channels.
• Program Information Display (DTV only)
- You can display the title, contents and other
information of the current DTV program on the TV
screen.
• Auto Channel Scan
-This unit automatically scans and memorizes
channels available in your area, eliminating difficult
setup procedures.
• V-chip
- This feature allows you to block children's access to
inappropriate TV programs.
• Closed Caption Decoder
- Built-in closed caption decoder displays text for
closed caption supported programming.
• MTS/SAP Tuner
- Audio language or stereo sound function can be
selected from the remote control.
• Auto Shut Off Function
- If there is no signal input from the antenna terminal
and no operation for 15 minutes, the unit will turn
itself off automatically.
• Sleep Timer
- This feature will automatically turned off the power
of the unit at a specific time.
• Choices for On-screen Language
- Select your on-screen language:
English, Spanish or French.
• PLL Frequency Synthesized Tuning
- Provides free and easy channel selection and lets
you tune directly to any channel using the channel
number buttons on the remote control.
• Component Video Input
• S-video Input
• AV Input
• Digital Audio Coaxial Output
D V D
• Dolby Digital Sound
- Enjoy Dolby Digital multi-channel surround sound
when you connect the unit to your Dolby Digital
decoder.
• Still / Fast / Slow / Step Playback
-Various playback modes are available including still
pictures, fast forward/reverse, slow motion and step
frames.
• DVD Menus in a Desired Language
- You can display DVD menus in a desired language, if
available on a DVD-video.
• Screen Saver
- If there is no operation for 5 minutes, the screen
saver program starts.
• Parental Lock
- Block the viewing of DVD-video unsuitable for
children.
• Resume Play
- Lets you resume play back from the point at which
playback was stopped.
• Bit Rate Indication
• Dynamic range control (DRC)
- You can control the range of sound volume.
Accessing from [MODE] button
During playback
• Subtitles in a Desired Language
- You can select a desired language for displaying
subtitle, if that language is available on a DVD-video.
• Selecting a Camera Angle
- You can select the desired camera angle, ira DVD
contains sequences recorded from different angles.
• Zoom
- Allows you to enlarge the size of picture image.
• Black Level Adjustment
• Virtual Surround
• Search
- chapter search / title search / track search / time
search
• Marker
-The part designated by user can be called back.
• Repeat
- chapter / title / track / group / all / A-B
In stop mode
• Program Playback for audio CD and MP3
- You can program the order of tracks/files to play
them back in designated order.
• Random Playback for audio CD and MP3
-This unit can shuffle the order of tracks/files to play
them back in randomly.
Accessing from [AUDIO] button
During playback
• Choices for Audio Language and Stereo Sound
Function
- Select your desired language or stereo sound
function when different options are available on
your disc.
EN

[] Remote Control Function
1
2
3
12
13
14
15
16
17
18
19
11
5. VOL. _F buttons (p15)
Press to adjust the volume.
6. PAUSE II button (p27)
Press to pause disc playback.
7. SKIP I<1<1/ _ button (p30)
• Press to skip forward or backward
chapters, titles (DVD) or tracks/files (CD,
MP3).
REV _ button (p28)
• Press and hold to begin slow reverse
playback during the pause mode (DVD)
and search backward through a disc.
FWD _ button (p28)
• Press and hold to begin slow forward
playback during the pause mode (DVD)
and search forward through a disc.
8. SETUP button (pl 3 / p37)
Press to display the main menu.
9. RETURN button (p19)
Press to return to the previous menu
operation.
10. CLEAR button (p31)
• Press to clear the numbers entered
incorrectly.
• Press to cancel the point A for A-B
repeat (DVD, CD).
• Press to remove the track/file number
in program input (CD, MP3).
11. MODE button (p6)
• Press to arrange the playing order or
playback randomly (CD, MP3).
• Press to set the black level (DVD) and
the virtual surround (DVD, CD, MP3) on
or off.
• Press to change the camera angle to
see the sequence being played back
from different angle (DVD-video).
• Press to search chapter, title (DVD),
time (DVD, CD) or track/file (CD, MP3).
• Press to set the marker (DVD, CD).
• Press to repeat playback chapter,
title (DVD), track/file, disc (CD, MP3),
group (MP3) repeatedly or between
designated point A and B (DVD, CD).
• Press to magnify the part of picture
(approx. 1.3x, 2x and 4x : DVD).
• Press to select the subtitles on a disc
(DVD).
12. EJECT_ button (p27)
Press to eject the disc.
13. INPUT button (p16)
Pressto access aconnected external device
like a video game, camcorder or VCR.
14. DISPLAY button (p17 / p33)
Digital Mode (DTV)
• Press to display the channel number
and the program information.
Analog Mode (TV)
• Press to display the channel number.
External Input Mode
• Press to display the currently selected
external input mode.
15. AUDIO button (p16 / p34)
Digital Mode (DTV)
• Press to select the audio language.
Analog Mode (TV)
• Press to select the audio mode.
DVD Mode
• Press to select the audio language
(DVD), or sound mode (CD).
16. SCREEN MODE button (p18)
Press to select aspect ratio available for
the TV screen.
17. PICTURE button (plg)
Press to adjust the picture quality.
18. CH. RETURN button (p15)
Press to return to previous channel.
19. CH.•/V buttons (p15)
Press to select channels.
20. PLAYII_ button (p27)
Press to begin disc playback.
21. STOPII button (p27)
Press to stop disc playback.
22. <1 / I_ / • / • buttons (p12)
Press to move left/right/up/clown
through the items.
23. ENTER button (p12)
Press to confirm your selection.
24. MENU button (p27)
• Press to call up the menu on a disc.
• Press to call up the file list. (MP3)
25. TOP MENU button (p2g)
• Press to call up the top menu on a
disc. (DVD-Video)
• Press to return to the top file of the
highest hierarchy in the program and
file list. (MP3)
ill
ill!+¸+!¸¸¸¸
1. POWER button (pl 2)
Press to turn the unit on and off.
2. MUTE button (pl 5)
Press to turn the sound on and off.
3. SLEEP button (p18)
Press to activate the sleep timer.
4. Number buttons (p15)
• Press to select channels.
• Press to select chapter, title (DVD), or track/
file (CD, MP3) directly.
-lENT button
• Press to shift the minor channel from the
major channel.
+I01+I00 button
• Press to select 100 or higher channels (CATV)
• Press to search if there are minor channels on
the currently selected major channel (DTV)
[] Installing the Batteries
Install the batteries (AA x 2) matching the polarity indicated inside battery compartment of the remote control.
Battery Precautions:
• Be sure to follow the correct polarity as indicated in the battery compartment. Reversed batteries may cause damage to the device.
• Do not mix different types of batteries together (e.g., Alkaline and Carbon-Zinc) or old batteries with fresh ones.
• If the device is not to be used for a long period of time, remove the batteries to prevent damage or injury from possible battery leakage.
• Do not try to recharge batteries; they can overheat and rupture.
EN

[] Control Panel
1
2
3
4
5
6
7
8
9
lO
1. SETUP button (pl 3 / p37)
Press to display the main menu.
2. STOP• button (p27)
Press to stop disc playback.
3. PLAYI_ button (p27)
Press to begin disc playback.
4. EJECT-- button (p27)
Press to eject the disc.
5. VOLUME _/T buttons (p15)
Press to adjust the volume.
6. CHANNELA/_' buttons (p15)
Press to select channels or move up/down through
the main menu items.
7. INPUT button (p16)
Press to select the digital, analog or external input.
8. POWER button (p12)
Press to turn the unit on and off.
9. Infrared Sensor Window
Receives infrared rays transmitted from the remote
control.
10. Disc Loading Slot (p27)
Insert the disc with label facing back of this unit.
[] Rear Panel
;ide of the unit
2
3
4
5
6
7
8
1. ANT jack (pg)
RF coaxial cable connection for your antenna or cable
receiver.
2. HEADPHONE jack
Headphone connection for personal listening.
3. COMPONENT and AUDIO input jack (pl0)
Component video cable connection for an external
device.
Use component video and audio output jack of an
external device.
4. AUDIO input jack (pl0)
RCA audio cable connection for an external device.
5. VIDEO input jack (pl 1)
RCA video cable connection for an external device.
6. S-VIDEO input jack (pl0)
S-video cable connection for an external device.
7. COAXIAL (digital audio) output jack (pl 1)
Digital audio coaxial cable connection for a decoder or
an audio receiver.
Use digital audio input jack of an external device.
8. AC power cord
Connect to a standard AC outlet to supply power to
this unit.
EN

[] Basic Connection
Thissectiondescribeshowtoconnecttheunittoanantenna,cablereceiverorsatellitebox.
Note:
• Besure yourantenna or other device is connected properly before plugging in the power cord.
[Antenna Cable Connection]
When connecting the unit to an antenna or cable TV signal (without receiver/satellite box)
Connect the RF coaxial cable on your home outlet to the antenna input jack of this unit.
e.g.)
VHF/UHF_
antenna _ rear of this unit
i::!
cableTV
signal
RFcoaxial cable
_Once connections are completed, turn on the unit and begin initial setup.
Channel scanning is necessary for the unit to memorize all available channels in your area.
(Refer to "Initial Setup" on page 12.)
Note:
• Ifyou have anyquestion about theDTV'santenna, visit www.antennaweb.org for further information.
• Foryour safetyand to avoid damage to device,please unplug theRFcoaxial cable from the antenna input jack before moving the unit.
• Ifyou use an antenna to receiveanalog TV,it should alsowork for DTVreception. Outdoor or attic antennas will be more effective than set-
top versions.
• Toeasilyswitch your reception source between antenna and cable,install an antenna selector.
• Ifyou connect to the cablesystem directly, contact the CATVinstaller.
[Connection to Cable Receiver or Satellite Box]
Use an RCA component video cable to connect the component video input jack of the unit to the component video
output jack of the cable receiver / satellite box.
If you connect to the unit's component video input jack, connect RCA audio cable to the audio L/R jack of VIDE02.
e.g.}
satellite
dish
RFcoaxial
caple
(green) (blue) (red)
FAUDIOOUT_ _ COMPONENTVIDEOOUT
cable receiver/satellite box
rear of this unit
RCA audio cable
ii,i:i'_
iii_i'!:i
iiii!!:i
ii_i::ii
iiIL
You can also connect this unit to the cable receiver or satellite box other than the component video output jack
because they might have different output jacks.
Required cables and connecting methods of the cable receiver / satellite box, or the availability channel for the clear
QAM may differ depending on the cable/satellite provider. For more information, please contact your cable/satellite
provider.
EN

[] External Device Connection
[Component Video Cable Connection]
Component video connection offers better picture quality for video devices connected to the unit.
Use an RCA component video cable to connect the unit to external video devices equipped with component video
output jack.
If you connect to the unit's component video input jack, connect RCA audio cable to the audio L/R jack of VIDE02.
e.g.)
DVD player with the component
video output jacks
RCAcomponent
video cable
rear of this unit
RCA audio cable
Note:
• This unit accepts480i/480p/simplified 1080ivideo signals.
• Simplified 1080ivideosignal differs to the original 1080ivideosignal becauseit is displayed after converted into 480psignal.
[S-video Cable Connection]
S-video connection offers good picture quality for video devices connected to the unit.
Use an S-video cable to connect the unit to external video devices equipped with S-video output jack.
If you connect to the unit's S-video input jack, connect RCA audio cable to the audio L/R jack of VIDE01.
e.g.)
DVD player with the S-video
output jack
AUDIO OUT S-VIDEO
F L R ] OUT
rear of this unit
RCAaudio cable
Note:
•Ifyou connect to the S-videojack and the videojack at thesame time, the S-videoconnection will have priority.
EN

[Video Connection]
Video connection offers standard picture quality for video devices connected to the unit.
If you connect to the unit's video input jack, connect RCA audio cables to the audio L/R jack of VIDE01.
When the audio jack of the video device is monaural, connect the RCA audio cable to the audio L input jack.
e.g.)
camcorder
VCR
RCA audio cable
rear of this unit
i_iiiiii!
Note:
• Ifyou connect to the S-videojack and the videojack at thesame time, the S-videoconnection will have priority.
[Digital Audio Output Connection]
If you connect this unit to an external digital audio device, you can enjoy multi-channel audio like 5.1ch digital
broadcasting sound.
"e,g.} rear of this unit
Dolby Digital decoder
DIGITAL AUDIO
COAXIAL IN
digital audio coaxial cable
C!ii
ili_,ii:il
i:%i
i!ii_ii!i_
EN

[] Initial Setup
Thissectionwill guideyouthroughthe unit'sinitialsettingwhichincludes
selectinga languageforyouron-screenmenuand"AUTOPRESETCH"which
automaticallyscansandmemorizesviewablechannels.
Beforeyoubegin:
Makesureiftheunitisconnectedtoantennaorcable.
After making all the necessary connections, press
[POWER] to turn on the unit.
• This operation may take a few moments.
2 Use [Cursor A/V] to select the on-screen language
from the choices on the right side of the TV screen.
(ENGLISH / ESPAiqlOL / FRAN(_AIS)
or
_SELECT LANGUAGE ENGUSH
SELECC]ONEEL ]DIOMA ESPA%L
CHO]S]R LALANGUE FRANCA]S
SELECT:A,V SET:ENTER
SELECCIONE:A,V AJUSTE:ENTER
CHO]X:A,V VAL]DER:ENTER
• "INITIAL SETUP" menu on step 3 will be displayed in
the selected language after you press [ENTER].
Note:
• If you connect the cable system directly, contact the CATV
installer.
• If you press [POWER] or [SETUP] during "AUTO PRESET CH",
this setting will be canceled.
• The initial auto channelscan function can be executed for
either TV/DTV or CATV only once. If you want to scan both
TV/DTV and CATV, you need to select "CHANNEL SETUP" in
the main menu to scan and memorize other channels after
initial presetting is completed. (Refer to page 13.)
• When no channel can be received by "AUTO PRESETCH",
"NO TV SIGNALS" is displayed on the TV screen.
• If there is no signal input from the antenna terminal and
no operation for several seconds after you turn on the unit,
"HELPFUL HINTS" appears. Follow the instructions listed on
the TV screen.
- HELPFULHINTS-
1.PLEASECHECKTO SEE IFTHE
ANTENNA/CABLE / SATELLITEIS
PROPERLYCONNECTED.
2.DIDYOUPERFORM"AUTO PRESETOH"?
3.PLEASEREFERTO FRONTPAGEOFTHE
OWNER'SMANUALOR REAR PANELFOR
SUPPORTLINEINFORMATION.
3 Use [Cursor A/V] to select"AUTO PRESETCH(TV/DTV)"
for TV channels or"AUTO PRESET CH(CATV)" for CATV
channels, then press [ENTER].
OF
- INITIALSETUP-
PLEASE CONNECT ANTENNA OR CABLE
OR SATELLITETO THIS UNIT.
AUTO PRESET CH(TV/DTV)
AUTO PRESETCH(CATV)
• Scanning and memorizing the channels automatically
start.
25
AUTO PRESETOH(TV/DTV)
| : i
• When the scanning and memorizing are completed,
the lowest memorized channel in the broadcasting
will be displayed.
EN

[] Main Menu
Thissectiondescribestheoverviewofthe mainmenudisplayedwhenyou
press[SETUP].Formoredetails,seethe referencepageforeachitem.
Themainmenuconsistsof thefunctionsettingitemsbelow.
Press [SETUP].
e.g.) digital TV mode
- TVSETUP -
_"CHANNEL SETUP
V-CHIP SETUP
LANGUAGE [ENGLISH]
CAPTION [OFF]
BACK LIGHT [BRIGHT]
COLOR TEMR [NORMAL]
DTVCC
• CHANNEL SETUP
You can automatically scan the viewable channels and
remove those that are undesired.
(Refer to "Auto Channel Scan" on page 13.)
• V-CHIP SETUP
You can set the viewing limitations.
(Refer to"V-chip"on page 23.)
• LANGUAGE
You can change the language (English, Spanish,
French) displayed on the main menu.
(Refer to "Language Selection" on page 14.)
• CAPTION
You can change the display format for closed caption,
which displays the dialogue of a TV program or other
information across the TV screen.
(Refer to "Closed Caption" on page 20.)
• BACK LIGHT
You can set the desired brightness mode. (Refer to
"Back Light Setting" on page 22.)
• COLOR TEMP.
You can adjust color temperature ("NORMAL", "WARM"
and "COOL")
(Refer to "Color Temperature" on page 23.)
• DTVCC
In addition to the basic closed caption described
on page 20, DTV has its own closed caption called
DTVCC.
(Refer to'DTV Closed Caption" on page 21 .)
[]Auto Channel Scan
Ifyou switchwires (e.g.,betweenantennaandCATV)orif youmovetheTV
toadifferentareaafterthe initialsetting,orifyourestorethe DTMchannel
youdeleted,youwill needto performautochannelscan.
Beforeyoubegin:
Makesureiftheunitisconnectedtoantennaorcable.
1 Press [SETUP] to display the main menu.
Use [Cursor A/V] to select"CHANNEL SETUP", then
press [ENTER].
e.g.) digital TV mode
- TVSETUP -
or CHANNEL SETUP
V-CHIP SETUP
LANGUAGE [ENGLISH]
CAPTION [OFF]
BACK LIGHT [BRIGHT]
COLOR TEMR [NORMAL]
DTVCC
2
Use [Cursor A/V] to select your desired preset type,
then press [ENTER[.
e.g.) digital TV mode
or
- CHANNEL SETUP -
ADD/DELETE (DTV)
_- AUTO PRESET CH (DTV)
AUTO PRESET CH (W/DTV)
AUTO PRESET CH (CAW)
! CATV takes approx. 5Omin.
3
i Bz_
•When aerial antenna is connected, select"AUTO
PRESETCH(TV)","AUTO PRESETCH(DTV)" or"AUTO ....
PRESETCH(TV/DTV)".
• When connected to CATV, select"AUTO PRESETCH
(CATV)".
• Scanning and memorizing the channels automatically
start.
e.g.) digital TV mode
AUTOPRESET CH(DTV)
I : i i
D25
• When the scanning and memorizing are completed,
the lowest memorized channel will be displayed.
• When you selected "AUTO PRESET CH(TV/DTV)", the
lowest memorized analog channel will be displayed
when the scanning and memorizing are completed.
If there is no analog channel, the lowest memorized
digital channel will be displayed.
i:Pi
i!iiii!i_
iiiiiill
EN

[] Language Selection
Youcan chooseEnglish, Spanish,or Frenchasyour on-screen language,
Note:
• If you connect the cable system directly, contact the CATV
installer.
• If you press [POWER] or [SETUP] during auto channel scan,
the setting will be canceled.
• When no channel can be received by auto channel scan,
"NO TV SIGNALS" will be displayed on the TV screen.
• Channel settings will be saved even if the power fails.
• If you have Spanish or French menus and need English,
press [SETUP]. Use [Cursor Air] to select "IDIOMA"
or "LANGAGE'[ Press [ENTER] to select "ENGLISH" Press
[SETUP] to remove the main menu.
• With regard only to the digital channel, even after the
scanning is complete if you unplug the AC power cord
before turning off the unit by pressing [POWER], the
channel setting may be lost.
Press [SETUP] to display the main menu.
2 Use [Cursor AIr] to select"LANGUAGE", then press
[ENTER] repeatedly to change the setting.
or
e.g.) digital TV mode
- TVSETUP -
CHANNEL SETUP
V-CHIP SETUP
LANGUAGE [ENGLISH]
CAPTION [OFF]
BACK LIGHT [BRIGHT]
COLOR TEMF_ [NORMAL]
DTVCC
NGUSH]
SPAI_IOL]
RAN(_.AB]
3 Press [SETUP] to exit.
EN

[] Channel Selection
Selectchannelsbyusing[CH.A/V] or[the Numberbuttons].
• To select the memorized channels, use [CH. A/V] or
[the Number buttons].
• To select the non-memorized channels, use
[the Number buttons].
To Use [the Number buttons]
-When selecting analog channel 12
-When selecting digital channel 12-1
Be sure to press [-1ENT.] before entering the minor
channel number. EN]_
• Press [CH. RETURN] to return to the previously
viewed channel.
• When you select a channel larger than 100, press
[+10/+100] first. Then use [the Number buttons] to
press the lower 2-digit numbers.
About digital TV broadcasting:
With its high definition broadcast, digital broadcasting
far surpasses analog broadcasting in both its picture
and sound quality.
What is the minor channel?
By using high compression technology, digital
broadcasting offers a service that enables multiple
signals to send simultaneously.
Therefore, you can select more than one program per
major channel since digital broadcasting technology
distinguishes between multiple channels broadcast by
a single network.
NTSC(analog mode) [Air Timel ATSC(digital mode)
18:00
18:30
19:00
19:30
20:00
20:30
-- L i i
major channel minor channel
_1_ : change automatically
_> :change manually by using [CH. A/V]
Although, you cannot watch the high definition TV
(HDTV) program, the unit converts the HDTV signal
down to the standard definition TV signal.
ote:
"NOSIGNAL"will appear on the TVscreen after the minor
channel broadcast isover.
[] Volume Adjustment
Thissectiondescribeshowto adjustthe volume.Themutefunction,which
turnsthesoundoffand on,isalsodescribed.
Use [VOL _ '_,,/] to adjust the audio volume.
or
VOLUME 20
IIIIII ..........
• The volume bar will be displayed at the bottom of the
TV screen when adjusting the volume.
• The volume bar display will automatically disappear in
a few seconds.
Press [MUTE] to turn offand on the sound.
i_iiiiii!
I IE;_
MUTE
MUTE 20
IIIIII ..........
• "MUTE" is displayed on the TV screen for a few
seconds.
Press [MUTE] again or use [VOL. _ '_,,/] to recover the
original volume.
i_i!!!!i
C!ii
i:Ei
i!iiii!i_
EN

[] Switching Each Mode
Youcaneasilyswitchwiththe remotecontroltothe DTV(ATSC)andTV
(NTSC)ortoaccessanexternaldevicewhentheyareconnectedtothe unit.
[] Switching Audio Mode
Thissectiondescribeshowto switchthe audiointheanalogmodeandhow
toswitchthe audiolanguageinthe digitalmode.
Press [INPUT] repeatedly to cycle through input
modes.
[ANALOG MODE]
INPUT [DIGITAL MODE]
[VIDEO1]
4
[VIDEO2]
• To use the video or S-video input jack on the unit,
select'VIDEO1".
• To use the component video input jack on the unit,
select'VIDEO2".
While receiving an MTS broadcast, press [AUDIO]
repeatedly to cycle through the available audio
channel.
AUDIO IT:MAIN]
[_ONO]
MAIN : Outputs main-audio
SAP : Outputs second audio program
MONO : Outputs mono-audio
•The information display will automatically disappear
in a few seconds.
Note:
• Whenyou switch theanalog mode to the digital mode,
it may take a while until the digital channel selection is
completed. Thefollowing TVscreenis displayed while
switching the mode.
NOWSCANNING
Press [AUDIO] to display the currently selected
language and the number of available languages.
AUDIO
2 Press [AUDIO] repeatedly to cycle through the available
audio languages.
AUDIO
• Available languages differ depending on the
broadcast. "OTHER" is displayed when the audio
language cannot be acquired, or the acquired
languages are other than English, Spanish or French.
• The information display will automatically disappear
in a few seconds.
Note:
• Pressing[AUDIO] doesnot control external audio device.
EN

[] Screen Information
Yoncandisplaythe currentlyselectedchannelorotherinformationsuchas
the audiomodeontheTVscreen.
In theanalogmode,thecurrentchannelnumberisdisplayed.
Press [DISPLAY].
DISPLAY
CH 10
•The current channel number is displayed at the top-
right corner of the TV screen.
• To clear the display, press [DISPLAY] again.
Inthe digitalmode,thedetailedbroadcastinginformationforthe current
channelsuchasprogramtitle, programguidesaredisplayed.
Press [DISPLAY] repeatedly to cycle through the
available display modes.
[OFF]
DISPLAY
[BROADCASTINGINFORMATION]
!
[PROGRAM GUIDE]
.=1
[Broadcasting Information]
• The following information is displayed.
1 channel number
2 broadcast station
3 program title
4 audio language
(Refer to "Switching Audio Mode" on page 16.)
_iiiiiiii!
[Program Guide]
• The program guide added to broadcasting
information is displayed.
guide
C!ii
iliiii:il
Note:
•When theprogram guide consists of more than 6lines, use
[Cursor A/V] to scroll
• "No description provided"is displayed when the program
guide isnot provided.
• While the program guide is displayed, theclosed caption
function is interrupted.
• In external input mode, the following screenis displayed;
e.g.)When an external device isconnected to VIDEO1input
jack.
VIDEO 1 I
•The information display will automatically disappear in a
few seconds when the closed caption is on.
EN

[] TV Screen Display Mode
2typesofdisplaymodescanbeselectedinthedigitalmodewhenthe
broadcastingstationissending16:9videosignal.
[] Sleep Timer
Thesleeptimercanbesettoautomaticallyturnoffthe unitafteran
incrementalperiodoftime.
Press [SCREEN MODE] repeatedly to switch the TV
aspect ratio.
SCREEN
MODE
LETTERBOX ZOOM
[LETTERBOX]
Display the digital-supported program in full-screen.
Black borders will spread in the upper and lower
screen.
[ZOOM]
Enlarge and display the center area of the digital-
supported program.
The right and left side of image will be cut off.
Note:
• Youmay not switch the display mode depending on the
proqram.
Press [SLEEP] to set the sleep timer.
SLEEP
SLEEP OFF
• Sleep timer display appears on the TV screen.
2 Press [SLEEP] repeatedly to change the amount of
time until shut off.
SLEEP
SLEEP 120MIN.
• You can set your unit to turn off after a set period of
time (from 30 to 120 minutes).
• Each press of [SLEEP] will increase the time by 30
minutes.
• After set up, the sleep timer display can be called up
for checking by pressing [SLEEP].
To Cancel the Sleep Timer
Press [SLEEP] repeatedly until "SLEEP OFF" is displayed
on the TV screen.
Note:
• Thesleeptimer setting display will automatically disappear
in 10seconds.
• Whenyou disconnect the unit from theACoutlet or when a
power failure occurs, thesleep timer setting will be canceled.
EN

[] Channel Add/Delete
Thechanneladd/deletefunctionletsyouaddthechannelthatwasnot
addedbytheautochannelscandueto the receptionstatusat theinitial
setting.Youcanalsodeletetheunnecessarychannels.
1 Press [SETUP] to display the main menu.
Note:
• "ADD/DELETE(DTV)"or "ADD/DELETE"menu will disappear
automatically in a few seconds.
• In the digital mode (DTV),you can add or delete channels
only for major channel
• Onceyou delete aDTVchannel, you cannot recover the
channel without performing auto channel scan again.
(Referto "Auto Channel Scan" on page 13.)
2 Use [Cursor A/V] to select"CHANNEL SETUP", then
press [ENTER].
e.g.) digital TV mode
- TVSETUP -
or CHANNEL SETUP
V-CHIP SETUP
LANGUAGE [ENGLISH]
CAPTION [OFF]
BACK LIGHT [BRIGHT]
COLOR TEMR [NORMAL]
DTVCC
3 Use [Cursor A/V] to select'ADD/DELETE(DTV)" or
"ADD/DELETE", then press [ENTER].
e.g.) digital TV mode
or
- CHANNEL SETUP -
_- ADD/DELETE (DTV)
AUTO PRESET CH (DTV)
AUTO PRESET CH (TV/DTV)
AUTO PRESET CH (CAW)
! CATV takes approx. 5Omin.
4 Select the channel you want to add or delete. (Refer to
"Channel Selection" on page 1S.)
e.g.) digital TV mode
D25
ADD/DELETE :DTV
5 Use [Cursor _1/I_] to select"ADD" or"DELETE".
or
• To add or delete another channels, repeat steps 4-5.
• Color of channel number displayed at the right top of
the TV screen indicates;
- Blue: The selected channel will be added.
- Red: The selected channel will be deleted.
6 Press [SETUP] to exit.
[] Picture Adjustment
Youcanadjustbrightness,contrast,color,tint andsharpness.
1 Press [PICTURE] to adjust the picture quality.
PC: _K/_
Use [Cursor A/V] to select the picture quality type you
want to adjust.
[BRIGHTNESS]
t
[CONTRAST]
or _
[COLOR]
t
[TINT]
t
[SHARPNESS]
_J
3 Within 5 seconds, use [Cursor _1 / I_] to adjust the
quality.
Cursor _1 Cursor I_
BRIGHTNESS to decreasebrightness to increasebrightness
CONTRAST to decrease contrast to increasecontrast
COLOR to decreasecolor to brighten color
TINT to add red to add green
SHARPNESS to make soft to make clear
Press [RETURN] to exit.
Note:
• Thepicture adjustment setting display will automatically
disappear in a few seconds.
ili!i:
i?_il
iliZ
iiB_'
EN

[] Closed Caption
Youcanviewclosedcaptioning(cc)forTVprograms,moviesandnews.
Closedcaptionreferto textof dialogueordescriptionsdisplayedon-screen
forthe hearingimpaired.
1 Press [SETUP] to display the main menu.
3 Press [SETUP] to exit.
2 Use [Cursor A/V] to select"CAPTION", then press
[ENTER] repeatedly to change the setting.
e.g.) digital TV mode
- TVSETUP -
CHANNEL SETUP
V-CHIP SETUP
LANGUAGE [ENGLISH]
CAPTION [OFF]
0 r BACK LIGHT [BRIGHT]
COLOR TEMR [NORMAL]
DTVCC
[OFF]
[CAPTION 1]
[CAPTION2]
[CAPTION3]
[CAPTION4]
[TEXT1]
[TEXT2]
!,
[TEXT3]
[TEXT4]
_.JI
[Caption Mode]
CAPTION1 and TEXT1;
are the primary caption and text services.
The captioning or text is displayed in the same
language as the program's dialogue
(up to 4 lines of script on the TV screen, where it
does not obstruct relevant parts of the picture).
CAPTION3 and TEXT3;
serve as the preferred data channels.
The captioning or text is often a secondary language.
CAPTION2, CAPTION4, TEXT2 and TEXT4;
are rarely available and broadcasters use them only
in special conditions, such as when "CAPTION1"
and "CAPTION3" or "TEXT1" and "TEXT3" are not
available.
• There are 3 display modes according to programs:
Paint-on mode:
Displays input characters on the TV screen
immediately.
Pop-on mode:
Once characters are stored in memory, they are
displayed all at once.
Roll-up mode:
Displays the characters continuously by scrolling
(max. 4 lines).
Note:
• To show the closed caption on your TVscreen, broadcast
signal must contain the closed caption data,
• Not all TVprograms and commercials have the closed
caption or all types of the closed caption,
• Captions and texts may not match the TV voice exactly,
• Changing channels may delay the closed caption for a few
seconds.
• Adjusting or muting the volume may delay the closed
caption for a few seconds.
• Abbreviations, symbols and other grammatical shortcuts
may be used in order to keep pace with the on-screen
action. This is not a problem with the unit.
• The caption or text characters will not be displayed while
the main menu or functions display is shown.
• Ifa black box appears on the TVscreen, this means that the
closed caption is set to TEXT mode. To clear the box, select
"CAPTION 1" "CAPTION 2" "CAPTION 3, "CAPTION 4" or
"OFF':
• If the unit receives poor quality television signals, the
captions may contain errors, or there might be no captions
at alL Some possible causes of poor quality signals are:
-Automobile ignition noise
- Electric motor noise
- Weak signal reception
- Multiplex signal reception (ghosts or screen flutter)
• The unit retains the closed caption setting if the power fails.
EN

[] DTV Closed Caption
In additionto thebasicclosedcaptiondescribedonpage20,DTVhasits
ownclosedcaptioncalledDTVCC.Usethismenuto changethesettingsfor
DTVCC
1 Press [SETUP] to display the main menu.
[] DTVCC Style
YoucanchangethestyleofDTVCCsuchasfont,colororsize,etc.
Press [SETUP] to display the main menu.
i_iiiiill
2 Use [Cursor A/V] to select"DTVCC", then press
[ENTER].
or
e.g.) digital TV mode
- TVSETUP -
CHANNEL SETUP
V-CHIP SETUP
LANGUAGE [ENGLISH]
CAPTION [OFF]
BACK LIGHT [BRIGHT]
COLOR TEMR [NORMAL]
DTVCC
Use [Cursor A/V] to select"DTVCC", then press
[ENTER].
e.g.) digital TV mode
or
- TVSETUP -
CHANNEL SETUP
V-CHIP SETUP
LANGUAGE [ENGLISH]
CAPTION [OFF]
BACK LIGHT [BRIGHT]
COLOR TEMR [NORMAL]
DTVCC
i?_il
3 Use [Cursor A/V] to select"CAPTlON SERVICE",then
press [ENTER] repeatedly to change the setting.
or
-DTVCC -
f,.CAPTIONSERVICE [SERVICE1/6]
USER SETTING [ON]
CAPTIONSIZE [MIDDLE]
FONT STYLE [STYLE1/8]
CHARACTEREDGE [NONE]
FORE OPACITY [SOLID]
FORE COLOR [WHITE]
BACK OPACffY [SOLID]
BACK COLOR BLACK
CAPTION SERVICE
OFF
SERVICE1 N6
Select if you do not want
DTVCC. This is the default.
Select one of these before
changing any other item in
"CAPTION" menu. Choose
"SERVICE1/6" under normal
circumstances.
Press [SETUP] to exit.
Note:
• "CAPTIONSERVICE"thatyou can switch differs depending
on thebroadcast description.
Use [Cursor A/V] to select"USER SETTING", then press
[ENTER] repeatedly to set to "ON".
• Items in the dotted box are available only when "USER
SETTING" is"ON".
or
E_
- DTVCC -
CAPTION SERVICE [SERVICE1/6]
FONT STYLE [STYLE1/8]
CHARACTEREDGE [NONE]
FORE OPACITY [SOLID]
FORE COLOR [WHITE]
BACKOPACITY [SOLID]
: BACKCOLOR BLACK
Use [Cursor A/V] to select an item, then press
[ENTER] repeatedly to change the setting for the item.
or
- DTVCC -
CAPTION SERVICE [SERVICE1/6]
USERSETTING [ON]
CAPTIONSIZE [MIDDLE]
FONT STYLE [STYLE1/8]
CHARACTEREDGE [NONE]
FORE OPACITY [SOLID]
FORE COLOR [WHITE]
BACKOPACITY [SOLID]
BACKCOLOR FBLACK]
ilili:_i
iM!
EN

[] Back Light Setting
Youcansetthedesiredbrightnessmode.
CAPTION SIZE
FONT STYLE
CHARACTER EDGE
FORE OPACITY
FORE COLOR
BACK OPACITY
BACK COLOR
• CAPTION SIZE
Closed captioning font size can be changed as below.
• FONT STYLE
Font style of the displayed caption can be switched as
below.
• CHARACTER EDGE
Edge type of the displayed caption can be switched
as below.
• FORE COLOR, BACK COLOR
Font and background color of the displayed caption
can be switched as below.
• FORE OPACITY, BACK OPACITY
Text and background opacity of the displayed caption
can be switched as below.
MIDDLE, LARGE, SMALL
STYLE1/8 Proportional font used in the
menu screen.
STYLE2/8 Monospaced with serifs.
STYLE3/8 Proportionally spaced with
serifs.
STYLE4/8 Monospaced with serifs.
STYLE5/8 Proportionally spaced
without serifs.
STYLE6/8 Casual font type.
STYLE7/8 Cursive font type.
STYLE8/8 Small capitals.
NONE, RAISED, DEPRESSED, UNIFORM,
SHADOW LEFT, SHADOW RIGHT
SOLID, TRANSLUCENT, FLASH
WHITE, BLACK, RED, GREEN, YELLOW,
BLUE, MAGENTA, CYAN, TRANSPARENT
SOLID, TRANSLUCENT, FLASH
BLACK, RED, GREEN, BLUE, YELLOW,
MAGENTA, CYAN, TRANSPARENT, WHITE
Press [SETUP] to display the main menu.
2 Use [Cursor • IV] to select"BACK LIGHT", then press
[ENTER] repeatedly to change the setting.
e.g.) digital TV mode
or
- TVSETUP -
CHANNEL SETUP
V-CHIP SETUP
LANGUAGE [ENGLISH]
CAPTION [OFF]
_" BACK LIGHT [BRIGHT]
COLOR TEMR [NORMAL]
DTVCC
[BRIGHT]
I
[NORMAL]
I
[DARK]
,.,,I
3 Press [SETUP] to exit.
5 Press [SETUP] to exit.
EN

[] Color Temperature
Youcanadjustcolortemperatureofthe TVscreen.
1 Press [SETUP] to display the main menu.
[]V-chip
V-chipreadstheratingsforprograms,thendeniesaccesstothe programs
whichexceedthe ratinglevelyouset.Withthisfunction,youcanblock
certainprogramminginappropriateforchildren.
1 Press [SETUP] to display the main menu.
i_iiiiill
2 Use [Cursor • IV] to select"COLORTEMP", then press
[ENTER] repeatedly to change the setting.
e.g.) digital TV mode
or
- TVSETUP -
CHANNEL SETUP
V-CHIP SETUP
LANGUAGE [ENGLISH]
CAPTION [OFF]
BACK LIGHT [BRIGHT]
COLOR TEMR [NORMAL]
DTVCC
"!,
[NORMAL]
!,
[WARM]
!
[COOL]
.d
3 Press [SETUP] to exit.
Use [Cursor •IV] to select"V-CHIP SETUP",then press
[ENTER].
e.g.) digital TV mode
or
- TVSETUP -
CHANNEL SETUP
•"V-CHIP SETUP
LANGUAGE [ENGLISH]
CAPTION [OFF]
BACK LIGHT [BRIGHT]
COLOR TEMR [NORMAL]
DTVCC
Use [the Number buttons] to enter the 4-digit
numbers for your password.
PASSWORD
• When you have not set up your password, enter 0000.
• When the password is correct, the following
"V-CHIP SETUP" menu is displayed.
See the following description for setting each item.
e.g.) digital TV mode
A'"'A.TV Rating" _ page 24
B..."B. MPAA Rating"_ page 25
C'""C. Change Password"
=:>page 25
1
- V- CHIPSETUP-
I
_-TV RATING A
Note:
• "DOWNLOADABLERATING"will beavailable when the unit
receivesa digital broadcast using thenew rating system.
• Whenyou selecta rating and set it to "BLOCK"the higher
ratings will beblocked automatically. Thelower ratings will
beavailable for viewing.
• Whenyou set the highest rating to "VIEW';all ratings turn
to "VIEW"automatically.
• If the "PROTECTEDPROGRAM"messageappears during
your TVviewing, change to a channel that is not blocked.
Then,you can access"V-CHIPSETUP"menu and change the
setting to allow all TVviewing.
• Toblock any inappropriate programming, set your limits in
both "TVRATING"and "MPAARATING".
• The V-chipsetting will beretained after a power failure
(except theaccesscode reverts to 0000).
ili!i:
i?_il
iCi
+C!!;
ilili:_i
i!E!
EN

Use[Cursor A/V] to select"TV RATING", then press
[ENTER].
e.g.) digital TV mode
or
- V- CHiPSETUP-
TV HATING
MPAARATING
DOWNLOADABLEHATING
CHANGE PASSWORD
5 Use [Cursor A/V] to select the desired rating, then
press [ENTER] repeatedly to switch between "VIEW"
and "BLOCK".
[To Set the Sub Ratings]
Asfor TV-Y7,TV-PG,TV-14 or TV-MA, you can further
set the sub ratings to block specific elements of
programming. To set the sub ratings, follow the steps
below.
1 Use [CursorA/v] to select the desired main rating,
then press [ENTER] twice to show its sub ratings.
or
_-TV-Y [VIEW]
TV-Y7 ( ) [VIEW]
TV-G [VIEW]
TV-PG(DLSV)[BLOCK]
TV-14 (DLSV) [BLOCK]
TV-MA(LSV) [BLOCK]
or
_- TV-Y [VIEW]
TV-Y7( ) [VIEW]
TV-G [VIEW]
TV-PG( ) [VIEW]
TV-14 ( ) [VIEW]
TV-MA( ) [VIEW]
Rating Category
TV-Y Appropriate for all children lower
TV-Y7 Appropriate for all children 7 and _
older
TV-G General audience
TV-PG Parental guidance suggested
TV-14 Unsuitable for children under 14 _ P
TV-MA Mature audience only higher
2 Use [Cursor A/V], then press [ENTER] repeatedly
to change the setting.
e.g.) TV-PG
or
TV-PG [BLOCK]
D [BLOCK]
L [BLOCK]
S [BLOCK]
V [BLOCK]
Sub Rating
FV
V
S
L
D
Category
Fantasy Violence
Violence
Sexual Situation
Coarse Language
Suggestive Dialogue
Rating
TV-Y7
TV-PG
TV-14
TV-MA
TV-PG,TV-14
6 Press [SETUP] to exit.
Note:
• Blocked sub ratings will appear beside the main rating
category in "TV RATING" menu.
• You cannot block a sub rating (D, L, S or V) if the main rating
is set to "VIEW':
• Changing the category to "BLOCK" or "VIEW" automatically
changes aft its sub ratings to the same ("BLOCK" or "VIEW").
EN

_%ii_ _ - _"_ _'_ _A%ii/J__ _"_ _ _q_ '_• '¸_¸¸'_!
MPAARatingisthe ratingsystemcreatedbyMPAA(MotionPicture
AssociationofAmerica).
Use [Cursor A/V] to select'MPAA RATING", then press
[ENTER].
e.g.) digital TV mode
or
- V-CHIP SETUP-
TV RATING
1- MPAARATING
DOWNLOADABLERATING
CHANGE PASSWORD
Use [Cursor A/V], then press [ENTER] repeatedly to
change the setting.
or
G [VIEW]
PG [VIEW]
PG-13 [VIEW]
1-R [BLOCK]
NCq7 [BLOCK]
X [BLOCK]
Rating Category
G General audience
PG Parental guidance suggested
PG-13 Unsuitable for children under 13
R Restricted; under 17 requires accompanying
parent or adult guardian
NC-17 No one under 17 admitted
X Mature audience only
Press [SETUP] to exit.
Althoughthedefaultcode"0000" issuppliedwith theunit,you canset
yourownpassword.
Use [Cursor A/V] to select"CHANGE PASSWORD': then
press [ENTER[.
e.g.) digital TV mode
or
- V- CHIP SETUP-
TV RATING
MPAARATING
DOWNLOADABLERATING
_- CHANGE PASSWORD
Press [the Number buttons] on the remote control to
enter the new 4-digit password.
• Enter password again in"CONFIRM PASSWORD"
space.
_.4j _5/ _,,_/ NEW PASSWORD
_,7._! (,8_: \9_, CONFIRM PASSWORD
Press [SETUP] to exit.
Note:
• Make sure new password and confirm password must be
exactly the same. If they are different, the space is cleared
for reentering.
• Your password will be erased and return to the default
(0000) when a power failure occurs. If you forget the
password, unplug the power cord for 10 seconds to restore
the password to 0000.
i li!i:
i?_il
i!E!
EN

[] Playable Media
DVD-video
"1,2,4,6,10,11
DVD-RW
DVD-R
"1,3,4,5,
6,7,8,9,10
DVD+RW
DVD+R
"1,4,5,6,9,10
audio CD
"4,6,10
CD-RW D,_,...... ,o
CD-R
.4,5,6,9,10
DIGITAL AUDIO
Q
RW
o
WD
digital video
(MPEG2)
digital audio
or
MP3
5inches
(12cm)
audio CD
isa trademark of DVD Format!Logo Licensing Corporation.
If you cannot play back a disc which bears one of the marks above, check the following notes•
"1 : This unit conforms to the NTSC color system. Discs recorded in other color system such as PAL cannot be played back.
*2: Certain DVD-video does not operate as described in this manual due to the intentions of the disc's producers.
*3: Discs recorded in VR (video recording) format cannot be played back.
*4: Scratched or stained discs may not be played back.
*5: Some discs cannot be played back because of incompatible recording conditions, characteristics of the recorder or special properties of discs.
*6: You can play back discs which bear the marks above. If you use non-standardized discs, this unit may not play them back. Even if they are
played back, the sound or video quality will be compromised.
*7: You may play back the unfinalized DVD-RW/-R recorded in the video format on our brand's DVD recorder. However, depending on the
recording status of a disc, the disc may not be played back at all or normally (the picture or sound may not be smooth, etc.). In this case,
you need to finalize the disc with the DVD recorder. Refer to the manual accompanying the DVD recorder.
*8: Only the discs recorded in the video format and finalized can be played back. Unfinalized discs cannot be played back. Depending on the
recording status of a disc, the disc may not be played back at all or the picture or sound may not be smooth, etc.
*9: If the recorded portion of the disc is too small (less than 2 3/16 inches (55 mm) across), it may not play back properly.
"10: Do not glue paper or put stickers on to the disc.These may damage the disc, and the unit may not read it correctly.
"11: The number inside the symbol refer to region of the world and disc encoded in a specific region format can only be played back on unit
with the same region code.
[] Unplayable Media
• NEVER play back the following discs• Otherwise, malfunction may result!
Blu-ray Disc, HD DVD, DVD-RAM, DVD-audio, CD-i, photo CD, video CD, DVD with region codes other than 1 or ALL,
DTS-CD, DVD-ROM for personal computers, CD-ROM for personal computers.
• On the following disc, the sound MAY NOT be heard•
super audio CD
Note:
• Only the sound recorded on the normal CD layer can be delivered. The sound recorded on the high densitysuper audio CD layer can-
not be delivered.
• Any other discs without compatibility indications
EN

[] Playback
Before you begin:
Turnonthe amplifierandanyotherequipmentwhichisconnectedto this
unit.Makesurethe externalaudioreceiveraresetto the correctinput
mode.
Press [POWER] to turn on the unit.
POWER
2 Insert a disc with label facing back from the left side of
the unit.
• In case the DVD was recorded on both sides, make
sure the label of the side you want to play back is
facing back.
• The unit switches to the DVD mode when the unit
was in TV mode.
3 Press [PLAY I_]. Playback will start.
PLAY
• If playback does not start automatically,
press [PLAYI_] again.
Press [STOP II] to stop playback temporarily.
STOP
• If playback remains stopped for 5 minutes, the screen
saver program will activate automatically, when
"SCREEN SAVER" is set to "ON".
5 Press [EJECT ___]to eject the disc.
EJECT
[] DVD Menu
Somediscscontain discmenuswhichdescribethe contentsofthediscor
allowyoutocustomizediscplayback,ortitle menuwhichliststhetitles
availableonthe DVD.
Press [MENU] to call up the disc menu.
Use [Cursor • / • / _1 / I_] to select an item, then press
[ENTER] (or [PLAY I_]).
Note:
• Menu operations may vary depending on the disc.
Referto the manual accompanyinf2 the disc for more details.
[] Resume Playback
Press [STOP II] during playback.
Resume message will appear on
the TV screen.
Press [PLAY I_]. Playback will
resume from the point at which
playback was stopped.
Note:
• Tocancelresume,press[STOPm] onemore time inthestop
mode.On somediscs,[STOPml]willnot work whiletheresume
messageappears.Pleasewaituntil themessagedisappears.
• ForMP3 files,playback will resume from the beginning of the
current file.
• Theresume information will bekept even when unit is turned
off. However,ejecting the disc will cancel theresume feature.
Playback will start at the beginning thenext time you insert
the disc.
[] Pause
Press [PAUSE I I] during playback. _ |
• Playback will be paused and sound will be
/
muted.
To continue playback, press [PLAY I_].
i_iiiiill
.........
i?_il
i_"ii!i,
iii!_!iiii
iiii:i
Note:
• "Q" may appear at the top-right on the TV _,_ I
screenwhen the operation isprohibited by
Ithediscor this unit.
• Some DVDmay start playback from title 2 or 3 dueto specific
programs.
• During the playback of a 2-layered disc,pictures maystop for
a moment. Thishappens while the 1stlayer isbeing switched
to the 2nd layer. Thisis not a malfunction.
EN

[] Step-by-step Playback [] Zoom
Each time you press [PAUSE I I] in the pause
mode, the disc goes forward one frame at a
time.
5_
To continue playback, press [PLAY I_].
Note:
• Set "STILLMODE" to "FIELD"in "DISPLAY"menuif pictures in
thepause mode are blurred. (Refer to page 38.)
Thezoomfunctionallowsyouto enlargethevideoimageandto pan
throughthe enlargedimage.
1 During playback, press [MODE] repeatedly until
" _ "appears.
[] Fast Forward / Fast Reverse
Press and hold [REV <_1] or [FWD IH_]
during playback to select the required
forward or reverse speed.
To continue playback, press [PLAY I_].
2 Press [ENTER] repeatedly to change the zoom factor;
"OFF (ZOOM)", "1.3x (ZOOM)", "2x (ZOOM)" or "4x (ZOOM)".
Note:
• Set "STILL MODE" to "FIELD" in "DISPLAY" menu ffpictures in
the fast playback mode are blurred. (Refer to page 38.)
• Fast forward/fast reverse speed varies with disc.
Approximate speed is 1(2x), 2(8x), 3(20x), 4(50x) and 5(100x)
on DVD and 1(2x), 2(8x) and 3(30x) on audio CD and MP3.
• For DVD, sound will be muted during the search.
• For audio CD and MP3, sound will be intermittent during the
search.
3 Once a desired zoom factor is set, press [RETURN] to dis-
play the position guide, then use [Cursor A/T/_1 / I_]
to slide the zoomed picture across the TV screen.
[] Slow Forward / Slow Reverse
Press and hold [REV <_1] or [FWD IH_]
during the paused mode to select the
I
required forward or reverse speed.
To continue playback, press [PLAY I_].
Note:
• Slow forward/slow reverse speed varies with disc.
Approximate speed is 1(1/16x), 2(1/8x) and 3(1/2x).
• Set "STILL MODE" to "FIELD" in "DISPLAY" menu if pictures in
the slow playback mode are blurred. (Refer to page 38.)
• The sound will be muted during slow forward/slow reverse
playback.
To exit zoom, repeat steps 1 to 2 above and press
[ENTER] until "OFF (ZOOM)" appears.
Note:
• The graybox with an inner blue box thatshows during
zoomed playback is the position guide indicates the position
of the zoomed image within the overall image.
Position guide stays on the TV screen until you press [ENTER].
Press [ENTER] one more time to recall the position guide
when disappears.
• Zoom function does not work while the disc menu is dis-
played.
• 4xzoom is not available on some discs.
• Zoom function is also available during pause mode.
EN

[] MP3 Playback
MP3isamethodof compressingfiles.YoucancopyMP3filesonCD-RW/-R
fromthe personalcomputerandplaythefileson thisunit.
1 Insert an CD-RW/-R with MP3 files, playback starts
automatically.
• Press [PLAY I_] if the disc is already inserted.
• Press [MENU] when you want to call up the file list.
When selecting the folder:
• Press [Cursor I_] when you want to go to the next
hierarchy.
PLAY
• Press [Cursor _I] when you want to go back to the
previous hierarchy (except for the top hierarchy).
• If [TOP MENU] is pressed when a file list is displayed,
the I st item in the top hierarchy will be highlighted.
• Press [MENU] or [RETURN] to go back to playback
display.
2 Press [STOP II] once to stop playback temporarily.
STOP
This unit recommends the files recorded under the
following circumstances:
Applicable MP3 file " Remarks
Sampling frequency:
44.1 kHz or 48 kHz For MP3 file recorded in Variable Bit
Rate (VBR),the unit may not display
Constant bit rate: the actual elapsed time,
32 kbps ~ 320 kbps
ili!i:
i?il
iii!!:!_!i
Refer to "Resume Playback" on page 27.
Note:
• Some selections may take a while to be recognized.
• Folders are known as Groups; files are known as Tracks.
• Folders, MP3 files are displayed respectively as and [_.
• A maximum of 255 folders or 999 files may be recognized in
one disc.
• Up to 8 hierarchies can be recognized in one folder. Files in
the 9th or deeper hierarchies cannot be played back.
• This unit can play back picture and sounds from data record-
ed in MP3 formats on CD-RW/-R discs.
• A file with an extension of'_mp3 (MP3)" is called an "MP3 file':
• The unit can run an image file conforming to the Exifspecifi-
cation. Exif is a file format, Exchangeable Image File format
established by Japanese Electronic Industry Development
Association (JEIDA).
• Files whose extension is other than ':mp3 (MP3)" will not be
listed in the file list.
• If the file is not recorded in MP3 format, noise may be pro-
duced even if the file extension is either '[mp3 (MP3)"
• The name of folder and file can be displayed in up to 25
characters. Unrecognizable characters will be replaced with
asterisks.
• Unplayable folders or files may be displayed depending on
the recording conditions.
EN

[] Search Functions
Using [MODE]
1
During playback, press [MODE] repeatedly until
.... appears.
• If you want to perform the title search, press
[Cursor A/V] repeatedly until .... appears.
2 Press [the Number buttons] to select your desired
chapter or title within 60 seconds.
To play back a single-digit chapter or title when there
are more than 10 chapters or titles, press [ENTER[ after
entering the chapter or title number.
3 Playback will start automatically from the chapter or
title you selected.
Note: ]
• The total number of chapters/titles in your disc; with less thanI
10 chapters/titles, press the chapter/title number directly. I
With 10 or more chapters/titles, to play a single digit chapter/I
title, press [0] first, then the chapter/title number. (e.g., for I
chapter 3, press [0] and [3].) To play a double-digit chapter/ I
title, press the chapter/title number. J
Using [SKIP t<t<I/ bdlH]
1 During playback, press [SKIP _/IHH] repeatedly
until a desired chapter or title will be selected.
current chapter
(CH)
ICHI! ICH31C"4!
I_ _,_ [SKIPt_t_] [SKIP_l_q]
or
current title
(TT)
[SKIPI_] [SKIPl_q]
(If the disc has no chapters.)
Playback will start automatically from the chapter or
title you selected.
Note:
• [SKIP_/I_IH] arenot available whenplayback isstopped.
• Chapter/tire searchcan only beperformed during playback or
when theunit has kept the resumeinformation. It cannot be
performed in thestop mode.
• Chapter/tire searchis not available with some DVD.
Using [MODE]
1 During playback, press [MODE] repeatedly until
"" appears.
J
Press[the Number buttons] to select your desired
track within 60 seconds.
f
To play back a single-digit track/file when there are
more than 10 tracks/files, press [ENTER[ after entering
the track/file number.
Playback will start automatically from the track/file you
selected.
Note:
• The total number of tracks/files in your disc;
With less than 10 tracks/files, press the track/file number
directly.
With 10 or more tracks/files, to p/aya single digit track/file,
press [0] first, then the track/file number. (e.g., for track/file 3,
press [0] and [3].) To play a double-digit track/file, press the
track/file number.
With 100 or more files, to play a single or double digit file,
press [0] first, then the file number directly. (e.g., for file 3,
press [0], [0] and [3]. For file 26, press [0], [2] and [5]).
To play a triple digit file, press the file number.
• Track search is not available for programmed or random
playback.
Using [SKIP t<t<I/IHH]
1 During playback, press [SKIP _ / I_] repeatedly
until your desired track/file will be selected.
current track/file
_ _4 _ (TR)
IT"II T" ITR !
[s.,P l [sK,P l
Playback will start automatically from the track/file you
selected.
Note:
• [SKIP_/I_IH] are not available when playback isstopped.
• Tracksearchcan only beperformed during playback or
when the unit has kept theresume information. It cannot be
performed in thestop mode.
EN

1 Duringplayback,press[MODE] repeatedly until
.... / .... appears.
e.g.) DVD
2 Use [Cursor AIr] repeatedly until "" appears.
or
3 Press [the Number buttons] to select your desired
time lapse within 60 seconds.
Playback will start automatically from the time you
selected.
Note:
• When there is no need to enter a number, "0" appears
automatically. For example, "0:0 : "appears in time search
menu if the total time of the title or track/file is less than 10
minutes.
• Press [CLEAR] to erase the incorrect input at step 3.
• Time search can only be performed during playback or
when the unit has kept the resume information. It cannot be
performed in the stop mode.
Press [the Number buttons] to select your desired
chapter, title, track/file.
Note:
• Toselect a single-digit chapter, title, track/file number, press
the number directly.
• Toselect double digit chapter, title, track/file number:
- If the disc contains more than 9 and less than 100chapter, title,
tracks/files, press [+ 10/+ 100] first, then enter the double digit
chapter, title, track/file number.
(e.g., for track 26, press [+ 10/+ 100], [2] and [5].)
- If the disc contains more than 99 files, press [+ 10/+ I00] then
press [0]. Then enter the double digit files number. Or press
[+ 10/+ I00] first, enterthe files number, then press [ENTER]
at the last.
• Toselect triple digit files number, press [+ 10/+ I00] first, then
enter the triple digit files number.
[] Repeat Playback
Youcan repeat playback chapters, titles or tracks/files on a disc.
During playback, press [MODE] repeatedly until
.... appears.
Press [Cursor A/V] to change the repeat mode.
r_ OFF (repeat off)
CHAPTER (current chapter repeat)
L-_D TITLE (current title repeat)
i%iii!_
ili!i:
i?_il
_! OFF (repeat off)
TRACK (current track repeat)
ALL (entire disc repeat)
3
Ii OFF
_ TRACK
GROUP
ALL
(repeat off)
(current file repeat)
(current folder repeat)
(entire disc repeat)
Press [RETURN] to exit.
iii!!:!;!i
[] Repeat A-B Playback
Youcan repeat playback between Aand Bon a disc.
i_ill
1 During playback, press [MODE] repeatedly until
" OFF" appears.
Press [ENTER] at your desired starting point (A).
Press [ENTER] at your desired ending point (B).
• Point Bshould be in the same title or track aspoint A.
•Within a few seconds, the section A-B will begin to
play back repeatedly.
To cancel repeat A-B playback, press [MODE] repeat-
edly until" A-B" appears.
Press [ENTER] so" OFF'appears.
EN

Note:
Repeat setting (except "ALL") will be cleared when moving to
another title, chapter, track/file or folder.
During programmed playback, repeat setting will be effective
for the tracks/files in the program.
Repeat playback or repeat A-B playback may not available
with some discs.
Repeat A-B playback does not function during other repeat
mode.
To cancel point A, press [CLEAR] at step 2 in
"Repeat A-B Playback"
Stopping playback will cancel repeat A-B playback.
[] Programmed Playback
Youmaydeterminethe orderinwhichtracks/fileswillbeplayedback.
In stop mode, press [MODE] repeatedly until the
"PROGRAM" menu appears.
e.g.) audio CD
2 Use [Cursor • /V] to select a desired track/file, then
press [ENTER] to store.
• Additional tracks/files may be on other screens. Use
[Cursor •/V] to go on to the next / previous pages.
• Repeat this step until you have selected all the tracks/
files you wish to play back in the program.
• Up to 99 tracks/files can be ordered.
• If 8 or more tracks/files were in a program, use
[SKIP I_1_1/ Im,l_t]to see all the tracks/files.
3 Press[PLAY I_] to start programmed playback.
PLAY /__
Note:
• Press [CLEAR] to erase the last track in the program if you
make an error.
• To erase all programmed tracks/files at once, select "ALL
CLEAR" and press [ENTER] at step 2.
• While a program is being played back, [STOP II] works as
follows:
- Pressing [STOP II] once: The track/file will be in the resume
standby mode. Next time you press [PLAY I_ ], the playback
will resume from the point where it is stopped in the
programmed playback. (For MP3 file, playback will resume
from the beginning of the current file.)
- Pressing [STOPII] twice: Resume mode will be canceled. Next
time you press [PLAY I_ ], playback will restart from the first
track/file in the original order. However, your programmed
playback can be restarted when you follow the above steps.
(Your programs are still stored until either the disc is ejected
or the unit is turned off..)
- On some discs, [STOP II] will not work while the resume
message appears. Please wait until the message disappears.
• To repeat the current track/file in theprogram, follow the
steps I and 2 in "Repeat Playback" on page 31 and select
" TRACK".
• To repeat the entire program, follow the steps I and 2 in
"Repeat Playback" on page 31 and select "_ ALL'_
• Turning off the unit or ejecting the disc will erase the
program.
• You cannot use [the Number buttons] to select another
track during programmed playback. Use [SKIP t<1_/I._] to
select other tracks/files in the program.
• You cannot combine random playback with programmed
playback.
• You cannot alter a programmed order during playback.
• You can start programmed playback only while in
"PROGRAM "menu.
[] Random Playback
Thisfunctionshufflesthe playingorderoftracks/filesinsteadofplayback
inthesequence.
In stop mode, press [MODE] repeatedly until
"RANDOM" menu appears.
e.g.) audio CD
Press [PLAY I_] to start random playback.
PLAY __
Note: I
• To repeat the current track/file in the random mode, follow I
the steps I and 2 in "Repeat Playback" on page 31 and select I
" TRACK'_ I
• To repeat the entire random selections, follow the steps I and I
2 in "Repeat Playback" on page 31 and select "_ ALL"
• Random playback will be kept untilyou press [STOP II].
EN

[] On-screen Display
Youcanchecktheinformationaboutthecurrentdiscbypressing[DISPLAY] on
theremotecontrol.
__ [_ appears on y when mu t -
....DISP _angle is available on the DVD
_ _ ii_ r[I 'r_ current p'ayback status
[]
[_-___ remaining time of the current
- I I chapter
I I elapsed time of the current
chapter
_CH (chapter):
current chapter number /
DISPLAY total chapters
[]
---- remainingtimeoft,ecurrenttit,e........
_elapsed time of the current title
I TT (title): "
current title number / total titles
DISPLAY
DISPLAY
layer number appears only when
-- playing a 2-1ayered disc
L0 : Layer 0is playing
LI : Layer I is playing
current repeat setting appears
only when the repeat setting is
active
_ C : Chapter repeat
_" T : Title repeat
A_B: A-B repeat
bit rate indication for the amount
of audio and video data currently
being read
Note: ]
• Some DVD will not allowyou to set chapterplayback correctly. J
D,SPL,_Y
[]
DISPLAY
current playback status
remaining time of the current
track
elapsed time of the current track
TR (Track):
current track number /
total tracks
ALL:
current track number /
I total tracks
current repeat setting
_appears only when the
repeat setting is active
__-T : Track repeat
__- A : All tracks repeat
_A_-B: A-B repeat
_ remaining time of the entire disc
DISPLAY
elapsed time of the entire disc
Note:
• When you are playing a disc in program or random mode,
" PROGRAM" (or" RANDOM") will be displayed
instead of [-2-1.
D!SPLAY
_ __jJ r_CUrrent playback status
%1
I _-_ ............... /1_ thenameofthefilecurrentlyin
>_ _ -'-D/SPLAY playback will be displayed
TR (File):
current file number / total files
_current repeat setting if active
c-T : Track repeat
_- G : Group (folder) repeat
c-A : All files repeat
elapsed playing time of the
current file
*Only when you are playing a disc in program or
random mode.
,sPLAY
[]_[.............................L
i?_il
iii!!:!_!i
i!Z!
i!iiiii_i
EN

[] Special Settings
Thisunitallowsyouto selectasubtitlelanguage(if available)duringDVD
playback.
1 During playback, press [MODE] repeatedly until
2 Use [Cursor AIr] repeatedly until your desired lan-
guage appears.
or
• Each time you press [Cursor A/V], the subtitle lan-
guage changes as example below.
OFF (no subtitles)
_ENG (English subtitles)
FRE (French subtitles)
To cancel the subtitle
1 During playback, press [MODE[ repeatedly until
/
Use [Cursor AIr] repeatedly until"_ OFF
(SUBTITLE)" appears.
or
/
Note:
• If your language is not shown after pressing [Cursor •/V]
several times, the disc may not have that language. However,
some discs only allow you to change subtitle languages set-
ting in the disc menu. (Operation varies depending on the
disc, so refer to the manual along with the disc.)
• When "NOTAVAILABLE" appears on the TVscreen, it means
no subtitle is recorded on the scene.
• If you choose a language that has 3-letter abbreviation, the
abbreviation will be displayed every time you change the
subtitle language setting. If you choose any other languages,
"---" will be displayed instead. (Refer to page 42.)
• Ejecting the disc will cancelyour subtitle setting.
Thisunit allowsyouto selectanaudiolanguage(ifmultiplelanguagesare
available)duringDVDplayback.
During playback, press [AUDIO] repeatedly
until the desired language appears.
AUDIO
•Each time you press [AUDIO], the audio language
changes as example below.
ENG (English audio)
D SPA (Spanish audio)
FRE (French audio)
Note:
• Some discs will only allow you to change the audio setting
from the disc menu, Refer to the manual accompanying the
discs for details,
• If your language is not shown after pressing [AUDIO] several
times, the disc may not have that language. However, some
discs allow you to change multiple audio languages setting
in the disc menu. (Operation varies depending on the disc, so
refer to the manual along with the disc.)
• When "NOTAVAILABLE" appears on the TVscreen, it means
audio language is not available.
SomeDVDmaycontainsceneswhichhavebeenshot
simultaneouslyfromvariousangles.Youcanchangethe
cameraangleif'_"appears onthe TVscreen.If"ANGLEICON"
issetto"OFF'in "OTHERS"menu,'_"will notappear.
(Referto page41.)
1 During playback, press [MODE] repeatedly until
" "appears.
Use [Cursor A/V] repeatedly until your desired
camera angle appears.
or _
_angles can be varied on
the displayed number.
EN

Adjustthe blacklevelto makethedarkareasof theTVpicturebrighter.
1 During playback, press [MODE] repeatedly until
"_" appears.
2 Use [Cursor A/V] to adjust the black level.
Youcanenjoyvirtualsurroundonyourexisting2channelstereosystem.
During playback, press [MODE] repeatedly until
.... appears.
Use [Cursor A/V] to select the sound level.
i_iiiiill
or
ON : Makes the dark areas brighter.
OFF : Shows the original picture as recorded.
3 Press [RETURN] to exit.
Note:
• Thesettinq will bekept evenif the unit isturned off..
ThisunitallowsyoutoselectasoundmodeduringaudioCDplayback.
During playback, press [AUDIO] repeatedly until the
desired sound mode appears.
AUDIO J
• Each time you press [AUDIO], the sound mode
changes as example below.
_ STEREO (stereo sound with left and right channels)
L-ch (left channel sound only)
R-ch (right channel sound only)
Note: ]
• Virtual surround cannot bechanged when the sound mode is
set to either "L-oh"or "R-oh"
or
1 : Natural effect
2 : Emphasized effect
OFF : No effects (original sound)
Press [RETURN] to exit.
Note:
• Thesetting will bekept evenif the unit is turned off.
• For audio CD,virtual surround wifl not be effective if the
sound mode is set to something other than "STEREO':
See"StereoSound Mode"
• Turn down the level or select "OFF"if thesound isdistorted.
i?_il
iii!!:!;!i
i!Z!
EN

Thisfeatureallowsyoutoassignaspecificpointonadisctobecalledback
later.
To set a marker
During playback, press [MODE] repeatedly until
.... /" "appears.
e.g.) DVD
2 Use [Cursor A/V] repeatedly until marker search menu
appears.
OF
3 Use [Cursor _1 liD"] to select an available marker within
60 seconds.
When the playback reaches the point at which you
want to set a marker, press [ENTER].
• Marker is now set.
To return to the marker later
To select a desired marker, repeat steps 1 to 3 in
"To set a marker".
e.g.) DVD
Press [ENTER] at the desired marker to start playback
from the specific point which you set.
Note:
• Marker Search menu will disappear in about 60seconds
when thereis no input.
• Youcan mark upto 10points.
• Toclear a marker, select the marker to be cleared,and then
press[CLEAR].
• Ejecting the disc or turning off the power will erase all mark-
ers.
• Selecting "at step 3 in the section "Toset a marker"
will also eraseall markers.
5 Press [RETURN] to exit.
EN

can also enter from the,QUICK"menu. Use [Cursor A IV] to
select I!QUICK%nd press [ENTER] at step 3.
ii ii _ i _
[] DVD Language Setting
Youcan change the desired language when playing back the disc,
1 In stop mode, press [SETUP] to display"TV SETUP".
- TVSETUP-
LANGUAGE [ENGLISH]
BACKLIGHT [BRIGHT]
COLORTEMIR [NORMAL]
DVDSETUP
2 Use [Cursor AIr] to select"DVD SETUP",then press [ENTER].
or
- TVSETUP-
LANGUAGE [ENGLISH]
BACKLIGHT [BRIGHT]
COLORTEM£ [NORMAL]
DVDSETUP
3 Use [Cursor A/T] to select"CUSTOM", then press [ENTER].
or
Use [Cursor A/V] to select"LANGUAGE", then press [ENTER].
or
5 Use [Cursor A/!!'] to select the desired item, then press
[ENTER].
or
6 Use [Cursor A/!!'] to select the desired item, then press
[ENTER].
[AUDIO] "1, *2 (Default: ORIGINAL)
Select the desired audio language.
or
,/ %
[SUBTITLE] "1, *2 (Default: OFF)
Select the desired subtitle language.
or
[DISCMENU] "I (Default: ENGLISH)
Select the desired language in DVD menu.
or
Y
Note:
• To change the on-screen language, call up "TV SETUP" menu
by pressing [SETUP] once and set the desired language.
(Refer to "Language Selection" on page 14.)
"1
• Language options are not available with some discs.
• If"OTHER" is selected in "AUDIO" "SUBTITLE" or "DISC MENU"
menu, press 4-digit number to enter the code for the desired
language. (Refer to "Language Code List"on page 42.)
• Only the languages supported by the disc can be selected.
*2
• Use [MODE] to selectsubtitles available on the DVD.
• Use [AUDIO] to select audio available on the DVD.
• If the DVD's default settings for audio and subtitle are the
same language, the subtitles may not show unless you turn
them on.
Press[SETUP]to exit.
i%iil!
i[iiiill
ili!i:
i_i]]i
iilii:il
i?_il
EN

[] Display Setting
YoucanchangetheTVaspectratioandstillmodeclarityin"DISPLAY"
menu.
1 In stop mode, press [SETUP] to display"TV SETUP".
- TVSETUP-
LANGUAGE [ENGLISH]
BACKLIGHT [BRIGHT]
COLORTEMR [NORMAL]
DVDSETUP
2 Use [Cursor A/V] to select"DVD SETUP", then press
[ENTER].
or
- TVSETUP-
LANGUAGE [ENGLISH]
BACKLIGHT [BRIGHT]
COLORTEMR [NORMAL]
DVDSETUP
3 Use [Cursor A/V] to select"CUSTOM", then press
[ENTER].
or
Use [Cursor A/V] to select"DISPLAY", then press
[ENTER].
6 Use [Cursor A/V] to select the desired item, then press
[ENTER].
[TV MODE] (Default: 4:3 LETTER BOX)
Select the desired TV aspect ratio.
or
[STILLMODE] (Default: AUTO)
Select the desired still mode.
or
Note:
TV MODE:
• Select "4:3LETTERBOX';so that black bars may appear on
the top and bottom of the TVscreen.
• Select "4:3PAN& SCAN"for a furl height picture with both
sidesadjusted.
STILL MODE:
• Select "AUTO"usually.
• Ifyou select "FIELD"thepicture in the still mode will be
stabilized.
• Ifyou select "FRAME",the picture in thestill mode will be
highly defined.
Or
Press [SETUP] to exit.
5 Use [Cursor A/V] to select the desired item, then press
[ENTER].
or
EN

[] DVD Audio Setting
Choosetheappropriateaudiosettingsforyourequipment.Itonlyaffects
duringthe playbackof DVD.
1 In stop mode, press [SETUP] to display"TV SETUP".
- TV SETUP -
LANGUAGE [ENGLISH]
BACK LIGHT [BRIGHT]
COLORTEMR [NORMAL]
DVD SETUP
2 Use [Cursor A/V] to select"DVD SETUP", then press
[ENTER].
or
- TV SETUP -
LANGUAGE [ENGLISH]
BACK LIGHT [BRIGHT]
COLORTEMR [NORMAL]
DVD SETUP
3 Use [Cursor A/V] to select"CUSTOM", then press
[ENTER].
or
Use [Cursor k_!'] to select"AUDlO", then press
[ENTER].
or
5 Use[Cursor A/V] to select the desired item, then press
[ENTER].
or
6 Use [Cursor A/V] to select the desired item, then press
[ENTER].
[DRC] (Default: ON)
Sets the dynamic range control.
This function is available only on the discs which are
recorded in the Dolby Digital format.
or
ON : Compress the range between soft and loud
sounds.
OFF : No effects (original sound).
[DOWN SAMPLING] (Default: ON)
This function is available only on digital outputting of a
disc recorded in 96kHz.
or
ON :When outputting in 48kHz.
OFF :When outputting the original sound.
Note:
• Whenplaying back a 96kHz disc with the copyrightprotec-
tion or when virtual surround is set to I or 2, thesound will
bedown sampled at 48kHz evenif "DOWN SAMPLING"is
OFF"
[DOLBY DIGITAL] (Default: BITSTREAM)
Sets"BITSTREAM" when this unit is connected to a
Dolby Digital decoder. Available on DVD only.
OF
BITSTREAM : Outputs Dolby Digital signals.
PCM : Converts the Dolby Digital into PCM.
(2 channel)
Press [SETUP] to exit.
i[:iill
i_i]]i
iiliiill
i?_il
iii!!_ii!i:
2
i!Z!
i C!
EN

[] Parental Setting
Parentalsettingpreventsyourchildrenfromviewinginappropriatematerials,
(passwordprotected,)Playbackwillstopiftheratingsexceedthe levelsyouset,
In stop mode, press [SETUP] to display'TV SETUP".
- TV SETUP -
LANGUAGE [ENGLISH]
BACK LIGHT [BRIGHT]
COLORTEMR [NORMAL]
DVD SETUP
Use[Cursor A/V] to select the desired item, then press
[ENTER].
or
2 Use [Cursor A/T] to select'DVD SETUP",then press [ENTER].
oF - TV SETUP -
LANGUAGE [ENGLISH]
BACK LIGHT [BRIGHT]
COLORTEMR [NORMAL]
DVD SETUP
3 Use [Cursor A/_'] to select"CUSTOM", then press [ENTER].
PARENTAL LEVEL
ALL : all parental locks are canceled.
8 [ADULT] : all ratings (adult/general/children) can
be played back.
7 [NC-17]-2 [G]: only DVD intended for general use and
children can be played back.
1 [KID SAFE] : only DVD intended for children can be
played back.
8 Press [SETUP] to exit.
oF
Use [CursorA/V] to select"PARENTAL",then press
[ENTER].
or
To change the password
6 Follow steps 1 to 5. Use [Cursor A/V] to select
"PASSWORD CHANGE", then press [ENTER].
or
5 Use [the Number buttons] to enter the 4-digit
number for your password, then press [ENTER].
Use [the Number buttons] to enter the new 4-digit
password, then press [ENTER].
• Ifyou have set password already, use [the Number buttons]
to enter the current 4-digit password.
• You cannot use the default password (4737) to play a DVD.
Use [Cursor A/V] to select"PARENTAL LEVEL:;then
press [ENTER].
%
or
Note:
• DVD-video may not respond toparental lock settings. Make
surethis function works with your DVD-video.
• Record thepassword in caseyou forget it.
• Ifyou forget the password, press[4], [7], [3], [7], then enter
your new password. Password will becleared and parental
levelswill beset to "ALL"
• Apower failure will not eraseyour password.
Press [SETUP] to exit.
EN

[] Others
Youcanchangetheotherfunctions.
In stop mode, press [SETUP] to display"TV SETUP".
- TV SETUP -
LANGUAGE [ENGLISH]
BACK LIGHT [BRIGHT]
COLORTEMR [NORMAL]
DVD SETUP
2 Use [Cursor A/V] to select"DVD SETUP", then press
[ENTER].
6 Use[Cursor A/V] to select the desired item, then press
[ENTER].
[ANGLE ICON] (Default: ON) iiii_iii_i
Set to"ON'to show the angle icon when multiple cam- ilill
era angles are available during DVD playback.
or
i_i]]i
iiliiill
or
- TV SETUP -
LANGUAGE [ENGLISH]
BACK LIGHT [BRIGHT]
COLORTEMR [NORMAL]
DVD SETUP
[SCREEN SAVER] (Default: OFF)
If you select "ON", the screen saver program starts when
there is no input from the unit for 5 minutes in stop
mode.
3 Use [Cursor A/V] to select"CUSTOM", then press
[ENTER].
OF
Use [Cursor A/V] to select"OTHERS", then press
[ENTER].
or
Y
Press [SETUP] to exit.
oF
5 Use[Cursor A/V] to select the desired item, then press
[ENTER].
i!Z!
or
EN

[] Reset to the Default Setting
Y0u can reset all the settings except for the parental setting and
0n-screen menu language,
1 In stop mode, press [SETUP] to display"TV SETUP".
- TVSETUP-
LANGUAGE [ENGLISH]
BACKLIGHT [BRIGHT]
COLORTEMR [NORMAL]
DVDSETUP
2 Use [Cursor A/V] to select"DVD SETUP", then press
[ENTER].
or
- TVSETUP-
LANGUAGE [ENGLISH]
BACKLIGHT [BRIGHT]
COLORTEMR [NORMAL]
DVDSETUP
3 Use [Cursor A/V] to select"lNITIALIZE", then press
[ENTER].
or
Use [Cursor A/V] to select"YES", then press [ENTER].
or
,," %
_N_
Note:
• When you want to cancel the initialization, select "NO" at
step 4, then press [SETUP].
5 Press [SETUP] to exit.
EN
[] Language Code List
Language Code Language Code
A-B Marathi 5964
Abkhazian 4748 Moldavian 5961
Afar 4747
Afrikaans 4752 Mongolian 5960
Albanian 6563 Nauru 6047
Amharic 4759 Nepali 6051
Arabic 4764 Norwegian [NOR] 6061
Armenian 5471
Assamese 4765 O-R
Aymara 4771 Occitan 6149
Azerbaijani 4772 Oriya 6164
Bashkir 4847 Oromo(Afan) 6159
Basque 5167 Panjabi 6247
Bengali;Bangla 4860
Bhutani 5072 Pashto;Pushto 6265
Bihari 4854 Persian 5247
Bislama 4855 Polish [POL] 6258
Breton 4864 Portuguese [POR] 6266
Bulgarian 4853
Burmese 5971 Quechua 6367
Byelorussian 4851 Rhaeto-Romance 6459
C-E Romanian [RUM] 6461
Cambodian 5759 Russian [RUS] 6467
Catalan 4947
Chinese [CHI] 7254 S
Corsican 4961 Samoan 6559
Croatian 5464 Sangho 6553
Czech [CZE] 4965 Sanskrit 6547
Danish [DAN] 5047 Scots Gaelic 5350
Dutch [DUT] 6058
English [ENG] 5160 Serbian 6564
Esperanto 5161 Serbo-Croatian 6554
Estonian 5166 Sesotho 6566
F-H Setswana 6660
Faroese 5261
Fiji 5256 Shona 6560
Finnish [FIN] 5255 Sindhi 6550
French [FRE] 5264 Singhalese 6555
Frisian 5271 Siswat 6565
Galician 5358
Georgian 5747 Slovak 6557
German [GER] 5051 Slovenian 6558
Greek [GRE] 5158 Somali 6561
Greenlandic 5758 Spanish [SPA] 5165
Guarani 5360 Sundanese 6567
Gujarati 5367
Hausa 5447 Swahili 6569
Hebrew 5569 Swedish [SWE] 6568
Hindi 5455 T
Hungarian [HUN] 5467
I-K Tagalog 6658
Icelandic [ICE] 5565 Tajik 6653
Indonesian 5560 Tamil 6647
Interlingua 5547 Tatar 6666
Interlingue 5551 Telugu 6651
Inupiak 5557
Irish [IRI] 5347 Thai 6654
Italian [ITA] 5566 Tibetan 4861
Japanese [JPN] 5647 Tigrinya 6655
Javanese 5669 Tonga 6661
Kannada 5760
Kashmiri 5765 Tsonga 6665
Kazakh 5757 Turkish [TUR] 6664
Kinyarwanda 6469 Turkmen 6657
Kirghiz 5771 Twi 6669
Kirundi 6460 U-Z
Korean [KOR] 5761
Kurdish 5767 Ukrainian 6757
L-N Urdu 6764
Laothian 5861 Uzbek 6772
Latin 5847 Vietnamese 6855
Latvian;Lettish 5868
Lingala 5860 Volapuk 6861
LitHuanian 5866 Welsh 4971
Macedonian 5957 Wolof 6961
Malagasy 5953 Xhosa 7054
Malay 5965 Yiddish 5655
Malayalam 5958
Maltese 5966 Yoruba 7161
Maori 5955 Zulu 7267
Note:
• If you choose a language that has a 3-letter abbreviation,
they will be displayed every time you change the audio or
subtitle language setting above. If you choose any other
language, '---" will be displayed instead. (3-letter abbrevia-
tion is written in bracket.)

T
[] Troubleshooting Guide
If the unit does not perform properly when operated as instructed in this owner's manual, check the following chart
once before calling for service.
iiiiiiiiiiiiiiiiiiiiiiiii.....
No power
No picture or sound
• Be sure the power cord is plugged in.
• If a power failure occurs, unplug the power cord for 30 minutes to allow the unit to
reset itself.
• Check if the power is on.
• Check the outlet connection.
• Check the antenna or cable connection to the main unit.
• When the outside antenna is used, check the wire condition and connection.
• View other TV channels. The problem might be limited to the broadcasting station.
• Turn off the power and wait for about 1 minute, then turn it on again.
No color • Check the antenna or cable connection to the main unit.
• When the outside antenna is used, check the wire condition and connection.
• View other TV channels. The problem might be limited to the broadcasting station.
• Adjust the "COLOR" in the main menu.
Sound OK, picture poor • Check the antenna or cable connection to the main unit.
• When the outside antenna is used, check the wire condition and connection.
• Electrical interference from nearby appliances may affect picture quality.
• Adjust"CONTRAST"and"BRIGHTNESS"in the main menu.
• View other TV channels. The problem might be limited to the broadcasting station.
Picture distorted • When the outside antenna is used, check the wire condition and connection.
• View other TV channels. The problem might be limited to the broadcasting station.
Weak picture • Check the antenna or cable connection to the main unit.
• When the outside antenna is used, check the wire condition and connection.
• Adjust"CONTRAST"and"BRIGHTNESS"in the main menu.
• View other TV channels. The problem might be limited to the broadcasting station.
Lines or streaks in picture •When the outside antenna is used, check the wire condition and connection.
• Electrical interference from nearby appliances may affect picture quality.
• View other TV channels. The problem might be limited to the broadcasting station.
Picture blurred • When the outside antenna is used, check the wire condition and connection.
• View other TV channels. The problem might be limited to the broadcasting station.
Ghosts in picture • Check the antenna or cable connection to the main unit.
• When the outside antenna is used, check the wire condition and connection.
• Electrical interference from nearby appliances may affect picture quality.
• View other TV channels. The problem might be limited to the broadcasting station.
Bars on TV screen • When the outside antenna is used, check the wire condition and connection.
• Electrical interference from nearby appliances may affect picture quality.
Picture rolls vertically • When the outside antenna is used, check the wire condition and connection.
• Electrical interference from nearby appliances may affect picture quality.
• View other TV channels. The problem might be limited to the broadcasting station.
Different color marks on TV • Move the unit away from nearby electric appliances. Turn off the power and wait
screen 30 minutes before turning it back on.
• View other TV channels. The problem might be limited to the broadcasting station.
Poor reception on some chan- • Check the antenna or cable connection to the main unit.
nels • When the outside antenna is used, check the wire condition and connection.
• Electrical interference from nearby appliances may affect picture quality.
• View other TV channels. The problem might be limited to the broadcasting station.
Picture OK, sound poor • View other TV channels. The problem might be limited to the broadcasting station.
No reception of digital signals •Make sure auto channel scan has been completed. (Refer to"Auto Channel Scan" on
page 13.)
Auto channel scan must be completed when you set up the unit for the first time
or move it to a location where previously unavailable channels are broadcast.
• The selected channel may not be broadcasting.
• When auto channel scan is interrupted and not completed, some channels will not
be received. Make sure to complete. (Refer to"Auto Channel Scan"on page 13.)
i?_il
iii!ii!!il
ili_ii_il
i!iiiii_i
EN

T
The entered channel number
changes automatically
Black box is displayed in the
|
Completely distorted picture
or black/white picture with
DVD
Picture freezes momentarily
during playback.
Disc cannot be played.
Buttons do not work or the
i_i: unit stops responding,
The unit does not respond to
some operating commands
during playback.
Angle does not switch.
Playback does not start
when the title is selected.
The password for rating level
has been forgotten.
Remote control does not work
• Many digital channels have alternate channel numbers.The unit changes the numbers
automatically to the ones signifying the broadcasting stations. These are the numbers used
for analog broadcasts.
• Check the antenna or cable connection to the main unit.
• Check the batteries of the remote control.
• Check if there is an obstacle between the infrared sensor window and the remote
control.
• Test the signal output. If OK, then possible remote sensor trouble.
(Refer to'lR Signal Check" on page 45.)
• Aim the remote control directly at the infrared sensor window on the front of the unit.
• Reduce the distance to the unit.
• Re-insert the batteries with their polarities (+/- signs) as indicated.
Problems with Closed Caption Feature
Misspelled captions are dis- • Closed captioning production companies may broadcast programs without cor-
played, recting the misspelling in a live broadcast.
Captions are not entirely dis- • Captions that are delayed a few seconds behind the actual dialogue are common for live
played, or captions are delayed broadcasts. Most captioning production companies can display a dialogue to a maxi-
behind the dialogue, mum of 220 words per minute. Ifa dialogue exceeds that rate, selective editing is used to
insure that the captions remain up-to-date with the current TV screen dialogue.
Captions are displayed as a • Interference from buildings or weather conditions may cause captioning to be
white box. incomplete.
No caption is displayed in the • Broadcasting station may shorten the program to insert advertisement. The closed
Closed Caption-supported caption decoder cannot read the information of the shortened program.
program.
No caption is displayed when • The videotape may be illegally copied, or the caption signal might not have been
playing the videotape contain- read during copying.
ing captions.
• The text mode is selected for caption. Select"CAPTION 1","CAPTION2","CAPTION3",
"CAPTION4" or"OFF".
• Make sure the disc is compatible with the unit.
• Check the disc for finger prints/scratches and clean with a soft cloth wiping from
center to edge.
Clean the disc.
Ensure the disc is correctly inserted.
Check if the disc is defective by trying another disc.
Cancel the parental lock or change the control level.
Insert a correct disc that plays on this unit.
Handle a disc with special care so that it does not have fingerprints, scratches, or
dusts on its surface.
• To completely reset the unit, unplug the power cord from the power outlet for
5-10 seconds.
• Operations may not be permitted by the disc. Refer to the instructions of the disc.
• The angle cannot be switched for DVD which do not contain multiple angles. In
some cases multiple angles are only recorded for specific scenes.
• Check the "PARENTAL" setting.
• Enter the default password"4737", then your forgotten password will be cleared.
Note:
• TheLCDpanel is manufactured toprovide manyyears of useful life. Occasionally afew non active pixels may appear as a fixedpoint of
blue, green or red. Thisisnot to be considered a defect in the LCDscreen.
• Some functions are not available in specific modes,but this isnot a malfunction. Readthe description in this owner's manual for more
details on correct operations.
• Playback from adesired track/file and random playback are not available during program playback.
• Some functions are prohibited on some discs.
EN

[] Glossary
ATSC
Acronym that standsfor AdvancedTelevision
SystemsCommittee and the nameof the
digital broadcasting standards.
Aspect ratio
The width of aTV screen relative to its
height. Conventional TVsare 4:3 (in
other words, the screen is almost square);
widescreen models are 16:9 (the screen is
almost twice as wide as its height).
Component Video
This is a video signal format that conveys
each of 3 principal colors of light (red,
blue and green) through different signal
lines. This allows the viewers to experience
picture colors as original as it is.There are
several signal formats, including Y/ Pb/ Pr
andY/Cb/Cr.
[] Maintenance
Dolby Digital
The system developed by Dolby Labora-
tories to compress digital sound. It offers
stereo sound (2ch) or multi-channel audio.
EDTV (enhanced definition TV)
Enhanced digital format that takes 480-1ine
progressive signal.
HDTV (high definition TV)
Ultimate digital format that produces high
resolution and high picture quality.
NTSC
Acronym that stands for National Television
Systems Committee and the name of the
current analog broadcasting standards.
Password
A stored 4-digit number that allows access
to parental control features.
Region Code
Regions associate discs and players with
particular areas of the world, this unit will
only play back discs that have compatible
region codes.You can find the region code
of your unit by looking on the rear panel.
Some discs are compatible with more than
one region (or all regions).
SAP (secondary audio program)
Second-audio channel delivered sepa-
rately from main-audio channel.This audio
channel is used as an alternate in bilingual
broadcasting.
SDTV (standard definition TV)
Standard digital format that is similar to the
NTSC picture quality.
S-video
Offers higher quality images by deliver-
ing each signal, color (c) and luminance
(y) independently of each other through
separate cables.
iz ] ] ] ]
ih_i)
iC)I
i ! i
•Wipethefront panelandotherexterior surfacesof the unitwithasoft
clothimmersedinlukewarmwaterandwrungdry.
• Neveruseasolventoralcohol.Donotsprayinsecticideliquidnearthe unit.
Suchchemicalsmaycausedamageanddiscolorationtotheexposedsurfaces.
Shouldyourunitbecomeinoperative,donottrytocorrecttheproblem
yourself.Therearenouserserviceablepartsinside.Turnofftheunit,
unplugthe powercordandcallourtoll freecustomersupportlinefoundon
thecoverofthismanualtolocateanauthorizedservicecenter.
Wipethe panelwithasoftcloth. Beforecleaningthe panel,disconnectthe
powercord.
![11 _ ,"Rf',_III-_N,q1%11__
• Ifthe unitstilldoesnotperformproperly whenit isoperated,while
referringto therelevantsectionsandto"TroubleshootingGuide"inthis
owner'smanual,thelaseropticalpickupunitmaybedirty.Consultyour
dealeroranAuthorizedServiceCenterfor inspectionandcleaningofthe
laseropticalpickupunit.
• Handlethediscssothatfingerprints anddustdonot adheretothe
surfacesofthe discs.
• Alwaysstorethediscinitsprotectivecasewhenitisnot used.
• Toclean-off,useasoftcloth.
• Donotusea hardclothsincethiswillmarthe disc.
• Wipethe discinastraightlinefromcentertoedge.
• Neverwipewithacircularmotion.
_.,t _ i_--:_D
• Donotusedetergentorabrasivecleaningagents.
If theremotecontrolisnotworkingproperly,youcanuseanAM radioor
digitalcamera(includingacellularphonewith built-incamera)toseeifit
issendingoutaninfraredsignal.
• WithanAM radio:
TunetheAMradiostationto anon-broadcasting
frequency.Pointthe remotecontroltowardsit,
pushanybuttonandlisten. Ifthesoundfrom
the radioflutters,it isreceivingthe remote
control'sinfraredsignal.
i ¸¸]
ili_i]
iilTi
• Withadigitalcamera
(includingbuilt-incellphonecameras)
Pointadigitalcameratowardsthe remotecontrol.
Pushanybuttonontheremotecontrolandlook
throughthe digitalcamera.If theinfraredlight
appearsthroughthe camera,theremotecontrolis
working.
EN

[] Cable Channel Designations
IfyousubscribetocableTV,the channelsaredisplayedas%135.
Cablecompaniesoftendesignatechannelswithlettersorletter-numbercombinations.Pleasecheckwithyourlocalcablecompany.
Thefollowingisachartof commoncablechanneldesignations.
IV Display 1 2 3 4 5 6 7 8 9 10 11 12 13 14 15 16 17 18 19 20 21
TVDisplay 22 23 24 25 26 27 28 29 30 31 32 33 34 35 36 37 38 39 40 41 42
IV Display 43 44 45 46 47 48 49 50 51 52 53 54 55 56 57 58 59 60 61 62 63
IV Display 64 65 66 67 68 69 70 71 72 73 74 75 76 77 78 79 80 81 82 83 84
iV Display 85 86 87 88 89 90 91 92 93 94 95 96 97 98 99 1O0 101 102 103 104 105
_:_'._ ... W_.
IV Display 106 107 108 109 110 111 112 113 114 115 116 117 118 119 120 121 122 123 124 125 126
IV Display 127 128 129 130 131 132 133 134 135
[] General Specifications
TV
Television Format: ATSC/ NTSC-MTVStandard
Closed caption
system: §15.122/FCC(DigitalCC)
§15.119/FCC(AnalogCC)
Channel coverage (ATSC/NTSC):
VHF: 2~ 13
UHF: 14~69
CATV: 2~ 13,A~ W, W+I ~ W+94,
(analogW+l ~ W+84), A-5~ A-l, 5A
Tuning system:
Channel access:
Channelfrequency
synthesizedtuningsystem
Directaccesskeyboard,
Programmablescan,andUp/down
DVD
Discs (playback compatibility):
DVDVideo,DVD-RW/-R,
DVD+RW/+R,audioCD,CD-RW/-R
Frequency response:
DVD (linear sound): 20Hzto20kHz(samplerate:48kHz)
20Hzto44kHz(samplerate:96kHz)
CO: 20Hzto20 kHz
Signal-to-noise ratio (SIN ratio):
CD: 75dB(JEITA)
Total distortion factor:
DVD: 1 kHz0.008%(JEITA)
CO: 1 kHz0.008%(JEITA)
[] Electrical Specification
Sound output: 1W,80 x2
[] Other Specifications
Terminals:
Antenna input:
Video input:
Audio input:
S-Video input:
VHF/UHF/CATV
750unbalanced(F-type)
RCAjackx1 1Vp-p(750)
RCAjackx4 500mVrms
(inputimpedance:morethan22k0)
MiniDIN4-piujackx1 Y:1Vp-p(750)
C:286mVp-p(750)
Component video input:
RCAjackx3
Y:1Vp-p(750)
Pb:700mVp-p(750)
Pr:700mVp-p(750)
Digital audio coaxial output:
Pinjack:500mVp-px1
Headphone: _/8inches(3.5mm)
Digitalencoded
infraredlightsystem
Remote control:
Operating temperature:
41°F(5°C)to 104°F(40°C)
Power requirements:
0 0
120VAC+/- 10_/o,60Hz+/- 0.5_/o
Power consumption (Maximum):
65W
LCD: 20inches
Dimensions:
H : 11.9inches (454mm)
W :23.4 inches (594mm)
D :8.1 inches (204mm)
Weight: 13.0 Ibs. (5.9kg)
• Designsandspecificationsaresubjectto changewithoutnoticeand
withoutourlegalobligation.
• If thereisadiscrepancybetweenlanguages,thedefaultlanguagewill
beEnglish.
EN

SYLVANIA
LIMITED WARRANTY
FUNAI CORR will repair this product, free of charge in the USA in the event of defect in materials or
workmanship as follows:
DURATION:
PARTS: FUNAI CORR will provide parts to replace defective parts without charge for one (1) year
from the date of original retail purchase. Certain parts and LCD image burn-in are excluded
from this warranty.
LABOR: FUNAI CORR will provide the labor without charge for a period of ninety (90) days from the
date of original retail purchase.
LIMITS AND EXCLUSIONS:
THIS WARRANTY IS EXTENDED ONLY TO THE ORIGINAL RETAIL PURCHASER. A PURCHASE RECEIPT OR
OTHER PROOF OF ORIGINAL RETAIL PURCHASE WILL BE REQUIRED TOGETHER WITH THE PRODUCT TO
OBTAIN SERVICE UNDER THIS WARRANTY.
This warranty shall not be extended to any other person or transferee.
This warranty is void and of no effect if any serial numbers on the product are altered, replaced, defaced,
missing or if service was attempted by an unauthorized service center. This limited warranty does not
apply to any product not purchased and used in the United States.
This warranty only covers failures due to defects in material or workmanship which occur during
normal use. It does not cover damage which occurs in shipment, or failures which are caused by repairs,
alterations or products not supplied by FUNAI CORR, or damage, which results from accident, misuse,
abuse, mishandling, misapplication, alteration, faulty installation, improper maintenance, commercial use
such as hotel, rental or office use of this product, or damage which results from fire, flood, lightning or
other acts of God.
THIS WARRANTY DOES NOT COVER PACKING MATERIALS, ANY ACCESSORIES (EXCEPTREMOTE CONTROL),
ANY COSMETIC PARTS,COMPLETE ASSEMBLY PARTS,DEMO OR FLOOR MODELS.
FUNAI CORR AND ITS REPRESENTATIVESOR AGENTS SHALL IN NO EVENT BE LIABLE FOR ANY GENERAL,
INDIRECT OR CONSEQUENTIAL DAMAGES ARISING OUT OF OR OCCASIONED BYTHE USEOF OR THE
INABILITY TO USE THIS PRODUCT. THIS WARRANTY ISMADE IN LIEU OF ALL OTHER WARRANTIES, EXPRESS
OR IMPLIED, AND OF ALL OTHER LIABILITIES ON THE PART OF FUNAI, ALL OTHER WARRANTIES INCLUDING
THE WARRANTY OF MERCHANTABILITY AND FITNESS FOR A PARTICULAR PURPOSE, ARE HEREBY
DISCLAIMED BY FUNAI AND ITS REPRESENTATIVESIN THE UNITED STATES.
ALL WARRANTY INSPECTIONS AND REPAIRSMUST BE PERFORMED BYAN AUTHORIZED SERVICECENTER.
THIS WARRANTY ISONLY VALID WHEN THE UNIT ISCARRIED-IN TO AN AUTHORIZED SERVICECENTER.
THE PRODUCT MUST BEACCOMPANIED BY A COPY OF THE ORIGINAL RETAIL PURCHASE RECEIPT.IFNO
PROOF OF PURCHASE ISATTACHED, THE WARRANTY WILL NOT BE HONORED AND REPAIRCOSTSWILL BE
CHARGED.
IMPORTANT:
THIS LIMITED WARRANTY GIVESYOU SPECIFIC LEGAL RIGHTS.YOU MAY HAVE OTHER RIGHTS THAT VARY
FROM STATETO STATE.IF,AT ANY TIME DURING THE WARRANTY PERIOD, YOU ARE UNABLE TO OBTAIN
SATISFACTION WITH THE REPAIROF THIS PRODUCT, PLEASE CONTACT FUNAI CORR
ATTENTION:
FUNAI CORP. RESERVES THE RIGHTTO MODIFY ANY DESIGN OF THIS PRODUCT
WITHOUT PRIOR NOTICE.
WARRANTY STATEMENT REGARDING NON AUTHORIZED REPAIRS:
To obtain warranty service, you must take the product, or deliver the product freight prepaid, in either its
original packaging or packaging affording an equal degree of protection, to any AUTHORIZED SERVICE
CENTER. FUNAI CORR will not reimburse you for any service done by unauthorized service providers
without prior written approval.
To locate your nearest AUTHORIZED SERVICE CENTER or for general service inquiries,
please contact us at:
FUNAI SERVICE CORPORATION
Customer Service
Tel: 1-800-968-3429
www°sylvania-ce°com
5653 Creekside Parkway, Suite A, Lockbourne, OH 43137
Printed in China A7444UH
1EMN23980 _

TelevisorDigital con Pantalla LCD
de 20"y ReproductorDVD Incorporado
Manual del Usuario
LD2OOSL9
Disc ONLY
Discos de 5 pulgadas
solamente
\
EN.A_C_D_FI_ITIO._LEVlSIO.
ITI DOLBY
DIGITAL I
© 2008 Funai Electric Co., Ltd.
iii_i!i!iiiiiiiiiiiiiiiiiiiiiiiiiiiiiiiiiiiiiiii_i_!!ii!!ii

ADVERTENCIA: PARA REDUCIR EL RIESGO DE INCENDIO 0 DESCARGA EL¢CTRICA, NO
EXPONGA ESTE APARATO A LLUVlA 0 HUMEDAD.
CAUTION
CUIDADO:PARAREDUCIRELRIESGODEDESCARGAELECTRICA,NO
RETIRELACUBIERTA(NILAPLACATRASERA).ELINTERIORDEESTEAPARATO
NOCONTIENEPIEZASREPARABLESPORELUSUARIO.DEJELAREPARACION
ENMANOSDEPERSONALDESERVlCIOTI_CNICOCUALIFICADO.
Lasnotasimportantesest_nubicadasenlapartetraseradelmueble.
ESTE SIMBOLO INDICA QUE EL INTERIOR DEL
APARATO CONTIENE TENSION PELIGROSA CON
RIESGO DE DESCARGA EL¢CTRICA.
ESTE SIMBOLO INDICA QUE LA DOCUMENTACION
QUE ACOMPANA A ESTE APARATO CONTIENE
IMPORTANTES INSTRUCCIONES DE
FUNCIONAMIENTO Y MANTENIMIENTO.
Importante para su Seguridad
I LEA LAS INSTRUCCIONES - Deben leerse todas las instrucciones de
seguridad y de funcionamiento antes de utilizar el aparato.
2 CONSERVE LAS INSTRUCClONES - Las instrucciones de seguridad y de
funcionamiento deben conservarse para futura consulta.
3 HAGA CASO DE LAS ADVERTENClAS -Todas las advertencias que
aparezcan en el aparato yen las instrucciones de funcionamiento
deben set tenidas en cuenta.
4 SIGA LAS INSTRUCCIONES - Deben seguirse todas las instrucciones de
funcionamiento y de uso.
5 LIMPIEZA - Desenchufe el televisor de la toma de pared antes de su
limpieza. No utilice limpiadores liquidos ni limpiadores en aerosol. Utilice
un par3o hQmedo para la limpieza.
EXCEPCION: Un producto destinado a su servicio interrumpido y que,
pot alguna raz6n especffica, por ejemplo la posibilidad de p@dida
de un c6digo de autorizaci6n para un convertidor de CATV, no debe
set desenchufado para su limpieza o cualquier otto fin, puede excluir
la referencia a desenchufar el aparato en la descripci6n de limpieza
requerida en el elemento 5.
6 CONEXIONES- No utilice conexiones no recomendadas pot el
fabricante del televisor, dado que podrian provocar riesgos.
7 AGUAY HUMEDAD - No utilice este televisor cerca de agua, pot
ejemplo, cerca de una ba6era, un lavabo, un fregadero o una pila de
lavado de ropa, en un suelo h0medo o cerca de una piscina o lugares
similares.
8 ACCESORIOS- No coloque este televisor sobre
un mueble con ruedas, un soporte, un tripode, un
soporte vertical o una mesa inestables. El televisor
puede caerse, provocando lesiones graves a alguien y
serios darqos en el propio aparato. Utilicelo solamente
con un mueble con ruedas, soporte, tripode, soporte
vertical o mesa recomendados pot el fabricante o
vendidos junto con el televisor.
Cualquier instalaci6n del aparato debe seguir las instrucciones del
fabricante y debe utilizar un accesorio de montaje recomendado pot el
fabricante.
El con junto de aparato y mueble con ruedas debe moverse con
precauci6n.
Las paradas bruscas, la fuerza excesiva o las superfcies irregulares
pueden provocar la caida del conjunto de aparato y mueble con ruedas.
VENTILACION - El mueble y la parte trasera o inferior del aparato
incluyen ranuras y aberturas para ventilaci6n; para garantizar un
funcionamiento fiable del televisor y para protegerlo de un posible
sobrecalentamiento, dichas aberturas no deben bloquearse ni taparse.
Las aberturas no deben bloquearse nunca colocando el televisor sobre
una cama, un sof_, una alfombra u otra superficie similar. Este televisor
no debe colocarse nunca cerca o encima de un radiador o una rejilla
de aire caliente. Este televisor no debe colocarse en una instalaci6n
empotrada, por ejemplo una libreria o estanteria, a menos que se
facilite la ventilaci6n adecuada o que se hayan seguido las instrucciones
del fabricante.
I @ FUENTES DE ALIMENTACION - Este televisor debe utilizarse solamente
con el tipo de fuente de alimentaci6n indicada en la etiqueta de fabrica.
Si no esta seguro del tipo de suministro de alimentaci6n el6ctrica de
su hogar, consulte con el distribuidor de su aparato o con la empresa
el_ctrica local. Para televisores destinados a funcionar con alimentaci6n
pot pilas u otras fuentes, consulte las instrucciones de funcionamiento.
11 PUESTA A TIERRA O POLARIZACI(JN - Este televisor est_ equipado con
un enchufe de linea de corriente alterna polarizada (un enchufe con
un contacto plano mas ancho que el otto). Este enchufe encajar_ en la
toma de corriente solamente en un sentido. Esto es una caracteristica
de seguridad. Si no puede insertar el enchufe totalmente en la toma,
intente invertir la posici6n del enchufe. Si el enchufe sigue sin encajar,
12o
13o
p6ngase en contacto con un electricista para sustituir su toma obsoleta.
No subestime la finalidad de seguridad del enchufe polarizado.
PROTECCION DEL CABLE DE ALIMENTACION - Los cables de
alimentaci6n el6ctrica deben extenderse de manera que resulte
improbable que nadie los pise o que queden pinzados por elementos
colocados encima o contra ellos, prestando especial atenci6n a
enchufes de los cables, sus tomas de corriente y su punto de salida del
aparato.
PUESTA ATIERRA DE ANTENA EXTERIOR - Si hay una antena exterior
o un sistema de cable conectado al televisor, aseg@ese de que la
antena o el sistema de cable esta puesto a tierra de manera que
proporcione protecci6n contra las subidas de tensi6n y las cargas de
electricidad estatica acumulada. El articulo 810 dd National Electrical
Code (C6digo El_ctrico National), ANSI/NFPA nOmero 70, proporciona
informaci6n con respecto a la adecuada puesta a tierra del mastil y la
estructura de soporte, puesta a tierra dd cable de entrada de corriente
a una unidad de descarga de antena, tama6o de los conductores de
puesta a tierra, ubicaci6n de la unidad de descarga de antena, conexi6n
a electrodos de puesta a tierra y requisitos para el electrodo de puesta
a tierra. (Fig. A)
FIOURAA
EJEMPLODEPUESTAATIERRADE ANTENA
SEGUNEL CODIGOELI_CTRICONACIONAL ENTRADA
DE ANTENA
ABRAZADERA DE
CONEXiON A T]ERRA
DE ANTENA
(NEC SECCION 810-20)
EOUIPO DE
9E]_ViCIO
(NEC SECCION 810-21)
CONEXION A TIERRA
= S]STE_,_A DE CONEXION A TIERRA DEL
NEC CODIGO ELECTRICO NACIONAL _ ELECTRODO DE SERVICIO ELECTRICO
(NEC ART 250, APARTADO H)
14 RAYOS - Para protecci6n a6adida de este receptor de televisidn en
caso de tormenta el6ctrica, o cuando permanezca desatendido y sin
utilizar durante largos periodos de tiempo, desenchOfdo de la toma de
corriente y desconecte la antena o el sistema de cable. Esto impedir_
que se produzcan da6os en el televisor debido a da6os provocados por
rayos y sobretensiones de la Ifnea d6ctrica.
15 LINEAS DE CONDUCCION EL¢CTRICA - Un sistema de antena exterior
no debe colocarse en las proximidades de lineas de conducci6n
el6ctrica a@eas u otras lineas de conducci6n de circuitos el_ctricos, o
de manera que puedan caer sobre dichas lineas o circuitos el_ctricos.
Cuando se instale un sistema de antena exterior, debe tenerse el
m_ximo cuidado para no tocar dichas lineas o circuitos el_ctricos, dado
que el contacto podria resultar mortal.
16 SOBRECARGA - No sobrecargue las tomas de pared ni los cables
alargadores, dado que esto puede suponer un riesgo de incendio o
descarga el6ctrica.
17 ENTRADA DE OBJETOS Y LIQUlDOS - No fuerce la entrada de objetos
de ning0n tipo en el interior de este televisor a trav_s de sus aberturas,
dado que pueden tocar puntos peligrosos de tensi6n o provocar un
cortocircuito, Io cual podria dar lugar a incendio o descarga el@trica.
Nunca derrame l[quidos de ning0n tipo sobre el televisor.
18 REPARACION - No intente reparar usted mismo este televisor, ya que
el hecho de abrir o extraer las cubiertas puede exponerle a tensi6n
pdigrosa u otros riesgos. Deje toda reparaci6n en manos de personal
de servicio t6cnico cualificado.
ES

9 DAI_IOS QUE EXIGEN UNA REPARACION - Desenchufe este televisor de
la toma de pared y 116velo a un servicio de reparaci6n cualificado en las
situaciones siguientes:
a. Cuando el cable o el enchufe de distribuci6n de corriente est_ dar_ado
o desgastado.
b. Si se ha derramado Ifquido o han caido objetos en el interior del
televisor.
c. Si el televisor ha estado expuesto a Iluvia o agua.
d. Si el televisor no funciona normalmente cuando se siguen las
instrucciones de funcionamiento. Ajuste 0nicamente los controles
a los que se refieran las instrucciones de funcionamiento, dado que
el ajuste inadecuado de otros controles puede provocar dar_os y
a menudo exigir6 una gran cantidad de trabajo pot parte de un
t_cnico cualiNcado para que el televisor pueda volver a funcionar
normalmente.
e. Si el televisor se ha caido o ha sufrido cualquier tipo de daflo.
f. Cuando el televisor deje de funcionar con normalidad, esto indica
que necesita una reparaci6n.
20 PIEZAS DE REPUESTO- Cuando se necesiten piezas de repuesto,
aseg0rese de que el personal de servicio t_cnico utiliza piezas de
repuesto especificadas pot el fabricante y de las mismas caracteristicas
que la pieza original.
Las sustituciones no autorizadas pueden provocar incendio, descarga
el_ctrica, lesiones personales u otros riesgos.
27 COMPROBACION DE SEGURIDAD - AI finalizar cualquier servicio o
reparaci6n de este televisor, pida al personal de servicio t_cnico que
realice unas cornprobaciones de seguridad de rutina para determinar
que el televisor esta en condiciones correctas de funcionamiento.
22 CALOR - Este televisor debe situarse lejos de fuentes de calor tales como
radiadores, rejillas de aire caliente, estufas u otros productos (incluidos
amplificadores) emisores de calor.
[] Precauciones
No coloque la unidad sobre un mueble que pueda volcar sialgun niflo o adulto Io inclina, empuja, se coloca encima o trepa por
61.La caida de la unidad puede provocar lesiones graves e incluso la muerte.
_) LA LAMPARA DE LA PANTALLA LCD CONTIENE MERCURIO. SE DEBE TIRARLA DE ACUERDO A LA
NORMATIVA LOCAL 0 LA LEY FEDERAL.
CUIDADO: PARA EVITAR LA DESCARGA EL¢CTRICA, HAGA COINCIDIR EL CONTACTO
ANCHO DEL ENCHUFE CON LA RANURAANCHA E INSERTE FIRMEMENTE.
ADVERTENCIA DE LA FCC Este equipo puede generar o utilizar energia de radiofrecuencia. Los cambios o modificaciones
en este equipo pueden provocar interferencia perjudicial a menos que las modificaciones est_n
expresamente aprobadas en el manual. El usuario podria perder la autorizaci6n para utilizar este
equipo si realiza cambios o modificaciones para los que no tiene autorizaci6n.
INTERFERENCIA DE RADIO-TELEVISION
Esteequipo ha sido probado y declarado conforme con los limites de un dispositivo digital Clase B,de acuerdo con la Parte 15
de las Normas de la FCC.El objetivo de estos limites es proporcionar una protecci6n razonable contra interferencias perjudiciales
en una instalaci6n residencial. Este equipo genera, utiliza y puede emitir energia de radiofrecuencia y, si no se instala y se utiliza
de acuerdo con lasinstrucciones, puede causar interferencias perjudiciales en lascomunicaciones por radio. No obstante, no
existe garantia de que no pueda producirse una interferencia en una instalaci6n concreta. Si este equipo provoca interferencia
perjudicial en la recepci6n de radio o televisi6n, Io cual puede determinarse apagando y encendiendo el equipo, el usuario
puede intentar corregir la interferencia mediante una o m_s de lassiguientes medidas:
1) Reorientar o reubicar la antena receptora.
2) Aumentar la separaci6n entre el equipo y el receptor.
3) Conectar el equipo a una toma de corriente en un circuito distinto de aquel en el que est_ conectado el receptor.
4) Solicitar la ayuda del distribuidor o de unt_cnico experimentado de radio/televisi6n.
Este aparato digital Clase B es conforme con la norma canadiense ICES-O03.
Nota paro el instalador del sistema CATV: I
Esta recordatorio se facilita para Ilamar la atenci6n del instalador del sistema CATV sobre el Artfculo 820-40 de la NEC, que I
proporciona pautas para una apropiada puesta a tierra, yen particular especifica que la toma de tierra del cable debe estar
conectada al sistema de puesta a tierra del edificio Io mds cerca posible del punto de entrada del cable.
SEGURIDAD DEL LASER
Esta unidad emplea un I_ser. $61o el personal de servicio calificado deber_ quitar la cubierta o intentar reparar este apara-
to, ya que de Io contrario podr[an producirse lesiones en los ojos.
PRECAUCION: EL USO DE CONTROLES, AJUSTES O PROCEDIMIENTOS DIFERENTES DE LOS ESPECIFICA-DOS EN ESTE
MANUAL PUEDE PRODUCIR UNA EXPOSICION PELIGROSA A LA RADIACION.
PRECAUCION: CUANDO SE ABRE LA UNIDAD Y SEANULA EL ENCLAVAMIENTO SE PRODUCE UNA RADIACION LASERVlSIBLE
E INVISIBLE. EVlTE MIRAR FIJAMENTE AL RAYO.
UBICACION: EN EL INTERIOR, CERCA DEL MECANISMO DE LA PLATINA.
PROTECTION DE COPYRIGHT
No se permiten las copias no autorizadas, las emisiones al aire, la reproducci6n en p0blico y el pr_stamo de los discos.
Este producto incorpora tecnologia de protecci6n de copyright que est_ protegida por patentes de los EE. UU. y otros
derechos de propiedad intelectual. El empleo de esta tecnologia de protecci6n de copyright debe estar autorizado por
Macrovision, y est_ concebido solamente para domicilios y otros lugares de visi6n limitada a menos que sea autorizado
para otros casos por Macrovision. Se prohiben la descompilaci6n o el desensamblaje.
_i!ii_iil
i:!i¸¸¸
il,
i if!!!::
i ,ii¸
ES

UBICACION
Para un funcionamiento seguro y un rendimiento satisfactorio del aparato, tenga en cuenta Io siguiente a la hora de seleccionar un lugar
para su instalaci6n:
• Debe protegerlo de la luz solar directa y mantenerlo apartado de fuentes de calor intenso.
• Evite lugares polvorientos o humedos.
• Evite lugares con ventilaci6n insuficiente para una disipaci6n de calor adecuada. No bloquee los orificios de ventilaci6n situados en la
parte superior e inferior del aparato. No coloque el aparato sobre una alfombra, porque esto bloquear_ los orificios de ventilaci6n.
• Instale el aparato en posici6n horizontal.
• Evite lugares sometidos a intensas vibraciones.
• No coloque el aparato cerca de campos magn_ticos intensos.
• Evite trasladar el aparato a lugares con diferencias extremas de temperatura.
• Asegurese de desenchufar el cable de alimentaci6n de CA de la toma de corriente antes de transportar la unidad.
PARA EVITAR LOS RIESGOS DE DESCARGA ELI_CTRICA E INCENDIO
• No manipule el cable de alimentaci6n con las manos humedas.
• No tire del cable de alimentaci6n para desconectarlo de una toma de CA.Ag_rrelo pot el enchufe.
• Sipot accidente se derrama agua sobre el aparato, desenchufe inmediatamente el cable de alimentaci6n y Ileve elaparato a nuestro
centro de servicio autorizado para su reparaci6n.
• No coloque ningun objeto directamente encima del aparato.
ADVERTENCIA SOBRE LA CONDENSACION DE HUMEDAD
• Puede tenet lugar condensaci6n de humedad dentro del aparato cuando _ste es trasladado desde un lugar frio a otto c_lido
o luego de calefaccionar una habitaci6n fria o bajo condiciones de alta humedad. Cuando se produzca la condensaci6n en
el interior de la unidad, encienda la unidad y d_jela secar durante al menos 2 horas.
El nOmero de serie de este producto puede encontrarse en la parte trasera del aparato. NingOn otto producto tiene el mismo
nOmero de serie que el suyo. Debe anotar aqui el nOmero y otros datos esenciales y conservar este libro como registro
permanente de su compra con el fin de ayudar a su identificaci6n en caso de robo.
fechade compra n°detel_fono del distribuidor n°deserie
comprado en n°de mode[o direcci6nde[distribuidor
Nota sobre reciclado: eliminarse de
Los materiales de embalaje de este producto son reciclables y pueden ser reuUlizados. Cualquier material debe
acuerdo con la normativa local sobre reciclado.
Las pilas nunca deben tirarse a la basura ni incinerarse, sino ser eliminadas de acuerdo con las normativas locales sobre
residuos qufmicos.
[] Accesorios Suministrados
manual del usuario
(1EMN23980)
mando a distancia
(NF603UD)
pilas
(AAx 2)
• Si necesita cambiar estos accesorios, consulte el numero de pieza que aparece junto alas ilustraciones y Ilame a
nuestro tel&fono de atenci6n al cliente, que encontrar_ en las p_ginas de garantia de este manual.
• Segun su sistema de antena, puede necesitar tipos diferentes de combinadores (mezcladores) o separadores
(divisores). Para obtener estos elementos, acuda a su establecimiento de electr6nica local.
[] Base Inclinable
Puede ajustar la base para cambiar el _ngulo del
televisor (-2,5 ° a 10°).
,j,
I_[I] _,[I] [.] _,I_'] IDl=4_ ivJ I _LIJ_[.] [.] _I_']1 .] :1II ._vj .]
ES
[] Simbolos Utilizados en este
Manual
festa es la descripci6n de los simbolos utilizados en este
manual.
La descripci6n se refiere a:
: Funcionamiento
de TV anal6gica
: Funcionamiento
de TV digital
• Si no aparece ninguno
de los simbolos bajo el
encabezamiento de funci6n,
el funcionamiento es
aplicable a ambos.
: Reproducci6n
de DVD-video
: Reproducci6n
de CD de audio
: Reproducci6n
de CD-RW/R con
archivos MP3
• Si no aparece un simbolo
debajo del encabezamiento
de la funci6n, la operaci6n se
puede aplicar a todas.

[] Contenido
Imp0rtanteparasuSeguridad...................................... 2
Precauciones..................................................... 3
AccesoriosSuministrados.......................................... 4
BaseInclinable................................................... 4
SimbolosUtilizadosenesteManual................................. 4
Caracteristicas.................................................... 6
FunciondeMandoaDistancia...................................... 7
InstalaciondelasPilas............................................. 7
PaneldeControl.................................................. 8
PanelTrasero..................................................... 8
ConexionB_sica.................................................. 9
ConexiondeDispositivoExterno................................... 10
FuncionesdelTV
I _ [::::Z'
A,,,,IUoTI..........NICIAII.......
ConflguracionInicial ............................................. 12
MemiPrincipal.................................................. 13
ExploracionAutom_ticadeCanales................................ 13
SelecciondeIdioma.............................................. 14
IPAII::::::(AVl!::::::::'l::::::RIi,,,,,,/",TIiZIi,,,,,,,IEVISI¢_N
SelecciondeCanal............................................... 15
AjustedeVolumen............................................... 15
ParaCambiarentreCadaModo.................................... 16
ParaCambiarelMododeAudio..................................... 16
InformaciondePantalla.......................................... 17
MododeVisualizaciondePantalladelTelevisor..................... 18
TemporizadordeApagado........................................ 18
A,,,,IUSTI,::::::::,OIF:::>CIONAII.......
Agregar/BorrarCanales........................................... 19
AjustedeImagen................................................ 19
SubtitulosCerrados.............................................. 20
SubtitulosCerradosenDTV....................................... 21
EstiloDTVCC..................................................... 21
AjustedeLuzdeFondo........................................... 22
TemperaturadeColor............................................ 23
V-chip.......................................................... 23
iiiii!!ii !i!ii!ii! i!ii!ii!ii!ii!ii!ii!ii!ii!ii!ii!ii!ii!ii!ii!ii!ii!ii!ii!ii!ii!ii!ii!ii!ii!ii!i!J ! !!!!!iFunci n sde= v i i i i i i i i i i i i i i i i i i i i i i i i i i i i i i i i i i iiiiiiiiiiiiiiiiiiii iii i! i! i
UTIi ZACION IDI!!!!!!!!!:Iih}Vh}
MediosquesePuedenRepmducir................................. 26
MediosquenosePuedenReproducir.............................. 26
Reproduccion................................................... 27
MemiDVD...................................................... 27
ReanudaciondelaReproduccion.................................. 27
Pausa.......................................................... 27
ReproduccionPasoaPaso........................................ 28
AvanceR_pido/ RetrocesoR_pido................................. 28
AvanceLento/ RetrocesoLento................................... 28
Zoom........................................................... 28
ReproduccionMP3............................................... 29
FuncionesdeBtisqueda........................................... 30
RepeticiondeReproduccion....................................... 31
RepeticiondeReproduccionA-B................................... 31
ReproduccionProgramada........................................ 32
ReproduccionAleatoria........................................... 32
VisualizacionenPantalla......................................... 33
AjustesEspeciales................................................ 34
I _ [::::Z'
A,IUoTI..........IDI!!ZIDVI!D
AjustedeIdiomaenDVD.......................................... 37
AjustedelaPantalla............................................. 38
AjustedeAudiodeDVD........................................... 39
AjustePaterno .................................................. 40
Otms........................................................... 41
ReposiciondelosAjustesPredeterminados......................... 42
ListadeC6digosdeIdiomas....................................... 42
SOl! UCION IDI!!ZI....>IROIBII,MAoI::::I _ o
GuiadeS01uci0ndePr0blemas.................................... 43
Glosario......................................................... 45
Mantenimiento.................................................. 45
DenominacionesdeCanalesdeCable.............................. 46
EspecificacionesGenerales........................................ 46
Especificaci6nElectrica........................................... 46
OtrasEspecificaciones............................................ 46
GarantiaLimitada...................................... Tapatrasera
ii!iiiiii_i
iiZ
iiiiii_ii!
iI i_ii_:i!'
ii
if"
ilid
_ii_,_
© 2008 Funai Electric Co., Ltd.
Todos los derechos reservados. No se permite la reproducci6n total o parcial de este manual, ni su copia, transmisi6n, difusi6n,
transcripci6n, descarga o almacenamiento en ningOn soporte de almacenamiento, en forma alguna o con fin alguno sin la autorizaci6n
expresa y previa por escrito de Funai.
Adem_s, toda distribuci6n comercial no autorizada de este manual o toda revisi6n del mismo queda estrictamente prohibida.
La informaci6n contenida en este documento puede ser objeto de cambios sin previo aviso. Funai se reserva el derecho de cambiar el
contenido de este documento sin la obligaci6n de notificar dichos cambios a ninguna persona u organizaci6n.
F'UNAI con el diseffo _'_ es una marca comercial registrada de Funai Electric Co., Ltd y no se puede utilizar en modo alguno sin la
autorizaci6n expresa por escrito de Funai.Todas las restantes marcas comerciales utilizadas en este documento siguen siendo propiedad
exclusiva de sus respectivos propietarios. Nada de Io contenido en este manual debe ser entendido como concesi6n, implicita o de otro
tipo, de cualquier licencia o derecho de uso de cualquiera de las marcas comerciales en _I visualizadas. El uso indebido de cualquier marca
comercial o de cualquier otro contenido de este manual queda estrictamente prohibido. Funai har_ cumplir en_rgicamente sus derechos
de propiedad intelectual dentro de los limites m_ximos establecidos por la ley.
iiii!!!i:
ES

[] Caracteristicas
T V
• DTVITVICATV
- Puede utilizar su mando a distancia para seleccionar
canales emitidos en formato digital, analdgico
convencional y definicidn est_ndar. Adem_s, los
suscriptores de cable pueden acceder a sus canales
de televisidn por cable.
• Pantalla de Informaci6n de Programas (solamente DTV)
- Puede visualizar el titulo, el contenido y otra
informacidn del actual programa DTV en la pantalla
del televisor.
• Exploraci6n Autom_tica de Canales
- Este aparato explora y memoriza autom_ticamente
los canales disponibles en su zona, eliminando
complicados procedimientos de configuraci6n.
• V-chip
- Esta funci6n le permite bloquear el acceso de los
ni_os a programas inapropiados.
• Decodificador de Subtitulos Cerrados
- El decodificador de subtitulos cerrados incorporado
muestra el texto de la programaci6n que contiene
subtitulos cerrados.
• Sintonizador MTS/SAP
- Puede seleccionarse el idioma de audio desde el
mando a distancia.
• Funci6n de Apagado Autom_tico
- Si no hay entrada de sehal desde el terminal de
antena y no se realiza ninguna operacidn durante 15
minutos, el aparato se apagar_ autom_ticamente.
• Temporizador de Apagado
- Esta funci6n apagar_ autom_ticamente el aparato a
una hora especificada.
• Opciones para Idioma de Pantalla
- Seleccione el idioma que aparecer_ en la pantalla:
Ingles, Espar_ol o Franc_s.
• Sintonizaci6n de Frecuencia PLL Sintonizada
- Proporciona una selecci6n de canales gratuita y
sencilla y le permite sintonizar directamente con
cualquier canal mediante los botones de n0mero de
canal del mando a distancia.
• Entrada de Video en Componentes
• Entrada de S-video
• Entrada AV
• Salida de Audio Digital Coaxial
D V D
• Sonido Dolby Digital
- Disfrute del sonido surround multicanal Dolby Digital
cuando conecte la unidad a su decodificador Dolby Digital.
• Imagen Fija / Avance R_pido / C_mara Lenta /
Reproducci6n Paso a Paso
- Se encuentran disponibles varios modos de
reproducci6n, incluyendo im_genes fijas, avance/
retroceso r_pido, c_mara lenta y paso a paso.
• Mends DVD en un Idioma Deseado
- Puede visualizar men0s DVD en un idioma deseado,
si _ste se encuentra disponible en un DVD-video.
• Salvapantalla
- Si no se realiza ninguna operacion durante 5 minutos,
el salvapantalla se activa.
• Bloqueo Paterno
- Bloquee la visi6n de los DVD-video inapropiados
para los ni_os.
• Reanudaci6n de la Reproducci6n
- Le permite reanudar la reproducci6n desde el punto
donde 6sta se detuvo.
• Indicaci6n de la Velocidad de Bits
• Control de gama din_mica (DRC)
- Puede controlar la gama del volumen del sonido.
Acceso desde el bot6n [MODE]
Durante la reproducci6n
• Subtitulos en un Idioma Deseado
- Puede seleccionar un idioma deseado para visualizar
subtitulos, si ese idioma se encuentra disponible en
el DVD-video.
• Selecci6n de un Angulo de C_mara
- Puede seleccionar el _ngulo de c_mara deseado, si un DVD
contiene secuencias grabadas desde _ngulos diferentes.
• Zoom
- Le permite ampliar el tamar_o de la imagen.
• Ajuste del Nivel del Negro
• Surround Virtual
• Bdsqueda
- B0squeda de Capitulos / B0squeda de Titulos /
B0squeda de Pistas / B0squeda porTiempo
• Marcador
- La parte designada por el usuario puede volver a ser
Ilamada.
• Repetici6n
- Capitulo / Titulo / Pista / Grupo/Todo / A-B
En el modo de parada
• Reproducci6n de Programas para CD de Audio y MP3
- Puede programar el orden de las pistas/archivos
para reproducirlas en el orden designado.
• Reproducci6n Aleatoria para CD de Audio y MP3
- Esta unidad puede cambiar el orden de las pistas/
archivos para reproducirlas aleatoriamente.
Acceso desde el bot6n [AUDIO]
Durante la reproducci6n
• Opciones para las Funciones de Idioma de Audio y
Sonido Est_reo
- Seleccione su funci6n de idioma o sonido est_reo deseada
cuando su disco disponga de opciones diferentes.
ES

[] Funcibn de Mando a Distancia
1
2
3
12
13
14
15
1.
2.
3.
4.
16
17
18
19
Bot6n POWER (pl 2)
Presione para activar y desactivar la unidad.
Bot6n MUTE (p15)
Presione para activar y desactivar el sonido.
Bot6n SLEEP (pl 8)
Presione para activar el temporizador de
apagado.
Botones num_ricos (pl 5)
• Presione para seleccionar los canales.
• Presione para seleccionar capitulo o titulo
(DVD) o pista/archivo (CD, MP3).
Bot6n -lENT
• Presione para cambiar de canal inferior a
superior.
Bot 6n +I 0/+ I O0
• Presione para seleccionar el canal I00 o
superiores. (CATV)
• Presione para buscar si hay los canales
menores en el canal mayor actualmente
seleccionado. (DTV)
5. BotonesVOL._F (p15)
Presione para ajustar el volumen.
6. Bot6n PAUSE II (p27)
Presione para hacer pausa en la
reproducci6n del disco.
7. Bot6n SKIP _ II_H (p30)
• Presione para saltar hacia delante o
hacia atr_s capitulos, titulos (DVD),
pistas/archivos (CD, MP3).
Bot6n REV <1< (p28)
• Presione y mantenga presionado
comenzar la reproducci6n de retroceso
lento durante el modo pausa (DVD) y la
b0squeda hacia atr_s en un disco.
Bot6n FWD _ (p28)
• Presione y mantenga presionado
comenzar la reproducci6n de avance
lento durante el modo pausa (DVD) y la
busqueda hacia delante en un disco.
8. Bot6n SETUP (p13 / p37)
Presione para visualizar el men0 principal,
9. Bot6n RETURN (p19)
Presione para volver a la operacion del
menu anterior.
10. Bot6n CLEAR (p31)
• Presione para borrar los numeros
introducidos incorrectamente.
• Presione para cancelar el punto A para
repetici6n A-B (DVD, CD).
• Presioneparaeliminarel n0mer0de pistao archiv0
enla intr0ducci6nde pr0gramas(CD,MP3).
11. Bot6n MODE (p6)
• Presi0neparaestablecerel 0rdenderepr0ducci0n
0 repr0duciraleat0riamente(CD,MP3)
• Presione para activar o desactivar el
nivel de negro (DVD) y el surround
virtual (DVD, CD, MP3).
• Presione paracambiar el _ngulo de camara
para ver la secuencia reproducida desde un
angulo diferente (DVD).
• Presione para buscar capitulo, titulo (DVD),
tiempo (DVD,CD)o pista/archivo (CD,MP3).
• Presione para establecer el marcador
(DVD, CD).
• Presione para repetir la reproducci6n de
capitulo, titulo (DVD),pista/archivo, disco
(CD,MP3),grupo (MP3)repetidamente o
entre los puntos designados A y B(DVD,CD).
• Presione paraampliar una parte de laimagen
(aproximadamente 1,3x2x y4x : DVD).
• Presione para seleccionar los subtitulos
en un disco (DVD).
12. Bot6n EJECTA (p27)
Presione para expulsar el disco.
13. Bot6n INPUT (p16)
Presione para acceder a un dispositivo
externo conectado, pot ejemplo un
[] Instalaci6n de las Pilas
Instale las pilas (AA x 2) de manera que coincida
a distancia.
videojuego, una c_mara de video o un
reproductor/grabador de video (VCR).
14. Bot6n DISPLAY (p17 / p33)
Modo digital (DTV)
• Presione para mostrar el numero de
canal y la informacion de programa.
Modo anal6gico (TV)
• Presione para mostrar el numero de
canal.
Modo de entrada externa
• Presione para visualizar el modo
de entrada extema actualmente
seleccionado.
15. Bot6n AUDIO (p16/p34)
Modo Digital (DTV)
• Presione para seleccionar el idioma de
audio.
Modo Anal6gico (TV)
• Presione para seleccionar el modo de
audio.
Modo DVD
• Presione para seleccionar el idioma de
audio (DVD) o el modo de sonido (CD).
16. Bot6n SCREEN MODE (p18)
Presione para seleccionar las relaciones
de aspecto disponibles para la pantalla
del televisor.
17. Bot6n PICTURE (p19)
Presione para ajustar la calidad de
imagen.
18. Bot6n CN. RETURN (p15)
Presione para volver al canal anterior.
19. Botones CH. AIr (pl 5)
Presione para seleccionar los canales.
20. Bot6n PLAY I_ (p27)
Presione para comenzar la reproducci6n
del disco.
21. Bot6n STOPII (p27)
Presione para detener la reproducci6n
del disco.
22. Botones_lll_ IA IV (p12)
Presione para desplazarse por los
elementos a izquierda/derecha/arriba/
abajo.
23 Bot6n ENTER (p12)
Presione para confirmar su selecci6n.
24. Bot6n MENU (p27)
• Presione para llamar al menu del disco.
• Presione para llamar a la lista de los
archivos. (MP3)
25. Bot6n TOP MENU (p29)
• Presione para llamar al menu superior
del disco. (DVD)
• Presione para volver al archivo superior
de la jerarquia m_s alta en la lista de
programas y de archivos. (MP3)
la polaridad indicada en el interior del compartimento de las pilas del mando
i
i ¸:_ .......
if!filli!!............
i¸i_ ¸¸¸
...................
@
Precauciones Sobre las Pilas: I
• Aseg(_rese de seguir la polaridad correcta seg(m Io indicado en el compartimento de/as pilas. Unas pilas en posicidn invertida pueden causarI
dafios en el dispositivo. I
• No mezcle diferentes tipos de pilas (por ejemplo, alcalinas y de carbono-zinc) ni pilas viejas con pilas nuevas. I
•Si el dispositivo no se va a usar durante un periodo prolongado de tiempo, quite las pilas para evitar da_os o lesiones por posibles fugas de las pilas.
• No intente recargar las pilas; podr/an sobrecalentarse y romperse.
ES

[] Panel de Control
1
2
3
4
5
6
7
8
9
i0
1°
2.
3.
4.
5.
6.
7°
8°
9.
10.
Bot6n SETUP (pl 3 / p37)
Presione para visualizar el men0 principal.
Bot6n STOP • (p27)
Presione para detener la reproduccidn del disco.
Bot6n PLAY I_ (p27)
Presione para comenzar la reproduccidn del disco.
Botdn EJECT-----(p27)
Presione para expulsar el disco.
Bot6n VOLUME _/_ (p] 5)
Presione para ajustar el volumen.
Bot6n CHANNEL A/V (p] 5)
Presione para seleccionar canales o desplazarse arriba/
abajo por loselementos del menu principal.
Bot6n INPUT (p] 6)
Presione para seleccionar la entrada digital, anal6gica
o externa.
Bot6n POWER (p] 2)
Presione para activar y desactivar la unidad.
Ventana del Sensor de Infrarrojos
Recibe los rayos infrarrojos transmitidos desde el
mando a distancia.
Ranura de Carga de Disco (p27)
Insert un disco con la etiqueta hacia abajo de la
unidad.
[] Panel Trasero
parte lado del aparato
1
5
6
7
8
I. Toma ANT(pg)
Conexi6n de cable coaxial RF para su antena o
receptor de cable.
2. Toma HEADPHONE
Conexi6n de auriculares para escuchar en privado.
3. Torna de entrada COMPONENT y AUDIO (p10)
Conexi6n de cable de video componente para un
aparato externo.
Utilice las toma de salida de audio y video
componente de un aparato externo.
4. Toma de entrada AUDIO (pl0)
Conexi6n de cable de audio RCA para un aparato
externo.
5. Toma de entrada VIDEO (pl I)
Conexi6n de cable de video RCA para un aparato
externo.
6. Toma de entrada S-VIDEO (pl0)
Conexi6n de cable de S-video para un aparato
externo.
7. Toma de Salida COAXIAL (audio digital) (pl 1)
Conexi6n de cable de audio digital coaxial para un
decodificador o receptor de radio.
Utilice una toma de entrada de audio digital de un
aparato externo.
8. Cable de Alimentaci6n de CA
Con_ctelo a una toma est_ndar de CA para suministrar
alimentaci6n el_ctrica a este aparato.
ES

[] Conexi6n B_sica
Esta secci6n describe c6mo conectar la unidad a una antena, caja de sat61ite o receptor de cable.
Nota:
• Asegdresedeque su antena u otra dispositivo est6 conectada correctamente antes deenchufar el cablede alimentaci6n.
[Conexi6n de Cable de Antena]
Cuando conecte la unidad a una antena o serial de televisi6n por cable (sin receptor de cable/caja de sat61ite)
Conecte el cable coaxial RF de su toma de corriente a la toma de entrada de antena de este aparato.
parte trasera de[ aparato
iiIL
......
S:i:_i..........
iI_;i_;
serial de televisi6n
por cable
cable coaxial RF
_Una vez completadas las conexiones, encienda el aparato e inicie la configuraci6n inicial.
La exploraci6n de canales es necesaria para que el aparato memorice todos los canales disponibles en su zona.
(Consulte "Configuraci6n Inicial"en p_gina 12).
Nota:
• Sitiene alguna duda acerca dela antena del DTV,visite la p6gina www.antennaweb.org para obtener m6s informacidn.
• Parasuseguridad, y para evitar dafiar el dispositivo, desenchufe el cable coaxial deRFdel conector de entrada deantena antes decambiar
desitio el aparato.
• Siutiliza una antena para recibir televisi6n anal6gica, _sta deberfafuncionar tambi_n para recepci6n deDTV.Las antenas deexterior o de
tejado ser6n m6s eficacesque lasde versionesdesobremesa.
• Paracambiar f6cilmente su fuente derecepcidn entre antena y cable,instale un selector de antena.
• Siseconecta directamente al sistema de cable,p6ngase encontacto con el instalador deCATV.
_iii!i!!!i....
[Conexidn al Receptor de Cable o Caja de Sat61ite]
Utilice el cable RCAde video en componentes para conectar la toma de entrada del video en componentes de la unidad a la
toma de salida del video en componentes del receptor de cable/caja de sat61ite. ...................
Si se conecta a la toma de entrada de video en componentes de la unidad, conecte un cable RCA de audio a la toma
de audio L/R (izquierda/derecha) de VIDE02.
p.
plato de
sat6lJte (verde) (azul) (rojo)
AUDIOOUTCOMPONENTVIDEOOUT parte trasera del aparato
F L R q Y Pb/Cb Pr/Cr
serial de televisi6n por cable
incluyendo la televisi6n de pago
receptor de cable / caja de sat6lite
cable RCA
deaudio
Tambi6n puede conectar esta unidad al receptor de cable o caja de sat61ite, en lugar de a la toma de salida del video
en componentes porque quiz_ tengan tomas de salida diferentes.
Los cables y m6todos de conexi6n del receptor de cable / caja de sat61ite,o el canal de disponibilidad para una QAM clara
pueden variar en funci6n del proveedor de cable/sat61ite. Para mhs informaci6n, consulte a su proveedor de sat61ite/cable.
ES

[] Conexibn de Dispositivo Externo
[Conexibn de Cable de Video en Componentes]
La conexi6n de video en componentes ofrece una mejor calidad de imagen para dispositivos de video conectados al
aparato.
Utilice un cable de video en componentes pare conectar el aparato a dispositivos de video externos equipados con
tome de salida de video en componentes.
Si se conecta a la tome de entrada de video en componentes del aparato, conecte el cable RCA de audio a la tome de
audio L/R (izquierda/derecha) de VIDE02.
p.ej.)
reproductor de DVD con las tomas
de salida de video en componentes
cable RCA de video
en componentes
parte trasera del aparato
cable RCA de audio
Note:
• Esteaparato acepta sehalesde v/deo de480i/480p/1080i simplificadas.
• La sehal de video 1080i simpfificada es diferida a la sehal de video original 1080i porque se muestra despu#s de set convertida a sehal
480p.
[Conexibn de Cable de S-video]
La conexi6n S-video ofrece una buena calidad de imagen para dispositivos de video conectados al aparato.
Utilice un cable S-video pare conectar el aparato a dispositivos de video externos equipados con tome de salida
S-video.
Si se conecta a la tome de entrada S-video del aparato, conecte el cable RCA de audio a la tome de audio L/R
(izquierda/derecha) de VIDE01.
p.ej.) o
reproductor de DVD
con toma de salida S-video
AUDIO OUT S=VIDEO
F L R ] OUT
parte trasera del aparato
cable RCA de audio
Note:
•Siseconecta a la toma S-videoy a la toma dev[deo al mismo tiempo, tendr6 prioridad la conexiOn S-video.
ES

[Conexi6n de Video]
La conexi6n de video ofrece una calidad normal de imagen para dispositivos de video conectados al aparato.
Si se conecta a la toma de entrada de video del aparato, conecte cable RCA de audio a la toma de audio L/R
(izquierda/derecha) de VIDE01.
Cuando la toma de audio del dispositivo de video sea monoaural, conecte el cable RCA de audio a la toma de entrada
de audio L (izquierda).
ej.)
cfimara
de video
aparato de video
:able RCAde video
cable RCA de audio
parte trasera del aparato
Nota:
• Siseconecta a la toma S-videoya la toma dev/deo al mismo tiempo, tendrd prioridad la conexiOn S-video.
[Conexi6n de Salida de Audio Digital]
Si conecta este aparato a un dispositivo de audio digital externo, podr_ disfrutar de audio multicanal, como el sonido
de emisiones digitales de 5+1 canales (5.1 ch).
p. @j.) parte trasera del aparato
decodificador Dolby Digital
cable coaxial de audio digital
_i!iliil
_iiiii_ii!
iII_Z!'
iiZ
i!!i,,ili_i
iiliiiii_!
iilZ
i(...................
i"i!ii:i!i.......
_ii_'_
i!i!iiill
ES

[] Configuraci6n Inicial
Estaseccionleguiar_atray,sdelajusteinicialdelaparato,queincluyela
seleccionde unidiomaparasusmenusdepantallay"PREA.AUTOCA"que
exploraymemorizaautom_ticamenteloscanalesvisibles.
Antesdeempezar:
Aseguresedequeelaparatoest_conectadaalaantenaoalcable
1 Despu_s de hacer todas las conexiones necesarias,
presione [POWER] para encender el aparato.
POFPOWERI
• Esta operaci6n tardar_fi unos momentos.
2 Utilice [Cursor A/V] para seleccionar el idioma de
pantalla entre las opciones de la derecha de la pantalla
del televisor. (ENGLISH/ESPAiqlOL/FRAN(_AIS)
_SELECT LANGUAGE ENGUSH
SELECC]ONEEL ]DIOMA ESPA%L
CHO]S]R LALANGUE FRANCA]S
SELECT:A,V SET:ENTER
SELECCDNE:A,V AJUSTE:ENTER
CHO]X:A,V VALDER:ENTER
• Aparecer_fi en pantalla el menO "INSTALACION INICIAL"
en el paso 3, en el idioma seleccionado despu_s de
presionar [ENTER[.
Nota:
• Siseconecta directamente al sistema decable,p6ngase en
contacto con el instalador de CATV.
• Sipresiona [POWER] o [SETUP]] durante "PREA.AUTOCA."
secancelar5 esteajuste.
• Lafunci6n de exploraci6n automStica iniciM decanMes
puede ejecutarse, para TV/DTVo CATV,solamente una
vez.Sideseaexplorar ambos (TV/DTVy CATV),deber5
seleccionar "AJUSTEDECANAL"en el mend principal para
explorar y memorizar otros canMes una vezfinMizado el
preajuste iniciaL (Consultela pSgina 13.)
• Cuando no pueda recibirse ningdn canal mediante "PREA.
AUTOCA."en la pantMla del televisor aparece "NOHAY
SEKIALDETV'[
• Sino hay entrada deseSMdesdeel terminal deantena y
no seproduce ninguna operaci6n durante variossegundos
despu_sde encender el aparato, apareceM "SUGERENCIAS
UTILES'[Siga lasinstrucciones dela pantalla del televisor.
Sigalas instrucciones dela pantalla del televisor.
-SUGERENCIAS 0TILES-
1.VERIFIQUEANTENA / CABLE/ SATELITE
ESTABIEN CONECTADO.
2.VERIFIQUE"PREA. AUTO CA."ESTA
BIENAJUSTADO.
3.LEALA R_GINAFRONTALDEL MANUAL
DEL USUARIOOPANELTRASEROPARA
EL NO.TELDE AYUDAALOS
CLIENTES.
3 Utilice [Cursor A/V] para seleccionar"PREA. AUTO
CA.(TV/DTV)" para canales de televisi6n o"PREA. AUTO
CA.(CATV)" para canales de CATV, y luego presione
[ENTER].
- INSTALACIONINICIAL-
CONECTELAANTENA 0 CABLE 0
SATELITEENESTAUNIDAD.
_" PREA. AUTOCA.(TV/DTV)
PREA. AUTOCA.(CAW)
• Comienza autom_fiticamente la exploraci6n y la
memorizaci6n de los canales.
25
PREA. AUTOCA. (TV/DTV)
I
• Cuando la exploraci6n y la memorizaci6n han
finalizado, se muestra el canal memorizado m_fisbajo
de la emisi6n.
ES

[] Mend Principal
Enestaseccionsedescribenlosaspectosgeneralesdelmemiprincipal
queaparecealpresionar[SETUP].Param_sdetalles,consultelap_gina
dereferenciadecadaelemento.Elmemiprincipalsecomponedelos
siguienteselementosdeajustedefuncion.
Presione [SETUP].
p. ej.) modo TV digital
- INSTALACIONTV -
AJUSTEDECANAL
AJUSTEDEV-CHIP
IDIOMA [ESPAi_OL]
TITULO [OFF]
LUZDE FONDO [BRILLO]
TENPE.DECOLOR [NORMAL]
DTVCC
• AJUSTE DE CANAL
Puede explorar autom_ticamente los canales visibles
y eliminar los no deseados.
(Consulte"Exploraci6n Autom_tica de Canales" en
p_gina 13.)
• AJUSTE DE V-CHIP
Puede ajustar las limitaciones de visi6n.
(Consulte"V-chip"en p_gina 23.)
• IDIOMA
Puede cambiar el idioma (Ingles, Espaflol, Franc_s)
visualizado en el men0 principal.
(Consulte "Selecci6n de Idioma"en p_gina 14.)
• TITULO
Puede cambiar el formato de pantalla para subtftulos
cerrados, que muestran el di_logo de un programa
de televisi6n u otra informaci6n en la pantalla del
televisor.
(Consulte "Subtitulos Cerrados" en p_gina 20.)
• LUZ DE FONDO
Puede ajustar el modo de brillo deseado.
(Consulte "Ajuste de Luz de Fondo"en p_gina 22.)
• TENPE. DE COLOR
Puede ajustar la temperatura de color ("NORMAL",
"CALIENTE"y"FRiO").
(Consulte"Temperatura de Color"en p_gina 23.)
• DTVCC
Adem_s de los subtftulos cerrados b_sicos descritos en
la p_gina 20, DTV tiene sus propios subtftulos cerrados
denominados DTVCC.
(Consulte "Subtitulos Cerrados en DTV" en p_gina 21.)
[] Exploraci6n Autom_tica de Canales
Sicambialoscables(potejemplo,entreantenayCAI"V)osimueveel
televisoraottolugardespuesdelajusteinicial,osirecuperauncanalDTV
eliminado,tendr_querealizarlaexploracionautom_ticadecanales.
Antesdeempezan
Aseg(iresedequeelaparatoest_conectadaalaantenaoalcable.
1 Presione [SETUP] para visualizar el menÙ principal.
2 Utilice [Cursor A/V] para seleccionar"AJUSTE DE
CANAL", y luego presione [ENTER].
p. ej.) modo TV digital
- INSTALACIONTV -
o _*AJUSTE DECANAL
AJUSTE DEV-CHIP
IDIOMA [ESPANOL]
TITULO [OFF]
LUZDE FONDO [BRILLO]
TENPE. DECOLOR [NORMAL]
DTVCC
3 Utilice [Cursor A/V] para seleccionar su tipo de
presintonia deseado, y luego presione [ENTER].
p. ej.) modo TV digital
o
_m
- AJUSTEDE CANAL -
AGREGAR/BORRAR(DTV)
PREA. AUTOCA. (DTV)
PREA. AUTOCA. (TV/DTV)
PREA. AUTOCA. (CAW)
! CATVdemoraunos 50mh_.
• Cuando tenga una antena a_rea conectada,
seleccione"PREA. AUTO CA. (TV)","PREA. AUTO CA.
(DTV)" o "PREA. AUTO CA. (TV/DTV)".
• Cuando est_ conectado a CATV, seleccione
"PREA. AUTO CA. (CATV)".
• Comienza autom_ticamente la exploracidn y la
memorizaci6n de los canales.
p. ej.) modo TV digital
D25
PREA.AUTO CA.(DTV)
I
• Cuando la exploracidn y la memorizacidn han
finalizado, se muestra el canal memorizado m_s bajo.
• Cuando haya seleccionado,"PREA. AUTO CA. (TV/
DTV)", se mostrar_ el canal anal6gico memorizado
m_s bajo cuando la exploracidn y la memorizacidn
hayan finalizado.
Cuando no haya ningun canal anal6gico, se mostrar_
el canal digital memorizado m_s bajo.
iiCII'
iI_;i;:
ii"
i!ii!i!!!il.......................
_iii!i!!!i....
ii.......................................
ii¸¸_¸_
ES

Nota:
• Si se conecta directamente al sistema de cable, pGngase en
contacto con el instalador de CATV.
• Si presiona [POWER] o [SETUP] durante la exploraciOn
automGtica de canales, se cancelar6 este ajuste.
• Cuando no pueda recibirse ning_n canal mediante la
exploraciOn automGtica de canales, en la pantalla del
televisor aparece "NO HAY SEI(IAL DE TV'_
• Los ajustes de canal se guardardn incluso aunque se
produzca un corte de energ[a.
• Si tiene men_s en ingles o en franc_synecesita en espa_oL
presione [SETUP]. Utilice [Cursor A/V] para seleccionar
"LANGUAGE" o "LANGAGE': Presione [ENTER] para
seleccionar "ESPAI(IOL': Presione [SETUP] para eliminar el
men_ principal
• Con respecto al canal digital solamente, si usted desenchufa
el cable de alimentacidn de CA antes de apagar esta unidad
presionando [POWER] es posible que se pierda el ajuste del
canal incluso despu_s de terminar el escaneado.
[] Selecci6n de Idioma
Puede elegir INGLES,ESPAI_OLo FRANCI_Scomoidioma de pantalla.
Presione [SETUP] para visualizar el menQ principal.
2 Utilice [Cursor AIr] para seleccionar"lDlOMA", y luego
presione [ENTER[ repetidamente para cambiar el
ajuste.
o
p. ej.) modo TV digital
- INSTALACIONTV -
AJUSTE DECANAL
AJUSTE DEV-CHIP
_" IDIOMA [ESPAi_OL]
TITULO [OFF]
LUZDE FONDO [BRILLO]
TENPE. DECOLOR [NORMAL]
DTVCC
SPAI_IOL]
RAN(.AIS]
NGLISH]
Presione [SETUP] para salir.
ES

[] Selecci6n de Canal
Seleccioneloscanalesutilizando[CH.A/V] o[los botonesnum_ricos].
• Para seleccionar los canales memorizados, utilice
[CH. A/V] o [los botones num6ricos].
• Para seleccionar los canal es no memorizados, utilice
[los botones num6ricos].
Para utilizar [los botones num6ricos]
- Cuando seleccione el canal anal6gico 12
- Cuando seleccione el canal digital 12-1
Asegurese de presionar [-1ENT.[ antes de introducir el
nOmero de canal menor.
ENT
Ldj "_ _ "_ LZJ "_ Ldj
• Presione [CH. RETURN] para volver al canal
anteriormente visualizado.
• Cuando seleccione un canal superior a 100,
presione [+10 / +100] primero. A continuaci6n, utilice
[los botones num6ricos] para presionar los numeros
inferiores de 2 digitos.
Acerca de I(I emisi6n de televisi6n digitah
Con su emisi6n de alta definici6n, la emisi6n digital
es muy superior a la emisi6n anal6gica en su calidad
tanto de imagen como de sonido.
zQu6 es el canal menor?
Mediante una tecnologia de alta compresi6n, la
emisi6n digital ofrece un servicio que permite el env[o
simult_neo de mOItiples seflales. Por tanto, puede
seleccionar m_s de un programa por canal mayor, dado
que latecnologia de emisi6n digital distingue entre
mOItiples canales emitidos por una determinada red.
[Hora de
NTSC(rnodoanal6gico) emisi6n] ATSC(rnodo digital)
18:00
18:30
[] Ajuste de Volumen
Enestaseccionsedescribecomoajustarel volumen. Tambiensedescribe
lafunciondesilenciamiento,queactivaydesactivaelsonido.
Utilice [VOL._] para ajustar el volumen de audio.
o
VOLUMEN 20
IIIIII ..........
• La barra de volumen se mostrar_ en la parte inferior
de la pantalla del televisor cuando ajuste el volumen.
• La barra de volumen desaparecer_ autom_ticamente
dentro de unos segundos.
Presione [MUTE] para activar y desactivar el sonido.
MUTE
MUDE 20
IIIIII ..........
• "MUDE"aparece en la pantalla del televisor durante
unos segundos.
Presione nuevamente [MUTE] o utilice [VOL. &_]
para recuperar el volumen original.
ii!!i¸
ii!iiiiii_i
iii>
iiii!!_iii_i
fIZ....
ii.......................................
i!]...................
i"i_'171!;.......
19:00
19:30
20:00
20:30
canal mayor
,_ :cambia automgdcamente
_:> :cambia manualmente mediante [CH. A/TI
I
i
canal menor
Aunque no pueda ver el programa de TV de alta
definici6n (HDTV), el aparato convierte la serial HDTV
en serial de TV de definici6n est_ndar.
Nota:
•Aparecer5 "SINSENAL"en la pantalla del televisor una vez
terminada la emisi6n del canM menor.
ii¸¸_¸_
ES

[] Para Cambiar entre Cada Modo
Puedecambiarf_cilmenteentreDTV(AI"SC)yTV(NI"SC)oaccederaun
dispositivoexternoconelmandoadistanciacuandoest_nconectadosal
aparato.
[] Para Cambiar el Modo de Audio
Enestaseccionsedescribecomocambiarelaudioenelmodoanalogicoy
comocambiarelidiomadeaudioenel mododigital.
1 Presione [INPUT] repetidamente para cambiar los
modos de entrada.
[MODO ANAL(T)GICO]
INPUT [FAODO DiGiTAL]
!
[AUX1]
I
[AUX2]
.,.,.I
• Para utilizar la toma de entrada de video o de S-video
del aparato, seleccione "AUXl ".
• Para utilizar la toma de entrada de video en
componentes del aparato, seleccione "AUX2".
Nota:
• Cuando cambie del modo anM6gico al digital, puede
tardar un poco enfinMizar laselecci6n de canMes digitMes.
Durante el cambio de modo semuestra la siguiente
pantMla en el televisor.
ESCANEANDO
Durante la recepcidn de una emisidn MTS, presione
[AUDIO] repetidamente para recorrer los canales de
audio disponibles.
AUDIO
MAIN
SAP
MONO
_IAoAIN]
P]
NO]
: Emite el audio principal
: Emite un segundo programa de audio
: Emite audio en mono
•La pantalla de informacidn desaparecer_
autom_ticamente dentro de unos segundos.
1 Presione [AUDIO] para visualizar el idioma actualmente
seleccionado y el nOmero de idiomas disponibles.
AUDIO
2 Presione [AUDIO] repetidamente para recorrer los
idiomas de audio disponibles.
AUDIO
• Los idiomas disponibles difieren seg0n la emisi6n.
Se muestra "OTRO"cuando no puede obtenerse el
idioma de audio o si los idiomas obtenidos no son
ingl6s, espahol o ffanc6s.
• La pantalla de informaci6n desaparecer_
autom_ticamente dentro de unos segundos.
Nota:
• Presionando [AUDIO] nosecontrola el dispositivo de audio
externo.
ES

[] Informacibn de Pantalla
Puedevisualizarelcanalactualmenteseleccionadou otrainformacion,pot
ejemploelmododeaudio,eulapautalladeltelevisor.
Enel modoanalogicosevisualizael ntimerodelcanalactual.
Presione [DISPLAY].
DISPLAY
CA 10
• Se muestra el nOmero del canal actual en la esquina
superior derecha de la pantalla del televisor.
• Para borrar la pantalla, presione [DISPLAY]
nuevamente.
Euel mododigitalsevisualizala iuformacioudeemisioudetalladapara
elcanalactualcomo,potejemplo,eltitulodelprogramay lasguiasde
programas.
Presione [DISPLAY] repetidamente para recorrer los
modos de visualizaci6n disponibles.
[OFF]
DISPLAY !
k_j [INFORMACION DE EMISION]
!
[GU|A DE PROGRAMAS]
,,,,I
[Informaci6n de Emisi6n]
• Se muestra la siguiente informaci6n.
I n0mero de canal
2 emisora
3 titulo de programa
4 idioma de audio
(Consulte"Para Combiar el Modo de Audio"en p_gina 16.)
[Gu|a de Programas]
• Se muestra la guia de programas afiadida a
informaci6n de emisi6n.
ii!iiiiii_i
iiii_>
_iii!i!!!i....
ii.......................................
Guia de
programas-
i!i...................
Nora:
• Cuando la gufa deprogramas tenga mds de6I[neas, utilice
[Cursor A/V] para desplazarse.
• Sevisualiza "No seproporciona descripci6n."cuando no se
facilita la gufa deprogramas.
• Mientras se visualiza la gu[a deprogramas se interrumpe la
funci6n desubtftulos ocultos.
• En el modo de entrada externa, semuestra la siguiente
pantalla;
p. ej.) Cuando seha conectado un dispositivo externo a la
toma deentrada VIDEO1.
• Lapantalla deinformacidn desaparecer5 automdticamente
dentro de unossegundos cuando lossubtftulos cerrados
est6n activados.
ES

[] Modo de Visualizaci6n de
Pantalla del Televisor
Enel mododigitalpuedenseleccionarse2tiposde modosde
visualizationcuandolaemisoraenvieunasepal16:9.
Presione [SCREEN MODE] repetidamente para cambiar
la relaci6n del aspecto del televisor.
SCREEN
MODE
ANCHO BUZON
ZOOM
[ANCHO BUZON]
Visualiza el programa de soporte digital en pantalla
completa.
Aparecen unas ffanjas negras en la parte superior e
inferior de la pantalla.
[ZOOM]
Amplia y muestra la zona central del programa de
soporte digital.
Se recortan los lados izquierdo y derecho de la
imagen.
Nota:
•Seg_n el programa, esposible que el modo devisualizaci6n
no cambie.
[]Temporizador de Apagado
Eltemporizadordeapagadopuedeconfigurarse paraapagar
automaticamentelaunidaddespu_sde unperiodoincrementalde
tiempo.
1 Presione [SLEEP] para ajustar el temporizador de
apagado.
SLEEP
REPOSAR OFF
• El temporizador de apagado aparece en la pantalla
del televisor.
2 Presione [SLEEP] repetidamente para cambiar el
tiempo que debe transcurrir hasta el apagado.
SLEEP
REPOSAR 120MIN.
• Puede preparar su unidad para que se apague
despu_s de transcurrir un periodo de tiempo (de 30 a
120 minutos).
• Cada presi6n de [SLEEP] aumentar_ el tiempo en 30
minutos.
• Despu_s del ajuste, puede visualizarse el
temporizador de apagado, para su comprobaci6n,
presionando [SLEEP].
Para Cancelar el Temporizador de Apagado
Presione [SLEEP] rrepetidamente hasta que aparezca
"REPOSAR OFF"en la pantalla del televisor.
Nora:
• Lapantalla deajuste del temporizador de apagado
desaparecer6 automSticamente en 10segundos.
• Cuando desconecteel aparato dela toma deCAocuando
seproduzca un fallo desuministro el#ctrico, el ajuste del
temporizador de apagado quedar6 anulado.
ES

[] Agregar/Borrar Canales
Lafunciondeagregar/borrarcanaleslepermiteagregarel canalque
no sehayaagregar mediantelaexplorationautomaticadecanales
debidoal estadode lareceptionenel ajusteinitial. Tambi_npuede
eliminarloscanalesinnecesarios.
1 Presione [SETUP] para visualizar el menO principal.
Nora:
• Elmend "AGREGAR/BORRAR(DTV)'o "AGREGAR/BORRAR"
desaparecer5 automSticamente dentro de unos segundos.
• En el modo digital (DTV),podrd agregar o borrar canales
solamente en el canal mayor.
• Una vezborrado uncanal DTV,no podrd recuperarel canalsin
realizarnuevamente la explorad6n automatica decanales.
(Consulte"Exploraci6nAutomatica deCanales"enpagina 13.)
2 Utilice [Cursor A/V] para seleccionar"AJUSTE DE
CANAL", y luego presione [ENTER].
p. ej.) modo TV digital
- INSTALACIONTV -
_*AJUSTE DECANAL
AJUSTEDEV-CHIP
IDIOMA [ESPAi_OL]
TITULO [OFF]
LUZDE FONDO [BRILLO]
TENPE.DECOLOR [NORMAL]
DTVCC
3 Utilice [Cursor &IV] para seleccionar"AGREGAR/
BORRAR(DTV)" o"AGREGAR/BORRAR", y luego presione
[ENTER].
p. ej.) modo TV digital
o
- AJUSTE DE CANAL -
AGREGAR/BORRAR(DTV)
PREA.AUTO CA.(DTV)
PREA.AUTO CA.(TV/DTV)
PREA.AUTO CA.(CAW)
! CATVdemoraunos 50rain.
4 Seleccione el canal que desea agregar o borrar.
(Consulte"Selecci6n de Canal"en p_gina 15.)
p. ej.) modo TV digital
D25
AGREGAR/BORRAR: DTV
5 Utilice [Cursor _1/I_] para seleccionar"AGREGAR"o
"BORRAR".
• Paraagregar o borrar otros canales, repita los pasos 4-5.
• El color del nOmero de canal visualizado en la parte
superior derecha de la pantalla del televisor indica;
- Azul: Se agregar_ el canal seleccionado.
- Rojo: Se borrar_ el canal seleccionado.
6 Presione [SETUP] para salir.
I-VIAjuste de Imagen
Puedeajustarelbrillo,elcontraste, elcolor,el matizylanitidez.
1 Presione [PICTURE] para ajustar el menO principal.
P ( UI_
Utilice [Cursor A/V] para seleccionar el tipo de calidad
de imagen que desea ajustar.
[CLARIDAD]
[CONTRAS'rE]
o ,
[COLOR]
[MATIZ]
[AGUDEZAI
._t
_ En 5 segundos, utilice [Cursor _1/_1 para ajustar la
calidad.
o
Cursor _1 Cursor I_
CLARIDAD para reducir el brillo paraaumentar el brillo
CONTRASTE parareducirel contraste paraaumentarelcontraste
COLOR para reducir elcolor para intensificarel color
MATIZ paraagregar rojo paraagregar verde
AGUDEZA parasuavizar paraaclarar
Presione [RETURN] para salir.
Nota:
• Lapantalla de ajustedeimagen desaparecer5
automSticamente endentro de unos segundos.
]
!i:%
iliiiii!i! ! !il
ii.......................................
ii¸¸_¸_
ES

[] Subtitulos Cerrados
Puedever lossubtituloscerrados(co)paraprogramasdetelevision,
peliculase informativos.
Subtitulocerradoserefiereal textodedialogoo descripciones
visualizadasenpantalla parapersonasconproblemasauditivos.
1 Presione [SETUP] para visualizar el menu principal. 3 Presione [SETUP] para salir.
2 Utilice [Cursor A/V] para seleccionar"TITULO", y luego
presione [ENTER[ repetidamente para cambiar el ajuste.
p. ej.) modo TV digital
- INSTALACIONTV -
AJUSTEDECANAL
AJUSTEDEV-CHIP
IDIOMA [ESPAi_OL]
TITULO [OFF]
LUZDE FONDO [BRILLO]
TENPE.DECOLOR [NORMAL]
DTVCC
[OFF]
[SUBTIT1]
!
[SUBTIT2]
!
[SUBTIT3]
[SUBTIT4]
I
[TEXTO 1]
!
[TEXT02]
I
[TEXT03]
!
[TEXT04]
[Modo de Subt|tulos]
SUBTIT1 y TEXT01 :
son los servicios primarios de subtitulos y texto.
Los subtitulos o el texto se muestran en el mismo
idioma que el di_logo del programa
(hasta 4 lineas de escritura sobre la pantalla del
televisor, sin tapar zonas relevantes de la imagen).
SUBTIT3 y TEXT03;
sirven como canales de datos preferidos.
Los subtitulos o el texto se muestran con ffecuencia
en un idioma secundario.
SUBTIT2, SUBTIT4, TEXT02 y TEXT04;
est_n raramente disponibles y las emisoras los utilizan
solamente en circunstancias especiales, por ejemplo
cuando "SU BTIT1" y"SUBTIT3" o "TEXTO 1"y"TEXT03"
no est_n disponibles.
• Hay 3 modos de visualizaci6n segun los programas:
Modo'Paint-on': Visualiza inmediatamente en la
pantalla del televisor los caracteres
introducidos.
Modo"Pop-on": Una vez que los caracteres son
almacenados en memoria, se
muestran todos a la vez.
Modo"Roll-up": Muestra los caracteres
continuadamente mediante
desplazamiento de lineas (m_ximo 4
lineas).
ES
Nota:
• Para mostrar los subtftulos cerrados en la pantalla de su
televisor, la seSal de emisi6n debe contener los datos de los
subtftulos cerrados.
• No todos los programas y anuncios de TV contienen
subtftulos cerrados o todo tipo de subtftulos cerrados.
• Los subtftulos y textos pueden no coincidir exactamente con
la voz del televisor.
• El cambio de canales puede retrasar los subtftulos unos
segundos.
• Ajustar o silenciar el volumen puede retrasar los subtftulos
unos segundos.
• Pueden utilizarse abreviaciones, sfmbolos y otras
abreviaturas gramaticales para sincronizar el texto con
la accian en pantalla. Esto no supone un problema del
aparato.
• Los subtftulos o caracteres de texto no se visualizar6n
mientras se muestren el men_ principal o la pantalla de
funciones.
• Si aparece un recuadro negro en la pantalla del televisor,
esto significa que los subtftulos cerrados estdn configurados
en modo TEXTO. Para borrar ese recuadro, seleccione
"SUBTIT1" "SUBTIT2" "SUBTIT3" "SUBTIT4" u "OFF"
• Si el aparato recibe seSales de televisi6n de calidad
deficiente, los subtftulos podr6n contener errores, o es
posible que no aparezcan los subt[tulos. Algunas posibles
causas de seSales de calidad deficiente son:
- Ruido de ignicidn de automdviles
- Ruido de motor el#ctrico
- Recepcidn de seSal d#bil
- Recepcidn de seSal multiplex (imSgenes fantasmas o
fluctuaciones en pantalla)
• El aparato conserva la configuraci6n de subt[tulos cerrados
si se produce un corte de suministro el#ctrico.

]
[] Subtitulos Cerrados en DTV [] Estilo DTVCC
Ademasde lossubtituloscerradosbasicosdescritosenla pagina20,
DTVtiene suspropiossubtituloscerradosdenominadosDTVCC.Utilice
estemendparacambiarlaconfigurationde DTVCC.
1 Presione [SETUP] para visualizar el menu principal.
PuedecambiarelestilodeDTVCC,porejemplofuente,colorotamafio,etc.
1 Presione [SETUP] para visualizar el menO principal.
i!....................................
2 Utilice [Cursor A/V] para seleccionar"DTVCC", y luego
presione [ENTER].
p. ej.) modo TV digital
- INSTALACIONTV -
AJUSTEDECANAL
AJUSTEDEV-CHIP
IDIOMA [ESPAi/OL]
TITULO [OFF]
LUZDE FONDO [BRILLO]
TENPE.DECOLOR [NORMAL]
_"DTVCC
Utilice [Cursor A/V] para seleccionar"DTVCC"y
presione [ENTER].
o
p. ej.) modo TV digital
- INSTALACIONTV -
AJUSTE DECANAL
AJUSTE DEV-CHIP
IDIOMA [ESPAiqOL]
TITULO [OFF]
LUZDE FONDO [BRILLO]
TENPE. DECOLOR [NORMAL]
DTVCC
!ii...................
ic
3 Utilice [Cursor A/V] para seleccionar"SERVlClO
TITULO', y luego presione [ENTER] repetidamente para
cambiar el ajuste.
k_
-DTVCC -
l, SERVICIOTITULO [SIRVE1/6]
CONFIG.USUARID [ON]
TAMANOTITULO [MEDIANO]
ESTILOFUENTE [ESTIL01/8]
BORDECARACTER [NINGUNO]
OPACOADELANTE [RELLENA]
COLORADEL&NTE [BLANCO]
OPACOATRAS [RELLENA]
COLORFONDO FNEG_I
SERVICIO TITULO
OFF
SIRVE1 N6
Selecci6nelo si no desea
DTVCC. leste es el ajuste
predeterminado.
Seleccione uno de
ellos antes de cambiar
cualquier otto elemento
del menu "TITULO".
Seleccione'SIRVE 1/6" en
circunstancias normales.
Presione [SETUP] para salir.
Nota:
• "SERVICIOTITULO"sepuede cambiar dependiendo de la
descripcidn de la emisidn.
Utilice [Cursor A/V] para seleccionar"CONFIG.
USUARID', y luego presione [ENTER] repetidamente
para ajustarlo en "ON".
• Los elementos del recuadro de puntos est_n
disponibles solamente cuando'CONFIG. USUARID"
est.1 en "ON".
o
- DTVCC -
SERVICIOTITULO [SIRVE1/6]
qON_!G.U_Y_!D•ION1............
TAMANOTITULO [MEDIANO]
ESTILOFUENTE [ESTIL01/S]
BORDECARACTER [NINGUNO]
OPACOADELANTE [RELLENA]
COLORADELANTE [BLANCO]
OPACOATR,_$ [RELLENA]
ii.......................................
Utilice [Cursor A/T] para seleccionar un elemento y ...................
luego presione [ENTER] repetidamente para cambiar el .......
ajuste del elemento.
- DTVCC -
SERVICIOTITULO [SIRVE1/6]
CONFIG. USUARID [ON]
TAMAitOTITULO [MEDIANO]
ESTILOFUENTE [ESTIL01/8]
BORDECARACTER [NINGUNO]
OPACOADELANTE [RELLENA]
COLORADELANTE [BL_NCO]
OPACOATR,_S [RELLENA]
COLORFONDO NEGRO
o
ii¸¸_¸_
ES

[]Ajuste de Luz de Fondo
Puedeajustarelmodode brillodeseado.
• TAMANO TITULO
El tamar_o de fuente de los subtitulos cerrados puede
elegirse entre los siguientes:
• ESTILO FUENTE
El estilo de fuente del subtitulo mostrado puede
elegirse entre los siguientes:
• BORDE CARACTER
El tipo de borde del subt[tulo mostrado puede
elegirse entre los siguientes:
• COLOR ADELANTE, COLOR FONDO
El color de fuente y de rondo del subtitulo mostrado
puede elegirse entre los siguientes:
• OPACO ADELANTE, OPACO ATRAS
La opacidad del texto y del rondo del subtitulo
mostrado puede elegirse entre las siguientes:
TAMAI_IO TITU LO
MEDIANO, GRANDE, PEQUEI_IO
Fuente proporcional utilizada
en la pantalla de men0
A un espacio con remates
Espacio proporcional con
remates
ESTILO FUENTE
ESTILOI/8
ESTILO2/8
ESTILO3/8
ESTILO4/8
ESTILO5/8
ESTILO6/8
ESTILO7/8
ESTILOS/8
BORDE CARACTER
OPACO ADELANTE
COLOR ADELANTE
OPACO ATRAS
COLOR FONDO
Presione[SETUP] para salir.
A un espacio con remates
Espacio proporcional sin
remates
Tipo de fuente informal
Tipo de fuente cursiva
Minusculas
NINGUNO, ELEVADO, HUNDIDO,
UNIFORME, SOMBRA IZQ., SOMBRA DER.
RELLENA, TRANSLUCIDA, DESTELLO
BLANCO, NEGRO, ROJO, VERDE,
AMARILLO, AZUL, MAGENTA, CYAN,
TRANSPARENTE
RELLENA, TRANSLUCIDA, DESTELLO
NEGRO, ROJO, VERDE, AZUL, AMARILLO,
MAGENTA, CYAN, TRANSPARENTE,
BLANCO
Presione [SETUP] para visualizar el men0 principal.
2 Utilice [Cursor • IV] para seleccionar"LUZ DE FONDO",
y luego presione [ENTER] repetidamente para cambiar
el ajuste.
o
p. ej.) modo TV digital
- INSTALACIONTV -
AJUSTE DECANAL
AJUSTE DEV-CHIP
IDIOMA [ESPANOL]
TITULO [OFF]
LUZDE FONDO [BRILLO]
TENPE. DECOLOR [NORMAL]
DTVCC
[BRILLO]
I
[NORMAL]
I
[OSCURO]
,,,,I
3 Presione [SETUP] para salir.
ES

]
[-4Temperatura de Color
Puede ajustar la temperatura de color de la pantalla del televisor.
1 Presione [SETUP] para visualizar el menu principal.
[]V-chip
V-chipleelasclasesdelosprogramas,y niegaelaccesoa losprogramas ....
queexcedenelniveldeclasincaci6nestablecido.Conestafuncion,
puedebloqueardeterminadosprogramasinapropiadosparani_os.
I Presione [SETUP] para visualizar el menO principal.
2 Utilice [Cursor • IV] para seleccionar'TENPE. DE
COLOR", y luego presione [ENTER[ repetidamente para
cambiar el ajuste.
p.ej.) modo TV digital
- INSTALACIONTV -
AJUSTEDECANAL
AJUSTEDEV-CHIP
IDIOMA [ESPAi_OL]
TITULO [OFF]
LUZDE FONDO [BRILLO]
_"TENPE.DECOLOR [NORMAL]
DTVCC
[NORMAL]
I
[CALIENTE]
I
[FR|O]
_._1
3 Presione [SETUP] para salir.
Utilice [Cursor •IV] para seleccionar'AJUSTE DE V-
CHIP", y luego presione [ENTER].
p. ej.) modo TV digital
o
- INSTALACIONTV -
AJUSTE DECANAL
AJUSTE DEV-CHIP
IDIOMA [ESPANOL]
TITULO [OFF]
LUZDE FONDO [BRILLO]
TENPE. DECOLOR [NORMAL]
DTVCC
Utilice [los botones num_ricos] para introducir los
n0meros de 4 digitos de su contrase_a.
_ i_ _gZ_,
CODIGODEACCESO
!....................................
i"
ic
iliiiii!i! ! !il
•Cuando no haya configurado su contraseffa, :
introduzca 0000. :
• Cuando la contrase_a sea correcta, se muestra el
siguiente menÙ de'AJUSTE DEV-CHIP". .......................................
Consulte la siguiente descripci6n para ajustar cada elemento.
p. ej.) modo TV digital
CLASE DEMPAA J B
CLASE DESCARGADA I
CAMBIARCODIGO . C
1
A'""A. Clase de TV"
p_gina 24
B'""B. Clase de MPAA"
=> p_gina 25
C'""C. Cambiar Contrasefia"
=> p_gina 25
Nota:
• "CLASEDESCARGADA" estard disponible cuando el aparato
reciba una emisi6n digital utilizando el nuevo sistema de
clasificaci6n.
• Cuando seleccione una clasificaci6n y la ajuste en "BLOQ."
las clasificaciones mSs altas quedardn bloqueadas
automdticamente. Las clasificaciones mds bajas estardn
disponibles para su visi6n.
•Cuando seleccione la clasificaci6n mds alta en "MIRAR"
todas las clases cambian automOticamente a "MIRAR'_
•Si aparece elmensaje "PROGRAMA PROHIBIDO" mientras estd
viendo la televisi6n, cambie a un canal que no est_ bloqueado.
Luego, podrd acceder al mend "AJUSTEDE V-CHIP" y cambiar el
ajuste para poder ver todos los canales de televisi6n.
• Para bloquear cualquier programa inapropiado, establezca sus
Ifmites tanto en "CLASE DE TV" como en "CLASEDE MPAA".
• El ajuste V-chip se mantendr5 despu_s de producirse un
corte en el suministro el_ctrico (pero el c6digo de acceso
vuelve a 0000).
ES
i!i...................

Utilice [Cursor A/T] tpara seleccionar"CLASE DE TV", y
luego presione [ENTER[.
p. ej.) modo TV digital
- AJUSTEDE V-CHIP-
CLASE DETV
CLASE DEMPAA
CLASE DESCARGADA
CAMBIARCODIGO
[Para Ajustar las Subcategorias]
En Io referente a TV-Y7, TV-PG, TV-14 6 TV-MA, puede
seguir ajustando las subcategorfas para bloquear
elementos especfficos de la programaci6n. Para ajustar
las subcategorfas, siga los pasos indicados.
1 Utilice [Cursor A/V] para seleccionar la
clasificaci6n principal deseada y luego presione
[ENTER[ dos veces para mostrar sus subcategorias.
5 Utilice [Cursor A/V] tpara seleccionar la clasificaci6n
deseada y luego presione [ENTER[ repetidamente para
cambiar entre "MIRAR" y"BLOQ".
o
_- TV-Y [MIRAR]
TV-Y7( ) [MIRAR]
TV-G [MIRAR]
TV-PG(DLSV) [BLOQ.]
TV-14 (DLSV) [BLOQ.]
TV-MA(LSV) [BLOQ.]
TV-Y [MIRAR]
TV-Y7( ) [MIRAR]
TV-G [MIRAR]
TV-PG( ) [MIRAR]
TV-14 ( ) [MIRAR]
TV-MA( ) [MIRAR]
Clasificaci6n Categoria
TV-Y Apto para todos los nirqos inferior
Apto para todos los nitros desde
TV-Y7 los 7 arqos J _
TV-G Todos los publicos
Se sugiere orientaci6n de los
TV-PG
padres
TV-14 No apto ni_os menores de 14 a_os
TV-MA Exclusivamente para pQblicoadulto superior
Utilice [Cursor J,/V] y luego presione [ENTER]
repetidamente para cambiar el ajuste.
p. ej.) TV-PG
o
TV-PG [BLO0.]
D [BLO0.]
L [BLO0.]
S [BLOQ.]
V [BLOO.]
Subclasificaci6n
FV
V
S
L
D
Categoria
Fantasia Violencia
Violencia
Situaci6n sexual
Lenguaje grosero
Di_logo sugerente
Clasificaci6n
TV-Y7
TV-PG
TV-14
TV-MA
TV-PG,TV-14
Presione [SETUP] para salir.
Nota:
• Las subcategoHas bloqueadas aparecerdnjunto a la
categorfa de clasificaci6n principal en el men5 "CLASE DE
TV"
• No podr5 bloquear una subcategoria (D, L, So V) si la clase
principal est5 ajustada en "MIRAR'[
•AI cambiar la categor[a a "BLOO." o "MIRAR" cambia
automSticamente todas sus subcategor[as a Io mismo
("BLOQ." o "MIRAR").
ES

ClasedeMPAAeselsistemadeclasificacioncreadopotlaMPAA(Motion
PictureAssociationof America).
Aunque el codigo predeterminado "0000" viene incorporado con el
aparato, usted puede ajustar supropia contrase_a.
!!i::i_i_
Utilice [Cursor A/V] para seleccionar"CLASE DE MPAA"
y luego presione [ENTER[.
p. ej.) modo TV digital
- AJUSTEDE V-CHIP-
CLOSEDETV
CLASE DEMPAA
CLASE DESCARGADA
CAMBIARCODIGO
Utilice [Cursor A/V] y luego presione [ENTER[
repetidamente para cambiar el ajuste.
G [MIRAR]
PG [MIRAR]
PG-13 [MIRAR]
R [BLOQ.]
NC-17 [BLOQ.]
X [BLOQ.]
Clasificaci6n Categoria
G Todos los pOblicos
PG Se sugiere orientaci6n de los padres
PG-13 No apto para nifios menores de 13 a_os
R Restringido; menores de 17 a_os tienen que estar
acompafiados por un progenitor o un tutor adulto
NC-17 No apto para menores de 17 aSos
X Exclusivamente para pOblico adulto
Presione [SETUP] para salir.
Utilice [Cursor A/V] para seleccionar"CAMBIAR
CODIGO"y luego presione [ENTER].
p. ej.) modo TV digital
o
- AJUSTEDEV-CHIP-
CLASE DETV
CLASE DE MPAA
CLASE DESCARGADA
CAMBIARCODIGO
Presione [los botones num6ricos] del mando a
distancia para introducir la nueva contrasefla de
4 digitos.
• Vuelva a introducir la contrasefla en el espacio
"CODIGO CONFIRMADO".
CODIGO NUEVO
CODIGO CONFIRMADO
V----1
Presione [SETUP] para salir.
Nora:
• AsegSrese de que la nueva contraseSa y la contraseSa de
confirmaci6n son exactamente iguMes. Si son diferentes, el
espacio queda en blanco para volver a introducirla.
• Su contraseSa se borrar6 y volver6 a la predeterminada
(0000) cuando se produzca un fMIo en la Mimentaci6n.
Si olvida la contraseSa, desenchufe el cable de alimentaci6n
durante 10 segundos para restaurar la contraseSa en 0000.
i!....................................
iiiii_i_iil
ic
ii!iii:il
iliiiii!i!!!il
ii.......................................
ii¸¸_¸_
ES

[] Medios que se Pueden Reproducir
DVD-video
"1,2,4,6,10,11
DVD-RW
DVD-R
"1,3,4,5,
6,7,8,9,10
DVD+RW
DVD+R
"1,4,5,6,9,10
CD de audio
"4,6,10
CD-RW D,_,...... ,o
CD-R
.4,5,6,9,10
DIGITAL AUDIO
ovo
Q
RW
ovo
o
WD
@o@
video digital
(MPEG2)
audio digital
O
MP3
5 pulgadas
(12 cm)
CD de audio
es una marca registrada de DVD Format/Logo Licensing Corporation.
Si no puede reproducir un disco que tiene las marcas indicadas m_s arriba, verifique las notas siguientes.
"1 : Esta unidad emplea el sistema de color NTSC. Losdiscos grabados cot] otros sistemas de color como, por ejemplo, PALno se pueden reproducir.
"2: Ciertos DVD-video no funcionan como se describe en este manual debido alas intenciones de los productores del disco.
*3: Los discos grabados con el formatoVR (grabaci6n de video) no se pueden reproducir.
*4: Los discos rayados o sucios no se pueden reproducir.
*5: Algunos discos no se pueden reproducir debido a que las condiciones de grabaci6n son incompatibles, a las caracteristicas de la grabadora o
alas propiedades especiales del disco.
*6: Puede reproducir los discos que tienen las marcas indicadas m_is arriba. Pero si utiliza discos no estandarizados, puede que la unidad no los
reproduzca.Y aunque se reproduzcan, la calidad del sonido o de la imagen se reducirS.
*7: En las grabadoras DVD de nuestra marca puede reproducir los DVD-RW/dR sin finalizar grabados en el formato de video. Sin embargo, dependi-
endo del estado de lagrabaci6n de un disco, el disco puede que no se reproduzca en absoluto o normalmente (la imagen y el sonido no ser_n
adecuados, etc.). En este caso, necesitar_ finalizar el disco con la grabadora DVD. Consulte el manual entregado con la grabadora DVD.
*8: 561o se pueden reproducir los discos grabados en el formato de video y finalizados. Los discos sin finalizar no se pueden reproducir. Dependiendo
del estado de la grabaci6n de un disco, _ste puede que no se reproduzca en absoluto, la imagen y el sonido no sean adecuados, etc.
*9: Si la parte grabada del disco es demasiado peque_a [menos de 55 mm (2 3/16 de pulgada) a Io ancho] puede que el disco no se repro-
duzca correctamente.
"1 O:No pegue papel ni ponga pegatinas en el disco. Estos pueden dar_ar el disco, y la unidad puede que no los lea correctamente.
"1 1: El nQmero dentro del simbolo indica la regi6n del mundo, y el disco codificado con un formato de regi6n especifica s61o puede ser repro-
ducido en una unidad que tenga el mismo c6digo de regi6n.
[] Medios que no se Pueden Reproducir
• NUNCA reproduzca los discos siguientes, iDe Io contrario podrdn producirse fallas en el funcionamiento!
disco Blu-ray, HD DVD, DVD-RAM, DVD-audio, CD-i, photo CD, CD de video, DVD con otros c6digos de regi6n que no
sean el 1 o la palabra ALL (todos), DTS-CD, DVD-ROM para computadoras personales, CD-ROM para computadoras
personales,
• En los discos siguientes PUEDE QUE NO se oiga el sonido.
CD de super audio
Nota:
• $61o se puede reproducir el sonido grabado en la capa CD normal. El sonido grabado en la capa de "CD de super audio" de alia
densidad no se puede reproducir.
ES

[] Reproducci6n
Antes de empezar:
Enciendaelamplil_cadorycualquierottoequipoqueest_conectadoaesta
unidad.Aseguresedequeel receptordeaudioexternoest_ajustadoenel
mododeentradacorrecto.
1 Presione [POWER] para encender el aparato.
POWER
2 Inserte un disco con la etiqueta orientada hacia abajo,
desde el lado izquierda de la unidad.
• En caso de que el DVD fue grabado en ambos lados,
asegurese de que la etiqueta del lado que desea
reproducir est_ orientada hacia abajo.
• El aparato pasa al modo DVD cuando estaba en modo TV.
3 Presione [PLAY I_]. La bandeja se cerrar_ y empezar_ la
reproducci6n. _
PLAY
• Si la reproducci6n no comienza autom_ticamente,
presione otra vez [PLAY I_].
Presione [STOP II] para interrumpir la reproducci6n
temporalmente.
STOP
• Si la reproducci6n se mantiene interrumpida durante
5 minutos, se activar_ autom_ticamente el programa
del protector de pantalla cuando"SALVA PANTALLA"
est_ ajustado en "ENC.".
5 Presione [EJECT___] para expulsar el disco.
EJECT
Nota:
• Puedeaparecer "_" en la zona superior |
derecha de la pantalla del televisor cuando
I
la operaci6n est_prohibida por el discoo
por esta unidad.
• Algunos discosDVDpueden iniciar la reproducci6n desdeel
t[tulo 2 6 3 debido a programas espedficos.
• Durante la reproducci6n de un disco de 2 capas, las im_genes
pueden interrumpirse durante un instante. Esto sucede
mientras la primera capa estd cambiando a la segunda capa.
Esto no es un fallo de funcionamiento.
[] Menu DVD
Algunosdiscoscontienen menusdediscoquedescribenelcontenidodel
discoolepermitenpersonalizarlareproducci6ndeldisco,omenude
titulosqueenumeranlostitulosdisponiblesenel DVD.
Presione [MENU] para Ilamar al men0 del disco.
Utilice [Cursor • / • / _1 / I_] para seleccionar un
elemento y luego presione [ENTER] (o [PLAY I_]).
Nota:
• Lasoperaciones con men_s pueden cambiar dependiendo
del disco.
Consulte el manual que acompa_a al disco para conocer
rods detalles.
[] Reanudaci6n de la Reproduc-
ci6n
Presione [STOP II] durante la
reproducci6n.
En la pantalla del televisor
aparecer_ un mensaje de reanu-
daci6n.
Presione [PLAY I_]. La reproducci6n se reanudar_
desde el punto donde se detuvo la reproducci6n.
Nota:
• Paracancelarla reanudaci6n,presione[STOPII] una vezm_sen
elmodo deparada.En algunosdiscos,[STOPII[ no funcionar_
mientrasapareceelmensajedereanudaci6n.Esperea que
desaparezcael mensaje.
• ParaMP3la reproducci6n se reanudardn desde el comienzo
dela pista actual
• Lainformaci6n de reanudaci6n semantendr_ aunque se
apague la unidad. Noobstante, la funci6n dereanudaci6n
secancelar_ sise expulsa el disco.La reproducci6n empezard
desdeel principio la pr6xima vezque introduzca el disco.
[] Pausa
....!ii......
ii,_%_....
i!...................
Presione [PAUSE I I] durante la
reproducci6n.
• La reproducci6n har_ una pausa y el
sonido se silenciar_.
°i
Para continuar con la reproducci6n, presione [PLAY I_].
ES

[] Reproducci6n Paso a Paso []Zoom
Cada vez que presiona [PAUSE I I] en el
modo de pausa, el disco avanza un cuadro
cada vez.
5_
Paracontinuar con la reproducci6n, presione [PLAYI_].
Nota:
• Si las imdgenes en el modo de pausa estdn borrosas, ponga
"MODO VISTA FIJA" en "IMAGEN" en el mend "PANTALLA"
(Consulte la pdgina 38.)
Lafunci0ndelzoomle permite ampliar laimageny m0verseensentid0
horizontalp0rlaimagenampliada.
Durante la reproduccidn, presione repetidamente
[MODE] hasta que aparezca" _:_".
[]Avance Rdpido / Retroceso Rdpido
Mantenga presionado [REV <_1] o
[FWD IH_] durante la reproducci6n para
seleccionar la velocidad de avance o ret-
roceso requerida.
Para continuar con la reproducci6n, presione [PLAY I_].
2 Presione repetidamente [ENTER] para cambiar el factor
del zoom: "APDO. (ZOOM)", "1,3x (ZOOM)", "2x (ZOOM)" o
"4x (ZOOM)".
Nota:
• Si las imdgenes en el modo de reproduccidn Mpida estdn
borrosas, ponga "MODO VISTA FIJA" en "IMAGEN" en el mend
"PANTALLA'[ (Consulte la pdgina 38.)
• La velocidad de avance rdpido /retroceso rdpido cambia
seg(m el disco.
La velocidad aproximada es de 1(2x), 2(8x), 3(20x), 4(50x)y
5(100x) en DVD y 1(2x), 2(8x), 3(30x) en CD de audio y MP3.
• Para DVD, elsonido sesilenciard durante la bdsqueda.
• Para CD de audio yMP3, el sonido saldrd intermitentemente
durante la b_squeda.
3 Una vez establecido el factor de zoom deseado, pre-
sione [RETURN] para visualizar la guia de posiciones, y
luego utilice [Cursor A/V/_1 / I_] para mover la ima-
gen focalizada a Io ancho de la pantalla del televisor.
[] Avance Lento / Retroceso Lento
Mantenga presionado [REV <_1] o
[FWD IH_] durante el modo de pausa para
seleccionar la velocidad de avance o retro-
I
ceso requerida.
Para continuar con la reproducci6n, presione [PLAY I_].
Noto:
• La velocidad de avance lento/retroceso lento cambia seg_n
el disco.
La velocidad aproximada es de 1(1/16x), 2(1/8x) y 3(1/2x).
• Si las imdgenes en el modo de reproducci6n lenta estdn
borrosas, ponga "MODO VISTA FIJA" en "IMAGEN" en el men(_
"PANTALLA'[ (Consulte la pdgina 38.)
• Elsonido sesilenciaM durante la reproducci6n de avance
len to/retroceso len to.
Para salir del zoom, repita los pasos 1 y 2 de m_s arriba y
presione [ENTER[ hasta que aparezca "APDO. (ZOOM)".
Noto:
• Elrecuadro gris con un recuadro azul interior que se visualiza
durante la reproducci6n con zoom es la guia de posici6n que indica
la posici6n de la imagen focalizada dentro de la imagen total.
La gu[a de posici6n permanece en la pantalla del televisor
hasta que usted presiona [ENTER].
Presione [ENTER] una vez mds para recuperar la gu[a de
posici6n cuando _sta desaparezca.
• La funci6n delzoom no se activa mientras se visualiza el
men(_ del disco.
• Elzoom 4x no estd disponible en algunos discos.
• La funci6n delzoom tambi_n estd disponible durante el
modo de pausa.
ES

[] Reproducci6n MP3
MP3 es un m6todo de compresi6n de archivos. Puede copiar
archivos MP3 en discos CD-RW/-R desde la computadora personal
y reproducir los archivos en esta unidad.
Inserte un CD-RW/-R con archivos MP3, y la reproduc-
ci6n comenzar_ autom_ticamente.
• Presione [PLAY I_] si ya hay un disco insertado.
• Presione [MENU] cuando quiera Ilamar a la lista de
archivos.
Cuando seleccione la carpeta:
• Presione [Cursor I_] cuando quiera ir a la siguiente
jerarquia.
PLAY
o
• Presione [Cursor _1] cuando quiera volver a la jerar-
qu[a anterior (excepto para la jerarqu[a superior).
• Si est_ presionado [TOP MENU] cuando se visualiza
una lista de archivos, el primer elemento de la jerar-
quia superior resaltar£
• Presione [MENU[ o [RETURN] para volver a la visual-
izaci6n de la reproducci6n.
2 Presione una vez [STOP II] para detener temporal-
mente la reproducci6n.
STOP
• Consulte "Reanudaci6n de la Reproducci6n"en la
p_gina 27.
Nota:
• Algunas selecciones tardar_n un rato en ser reconocidas.
• Alas carpetas se les llama grupos; y a los archivos se les
llama pistas.
• Las carpetas y los archivos MP3 se visualizan respectivamente
como y [_.
• En un disco sepuede reconocer un mdximo de 255 carpetas o 999
archivos.
• En una carpeta sepueden reconocer basra 8jerarquias. Los archivos
de lasjerarquias 9 o m6s profundas no sepueden reproducir.
• Esta unidad puede reproducir imOgenes y sonidos de datos
grabados en los formatos MP3 en discos CD-RW/-R.
• A un archivo con una extensi6n de '_mp3 (MP3)'se le llama
"archivo MP3"
• La unidad puede ejecutar un archivo de imagen que cumpla
con la especificaci6n Exif. Exiles un formato de archivo,
un formato Exchangeable Image File (Archivo de Imagen
Intercambiable) establecido pot la Japanese Electronic
Industry Development Association (Asociaci6n para el
Desarrollo de la Industria Electr6nica Japonesa) (JEIDA).
• Los archivos cuya extensi6n sea otra diferente de ':mp3
(MP3)" no se enumerarOn en la lista de archivos.
• Si el archivo no estd grabado en el formato MP3 puede que se
produzca ruido aunque la extensi6n del archivo sea '_mp3 (MP3)'_
• El nombre de la carpeta o archivos se puede visualizar con un
mOximo de 25 caracteres. Los caracteres que no se puedan
reconocer serdn reemplazados por asteriscos.
• Los carpetas o archivos que no se puedan reprodueir puede
que sean visualizados dependiendo de las eondiciones de la
grabaei6n.
Para utilizar con esta unidad se recomiendan los archivos
grabados bajo las circunstancias siguientes:
Archivo MP3 aplicable " Observaciones
Frecuencia de muestreo: Para el archivo MP3 grabado con
44,1 kHz 6 48 kHz velocidad de bits variable (VBR),la
Velocidad de bits constante: unidad puede que no visualice el
32 kbps -320 kbps tiempo transcurrido realmente.
...................
ii¸¸_¸_
i!!_i;i!_!!
_iiii_!il
ES

[] Funciones de Bdsqueda
Utilizando [MODE]
1
Presione repetidamente [MODE] durante la reproduc-
ci6n hasta que aparezca" '1
• Si desea realizar la busqueda de titulos, presione
repetidamente [Cursor A/V] hasta que aparezca" '.
2 Presione [los botones num_ricos] antes de que pasen 60
segundos para seleccionar el capitulo o el titulo deseado.
Para reproducir un capitulo o un titulo de un solo digito
cuando haya m_s de 10capitulos o titulos, presione [ENTER]
despu_s de introducir el nOmero del capitulo o del titulo.
3 La reproducci6n comenzar,] autom,]ticamente desde el
cap[tulo o t[tulo que haya seleccionado.
Nota:
• El n_mero total de cap/tulos/t/tulos de su disco; con menos
de 10 cap/tulo/tftulo, presione directamente el n#mero de la
cap/tulo/tftulo. Con 10 o mSs cap/tulos/tftulos, para reproducir
una cap/tulo/tftulo de un solo dfgito, presione primero [0] y
luego el n#mero de la cap/tulo/tftulo. (p. ej., para la cap/tulo 3,
presione [0] y [3].) Para reprodudr una capftulo/tftulo de dos
dfgitos, presione el n#mero de la capftulo/tftulo.
Utilizando [SKIP t<t<I/ I_IH]
1 Presione repetidamente [SKIP _/IHH] durante la
reproduccidn hasta seleccionar un capitulo o titulo
deseado.
capitulo actual
(CH)
ICHI!iC2IcH31cH4!
[SKIP_[ [SKIP_[
o
titulo actual
(TT)
!TT1IT_!TT3!TT4!
[SKIP_ ] [SKIP_q ]
(Siel disco no tiene capitulos.)
La reproducci6n empezar_ autom_ticamente desde el
capitulo o el titulo que haya encontrado.
Nota: I
•[SKIP I<1<1/I_IH] no se encuen tran disponibles cuando la I
reproducci6n est5 parada. I
• La b(_squedadecapitulos/tftulos descrita rods arriba s61opuede I
realizarsedurante la reproducci6n o cuando la unidad ha mantenido la I
informaci6n dereanudad6n. No puederealizarseen el modo de parada.
• Con Mgunos DVD no se pueden reproducir capftulos/tftulos.
Utilizando [MODE]
Presionerepetidamente [MODE] durante lareproduc-
ci6n hasta que aparezca" ".
2
3
Presione [los botones num_ricos] antes de que pasen
60 segundos para seleccionar la pista deseada.
J
Para reproducir una pista/archivo de un solo digito cuando
haya m_s de 10 pistas/archivos, presione [ENTER] despu_s
de introducir el nOmero de la pista/archivo.
La reproducci6n empezar_ autom_ticamente desde la
3ista/archivo que haya seleccionado.
Nota:
•El n_mero total de pistas/archivos de su disco;
Con menos de 10pistas/archivos, presione directamente el
n_mero de la pista/archivo.
Con 10o mSs pistas/archivos, para reproducir una pista/
archivo de un solo dfgito, presione primero [O] y luego el
n_mero de la pista/archivo. (p. ej., para la pista/_rchivo 3,
presione [0] y [3].) P_r_ reproducir un_ pista/_rchivo de dos
dfgitos, presione el n_mero de I_ pist_/_rchivo.
Con 100 6 mSs _rchivos, p_r_ reproducir un_ archivo de
uno o dos dfgitos, presione primero [0], y luego presione
direct_mente el n_mero de I_ _rchivo. (p. ej., pare I_ archivo 3,
presione [0], [0] y [3]. P_r_ I_ _rchivo 26, presione [0], [2] y [6].)
P_r_ reproducir un_ _rchivo de tres dfgitos, presione
direct_mente el n_mero de I_ _rchivo.
•L_ b_squed_ de pist_s no est5 disponible p_r_ I_ reproduccidn
progr_m_d_ o Me_tori_.
Utilizando [SKIP t<t<I/IHIH]
1 Presione repetidamente [SKIP _/IHH] durante la
reproducci6n hasta seleccionar la pista/archivo que
usted desee.
pista/archivo actual
i_ _4 _, (TR)
[SKIPt_I_] [SKIPS]
La reproducci6n empezar_ autom_ticamente desde la
3ista/archivo que usted seleccion6.
Nota:
•[SKIPI<I<I/I_IH] no se encuentr_n disponibles cu_ndo I_
reproduction est5 p_r_d_.
•L_ b_squed_ de pist_s descrit_ mds _rriba solo puede
reMiz_rse durante I_ reproducd6n o cu_ndo I_ unid_d
h_ m_ntenido I_ inform_ci6n de re_nud_cidn. No puede
reMiz_rse en el modo de p_r_d_.
ES

Presionerepetidamente[MODE] durante la repro-
ducci6n hasta que aparezca .... /" ".
p. ej.) DVD
2 Utilice repetidamente [Cursor A/V] hasta que apa-
rezca "D".
o
/
3 Presione[losbotonesnum_ricos]antesde que pasen60
segundosparaseleccionarel intervalo detiempo deseado.
/
La reproduccidn empezar_ autom_ticamente a partir
de pasar el tiempo que usted haya seleccionado.
Nora:
• Cuando no esnecesariointroducir un n[lmero aparece "0"
automdticamente. Porejemplo, "0:0_:_ " apareceen el mend
debDsquedapot tiempo si eltiempo total del t[tulo o dela
pista/archivo esinferior a 10minutos.
• Presione[CLEAR]para borrarlaentrada incorrectaenelpaso 3.
• LabDsquedapot tiempo sdlosepuede realizar durante la
reproduccidn o cuando la unidad ha mantenido informacidn
dereanudacidn. Nosepuede realizar enelmodo deparada.
Presione [los botones num_ricos] para seleccionar el
nomero de la pista deseada.
Nora:
•Paraselecdonar unnDmero decap[tulo,tftulo, pista/archivo de
unod[gito, presione directamente el nDmero.
• Paraseleccionar un nDmero decap[tulo, t[tulo, pista/archivo
de dos dfgitos:
- Sieldiscotienemdsde9pistasymenosde 100,presioneprimero
[+ 10/+ 100]yluegointroduzcaeln_merodecap[tulo, t[tulo,
pista/archivo dedosdigitos.
(p.ej.,parala pista 26,presione[+ I0/+ 100], [2] y[6].)
- Siel disco tienerodsde99archivos,presione[+ 10/+ 100]y
luego presione[0]. Luego introduzca elndmerode archivosde
dos d[gitos.0 presioneprimero [+ 10/+I00], luego introduzca el
ndmerodela archivosy finalmente presione[ENTER].
• Paraselecdonar unnDmero dearchivos detresd[gitos,
presioneprimero [+ 100/+ I0] y luego in troduzcael nDmero de
archivos detres dfgitos.
i ,%
[] Repeticibn de Reproduccibn
Puederepetirlareproducci6ndecapitulos,titulosopistas/archivosdeundisco.
Presione repetidamente [MODE] durante la repro-
ducci6n hasta que aparezca "_".
Presione [Cursor A/T] para cambiar el modo de repetici6n.
Ei APDO.
CAP|TULO
T|TULO
(repetici6ndesactivada)
i
(repeticion del capitulo actual)
(repetici6n del titulo actual)
F_ PDO.
PISTA
L ooo
(repetici6n desactivada)
(repetici6n de la pista actual)
(repeticion del disco completo)
li APDO.
_ PISTA
GRUPO
TODO
(repetici6n desactivada)
(repetici6n de la pista actual)
(repeticion de la carpeta actual)
(repeticion del disco completo)
Presione [RETURN] para salir.
[] Repeticibn de Reproduccibn A-B
!
PuederepetirlareproduccionentrelospuntosAy Bdeundisco. ...................
Presione repetidamente [MODE] durante la reproduc- .......
ci6n hasta que aparezca" APDO:'. ....
Presione [ENTER] en el punto de inicio deseado (A).
i
Presione [ENTER] en el punto de finalizaci6n deseado (B).
!
! !iiii:
• Elpunto Bdeberaestar en el mismo titulo o pista que el punto A.
• Dentro de unos pocos segundos, la secci6n A-B
empezar_ a reproducirse repetidamente.
Paracancelar la repetici6n de reproducci6n A-B, presione
repetidamente [MODE] hasta que aparezca" A-B".
Presione [ENTER] para que aparezca "D APDO:'.
ES

Nora:
• El ajuste de repetici6n (excepto "TODO') se cancelar6 cuando
pase a otro tftulo, capftulo, pista/archivo o carpeta.
• Durante la reproducci6n programada, el ajuste de repeticidn
ser6 efectivo para las pistas/archivos del programa.
• La repeticidn de reproducci6n o la repetici6n de reproduccidn
A-B puede no estar disponible con algunos discos.
• La repetici6n de reproducci6n A-B no funciona durante otro
modo de repetici6n.
• Para cancelar el punto A, presione [CLEAR] en el paso 2 de
"Repetici6n de Reproducci6n A-B'_
• AI parar la reproducci6n se cancelar6 la repeticidn de
reproducci6n A-B.
[] Reproducci6n Programada
Puededeterminarelordendelareproducciondelaspistas/archivos.
Presione repetidamente [MODE] en el modo de parada
hasta que aparezca el menu "PROGRAMA".
P.eJ.)CD de audio
2 Utilice [Cursor • / V] para seleccionar una pista/archi-
vo deseada y luego presione [ENTER] para guardarla.
• Puede haber pistas/archivos adicionales en otras
pantallas. Utilice [Cursor •l V] para ir a las p_ginas
siguientes / anteriores.
• Repita este paso hasta que haya seleccionado todas
las pistas/archivos que quiera reproducir del pro-
grama.
k_
Nota:
• Presione [CLEAR] para borrar la dltima pista del programa si
ha cometido un error.
• Para borrar todas las pistas/archivos programadas de una vez,
seleccione "BORRA TODO" y presione [ENTER] en el paso 2.
• Mientras est6 reproduci_ndose un programa, [STOP II]
funciona de la forma siguiente:
- AI presionar una vez[STOP II]: La pista/archivo estard en el modo
de espera de reanudaci6n. La pr6xima vez que presione [PLAYI_],
la reproducci6n se reanudara desde el punto donde separd en la
reproducci6n programada. (Para archivos MP3, la reproducci6n se
reanudard desde el principio del archivo actuaL)
- AI presionar dos veces [STOP II]: El modo de reanudaci6n
se cancelard. La pr6xima vez que presione [PLAYful, la
reproducd6n se reiniciard desde la primera pista/archivo en
el orden original Sin embargo, su reproducci6n programada
podrd volver a empezar cuando usted siga los pasos de arriba.
(Sus programas estardn adn guardados hasta que el disco sea
expulsado o hasta que se apague la unidad.)
- En algunos discos, [STOP II] no funcionard mientras aparezca
el mensaje de reanudaci6n. Espere a que desaparezca el
mensaje.
• Para repetir la pista/archivo actual del programa, siga los
pasos I y 2 de "Repetici6n de Reproducci6n" en la pdgina 31 y
seleccione " PISTA"
• Para repetir todo el programa, siga los pasos I y 2 de
"Repetici6n de Reproducci6n" en la pdgina 31 y seleccione "
TODO'f
• AI apagar launidad o atabrir ta bandeja detdiscoseborrard etprograma.
• No puede utilizar [los botones num_ricos] para seleccionar otra
pista durante la reproducci6n programada. Utilice [SKIP t<l</l._q]
para seleccionar otras pistas/archivos del programa.
• No puede combinar la reproducci6n aleatoria con la
reproducci6n programada.
• No puede alterar el orden de un programa durante la reproducci6n.
• $61o puede iniciar la reproducci6n programada mientras est6
en el mend "PROGRAMA"
[] Reproducci6n Aleatoria
Estafuncioncambiaelordendereproducciondelaspistas/archivosen
lugardelareproduccionenorden.
Presione repetidamente [MODE] en el modo de parada
hasta que aparezca el menQ"ALEATORIO".
p. ej.) CD de audio
• Se pueden ordenar hasta 99 pistas/archivos.
• Si un programa tiene 8 o m_s pistas/archivos, utilice
[SKIP _ / IHH] para ver todas las pistas/archivos.
Presione [PLAYI_] para iniciar la reproducci6n pro-
gramada.
PLAY
Presione [PLAY I_] para iniciar la reproduccion aleatoria.
PLAY
Nora:
• Para repetir la pista/archivo actual en el modo aleatorio, siga
los pasos I y2 de "Repetici6n de Reproduccidn" en la pdgina
31 y seleccione " PISTA'[
• Para repetir toda la reproducci6n aleatoria, siga los pasos I y
2 de "Repetici6n de Reproducci6n" en la pdgina 31 y
seleccione " TODO':
• La reproducci6n aleatoria se mantendr6 hasta que presione
[STOP II].
ES

[]Visualizacibn en Pantalla
Presionando[DISPLAY] en el mandoa distanciapuedeverificarlainformaci6n
relacionadaconeldiscoactual.
I'_ [_ aparece solamente cuando
DISPLAY | multiples _ngulos est_n
disponibles en el DVD.
iJ],l._estado de reproducci6n actual
tiempo restante del capitulo
actual
tiempo transcurrido del capitulo
actual
DISPLAY
CH (capitulo):
numero del capitulo actual /
total de capitulos
TT tiemporestante ettuoactua
I- _ (r_iPt_l:)anscurrido del titulo actual
numero del titulo actual / total de
DISPLAY
titulos
DISPLAY
nOmero de capa, s61oaparece cuando
....... - se reproduce un disco de 2 capas
L0 : Se reproducela capa 0
LI : Se reproducela capa I
el ajuste de repetici6n actual
aparece solamente cuando el
ajuste de repetici6n est_ activado
_-" C : Repetici6n de capitulo
_-T : Repetici6n de titulo
A_B: Repetici6n A-B
indicaci6n de velocidad de bits para
la cantidad de datos de audio y video
que est_ siendo leida actualmente
Noto:
• Algunos DVD no lepermitirSn establecer correctamente la
reproducci6n de capftulos.
DISPLAY
k_J I_E[- estado de reproducci6n actual
[]
H -__k__ tiempo restante de la pista actual
-- _i:tn_po transcu rrido de la pista
I TR (Pista):
DISPLAY numero de la pista actual /
total de pistas
[]
i ,%
iiiiii iii
TODO:
numero de la pista actual /
total de pistas .................................
| /_--_ el ajuste de repetici6n actual
-| .... aparece solamente cuando el
| ajuste de repetici6n est_ activado
| _ T : Repetici6n de pista
/ _-A : Repetici6n de todas las pistas
_A_-B: Repetici6n A-B
_tiempo restante de todo el disco ...................
DISPLAY
tiempo transcurrido de todo el disco
Nota:
• Cuando est5 reproduciendo un disco en un modo de
programa o aleatorio, " PROGRAMA" (o "
ALEATORIO") se visualizar5 en luqar de 1-21.
DSPLAY
_ k,._]_ i_estado de la reproducci6n actual .......................................
%1
I _! ............ _L El nombre del archivo actualmente
_'_ _ -'-DISPLAY en reproducci6n se visualizar_ ::
numero de la archivo actual / ........
archivos en total
_ajuste de repeticidn actual, si est_
activado
_-1 : Repetici6n de pista
_-G : Repeticidn de grupo (carpeta)
_-A : Repetici6n de totas archivos
tiempo de reproducci6n
transcurrido de la archivo actual
[] I I
...................o ..........................
*$61o cuando est_ reproduciendo un disco en el
modo programa o aleatorio.
?,sPLAY
[]_[.............................L
ES

[] Ajustes Especiales
Estauuidadlepermiteselecciouaruuidiomadesubtitulos (siest_dis-
pouible)durautelareproduccioudeDVD.
Presione repetidamente [MODE] durante la reproduc-
ci6n hasta que aparezca "@".
2 Utilice repetidamente [Cursor A/V] hasta que apa-
rezca su idioma deseado.
•Cada vez que presiona [Cursor A/V], el idioma de
los subtitulos cambia como se indica en el ejemplo
siguiente:
_ PDO.
ENG
FRE
Para cancelar los subtitulos
(no hay subtftulos)
(subtftulos en ingles)
(subtftulos en franc_s)
Presione repetidamente [MODE] durante la
reproducci6n hasta que aparezca "_".
/
Utilice repetidamente [CursorA/V] hasta que aparez-
ca"@ APDO.(SUBTiTULO)".
J
Nota:
• Si su idioma no se visualiza despu_s de presionar varias veces
[Cursor • iV], puede que el disco no tenga ese idioma.
Sin embargo, algunos discos s61o le permiten cambiar el
ajuste de los idiomas de subt[tulos en el men_ del disco. (La
operaci6n cambia dependiendo del disco, as/que consulte el
manual entregado con el disco.)
• Cuando aparece "NO DISPONIBLE" en la pantalla del televi-
sor, esto significa que no hay subt[tulo grabado en la escena.
• Si elige un idioma que tiene una abreviatura de 3 letras, la
abreviatura se visualizar6 cada vez que se ajuste el idioma de
los subt[tulos. Si elige otros idiomas se visualizar6 "--" en su
lugar. (Consulte la p6gina 42.)
• El expulsa de del disco cancelar6 el ajuste de los subt[tulos.
Estauuidadle permiteselecciouaruuidiomadeaudio(siseeucueutrau
dispouiblesmtiltiplesidiomas)durautelareproduccioude DVD.
Presione repetidamente [AUDIO] durante la
reproducci6n hasta que aparezca su idioma
deseado.
AUDIO
• Cada vez que presiona [AUDIO], el idioma de audio
cambia como se indica en el ejemplo siguiente:
ENG (audio en ingl6s)
SPA (audio en espar_ol)
FRE (audio en franc@s)
Nota:
•Algunos discos s61o le permiten cambiar el ajuste de audio
desde el men_ del disco. Consulte el manual entregado con
los discos para conocer detalles.
• Sisu idioma no se visualiza despu_s de utilizar varias veces
[AUDIO], puede que el disco no tenga ese idioma. Sin embar-
go, algunos discos le permiten cambiar el ajuste de m_ltiples
idiomas de audio en el men_ del disco. (La operaci6n cambia
dependiendo del disco, as/que consulte el manual entregado
con el disco.)
• Cuando aparece "NO DISPONIBLE" en la pantalla del televi-
sor, esto significa que el idioma de audio no est6 disponible.
AlguuosDVDpuedeuteueresceuasquehausidofilmadas
simult_ueameutedesderatios _ugulos.Ustedpuedecambiar
elaugulodelac_marasiaparece"_"eu lapautalladel
televisor.Si"ICONODEANGULO"est_eu"APDO:'euelmeuti
"OTROS'_"_" noaparecer_.(Cousultelap_giua41.)
Presione repetidamente [MODE] durante la
reproduccidn hasta que aparezca "".
Utilice repetidamente [Cursor A/V] hasta que apa-
rezca el _ngulo de c_mara deseado.
o
diendo del n_mero visualizado.
ES

Ajusteeluiveldelnegroparahacerquelas_reasoscurasdelaimageudel
televisortenganm_sbrillo.
Presione repetidamente [MODE] durante la
reproduccidn hasta que aparezca "_".
Eususistemaest_reode2caualesactualpuededisfrutarsurroundvirtual.
Presione repetidamente [MODE] durante la
reproduccidn hasta que aparezca "D".
i!....................................
2 Utilice [Cursor A/V] para ajustar el nivel del negro.
o
ENC. : Hace que las_reas oscuras aparezcan m_s brillantes.
APDO.: Visualiza la imagen original como rue grabada.
Presione [RETURN] para salir.
Nota:
• Elajuste se mantendr6 aunque se apague la unidad.
Estauuidadle permiteselecciouaruumododesouidodurautela reproduc-
cioudeCDdeaudio.
Presione repetidamente [AUDIO] durante la reproduc-
ci6n hasta que aparezca el modo de sonido deseado.
AUDIO J
•Cada vez que presione [AUDIO], um modo de sonido
cambiar_ como se visualiza en el ejemplo siguiente.
_ STI_REO(sonidomezcladoconloscanalesderechoeizquierdo)
L-oh (sonido del canal izquierdo solamente)
R-oh (sonido del canal derecho solamente)
Nota:
• Surround virtual no sepuede cambiar cuando el modo de
sonido est_ajustado en "L-ch"(canal izquierdo) o "R-ch"
(canal derecho).
Utilice [Cursor A/V] para seleccionar el nivel del
sonido.
o
1 : Efecto natural
2 : Efecto realzado
APDO. : Sin efectos (sonido original)
3 Presione [RETURN] para salir.
Nota:
• Elajuste se mantendM aunque seapague la unidad.
• ParaCD deaudio, surround virtual no ser6efectivo si elmodo
desonido esotro diferente de "ESTE-REO"
Consulte "Modo deSonido Est_reo'[
• Siel sonido se distorsiona, baje el nivel oseleccione 'APDO."
...................
ii¸¸_¸_
! !ill::
ES

Estacaracteristicalepermiteponerunpuntoespecificoenundiscoqueser_
Ilamadoposteriormente.
Para poner un marcador
1 Presione repetidamente [MODE] durante la reproduc-
ci6n hasta que aparezca .... /.... .
p. ej.) DVD
2 Utilice repetidamente [Cursor AIr] hasta que apa-
rezca el menu de b0squeda de marcador.
Para volver al marcador posteriormente
1 Para seleccionar un marcador deseado, repita los pasos
1-3 de"Para poner un marcador"explicados anterior-
mente.
p. ej.) DVD
Presione [ENTER] en el marcador deseado para iniciar
la reproducci6n desde el punto especffico que usted
puso.
3 Utilice [Cursor < liD'] para seleccionar un marcador
disponible dentro de 60 segundos.
Cuando la reproducci6n alcance el punto donde quiera
poner un marcador, presione [ENTER].
• El marcador queda puesto ahora.
Nota:
• Elmen_ de b_squeda de marcador desaparecerd en unos 60
segundos cuando no se introduzca nada.
• Puede marcar hasta 10puntos.
• Para borrar un marcador, seleccione el marcador que quiera
borrar y luego presione [CLEAR].
• AIexpulsar el disco o desconectar la alimentacidn se bor-
rarSn todos los marcadores.
• AIseleccionar "en el paso 3 de la seccidn"Para poner
un marcador" tambi_n seborrarSn todos los marcadores.
5 Presione [RETURN] para salir.
ES

Si desea ajustar"MODO TV" o "DOLBY DIGITAL",tambi_n Io puede
hacer entrando desde el menO "R#,PIDO".Utilice [Cursor • IV]
para seieccionar"R#,PIDO"y luego presione [ENTER] en el paso 3.
VIODO TV
Utilice [Cursor A/V] para seleccionar el elemento
deseado y presione [ENTER].
[AUDIO] "1, *2 (Predeterminado: ORIGINAL)
Seleccione el idioma de audio deseado.
o
[] Ajuste de Idioma en DVD
Puede cambiar el idioma deseado para reproducir el disco.
En el modo de parada, presione[SETUP] para mostrar el
menu "IN STALACION TV'I
- INSTALACIONW -
DIOMA ESPAF_OL]
LUZDE FONDO [BRILLO]
TENPE.DE COLOR [NORMAL1
INSTALACIONDVD
Utilice [Cursor A/!!'] para seleccionar"lNSTALAClON
DVD", y presione [ENTER[.
o - INSTALACION W -
IDIOMA [ESPANOL]
LUZ DE FONDO [BRILLO]
TENPE. DE COLOR [NORMAL]
INSTALACIC)NDVD
Utilice [Cursor A/!!'] para seleccionar"PERSNALIZ."y
presione [ENTER[.
L_
Utilice [Cursor A/V] para seleccionar"lDIOMA"y
presione [ENTER].
Utilice [Cursor A/V] para seleccionar el elemento
deseado y presione [ENTER].
[SUBT|TULO] "1, *2 (Predeterminado: APDO.)
Seleccione el idioma de subtitulos deseado.
o
[MENO DE DISCO] "I (Predeterminado: INGLES)
Seleccione el idioma deseado en el menO de disco.
o
Y
Nora:
• Para cambiar el idioma de la pantalla, flame el men_
"INSTALACION TV" presionando una vez [SETUP] y selec-
done el idioma deseado. (Consulte "SelecciOn de idioma" en
p(_gina 14).
"1
• Las opciones de idioma no est6n disponibles en determina-
dos discos.
• Si se selecciona "OTRO" en el mend "AUDIO" "SUBT[TULO"
o "MENO DE DISCO" presione el nDmero de dfgito 4 para
introducir el cOdigo del idioma deseado. (Consulte "Lista de
c6digos de idiomas" en p6gina 42).
• Solamente pueden seleccionarse los idiomas compatibles
con el disco.
*2
• Utilice [MODE] para selecdonar los subtftulos disponibles en
el DVD.
• Utilice [AUDIO] para seleccionar el audio disponibles en el
DVD.
• Silos ajustes predeterminados de audio y subtftulos del DVD
est6n en el mismo idioma, esposible que los subtftulos no
aparezcan a menos que usted los active.
Presione [SETUP] para salir.
[!iiiii]
!iiiii.....
..........
_i"i[i!
Ajuste de la Pantalla
Puedecambiarlarelaciondeaspectodelapantalladeltelevisoryla
claridaddelmododeimagenfijaconelmenu"PANTALLA':
I Presione [SETUP]en el modo de parada para visualizar
"INSTALACIONTV".
- INSTALACION TV -
IDIOMA [ESPANOL]
LUZ DE FONDO [BRILLO]
TENPE. DE COLOR [NORMAL]
INSTALACIC)NDVD
6 Utilice [Cursor AIr] para seleccionar el elemento
deseado y luego presione [ENTER].
[MODO TV] (Ajuste predeterminado: 4:3 LETTERBOX)
Seleccione la relacidn de aspecto del televisor deseada.
o
2 Utilice [Cursor A/V] para seleccionar"lNSTALAClON
DVD"y luego presione [ENTER].
- INSTALACION W -
IDIOMA [ESPANOL]
LUZ DE FONDO [BRILLO]
TENPE. DE COLOR [NORMAL]
INSTALACIC)NDVD
3 Utilice [Cursor A/V] para seleccionar"PERSONALIZ"y
luego presione [ENTER[.
[MODO VISTA FIJA] (Ajuste predeterminado: AUTO)
Seleccione el modo de imagen fija deseado
o
o
Utilice [Cursor A/V] para seleccionar"PANTALLA"y
luego presione [ENTER[.
o
Nota:
MODO TV:
• Seleccione "4:3LETTERBOX'para que puedan aparecer bar-
rasnegrasen la parte superior einferior dela pantalla del
televisor.
• Seleccione "4:3PAN& SCAN'para quela imagen ocupe
toda la pantalla con ambos lados ajustados.
MODO VISTA FIJA:
• Seleccionenormalmente "AUTO.
• Siselecciona "IMAGEN" la imagen del modo de imagen fija
seestabilizard
• Siselecciona "CUADRO',la imagen del modo deimagen fija
tendrd una definici6n alta
Presione [SETUP] para salir.
5 Utilice [CursorA/V] para seleccionar el elemento
deseado y luego presione [ENTER]
ES

[]Ajuste de Audio de DVD
Elijaelajustedeaudioapropiadoparasuequipo.I_stesoloseaplicar_
durantelareproducciondediscosDVD.
I Presione [SETUP] en el modo de parada para visualizar
"INSTALACIONTV".
- INSTALACION TV -
IDIOMA [ESPANOL]
LUZ DE FONDO [BRILLO]
TENPE. DE COLOR [NORMAL]
INSTALACIC)NDVD
2 Utilice [Cursor A/V] para seleccionar"lNSTALAClON
DVD"y luego presione [ENTER[.
- INSTALACION W -
IDIOMA [ESPANOL]
LUZ DE FONDO [BRILLO]
TENPE. DE COLOR [NORMAL]
INSTALACIC)NDVD
3 Utilice [Cursor A/V] para seleccionar"PERSONALIZ"y
luego presione [ENTER[.
Utilice [Cursor A/V] para seleccionar"AUDlO"y luego
presione [ENTER[.
5 Utilice [Cursor AIr] para seleccionar el elemento
deseado y luego presione [ENTER].
6 Utilice [Cursor AIr] para seleccionar el elemento
deseado y luego presione [ENTER].
[DRC] (Ajuste predeterminado: ENC.)
Ajusta el control de la gama din_mica.
Esta funci6n s61o se encuentra disponible en los discos
que est_n grabados en el formato Dolby Digital.
o
ENC. : Comprime la gama entre los sonidos suaves y
altos.
APDO• : Sin efectos (sonido original).
[SUB MUESTREO] (Ajuste predeterminado: ENC.)
Esta funci6n s61o se encuentra disponible en la salida
digital de un disco grabado en 96kHz.
o
ENC• :Cuandosedasalidaen48kHz
APDO• : Cuando se da salida en sonido original.
Nora:
• Cuando sereproduzcaun discode96kHzcon protecci6n de
derechosdeautor o cuandosurround virtual seajusteen1o2,
el sonidosemuestrearddescendentementea 48kHzy saldrd
como audio digital aunque "SUBMUESTREO"est@en 'APDO.'[
[DOLBY DIGITAL] (Ajuste predeterminado: BITSTREAM)
Elija"BITSTREAM"cuando esta unidad est_ conectada a un
decodificador Dolby Digital. Solo disponible en DVD.
o
BITSTREAM : Da salida a seflales Dolby Digital.
PCM : Convierte Dolby Digital en PCM.
(2 canales)
Presione [SETUP] para salir.
ii!iiiii_]
iiL
iiii]i_i
!iiiii.....
..........
ii"
_ii[i!
[] Ajuste Paterno
Elajustepaternoimpidequesushijosp.uedanverprogramasquenosean
apropiadosparaellos.(Protectionmediantecontrase_a.)Lareproduccion
sedetienesilacalificacionexcedelosnivelesqueustedhaestablecido.
I Presione [SETUP] en el modo de parada para visualizar
"INSTALACION TV".
- INSTALACION W -
IDIOMA [ESPANOL]
LUZ DE FONDO [BRILLO]
TENPE. DE COLOR [NORMAL]
INSTALACION DVD
Utilice [Cursor A/V] para seleccionar el elemento
deseado y luego presione [ENTER].
o
2 Utilice [Cursor A/V] para seleccionar"lNSTALAClON
DVD"y luego presione [ENTER[.
- INSTALACION W -
IDIOMA [ESPA_OL]
LUZ DE FONDO [BRILLO]
TENPE. DE COLOR [NORMAL]
INSTALACION DVD
3 Utilice [Cursor A/V] para seleccionar"PERSONALIZ"y
luego presione [ENTER[.
NIVEL PATERNO
TODO : todos los bloqueos paternos est,_n
cancelados.
8 [ADULTO] : se pueden reproducir programas de todas
las calificaciones (adultos/general/niflos).
7 [NC-17]-2 [G]: s61o se pueden reproducir DVD para
uso general y niflos.
I [TOLERADO] : s61ose pueden reproducir DVD para niflos.
8 Presione [SETUP] para salir.
Utilice [Cursor A/V] para seleccionar"PATERNO"y
luego presione [ENTER[.
5 Utilice [los botones num_ricos] para introducir un numero
de 4 digitos para su contrasefla y luego presione [ENTER].
Cambio de la contrase_a
Siga lospasos 1a s. Utilice [Cursor A/v] para seleccio-
nar"CAMB. CONTRAS."yluego presione [ENTER].
o
Utilice [los botones num_ricos] para introducir
la nueva contrasefla de 4 digitos y luego presione
[ENTER].
__L.'_TJ 3_.,
oj
F_
• Siya ha puesto la contrasefla, utilice [los botones num_ricos]
para introducir la contrasefla actual de4 digitos.
• Para reproducir un DVD no puede utilizar la contrasefla
preajustada (4737).
Utilice [Cursor A/V] para seleccionar"NIVEL PATERNO"
y luego presione [ENTER].
Nora:
• DVD-videopuede norespondera losajustesdebloqueopater-
no.Asegdresedequeestafuncidn seactivecon su DVD-video.
• Anote su contraseha por si la olvida.
• Siolvida su contraseha, presione [4], [7], [3] y [7] y luego
introduzca la contraseha nueva. La contraseha seborrard y
los nivelespaternos seajustardn en "TODO':
• Unfalloenelsuministrodealimentacidnnoborrardsucontraseha.
Presione [SETUP] para salir.
ES

[] Otros
Puedecambiar0trasfund0nes.
I Presione [SETUP] en el modo de parada para visualizar
"INSTALACIONTV".
- INSTALACION TV -
IDDMA [ESPANOL]
LUZ DE FONDO [BRILLO]
TENPE. DE COLOR [NORMAL]
INSTALACION DVD
2 Utilice [Cursor A/V] para seleccionar"lNSTALAClON
DVD"y luego presione [ENTER[.
o - INSTALACIONW -
IDIOMA [ESPANOL]
LUZDEFONDO [BRILLO]
TENPE.DECOLOR[NORMAL]
INSTALACIONDVD
3 Utilice [Cursor A/V] para seleccionar"PERSONALIZ"y
luego presione [ENTER].
Utilice [Cursor A/V] para seleccionar"OTROS"y luego
presione [ENTER].
6 Utilice [Cursor A/V] para seleccionar el elemento
deseado y luego presione [ENTER].
[ICONO DE ANGULO] (Ajuste predeterminado: ENC.)
P6ngalo en"ENC:' para visualizar el icono de _ngulo
cuando se encuentren disponibles m01tiples _ngulos
de c_mara durante la reproducci6n de un DVD.
o
[!iiiii_]
iiL
!iiiii.....
..........
[SALVA PANTALLA] (Ajuste predeterminado: APDO.)
Si selecciona "ENC."el salvapantalla se activar_ cuando
no se introduzca nada desde la unidad durante 5 ...........................
i
minutos en el modo de parada.
o
Presione [SETUP] para salir.
_ii[i!![....
ii!i
! C7
il?!
O
5 Utilice [Cursor A/V] para seleccionar el elemento
deseado y luego presione [ENTER].
o
il]_:i
ii¸¸_¸_
ES

[] Reposici6n de los Ajustes
Predeterminados
Puederep0nert0d0s10sajustes,aexcepciOndelajustepatern0y el idi0ma
delmenuenpantalla.
I Presione [SETUP] en el modo de parada para visualizar
"INSTALACIONTV".
- INSTALACION TV -
_" DDMA [ESPANOL]
LUZ DE FONDO [BRILLO]
TENPE. DE COLOR [NORMAL]
INSTALACI()N DVD
2 Utilice [Cursor A/V] para seleccionar"lNSTALAClON
DVD"y luego presione [ENTER[.
o - INSTALACION W -
DDMA [ESPANOL]
LUZ DE FONDO [BRILLO]
TENPE. DE COLOR [NORMAL]
INSTALACI()N DVD
3 Utilice [Cursor A/V] para seleccionar"lNICIALIZAR"y
luego presione [ENTER[.
Utilice [Cursor A/V] para seleccionar"Si"y luego
presione [ENTER[.
Nota:
• Cuando quiera cancelar la inicializaci6n, seleccione "NO" en
el paso 4, y luego presione [SETUP].
5 Presione [SETUP] para salir.
[] Lista de C6digos de Idiomas
Idioma C6digo Idioma C6digo
A-B Malgache 5953
Abcaciano 4748
Afari 4747 Malayo 5965
Afrikaans 4752 Malayglam 5958
Alem_n [GER] 5051 Malt,s 5966
Alban_s 6563 Maori 5955
Am_rico 4759
#,rabe 4764 Marathi 5964
Armenio 5471 Moldavo 5961
Assam,s 4765 Mongol 5960
Aymar_ 4771 Nauru 6047
Azeri 4772
Bashkirio 4847 Nepali 6051
Bengali; Bangla 4860 Noruego [NOR] 6061
Butanes 5072 O-R
Bihari 4854 Occitano 6149
Bislama 4855 Oriya 6164
Bret6n 4864
Bulgaro 4853 Oromo (Afan) 6159
Birmano 5971 Punjabi 6247
Bielorruso 4851 Pashto, pushto 6265
C-E Persa 5247
Cachemir 5765
Camboyano 5759 Polaco [POLl 6258
Catalan 4947 Portug_s [POR] 6266
Chino [CHI] 7254 Quechua 6367
Cingal_s 6555 Rhaeto-Romance 6459
Corso 4961 Rumano [RUM] 6461
Coreano [KOR] 5761
Croata 5464 Ruso [RU5] 6467
Checo [CZE] 4965 S
Dan@s [DAN] 5047 Samoano 6559
Eslovaco 6557 Sangho 6553
Esloveno 6558
Espaffol [SPA] 5165 S&nscrito 6547
Esperanto 5161 Serbio 6564
Estonio 5166 Serbocroata 6554
F-H Sesotho 6566
Feroe 5261 Setswana 6660
Fiyiano 5256
Finland,s [FIN] 5255 Shona 6560
Franc_s [FRE] 5264 Sindhi 6550
Frisio 5271 Siswat 6565
Gaelico escoc_s 5350 Somali 6561
Gallego 5358
Gal_s 4971 Sundan_s 6567
Georgiano 5747 Suahili 6569
Griego [GRE] 5158 Sueco [SWE] 6568
Groenland6s 5758 T
Guarani 5360 Tagalo 6658
Gujarati 5367
Hausa 5447 Tajik 6653
Hebreo 5569 Tamil 6647
Hindi 5455 T_rtaro 6666
HungaroH°land@s[DUT]M1 60585467 Telugo 6651
[HU'i!K Tailand_s 6654
Island@s lICE] 5565 Tibetano 4861
Indonesio 5560 Tigriffa 6655
Interlingua 5547 Tonga 6661
Ingl@s [ENG] 5160
Interlingue 5551 Tsonga 6665
Inupiak 5557 Turco [TUR] 6664
Irland@s [IRI] 5347 Turcomano 6657
Italiano [ITA] 5566 Twi 6669
Japon6s [JPN] 5647 U-Z
Javan6s 5669
Kannada 5760 Ucraniano 6757
Kazako 5757 Urclu 6764
Kinyarwanda 6469 Uzbeco 6772
Kirguiz 5771 Vascuence 5167
Kirundi 6460
Kurdo 5767 Vietnamita 6855
L-N Volapuk 6861
Laosiano 5861 Wolof 6961
Latin 5847 Xhosa 7054
Latvio, let6n 5868 Yidish 5655
Lingala 5860
Lituano 5866 Yoruba 7161
Macedonio 5957 Zulu 7267
Nora:
• Si elige un idioma que tiene abreviatura de 3 letras, ellos
se visualizard cada vez que usted cambie el ajuste de
idioma de audio o de subtftulos indicado mds arriba. Si
elige cualquier otto idioma se visualizar_ '---" en su lugar.
(Abreviatura de 3 letras est_ escrito entre corchetes.)
ES

_Guia de Soluci6n de Problemas
Si el aparato no funciona correctamente cuando se siguen las instrucciones de este manual del usuario, compruebe la
siguiente tabla antes de llamar al servicio t_cnico.
iiiiiiiiiiiiiiiiiiiiiiiii.....
iiiiiiiiiiiiiiiiiiiiiiiii_
No hay corriente
No hay imagen ni sonido
• AsegOrese de que el cable de alimentaci6n est_ enchufado.
• Si seproduce un corte de alimentaci6n, desenchufe el cable de alimentaci6n durante
30 minutos para permitir que el aparato se reinicie.
Compruebe si el aparato est_ encendido.
Compruebe la conexi6n el_ctrica.
Compruebe la conexi6n de antena o de cable con el aparato principal.
Cuando se utilice la antena exterior, compruebe el estado del cable y de la conexi6n.
Vea otros canales de televisi6n. El problema podria limitarse a una emisora.
Apague el aparato y espere aproximadamente 1 minuto para volver a encenderlo.
No hay color • Compruebe la conexi6n de antena o de cable con el aparato principal.
• Cuando se utilice la antena exterior, compruebe el estado del cable y de la conexi6n.
• Vea otros canales de televisi6n. El problema podria limitarse a una emisora.
• Ajuste el "COLOR"en la pantalla de configuraci6n.
Sonido correcto, imagen • Compruebe la conexi6n de antena o de cable con el aparato principal.
deficiente •Cuando se utilice la antena exterior, compruebe el estado del cable y de la conexi6n.
• Lainterferencia el_ctrica de aparatos cercanos puede afectar a la calidad de la imagen.
• Ajuste"CONTRASTE"y"CLARIDAD"en el menQ principal.
• Vea otros canales de televisi6n. El problema podria limitarse a una emisora.
Imagen distorsionada • Cuando se utilice laantena exterior, compruebe el estado del cable y de la conexi6n.
• Vea otros canales de televisi6n. El problema podria limitarse a una emisora.
Imagen d_bil • Compruebe la conexi6n de antena o de cable con el aparato principal.
• Cuando se utilice la antena exterior, compruebe el estado del cable y de la conexi6n.
• Ajuste"CONTRASTE"y"CLARIDAD"en el menQ principal.
• Vea otros canales de televisi6n. El problema podria limitarse a una emisora.
Lineas o rayas en la imagen • Cuando se utilice la antena exterior, compruebe el estado del cable y de la conexi6n.
• Lainterferencia el_ctrica de aparatos cercanos puede afectar a la calidad de la imagen.
• Vea otros canales de televisi6n. El problema podria limitarse a una emisora.
Imagen borrosa • Cuando se utilice la antena exterior, compruebe el estado del cable y de la conexi6n.
• Vea otros canales de televisi6n. El problema podria limitarse a una emisora.
Im_genesfantasmasen la imagen • Compruebe la conexi6n de antena o de cable con el aparato principal.
• Cuando se utilice la antena exterior, compruebe el estado del cable y de la conexi6n.
• Lainterferencia el_ctrica de aparatos cercanos puede afectar a la calidad de la imagen.
• Vea otros canales de televisi6n. El problema podria limitarse a una emisora.
Barras en la pantalla del televisor • Cuando se utilice la antena exterior, compruebe el estado del cable y de la conexi6n.
• Lainterferencia el_ctrica de aparatos cercanos puede afectar a la calidad de la imagen.
Laimagen se desplaza •Cuando se utilice la antena exterior, compruebe el estado del cable y de la conexi6n.
verticalmente • Lainterferencia el_ctrica de aparatos cercanos puede afectar a lacalidad de la imagen.
• Vea otros canales de televisi6n. El problema podria limitarse a una emisora.
Marcas de diferente color en la • Separe el aparato de los aparatos el_ctricos cercanos. Apague el aparato y espere
pantalla del televisor aproximadamente 30 minutos para volver a encenderla.
• Vea otros canales de televisi6n. El problema podria limitarse a una emisora.
Recepci6n deficiente en •Compruebe la conexi6n de antena o de cable con el aparato principal.
determinados canales •Cuando se utilice la antena exterior, compruebe el estado del cable y de la conexi6n.
• Lainterferencia el_ctrica de aparatos cercanos puede afectar a la calidad de la imagen.
• Vea otros canales de televisi6n. El problema podria limitarse a una emisora.
Imagen correcto, sonido
deficiente •Vea otros canales de televisi6n. El problema podria limitarse a una emisora.
No se reciben sehales digitales • AsegOrese de que la exploraci6n autom_tica ha finalizado.
(Consulte"Exploraci6n Autom_tica de Canales"en p_gina 13).
Laexploraci6n autom_tica de canales debe haberse finalizado cuando configure el
aparato pot primera vez o cuando la traslade a un lugar donde se emitan canales
anteriormente no disponibles.
• Esposible que el canal seleccionado no se est_ emitiendo.
• Cuando la exploraci6n autom_tica se interrumpe y no sefinaliza, algunos canales no se
recibir_n. AsegOresede finalizar. (Consulte"Exploraci6n Autom_tica de Canales"en p_gina 13).
El nOmero de canal introducido • Muchos canales digitales tienen nOmeros de canal alternativos. Elaparato cambia
cambia autom_ticamente dichos nOmeros autom_ticamente a los correspondientes alas emisoras activas. Estos
son los nOmeros utilizados para emisiones anal6gicas.
ES
i!...................................
i"
..........
;:
ii"
i!i!iiill

Imagen completamente • Aseg0rese de que el disco es compatible con la unidad.
distorsionada o imagen en
blanco y negro con DVD.
Laimagensecongelamoment_nea- • Inspeccione el disco pot si tiene huellas dactilares/rayas, y limpielo con un paho blando
mente durantelareproducd6n, pas_ndolo desde el centro hacia el borde.
No se puede reproducir el disco. Limpie el disco.
Aseg0rese de que el disco est_ introducido correctamente.
Compruebe si el disco est_ defectuoso probando con otto disco.
Cancele el bloqueo paterno o cambie el nivel del control.
Introduzca un disco que se pueda reproducir en esta unidad.
Maneje eldisco con un cuidado especial para que no se manche con huellas dactilares,
se raye o acumule polvo en su superficie.
Los botones no funcionan o la • Para reponer completamente la unidad, desenchufe el cable de la alimentaci6n de la
unidad no responde, toma de corriente entre 5 y 10 segundos.
La unidad no responde a algu- • Puede que lasoperaciones no sean permitidas pot el disco. Consulte las instrucciones
nos comandos de operaci6n del disco.
durante la reproducci6n.
No cambia el _ngulo. • No se puede cambiar el _ngulo de los DVD que no tienen im_genes tomadas desde
mOltiples _ngulos. En algunos casos, los _ngulos mOltiples s61ohan sido grabados para
escenas espec[ficas.
Lareproducci6n no empiezacu- • Compruebe el ajuste "PATERNO".
ando seha seleccionado el titulo.
Ha olvidado la contraseha para • Introduzca la contraseha predeterminada "4737"y la contraseha que usted ha olvidado
el nivel de calificaci6n, seborrar_.
Nota:
• Elpanel LCDha sido fabricado de manera que puede tener muchos aSos de vida _til. Ocasionalmente, pueden aparecer p/xeles inactivo_
como un punto fijo de color azul,verdeo rojo. Estono debe considerarse un defecto de la pantalla LCD.
• Algunas funciones no se encuentran disponibles enciertos modos especfficospero estono significa un fallo enelfuncionamiento. Leala
descripcidn en estemanual del usuario para conocer mSsdetalles delas operaciones correctas.
• Lareproduccidn desde una pista/archivo deseadao la reproduccidn aleatoria no seencuentran disponibles durante la reproduccidn
programada.
• Algunas funciones est_n prohibidas en algunos discos.
ES

[] Glosario
ATSC
Acr6nimoale"AdvancedTelevisionSystems
Committee"(Comit_de sistemasavanzados
detelevision) yelnombredeunasnormasde
emisi6ndigital.
C6digo de Regi6n
Lasregionesasociandiscosy reproductorescon
especificasregionesdel mundo.Esteaparatore-
producir_0nicamentediscosquetenganc6digos
compatiblesderegi6n.Ustedpuedeencontrar
el codigoderegi6ndesuequipo mirandoenel
paneltrasero.Algunosdiscossoncompatibles
con m_sdeunaregi6n(otodas lasregiones).
Contrasefia
Un n0mero almacenado de4 digitos que
permite el acceso alas funciones de control
parental,
Dolby Digital
Elsistemadesarrolladopor Dolby Laboratories
paracomprimir el sonidodigital. Ofreceun
sonidoest6reo(2canales)o audiomulticanal.
[] Mantenimiento
EDTV
(televisi6n de definici6n mejorada)
Formato digital mejorado que utiliza la serqal
progresiva de 480 lineas.
HDTV (televisi6n de alta definici6n)
Reciente formato digital que produce una alta
resoluci6n y una elevada calidad de imagen.
NTSC
Acr6nimo ale"National Television Systems
Committee" (Comit_ de sistemas nacionales
de televisi6n) y el nombre de unas normas
de emisi6n anal6gica.
Relaci6n de Aspecto
La anchura de una pantalla de televisi6n
con respecto a su altura. Los televisores
convencionales son de 4:3 (en otras
palabras, la pantalla del televisor es casi
cuadrada); los modelos de pantalla ancha
son de 16:9 (la pantalla del televisor es casi
dos veces m_s ancha que alta).
SAP (programa de audio secundario)
Segundo canal de audio transmitido pot separado
del canal de audio principal. Estecanal de audio se
utiliza como altemativo en la emisi6n biling0e.
SDTV
(televisi6n de definici6n est_ndar)
Formato digital est_ndar similar a la calidad
de imagen de NTSC.
S-video
Ofrece im_genes de mayor calidad al trans-
mitir cada seffal, color (c) y luminancia (y)
de manera independiente entre si a trav_s
de cables separados.
Video en Componentes
Setrata de un formato de seflal de video que
transmite cada uno de los 3 colores principales
de luz (rojo, azul y verde) a trav_s de diferentes
lineas de seflal. Esto permite a los espectadores
experimentar colores de imagen muy similares
a los originales. Existen diversos formatos de
seflal, incluidos el denominado Y/Pb/Pr y el
denominado Y/Cb/Cr.
• Limpieel paneldelanteroy otrassuperficiesexterioresdelaparatoconun
traposuaveinmersoenaguatempladaybienescurrido.
• Noutilicennncadisolventenialcohol.Nosuelteliquidoinsecticidaen
aerosolcercadelaparato.Estosproductosquimicospuedencausardatos
ydecoloraciOnenlassuperficiesexpuestas.
Sisuaparatodejadefuncionar,nointente corregirel problemausted
mismo.Ensuinteriornocontienepiezasquepuedansetreparadaspotel
usuario.Apagneelaparato,desenchufeelcabledealimentaciOnyIlame
anuestrotelefonogratuitodeatenciOnalcliente,queencontrar_enla
portadadeestemanualparaIocalizaruncentrodeservicioautorizado.
Limpiela pantalla LCDdelaparatoconunpato suave.Antesdelimpiar la
pantallaLCD,desconecteelcabledealimentaciOn.
• Manejelosdiscosconcuidadodenomancharsussuperficiesconhuellas
dactilaresypolvo.
• Guardesiemprelosdiscosensuscajasdeproteccidncuandonolosutilice.
• Paralimpiarlos,utiliceunpatosuave.
• Noutiliceunpatoduroporqueestropear_eldisco.
• [impieeldiscopasandoelpatioenlinearectadesdeel centrohaciaelborde.
• Nopasenuncaelpato ensentidocircular.
• Noutilicedetergenteni agentesdelimpiezaabrasivos.
il......
ii!iiiiii_i
iiii!::
......
S:i:i..........
iI_i_:
ii
....!!.......................
_iIZ....
ii.......................................
[_,] i iI,] l[,] ,1:.[,I [',] i [, [I I_"I_]-:41_-4l_ ['_ IT[ IIrl:'li l['] [']"II | II
•Sila unidadsiguesinfuncionarcorrectamenteal utilizarla,mientrasse
consultanlasseccionespertinentesy la"GuiadeSoluciOndeProblemas"
delManualdelpropietario,pnedequelaunidaddellectorOpticodeI_ser
est_sucia.Consulteasuconcesionarioocentrodeservicioautorizado
parainspeccionarylimpiarlaunidaddellectorOpticodeI_ser.
Siel mandoadistancianofuncionacorrectamente, j _
puedeutilizarunaradioAMo unac_maradigital
(inclusountelefonomOvilconc_maraincorporada)
paracomprobarsiest_enviandounasetalde
infrarrojos.
• Con una radio AM:
SintonicelaemisoraderadioAMenunafrecuencia
denoemisi6n.Apunteconelmandoadistanciahacia
ella,presionecualquierbot6nyescuche.Sielsonido
delaradiofluctua,significaqueestarecibiendola
setaldeinfrarrojosdelmandoadistancia.
• Con una c_mara digital
(incluidaslasc_marasincorporadasentelefonos
mOviles)
Apunteconlac_maradigital haciael mandoadistancia.
PresionecualquierbotOndelmandoadistanciay mire
enelvisordelac_maradigital.
Silaluzinfrarrojaapareceenlac_mara,elmandoa
distanciafunciona.
ES

[] Denominaciones de Canales de Cable
Sisesuscribealatelevisionpotcable,loscanalessemuestrancomo1-135.Lasempresasdecablea menudodenominanloscanalesconletrasocombina-
cionesdeletra-mimero.Compruebeestedetalleconsuempresalocaldecable.Latablasiguienteincluyelasdenominacionesdecanaldecablehabituales.
Pa,/taHadeT_ 1 2 3 4 5 6 7 8 9 10 11 12 13 14 15 16 17 18 19 20 21
PantalladeT_, 22 23 24 25 26 27 28 29 30 31 32 33 34 35 36 37 38 39 40 41 42
PantalladeT_ 43 44 45 46 47 48 49 50 51 52 53 54 55 56 57 58 59 60 61 62 63
PantalladeT_ 64 65 66 67 68 69 70 71 72 73 74 75 76 77 78 79 80 81 82 83 84
Lv#@._
PantalladeT_, 85 86 87 88 89 90 91 92 93 94 95 96 97 98 99 1O0 101 102 103 104 105
PantalladeT_ 106 107 108 109 110 111 112 113 114 115 116 117 118 119 120 121 122 123 124 125 126
PantalladeT_, 127 128 129 130 131 132 133 134 135
[] Especificaciones Generales
TV
Formato de TV: ATSC/ NTSC-MTVest&ndar
Subtitulos cerrados (CC) sistema:
§15.122/FCC(Subtituloscerradosdigitales)
§15.119/FCC(Subtituloscerradosanalogicos)
Cobertura de canales (ATSC/NTSC):
VHF: 2~13
UHF: 14~69
CATV: 2~ 13,A~ W, W+I ~ W+94
(analogicoW+I ~ W+84), A-5~ A-l, 5A
Sistemade sintonizaci6n:Sistemadesintonizacionsintetizadade
frecuenciadecanales
Acceso a los canales: Tecladodeaccesodirecto,exploracion
programableyarriba/abajo
DVD
Discos (compatibilidad de reproducci6n):
DVDVideo,DVD-RW/-R,
DVD+RW/+R,CDdeaudio,CD-RW/-R
Respuesta de frecuencia:
DVD (sonido lineal): 20I-Iza20kHz(frecuenciademuestreo:48kHz)
20Hza44kHz(frecuenciademuestreo:96kHz)
CO: 20Hza 20kHz
Relaci6n sepal a ruido (relaci6n S/N)
CD: 75dB(JEITA)
Factor de distorsi6n total:
DVD: 1 kHz0,008%(JEITA)
0
CO: 1 kHz0,008Vo(JEITA)
[] Especificaci6n El ctrica
Salida de sonido: 1W,811x2
[] Otras Especificaciones
Terminales:
Entrada de antena: VHF/UHF/CATV
750desequilibrados(tipoF)
Entrada de video: TomaRCAx1 lVp-p (751l)
Entrada de audio: TomaRCAx4 500mVrms
(impedanciadeentrada:m&sde22k0)
Entrada de S-video:MinitomaDINde4patillasx 1 Y:lVp-p (750)
C:286mVp-p(750)
Entrada de video en componentes:
TomaRCAx3
Y: lVp-p (750)
Pb:700mVp-p(750)
Pr:700mVp-p(750)
Salida de audio digital coaxial:
TomaRCAx1:500mVp-p(750)
Headphone: 1/8pulg.(3,5mm)
Mando a distancia: Sistemadeluzinfrarroja
codiflcadadigitalmente
Temperatura de funcionamiento:
41°F(5°0 a104°F(40°C)
Potencia:
0 0
120VAC+I-10Vo,60 Hz+/-O,SVo
Consumo de potencia (m&ximo):
65W
LCD: 20pulg.
Dimensions:
H :17,9 pulg. (454mm)
W : 23,4pulg. (594mm)
D :8,1 pulg. (204mm)
Peso: 13,0Ibs. (5,9kg)
• Losdise_osy lasespecificacionespuedenserobjetodemodificaciones
sinprevioavisoysinobligacioneslegalespotnuestraparte.
• Siseproduceunadiscrepanciaentreidiomas,elidiomapredeterminado
set&elingles.
ES

SYLVANIA
GARANTIA LIMITADA
FUNAI CORR reparar_ este producto, de forma gratuita en Estados Unidos, en caso de defecto de materiales o
fabricaci6n, del modo siguiente:
DURACION:
PIEZAS: FUNAI CORR suministrar_ piezas de repuesto de las piezas defectuosas de forma gratuita
durante un (1) afro desde la fecha de compra minorista original. Determinadas piezas y el
efecto de persistencia de la imagen en la pantalla LCD est_n excluidas de esta garantfa.
MANODEOBRA:FUNAI CORR suministrar_ la mano de obra de forma gratuita durante un periodo de
noventa (90) dias desde la fecha de compra minorista original.
LiMITES Y EXCLUSIONES:
ESTAGARANTfA SE EXTIENDE SOLAMENTE AL COMPRADOR MINORISTA ORIGINAL. UN RECIBO
DE COMPRA U OTRA PRUEBA DE COMPRA MINORISTA ORIGINAL SERA EXlGIDA JUNTO CON EL
PRODUCTO PARA OBTENER SERVlCIO BAJO ESTA GARANTiA.
Esta garantia no se extender_ a ninguna otra persona o beneficiario.
Esta garantia quedar_ invalidada y sin efecto en caso de alteraci6n, sustituci6n, borrado o p_rdida de
los nOmeros de serie del producto o si se intent6 una reparaci6n por parte de un centro de servicio no
autorizado. Esta garantia limitada no se aplica a ningOn producto no comprado y utilizado en Estados Unidos.
Esta garantia solamente cubre los fallos debidos a defectos de material o fabricaci6n que se produzcan
durante su uso normal. No cubre daffos producidos durante el transporte, ni daffos ocasionados por
reparaciones, alteraciones o productos no suministrados por FUNAI CORP.,o daffos resultantes de accidente,
uso indebido, abuso, trato indebido, aplicaci6n indebida, alteraci6n, instalaci6n defectuosa, mantenimiento
inadecuado, uso comercial (por ejemplo, el uso de este producto en hoteles, establecimientos de alquiler u
oficinas)o daffos resultantes de incendio, inundaci6n, tormenta el_ctrica o cat_strofes naturales.
ESTAGARANTiA NO CUBRE LOS MATERIALES DE EMBALAJE, NINGON TIPO DE ACCESORIOS (EXCEPTO EL
MANDO A DISTANCIA), NINGUNA PIEZA DE ADORNO, PIEZAS DE MONTAJE COMPLETAS, MODELOS DE
DEMOSTRACION 0 DE TALLER.
FUNAI CORP.Y SUSREPRESENTANTES0 AGENTESNO SERANEN NINGUN CASOCONSIDERADOS RESPONSABLES
DE DANOS GENERALES,INDIRECTOS0 CONSECUENClALES,RESULTANTESDE0 PROVOCADOSPORELUSO0
LA IMPOSIBILIDAD DE USODE ESTEPRODUCTO.ESTAGARANT[A SUSTITUYEA CUALQUIEROTRA GARANT[A,
EXPRESA0 IMPL[ClTA,YCUALQUIEROTRARESPONSABILIDADCIVIL PORPARTEDE FUNAI, CUALQUIEROTRA
GARANT[A QUE INCLUYALA GARANT[A DE COMERCIABILIDAD E IDONEIDAD PARAUN FIN CONCRETO,QUEDAN
PORLA PRESENTEEXCLUIDASPORDE FUNAI YSUSREPRESENTANTESEN ESTADOSUNIDOS.
TODAS LAS INSPECCIONES Y REPARAClONES BAJO GARANTfA DEBEN SEREFECTUADAS POR UN CENTRO
DE SERVlCIO AUTORIZADO.
ESTAGARANTiA ESVALIDA EXCLUSIVAMENTE CUANDO EL APARATO SEA ENTREGADO A UN CENTRO DE
SERVlCIO AUTORIZADO.
EL PRODUCTO DEBE IRACOMPANADO POR UNA COPIA DEL REClBO DE COMPRA MINORISTA ORIGINAL. SI
NO SEADJUNTA PRUEBA DE COMPRA, LA GARANTiA NO SEAPLICARA Y SECOBRARAN LOS COSTES DE LA
REPARAClON.
IMPORTANTE:
ESTAGARANT[ALIMITADALEOTORGADERECHOSLEGALESESPEdFICOS.ESPOSIBLEQUESEAUSTED
BENEFICIARIODEOTROSDERECHOSQUEVARiENDEUN ESTADOA OTRO.SI,ENCUALQUIERMOMENTO
DURANTEELPERIODODEGARANTiA,NO PUEDEUSTEDOBTENERSATISFACCIONCON RESPECTOA LA
REPARAClONDEESTEPRODUCTO,LEROGAMOSQUESEPONGAENCONTACTOCONFUNAICORP.
ATENCION:
FUNAI CORP. SE RESERVA EL DERECHO DE MODIFICAR CUALQUIER DISENO DE ESTE
PRODUCTO SIN PREVIO AVISO.
DECLARACION DE GARANT|A CON RESPECTO A REPARACIONES NO AUTORIZADAS:
Paraobtener servicio de garantfa, debe usted aceptar el producto, o hacer entrega del producto con
portes pagados, ya seaen su embalaje original o en un embalaje que proporcione el mismo grado de
protecci6n, a cualquier CENTRODESERVlCIOAUTORIZADO.FUNAICORP.no efectuar_ reembolso por
ningOn servicio realizado pot proveedores de servicio no autorizados sin autorizaci6n previa pot escrito.
Para Iocalizar su CENTRO DE SERVlCIO AUTORIZADO m_s pr6ximo o para solicitudes generales
de servicio, puede ponerse en contacto con nosotros en:
FUNAI SERVICE CORPORATION
Servicio de atenci6n al cliente
Tel : 1-800-968-3429
www.sylvania-ce.com
5653 Creekside Parkway, Suite A, Lockbourne, OH 43137
A7444UH
/