Mr Coffee NL12 Manual de usuario
- Categoría
- Cafeteras
- Tipo
- Manual de usuario


I
MPORTANT
S
AFEGUARDS
When using electrical appliances, basic safety precautions should always be followed to reduce
the risk of fire, electric shock and/or injury to persons, including the following:
1.
READ ALL INSTRUCTIONS BEFORE USING THE MACHINE.
2.Do not touch hot surfaces. Use handles or knobs.
3.To protect against electric shock, do not immerse cord, plugsor machine in water
or other liquids.
4.Close adult supervision is necessary when this appliance is used by or near children.
5.Unplug fromoutlet when Coffeemaker is not in use and before cleaning.
Allow to cool before putting on or taking off parts and before cleaning the appliance.
6.Do not operate any appliance with a damaged cord or plug or after theappliance malfunctions
or has been damaged in any manner. Return this appliance only to the nearest Authorized
Service Center for examination, repair or adjustment.
7.
The use of accessory attachments not recommended by Sunbeam may cause hazards or injuries.
8.Do not use outdoors. This Coffeemaker is for household use only.
9.
Do not let cord hang over edge of table or countertop or to touch hot surfaces.
10.Do not place this appliance on or near a hot gas or electricburner or in a heated oven.
11. To disconnect, remove plug fromwall outlet.
12.Do not use appliance for other than its intended use.
13.Use on a hard, flat level surface only, to avoid interruption of air flow underneath the appliance.
14.D
ECANTER
U
SE AND
C
ARE
Breakage may occur if the following instructions are not followed:
Use only decanters specifically designed for
M
R
.C
OFFEE
®
models.
A.
This decanter is designed for use with your
M
R
.C
OFFEE
®
Coffeemaker
and therefore
must never be used on a rangetop or in any oven, INCLUDING AMICROWAVE.
B.Do not set a hot decanter on a wet or cold surface.
C.Do not use a cracked decanter or a decanter with a loose or weakened handle.
D.Do not clean the decanter with cleansers, steel wool pads or other abrasivematerials.
E.Discard decanter immediately if it is ever boiled dry.
F.Avoid sharp blows, scratches or rough handling.
15.W
ARNING
: To reduce the risk of fire or electric shock, do not remove any service
covers. No user serviceable parts inside. Repair should be done by authorized
personnel only. Opening the bottom service cover will void the warranty.
T
HIS
U
NIT
I
S FOR
H
OUSEHOLD
U
SE
O
NLY
1

S
PECIAL
C
ORD
S
ET
I
NSTRUCTIONS
1. A short power supply cord is provided to reducethe hazardsresulting from becoming
entangled in or tripping over a longer cord.
2. An extension cord may be purchased and used if care is exercised in its use.
3. If an extension cord is used, the marked electrical rating of the extension cord must be
at least 10 amps and 120 volts. The resulting extended cord must be arranged so that
it will not drape over the countertop or tabletop where it can be pulledon by children
or tripped over accidentally.
This appliance has a polarized plug (one blade is wider than the other).
To reduce the riskofelectric shock, this plug will fitin a polarized outletonly
one way. If the plug does not fit fullyin the outlet, reverse the plug. If itstill
does not fit, contactaqualified electrician. Do not modify the plug in any way.
For Service
•In the US, Call 1-800 MR COFFEE (1-800-672-6333)
•In Canada, Call 1-800-667-8623
T
O
A
SSIST
U
SIN
S
ERVING
Y
OU
, P
LEASE
H
AVE THE
M
ODEL
N
UMBER
(NL12, NL12D, NL13, NL13D, NLS12, NLS13, NLX20, NLX20D,
NLX23, NLX26, NLX23D, NLX30
OR
NLX33)
D
AND ATEOF
P
URCHASE
A
VAILABLE
.
P
LEASE
D
O
N
OT
R
ETURN
T
HIS
A
PPLIANCE TO
Y
OUR
S
TORE
.
All repairs must be made by Sunbeam
®
or by an Authorized Mr. Coffee
®
Service Center.
Please call us for assistance or for the location of the nearest Authorized Mr. Coffee
®
Service Center.
Wewelcomeyour questions,commentsor suggestions.
Please include your complete name, address and telephone number
so we can reach you if necessary.
S
AVE
T
HESE
I
NSTRUCTIONS
2

I
NTRODUCTION
C
ONGRATULATIONS
!You are the owner of a
M
R
.C
OFFEE
®
Coffeemaker.
Please read all of the instructions in this manual carefully before you begin to use
this appliance.
Proper care and maintenance will ensure the long life of this appliance
and its trouble-free operation.
Save these instructions and refer to them often for cleaning
and care tips.
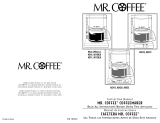
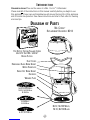
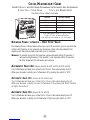
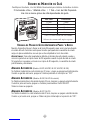
D
IAGRAM OF
P
ARTS
M
R
.C
OFFEE
®
R
EPLACEMENT
D
ECANTER
: ND13
F
OR
B
ETTER
T
ASTING
T
EAAND
C
OFFEE
U
SE
8-12 C
UP
M
R
.C
OFFEE
®
B
RAND
F
ILTERS
.
NL12,NL12D/W
HITE
,
NL13,NL13D/B
LACK
NLX20, NLX20D/W
HITE
NLX23,NLX23D/B
LACK
Press
Hold Hour
Min.
On
Auto
1-4
Clean
Warmer Temp
_+
Select
Off
111:1:2020
NLX30/W
HITE
NLX33/B
LACK
NLS12,NLS13/B
LACK
D
UST
C
OVER
R
EMOVABLE
B
LACK
B
REW
B
ASKET
W
ATER
R
ESERVOIR
S
WING
O
UT
B
REW
B
ASKET
D
ECANTER
W
ARMER
P
LATE
NLX26/R
ED
3

O
PERATION AND
U
SE
B
EFORE
F
IRST
U
SE
Before using your Coffeemaker for the first time, wash decanter/lid and removable brew
basket (black) using a mild, non-abrasive detergent and water. Rinse each thoroughly.
Follow Steps4–6(Brewing Coffee)using water, to clean the inside.
S
ETTING
C
LOCK AND
T
IMER
(NLX20, NLX20D, NLX23, NLX23D, NLX26)
NOTE:You do not have to set your clock before the Coffeemaker will operate.
Plug in the power cord, slide the control lever to the “on”position.The green
light will illuminate.
S
ETTINGTHE
C
LOCK
1.Turn the AUTO/OFF/ON switch to “OFF.”
2.Plug the power cord into your electrical outlet.The clockdisplay will flash
until you set the time.
3.Alternately press and hold the “HOUR”and “MINUTE”buttons until you reach
the current time.The “PM”indicator light in the display will illuminate to
indicate PMtime.
P
RESETTINGTHE
B
REWING
T
IME
1.Press and hold the “BREW”button while setting the desiredbrew time with the
“HOUR”and “MINUTE”buttons.The “PM”indicator light in the display will
illuminate to indicate PMtime.
B
REWING
A
UTOMATICALLYATTHE
P
RESET
T
IME
1. Follow Steps1–5in the “BREWING”Section.
2.Press the PRESS/HOLD button.The “AUTO”indicator light should illuminate.
3.Brewing will begin at the preset time.The coffee will remain hot in
the decanter for 2hours.To keepyour coffee hot for an additional 2hours,
press the “SELECT” button.The “ON”indicator light should illuminate.
5
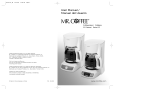
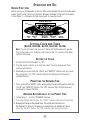
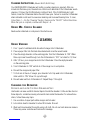
C
LOCK
D
ISPLAY
PM OFF
H
OUR
M
INUTE
A
UTO
/O
FF
I
NDICATOR
B
REW
S
ET
S
ET
O
N
S
WITCH
L
IGHT
B
UTTON
4

I
MPORTANT
: R
ESETTING
A
UTO
B
REW AT THE
P
RE
-S
ET
T
IME
The programmable timer will not automatically brewthe nextday if left in the “AUTO”
position after its last use. This is a safety feature. If the “OFF” indicator light in the lower
right hand corner of the clock display is illuminated, reset “AUTO BREW” by turning the
control switch to “OFF”, then to “AUTO.”
(Models NLX20, NLX23, NLX20D, NLX23D,NLX26 Only)
S
ETTING
C
LOCK AND
T
IMER
(NLX30, NLX33)
NOTE:You do not have to set your clock beforethe Coffeemaker will operate.
Plug in the power cord, press SELECT once to turn the Coffeemaker on. The
“ON”light will illuminate and the clock will stop flashing, but it will not keep time.
S
ETTING THE
C
LOCK
1.Plug the power cord into your electrical outlet. The clock display will flash
until you set the time.
2. Alternately press and hold the “HOUR” and “MINUTE” buttons until you reach
the current time.
3.The “PM” indicator light in the display will illuminate to indicate PMtime.
P
RESETTING THE
B
REWING
T
IME
1.You must first set the clock to the correct time before setting the Auto brew.
2.Press the PRESS/HOLDbutton, then alternately press theHOUR
and MINUTE buttons to set the time you want the Coffeemaker
to start brewing. The Auto indicator light will flash during this time.
3.Press the PRESS/HOLDbutton again to turn off the flashing light.
If the Auto light is not flashing, pressing the HOUR or MINUTE buttons
will change the clock time.
B
REWING
A
UTOMATICALLYAT THE
P
RESET
T
IME
1. Follow Steps 1–5in the “Brewing” Section.
2.Press the PRESS/HOLDbutton. The “AUTO” indicator light should
illuminate.
3. Brewing will begin at the preset time. The coffee will remain hot in
the decanter for 2hours. To keep your coffee hot for an additional 2hours,
press the “SELECT” button. The “ON” indicator light should illuminate.
5

B
REWING
C
OFFEE
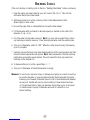
If the clock display is flashing, refer to Section “Setting the Clock” beforecontinuing.
1. Open the swing-outbrew basket to your left.Insert a MR. COFFEE
®
filterinto the
removable black inner brew basket.
2. Add desired amount of coffee, referring to the Coffee Measurement Chart.
Shake lightly to level coffee.
3. Be sure the paper filter is centered before closing the brew basket.
4. Fill the decanter with cold water to desired capacity as marked on the side of the
decanter. (1 cup=5oz).
5. Pour the water into the water reservoir.NOTE:For easy and accurate filling, refer to
cupmarkings inside the reservoir. Place the empty decanteronto the warmer plate.
6.Turn yourCoffeemaker switch to “ON”.When the coffee stops flowing, the brewing
cycle is complete.
7.Carefully remove the black inner brew basketand discard the used grounds and filter.
Rinse the black brew basket and replace.NOTE:Remove decanter fromthe warming
plate before opening the swivel basket.This will prevent the drip stop valve from
catching on the decanter lid.
8.Tomake another pot of coffee, repeat Steps 1–7.
9.Turn yourCoffeemaker off when the decanter is empty.
WARNING:To avoid risk of personal injury or damage to property as a result of overflow,
besure the decanter is squarely centered under the brew basket during the
brewing cycle. Brewed coffee and grounds, both in brew basket and decanter,
are very hot.Handle with care to avoid scalding.If brew basket overflows,
or if brew basket fails to drain into decanter during brewcycle, do not open
or handle basket.UnplugCoffeemaker and wait for contents to cool
before handling.
6

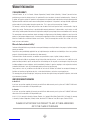
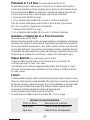
C
OFFEE
M
EASUREMENT
C
HART
F
OR
B
EST
R
ESULTS
, U
SE
D
RIP
G
RIND
R
ECOMMENDED FOR
A
UTOMATIC
D
RIP
C
OFFEEMAKERS
.
2 L
EVEL
T
BSP
.=1L
EVEL
S
COOP
1 C
UP
= 5
OZ
. B
REWED
C
OFFEE
Use more or less coffee to suit taste.
B
REWING
P
AUSE
’
N
S
ERVE
–D
RIP
S
TOP
V
ALVE
Our Brewing Pause ’n Serve feature allowsyou upto 30 secondsto pour acup while the
coffee is still brewing.It also prevents any remaining coffee inthebrew basket from
dripping onto thewarmer plate once brewcycle is complete.
W
ARNING
:Toprevent injuryfrom hot overflow,replace decanter within 30 seconds if
removed during brewing.If thedecanter is not replaced within 30 seconds,
the filter basket will fill with water and overflow.
A
UTOMATIC
S
HUT
-O
FF
(Models NLX20, NLX20D, NLX23, NLX23D, NLX26)
Your Coffeemaker will keep your coffee hot for 2hours,thenautomaticallyshut off.
When your decanter is empty,turnCoffeemaker off by turning the switchto “OFF.”
A
UTOMATIC
S
HUT
-O
FF
(Models NLX30, NLX33 Only)
Your Coffeemaker will keep your coffee hot for 2hours,thenautomaticallyshut off.
When your decanter is empty,turnyour Coffeemaker off by pressing theSELECTbutton.
All lights should be off.
A
UTOMATIC
S
HUT
-O
FF
(Models NLS12, NLS13)
Your Coffeemaker will keep your coffee hot for 2hours,thenautomaticallyshut off.
When your decanter is empty,turnCoffeemaker off by turning the switchto “OFF”.
7
To Brew Ground Coffee
12 Cups 9 tbsp.
10 Cups 7.5 tbsp.
8Cups 6.5 tbsp.
6Cups 4.5 tbsp.
4Cups 3 tbsp.
1level tablespoon (tbps) = 5 gr./0.17 oz.
1cup = 5 fl. oz. of brewed coffee
Use more or less coffee to suit your taste.

B
REWING
1–4C
UPS
(Models NLX30, NLX33 Only)
If you want to brew 4 cups or less, the 1 – 4 Cup mode will slow the brewing cycle to ensure
optimal saturation of the ground coffee beans.
N
OTE
:
Use only the proper amount of
ground coffee and fill the water reservoir with 4 cups or less of water.
1. Press the SELECTbutton twice.
2.The ON and 1 – 4 Cup Indicator Lights should be illuminated.
If you want to brew 4 cups or less at a preset time, follow Steps 1 – 3in the
“Presetting Your Brewer”section.
1. Press the SELECTbutton twice.
2.The ON and 1 – 4 Cup Indicator Lights should be illuminated.
A
DJUSTING THE
W
ARMER
P
LATE
T
EMPERATURE
(Models NLX30, NLX33 Only)
After the coffee is brewed, you can keep the coffee at your preferredtemperature.
Turn the Warmer Temp knob clockwise to increase the temperature, or turn
counterclockwise to decrease the temperature. To maintain a constant temperature,
you may need to lower the warmer plate temperature as you decrease the amount of
coffee in the pot. DO NOT allow the decanter to boil dry. This will damage the decanter.
A
UDIBLE
I
NDICATORS
(Models NLX30, NLX33 Only)
When the Coffeemaker is finished brewing and your coffee is ready, your Coffeemaker
will beep five times.
Just before the Coffeemaker shuts off automatically, it will beep three times.
Upon completion of the clean cycle, the Coffeemaker will beep once.
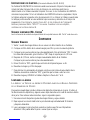
C
LEANING
Your Coffeemaker must be cleaned when you begin to noticeexcessive steaming or the
brewing time increases considerably. This condition is caused by abuild-up of lime and
mineral deposits from your water. If the pumping action stops beforeall the waterhas been
pumped out of the machine, the appliance requires cleaning.
The frequency of cleaning depends on the hardness of water used.
The following table gives a suggested cleaning schedule.
S
UGGESTED
C
LEANING
I
NTERVAL
Type of Water Cleaning Frequency
Soft Water Every 80 Brew Cycles
Hard Water Every 40 Brew Cycles
Your Coffeemaker may be cleaned by using MR.COFFEE
®
Cleaner or vinegar.
M
R
.C
OFFEE
Cleaner is available at many retail stores or by calling the
M
R
.C
OFFEE
Consumer Affairs Department at 1-800-MR COFFEE (1-800-672-6333).
8

C
LEANING
I
NSTRUCTIONS
(Models NLX30, NLX33 Only)
Your NLX30/NLX33 Coffeemaker will notify you when cleaning is required. After one
minute into the brew cycle, the electronic controls will determine if the Coffeemaker needs
cleaning. If it does, the CLEAN Indicator Light will flash. If the CLEAN Indicator Light
flashes, clean the Coffeemaker before the next brew cycle.Failure to clean the Coffeemaker
when indicated could result in excessive steaming and increasedbrewing time. To clean,
follow Steps 1 – 4 in the “Cleaning” Section, then press the “SELECT” button three times.
When the cycle is complete, continue with Steps 6 – 8.
U
SING
M
R
.C
OFFEE
C
LEANER
Read caution statement on side panel of box before use.
C
LEANING
U
SING
V
INEGAR
1. Pour 1 quart of undiluted white household vinegar into Coffeemaker.
2.Place a paper filter into the black brew basket and close the swivel basket.
3. Place the empty decanter on the warming plate. Turn the Coffeemaker to “ON.” When
three cups have flowed through, turn the Coffeemaker to “OFF.”Let stand for 1/2hour.
4. After 1/2hour, pour vinegar back into the Coffeemaker. Place the empty decanter
on the warming plate.
5. Turn Coffeemaker to “ON” and let all of the vinegar run to completion.
6. Discard the vinegar and paper filter.
7. To flush out all traces of vinegar, pour decanterfull of tap water into Coffeemaker,
slide switch to “ON.” Allow it to cycle through.
8. Discard water and turn Coffeemaker off. Repeat Steps 7through 8.
C
LEANING THE
D
ECANTER
D
ECANTER AND
L
ID
A
RE
T
OP
-R
ACK
D
ISHWASHER
S
AFE
Hard water can leave a whitish mineral deposit inside the decanter. Coffee and tea discolor
these deposits, sometimes leaving a brownish stain inside the decanter. To remove these
stains, follow these easy steps.
1. Use a solution of equal parts white vinegar and hot water.
2. Let solution stand in decanter for about 20 minutes. Discard.
3.
Wash and rinse decanter thoroughly using soft cloth. Do not use harsh abrasive cleaners.
These may cause scratches and can lead to breakage.
9

10
WARRANTY INFORMATION
1-YEAR LIMITED WARRANTY
Sunbeam Products, Inc, or if in Canada, Sunbeam Corporation (Canada) Limited (collectively “Sunbeam”) warrants that for a
period of one year from the date of purchase, this product will be free from defects in material and workmanship. Sunbeam, at
its option, will repair or replace this product or any component of the product found to be defective during the warranty period.
Replacement will be made with a new or remanufactured product or component. If the product is no longer available, replacement
may be made with a similar product of equal or greater value. This is your exclusive warranty from Sunbeam.
This warranty is valid for the original retail purchaser from the date of initial retail purchase and is not transferable. Keep the
original sales receipt. Proof of purchase is required to obtain warranty performance. Sunbeam dealers, service centers, or retail
stores selling Sunbeam products do not have the right to alter, modify or any way change the terms and conditions of this warranty.
This warranty does not cover normal wear of parts or damage resulting from any of the following: negligent use or misuse of the
product, use on improper voltage or current, use contrary to the operating instructions, disassembly, repair or alteration by anyone
other than Sunbeam or an authorized Sunbeam service center. Further, the warranty does not cover: Acts of God, such as fire,
flood, hurricanes and tornadoes.
What are the Limits on Sunbeam’s Liability?
Sunbeam shall not be liable for any incidental or consequential damages caused by the breach of any express, implied or statutory
warranty or condition.
Except to the extent prohibited by applicable law,any implied warranty or condition of merchantability or fitness for a particular
purpose is limited in duration to the duration of the above warranty.
Sunbeam disclaims all other warranties, or conditions or representations, express, implied, statutoryor otherwise.
Sunbeam shall not be liable for any damages of any kind resulting from the purchase, use or misuse of, or inability to use the
product including incidental, special, consequential or similar damages or loss of profits, or for damages arising from any tort,
including negligence or gross negligence, or fault committed by Sunbeam, its agents or employees or for any breach of contract,
fundamental or otherwise, or for any claim brought against purchaser by any other party.
Some provinces, states or jurisdictions do not allow the exclusion or limitation of incidental or consequential damages or
limitations on how long an implied warranty lasts, so the above limitations or exclusions may not apply to you.
This warranty gives you specific legal rights, and you may also have other rights that vary from province to province, state to state
or jurisdiction to jurisdiction.
HOW TOOBTAIN WARRANTY INFORMATION
In the U.S.A.
If you have any question regarding this warranty or would like to obtain warranty service, please call 1-800-672-6333 and a
convenient service center address will be provided to you.
In Canada
If you have any question regarding this warranty or would like to obtain warranty service, please call 1-800-667-8623 and a
convenient service center address will be provided to you.
In the U.S.A., this warranty is offered by Sunbeam Products, Inc., located in Boca Raton, Florida 33431. In Canada, this warranty
is offered by Sunbeam Corporation (Canada) Limited, located at 5975 Falbourne Street, Mississagua, Ontario L5R 3V8.
PLEASE DO NOT RETURN THIS PRODUCT TO ANY OF THESE ADDRESSES
OR TO THE PLACE OF PURCHASE

P
RECAUCIONES
I
MPORTANTES
Cuando use aparatos eléctricos, siempre se deben tomar precauciones básicas de seguridad para
reducir los riesgos de incendio, descarga eléctrica y/o lesiones personales, incluyendo lo siguiente:
1. LEA TODAS LAS INSTRUCCIONES ANTES DE USAREL APARATO.
2.No toque las superficies calientes. Use las manijas o los botones.
3.Para protegerse contra descargas eléctricas, no sumerja el cordón, las clavijas ni el aparato
en el agua ni en otro líquido.
4.
Una supervisión cercana de un adulto es necesaria cuando este aparatose usadonde hay niños.
5.Desconecte la clavija del tomacorriente cuando la Cafetera no esté en uso y antes de limpiarla.
Dejeque se enfríe antes de poner o sacar las partes y antes de limpiar el aparato.
6.No opere ningún aparato que tenga la clavija o el cordóndañado, o después de que el aparato
haya funcionado mal, o que se haya descompuesto. Regrese el aparato al Centro de Servicio
Autorizado más cercano para que lo examinen, reparen o ajusten.
7.El uso de accesorios que
S
UNBEAM
no recomienda puede ser peligroso y ocasionar lesiones.
8.No la use a la intemperie. Este aparato es para uso doméstico sólamente.
9.No dejeque el cordón cuelgue del borde de la mesa o del fregadero,ni que esté en contacto
con superficies calientes.
10.No coloque este aparato en o cerca de una hornilla caliente degas o eléctrica ni de
un horno caliente.
11. Para desconectarla, desenchufe la clavija del tomacorriente de la pared.
12.No use el aparato para otro fin para el que fue diseñado.
13.Usela sólamente en una superficie dura, horizontal para evitar la interrupcióndelflujo de aire
por debajo del aparato.
14.
U
SO Y
C
UIDADO DE LA
G
ARRAFA
Se puede romper la garrafa si no se siguen las siguientes instrucciones:
Use sólamente las garrafas diseñadas específicamente para los modelos
M
R
.C
OFFEE
.
A.Esta garrafa está diseñada para usarse con su Cafetera
M
R
.C
OFFEE
, por lo que nunca
se deberá usar en la hornilla de la estufa, el horno, NI EL HORNO DE MICROONDAS.
B.No ponga la garrafa caliente en una superficie mojada o fría.
C. No use una garrafa cuarteada ni que tenga una manijafloja o débil.
D.No limpie la garrafa con limpiadores, fibras ni otros materiales abrasivos.
E.Deseche la garrafa inmediatamente si alguna vezse ha dejado hervir hasta quedarseca.
F.Evite golpearla, rayarla o tratarla con rudeza.
15.
A
DVERTENCIA
:
Para disminuir los riesgos de incendio o de descarga eléctrica,
no quite las cubiertas. El usuario no debe dar servicio a las partes de adentro.
Las reparaciones deben ser
hechas sólamente por el personal autorizado.
Elabrir la cubierta de la base invalidará la garantía.
E
STE
A
PARATO
E
SPARA
U
SO
D
OMÉSTICO
S
ÓLAMENTE
11

I
NSTRUCCIONES
E
SPECIALES PAR
P
ONER EL
C
ORDON
1. Se proporciona un cordón corto para el suministro de corriente que reduce los riesgos
de los cordones largos que pueden enredarse o que hacen que la gente se tropiece.
2. Se puede comprar y usar una extensión si se tiene cuidado.
3.
Si se usa una extensión, la clasificación eléctrica que viene marcada en el cordón debe ser
de por lo menos 10 Amperos y 120 Voltios. La extensión se debe arreglar de tal manera que
no cuelgue del fregadero ni de la mesa donde los niños puedan jalarlo o la gente se tropiece.
Este aparato tiene una clavija polarizada (una espiga más ancha que la otra).
Para disminuir el riesgo de descarga eléctrica,esta clavija se conectaráa un
tomacorriente polarizado de una sola manera. Si la clavija no entra totalmente
en el tomacorriente,inviértala. Si todavía no entra,contacte a un electricista
calificado. Nomodifique la clavija de ninguna forma.
S
I
R
EQUIERE
S
ERVICIO
,
NO LA
R
EGRESE A
S
U
T
IENDA
Llame al 1-800-MR COFFEE (1-800-672-6333),
Canada 1-800-667-8623
P
ARA QUENOS
A
YUDEA
S
ERVIRLE
,
S
ÍRVASE
T
ENERA
M
ANOEL
N
ÚMERO DEL
M
ODELO
(NL12, NL12D, NL13, NL13D, NLS12, NLS13, NLX20
NLX20D,NLX23, NLX23D, NLX26, NLX30, NLX33)
YLA
F
ECHA DE
C
OMPRA
.
S
I
R
EQUIERE
S
ERVICIO
, N
OLA
R
EGRESEA
S
U
T
IENDA
.
Todas las reparaciones se deben hacer por Sunbeam
®
o en un Centro de Servicio
Autorizado
M
R
.C
OFFEE
®
. Sírvase llamarnos para asistirle o para informarle el lugar
del Centro de Servicio Autorizado
M
R
.C
OFFEE
®
máscercano.
Nos complace recibir sus preguntas,comentarios o sugerencias.
Sírvase incluir su nombre completo, dirección, número telefónico y una breve descripción
en todos sus comunicados.
C
ONSERVE
E
STAS
I
NSTRUCCIONES
12

I
NTRODUCCIÓN
¡F
ELICITACIONES
!
Usted es el propietario de una Cafetera de
M
R
.C
OFFEE
.
®
Gracias por la compra de su
Cafetera de
M
R
.C
OFFEE
.
®
Antes de usar este producto la
primera vez, por favor tome un momento para leer estas instrucciones y guárdelas para
futura referencia. Ponga particular atención a las Instrucciones de Seguridad que se ofrecen.
Por favor lea los estatutos en la garantía del producto.
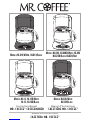
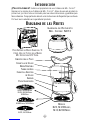
D
IAGRAMA DELAS
P
ARTES
G
ARRAFA DE
R
EPUESTO
M
R
.C
OFFEE
: ND13
P
ARA
O
BTENER UN
M
EJOR
S
ABOR DEL
T
É
Y
C
AFÉ
, U
SE LOS
F
ILTROS DE LA
M
ARCA
M
R
. C
OFFEE PARA
8-12 T
AZAS
.
M
ODELOS
NL12, NL12D/B
LANCO
,
NL13, NL13D/N
EGRO
C
UBIERTA PARA EL
P
OLVO
C
ANASTILLA DE
C
OLADO
N
EGRA
R
EMOVIBLE
T
ANQUE DE
A
GUA
C
ANASTILLA
G
IRATORIA
DE
C
OLADO
G
ARRAFA
P
LACA
C
ALENTADORA
NLX20, NLX20D/B
LANCO
NLX23, NLX23D/N
EGRO
Press
Hold Hour Min.
On
Auto
1-4
Clean
Warmer Temp
_+
Select
Off
111:1:2020
NLX30/B
LANCO
, NLX33/N
EGRO
NLS12, NLS13/N
EGRO
NLX26/R
OJO
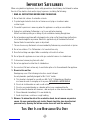
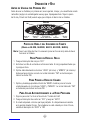
13

R
ELOJ
B
OTÓN DE
C
OLADO
L
UZ
I
NDICADORA
I
NTERRUPTOR DE
C
ONTROL
O
N
/O
FF
/A
UTO
C
ONTROL DE
M
INUTOS
C
ONTROL DE
H
ORAS
A
PAGADO
PM
O
PERACIÓN Y
U
SO
A
NTES DE
U
SARLA POR
P
RIMERA
V
EZ
Antes de usar su Cafetera por primera vez, lave la garrafa, la tapa, y la canastilla de colado
removible (negra) con un detergente suave y agua. Enjuáguelas bien. Siga los pasos
del 4al 6(Colado del Café)usando agua, para limpiar el interior de su Cafetera.
P
UESTA DE
H
ORA YDEL
C
ONTADOR DE
T
IEMPO
(M
ODELOS
NLX20, NLX20D,NLX23, NLX23D,NLX26)
N
OTA
:
Favor Leer Antes de Usar.Es necesario poner en hora el relojantes de hacer
funcionar la Cafetera.
P
ARA
P
ONER EN
H
ORA EL
R
ELOJ
1.Ponga el interruptor del relojen “OFF”.
2.Enchufe el cordón de corriente en el tomacorriente. El relojparpadearáhasta que
lo ponga en hora.
3.
Oprima alternativamente los botones “HOUR” (dehoras)y“MINUTE”(deminutos)
hasta que tenga la hora correcta.La luz del indicador “PM”se iluminarápara
indicar las horas PM.
P
ARA
P
ONER LA
H
ORA DE
C
OLADO
1.Oprima y mantenga apretado el botónde“BREW”mientras pone la hora de
colado deseada con los botones “HOUR” y “MINUTE”.Laluz del indicador “PM”
se iluminarápara indicar las horas PM.
P
ARA
C
OLAR
A
UTOMÁTICAMENTE A LA
H
ORA
P
REFIJADA
1.Siga los pasos del 1al 5en la Sección de “Colado del Café”.
2.Ponga el interruptor de control en “OFF”yluego en “AUTO”.
3.El colado empezaráalahora que haya prefijado. El cafépermanecerácaliente
en la garrafa durante 2horas.Para mantener su cafécaliente por otras 2horas,
cambie el interruptor de “AUTO” a“ON”.
14

A
DVERTENCIA
: C
ÓMO
P
ONER DE
N
UEVO EL
C
OLADO
A
UTOMÁTICO
ALA
H
ORA
P
REFIJADA
El contador de tiempo programable no colará automáticamente el día siguiente si se deja
en la posición “AUTO” después de haberlo usado. Esta es una característica de seguridad.
Si la luz indicadora “OFF” en la esquina derecha inferior del reloj se ilumina, reactive
el colado automático “AUTO BREW” poniendo el interruptor de control en “OFF”,
luego en “AUTO”.
(Modelos NLX20, NLX23, NLX20D, NLX23D, NLX26 Únicamente)
N
UESTA DE
H
ORA Y DEL
C
ONTADOR DE
T
IEMPO
(M
ODELOS
NLX30, NLX33)
N
OTA
:
No es necesario poner en hora el reloj antes de hacer funcionar la Cafetera
.
Enchufe el cordón de corriente en el tomacorriente, presione el botón
“SELECT” una vez para comenzar la operación de la Cafetera.
La luz
“ON”iluminará yel roloj parará el contellear, pero no guardará tiempo.
P
ARA
P
ONER EN
H
ORA EL
R
ELOJ
1.Enchufe el cordón de corriente en el tomacorriente. El reloj parpadeará hasta
que lo ponga en hora.
2.
Oprima alternativamente los botones “HOUR”
(de horas)
y“MINUTE”
(de minutos)
hasta que tenga la hora correcta.
3.La luz del indicador “PM” se iluminará para indicar las horas PM.
P
ARA
P
ONER LA
H
ORA DE
C
OLADO
1.Primero Ud. debe fijar el reloj al tiempo correcto antes de Ud. fije el “AUTO”.
2.Pressione el botón “PRESS/HOLD”,entonces alternativamente presione los
botones de la “HORA” y del “MINUTO” para fijar la hora que quisiera que
la cafetera colar. La luz del indicador “AUTO” contelleará durante este tiempo.
3.Pressione el botón “PRESS/HOLD” otra vez para dar vuelta apagado la luz.
Si no está contelleando la luz “AUTO”, presione el botón “HORA” o “MINUTO”
yla época del reloj cambiarán.
P
ARA
C
OLAR
A
UTOMÁTICAMENTE A LA
H
ORA
P
REFIJADA
1. Siga los pasos del 1 al 5 en la Sección de “Colado del Café”.
2. Pressione el botón “PRESS/HOLD”. La luz del indicador “AUTO” iluminará.
3. El colado empezará a la hora que haya prefijado. El café seguirá siendo
caliente en la jarra por 2 horas. Para mantener su café caliente por 2 horas
más, presione el botón “SELECCIÓN”. La luz del indicador “ON” iluminará.
15

C
OLADO DEL
C
AFÉ
Si el reloj está parpadeando, consulte la sección para “Poner en Horael Reloj”
antes de continuar.
1. Abra la canastilla giratoria a su izquierda. Inserte un filtro de marca
M
R
.C
OFFEE
en la canastilla de colado negra interior.
2. Añada la cantidad deseada de café de acuerdo con la Tabla de Medidas de Café.
Golpee ligeramente para nivelar el café.
3. Asegúrese de que el filtro de papel estéapropiadamente centrado antes de cerrar
la canastilla de colado.
4. Llene la garrafa con agua del grifo a la medida deseada de acuerdo con lasmarcas
laterales, (1 taza es igual a 150 ml[5 onzas]).
5.Vacíe el agua dentro del tanque de agua.
N
OTA
:
Para un llenado fácil yaproximado,
las marcas del número de tazas también se encuentran dentro del tanque.
Coloque la garrafavacía en la placa calentadora.
6.Ponga el interruptor de la Cafetera en “ON”.Cuando elcafé deja de fluir,
se habrá completado el ciclo de colado.
7.Saque con cuidado la canastilla de colado interior negra ydeseche el filtro
con el café molido usado. Enjuague la canastilla de colado ycolóquela de nuevo.
8.Para hacer otra garrafa de café, repita los pasos del 1al 7.
9.Apague la Cafetera cuando la garrafa esté vacía.Para apagar su Cafetera deslice
el interruptor de control a la posición “OFF”.
A
DVERTENCIA
:
Para evitar el riesgo de una lesión o de daño a la propiedad por causa
de un derrame, asegúrese que la garrafa esté bien centrada debajo de la canastilla de
colado durante el ciclo de colado. El café colado ymolido, tanto en la canastilla como
en la garrafa están muycalientes, manipule con cuidadopara evitar quemarse.Si hay
derrames de la canastilla de colado, o si la misma no drena el café a la garrafa durante
el ciclo de colado, no abra ni toque la canastilla.Desenchufe la Cafetera yespere que
se enfríe el contenido antes de manipularla.
16

C
UADRO DE
M
EDICIÓN DE
C
AFÉ
Para Mejores Resultados, Use Café Molido Recomendado para Cafeteras Automáticas de Goteo
2 Cucharadas a Ras = 1 Medida a Ras / 1 Taza = 5 oz. de Café Preparado
Use más o menos granos de café dependiendo del gusto.
V
ÁLVULA DE
P
AUSA DE
G
OTEO
A
UTOMÁTICA
P
AUSE
’
N
S
ERVE
Nuestro dispositivo Pause ’n Serve le da hasta 30 segundos para servir una taza durante
el colado del café. Asimismo evita que el residuo que queda en la canastilla de colado
caiga a la placa calentadora, una vez que se ha completado el ciclo de colado.
A
DVERTENCIA
:
Para evitar quemaduras debidas al derrame de café caliente, vuelva a
colocar la garrafa en un lapso menor de 30 segundos cuando la quite durante el colado.
Si la garrafa no se vuelve a colocar en un lapso de 30 segundos, la canastilla de colado
podrállenarse yderramarse.
A
PAGADO
A
UTOMÁTICO
(Modelos NLX20,NLX20D,NLX23,NLX23D,NLX26)
Su Cafetera mantendrásu café caliente por 2horas, yluego se apagaráautomáticamente.
Cuando su garrafa esté vacía, apague la Cafetera poniendo el interruptor en “OFF”.
A
PAGADO
A
UTOMÁTICO
(Modelos NLX30,NLX33 Únicamente)
Su Cafetera mantendráel café caliente durante 2horas, después se apagaráautomáticamente.
Cuando la jarra esté vacía, apague su Cafetera presionando el botón SELECT.
Todas las luces se apagarán.
A
PAGADO
A
UTOMÁTICO
(Modelos NLS12,NLS13)
Su Cafetera mantendrásu café caliente durante 2horas, despuésse apagara automáticamente.
Cuando su jarra esté vacía, apague su Cafetera
al girar el interruptor a la posición de “OFF”.
17
Para Colar Café Molido
12 Tazas 9 cdas
10 Tazas 7.5 cdas
8Tazas 6.5 cdas
6Tazas 4.5 cdas
4Tazas 3 cdas
1taza = 5 onzas fluidas de café colado
Utilice más o menos café según su gusto.

P
REPARANDO DE
1
A
4 T
AZAS
(Únicamente Modelos NLX30, NLX33)
Si usted desea preparar 4 tazas o menos, la función de 1 a 4 Tazas hará máslento el
proceso de preparación de café para asegurar que los granos de café se saturen de agua
de una manera óptima.
N
OTA
:
Use solamente la cantidad adecuada de granos de café
yllene el tanque con 4 tasas o menos de agua, según las que usted desee.
1. Presione el botón SELECT dos veces.
2.LaLuz Indicadora de Encendido ON y la Luz de 1 a 4 Tazas se iluminarán.
Si en ese momento usted desea preparar 4 tazas o menos de café, siga los pasos
del 1 al 3en la sección “Programando la Preparación”.
1. Presione el botón SELECT dos veces.
2.LaLuz Indicadora de Encendido ON y la Luz de 1 a 4 Tazas se iluminarán.
A
JUSTANDO LA
T
EMPERATURA DE LA
P
LACA
C
ALEFACTORA
(Únicamente Modelos NLX30, NLX33)
Después de que ha preparado el café, usted puede mantener el cafécaliente a la temperatura
que desee. Gire la perilla de Temperatura de Calentamiento en sentido de las manecillas
del relojpara aumentar la temperatura, o bien, gírela en sentido contrario a las manecillas
del relojpara disminuirla. Para mantener la temperatura constante, usted debe disminuir
la temperatura de la placa calefactora a medida que disminuye
la cantidad de café en lajarra.
NO permita que el contenido de la jarra hiervayse evapore.
Esto podría dañar la jarra.
S
EÑALES
A
UDITIVAS
(Únicamente Modelos NLX30, NLX33)
Cuando la Cafetera ha ya terminado el ciclo de preparación ysu café esté listo,
la Cafetera hará sonar un “beep”cinco veces.
Justo antes de que la Cafetera se apague automáticamente, ésta hará sonar un “beep”
tres veces. Una vez que se haya completado el ciclo de limpieza,la Cafetera hará sonar
un “beep”una vez.
L
IMPIEZA
Su Cafetera deben limpiarse cuando comienza a notar que genera vapor excesivo o que el
tiempo de colado aumenta considerablemente. Esta condición es causada por acumulación
de depósitos calcáreos yminerales del agua. Si la acción bombeadora se interrumpe antes
de que se hayabombeado toda el agua de la Cafetera, el aparato requerirá limpieza.
La frecuencia de limpieza depende de la dureza del agua empleada.
La tabla siguiente le da el programa sugerido de limpieza.
Se puede limpiar su Cafetera usando el Limpiador
M
R
.C
OFFEE
ovinagre.
I
NTERVALOS DE
L
IMPIEZA
S
UGERIDOS
T
IPOS DE
A
GUA
F
RECUENCIA DE
L
IMPIEZA
Agua Suave Cada 80 Ciclos de Preparación
Agua Dura Cada 40 Ciclos de Preparación
18

I
NSTRUCCIONES DE
L
IMPIEZA
(Únicamente Modelos NLX30, NLX33)
Su Cafetera NLX30/NLX33 le indicará cuando sea necesario limpiarla. Después de un
minuto de haber transcurrido el ciclo de limpieza, los controles electrónicos
determinarán si la Cafetera necesita limpieza. Si es así, la Luz Indicadora de LIMPIEZA
comenzará a parpadear. Si la Luz Indicadora de LIMPIEZA comienza a parpadear, limpie
la Cafetera antes del siguiente ciclo de preparación. El no limpiar la Cafetera cuando ésta
lo indique podría resultar en una salida de vapor excesiva y aumento en el tiempo de
preparación. Para limpiarla
, siga los Pasos del 1 al 4 en la Sección de “Limpiando”,
entonces
presione el botón
“SELECT” tres veces
. Cuando el ciclo es completo,
continúe con los Pasos del 6 al 8.
U
SANDO
L
IMPIADOR
M
R
. C
OFFEE
®
Lea la información de cuidado en el panel lateral de la caja del L
IMPIADOR
M
R
. C
OFFEE
®
antes de usarlo
.
L
IMPIANDO
U
SANDO
V
INAGRE
1. Vierta 1 cuarto de vinagre blanco de uso casero sin diluir dentro de su Cafetera.
2.Coloque un filtro dentro de la canasta negra para filtro y cierre la canasta giratoria.
3. Coloque la jarra vacía sobre la placa de calentamiento. Gira el botón de “ON”. Cuando
tres tazas han atravesado, gira el botón a “ON”. Deje el soporte para la 1/2 hora.
4. Después de 1/2 hora, vierta el vinagre nuevamente dentro de la Cafetera.
Coloque la jarra vacía sobre la placa de calentamiento.
5.Gira el Control a “ON” y permita que el modo de limpieza llegue a su fin.
6. Deseche el vinagre y el filtro de papel.
7.Para eliminar los remanentes de vinagre, vierta una jarra llena de agua dentro de la
Cafetera, encienda la unidad en “ON”, y permita que se lleve a cabo un ciclo.
8. Deseche el agua y APAGUE la Cafetera. Repita los Pasos del 7 al 8 .
L
IMPIANDO LA
J
ARRA
L
A
J
ARRA YLA
T
APA DE LA
J
ARRA SE
P
UEDEN
L
AVAR EN LA
R
EJILLA
S
UPERIOR
DE LA
V
AVADORA DE
P
LATOS
El agua dura puede dejar residuos blancos de depósitos minerales en la jarra. El café o el
Te decoloran estos depósitos y algunas veces dejan manchas color café de residuos dentro
de la jarra. Para remover estas manchas, siga los siguientes pasos:
1. Use una solución de partes iguales de vinagre blanco y agua caliente.
2.Deje reposar la solución dentro de la jarra durante aproximadamente 20 minutos
ydespués deséchela.
3. Lave y enjuague la jarra muy bien usando un paño suave. No use limpiadores
abrasivos. Esto puede dañar la jarra o causar que se rompa.
19

20
INFORMACIÓN SOBRE LAGARANTÍA
Garantía Limitada de 1 Año
Sunbeam Products Inc., o, en el Canadá, Sunbeam Corporation (Canada) Limited (“Sunbeam” colectivamente)
garantiza que, por un período de un año a partir de la fecha de compra, este producto estará libre de defectos en
el material y en la mano de obra. Sunbeam, a su criterio, reparará o reemplazará este producto o cualquiera de los
componentes del mismo que estén defectuosos durante el período de garantía. El reemplazo será hecho con un
producto o componente nuevo o reconstruido. Si el producto ya no se encuentra disponible, se reemplazará con
un producto similar de igual o mayor valor. Esta es su garantía exclusiva.
Esta garantía es válida para el comprador original al detal a partir de la fecha inicial de compra al detal y no es
transferible. Conserve el recibo original de compra. La evidencia de compra es requerida para honrar la garantía.
Los concesionarios, centros de servicio de Sunbeam o tiendas al detal que vendan productos Sunbeam, no tienen
el derecho de alterar, modificar o cambiar de forma alguna los términos o condiciones de esta garantía.
Esta garantía no cubre el desgaste por el uso normal de las piezas, o daños que resulten de cualesquiera de las
siguientes: uso negligente o incorrecto del producto, uso bajo un voltaje o corriente inadecuados, uso contrario a
las instrucciones de operación, desensamble, reparaciones o alteraciones que no sean hechas por Sunbeam o por
un centro de servicio autorizado Sunbeam. Además, la garantía no cubre: factores de fuerza mayor tales como
incendios, inundaciones, huracanes y tornados.
¿Cuáles son los límites de la responsabilidad de Sunbeam?
Sunbeam no será responsable de ningún daño incidental o consecuente causado por el incumplimiento de
cualquier garantía o condición expresa, implícita o estatutaria. Excepto hasta donde esté prohibido por el derecho
aplicable, cualquier garantía o condición implícita de comercialización o de aptitud para un propósito en particular
están limitadas en duración al período de la garantía antedicha. Sunbeam rechaza cualesquiera otras garantías,
condiciones o representaciones, expresas, implícitas, estatutarias o de otra índole. Sunbeam no será responsable
de cualesquiera daños de clase alguna que resulten de la adquisición, uso o mal uso de, o incapacidad para utilizar
el producto, incluyendo daños incidentales, especiales, consecuentes o similares, o la pérdida de ganancias, o por
cualquier incumplimiento de contrato, fundamental o de otra índole, o por cualquier reclamación incoada contra
el comprador por cualquier tercero. Algunas provincias, estados o jurisdicciones no permiten la exclusión o
limitación de daños incidentales o consecuentes o limitar la duración de una garantía implícita, así que las
limitaciones o exclusiones antedichas pueden no ser aplicables a usted. Esta garantía le otorga derechos legales
específicos, y usted puede también tener otros derechos que varían de provincia en provincia, de estado en estado
yde jurisdicción en jurisdicción.
Cómo obtener el servicio de la garantía
En los EE.UU.
Si usted tiene cualquier pregunta con respecto a esta garantía o si desea obtener servicio, favor de llamar al 1-
800-672-6333 y se le proveerá una dirección de un centro de servicio de acceso conveniente para usted.
En el Canadá
Si usted tiene cualquier pregunta con respecto a esta garantía o si desea obtener servicio, favor de llamar al 1-
800-667-8623 y se le proveerá una dirección de un centro de servicio de acceso conveniente para usted.
En los EE.UU., esta garantía es ofrecida por Sunbeam Products, Inc., localizado en Boca Ratón, Florida 33431. En
el Canadá, esta garantía es ofrecida por Sunbeam Corporation (Canada) Limited, localizado en 5975 Falbourne
Street, Mississauga, Ontario L5R 3V8.
FAVOR DE NO DEVOLVER ESTE PRODUCTO A CUALQUIERA DE ESTAS
DIRECCIONES O AL LUGAR DONDE LO ADQUIRIÓ.

©2005 Sunbeam Products, Inc. Boca Raton, FL 33431. All rights reserved.
MR. COFFEE
®
is a registered trademark of SunbeamProducts,Inc.
Distributed by Sunbeam Products, Inc., Boca Raton, Florida 33431.
©2005 Sunbeam Products, Inc. Boca Raton, FL 33431. Todos los derechos reservados.
MR. COFFEE
®
es una marca registrada de SunbeamProducts,Inc.
Distribuido por Sunbeam Products, Inc., Boca Raton, Florida 33431.
Printed In China
Impreso en China P. N . 1 1 5953
-
 1
1
-
 2
2
-
 3
3
-
 4
4
-
 5
5
-
 6
6
-
 7
7
-
 8
8
-
 9
9
-
 10
10
-
 11
11
-
 12
12
-
 13
13
-
 14
14
-
 15
15
-
 16
16
-
 17
17
-
 18
18
-
 19
19
-
 20
20
-
 21
21
-
 22
22


Mr Coffee NL12 Manual de usuario
- Categoría
- Cafeteras
- Tipo
- Manual de usuario
En otros idiomas
- English: Mr Coffee NL12 User manual