
Model:
27400A
complies with
INTERNATIONAL
IEC60335
SAFETY SPECIFICATIONS
900W
JUNO 900W
Pressure cooker

Dear customer,
Thank you for choosing to purchase a Mellerware
brand product. Thanks to its technology, design and
operation and the fact that it exceeds the strictest qual-
ity standards, a fully satisfactory use and long product
life can be assured.
1. Parts Description
1. Handle
2. Lid
3. Steam release handle
4. Floating valve
5. Steam vent valve
6. Auto bolt
7. Inner pot
8. Exterier pot
9. External cover
10. Control panel
11. LED panel
12. Water collection container
13. Cool touch handles
14. Stainless steel accented body
15. Lower base
16. Removable power cable
17. Measuring cup
18. Measuring Spoon
19. Inside cover
20. Lid seal
21. Sealant washer
Delay Time
Keep warm/Cancel
Rice
Meat
Beans
Soup
Chicken
Vegetable
Adjust time
1
3
5
4
6
2
7
20
19
21
5
12
13
14
15
16
17
18
11
10
9
8
13
4
21

2. Safety advice and warnings!
Read these instructions carefully before switching on
the appliance and keep them for future reference. Fail-
ure to follow and observe these instructions could lead
to an accident. Clean all the parts of the product that
will be in contact with food, as indicated in the cleaning
section, before use.
2.1. Use or working environment:
2.1.1. Keep the working area clean and well lit. Clut-
tered and dark areas invite accidents.
2.1.2. Use the appliance in a well ventilated area.
2.1.3. Do not place the appliance on hot surfaces,
such as cooking plates, gas burners, ovens or similar
items.
2.1.4. Keep children and bystanders away when using
this appliance.
2.1.5. Place the appliance on a horizontal, flat, stable
surface suitable for withstanding high temperatures
and away from other heat sources and contact with
water.
2.1.6. Keep the appliance away from flammable mate-
rial such as textiles, curtains, cardboard or paper, etc.
2.1.7. Do not place flammable material near the appli-
ance.
2.1.8. Do not use the appliance in association with a
programmer, timer or other device that automatically
switches it on.
2.1.9. Do not use the appliance if the cable or plug is
damaged.
2.1.10. Ensure that the voltage indicated on the rating
label matches the mains power supply voltage before
plugging in the appliance.
2.2.11. Connect the appliance to the mains power sup-
ply with an earth socket withstanding a minimum of 10
amperes.
2.1.12. The appliance’s plug must fit into the mains
power supply socket properly. Do not alter the plug.
2.1.13. If using a multi plug check ratings carefully as
the current used by several appliances could easily
exceed the rating of the multi plug.
2.1.14. If any of the appliance casings breaks, imme-
diately disconnect the appliance from the mains power
supply to prevent the possibility of an electric shock.
2.1.15. Do not use the appliance if it has fallen on the
floor or if there are visible signs of damage.
2.1.16. Do not force the power cord. Never use the
power cord to lift up, carry or unplug the appliance.
2.1.17. Do not wrap the power cord around the appli-
ance.
2.1.18. Do not clip or crease the power cord.
2.1.19. Do not allow the power cord to hang or to
come into contact with the hot surfaces of the appli-
ance.
2.1.20. Check the state of the power cord. Damaged or
tangled cables increase the risk of electric shock.
2.1.21. The appliance is not suitable for outdoor use.
2.1.22. Power cord should be regularly examined for
signs of damage, and if the cord is damaged, the appli-
ance must not be used.
2.1.23. Do not touch the plug with wet hands.
2.2. Personal safety:
2.2.1. CAUTION: Do not leave the appliance unattended
during use as there is a risk of an accident.
2.2.2. Do not touch the heated parts of the appliance,
as it may cause serious burns.
2.2.3. This appliance is only for domestic use, not for
industrial or professional use. It is not intended to be
used by guests in hospitality environments such as
bed and breakfast, hotels, motels, and other types of
residential environments, even in farm houses, areas
of the kitchen staff in shops, offices and other work
environments.
2.2.4. This appliance is not intended for use by
persons (including children) with reduced physical,
sensory or mental capabilities, or lack of experience
and knowledge, unless they have been given supervi-
sion or instruction concerning use of the appliance by
a person responsible for their safety.
2.2.5. This appliance is not a toy. Children should be
supervised to ensure that they do not play with the
appliance.
2.3. Use and care:
2.3.1. Fully unroll the appliance’s power cable before
each use.
2.3.2. Do not use the appliance if the parts or acces-
sories are not properly fitted.
2.3.3. Do not use the appliance when empty.
2.3.4. Do not turn the appliance over while it is in use
or connected to the mains power supply.
2.3.5. Do not cover the cooking surface or food with
aluminium foil and other similar materials.
2.3.6. Unplug the appliance from the mains power
supply when not in use and before undertaking any
cleaning task.
2.3.7. This appliance should be stored out of reach of
children.
2.3.8. Do not store the appliance if it is still hot.

2.3.9. Never leave the appliance unattended when in
use and keep out of the reach of children.
2.3.10. If, for some reason, the appliance were to
catch fire, disconnect the appliance from the mains
power supply and DO NOT USE WATER TO PUT THE
FIRE OUT.
2.4. Service:
2.4.1. Make sure that the appliance is serviced only
by suitably qualified technician, and that only original
spare parts or accessories are used to replace existing
parts/accessories.
2.4.2. If the power cord is damaged, the manufacturer
or its service agent or a similarly qualified person must
replace it in order to avoid a hazard.
2.4.3. Any misuse or failure to follow the instructions
for use renders the guarantee and the manufacturer’s
liability null and void.
3. Instructions for use
3.1. Before use:
3.1.1. Remove the appliance’s protective film(if ap-
plicable).
3.1.2. Before using the product for the first time, clean
the parts that will come into contact with food in the
manner described in the cleaning section.
3.1.3. Attach the water collection container to the appli-
ance, simply slide it into place (refer to diagram) The
water collection container will collect any access liquid
generated by the steam.
3.2. Use and care:
3.2.1. Unroll the power cord completely before plug-
ging it in.
3.2.2. Place your appliance on a flat, dry, stable
surface.
3.2.3. Connect the power cord securely to the pressure
cooker to prevent arcing and unit failure.
3.2.4. Connect the appliance to the mains power sup-
ply.
3.3 Browning / Sealing:
3.3.1. Before cooking meat in the Juno pressure
cooker, it is important that the meat is sealed /
browned first.
3.2.2. Cook meat slightly in a frying pan or pot with a
little oil before starting the pressure cooking process
( make sure the meat is only slightly browned on the
outside and still raw on the inside).
3.4 Use:
3.4.1. Remove the cooking pot, add ingredients (en-
sure meat is browned beforehand and water, never fill
the cooking pot to more than 80% of its capacity.
3.4.2. Insert the cooking pot into the appliance ensur-
ing the external surface of the cooking pot is dry and
clean.
3.4.3. Turn the cookoing pot slightly once inside the
appliance to ensure even contact with the cooking
plate.
3.4.4. Then secure the lid to the appliance and seal it
as follows:
a. Check that the sealing ring is correctly in place on
the lid.
b. Place the lid on the appliance in the “open” position,
then turn the lid anti-clockwise to the “Sealed” position.
Ensure that the lid is securely closed.
3.4.5. Once the lid is closed securely use the “selec-
tion dial” to choose the appropriate food type you are
cooking.
NB: Please note that all cooking times are just a
guideline.
3.4.6. The pressure cooker will take a few minutes
to build up pressure, once the required pressure is
reached the time will begin to count down.
3.4.7. The cooking time is indicated with a “P” fol-
lowed by the remaining cooking time.
i.e. “P.15” for chicken.
3.4.8. The cooking time is adjustable in increments
of 1 min between 3 - 60 minutes, depending on the
function selected.
PLEASE NOTE:
During initial use, you may notice a slight odour due to
the burning off of manufacturing residue. This is com-
pletely normal, it does not affect the food being cooked
and will disappear after a few uses.
Preset function Preset cooking
time
Adjustable
Min Max
Soup 25min 10min 40min
Chicken 15min 12min 30min
Vegetable 8min 5min 15min
Beans 30min 10min 50min
Meat 20min 10min 30min
Rice 12min 8min 18min

NOTE:
Ensure that the steam release valve is in the “sealed”
position before the appliance starts the cooking
process otherwise the unit will not be able to build up
pressure.
3.5 Delay Time:
3.5.1. The Juno pressure cooker has a delay timer you
can set, to start cooking at a later stage. This feature
is optional. Set your timer after you have selected
you desired cooking function. The delay timer can be
adjusted in increments of 30 minutes. Maximum delay
time is 24 hours.
3.5.2. Press the delay timer button once for every 30
minutes to delay the cooking process. For example,
to set a 90 minute delay time, press the button three
times. The delay time will be displayed on the screen.
3.5.3. Please note that once the cooking time has
counted down, the time may not be adjusted. If more
or less cooking time is required, the cooking process
must be cancelled and the timing must be reset to the
required/desired time.
3.5.4. During set up or while cooking the “Keep warm/
cancel” button can be pressed to cancel cooking.
3.5.5. After cooking the unit will automatically engage
“Keep Warm” mode and the letters “bb” will be dis-
played on the screen. The “Keep warm/Cancel” button
can be pressed to cancel keep warm mode.
3.5.6. Once the unit has completed the cooking cycle
or the LCD display has turned off before opening and
removing the lid, turn the pressure release valve to
the “vent” position as indicated by the label on the lid.
Ensure that your face and hands are away from the
opening of the pressure release valve to ensure that
you do not get burnt or injured; the steam is very hot
therefore extreme caution must be exercised when
steam is being released.
3.5.7. When cooking liquid foods such as soup or por-
ridge wait for the unit to cool down before the pressure
is released.
3.5.8. Switch off the appliance at the wall socket and
remove the plug from the wall socket.
3.5.9. Once all pressure has been released and the
plug has been removed from the wall socket and there
is no longer any steam escaping from the pressure
release valve, the lid may be turned clockwise to be
unlocked.
3.5.10. When removing the lid, remove it in such a
manner that the steam is directed away from you. Do
this by allowing the top of the lid to face your direction,
the steam will deflect against the inner surface of the
lid. Ensure you are positioned to the side of the unit
without your face or hands over it. Use an oven glove
when removing the lid to reduce the chance of being
burnt by steam.
3.5.11. Only use not-stick utensils to serve from the
cooking pot as any hard utensils made from stainless
steel or similar materials could damage the non-stick
surface of the inner cooking pot.
3.6 Once you have finished using the appliance:
3.6.1. Allow the appliance to cool down.
3.6.2. Unplug the appliance from the mains power
supply.
3.6.3. Clean the appliance as described in the cleaning
section.
4. Cleaning
4.1. Disconnect the appliance from the mains power
supply and allow it to cool completely before undertak-
ing any cleaning task.
4.2. Remove the water collection container from the
unit and wash under warm water with a mild detergent,
then rinse and dry completely before attaching it to the
unit.
4.3. Clean the outer parts of the appliance with a damp
cloth with a few drops of washing-up liquid and then
dry. CAUTION! Do not immerse electrical parts of the
appliance in any liquid.
4.4.Use water and a damp cloth to clean the cooker lid,
ensure that all the parts of the lid are dried completely
before sotring or re-use.
4.5. Clean the non-stick cooking pot with warm water
and a mild detergent, use a soft cloth to clean it, do
not use any abrasive materials to clean the pot as it
will scratch the non-stick coating. Ensure the pot is
completely dry before storing or re-use.
4.6. Do not use solvents, or products with an acid
or base pH such as bleach, or abrasive products, for
cleaning the appliance.
4.7. Never submerge the appliance in water or any
other liquid or place it under running water.
4.8. NOTE: It is advised that you check that the steam
vent valve and floating valve are in good working order
and free of debris after each use. Always check the
steam release valve, float valve and anti-block shield
for clogging before use.
5. Anomalies and repair
5.1. Take the appliance to an authorised support centre

Geagte Klient,
Baie dankie vir u keuse om `n Mellerware handelsmerk
produk te koop.Danksy die tegnologie,ontwerp end
werking en die feit dat dit voldoen aan die strengste
gehalte standaarde, is u verseker van `n volle bevredi-
gende gebruik en lang produklewe
1. Beskrywing
1. Handvatsel
2. Desksel
3. Stoom vrylating handvatsel
4. Swaai klep
5. Uitlaatklep
6. Auto grendel
7. Innerlike pot
8. Buite pot
9. Buite dekking
10. Beheer paneel
11. LED paneel
12. Water versameling houer
13. Koel touch handvatsels
14. Vlekvye staal buitenste liggaam
15. Laer basis
16. Verwyderbare kragkabel
17. Maat beker
18. Maat lepel
19. Binne dekking
20. Deksel seël
21. Seëlaar wasser
Vertraging funksie
Hou warm/Kanselleer
Rys
Vleis
Bone
Sop
Hoender
Groente
Eers tyd
1
3
5
4
6
2
7
20
19
21
5
12
13
14
15
16
17
18
11
10
9
8
13
4
21

Belangrike veiligheids voorsorg:
Voor die toestel vir die eerste keer gebruik word maak
alle parte skoon wat met kos in aanraking kom soos
voorgeskryf in skoonmaak artikel.
2.1. Gebruik en werksomgewing:
2.1.1 Hou die werk oppervlak skoon en helder verlig.
Ongelukke gebeur in donker areas
2.1.2. Gebruik die produk in n goed geventileerde area
2.1.2. Gebruik die produk in n goed geventileerde area
2.1.3 Moenie die toestel naby `n warm gas of elektri-
ese brander of qn warm oond plaas nie.
2.1.4.Streng toesig is nodig as die toestel naby of deur
kinders gebruik word
2.1.5.Plaas toestel op `n stabiele area en weg van
water
2.1.6`n Brand mag ontstaan as die rooster bedek is of
aan vlambare material raak, insluitende gordyne as dit
in werking is
2.1.7 .Moenie naby vlambare material plaas nie
2.1.8.Die toestel is nie geskik om op aan `n tydsbeheer
toestel te Koppel nie
2.1.9.Moenie die toestel gebruik as die koord of prop
beskadig is.
2.1.10.Maak seker die spanning soos aangedui op die
gradering etiket kom ooreen met die hoofspanning
2.2.11.prop in elektriese uitlaat
2.1.12.die toestel prop moet in die hoof prop pas en
Moenie die prop verander
2.1.13 Indien `n multi prop gebruik word maak seker
die toestel se strome oorskry nie die gradering van die
multi prop
2.1.14 Moenie die toestel gebruik as die prop of koord
beskadig isnie of enige sigbare skade aan die omhulsel
is nie
2.1.15.Moenie die toestel gebruik as dit op die vloer
geval het en daar is sigbare skade.
2.1.16 Moenie die koord gebruik om die toestel te dra,
op te tel of van diemuurprop te ontkoppel nie
2.1.17.Die koord mag nooit om die toestel gedraai
word nie.
2.1.18.moenie die koord plooi nie
2.1.19. Die koord Moenie oor die kant van die tafel of
toonbank hang of aan warm oppervlaktes raak nie.
2.1.20.Maak seker die koord is nie beskadig of ver-
strengel nie.
2.1.21 Die toestel moet nie buite gebruik word nie
2.1.22. Moenie die prop met nat hande hanteer nie
2.2. Persoonlike veiligheid:
2.2.1. LET WEL: Moenie die toestel sonder toesig laat
nie
2.2.2. Moenie warm oppervlaktes aanraak nie gebruik
handvatsels of knoppe want dit kan lei tot ernstige
brandwonde
2.2.3 Die toestel is nie geskik vir industriele gebruik
soos kantore,hotelle motelle en gastehuise
2.2.4. Die toestel is nie geskik vir gebruik deur vermin-
dered fisiese verstandelike vermoens of gebrek aan
ervaring of kennis tensy hulle opleiding gehad het
2.2.5. Die toestel is nie `n speelding and kinders moet
altyd toesig he om te verhoed dat hulle met die toestel
speel
2.3. Gebruik en sorg:
2.3.1. Die kabel moet ten volle afgewikkel word voor
gebruik
2.3.2. Die toestel moet nie gebruik word as die parte of
bykomstighede nie behoorlik pas
2. 3. 3 Die toestel moet nooit leeg gebruik word nie.
2. 3. 4 Die Toestel moet nooit gedraai word terwyl dit in
werking is of in die muurprop gekoppel is
2. 3. 6. Ontkoppel die toestel van die hooftoevoer
as dit nie in gebruik is nie en laat dit heeltemal afkoel
voordat dit skoongemaak word. As dele afgehaal word
of toegevoeg word,moet die toestel nie in werking
wees nie.
2. 3. 7.Die toestel moet buite bereik van kinders
gestoor word
2. 3. 8.Die toestel moet heeltemal afkoel voor dit
gestoor word
2. 3. 9 Die toestel moet altyd onder toesig wees wan-
neer in gebruik en moet buite bereik van kinders gehou
word.
2. 3. 10 As die toestel aan die brand slaan ontkoppel
van die muursok en gooi n kombuis vadoek oor MOET
NOOIT WATER GEBRUIK!!!
2.4. Diens:
2.4.1.Die toestel moet deur `n gekwalifiseerde tegnikus
gediens word
2.4.2 As die koord beskadig word moet dit deur die
diensagent of `n gekwalifiseerde person vervang word
om brandgevaar te verhoed
2.4.3.Enige misbruik en mislukking om instruksies te
volg lewer die waarborg nul en van gener waarde

3. Instruksies vir gebruik
3.1. Voor gebruik:
3.1.1. Verwyder alle verpakking material voor gebruik
3.1.2. Voor die toestel vir die eerste keer gebruik word
maak alle parte skoon wat met kos in aanraking kom
soos voorgeskryf in skoonmaak artikel
3.1.3. Heg lekbak aan die toestel soos verwys in
diagram. Die lekbak sal al die vloeistof opvang wat deur
die stoom gegenereer word.
3.2. Gebruik en sorg:
3.2.1. Die kabel moet ten volle afgewikkel word voor
gebruik.
3.2.2. Plaas toestel op `n stabiele area en weg van
waterl.
3.2.3. prop in elektriese uitlaat.
3.3 Verbruining/Seel:
3.3.1. Voor kookproses begin is dit belangrik om vleis
te seel en te verbruin
3.2.2. Kook vleis effens in a braaipan of pot voor druk
kook begin
( Maak seker die vleis is effens verbruin aan die bui-
tekan en nog rou binne).
Gebruik:
3.4.1. Verwyder pot, voeg bestandelel by (maak seker
die vleis is eers verbruin) voeg water by en moet nooit
die pot meer as 80% van die kapasiteit vul nie
3.4.2. Plaas die pot terug in die toestel en verseker die
buitekant van pot is skoon en droog.
3.4.3. Draai pot effens om te verseker dit maak kontak
met plaat.
3.4.4. Plaas deksel op en seel soos volg:
a. Maak seker die seelring is reg in plek op die deksel
b. Plaas deksel in oop posisie en draai antikloksgewys
na toe posisie
3.4.5. As deksel stewig toe is gebruik die beheer
paneel.
3.4.6. Wanneer die kos tipe wat gekook word verskyn
druk die knop om proses te begin.
3.4.7. Die druk koker sal `n paar minute vat om druk
op te bou en wanneer die druk bereik is sal die tyd
begin aftel.
3.4.8. Die kooktyd word aangedui met `n “P” gevolg
deur die oorblywende kooktyd.
bv. “P.15” vir hoender.
3.4.9. Die kooktyd is verstelbaar in inkremente van 1
min tussen 3 – 60 min,na gelang van funksie wat is
gekies is.
NB: Neem asseblief kennis dat alle kook tye is net ‘n
riglyn.
NEEM KENNIS:
Tydens gebruik sal `n ligte reuk bespeur word wat net
die brand van vervaardigers oorskot is. Dit is normal en
het geen invloed op die voedsel en sal verdwyn na `n
paar gebruike.
BELANGRIK:
Verseker die stoomklep is in die “sealed” posisie voor
die kookproses begin anders sal die toestel nie druk
opbou nie
3.5 Vertraging tyd:
3.5.1. Voor kook funksie gekies word druk “time”
sleutel om vertraging kooktyd by te voeg. Die vertrag-
ing timer kan verstel word in inkremente van 30 min.
Maximum vertraagtyd is 24 uur. Druk aanhoudend tot
gewenste tyd bereik is. Die tyd tot kook proses gaan
begin word vertoon op die skerm.
3.5.2. wanneer vertraging gekies is gebruik knop
op panel om gewenste kook funksie te kies (bv.
Rys,hoender,sop ens) druk dan die knop op funksie te
selekteer. Die kook proses sal begin wanneer vertraag
tyd om is.
3.5.3. Neem kennis dat wanneer kooktyd begin kan die
tyd nie verstel word nie. Die kook proses moet gekan-
selleer word en die tyd meot herstel word na gewenste
tyd (PO8 verwys na 8 min kooktyd oor.
3.5.4. Tydens opstel of gedurende kooktyd kan die
Keep warm/cancel knoppie gedruk word om funksie te
kanselleer
3.5.5. No kook sal die toestel automaties na “keep
warm” funksie toe gaan en die letters “bb” sal op die
skerm verskyn. Die “Keep warm/Cancel” knoppie kan
gedruk word om keep warm te kanselleer.
3.5.6. Wanneer die toestel die kook siklus voltooi het of
die skerm is af draai die klep na “vent” soos aangedui
op die deksel om die druk uit te laat. Moenie naby die
toestel staan nie en hande en gesig moet weg wees
van die klep om te verseker dat jy nie brand. STOOM IS
Voorafbepaalde funksie Voorafbepaalde kooktyd Verstelbaar
Min Max
Sop
25min 10min 40min
Hoender
15min 12min 30min
Groente
8min 5min 15min
Boontjies
30min 10min 60min
Vleis
20min 10min 30min
Rys
12min 8min 18min

BAIE WARM EN KAN BRAND
3.5.7. Wanneer dun voedsel gekook word sop en pap
wag vir die toestel om heeltemal koud te word woor die
klep oopgedraai word om die druk uit te kry.
3.5.8. Skakel toestel af en verwyder prop van muursok.
3.5.9. As al die druk vrygestel is en die prop is uit die
muursok en daar kom geen stoom meer uit nie kan die
deksel kloksgewys gedraai word om oop te maak.
3.5.10. Wanneer die deksel afgehaal word verwyder
sodat die stoom weg van jou af is. Om te verhoed dat
stoom in jou gesig kom die bokant van die deksel moet
na jou toe wys. Gebruik `n oond handskoen om die
deksel af te haal.
3.5.11. Gebruik net gereedskap wat nie die kookpot sal
bekadig nie want dit is `n oppervlakte wat nie laat kos
vassit nie.
3.6 Na gebruik:
3.6.1. Laat toestel afkoel.
3.6.2. Ontkoppel die toestel van hoof krag toevoer
3.6.3 Maak skoon soos in skoonmaak seksie.
4. Skoonmaak:
4.1. Ontkoppel die toestel van hoof krag toevoer en laat
afkoel voor skoonmaak begin.
4.2. Verwyder lekbak van toestel en was met warm wa-
ter en maak deeglik droog voor dit weer gebruik word.
4.3. Maak die buitekant van die toestel met n klam lap
skoon en moet glad nie in water gedruk word nie
4.4.Maak deksel met sagte klam lap skoon en moet
heeltemal droog wees voor gebruik.
4.5. Maak die pot met warm water skoon en `n ligte
wasmiddel. Geen skuur produkte mag gebruik word
nie wat dit sal die oppervlakte van die pot beskadig.
4.67. Die toestel mag nie onder lopende water gewas
word nie.
4.7. OPMERKING: Dit word aanbeveel dat u na elke ge-
bruik seker maak dat die stoomuitlaatklep en drywende
klep in ‘n goeie werkende toestand is en sonder puin is.
Kontroleer altyd dat die stoomuitlaatklep, die vlotteklep
en die blokkeringskerm verstop is voor gebruik.
5. Anomalies and herstel
5.1. Neem die toestel na gemagtigde tegniese sentrum
as toestel beskadig is of probleme ontstaan.
5.2 As koneksie na die muurprop beskadig is moet die
toestel vervang word volgens waarborg

Estimado cliente,
Gracias por elegir comprar un producto de la marca
Mellerware. Gracias a su tecnología, diseño y funcio-
namiento, y al hecho de que supera los más estrictos
estándares de calidad, puede garantizarse un uso
totalmente satisfactorio y una larga vida del producto.
1. Descripción de piezas
1. Mango
2. Tapa
3. Mango de liberación del vapor
4. Válvula flotante
5. Válvula de purga de vapor
6. Tornillo automático
7. Maceta interna
8. Olla Exterier
9. Cubierta externa
10. Panel de control
11. Panel LED
12. Contenedor de recogida de agua
13. Manijas táctiles frescas
14. Cuerpo acentuado en acero inoxidable
15. Base inferior
16. Cable de alimentación extraíble
17. Taza de medir
18. Cuchara Medida
19. cubierta interior
20. Sello de la tapa
21. Arandela selladora
2. Consejos y advertencias de seguridad!
Lea atentamente estas instrucciones antes de en-
cender el aparato y guárdelas para futuras consultas. El
incumplimiento y el cumplimiento de estas instruc-
Tiempo de retardo
Mantener caliente / cancelar
Arroz
Carne
Frijoles
Sopa
Pollo
Legumbre
Ajustar el tiempo
1
3
5
4
6
2
7
20
19
21
5
12
13
14
15
16
17
18
11
10
9
8
13
4
21

ciones pueden provocar un accidente. Limpie todas las
partes del producto que estarán en contacto con los
alimentos, como se indica en la sección de limpieza,
antes de usarlas.
2.1. Uso o ambiente de trabajo:
2.1.1. Mantenga el área de trabajo limpia y bien
iluminada. Las áreas obstruidas y oscuras invitan a
accidentes.
2.1.2. Utilice el aparato en un lugar bien ventilado.
2.1.3. No coloque el aparato sobre superficies cali-
entes, tales como placas de cocción, quemadores de
gas, hornos o artículos similares.
2.1.4. Mantenga alejados a los niños y transeúntes
cuando utilice este aparato.
2.1.5. Coloque el aparato sobre una superficie hori-
zontal, plana y estable, adecuada para soportar altas
temperaturas y lejos de otras fuentes de calor y en
contacto con el agua.
2.1.6. Mantenga el aparato alejado de materiales in-
flamables como textiles, cortinas, cartón o papel, etc.
2.1.7. No coloque material inflamable cerca de la
aplicación.
2.1.8. No utilice el aparato en combinación con un
programador, temporizador u otro dispositivo que lo
encienda automáticamente.
2.1.9. No utilice el aparato si el cable o el enchufe
están dañados.
2.1.10. Asegúrese de que la tensión indicada en la
etiqueta de características coincide con la tensión de
red antes de enchufar el aparato.
2.2.11. Conecte el aparato a la red eléctrica con un
enchufe de tierra de un mínimo de 10 amperios.
2.1.12. El enchufe del aparato debe encajar correcta-
mente en la toma de corriente. No altere el enchufe.
2.1.13. Si se utiliza un multi enchufe comprobar las
calificaciones con cuidado como la corriente utilizada
por varios aparatos podría fácilmente exceder la clasifi-
cación de la multi-enchufe.
2.1.14. Si se rompe alguna de las cubiertas del
aparato, desconecte inmediatamente el aparato de la
red eléctrica para evitar la posibilidad de una descarga
eléctrica.
2.1.15. No utilice el aparato si ha caído en el suelo o si
hay signos visibles de daños.
2.1.16. No fuerce el cable de alimentación. Nunca uti-
lice el cable de alimentación para levantar, transportar
o desenchufar el aparato.
2.1.17. No envuelva el cable de alimentación alrededor
de la aplicación.
2.1.18. No sujete ni doble el cable de alimentación.
2.1.19. No permita que el cable de alimentación cuel-
gue o entre en contacto con las superficies calientes
del aparato.
2.1.20. Compruebe el estado del cable de aliment-
ación. Los cables dañados o enredados aumentan el
riesgo de descarga eléctrica.
2.1.21. El aparato no es adecuado para uso en exteri-
ores.
2.1.22. El cable de alimentación debe ser examinado
regularmente para detectar signos de daño, y si el
cable está dañado, la aplicación no debe utilizarse.
2.1.23. No toque el enchufe con las manos mojadas.
2.2. Seguridad personal:
2.2.1. PRECAUCIÓN: No deje el aparato desatendido
durante el uso, ya que existe el riesgo de un accidente.
2.2.2. No toque las partes calientes del aparato, ya que
puede causar quemaduras graves.
2.2.3. Este aparato es sólo para uso doméstico, no
para uso industrial o profesional. No está destinada
a ser utilizada por los huéspedes en ambientes de
hospitalidad como bed and breakfast, hoteles, moteles
y otros tipos de ambientes residenciales, incluso en
casas de granja, áreas del personal de cocina en
tiendas, oficinas y otros ambientes de trabajo.
2.2.4. Este aparato no está destinado a ser utilizado
por personas (incluyendo niños) con capacidades
físicas, sensoriales o mentales reducidas, o por falta
de experiencia y conocimiento, a menos que hayan
recibido supervisión o instrucciones sobre el uso del
aparato por una persona responsable de su uso la
seguridad.
2.2.5. Este aparato no es un juguete. Los niños deben
ser supervisados para asegurarse de que no juegan
con el aparato.
2.3. Uso y cuidado:
2.3.1. Desenrolle completamente el cable de aliment-
ación del aparato antes de cada uso.
2.3.2. No utilice el aparato si las piezas o los acceso-
rios no están bien colocados.
2.3.3. No utilice el aparato cuando esté vacío.
2.3.4. No encienda el aparato mientras esté en uso o
conectado a la red eléctrica.
2.3.5. No cubra la superficie o los alimentos con papel
de aluminio y otros materiales similares.
2.3.6. Desconecte el aparato de la red eléctrica cuando
no esté en uso y antes de realizar cualquier tarea de
limpieza.
2.3.7. Este aparato debe guardarse fuera del alcance
de los niños.
2.3.8. No guarde el aparato si todavía está caliente.
2.3.9. Nunca deje el aparato desatendido cuando esté
en uso y manténgalo fuera del alcance de los niños.

2.3.10. Si, por alguna razón, el aparato se incendia,
desconecte el aparato de la red eléctrica y NO USE
AGUA PARA DESCONECTAR EL FUEGO.
2.4. Servicio:
2.4.1. Asegúrese de que el aparato sea reparado
únicamente por un técnico cualificado y que sólo se
utilicen piezas de repuesto o accesorios originales para
sustituir las piezas / accesorios existentes.
2.4.2. Si el cable de alimentación está dañado, el
fabricante o su agente de servicio o una persona cuali-
ficada debe reemplazarlo para evitar un peligro.
2.4.3. Cualquier mal uso o incumplimiento de las
instrucciones de uso hace nula la garantía y la respon-
sabilidad del fabricante.
3. Instrucciones de uso
3.1. Antes de usar:
3.1.1. Retire la película protectora del aparato (si es
posible).
3.1.2. Antes de utilizar el producto por primera vez,
limpie las piezas que entrarán en contacto con los
alimentos de la manera descrita en la sección de
limpieza.
3.1.3. Conecte el recipiente de recolección de agua a la
aplicación, simplemente deslícelo en su lugar (consulte
el diagrama), el recipiente de recogida de agua reco-
gerá cualquier líquido de acceso generado por el vapor.
3.2. Uso y cuidado:
3.2.1.1. Desenrolle completamente el cable de aliment-
ación antes de enchufarlo.
3.2.2. Coloque el aparato sobre una superficie plana,
seca y estable.
3.2.3. Conecte el cable de alimentación de forma
segura a la olla a presión para evitar la formación de
arcos y el fallo de la unidad.
3.2.4. Conectar el aparato a la red eléctrica
3.3 Bronceado / sellado:
3.3.1. Antes de cocinar la carne en la olla a presión
Juno, es importante que la carne se selle / se dorne
primero.
3.2.2. Cocine ligeramente la carne en una sartén o una
olla con un poco de aceite antes de iniciar el proceso
de cocción a presión (asegúrese de que la carne esté
ligeramente dorada en el exterior y todavía cruda por
dentro).
3.4 Uso:
3.4.2. Inserte la olla en el aparato asegurando que la
superficie externa de la olla esté seca y limpia.
3.4.3. Gire la olla una vez dentro del aparato para ase-
gurar un contacto uniforme con la placa de cocción.
3.4.4. A continuación, sujete la tapa al aparato y séllela
como sigue:
a. Compruebe que el anillo de estanqueidad esté cor-
rectamente colocado en la tapa. Segundo. Coloque la
tapa en el aparato en posición “abierta”, luego gire la
tapa en sentido anti horario hasta la posición “Sellado”.
Asegúrese de que la tapa esté bien cerrada.
3.4.5. Una vez que la tapa esté cerrada, utilice el
“selector de selección” para elegir el tipo de alimento
que está cocinando.
NB: Tenga en cuenta que todos los tiempos de coc-
ción son sólo una pauta.
3.4.6. La olla a presión tardará unos minutos en
acumular presión; Una vez que se alcanza la presión
requerida el tiempo comenzará a contar hacia abajo.
3.4.7. El tiempo de cocción se indica con un “P”
seguido del tiempo de cocción restante. “P.15” para el
pollo.
3.4.8. El tiempo de cocción es ajustable en incremen-
tos de 1 min entre 3 - 60 minutos, dependiendo de la
función seleccionada.
TENGA EN CUENTA:
Durante el uso inicial, puede notar un ligero olor debido
a la quema de los residuos de fabricación. Esto es
completamente normal, no afecta a la comida que
se está cocinando y desaparecerá después de unos
pocos usos.
NOTA:
Asegúrese de que la válvula de liberación de vapor
esté en la posición “sellada” antes de que el aparato
comience el proceso de cocción, de lo contrario la
unidad no podrá aumentar la presión.
3.5 Tiempo de Retardo:
3.5.1. La olla a presión Juno tiene un temporizador de
retardo que puede ajustar, para iniciar la cocción en
Función de
preajuste
Tiempo de coc-
ción predefinido
Ajustable
Min Max
Sopa 25min 10min 40min
Pollo 15min 12min 30min
Vegetal 8min 5min 15min
Frijoles 30min 10min 50min
Carne 20min 10min 30min
Arroz 12min 8min 18min

una etapa posterior. Esta función es opcional. Ajuste
el temporizador después de seleccionar la función de
cocción deseada. El temporizador de retardo se puede
ajustar en incrementos de 30 minutos. El tiempo de
retardo máximo es de 24 horas.
3.5.2. Presione el botón del temporizador de retardo
una vez cada 30 minutos para retrasar el proceso
de cocción. Por ejemplo, para ajustar un tiempo de
retardo de 90 minutos, presione el botón tres veces. El
tiempo de retardo se mostrará en la pantalla.
3.5.3. Tenga en cuenta que una vez que haya transcur-
rido el tiempo de cocción, es posible que no se ajuste
el tiempo. Si se requiere más o menos tiempo de
cocción, el proceso de cocción debe ser cancelado y
el tiempo debe ser restablecido al tiempo deseado /
deseado.
3.5.4. Durante la configuración o durante la cocción,
se puede presionar el botón “Mantener caliente /
cancelar” para cancelar la cocción.
3.5.5. Después de cocinar, la unidad se activará
automáticamente en el modo “Keep Warm” y las letras
“bb” aparecerán en la pantalla. El botón “Mantener
caliente / Cancelar” se puede presionar para cancelar
el modo de mantener caliente.
3.5.6. Una vez que la unidad ha completado el ciclo
de cocción o la pantalla LCD se ha apagado antes de
abrir y retirar la tapa, gire la válvula de liberación de
presión a la posición de “ventilación” como se indica
en la etiqueta de la tapa. Asegúrese de que su cara y
las manos están lejos de la apertura de la válvula de
liberación de presión para asegurarse de que no se
queman o heridos; El vapor es muy caliente, por lo
tanto, se debe tener extrema precaución cuando se
libera vapor.
3.5.7. Al cocinar comidas líquidas tales como sopa o
manteca, espere a que la unidad se enfríe antes de que
se libere la presión.
3.5.8. Desconecte el aparato de la toma de corriente y
desenchúfelo de la toma de corriente.
3.5.9. Una vez que se ha liberado toda la presión y se
ha retirado el tapón de la toma de pared y ya no hay
ningún vapor que escape de la válvula de liberación
de presión, la tapa se puede girar en el sentido de las
agujas del reloj para desbloquearse.
3.5.10. Al retirar la tapa, extráigala de tal manera que
el vapor se aleje de usted. Hacer esto permitiendo que
la tapa de la tapa haga frente a su dirección, el vapor
se desviará contra la superficie interna de la tapa.
Asegúrese de que está colocado al lado de la unidad
sin la cara o las manos sobre él. Use un guante de
horno cuando quite la tapa para reducir la posibilidad
de ser quemado por el vapor.
3.5.11. Utilice solamente utensilios antiadherentes para
servir de la olla, ya que cualquier utensilio duro hecho
de acero inoxidable o materiales similares podría dañar
la superficie antiadherente de la olla interna.
3.6 Una vez que haya terminado de utilizar el
aparato:
3.6.1. Deje que el aparato se enfríe.
3.6.2. Desconecte el aparato de la red eléctrica.
3.6.3. Limpie el aparato como se describe en la sec-
ción de limpieza.
4. Limpieza
4.1. Desconecte el aparato de la red eléctrica y deje
que se enfríe completamente antes de realizar cualquier
tarea de limpieza.
4.2. Retire el recipiente de recogida de agua de la
unidad y lave bajo agua tibia con un detergente suave,
luego enjuague y seque completamente antes de
conectarlo a la unidad.
4.3. Limpie las partes exteriores del aparato con un
paño húmedo con unas gotas de detergente y luego
seque. ¡PRECAUCIÓN! No sumerja las partes eléctri-
cas del aparato en ningún líquido.
4.4. Utilice agua y un paño húmedo para limpiar la tapa
de la cocina, asegúrese de que todas las partes de la
tapa se sequen completamente antes de almacenar o
reutilizar.
4.5. Limpie la olla de cocinar antiadherente con agua
tibia y un detergente suave, use un paño suave para
limpiarlo, no use ningún material abrasivo para limpiar
la olla, ya que rayará el revestimiento antiadherente.
Asegúrese de que la olla esté completamente seca
antes de guardarla o volverla a usar.
4.6. No utilice disolventes, ni productos con un pH
ácido o base, tales como lejía, o productos abrasivos,
para limpiar el aparato.
4.67. Nunca sumerja el aparato en agua o cualquier
otro líquido o colóquelo bajo agua corriente.
4.8 NOTA: Se recomienda que verifique que la válvula
de ventilación de vapor y la válvula flotante estén en
buen estado de funcionamiento y libres de residuos
después de cada uso. Siempre verifique que la válvula
de liberación de vapor, la válvula de flotador y el pro-
tector antibloqueo no estén obstruidos antes de usar.
5. Anomalías y reparación
5.1. Lleve el aparato a un centro de asistencia autor-
izado si el producto está dañado o si surgen otros

Cher client,
Merci d’avoir choisi d’acheter un produit de marque
Mellerware. Grâce à sa technologie, sa conception
et son fonctionnement et le fait qu’elle dépasse les
normes de qualité les plus strictes, une utilisation
parfaitement satisfaisante et une longue durée de vie
du produit peuvent être assurées.
1. Description des pieces
1. Poignée
2. Couvercle
3. Poignée de dégagement de vapeur
4. Vanne flottante
5. Vanne d’évacuation de vapeur
6. Boulon automatique
7. Pot intérieur
8. Pot Exterier
9. Couvercle externe
10. Panneau de commande
11. Panneau de temoin lumineux
12. Conteneur de collecte d’eau
13. Poignées fraîches
14. Corps accentué en acier inoxydable
15. Base inférieure
16. Câble d’alimentation amovible
17. Tasse de mesure
18. Cuillère de mesure
19. Couverture intérieure
20. Joint d’étanchéité
21. Lave-glace
1
3
5
4
6
2
7
20
19
21
5
12
13
14
15
16
17
18
11
10
9
8
13
4
21
Temps de délai
Conserver au chaud / annuler
riz
viande
haricots
Soupe
poulet
Légume
Ajuster l’heure

2. Conseils et avertissements de sécurité!
Lisez attentivement ces instructions avant d’allumer
l’appareil et conservez-les pour référence ultérieure. Le
non-respect et observation de ces instructions peuvent
entraîner un accident. Nettoyez toutes les parties du
produit qui seront en contact avec les aliments, comme
indiqué dans la section de nettoyage, avant utilisation.
2.1. Environnement d’utilisation ou de travail:
2.1.1. Gardez la zone de travail propre et bien éclairée.
Les zones obsolètes et obscures invitent des acci-
dents.
2.1.2. Utilisez l’appareil dans un endroit bien ventilé.
2.1.3. Ne placez pas l’appareil sur des surfaces
chaudes, telles que des plaques de cuisson, des
brûleurs à gaz, des fours ou des articles similaires.
2.1.4. Gardez à l’écart les enfants et les personnes
présentes lorsque vous utilisez cet appareil.
2.1.5. Placez l’appareil sur une surface horizontale,
plate et stable, apte à supporter des températures
élevées et à l’écart des autres sources de chaleur et au
contact de l’eau.
2.1.6. Gardez l’appareil à l’écart des matériaux inflam-
mables tels que les textiles, les rideaux, le carton ou le
papier, etc.
2.1.7. Ne placez pas de matière inflammable près de
l’appareil.
2.1.8. N’utilisez pas l’appareil en association avec un
programmeur, une minuterie ou un autre appareil qui
l’allume automatiquement.
2.1.9. N’utilisez pas l’appareil si le câble ou la fiche est
endommagé.
2.1.10. Assurez-vous que la tension indiquée sur
l’étiquette d’évaluation correspond à la tension
d’alimentation secteur avant de brancher l’appareil.
2.2.11. Connectez l’appareil à l’alimentation secteur
avec une prise de terre résistant à un minimum de 10
ampères.
2.1.12. La fiche de l’appareil doit s’adapter correcte-
ment à la prise secteur. Ne modifiez pas la fiche.
2.1.13. Si vous utilisez une prise multiple, vérifiez bien
les notes car le courant utilisé par plusieurs appar-
eils pourrait facilement dépasser la note de la prise
multiple.
2.1.14. Si l’une des enveloppes de l’appareil est
en panne, débranchez immédiatement l’appareil de
l’alimentation électrique afin d’éviter tout risque de
choc électrique.
2.1.15. N’utilisez pas l’appareil s’il tombe sur le sol ou
s’il y a des signes visibles de dégâts.
2.1.16. Ne forcez pas le cordon d’alimentation.
N’utilisez jamais le cordon d’alimentation pour soulever,
transporter ou débrancher l’appareil.
2.1.17. Ne pas enrouler le cordon d’alimentation autour
de l’appareil.
2.1.18. Ne pas couper ni plier le cordon d’alimentation.
2.1.19. Ne laissez pas le cordon d’alimentation
s’accrocher ou entrer en contact avec les surfaces
chaudes de l’appareil.
2.1.20. Vérifiez l’état du cordon d’alimentation. Les
câbles endommagés ou enchevous augmentent le
risque de choc électrique.
2.1.21. L’appareil ne convient pas pour l’utilisation à
l’extérieur.
2.1.22. Le cordon d’alimentation doit être régulière-
ment examiné pour détecter les signes de dommages
et si le cordon est endommagé, l’appareil ne doit pas
être utilisé.
2.1.23. Ne pas toucher la fiche avec les mains mouil-
lées.
2.2. Sécurité personnelle:
2.2.1. ATTENTION: Ne laissez pas l’appareil sans sur-
veillance lors de l’utilisation car il y a risque d’accident.
2.2.2. Ne pas toucher les parties chauffantes de
l’appareil, car cela pourrait provoquer des brûlures
graves.
2.2.3. Cet appareil n’est utilisé qu’à usage domestique
et non à usage industriel ou professionnel. Il n’est
pas destiné à être utilisé par des invités dans des
environnements d’hôtellerie tels que des chambres
d’hôtes, des hôtels, des motels et d’autres types
d’environnements résidentiels, même dans les maisons
de ferme, les domaines du personnel de cuisine dans
les magasins, les bureaux et autres environnements de
travail.
2.2.4. Cet appareil n’est pas destiné à être utilisé par
des personnes (y compris des enfants) avec des ca-
pacités physiques, sensorielles ou mentales réduites,
ou un manque d’expérience et de connaissances, à
moins d’avoir reçu une supervision ou des instructions
concernant l’utilisation de l’appareil par une personne
responsable de leur sécurité.
2.2.5. Cet appareil n’est pas un jouet. Les enfants
devraient être surveillés pour s’assurer qu’ils ne jouent
pas avec l’appareil.
2.3. Utilisation et soin:
2.3.1. Déroulez entièrement le câble d’alimentation de
l’appareil avant chaque utilisation.
2.3.2. N’utilisez pas l’appareil si les pièces ou les ac-
cessoires ne sont pas correctement installés.

2.3.3. N’utilisez pas l’appareil lorsqu’il est vide.
2.3.4. Ne rallumez pas l’appareil lorsqu’il est utilisé ou
connecté à l’alimentation secteur.
2.3.5. Ne couvrez pas la surface de cuisson ou les
aliments avec du papier d’aluminium et d’autres maté-
riaux similaires.
2.3.6. Débranchez l’appareil de l’alimentation secteur
lorsqu’il n’est pas utilisé et avant toute tâche de net-
toyage.
2.3.7. Cet appareil doit être stocké hors de portée des
enfants.
2.3.8. Ne rangez pas l’appareil s’il est encore chaud.
2.3.9. Ne laissez jamais l’appareil sans surveillance
lorsque vous l’utilisez et gardez-vous hors de portée
des enfants.
2.3.10. Si, pour une raison ou pour une autre,
l’appareil devait prendre feu, débrancher l’appareil
de l’alimentation secteur et NE PAS UTILISER D’EAU
POUR ETEINDRE LE FEU.
2.4. Entretien:
2.4.1. Assurez-vous que l’appareil n’est entretenu que
par un technicien qualifié et que seules les pièces de
rechange d’origine ou les accessoires sont utilisés
pour remplacer les pièces / accessoires existants.
2.4.2. Si le cordon d’alimentation est endommagé, le
fabricant ou son agent d’entretien ou une personne
qualifiée doit le remplacer afin d’éviter tout danger.
2.4.3. Toute utilisation abusive ou le non-respect des
instructions d’utilisation rend la garantie et la respon-
sabilité du fabricant nulle et non avenue.
3. Instructions d’utilisation
3.1. Avant utilisation:
3.1.1. Retirez le film de protection de l’appareil (le cas
échéant).
3.1.2. Avant d’utiliser le produit pour la première fois,
nettoyez les pièces qui entreront en contact avec les
aliments de la manière décrite dans la section de net-
toyage.
3.1.3. Fixez le récipient de collecte d’eau à l’appareil,
faites-le glisser simplement dans l’endroit (voir dia-
gramme). Le récipient collecteur d’eau collectera tout
liquide d’accès généré par la vapeur.
3.2. Utilisation et soin:
3.2.1. Déroule le cordon d’alimentation complètement
avant de le brancher.
3.2.2. Placez votre appareil sur une surface plane,
sèche et stable.
3.2.3. Connectez le cordon d’alimentation en toute sé-
curité à l’autocuiseur afin d’éviter les arcs et les pannes
de l’unité. 3.2.4. Connectez l’appareil à l’alimentation
secteur.
3.3 Brunissage / étanchéité:
3.3.1. Avant de cuire de la viande dans l’autocuiseur
Juno, il est important que la viande soit scellée / dorée
d’abord.
3.2.2. Cuire légèrement la viande dans une poêle ou
un pot avec un peu d’huile avant de commencer la
cuisson sous pression (assurez-vous que la viande
est légèrement dorée à l’extérieur et encore crue à
l’intérieur).
3.4 Utilisation:
3.4.1. Retirez le pot de cuisson, ajoutez des ingrédients
(assurez-vous que la viande est dorée au préalable et à
l’eau, ne jamais remplir la cuisinière à plus de 80% de
sa capacité.
3.4.2. Insérez le pot de cuisson dans l’appareil en
assurant que la surface extérieure de la cuisinière est
sèche et propre.
3.4.3. Mettez le pot de cuisson légèrement une fois
à l’intérieur de l’appareil pour assurer un contact
uniforme avec la plaque de cuisson.
3.4.4. Ensuite, protégez le couvercle de l’appareil et
scellez-le comme suit:
a. Vérifiez que la bague d’étanchéité est correctement
installée sur le couvercle.
b. Placez le couvercle sur l’appareil en position «ou-
verte», puis tournez le couvercle dans le sens inverse
des aiguilles d’une montre jusqu’à la position «scellé».
Assurez-vous que le couvercle est bien fermé.
3.4.5. Une fois que le couvercle est fermé, utilisez la
“selection dail” pour choisir le type de nourriture ap-
proprié que vous cuisinez.
Fonction préréglée Temps de cuisson
prédéfini
Adjustable
Min Max
La Soupe 25min 10min 40min
Le poulet 15min 12min 30min
Légeme 8min 5min 15min
les haricots 30min 10min 50min
La viande 20min 10min 30min
Le riz 12min 8min 18min

NB: Veuillez noter que tous les temps de cuisson ne
sont qu’une directive.
3.4.6. L’autocuiseur prend quelques minutes pour
augmenter la pression, une fois que la pression requise
est atteinte, le temps commencera à décompter.
3.4.7. Le temps de cuisson est indiqué avec un “P”
suivi du temps de cuisson restant.
C’est-à-dire «P.15» pour le poulet.
3.4.8. Le temps de cuisson est réglable par incréments
de 1 minute entre 3 et 60 minutes, selon la fonction
sélectionnée.
NOTEZ S’IL VOUS PLAÎT:
Pendant l’utilisation initiale, vous pouvez remarquer une
légère odeur due à la combustion des résidus de fabri-
cation. Ceci est tout à fait normal, cela n’affecte pas les
aliments cuits et disparaîtra après quelques utilisations.
REMARQUE
Assurez-vous que la soupape de dégagement de
vapeur est en position “scellée” avant que l’appareil ne
démarre le processus de cuisson, sinon l’appareil ne
pourra pas augmenter la pression.
3.5 Temps de délai:
3.5.1. L’autocuiseur Juno a une minuterie de retarde-
ment que vous pouvez régler, pour commencer à cuire
à un stade ultérieur. Cette fonctionnalité est facultative.
Réglez votre minuterie après avoir sélectionné la fonc-
tion de cuisson souhaitée. La minuterie de retard peut
être ajustée par incréments de 30 minutes. Le délai de
retard maximal est de 24 heures.
3.5.2. Appuyez sur le bouton de temporisation de
retard une fois toutes les 30 minutes pour retarder le
processus de cuisson. Par exemple, pour régler un
délai de 90 minutes, appuyez trois fois sur le bouton.
Le temps de retard s’affiche à l’écran.
3.5.3. Veuillez noter qu’une fois que le temps de cuis-
son a été compté, l’heure peut ne pas être réglée. Si
plus ou moins de temps de cuisson est nécessaire, le
processus de cuisson doit être annulé et la synchroni-
sation doit être réinitialisée à l’heure souhaitée.
3.5.4. Pendant la mise en place ou pendant la cuisson,
le bouton “Keep warm / Cancel” peut être pressé pour
annuler la cuisson.
3.5.5. Après la cuisson, l’appareil s’engage automa-
tiquement dans le mode “Keep Warm” et les lettres
“bb” seront affichées sur l’écran. Le bouton “Keep
warm / Cancel” peut être pressé pour annuler le mode
de maintien en mode chaud.
3.5.6. Une fois que l’appareil a terminé le cycle de
cuisson ou que l’écran LCD a été éteint avant d’ouvrir
et de retirer le couvercle, tournez la soupape de dé-
gagement de pression dans la position “vent” comme
indiqué par l’étiquette sur le couvercle. Assurez-vous
que votre visage et vos mains sont éloignés de
l’ouverture de la soupape de pression afin de ne pas
être brûlé ou blessés; La vapeur est très chaude donc
une extrême prudence doit être exercée lorsque la
vapeur est relâchée.
3.5.7. Lors de la cuisson des aliments liquides tels
que la soupe ou la porcelaine, attendez que l’appareil
refroidisse avant que la pression ne soit relâchée.
3.5.8. Éteignez l’appareil sur la prise murale et retirez la
fiche de la prise murale.
3.5.9. Une fois que toutes les pressions ont été
relâchées et que la fiche a été retirée de la prise murale
et qu’il n’y a plus de vapeur s’échappant de la soupape
de dégagement de pression, le couvercle peut être
tourné dans le sens des aiguilles d’une montre pour
être déverrouillé.
3.5.10. Lorsque vous retirez le couvercle, retirez-le
de telle manière que la vapeur soit éloignée de vous.
Faites cela en permettant au haut du couvercle de
faire face à votre direction, la vapeur évoluera contre
la surface intérieure du couvercle. Assurez-vous que
vous êtes placé sur le côté de l’unité sans votre visage
ni la relève. Utilisez un gant de four lorsque vous retirez
le couvercle pour réduire le risque de brûlure par la
vapeur.
3.5.11. N’utilisez que des ustensiles anti-adhésifs pour
servir à partir du pot de cuisson car tous les ustensiles
en acier inoxydable ou similaires peuvent endommager
la surface antiadhésive de la cuvette intérieure.
3.6 Une fois que vous avez terminé l’utilisation de
l’appareil:
3.6.1. Laissez l’appareil refroidir.
3.6.2. Débranchez l’appareil de l’alimentation secteur.
3.6.3. Nettoyez l’appareil comme décrit dans la section
de nettoyage.
4. Nettoyage
4.1. Débranchez l’appareil de l’alimentation secteur et
laissez-le refroidir complètement avant d’entreprendre
une tâche de nettoyage.
4.2. Retirez le récipient de récupération d’eau de
l’appareil et lavez-les sous l’eau tiède avec un déter-
gent doux, puis rincez et séchez complètement avant
de l’attacher à l’unité.

4.3. REMARQUE: Il est conseillé de vérifier que la sou-
pape de purge de vapeur et la soupape flottante sont
en bon état de fonctionnement et exemptes de débris
après chaque utilisation. Vérifiez toujours la soupape
de décharge de vapeur, la soupape à flotteur et le bou-
clier antiblocage pour colmatage avant utilisation.
5. Anomalies et réparation
5.1. Amenez l’appareil dans un centre d’assistance
autorisé si le produit est endommagé ou d’autres
problèmes apparaissent.
5.2. Si la connexion au secteur a été endommagée,
elle doit être remplacée et vous devez procéder comme
vous le feriez en cas de dommage.
4.3. Nettoyez les parties extérieures de l’appareil avec
un chiffon humide avec quelques gouttes de liquide
vaisselle puis séchez.
MISE EN GARDE! Ne pas immerger les pièces élec-
triques de l’appareil dans un liquide quelconque.
4.4. Utilisez de l’eau et un chiffon humide pour nettoyer
le couvercle de cuisson, assurez-vous que toutes les
parties du couvercle sont complètement séchées avant
de les ranger ou de les réutiliser.
4.5. Nettoyez le pot anti-adhésif avec de l’eau tiède
et un détergent doux, utilisez un chiffon doux pour
le nettoyer, n’utilisez pas de matériaux abrasifs pour
nettoyer le pot car il risquera de ranger le revêtement
antiadhésif. Assurez-vous que le pot est complètement
sec avant de le ranger ou de le réutiliser.
4.6. N’utilisez pas de solvants ou de produits avec pH
ou a base acide ou de base tel que l’eau de javel ou
des produits abrasifs pour nettoyer l’appareil.
4.7. Ne jamais immerger l’appareil dans de l’eau ou
tout autre liquide ou le placer sous l’eau courante.

Estimado cliente,
Obrigado por escolher comprar um produto da marca
Mellerware. Graças à sua tecnologia, design e opera-
ção e ao facto de exceder os padrões de qualidade
mais rigorosos, pode ser assegurado um uso total-
mente satisfatório e uma longa vida útil do produto.
1. Descrição das Peças
1. Alça
2. Tampa
3. Punho de liberação do vapor
4. Válvula flutuante
5. Válvula de ventilação do vapor
6. Parafuso auto
7. Pote interior
8. Exterier pote
9. Cobertura externa
10. Painel de controle
11. Painel LED
12. Recipiente de recolha de água
13. Pegas de toque frescas
14. Corpo acentuado em aço inoxidável
15. Base inferior
16. Cabo de alimentação removível
17. Copo de medição
18. Colher de Medição
19. dentro da tampa
20. Vedação da tampa
21. Anilha de vedação
Tempo de atraso
Manter quente / cancelar
Arroz
Carne
Feijões
Sopa
Frango
Legume
Ajustar o tempo
1
3
5
4
6
2
7
20
19
21
5
12
13
14
15
16
17
18
11
10
9
8
13
4
21

2. Conselhos e avisos de segurança!
Leia atentamente estas instruções antes de ligar o
aparelho e guarde - as para referência futura. A falha
em seguir e observar estas instruções pode levar a
um acidente. Limpe todas as peças do produto que
estarão em contato com os alimentos, conforme
indicado na seção de limpeza, antes de usar.
2,1. Utilização ou ambiente de trabalho:
2.1.1. Mantenha a área de trabalho limpa e bem
iluminada. As áreas obstruídas e escuras convidam
acidentes.
2.1.2. Utilize o aparelho numa área bem ventilada.
2.1.3. Não coloque o aparelho sobre superfícies quen-
tes, tais como placas de cozinhar, queimadores a gás,
fornos ou artigos semelhantes.
2.1.4. Mantenha as crianças e os espectadores afasta-
dos quando utilizar este aparelho.
2.1.5. Coloque o aparelho numa superfície horizontal,
plana e estável, adequada para suportar altas temper-
aturas e longe de outras fontes de calor e contacto
com a água.
2.1.6. Mantenha o aparelho afastado de materiais
inflamáveis, como têxteis, cortinas, papelão ou papel,
etc.
2.1.7. Não coloque material inflamável perto do
aparelho.
2.1.8. Não utilize o aparelho em associação com um
programador, temporizador ou outro dispositivo que o
ligue automaticamente.
2.1.9. Não utilize o aparelho se o cabo ou a ficha
estiverem danificados.
2.1.10. Certifique-se de que a tensão indicada na
etiqueta de identificação corresponde à tensão da rede
antes de ligar o aparelho.
2.2.11. Ligue o aparelho à alimentação eléctrica com
uma tomada de terra com um mínimo de 10 amperes.
2.1.12. A ficha do aparelho deve encaixar-se correcta-
mente na tomada de alimentação. Não altere a ficha.
2.1.13. Se estiver usando um multi plug verificar
avaliações cuidadosamente como a corrente utilizada
por vários aparelhos poderia facilmente exceder a clas-
sificação do multi plug.
2.1.14. Se qualquer um dos invólucros do aparelho
quebrar, desligue imediatamente o aparelho da cor-
rente eléctrica para evitar a possibilidade de choque
eléctrico.
2.1.15. Não utilize o aparelho se cair no chão ou se
houver sinais visíveis de danos.
2.1.16. Não force o cabo de alimentação. Nunca utilize
o cabo de alimentação para levantar, transportar ou
desligar o aparelho.
2.1.17. Não enrole o cabo de alimentação ao redor do
aparelho.
2.1.18. Não prenda nem dobre o cabo de alimentação.
2.1.19. Não permita que o cabo de alimentação fique
pendurado ou entre em contacto com as superfícies
quentes do aparelho.
2.1.20. Verifique o estado do cabo de alimentação.
Cabos danificados ou emaranhados aumentam o risco
de choque elétrico.
2.1.21. O aparelho não é adequado para utilização no
exterior.
2.1.22. O cabo de alimentação deve ser examinado
regularmente quanto a sinais de danos e, se o cabo
estiver danificado, o aparelho não deve ser utilizado.
2.1.23. Não toque na ficha com as mãos molhadas.
2.2. Segurança pessoal:
2.2.1. CUIDADO: Não deixe o aparelho sem vigilância
durante o uso, pois existe o risco de acidente.
2.2.2. Não toque nas partes aquecidas do aparelho,
pois pode provocar queimaduras graves.
2.2.3. Este aparelho é apenas para uso doméstico, não
para uso industrial ou profissional. Não se destina a
ser utilizado por hóspedes em ambientes de hospi-
talidade, tais como bed and breakfast, hotéis, motéis
e outros tipos de ambientes residenciais, mesmo em
casas de fazenda, áreas do pessoal de cozinha em
lojas, escritórios e outros ambientes de trabalho.
2.2.4. Este aparelho não deve ser utilizado por pessoas
(incluindo crianças) com capacidades físicas, sensori-
ais ou mentais reduzidas, ou com falta de experiência e
conhecimento, a não ser que tenham recebido super-
visão ou instruções sobre a utilização do aparelho por
uma pessoa responsável por segurança.
2.2.5. Este aparelho não é um brinquedo. As crianças
devem ser supervisionadas para garantir que não
brincam com o aparelho.
2.3. Uso e cuidados:
2.3.1. Desenrolar completamente o cabo de alimenta-
ção do aparelho antes de cada utilização.
2.3.2. Não utilize o aparelho se as peças ou acessórios
não estiverem correctamente montados.
2.3.3. Não utilize o aparelho quando estiver vazio.
2.3.4. Não ligue o aparelho enquanto estiver a ser
utilizado ou ligado à rede eléctrica.
2.3.5. Não cubra a superfície de cozedura ou alimentos
com folha de alumínio e outros materiais semelhantes.
2.3.6. Desconecte o aparelho da rede de alimentação
quando não estiver em uso e antes de realizar qualquer
tarefa de limpeza.
2.3.7. Este aparelho deve ser guardado fora do alcance

das crianças.
2.3.8. Não guarde o aparelho se ainda estiver quente.
2.3.9. Nunca deixe o aparelho sem vigilância quando
estiver a ser utilizado e mantenha-os fora do alcance
das crianças.
2.3.10. Se, por algum motivo, o aparelho se incendiar,
desligue o aparelho da rede e NÃO USE ÁGUA PARA
DESLIGAR.
2.4. Serviço:
2.4.1. Certifique-se de que o aparelho é reparado
apenas por um técnico devidamente qualificado e que
apenas peças sobresselentes ou acessórios originais
são utilizados para substituir peças / acessórios
existentes.
2.4.2. Se o cabo de alimentação estiver danificado, o
fabricante ou o seu agente de assistência ou uma pes-
soa com qualificações semelhantes devem substituí-lo
para evitar um perigo.
2.4.3. Qualquer mau uso ou falha em seguir as
instruções de uso torna a garantia e a responsabilidade
do fabricante nula e sem efeito.
3. Instruções de utilização
3.1. Antes de usar:
3.1.1. Remova a película protetora do aparelho (se
possível).
3.1.2. Antes de utilizar o produto pela primeira vez,
limpe as peças que entrarão em contacto com os
alimentos da forma descrita na secção de limpeza.
3.1.3. Conecte o recipiente de coleta de água à válvula,
basta deslizar para o lugar (consulte o diagrama), o
recipiente de coleta de água irá coletar qualquer líquido
de acesso gerado pelo vapor.
3.2. Uso e cuidados
:
3.2.1. Desenrole completamente o cabo de alimenta-
ção antes de ligá-lo.
3.2.2. Coloque o aparelho sobre uma superfície plana,
seca e estável.
3.2.3. Conecte o cabo de alimentação firmemente
à panela de pressão para evitar arcos e falhas da
unidade.
3.2.4. Ligar o aparelho à alimentação eléctrica
.
3.3 Branqueamento / Vedação:
3.3.1. Antes de cozinhar a carne na panela de pressão
Juno, é importante que a carne seja selada / dourada
primeiro.
3.2.2. Cozinhe a carne ligeiramente em uma frigideira
ou panela com um pouco de óleo antes de iniciar o
processo de cozimento a pressão (certifique-se de que
a carne está apenas ligeiramente dourada no exterior e
ainda cru por dentro).
3.4 Utilização:
3.4.1. Retire a panela, adicione os ingredientes (a
carne é envelhecida previamente e água, nunca encha
a panela para mais de 80% da sua capacidade.
3.4.2. Insira a panela no aparelho assegurando que a
superfície externa da panela esteja seca e limpa.
3.4.3. Vire a panela ligeiramente dentro do aparelho
para assegurar um contacto uniforme com a placa de
cozedura.
3.4.4. Em seguida, fixe a tampa no aparelho e feche-a
da seguinte forma:
uma. Verifique se o anel de vedação está correcta-
mente colocado na tampa.
B. Coloque a tampa no aparelho na posição “aberta”
e rode a tampa no sentido anti-horário para a posição
“Selada”. Certifique-se de que a tampa está bem
fechada.
3.4.5. Uma vez que a tampa esteja fechada, use o
“select- dial dial” para escolher o tipo de alimento que
você está cozinhando.
NB: Por favor, note que todos os tempos de cozi-
mento são apenas uma orientação.
3.4.6. A panela de pressão levará alguns minutos para
acumular pressão; Uma vez que a pressão necessária
é atingida o tempo começará a contar para baixo.
3.4.7. O tempo de cozedura é indicado com um “P”
seguido pelo tempo de cozimento restante. “P.15” para
frango.
3.4.8. O tempo de cozedura é ajustável em incremen-
tos de 1 min entre 3 - 60 minutos, dependendo da
função selecionada.
OBSERVE:
Durante o uso inicial, você pode notar um ligeiro odor
devido à queima de resíduos de fabricação. Isso é
completamente normal, não afeta a comida sendo
Função
predefinida
Tempo de cozi-
mento predefinido
Regulável
Min Max
Sopa 25min 10min 40min
Frango 15min 12min 30min
Vegetal 8min 5min 15min
Feijões 30min 10min 50min
Carne 20min 10min 30min
Arroz 12min 8min 18min

cozida e desaparecerá após alguns usos.
NOTA:
Certifique-se de que a válvula de liberação de vapor
está na posição “selada” antes do aparelho iniciar o
processo de cozimento, caso contrário a unidade não
será capaz de aumentar a pressão.
3.5 Tempo de Retardo:
3.5.1. A panela de pressão Juno tem um temporizador
de atraso que você pode definir, para começar a coz-
inhar em uma fase posterior. Este recurso é opcional.
Defina o temporizador depois de ter seleccionado
a função de cozedura desejada. O temporizador de
atraso pode ser ajustado em incrementos de 30 minu-
tos. O tempo máximo de atraso é de 24 horas.
3.5.2. Pressione o botão temporizador de retardo uma
vez por cada 30 minutos para atrasar o processo de
cozimento. Por exemplo, para definir um tempo de
atraso de 90 minutos, pressione o botão três vezes. O
tempo de atraso será exibido na tela.
3.5.3. Por favor, note que uma vez que o tempo de
cozimento tenha contado para baixo, o tempo não
pode ser ajustado. Se for necessário mais ou menos
tempo de cozedura, o processo de cozedura deve ser
cancelado eo tempo deve ser reposto para o tempo
desejado / desejado.
3.5.4. Durante a configuração ou durante a cozedura, o
botão “Manter quente / cancelar” pode ser pressionado
para cancelar a cozedura.
3.5.5. Depois de cozinhar, a unidade entrará automati-
camente no modo “Keep Warm” e as letras “bb” serão
exibidas na tela. O botão “Manter quente / Cancelar”
pode ser pressionado para cancelar o modo de manter
quente.
3.5.6. Quando a unidade tiver concluído o ciclo de
cozedura ou se o visor LCD tiver sido desligado antes
de abrir e retirar a tampa, rode a válvula de libertação
de pressão para a posição de “ventilação” conforme
indicado pela etiqueta na tampa. Certifique-se de que
seu rosto e as mãos estão longe da abertura da válvula
de liberação de pressão para garantir que você não
ficar queimado ou ferido; O vapor é muito quente,
portanto, extrema cautela deve ser exercida quando o
vapor está sendo liberado.
3.5.7. Quando cozinhar alimentos líquidos, tais como
sopa ou por- ridge aguardar a unidade para arrefecer
antes da pressão é liberada.
3.5.8. Desligue o aparelho na tomada de parede e retire
a ficha da tomada.
3.5.9. Uma vez que toda a pressão tenha sido libertada
e o plugue tenha sido removido da tomada de parede
e não haja mais qualquer vapor que escapa da válvula
de libertação de pressão, a tampa pode ser rodada
no sentido dos ponteiros do relógio para ser desblo-
queada.
3.5.10. Ao remover a tampa, remova-a de tal forma
que o vapor seja dirigido para longe de você. Faça isso
permitindo que o topo da tampa para enfrentar sua
direção, o vapor irá deflectir contra a superfície interna
da tampa. Certifique-se de que você está posicionado
para o lado da unidade sem o rosto ou as mãos sobre
ele. Use uma luva de forno ao remover a tampa para
reduzir a chance de ser queimado pelo vapor.
3.5.11. Utilize apenas utensílios não-stick para servir a
partir da panela de cozinha, como qualquer utensílios
duros feitos de aço inoxidável ou materiais semel-
hantes pode danificar a superfície antiaderente da
panela interna.
3.6 Depois de terminar de usar o aparelho:
3.6.1. Deixe o aparelho arrefecer.
3.6.2. Desligue o aparelho da rede eléctrica.
3.6.3. Limpe o aparelho conforme descrito na secção
de limpeza.
4. Limpeza
4.1. Desligue o aparelho da rede de alimentação e
deixe-o arrefecer completamente antes de realizar
qualquer tarefa de limpeza.
4.2. Retire o recipiente de recolha de água da unidade
e lave com água morna com um detergente suave,
em seguida, enxágüe e secar completamente antes de
ligá-lo à unidade.
4.3. Limpe as partes exteriores do aparelho com um
pano húmido com algumas gotas de detergente e
depois seque. CUIDADO! Não mergulhe as partes
eléctricas do aparelho em qualquer líquido.
4.4. Use água e um pano úmido para limpar a tampa
do fogão, certifique-se de que todas as partes da
tampa são completamente secas antes de armazenar
ou reutilizar.
4.5. Limpe a panela antiaderente com água morna e
um detergente suave, use um pano macio para limpá-
lo, não use qualquer material abrasivo para limpar o
pote, pois ele vai arranhar o revestimento antiaderente.
Certifique-se de que o pote está completamente seco
antes de armazená-lo ou reutilizá-lo.
4.6. Não utilize solventes, nem produtos com pH ácido
ou básico, tais como lixívia ou produtos abrasivos,
para a limpeza do aparelho.
4,67. Nunca submergir o aparelho em água ou qual-
quer outro líquido ou colocá - lo sob água corrente.

4.8. NOTA: É recomendável que você verifique se o
vapor válvula de ventilação e válvula flutuante estão em
boas condições de funcionamento e livre de detritos
após cada uso. Sempre verifique o válvula de liberação
de vapor, válvula de bóia e blindagem antibloqueio para
entupir antes de usar.
5. Anomalias e reparos
5.1. Leve o aparelho a um centro de assistência
autorizado caso o produto esteja danificado ou surjam
outros problemas.
5.2. Se a conexão à rede elétrica tiver sido danificada,
ela deve ser substituída e você deve proceder como
faria em caso de danos.

3
Beef stock recipe
3
Beef Stroganoff
4
Chicken paprika
4
Chicken Stock
5
Fish Stock
5
Vegetable Stock
6
Potato, Leek and Pea Soup (V)
6
French Onion Soup
7
French-Canadian Split Pea Soup
7
Chickpea and Spinach Soup (V)
8
Spiced Italian Chicken Soup
8
Moroccan Lentil Soup (V)
9
Greek Tomato Soup
9
Humus (V)
10
Tomato Pasta Sauce
10
Fresh Vegetable Mélange
11
Potato and Green Bean Casserole
11
Country Style Potatoes
12
Aaloo Mutter
12
Wild Mushroom Risotto
13
Risotto with Peas
13
Beef Stew (Sweet)
14
Lemony Garlic Lamb Stew
14
Spicy South of the Border Chilli
15
Suggeste Beef Stroganof
15
Hungarian Goulash
16
Easy Beef Pot Roast
16
Stuffed Cabbage Hungarian Style
17
Jambalaya
17
Beef Bourguignon
18
Herbed Pork Roast
18
Pork Chop and Potato Casserole
19
Chicken Bouillabaisse
19
Chicken Salad
20
Chicken and Rice
20
Chicken Curry
21
Lemon Chicken
21
Chicken Cacciatore (Boneless)
22
Herb “Roasted” Chicken
22
Chicken in Casserole
23
Coq Au Vin
23
Mandarin Chicken
24
Spicy Chicken with Noodles
24
Chicken Fajitas with a Scotish Twist
25
Cinnamon-Flavoured Stewed Fruits

Beef stock recipe: Makes about
6 cups.
• 1 tablespoon (15 ml) olive oil
• 900 g stewing beef, such as shanks, cut in 25
mm cubes
• 450 g beef bones
• 8 cups water
• 1 medium onion, coarsely chopped
• 1 large carrot, scraped and coarsely chopped
• 1 bay leaf
• Salt to taste
• 6 peppercorns or 1/4 teaspoon
ground black pepper
• 1 celery stalk, coarsely chopped
• 2 sprigs parsley
• 1/2 teaspoon thyme
Directions:
Brown the meat in a little oil in a pot or frying pan
(the meat should still be raw in the middle).Remove
and place on a platter. Drain off any excess fat. Add
the meat and remaining ingredients to the Mellerware
pressure cooker. Lock the lid in place, select soup
setting and adjust time (see below). When cooking
is complete, remove the lid and strain by pouring it
through a strainer which has been lined with a couple
of layers of damp cheesecloth. Press with the back of
a wooden spoon to extract as much liquid as possible.
Cool, then refrigerate overnight and remove any
congealed fat that has collected on the surface.
Suggested time: 40 minutes
Suggested setting: soup
Beef Stroganoff
Serves 4
• 900 g beef stew meat or round
steak, cut into 25 mm cubes
• 3 tablespoons vegetable oil
• 2 tablespoons flour
• 1 large onion, chopped
• 1 teaspoon garlic
• 1 cup beef broth
• 125 g fresh mushrooms, sliced
• 2 tablespoons tomato paste
• 1 tablespoon Worcestershire sauce
• 1 cup sour cream
• Salt and pepper to taste
• 1 package egg noodles, cooked
Directions:
Brown the meat in a little oil in a pot or frying
pan (the meat should still be raw in the middle).
Add the contents of the pot and the flour to the
Mellerware pressure cooker and mix well. Stir in
onion, garlic powder, mushrooms, tomato paste, and
Worcestershire sauce. Blend thoroughly. Lock the lid
in place and select the correct setting and adjust time
(see below). Once cooked, release pressure and open
lid. Stir in sour cream and blend well. Serve over hot
egg noodles.
Suggested time: 25 minutes
Suggested setting: meat

Chicken paprika
Serves 4
• 1 tablespoon olive oil
• 1.3-1.6 kg chicken, cut in serving pieces
• Salt and freshly ground pepper
• 1/2 teaspoon paprika
• 1/2 teaspoon marjoram
• 1/2 cup duck sauce
• 1/4 cup white wine
• 1/4 cup chicken stock
Directions:
Brown the chicken lightly in hot oil in a pot or frying
pan before starting the cooking process (the meat
should still be raw in the middle). Remove chicken
and reserve on a warm platter. Sprinkle with salt,
pepper, paprika and marjoram. Add the chicken to the
Mellerware pressure cooker, mix in the wine and stock.
Arrange the chicken on top. Brush with duck sauce.
Lock the lid in place and select the correct setting and
adjust cooking time (see below). Once cooked, release
pressure by opening the pressure valve and remove
lid. Remove the chicken to a warm platter and serve,
spooning sauce over the chicken.
Suggested time: 12 minutes
Suggested setting: chicken
Chicken Stock
Makes about 6 cups
• 900 g chicken parts, primarily backs, but also
including gizzards, necks, hearts and wings
• 1 medium onion, peeled and halved
• 1 celery stalk, cut into several pieces
• 1 large carrot, scraped and cut into several pieces
• 2 sprigs parsley
• 1/4 teaspoon ground black pepper
• 1 teaspoon thyme
• 2 bay leaves
• Salt to taste
• 6 cups water
Directions:
Combine all ingredients in the Mellerware pressure
cooker. Lock the lid in place and adjust to suggested
setting and time. Once cooked release pressure by
opening the pressure valve, remove the lid and strain
by pouring it through a strainer which has been lined
with a couple of layers of damp cheesecloth, damp
kitchen towel or damp paper towels. Press with the
back of a wooden spoon to extract as much liquid as
possible. Cool, then refrigerate overnight and remove
any congealed fat that has collected on the surface.
Suggested time: 30 minutes
Suggested setting: soup

Fish Stock
Makes about 6 cups
• 900 g fish and shellfish meat, bones, heads and
shells
• 1 celery stalk, cut into several pieces
• 1 carrot, scraped and cut into several pieces
• 1 bay leaf
• 1 teaspoon thyme
• 4 peppercorns
• 2 sprigs parsley
• 1 onion, peeled and sliced
• Salt to taste
• 6 cups water
Directions:
Combine all ingredients in the Mellerware pressure
cooker. Lock the lid in place and set to suggested
setting and adjust time (see below). Once finished
release pressure by opening the pressure valve,
remove the lid. Cool, then strain, and refrigerate or
freeze until ready to use.
Suggested time: 25 minutes
Suggested setting: soup
Vegetable Stock
Makes about 6 cups
• 8 cups boiling water
• 8 cups miscellaneous vegetables (see alongside),
washed and coarsely
chopped
• 2 medium onions, peeled and quartered
• 1 to 2 garlic cloves, chopped
• 3 carrots, cut into chunks
• 4 celery ribs, cut into chunks
• 1 to 2 parsnips, cut into chunks
• 2 bay leaves
• 3 to 4 sprigs parsley
• 2 sprigs of fresh thyme or oregano
• Salt to taste
Directions:
Add boiling water to the Mellerware pressure cooker.
Add all the ingredients, except salt. Lock the lid in place
and set to suggested setting and adjust time. Once
finished release pressure by opening pressure valve
and remove the lid. Allow the stock to cool slightly,
then strain, pressing the vegetables against the sides
of the strainer to extract all of the liquid. Add salt if
desired. Cool and refrigerate for up to 3 days, or freeze
for up to 3 months. Suggested vegetables for stock:
asparagus stalks, broccoli stalks, baby marrows, corn
cobs, celery, parsnip, carrot, leek greens, peeled winter
squash, peeled turnips, potatoes, sweet potatoes.
Note: skins of potatoes, parsnip. carrots, onion,
garlic may be included. Avoid using: turnip skins,
waxed squash peels, cabbage, brussel sprouts, green
peppers, eggplant and collards.
Suggested time: 10 minutes
Suggested setting: soup
Potato, Leek and Pea Soup (V)
Serves 4
• 2 tablespoons canola or olive oil
• 1 medium onion, finely chopped
• 4 leeks, well washed and finely chopped
• 500g potatoes, cubed
• 1 cup peas
• 2 tablespoons minced parsley
• 1 cup milk
• 4 cups chicken or vegetable stock
or water
• Salt and pepper to taste
• Croutons (optional)
Directions:
Sauté leeks and onions in oil in a pot or frying pan
until softened and add to the pressure cooker. Now
add potatoes, peas and parsley. Stir in the milk and
stock and season with salt and pepper. Lock the lid
in place and set to suggested setting and adjust time.
Allow pressure to drop by releasing the pressure
valve, remove the lid and allow to cool slightly. Place
ingredients into a blender or food processor. Puree until
smooth. Serve hot or cold, sprinkled with croutons.
Suggested time: 10 minutes
Suggested setting: soup

French Onion Soup
Makes about 6 cups
• 5 medium onions, thinly sliced
• 2 tablespoons (30 ml) dry white wine
• 4 tablespoons (60 ml) butter
• 6 cups (1.4 l) beef or chicken stock, or a mixture of
both
• 1/4 teaspoons (1 ml) freshly ground pepper or 1
tablespoon (15 ml) dry sherry
• 6 slices French or Italian bread, lightly toasted
• 1/2 cup (125 ml) grated parmesan cheese
Directions:
Melt the butter in a pot, add the onion slices and
cook very slowly for about 20 minutes until golden.
Add the pot’s contents, stock, pepper and wine to
the Mellerware pressure cooker. Lock the lid in place
and set to the suggested setting and adjust time
(see below). Allow pressure to drop by releasing
the pressure valve, and remove the lid. Serve in
soup bowls with a slice of toasted bread on top and
sprinkled with cheese.
Suggested time: 15 minutes
Suggested setting: soup
French-Canadian Split Pea Soup -
Serves 4-6
• 450g yellow split peas
• 225g smoked pork hock
• 3 medium carrots, diced
• 1/4 teaspoon (1 ml) thyme
• 1/4 teaspoon (1 ml) basil
• 1/4 teaspoon (1 ml) oregano
• 1 large potato, peeled and diced
• 1 stalk celery, finely chopped
• Salt and pepper to taste
• 6 cups (1.4 l) water
Directions:
Add all the ingredients (except the salt and pepper) and
6 cups (1.4 l) of water into the Mellerware pressure
cooker. Lock the lid in place and set suggested setting
and adjust time. When cooking is complete, allow
pressure to drop by releasing the pressure valve, then
remove the lid. Remove pork hock from the soup.
Remove the meat from the bone, cut into chunks and
return the meat to the soup. Remove the bay leaf.
Season with salt and pepper.
Suggested time: 40 minutes
Suggested setting: soup
Chickpea and Spinach Soup (V) -
Serves 6
• 2 cups (500 ml) (about 450 g) dried chickpeas
• 2 medium potatoes, quartered
• 3 large cloves garlic
• 2 medium onions, quartered
• 225g spinach
• Water or chicken or vegetable stock
• 1/4 cup (60 ml) canola or olive oil
• Salt and pepper to taste
Directions:
Soak chickpeas in
water for at least four hours (or start soaking before
work in the morning so they are ready by the evening).
After soaking, dispose the soaking water and rinse
chickpeas. Place chickpeas in the Mellerware pressure
cooker. Add potatoes, garlic cloves and onions. Add
water or stock. Lock the lid in place and select the
suggested setting and adjust time. Allow pressure to
drop by releasing the pressure valve and remove the
lid. Scoop out about 1 1/2 cups (350 ml) of chickpeas
and set aside. Using a blender or potato masher, blend
the soup until you have a creamy puree. Add more
liquid if necessary. Add spinach and the oil. Lock the
lid in place and cook for an additional 5 minutes.
Suggested time: 15 minutes
Suggested setting: soup
Spiced Italian Chicken Soup
Serves 6-8
• 225g Italian sausage, casing removed, crumbled
• 3/4 cup (175 ml) diced onion
• 1/2 cup (125 ml) pearl barley
• 3 cloves garlic
• 12 cups (2.8 l) chicken stock
• 1 chicken breast, split with bone
• 1/2 cup (125 ml) parsley, chopped
• 2 cups (500 ml) chickpeas, including juice
• 225 to 450g fresh or frozen spinach
• 1 cup (250 ml) mild to medium salsa
• 2 tablespoons (30 ml) canola or olive oil
• 1 cup (250 ml) lentils
Directions:
Place 1 tablespoon (15 ml) canola or olive oil in a pot.
Cook sausage, drain, and set aside. Add 1 tablespoon
(15 ml) canola or olive oil to a pot and sauté onion and
garlic. Do not brown. Add barley to the pot and mix
for 1 minute. Add contents of pot, browned sausage,
lentils, chicken breast and barley to the Mellerware

pressure cooker. Then add enough chicken stock to
cover ingredients in the Mellerware pressure cooker.
Lock the lid in place and set to the suggested setting
and adjust time. Release pressure by adjusting
release valve. Open the Mellerware pressure cooker.
Remove chicken, shred meat and return to cooker. Add
remaining chicken stock, beans, spinach and salsa to
soup mixture and heat for 10 min.
Suggested time: 10 min
Suggested setting: soup
Moroccan Lentil Soup (V)
Serves 4
• 2/3 cup (150 ml) brown lentils, washed
• 2 teaspoons (10 ml) olive oil
• 1 medium onion, chopped
• 3 garlic cloves, minced
• 1 bell pepper, chopped
• 1 tomato, chopped
• 2 carrots, chopped
• 1 teaspoon (5 ml) ginger
• 1/2 teaspoon (2 ml) ground cumin
• 1/2 teaspoon (2 ml) ground coriander
• 1/2 teaspoon (2 ml) pepper
• 1/2 teaspoon (2 ml) cinnamon
• 1/2 teaspoon (2 ml) pepper flakes or chili powder
• salt and pepper, to taste
• lime juice
Directions:
Heat the oil in a pot or frying pan and sauté the onion
and garlic for a minute (onion should be soft but not
brown). Add the spices and sauté for another minute.
Add the contents of the pot to the Mellerware pressure
cooker. Add the bell pepper, carrot, tomato and lentils.
Add enough water to completely cover the lentils. Lock
the lid in place and set to the suggested setting and
adjust time (see below). Once cooked, allow pressure
to drop by releasing the pressure valve and remove
the lid. Add salt as necessary. Serve in bowls, with a
squeeze of lime juice on top, and bread on the side.
Suggested time: 10 min
Setting: soup
Greek Tomato Soup
Serves 4
• 900g piece of beef suitable for soup, such as chuck
• 2 beef knuckle bones
• 4 cups (1 l) water
• Salt and freshly ground pepper, to
taste
• 3 cups (750 ml) crushed tomatoes
• 1 celery stalk
• 2 large carrots, peeled
• 1 leek, very well washed
• 2 sprigs parsley
• 4 very small red waxy potatoes, well-scrubbed with
skin still on
• 2 cups (about150g) very fine noodles
• Grated parmesan cheese
Directions:
Place the beef (in one piece) and the beef bones in
the Mellerware pressure cooker. Pour in the water,
season with salt and pepper. Lock the lid in place and
set to suggested setting and adjust time. Once cooked,
allow pressure to drop by releasing the pressure valve
and remove the lid. Add all the remaining ingredients
except the noodles and cheese (remove the bones if the
Mellerware pressure cooker is too full). Lock the lid in
place and then cook for an additional10 minutes. Allow
pressure to drop by releasing the pressure valve and
remove the lid. Meanwhile, bring salted water to a boil
in a pot. Add the noodles. Cook briefly until done. Drain
and reserve.Transfer the meat, potatoes, carrots, leek and
celery from the Mellerware pressure cooker onto a warm
platter. Discard the bones. Strain the remaining liquid,
pressing with the back of a wooden spoon to extract as
much liquid as possible. Discard what remains in a sieve.
Mix the noodles into the soup and served with grated
cheese. In individual dishes, arrange portions of the meat
and vegetables, and serve at the same time as the soup.
A hearty mustard is excellent for the meat and vegetables.
Suggested time: 10+10 minutes
Suggested setting: soup
Humus (V
)
• 3/4 cup (175 ml) dried chickpeas
• 1/3 cup (75 ml) canola oil
• 1/3 cup (75 ml) extra virgin olive oil
• 1/3 cup (75 ml) tahini
• 1/3 cup (75 ml) water
• 4 tablespoons (60 ml) lemon juice
• 2 garlic cloves, minced
• 1/2 teaspoon (2.5 ml) cumin
• Salt to taste

Directions:
Soak chickpeas in water for at least four hours (or
start soaking before work in the morning so they are
ready by the evening). After soaking, dispose the
soaking water and rinse chickpeas. Place the soaked
chickpeas in the Mellerware pressure cooker with 3
1/2 cups (825 ml) of water. Lock the lid set to the
suggested setting and adjust time. Once cooked allow
the pressure to drop by releasing the pressure valve. In
a blender, mix cooked chickpeas and other ingredients.
Blend until creamy.
Suggested time: 15 minutes
Tomato Pasta Sauce
• 3 tablespoons (45 ml) canola oil
• 1/2 cup (125 ml) onion, finely chopped
• 3/4 cup (175 ml) carrot, finely chopped
• 3/4 cup (175 ml) celery, finely chopped
• 2 garlic cloves, minced
• 800 ml crushed canned tomatoes
• 1/4 cup (60 ml) tomato paste
• 3 teaspoons (15 ml) dried basil
• 2 teaspoons (10 ml) dried oregano
• 1 teaspoon (5 ml) dried parsley
• 1 or 2 bay leaves
• 1/4 cup (60 ml) dry red or white wine
• 1/2 cup (125 ml) water
• Salt and freshly ground pepper, to taste
Directions:
Heat the oil in a pot and sauté the onion, carrot, celery
and garlic until soft. (If you prefer a meat sauce, add
225 grams ground beef to the sautéed vegetables and
cook until it loses its colour). Then add the tomatoes
and all other ingredients.Lock the lid in place and set
to the suggested setting and adjust time (see below).
Once cooked, allow pressure to drop by releasing the
pressure valve and remove the lid. Reduce the sauce if
it is not thick enough.
Suggested time: 10 minutes
Suggested setting: soup
Fresh Vegetable Mélange
Serves 4
• 1 medium onion, chopped
• 1/2 cup (125 ml) canola oil
• 3/4 cup (175 ml) red split lentils
• 1 garlic clove, chopped
• 1/4 cup (60 ml) parsley, diced in small pieces
• 1/4 cup (60 ml) fresh dill, diced in small pieces or 1
teaspoon (5 ml) dried dill
• 1 teaspoon (5 ml) fresh chopped basil
• 1 cup (250 ml) chicken or vegetable stock
• 3 large tomatoes, cut in small chunks, seeds
removed
• 2 x courgettes, cut in large chunks
• 4 medium potatoes, skinned, cut in 10 mm slices
• 2 large carrots, cut in 10 mm slices
• 1 green pepper, seeds removed, cut in 5 ml slices
• 3 stalks celery, cut in 5 mm slices
• 2 cups (500 ml) frozen peas, thawed
• Salt and pepper to taste
Directions:
Sauté onion in hot oil in a pot or frying pan for 2
minutes. Stir in garlic, parsley and dill and cook for
1 minute. Stir in stock, red split lentils, vegetables
and salt and pepper. Add contents of pot or frying
pan to the Mellerware pressure cooker, lock the lid in
place and set to suggested setting and adjust time.
Once cooked allow pressure to drop by releasing the
pressure valve and remove the lid. Stir vegetables and
drain any excess liquid.
Suggested time: 10 minutes
Suggested setting: Soup
Potato and Green Bean Casserole -
Serves 4
• 3 potatoes, peeled and cut in 25 mm cubes
• 350g green beans
• 1 tablespoon (15 ml) olive oil
• 1 medium onion, minced
• 1 garlic clove, minced
• 1 green pepper, diced
• 1 tablespoon (15 ml) minced parsley
• Salt and freshly ground pepper
• 1/2 cup (125 ml) chicken stock

Directions:
In the Mellerware pressure cooker, mix together all the
ingredients. Lock the lid in place set to the suggested
setting and adjust time. Once cooked, allow pressure
to drop by releasing the pressure valve and remove the
lid.
Suggested time: 5 minutes
Suggested setting: soup
.
Country Style Potatoes
Serves 4
• 1 tablespoon (15 ml) olive oil
• Salt and freshly ground pepper, to taste
• 125g fresh mushrooms, stems
trimmed, sliced
• 1/2 cup (125 ml) onion, finely chopped
• 1/2 cup (125 ml) chicken stock or water
• 4 cups (1 l) potatoes in 10 mm slices
• 2 tablespoons (30 ml) minced parsley
Directions:
In a pot or frying pan, heat the oil and sauté the
mushrooms and onions until the onions are wilted. Add
the contents of the pot / frying pan to the Mellerware
pressure cooker and add the remaining ingredients.
Lock the lid in place and set to the suggested setting
and adjust time (see below). Once cooked allow
pressure to drop by releasing the pressure valve and
remove the lid.
Suggested time: 10 minutes
Suggested setting: soup
Aaloo Mutter
Serves 4-6
• 5-6 large potatoes, peeled and cut into 8-10 pieces
each
• 1 cup (250 ml) frozen peas
• 2 tablespoons (30 ml) canola oil
• 1 teaspoon (5 ml) cumin seeds
• 2 green chilies, slit
• 1 large onion, diced
• 2 large tomatoes, diced
• 1 teaspoon (5 ml) garlic paste
• 1 teaspoon (5 ml) ginger paste
• 2 teaspoons (10 ml) coriander powder
• 1 teaspoon (5 ml) cumin powder
• 1 teaspoon (5 ml) red chili powder
• 1/2 teaspoon (2 ml) turmeric powder
• 1 teaspoon (5 ml) dry mango powder
• Salt, to taste
• 1 teaspoon (5 ml) garam masala
• 2 tablespoons (30 ml) fresh coriander, finely
chopped
• 1/2 cup (125 ml) water
Directions:
Heat the oil in a pot or frying pan and add the cumin
seeds. Add the green chillies, and then a minute or
so later, add the onions. Sauté the onions until they
turn soft. Add the ginger and garlic paste, and sauté
for one minute. Add the tomatoes, coriander, cumin,
turmeric,chili powder, mango powder, and sauté
for one minute. Add the contents of the pot to the
Mellerware pressure cooker. Then add the potatoes,
peas and half a cup of water. Add salt to taste. Lock
the lid in place and set to the suggested setting and
adjust time (see below). Once cooked, allow pressure
to drop by releasing the pressure valve and remove the
lid. Sprinkle the garam masala over the dish
and cover for a few minutes. Garnish with coriander
leaves and serve (can be served with rice).
Suggested time: cook for 10 minutes
Suggested setting: soup
Wild Mushroom Risotto
• 225 g fresh mushrooms
• 2 cups (500 ml) Arborio rice
• 4 cups (1 l) chicken or vegetable stock
• 1/4 cup (60 ml) dry vermouth or cooking wine
• 2 tablespoons (30 ml) shallots
• 1/4 cup (60 ml) grated Parmesan cheese
• 3 tablespoons (45 ml) olive oil
• Salt and pepper to taste

Directions:
Coarsely chop mushrooms and shallots. In a pot
simmer shallots in hot olive oil for three minutes,
stirring often. Do not brown. Add mushrooms and
Arborio rice, and stir constantly for an additional
minute. Add stock and cooking wine; then stir. Add
contents of pot to the Mellerware pressure cooker, lock
the lid in place heat and set to the suggested setting
and adjust time. Once cooked allow pressure to drop
by releasing pressure valve and remove
the lid. Thoroughly stir, adding grated parmesan cheese
and salt and pepper, if desired.
Suggested time: 10 minutes
Suggested setting: soup
Risotto with Peas
• 2 tablespoons (30 ml) canola oil
• 1 small onion, finely chopped
• 1 cup (250 ml) Arborio rice or other short-grain rice
• 1 cup (250 ml) frozen peas (or other favourite
vegetables)*
• 2 1/4 cups (525 ml) chicken or vegetable stock
• 1/3 cup (75 ml) Parmesan cheese
• 1/8 teaspoon (0.5 ml) pepper
Directions:
In a pot, heat 2 tablespoons (30 ml) of oil over medium
heat. Sauté onion
for 4-5 minutes, until soft. Stir frequently so onion
does not brown. Add rice, and sauté until light brown.
Add peas and chicken or vegetable stock; stir well. Add
contents of pot to Mellerware pressure cooker, Lock
the lid in place and set to the suggested setting and
adjust time. Allow pressure to drop by releasing the
pressure valve and remove the lid. Stir in parmesan
cheese until it melts. Stir thoroughly and serve.
Suggested time: 10 minutes
Suggested setting: soup
*Hint: We recommend cooking the vegetables
separately and mixing them into the
risotto at the end.
Beef Stew (Sweet)
Serves 2
• 450 g stewing beef
• 2 tablespoons (30 ml) canola oil
• 1 large onion, minced
• 2 cloves garlic, minced
• 5 medium carrots, 15 mm pieces
• 1 large potato, 15 mm cubed
• 1 large parsnip, 25 mm pieces
• 2 cups (500 ml) frozen peas
• 1 sweet potato, 25 mm pieces
• 1/2 cup (125 ml) tomato sauce
• 1/2 cup (125 ml) dry red or white wine
• 2 bay leaves
• 1 teaspoon (5 ml) dried thyme
• 1 teaspoon (5 ml) Worchestershire sauce
• 1/2 cup (125 ml) water
• salt and pepper to taste
Directions:
Heat the oil in a pot and sauté the onion and garlic. Add
meat and brown well on all sides lifting meat frequently
with a long wooden spoon to prevent sticking—about
2 to 3 minutes per side. Add extra oil as needed. Add
the rest of ingredients and stir.Add contents of pot to
Mellerware pressure cooker and lock lid into place and
set to the suggested setting and adjust time. Allow
pressure to drop by releasing the pressure valve and
remove the lid. Stir while adding the frozen peas.
Suggested time: 30 minutes
Suggested setting: meat

Lemony Garlic Lamb Stew
Serves 4
• 2 tablespoons (30 ml) olive oil
• 1.4 kg lamb stew meat (with some bone) cut in 50
mm slices
• Salt and freshly ground pepper
• 3 garlic cloves
• 6 tablespoons (90 ml) freshly squeezed lemon juice
• 6 tablespoons (90 ml) chicken stock
Directions:
Heat the oil in a pot, add as much meat that will
comfortably fit at one time and brown well. Season
with salt and pepper, and stir in the garlic. Add the
lemon juice and stock. Add contents of the pot to the
Mellerware pressure cooker, lock lid into place and
set to suggested setting and adjust time (see below).
Once cooked, allow pressure to drop by releasing the
pressure valve and remove the lid. Serve with noodles
or other pasta sprinkled with grated cheese and a green
vegetable.
Suggested time: 20 minutes
Suggested setting: meat
Spicy South of the Border Chilli -
Serves 6
• 2 tablespoons (30 ml) olive oil
• 2 medium onions, chopped
• 3 garlic cloves, minced
• 700g ground beef
• 2 teaspoons (10 ml) ground cumin
• 2 tablespoons (30 ml) chili powder, or to taste
• 1 1/2 teaspoons (7.5 ml) oregano
• 1 bay leaf
• 2 teaspoons (10 ml) celery seed
• Salt to taste
• 1 tablespoon (15 ml) flour
• 1 1/2 cups (375 ml) crushed tomato
• 1 cup (250 ml) beef stock
• 1 1/2 cups (375 ml) cooked pinto or red kidney
beans
Garnishes:
Grated cheddar
Finely chopped onion
Shredded lettuce
Directions:
Heat the oil in a pot and sauté the onion and garlic
until the onion has wilted. Add the beef and cook until
it is browned. Mix the cumin, chili powder, oregano,
bay leaf, celery seed, salt and flour. Stir in the crushed
tomato and beef stock. Add contents of the pot to
the Mellerware pressure cooker, lock the lid in place
and set to the suggested setting and adjust time
(see below). Once cooked allow pressure to drop by
releasing the pressure valve and remove the lid, then
add the beans. Cook uncovered for 5 minutes. Serve in
bowls with garnish on the side.
Suggested time: 15 minutes
Suggested setting: meat.
Suggeste Beef Stroganoff
Serves 4
• 900 g beef stew meat or round steak, cut into 25
mm cubes
• 3 tablespoons (45 ml) vegetable oil
• 2 tablespoons (30 ml) flour
• 1 large onion, chopped
• 1 teaspoon (5 ml) garlic
• 1 cup (250 ml) beef broth
• 125 g fresh mushrooms, sliced
• 2 tablespoons (30 ml) tomato paste
• 1 tablespoon (15 ml) Worcestershire sauce
• 1 cup (250 ml) sour cream
• Salt and pepper to taste
• 1 package egg noodles, cooked
Browning:
Heat oil in a pot, add meat and flour to the pot and mix
well. Stir in onion, garlic powder, mushrooms, tomato
paste, and Worcestershire sauce. Blend thoroughly.
Add contents of pot to the Mellerware pressure cooker,
lock the lid in place and set to the suggested setting
and adjust time (see below). Once cooked allow
pressure to drop by releasing pressure valve and open
the lid. Stir in sour cream and blend well. Serve over
hot egg noodles.
Suggested time: 25 minutes
Suggested setting: meat

Hungarian Goulash
Serves 4
• 225 g lean beef, cut into small pieces
• 1/2 cup (140 g) bacon, finely diced
• 1 1/2 cups (255 g) onion, chopped
• 2 potatoes, chopped
• 1/2 teaspoon (2 ml) paprika
• 2 garlic cloves, minced (optional)
• 1/4 teaspoon (1 ml) marjoram
• 1/4 teaspoon (1 ml) crushed caraway seeds
• Salt, to taste
• 1 package egg noodles, cooked
Directions:
Sauté bacon and onion in a pot. Add garlic, if desired.
Stir in paprika and 1 1/4 cup (300 ml) water. Add beef,
potatoes, salt, marjoram and crushed caraway seeds.
Add the contents of the pot to Mellerware pressure
cooker. Lock the lid in place and set to the
suggested setting and adjust time. Allow pressure to
drop by releasing the pressure valve and remove the
lid. Serve over hot egg noodles.
Suggested time: 15 minutes
Suggested setting: meat
Easy Beef Pot Roast
Serves 2-3
• 3 tablespoons (45 ml) canola oil
• 700 g pot roast
• Salt and pepper
• 1 onion, chopped
• 1 bay leaf
• 1 1/2 cups (375 ml) water or beef
stock
Directions:
Place canola oil and roast in a pot and brown on all
sides. Then place roast on a trivet in the Mellerware
pressure cooker. Season roast with salt and pepper.
Add chopped onion, bay leaf, and water. Lock the lid in
place and select the suggested setting and adjust time
(see below). Once cooked, allow pressure to drop by
releasing the pressure valve and remove the lid.
Suggested time: 35 minutes
Suggested setting: meat
If not sufficiently tender, lock the lid back in place and
cook for an additional 5 minutes
Stuffed Cabbage Hungarian Style
Serves 4
• 1 head cabbage, separated into leaves
• 1 cup (250 ml) tomato sauce
• 1 cup (250 ml) water
• Salt and freshly ground pepper
• 225g tin sauerkraut, rinsed and well drained
• 450 g chopped beef, or a mixture of beef, veal and
pork
• 1 onion, finely chopped
• 1/4 cup (60 ml) rice
• 1 tablespoon (15 ml) minced parsley
• 2 tablespoons (30 ml) chicken stock
• Sour cream or yogurt (optional)
Directions:
Fill a pot halfway with water and bring to a boil. Add
several cabbage leaves at a time and cook briefly until
they are softened. Drain on paper towels. Then add the
tomato sauce, water, salt, pepper and sauerkraut, and
mix well. In a bowl, combine the chopped meat, onion,
rice, parsley, and chicken stock, and season with salt
and pepper. Place about 2 tablespoons (30 ml) of this
mixture in each cabbage leaf, fold the sides, then roll.
Add contents of pot to the Mellerware pressure cooker
and arrange the cabbage rolls inside the cooker, over
the sauerkraut mixture. Lock the lid in place and set
to the suggested setting and adjust time (see below).
Once cooked allow pressure to drop by releasing the
pressure valve and remove the lid. Serve with sour
cream or yogurt on the side.
Suggested time: 35 minutes
Suggested setting: meat
Jambalaya
Serves 4-6
• 1 tablespoon (15 ml) vegetable oil
• 225 g boneless skinless chicken breasts cut into
2.5cm pieces
• 225 g fully cooked andouille or Italian sausage,
sliced
• 225 g uncooked shrimp, peeled and deveined
• 2 teaspoons (10 ml) Creole seasoning
• 1 teaspoon (5 ml) dried thyme leaves
• 1/8 teaspoon (0.5 ml) cayenne pepper
• 1 onion, chopped
• 3 garlic cloves, minced
• 1 green bell pepper, chopped
• 3 stalks celery, sliced
• 1 cup (250 ml) long grain rice

• 475 ml canned chopped tomatoes, undrained
• 1 cup (250 ml) chicken stock
• 3 tablespoons (45 ml) fresh parsley, minced
Directions:
Heat oil in a pot over
medium/high heat. Add chicken, sausage and shrimp.
Sprinkle meats with half of the Creole seasoning, half
the thyme and half the cayenne. Cook for 5 minutes
uncovered, stirring frequently, until chicken and shrimp
are thoroughly cooked. Remove chicken, sausage
and shrimp with a slotted spoon and set aside. Add
contents of the pot, onion, bell pepper, celery and
remaining Creole seasoning, thyme and cayenne to the
Mellerware pressure cooker, stirring frequently. Add
rice, tomatoes with their juice and stock. Lock the lid
in place and set to the suggested setting and adjust
time. Once cooked allow pressure to drop by releasing
the pressure valve and remove the lid. Stir in chicken,
sausage, shrimp and parsley. Cover tightly and let it
stand for 5 minutes before serving.
Suggested time: 10 minutes
Suggested setting: chicken
Beef Bourguignon
Serves 8-10
• 2 tablespoons (30 ml) olive oil
• 1.8 kg beef stew meat, cubed
• 1 tablespoon (15 ml) sugar
• 1 tablespoon (15 ml) red wine vinegar
• 3/4 cup (175 ml) dry red wine
• 1 1/4 cups (300 ml) beef broth
• 1 1/2 teaspoon (7.5 ml) salt
• Pepper, to taste
• 2 large onions, diced
• 12 small pearl onions, peeled
• 1/4 cup (60 ml) butter
• 900 g mushrooms, quartered
• 1 teaspoon (5 ml) lemon juice
Directions:
In a separate skillet, sauté the onion until translucent.
Then in a pot,
heat oil and brown meat. Move the beef to one side
and add sugar. When it begins to caramelise, add
vinegar and stir. Add the wine, beef broth, salt and
pepper. Add onions to beef mixture. Then add contents
of the pot to the Mellerware pressure cooker, lock lid
into place and select the suggested setting and adjust
time (see below). Place peeled onions in water until
tender. In the skillet where onions were sautéed, heat
butter and sauté mushrooms. Add peeled onions and
sauté until onions are glazed. When meat has finished
cooking, allow pressure to drop by releasing the
pressure valve and remove the lid. Add mushroom/
onion mixture. Then add contents of the pot and
skillet to the Mellerware pressure cooker, close the lid
and cook for 5 mins. Allow pressure to drop again by
releasing the pressure valve and remove the lid. Serve
over egg noodles or rice.
Suggested time: 40+5 minutes
Suggested setting: meat
Herbed Pork Roast
Serves 4
• 700 g boneless pork loin
• 1 tablespoon (15 ml) olive oil
• 3 medium potatoes, peeled and cut into 25 mm
cubes
• 1 clove garlic, lightly crushed and peeled
• 1 teaspoon (5 ml) thyme
• 1 teaspoon (5 ml) crushed rosemary
• 1/2 teaspoon (2.5 ml) basil
• 1/2 teaspoon (2.5 ml) marjoram
• 1/2 cup (125 ml) chicken stock or water
• Salt and pepper
Directions:
Sprinkle the pork with salt and pepper. Heat the oil in a
pot and brown the potatoes over high heat until golden.
Remove to a warm platter. In the same pot brown the
pork roast on all sides. Place the pork roast in the
Mellerware pressure cooker. Add the crushed garlic
and cook for a minute, then sprinkle all the herbs over
the pork. Pour the broth around the meat. Lock lid into
place and set to the suggested setting and adjust time
(see below). Once cooked allow pressure to drop by
releasing the pressure valve and remove the lid. Add
the potatoes, lock lid into place and cook again for an
additional 5 minutes.
Suggested time: cook for 14+5 minutes
Suggested setting: meat
Pork Chop and Potato Casserole -
Serves 4
• 2 tablespoons (30 ml) olive oil
• 4 pork chops, 25 mm thick
• Salt and freshly ground pepper
• 1/4 cup (60 ml) chicken stock
• 3 medium potatoes, peeled and cut into 3 mm slices
• 1 medium onion
• 3/4 cup (175 ml) dry white wine
• 3 bay leaves
• 1/2 teaspoon (2.5 ml) nutmeg

Directions:
Heat the oil in a pot, sprinkle the chops with salt and
pepper and brown as many chops as will comfortably
fit at one time. Remove to a warm platter. Add the
stock to the Mellerware pressure cooker, scraping up
any stuck particles. Layer half of the potato and onion
slices in the Mellerware pressure cooker, sprinkling
with salt, pepper and nutmeg. Place a bay leaf on top.
Arrange the chops over the potatoes and onions and
add another bay leaf. Cover the chops with another
layer of potato and onion, again season with salt,
pepper and nutmeg. Pour in the wine and add the
remaining bay leaf. Lock the lid into place and set to
the suggested setting and adjust time (see below).
Once cooked allow pressure to drop by releasing the
pressure valve and remove the lid. Discard the bay
leaves.
Suggested time: 14+5 minutes
Suggested setting: meat
Chicken Bouillabaisse
Serves 4-6
• 1 tablespoon (15 ml) olive oil
• 1 tablespoon (15 ml) garlic, coarsely chopped
• 1/2 teaspoon (2 ml) saffron threads
• 1 teaspoon (5 ml) grated lemon or orange zest
• 3/4 teaspoon (4 ml) salt
• 1/2 teaspoon (2 ml) pepper
• 1/4 teaspoon (1 ml) fennel seeds
• 1/4 teaspoon (1 ml) herbes de Provence
• 1/2 cup (125 ml) onion, chopped
• 1/4 cup (60 ml) celery, chopped
• 1/4 cup (60 ml) carrot, peeled and chopped
• 4 chicken thighs (about 800g), skin and fat removed
• 1 cup (250 ml) diced tomatoes
• 1/2 cup (125 ml) dry white wine
• 3/4 cup (175 ml) water
• 5 red potatoes,peeled and quartered
• 300 g kolbassa sausage,cut into 25mm chunks
Directions:
In a large bowl, mix the olive oil, garlic, saffron, lemon
zest, salt, pepper, fennel seeds, herbs de Provence,
onion, celery and carrot. Add the chicken to the bowl
and coat with oil mixture. Note: the chicken can be
combined with the oil mixture and allowed to sit in the
bowl, covered and in the refrigerator for up to 8 hours
in advance.
Transfer ingredients in the bowl to the Mellerware
pressure cooker. Add tomatoes, wine, water and
potatoes. Lock the lid in place and set to the suggested
setting and adjust time (see below) to ten minutes.
Once finished allow pressure to drop by releasing the
pressure valve and remove the lid. Add the sausage to
the Mellerware pressure cooker. Lock the lid in place
again and cook for a further 2 minutes. Once finished
allow pressure to drop by releasing the pressure valve
and remove the lid.
Suggested time: 10+2 minutes
Suggested setting: chicken
Chicken Salad
Serves 6
• 900 g boneless chicken breast, cubed
• 2 cups (500 ml) chicken broth
• 1 bay leaf
• 1 onion, quartered
• 450 g celery, diced
• 1 carrot, diced into 10 mm pieces
• 1/4 cup (60 ml) chopped parsley
• 1 bunch scallions, diced
• 1 cup (250 ml) toasted slivered almonds
• 1 cup (250 ml) pineapple chunks, chopped in 1/2
• 2 cups (500 ml) mayonnaise
• 1 tablespoon (15 ml) lemon juice
• 1 teaspoon (5 ml) curry powder
Directions:
Place chicken, water, onion, 1/2 cup (125 ml) celery,
carrot and parsley into the Mellerware pressure cooker.
Lock the lid in place and set to the suggested setting
and adjust time. Once finished allow pressure to drop
by releasing the pressure valve and remove the lid.
Take the chicken out of the cooker and discard the
liquid. Cool the chicken and add remaining diced
celery, scallions, almonds and pineapple. In a separate
bowl, mix together mayonnaise, lemon juice, and curry
powder. Add dressing to chicken mixture, enough just
to moisten.
Suggested time: 15 minutes
Suggested setting: chicken

Chicken and Rice
Serves 4-6
• 1.3 kg chicken, skin removed and cut,
into 8 pieces
• 3 tablespoons (45 ml) olive oil
• 1 chorizo sausage, thinly sliced (optional)
• 1/2 cup (125 ml) white wine
• 1 small onion, diced
• 2 garlic cloves, minced
• 1 red bell pepper, cored, seeded and
diced
• 1 large ripe tomato peeled, or 2
canned plum tomatoes, seeded and
chopped
• 1 cup (250 ml) uncooked long-grain
white rice
• 1/2 cup (125 ml) frozen peas
• 3 cups (750 ml) chicken stock or broth
• 1 teaspoon (5 ml) salt
Directions:
Salt and pepper the chicken pieces. Heat 2 tablespoons
of olive oil in a pot. Add the onion, garlic, red bell
pepper and tomato. Cook until the onion is soft. Add
the rice and cook for 1 minute. Add the peas, stock,
salt, chicken pieces, and chorizo sausage, with any
accumulated juices. Stir well, then add contents of the
pot into the Mellerware pressure cooker, lock the lid in
place and select the suggested setting and adjust time.
Once finished allow pressure to drop by releasing the
pressure valve and remove the lid.
Suggested time: 10 minutes
Suggested setting: chicken
Chicken Curry
Serves 4 •
1 cup (250 ml) brown rice
• 1 tablespoon (15 ml) canola oil
• 450 g boneless, skinless chicken
breasts,cut into 20 mm pieces
• 4 large onions, cut into thin
wedges
• 1 1/4 cups (300 ml) water
• 4 garlic cloves, minced
• 1 teaspoon (5 ml) peanut oil
• 1 tablespoon (15 ml) low-sodium
soy sauce
• 1 teaspoon (5 ml) chili powder
• 1 teaspoon (5 ml) curry powder
• 1/4 teaspoon (1 ml) turmeric
• 1 teaspoon (5 ml) ground ginger
• 2 tablespoons (30 ml) fresh
parsley, chopped
Directions:
Cook rice and set aside. In a pot, heat oil and sauté
chicken and onions over medium-high heat until
chicken is lightly browned. Add in the water, garlic,
oil and soy sauce, then stir in the chili powder, curry
powder, turmeric and ginger. Add contents or the
pot to the Mellerware pressure cooker, lock the lid in
place select the suggested setting and adjust time
(see below). Once finished allow pressure to drop by
releasing the pressure valve and remove the lid. Stir in
parsley and serve over warm rice.
Suggested time: 5 minutes
Suggested setting: chicken
Lemon Chicken
Serves 4
• 1.6 kg chicken, cut in serving pieces
• 1/4 cup (60 ml) plus 2 tablespoons (30 ml) olive oil
• 1/4 cup (60 ml) lemon juice
• 2 teaspoons (10 ml) oregano
• Salt and freshly ground pepper to taste
• 1/2 cup (125 ml) chicken stock
Directions:
In a small bowl, mix together 1/4 cup (60ml) oil, lemon
juice, oregano, salt and pepper. Pour over the chicken
and marinate for several hours, or overnight. Dry the
chicken well on paper towels and sprinkle with salt
and pepper. Reserve the marinade. Heat the remaining
2 tablespoons (30 ml) of oil in a pot and brown the
chicken pieces on all sides. Reserve chicken pieces on
warm platter.
Pour off the fat and add contents of the pot to the
Mellerware pressure
Cooker, also add the reserved marinade and the
chicken stock. Lock the lid in place and select the
suggested setting and adjust time (see below). Once
finished allow pressure to drop by releasing the
pressure valve and remove the lid. Serve the chicken
with the sauce spooned over it.
Suggested time: 10 minutes
Suggested setting: chicken
Chicken Cacciatore (Boneless) -
Serves 4
• 900 g boneless chicken breast, cut into 50 mm
cubes
• 3 tablespoons (45 ml) canola oil
• 1/4 cup (60 ml) chicken stock
• 1 cup (250 ml) white cooking wine

• 400 g sliced mushrooms
• 1 large onion, minced
• 2 teaspoons (10 ml) garlic powder
• 1 small bunch fresh basil
• 1 small can (156 ml) tomato paste
• 1/2 teaspoon (2 ml) thyme
Directions:
In a pot, add canola oil and brown chicken breast for
approximately 5
minutes, then add the rest of the ingredients. Transfer
the content of the pot to the Mellerware pressure
cooker. Lock the lid in place and select the suggested
setting and adjust time. Once finished allow pressure
to drop by releasing the pressure valve and remove the
lid. Serve withpasta, preferably spaghetti.
Suggested time: 10 minutes
Suggested setting: chicken
Herb “Roasted” Chicken
Serves 4
• 3 tablespoons (45 ml) canola oil
• 1.4 kg chicken, cut into pieces
• 3 medium tomatoes, sliced
• 1/4 cup (60 ml) parsley, chopped
• 1 1/4 cup (300 ml) chicken stock
• 1 tablespoon (15 ml) fresh rosemary
• 1 tablespoon (15 ml) fresh sage, chopped
• Cooked brown or white rice
• Parsley, chopped
• Salt and pepper to taste
Directions:
Add canola oil to a pot and
brown chicken on all sides. Remove chicken and sauté
onions until golden brown. Add tomatoes, parsley,
chicken stock, salt and pepper. Add chicken and herbs
followed by all the contents of the pot to the Mellerware
pressure cooker , lock the lid in place and select
suggested setting and adjust time. Once finished allow
pressure to drop by releasing the pressure valve and
remove the lid. Serve with either brown or white rice.
Suggested time: 15 minutes
Suggested setting: chicken
Chicken in Casserole
Serves 4
• 3 medium potatoes
• 1.3-1.6 kg chicken, cut in serving pieces
• Salt to taste
• 2 slices of bacon, cut in 25 mm pieces
• 100 g fresh mushrooms
• 12 very small pearl onions, peeled
• 1 teaspoon (5 ml) flour
• 1 tablespoon (15 ml) brandy
• 1/4 cup (60 ml) dry white wine
• 1/4 cup (60 ml) chicken stock
• Truffle bits or slices for garnish (optional)
Directions:
Peel the potatoes and cut them with a
melon scoop into small balls. Sprinkle
the pieces of chicken with salt. Place
bacon in a pan and slowly sauté until it has rendered
its fat. Remove the bacon and reserve, leaving the fat
in the pan. Add the potatoes and quickly sauté until
they are lightly golden. Remove the potatoes and
reserve. Add the chicken pieces - as many at a time
as fit comfortably - and brown on all sides. Remove
from the pan and add the mushrooms and onions to
the Mellerware pressure cooker and sauté for a minute.
Sprinkle in the flour, then stir in the brandy, wine and
stock. Add the chicken, bacon and potatoes to the
Mellerware pressure cooker. Lock the lid in place
and select the suggested setting and adjust time (see
below). Once finished allow the pressure to drop by
releasing the pressure valve and remove the lid. Serve
the chicken garnished with truffle pieces.
Suggested time: 10 minutes
Suggested setting: chicken
Coq Au Vin
Serves 4
• 1.4-1.6 kg chicken, cut into
serving pieces • Flour for dusting
• 2 tablespoons (30 ml) canola oil
• 3 slices bacon, minced
• 1 large onion, chopped
• 2 cloves garlic, minced
• 1 carrot, scraped and diced
• 1 tablespoon (15 ml) flour
• 1 cup (250 ml) dry red wine
• 1/2 teaspoon (2 ml) thyme
• 2 tablespoons (30 ml) parsley, minced
• 1 bay leaf
• 100 g fresh mushrooms, cleaned and sliced

• Salt and pepper to taste
Directions:
Dust the chicken parts with flour and place in a pot,
add canola oil and heat
the oil until very hot and brown the chicken pieces.
Remove the chicken to a warm platter. Add the bacon
to the pot with onion, garlic and carrot, and sauté until
the onion has wilted. Stir in the 15
ml (1 tablespoon) of flour, then gradually
add the wine and stir until thickened and smooth. Add
the thyme, parsley, bay leaf, salt and pepper, then
add the chicken to the Mellerware pressure cooker.
Lock the lid in place and select the suggested setting
and adjust time (see below). Once finished allow the
pressure to drop by releasing the pressure valve and
remove the lid. Add
the mushrooms and cook in the Mellerware pressure
cooker, uncovered for 3
minutes. Discard the bay leaf.
Suggested time: 10 minutes
Suggested setting: chicken
Mandarin Chicken
Serves 4
• 350 g boneless, skinless chicken
breasts
• 1 tablespoon (15 ml) balsamic vinegar
• 500 ml (2 cups) chicken stock or broth
• 1 onion, cut into thin wedges
• 1 teaspoon (5 ml) dried tarragon
• 1 x 210g tin mandarin oranges, drained
• 1 tablespoon (15 ml) honey
• 1 tablespoon (15 ml) low-sodium soy
sauce
• 4 tablespoons (60 ml) cornstarch
• 225 g Chinese wheat noodles
• 1/4 cup (60 ml) water
• Freshly ground pepper, to taste
Directions:
In the Mellerware pressure cooker, combine
chicken,vinegar, stock and onions. Lock the lid in
place and select the suggested setting and adjust time
(see below). Once finished allow pressure to drop by
releasing the pressure valve and remove the lid.
Transfer chicken to a platter and keep
warm. Leave the stock mixture in the
Mellerware pressure cooker, and stir in tarragon,
oranges, honey and soy sauce. Combine the
cornstarch and water. Stir into the stock mixture, and
set keep warm function for 5 min.
Serve the chicken over cooked noodles. Add freshly
ground pepper to taste.
Suggested time: 5 minutes
Suggested setting: chicken
Spicy Chicken with
Noodles
- Serves 4
• 450 g boneless, skinless chicken breasts, 20 mm
pieces
• 1 cup (250 ml) chicken stock or broth
• 4 garlic cloves, minced
• 1 sweet red pepper, cut into thin strips
• 1 1/2 cups (375 ml) scallions
• 1 tablespoon (15 ml) minced ginger
• 1/2 teaspoon (2 ml) crushed red pepper flakes
• 2 tablespoons (30 ml) peanut butter
• 4 tablespoons (60 ml) cornstarch
• 1 tablespoon (15 ml) low-sodium soy sauce
• 280 g angel-hair pasta, vermicelli or spaghettini
• 2 tablespoons (30 ml) unsalted peanuts, chopped
• 2 tablespoons (30 ml) fresh parsley,
chopped
Directions:
In the Mellerware pressure cooker, combine chicken,
chicken stock and garlic. Lock the lid in place and
select the suggested setting and adjust time. Once
finished allow pressure to drop by releasing the
pressure valve and remove the lid. Stir in red pepper,
scallions, ginger and red pepper flakes. Set keep warm
function for 5 more minutes (do
not lock lid). Combine the peanut butter
and soy sauce in a bowl, then stir into the chicken
mixture. Heat, uncovered for 5 minutes. Serve the
chicken over cooked noodles, and top with the peanuts
and parsley.
Suggested time: 10 minutes
Suggested setting: chicken
Chicken Fajitas with a Scotish Twist
- Serves 4
• 1 tablespoon (15 ml) canola oil
• 450 g boneless, skinless chicken
breasts, cut into 1 cm pieces
• 2 large onions, chopped
• 8 garlic cloves, minced
• 1 sweet red pepper, cut into thin strips
• 440 ml can diced tomatoes
• 1/2 cup (125 ml) raisins
• 1 sweet red pepper, finely chopped
• 1 mild chili pepper, seeded and finely

chopped
• 1 stick cinnamon
• 1/4 teaspoon (1 ml) crushed red pepper flakes
• 6 black olives, sliced (optional)
• 8 corn tortillas, warmed
Directions:
In a pot, heat oil and sauté
chicken, onions and garlic over medium-high heat until
chicken is lightly browned. Stir in the tomatoes, raisins,
sweet peppers, chilli pepper, and cinnamon. Then add
the pot’s contents to the Mellerware pressure cooker,
lock the lid in place and select the suggested setting
and adjust time. Once finished allow pressure to drop
by releasing the pressure valve, then remove the lid.
Discard the cinnamon. Stir in the flour, red pepper
flakes, and olives (if using). Heat the mixture until
thickened (2-5 minutes). Spoon chicken mixture onto
warm tortillas, roll and serve.
Suggested time: 5 minutes
Suggested setting: chicken
Cinnamon-Flavoured Stewed Fruits
Serves 6
• 1 cup (250 ml) red wine
• 1 cup (250 ml) water
• 3/4 cup (175 ml) packed brown sugar
• 1 cinnamon stick
• 2 lemon slices
• 450 g mixed dried fruits, such as prunes, figs,
apples, etc.
Directions:
In a pot, mix together the wine, water, sugar, cinnamon
stick and lemon slices. Bring to a boil, then simmer
until the sugar dissolves. Add the fruits and contents
of the pot to the Mellerware pressure cooker, lock the
lid in place
and select the suggested setting and adjust time.
Serve warm or at room temperature, with, if you wish,
liquid or whipped heavy cream.
Suggested time: 5 minutes
Suggested setting: soup

Thank you for purchasing a Mellerware product. Mellerware guarantees that your
product has been thoroughly inspected and tested before being dispatched and is
free from mechanical and electrical defects and complies with the applicable safety
standards. With every Mellerware product purchased you get a 2 year warranty as detailed
in the terms and conditions below.
First Year – 1 Year Retail Warranty:
Should defects due to faulty parts or workmanship devel-
op, under normal use, within 12 months from the original
purchase date, please return the product to the store from
where it was purchased for repair free of charge. However,
for the custormer’s convenience we will replace products
where the purchase price is equal to or less than R750
incl. VAT
Second Year – 1 Year Extended Warranty
Mellerware takes pride in their product quality and there-
fore offer an extended 12 month warranty over and above
the 1 Year Retail Warranty. Should defects due to faulty
material or workmanship develop, under normal domestic
use, after the 12 month period and within 24 months from
the original date of purchase, please return the product
postage pre-paid to Mellerware for repair. Mellerware
will repair the product free of charge and return it to you
directly. Mellerware will replace a product with a similar
product in the same or better condition, if the repair can-
not be conducted for whatever reason.
NB: The 1 Year Extended Warranty is only valid for cus-
tomers who have registered their warranty online at www.
mellerware.co.za within the first year after making their
purchase. See overleaf for details and instructions.
Before returning your product, check the
following:
•Your household mains supply socket is in good condi-
tion, working and switched on.
•The mains supply circuit is not overloaded (White trip
switch on your DB board is off).
•You have read the trouble shooting guide in your
Instructions for Use.
•All accessories and parts are present
.
The following conditions apply:
1. Please ensure you retain your original receipt as this
must be presented when making a claim under the
terms of the warranty. It is impossible to determine
the warranty period without your original proof of pur-
chase, so please keep this in a safe place. (NB. Your
warranty can be scanned onto the Mellerware web
site for safe storage – see reverse side for details.)
2. If a refund or exchange is required the product must
be complete with all accessories, parts and packag-
ing. Missing parts will render the warranty void.
3. Upon receipt of your appliance, check it for any
transport damage to ensure it is safe for use. Return it
to the store as soon as possible for exchange if dam-
aged. The warranty is void if products are damaged
after use, so please do not use the damaged product.
4. Your product is designed for normal domestic
household use. Failure to read and comply with the
instructions for use, cleaning and maintenance will
render your warranty void, so please read these
instructions carefully to ensure your safety, and to
get the most effective use from the product. (e.g. not
removing lime scale; water deposits; insect infesta-
tion, and/or burnt products)
5. Any abuse, negligent, improper or accidental use
or care will render the warranty void and Creative
Housewares (Pty) Ltd will not be liable for any loss
or damage.
6. Any attempted repair, or replacement of unauthor-
ised parts will render the warranty void, so please
contact an authorised service centre or service
agent for any service or repair requirements.
7. NB: The warranty on replaced products will be from
the original date of purchase and not from when the
date replacement was made.
8. All repairs carry a 3 month warranty even if this falls
outside of the 2 year warranty period.
9. Mellerware will attempt to conduct repairs within
reasonable time in line with industry standards but
cannot be held responsible or liable for any circum-
stances not under our control.
10. Terms and Conditions are subject to change without
prior notice.
Repairs Out of the Warranty Period
If service or repair becomes necessary outside the
warranty period, this service is still available however all
transport/postage, spares and labour costs will be for the
customers’ account. All chargeable repairs will require
the customers’ written acceptance of the quote. Once the
go-ahead has been received Mellerware will undertake to
conduct the repair within a reasonable time and maintain
the condition of the product as received. All repairs are
warranteed for 3 months from the date of the repair.
For any service, enquiries and complaints please contact
our Customer Care on 086 111 5006 or e-mail help@
chwsa.co.za from 08h00 to 15h00 Monday to Friday
excluding public holidays. Please also note that the com-
pany is normally closed for 2 weeks around Christmas
and New Year.
Please send all products for repair postage pre-paid to
one of the service centres listed on the back of this page.

Why register your warranty?
We at Mellerware pride ourselves on bringing premium quality appliances to market, and as a commitment to this
level of quality we offer a 2 year warranty (1 Year Retail + 1 Year Extended) on all of our products. We often hear
that our customers lose their receipts and can therefore no longer claim if they have a problem. To take advantage
of the 1 Year Extended Warranty you will need to register your warranty online within the first year of purchase in
order to make a valid claim. Now you can register your product, upload your warranty online, never have to worry
about losing your receipt again and enjoy the benefit of your 2 year warranty.
Added Benefits
In addition to providing you with an online profile of your registered
products we will also provide a host of value added benefits:
•Incentives and Competitions for registered users
•New recipes or ideas for your products
•New product developments – be the first to get the latest appliances
•Special offers on promotional items
How to Register your Online Warranty?
STEP1 Create your user prole:
DESKTOP/
LAPTOP
SMART
PHONE/
TABLET
FAX
STEP2 Pick a registration method:
ONLINE WARRANTY REGISTRATION
Notes:
1. The online warranty system is a safe storage facility for your
receipt.
2. You will be required to register on the Mellerware website.
You will receive a username and password once registered.
This will give you access to your profile.
3. From your profile you will be able to load products that you
have purchased. In order to successfully register your warranty
you will need to either scan and upload, or fax through your
receipt to us.
4. All instructions on how to load your products are available
inside your profile.
5. Please note that you must check that your receipt has been
uploaded correctly. Creative Housewares cannot be held
responsible for faxes or files not received.
6. For assistance with registration please email: marketing@
chwsa.co.za
NB: Your 1 year extended warranty is only valid if your
product is registered online within the first year after purchasing
your Mellerware product. Failure to register your product on-line
within the first year will render the extended warranty as void.
•Fax the following to 021 931 4058
•First Name and Surname
•Contact telephone and fax number.
•Product Model number and Type.
•Traceability Code (found on a label
on the product)
•A clear and legible copy
of your receipt.
•Scan the QR code above or visit
www.mellerware.co.za
•Click on the “Registration” link
and login using your user
name and password.
•Click on “Register your products
and upload receipts” and follow
the easy instructions.
•Scan or take a photo and
upload your receipt.
•Open your internet browser and visit
www.mellerware.co.za
•Click on the “Registration” link and
login using your user name
and password.
•Click on “Register your products
and upload receipts” and follow the
easy instructions.
•Scan and upload your receipt
If you haven’t done so already, simply visit www.mellerware.co.za, click on the
“Product Registration” link and follow the easy instructions. You will receive a user-
name and password once registered. This will give you access to your user profile.
Cape Town
20 Tekstiel Street, Parow, Cape Town, 7493,
South Africa • P.O. Box 6156 Parow East, 7501,
South Africa Tel: +27 21 931 8117
Fax: +27 21 931 4058
Durban
35 Adrain Road, Windermere,
Durban, South Africa, 4001
Tel: +27 31 303 3465
Fax: +27 31 303 8259
Johannesburg
Unit 25 & 26 San Croy Office Park
Die Agora Road, Croydon, 1619
Tel:+27 11 392 5652
Fax:+27 11 392 1694
National Service Centre: 086 111 5006
e-mail: [email protected]
www.creativehousewares.co.za

Dankie vir die aankoop van ‘n Mellerware produk. Mellerware waarborg
dat u produk deeglik geïnspekteer en getoets word voordat dit versend
word en is vry van meganiese en elektriese gebreke en voldoen aan die
toepaslike
veiligheidstandaarde. Met elke Mellerware produk wat gekoop word kry u 'n 2 jaar
waarborg soos uiteengesit in die terme en voorwaardes hieronder.
Eerste Jaar - 1 Jaar Kleinhandelswaarborg:
Indien defekte as gevolg van foutiewe onderdele of
vakmanskap binne 12 maande onder normale huis-
houdelike gebruik ontwikkel, binne die 12
maande vanaf die oorspronklike datum van aankoop,
neem asseblief die produk na die winkel van waar dit
gekoop is vir 'n terugbetaling of vervanging.
Tweede Jaar - 1 Jaar Uitgebreide Waarborg
Mellerware is trots op die kwaliteit van die produk en
bied dus 'n uitgebreide 12 maande waarborg bo en
behalwe die 1 Jaar kleinhandelswaarborg. Indien de-
fekte as gevolg van foutiewe materiaal of vakmanskap
ontwikkel, onder normale huishoudelike gebruik, na
die 12 maande tydperk en binne 24 maande vanaf die
oorspronklike datum van aankoop, stuur die produk
terug met posgeld betaal na Mellerware vir herstel.
Mellerware sal die produk gratis herstel en dit direk
aan u terugstuur. Mellerware sal die produk vervang
met 'n soortgelyke produk in dieselfde of beter toes-
tand, as die herstel nie uitgevoer kan word vir watter
rede ookal nie.
NB: Die 1 Jaar Uitgebreide waarborg is slegs geldig
vir kliënte wat hul waarborg geregistreer het op ons
webtuiste by www.mellerware.co.za binne die eerste
jaar nadat hulle dit aangekoop het
Sien keersy vir besonderhede en instruksies.
Voordat u die produk terug stuur, maak seker
van die volgende:
•U huishoudelike geleidingsok is in 'n goeie toestand,
werk en aangeskakel is,
•Die geleidingsok is nie oorlaai nie (Wit uitskop
skakelaar op u DB bord af is),
•U het die moeilikheid steuringsgids gelees in u
instruksies vir gebruik,
•Alle bykomstighede en dele teenwoordig is.
Die volgende voorwaardes geld:
1. Maak seker dat jou oorspronklike kwitansie behoue is, dit
moet aangebied word wanneer 'n eis gemaak word onder
die voorwaardes van die waarborg. Dit is onmoontlik om
die waarborg tydperk te bepaal sonder die bewys van
aankoop, so hou dit asseblief in 'n veilige plek. (NB. Jou
oorspronklike waarborg kan opgeskandeer word na die
Mellerware webtuiste vir veilige bewaring - sien keersy vir
meer inligting.)
2. Indien 'n terugbetaling of omruiling van die produk nodig is
moet die produk volledig wees met al die bykomstighede,
onderdele en verpakking. Toebehore wat weg is sal die
waarborg nietig maak.
3. Met ontvangs van u toestel, gaan dit na vir enige vervoer
skade om te verseker dat dit veilig is vir gebruik. Stuur dit
so gou as moontlik terug na die winkel om die beska-
digde toestel te vervang. Die waarborg is nietig indien
die beskadigde produk gebruik word na die tyd, so
moet asseblief nie die beskadigde produk gebruik nie.
4. U produk is ontwerp vir normale huishoudelike
gebruik. Deur te versuim om die instruksies te lees en
te voldoen aan die terme van gebruik, die skoonmaak
en instandhouding van die produk maak u waarborg
ongeldig, so lees asseblief hierdie instruksies versigtig
om u veiligheid te verseker, en om die beste uit die
gebruik van die produk te kry. (bv nie die verwydering
van kalk skaal; water neerslag; insek besmetting, en /
of verbrande produkte)
5. Enige misbruik, nalatige, onbehoorlike of toevallige
beskadiging of sorg van die produk word die waarborg
nietig en Creative Housewears (Pty) Ltd, sal nie
aanspreeklik wees vir enige verlies of skade nie.
6. Enige poging tot herstel, of vervanging met
ongemagtigde onderdele sal die waarborg nietig maak,
so kontak 'n gemagtigde dienssentrum of diensagent
vir enige diens of herstelwerk.
7. NB: Die waarborg op die vervangingsproduk sal by die
oorspronklike datum van aankoop bly en nie van die
datum wanneer dit vervang is nie.
8. Alle herstelwerk dra 'n 3 maande waarborg selfs al val
dit buite die 2-jaar waarborg tydperk.
9. Mellerware sal probeer om die herstelwerk te doen
binne 'n redelike tyd in lyn met die industrie stan-
daarde, maar kan nie verantwoordelik gehou word of
aanspreeklik wees vir enige omstandighede nie onder
ons beheer nie.
Herstelwerk buite die waarborg tydperk
As diens of herstelwerk benodig word buite die waar-
borg tydperk, is hierdie diens steeds beskikbaar, maar
is alle vervoer / posgeld, onderdele en arbeidskoste op
die kliënte se onkoste. Alle betaalbare herstelwerk sal
skriftelike aanvaarding van die kwotasie vereis van die
kliënt. Sodra Mellerware die groen lig ontvang sal ons
onderneem om die herstel binne 'n redelike tyd en in die-
selfde toestand te hou as wat die produk ontvang is. Alle
herstelwerk is gewaarborg vir 3 maande vanaf die datum
van die herstel.
Vir enige diens, navrae en klagtes kontak ons kliënte diens
op 086 111 5006 of e-pos help@chwsa.co.za vanaf 08h00
tot 15h00, Maandag tot Vrydag, openbare vakansiedae
uitgesluit. Let asseblief ook daarop
dat die maatskappy gewoonlik gesluit is vir 2 weke ge-
durende Kersfees en Nuwejaar.
Stuur asseblief alle produkte vir herstel met posgeld
vooruit betaal aan een van die dienssentrums wat op die
agterkant van hierdie bladsy verskyn.

Hoekom moet u die waarborg moet registreer?
Ons by Mellerware is trots om premium gehalte toestelle op die mark te bring, en as 'n verbintenis tot die vlak
van gehalte bied ons 'n 2 jaar waarborg (1 Jaar Kleinhandel + 1 Jaar Uitgebreide) op al ons produkte. Ons hoor
dikwels dat ons kliënte hul kwitansies verloor en kan dus nie meer eis as hulle 'n probleem het nie. Om voordeel te
trek van die 1 Jaar Uitgebreide waarborg sal u nodig hê om u waarborg aanlyn te registreer binne die eerste jaar
van aankoop om 'n geldige eis te maak. Nou kan u die produk aanlyn registreer, laai u waarborg en hoef u nooit te
bekommer dat u die kwitansie sal verloor nie en die voordeel van u 2-jaar waarborg geniet.
Bygevoegde Voordele
Bykomend tot die verskaffing van ‘n aanlyn profiel van u geregistreerde produkte bied ons ook vele ander toege-
voegde waarde voordele:
•aansporings en kompetisies vir geregistreerde gebruikers
•nuwe resepte of idees vir u produkte
•nuwe produk ontwikkelings - die eerste wees om die nuutste toestelle te kry
•spesiale aanbiedings op promosie-items
Hoe om u Aanlyn Waarborg te Registreer?
STAP 1 Skep u gebruikersproel:
REKENAAR/
SKOOTREK-
ENAAR
SMART-
FOON /
TABLET
FAKS
STAP 2 Kies 'n registrasie metode:
AANLYN WAARBORG REGISTRASIE
Notas:
1. Die aanlyn waarborg stelsel is 'n veilige stoor fasiliteit vir u
strokies.
2. U sal gevra word om op die Mellerware webtuiste te regis-
treer. U sal 'n gebruikersnaam en wagwoord ontvang. Dit sal u
toegang gee tot u profiel.
3. Van u profiel u sal in staat wees om produkte te laai wat u
gekoop het. Om u waarborg suksesvol te registreer sal u nodig
hê om of te skandeer en oplaai, of faks u strokie deur na ons.
4. Alle instruksies oor hoe om u produkte te laai is beskikbaar
binne in u profiel.
5. Let daarop dat u moet seker maak dat u kwitansie korrek op-
gelaai is. Creative Housewares kan nie verantwoordelik gehou
word vir fakse of lêers nie ontvang nie.
6. Vir hulp met registrasie e-pos asseblief: marketing@chwsa.
co.za
NB: U 1 jaar verlengde waarborg is slegs geldig indien u
produk aanlyn geregistreer is binne die eerste jaar na die
aankoop van u Mellerware produk. Indien u produk nie aanlyn
geregistreer word binne die eerste jaar nie sal dit die verlengde
waarborg nietig maak.
•Faks die volgende na 021 931 4058
•Naam en Van
•Kontak telefoon en faksnommer.
•Produk model nommer en tipe.
•Traceability Code (wat op die
•Waarborgkaart of op 'n etiket op die
produk gevind kan word)
•'n Duidelike en leesbare afskrif van
u ontvangs.
•Skandeer die QR-kode bo of besoek
www.mellerware.co.za
•Klik op die "Registration" skakel en
teken aan met u verbruikersnaam en
wagwoord.
•Klik op "Register your products” en
laai u kwitansie en volg die maklike
instruksies.
•Skandeer of neem 'n foto en laai u
strokie.
•Maak u internet snuffelgids oop en
besoek
www.mellerware.co.za
•Klik op die "Registrasie" skakel en
teken in met u gebruikersnaam en
wagwoord.
•Klik op "Register your products” en
laai kwitansies en volg die maklike
instruksies.
•Skandeer en laai u strokie
As u dit nie reeds gedoen het nie, besoek www.mellerware.co.za, kliek op
die "Product Registration" skakel en volg die maklike instruksies. U sal 'n gebrui-
kersnaam en wagwoord ontvang sodra u geregistreer het. Dit sal u toegang tot u
profiel gee.
Cape Town
20 Tekstiel Street, Parow, Cape Town, 7493,
South Africa • P.O. Box 6156 Parow East, 7501,
South Africa Tel: +27 21 931 8117
Fax: +27 21 931 4058
Durban
35 Adrian Road, Windermere,
Durban, South Africa, 4001
Tel: +27 31 303 3465
Fax: +27 31 303 8259
Johannesburg
Unit 25 & 26 San Croy Office park
Die Agora Road, Croydon, 1619
Tel: +27 11 392 5652
Fax: +27 11 392 1694
National Service Centre: 086 111 5006
e-mail: [email protected]-
ativehousewares.co.za

Durban
35 Adrain Road, Windermere,
Durban, South Africa, 4001
Tell: +27 31 303 3465
Fax: +27 31 303 8259
Johannesburg
Unit 25 & 26 San Croy Office Park
Die Agora Road, Croydon, 1619
Tell: +27 11 392 5652
Fax: +27 11 392 1694
-
 1
1
-
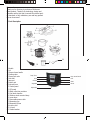 2
2
-
 3
3
-
 4
4
-
 5
5
-
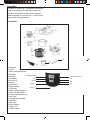 6
6
-
 7
7
-
 8
8
-
 9
9
-
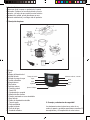 10
10
-
 11
11
-
 12
12
-
 13
13
-
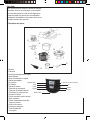 14
14
-
 15
15
-
 16
16
-
 17
17
-
 18
18
-
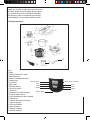 19
19
-
 20
20
-
 21
21
-
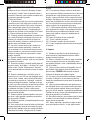 22
22
-
 23
23
-
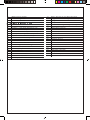 24
24
-
 25
25
-
 26
26
-
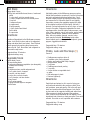 27
27
-
 28
28
-
 29
29
-
 30
30
-
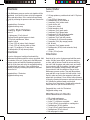 31
31
-
 32
32
-
 33
33
-
 34
34
-
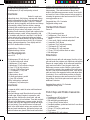 35
35
-
 36
36
-
 37
37
-
 38
38
-
 39
39
-
 40
40
-
 41
41
-
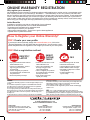 42
42
-
 43
43
-
 44
44
-
 45
45


en otros idiomas
- français: Mellerware 27400A Manuel utilisateur
- English: Mellerware 27400A User manual
- português: Mellerware 27400A Manual do usuário
Artículos relacionados
-
Mellerware 26855 Manual de usuario
-
-
-
-
-
-
 creative housewares mellerware ROBOT 500 INOX Manual de usuario
-
-
-
