Electrolux EOB66712X Manual de usuario
- Categoría
- Cocinas
- Tipo
- Manual de usuario

user manual
manual de instrucciones
Oven
Horno
EOB 66712

Electrolux. Thinking of you.
Share more of our thinking at www.electrolux.com
Contents
Safety information 2
Product description 5
Before first use 5
Daily use 6
Hints, tips and cooking tables 10
Care and cleaning 15
What to do if… 18
Installation 18
Environment concerns 20
Subject to change without notice
Safety information
Before the installation and use, read this
manual carefully:
• For your personal safety and the safety of
your property
• For the respect of the environment
• For the correct operation of the appliance.
Always keep these instructions with the ap-
pliance also if you move or sell it.
The manufacturer is not responsible if incor-
rect installation or use results in damage.
Children and vulnerable people safety
• Do not let persons, children included, with
reduced physical sensory, reduced mental
functions or lack of experience and knowl-
edge to use the appliance. They must have
supervision or instruction for the operation
of the appliance by a person who is re-
sponsible for their safety.
• Keep all packaging away from children.
There is the risk of suffocation or physical
injury.
• Keep children and animals away from the
appliance when the door is open or the
appliance is in operation. There is the risk
of injury or other permanent disability.
• If the appliance has Child lock or Key lock
function, use it. It prevents children and
animals from accidental operation of the
appliance.
General safety
• Do not change the specifications of this
appliance. There is the risk of injury and
damage to the appliance.
• Do not let the appliance stay unattended
during operation.
• Switch off the appliance after each use.
Installation
• Only an approved electrician can install
and connect the appliance. Contact an
approved service centre. This is to prevent
the risks of structural damage or physical
injury.
• Make sure that the appliance is not dam-
aged because of transport. Do not con-
nect a damaged appliance. If necessary,
contact the supplier.
• Remove all packaging, stickers and layers
from the appliance before first use. Do not
remove the rating plate. It can invalidate
the guarantee.
• Fully obey the laws, ordinances, directives
and standards in force in the country
where you use the appliance (safety regu-
lations, recycling regulations, electrical or
gas safety rules etc.).
• Make sure that the appliance is discon-
nected from the power supply during the
installation.
• Be careful when you move the appliance.
The appliance is heavy. Always use safety
gloves. Do not pull the appliance by the
handle.
• The electrical installation must have an iso-
lation device which lets you disconnect the
appliance from the mains at all poles. The
isolation device must have a contact open-
ing width of minimum 3 mm.
•You must have correct isolation devices:
line protecting cut-outs, fuses (screw type
fuses removed from the holder), earth
leakage trips and contactors.
• The shock protection parts must be fixed
in such a way that they cannot be undone
without tools.
2 electrolux

• Some parts of the appliance carry current.
Close the appliance with furniture and
make sure that there are no free spaces. It
prevents electrical shock because you
cannot accidentally touch dangerous
parts.
• Before the installation, make sure that the
kitchen cabinet has the recess dimensions
applicable.
• Make sure that the appliance is installed
below and adjacent safe structures.
• Keep the minimum distances to the other
appliances and units.
• Install the appliance with its back and one
side close to the higher appliance. The
other side must be close to appliance with
the same height.
• The appliance cannot be positioned on a
base.
• Built in ovens and built in cooking surfaces
are attached with special connection sys-
tem. To prevent damage to the appliance,
only use an appliance with the appliances
from the same manufacturer.
Electrical connection
• The appliance must be earthed.
• Make sure that the electrical data on the
rating plate agree with your domestic pow-
er supply.
• Information on the voltage is on the rating
plate.
• Always use a correctly installed shock-
proof socket.
• When you connect electrical appliances to
mains sockets, do not let cables touch or
come near the hot appliance door.
• Do not use multi-way plugs, connectors
and extension cables. There is the risk of
fire.
• Do not replace or change the mains cable.
Contact the service centre.
• Make sure not to squash or cause damage
to the mains plug (if applicable) and cable
behind the appliance.
• Make sure that the mains connection is
accessible after the installation.
• Do not pull the mains cable to disconnect
the appliance. Always pull the mains plug
– if applicable.
Use
• The appliance is only for domestic use. Do
not use the appliance for commercial and
industrial use.
• Only use the appliance for domestic cook-
ing tasks. This is to prevent physical injury
to persons or prevent damage to property.
• Do not use the appliance as a work surface
or storage surface.
• Do not put flammable products or items
that are wet with flammable products,
and/or fusible objects (made of plastic or
aluminium) in, near or on the appliance.
There is the risk of explosion or fire.
• The interior of the appliance becomes hot
during use. There is the risk of burns. Use
gloves when you insert or remove the ac-
cessories or pots.
• Be careful when you remove or install the
accessories to prevent damage to the
oven enamel.
• Always stay away from the appliance when
you open the door while the appliance is in
operation. Hot steam can release. There is
the risk of skin burns.
• To prevent damage or discoloration to the
enamel:
– do not put any objects directly on the
appliance floor and do not cover it with
aluminium foil;
– do not put hot water directly into the ap-
pliance;
– do not keep moist dishes and food in the
appliance after you finish the cooking.
• Discoloration of the enamel has no effect
on the performance of the appliance
• Do not use this appliance if it is in contact
with water. Do not operate the appliance
with wet hands.
• Do not apply pressure on the open door.
• Always close the appliance door when you
cook, even while grilling.
Care and cleaning
• Before maintenance, switch off the appli-
ance and disconnect the appliance from
the power supply.
• Before maintenance, make sure that the
appliance is cold. There is the risk of burns.
There is the risk that the glass panels can
break.
electrolux 3

• Keep the appliance clean at all times. A
build-up of fats or other foodstuff can re-
sult in a fire.
• Regular cleaning prevents the surface ma-
terial from deteriorating
• For your personal safety and the safety of
your property, only clean the appliance
with water and a soap. Do not use flam-
mable products or products that can
cause corrosion.
• Do not clean the appliance with steam
cleaners, high-pressure cleaners, sharp
objects, abrasive cleaning agents, abra-
sive sponges and stain removers
• If you use an oven spray, follow the in-
structions from the manufacturer. Do not
spray anything on the heating elements
and the thermostat sensor.
• Do not clean the glass door with abrasive
cleaning agents or metal scraper. Heat re-
sistant surface of the inner glass can break
and shatter.
• When the door glass panels are damaged
they become weak and can break. You
must replace them. Contact the service
centre.
• Be careful when you remove the door from
the appliance. The door is heavy!
• Do not clean catalytic enamel (if applica-
ble).
Oven lamp
• Disconnect the appliance from the power
supply before the replacement of the oven
lamp. There is the risk of electrical shock!
Service centre
• Only an approved engineer can repair or
work on the appliance. Contact an ap-
proved service centre.
• Use only original spare parts.
Disposal of the appliance
• To prevent the risk of physical injury or
damage
– Disconnect the appliance from the pow-
er supply.
– Cut off the mains cable and discard it.
– Discard the door catch. This prevents
children or small animals from being
closed inside of the appliance. There is
the risk of suffocation.
4 electrolux

Product description
1
2
3
4
5
6
7
1 Electronic programmer
2 Air Vents for Cooling Fan
3 Grill
4 Oven lamp
5 Fan
6 Rating plate
Oven accessories
• Oven shelf
For cookware, cake tins, roasts.
•
Flat baking tray
For cakes and biscuits.
•
Deep roasting pan
To bake and roast or as pan to collect fat.
•
Removable telescopic runners
To put shelves or trays on it.
Before first use
Warning! Refer to "Safety information"
chapter.
Initial Cleaning
• Remove all parts from the appliance.
• Clean the appliance before first use.
Important! Refer to chapter "Care and
Cleaning".
Setting and changing the time
Set the time first to operate the oven.
When you connect the oven to the electrical
supply or after a power cut, the symbol for
the time
and automatically flashes.
Set the correct time with
or .
electrolux 5

Changing the time
1.
Touch
again and again until the sym-
bol
and flashes.
2.
Set the correct time with
or .
1
2
The clock shows the time and the flashing
stops after approximately 5 seconds .
Preheating
Set
and maximum temperature and run
an empty oven for 45 minutes, to burn off any
residue from the cavity surface. Accessories
can become hotter than in normal use. Dur-
ing this period an odour can be emitted. This
is normal. Make sure the room is well venti-
lated.
Daily use
The display
1 2 3
1 Cooking function
2 Temperature
3 Time
Button Function Description
ON/OFF To switch the appliance on or off.
SELECTOR To set the oven function.
RAPID HEAT UP To switch the rapid heat-up function on.
CLOCK To set the clock function.
/
PLUS, MINUS To adjust the values (temperature and time).
Touch controls
Touch controls control all the oven functions.
Use the touch controls to set combination of
cooking function, cooking temperature and
automatic timing .
Make sure you touch just one control at a
time.
To set a cooking function touch and hold.
Switching ON/OFF
To switch on or off the appliance, push
button.
Setting the oven function
1
2
1.
Touch
again and again until necessary
function indicator flashes.
An automatic temperature comes on in
the display. If you do not change it in ap-
proximately 5 seconds, the oven starts to
operate.
2.
To change the temperature, use
or
button.
6 electrolux

If there is a power cut, the programmer
keeps all the settings for approximately
3 minutes. After more than 3 minutes
without power supply, you have to do
the settings (also the time of day) again.
Oven functions
Oven Function Application
Fan cooking
To roast or roast and bake the food that requires
the same cooking temperature, using more than
one shelf, without flavour transference.
Pre-set temperature: 175ºC
Conventional cooking
Heats both from the top and bottom element. To
bake and roast on one oven level.
Pre-set temperature: 200°C
Inner Grill
To grill flat food items in small quantities in the
middle of the shelf. To make toasts.
Pre-set temperature: 250°C
Thermal grilling
The grill element and the oven fan supply hot air
around the food. To cook large pieces of meat.
Pre-set temperature: 180°C
Important! Maximum temperature for this func-
tion: 200 °C.
Pizza Oven
The bottom element provides direct heat to the
base of pizzas, quiches or pies, while the fan en-
sures air is circulated to cook the pizza toppings
or pie fillings.
Pre-set temperature: 175°C
Full Grill
The full grill element is on. To grill flat food items in
large quantities. To make toasts.
Pre-set temperature: 250°C
Bottom oven
element
Heats only from the bottom of the oven. To bake
cakes with crispy or crusty bases.
Pre-set temperature: 250ºC
Top heating element
Heats only from the top of the oven. To complete
cooked dish.
Pre-set temperature: 250 °C
Defrosting
To defrost frozen food.
Suitable for defrosting delicate food, e.g. cream
filled gateaux, iced cakes, pastries, bread and oth-
er food made of yeast.
Setting the clock functions
1
2
1.
Touch
again and again until necessary
function indicator flashes.
2.
To set the time for Minute minder
,
Duration
or End , use or but-
ton.
The related function indicator comes on.
When the time period is completed, the
function indicator flashes and an acoustic
signal sounds for 2 minutes.
With the functions Duration and End
the oven switches off automatically.
3. Touch any button to stop the signal.
electrolux 7

Cancelling the clock functions
1.
Touch
again and again until necessary
function indicator and
flashes.
2.
Touch "
" again and again until the time
is "00:00".
Clock function Application
Time of day Shows the time. To set, change or check the time.
Minute minder To set a countdown time.
A signal sounds, after the time period is completed.
This function has no effect on the operation of the oven.
Duration To set how long the oven has to be in operation.
End To set the switch-off time for an oven function.
Duration and End can be used at
the same time, if the oven is to be
switched on and off automatically later.
In this case first set Duration
, then
End
.
Additional functions
Automatic switch-off
The appliance switches off after some time:
• if you do not switch off the appliance;
• if you do not change the oven tempera-
ture.
The last temperature set flashes in the tem-
perature display.
Oven temperature Switch-off time
30 °C -120 °C 12 h.
120 °C - 200 °C 8.5 h.
200 °C -250 °C 5.5 h.
250 °C 3.0 h.
If you set the clock function Duration
or End , the automatic switch-off
deactivates.
Child lock
When the child lock is set, you can not
operate the oven.
Switching on the child lock
1. Switch on the appliance. No oven func-
tion must be set.
2.
Use Selection
and at the same
time, until the display shows “SAFE”. The
child lock is switched on.
Switching off the child lock
To switch off the child lock, obey the same
procedure.
Residual Heat function
With Duration function, the oven automati-
cally switches off some minutes before the
time period is completed. The oven uses the
residual heat to complete the cooking with-
out energy consumption.
Important! Residual heat function is
applicable only if the Duration is more than
15 minutes.
Rapid heat-up function
With Rapid heat-up function you decrease
the pre-heating time. You can use it with
each cooking function.
Important! Do not put the food into the
oven, until Rapid heat up is completed.
1. Set an oven function.
If necessary, change the recommended
temperature.
2.
Push
button. The display shows
"FHU" and Rapid heat-up function oper-
ates.
8 electrolux

3. When Rapid heat up is completed, an
acoustic signal sounds and "FHU" goes
out.
At this time the appliance continues to
heat in the set oven function and oven
temperature.
4. Put the food in the oven.
Demo mode
You can do the test of the oven or see all the
operating steps in the Demo mode. The oven
does not use the heat.
You can use Demo mode only when the ap-
pliance is first connected or there was a pow-
er cut and "12:00" and
flash on the dis-
play.
Switching on the Demo mode
1.
Push
button for approximately 2 sec-
onds. An acoustic signal sounds.
2.
Push
and " " buttons at the same
time. An acoustic signal sounds and the
display shows "12:00".
If the display shows , the Demo mode
is on.
Switching off the Demo mode
1. Switch off the oven.
2. Follow above procedure again.
If there is a power cut the Demo mode
function stays saved.
Control Beep
Switching off the control beep
1. Stop the oven with the On/Off control
.
2.
Touch and hold the
and controls at
the same time, until a sound operates
(approximately 2 seconds).
The control beep does not operate.
Switching on the control beep
1.
Touch and hold the
and controls at
the same time, until a sound operates
(approximately 2 seconds).
2. The control beep operates again.
Error code
If some parameters are not correct, the con-
trol unit stops the functions which operate
and the display shows the related error code.
Refer to "What to do if" chapter.
Replaceable telescopic runners
Place the telescopic runner with the locking
system on any level.
Important! The „stop elements“ at the one
end of the runner MUST face upwards.
electrolux 9

1
1 Stop element
It is possible to buy telescopic runners sep-
arately.
Make sure that both the telescopic run-
ners are placed on parallel levels.
You can fit each level with telescopic runners
to allow an easier operation when you insert
or remove the shelves.
Pull the right and left hand telescopic shelf
supports completely out.
°C
Place the shelf or the grill pan on the tele-
scopic shelf supports, then gently push them
all inside the oven.
°C
Warning! Do not close the oven door if
the telescopic shelf supports are not
completely inside the oven. This could
damage the door enamel and glass.
Cooling fan
When the appliance operates, the cooling fan
switches on automatically to keep the surfa-
ces of the appliance cool. If you switch off the
appliance, the cooling fan continues to op-
erate until the appliance cools down.
Safety thermostat
To prevent dangerous overheating (due to
incorrect use of the appliance or defective
components), the oven has a safety thermo-
stat, which interrupts the power supply. The
oven switches back on again automatically,
when the temperature drops.
Hints, tips and cooking tables
Warning! Refer to "Safety information"
chapter.
Information on acrylamides
Important! According to the newest
scientific knowledge, if you brown food
(specially the one which contains starch),
acrylamides can pose a health risk. Thus, we
recommend that you cook at the lowest
temperatures and do not brown food too
much.
• The appliance has four shelf levels. Count
the shelf levels from the bottom of the ap-
pliance floor.
• You can cook different dishes on two lev-
els at the same time. Place the shelves on
level 1 and 3.
• The appliance has a special system which
circulates the air and constantly recycles
10 electrolux

the steam. With this system you can to
cook in a steamy environment and keep
the food soft inside and crusty outside. It
decreases the cooking time and energy
consumption to a minimum.
• Moisture can condense in the appliance or
on the glass doors. This is normal. Always
stand back form the appliance when you
open the appliance door while cooking. To
decrease the condensation, run the appli-
ance for 10 minutes before cooking.
• Wipe away moisture after every use of the
appliance.
• Do not put the objects directly on the ap-
pliance floor and do not cover the compo-
nents with aluminium foil when you cook.
This can change the baking results and
damage the enamel coating.
Baking cakes
• The best temperature for baking cakes is
between 150°C and 200°C.
• Preheat the oven for approximately 10 mi-
nutes before baking.
• Do not open the oven door before 3/4 of
the set cooking time is up.
• If you use two baking trays at the same
time, keep one level empty between them.
Cooking meat and fish
• Do not cook meat with weight below 1 kg.
Cooking too small quantities makes the
meat too dry.
• To keep the red meat well cooked outside
and juicy inside set the temperature be-
tween 200°C-250°C.
• For white meat, poultry and fish set the
temperature between 150°C-175°C.
• Use a dripping pan for very fatty food to
prevent the oven from stains that can be
permanent.
• Leave the meat for approximately 15 mi-
nutes before carving so that the juice does
not seep out.
• To prevent too much smoke in the oven
during roasting, add some water into the
dripping pan. To prevent the smoke con-
densation, add water each time after it
dries up.
Cooking times
Cooking times depend on the type of food,
its consistency, and volume.
Initially, monitor the performance when you
cook. Find the best settings (heat setting,
cooking time, etc.) for your cookware, rec-
ipes and quantities when you use this appli-
ance.
Baking and roasting table
CAKES
TYPE OF DISH
Conventional
cooking
Fan cooking
Cooking
time [min]
Notes
Level
Temp
[°C]
Level
Temp
[°C]
Whisked recip-
ies
2 170 2 (1
and 3)
160 45-60 In cake mould
Shortbread
dough
2 170 2 (1
and 3)
160 24-34 In cake mould
Butter-milk
cheese cake
1 170 2 160 60-80 In cake mould 26 cm
Apple cake (Ap-
ple pie)
1 170 2 left +
right
160 100-120 2 cake moulds of 20 cm on
the oven shelf
Strudel 2 175 2 150 60-80 On baking tray
Jam- tart 2 170 2 160 30-40 In cake mould 26 cm
Fruit cake 2 170 2 155 60-70 In cake mould 26 cm
electrolux 11

TYPE OF DISH
Conventional
cooking
Fan cooking
Cooking
time [min]
Notes
Level
Temp
[°C]
Level
Temp
[°C]
Sponge cake
(Fatless sponge
cake)
2 170 2 160 35-45 In cake mould 26 cm
Christmas cake/
Rich fruit cake
2 170 2 160 50-60 In cake mould 20 cm
Plum cake 2 170 2 160 50-60
In bread tin
1)
Small cakes 3 170 3 (1
and 3)
160 20-30 On flat baking tray
Biscuits 3 150 3 150 20-30
On flat baking tray
1)
Meringues 3 100 3 100 90-120 On flat baking tray
Buns 3 190 3 180 15-20
On flat baking tray
1)
Choux 3 190 3 180 25-35
On flat baking tray
1)
Plate tarts 3 180 2 170 45-70 In cake mould 20 cm
Victoria sand-
wich
1 or 2 180 2 170 40-55 Left + right in cake mould 20
cm
1) Preheat for 10 minutes.
BREAD AND PIZZA
TYPE OF DISH
Conventional
cooking
Fan cooking
Cooking
time [min]
Notes
Level
Temp
[°C]
Level
Temp
[°C]
White bread 1 190 1 190 60-70 1-2 pieces, 500 gr one
piece
1)
Rye bread 1 190 1 180 30-45 In bread tin
Bread rolls 2 190 2 (1
and 3)
180 25-40 6-8 rolls on flat baking tray
1)
Pizza 1 190 1 190 20-30
On deep roasting pan
1)
Scones 3 200 2 190 10~20
On flat baking tray
1)
1) Preheat for 10 minutes.
FLANS
TYPE OF DISH
Conventional
cooking
Fan cooking
Cooking
time [min]
Notes
Level
Temp
[°C]
Level
Temp
[°C]
Pasta flan 2 180 2 180 40-50 In mould
Vegetable flan 2 200 2 175 45-60 In mould
Quiches 1 190 1 190 40-50 In mould
Lasagne 2 200 2 200 25-40 In mould
Cannelloni 2 200 2 190 25-40 In mould
12 electrolux

TYPE OF DISH
Conventional
cooking
Fan cooking
Cooking
time [min]
Notes
Level
Temp
[°C]
Level
Temp
[°C]
Yorkshire pud-
ding
2 220 2 210 20-30
6 pudding mould
1)
1) Preheat for 10 minutes.
MEAT
TYPE OF DISH
Conventional
cooking
Fan cooking
Cooking
time [min]
Notes
Level
Temp
[°C]
Level
Temp
[°C]
Beef 2 200 2 190 50-70 On oven shelf and deep
roasting pan
Pork 2 180 2 180 90-120 On oven shelf and deep
roasting pan
Veal 2 190 2 175 90-120 On oven shelf and deep
roasting pan
English roast
beef rare
2 210 2 200 44-50 On oven shelf and deep
roasting pan
English roast
beef medium
2 210 2 200 51-55 On oven shelf and deep
roasting pan
English roast
beef well done
2 210 2 200 55-60 On oven shelf and deep
roasting pan
Shoulder of
pork
2 180 2 170 120-150 On deep roasting pan
Shin of pork 2 180 2 160 100-120 2 pieces on deep roasting
pan
Lamb 2 190 2 190 110-130 Leg
Chicken 2 200 2 200 70-85 Whole on deep roasting
pan
Turkey 1 180 1 160 210-240 Whole on deep roasting
pan
Duck 2 175 2 160 120-150 Whole on deep roasting
pan
Goose 1 175 1 160 150-200 Whole on deep roasting
pan
Rabbit 2 190 2 175 60-80 Cut in pieces
Hare 2 190 2 175 150-200 Cut in pieces
Pheasant 2 190 2 175 90-120 Whole on deep roasting
pan
electrolux 13

FISH
TYPE OF DISH
Conventional
cooking
Fan cooking
Cooking
time [min]
Notes
Level
Temp
[°C]
Level
Temp
[°C]
Trout/Sea
bream
2 190 2 (1
and 3)
175 40-55 3-4 fishes
Tuna fish/Sal-
mon
2 190 2 (1
and 3)
175 35-60 4-6 fillets
Grilling
Preheat the empty oven for 10 minutes,
before cooking.
Quantity Grilling Cooking time in minutes
TYPE OF DISH Pieces g
level
Temp.
(°C)
1st side 2nd side
Fillet steaks 4 800 3 250 12-15 12-14
Beef steaks 4 600 3 250 10-12 6-8
Sausages 8 / 3 250 12-15 10-12
Pork chops 4 600 3 250 12-16 12-14
Chicken (cut in 2) 2 1000 3 250 30-35 25-30
Kebabs 4 / 3 250 10-15 10-12
Breast of chicken 4 400 3 250 12-15 12-14
Hamburger 6 600 3 250 20-30
Fish Fillet 4 400 3 250 12-14 10-12
Toasted sandwich-
es
4-6 / 3 250 5-7 /
Toast 4-6 / 3 250 2-4 2-3
Thermal grilling
Warning! Use this function with a
maximum temperature of 200°C.
Quantity Grilling Cooking time in minutes
TYPE OF DISH Pieces g
level
Temp.
(°C)
1st side 2nd side
Rolled joints (turkey) 1 1000 3 200 30-40 20-30
Chicken (cut in two) 2 1000 3 200 25-30 20-30
Chicken drumsticks 6 - 3 200 15-20 15-18
Quail 4 500 3 200 25-30 20-25
Vegetable gratin - - 3 200 20-25 -
pieces. Scallops - - 3 200 15-20 -
Mackerel 2-4 - 3 200 15-20 10-15
Fish slices 4-6 800 3 200 12-15 8-10
14 electrolux

Pizza
Preheat the empty oven for 10 minutes,
before cooking.
TYPE OF DISH
Pizza Function
Cooking time in mi-
nutes
NOTES
Level temp.°C
Pizza , large 1 200 15~25 on flat baking tray
Pizza , small 1 200 10~20
on flat baking tray or
on oven shelf
Bread rolls 1 200 15~25 on flat baking tray
Care and cleaning
Warning! Refer to "Safety information"
chapter.
Shelf Support Rails
Removing the shelf support rails
1. Pull the front of the shelf support rail away
from the side wall.
2. Pull the rear shelf support rail away from
the side wall and remove it.
Installing the shelf support rails
Install the shelf support rails in opposite se-
quence.
The rounded ends of the shelf support
rails must point to the front!
Cleaning the oven door
The oven door has three panels of glass in-
stalled one behind the other. You can remove
the glass panels to clean them.
Removing the oven door and the glass
panels
1. Hold the aluminium plate (A) with one
hand and remove the holder (B) of the in-
ner panel with the other hand. To unlock
the holder (B), press it to the right side
and pull up.
A
B
2. Pull the aluminium plate (A) out of the
holder (C).
electrolux 15

A
C
3. Hold tight the inner panel (D) with one
hand in position and pull out the holder
(C) with the other.
D
C
4. Hold the door glass with one hand and
remove the first glass panel (D) with the
other hand. Do the same with the second
glass panel (E).
D
E
Clean the glass panels with water and soap.
Dry the glass panels carefully.
Installing the door and the glass panels
After you clean the door, install the glass
panels in the opposite sequence. Make sure
that you put the middle panel of glass in the
correct seats.
The glass panel "E" has a dot in one of the
corners. When you install this panel, make
sure that the dot is in the top left corner of the
glass panel.
The glass panel "D" has a decorative frame.
When you install this panel, make sure that
the screen-printing is on the outer side. Make
sure that the surface of the glass panel frame
is not rough when you touch it.
After you install the glass panels:
1. Install the right end of the aluminium plate
(A) in the recess in the holder "C”.
16 electrolux

A
C
2. Install the left end of the aluminium
plate ”A” in the recess in the holder “B”.
Install the holder “B”. Make sure that all
components are attached correctly.
A
B
Oven ceiling
You can remove the heating element on the
oven ceiling to clean the oven ceiling easily.
Warning! Before you remove the
heating element switch off the
appliance. Make sure that the appliance
is cold. There is a risk of burns!
1. Remove the screw which holds the heat-
ing element. At first time, use a screw-
driver.
2. Carefully pull the heating element down.
At this time you can clean the oven ceil-
ing.
Clean the oven ceiling with a soft cloth with
warm water and cleaning agent and let it dry.
Installing the heating element
1. Install the heating element in opposite se-
quence.
Warning! Make sure that the heating
element is correctly installed and it does
not fall down.
electrolux 17

Oven lamp
Replacing the oven light bulb/cleaning
the glass cover
Warning! Be careful! There is the risk of
electrical shock!
1. Turn the glass cover anti-clockwise to re-
move it.
2. Clean the glass cover.
3. Replace the oven light bulb with applica-
ble 300°C heat-resistant oven light bulb.
New oven light bulb must have the same
parameters as your previous one.
4. Install the glass cover.
What to do if…
Warning! Refer to "Safety information"
chapter.
Problem Possible cause Remedy
The oven does not heat
up
The oven is switched off Switch on the oven
The clock is not set Set the clock
The necessary settings are not set Check the settings
The automatic switch off is on Refer to “Automatic switch off”
The switch-on lock is on Refer to "Switching off the switch-
on lock"
The fuse in the fuse box is released Check the fuse
If the fuse is released more than one
time, contact a qualified electrician
Demo mode is on Refer to "Demo mode"
The display shows an er-
ror code “F.."
There is an electronic fault. Write down the error code and con-
tact the Service Center.
The oven lamp does not
operate
The oven lamp is defective Replace the oven lamp
Steam and condensation
settle on the food and in
the oven cavity
You left the dish in the oven for too
long
Do not leave the dishes in the oven
for longer than 15-20 minutes after
the cooking process ends
If you cannot find a solution to the problem
yourself, contact your dealer or the service
centre.
The necessary data for the service centre is
on the rating plate. The rating plate is on the
front frame of the oven cavity.
We recommend that you write the data here:
Model (MOD.) .........................................
Product number (PNC) .........................................
Serial number (S.N.) .........................................
Installation
Warning! Refer to "Safety information"
chapter.
18 electrolux

Building In
594
2
20
570
590
540
560
50
580
550 min
560÷570
550 min
593
560-570
80÷100
A
B
Electrical installation
Warning! Only a qualified and
competent person must do the electrical
installation.
The manufacturer is not responsible if
you do not follow safety precautions
from chapter "Safety".
This appliance is only supplied with a main
cable.
electrolux 19

Environment concerns
The symbol on the product or on its
packaging indicates that this product may
not be treated as household waste. Instead
it should be taken to the appropriate
collection point for the recycling of electrical
and electronic equipment. By ensuring this
product is disposed of correctly, you will help
prevent potential negative consequences for
the environment and human health, which
could otherwise be caused by inappropriate
waste handling of this product. For more
detailed information about recycling of this
product, please contact your local council,
your household waste disposal service or the
shop where you purchased the product.
Packaging material
The packaging material is environmen-
tally-friendly and recyclable. Plastic parts
are marked with international abbrevia-
tions such as PE, PS, etc. Dispose of the
packaging material in the containers
provided for this purpose at your local
waste management facility.
Disposal of the appliance
1. Disconnect the mains plug from the
mains socket.
2. Cut off the mains cable and discard it.
3. Discard the door catch. This prevents the
children to close themselves inside the
appliance. There is risk of suffocation.
20 electrolux

Electrolux. Thinking of you.
Conozca mejor nuestros conceptos en www.electrolux.com
Índice de materias
Información sobre seguridad 21
Descripción del producto 24
Antes del primer uso 24
Uso diario 25
Consejos, sugerencias y tablas de cocción
30
Mantenimiento y limpieza 34
Qué hacer si… 37
Instalación 38
Aspectos medioambientales 39
Salvo modificaciones
Información sobre seguridad
Antes de instalar y usar el electrodoméstico,
lea atentamente este manual:
• por su seguridad personal y la seguridad
de su hogar
• por respeto al medio ambiente
• para el correcto funcionamiento del elec-
trodoméstico
Guarde estas instrucciones junto al aparato
para que estén siempre a mano, incluso si se
muda o lo vende.
El fabricante no se hace responsable de da-
ños ocasionados por una instalación o uso
incorrecto.
Seguridad de niños y personas
vulnerables
• Este electrodoméstico no debe ser usado
por niños, personas con capacidades físi-
cas o mentales reducidas, ni tampoco por
personas sin experiencia en el manejo del
aparato, a menos que lo hagan bajo las
instrucciones o la supervisión de la perso-
na responsable de su seguridad.
• Mantenga los materiales de embalaje ale-
jados de los niños. Existe riesgo de asfixia
y de lesiones.
• Mantenga a los niños y animales alejados
del electrodoméstico cuando la puerta se
encuentre abierta o el aparato esté funcio-
nando. Existe riesgo de sufrir lesiones o
incapacidad permanente.
• Si el electrodoméstico cuenta con una fun-
ción de bloqueo contra la manipulación
por niños o de bloqueo de teclas, utilícela.
Ello evitará que los niños o los animales
pongan accidentalmente el aparato en
funcionamiento.
Instrucciones generales de seguridad
• No cambie las especificaciones de este
aparato. Existe riesgo de lesiones y de da-
ños al aparato.
• No deje ese electrodoméstico nunca sin la
debida vigilancia mientras esté funcionan-
do.
• Apague el aparato después de cada uso.
Instalación
• Solo un electricista cualificado puede ins-
talar y conectar el electrodoméstico. Pón-
gase en contacto con un servicio técnico
autorizado. De esta manera se evitarán
riesgos de daños materiales y de lesiones.
• Asegúrese de que el aparato no ha sufrido
daños durante el transporte. No enchufe
el aparato si está dañado. Si fuera nece-
sario, póngase en contacto con el provee-
dor.
• Retire todo el material de embalaje, adhe-
sivos y láminas de protección del aparato
antes de ponerlo en marcha por primera
vez. No retire la placa de datos técnicos.
Puede anular la garantía.
• Siga rigurosamente las leyes, órdenes, di-
rectivas y normas (por ejemplo, de segu-
ridad, eliminación de residuos, instalacio-
nes eléctricas y de gas, etc.) vigentes en el
país donde se vaya a utilizar el aparato.
• Durante la instalación, asegúrese de que
el aparato no está conectado a la alimen-
tación eléctrica.
• Tome las debidas precauciones cuando
desplace el aparato. Este aparato es pe-
sado. Utilice siempre guantes de protec-
electrolux 21

ción. No tire nunca del aparato sujetando
el asa.
• El aparato debe ir provisto de un disposi-
tivo que permita desconectarlo de la co-
rriente eléctrica en todos los polos y que
tenga una separación mínima entre con-
tactos de 3 mm.
• Asimismo, debe contar con los dispositi-
vos de aislamiento correctos: línea con
protección contra los cortocircuitos, fusi-
bles (tipo tornillo que puedan retirarse del
soporte), dispositivos de fuga a tierra y
contactores.
• Los componentes de protección contra
las descargas eléctricas tienen que fijarse
de forma que no puedan desmontarse sin
usar herramientas.
• Algunas partes del aparato tienen corrien-
te. Encajone el aparato en un mueble y
cerciórese de que no quedan espacios li-
bres. De esta forma evitará descargas
eléctricas al no poder tocarse accidental-
mente piezas peligrosas.
• Antes de la instalación, cerciórese de que
el armario de la cocina tiene las dimensio-
nes del hueco necesarias.
• Asegúrese de que el aparato se instala de-
bajo y junto a estructuras seguras.
• Respete siempre las distancias mínimas
entre el aparato y los demás electrodo-
mésticos y mobiliario.
• Instale el aparato con su parte posterior y
un lateral adyacente a un aparato más alto.
El otro lateral debe cerrar el aparato a la
misma altura.
• El aparato no se puede colocar sobre una
base.
• Los hornos y las placas de cocción em-
potrados se instalan con unos sistemas de
conexión especiales. A fin de impedir que
el aparato se dañe, utilícelo tan sólo con
otros del mismo fabricante.
Conexión eléctrica
• El aparato debe tener conexión a tierra.
• Asegúrese de que las especificaciones
eléctricas de la placa coincidan con las del
suministro eléctrico de su hogar.
• La información sobre la tensión se en-
cuentra en la placa de especificaciones
técnicas.
• Utilice siempre una toma de corriente con
aislamiento de conexión a tierra.
• Impida que los cables de los restantes
aparatos eléctricos entren en contacto o
queden cerca de la puerta del aparato.
• No utilice enchufes o conectores múltiples
ni cables prolongadores. Existe riesgo de
incendio.
• No sustituya ni cambie el cable de alimen-
tación. Póngase en contacto con el servi-
cio técnico.
• Asegúrese de no aplastar ni dañar el cable
de alimentación (si lo hay) y el enchufe de-
trás del aparato.
• Asegúrese de que se puede acceder a la
toma de corriente una vez instalado el apa-
rato.
• No desconecte el aparato tirando del ca-
ble de alimentación. Tire siempre del en-
chufe - si lo hay.
Uso
• Este aparato está diseñado exclusivamen-
te para su uso doméstico. No utilice el
aparato con fines comerciales o industria-
les.
• Este electrodoméstico debe utilizarse ex-
clusivamente para la elaboración domés-
tica de alimentos. Evitará lesiones perso-
nales y daños materiales.
• No utilice el aparato como superficie de
trabajo o almacenamiento.
• No coloque productos inflamables ni ob-
jetos mojados con productos inflamables,
como tampoco objetos que se puedan
fundir (fabricados con plástico o aluminio)
dentro, cerca o encima del aparato. Existe
riesgo de incendio o explosión.
• El interior del aparato alcanza temperatu-
ras muy elevadas durante el uso y puede
causar quemaduras. Utilice guantes cuan-
do introduzca o retire accesorios o reci-
pientes.
• Preste especial atención al desmontar o
instalar los accesorios para no dañar el es-
malte del horno.
• Manténgase siempre alejado del electro-
doméstico cuando abra la puerta mientras
el aparato se encuentre en funcionamien-
to. Pueden liberarse vapores calientes.
Existe riesgo de quemaduras.
• Para evitar daños o decoloraciones del es-
malte:
– no coloque objetos directamente en el
suelo del aparato ni lo cubra con papel
de aluminio;
22 electrolux

– no coloque agua caliente directamente
dentro del aparato;
– no deje platos húmedos ni comida en el
horno una vez finalizada la cocción.
• La pérdida de color del esmalte del horno
no afecta a su rendimiento.
• No utilice este aparato si está en contacto
con el agua. No utilice el aparato con las
manos húmedas.
• No ejerza presión sobre la puerta abierta.
• Cierre siempre la puerta del aparato cuan-
do cocine, incluso aunque sólo gratine ali-
mentos.
Mantenimiento y limpieza
• Antes de realizar cualquier tarea de man-
tenimiento, apague el aparato y desen-
chúfelo de la toma de corriente.
• Antes del mantenimiento, asegúrese de
que está totalmente frío. Existe riesgo de
quemaduras. Los paneles de cristal pue-
den romperse.
• Mantenga el horno limpio en todo momen-
to. La acumulación de grasas o alimentos
puede provocar un incendio.
• Una limpieza periódica evita el deterioro
del material de la superficie.
• Por su seguridad y la de su hogar, utilice
únicamente agua y jabón para limpiar el
aparato. No utilice productos inflamables
ni corrosivos.
• No limpie el aparato con limpiadores a va-
por, aparatos de limpieza de alta presión,
objetos punzantes, productos abrasivos,
esponjas abrasivas ni quitamanchas.
• Si utiliza productos específicos para hor-
nos, siga las instrucciones del fabricante.
No rocíe nunca con ningún producto la re-
sistencia ni la sonda del termostato.
• No limpie el vidrio de la puerta con pro-
ductos abrasivos ni rascadores metálicos.
Podría dañar la superficie especial del cris-
tal interior.
• Cuando los paneles de cristal de la puerta
están dañados, se debilitan y pueden rom-
perse. Debe cambiarlos. Póngase en con-
tacto con el servicio técnico.
• Tenga mucho cuidado al desmontar la
puerta del aparato. ¡La puerta es muy pe-
sada!
• No limpie el esmalte catalítico (si procede).
Bombilla del horno
• Desconecte el enchufe de la toma de red
antes de reemplazar la bombilla del horno.
¡Riesgo de descarga eléctrica!
Servicio técnico
• Sólo el personal técnico autorizado puede
reparar o manipular el aparato. Póngase
en contacto con un servicio técnico auto-
rizado.
• Utilice únicamente recambios originales.
Desecho del aparato
• Para evitar el riesgo de lesiones y daños
– Desconecte el enchufe de la toma de
red.
– Corte el cable de alimentación y desé-
chelo.
– Elimine el cierre de la puerta. Esto evita
que los niños o las mascotas se queden
encerrados en el interior del aparato.
Puede causar asfixia.
electrolux 23

Descripción del producto
1
2
3
4
5
6
7
1 Programador electrónico
2 Salidas de aire del ventilador de enfria-
miento
3 Grill
4 Bombilla del horno
5 Ventilador
6 Placa de datos técnicos
Accesorios del horno
• Parrilla
Para recipientes, moldes de pastelería y
asados.
• Bandeja plana
Para pasteles y galletas de pastaflora.
•
Bandeja honda para asar
Para hornear y asar y como recoge grasas.
• Carriles telescópicos extraíbles
Para colocar estantes o bandejas en ellos.
Antes del primer uso
Advertencia Consulte el capítulo
"Información sobre seguridad".
Limpieza inicial
• Retire y limpie todas las piezas del aparato.
• Limpie el interior del aparato antes de uti-
lizarlo por primera vez.
Importante Consulte el capítulo "Cuidado y
limpieza".
Ajuste y modificación de la hora
Ajuste la hora del horno antes de ponerlo
en funcionamiento.
Cuando conecte el horno al suministro de
red, o después de un corte del mismo, los
símbolos de la hora
y parpadean au-
tomáticamente.
Ajuste la hora correctamente con
o .
24 electrolux

Cambio de la hora
1.
Pulse
repetidamente hasta que el sím-
bolo
y parpadee.
2.
Ajuste la hora correctamente con
o
.
1
2
El reloj mostrará la hora y el parpadeo parará
tras 5 segundos aproximadamente.
Precalentamiento
Programe
a la temperatura máxima y
haga funcionar el horno vacío durante 45 mi-
nutos para quemar los residuos que pueda
haber en la superficie de la cavidad. Los ac-
cesorios pueden calentarse más que duran-
te el uso normal. Además, el horno puede
despedir cierto olor durante este intervalo de
tiempo. Es normal. Asegúrese de que la co-
cina está bien ventilada.
Uso diario
La pantalla
1 2 3
1 Funciones de cocción
2 Temperatura
3 Hora
Tecla Función Descripción
ENCENDIDO/APAGADO Conecta y desconecta el aparato.
SELECTOR Para programar las funciones del horno.
CALENTAMIENTO RÁPIDO Para encender la función de calentamiento rápido.
RELOJ Para programar las funciones del reloj.
/
MÁS, MENOS Para ajustar los valores de la temperatura y la hora.
Mandos táctiles
Los mandos táctiles controlan todas las fun-
ciones del horno. Utilice los mandos táctiles
para ajustar la función de cocción, la tempe-
ratura y el tiempo.
Para ello, tiene que pulsar brevemente un
solo mando.
Para ajustar una función de cocción, man-
téngalo pulsado.
Encendido y apagado
Para conectar y desconectar el aparato, pul-
se la tecla
.
Ajuste de la función del horno
1
2
1.
Pulse
repetidamente hasta que par-
padee la función que desea.
La pantalla presentará una temperatura
automática. Si no la cambia en unos 5
segundos aproximadamente, el horno
comenzará a funcionar.
2. Para cambiar la temperatura, pulse la
tecla
o la tecla .
electrolux 25

Si se produce una interrupción del su-
ministro eléctrico, el programador retie-
ne todos los ajustes durante 3 minutos
aproximadamente. Transcurridos 3 mi-
nutos sin suministro eléctrico, será ne-
cesario volver a establecer los ajustes (y
también la hora).
Funciones del horno
Función del horno Uso
Aire caliente
Permite asar o asar y hornear a la vez alimentos
que requieran la misma temperatura, utilizando
más de una bandeja y sin que se transfieran los
sabores.
Temperatura predefinida: 175 ºC
Cocción convencional
Calienta desde las resistencias superior e inferior.
Para hornear y asar en un nivel.
Temperatura predefinida: 200°C
Grill central
Para asar al grill pequeñas cantidades de alimen-
tos de poco espesor en el centro de la bandeja.
Para hacer tostadas.
Temperatura predefinida: 250°C
Grill + ventilador
En este caso, la resistencia del grill y el ventilador
del horno suministran aire caliente alrededor de
los alimentos. Para cocinar grandes trozos de car-
ne.
Temperatura predefinida: 180°C
Importante Temperatura máxima para esta fun-
ción: 200°C.
Pizza
La resistencia inferior aplica calor directamente a
la base de las pizzas, tartas "quiche" o pasteles de
carne, al tiempo que el ventilador asegura que el
aire caliente circule para que se cocinen los ingre-
dientes de la pizza o el relleno de los pasteles.
Temperatura predefinida: 175°C
Grill potente
Está encendida toda la resistencia del grill. Para
asar al grill alimentos poco gruesos en grandes
cantidades. Para hacer tostadas.
Temperatura predefinida: 250°C
Resistencia
inferior
Calienta únicamente desde la parte inferior del
horno. Para hornear pasteles con bases gruesas
o crujientes.
Temperatura predefinida: 250 ºC
Resistencia superior
Calienta únicamente desde la parte superior del
horno. Para acabar de cocinar los platos.
Temperatura predefinida: 250 °C
Descongelación
Para descongelar alimentos.
Idónea para descongelar alimentos delicados; por
ejemplo, tartas rellenas de crema, tartas heladas,
pasteles, pan y alimentos elaborados con levadu-
ra.
Ajuste de las funciones del reloj
26 electrolux

1
2
1.
Pulse
repetidamente hasta que par-
padee la función que desea.
2.
Para ajustar el minutero
, la Duración
o el Fin , use o la tecla .
Se enciende el indicador de programa
correspondiente.
Al finalizar el tiempo elegido, el indicador
de funciones comienza a parpadear y se
emite una señal acústica durante 2 mi-
nutos.
Con las funciones Duración y Fin
el horno se apaga automáticamente.
3. Pulse cualquier tecla para parar la señal.
Cancelación de las funciones del reloj
1.
Pulse
repetidamente hasta que el in-
dicador de la función que desea y
par-
padee.
2.
Pulse "
" repetidamente hasta que la
hora que se indique sea "00:00".
Función de reloj Uso
Reloj Muestra la hora. Ajustar, cambiar o comprobar la hora.
Minutero Programar un espacio de tiempo.
Al final de la cuenta atrás se emite una señal acústica.
Esta función no influye en el funcionamiento del horno.
Duración Programar el tiempo de funcionamiento del horno.
Fin de programa Programar la hora de desconexión de una función del horno.
Duración y Fin se pueden utilizar
al mismo tiempo si el horno se va a co-
nectar y desconectar automáticamente.
En este caso, se recomienda ajustar pri-
mero el tiempo de Duración
, y luego
el de Fin
.
Funciones adicionales
Desconexión automática
El aparato se apaga automáticamente des-
pués de unos minutos:
• si no lo apaga expresamente;
• si no se cambia la temperatura del horno.
El indicador de temperatura parpadea con la
última temperatura programada.
Temperatura del horno Tiempo en funcionamiento antes de apagar
30°C - 120°C 12 h.
120 °C - 200 °C 8,5 h.
200°C - 250°C 5,5 h.
250°C 3,0 h.
Si utiliza la función de reloj Duración
o Fin , la función de desconexión au-
tomática se desactiva.
Seguro contra la manipulación de niños
Cuando se ha programado el bloqueo
de encendido, no se puede utilizar el
horno.
Para conectar el dispositivo de seguridad
para niños
1. Encienda el aparato. No debe haber nin-
guna función del horno programada.
2.
Utilice la tecla Selección
y simultá-
neamente, hasta que en la pantalla se in-
dique "SAFE" (seguro). El bloqueo contra
la manipulación por niños está conecta-
do.
electrolux 27

Desactivación del bloqueo para niños
Si desea desactivar el bloqueo, siga el mismo
procedimiento.
Función de calor residual
En la función Duración, el horno se apaga
automáticamente unos minutos antes de ter-
minarse el periodo de tiempo establecido. El
horno se sirve del calor residual para terminar
de cocinar los alimentos sin consumir más
energía.
Importante La función de calor residual es
aplicable tan sólo si el periodo establecido
para la Duración es superior a 15 minutos.
Función de calentamiento rápido
La función de calentamiento rápido le per-
mite reducir el periodo de precalentamiento.
Puede utilizarse con cualquier otra función.
Importante No coloque los alimentos en el
horno hasta que se haya terminado el
calentamiento rápido.
1. Ajuste una función del horno.
Si fuera necesario, cambie la temperatura
recomendada.
2.
Pulse
. La pantalla mostrará "FHU" y
se activará la función de calentamiento
rápido.
3. Al término del calentamiento rápido se
oirá una señal sonora y "FHU" desapare-
cerá.
En esta fase el aparato sigue calentando
en la función y temperaturas establecidas
para el horno.
4. Coloque los alimentos en el horno.
Modo de demostración
En el modo de demostración puede someter
a prueba el horno u observar las diferentes
etapas del funcionamiento. En esta modali-
dad el horno no se calentará.
El modo de demostración sólo puede utili-
zarse cuando el aparato se conecta por pri-
mera vez o si se ha producido una interrup-
ción de corriente y "12:00" y
parpadean
en la pantalla.
Activación del modo de demostración
1.
Pulse la tecla
aproximadamente 2 se-
gundos. Sonará una señal acústica.
2.
Pulse
y " " al mismo tiempo. Se oirá
una señal acústica y la pantalla indicará
"12:00".
Si la pantalla muestra , el modo de
demostración está activado.
Desactivación del modo de demostración
1. Apague el horno.
2. Siga nuevamente el procedimiento ante-
rior.
Si se produce una interrupción del su-
ministro eléctrico, la función del modo
de demostración se guardará.
Señal acústica
Apagado de la señal acústica
1. Apague el horno con el mando de En-
cendido y Apagado (On/Off)
.
2.
Mantenga pulsados los mandos
y
al mismo tiempo, hasta que se oiga un
sonido (aproximadamente 2 segundos).
La señal acústica no funciona.
Encendido de la señal acústica
1.
Mantenga pulsados los mandos
y
al mismo tiempo, hasta que se oiga un
sonido (aproximadamente 2 segundos).
2. La señal acústica vuelve a funcionar.
Código de error
Cuando se detecta un parámetro incorrecto,
la unidad de control detiene las funciones
activas y muestra el código de error corres-
pondiente en el indicador. Consulte el capí-
tulo "Qué hacer si...".
Guías telescópicas reemplazables
Coloque el carril telescópico en el nivel que
prefiera utilizando el sistema de bloqueo.
28 electrolux

Importante Los "topes“ de los extremos de
la guía DEBEN quedar hacia arriba.
1
1 Tope
Los carriles telescópicos se pueden adquirir
por separado.
Asegúrese de que los dos carriles tele-
scópicos están en niveles paralelos.
En cada nivel se pueden instalar carriles te-
lescópicos que faciliten la introducción y ex-
tracción de las bandejas.
Saque completamente los soportes telescó-
picos de la derecha y la izquierda.
°C
Coloque la bandeja o parrilla en los soportes
telescópicos y luego empuje suavemente
para introducirlos en el horno.
°C
Advertencia No intente cerrar la puerta
del horno si las guías telescópicas no se
han introducido por completo, ya que
podría dañar el esmalte y el cristal de la
puerta.
Ventilador de refrigeración
El ventilador se enciende automáticamente
para mantener frías las superficies del apa-
rato. Cuando se apaga el aparato, el ventila-
dor sigue funcionando hasta que el aparato
se enfría.
Termostato de seguridad
Para evitar que se produzca un calentamien-
to excesivo peligroso (debido al uso inco-
rrecto del aparato o a un componente de-
fectuoso), el horno cuenta con un termostato
electrolux 29

de seguridad que interrumpe el suministro de
energía eléctrica. El horno se vuelve a co-
nectar automáticamente cuando desciende
la temperatura.
Consejos, sugerencias y tablas de cocción
Advertencia Consulte el capítulo
"Información sobre seguridad".
Indicación sobre la acrilamida
Importante Según los últimos
conocimientos científicos, si se tuestan
alimentos (sobre todo los que contienen
almidón), la acrilamida puede representar un
peligro para la salud. Por tanto,
recomendamos cocinar a bajas
temperaturas y no tostar excesivamente los
alimentos.
• El horno tiene cuatro niveles o alturas. Es-
tos niveles se ordenan contándolos de
abajo a arriba desde la solera del aparato.
• Se pueden cocinar simultáneamente dife-
rentes platos en dos niveles diferentes.
Coloque los estantes en el nivel 1 y 3.
• El aparato está dotado con un sistema es-
pecial que hace circular el aire y recicla
constantemente el vapor. Gracias a este
sistema puede cocinar en un entorno de
vapor y mantener los alimentos blandos en
su interior y crujientes en su exterior. Ello
reduce al mínimo el tiempo de cocción y el
consumo de energía.
• La humedad puede llegar a condensarse
en el aparato o en las puertas de cristal.
Esto es totalmente normal. Manténgase
alejado del aparato cuando abra la puerta
mientras está funcionando. Si desea re-
ducir la condensación, ponga en funcio-
namiento el aparato 10 minutos antes de
cocinar.
• Limpie con un paño la humedad cada vez
que termine de utilizar el aparato.
• No coloque objetos directamente sobre la
solera del aparato ni cubra los componen-
tes con papel de aluminio cuando cocine.
De lo contrario puede que se alteren los
resultados de la cocción y se dañe el re-
vestimiento de esmalte.
Preparación de pasteles
• La temperatura óptima para hornear pas-
teles es de entre 150 °C y 200 °C.
• Precaliente el horno durante aproximada-
mente 10 minutos.
• No abra la puerta del horno antes de que
hayan transcurrido las ¾ partes del tiempo
de cocción programado.
• Si utiliza dos bandejas a la vez, deje un ni-
vel vacío entre ellas.
Preparación de carne y pescado
• No cocine carne que pese menos de 1 kg.
La carne queda demasiado seca si se pre-
para en pequeñas cantidades.
• Para que la carne roja quede bien cocida
por fuera y jugosa por dentro, utilice una
temperatura de entre 200 °C y 250 °C.
• La carne blanca, las aves y el pescado re-
quieren una temperatura de entre 150°C y
175°C.
• Con alimentos muy grasos, utilice una
bandeja de goteo para evitar manchas
permanentes en el horno.
• Deje reposar la carne durante unos 15 mi-
nutos antes de trincharla para que el jugo
no gotee.
• Para evitar que se forme mucho vapor en
el horno mientras asa los alimentos, añada
un poco de agua en la bandeja de goteo.
Si no quiere que el vapor se condense,
añada agua cada vez que se evapore.
Tiempos de cocción
Los tiempos de cocción dependen del tipo,
grosor y volumen de los alimentos.
Al principio hay que vigilar el proceso de coc-
ción hasta que se encuentran los mejores
ajustes (temperatura, tiempo, etc.) en fun-
ción de los recipientes, las recetas y las can-
tidades que se utilizan.
30 electrolux

Tabla para hornear y asar
REPOSTERÍA
TIPO DE ALI-
MENTO
Cocción con-
vencional
Turbo
Tiempo de
cocción
(min)
Notas
Nivel
Temp.
(°C)
Nivel
Temp.
(°C)
Masas batidas 2 170 2 (1 y 3) 160 45-60 En molde de repostería
Masa con man-
tequilla
2 170 2 (1 y 3) 160 24-34 En molde de repostería
Tarta de queso
a base de suero
de leche
1 170 2 160 60-80 En molde de repostería (26
cm)
Tarta o pastel de
manzana
1 170 2 izda +
dcha
160 100-120 2 moldes de repostería de
20 cm en la bandeja del
horno
Strudel 2 175 2 150 60-80 En bandeja de horno
Tarta de mer-
melada
2 170 2 160 30-40 En molde de repostería (26
cm)
Tarta de frutas 2 170 2 155 60-70 En molde de repostería (26
cm)
Bizcocho (biz-
cocho sin grasa)
2 170 2 160 35-45 En molde de repostería (26
cm)
Pastel de Navi-
dad/tarta de fru-
tas
2 170 2 160 50-60 En molde de repostería (20
cm)
Tarta de ciruelas 2 170 2 160 50-60
En molde para pan
1)
Pastelillos 3 170 3 (1 y 3) 160 20-30 En bandeja de horno plana
Galletas 3 150 3 150 20-30 En bandeja de horno plana
1)
Merengues 3 100 3 100 90-120 En bandeja de horno plana
Bollos 3 190 3 180 15-20 En bandeja de horno plana
1)
Pasta Choux 3 190 3 180 25-35 En bandeja de horno plana
1)
Tartaletas 3 180 2 170 45-70 En molde de repostería (20
cm)
Tarta Victoria 1 o 2 180 2 170 40-55 Izquierda + derecha en mol-
de de repostería de 20 cm
1) Precalentar durante 10 minutos.
PAN Y PIZZA
TIPO DE ALI-
MENTO
Cocción con-
vencional
Turbo
Tiempo de
cocción
(min)
Notas
Nivel
Temp.
(°C)
Nivel
Temp.
(°C)
Pan blanco 1 190 1 190 60-70 1-2 piezas, 500 g cada pie-
za
1)
electrolux 31

TIPO DE ALI-
MENTO
Cocción con-
vencional
Turbo
Tiempo de
cocción
(min)
Notas
Nivel
Temp.
(°C)
Nivel
Temp.
(°C)
Pan de centeno 1 190 1 180 30-45 En molde para pan
Panecillos 2 190 2 (1 y 3) 180 25-40 6-8 panecillos en bandeja
de horno plana
1)
Pizza 1 190 1 190 20-30 En fuente de horno honda
1)
Bollitos 3 200 2 190 10~20 En bandeja de horno plana
1)
1) Precalentar durante 10 minutos.
FLANES
TIPO DE ALI-
MENTO
Cocción con-
vencional
Turbo
Tiempo
de coc-
ción (min)
Notas
Nivel
Temp.
(°C)
Nivel
Temp.
(°C)
Pudin de pasta 2 180 2 180 40-50 En molde
Pudin de verdu-
ras
2 200 2 175 45-60 En molde
Quiches 1 190 1 190 40-50 En molde
Lasaña 2 200 2 200 25-40 En molde
Canelones 2 200 2 190 25-40 En molde
Pudin Yorkshire 2 220 2 210 20-30
6 moldes de pudin
1)
1) Precalentar durante 10 minutos.
CARNES
TIPO DE ALI-
MENTO
Cocción con-
vencional
Turbo
Tiempo
de coc-
ción (min)
Notas
Nivel
Temp.
(°C)
Nivel
Temp.
(°C)
Carne de vacu-
no
2 200 2 190 50-70 En la bandeja del horno y
fuente de horno honda
Carne de cerdo 2 180 2 180 90-120 En la bandeja del horno y
fuente de horno honda
Ternera 2 190 2 175 90-120 En la bandeja del horno y
fuente de horno honda
Rosbif poco he-
cho
2 210 2 200 44-50 En la bandeja del horno y
fuente de horno honda
Rosbif en su
punto
2 210 2 200 51-55 En la bandeja del horno y
fuente de horno honda
Rosbif inglés
muy hecho
2 210 2 200 55-60 En la bandeja del horno y
fuente de horno honda
Paletilla de cer-
do
2 180 2 170 120-150 En fuente de horno honda
Morcillo de cer-
do
2 180 2 160 100-120 2 piezas en fuente de horno
honda
32 electrolux

TIPO DE ALI-
MENTO
Cocción con-
vencional
Turbo
Tiempo
de coc-
ción (min)
Notas
Nivel
Temp.
(°C)
Nivel
Temp.
(°C)
Cordero 2 190 2 190 110-130 Pata
Pollo 2 200 2 200 70-85 Entero en fuente de horno
honda
Pavo 1 180 1 160 210-240 Entero en fuente de horno
honda
Pato 2 175 2 160 120-150 Entero en fuente de horno
honda
Ganso 1 175 1 160 150-200 Entero en fuente de horno
honda
Conejo 2 190 2 175 60-80 Troceado
Liebre 2 190 2 175 150-200 Troceada
Faisán 2 190 2 175 90-120 Entero en fuente de horno
honda
PESCADO
TIPO DE ALI-
MENTO
Cocción con-
vencional
Turbo
Tiempo de
cocción
(min)
Notas
Nivel
Temp.
(°C)
Nivel
Temp.
(°C)
Trucha/Pargo 2 190 2 (1 y 3) 175 40-55 3-4 pescados
Atún/Salmón 2 190 2 (1 y 3) 175 35-60 4-6 filetes
Asado a la parrilla
Precaliente el horno vacío durante 10
minutos antes de cocinar.
Cantidad Gratinado Tiempo de cocción (mi-
nutos)
TIPO DE ALIMEN-
TO
Piezas g
nivel
Temp.
(°C)
1ª cara 2ª cara
Filetes de ternera 4 800 3 250 12-15 12-14
Filetes de ternera 4 600 3 250 10-12 6-8
Salchichas 8 / 3 250 12-15 10-12
Chuleta de cerdo 4 600 3 250 12-16 12-14
Pollo (cortado en
dos)
2 1000 3 250 30-35 25-30
Brochetas 4 / 3 250 10-15 10-12
Pechuga de pollo 4 400 3 250 12-15 12-14
Hamburguesa 6 600 3 250 20-30
Filete de pescado 4 400 3 250 12-14 10-12
Sándwiches 4-6 / 3 250 5-7 /
Tostadas 4-6 / 3 250 2-4 2-3
electrolux 33

Grill + ventilador
Advertencia Utilice esta función con
una temperatura máxima de 200°C.
Cantidad Gratinado Tiempo de cocción (mi-
nutos)
TIPO DE ALIMEN-
TO
Piezas g
nivel
Temp.
(°C)
1ª cara 2ª cara
Redondos (pavo) 1 1000 3 200 30-40 20-30
Pollo (cortado en
dos)
2 1000 3 200 25-30 20-30
Muslos de pollo 6 - 3 200 15-20 15-18
Codorniz 4 500 3 200 25-30 20-25
Gratinado de verdu-
ras
- - 3 200 20-25 -
Piezas Vieiras - - 3 200 15-20 -
Caballa 2-4 - 3 200 15-20 10-15
Pescado en rodajas 4-6 800 3 200 12-15 8-10
Pizza
Precaliente el horno vacío durante 10
minutos antes de cocinar.
TIPO DE ALI-
MENTO
Función pizza
Tiempo de cocción
(minutos)
NOTAS
Nivel temp.°C
Pizza, grande 1 200 15~25
Bandeja horneado
plana
Pizza, pequeña 1 200 10~20
sobre bandeja plana
o bandeja del horno
Panecillos 1 200 15~25
Bandeja horneado
plana
Mantenimiento y limpieza
Advertencia Consulte el capítulo
"Información sobre seguridad".
Guías de apoyo extraíbles
Extracción de las guías de apoyo
1. Tire de la parte delantera de la guía para
separarla de la pared.
2. Tire de la guía de apoyo trasera para se-
pararla de la pared y extráigala.
34 electrolux

Instalación de las guías de apoyo
Repita las instrucciones anteriores en orden
inverso.
Los extremos redondeados de las guías
de apoyo deben quedar en la parte de-
lantera.
Limpieza de la puerta del horno
La puerta del horno tiene tres paneles de vi-
drio, instalados uno a continuación del otro.
Los paneles de cristal se pueden retirar para
limpiarlos.
Retirada de la puerta del horno y los
paneles de cristal
1. Sujete el panel de aluminio (A) con una
mano y retire el soporte (B) del panel in-
terior con la otra. Presione primero el so-
porte (B) hacia la derecha para desblo-
quearlo y, después, tire hacia arriba.
A
B
2. Extraiga el panel de aluminio (A) del so-
porte (C).
A
C
3. Sujete firmemente en su posición el panel
interior (D) con una mano y tire del so-
porte (C) con la otra.
D
C
4. Sujete el cristal de la puerta con una ma-
no y retire el primer panel de cristal (D)
con la otra. Proceda de la misma forma
con el segundo panel de vidrio (E).
D
electrolux 35

E
Limpie los paneles de cristal con agua y ja-
bón. Seque los paneles de cristal con cuida-
do.
Instalación de la puerta y los paneles de
cristal
Después de limpiar la puerta, coloque los
paneles de cristal en el orden inverso. Ase-
gúrese de que coloca el panel de cristal cen-
tral en los soportes correctos.
El panel de cristal "E" tiene un punto en una
de las esquinas. Cuando coloque este panel,
asegúrese de que el punto se encuentra en
la esquina superior izquierda del panel de
cristal.
El panel de cristal "D" tiene un marco deco-
rativo. Cuando coloque este panel, asegúre-
se de que la cara impresa está por fuera.
Asegúrese de que la superficie del marco del
panel de cristal no esté áspera cuando la to-
que.
Después de instalar los paneles de cristal:
1. Coloque el extremo derecho del panel de
aluminio (A) en el hueco del soporte "C”.
A
C
2. Coloque el extremo izquierdo del panel
de aluminio "A" en el hueco del soporte
"B”. Coloque el soporte “B”. Asegúrese
de que todos los componentes están
acoplados correctamente.
A
B
Techo del horno
La resistencia del techo del horno es extraí-
ble para facilitar su limpieza y la del techo del
horno.
Advertencia Apague el aparato antes
de extraer la resistencia. Asegúrese de
que está totalmente frío. Puede causar
quemaduras.
1. Retire el tornillo que sujeta la resistencia.
Utilice un destornillador la primera vez.
36 electrolux

2. Desplace con cuidado la resistencia ha-
cia abajo.
En ese momento puede limpiar el techo
del horno.
Limpie el techo del horno con un paño suave
humedecido en agua templada y jabón, y
déjelo secar.
Instalación de la resistencia
1. Para instalar la resistencia, siga las ins-
trucciones anteriores en orden inverso.
Advertencia Asegúrese de que la
resistencia se ha colocado
correctamente y no se cae.
Bombilla del horno
Cambio de la luz del horno/limpieza de
la tapa de cristal
Advertencia Tenga cuidado: existe
riesgo de descarga eléctrica.
1. Gire la tapa de cristal hacia la izquierda y
retírela.
2. Limpie la tapa de cristal.
3. Cambie la bombilla del horno por otra
preparada para soportar temperaturas
de hasta 300°C. La nueva bombilla del
horno tiene que ser del mismo régimen
que la anterior.
4. Instale la tapa de cristal.
Qué hacer si…
Advertencia Consulte el capítulo
"Información sobre seguridad".
Problema Causa probable Solución
El horno no se calienta El horno está apagado Encienda el horno
No se ha ajustado la hora Ajuste la hora
No se ha elegido ninguna función Verifique los ajustes
La desconexión automática está
activada
Consulte el apartado "Desconexión
automática"
El bloqueo de encendido está acti-
vado
Consulte "Desactivación del blo-
queo de encendido"
electrolux 37

Problema Causa probable Solución
Se ha fundido un fusible de la ins-
talación doméstica
Compruebe el fusible
Si el fusible se daña más de una
vez, póngase en contacto con un
electricista homologado
El modo de demostración está fun-
cionando
Consulte el apartado "Modo de de-
mostración"
La pantalla muestra el có-
digo de error "F.."
Hay un fallo electrónico. Anote el código de error y llame al
Centro de servicio.
La bombilla del horno no
funciona
La bombilla está averiada Cambie la bombilla del horno
Se acumula vapor y con-
densación en los alimen-
tos y en el interior del hor-
no
Los platos han permanecido en el
horno durante demasiado tiempo
No deje los platos en el horno más
de 15 a 20 minutos tras finalizar el
proceso de cocción
Si no lograra subsanar el problema, póngase
en contacto con el centro de servicio.
Los datos necesarios para el servicio técnico
están en la placa de especificaciones técni-
cas. La placa de especificaciones técnica se
encuentra en el marco delantero de la cavi-
dad de horno.
Es conveniente que los anote aquí:
Modelo (Mod.) .........................................
Número de producto (PNC) .........................................
Número de serie (S.N.) .........................................
Instalación
Advertencia Consulte el capítulo
"Información sobre seguridad".
Encastrado
594
2
20
570
590
540
560
50
580
550 min
560÷570
38 electrolux

550 min
593
560-570
80÷100
A
B
Instalación eléctrica
Advertencia Deje la instalación
eléctrica en manos de un profesional
cualificado.
El fabricante declina toda responsabili-
dad si la instalación no se efectúa si-
guiendo las instrucciones de seguridad
del capítulo "Seguridad".
El electrodoméstico sólo se suministra con
un cable de alimentación.
Aspectos medioambientales
El símbolo que aparece en el aparato o
en su embalaje, indica que este producto no
se puede tratar como un residuo normal del
hogar. Se deberá entregar, sin coste para el
poseedor, bien al distribuidor, en el acto de
la compra de un nuevo producto similar al
que se deshecha, bien a un punto municipal
de recolección selectiva de equipos
eléctricos y electrónicos para su reciclaje. Al
asegurarse de que este producto se
desecha correctamente, usted ayudará a
evitar posibles consecuencias negativas
para el medio ambiente y la salud pública, lo
cual podría ocurrir si este producto no se
gestionara de forma adecuada. Para obtener
información más detallada sobre el reciclaje
de este producto, póngase en contacto con
el Ayuntamiento de su Municipio, ó con la
tienda donde lo compró.
Material de embalaje
El material de embalaje es respetuoso
con el medio ambiente y reciclable. Las
piezas de plástico están identificadas
con abreviaturas internacionales, como
PE, PS, etc. Deseche el material de em-
balaje en los contenedores destinados a
tal fin por los servicios de limpieza.
Eliminación del aparato
1. Desconecte el enchufe de la toma de co-
rriente.
2. Corte el cable y el enchufe y deséchelos.
3. Retire el cierre de la puerta. Así evitará
que los niños se queden atrapados en el
interior del aparato. Existe riesgo de asfi-
xia.
electrolux 39

892940573-A-032010
www.electrolux.com
Para comprar accesorios, consumibles y recambios en nuestra tienda online, por favor visite
nuestro site:
www.electrolux.es
-
 1
1
-
 2
2
-
 3
3
-
 4
4
-
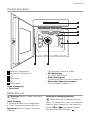 5
5
-
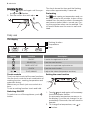 6
6
-
 7
7
-
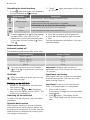 8
8
-
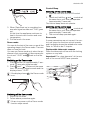 9
9
-
 10
10
-
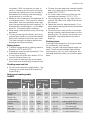 11
11
-
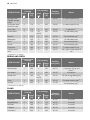 12
12
-
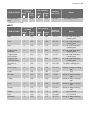 13
13
-
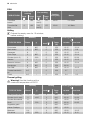 14
14
-
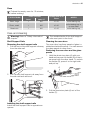 15
15
-
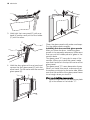 16
16
-
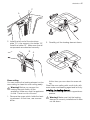 17
17
-
 18
18
-
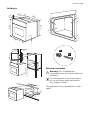 19
19
-
 20
20
-
 21
21
-
 22
22
-
 23
23
-
 24
24
-
 25
25
-
 26
26
-
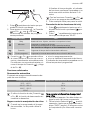 27
27
-
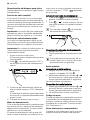 28
28
-
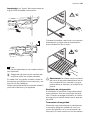 29
29
-
 30
30
-
 31
31
-
 32
32
-
 33
33
-
 34
34
-
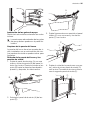 35
35
-
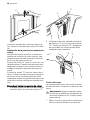 36
36
-
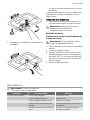 37
37
-
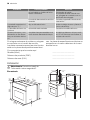 38
38
-
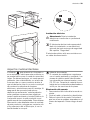 39
39
-
 40
40


Electrolux EOB66712X Manual de usuario
- Categoría
- Cocinas
- Tipo
- Manual de usuario
en otros idiomas
- English: Electrolux EOB66712X User manual
Artículos relacionados
-
Electrolux EOC55200X Manual de usuario
-
-
-
-
Electrolux EOC56200W Manual de usuario
-
Electrolux EOZ3430AOX Manual de usuario
-
-
-
-
Otros documentos
-
Zanussi ZOHEX3X1 Manual de usuario
-
-
Progress PHN1310W Manual de usuario
-
Aeg-Electrolux BE6914001M Manual de usuario
-
-
-
-
-
-