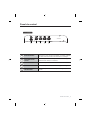
Samsung WT14J4200MB/AP Manual de usuario
- Categoría
- Lavadoras
- Tipo
- Manual de usuario

Washing Machine
user manual
imagine the possibilities
Thank you for purchasing this Samsung product.
WT14J4200MB/AP

2_ features
contents
Instruction about the WEEE mark
Correct Disposal of This Product (Waste
Electrical & Electronic Equipment)
This marking on the product,
accessories or literature indicates
that the product and its electronic
accessories should not be disposed
of with other household waste at the
end of their working life. To prevent
possible harm to the environment or
human health from uncontrolled waste
disposal, please separate these items
from other types of waste and recycle
them responsibly to promote the
sustainable reuse of material resources.
For more information on safe disposal and recycling
visit our website www.samsung.com
features
Double Storm Pulsator
- By rotating an inner and outer blade at different
speeds, two powerful currents of water
created that ensure that clothes get clean with
less damage than a conventional washing
machine. The Double Storm like water currents
enhance both washing and rinsing power while
reducing unnecessary fractions and in creating
both the durability and reliability of your fine
fabrics by preventing the laundry from getting
twisted and knotted.
Transparent Window
- This Transparent Window is the new concept
to solve the curiosity of users to see inside of
washing machine while operation.
While operation, the laundry progress inside of
washing machine can be checked by looking
through the transparent window.
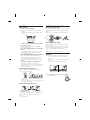
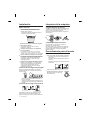
safety instructions
Must follow the cautions and precautions for
safety intend to prevent unpredictable danger and
damage by helping the proper use in safety.
cautions
Do not put your hands into the
spin dryer basket when it is
spinning.
Your fingers can be caught by
spinning laundry and damaged.
Never allow children to operate
or play with the washing
machine.
Children playing with the washing
machine may accidentally fall into
the washing tub.
Do not climb up the Washing
Machine or lid.
FEATURES . . . . . . . . . . . . . . .2
SAFETY INSTRUCTIONS . . . . . . . . .2
cautions . . . . . . . . . . . . . . .2
precautions when operating . . . . . . . .3
DESCRIPTION OF PARTS . . . . . . . . .4
CONTROL PANEL . . . . . . . . . . . .5
INSTALLATION . . . . . . . . . . . . .6
Environment . . . . . . . . . . . . . .6
Connecting the inlet hose . . . . . . . . .6
CLEANING THE MACHINE. . . . . . . . .6
Cleaning the lint filter . . . . . . . . . . .6
Cleaning the wash tub . . . . . . . . . .6
WASHING PROCEDURE . . . . . . . . .6
Washing .
. .
. . . . . . . . . . . . . .
. . . . . . . . . . .
. . .
6
Spinning dry
Soaking
. . . . . . . . . . . . . .7
7
Heavy wash . . . . . . . . . . . . . .7
Over flow wash . . . . . . . . . . . . .8
Spinning rinse . . . . . . . . . . . . .8
LAUNDRY GUIDE . . . . . . . . . . . .8
MAINTENANCE . . . . . . . . . . . . .9
TROUBLESHOOTING. . . . . . . . . . .9
SPECIFICATIONS . . . . . . . . . . . 10

safety instructions _3
t Must follow the cautions below
when the washing machine is
working.
Do not fall the WASH-TRAY to
the wash-tub when the washing
running.
t Disconnect the power cord from the power
supply when not in use.
t Ventilation opening must not be obstructed
by carpeting when the washing machine is
installed on a carpeted floor.
t If the supply cord is damaged, it must be
replaced by the manufacturer, its service
agent or similarly qualified persons in order
to avoid a hazard.
t To avoid overfilling and damages this
appliance must be filled with the operator
present using a moderate water supply
pressure only.
t For washing machines with ventilation
openings in the base, that a carpet must not
obstruct the openings.
t Do not use adapter or extension cord to
supply power to your washing machine.
t This appliance is not intended for use by
persons (including children) with reduced
physical, sensory or mental capabilities,
or lack of experience and knowledge,
unless they have been given supervision or
instruction concerning use of the appliance
by a person responsible for their safety.
t Children should be supervised to ensure
that they do not play with the appliance.
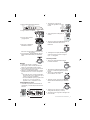
precautions when operating
t Don’t use excessively hot water. (50°C or
more)
Plastic parts may be deformed or damaged.
Also, clothing may be deformed or decolored.
Do not connect to the hot water supply.
t Before washing,check all pockets.
If nails or pins remain in pockets, they may
damage the washing machine or clothes.
t Close the water tap a little if the water
pressure is too high.
t To avoid water splashes, close the wash
tub lid.
t Never splash water on the control panel.
t Take out personal belongings from pockets.
Check the pockets! Hairpins and coins cause
damages to clothes and washing machine.
They make noise and problems to the
machine. Must check the pocket.
t Put only washing
cloths on WASH-
TRAY.
Heavy cloths &
thing not to be kept.
t Don’t put candle
& Hot Things on
washing machine.
t Be able to hang the WASH-TRAY on the
side hook, while operating the Washing
Machine or not.
t Be sure to cover
with the inner cover
on laundry before
spinning.
This prevents laundry
from being tossed out
and damaged.
t
Be sure lay the drain hose(A) down.
t Heavy laundry or loads on WASH-TRAY
may make it buckle and fall out of washing
machine.
Do not overload WASH-TRAY
t Don’t pull off the Knobs. Knobs can’t take
off from outside of the Panel.
CAUTION
CAUTION
Inner Lid
Safety
Cover

4_ description of parts
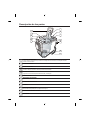
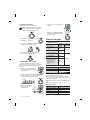
description of parts
1
2
3
4
5
6
7
8
9
10
11
12
SPIN DRYER LID
When you open this lid while the spin basket is spinning, the spinning will be stopped by brake system.
DRAIN HOSE
INNER LID
(WITH PUMP)
OVER FLOW FILTER
WATER SELECTOR
SPIN DRYER BASKET
LINT FILTER
This is used for gathering the dregs which are made during washing.
WASH TUB
WASH TRAY
POWER CORD
Be sure to keep the tray closed during washing and spinning.
The plug’s shape may not correspond with this drawing
WATER DRAIN HOSE
PULSATOR
1
8
9
10
11
12
4
5
6
7
2
3

control panel _5
control panel
1
WATER SELECTOR
During washing,WATER SELECTOR KNOB
should be selected to wash.During spin rinsing,
WATER SELECTOR KNOB should be selected to spin.
2
WASH TIMER
This is used to set the wash time, 1-15 minutes
and can close the “Soak” fuction by 1-20 minutes.
You can wash laundry effectively by various methods.
3
WASH SELECTOR
4
DRAIN SELECTOR
5
SPIN TIMER
This is used to set the Wash/Rinse or Drain.
This is used to set the spin time, 1-5 minutes.
1 2 3 4 5
WT14J4200MB/AP

6_ installation
installation
Environment
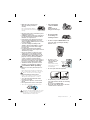
t How to move the machine.
Wheels are provided for easy translocation of
machine.
- Hold the machine firmly as shown in the figure
below.
Do not move machine when it is loaded.
t Leave some space.
Space at last 15 cm between the washing
machine and the wall.
t Place the washing machine on a sturdy flat
surface.
If the washing machine is placed on an uneven
or weak surface, noise or vibration may be
occurred. (Allowable is 2°)
t Never install the washing machine near water.
Do not place the washing machine in steamy
rooms or where the washing machine is directly
exposed to rain. Moisture may destroy the
electrical insulation and cause an electrical shock
hazard.
t Avoid direct sunlight or heating devices.
As plastic and electrical components are
affected by direct heat, never place the washing
machine near heaters, boilers,etc. Do not place
under direct sunlight.
Connecting the drain hose
Insert the drain hose(a) and push it tightly to be
connected as arrow direction.
- Push it with force further to the bottom of the
drain outlet
- Check the drain hose for not getting apart from
the outlet by drawing it.
Connecting the inlet hose
(Insert the inlet hose
into washing machine) into faucet)
The new hose-sets supplied with the appliance are
to be used and that old hose-sets should not be
reused.
cleaning the machine
Cleaning the lint filter
If the dregs are filled up in the lint filter after finishing
the wash, push down(1) and pull it out(2) as shown
in figure.
Remove the collected lint and rinse the filter net.
Lint filter
Cleaning the wash tub
Wipe off strains on the cabinet and operation panel
with soft cloth.
Do not use benzene, thinners, cleanser, or wax, nor
scrub the washing machine with a brush. Painted
surfaces or plastic parts will be damaged.
washing procedure
Washing
1. Before starting washing, check the following;
- Connect the water inlet hose and open the
water tap.
- Connect the power cord to the power supply
outlet.
- Lay the drain hose (A) toward a sinkhole.
2. Set the NORMAL / HEAVY SELECTOR KNOB
to the desired mode.
(Insert the inlet hose

washing procedure _7
3. Set the WATER INLET SELECTOR.
4. Load laundry in the wash
tub.
5. Fill water in the wash tub
and add the detergent.
6. Set the WASH TIMER.
Set the Wash Timer 1-15 min. (option)
7.
After washing,set the DRAIN
SELECTOR KNOB to ‘DRAIN’
for draining.
Spinning dry
1. Transfer the clothes into the spin basket and
arrange the clothes evenly.
Bottom of balancer
safety cover
3. Close the spin dryer lid.
4. Set the SPIN DRYER TIMER 1-5 minutes.
5. Incomplete spining.(Severe vibration or
unbalance) See “When you load ...”on page 9.
2. Be sure to attach the
safety cover and close the
inner lid.
Heavy wash
1. Set the WASH SELECTOR KNOB to ‘HEAVY’.
2. Supply the proper amount of water as not to
overflow the top of the washing tub.
3. Set the WASH TIMER 10~15
minutes.
4. Drain the water. Set the DRAIN
SELECTOR KNOB to ‘DRAIN’.
5. Repeat this cycle until drain water is clean. (2~3
cycles)
6. Be sure lay the drain hose down.
Soaking
1. Place clothes into the WASH TUB.
2. Turn on tap or use bucket to fill the
WASH TUB with desired amount of
water.
3. Put detergent depending on the
water volume and detergent
package indications.
4. Set WASH TIMER to point between
“15” to “35” in the timer.
t4PBL8BTIJOHBVUPNBUJDBMMZ
starts the wash (15 min.) after the
soak (2 to 20 min.) is completed.
t5IF40",GVODUJPONJO
repeats the cycle that is
1.5 ~ 2.0 min. turning and
the next 5 min. resting 3 times.
Inner Lid
Safety
Cover
wash inlet
spin inlet

8_ laundry guide
Over flow wash
1. Keep suppling water.
Adjust water pressure to ensure that the
amount of water supplied does not exceed
that water drained.
2. Set the WASH TIMER 6~8 minutes.
3. As soon as the WASH TIMER shuts off, turn off
the water tap.
4. Set the DRAIN SELECTOR KNOB
to ‘DRAIN’.
Spinning rinse
After rinsing you can select this course for more
effective rinse (Don’t select only this course for
rinse.)
1. Load the laundry evenly into the spin
basket.
2.
Connect the water inlet pipe.
set the water selector to the right side.
And set the time of spinning as per your favor.
(b)
(a)
3. After stopping water
supply, cover the laundry
with safety cover and
close the inner lid.
4. Close the spin dryer lid.
5. Set the SPIN DRY TIMER 2~3
minutes.
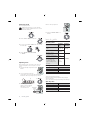
laundry guide
Washing time
Kinds of clothing
Washing
time
Washing
Selection
Extremely soiled heavy
fabric
10 to 35
minutes
(soak 20)
HEAVY
Linen,cotton,etc.
8 to10
minutes
Ordinary clothes
(underwear,etc)
7 minutes
NORMAL
Slightly soiled synthetic
fiber
2 to 5
minutes
100% wool,mixed
wool knitting, thin
synthetic fiber with
tags indicating hand
washing
2 to 5
minutes
Detergent
Amount of detergent Water level
40 g Low (42 ℓ)
50 g Med (65 ℓ)
61 g High (87 ℓ)
The amount of detergent is average.
Follow the instruction detergent printed on the package for
amount of detergent.
Choose the amount of detergent depending on the fabric type.
Spin dry time
Type of laundry Time
Thin (synthetic fiber) 1 min.
Wool 1~2 min.
Cotton 3~5 min.
Thick (cotton) 5 min.
Inner Lid
Safety
Cover

maintenance _9
maintenance
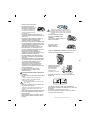
WHEN YOU LOAD THE LAUNDRY INTO THE SPIN BASKET.
Press the laundry evenly and put the safety cover into the spin basket drum as shown in the figure.
Bottom of balancer
Safety cover
troubleshooting
TROUBLE CHECK POINT
The washing machine does not
work.
Check that the power supply is in good condition.
Check that the power plug is inserted properly.
Check that the wash timer knob or the spin timer knob is not in the
"0" position.
The drain hose does not work.
There is abnormal noise
during washing.
There is abnormal noise and
violent vibration during spinning.
Check that the drain hose is not laid too high.
Check that the drain hose is not frozen.
Check that the washing machine is placed on flat, stable floor.
Check that clothes are evenly distributed in the spin tub.
Check that there are no washing materials or foaming debris dropped
into the outside of the spin tub.
Check that there are no coins or any other foreign objects dropped
into the wash tub.that the drain hose is not blocked by foreign matter.
Inner Lid
Safety
Cover

10_ specifications
specifications
W931xD553xH1052mm
Washing 35minutes (Soak 20) / Spinning 5minutes
Low : 42L Middle : 65L High : 87L
31.5kg
14.0kg
7.0 kg
0.1~0.6 MPa
RATING TIME
WEIGHT
WT14J4200MB/AP
CAPACITY
DIMENSIONS (WxDxH)mm
WATER PRESSURE
STANDARD QUANTITY OF WATER
WT14J4200MB/AP
WT14J4200MB/AP

memo

QUESTIONS OR COMMENTS?
This product is RoHS compliant.
etiS beWretneC tcatnoCyrtnuoC
troppus/ur/moc.gnusmas.www55-55-555-008-8AISSUR
troppus/ua/moc.gnusmas.www306 263 0031AILARTSUA
www.samsung.com/in/support
www.samsung.com/my/support
www.samsung.com/ph/support
www.samsung.com/sg/support
www.samsung.com/vn/support
www.samsung.com/support
INDIA
1800 3000 8282 - Toll Free
1800 266 8282 - Toll Free
MALAYSIA
1800-88-9999
603-77137477(Overseas contact)
PHILIPPINES
1-800-10-7267864 [PLDT]
1-800-8-7267864 [Globe landline amd Mobile]
02-4222111 [Other landline]
SINGAPORE
SOUTH AFRICA
VIETNAM
www.samsung.com/iran/support
www.samsung.com/pk/support
www.samsung.com/n_africa/support
www.samsung.com/ae/support (English)
www.samsung.com/ae_ar/support (Arabic)
www.samsung.com/Levant/support (English)
www.samsung.com/n_africa/support
www.samsung.com/mx/support
www.samsung.com/cl/support
www.samsung.com/latin/support (Spanish)
www.samsung.com/pe/support
www.samsung.com/africa_en/support
www.samsung.com/africa_en/support
www.samsung.com/latin/support (Spanish)
www.samsung.com/latin_en/support (English)
www.samsung.com/latin/support (Spanish)
www.samsung.com/latin_en/support (English)
021-8255
0800-Samsung (72678)
080 100 22 55
01-800-726-7864 (SAMSUNG)
800-7267
1-800-10-7267
0800-777-08
0-800-507-7267
0800-726-7864
0800-10077
0302-200077
800-726-7864
(Desde Celulares 02-4828200)
183-CALL (183-2255)
0800-22273
06 5777444
IRAN
PAKISTAN
TUNISIA
KUWAIT
JORDAN
MOROCCO
MEXICO
CHILE
PANAMA
ECUADOR
PERU
COSTARICA
NIGERIA
GHANA
1800-SAMSUNG(726-7864)
1 800 588 889
0860-SAMSUNG(726-7864 )
800-0101
1-800-SAMSUNG (72-6786) www.samsung.com/latin_en/support (English)
00-800-1-SAMSUNG (726-7864)

Lavarropas
Manual del usuario
Imagine las posibilidades
Agradecemos la compra de este producto Samsung.
WT14J4200MB/AP

2_ Características
Índice
Instrucciones sobre la marca WEEE
Características
Pulsador Double Storm
-
Ventana transparente
Instrucciones de seguridad
Precauciones
Eliminación correcta de este producto
(Deshecho eléctrico & equipo electrónico)
CARACTERÍSTICAS···········································
INSTRUCCIONES DE SEGURIDAD···················
Precauciones ···················································
Precauciones durante el funcionamiento·········
DESCRIPCIÓN DE LAS PARTES ·······················
PANEL DE CONTROL·········································
INSTALACIÓN ·····················································
Medio ambiente···············································
Conexión de la manguera de entrada·············
LIMPIEZA DE LA MÁQUINA·······························
Limpieza del filtro de pelusas ·························
Limpieza del tambor de lavado ·······················
PROCEDIMIENTO PARA EL LAVADO ··············
Lavado ····························································
Remojo····························································
Centrifugado en seco······································
Lavado pesado················································
Desborde del lavado········································
Centrifugado de enjuague·······························
GUÍA DE LAVADO ···············································
MANTENIMIENTO ···············································
LOCALIZACIÓN Y SOLUCIÓN DE PROBLEMAS···
ESPECIFICACIONES·········································
Para obtener más información sobre la
eliminación segura y el reciclaje visite nuestra
página web www.samsung.com
La marca de este producto, los
accesorios o los materiales indican
que el producto y sus accesorios
electrónicos no pueden ser tratados
como basura doméstica al finalizar
su vida útil. Para evitar daños al
medio ambiente o a la salud de los
seres humanos debido a la
eliminación sin control de los
deshechos. Por favor, separe estos
artículos de otros tipos de
deshechos y recíclelos de manera
responsable para promover la
reutilización sustentable de los
recursos materiales.
Con paletas giratorias internas y externas de
diferentes velocidades, se forman dos
corrientes potentes de agua que garantizan
que las prendas se limpien con menos daño
que en un lavarropas convencional. El
Double Storm y las corrientes de agua
mejoran el poder del lavado y del enjuague.
Reduce fracciones innecesarias y crea
durabilidad y confiabilidad en sus prendas
delicadas. De esta manera, evita que el
lavado retuerza o enrede sus prendas.
-
Esta ventana transparente es el nuevo
concepto que soluciona la curiosidad que
tienen los usuarios de ver dentro del
lavarropas mientras está funcionando.
Mientras está funcionando, el lavado en
progreso puede observarse a través de la
ventana transparente.
El usuario debe seguir las precauciones de
seguridad para evitar el peligro y el daño
impredecible.
No introduzca sus manos en el
tambor del lavarropas cuando
esté centrifugando.
Sus dedos pueden ser atrapados
por el centrifugador y causarle
daños.
Nunca permita que los niños
operen o jueguen con el
lavarropas.
Los niños que juegan con el
lavarropas pueden caer
accidentalmente dentro del
tambor.
No trepe sobre el lavarropas ni
sobre la tapa.
2
2
2
3
4
5
6
6
6
6
6
6
6
6
7
7
7
8
8
8
9
9
10

Instrucciones de seguridad _3
t
t
t
t
t
t
t
t
t
t
t
t
t
t
t
t
t
t
t
t
t
PRECAUCIÓN
Cuando el lavarropas esté en
funcionamiento, siga las
siguientes precauciones que
se detallan a continuación.
No coloque la BANDEJA DE
LAVADO dentro del tambor
cuando el lavarropas esté en
funcionamiento.
t
Desconecte el cable de alimentación del
suministro eléctrico cuando el lavarropas no
esté en uso.
Coloque únicamente prendas
lavables en la BANDEJA DE
LAVADO.
Las prendas y objetos pesados no
deben ser colocadas.
No coloque velas u
objetos calientes
sobre el lavarropas.
Asegúrese de cerrar la
cubierta interna antes
del centrifugado.
Esto evita que las
prendas salgan
expulsadas y se dañen.
Cuelgue la BANDEJA DE LAVADO en el gancho lateral
cuando el lavarropas esté en funcionamiento o no.
Asegúrese de colocar a un costado la manguera de
drenaje (A).
Las prendas o cargas pesadas sobre la bandeja de
lavado pueden provocarle una deformación y caerse del
lavarropas.
No sobrecargue la BANDEJA DE LAVADO
No quite los botones Los botones no pueden quitarse
de la parte externa del panel.
No utilice agua excesivamente caliente. (50°C
o más)
Las partes plásticas pueden deformarse o
dañarse. También, las prendas pueden
deformarse o decolorarse.
Antes de lavar verifique que los bolsillos de
las prendas estén vacíos.
Si los clavos o los alfileres permanecen en los
bolsillos, pueden dañar el lavarropas o las
prendas.
Cierre un poco el grifo si la presión del agua es alta.
Para evitar salpicaduras de agua, cierre la
tapa del tambor.
Nunca salpique agua en el panel de control.
Retire todos los objetos personales de los
bolsillos.
Las aberturas de ventilación no deben ser
obstruidas cuando el lavarropas esté
instalado sobre un piso alfombrado.
Si el cable de alimentación está dañado debe
ser reemplazado por el fabricante, el servicio
técnico autorizado o personas similarmente
calificadas para así evitar riesgos.
Para evitar la sobrecarga y daños de este
electrodoméstico, el usuario debe estar
presente y utilizar únicamente el suministro
de agua a una presión moderada.
Para los lavarropas con aberturas de
ventilación en la base, debe evitarse que las
alfombras obstruyan las aberturas.
No utilice adaptadores o cables prolonga-
dores para suministrar energía eléctrica al
lavarropas.
Este electrodoméstico no fue diseñado para
que lo utilicen personas (incluyendo niños)
con discapacidades mentales, físicas o
sensoriales, o falta de experiencia y
conocimiento; a menos que la persona
responsable de su seguridad los haya
instruido o supervisado con respecto al uso
del electrodoméstico.
Los niños deben ser supervisados.
Asegúrese de que no jueguen con el
electrodoméstico.
Precauciones durante el funciona-
miento
No conecte el lavarropas al suministro del
agua caliente.
PRECAUCIÓN
¡Revise los bolsillos! Las horquillas y las
monedas causan daños a las prendas y al
lavarropas. Éstos hacen ruidos y provocan
problemas en la máquina. Debe revisar los
bolsillos.
Tapa
interior
Cubierta de
seguridad

4_ Descripción de las partes
Descripción de las partes
1
2
3
4
5
6
7
8
9
10
11
12
TAPA DEL SECARROPAS
Cuando usted abre esta tapa mientras que el tambor de centrifugado está en funcionamiento, el centrifugado se detendrá
mediante un sistema de frenos.
MANGUERA DE DESAGÜE
TAPA INTERIOR
(CON BOMBA)
FILTRO DE DESAGÜE
SELECTOR DE AGUA
TAMBOR DEL SECARROPAS
FILTRO PARA PELUSAS
Este filtro se utiliza para recolectar los deshechos producidos durante el lavado.
TAMBOR
BANDEJA DE LAVADO
CABLE DE ALIMENTACIÓN
Asegúrese de mantener la bandeja cerrada durante el lavado y el centrifugado.
La forma del enchufe puede que no corresponda con la figura
MANGUERA DE DESAGÜE DE AGUA
PULSADOR
1
8
9
10
11
12
4
5
6
7
2
3

Panel de control _5
Panel de control
1
SELECTOR DE AGUA
2
TEMPORIZADOR DE
LAVADO
Puede lavar sus prendas de manera efectiva mediante varios métodos.
3
SELECTOR DE AGUA
4
SELECTOR DE DESAGÜE
5
TEMPORIZADOR DE
CENTRIFUGADO
Éste se utiliza para establecer el Lavado/Enjuague o Desagote.
Durante el lavado, el BOTÓN DEL SELECTOR DE AGUA debe estar
seleccionado en "lavar". Durante el centrifugado y el enjuague, EL BOTÓN
DEL SELECTOR DE AGUA debe estar seleccionado en "centrifugar".
Éste se utiliza para establecer el tiempo de lavado, 1-15 minutos y puede
finalizar la función "remojo" de 1-20 minutos.
Éste se utiliza para establecer el tiempo de centrifugado, 1-5
minutos.
1 2 3 4 5
WT14J4200MB/AP

6_ Instalación
-
-
Conexión de la manguera de entrada
Instalación
Medio ambiente
-
No mueva la máquina cuando esta cargada.
Conexión de la manguera de desagüe
Limpieza de la máquina
Limpieza del filtro de pelusas
Filtro para
pelusas
Limpieza del tambor de lavado
Procedimiento para el lavado
Lavado
1.
-
-
-
2.
Cómo trasladar el electrodoméstico.
Deje algo de espacio.
Coloque el lavarropas en una superficie
plana y resistente.
Nunca instale el lavarropas cerca del agua.
Evite la luz del sol directa o dispositivos de calor.
El lavarropas posee ruedas para un fácil
traslado de la máquina.
Un espacio mínimo de 15 cm entre el
lavarropas y la pared.
No coloque el lavarropas en habitaciones con
humedad o donde esté expuesto directamente
a la lluvia. La humedad puede destruir el
aislamiento eléctrico y causar riesgo de
descarga eléctrica.
Inserte la manguera de desagüe y presiónela
fuertemente para que se conecte en la dirección
de las flechas.
Si el filtro de pelusas está lleno de residuos luego
de finalizar un lavado, presione hacia abajo (1) y
retire (2) como se detalla en la figura.
Remueva las pelusas acumuladas y enjuague la
malla del filtro.
Limpie los filtros de la cabina y el panel de
operación con un paño suave.
No utilice bencina, tíner, productos de limpieza, o
cera, ni friegue el lavarropas con un cepillo. Las
superficies pintadas o las partes de plástico
pueden dañarse.
Antes de comenzar el lavado, verifique lo siguiente;
Seleccione la opción
NORMAL/PESADO DEL BOTÓN
DEL SELECTOR en el modo de
lavado deseado.
Conecte la manguera de entrada de agua y
abra el grifo.
Conecte el cable de alimentación a la toma
corriente.
Extienda la manguera de desagüe (A) hacia
el sumidero.
Debe utilizar los juegos nuevos de mangueras
proporcionados con el electrodoméstico. Los
juegos de mangueras viejos no deben reutilizarse.
Presione fuertemente hasta el fondo de la
boca de descarga
Verifique que la manguera de desagüe no se
separe de la boca de descarga quitándola de
su lugar.
Debido a que el plástico y los componentes
eléctricos son afectados por el calor directo,
nunca coloque el lavarropas cerca de
calefactores, calderas, etc. No lo coloque
directamente bajo el sol.
Si el lavarropas es colocado en una superficie
irregular o poco sólida, puede provocar ruidos o
vibración durante el funcionamiento. (2° es admisible)
Mantenga la máquina firmemente como se
muestra en la figura de abajo.
(Conecte la
manguera al grifo)

Procedimiento de lavado _7
3. SELECTOR DE ENTRADA DE AGUA.
4. Carga de lavado en el tambor.
5.
6.
7.
Centrifugado en seco
Botón de balanceo
Cubierta de seguridad
Lavado pesado
Remojo
t
t
entrada de
lavado
entrada de centrifugado
Llene de agua el tambor
y agregue jabón.
Seleccione el TEMPORI-
ZADOR DE LAVADO
Luego del lavado, SELECCIONE EL BOTÓN
SELECTOR DE DESAGÜE para "DESAGO-
TAR".
El Lavado de remojo comienza automática-
mente el lavado (15 min) después de que el
remojo (2 a 20 min) es finalizado.
La función REMOJO (20 min.) repite el ciclo
que es de 1,5 ~ 2,0 min. girando los
siguientes 5 min. y reposando 3 veces.
1. Coloque las prendas en el tambor
2. Abra el grifo o utilice un balde para llenar el
tambor con la cantidad de agua deseada.
3. Coloque jabón de acuerdo con el volumen del
agua y las indicaciones del envase.
4. Seleccione el TEMPORIZADOR DE LAVADO
para indicar entre "15" a "35" en el temporiza-
dor.
1. Transfiera las prendas dentro del tambor de
centrifugado y acomode las prendas de forma
uniforme.
2. Asegúrese de enganchar la
cubierta de seguridad con la tapa
interna.
3. Cierre la tapa del centrifugador de
secado.
4. Posicione el botón del TEMPORIZADOR DE
CENTRIFUGADO EN SECO EN 1-5
MINUTOS.
5. Centrifugado incompleto (Desbalanceo y
vibraciones graves) Consulte "Carga de
ropa..." en la página 9.
1. Seleccione el BOTÓN SELECTOR DE
LAVADO "PESADO".
2. Suministre la cantidad apropiada de agua
para que no desborde la parte superior del
tambor.
3. Seleccione el TEMPORIZADOR
DE LAVADO de 10~15 min.
5. Repita este ciclo hasta que el agua
desagotada esté limpia. (2~3 ciclos)
6. Asegúrese que la manguera de desagüe esté
bien colocada.
4. Desagote el agua. Seleccione el BOTÓN
SELECTOR DE DESAGÜE para "DESAGO-
TAR".
Seleccione el temporizador de lavado de 1-15
min. (opción)
Tapa
interior
Cubierta de
seguridad

(b)
Tapa
interna
Cubierta
de seguridad
(a)
8_ Guía de lavado
Desborde del lavado
Centrifugado de enjuague
Guía de lavado
Tiempo de lavado
Tipos de prendas
Tiempo de
lavado
Selección
de lavado
Jabón
Cantidad de jabón Nivel de agua
40 g Bajo (42 ℓ)
50 g Medio (65 ℓ)
61 g Alto (87 ℓ)
Tipo de lavado
Tipo de lavado Tiempo
Fino (fibra sintética) 1 min.
Lana 1~2 min.
Algodón 3~5 min.
Grueso (algodón) 5 min.
1. Mantenga el suministro de agua
4. Cierre la tapa del centrifugador de
secado.
5. Seleccione el TEMPORIZADOR
CENTRIFUGADOR DE SECADO
DE 2~3 minutos
Luego de enjuagar puede seleccionar esta
opción para obtener un enjuague más efectivo
(No seleccione solamente esta opción para
enjuague).
La cantidad de jabón es promedio.
Siga las instrucciones del jabón que se encuen-
tran impresas en el envase para ver la cantidad de
jabón va a ser utilizado.
Elija la cantidad de jabón dependiendo del tipo de
tela.
Tiempo de centrifugado en seco
3. Tan pronto el TEMPORIZADOR DE LAVADO
se detiene, cierre el grifo de agua.
4. Seleccione el BOTÓN SELECTOR DE
DESAGÜE para "DESAGOTAR".
2. Seleccione el TEMPORIZADOR DE
LAVADO de 6~8 minutos.
1. Distribuya la carga a lavarse de
manera uniforme dentro del tambor
de centrifugado.
2. Conecte la tubería de entrada de agua, gire el
selector de agua hacia la derecha y seleccione
el tiempo de centrifugado que desea.
3. Luego de finalizar la
carga de agua, cierre la
cubierta de seguridad y
la tapa interna.
Ajuste la presión de agua para asegurar
que la cantidad de agua suministrada no
excede el agua que se desagota.
TEMPORIZADOR DE CENTRIFUGADO
Telas pesadas
extremadamente
sucias
Prendas comunes
(ropa interior, etc.)
Fibras sintéticas
levemente sucias
100% lana, tejidos de
lana mixta, fibras
sintéticas finas con
etiquetas que
indiquen lavado a
mano
Lino, algodón, etc.
PESADAS
NORMAL
10 a 35
minutos
(remojo 20)
8 a 10
minutos
7 minutos
2 a 5
minutos
2 a 5
minutos

Mantenimiento _9
Mantenimiento
CUANDO CARGUE LA ROPA EN EL TAMBOR DE CENTRIFUGADO.
Botón de balanceo
Cubierta de seguridad
Localización y solución de problemas
PROBLEMA PUNTO DE VERIFICACIÓN
El lavarropas no funciona.
La manguera de desagüe no
funciona.
Hay un ruido anormal durante el
lavado.
Hay ruido anormal y vibración
violenta durante el centrifugado.
Tapa
interior
Cubierta de
seguridad
Presione las prendas de manera uniforme y coloque la cubierta de seguridad en el tambor de centrifugado
como se expone en la figura.
Verifique que el suministro de energía se encuentre en buenas
condiciones.
Verifique que el enchufe esté insertado de manera apropiada.
Verifique que el botón temporizador de lavado y el botón temporiza-
dor de centrifugado no se encuentren en la posición "0".
Verifique que la manguera de desagüe no esté instalada muy alto.
Verifique que la manguera de desagüe no esté congelada.
Verifique que no haya monedas u otros objetos extraños en el
tambor de lavado y que la manguera de desagüe no esté bloqueada
por materiales extraños.
Verifique que el lavarropas esté colocado sobre un piso plano y estable.
Verifique que las prendas estén distribuidas de manera uniforme en
el tambor de centrifugado.
Verifique que no hayan materiales de lavado o deshechos de
espuma en la parte externa del tambor de centrifugado.

W931xD553xH1052mm
31.5 kg
14.0kg
7.0 kg
0.1~0.6 MPa
WT14J4200MB/AP
10_ Especificaciones
Especificaciones
Lavado 35 minutos (Remojo 20) / Centrifugado 5 minutos
Baja: 42 l Media: 65 l Alta: 87 l
RÉGIMEN DE TIEMPO
PESO
CAPACIDAD
DIMENSIONES
(ANCHOxPROFUNDIDADxALTURA)mm
PRESIÓN DEL AGUA
CANTIDAD DE AGUA ESTÁNDAR
LAVAD CENTRIFUGADO
TIPO
WT14J4200MB/AP
WT14J4200MB/AP

Nota

PREGUNTAS O COMENTARIOS
Este producto cumple con las normativas de RoHS.
etiS beWretneC tcatnoCyrtnuoC
troppus/ur/moc.gnusmas.www55-55-555-008-8AISSUR
troppus/ua/moc.gnusmas.www306 263 0031AILARTSUA
www.samsung.com/in/support
www.samsung.com/my/support
www.samsung.com/ph/support
www.samsung.com/sg/support
www.samsung.com/vn/support
www.samsung.com/support
INDIA
1800 3000 8282 - Toll Free
1800 266 8282 - Toll Free
MALAYSIA
1800-88-9999
603-77137477(Overseas contact)
PHILIPPINES
1-800-10-7267864 [PLDT]
1-800-8-7267864 [Globe landline amd Mobile]
02-4222111 [Other landline]
SINGAPORE
SOUTH AFRICA
VIETNAM
www.samsung.com/iran/support
www.samsung.com/pk/support
www.samsung.com/n_africa/support
www.samsung.com/ae/support (English)
www.samsung.com/ae_ar/support (Arabic)
www.samsung.com/Levant/support (English)
www.samsung.com/n_africa/support
www.samsung.com/africa_en/support
www.samsung.com/africa_en/support
021-8255
0800-Samsung (72678)
080 100 22 55
01-800-726-7864 (SAMSUNG)
0800-726-7864
0800-10077
0302-200077
800-726-7864
(Desde Celulares 02-4828200)
183-CALL (183-2255)
0800-22273
06 5777444
IRAN
PAKISTAN
TUNISIA
KUWAIT
JORDAN
MOROCCO
MEXICO
CHILE
PANAMA
ECUADOR
PERU
COSTARICA
NIGERIA
GHANA
1800-SAMSUNG(726-7864)
1 800 588 889
0860-SAMSUNG(726-7864 )
www.samsung.com/mx/support
www.samsung.com/cl/support
www.samsung.com/latin/support (Spanish)
www.samsung.com/pe/support
www.samsung.com/latin/support (Spanish)
www.samsung.com/latin_en/support (English)
www.samsung.com/latin/support (Spanish)
www.samsung.com/latin_en/support (English)
800-7267
1-800-10-7267
0800-777-08
0-800-507-7267
800-0101
1-800-SAMSUNG (72-6786)
www.samsung.com/latin_en/support (English)
00-800-1-SAMSUNG (726-7864)
-
 1
1
-
 2
2
-
 3
3
-
 4
4
-
 5
5
-
 6
6
-
 7
7
-
 8
8
-
 9
9
-
 10
10
-
 11
11
-
 12
12
-
 13
13
-
 14
14
-
 15
15
-
 16
16
-
 17
17
-
 18
18
-
 19
19
-
 20
20
-
 21
21
-
 22
22
-
 23
23
-
 24
24


Samsung WT14J4200MB/AP Manual de usuario
- Categoría
- Lavadoras
- Tipo
- Manual de usuario
en otros idiomas
- English: Samsung WT14J4200MB/AP User manual
Artículos relacionados
-
Samsung WA45M7050AW/A4-03 El manual del propietario
-
-
-
Samsung WA45H7200AP Manual de usuario
-
Samsung WA50M7450AW Manual de usuario
-
-
-