Monster MH21902 Guía de inicio rápido
- Categoría
- Auriculares móviles
- Tipo
- Guía de inicio rápido
Este manual también es adecuado para

Quick Start Guide
please read this manual carefully and keep it for
future use.
• Earphones (Left & Right)
• Charging Case
• SportClip™ x 1 Pair (Installed)
• Eartips x 3 Pairs (S, M & L)
• Micro USB Charging Cable
• Quick Start Guide & Warranty letter
1
2
3
5
6
7
4
4
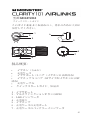
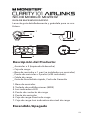
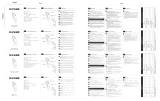
Product Overview
Power On/O
Take the earbuds out of the charging case, and the
earbuds will be automatically power on. When the
earbuds is power on, put the earbuds into the charging
case, and the earbuds can be power o and charging.
MODEL NO.:MH21902
SportClip™
Multi Function Button (MFB
Charging Contacts
Charging Case -
Battery level LED
Indicator

2
Answer/End Call: short press MFB button to answer/end
the phone call
Reject Call: long press MFB button about 2 seconds to
reject phone call
Calling
Volume Control
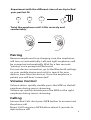
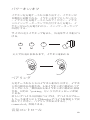
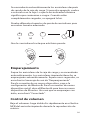
Pairing
Remove earphones from charging case, the earphones
will turn on automatically. Left and right earphones will
be connected automatically. Wait for a few seconds,
“pairing” voice prompt will be heard.
For new device connection, go to the Bluetooth settings
on your mobile device and set it to search for new
devices (new Monster device). Once the earphone is
paired, you will hear “connected”.
Twist the earphone until it ts securely and
comfortably.
Experiment with the dierent sizes of ear tip to nd
your perfect t.
S M L
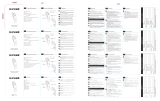
Volume down: quickly double press the MFB on the left
earphone during music streaming
Volume up: quickly double press the MFB on the right
earphone during music streaming

3
Play/Pause: press MFB once to play/pause music
Track forward: press and hold MFB on right earphone for
about 2 seconds
Track backward: press and hold MFB on left earphone for
about 2 seconds
Music
After connecting to the phone, quickly double press the
MFB to activate the voice assistant.
Vioce Control
LED Indicator Guide
Connect
Charging –
Earphones
Status DESCRIPTION Voice Prompt
Power On
Power O
Pairing
Blue LED indicator stays
On about 1 second
Blue LED indicator stays
On about 1 second
Blue LED indicator
ashes continuously
Blue LED ashs every
6 seconds
Blue LED indicator
stays On
“Power On”
“Power O”
“Pairing”
“Connected”
Charging –
Charging
Case
Battery level LED
Indicator ashes while
charging. When battery
level LED indicator is o,
it is fully charged.
ONLY use computer USB output or standard 5 volt only
(500mA minimum) power adaptor for charging. Damage
may occur if non-standard USB power adaptor is used for
charging. Do not charge if connector and/or device is wet
or damaged.
Caution

4
Reorient or relocate the receiving antenna.
Increase the separation between the equipment and
receiver.
Connect the equipment into an outlet on a circuit
dierent from that to which the receiver is connected.
Consult the dealer or an experienced radio/TV
technician for help
•
•
•
•
FCC Statement
Changes or modications not expressly approved by the
party responsible for compliance could void the user's
authority to operate the equipment.
This equipment has been tested and found to comply
with the limits for a Class B digital device, pursuant to
Part 15 of the FCC Rules. These limits are designed to
provide reasonable protection against harmful
interference in a residential installation. This equipment
generates uses and can radiate radio frequency energy
and, if not installed and used in accordance with the
instructions, may cause harmful interference to radio
communications. However, there is no guarantee that
interference will not occur in a particular installation. If
this equipment does cause harmful interference to radio
or television reception, which can be determined by
turning the equipment o and on, the user is encouraged
to try to correct the interference by one or more of the
following
measures:
This device complies with part 15 of the FCC rules.
Operation is subject to the following two conditions
(1) this device may not cause harmful interference, and
(2) this device must accept any interference received,
including interference that may cause undesired
operation.

1
2
3
5
6
7
4
4
5
MODELL: MH21902
Bitte lesen Sie diese Kurzanleitung sorgfältig durch und
bewahren Sie sie für spätere Verwendung auf.
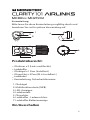
Ohrhörer x 2 (Links und Rechts)
Ladekoer
Ohrbügel x 1 Paar (Installiert.)
Ohrpolster x 3 Paar (M ist installiert.)
Ladekabel
Kurzanleitung, Sicherheitshinweise
1. Ohrbügel
2. Multifunktionstaste (MFB)
3. LED-Anzeigen
4. Ladekontakt
5. Ohrpolster
6. Ladekoer - Ladeanschluss
7. Ladekoer-Batterieanzeige
Produktübersicht:
Ein/Ausschalten
Kurzanleitung

S M L
6
Die Ohrhörer werden nach dem Entfernen aus dem
Ladekoer automatisch eingeschaltet. Stellen Sie die
Kopfhörer wieder in den Ladekoer, um sie
auszuschalten. Wenn der Ladevorgang beginnt, leuchtet
die LED-Anzeige. Wenn vollständig aufgeladen, ist die
LED-Anzeige aus.
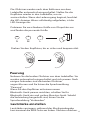
Drehen Sie den Kopfhörer, bis er sicher und bequem sitzt.
Nehmen Sie die beiden Ohrhörer aus dem Ladekoer. Sie
werden automatisch eingeschaltet und sich paaren. Nach
einigen Sekunden sind die beiden Ohrhörer
angeschlossen und Sie hören die Sprachmeldung
“Paarung”.
Wenn Sie den Kopfhörer mit einem neuen
Bluetooth-Gerät paaren möchten, schalten Sie Ihr
Bluetooth-Gerät ein und suchen Monster-Gerät. Sobald
die Verbindung hergestellt sind, hören Sie die
Sprachmeldung “Verbunden”.
Lautstärke verringern: während der Musikwiedergabe
kurz zweimal die MFB-Taste am linken Ohrhörer drücken.
Paarung
Probieren Sie verschiedene Größe von Ohrpolster aus
und nden die passende Größe.
Lautstärke einstellen

7
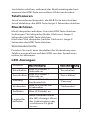
Verbunden
Auaden
Zustand Beschreibung Sprachmeldung
Einschalten
Ausschalten
Paarung
Blau LED bleibt 1
Sekunde an
Blau LED bleibt 1
Sekunde an
Blaue LED blinkt
kontinuierlich
Blau LED blinkt alle
6 Sekunden
Blau LED bleibt an
“Einschalten”
“Ausschalten”
“Paarung”
“Verbunden”
Anruf annehmen/beenden: die MFB-Taste kurz drücken
Anruf ablehnen: die MFB-Taste lange 2 Sekunden drücken
Telefonieren
Musik abspielen/anhalten: Kurz die MFB-Taste drücken
Vorherigen Titel abspielen (linker Ohrhörer): lange 2
Sekunden die MFB-Taste drücken
Nächsten Titel abspielen (rechter Ohrhörer): lange 2
Sekunden die MFB-Taste drücken
Musik hören
Drücken Sie nach dem Herstellen der Verbindung zum
Telefon zweimal kurz auf den MFB, um den Sprachassis-
tenten zu aktivieren.
Stimmenkontrolle
LED-Anzeigen
Ladekoer
auaden
Beim Auaden blinkt
die LED-Anzeige. Wenn
der Ladevorgang abg
-eschlossen ist, geht
sie aus.
Lautstärke erhöhen: während der Musikwiedergabe kurz
zweimal die MFB-Taste am rechten Ohrhörer drücken.

8
Hinweise:
Laden Sie den Kopfhörer vor den ersten Verwendung
vollständig.
Wenn die Kopfhörer von dem Ladekoer entfernt
werden, werden die beiden Ohrhörer sich automatisch
verbinden und in Paarungsmodus treten.
Setzen Sie die Kopfhörer zum Laden in die richtige
Position.
Die Batterie [Batteriepack oder Kombinierte Batterie]
darf keinem Licht, Feuer oder ähnlicher Überhitzung
ausgesetzt werden.
Wenn die Batterie nicht ordnungsgemäß ersetzt
wird, besteht Explosionsgefahr. Ersetzen Sie die
Batterie nur durch den gleichen oder einen
gleichwertigen Typ. Es wird nicht empfohlen, die
Batterie privat zu ersetzen, Sie können sie zurück zum
Hersteller schicken und austauschen.

9
1
2
3
5
6
7
4
4
MODÈLE: MH21902
Veuillez lire attentivement ce guide et le conserver pour
une utilisation ultérieure.
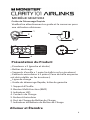
Présentation du Produit:
Écouteurs x 2 (gauche et droite)
Boîtier de charge
Supports d'oreille x 1 paire (installés sur les écouteurs)
Embouts auriculaires x 3 paires (Ceux de taille moyenne
ont été installés sur les écouteurs)
Ligne de charge
Guide de démarrage Rapide, lettre de garantie
1. Support d'Oreille
2. Bouton Multi-fonction (BMF)
3. Indicateur LED
4. Contacts de Charge
5. Embout Auriculaire
6. Port de Charge du Boîtier de Charge
7. Indicateur de Batterie du Boîtier de Charge
Allumer et Éteindre
Guide de Démarrage Rapide

10
S M L
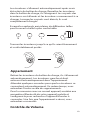
Les écouteurs s’allument automatiquement après avoir
été retirés du boîtier de charge. Remettre les écouteurs
dans le boîtier de charge, ils s'éteignent. Les voyants des
écouteurs sont allumés et les écouteurs commencent à se
charger. Lorsque les voyants sont éteints, ils sont
complètement chargés.
Essayez les embouts auriculaires de diérentes tailles
pour trouver la taille la plus confortable.
Tournez les écouteurs jusqu'à ce qu'ils soient fermement
et confortablement portés.
Appariement
Retirez les écouteurs du boîtier de charge, ils s'allumeront
automatiquement. Les écouteurs gauche et droit
entreront automatiquement dans l'appariement.
Attendez quelques secondes pour que les écouteurs se
connectent automatiquement. En même temps, vous
entendrez l'invite vocale de «appariement».
Pour la connexion avec un nouvel appareil, accédez aux
paramètres Bluetooth de votre appareil mobile et
congurez-le pour rechercher l'appareil Monster à
connecter. Une fois que l'appariement a réussi, vous
entendrez «connecté».
Contrôle de Volume

11
Pour baisser le volume: appuyer rapidement deux fois sur
le BMF de l'écouteur gauche pendant la lecture de la
musique.
Pour augmenter le volume: appuyer rapidement deux fois
sur le BMF de l'écouteur droite pendant la lecture de la
musique.
Appel
Pour répondre / mettre n à l'appel: appuyer brièvement
sur le BMF.
Pour rejeter l'appel: appuyez longuement sur le BMF
pendant 2 secondes.
Musique
Pour lire / pauser la musique: appuyer brièvement sur le
BMF.
Chanson précédente (écouteur gauche): appuyer
longuement sur le BMF pendant 2 secondes
Chanson suivante (écouteur droite): appuyer longuement
sur le BMF pendant 2 secondes.
Commande Vocale
Une fois connecté au téléphone, appuyer deux fois
rapidement sur le BMF pour activer l’assistant vocal.
Guide d'Indicateur LED
État
Allumer
Éteindre
Appariement
Description
Invite vocale
«Allumer»
«Éteindre»
«Appariement»
La LED bleue reste
allumée pendant une
seconde
La LED bleue reste
allumée pendant une
seconde
La LED bleue clignote

12
Connecté
Charge
«Connecté»
La LED bleue clignote
toutes les 6 secondes
La LED bleue reste
allumée
Remarques:
Complètement chargé avant utilization.
Une fois retirés du boîtier de chargement, les écouteurs
gauche et droit se connecteront automatiquement et
entreront dans l'appariement. Il n'est pas nécessaire
d'appuyer sur un bouton.
Veuillez placer les écouteurs à la bonne position dans le
boîtier de charge pour les charger.
Il y aura un risque d'explosion si la batterie n'est pas
remplacée correctement. La batterie ne peut être
remplacée que par le même type ou un type équivalent. Il
n'est pas recommandé de remplacer la batterie à titre
privé, mais peut être renvoyé au fabricant pour
remplacement.
Les batteries [blocs-piles ou batteries combinées] ne
doivent pas être exposées à des conditions d'éclairage, de
feu ou de surchaue similaire.
Recharge de
boîtier de
charge
L’indicateur du boîtier
de charge clignote
pendant la recharge et
est éteint

13
1
2
3
5
6
7
4
4
: MH21902
:
x 2 ( & )
1.
2.
3. LED
4.
5.
6.
7.

14
S M L

15

16

17
1
2
3
5
6
7
4
4
:MH21902

18
S M L

19

20
:

21
1
2
3
5
6
7
4
4
NO. DE MODELO: MH21902
Lea esta guía detalladamente y guárdela para su uso
futuro.
Descripción del Producto:
Auricular x 2 (izquierda & derecha)
Caja de carga
Base de auricular x 1 par (ya instalados en auricular)
Punta de auricular x 3 pares (el M instalado)
Cable de carga
Guía de Encendido rápido, Carta de Garantía
1. Base de auricular
2. Teclado de multifunciones (MFB)
3. Luz indicadora LED
4. Punto de contacto de carga
5. Punta de auricular
6. Caja de carga-Puerta de carga
7. Caja de carga-Luz indicadora de nivel de carga
Encendido/Apagado
GUÍA DE ENCENDIDO RÁPIDO

22
S M L
Se encenderán automáticamente los auriculares después
de sacarlo de la caja de carga. Si necesita apagarlo, vuelva
a colocarlos en la caja. Lo que la luz indicadora ilumina
signica que comienzan a cargar. Cuando están
completamente cargados, se apagará la luz.
Pruebe diferentes tamaños de punta de auriculares para
encontrar tamaño adecuado.
Gire los auriculares hasta que esté bien puesto.
Emparejamiento
Saque los auriculares de la caja de carga y se encenderán
automáticamente. Los auriculares izquierdo/derecho se
emparejarán automáticamente. Espere unos segundos, se
escuchará el mensaje de voz de "Emparejamiento".
Para la conexión de un nuevo dispositivo, vaya a la
conguración de Bluetooth Para la conexión de nuevo
dispositivo móvil, abra el Bluetooth para buscar nuevo
dispositivo de Monster. Una vez que se emparejen con
éxito, escuchará "Conectado".
Control de volumen
Baje el volumen: haga doble clic rápidamente en el botón
MFB del auricular izquierdo durante la reproducción de
música.

23
Suba el volumen: haga doble clic rápidamente en el
botón MFB del auricular derecho durante la reproducción
de música.
Llamada
Contestar/terminar llamada: presione brevemente el
botón MFB
Rechazar la llamada: mantenga presionado el botón MFB
durante 2 segundos
Música
Reproducir/pausar música: presione brevemente el botón
MFB
Canción anterior (auricular izquierdo): mantenga
presionado el botón MFB durante 2 segundos
Canción siguiente (auricular derecho): mantenga
presionado el botón MFB durante 2 segundos
Control de voz
Cuando esté conectado con el teléfono móvil, haga doble
clic rápidamente en el botón MFB para ingresar al estado
de voz.
Guía de luz indicadora
Estado
Encendido
Apagado
Emparejamiento
Conexión
con éxito
Carga
Descripción
Recordatorio
de voz
Luz azul LED mantiene
iluminada 1 segundo
Luz azul LED mantiene
iluminada 1 segundo
Luz azul LED parpadea
Luz azul LED parpadea
una vez cada 6 segundos
Luz azul LED mantiene
iluminada
“Encendido”
“Apagado”
“Emparejam
-iento”
“Conectado”

24
Nota:
Cargue completamente antes de usarlos.
Tras sacar los auriculares de la caja de carga, los
auriculares izquierdo y derecho se conectarán y entrarán
automáticamente en el modo de emparejamiento sin
Carga en la caja
de carga
Cargando, la luz
indicadora de la caja
parpadea y se apagará
al completar la carga.
presionar ningún botón.
Coloque los auriculares en la posición correcta para
cargarlos.

25
型号: MH21902
快速指南
请仔细阅读本指南并妥善保管以备将来使用。
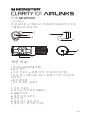
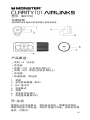
产品概述:
耳机 x2 (左&右)
充电盒
耳撑 x1对 (已安装在耳机上)
耳帽 x3对 (M号已安装在耳机上)
充电线
快速指南, 保证函
1. 耳撑
2. 多功能轻触键 (MFB)
3. LED 指示灯
4. 充电触点
5. 耳帽
6. 充电盒充电端口
7. 充电盒电量指示灯
开/关机
将耳机从充电盒拿出,耳机自动开机,想要关闭耳机,
请将耳机放入充电盒,耳机灯亮进行充电,当耳机充满
电后,灯熄灭。

26
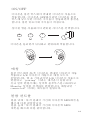
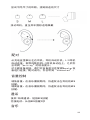
尝试不同尺寸的耳帽,找到舒适的尺寸
扭动耳机,直至其牢固舒适地佩戴
配对
从充电盒里拿出左右耳机,耳机自动开机,L/R耳机
自动连接,再等待数秒后L/R耳机自动连上,之后你
会听到“pairing”的语音提示,
对于新设备连接,请打开设备蓝牙并搜索Monster设
备进行连接,配对成功,你会听到“connected”。
音量控制
调低音量:在音乐播放期间,快速双击左耳机的MFB
按键。
调高音量:在音乐播放期间,快速双击右耳机的MFB
按键。
通话
接听/结束通话:短按MFB按键
拒接电话:长按MFB按键2秒
音乐

播放/暂停音乐: 短按MFB按键
上一曲(左耳机): 长按MFB按键2秒
下一曲(右耳机): 长按MFB按键2秒
语音控制
与手机连接状态下,快速双击MFB按键,进入语音状态
指示灯指南
状态
关机
开机
配对
已连接
耳机充电
充电盒充电
描述
蓝色LED指示灯长亮一秒
蓝色LED指示灯长亮一秒
蓝色LED指示灯闪烁
蓝色LED指示灯 6秒闪一次
蓝色LED指示灯长亮,
充满指示灯熄灭
充电中,充电盒指示灯
闪烁,充满后熄灭
语音提示
“Power On”
“Power Off”
“Pairing”
“Connected”
注意
请在使用前完全充满电。
从充电盒中取出耳机后,不需按任何按键,左右耳
机会自动连接和自动进入配对模式。
请将耳机放在正确的位置进行充电。
如果电池更换不当会有爆炸危险,只能用同样类型
或等效类型的电池来更换,不建议私自更换电池,可
退回厂家更换。
电池[电池包或组合电池]不得暴露在诸如照、火烤
或类似过热环境中。
27

28
Transcripción de documentos
MODEL NO.:MH21902 Quick Start Guide please read this manual carefully and keep it for future use. 1 2 4 3 5 6 7 4 Product Overview SportClip™ Multi Function Button (MFB) Charging Contacts • • • • • • Earphones (Left & Right) Charging Case SportClip™ x 1 Pair (Installed) Eartips x 3 Pairs (S, M & L) Micro USB Charging Cable Quick Start Guide & Warranty letter Charging Case Battery level LED Indicator Power On/Off Take the earbuds out of the charging case, and the earbuds will be automatically power on. When the earbuds is power on, put the earbuds into the charging case, and the earbuds can be power off and charging. Experiment with the different sizes of ear tip to find your perfect fit. S M L Twist the earphone until it fits securely and comfortably. Pairing Remove earphones from charging case, the earphones will turn on automatically. Left and right earphones will be connected automatically. Wait for a few seconds, “pairing” voice prompt will be heard. For new device connection, go to the Bluetooth settings on your mobile device and set it to search for new devices (new Monster device). Once the earphone is paired, you will hear “connected”. Volume Control Volume down: quickly double press the MFB on the left earphone during music streaming Volume up: quickly double press the MFB on the right earphone during music streaming Calling Answer/End Call: short press MFB button to answer/end the phone call Reject Call: long press MFB button about 2 seconds to reject phone call 2 Music Play/Pause: press MFB once to play/pause music Track forward: press and hold MFB on right earphone for about 2 seconds Track backward: press and hold MFB on left earphone for about 2 seconds Vioce Control After connecting to the phone, quickly double press the MFB to activate the voice assistant. LED Indicator Guide Status DESCRIPTION Power On Blue LED indicator stays On about 1 second Blue LED indicator stays On about 1 second Blue LED indicator flashes continuously Blue LED flashs every 6 seconds Blue LED indicator stays On Battery level LED Indicator flashes while charging. When battery level LED indicator is off, it is fully charged. Power Off Pairing Connect Charging – Earphones Charging – Charging Case Voice Prompt “Power On” “Power Off” “Pairing” “Connected” Caution ONLY use computer USB output or standard 5 volt only (500mA minimum) power adaptor for charging. Damage may occur if non-standard USB power adaptor is used for charging. Do not charge if connector and/or device is wet or damaged. 3 FCC Statement Changes or modifications not expressly approved by the party responsible for compliance could void the user's authority to operate the equipment. This equipment has been tested and found to comply with the limits for a Class B digital device, pursuant to Part 15 of the FCC Rules. These limits are designed to provide reasonable protection against harmful interference in a residential installation. This equipment generates uses and can radiate radio frequency energy and, if not installed and used in accordance with the instructions, may cause harmful interference to radio communications. However, there is no guarantee that interference will not occur in a particular installation. If this equipment does cause harmful interference to radio or television reception, which can be determined by turning the equipment off and on, the user is encouraged to try to correct the interference by one or more of the following measures: • Reorient or relocate the receiving antenna. • Increase the separation between the equipment and receiver. • Connect the equipment into an outlet on a circuit different from that to which the receiver is connected. • Consult the dealer or an experienced radio/TV technician for help This device complies with part 15 of the FCC rules. Operation is subject to the following two conditions (1) this device may not cause harmful interference, and (2) this device must accept any interference received, including interference that may cause undesired operation. 4 MODELL: MH21902 Kurzanleitung Bitte lesen Sie diese Kurzanleitung sorgfältig durch und bewahren Sie sie für spätere Verwendung auf. 1 2 4 3 5 6 7 4 Produktübersicht: Ohrhörer x 2 (Links und Rechts) Ladekoffer Ohrbügel x 1 Paar (Installiert.) Ohrpolster x 3 Paar (M ist installiert.) Ladekabel Kurzanleitung, Sicherheitshinweise 1. Ohrbügel 2. Multifunktionstaste (MFB) 3. LED-Anzeigen 4. Ladekontakt 5. Ohrpolster 6. Ladekoffer - Ladeanschluss 7. Ladekoffer-Batterieanzeige Ein/Ausschalten 5 Die Ohrhörer werden nach dem Entfernen aus dem Ladekoffer automatisch eingeschaltet. Stellen Sie die Kopfhörer wieder in den Ladekoffer, um sie auszuschalten. Wenn der Ladevorgang beginnt, leuchtet die LED-Anzeige. Wenn vollständig aufgeladen, ist die LED-Anzeige aus. Probieren Sie verschiedene Größe von Ohrpolster aus und finden die passende Größe. S M L Drehen Sie den Kopfhörer, bis er sicher und bequem sitzt. Paarung Nehmen Sie die beiden Ohrhörer aus dem Ladekoffer. Sie werden automatisch eingeschaltet und sich paaren. Nach einigen Sekunden sind die beiden Ohrhörer angeschlossen und Sie hören die Sprachmeldung “Paarung”. Wenn Sie den Kopfhörer mit einem neuen Bluetooth-Gerät paaren möchten, schalten Sie Ihr Bluetooth-Gerät ein und suchen Monster-Gerät. Sobald die Verbindung hergestellt sind, hören Sie die Sprachmeldung “Verbunden”. Lautstärke einstellen Lautstärke verringern: während der Musikwiedergabe kurz zweimal die MFB-Taste am linken Ohrhörer drücken. 6 Lautstärke erhöhen: während der Musikwiedergabe kurz zweimal die MFB-Taste am rechten Ohrhörer drücken. Telefonieren Anruf annehmen/beenden: die MFB-Taste kurz drücken Anruf ablehnen: die MFB-Taste lange 2 Sekunden drücken Musik hören Musik abspielen/anhalten: Kurz die MFB-Taste drücken Vorherigen Titel abspielen (linker Ohrhörer): lange 2 Sekunden die MFB-Taste drücken Nächsten Titel abspielen (rechter Ohrhörer): lange 2 Sekunden die MFB-Taste drücken Stimmenkontrolle Drücken Sie nach dem Herstellen der Verbindung zum Telefon zweimal kurz auf den MFB, um den Sprachassistenten zu aktivieren. LED-Anzeigen Zustand Beschreibung Einschalten Blau LED bleibt 1 Sekunde an Blau LED bleibt 1 Ausschalten Sekunde an Blaue LED blinkt Paarung kontinuierlich Verbunden Blau LED blinkt alle 6 Sekunden Aufladen Blau LED bleibt an Ladekoffer aufladen Beim Aufladen blinkt die LED-Anzeige. Wenn der Ladevorgang abg -eschlossen ist, geht sie aus. Sprachmeldung “Einschalten” “Ausschalten” “Paarung” “Verbunden” 7 Hinweise: Laden Sie den Kopfhörer vor den ersten Verwendung vollständig. Wenn die Kopfhörer von dem Ladekoffer entfernt werden, werden die beiden Ohrhörer sich automatisch verbinden und in Paarungsmodus treten. Setzen Sie die Kopfhörer zum Laden in die richtige Position. Wenn die Batterie nicht ordnungsgemäß ersetzt wird, besteht Explosionsgefahr. Ersetzen Sie die Batterie nur durch den gleichen oder einen gleichwertigen Typ. Es wird nicht empfohlen, die Batterie privat zu ersetzen, Sie können sie zurück zum Hersteller schicken und austauschen. Die Batterie [Batteriepack oder Kombinierte Batterie] darf keinem Licht, Feuer oder ähnlicher Überhitzung ausgesetzt werden. 8 MODÈLE: MH21902 Guide de Démarrage Rapide Veuillez lire attentivement ce guide et le conserver pour une utilisation ultérieure. 1 2 4 3 5 6 7 4 Présentation du Produit: Écouteurs x 2 (gauche et droite) Boîtier de charge Supports d'oreille x 1 paire (installés sur les écouteurs) Embouts auriculaires x 3 paires (Ceux de taille moyenne ont été installés sur les écouteurs) Ligne de charge Guide de démarrage Rapide, lettre de garantie 1. Support d'Oreille 2. Bouton Multi-fonction (BMF) 3. Indicateur LED 4. Contacts de Charge 5. Embout Auriculaire 6. Port de Charge du Boîtier de Charge 7. Indicateur de Batterie du Boîtier de Charge Allumer et Éteindre 9 Les écouteurs s’allument automatiquement après avoir été retirés du boîtier de charge. Remettre les écouteurs dans le boîtier de charge, ils s'éteignent. Les voyants des écouteurs sont allumés et les écouteurs commencent à se charger. Lorsque les voyants sont éteints, ils sont complètement chargés. Essayez les embouts auriculaires de différentes tailles pour trouver la taille la plus confortable. S M L Tournez les écouteurs jusqu'à ce qu'ils soient fermement et confortablement portés. Appariement Retirez les écouteurs du boîtier de charge, ils s'allumeront automatiquement. Les écouteurs gauche et droit entreront automatiquement dans l'appariement. Attendez quelques secondes pour que les écouteurs se connectent automatiquement. En même temps, vous entendrez l'invite vocale de «appariement». Pour la connexion avec un nouvel appareil, accédez aux paramètres Bluetooth de votre appareil mobile et configurez-le pour rechercher l'appareil Monster à connecter. Une fois que l'appariement a réussi, vous entendrez «connecté». Contrôle de Volume 10 Pour baisser le volume: appuyer rapidement deux fois sur le BMF de l'écouteur gauche pendant la lecture de la musique. Pour augmenter le volume: appuyer rapidement deux fois sur le BMF de l'écouteur droite pendant la lecture de la musique. Appel Pour répondre / mettre fin à l'appel: appuyer brièvement sur le BMF. Pour rejeter l'appel: appuyez longuement sur le BMF pendant 2 secondes. Musique Pour lire / pauser la musique: appuyer brièvement sur le BMF. Chanson précédente (écouteur gauche): appuyer longuement sur le BMF pendant 2 secondes Chanson suivante (écouteur droite): appuyer longuement sur le BMF pendant 2 secondes. Commande Vocale Une fois connecté au téléphone, appuyer deux fois rapidement sur le BMF pour activer l’assistant vocal. Guide d'Indicateur LED État Description Invite vocale Allumer La LED bleue reste allumée pendant une seconde «Allumer» Éteindre La LED bleue reste allumée pendant une seconde «Éteindre» Appariement La LED bleue clignote «Appariement» 11 Connecté Charge La LED bleue clignote toutes les 6 secondes La LED bleue reste allumée «Connecté» Recharge de L’indicateur du boîtier boîtier de de charge clignote charge pendant la recharge et est éteint Remarques: Complètement chargé avant utilization. Une fois retirés du boîtier de chargement, les écouteurs gauche et droit se connecteront automatiquement et entreront dans l'appariement. Il n'est pas nécessaire d'appuyer sur un bouton. Veuillez placer les écouteurs à la bonne position dans le boîtier de charge pour les charger. Il y aura un risque d'explosion si la batterie n'est pas remplacée correctement. La batterie ne peut être remplacée que par le même type ou un type équivalent. Il n'est pas recommandé de remplacer la batterie à titre privé, mais peut être renvoyé au fabricant pour remplacement. Les batteries [blocs-piles ou batteries combinées] ne doivent pas être exposées à des conditions d'éclairage, de feu ou de surchauffe similaire. 12 모델: MH21902 신속 안내서 본 안내서를 숙지하시고 적당하게 보관하시여 이후 사용하도록 하십시요. 1 2 4 3 5 6 7 4 제품 개술: 이어폰 x 2 (좌변 & 우변) 충전 박스 이어 서포트 x 한쌍(이미 이어폰에 설치됨) 이어 캡 x 3쌍((M 사이즈 한쌍이 이미 이어폰에 설치됨) 충전 케이블 신속 안내서, 보증서 1. 이어 서포트 2. 다기능 터치 버튼(MFB) 3. LED 지시등 4. 충전 터치 포인트 5. 이어 캡 6. 충전 박스 충전 포트 7. 충전 박스 전기량 지시등 13 ON/OFF 이어폰을 충전 박스에서 꺼내면 이어폰이 자동으로 작동합니다. 이어폰을 OFF하시려면 이어폰을 충전 박스에 넣으시면 이어폰 지시등이 점등하면서 충전을 합니다. 충전 만료시에 지시등이 꺼집니다. 상이한 캡을 사용하시여 편안한 사이즈를 선택합니다. S M L 이어폰을 돌리면서 단단하고 편안하게 착용합니다. 매칭 충전 박스에서 좌/우 이어폰을 꺼내면 이어폰이 자동 작동하고 L/R 이어폰이 자동으로 매칭 모드로 진입합니다. 몇 초 기다리시면 L/R 이어폰이 자동으로 연결되고 “pairing”이라는 제시음이 들립니다. 신규 설비 연결시에는 설비의 불루투스를 ON하시고 Monster 설비를 검색하여 연결합니다. 매칭되면 “ connected”이라는 제시음이 들립니다. 볼륨 컨트롤 볼륨 낮게:뮤직 플레이 기간에 이어폰의 MFB버튼을 빠르게 더블 클릭합니다. 볼륨 높게:뮤직 플레이 기간에 이어폰의 MFB 버튼을 빠르게 더블 클릭합니다. 14 통화 전화 받기/종료하기:MFB 버튼을 짧게 누름 전화 거절:MFB 버튼을 2초간 길게 누름 뮤직 뮤직 플레이/잠시 중지: MFB 버튼을 짧게 누름 먼저 곡(좌변 이어폰 ): MFB 버튼을 2초간 길게 누름 다음 곡(우변 이어폰 ): MFB 버튼을 2초간 길게 누름 음성 컨트롤 핸드폰과 연결된 상태에서 빠르게 MFB 버튼을 더블 클릭하시면 음성 상태로 진입합니다. 지시등 안내 상태 서술 ON 불루 LED 1초간 점등 OFF 불루 LED 1초간 점등 “Power Off” 매칭 불루 LED 점멸 “Pairing” 연결됨 불루 LED 6초 1회 점멸 충전 제시음 “Power On” “Connected” 불루 LED 점등 충전 중, 충전 박스 지시등이 충전 박 스 충전 점멸하고 충전 완료시에 지 시등이 꺼집니다. 주의: 사용하시기 전에 전기량을 100%로 충분하게 충전하십시요. 충전 박스에서 이어폰을 꺼낸 후 임의 버튼을 누르지 않으셔도 좌/우 이어폰이 자동 연결과 자동 매칭 15 모드로 진입합니다. 이어폰을 정확한 위치에 두고 충전하십시요. 16 型番:MH21902 クイックスタートガイド このガイドををよくお読みの上、将来のために大切に 保管してください。 1 2 4 3 5 6 7 4 製品概要: ㅤイヤホン(左&右) ㅤ充電ケース ㅤイヤサポート×1ペア(イヤホンに設置済み) ㅤイヤチップ X 3ペア(Mサイズがイヤホンに設置 済み) ㅤ充電ケーブル ㅤクイックスタートガイド、保証書 1.イヤサポート 2.マルチファンクションボタン(MFB) 3.LEDインジケータ 4.充電接点 5.イヤチップ 6.充電ケースの充電ポート 7.充電ケースのバッテリーインジケータ 17 パワーオン/オフ イヤホンを充電ケースから取り出すと、イヤホンが 自動的に起動される。イヤホンをオフにしたいなら 、イヤホンを充電ケースに入れてください。イヤホ ンのインジケーターランプが点灯すると充電し、イ ヤホンが100%充電されたら、インジケーターランプ が消灯する。 サイズの違うイヤチップを試し、快適なサイズを見つ ける。 S M L 丈夫で快適に収まるまで、イヤホンをねじる ペアリング 充電ケースから左右のイヤホンを取り出すと、イヤホ ンが自動的に起動され、L/Rイヤホンが自動的にペア リングに入り、数秒後にL/Rイヤホンが自動的に接続 され、同時に「pairing」という音声メッセージが聞 こえる。 新しいデバイスの接続については、デバイスのブルー トゥースをオンにしてMonsterデバイスを検索して接 続してください。ペアリングが成功すると、「 connected」が聞こえる。 音量コントロール 18 音量ダウン:音楽再生中に、左イヤホンのMFBボタ ンを素早くダブルクリックする。 音量アップ:音楽再生中に、右イヤホンのMFBボタ ンを素早くダブルクリックする。 通話 通話開始/終了:MFBボタンを短く押す 通話拒否:MFBボタンを2秒間長押す 音楽 音楽の再生/一時停止:MFBボタンを短押す 前の曲(左イヤホン):MFBボタンを2秒間長押す 次の曲(右イヤホン):MFBボタンを2秒間長押す 音声コントロール 携帯と接続した状態で、MFBボタンを素早くダブル クリックすると、音声状態に入る。 インジケータランプガイド 状態 説明 音声メッセージ 青色LED 1秒間点灯 パワーオン する 青色LED 1秒間点灯 パワーオフ する “Power On” ペアリング 青色 LEDが点滅する “Pairing” 接続成功 充電 “Power Off” 青色LEDが6秒に一回 “Connected” 点滅する 青色 LEDが常時点灯 する 充電中は、充電ケース 充電ケース ののインジケーターラ の充電 ンプが点滅し、100% 充電されたら消灯する。 19 注意: 使用前に100%充電してください。 充電ケースからイヤホンを取り出したら、ボタンを 押す必要がなく、左右のイヤホンが自動的に接続され 、自動的にペアリングモードに入る。 イヤホンを正しい位置に置いて充電してください。 電池の交換が適当でないと爆発の危険がある。同じ 種類または等価タイプの電池で交換するしかない。 電池を勝手に交換することをおすすめしなく、メー カーに返却して交換することができる。 電池[バッテリーパックまたはバッテリーセット]は 、例えば太陽光、火またはそのような過熱環境に晒 されてはならない。 20 NO. DE MODELO: MH21902 GUÍA DE ENCENDIDO RÁPIDO Lea esta guía detalladamente y guárdela para su uso futuro. 1 2 4 3 5 6 7 4 Descripción del Producto: Auricular x 2 (izquierda & derecha) Caja de carga Base de auricular x 1 par (ya instalados en auricular) Punta de auricular x 3 pares (el M instalado) Cable de carga Guía de Encendido rápido, Carta de Garantía 1. Base de auricular 2. Teclado de multifunciones (MFB) 3. Luz indicadora LED 4. Punto de contacto de carga 5. Punta de auricular 6. Caja de carga-Puerta de carga 7. Caja de carga-Luz indicadora de nivel de carga Encendido/Apagado 21 Se encenderán automáticamente los auriculares después de sacarlo de la caja de carga. Si necesita apagarlo, vuelva a colocarlos en la caja. Lo que la luz indicadora ilumina significa que comienzan a cargar. Cuando están completamente cargados, se apagará la luz. Pruebe diferentes tamaños de punta de auriculares para encontrar tamaño adecuado. S M L Gire los auriculares hasta que esté bien puesto. Emparejamiento Saque los auriculares de la caja de carga y se encenderán automáticamente. Los auriculares izquierdo/derecho se emparejarán automáticamente. Espere unos segundos, se escuchará el mensaje de voz de "Emparejamiento". Para la conexión de un nuevo dispositivo, vaya a la configuración de Bluetooth Para la conexión de nuevo dispositivo móvil, abra el Bluetooth para buscar nuevo dispositivo de Monster. Una vez que se emparejen con éxito, escuchará "Conectado". Control de volumen Baje el volumen: haga doble clic rápidamente en el botón MFB del auricular izquierdo durante la reproducción de música. 22 Suba el volumen: haga doble clic rápidamente en el botón MFB del auricular derecho durante la reproducción de música. Llamada Contestar/terminar llamada: presione brevemente el botón MFB Rechazar la llamada: mantenga presionado el botón MFB durante 2 segundos Música Reproducir/pausar música: presione brevemente el botón MFB Canción anterior (auricular izquierdo): mantenga presionado el botón MFB durante 2 segundos Canción siguiente (auricular derecho): mantenga presionado el botón MFB durante 2 segundos Control de voz Cuando esté conectado con el teléfono móvil, haga doble clic rápidamente en el botón MFB para ingresar al estado de voz. Guía de luz indicadora Estado Descripción Encendido Luz azul LED mantiene iluminada 1 segundo Luz azul LED mantiene iluminada 1 segundo Apagado Recordatorio de voz “Encendido” “Apagado” “Emparejam -iento” Luz azul LED parpadea una vez cada 6 segundos “Conectado” Luz azul LED mantiene iluminada Emparejamiento Luz azul LED parpadea Conexión con éxito Carga 23 Carga en la caja de carga Cargando, la luz indicadora de la caja parpadea y se apagará al completar la carga. Nota: Cargue completamente antes de usarlos. Tras sacar los auriculares de la caja de carga, los auriculares izquierdo y derecho se conectarán y entrarán automáticamente en el modo de emparejamiento sin presionar ningún botón. Coloque los auriculares en la posición correcta para cargarlos. 24 型号: MH21902 快速指南 请仔细阅读本指南并妥善保管以备将来使用。 产品概述: 耳机 x2 (左&右) 充电盒 耳撑 x1对 (已安装在耳机上) 耳帽 x3对 (M号已安装在耳机上) 充电线 快速指南, 保证函 1. 2. 3. 4. 5. 6. 7. 耳撑 多功能轻触键 (MFB) LED 指示灯 充电触点 耳帽 充电盒充电端口 充电盒电量指示灯 开/关机 将耳机从充电盒拿出,耳机自动开机,想要关闭耳机, 请将耳机放入充电盒,耳机灯亮进行充电,当耳机充满 电后,灯熄灭。 25 尝试不同尺寸的耳帽,找到舒适的尺寸 扭动耳机,直至其牢固舒适地佩戴 配对 从充电盒里拿出左右耳机,耳机自动开机,L/R耳机 自动连接,再等待数秒后L/R耳机自动连上,之后你 会听到“pairing”的语音提示, 对于新设备连接,请打开设备蓝牙并搜索Monster设 备进行连接,配对成功,你会听到“connected”。 音量控制 调低音量:在音乐播放期间,快速双击左耳机的MFB 按键。 调高音量:在音乐播放期间,快速双击右耳机的MFB 按键。 通话 接听/结束通话:短按MFB按键 拒接电话:长按MFB按键2秒 音乐 26 播放/暂停音乐: 短按MFB按键 上一曲(左耳机): 长按MFB按键2秒 下一曲(右耳机): 长按MFB按键2秒 语音控制 与手机连接状态下,快速双击MFB按键,进入语音状态 指示灯指南 状态 描述 语音提示 开机 蓝色LED指示灯长亮一秒 “Power On” 关机 蓝色LED指示灯长亮一秒 “Power Off” 配对 蓝色LED指示灯闪烁 “Pairing” 已连接 蓝色LED指示灯 6秒闪一次 “Connected” 耳机充电 蓝色LED指示灯长亮, 充满指示灯熄灭 充电中,充电盒指示灯 充电盒充电 闪烁,充满后熄灭 注意 请在使用前完全充满电。 从充电盒中取出耳机后,不需按任何按键,左右耳 机会自动连接和自动进入配对模式。 请将耳机放在正确的位置进行充电。 如果电池更换不当会有爆炸危险,只能用同样类型 或等效类型的电池来更换,不建议私自更换电池,可 退回厂家更换。 电池[电池包或组合电池]不得暴露在诸如照、火烤 或类似过热环境中。 27 28-
 1
1
-
 2
2
-
 3
3
-
 4
4
-
 5
5
-
 6
6
-
 7
7
-
 8
8
-
 9
9
-
 10
10
-
 11
11
-
 12
12
-
 13
13
-
 14
14
-
 15
15
-
 16
16
-
 17
17
-
 18
18
-
 19
19
-
 20
20
-
 21
21
-
 22
22
-
 23
23
-
 24
24
-
 25
25
-
 26
26
-
 27
27
-
 28
28


Monster MH21902 Guía de inicio rápido
- Categoría
- Auriculares móviles
- Tipo
- Guía de inicio rápido
- Este manual también es adecuado para
En otros idiomas
- français: Monster MH21902 Guide de démarrage rapide
- English: Monster MH21902 Quick start guide
- Deutsch: Monster MH21902 Schnellstartanleitung
- 日本語: Monster MH21902 クイックスタートガイド
Documentos relacionados
Otros documentos
-
 Hawksbill 5228847343 Manual de usuario
-
 HIFEER 5962873431 Manual de usuario
-
 TOZO T12 Waterproof Wireless Earbuds Manual de usuario
-
SoundPEATS TWS Wireless Bluetooth Earbuds True Wireless Manual de usuario
-
SoundPEATS TrueFree Wireless Earbuds Manual de usuario
-
SoundPEATS Truengine 3 SE Guía del usuario
-
SoundPEATS Truengine 3SE El manual del propietario
-
-
SoundPEATS TrueFree+ Manual de usuario
-
SoundPEATS SonicTrue Wireless Earbuds Manual de usuario


