X Rocker Battle Den Gaming Bunk Bed Manual de usuario
- Categoría
- Muebles de bebe
- Tipo
- Manual de usuario

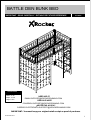
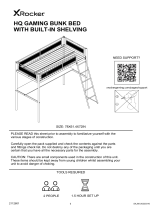
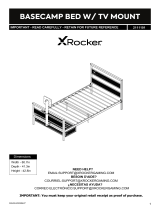
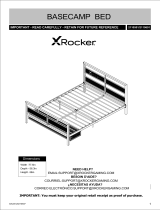
BATTLE DEN
BUNK BED
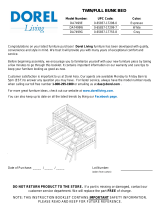
IMPORTANT - READ CAREFULLY - RETAIN FOR FUTURE REFERENCE
1
NEED HELP?
EMAIL:SUPPORT@XROCKERGAMING.COM
BESOIN D'AIDE?
COURRIEL:SUPPORT@XROCKERGAMING.COM
¿NECESITAS AYUDA?
CORREO ELECTRÓNICO:SUPPORT@XROCKERGAMING.COM
2110801
IMPORTANT: You must keep your original retail receipt as proof of purchase.
Dimensions
Width -77.7in
Depth - 41.3in
Height - 72in
SXJ00-20210318

correct order. If these steps are not followed in sequence, assembly difficulties will occur.
● Read each step carefully. It is very important that each step of the instructions is performed in the
● Make sure all parts are included. Most parts are labeled or stamped on the raw edge.
hours.3● Estimated assembly time is
(however it is always better to have an extra hand). 2● Recommended # of people needed for assembly:
the cardboard packaging to protect your floor and product.
● Call 866-969-2603 if you need assistance.
● Work in a spacious area and near where the unit will be used, preferably on a carpet, or use a piece of
Caution
● Move your new furniture carefully,with two people lifting and carrying the unit to its new location.
● Your furniture can be disassembled and reassembled to move.
● Assemble all parts and bolts loosely during assembly, only once the product is complete should you
fully tighten the bolts
● Regularly check and ensure that all bolts and fittings are tightened properly.
● T
his product is designed for home use and not intended for commercial use.
● This product contains small components. Please ensure that they are kept away from small children.
● Clean the product with a soft damp cloth . DO NOT use harsh chemicals or abrasive cleaners.
● Periodically check and ensure that the guardrail, ladder, and other components are in their proper
position,
free from damage, and that all connectors are tight.
Handy Hints
Read Before Beginning Assembly
Safety and Care Advice
2

WARNINGS
Safety and Care Advice
3
● Follow the information on the warnings appearing on the upper bunk end structure and on the carton.
Do not remove warning label from bed.
● Always use the recommended size mattresses or mattress supports, or both, to help prevent the
likelihood of entrapment or falls.
● Use only a mattress which is 74"- 75" long and 37½" - 38½" wide on upper bunk.
● Ensure thickness of mattress on upper bunk is greater than 4" and that it does not exceed 6".
● Surface of mattress must be at least 5" (127 mm) below the upper edge of guardrails.
● Do not allow children under 6 years of age to use the upper bunk.
● Do not allow horseplay on or under the bed and prohibit jumping on the bed.
● Prohibit more than one person on upper bunk.
● Always use the ladder for entering and leaving the upper bunk.
● Do not use substitute parts. Contact the manufacturer or dealer for replacement parts.
● Use of a night light may provide added safety precaution for a child using the upper bunk.
● Always use guardrails on both long sides of the upper bunk. If the bunk bed will be placed next to the
wall, the guardrail that runs the full length of the bed should be placed,against the wall to prevent
entrapment between the bed and wall.
● The use of water or sleep flotation mattresses is prohibited.
● STRANGULATION HAZARD-Never attach or hang items to any part of the bunk bed that are not
designed for use with the bed; for example, but not limited to, hooks, beltsand jump ropes.
● Keep these instructions for future reference.

● Vérifiez régulièrement et assurez-vous que tous les boulons et raccords sont bien serrés.
produit terminé, si vous serrez complètement les boulons.
Conseils utiles
sont à la bonne place, qu'ils ne sont pas endommagés et que tous les boulons et écrous sont bien serrés.
● Périodiquement, vérifiez et assurez-vous que les barres de sécurité, l'échelle etautres composantes
pour un remplacement.
● Certaines pièces ont été pré-assemblées.Elles sont illustrées sur cette page et elles sont disponibles
composants. S'il vous plaît assurez-vous qu'ils soient gardés loin d'eux.
● AVERTISSEMENT CONCERNANT LES JEUNES ENFANTS: Ce produit contient des petits
● Ce produit est conçu pour un usage domestique et n'est pas destiné à des fins commerciales.
.
(cependant il est toujours préférable
● Déplacez votre nouveau mobilier avec soin, nous recommandons soulever et transporter le mobilier
vers son nouvel emplacement à deux
● Votre mobilier peut être démonté et ré-assemblé pour faciliter les déménagements.
● Assemblez toutes les pièces et les boulons desserrés pendant l'assemblage,seulement une fois le
soit exécutée dans le bon ordre, sinon vous risquez d'éprouver de la difficulté à assembler votre meuble.
● Lire attentivement chaque étape avant de débuter. Il est très important que chaque étape de montage
sur leur côté non fini.
● Assurez-vous d'avoir bien reçu toutes les pièces. La plupart de celles-ci sont étiquetées ou estampées
Temps d'assemblage estimé : 3 heures●
d'être assisté par une personne supplémentaire).
● Si vous avez besoin d'aide, appelez notre numéro de service 866-969-2603.
● Travaillez dans un endroit spacieux et près du lieu où l'unité sera utilisée, préférablement sur un tapis,
Nombre de personnes recommandées pour l'assemblage : 2
ou sur un morceau de l'emballage, afin de protéger le plancher et le produit.
●
Précautions
Safety and Care Advice
Avant de commencer l'assemblage
4

Avertissements
Safety and Care Advice
5
● Suivre les informations indiquées sur les avertissements paraissant au bout de la structure du lit
superposé et sur la boîte. Ne pas enlever l'étiquette d'avertissement du lit.
● Risque d'étranglement - jamais installer ou acrocher à toute partie du lit des re-align this paragraph
articles qui ne sont pas conçus pour une utilisation avec celui-ci; par exemple, mais sans s'y limiter, des
crochets, ceintures et cordes à sauter.
● Conservez ces instructions pour référence ultérieure.
● Utilisez toujours la dimension recommandée de matelas, ou de support de matelas, ou les deux pour
aider à prévenir les risques possibles de coinçage ou de chute.
● Pour le lit du haut, utilisez uniquement un matelas de 74"-75"de long par 37½" - 38½" de large.
● Assurez-vous que l'épaisseur du matelas du lit du haut soit supérieure à 4", et qu'elle n'excède pas
les 6".
● La surface du matelas doit être au moins 5" (127mm) sous le bord supérieur du garde-corps.
● Ne permettez pas des enfants de moins de 6 ans d'utiliser le lit du haut.
● Ne jouez pas sur ou sous le lit et ne sautez pas sur le lit.
● Interdire I'accès à plus d'une personne sur le lit du haut.
● Utilisez toujours l'échelle pour monter ou descendre du lit du haut.
● Ne substituez pas de pièces. Communiquez avec ACE pour obtenir des pièces de rechange.
● L'usage d'une lumière de nuit peut fournir une précaution supplémentaire lorsqu'un enfant utilise le lit
du haut.
● Utilisez toujours les garde-corps sur les deux côtés du lit superieur. Lorsque le lit superposé est placé
le long d'un mur, le garde-corp du lit doit être contre le mur, afin de prévenir qu'un enfant se coince entre
le mur et le lit.
● L'utilisation de matelas d'eau ou de matelas gonflable est strictement interdite.
● Ne pas utiliser de rehausseur de lit sous ce produit.

ensamblado.
en el orden correcto. Si estos pasos no se siguen en secuencia, pueden ocurrir dificultades durante el
● Lea cada paso cuidadosamente. Es muy importante que cada paso de las instrucciones sea realizado
selladas en los bordes.
● Asegúrese de que todas las partes están incluidas. La mayoría de las partes están etiquetadas o
en su posición apropiada, libre de daños, y que todos los conectores están apretados.
● Compruebe y asegúrese periódicamente de que la barandilla, la escalera y otros componentes están
y disponibles para reemplazo.
● Algunas partes han sido pre-ensambladas en este producto. Se encuentran ilustradas en esta página
● ADVERTENCIA PARA NIÑOS PEQUEÑOS - Este producto contiene componentes pequeños. Por
● Este producto está diseñado para uso doméstico y no para uso comercial.
Precauciones
(sin embargo es
favor asegúrese de que las piezas estén fuera del alcance de los niños.
● Mueva sus muebles nuevos con cuidado, se requiere de dos personas para levantar y trasladar su
producto a su nueva ubicación.
● Sus muebles se pueden desmontar y volver a ensamblar en caso de mudanza.
● Ensamble todas las piezas y pernos sueltos durante el ensamblaje, solo una vez que el producto esté
completo, debe apretar completamente los pernos.
● Verifique y asegúrese regularmente de que todos los pernos y accesorios estén apretados
correctamente.
Tiempo estimado de ensamble es: 3 Horas.●
recomendable contar con ayuda adicional).
El número de personas recomendadas para el montaje de este producto es: 2 ●
Consejos útiles
alfombra o utilice el cartón del empaque para proteger su piso y su producto.
● Trabaje en un área espaciosa y cerca de donde su producto será utilizado, preferiblemente sobre una
● Llame a nuestro número 866-969-2603 si necesita asistencia.
Safety and Care Advice
Lea antes de comenzar a ensamblar
6

Precaucíones
Safety and Care Advice
7
● Siga la información sobre las advertencias que aparecen en el extremo superior de la litera y en el
empaque. No quite la etiqueta de advertencia de la cama.
● Utilice siempre el colchón del tamaño recomendado, el soporte del colchón recomendado, o ambos,
para ayudar a prevenir la probabilidad de quedar atrapado o de caídas.
● Utilice solamente un colchón individual que sea 74"-75"de largo y 37½" - 38½" de ancho en la cama
superior y cama inferior.
● Asegúrese de que el grosor del colchón en la cama superior sea mayor a 4" y que no exceda 6".
● La superficie del colchón debe estar por lo menos a 5"(127mm) por debajo del borde superior de las
barandillas.
● No permita que los niños menores de 6 años de edad utilicen la cama superior.
● No permita jugar en o debajo de la cama y prohíba saltar en la cama.
● Prohíba a más de una persona en la cama superior.
● Utilice siempre la escalera para subir y bajar de la cama superior.
● No utilice piezas sustitutas. Entre en contacto con ACE para las piezas de reemplazo.
● El uso de una lámpara de noche puede proporcionar más seguridad para un niño que utilice la cama
superior.
● Utilice siempre las barandillas en ambos lados largos de la cama superior. Si la litera es colocada
contra la pared, la barandilla lateral debe ser colocada de igual forma contra la pared para prevenir quedar
atrapado entre la cama y la pared.
● Se prohíbe el uso de colchones de agua.
● No utilice elevadores para cama con este producto.
● Peligro de estrangulación: nunca ate o cuelgue articulos de ninguna parte de la litera que no hayan
sido diseñados para utilizar con esta; por ejemplo pero sin limitarse a, ganchos, correas y cuerdas de
saltar.
● Guarde estas instrucciones para futura referencia.

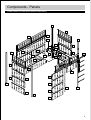
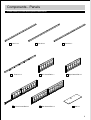
Please check you have all the panels listed below
Components - Panels
8
1
2
3
4
7
a
7
13
12
22
53
53
53
53
53
53
14
16
15
50
52a
52c
52c
52c
52c
52d
55a
55b
23a
23b
52a
52b
52b
55c
60
63

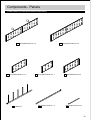
Please check you have all the panels listed below
Components - Panels
9
Post 01 x 1
123
4
Post 02 x 1 Post 03 x 1
Post 04 x 1
13
12
7
50
Rear Guard Rail x 1
Front Guard Rail x 1
Right Guard Rail x 1
Shelf x 1
Left Guard Rail x 1
7a

Please check you have all the panels listed below
Components - Panels
10
52b
52a Rear Mesh Panel 02 x 2
Rear Mesh Panel 01 x 2
53 Side Mesh Panel x 8
Front Mesh Panel 01 x 4
52c 52d Front Mesh Panel 02 x 1
22 Ladder x 1 23a Support Post 01 x 1 Support Post 02 x 1
23b

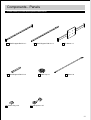
Please check you have all the panels listed below
Components - Panels
11
55a 55b
55c
Shelf Support Rail 02 x 1
Shelf Support Rail 03 x 2 14
16
15
Slats x 24
Slat Spacer x 23
Plastic Plug x 48
Shelf Support Rail 01 x 1 60 TV Mount x 1
63 Cable Cap x 1

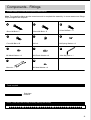
Please check you have all the panels listed below
Components - Fittings
Note: The quantities below are the correct amount to complete the assembly. In some cases more fittings
may be supplied are required.
Tools required
Ruler - User this ruler to help correctly identity the screws
05 10 15 20 25 30 35 40 45 50 55 60 65 70 75 80 85 90 95 100 105 110 115 120 125 130 135 140 145 150 155 160 165 170
0510 15 20 25 30 35 40 45 50 55 60 65 70 75 80 85 90 95 100 105 110 115 120 125 130 135 140 145 150 155 160 165 170
Ruler/tape
measure
12
30mm M6 Bolt x 15
28mm M6 Bolt x 4
25mm M6 Bolt x 11
17mm M6 Bolt x 85 M6 x 6 M6 Spring Washer x 8
M6 Metal Washer x 8 M6 Plastic Washer x 8 Allen Key 4mm x 1
Wrench x 1 M4 Metal Washer x 4
45mm M6 Bolt x 5
N G H
D
E
C
A
IJK
LM

局部视图 BC
比例 1 / 5 BC
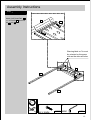
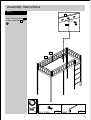
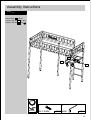
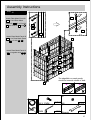
Assembly Instructions
13
Step 1
7a
Attach Left Guard Rail
x 1 to Post 01 and Post
02 with .
1
C
C
4mm
75%
1
2
7
a
C
4PCS
M6 X 30MM
K
1PC
4MM
2
C
7
a
1
Warning label on 7a must
be oriented on the same
side as the side rail holes

C
Assembly Instructions
14
Step 2
C
M6 X 30MM 4PCS
K
1PC
4mm
75%
3
7
4
37
C
C
4MM
7
4C
3
Attach Right Guard Rail
x 1 to Post 03 and Post
04 with .
Warning label on 7 must
be oriented on the same
side as the side rail holes

D
E
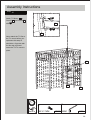
Assembly Instructions
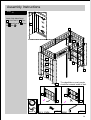
15
3
Step
4mm
75%
4
3
1
2
13
3
13
13
23b
C
M6 X 30MM 4PCS
H
IJ
K
4MM 1PC
M6
Spring Washer 4PCS
4PCS 4PCS
M6
Metal Washer
M6
Plastic Washer
C
C
E
H
I
J
J
I
H
Attach Rear Guard Rail
to Post 02 and Post 03
with , , , .
b: Attach Support Post 02
to Rear Guard Rail
with .
C
H
IJ
2
3
13

Assembly Instructions
16
Step 4
22
4
E
M6 X 25MM 5PCS
K
4MM 1PC
4mm
75%
Attach Ladder to Post
04 with .
22
4E
E
E
E
E
E

F
G
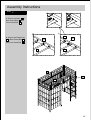
Assembly Instructions
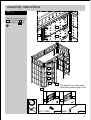
17
5
Step
C
M6 X 30MM 2PCS
M6
Spring Washer
HI
M6
Metal Washer
4PCS 4PCS
1PC
K
4MM
4PCS
M6
Plastic Washer
J
2PCS
M6 X 25MM
E
1
4
12
4mm
75%
12
1
4
C
H
I
J
C
H
I
J
E
E
H
H
I
I
J
J
Attach Front Guard Rail
to Post 01 with , ,
, and Post 04
with , , , .
12
1
H
C
IJ4
E
H
IJ
12

HJ
Assembly Instructions
18
Step 6
N
M6 X 17MM 2PCS
K
4MM 1PC
4mm
75%
23a
22
12
12
12
23a 22
NN
Attach Support Post 01
to Front Guard Rail with
.
Then screw to Ladder
.
23a
N
22
12
N

AU
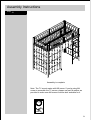
Assembly Instructions
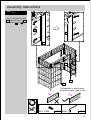
19
Step 7
4mm
75%
N
M6 X 17MM 1PC
K
4MM 1PC
N
13
13
23b
13
23b
N
Attach Support Post 02
to Rear Guard Rail with
.
23b

Assembly Instructions
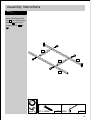
20
Step 8
K
4MM 1PC
A
M6 X 45MM 4PCS
55a
55b
55c
55c
4mm
75%
A
A
A
A
Attach Shelf Support Rail
03 x 2 to Shelf Support
Rail 01 and Shelf
Support Rail 02 with
.
55c
55b
A
55a
55c
55c 55a
55b
A
A
A
A

K
AY
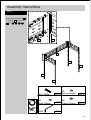
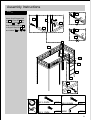
Assembly Instructions
21
9
Step
4mm
75%
C
M6 X 30MM 1PC
4PCS
K
4MM 1PC
N
M6 X 17MM
3
23b
4
22
55a
55b
55a
23b
55b
3N
N
C
Attach Shelf Support Rail
01 to Post 03 and
Post 04 with , then
Shelf Support Rail 02
to Support Post 02
and Ladder with , .
23b
23b
55b
55b
1PC
M6 X 45MM
A
A
22
55b
C
C
N
CA
3
55a
4
55b
23b
22

局部视图 BD
比例 1 / 3
BD
Assembly Instructions
22
Step 10
Attach Cable Cap to
Shelf .
The cover could be removed
before passing through the
cable and assembled back
when finished.
50
50
50
63
63
63

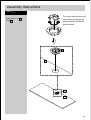
Assembly Instructions
23
Step 11
4MM
K
1PC
E
M6 X 25MM 4PCS
EE
E
E
4mm
75%
50
55c
55b
Attach Shelf to Shelf
Support Rail 03 x 2 and
Support Rail 02 with .
55c
50
55b E

V
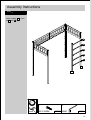
Assembly Instructions
24
Step 12
K
4MM 1PC
N
M6 X 17MM 32PCS
4mm
75%
1
2
53
3
4
53
53
3
N
N
53
53
53
Attach Side Mesh Panel
x 8 to Post 01 , Post
02 and Post 03 , Post
04 with .
53 1
23
4N
The edgefolds on mesh panels
should be towards inside of bed.
22
1 1

局部视图 BB
比例 1 / 10
Y
BB
Assembly Instructions
25
Step 13
4mm
75%
N
M6 X 17MM 16PCS
K
4MM 1PC
1
52c 23a
1
52c
N
N
Attach Front Mesh Panel 01
x 4 to Post 01 and
Support Post 01 with
.
52c
52c
52c
52c
1
23a
N
52c
N
N
N
N
N
N
23a
The edgefolds on mesh panels
should be towards inside of bed.
1
23a 23a
1

AA
AW
Assembly Instructions
26
Step 14
N
M6 X 17MM 4PCS
K
4MM 1PC
4mm
75%
52d
23a
22
23a
N
N
Attach Front Mesh Panel 02
to Support Post 01
and Ladder with .
52d 23a
22 N
52d
N
N
22
The edgefolds on mesh panels
should be towards inside of bed.

AB
AC
Assembly Instructions
27
Step 15
4mm
75%
K
4MM 1PC
G
M6 6PCS
2
N
M6 X 17MM 22PCS
3
2
52a
52a
52b
52b
L
1PC
Wrench
N
N
N
G
52b
52a
52a
52b
Attach Rear Mesh Panel 01
x 2 and Rear Mesh
Panel 02 x 2 to Post 02
and Post 03 with .
52b
52a
N
Attach Rear Mesh Panel 02
x 2 to Rear Mesh Panel
01 x 2 with , .
3
2
52b
52a N
G
Attach Rear Mesh Panel 01
x2 together with .
52a N
G
The edgefolds on mesh panels
should be towards outside of bed.

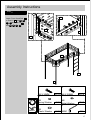
Assembly Instructions
28
Step 16
4mm
75%
N
M6 X 17MM 4MM
K
1PC
4PCS
Attach TV Mount to
Post 03 and Post 04
60
34
with
N
.
Note:
attach
the TV first to
the TV mount before you
implement this step! It
should be a 2 person task
for this step to lift and
screw the TV/TV mount in
place.
3
4
60
3
60
N
N

AV
Assembly Instructions
29
Step 17
12
14
15
13
13
13
14 14
a: Secure the Slats to
Rear Guard Rail and
Front Guard Rail .
b: Secure the Plastic Plug
to Rear Guard Rail
and Front Guard Rail .
a: b:
14
13
12
15 13
12

Assembly Instructions
30
Step 18
16
14
16
14
Secure Slats Spacer to
Slats .
16
14

Assembly Instructions
31
Step 19
100%
4mm
Note: The TV mount mates with M6 screw. If you're using M4
screw to assemble the TV screen, please use part M washer as
provided to make sure M4 screw could be also workable for it.
Assembly is complete
-
 1
1
-
 2
2
-
 3
3
-
 4
4
-
 5
5
-
 6
6
-
 7
7
-
 8
8
-
 9
9
-
 10
10
-
 11
11
-
 12
12
-
 13
13
-
 14
14
-
 15
15
-
 16
16
-
 17
17
-
 18
18
-
 19
19
-
 20
20
-
 21
21
-
 22
22
-
 23
23
-
 24
24
-
 25
25
-
 26
26
-
 27
27
-
 28
28
-
 29
29
-
 30
30
-
 31
31


X Rocker Battle Den Gaming Bunk Bed Manual de usuario
- Categoría
- Muebles de bebe
- Tipo
- Manual de usuario
en otros idiomas
Artículos relacionados
-
 X Rocker HQ Gaming Loft Bunk Bed Manual de usuario
-
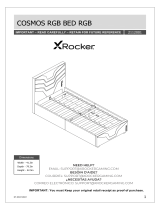 X Rocker Cosmos RGB Gaming Bed Manual de usuario
-
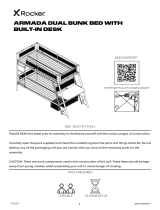 X Rocker Armada Twin-Over-Twin Bunk Bed Manual de usuario
-
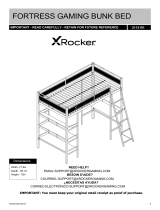 X Rocker Fortress Gaming Bunk Manual de usuario
-
 X Rocker Basecamp Gaming Bed Manual de usuario
-
 X Rocker Basecamp Full Gaming Bed Manual de usuario


Otros documentos
-
 Craftsman ProSeries TJZ10/3 El manual del propietario
-
FM Velvet Foldable Sofa Bed 145cm Manual de usuario
-
Rikon Power Tools 10-205 Manual de usuario
-
Dorel Living WM2906B-DC Instrucciones de operación
-
 DHP Furniture DL1010BB-2 Manual de usuario
-
Dorel Home Furnishings FA1008TFBB Manual de usuario
-
-
 Dorel Home Products DL7891G Manual de usuario
-
 Dorel Home Furnishings TWIN/FULL BUNK BED DA7499W Instrucciones de operación
-
KitchenAid 870-0003 El manual del propietario


