La página se está cargando...

KT-03/01/2021
IMPORTANT – READ CAREFULLY – RETAIN FOR FUTURE REFERENCE
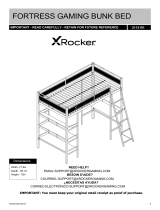
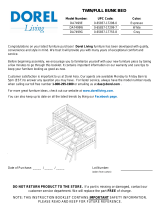
COSMOS RGB BED RGB
2112001
Width - 41.3in
Depth - 79.3in
Height - 42.5in
Dimensions
1
IMPORTANT: You must Keep your original retail receipt as proof of purchase.
w--%ژO-k¥ّژ
-uUkيژ°Å¥¥¨¾ۮã¨h-¨GuUwGِuژ
-°Uwژ%ٔU%-ّژ
Ũ¨U-kيژ°Å¥¥¨¾ۮã¨h-¨GuUwGِuژ
ْw--°U¾°ژäÅ%ّژ
¨¨-ژ-k-¾¨wUيژ°Å¥¥¨¾ۮã¨h-¨GuUwGِu

2
Safety and Care Advice
Caution
Handy Hints
● Assemble all parts and bolts loosely during assembly, only once the product is complete
should you fully tighten the bolts
● Regularly check and ensure that all bolts and fittings are tightened properly.
WARNINGS
● Call 866-969-2603 if you need assistance.
● Work in a spacious area and near where the unit will be used, preferably on a carpet,
or use a piece of the cardboard packaging to protect your floor and product.
● Recommended # of people needed for assembly: 2 (however it is always better to
have an extra hand).
● Estimated assembly time is 1.5 hours.
● Make sure all parts are included. Most parts are labeled or stamped on the raw edge.
● Read each step carefully. It is very important that each step of the instructions is
performed in the correct order. If these steps are not followed in sequence, assembly
difficulties will occur.
● This product is designed for home use and not intended for commercial use.
● This product contains small components. Please ensure that they are kept away from small children.
● Clean the product with a soft damp cloth. DO NOT use harsh chemicals or abrasive cleaners.
● Move your new furniture carefully, with two people lifting and carrying the unit to its new location.
● Your furniture can be disassembled and reassembled to move.
● Always use the recommended size mattresses or mattress supports, or both, to help prevent the likelihood
● Use only a mattress which is long and wide.
● This bed is not intended for use by children under 4 years old.
● Do not allow horseplay on or under the bed and prohibit jumping on the bed.
● Do not use substitute parts. Contact the manufacturer or dealer for replacement parts.
● The use of water or sleep flotation mattresses is prohibited.
● Keep these instructions for future reference.
of entrapment or falls.
Read Before Beginning Assembly
74"-75" 37 1/2"-38 1/2"
● Do not use risers under this bed.

3
Safety and Care Advice
Avant de commencer l'assemblage
● Si vous avez besoin d'aide, appelez notre numéro de service 866-969-2603.
● Travaillez dans un endroit spacieux et près du lieu où l'unité sera utilisée,
préférablement sur un tapis, ou sur un morceau de l'emballage, afin de protéger le
plancher et le produit.
● Nombre de personnes recommandées pour l'assemblage : 2 (cependant il est
toujours préférable d'être assisté par une personne supplémentaire).
● Temps d'assemblage estimé : 1.5 heures.
● Assurez-vous d'avoir bien reçu toutes les pièces. La plupart de celles-ci sont
étiquetées ou estampées sur leur côté non fini.
● Lire attentivement chaque étape avant de débuter. Il est très important que chaque
étape de montage soit exécutée dans le bon ordre, sinon vous risquez d'éprouver de la
difficulté à assembler votre meuble.
Précautions
● Ce produit est conçu pour un usage domestique et n'est pas destiné à des
fins commerciales.
● AVERTISSEMENT CONCERNANT LES JEUNES ENFANTS: Ce produit
contient des petits composants. S'il vous plaît assurez-vous qu'ils soient gardés
loin d'eux.
● Certaines pièces ont été pré-assemblées.
Elles sont illustrées sur cette page et
elles sont disponibles pour un remplacement.
Conseils utiles
● Déplacez votre nouveau mobilier avec soin, nous recommandons soulever et
transporter le mobilier vers son nouvel emplacement à deux.
● Votre mobilier peut être démonté et ré-assemblé pour faciliter les
déménagements.
Avertissements
● Utilisez toujours la dimension recommandée de matelas, ou de support de matelas, ou les deux
pour aider à prévenir les risques possibles de coinçage ou de chute.
● Utilisez uniquement un matelas de 74" - 75" de long par 37 1/2"-38 1/2" de large.
● Ce lit n'est pas conou pour rtre utilisp par des enfants de moins de 4 ans.
● Ne jouez pas sur ou sous le lit et ne sautez pas sur le lit.
● Ne substituez pas de pièces. Communiquez avec ACE pour obtenir des pièces de rechange.
● L'utilisation de matelas d'eau ou de matelas gonflable est strictement interdite.
● Ne pas utiliser de rehausseur de lit sous ce produit.
● Conservez ces instructions pour référence ultérieure.
● Vérifiez régulièrement et assurez-vous que tous les boulons et raccords sont
bien serrés.
● Assemblez toutes les pièces et les boulons desserrés pendant l'assemblage,
seulement une fois le produit terminé, si vous serrez complètement les boulons.

● Llame a nuestro número 866-969-2603 si necesita asistencia.
● Trabaje en un área espaciosa y cerca de donde su producto será utilizado,
preferiblemente sobre una alfombra o utilice el cartón del empaque para proteger su piso
y su producto.
● El número de personas recomendadas para el montaje de este producto es: 2 (sin
embargo es recomendable contar con ayuda adicional).
● Tiempo estimado de ensamble es: 1.5 Horas.
● Asegúrese de que todas las partes están incluidas. La mayoría de las partes están
etiquetadas o selladas en los bordes.
● Lea cada paso cuidadosamente. Es muy importante que cada paso de las
instrucciones sea realizado en el orden correcto. Si estos pasos no se siguen en
secuencia, pueden ocurrir dificultades durante el ensamblado.
● Este producto está diseñado para uso doméstico y no para uso comercial.
● ADVERTENCIA PARA NIÑOS PEQUEÑOS - Este producto contiene
componentes pequeños. Por favor asegúrese de que las piezas estén fuera del
alcance de los niños.
4
Safety and Care Advice
Lea antes de comenzar a ensamblar
Precauciones
● Algunas partes han sido pre-ensambladas en este producto. Se encuentran
ilustradas en esta página y disponibles para reemplazo.
Consejos útiles
● Mueva sus muebles nuevos con cuidado, se requiere de dos personas para
levantar y trasladar su producto a su nueva ubicación.
● Sus muebles se pueden desmontar y volver a ensamblar en caso de mudanza.
Precaucíones
● Utilice siempre el colchón del tamaño recomendado, el soporte del colchón recomendado, o ambos, para ayudar
a prevenir la probabilidad de quedar atrapado o de caídas.
● Utilice ~nicamente un colchyn que sea de 74" - 75" de largo y 37 1/2"-38 1/2" de ancho.
● Este producto no ha sido disexado para ser utilizado por ninos menores de 4 axos.
● No permita jugar en o debajo de la cama y prohíba saltar en la cama.
● No utilice piezas sustitutas. Entre en contacto con ACE para las piezas de reemplazo.
● Se prohíbe el uso de colchones de agua.
● No utilice elevadores para cama con este producto.
● Guarde estas instrucciones para futura referencia.
● Ensamble todas las piezas y pernos sueltos durante el ensamblaje, solo una vez que el
producto esté completo, debe apretar completamente los pernos.
● Verifique y asegúrese regularmente de que todos los pernos y accesorios estén apretados
correctamente.

Headboard x1 Footboard x1 Side Panel x2
Side Rail x4 Support Leg x2 Leg x4 Bracket x2 Single Slat Cap x24
Center Rail x2 Wooden Slats x24 Center Rail x1 Side Rail x2
Side Panel x2
Bracket x2
Double Slat Cap x12
Components - Panels
Please check you have all the panels listed below
1 2 3 4
5 6 7 9 10 11
12 13 14 15 17
5
LED Driver x1
37

20mm M6 Bolt x 28 35mm M6 Bolt x 12 40mm M6 Bolt x 20
30mm M8 Bolt x 1 Allen Key x 1
Components - Fittings
Please check you have all the panels listed below
Note: The quantities below are the correct amount to complete the assembly. In some cases more fittings
may be supplied are required.
0 5 10 15 20 25 30 35 40 45 50 55 60 65 70 75 80 85 90 95 100 105 110 115 120 125 130 135 140 145 150 155 160 165 170
Ruler - User this ruler to help correctly identity the screws
Tools required
0 5 10 15 20 25 30 35 40 45 50 55 60 65 70 75 80 85 90 95 100 105 110 115 120 125 130 135 140 145 150 155 160 165 170 Ruler/tape
measure
ABC
DE
6

Assembly Instructions
Step 1
7
Step 1
Attach to and
with .
7
C
21
1
7
1
7
C
40mm M6 Bolt C x8 E x1
4mm
100%
2

Assembly Instructions
Step 1
8
Step 2
B
2
1
35mm M6 Bolt B x4 E x1
20mm M6 Bolt A x4
1
1
B
A
A
2
2

Assembly Instructions
Step 1
9
Step 3
Attach to with .
10 A
3
E x1
4mm
100%
A
A
20mm M6 Bolt A x12
Attach to with .
9A
4
3
3
4
4
9
9
10
10

Assembly Instructions
Step 1
10
Step 4
Attach to and with .
5 C
3
E x1
4mm
75%
40mm M6 Bolt C x12
C
C
B
35mm M6 Bolt B x8
4
Attach to and with .
17 B
34
3
3
3
4
4
4
5
5
5
5
17
17

Assembly Instructions
Step 1
11
Step 5
Hang sub-assembly and
on and as illustrated,
don't completely tighten the
bolts until STEP 8 is
complete.
3
4 21
1
1
2
3
3
3
4
4
4
2

Assembly Instructions
Step 1
12
Step 6
Attach to with .
6 A
15
E x1
4mm
100%
A
20mm M6 Bolt A x4
15
6
15
6
6

Assembly Instructions
Step 1
13
Step 7
Attach to and with .
3 A
15
E x1
4mm
75%
20mm M6 Bolt A x4
A
A
4
3
3
3
4
4
4
15
15

Assembly Instructions
Step 1
14
Step 8
Attach to and with .
1 A
13
E x1
4mm
100%
20mm M6 Bolt A x4
2
1
1
A
D
30mm M8 Bolt D x1
Attach to with .
Then properly tighten all the
bolts.
15 D
13
2
13
13
13
13
13
15
15

9.1 9.2 9.3
Assembly Instructions
Step 1
15
Step 9
9.1 Insert into ,
9.2 Press into , repeat
the same procedure for the
opposite side of the bed with
a new and .
9.3 Insert ends of both slats
into , then press
into as illustrated.
Repeat the same procedures
going backwards for every
row of slats.
14 11
11 5
14 11
14 12 12
13
14 14
14
11
11 12
13
5

Assembly Instructions
Step 1
16
Step 10

Assembly Instructions
Step 1
17
Step 11

Turn on/off the strip with memory
Switch of 7 constant colors on the
strip and a “7-color lit at the same
time” on the strip
Switch of flash and breathing color
changing modes
Swtich of 4 light flow directions
a)From left to right
b)From right to left
c)From center to two sides
d)From two sides to center

Safety notes
• The user of the Neo Motion LED must have read and understood
these operating instructions prior to its first use in order to safely
use this product.
• The LEDs must only be used when they functions properly. If the
LEDs or part of the LEDs are defective, please contact your retailer
for advice and cease to use the lighting function.
• Always keep the operating instructions within reach.
• If you sell or pass on the device, you must also pass on these
operating instructions.
• Never use the LED function in a room where there is a danger of
explosion or in the vicinity of flammable liquids or gases.
• The LEDs may only be connected to a grounded socket which
has been installed professionally, is grounded and checked.
• Main power voltage and fuse must meet the Technical data
specifications.
• If the power cable or the device is damaged immediately turn
off the plug and pull out the plug. Do not use the Cable again and
dispose of it properly.
• Do not bend, crush or pull the cable, protect from sharp edges, oil
and heat.
• If the LEDs are not in use make sure the plug is pulled out.
• Do not touch the power connector with wet hands! Always
unplug by pulling the connector, not the cable.
• Do not lift the bed using the cable or use the cable for pur-
poses other than intended.
• The power cable may not be shortened.
RGB LED ‘Neo Motion’ Lighting Instructions
Risk of damage to the eyes! Never look directly into the LED.
The light can only be used in dry indoor areas.
Not suitable for ordinary lighting in household room
illumination
Operation
Storage and transport
Storing
– Store the device and any accessories in a dry, wellventilated place.
– In case of longer periods without operation, protect the LEDs and its
accessories against soiling and corrosion.
Disposing of the packaging
Transport
– Use the original packaging to ship whenever possible.
Troubleshooting
If something stops working…
DANGER! Danger to life and limb! Improper repairs can result in
the product functioning unsafely. This endangers yourself and your
environment.
Malfunctions are often caused by minor faults. You can easily remedy
most of these yourself. Please consult the following table
before contacting the vendor. You will save yourself a lot of trouble
and possibly money too.
-Ensure the power adapter, controller and strip are connected well
-The LED Strip can be controlled by the buttons on the controller
1 - Turn on/off the strip with memory
2 - Switch of 7 constant colors on the strip and a “7-color lit
at the same time” on the strip
3 - Switch of flash and breathing color changing modes
4 - Swtich of 4 light flow directions
a)From left to right
b)From right to left
c)From center to two sides
d)From two sides to center
DANGER! Risk of fatal injury due to electric shock! All work to
eliminate possible faults should be carried out with the fuse
switched off. All work should be carried out by a
qualified electrician.
Fault/malfunction Cause Remedy
The lamp does not
light up No mains voltage?
Light source defective?
LED Lights switched on via
switch?
Switch defective?
Connection cable defective?
Incorrect connection?
Check fuse. Contact a specialist.
Contact our help desk for support
Check switch position
Contact a specialist.
Contact a specialist.
Switch off the fuse and check the
connection according to the wiring diagram.
Contact a specialist.
If you can’t fix the fault yourself, contact X Rocker support. Please be
aware that any improper repairs will also invalidate the warranty and
additional costs may be incurred.
Disposal
Disposing of the device
A crossed-out wheelie bin icon means: Batteries and
rechargeable batteries, electrical or electronic devices
must not be disposed of with household waste. They may
contain substances that are harmful to the environment
and human health.
Consumers must dispose of waste electrical devices, spent portable
batteries and rechargeable batteries separately from household
waste at an official collection point to ensure that these items are
processed correctly. Information on returning these items is available
from the seller. Sellers are required to accept these items free of
charge.
Batteries and rechargeable batteries, which are not per-
manently installed in waste electrical devices, must be
removed prior to disposal and must be disposed of sep-
arately. Lithium batteries and battery packs in all systems
must only be retuned to a collection point when dis-
charged. Batteries must always be protected against short circuits by
covering the poles with adhesive tape.
All end users are responsible for deleting any personal data stored on
waste devices prior to their disposal.
Disposal of batteries
Disused batteries do not belong in domestic refuse; they must be
disposed of as prescribed by regulations.
– Bring batteries which are no longer usable to the battery collection
point of the dealer or of your local authority.
– Do not burn batteries. Risk of explosion!

The packaging consists of cardboard and marked plastics
that can be recycled.
– Take these materials to a recycling center.
Technical data
Article number H3960-3.75M
Dimensions 1250 x 10 x4mm * 3PCS
Illuminant 60 x LED/M
Rated Voltage 12V
Capacity 25W
Protection class II
Degree of projection IP20

EN
1. The bed can only be used with the supplied adapter. The external flexible
cable of this transformer cannot be replaced. If the cord is damaged, the
transformer should be discarded.
2. Do not expose the adapter to rain or moisture. Use the adapter indoors only
to avoid the risk of electric shock or fire. The adapter must not be used by
children or by invalids without supervision.
3. Do not disassemble the adapter. Unplug the adapter if it is not being used.
Use the adapter in a ventilated room. If the adapter cable is damaged, it
should be discarded.
4. Do not try to power the LEDs using your own or any other type of adaptor as
doing so may result in the blowing out of the LEDs and failure to work. This will
invalidate your warranty.
5. This product should be used by children from 8 years old. It is strongly
advised that adults supervise all minors in the correct use of this product at all
times to ensure minors are always free from harm and danger. Children should
nott use the device as a toy. Cleaning and user maintenance must not be
carried out by children.
REMEMBER - IF YOU ARE AT ALL UNSURE OR NEED
SUPPORT OR TECHNICAL ADVICE, PLEASE CONTACT
X ROCKER OR YOUR RETAILER
YOU CAN ASK FOR HELP HERE:
www.xrockergaming.com/pages/support
/