
Before Installing:
All installations should comply with National and local electrical codes.
If you have any doubts concerning installation contact a qualied
licensed electrician.
1) TURN OFF POWER.
IMPORTANT: Before you start, NEVER attempt any work without
shutting off the electricity until the work is done.
a) Go to the main fuse, or circuit breaker, box in your home. Place
the main power switch in the “OFF” position.
b) Unscrew the fuse(s), or switch “OFF” the circuit breaker switch(s),
that control the power to the xture or room that you are working on.
c) Place the wall switch in the “OFF” position. If the xture to be re
placed has a switch or pull chain, place those in the “OFF”
position.
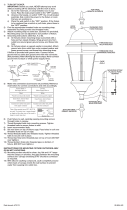
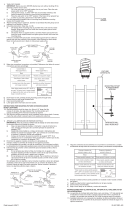
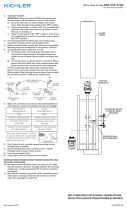
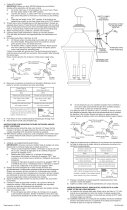
2) Attach mounting strap to outlet box. (Screws not provided).
3) Insert threaded nipple into mounting strap.
4) Attach the grounding conductor to the raised grounding lug on the back
of the xture housing. Secure by tightening the green screw. Never
connect black or white power supply wires to the grounding lug.
5) Connect the black xture wire to the black supply wire with a suitable
wire connector (not provided). Connect the white xture wire to the
white supply wire with a suitable connector.
6) Push xture to wall carefully passing the threaded nipple through hole.
7) Tighten xture to wall with threaded cap.
INSTRUCTIONS FOR MOUNTING FIXTURE OUTDOORS AND/OR IN
WET LOCATIONS.
8) Mounting surface should be clean, dry, at and 1/4” larger that the
canopy/xture on all sides. Any gaps between the mounting surface and
canopy/xture exceeding 3/16” should be corrected as required.
9) With silicone caulk, caulk completely around where back of canopy/
xture meets the wall surface to prevent water from entering the outlet box.
Antes de instalar:
Todas las instalaciones deben cumplir con los códigos locales y nacionales
de electricidad.
Si tiene alguna duda con respecto a la instalación, comuníquese con un
electricista profesional autorizado.
1) APAGUE LA ALIMENTACIÓN ELÉCTRICA.
IMPORTANTE: Antes de comenzar, NUNCA trate de trabajar sin antes
desconectar la corriente hasta que el trabajo se termine.
a) Vaya a la caja principal de fusibles, o interruptor o caja de circuitos
de su casa. Coloque el interruptor de la corriente principal en
posición de apagado “OFF”.
b) Desatornille el (los) fusible (s), o coloque el interruptor o interruptores
del breaker en posición de apagado “OFF”, que controla (n) la
corriente hacia el artefacto o habitación donde está trabajando.
c) Coloque el interruptor de pared en posición de apagado “OFF”. Si
el artefacto que se va a reemplazar tiene un interruptor o cadena
que se jala, colóquelos en la posición de apagado “OFF”.
2) Sujeta la plancha para montar a la caja de conexión. (No se proveen lost
tornillos).
3) Inserte el tube roscado en la plancha para montar.
4) Fije el conductor a tierra con la terminal de la conexión a tierra elevada
en la parte posterior de la caja del artefacto. Fije apretando el tornillo
verde. Nunca conecte los alambres de alimentación negro o blanco a la
terminal de la conexión a tierra.
5) Conecte el alambre negro de la lámpara al alambre negro de la
alimentación con un conector para alambre adecuado (no suministrado).
Conecte el alambre blanco de la lámpara al alambre blanco de la
alimentación con un conector adecuado.
6) Empuje la unidad contra la pared, pasando con cuidado el tubo roscado
a través del agujero.
7) Sujete la unidad contra la pared apretándola con la tapa roscada.
INSTRUCCIONES PARA EL MONTAJE DEL ARTEFACTO AL AIRE
LIBRE Y/O EN UN LUGAR MOJADO.
8) La supercie de montaje debe estar limpia, seca, ser plana y 1/4” más
grande que el escudete/artefacto en todos los bordes. Cualquier
espacio libre entre la supercie de montaje y el escudete/artefacto que
exceda de 3/16” debe corregirse según se requiera.
9) Calafatee totalmente con compuesto de calafatear de silicona alrededor
donde el escudete/artefacto sienta en la supercie de la pared para
impedir la entrada de agua en la caja de conexiones.
Date Issued: 4/6/12 IS-11077-US
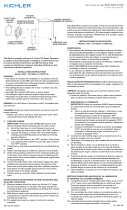
MOUNTING STRAP
PLANCHA PARA MONTAR
FIXTURE
ARTEFACTO
THREADED CAP
TAPA ROSCADA
THREADED NIPPLE
TUBO ROSCADO
OUTLET BOX
CAJA DE CONEXIÓN
INSTALLATION INSTRUCTIONS
Model 11077 / CP137593
La página se está cargando...
Transcripción de documentos
INSTALLATION INSTRUCTIONS Model 11077 / CP137593 FIXTURE ARTEFACTO MOUNTING STRAP PLANCHA PARA MONTAR THREADED CAP TAPA ROSCADA OUTLET BOX CAJA DE CONEXIÓN THREADED NIPPLE TUBO ROSCADO Before Installing: All installations should comply with National and local electrical codes. If you have any doubts concerning installation contact a qualified licensed electrician. 1) TURN OFF POWER. IMPORTANT: Before you start, NEVER attempt any work without shutting off the electricity until the work is done. a) Go to the main fuse, or circuit breaker, box in your home. Place the main power switch in the “OFF” position. b) Unscrew the fuse(s), or switch “OFF” the circuit breaker switch(s), that control the power to the fixture or room that you are working on. c) Place the wall switch in the “OFF” position. If the fixture to be re placed has a switch or pull chain, place those in the “OFF” position. 2) Attach mounting strap to outlet box. (Screws not provided). 3) Insert threaded nipple into mounting strap. 4) Attach the grounding conductor to the raised grounding lug on the back of the fixture housing. Secure by tightening the green screw. Never connect black or white power supply wires to the grounding lug. 5) Connect the black fixture wire to the black supply wire with a suitable wire connector (not provided). Connect the white fixture wire to the white supply wire with a suitable connector. 6) Push fixture to wall carefully passing the threaded nipple through hole. 7) Tighten fixture to wall with threaded cap. INSTRUCTIONS FOR MOUNTING FIXTURE OUTDOORS AND/OR IN WET LOCATIONS. 8) Mounting surface should be clean, dry, flat and 1/4” larger that the canopy/fixture on all sides. Any gaps between the mounting surface and canopy/fixture exceeding 3/16” should be corrected as required. 9) With silicone caulk, caulk completely around where back of canopy/ fixture meets the wall surface to prevent water from entering the outlet box. Date Issued: 4/6/12 Antes de instalar: Todas las instalaciones deben cumplir con los códigos locales y nacionales de electricidad. Si tiene alguna duda con respecto a la instalación, comuníquese con un electricista profesional autorizado. 1) APAGUE LA ALIMENTACIÓN ELÉCTRICA. IMPORTANTE: Antes de comenzar, NUNCA trate de trabajar sin antes desconectar la corriente hasta que el trabajo se termine. a) Vaya a la caja principal de fusibles, o interruptor o caja de circuitos de su casa. Coloque el interruptor de la corriente principal en posición de apagado “OFF”. b) Desatornille el (los) fusible (s), o coloque el interruptor o interruptores del breaker en posición de apagado “OFF”, que controla (n) la corriente hacia el artefacto o habitación donde está trabajando. c) Coloque el interruptor de pared en posición de apagado “OFF”. Si el artefacto que se va a reemplazar tiene un interruptor o cadena que se jala, colóquelos en la posición de apagado “OFF”. 2) Sujeta la plancha para montar a la caja de conexión. (No se proveen lost tornillos). 3) Inserte el tube roscado en la plancha para montar. 4) Fije el conductor a tierra con la terminal de la conexión a tierra elevada en la parte posterior de la caja del artefacto. Fije apretando el tornillo verde. Nunca conecte los alambres de alimentación negro o blanco a la terminal de la conexión a tierra. 5) Conecte el alambre negro de la lámpara al alambre negro de la alimentación con un conector para alambre adecuado (no suministrado). Conecte el alambre blanco de la lámpara al alambre blanco de la alimentación con un conector adecuado. 6) Empuje la unidad contra la pared, pasando con cuidado el tubo roscado a través del agujero. 7) Sujete la unidad contra la pared apretándola con la tapa roscada. INSTRUCCIONES PARA EL MONTAJE DEL ARTEFACTO AL AIRE LIBRE Y/O EN UN LUGAR MOJADO. 8) La superficie de montaje debe estar limpia, seca, ser plana y 1/4” más grande que el escudete/artefacto en todos los bordes. Cualquier espacio libre entre la superficie de montaje y el escudete/artefacto que exceda de 3/16” debe corregirse según se requiera. 9) Calafatee totalmente con compuesto de calafatear de silicona alrededor donde el escudete/artefacto sienta en la superficie de la pared para impedir la entrada de agua en la caja de conexiones. IS-11077-US-
 1
1
-
 2
2
Kichler Lighting 11077BKT Manual de usuario
- Tipo
- Manual de usuario
- Este manual también es adecuado para
en otros idiomas
Artículos relacionados
-
 Kichler Lighting 9654BK Manual de usuario
-
 Kichler Lighting 49119AVI Manual de usuario
-
Kichler Lighting 9707BK Manual de usuario
-
 Kichler Lighting 49120AVI Manual de usuario
-
 Kichler Lighting 9704BK Manual de usuario
-
 Kichler Lighting 49623BKTLED Manual de usuario
-
 Kichler Lighting 49857BKT Manual de usuario
-
 Kichler Lighting 43489BKSLV Manual de usuario
-
 Kichler Lighting 11250AZT30 Manual de usuario
-
 Kichler Lighting 11251AZT30 Manual de usuario


