
CHARCOAL SMOKER
AHUMADOR A CARBÓN
Heavy-Duty Charcoal/Wood Smoker Grill
Ahumador de Carbón o Madera con Parrilla de Uso Fuerte
WARNING/ADVERTENCIA
HAZARDOUS EXPLOSION MAY RESULT IF THESE WARNINGS AND INSTRUCTIONS ARE IGNORED. READ AND
FOLLOW ALL WARNINGS AND INSTRUCTIONS IN THIS MANUAL TO AVOID PERSONAL INJURY, INCLUDING
DEATH OR PROPERTY DAMAGE.
SE PUEDE PRODUCIR UNA EXPLOSIÓN PELIGROSA SI SE HACE CASO OMISO A ESTAS ADVERTENCIAS E
INSTRUCCIONES. LEA Y SIGA TODAS LAS ADVERTENCIAS E INSTRUCCIONES EN ESTE MANUAL PARA
EVITAR LESIONES PERSONALES, INCLUSO LA MUERTE, O LOS DAÑOS MATERIALES.
ASSEMBLY AND OPERATING INSTRUCTIONS
INSTRUCCIONES DE ARMADO Y OPERACIÓN
SAVE THIS MANUAL FOR FUTURE REFERENCE
GUARDE ESTE MANUAL PARA REFERENCIA FUTURA
NOTICE TO INSTALLER:
LEAVE THESE INSTRUCTIONS WITH
THE GRILL OWNER FOR FUTURE
REFERENCE.
AVISO PARA EL
INSTALADOR:
ENTREGUE ESTAS INSTRUCCIONES
AL PROPIETARIO DE LA PARRILLA
PARA REFERENCIA FUTURA.
OWNER’S MANUAL / MANUAL DEL PROPIETARIO
INS_810-5503-S.qxd 11/9/09 11:05 AM Page 1

IMPORTANT SAFETY WARNINGS
WE WANT YOU TO ASSEMBLE AND USE YOUR SMOKER AS SAFELY AS POSSIBLE.
THE PURPOSE OF THIS SAFETY ALERT SYMBOL
IS TO ATTRACT YOUR ATTENTION TO POSSIBLE HAZARDS AS YOU ASSEMBLE AND USE YOUR SMOKER.
WHEN YOU SEE THE SAFETY ALERT SYMBOL, PAY CLOSE ATTENTION TO THE INFORMATION WHICH FOLLOWS!
READ ALL SAFETY WARNINGS AND INSTRUCTIONS CAREFULLY
BEFORE ASSEMBLING AND OPERATING YOUR SMOKER.
1
WARNING
• Only use this smoker on a hard, level, non-combustible, stable surface (concrete, ground, etc.) capable of supporting the weight of the
smoker. Never use on wooden or other surfaces that could burn.
• Proper clearance of 10 feet between the smoker and combustible material (bushes, trees, wooden decks, fences, buildings, etc.) or construction
should be maintained at all times when smoker is in use. Do not place smoker under a roof overhang or other enclosed area.
• FOR OUTDOOR USE ONLY. Do not operate smoker indoors or in an enclosed area.
• For household use only. Do not use this smoker for other than its intended purpose.
• We recommend the use of a Charcoal Chimney Starter to avoid the dangers associated with charcoal lighting fluid. If you choose to use
charcoal lighting fluid, only use lighting fluid approved for lighting charcoal. Carefully read manufacturer’s warnings and instructions on the
charcoal lighting fluid and charcoal prior to the use of their product. Store charcoal lighting fluid safely away from smoker.
• When using charcoal lighting fluid, allow charcoal to burn with smoker box door open until covered with a light ash (approximately 20 min-
utes). This will allow charcoal lighting fluid to burn off. Failure to do this could trap fumes from charcoal lighting fluid in smoker and may
result in a flash fire or explosion when smoker box door is opened.
• Never use charcoal that has been pre-treated with lighter fluid. Use only a high grade plain charcoal or charcoal/wood mixture.
• Do not use gasoline, kerosene or alcohol for lighting charcoal. Use of any of these or similar products could cause an explosion possibly
leading to severe bodily injury.
• Never add charcoal lighting fluid to hot or even warm coals as flashback may occur causing severe burns.
• Place smoker in an area where children and pets cannot come into contact with unit. Close supervision is necessary when
smoker is in use.
• Do not leave smoker unattended when in use.
• When adding charcoal and/or wood, use extreme caution and follow instructions in “Adding Charcoal/Wood During Cooking” section of this
manual.
• To avoid overturning/spilling pan of hot liquid, never pull water pan bracket out more than 4”. Refer to the illustration in “Adding Water
During Cooking” section of this manual.
• Do not store or use smoker near gasoline or other flammable liquids, gases or where flammable vapors may be present.
INS_810-5503-S.qxd 11/9/09 11:05 AM Page 2

2
WARNING
• Smoker is hot when in use. To avoid burns:
• DO NOT attempt to move the smoker.
• Wear protective gloves or oven mitts.
• DO NOT touch any hot smoker surfaces.
• DO NOT wear loose clothing or allow hair to come in contact with smoker.
• Use caution since flames can flare-up when fresh air suddenly comes in contact with fire. When opening the door, keep hands, face and
body a safe distance from hot steam and flame flare-ups.
• Do not allow charcoal and/or wood to rest on the walls of smoker. Doing so will greatly reduce the life of the metal and finish of you
smoker.
• Use caution when assembling and operating your smoker to avoid scrapes or cuts from possible sharp edges of metal parts. Use caution
when reaching into or under smoker.
• In windy weather, place smoker in an outdoor area that is protected from the wind.
• Never leave coals and ashes in smoker unattended. Before smoker can be left unattended, remaining coals and ashes must be removed
from smoker. Use caution to protect yourself and property. Carefully place remaining coals and ashes in a non-combustible metal
container and saturate completely with water. Allow coals and water to remain in metal container 24 hours prior to disposing.
• Extinguished coals and ashes should be placed a safe distance from all structures and combustible and flammable materials.
• With a garden hose, completely wet the surface beneath and around smoker to extinguish any ashes, coals or embers which may have
fallen during the cooking or cleaning process.
• After each use and the smoker has cooled completely, clean the smoker thoroughly and reapply a light coat of oil to interior to prevent
rusting. Cover the smoker to protect it from excessive rusting.
• Use caution when lifting or moving smoker to prevent strains and back injuries. Moving smoker may require the help of an additional
person.
• We advise that a fire extinguisher be on hand. Refer to your local authority to determine proper size and type of fire extinguisher.
• Accessory attachments not manufactured by The Brinkmann Corporation for this particular product are not recommended and may lead to
personal injury or property damage.
• Store the smoker out of reach of children and in a dry location when not in use.
• Do not attempt to service smoker other than normal maintenance as explained in “After-Use Safety” and “Proper Care & Maintenance”
sections of this manual. Repairs should be performed by The Brinkmann Corporation only.
• Properly dispose of all packaging material.
USE CAUTION AND COMMON SENSE WHEN OPERATING YOUR SMOKER.
FAILURE TO ADHERE TO SAFETY WARNING AND GUIDELINES IN THIS MANUAL COULD RESULT
IN BODILY INJURY OR PROPERTY DAMAGE.
SAVE THIS MANUAL FOR FUTURE REFERENCE.
INS_810-5503-S.qxd 11/9/09 11:05 AM Page 3

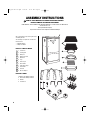
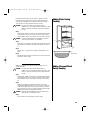
PARTS LIST - VERTICAL SMOKER:
1 Smoker box
2 Cooking grills
1 Water pan
1 Water pan bracket
1 Wire Rack
4 Legs
1 Charcoal pan
2 Door handles
1 Temperature gauge
2 Side handles
8 Side rails
4 Air vent dampers
PARTS BAG CONTAINS:
20 M6 X 12 mm Phillips head bolts
4 M5 X 10 mm Phillips head bolts
8 M6 nuts
4 Star washers
ASSEMBLY INSTRUCTIONS
READ ALL SAFETY WARNINGS & ASSEMBLY INSTRUCTIONS CAREFULLY
BEFORE ASSEMBLING OR OPERATING YOUR SMOKER.
FOR COVERS, ACCESSORIES AND OTHER PRODUCTS, PLEASE VISIT US ONLINE AT:
www.brinkmann.net
(Proof of purchase will be required.)
Inspect contents of the box to ensure all parts are included and undamaged.
3
We recommend two people work together when
assembling this unit.
The following tool is required to assemble this
Vertical Smoker:
• Adjustable Wrench
• Phillips Screwdriver
1
2
3
4
5
6
7
8
9
10
11
12
2
3
4
5
6
7
9
8
10
12
1
11
INS_810-5503-S.qxd 11/9/09 11:05 AM Page 4

4
Choose a good, cleared assembly area and get a friend
to help you put your smoker together. Carefully remove
all components from Smoker Box. Lay cardboard down
to protect smoker finish and assembly area.
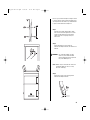
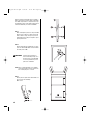
Step 1
Mount the door handle with two M5 X 10 mm
bolts. Insert each bolt through the door from the
inside. Then thread the bolts into the handle.
Tighten each bolt securely. Repeat steps for
bottom door.
Step 2
Attach side handles to smoker using four
M6 X 12 mm Phillips head bolts, star washers and
M6 nuts.
WARNING: Use caution when lifting or moving
smoker to prevent strains and back
injuries. Moving smoker may require the
help of an additional person.
NOTE: With the help of a friend, turn the smoker box
upside down. Make sure door is securely
latched to avoid injury.
Step 3
Attach legs to bottom of smoker using twelve
M6 X 12 mm Phillips head bolts.
300
200
100
50
400
500
600
700
INS_810-5503-S.qxd 11/9/09 11:05 AM Page 5

5
WARNING: Use caution when lifting or moving
smoker to prevent strains and back
injuries. Moving smoker may require
the help of an additional person.
NOTE: With the help of a friend, turn the smoker
box with legs to an upright position.
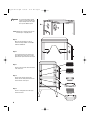
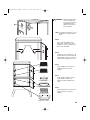
Step 4
Attach four air vent dampers to sides of
smoker box using four M6 X 12 mm Phillips
head bolts and M6 nuts.
Step 5
Insert eight side rails into smoker box sides.
These will form the shelves for the cooking
grills and water pan bracket and charcoal pan.
Step 6
Place the charcoal pan into the bottom shelves
of the smoker box.
Step 7
Place the water pan into the water pan
bracket. Place the water pan bracket onto the
shelves above the charcoal pan.
Step 8
Place the cooking grills onto the two upper
smoker box shelves.
Cooking Grill
Cooking Grill
Water Pan
Water Pan Bracket
Wire Rack
Charcoal Pan
Side Rails
INS_810-5503-S.qxd 11/9/09 11:05 AM Page 6

6
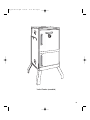
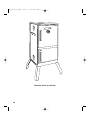
Vertical Smoker (assembled)
INS_810-5503-S.qxd 11/9/09 11:05 AM Page 7

7
PREPARATION FOR USE
& LIGHTING INSTRUCTIONS
PLACE THE SMOKER OUTDOORS ON A HARD, LEVEL, NON-COMBUSTIBLE SURFACE
AWAY FROM ROOF OVERHANG OR ANY COMBUSTIBLE MATERIAL. NEVER USE ON WOODEN OR OTHER SURFACES THAT
COULD BURN. PLACE THE SMOKER AWAY FROM OPEN WINDOWS OR DOORS TO PREVENT SMOKE FROM ENTERING YOUR
HOUSE. IN WINDY WEATHER, PLACE THE SMOKER IN AN OUTDOOR AREA THAT IS PROTECTED FROM THE WIND.
READ ALL SAFETY WARNINGS AND INSTRUCTIONS CAREFULLY
BEFORE OPERATING YOUR SMOKER.
Prior to your first use of the Brinkmann Vertical Smoker, follow the
instructions below carefully to cure your smoker. Curing your smoker will
minimize damage to the exterior finish as well as rid the smoker of paint odor
that can impart unnatural flavors to the first meal prepared on your Brinkmann
Vertical Smoker.
IMPORTANT: To protect your smoker from excessive rust, the unit must be
properly cured and covered at all times when not in use. A cover
for your Vertical Smoker may be ordered directly from
Brinkmann by calling 1-800-468-5252.
Step 1
Remove water pan from smoker. Lightly coat all interior surfaces of the
Vertical Smoker including cooking grills with vegetable oil or vegetable oil
spray. Do not coat charcoal pan.
Step 2
Follow the instructions below carefully to build a fire. You may use charcoal
and/or a charcoal/wood mixture as fuel in the Vertical Smoker (see “Adding
Charcoal/Wood During Cooking” section of this manual).
WARNING: Never use charcoal that has been pre-treated with lighter fluid.
Use only a high grade plain charcoal or charcoal/wood mixture.
If using a Charcoal Chimney Starter, follow all manufacturer’s warnings and
instructions regarding the use of their product. You will need to remove the
lower cooking grills to allow enough clearance for a Charcoal Chimney
Starter. Start with 5 to 6 pounds of charcoal. This should be enough
charcoal to cook with, once the curing process has been completed. When
charcoal is burning strong, carefully place hot coals in center of charcoal
pan then replace cooking grills.
NOTE: To extend the life of your smoker, make sure that hot coals and
wood do not touch the walls of smoker.
IF USING CHARCOAL CHIMNEY STARTER, PROCEED TO STEP 5
If you choose to use charcoal lighting fluid, ONLY use charcoal lighting fluid
approved for lighting charcoal. Do not use gasoline, kerosene, alcohol or
other flammable material for lighting charcoal. Follow all manufacturer’s
warnings and instructions regarding the use of their product. Start with 5 to
6 pounds of charcoal. This should be enough charcoal to cook with, once
the curing process has been completed. Place the charcoal in center of
charcoal pan.
Curing Your Smoker
INS_810-5503-S.qxd 11/9/09 11:05 AM Page 8

Step 3
Saturate charcoal with lighting fluid. With smoker box door open wait 2 to 3
minutes to allow lighting fluid to soak into charcoal. Store charcoal lighting
fluid safely away from the smoker.
Step 4
With smoker box door open, stand back and carefully light charcoal. Allow
to burn until covered with a light ash (approximately 20 minutes).
WARNING: Charcoal lighting fluid must be allowed to completely burn off
prior to closing smoker box door (approximately 20 minutes).
Failure to do this could trap fumes from charcoal lighting fluid in
smoker box and may result in a flash-fire or explosion when door
is opened.
Step 5
With coals burning strong, close the smoker box door. Allow the charcoal to
burn uninterrupted for 2 hours.
Step 6
Increase the temperature on the heat indicator. This can be achieved by
adjusting the air vent dampers or by adding more charcoal and/or
charcoal/wood mixture (see “Adding Charcoal/Wood During Cooking”
section of this manual). Maintain the fire for 1 hour then allow unit to cool
completely.
NOTE: It is important that the exterior of the smoker is not scraped or
rubbed during the curing process.
IMPORTANT: To protect your smoker from excessive rust, the unit must be
cured periodically and covered at all times when not in use.
A cover can be ordered directly from Brinkmann by calling
1-800-468-5252.
YOUR BRINKMANN VERTICAL SMOKER IS NOW CURED
AND READY FOR USE.
8
INS_810-5503-S.qxd 11/9/09 11:05 AM Page 9

9
Step 1
Remove water pan bracket and water pan from smoker. Follow instructions
below carefully to build a fire. You may use charcoal and/or charcoal/wood
mixture as fuel in the Vertical Smoker (see “Adding Charcoal/Wood During
Cooking” section of this manual).
WARNING: Never use charcoal that has been pre-treated with
lighter fluid. Use only a high grade plain charcoal or
charcoal/wood mixture.
If using a Charcoal Chimney Starter, follow all manufacturer’s warnings and
instructions regarding the use of their product. You will need to remove the
lower cooking grills to allow enough clearance for a Charcoal Chimney
Starter. Start with 5 to 6 pounds of charcoal. When charcoal is burning
strong, carefully place hot coals in center of charcoal pan and replace
cooking grills.
NOTE: To extend the life of your smoker, make sure that hot coals and wood
do not touch the walls of smoker
IF USING CHARCOAL CHIMNEY STARTER, PROCEED TO STEP 4
If you choose to use charcoal lighting fluid, ONLY use charcoal
lighting fluid approved for lighting charcoal. Do not use gasoline, kerosene,
alcohol or other flammable material for lighting charcoal. Follow all
manufacturer’s warnings and instructions regarding the
use of their product. Place 5 to 6 pounds of charcoal on charcoal pan.
Step 2
Saturate charcoal with lighting fluid. With smoker box door open wait 2 to 3
minutes to allow lighting fluid to soak into charcoal. Store charcoal lighting
fluid safely away from the smoker.
Step 3
With smoker box door open, stand back and carefully light charcoal and
allow to burn until covered with a light ash (approximately 20 minutes).
Charcoal lighting fluid must be allowed to completely burn off prior to
closing smoker box door.
WARNING: Failure to do this could trap fumes from charcoal lighting fluid in
smoker box and may result in a flash-fire or explosion when door
is opened.
Step 4
With coals burning well, carefully add wood chunks using long
cooking tongs (see “Flavoring Wood” and “Adding Charcoal/Wood During
Cooking” sections of this manual.)
Smoking
OPERATING INSTRUCTIONS
PLACE THE SMOKER OUTDOORS ON A HARD, LEVEL, NON-COMBUSTIBLE SURFACE
AWAY FROM ROOF OVERHANG OR ANY COMBUSTIBLE MATERIAL. NEVER USE ON WOODEN OR OTHER
SURFACES THAT COULD BURN. PLACE THE SMOKER AWAY FROM OPEN WINDOWS OR DOORS TO PREVENT
SMOKE FROM ENTERING YOUR HOUSE. IN WINDY WEATHER, PLACE THE SMOKER IN AN OUTDOOR AREA THAT
IS PROTECTED FROM THE WIND.
READ ALL SAFETY WARNINGS AND INSTRUCTIONS CAREFULLY
BEFORE OPERATING YOUR SMOKER.
INS_810-5503-S.qxd 11/9/09 11:05 AM Page 10

10
NOTE: Depending on the weather, a full pan of charcoal will burn for
5-6 hours.
Step 5
Replace the water pan bracket and water pan.
WARNING: To avoid overturning/spilling pan of hot liquid, never pull water
pan bracket out more than 4”. Refer to the illustration in “Adding
Water During Cooking” section of this manual.
Step 6
Carefully fill the water pan with warm water or marinade to 1“ below the
rim. A full pan holds 4 quarts / 1 gallon of water and will last
2-3 hours. Do not overfill and allow water to overflow from water pan.
Step 7
Place food on the cooking grills in a single layer with space between each
piece. This will allow smoke and moist heat to circulate evenly around all
pieces. Close smoker box door.
Step 8
After 2-3 hours of cooking, check water and charcoal levels by following
instructions in the “Adding Water During Cooking and Adding
Charcoal/Wood During Cooking“ sections of this manual.
WARNING:
Do not allow liquid in water pan to completely evaporate. Always
keep water in water pan as long as coals are still burning. Water
will evaporate and grease in water pan can catch on fire.
Step 9
The ideal smoking temperature is between 175°F and 250°F. For large cuts
of meat, allow approximately one hour of cooking time per pound of meat.
Always use a meat thermometer to ensure food is fully cooked before
removing from smoker.
Step 10
Allow smoker to cool completely, then follow instructions in the
“After-Use Safety” and “Proper Care & Maintenance” sections of this
manual.
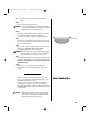
Smoke Cooking Tips
During the smoking process, avoid the temptation to open smoker box
door to check food. Opening the door allows heat and smoke to escape,
making additional cooking time necessary.
Food closest to the charcoal will cook and brown faster. Rotate food
midway through the cooking cycle. If food is excessively browned or
flavored with smoke, wrap food in aluminum foil after the first few hours of
smoking. This will allow food to continue cooking without further browning
or smoke flavoring.
CAUTION: Always use oven mitts/gloves to protect your hands. Liquid in
water pan will be extremely hot and can scald or burn. Always
allow liquid to cool completely before handling. Do not allow
liquid to completely evaporate from water pan.
1"
(2.54 cm)
INS_810-5503-S.qxd 11/9/09 11:05 AM Page 11

To obtain your favorite smoke flavor, experiment by using chunks, sticks or
chips of flavor producing wood such as hickory, pecan, apple, cherry, or
mesquite. Most fruit or nut tree wood may be used for smoke flavoring. Do
not use resinous wood such as pine as it will produce an unpleasant taste.
Wood chunks or sticks 3" to 4" long and 1" to 2" thick work best. Unless
the wood is still green, soak the wood in water for 30 minutes or wrap
each piece in foil and tear several small holes in the foil to
produce more smoke and prevent the wood from burning too quickly. A lot
of wood is not required to obtain a good smoke flavor. A recommended
amount for the Vertical Smoker is 5 to 6 wood chunks or sticks. Experiment
by using more wood for stronger smoke flavor or less wood for milder
smoke flavor.
Additional flavoring wood should not have to be added during the cooking
process. However, it may be necessary when cooking very large pieces of
food. Follow instructions and cautions in the “Adding Charcoal/Wood During
Cooking” section of this manual to avoid injury while adding wood.
Flavoring Wood
11
Regulating Heat
To maintain or increase temperature, fully open air vent dampers on sides
of smoker box. If increased air circulation does not raise the temperature
sufficiently, more wood and/or charcoal may need to be added during the
cooking cycle. Follow instructions in “Adding Charcoal/Wood During
Cooking” section of this manual.
NOTE: Dry wood burns hotter than charcoal, so you may want to increase
the ratio of wood to charcoal to increase the cooking temperature.
Hardwood such as oak, hickory, mesquite, fruit and nut wood are
an excellent fuel because of their burning rate. When using wood
as fuel, make sure the wood is seasoned and dry. DO NOT use
resinous wood such as pine as it will produce an unpleasant taste.
INS_810-5503-S.qxd 11/9/09 11:05 AM Page 12

12
Check the water level in water pan if the complete cooking process takes
longer than 2 hours. A low water level can be detected by listening for the
sound of water sizzling. Water can be added to the water pan through the
smoker box door. Use caution and follow instructions carefully.
WARNING: Use caution since flames can flare-up when fresh air
suddenly comes in contact with fire. When opening the door, keep
hands, face and body a safe distance from hot steam and flame
flare-ups.
Step 1
Stand back and carefully open smoker box door allowing heat and steam to
escape away from your face. Use caution since flames can flare-up when
fresh air suddenly comes in contact with fire. Inspect the water level in pan.
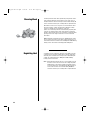
WARNING: To avoid overturning/spilling pan of hot liquid, never pull water
pan bracket out more than 4”. (See illustration)
Step 2
If water level is low, extra water or marinade will need to be added to water
pan. Wearing oven mitts/gloves, slide out water pan bracket no more than
4”.
Step 3
Fill water pan to 1” below the rim. Pour slowly to avoid splashing or over-
filling.
Step 4
Carefully slide water pan bracket in completely, close smoker box door and
allow food to continue cooking.
Adding Water During
Cooking
Additional charcoal and/or wood may be required to maintain or increase
cooking temperature.
WARNING: Use caution since flames can flare-up when fresh air
suddenly comes in contact with fire. When opening the door, keep
hands, face and body a safe distance from hot steam and flame
flare-ups.
Step 1
Stand back and carefully open smoker box door allowing heat and steam to
escape away from your face. Use caution since flames can flare-up when
fresh air suddenly comes in contact with fire. Inspect the charcoal level in
pan.
Step 2
Wearing oven mitts/gloves, stand back a safe distance and use long
cooking tongs to lightly brush aside ashes on hot coals. Use cooking tongs
to add charcoal and/or wood to charcoal pan, being careful not to stir-up
ashes and sparks. If necessary, use your Charcoal Chimney Starter to light
additional charcoal and/or wood and add to existing fire.
WARNING: Never add charcoal lighting fluid to hot or even warm coals as
flashback may occur causing severe burns.
Step 3
Close smoker box door and allow food to continue cooking.
Adding Charcoal/Wood
During Cooking
4”
1"
(2.54 cm)
INS_810-5503-S.qxd 11/9/09 11:05 AM Page 13

13
• Always allow smoker and all components to cool completely before handling.
• Never leave coals and ashes in smoker unattended. Make sure coals and ashes are completely extinguished before removing.
• Before smoker can be left unattended, remaining coals and ashes must be removed from smoker. Use caution to protect yourself
and property. Place remaining coals and ashes in a non-combustible metal container and completely saturate with water. Allow
coals and water to remain in metal container 24 hours prior to disposing.
• Extinguished coals and ashes should be placed a safe distance from all structures and combustible materials.
• With a garden hose, completely wet surface beneath and around the smoker to extinguish any ashes, coals or embers which may
have fallen during the cooking or cleaning process.
• Cover and store smoker in a protected area away from children and pets.
• Cure your smoker periodically throughout the year to protect
against excessive rust.
• To protect your smoker from excessive rust, the unit must be properly cured
and covered at all times when not in use. A smoker cover may be ordered
directly from Brinkmann by calling 1-800-468-5252.
• Wash cooking grills and water pan with hot, soapy water, rinse
well and dry. Lightly coat grills with vegetable oil or vegetable oil spray.
• Clean inside and outside of smoker by wiping off with a damp cloth. Apply a
light coat of vegetable oil or vegetable oil spray to the interior surface to
prevent rusting. Do not coat charcoal pan.
• If rust appears on the exterior surface of your smoker, clean and buff the
affected area with steel wool or fine grit emery cloth. Touch-up with a good
quality high-temperature resistant paint.
• Never apply paint to the interior surface. Rust spots on the interior surface
can be buffed, cleaned, then lightly coated with vegetable oil or vegetable
oil spray to minimize rusting.
AFTER-USE SAFETY
WARNING
Proper Care
& Maintenance
INS_810-5503-S.qxd 11/9/09 11:05 AM Page 14

ADVERTENCIA
• Utilice este ahumador solo sobre una superficie estable dura, nivelada, no combustible (concreto, piso, etc.) capaz de aguantar el peso del
ahumador. Nunca lo utilice sobre superficies de madera o de otro tipo que podrían quemarse.
• Tiene que haber un espacio de 10 pies (3.3 m) entre el ahumador y materiales combustibles (arbustos, árboles, terrazas de madera, cercas,
edificios, etc.) o una construcción en todo momento en que el ahumador está en uso. No coloque el ahumador debajo del voladizo de un techo u
otro lugar cerrado.
• PARA USO EXTERNO ÚNICAMENTE. No debe operarse en interiores o en una zona cerrada.
• Para uso casero solamente. No utilice este ahumador para otra finalidad que no sea la indicada.
• Recomendamos el uso del encendedor de chimenea de carbón para evitar el peligro que acarrea el líquido encendedor de carbón. Si decide
usar este líquido, use sólo aquél aprobado para encender carbón. Lea detenidamente las advertencias e instrucciones del fabricante del
líquido encendedor de carbón antes de usar ese producto. Almacene el líquido encendedor de carbón a buena distancia del ahumador.
• Al usar líquido encendedor de carbón, deje que el carbón se queme con la puerta de la caja del ahumador abierta hasta que esté cubierto
ligeramente por ceniza (aproximadamente 20 minutos). Así, el líquido encendedor de carbón se habrá consumido totalmente. Si no lo hace,
los gases de la combustión del líquido encendedor de carbón podrían quedar atrapados en el ahumador y causar una explosión o un
incendio repentino cuando se abra la puerta de la caja del ahumador.
• Nunca emplee carbón al cual se ha añadido previamente líquido encendedor. Use sólo carbón común y corriente de buena calidad o una
mezcla de carbón y madera.
• No utilice gasolina, queroseno o alcohol para encender el carbón. El empleo de uno de estos productos o uno similar podría causar una
explosión con posibles lesiones graves a la persona.
• Nunca añada líquido encendedor de carbón que ya está caliente porque puede ocurrir un retroceso de la llama que causaría quemaduras
graves.
• Coloque el ahumador en una zona no accesible para niños y mascotas. La supervisión estricta es necesaria cuando se está usando el
ahumador.
• No deje el ahumador desatendido durante el uso.
• Añada carbón y/o leña con suma precaución y siga las instrucciones de la sección “Cómo añadir carbón o leña durante el cocimiento” de
este manual.
• Para evitar que se voltee o derrame el líquido caliente de la bandeja, nunca jale el soporte de la bandeja de agua más de 4” (10 cm). Vea la
ilustración de la sección “Cómo añadir carbón o leña durante el cocimiento” de este manual.
• No almacene o utilice el ahumador cerca de gasolina u otros líquidos inflamables, gases o donde se encuentren vapores inflamables.
ADVERTENCIAS IMPORTANTES DE
SEGURIDAD
QUEREMOS QUE USTED ENSAMBLE Y UTILICE SU AHUMADOR DE LA MANERA MÁS SEGURA POSIBLE.
LA FINALIDAD DE ESTE SÍMBOLO DE ALERTA DE SEGURIDAD ES ATRAER SU ATENCIÓN A LOS POSIBLES RIESGOS
INHERENTES EN EL ENSAMBLADO Y USO DE SU AHUMADOR.
CUANDO VEA EL SÍMBOLO DE ALERTA DE SEGURIDAD, ¡LEA DETENIDAMENTE LA INFORMACIÓN QUE SIGUE!
LEA CUIDADOSAMENTE TODAS LAS ADVERTENCIAS E INSTRUCCIONES DE SEGURIDAD ANTES
DE ENSAMBLAR Y UTILIZAR SU AHUMADOR.
14
INS_810-5503-S.qxd 11/9/09 11:05 AM Page 15

ADVERTENCIA
• El ahumador está caliente al usarse. Para evitar quemaduras:
• NO intente mover el ahumador.
• Póngase guantes protectores o guantes gruesos para el horno.
• NO toque ninguna superficie caliente del ahumador.
• NO se ponga ropa suelta y cuídese de que su pelo no toque el ahumador.
• Tenga precaución ya que las llamas pueden crecer súbitamente cuando aire fresco hace contacto con el fuego. Al abrir la puerta,
mantenga sus manos, cara y cuerpo a una distancia segura del vapor caliente y las llamas crecidas.
• No permita que carbón o leña permanezcan en las paredes del ahumador ya que disminuirían mucho la vida útil del metal y afectarían el
acabado de su ahumador.
• Tenga precaución al ensamblar y utilizar su ahumador para que no se raspe o corte en los posibles bordes filosos de las piezas metálicas.
Tenga precaución al alcanzar algo dentro o debajo del ahumador.
• Cuando haya viento, coloque el ahumador en un lugar externo protegido del viento.
• Nunca deje carbón y ceniza en el ahumador sin que alguien esté presente. Antes de dejar al ahumador desatendido, debe sacar el carbón
y la ceniza sobrantes del ahumador. Tenga precaución para proteger su persona y propiedad. Con cuidado, coloque el carbón y la ceniza
que sobraron en un recipiente metálico no combustible y llénelo completamente con agua. Deje el carbón y la ceniza en el recipiente
metálico por 24 horas antes de tirarlos.
• El carbón y la ceniza que se extinguieron deben ponerse a una buena distancia de toda estructura y materiales combustibles e
inflamables.
• Con una manguera de jardín, moje totalmente la superficie debajo y alrededor del ahumador para extinguir toda ceniza, carbón o carbón
ardiente que pudo haberse caído durante el cocimiento o la limpieza.
• Tras cada uso, y una vez que el ahumador se haya enfriado completamente, límpielo muy bien y vuelva a aplicar una capa de aceite al
interior para evitar su oxidación. Cubra el ahumador para protegerlo de oxidación excesiva.
• Tenga precaución al levantar o mover el ahumador para que no se tuerza ni lesione su espalda. Quizá necesite la ayuda de otra persona
para mover el ahumador.
• Recomendamos tener a la mano un extintor. Consulte con las autoridades locales correspondientes para saber el tamaño y tipo indicado
de extintor.
• Los aditamentos para accesorios no fabricados por The Brinkmann Corporation para este producto en particular no se recomiendan y
pueden causar lesiones personales o daños a la propiedad.
• Guarde su ahumador lejos del alcance de los niños y en un lugar seco cuando no lo use.
• No intente reparar su ahumador a excepción del mantenimiento normal, tal y como se explica en las secciones “Seguridad después del
uso” y “El debido cuidado y mantenimiento” de este manual. Las reparaciones debe realizarlas solamente The Brinkmann Corporation.
• Elimine debidamente todo material de empaque.
TENGA PRECAUCIÓN Y SENTIDO COMÚN AL OPERAR SU AHUMADOR.
LA PERSONA QUE NO SIGA LAS DIRECTRICES Y ADVERTENCIAS DE SEGURIDAD DE ESTE MANUAL PODRÍA
LESIONARSE GRAVEMENTE O TENER DAÑOS A LA PROPIEDAD.
GUARDE ESTE MANUAL PARA CONSULTARLO EN EL FUTURO.
15
INS_810-5503-S.qxd 11/9/09 11:05 AM Page 16

16
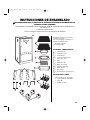
LISTA DE PIEZAS – AHUMADOR VERTICAL:
1 Caja del ahumador
2 Parrillas para cocinar
1 Bandeja de agua
1 Soporte de la bandeja de agua
1 Rejilla para el carbón
4 Patas
1 Bandeja para carbón
2 Manijas de las puertas
1 Indicador de temperatura
2 Manijas laterales
8 Rieles laterales
4 Amortiguadores de las ventilas de aire
LA BOLSA DE PIEZAS CONTIENE:
20 Pernos M6 X 12 mm cabeza Phillips
4 Pernos M5 X 10 mm cabeza Phillips
8 Tuercas M6
4 Arandelas de estrella
INSTRUCCIONES DE ENSAMBLADO
LEA CUIDADOSAMENTE TODAS LAS ADVERTENCIAS DE SEGURIDAD E INSTRUCCIONES DE ENSAMBLADO ANTES DE
ENSAMBLAR Y UTILIZAR SU AHUMADOR.
PARA CUBIERTAS, ACCESORIOS Y OTROS PRODUCTOS, FAVOR DE VISITARNOS POR LA RED MUNDIAL EN:
www.brinkmann.net
(Le exigiremos su comprobante de compra.)
Inspeccione el contenido de la caja para cerciorarse de que no falte ninguna pieza y todas estén intactas.
Recomendamos que dos personas ensamblen
esta unidad conjuntamente.
Se necesitan las siguientes herramientas para
ensamblar este ahumador vertical:
• Llave de tuercas ajustable
• Destornillador Phillips
1
2
3
4
5
6
7
8
9
10
11
12
2
3
4
5
6
7
9
8
10
12
1
11
INS_810-5503-S.qxd 11/9/09 11:05 AM Page 17

Elija una zona buena y despejada para el ensamble y
dígale a un amigo que le ayude a armar su ahumador.
Con cuidado, saque todos los componentes de la caja
del ahumador. Ponga un cartón debajo para proteger el
acabado del ahumador y la zona del ensamblado.
Paso 1
Monte la manija de la puerta con dos pernos M5 X
10 mm. Inserte cada perno a través de la puerta
desde el interior. Luego enrosque los pernos a la
manija. Apriete bien cada perno. Repita los pasos
para la puerta inferior.
Paso 2
Una las manijas laterales al ahumador con cuatro
pernos de cabeza Phillips M6 X 12 mm, arandelas
de estrella y tuercas M6.
ADVERTENCIA: Tenga precaución al levantar o
mover el ahumador para que no se
tuerza ni lesione su espalda. Quizá
necesite la ayuda de otra persona
para mover el ahumador.
NOTA: Voltee la caja del ahumador con la ayuda de
otra persona. Asegúrese de que la puerta esté
bien cerrada para que no se lesione.
Paso 3
Una las patas a la parte inferior del ahumador con
doce pernos de cabeza Phillips
M6 X 12 mm.
300
200
100
50
400
500
600
700
17
INS_810-5503-S.qxd 11/9/09 11:05 AM Page 18

ADVERTENCIA: Tenga precaución al levantar
o mover el ahumador para
que no se tuerza ni lesione su
espalda. Quizá necesite la
ayuda de otra persona para
mover el ahumador.
NOTA: Con la ayuda de un amigo, voltee la caja
del ahumador con las patas a posición
vertical.
Paso 4
Una los cuatro amortiguadores de las
ventilas de aire a los lados de la caja del
ahumador con cuatro tuercas M6 y pernos
M6 X 12 mm cabeza Phillips.
Paso 5
Introduzca los ocho rieles laterales a la caja
del ahumador. Éstos serán los anaqueles de
las parrillas para cocinar y los soportes de la
bandeja de agua y bandeja para el carbón.
Paso 6
Coloque la bandeja para el carbón en los
anaqueles inferiores de la caja del
ahumador.
Paso 7
Coloque la bandeja de agua a su soporte
correspondiente y este último a los
anaqueles encima de la bandeja para el
carbón.
Paso 8
Coloque las parrillas para cocinar a los dos
anaqueles superiores de la caja del
ahumador.
Parrilla para Cocinar
Parrilla para Cocinar
Bandeja de Agua
Soporte de la Bandeja de Agua
Rejilla para el Carbón
Bandeja para el Carbón
Rieles laterales
18
INS_810-5503-S.qxd 11/9/09 11:05 AM Page 19

Ahumador Vertical (ensamblado)
19
INS_810-5503-S.qxd 11/9/09 11:05 AM Page 20

COLOQUE EL AHUMADOR EN EL EXTERIOR, SOBRE UNA SUPERFICIE DURA, NIVELADA Y NO COMBUSTIBLE, LEJOS DEL
VOLADIZO DE UN TECHO O DE CUALQUIER MATERIAL COMBUSTIBLE. NUNCA LO PONGA SOBRE SUPERFICIES DE MADERA O
DE OTRO TIPO QUE PUDIESEN QUEMARSE. ALEJE EL AHUMADOR DE PUERTAS O VENTANAS ABIERTAS PARA QUE EL HUMO
NO ENTRE A LA CASA. CUANDO HAGA VIENTO, COLOQUE EL AHUMADOR EN UN LUGAR EXTERNO PROTEGIDO DEL VIENTO.
LEA DETENIDAMENTE TODAS LAS ADVERTENCIAS E INSTRUCCIONES
DE SEGURIDAD ANTES DE UTILIZAR SU AHUMADOR.
Antes de utilizar su ahumador vertical Brinkmann por primera vez, siga
detenidamente las instrucciones dadas a continuación para curar su ahumador
porque la curación minimizará daños al acabado de la superficie y además le
quitará al ahumador el olor a pintura para evitar que la primera comida preparada
en su ahumador vertical Brinkmann no tenga un sabor no natural.
IMPORTANTE: Para proteger su ahumador de oxidación excesiva, debe curar
debidamente la unidad y mantenerla cubierta en todo momento
cuando no la use. Puede pedir una cubierta para su ahumador
vertical directamente de Brinkmann llamando al
1-800-468-5252.
Paso 1
Saque la bandeja de agua del ahumador. Aplique o rocíe una capa ligera de aceite
vegetal a todas las superficies del interior del ahumador vertical, incluyendo las
parrillas para cocinar. No le aplique ninguna capa a las bandejas para carbón.
Paso 2
Siga las instrucciones dadas a continuación al pie de la letra para encender y
mantener el fuego. Puede usar carbón o una mezcla de carbón y leña como
combustible para su ahumador vertical (consulte la sección “Cómo añadir carbón
o leña durante el cocimiento” de este manual).
ADVERTENCIA: Nunca emplee carbón que ya contenga líquido encendedor. Use
sólo carbón común y corriente de buena calidad o una mezcla de
carbón y leña.
Si emplea un encendedor de chimenea para carbón, siga todas las advertencias e
instrucciones del fabricante concernientes al uso de su producto. Necesitará quitar
las parrillas inferiores para cocinar para que haya suficiente lugar para el
encendedor de chimenea para carbón. Comience con 5 a 6 libras (2.5 a 3 kg) de
carbón, suficiente para cocinar con él una vez terminado el curado. Cuando el
carbón ya esté ardiendo bien, ponga unos trozos de carbón caliente en el centro
de la bandeja para carbón y luego reemplace las parrillas para cocinar.
NOTA: Para prolongar la vida útil de su ahumador, cerciórese de que ni el carbón ni
la leña caliente toquen las paredes del ahumador.
SI EMPLEA EL ENCENDEDOR DE CHIMENEA PARA CARBÓN, SIGA EN EL PASO 5
Si eligió emplear líquido para encender carbón, use SOLAMENTE líquido
encendedor de carbón. Es decir, no use gasolina, queroseno, alcohol u otros
materiales inflamables para encender el carbón. Siga todas las instrucciones y
advertencias del fabricante concernientes al uso de su producto. Comience con 5
a 6 libras (2.5 a 3 kg) de carbón, suficiente para cocinar con él una vez terminado
el curado. Ponga el carbón en el centro de la bandeja para carbón.
Cómo curar su ahumador
PREPARACIÓN PARA EL USO
E INSTRUCCIONES DE ENCENDIDO
20
INS_810-5503-S.qxd 11/9/09 11:05 AM Page 21

Paso 3
Sature el carbón con el líquido encendedor. Con la puerta de la caja del
ahumador abierta, espere de 2 a 3 minutos para que el líquido encendedor
de carbón lo penetre. Guarde el líquido encendedor de carbón a buena
distancia del ahumador.
Paso 4
Con la puerta de la caja del ahumador abierta, aléjese y cuidadosamente
encienda el carbón. Deje que arda hasta que lo cubra una ligera capa de
ceniza (aproximadamente 20 minutos).
ADVERTENCIA: Debe dejar que el líquido encendedor de carbón se
consuma por completo antes de cerrar la puerta de la caja
del ahumador (aproximadamente 20 minutos). No hacerlo
podría hacer que quedaran atrapados los gases del líquido
encendedor de carbón en la caja del ahumador, los cuales
podrían causar una explosión o un incendio repentino al
abrir la puerta.
Paso 5
Con el carbón ardiendo bien, cierre la puerta de la caja del ahumador. Deje
que el carbón arda ininterrumpidamente por 2 horas.
Paso 6
Suba la temperatura en el indicador de calor ajustando los amortiguadores
de las ventilas de aire o añadiendo más carbón o una mezcla de carbón y
leña (consulte la sección “Cómo añadir carbón o leña durante el
cocimiento” de este manual). Mantenga el fuego por
1 hora y luego deje que la unidad se enfríe totalmente.
NOTA: Es importante no raspar ni tallar el exterior del ahumador durante el
curado.
IMPORTANTE: Para proteger su ahumador de la oxidación excesiva, debe
curar la unidad periódicamente y mantenerla cubierta en
todo momento cuando no la use. Puede pedir una cubierta
directamente de Brinkmann llamando al 1-800-468-5252.
SU AHUMADOR VERTICAL BRINKMANN YA HA SIDO CURADO Y
ESTÁ LISTO PARA USARSE.
21
INS_810-5503-S.qxd 11/9/09 11:05 AM Page 22

Paso 1
Saque el soporte de la bandeja de agua y la bandeja misma del ahumador. Siga
detenidamente las instrucciones dadas a continuación para hacer el fuego.
Puede utilizar carbón o una mezcla de carbón y leña como combustible para su
ahumador vertical (consulte la sección “Cómo añadir carbón o leña durante el
cocimiento” de este manual).
ADVERTENCIA: Nunca emplee carbón que ya contenga líquido encendedor. Use
sólo carbón común y corriente de buena calidad o una mezcla
de carbón y leña.
Si emplea un encendedor de chimenea para carbón, siga todas las advertencias
e instrucciones del fabricante concernientes al uso de su producto. Necesitará
quitar las parrillas inferiores para cocinar para que haya suficiente lugar para el
encendedor de chimenea para carbón. Comience con 5 a 6 libras (2.5 a 3 kg) de
carbón, suficiente para cocinar con él una vez terminado el curado. Cuando el
carbón ya esté ardiendo bien, ponga unos trozos de carbón caliente en el centro
de la bandeja para carbón y luego reemplace las parrillas para cocinar
NOTA: Para prolongar la vida útil de su ahumador, cerciórese de que el carbón o
la leña caliente no toquen las paredes del ahumador.
SI USA EL ENCENDEDOR DE CHIMENEA PARA CARBÓN, VAYA AL PASO 4
Si eligió emplear el líquido encendedor de carbón, use SÓLO uno que haya sido
aprobado para encender carbón. No utilice gasolina, queroseno, alcohol u otros
materiales inflamables para encender carbón. Siga todas las advertencias e
instrucciones del fabricante concernientes al uso de su producto. Ponga 5 a 6
libras (2.5 a 3 kg) de carbón en la bandeja para carbón.
Paso 2
Sature el carbón con líquido encendedor. Con la puerta de la caja del ahumador
abierta, espere de 2 a 3 minutos para que el líquido encendedor penetre el
carbón. Almacene el líquido encendedor de carbón lejos del ahumador.
Paso 3
Con la puerta de la caja del ahumador abierta, aléjese y con cuidado encienda el
carbón y deje que arda hasta que esté cubierto ligeramente por ceniza
(aproximadamente 20 minutos). Debe dejar que el líquido encendedor de carbón
se consuma totalmente antes de cerrar la puerta de la caja del ahumador.
ADVERTENCIA: No hacerlo podría hacer que quedaran atrapados los gases del
líquido para encender carbón en la caja del ahumador, los
cuales podrían causar una explosión o un incendio repentino al
abrir la puerta.
Paso 4
Con el carbón ardiendo bien, agregue cuidadosamente trozos de leña con pinzas
largas para cocinar (consulte las secciones “Leña que imparte sabor” y “Cómo
añadir carbón o leña durante el cocimiento” de este manual.)
Cómo ahumar
INSTRUCCIONES DE OPERACIÓN
COLOQUE EL AHUMADOR EN EL EXTERIOR, SOBRE UNA SUPERFICIE DURA, NIVELADA Y NO COMBUSTIBLE,
LEJOS DEL VOLADIZO DE UN TECHO O DE CUALQUIER MATERIAL COMBUSTIBLE. NUNCA LO PONGA SOBRE
SUPERFICIES DE MADERA O DE OTRO TIPO QUE PUDIESEN QUEMARSE. ALEJE EL AHUMADOR DE PUERTAS O
VENTANAS ABIERTAS PARA QUE EL HUMO NO ENTRE A LA CASA. CUANDO HAGA VIENTO, COLOQUE EL
AHUMADOR EN UN LUGAR EXTERNO PROTEGIDO DEL VIENTO.
LEA DETENIDAMENTE TODAS LAS ADVERTENCIAS E INSTRUCCIONES
DE SEGURIDAD ANTES DE UTILIZAR SU AHUMADOR.
22
INS_810-5503-S.qxd 11/9/09 11:05 AM Page 23

NOTA: Según el estado del tiempo, una bandeja llena de carbón arderá por
5 a 6 horas.
Paso 5
Reemplace el soporte de la bandeja de agua y la bandeja misma.
ADVERTENCIA: Para evitar que se voltee o derrame el líquido caliente de la
bandeja, nunca jale el soporte de la bandeja de agua más
de 4” (10 cm). Vea la ilustración de la sección “Cómo
añadir carbón o leña durante el cocimiento” de este
manual.
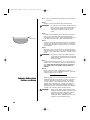
Paso 6
Con cuidado, llene la bandeja de agua con agua caliente o adobo ácido
hasta a 1“ (2.54 cm) por debajo del borde. Una bandeja llena tiene
capacidad para 4 cuartos (1 galón = 3.78 litros) de agua y durará de 2 a 3
horas. No llene demasiado, ya que el agua se saldrá de la bandeja.
Paso 7
Coloque una sola capa de comida entre las parrillas para cocinar, dejando
un espacio entre cada pieza de comida. Así, el humo y el calor húmedo
podrán circular uniformemente por todas las piezas. Cierre la puerta de la
caja del ahumador.
Paso 8
Después de 2-3 horas de cocimiento, revise los niveles de agua y carbón
siguiendo las instrucciones en las secciones “Cómo añadir agua durante el
cocimiento” y “Cómo añadir carbón o leña durante el cocimiento” de este
manual.
ADVERTENCIA:
No permita que se evapore toda el agua de la bandeja.
Siempre tenga agua en la bandeja mientras el carbón siga
ardiendo. El agua se evaporará y la grasa en la bandeja de
agua puede incendiarse.
Paso 9
La temperatura ideal para ahumar es entre 175° F y 250° F. Para cortes
grandes de carne, cocine alrededor de una hora por cada libra (454 g) de
carne. Siempre utilice un termómetro de carne para cerciorarse de
que la comida se haya cocido totalmente antes de retirarla del
ahumador.
Paso 10
Deje que el ahumador se enfríe completamente y luego siga las
instrucciones en las secciones “Seguridad después del uso” y “El debido
cuidado y mantenimiento” de este manual.
1"
(2.54 cm)
Consejos Sobre cómo
Cocinar con Humo
Durante el ahumado, evite caer en la tentación de abrir la puerta de la caja
del ahumador para revisar la comida, ya que si lo hace se escaparán el
calor y humo, alargando así el tiempo de cocimiento. La comida más
cercana al carbón se cocinará y dorará más rápido. Por ello, cambie la
comida de lugar a la mitad del ciclo de cocimiento. Si la comida está
demasiado dorada o tiene demasiado sabor ahumado, envuélvala con
papel aluminio a las pocas horas de haberla ahumado. Esto permitirá que
la comida se siga cocinando sin dorarse o ahumarse aún más.
PRECAUCIÓN: Póngase siempre guantes o guantes gruesos de cocina
para proteger sus manos. El líquido en la bandeja de agua
estará mucho muy caliente y usted puede escaldarse o
quemarse. Siempre deje que el líquido se enfríe
completamente antes de manipularlo. Fíjese que no todo
el líquido se evapore de la bandeja de agua.
23
INS_810-5503-S.qxd 11/9/09 11:05 AM Page 24

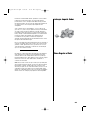
Para obtener su sabor ahumado favorito, experimente con trozos, varitas o
pedacitos de leña que imparten sabor como la del nogal americano,
pacana, manzano, cerezo o mesquite. Puede utilizar la mayor parte de la
leña de árboles frutales o de nueces para que imparta sabor ahumado. No
use madera resinosa como la del pino porque impartirá un sabor
desagradable.
Trozos o varas de leña con una longitud de 3" a 4" (7.5 a 10 cm) y un
grosor de 1" a 2" (2.54 a 5 cm) son óptimos. A menos que la leña todavía
esté verde, remójela en agua por 30 minutos o envuelva cada pieza en
papel aluminio y abra varios agujeros en el papel para que produzca más
humo y evitar que consuma demasiado rápido. No es necesaria tanta leña
para obtener un buen sabor ahumado. Para el ahumador vertical,
recomendamos de 5 a 6 pedazos o varitas de leña. Experimente
empleando más leña para impartir un sabor ahumado más fuerte o menos
leña para un sabor ahumado más ligero.
No es necesario añadir más leña para impartir sabor una vez comenzado el
cocimiento. Sin embargo, quizá sí sea necesario si uno cocina trozos muy
grandes de comida. Siga las instrucciones y precauciones en la sección
“Cómo añadir carbón o leña durante el cocimiento” de este manual para
que no se lesione mientras los añade.
Leña que Imparte Sabor
Cómo Regular el Calor
Para mantener o subir la temperatura, abra totalmente los amortiguadores
de las ventilas de aire a los lados de la caja del ahumador. Si la mayor
circulación del aire no sube la temperatura lo suficiente, es posible que
tenga que añadir más leña o carbón durante el ciclo de cocimiento. Siga las
instrucciones en la sección “Cómo añadir carbón o leña durante el
cocimiento” de este manual.
NOTA:Leña seca arde con más calor que el carbón, por lo que usted quizá
desee aumentar la proporción de leña con respecto al carbón para subir la
temperatura de cocimiento. La madera dura como la de encino, nogal
americano y mesquite, así como la de árboles frutales y de nueces, son un
combustible excelente por la rapidez en que se queman. Cuando emplee
madera como combustible, fíjese que esté seca y haya sido curada. NO use
madera resinosa como la de pino porque imparte un sabor desagradable.
24
INS_810-5503-S.qxd 11/9/09 11:05 AM Page 25

Revise la cantidad de agua en la bandeja si el cocimiento dura más de 2 horas.
Poca agua en la bandeja puede detectarse escuchando el sonido de agua que
chisporrotea. Usted puede añadirle agua a la bandeja a través de la puerta de la
caja del ahumador. Tenga precaución y siga las instrucciones al pie de la letra.
ADVERTENCIA: Tenga precaución ya que las llamas pueden crecer
súbitamente cuando aire fresco hace contacto con el fuego.
Al abrir la puerta, mantenga sus manos, cara y cuerpo a una
distancia segura del vapor caliente y las llamas crecidas.
Paso 1
Aléjese y con cuidado abra la puerta de la caja del ahumador para que el
calor y el vapor se escapen lejos de su cara. Tenga precaución ya que las
llamas pueden crecer súbitamente cuando aire fresco hace contacto con el
fuego. Revise la cantidad de agua que queda en la bandeja.
ADVERTENCIA: Para evitar que se voltee o derrame el líquido caliente de la
bandeja, nunca jale el soporte de la bandeja de agua más
de 4” (10 cm). (Vea la ilustración)
Paso 2
Si hay poca agua, necesitará agregarle agua o adobo ácido a la bandeja de
agua. Con sus guantes o guantes gruesos de cocina puestos, deslice y saque
el soporte de la bandeja de agua a no más de 4” (10 cm).
Paso 3
Llene la bandeja de agua a 1” (2.54 cm) debajo del borde. Vierta el líquido
lentamente para evitar que se derrame o sobrellene.
Paso 4
Con cuidado, deslice el soporte de la bandeja de agua hasta adentro, cierre la
puerta de la caja del ahumador para que la comida se siga cocinando.
Cómo Añadir agua Durante
el Cocimiento
Es posible que necesite agregar más carbón y/o leña para mantener o
incrementar la temperatura de cocimiento.
ADVERTENCIA: Tenga precaución ya que las llamas pueden crecer
súbitamente cuando aire fresco hace contacto con el fuego.
Al abrir la puerta, mantenga sus manos, cara y cuerpo a una
distancia segura del vapor caliente y las llamas crecidas.
Paso 1
Aléjese y con cuidado abra la puerta de la caja del ahumador para que el
calor y el vapor se escapen lejos de su cara. Tenga precaución ya que las
llamas pueden crecer súbitamente cuando aire fresco hace contacto con el
fuego. Revise cuánto carbón queda en la bandeja.
Paso 2
Con sus guantes o guantes gruesos de cocina puestos, aléjese lo suficiente
para que no corra peligro y utilice pinzas largas de cocina para quitar
cuidadosamente la ceniza del carbón caliente. Utilice esas mismas pinzas
para añadirle carbón y/o leña a la bandeja para el carbón, cuidándose de no
moverlo demasiado por la ceniza y las chispas. En caso necesario, use su
encendedor de chimenea para carbón para encender más carbón y/o leña y
agregar al fuego existente.
ADVERTENCIA: Nunca agregue líquido encendedor de carbón a carbón
caliente o incluso poco caliente ya que puede ocurrir un
retroceso de la llama y causar fuertes quemaduras.
Paso 3
Cierre la puerta de la caja del ahumador y deje que la comida se siga
cocinando.
Cómo Añadir Carbón o Leña
Durante el Cocimiento
4”
25
1"
(2.54 cm)
INS_810-5503-S.qxd 11/9/09 11:05 AM Page 26

• Siempre deje que su ahumador y todos sus componentes se enfríen completamente antes de manipularlos.
• Nunca deje el carbón y la ceniza sin atender en el ahumador. Asegúrese de que el carbón y su ceniza se hayan extinguido
totalmente antes de sacarlos.
• Antes de dejar desatendido al ahumador, el carbón y la ceniza sobrantes deben ser sacados del ahumador. Tenga precaución y
proteja su propiedad y a sí mismo. Ponga el carbón y la ceniza sobrantes en un recipiente metálico no combustible metal y llénelo
con agua hasta el tope. Antes de tirar el carbón y la ceniza, déjelos por 24 horas en el recipiente metálico.
• El carbón y la ceniza ya extinguidos deben colocarse a buena distancia de toda estructura y material combustible.
• Con una manguera de jardín, moje completamente toda la superficie debajo y alrededor del ahumador para extinguir toda ceniza,
carbón o carbón ardiente que pudiese haberse caído durante el cocimiento o la limpieza.
• Cubra y guarde su ahumador en un lugar alejado de niños y mascotas.
• Cure su ahumador periódicamente durante el año para protegerlo de la
oxidación excesiva.
• Para proteger su ahumador de la oxidación excesiva, debe curar su unidad
debidamente y cubrirla siempre que no la use. Puede pedir una cubierta
para su ahumador directamente de Brinkmann llamando al
1-800-468-5252.
• Lave las parrillas para cocinar y la bandeja de agua con agua caliente
jabonosa, enjuague bien y seje secar. Aplique o rocíe una capa delgada de
aceite vegetal a las parrillas.
• Limpie el interior y exterior del ahumador frotándolo con un paño húmedo.
Aplique o rocíe un poco de aceite vegetal a la superficie interior para evitar
la oxidación. No lo haga con la bandeja para el carbón.
• Si aparece un área oxidada (herrumbre) en la superficie externa de su
ahumador, limpie y pula el área afectada con estopa de acero o un paño
esmerilado con arenilla fina. Retoque con una pintura de buena calidad
resistente a altas temperaturas.
• Nunca aplique pintura a la superficie interior. Las áreas oxidadas internas
pueden pulirse, limpiarse y luego cubrirse o rociarse ligeramente con aceite
vegetal para minimizar la oxidación.
SEGURIDAD DESPUÉS DEL USO
ADVERTENCIA
Debido Cuidado y
Mantenimiento
26
INS_810-5503-S.qxd 11/9/09 11:05 AM Page 27

140-5503-S
9/08, 12/08, 9/09, 10/09, 11/09
Owner’s Manual for Model
810-5503-S
For one year from date of purchase, The Brinkmann Corporation warrants the Vertical Smoker against defects due to workmanship or materials to the
original purchaser. The Brinkmann Corporation’s obligations under this warranty are limited to the following guidelines:
• This warranty does not cover smokers that have been altered/modified or damaged due to: normal wear, rust, abuse, improper maintenance and/or
improper use.
• This warranty does not cover surface scratches or heat damage to the finish, which is considered normal wear.
• The Brinkmann Corporation may elect to repair or replace damaged units covered by the terms of this warranty.
• This warranty extends to the original purchaser only and is not transferable or assignable to subsequent purchasers.
The Brinkmann Corporation requires reasonable proof of purchase. Therefore, we strongly recommend that you retain your sales receipt or invoice. To
obtain replacement parts for your Vertical Smoker under the terms of this warranty, please call Customer Service Department at
1-800-527-0717. A receipt will be required. The Brinkmann Corporation will not be responsible for any smokers forwarded to us without prior
authorization. Vertical Smoker must be returned to the original place of purchase for replacement of the unit.
EXCEPT AS ABOVE STATED, THE BRINKMANN CORPORATION MAKES NO OTHER EXPRESS WARRANTY.
THE IMPLIED WARRANTIES OF MERCHANTABILITY AND FITNESS FOR A PARTICULAR PURPOSE ARE LIMITED IN DURATION TO ONE YEAR FROM THE DATE
OF PURCHASE. SOME STATES DO NOT ALLOW LIMITATIONS ON HOW LONG AN IMPLIED WARRANTY LASTS, SO THE ABOVE LIMITATION MAY NOT APPLY
TO YOU.
ANY LIABILITY FOR INDIRECT, INCIDENTAL OR CONSEQUENTIAL DAMAGES ARISING FROM THE FAILURE OF THE
VERTICAL SMOKER TO COMPLY WITH THIS WARRANTY OR ANY IMPLIED WARRANTY IS EXCLUDED. CUSTOMER ACKNOWLEDGES THAT THE PURCHASE
PRICE CHARGED IS BASED UPON THE LIMITATIONS CONTAINED IN THE WARRANTY SET OUT ABOVE. SOME STATES DO NOT ALLOW THE EXCLUSION OR
LIMITATION OF INCIDENTAL OR CONSEQUENTIAL DAMAGES, SO THE ABOVE LIMITATION OR EXCLUSION MAY NOT APPLY TO YOU. THIS WARRANTY GIVES
YOU SPECIFIC LEGAL RIGHTS, AND YOU MAY ALSO HAVE OTHER RIGHTS WHICH VARY FROM STATE TO STATE.
ONE YEAR LIMITED WARRANTY
©2008 The Brinkmann Corporation
Dallas, Texas 75244 U.S.A.
www.brinkmann.net
Por un año a partir de la fecha de compra, The Brinkmann Corporation le garantiza al comprador original del Ahumador Vertical contra defectos debidos
a mano de obra o materiales. Las obligaciones de The Brinkmann Corporation bajo esta garantía se limitan a las siguientes directrices:
• Esta garantía no cubre ahumadores que hayan sido alteradas/modificado o dañadas debido a: uso normal, herrumbre, maltrato, mantenimiento
inadecuado y/o uso inapropiado.
• Esta garantía no cubre raspones superficiales o daños térmicos al acabado, considerándose desgaste normal.
• The Brinkmann Corporation puede optar ya sea por reparar o reponer unidades dañadas cubiertas por las condiciones de esta garantía.
• Esta garantía se le extiende solamente al comprador original y no es transferible o asignable a los compradores posteriores.
The Brinkmann Corporation requiere un comprobante razonable de compra. Por consiguiente, recomendamos mucho que guarde su recibo o factura de
compra. Para obtener las piezas de repuesto para su Ahumador Vertical bajo las condiciones de esta garantía, llame por favor al Departamento de
Atención al Cliente al 1-800-527-0717. Exigiremos un recibo. The Brinkmann Corporation no se hará responsable por cualquier ahumador que
se nos envía sin previa autorización. El ahumador vertical debe ser devuelto al lugar original de su compra para que la unidad sea repuesta.
EXCEPTO COMO SE DECLARÓ ARRIBA, THE BRINKMANN CORPORATION NO DA EXPRESAMENTE NINGUNA OTRA GARANTÍA.
LAS GARANTÍAS IMPLÍCITAS DE COMERCIALIZACIÓN Y ADECUACIÓN PARA UN PROPÓSITO EN ESPECIAL SE LIMITAN A UN AÑO A PARTIR DE LA FECHA
DE COMPRA. ALGUNOS ESTADOS NO PERMITEN LIMITACIONES RELACIONADAS CON LA DURACIÓN DE UNA GARANTÍA IMPLÍCITA, POR LO QUE LA
LIMITACIÓN ANTERIOR PUDIESE NO SER EPRTINENTE PARA USTED.
QUEDA EXCLUIDA TODA RESPONSABILIDAD CIVIL POR DAÑOS INDIRECTOS, INCIDENTALES O EMERGENTES DEBIDOS A QUE EL AHUMADOR VERTICAL
NO CUMPLE CON ESTA GARANTÍA O CUALQUIER GARANTÍA IMPLÍCITA. EL COMPRADOR RECONOCEQUE EL PRECIO DE COMPRA COBRADO SE BASA EN
LAS LIMITACIONES CONTENIDAS EN ESTA GARANTÍA PRESENTADAS ARRIBA. ALGUNOS ESTADOS NO PERMITEN LA EXCLUSIÓN O LIMITACIÓN DE DAÑOS
INCIDENTALES O EMERGENTES, POR LO QUE LA LIMITACIÓN O EXCLUSIÓN ANTERIOR QUIZÁ NO SEA PERTINENTE PARA USTED. ESTA GARANTÍA LE DA
DERECHOS LEGALES CONCREOS Y ES POSIBLE QUE USTED TENGA OTROS DERECHOS QUE VARÍAN DE UN ESTADO AL OTRO.
GARANTÍA LIMITADA DE UN AÑO
FOR COVERS, ACCESSORIES AND OTHER PRODUCTS, PLEASE VISIT US ONLINE AT:
www.brinkmann.net
PARA CUBIERTAS, ACCESORIOS Y OTROS PRODUCTOS, FAVOR DE VISITARNOS POR LA RED MUNDIAL EN:
www.brinkmann.net
INS_810-5503-S.qxd 11/9/09 11:05 AM Page 28
-
 1
1
-
 2
2
-
 3
3
-
 4
4
-
 5
5
-
 6
6
-
 7
7
-
 8
8
-
 9
9
-
 10
10
-
 11
11
-
 12
12
-
 13
13
-
 14
14
-
 15
15
-
 16
16
-
 17
17
-
 18
18
-
 19
19
-
 20
20
-
 21
21
-
 22
22
-
 23
23
-
 24
24
-
 25
25
-
 26
26
-
 27
27
-
 28
28


Brinkmann 810-5503-s Manual de usuario
- Tipo
- Manual de usuario
- Este manual también es adecuado para
en otros idiomas
- English: Brinkmann 810-5503-s User manual
Artículos relacionados
-
Brinkmann 810-5504-S El manual del propietario
-
-
Brinkmann 810-5302-S El manual del propietario
-
-
-
-
-
Charmglow 810-3810-S Manual de usuario
-
-
