Kenmore DS6001 Guía del usuario
- Categoría
- Aspiradoras
- Tipo
- Guía del usuario

Use & Care Guide
Manual de Uso y Cuidado
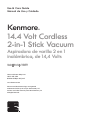
Kenmore
®
14.4 Volt Cordless
2-in-1 Stick Vacuum
Model/Modelo: DS6001
Aspiradora de varilla 2 en 1
inalámbrica, de 14,4 Volts
www.kenmore.com
Vacuum Cleaner Help Line:
1-877-531-7321
8:00am-5:00pm EST, M-F
Kenmore and the Kenmore logo are registered
trademarks of KCD IP, LLC and/or Sears Brands, LLC
and are used under license by Cleva North America, Inc.
All Rights Reserved.

- 2 -
Before Using Your New Vacuum Cleaner ........................................................................ 2
Packing List ..................................................................................................................... 2
Kenmore Vacuum Cleaner Warranty ............................................................................... 3
Important Safety Instructions ........................................................................................4-5
Parts and Features ...........................................................................................................6
Assembly Instructions ...................................................................................................7-8
Operating Instructions ..................................................................................................8-9
Vacuum Cleaner Maintenance and Care .....................................................................10-11
Troubleshooting ..............................................................................................................12
TABLE OF CONTENTS
Please read this guide. It will help you assemble and operate your new Kenmore vacuum cleaner in the
safest and most effective way.
Use the space below to record the model number of your new Kenmore vacuum cleaner.
Model No.____________________________________________
Date of Purchase ______________________________________
Keep this book and your sales check (receipt) in a safe place for future reference.
BEFORE USING YOUR NEW VACUUM CLEANER
PACKING LIST
Your KENMORE 14.4V Cordless 2-in-1 Stick Vacuum is packaged with the following parts
and components included separately in the carton:
1 Handle
1 Main Body
1 Hand Vacuum
1 Motorized Brush
1 Charger Base
1 Vacuum Support
1 Charging Adapter
1 Combination Tool
1 Manual

- 3 -
KENMORE LIMITED WARRANTY
FOR ONE YEAR from the date of sale this product is warranted against defects in
material or workmanship.
WITH PROOF OF SALE a defective product will be replaced free of charge.
The Kenmore brand is used under license. Direct all claims for warranty service to: Cleva
North America, Inc., 1-877-531-7321
This warranty does not cover filters or belts, which are expendable parts that can wear
out from normal use within the warranty period.
This warranty applies for only 90 days from the date of sale if this product is ever used for
other than private household purposes.
This warranty gives you specific legal rights, and you may also have other rights which
vary from state to state.
Cleva North America, Inc., Greenville SC 29607
KENMORE VACUUM CLEANER WARRANTY

- 4 -
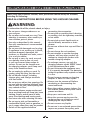
IMPORTANT SAFETY INSTRUCTIONS
When using your Kenmore vacuum, basic precautions should always be followed,
including the following:
READ ALL INSTRUCTIONS BEFORE USING THIS VACUUM CLEANER.
To reduce the risk of fire, electric shock, or injury:
• Do not use or charge outdoors or on
wet surfaces.
• Do not allow to be used as a toy. Close
attention is necessary when used by or
near children, pets or plants.
• Use only as described in this manual.
Use only manufacturer’s recommended
attachments.
• Do not use with damaged cord or plug.
If appliance is not working as it should,
has been dropped, damaged, left
outdoors, or dropped into water, return
it to a service center.
• Do not pull or carry by cord, use cord
as a handle, close a door on cord,
or pull cord around sharp edges or
corners. Do not run the vacuum over
the charging adapter cord. Keep cord
away from heated surfaces.
• Do not unplug by pulling on cord. To
unplug, grasp the plug, not the cord.
• Do not handle charger, including
charger plug, and charger terminals
with wet hands.
• Do not put any object into openings. Do
not use with any opening blocked; keep
free of dust, lint, hair, and anything that
may reduce air flow.
•
This vacuum cleaner creates suction and
has a revolving brush roll. Keep hair, loose
clothing, fingers, and all parts of body
away from openings and moving parts.
• Use extra care when cleaning on stairs.
• Do not use to pick up flammable or
combustible liquids, such as gasoline, or
use in areas where they may be present.
• Switch off the appliance before
connecting the accessories.
• Do not pick up anything that is burning
or smoking, such as cigarettes, matches,
or hot ashes.
• Do not pick up toxic liquids such as
chorine bleach, ammonia or drain
cleaner.
• Do not use without dust cup and filter in
place.
• Do not charge the unit outdoors.
• Do not attempt to use the charging
adapter with any other product nor
attempt to charge this product with
another charging adapter.
• To recharge vacuum, use only the
charging adapter model 30007 listed
in the Replacement Parts table.
• Do not incinerate the appliance even
if it is severely damaged. The batteries
inside this product may explode or leak
in a fire.
• Do not immerse vacuum or charging
adapter in water or other liquids.
• Always turn the vacuum off before
connecting or disconnecting the
motorized brush.
• Store the cordless vacuum indoors. Put
the cordless vacuum away after use to
prevent accidents.
• Keep your work area well lit.
• Keep the vacuum moving over the
carpet surface at all times to avoid
damaging the carpet fibers.
• Do not vacuum any liquids.
• Do not use in an enclosed space where
vapors are present from paint, paint
WARNING:

- 5 -
SAVE THESE INSTRUCTIONS
Household use only.
thinner, moth-proofing substances,
flammable dust or other explosive or
toxic materials.
• Do not vacuum up hard or sharp objects
such as glass, nails, screws or coins that
could damage the vacuum.
• To avoid excessive heat and damage
to unit or batteries, do not operate the
vacuum while charging.
• Do not use extension cords or outlets
with inadequate current carrying
capacity.
• DO NOT MUTILATE OR INCINERATE
BATTERIES AS THEY WILL EXPLODE AT
HIGH TEMPERATURES.
• Leaks from battery cells can occur
under extreme usage or temperature
conditions. If the liquid gets on skin,
wash quickly with water. If liquid gets
into the eyes, flush them immediately
with clean water for a minimum of 10
minutes. Seek medical attention.
• While there is no shock hazard from
electrical terminals located on the
vacuum, a burn could result from metal
objects being inserted into the terminal
areas. Vacuum cleaner terminals should
always be kept free of objects.
• Store charger indoors in a cool, dry
area, not exposed to weather to avoid
electrical shock and/or damage to the
vacuum cleaner.
• Changes or modifications to this unit
not expressly approved by the party
responsible for compliance could void
the user’s authority to operate the
equipment.
NOTE:
This equipment has been tested
and found to comply with the limits for
a Class B digital device, pursuant to
Part 15 of the FCC Rules. These limits
are designed to provide reasonable
protection against harmful interference in
a residential installation. This equipment
generates, uses and can radiate radio
frequency energy and, if not installed and
used in accordance with the instructions,
may cause harmful interference to radio
communications.
However, there is no guarantee that
interference will not occur in a particular
installation. If this equipment does cause
harmful interference to radio or television
reception, which can be determined
by turning the equipment off and on,
the user is encouraged to try to correct
the interference by one or more of the
following measures:
• Reorient or relocate the receiving
antenna.
• Increase the separation between the
equipment and receiver.
• Connect the equipment into an outlet
on a circuit different from that to which
the receiver is connected.
• Consult the dealer or an experienced
radio/TV technician for help.
Product Disposal
This product contains an internal Lithium-
ion battery pack formulated from
environmentally sensitive materials. This
product must be disposed of properly
with due care for the environment. Do
not dispose of product with household
garbage. Consult your local waste
authority for information regarding
available recycling or disposal options.
This device complies with part 15 of the FCC Rules. Operation is subject to the
following two conditions: (1) this device may not cause harmful interference,
and (2) this device must accept any interference received, including
interference that may cause undesired operation.

- 6 -
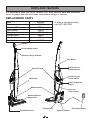
PARTS AND FEATURES
Combination Tool
Motorized Brush
Powerhead
Dust Cup
(Filter inside)
Charging AdapterCharger Base
Vacuum Support
Hand Vacuum
Hand Vacuum
Power Switch
Lock Button
Release Button
Dust Cup Release
Button
Hand Vacuum
Release Button
It is important to know your 14.4V Cordless 2-in-1 Stick Vacuum's parts and features to
assure its proper and safe use. Review these before using your vacuum.
REPLACEMENT PARTS
Item Part No.
Filter 30002
Alternate Filter 57004
Filter Basket 30003
Charging Adaptor 30007
Charger Base 30005
Vacuum Support 30006
Brush roll 561031104
Main Body
Power/Speed Switch
Battery Charge Indicator
Handle
To order a replacement part
call 1-877-531-7321.

Click!
Click!
Click!
- 7 -
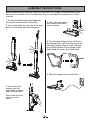
Before assembling the vacuum, check the PACKING LIST (Page 2). Use this list to verify
that you have received all the components of your new Kenmore Cordless 2-in-1 Stick
Vacuum.
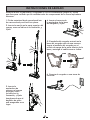
ASSEMBLY INSTRUCTIONS
1. Fit the motorized brush powerhead into
the vacuum body and lock into place.
2. Insert the handle onto the top of the main
body, as illustrated, and lock into
place.
3. Insert the hand
vacuum into the
main body as shown
and lock into place.
Ensure that the dust
cup is secure in
place.
4. Insert vacuum support
into charger base and
lock into place.
5. The charging adapter plug will fit into
the charger base only one way. Insert the
charging adapter plug into the charging
port on the bottom of the charger base
and thread the cord out as illustrated.
6. Plug the adapter into a wall outlet.

Battery Charge Indicator
- 8 -
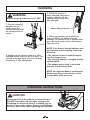
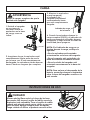
3. While the vacuum is
being charged, the battery
charge indicator will be
flashing continuously until
fully charged.
WARNING
Before charging, make sure unit is OFF.
CHARGING
2. Make sure the vacuum cleaner is fully
charged before using for the first time. The
vacuum may take up to 5 hours to charge
completely if fully discharged.
1. Plug the charging
adapter into an
outlet. Insert the
vacuum cleaner onto
the charger base as
shown.
4. When the vacuum has reached full
charge (100%), the battery charge
indicator will remain lit for 3 seconds then
go to dormant mode with no illuminated
lights showing.
NOTE: If the battery charge indicator does
not illuminate when charging, ensure the
following:
• The vacuum cleaner is seated properly
onto the charger base.
• The charging adaptor is plugged into the
outlet properly.
• The adaptor power plug is connected
properly on the charger base.
NOTE: For improved battery performance,
always keep the vacuum cleaner on the
charger base while not in use
.
OPERATING INSTRUCTIONS
CAUTION
Moving parts! To reduce the risk of personal injury,
DO NOT touch the brush roll when vacuum is on.
Contacting the brush roll while it is rotating can cut,
bruise or cause other injuries. Always turn off before
servicing. Use caution when operating near children.

Power Button
- 9 -
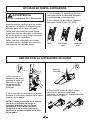
1. To start the vacuum, slide the power
switch to the desired speed position
(Low Speed, High Speed).
2. To stop the vacuum, place the power
switch in (OFF) position.
USING YOUR VACUUM CLEANER
(OFF) (High Speed)(Low Speed)
WARNING
Do not operate vacuum cleaner without
filter in place.
Before vacuuming, check that the brush
powerhead wheels and brush roll are clear
from any sharp objects to avoid scratching
floors.
Use low speed for surface cleaning of bare
floors or low pile rugs and carpets or when
increased runtime is needed.
Use high speed for cleaning of plush rugs
and carpets or when additional cleaning
power is required.
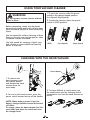
CLEANING WITH THE HAND VACUUM
2. To turn on the hand vacuum, press the
power switch located on top of the handle.
NOTE: When battery power is low, the
battery charge indicator around the switch
will flash.
To charge, place the hand vacuum into the
main body and place the whole unit onto
the charger base.
1. To remove the
hand vacuum, press
the release button
and detach the hand
vacuum from the
main body.
3. To clean difficult to reach areas, use
the combination tool by inserting end of
combination tool into the hand vacuum as
shown.

- 10 -
VACUUM MAINTENANCE & CARE
CAUTION
To reduce the risk of shock, remove vacuum cleaner from the charger base. Turn off
before performing any service or maintenance.
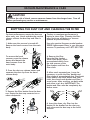
EMPTYING THE DUST CUP AND CLEANING THE FILTER
For best performance, empty the dust cup
after every use. Never operate the vacuum
cleaner without the dust cup and filter in
place.
1. Make sure the vacuum is turned off.
Remove the hand vacuum from the main
body.
2. Press the dust cup release button and
separate the dust cup from the hand
vacuum body.
3. Remove the filter basket from the dust
cup. Empty the dust cup contents into a
waste receptacle.
The key to maximum performance is
having a clean filter. Cleaning the filter
after each use will help your vacuum
operate at peak efficiency.
Use only genuine Kenmore model number
30002 replacement filters in your Kenmore
vacuum. To purchase, call 1-877-531-7321.
4. Remove the filter
from the filter basket.
With a soft brush, brush
accumulated debris from
the side screens of the
filter basket and from the
filter cloth.
5. After much repeated use, it may be
necessary to wash the filter basket and
filter clean of accumulated dust. First brush
loose debris from both basket and filter
cloth, then hand wash basket and filter in
warm water. After washing, set both aside
and allow to air dry. IMPORTANT: The
basket and filter must be completely dry
before reuse.
6. Insert the clean, dry filter into the
basket, fit the basket into the dust cup,
and reconnect the dust cup to the hand
vacuum.
To remove the hand
vacuum, press the release
button and detach the
hand vacuum from the
main body.

1
1
2
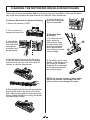
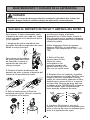
3. Unlock the
brush roll tab
with flat head
screwdriver
or similar tool
as illustrated.
- 11 -
CLEANING THE MOTORIZED BRUSH AND BLOCKAGES
The brush roll may accumulate debris such as strings, hair and fibers. This type of debris
can wrap around the brush and diminish its ability to clean effectively.
To Remove Brush Roll For Manual Cleaning:
1. Ensure the vacuum is OFF.
4. Lift the brush roll out of the housing.
Clean off debris and anything wrapped
around the brush. You can use a pair of
scissors to remove threads etc.
5. Place the brush roll into the housing by
aligning the end to the brush drive first,
then inserting the other end correctly into
place. When installed correctly, the brush
roll should spin freely.
2. Turn unit over to
access the brush roll.
2. Carefully remove any
debris or blockage from
the inside of the hose.
Reattach the motorized
brush powerhead onto
the vacuum body.
NOTE: Do not use scissors or other sharp
objects to remove a blockage from the
hose as these may damage the hose.
To Remove Hose
Blockages:
1. To clean out the
hose, press the
hose release tabs,
as illustrated, and
pull the motorized
brush powerhead
away from the main
vacuum body.
6. Lock the brush in
place by closing the
tab as illustrated.

- 12 -
Review the table for solutions to minor performance problems. Any service needed, other
than maintenance described in this Use & Care Guide, should be performed by a Sears or
other qualified service agent.
TROUBLESHOOTING
WARNING
Disconnect electrical supply before performing maintenance to the vacuum cleaner.
Failure to do so could result in electrical shock or personal injury.
PROBLEM POSSIBLE CAUSE SOLUTION
Vacuum will not
turn on.
1. Battery may be depleted.
2. Wrong charger being used.
3. Hand vacuum is not installed
properly.
1. Charge the battery as instructed on
page 8.
2. Be sure to use only the charger supplied
with your product.
3. Remove hand vacuum and reattach
ensuring that it is securely in place.
Battery charge
indicator does not
illuminate.
1. Battery may be depleted.
2. Charging adapter is not
plugged in.
3. Debris accumulated on the
metal charge contacts on the
hand vacuum, main body and
charging adapter.
4. The electrical outlet is out of
power.
1. Charge the battery as instructed on
page 8.
2. Be sure the charging adapter is plugged
in properly to the outlet and to the
charging hole on the bottom of the
charging adapter.
3. Clear any debris accumulated on the
metal charger contacts on the hand
vacuum, main body and charging adapter.
4. Ensure that the outlet is supplying power
to the charger.
Motorized brush
not turning.
1. Brush roll is jammed.
2. Brush roll needs to be reset.
3. Brush roll is not installed well.
1. Remove obstruction. Follow instructions
on page 11.
2. Turn the unit off and remove the
obstruction, then turn back on.
3. Remove brush roll and reinstall following
instructions on page 11.
Vacuum not picking
up or suction
power is weak.
1. Dust cup is full.
2. Filter needs cleaning.
3. Filter needs to be replaced.
4. Battery may be depleted.
5. Dust cup is not installed well.
1. Empty dust cup.
2. Follow filter cleaning instructions on
page 10.
3. To purchase call 1-877-531-7321.
4. Charge the battery as instructed on
page 8.
5. Check dust cup for correct installation
and ensure it is snapped firmly in place.
Dust escapes from
vacuum.
1. Filter is missing or installed
incorrectly.
2. Filter is damaged and needs
to be replaced.
3. Dust cup installed incorrectly.
1. Check filter for correct installation.
2. To purchase call 1-877-531-7321.
3. Position dust cup correctly and snap
firmly into place.
Vacuum turns off
on its own.
1. Battery may be depleted.
2. Brush roll is blocked or
jammed and needs to be
reset.
1. Charge the battery as instructed on
page 8.
2. Turn the unit off and check agitator
for blockage or jam. Remove the
obstruction and turn back on.

- 2 -
Antes de utilizar su nueva aspiradora .............................................................................. 2
Lista de empaque ............................................................................................................ 2
Garantía de la aspiradora Kenmore ................................................................................ 3
Importantes instrucciones de seguridad ........................................................................ 4-5
Piezas y características .................................................................................................... 6
Instrucciones de montaje ..............................................................................................7-8
Instrucciones de uso .....................................................................................................8-9
Mantenimiento y cuidado de la aspiradora .................................................................10-11
Resolución de problemas ................................................................................................ 12
TABLA DE CONTENIDOS
Lea esta guía. Lo ayudará a ensamblar y utilizar su nueva aspiradora Kenmore de la manera más
segura y efectiva posible.
Utilice el siguiente espacio para anotar el número de modelo de su nueva aspiradora Kenmore.
N° de modelo _________________________________________
Fecha de compra ______________________________________
Mantenga este libro y su recibo de compra en un lugar seguro para utilizarlo como referencia a futuro.
ANTES DE UTILIZAR SU NUEVA ASPIRADORA
LISTA DE EMPAQUE
Su aspiradora de varilla KENMORE 2 en 1 de 14,4 volts posee las siguientes piezas y
componentes incluidos por separado en la caja:
1 Manija
1 Cuerpo principal
1 Aspiradora de mano
1 Cepillo motorizado
1 Base para el cargador
1 Soporte para la aspiradora
1 Cargador
1 Herramienta combinada
1 Manual

- 3 -
GARANTÍA LIMITADA KENMORE
DURANTE UN AÑO a contar de la fecha de venta, este producto está garantizado contra
defectos en sus materiales o fabricación.
Un producto defectuoso recibirá una reparación gratuita con la única condición de
presentar una PRUEBA DE VENTA. Si el producto no puede repararse, se reemplazará por
otro sin costo.
La marca Kenmore se utiliza bajo licencia. Dirija sus reclamaciones de garantía a: Cleva
North America, Inc., 1-877-531-7321
Esta garantía no cubre los filtros ni las correas, ya que son piezas desechables que
pueden desgastarse con el uso normal dentro del periodo de la garantía.
Esta garantía se aplica solo durante 90 días a contar de la fecha de venta de este
producto en caso de que se use para propósitos distintos al uso doméstico normal.
Esta garantía le entrega derechos legales específicos que pueden variar según su estado,
ya que podría tener otros derechos adicionales.
Cleva North America, Inc., Greenville SC 29607
GARANTÍA DE LA ASPIRADORA KENMORE

- 4 -
INSTRUCCIONES DE SEGURIDAD IMPORTANTES
Al utilizar su aspiradora Kenmore, se deben siempre seguir precauciones básicas,
incluyendo las siguientes:
LEA TODAS LAS INSTRUCCIONES ANTES DE USAR ESTA ASPIRADORA.
Para evitar el riesgo de incendio, descarga eléctrica o lesiones:
• No utilice este aparato ni lo cargue en
exteriores o superficies mojadas.
• No permita que se utilice como un
juguete. Se debe prestar estricta
atención cuando el aparato se use
cerca de niños, mascotas y plantas.
• Utilice el producto solo como se
describe en este manual. Utilice solo
los aditamentos recomendados por el
fabricante.
• No utilizar si el enchufe o cable están
dañados. Si el aparato no funciona
como debiera o si se ha caído, dañado,
dejado en exteriores o sumergido bajo
el agua, llévelo a un centro de servicio.
• No jale o transporte utilizando el
cable como manija, no apriete el
cable al cerrar puertas ni lo jale cerca
de bordes afilados o esquinas. No
utilice la aspiradora sobre el cable del
cargador. Mantenga el cable alejado
de superficies calientes.
• No desconecte jalando el cable. Para
desconectarlo tire del enchufe, no del
cable.
• No manipule el cargador, incluyendo el
enchufe y terminales del cargador con
las manos mojadas.
• No ponga objetos sobre las aberturas.
No utilizar si las aberturas están
bloqueadas, manténgalas libres de
polvo, cabellos, pelusas y cualquier
cosa que pueda reducir el flujo de aire.
• Esta aspiradora genera succión y posee
un cepillo de rodillo revolvedor. Al
utilizarlo, mantenga su cabello, ropas
holgadas, dedos y partes de su cuerpo
lejos de las aberturas y piezas móviles
del producto.
• Tenga precaución adicional al limpiar
en escaleras.
• No utilizar para aspirar líquidos
inflamables o combustibles, tales como
gasolina, ni tampoco utilizar en zonas
donde estos elementos puedan estar
presentes.
• Apague el aparato antes de conectar
los accesorios.
• No aspire elementos en llamas ni
quemándose, tales como cigarrillos,
cerillos o cenizas calientes.
• No aspire líquidos tóxicos tales como
blanqueador en base a cloro, amoniaco
o quitamanchas.
• No utilizar sin el depósito para polvo y
filtro en su lugar.
• No cargue la unidad en exteriores.
• No intente utilizar el cargador con otro
producto ni intente cargarlo con otro
cargador.
• Para recargar la aspiradora, utilice solo
el modelo de cargador 30007, indicado
en la tabla Piezas de repuesto.
• No incinere el aparato incluso en caso
de haberse dañado de forma severa.
Las baterías de este producto expuestas
a fuego pueden explotar o tener fugas.
• No sumerja la aspiradora ni el
cargador en agua u otros líquidos.
• Apague siempre la aspiradora antes
de conectar y desconectar el cepillo
motorizado.
• Almacene la aspiradora inalámbrica
en interiores. Para evitar accidentes,
almacene la aspiradora inalámbrica
después de usarla.
• Mantenga su zona de trabajo bien
iluminada.
• Mantenga la aspiradora moviéndose
sobre la alfombra en todo momento
para así no dañar las fibras de la
alfombra.
• No aspire líquidos.
• No utilice en un espacio confinado
ADVERTENCIA:

- 5 -
GUARDE ESTAS INSTRUCCIONES
Solo para uso doméstico.
donde haya vapores de pintura, de
diluyente de pintura, sustancias que
alejen polillas, polvos inflamables u
otros materiales tóxicos o explosivos.
• No aspire objetos afilados ni duros,
tales como vidrio, uñas, tornillos
o monedas que puedan dañar la
aspiradora.
• Para evitar calor excesivo y daños
a la unidad o baterías, no utilice la
aspiradora mientras la esté cargando.
• No utilice cables alargadores ni tomas
de corriente de capacidad inadecuada.
• NO MUTILE NI INCENERE LAS
BATERÍAS, YA QUE EXPLOTAN A ALTAS
TEMPERATURAS.
• Las fugas de las baterías pueden
ocurrir bajo condiciones de uso extremo
o temperatura. Si el líquido cae sobre
la piel, lave rápidamente con agua. Si
el líquido entra en los ojos, enjuáguelos
inmediatamente con agua limpia
durante al menos 10 minutos. Consiga
atención médica.
• Si bien no existe riesgo de descarga
en las terminales eléctricas de la
aspiradora, podría ocurrir una
quemadura provocada por objetos
metálicos insertados en las terminales.
Las terminales de la aspiradora deben
mantenerse siempre libres de objetos.
• Almacene el cargador en interiores, en
una zona seca y fresca, sin exponerlo
al clima para así evitar descargas
eléctricas y daños a la aspiradora.
• Los cambios o modificaciones a este
producto sin la aprobación expresa
de la parte responsable del dicho
cumplimiento podrían anular la
autoridad del usuario para operar el
equipo.
NOTA:
Este equipo se ha probado
y comprobado en relación a su
cumplimiento con los límites para los
dispositivos digitales Clase B, según
la Parte 15 de las Regulaciones FCC.
Estos límites están diseñados para
proporcionar una protección razonable
contra interferencias dañinas en una
instalación residencial. Este equipo
genera, utiliza y puede emitir energía
de radiofrecuencias, la cual, de no
instalarse según las instrucciones, puede
provocar interferencia dañina a las
comunicaciones por radio.
No obstante, no hay garantía de que no
ocurra interferencia en una instalación
en particular. Si este equipo no provoca
interferencia dañina a la recepción
de radio o televisión, lo cual puede
determinarse encendiendo o apagando
el equipo, se anima al usuario a intentar
corregir la interferencia mediante uno o
más de los siguientes pasos:
• Reoriente o reubique la antena
receptora.
• Aumente la separación entre el equipo
y el receptor.
• Conecte el equipo en un tomacorriente
en un circuito diferente al que está
conectado el receptor.
• Consulte con su vendedor minorista o
con un técnico especializado en radio/
TV para obtener ayuda.
Eliminación del product
Este producto contiene un paquete
de baterías de iones de litio hecho
de materiales perjudiciales para el
medio ambiente. Este producto debe
ser eliminado de forma adecuada
para proteger el medio ambiente. No
deseche este producto junto a la basura
doméstica. Consulte con su autoridad
local en materia de desechos para
conseguir información sobre las opciones
de eliminación y reciclaje disponibles.
Este dispositivo cumple con la parte 15 de las Regulaciones FCC. La operación
queda sujeta a las siguientes dos condiciones: (1) este dispositivo no puede
provocar interferencias peligrosas, y (2) este dispositivo debe aceptar
cualquier interferencia recibida, incluyendo aquellas que puedan provocar un
funcionamiento no deseado.

- 6 -
PIEZAS Y CARACTERÍSTICAS
Herramienta
combinada
Cabezal de cepillo
motorizado
Depósito para polvo
(filtro en el interior)
CargadorBase para
el cargador
Soporte para
la aspiradora
Interruptor de
encendido de la
aspiradora de mano
Botón de bloqueo
Botón de liberación
Botón de liberación del
depósito para polvo
Botón de liberación de
la aspiradora de mano
Es importante que conozca las piezas y características de su aspiradora de varilla 2 en
1 inalámbrica, para garantizar su uso correcto y adecuado. Revise antes de utilizar su
aspiradora.
PIEZAS DE REPUESTO
Cuerpo principal
Interruptor de
encendido/velocidad
Indicador de carga
de la batería
Manija
Aspiradora de mano
Elemento N° de pieza
Filtro 30002
Filtro alternativo 57004
Soporte para el filtro 30003
Cargador 30007
Base para el cargador 30005
Soporte para la aspiradora 30006
Cepillo de rodillo 561031104
Para ordenar filtros de reemplazo
llamando al 1-877-531-7321

¡Clic!
¡Clic!
¡Clic!
- 7 -
Antes de armar la aspiradora, compruebe la LISTA DE EMPAQUE (página 2). Utilice
esta lista para verificar que ha recibido todos los componentes de su nueva aspiradora
Kenmore.
INSTRUCCIONES DE ARMADO
1. Fit the motorized brush powerhead into
the vacuum body and lock into place.
2. Inserte la manija en la parte superior del
cuerpo, como se indica en la ilustración, y
fíjela.
3. Inserte la
aspiradora de
mano en el cuerpo
principal, como
se indica en la
ilustración, y fíjela.
Asegúrese de que el
depósito de polvo
esté asegurado en su
lugar.
4. Inserte el soporte de
la aspiradora en la base
del cargador y fíjelo.
5. El enchufe del cargador entrará en la
base del cargador solo de una manera.
Inserte el enchufe del cargador en el
orificio de carga de la parte inferior de la
base y extraiga el cable como se indica.
6. Conecte el cargador a una toma de
corriente.

Indicador de carga
de la batería
- 8 -
3. Mientras la aspiradora
se esté cargando,
el indicador del
cargador parpadeará
constantemente hasta
que esté completamente
cargada.
ADVERTENCIA
Antes de cargar, asegúrese de que la
unidad esté apagada.
CARGA
2. Asegúrese de que la aspiradora esté
completamente limpia antes de usarla
por primera vez. Si está completamente
descargada, la aspiradora puede demorar
hasta 5 horas en cargarse por completo.
1. Enchufe el cargador
en una toma de
corriente. Inserte la
aspiradora en la base
de carga, como se
indica.
4. Cuando la aspiradora alcance la
carga completa (100%), el indicador de
carga permanecerá encendido durante
3 segundos y luego entrará en modo de
inactividad para apagarse.
NOTA: Si el indicador de carga no se
ilumina durante la carga, verifique lo
siguiente:
• Que la aspiradora esté asentada
correctamente en la base del cargador.
• Que el cargador esté enchufado a la
toma de corriente de manera correcta.
• Que el enchufe del cargador esté
conectado correctamente a la base del
cargador.
NOTA: Para mejorar el desempeño de la
batería, mantenga siempre la aspiradora
sobre la base del cargador cuando no la
esté usando
.
INSTRUCCIONES DE USO
CUIDADO
¡Piezas móviles! Para reducir el riesgo de lesiones
personales, NO toque el cepillo de rodillo cuando la
aspiradora esté encendida. Tocar el cepillo de rodillo
cuando está girando puede cortar, dañar o provocar
otras lesiones. Apague siempre antes de reparar.
Tenga cuidado al utilizar el producto cerca de niños.

- 9 -
Botón de
encendido
1. Para encender la aspiradora, deslice el
interruptor hacia la velocidad deseada
(velocidad baja, velocidad alta).
2. Para detener la aspiradora, mueva el
interruptor hacia la posición (OFF).
UTILIZAR SU NUEVA ASPIRADORA
(OFF) (Velocidad
alta)
(Velocidad
baja)
ADVERTENCIA
No use la aspiradora sin el filtro puesto.
Antes de aspirar, verifique que las ruedas
del cepillo y el rodillo no tengan objetos
afilados, para así no rayar los pisos.
Utilice una velocidad baja para limpiar
superficies de pisos desnudos o alfombrar
de cerdas bajas en caso de ser necesario
un tiempo de uso extendido.
Utilice una alta velocidad para limpiar
alfombras plush o cuando sea necesaria
una potencia de aspirado mayor.
LIMPIAR CON LA ASPIRADORA DE MANO
2. Para encender la aspiradora de mano,
presione el interruptor ubicado en la parte
superior de la manija.
NOTA: Cuando la potencia de la batería
sea baja, el indicador de carga de
la batería alrededor del interruptor
parpadeará. Para cargar, posicione
la aspiradora en el cuerpo principal y
posicione la unidad completa en la base
del cargador.
1. Para extraer la
aspiradora de mano,
presione el botón de
liberación y separe
la aspiradora de
mano del cuerpo
principal.
3. Para limpiar zonas de difícil acceso,
utilice la herramienta combinada
insertando su extremo en la aspiradora de
mano, como se indica.

- 10 -
MANTENIMIENTO Y CUIDADO DE LA ASPIRADORA
CUIDADO
Para reducir el riesgo de descarga eléctrica, extraiga la aspiradora dese la base del
cargador. Apague antes de realizar trabajos de reparación o mantenimiento.
VACIADO EL DEPÓSITO DE POLVO Y LIMPIEZA DEL FILTRO
Para obtener el mejor desempeño, vacíe
el depósito de polvo tras cada uso. Jamás
use la aspiradora sin el depósito de polvo
y filtro puestos.
1. Asegúrese de que la aspiradora esté
apagada. Extraiga la aspiradora de mano
desde el cuerpo principal.
2. Presione el botón de liberación del
depósito de polvo y separe el depósito del
cuerpo de la aspiradora de mano.
3. Retire el soporte para el filtro del
recipiente para polvo. Vacíe el contenido
del recipiente en la basura.
La clave para lograr el máximo
desempeño es un filtro limpio. Limpiar el
filtro tras cada uso lo ayudará a mantener
su aspiradora funcionando con la máxima
eficiencia posible.
Utilice únicamente filtros de repuesto
Kenmore 30002 en su aspiradora
Kenmore. Para comprarlos, al 1-877-531-
7321.
4. Retire el filtro del
soporte para el filtro.
Limpie los restos
acumulados en las
pantallas laterales del
soporte para filtro y del
filtro con un cepillo suave.
5. Después de un uso repetido, es posible
que sea necesario un lavado del filtro para
limpiarlo de polvo acumulado. Primero
cepille los restos sueltos adheridos al filtro,
después lave a mano el filtro y el soporte
en agua tibia. Después de lavar, deje que
se sequen al aire. IMPORTANTE: el soporte
y el filtro deben estar completamente
secos antes de utilizarlos de nuevo.
6. Inserte un filtro limpio y seco en el
soporte, fije el soporte en el recipiente para
polvo y conecte de nuevo el recipiente para
polvo a la aspiradora de mano.
Para extraer la aspiradora
de mano, presione el botón
de liberación y separe la
aspiradora de mano del
cuerpo principal.

1
1
2
- 11 -
3. Libere la lengüeta del rodillo con
un destornillador de cabeza plana o
herramienta similar, como se indica en
la ilustración.
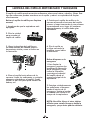
LIMPIEZA DEL CEPILLO MOTORIZADO Y BLOQUEOS
El cepillo de rodillo puede acumular sedimentos tales como hebras, cabello y fibras. Este
tipo de sedimentos pueden enredarse en el cepillo y reducir su capacidad de limpiar
efectivamente.
Retirar el cepillo de rodillo para limpieza
manual:
1. Asegúrese de que la aspiradora esté
apagada.
4. Eleve el cepillo hacia afuera de la
carcasa. Limpie los sedimentos y cualquier
elemento enredado en el cepillo. Puede
utilizar un par de tijeras para extraer las
hebras, etc.
5. Posicione el cepillo de rodillo en la
carcasa alineando el extremo del cepillo
primero y luego insertando el otro extremo
correctamente en su lugar. Al instalarse
adecuadamente, el rodillo debe girar
libremente.
2. Gire la unidad
para acceder al
cepillo de rodillo.
2. Extraiga cuidadosamente
los sedimentos o bloqueos
desde el interior de la
manguera. Vuelva a instalar
el cabezal del rodillo en el
cuerpo de la aspiradora.
Retirar bloqueos en la
manguera:
1. Para limpiar la
manguera, presione las
lengüetas de liberación
de la manguera, como
indica la ilustración,
y extraiga el cabezal
del cepillo desde el
cuerpo principal de la
aspiradora.
6. Fije el cepillo en
su lugar cerrando la
lengüeta, como indica
la ilustración.
NOTA: No utilice tijeras ni otros objetos
afilados para extraer bloqueos desde la
manguera, ya que éstos podrían dañarla.

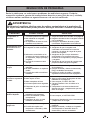
- 12 -
Revise la tabla para ver soluciones a problemas de rendimiento menores. Cualquier
reparación necesaria, aparte del mantenimiento descrito en esta Guía de uso y cuidado,
se deben realizar mediante un agente Kenmore o de servicio calificado.
RESOLUCIÓN DE PROBLEMAS
ADVERTENCIA
Desconecte el suministro eléctrico antes de realizar mantenimiento a la aspiradora. El
no seguir estas indicaciones puede provocar descargas eléctricas o lesiones a personas.
PROBLEMA POSIBLE CAUSA SOLUCIÓN
La aspiradora no
enciende.
1. La batería podría estar agotada.
2. Está utilizando un cargador
incorrecto.
3. La aspiradora de mano no está
instalada correctamente.
1. Cargue la batería como se indica en la página 8.
2. Asegúrese de utilizar solo el cargador incluido
con su producto.
3. Extraiga la aspiradora de mano y fíjela
nuevamente asegurándola correctamente.
El indicador de carga
de la batería no se
enciende.
1. La batería podría estar agotada.
2. El cargador no está conectado.
3. Sedimentos acumulados en los
contactos de carga metálicos de
la aspiradora, cuerpo principal y
cargador.
4. La toma de corriente no tiene
energía.
1. Cargue la batería como se indica en la página 8.
2. Asegúrese de que el cargador esté
conectado correctamente a la toma de
corriente y al orificio de carga de la parte
inferior del cargador.
3. Asegúrese de que no haya sedimentos
acumulados en los contactos de carga
metálicos de la aspiradora, cuerpo principal
y cargador.
4. Asegúrese de que la toma de corriente esté
proporcionando energía al cargador.
El cepillo motorizado
no gira.
1. El cepillo de rodillo está
atascado.
2. Se debe restablecer el cepillo de
rodillo.
3. El cepillo de rodillo no está bien
instalado.
1. Elimine la obstrucción. Siga las instrucciones
de la página 11.
2. Apague la unidad y elimine la obstrucción;
luego, enciéndala nuevamente.
3. Extraiga el cepillo de rodillo y reinstálelo
siguiendo las instrucciones de la página 11.
La aspiradora no
succiona o su potencia
es débil.
1. El depósito de polvo está lleno.
2. Debe limpiar el filtro.
3. Debe reemplazar el filtro.
4. La batería podría estar agotada.
5. El depósito de polvo no está bien
instalado.
1. Vacíe el depósito de polvo.
2. Siga las instrucciones de limpieza del filtro
indicadas en la página 10.
3. Para comprar, al 1-877-531-7321.
4. Cargue la batería como se indica en la
página 8.
5. Compruebe la correcta instalación del
depósito de polvo y asegúrese de que esté
firme en su lugar.
Hay polvo escapando
desde el depósito.
1. El filtro no está instalado o está
instalado incorrectamente.
2. El filtro está dañado y debe
reemplazarse.
3. El depósito de polvo no está
instalado correctamente.
1. Compruebe la correcta instalación del filtro.
2. Para comprar, al 1-877-531-7321.
3. Posicione el depósito de polvo correctamente
y déjelo firme en su lugar.
La aspiradora se
apaga sola.
1. La batería podría estar agotada.
2. El rodillo de cepillo está
bloqueado o atascado y debe
restablecerse.
1. Cargue la batería como se indica en la
página 8.
2. Apague la unidad y verifique si el agitador
está bloqueado o atascado. Retire la
obstrucción y vuelva a encenderla.

-
 1
1
-
 2
2
-
 3
3
-
 4
4
-
 5
5
-
 6
6
-
 7
7
-
 8
8
-
 9
9
-
 10
10
-
 11
11
-
 12
12
-
 13
13
-
 14
14
-
 15
15
-
 16
16
-
 17
17
-
 18
18
-
 19
19
-
 20
20
-
 21
21
-
 22
22
-
 23
23
-
 24
24


Kenmore DS6001 Guía del usuario
- Categoría
- Aspiradoras
- Tipo
- Guía del usuario
En otros idiomas
- English: Kenmore DS6001 User guide
Documentos relacionados
-
Kenmore DS6012 Guía del usuario
-
-
-
-
-
-
-
-
-
Kenmore CROSSOVER MAX 116.10325 Manual de usuario

