
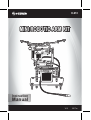
K-910
0917mV0.0
de Instrucciones
Manual
KIT MINI BRAZO ROBÓTICOKIT MINI BRAZO ROBÓTICOKIT MINI BRAZO ROBÓTICO

Lea cuidadosamente este instructivo para evitar cualquier mal funcionamiento.
La información que se muestra en este manual sirve únicamente como referencia sobre
el producto.
Debido a actualizaciones pueden existir diferencias.
Por favor, consulte nuestra página web www.steren.com para obtener la versión más
reciente de este manual.
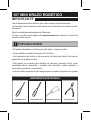
• NO apriete demasiado los tornillos para evitar dañar o romper el acrílico.
• Tenga cuidado al ensamblar las piezas, NO las fuerce.
• Use pegamento para acrílico en las uniones de los chasis para fijarlas. Evite colocar
pegamento en las partes móviles.
• Este aparato no se destina para utilizarse por personas (incluyendo niños), cuyas
capacidades físicas, sensoriales o mentales sean diferentes o estén reducidas, o
carezcan de experiencia o conocimiento.
• Los niños deben supervisarse para asegurar que no empleen el aparato como juguete.
PRECAUCIONES:
KIT MINI BRAZO ROBÓTICO
IMPORTANTE
Desarmador plano Desarmador de cruz Pegamento para acrílico Pinzas de punta
HERRAMIENTAS NECESARIAS

2
Antes de ensamblar, retire el plástico protector
de las piezas de acrílico.
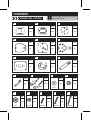
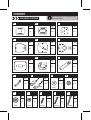
CONTENIDO
PIEZAS DEL CHASIS
A
2 pzas.
Cant.
D
1 pza.
Cant.
B
2 pzas.
Cant.
C
2 pzas.
Cant.
G
1 pza.
Cant.
E
1 pza.
Cant.
F
1 pza.
Cant.
H
1 pza.
Cant.
I
2 pzas.
Cant.
J
2 pzas.
Cant.
K
2 pzas.
Cant.
L
2 pzas.
Cant.
M
2 pzas.
Cant.
3 mm
3 mm
N
13 pzas.
Cant.
2 mm
O
8 pzas.
Cant.
3x10 mm
P
13 pzas.
Cant.
2x12 mm
Q
8 pzas.
Cant.
3x30 mm
R
2 pzas.
Cant.
K1
K2

3
8 mm
5 mm
PIEZAS DEL MOTOR
S
4 pzas.
Cant.
T
8 pzas.
Cant.
U
4 pzas.
Cant.
V
4 pzas.
Cant.
W
4 pzas.
Cant.
X
4 pzas.
Cant.
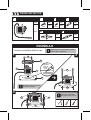
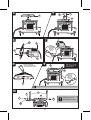
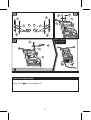
ENSAMBLAJE
Coloque
pegamento
antes de
insertar el
motor.
Q
H
O
G
S
Comience a ensamblar desde la base.
Asegúrese de colocar las piezas correctas
antes de aplicar pegamento.
No dañe los cables o las piezas
al insertar los tornillos.
Utilice pinzas y desarmador
para apretar tornillos y tuercas.
N
R
P
P
1 2
3
N

4
C
Asegúrese de colocar
correctamente las piezas.
Después de haber insertado las piezas, espere hasta que seque el pegamento para continuar ensamblando.
S
B
4
6
8
10
7
5
9
E
V
U
T
C
A
Q
O
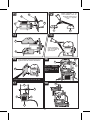
Coloque pegamento
en las zonas indicadas
antes de insertar la pieza.
Coloque
pegamento
antes de
insertar las
piezas.
Coloque
pegamento
antes de
insertar la
pieza.
Coloque la pieza
con el orificio del
lado del rotor.
V
I
P
U
T
M

5
T
P
V
U
B
O
C
Coloque pegamento
en las zonas indicadas
antes de insertar la
siguiente pieza.
Inserte la pieza
B, y espere hasta que seque el
pegamento antes de continuar ensamblando.
Coloque la pieza con el orificio del lado del rotor.
11 12
13
15
17 18
16
14
Q
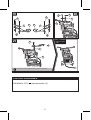
Coloque pegamento en las
zonas indicadas, antes de
insertar las piezas como se
indica en el siguiente
paso.
D
A
Q
O
O
S
Coloque el complemento
que ha ensamblado
anteriormente y fíjelo
como se muestra en la
imagen.
M
S
D
C
P
PN
F

6
¡Listo! Ahora puede
comenzar a utilizar
el kit.
19
21
20
J
P
P
N
N
J
K1
K1
K2
K2
V
T
U
P
L
N
ESPECIFICACIONES
Alimentación: 4,8 V - - - (para servomotor x 4)
Tenga cuidado de no forzar los límites de apertura y cierre de los servomotores.


K-910
0917mV0.0
Manual
Instruction
MINI ROBOTIC ARM KITMINI ROBOTIC ARM KITMINI ROBOTIC ARM KIT

Read these manual to avoid any damage.
The instructions only are for reference about the product.
There may be differences due to update.
Please check our web site www.steren.com to obtain the latest version of the instruction
manual.
• DO NOT over tighten the screws to avoid damaging or breaking acrylic.
• Be careful when assembling parts, DO NOT force them.
• Use acrylic glue on the chassis joints to fix them. Avoid placing glue on moving parts.
• This appliance is not intended for use by persons (including children) whose physical,
sensory or mental capabilities are different or reduced, or lack experience or knowledge.
• Children should be supervised to ensure that they do not use the appliance as a toy.
CAUTIONS:
MINI ROBOTIC ARM KIT
IMPORTANT
Flat screwdriver Cross screwdriver Acrylic glue Tip tweezers
NECESSARY TOOLS

2
Before assembling, remove protective plastic
of the acrylic pieces.
CONTENT
CHASSIS PIECES
A
2 pcs.
Qty.
D
1 pc.
Qty.
B
2 pcs.
Qty.
C
2 pcs.
Qty.
G
1 pc.
Qty.
E
1 pc.
Qty.
F
1 pc.
Qty.
H
1 pc.
Qty.
I
2 pcs.
Qty.
J
2 pcs.
Qty.
K
2 pcs.
Qty.
L
2 pcs.
Qty.
M
2 pcs.
Qty.
3 mm
3 mm
N
13 pcs.
Qty.
2 mm
O
8 pcs.
Qty.
3x10 mm
P
13 pcs.
Qty.
2x12 mm
Q
8 pcs.
Qty.
3x30 mm
R
2 pzas.
Qty.
K1
K2

3
8 mm
5 mm
ENGINE PIECES
S
4 pcs.
Qty.
T
8 pcs.
Qty.
U
4 pcs.
Qty.
V
4 pcs.
Qty.
W
4 pcs.
Qty.
X
4 pcs.
Qty.
ASSEMBLY
Put glue
before
inserting
engine.
Q
H
O
G
S
Start assembling from the base.
Be sure to place the correct pieces before
applying glue.
Do not damage cables or parts
when inserting screws.
Use tweezers and screwdrivers
to tighten screws and nuts.
N
R
P
P
1 2
3
N

4
Be sure to place pieces
correctly.
After inserting the pieces, wait until the glue is dry to continue assembling.
S
B
4
6
8
10
7
5
9
E
V
U
T
C
C
A
Q
O
Put glue in the indicated
areas before inserting piece.
Put glue
before
inserting
pieces.
Put glue
before
inserting
piece.
Place the piece
with the hole on
the rotor side.
V
I
P
U
T
M

5
T
P
V
U
B
O
C
Put glue in the indicated
areas before inserting
the next piece.
Insert piece B, and wait until the glue is dry
before continuing to assembling.
Place the piece with the hole on the rotor side.
11 12
13
15
17 18
16
14
Q
Put glue in the indicated areas,
before inserting the pieces as
indicated in the next step.
D
A
Q
O
O
S
Place the add-in that
you have previously
assembled and fix it as
shown in the image.
M
S
D
C
P
PN
F

6
Ready! Now you
can start using the
kit.
19
21
20
J
P
P
N
N
J
K1
K1
K2
V
T
U
SPECIFICATIONS
Input: 4,8 V - - - (for servo engine x 4)
Be careful not to force the opening and closing limits of servo engines.
K2
P
L
N

www.steren.com
-
 1
1
-
 2
2
-
 3
3
-
 4
4
-
 5
5
-
 6
6
-
 7
7
-
 8
8
-
 9
9
-
 10
10
-
 11
11
-
 12
12
-
 13
13
-
 14
14
-
 15
15
-
 16
16


