75521_V6_11/09/2020
FR
EN
DE
ES
RU
1-12 / 78-80
13-22 / 78-80
23-33 / 78-80
34-44 / 78-80
45-55 / 78-80
GYSDUCTION AUTO
www.gys.fr
NL
56-66 / 78-80
IT
67-77 / 78-80
2
GYSDUCTION AUTO
FR
Notice originale
INSTRUCTIONS DE SÉCURITÉ
Ce manuel d’utilisation comprend des indications sur le fonction-
nement de votre appareil et les précautions à suivre pour votre
sécurité. Merci de le lire attentivement avant la première utilisation
et de le conserver soigneusement pour toute relecture future. Ces
instructions doivent être lues et bien comprises avant toute opéra-
tion. Toute modification ou maintenance non indiquée dans le
manuel ne doit pas être entreprise. Tout dommage corporel ou
matériel dû à une utilisation non-conforme aux instructions de ce
manuel ne pourra être retenu à la charge du fabricant. En cas de
problème ou d’incertitude, veuillez consulter une personne quali-
fiée pour manier correctement l’appareil. Cet appareil doit être
utilisé uniquement pour chauffer des matériaux ferreux dans les
limites indiquées sur l’appareil et le manuel. Il faut respecter les
instructions relatives à la sécurité. En cas d’utilisation inadéquate
ou dangereuse, le fabricant ne pourra être tenu responsable.
Toute autre utilisation non mentionnée dans cette notice est stricte-
ment interdite, et potentiellement dangereuse. Le produit est semi-
automatique et requiert la présence d’un opérateur.
Cet appareil peut être utilisé par des enfants âgés d’au moins 8
ans et par des personnes ayant des capacités physiques, senso-
rielles ou mentales réduites ou dénuées d’expérience ou de
connaissance, s’ils (si elles) sont correctement surveillé(e)s ou si
des instructions relatives à l’utilisation de l’appareil en toute sécu-
rité leur ont été données et si les risques encourus ont été appré-
hendés. Les enfants ne doivent pas jouer avec l’appareil. Le net-
toyage et l’entretien par l’usager ne doivent pas être effectués par
des enfants sans surveillance.
Ne pas utiliser l’appareil, si le cordon d’alimentation ou la fiche
de secteur sont endommagés.
Ne pas couvrir l’appareil.
Risque d’explosion et d’incendie !
N’utilisez pas l’appareil en atmosphère explosive.
Maintenez les AIRBAG, les bombes aérosol et autres réci-
pients pressurisés éloignés de l’équipement de chauffage par
induction.
Attention risque de chaleur et de amme
Ne surchauffez pas les pièces et les adhésifs.
Soyez vigilant au feu, maintenez un extincteur à proximité.
Ne pas disposer l’appareil sur, ou à proximité de surfaces
inflammables.
N’installez pas l’appareil près de substances inflammables ou
comburantes.
Attention ! Surface très chaude. Risque de brûlures.
Les pièces et l’équipement chauds peuvent causer des brûlures.
Ne pas toucher les pièces chaudes à main nue.
Attendre le refroidissement des pièces et de l’équipement
avant de les manipuler.
3
GYSDUCTION AUTO
FR
Notice originale
Veiller à ce que des bijoux (alliance en particulier) ou pièces
métalliques ne viennent pas à proximité du système d’induction
et de l’inducteur lors du fonctionnement.
Enlevez tous les bijoux et autres objets en métal de votre corps
avant d’utiliser cet équipement
Les personnes avec des implants en métal dans le corps ne
doivent pas utiliser cet équipement.
En cas de brulure, rincer abondamment à l’eau et consulter un
médecin sans tarder.
Dangerosité des vapeurs et gaz
Maintenir la tête hors des fumées, ne pas respirer les vapeurs.
En travail intérieur, aérer le secteur et/ou utiliser un extracteur
d’air pour évacuer les vapeurs et les gaz.
Le chauffage par induction de certains matériaux, adhésifs, et
flux peut produire des vapeurs et des gaz. La respiration de ces
vapeurs et gaz peut être dangereuse pour la santé. Par exemple
le chauffage de l’uréthane libère un gaz : le cyanure d’hydro-
gène, qui peut être mortel aux humains.
Si la ventilation est insuffisante, utiliser un respirateur agréé.
Lire les fiches techniques d’hygiène et sécurité des produits
(MSDS) et les instructions du fabricant pour les adhésifs, les
flux, les métaux, les consommables, les enduits, les nettoyants et
les décapants.
Travailler dans un espace confiné seulement s’il est bien aéré,
ou en utilisant un respirateur agréé. Veiller à garder une per-
sonne qualifiée pour vous surveiller. Les vapeurs et les gaz résul-
tants du chauffage peuvent remplacer l’oxygène de l’air et pro-
voquer un accident ou la mort. S’assurer de la qualité de l’air
respiré.
Ne pas utiliser le chauffage sur des parties en cours de dégrais-
sage, ou de pulvérisation. La chaleur peut réagir avec les va-
peurs et former des gaz fortement toxiques et irritants.
Ne pas surchauffer les métaux, tel que l’acier galvanisé, revêtus
de plomb ou de cadmium, à moins que le revêtement soit enlevé
de la surface à chauffer, que l’aire de travail soit bien ventilée, et
au besoin, en portant un respirateur agréé. Les pièces de fonderie
et tous les métaux contenant ces éléments peuvent dégager les
vapeurs toxiques si surchauffés. Se référer au MSDS concernant
les informations relatives aux températures.
Attention danger électrique
Attention danger de rayonnement optique lorsque les éléments
métalliques chauffés atteignent la fusion.
Attention ! Champ magnétique important. Les personnes por-
teuses d’implants actifs ou passifs doivent être informées.
4
GYSDUCTION AUTO
FR
Notice originale
Dans le cas où les mesures dépassent les niveaux d’émission, il faut
donner des informations pour l’utilisation et pour la maintenance.
Aucune mesure de protection supplémentaire n’est nécessaire
lorsque la machine est utilisée seule. Des restrictions et/ou des me-
sures de protection supplémentaires peuvent être nécessaires dans
les autres cas.
Lors d’une maintenance les niveaux de champ doivent être vérifiés
avant la remise en service du matériel.
En fonctionnement, ne jamais approcher l’inducteur au niveau de
la tête ou des organes vitaux
Les porteurs de stimulateur cardiaque ne doivent pas s’approcher
à moins d’un mètre de l’ensemble de l’appareil lorsque celui-ci est
en fonctionnement. Risque de perturbation du fonctionnement des
stimulateurs cardiaques à proximité de l’appareil.
Consulter un médecin et évaluer les risques avant d’aller à
proximité d’un système de chauffage à induction.
Risques de projection de métal ou d’adhésif
Portez les verres de sécurité approuvés avec des protections
latérales ou utilisez un écran sur le visage.
Portez un vêtement de travail
Portez des gants.
Ne pas obstruer les ouvertures de ventilation. Se référer à la partie
installation avant d’utiliser l’appareil.
Raccordement :
Cet appareil doit être raccordé à un socle de prise de courant
relié à la terre.
Ce matériel destiné aux environnements industriels (classe A)
n’est pas prévu pour être utilisé dans un site résidentiel où le cou-
rant électrique est fourni par le réseau public d’alimentation
basse tension. Il peut y avoir des difficultés potentielles pour
assurer la compatibilité électromagnétique dans ces sites, à
cause des perturbations conduites, aussi bien que rayonnées à
fréquence radioélectrique.
Ce matériel est conforme à la CEI 61000-3-12
Ce matériel est conforme à la CEI 61000-3-11.
Entretien :
Si le câble d’alimentation est endommagé, il doit être rempla-
cé par le fabricant, son service après-vente ou des personnes
de qualification similaire afin d’éviter un danger.
Avertissement ! Débrancher toujours la fiche de la prise sec-
teur avant d’effectuer des travaux sur l’appareil.
À l’intérieur du produit, les tensions et intensités sont élevées et
dangereuses.
Régulièrement, enlever le capot et dépoussiérer à la soufflette.
En profiter pour faire vérifier la tenue des connexions élec-
triques avec un outil isolé par un personnel qualifié.
N’utiliser en aucun cas des solvants ou autres produits net-
toyants agressifs.
5
GYSDUCTION AUTO
FR
Notice originale
Réglementation:
Appareil conforme aux directives européennes.
La déclaration de conformité est disponible sur notre site internet.
Marque de conformité EAC (Communauté économique Eurasienne)
• Appareil conforme aux normes Marocaines.
La déclaration Cم (CMIM) de conformité est disponible sur notre
site internet.
Mise au rebut :
Ce matériel fait l’objet d’une collecte sélective. Ne pas jeter dans
une poubelle domestique.
Produit dont le fabricant participe à la valorisation des emballages
en cotisant à un système global de tri, collecte sélective et
recyclage des déchets d’emballages ménagers
Produit recyclable qui relève d’une consigne de tri selon le décret
n°2014-1577.
IDENTIFICATION
A l’arrière du produit gurent les informations suivantes :
• Nom et adresse du fabricant
• Modèle
• Numéro de série du produit
• Tension d’utilisation
• Puissance du produit
Le modèle, ainsi que le numéro de série du produit, doivent être mentionnées à chaque intervention de technicien ou
si des pièces détachées sont demandées.
ALIMENTATION ÉLECTRIQUE
Le Gysduction est livré avec une prise 16 A de type CEE7/7 et doit être branché à une alimentation électrique monopha-
sée 230 V (50/60 Hz) à trois ls avec le neutre relié à la terre.
Vérier que l’alimentation et ses protections (fusible et/ou disjoncteur) sont compatibles avec le courant nécessaire en
utilisation. Le produit est protégé pour le fonctionnement sur groupe électrogène.
DISPOSITIFS DE SÉCURITÉ
Le produit dispose de la sécurité PROTEC 400. Il est protégé contre les surtensions au-delà de 300V et contre des
débranchements de neutre.
Lors d’utilisations intensives, l’inducteur, les câbles, l’électronique et le transformateur de puissance chauffent. Pour
éviter tout dysfonctionnement dû aux surchauffes, le Gysduction est équipé d’un circuit de refroidissement à air. Une
protection thermique coupe également le produit lorsque la température interne devient trop importante.
• Les inducteurs sont isolés pour protéger l’utilisateur contre un éventuel choc électrique.
Le Gysduction est équipé d’une sécurité contre une chauffe accidentelle. Si la commande de chauffe est actionnée
par inadvertance (pression sur la poire de commande ou bouton de commande de l’inducteur vitre), et que l’induc-
teur n’est pas en contact avec un métal à chauffer sur une période dépassant une minute, alors le poste émet un
BIP sonore et se coupe automatiquement. Relâcher la commande de chauffe pour pouvoir reprendre un cycle de
chauffe normal.
DESCRIPTION DU PRODUIT
Le Gysduction est composé d’un inducteur relié à une source d’énergie électrique alternative moyenne fréquence.
Lorsqu’une commande de chauffe est enclenchée, un champ magnétique puissant est émis par l’inducteur. À l’approche
d’un métal ferreux, les courants induits vont créer un échauffement dans le métal, sans contact physique.
6
GYSDUCTION AUTO
FR
Notice originale
Le Gysduction Auto peut être utilisé pour de multiples applications (suivants l’inducteur choisi) :
- décoller tous les logos, adhésifs, moulures, baguettes plastiques collées à la carrosserie.
- dégripper et débloquer les pièces métalliques (boulons, vis, bielettes...).
- déposer les vitrages collés (lunette arrière, custode, toit panoramique).
- Enlever les anti-gravillons et les joints d’étanchéité.
Le produit chauffe l’acier, mais n’est pas adapté pour chauffer l’Aluminium, le cuivre ou le zinc.
INSTRUCTIONS D’UTILISATION
2
1
3
4
6
8
9
10
7
5
1 Boutons de réglages
2 Afcheur digital
3 Indicateur de mise en marche
4 Indicateur mode Auto
5 Indicateur mode Manuel
6 Indicateur de puissance maximum
7 Bouton de sélection de mode
8 Indicateur de protection thermique
9 Zone de chauffe optimale
10 Indicateur «No load»
No-Load En l’absence de pièce à chauffer, ou si l’inducteur est présenté sur un métal
non ferreux, l’indicateur « no-load » (10) s’allume lorsqu’une pression est
exercée sur l’une des commandes de chauffe.
Mode Automatique Dans ce mode, le Gysduction s’adapte à la pièce qu’il chauffe (taille-épais-
seur) et à la distance entre cette pièce et l’inducteur. Il conserve une puis-
sance de chauffe constante et optimale symbolisée par la zone OK (9) de
l’interface. Le poste ne chauffe jamais à puissance maximale dans ce mode.
Pour entrer dans ce mode :
Le mode Automatique est le mode par défaut. Si toutefois le poste est en
mode Manuel, réaliser un appui court sur la touche MODE (7) jusqu’à ce que
la LED devant l’indication « AUTO » (4) s’allume.
Afchage :
L’afchage digital montre la dernière valeur en % utilisée par la machine
pour maintenir une puissance constante et optimale selon les conditions de
chauffe. Cette valeur correspond aux réglages qu’il faudrait utiliser en mode
Manuel pour obtenir le même résultat, dans les mêmes conditions. Ainsi, si
l’utilisateur juge la chauffe préconisée par le Gysduction trop faible ou trop
forte, il peut calquer cette valeur dans le mode manuel et la faire varier à sa
guise pour atteindre la puissance désirée.
Mode Manuel Dans ce mode, l’utilisateur sélectionne lui-même la puissance de chauffe
désirée.
Pour entrer dans ce mode :
Réaliser un appui court sur la touche MODE (7) jusqu’à ce que la LED
devant l’indication « MANUAL » (5) s’allume.
Fonctionnement :
L’afchage digital (2) indique le pourcentage de la puissance maximale
(2400 W) que l’inducteur peut transmettre à la pièce à chauffer. Utiliser les
boutons de réglages (1) pour régler à la puissance souhaitée.
7
GYSDUCTION AUTO
FR
Notice originale
Le mode manuel permet d’atteindre la puissance maximale du Gysduction. À cette puissance, la chauffe
des pièces peut être très rapide. La puissance chauffante sera d’autant plus élevée que l’inducteur sera
proche de la pièce.
Signalisation sonore de chauffe Un BIP sonore peut être activé pour indiquer l’activité de chauffe. Le BIP
résonne dès que la chauffe est effective et sa fréquence varie en fonction de
la position de l’inducteur par rapport à la pièce à chauffer. Plus l’inducteur est
proche, plus la fréquence est élevée.
Pour activer / désactiver
cette fonction :
Presser la touche MODE (7) pendant 3 secondes pour activer/désactiver ce
BIP.
Voyant protection thermique (8) Ce voyant s’allume pour indiquer que le produit est entré en protection ther-
mique suite à une surchauffe. Tant que ce voyant reste allumé, le produit est
inopérant. Il s’éteint lorsque le produit a sufsamment refroidi.
Il n’est possible de reprendre la chauffe qu’à partir de ce moment seulement.
MISE EN ROUTE DU PRODUIT
1
Allumer le poste (1)
Connexion de l’accessoire (2)
1. Sélectionner l’inducteur souhaité.
2. Lever le clapet du connecteur du Gysduction.
3. Brancher le connecteur de l’inducteur au Gysduction.
4. Refermer le clapet pour verouiller la connexion.
5. L’afcheur indique le numéro de l’accessoire branché (ex. AC1)
Connexion de la poire de commande (3)
Le Gysduction peut être fourni avec une pédale de contrôle
(réf. 055490), nécessaire pour l’utilisation des inducteurs
dégrippage, adhésifs.
Relier le câble au Gysduction et à la pédale pour la rendre
opérationnelle.
Activation de la chauffe
Tous les inducteurs fonctionnent avec la poire de commande.
Les inducteurs vitre, débosselage et spirales sont également
dôtés d’un bouton de chauffe.
Approcher l’inducteur de la pièce métallique à chauffer, puis
presser le bouton de l’inducteur ou la poire de commande pour
activer la chauffe.
23
8
GYSDUCTION AUTO
FR
Notice originale
DESCRIPTION & UTILISATION DES INDUCTEURS
Toutes manipulations décrites ci-après nécessitent de la pratique. Ne pas hésiter à expérimenter
en réalisant des essais sur des tôles ou épaves.
Inducteur vitre
réf. 053373
Description
Cet inducteur est spécialement conçu pour déposer les vitres collées (lunette arrière, custode, toit panoramique, etc.),
décaper les anti-gravillons de bas de caisse. Il permet aussi de décoller les tôles soudo-collées.
Le mode Automatique est particulièrement recommandé pour le décollement de vitrage.
Dépose d’une vitre
◊ Préparation
1. Retirer au préalable toutes garnitures extérieures éventuelles : vitres garnies de moulures serties, en métal ou en
plastique. Pour les moulures ne pouvant être enlevées, chauffer la soudure de maintien depuis l’intérieur.
2. Il est recommandé de retirer également toute garniture intérieure et tous composants tels que clips et goujons pou-
vant servir à maintenir la fenêtre.
3. Débrancher les antennes et les circuits de dégivrage des vitres.
4. Coller un ruban adhésif de protection autour de la vitre an d’éviter d’endommager les surfaces peintes lors de la
manipulation.
5. Coller un ruban adhésif de protection sur l’inducteur vitre pour éviter de rayer la vitre. Remplacer le ruban adhésif
après chaque dépose de vitre.
6. Nettoyer la vitre complètement avant de commencer la dépose.
◊ Phase de chauffe & retrait de la vitre
Le plus grand risque de dommages à la peinture se situe au début de la chauffe, compte tenue de la difculté
plus grande d’introduire des cales entre la vitre et la carrosserie.
Commencer dans un coin et chauffer de chaque côté de ce coin en progressant vers les angles opposés.
Si la vitre est endommagée, commencer par le coin à réparer et progresser vers la partie intacte de la vitre.
Bords soudés sur lesquels reposent les joins de colle
Surfaces peintes visibles à ne pas chauffer
Directions de progression de la chauffe
7. Placer l’inducteur en vis-à-vis du joint de colle en uréthane pour un décollage aisé de la vitre.
Certains véhicules ont des rebords soudés étroits, la chauffe de l’inducteur peut induire la surface peinte visible, risquant de com-
promettre son aspect. Dans ce cas il est judicieux de refroidir la surface extérieure avec un linge humide ou un spray refroidisseur.
Éloigner l’inducteur vers le milieu de la vitre pour que celui-ci soit au moins à 2 cm de la partie peinte visible.
9
GYSDUCTION AUTO
FR
Notice originale
8. Déplacer l’inducteur dans un mouvement de va-et-vient sur environ 30 cm sur les deux cotés adjacents au coin.
Trouver la vitesse de chauffe adéquate : un rythme trop lent entraîne une chauffe excessive localisée qui est inefcace
car elle réduit la chaleur produite au niveau du rebord soudé. Un rythme élevé ne permet pas de chauffer sufsamment
le rebord soudé et le join de colle. Une légère fumée se dégage pour indiquer que la température optimale du cordon
de colle en uréthane est atteinte.
Si une fumée épaisse apparait, arrêter la chauffe immédiatement. S’éloigner de la zone pour ne pas respirer les vapeurs
et essayer d’en déterminer la cause. La chauffe de la colle uréthane provoque l’émission de cyanure d’hydrogène, très
dangereux pour l’homme.
9. Exercer une pression de l’intérieur du véhicule sans forcer pour rompre la
continuité du joint.
Créer une amorce de décollage peut prendre quelques minutes. Une fois que
le joint est décollé, il ne se recolle pas au métal.
Quand le coin de la vitre se soulève, glisser une cale en plastique dans l’espace
libéré entre la vitre et le rebord soudé. Rester prudent et ne pas exercer une
force trop importante qui pourrait briser la glace.
10. Une fois le coin du vitrage décollé, répéter le processus de chauffe sur la longueur et la hauteur de la vitre tout en
déplaçant les cales sous la vitre au fur et à mesure.
Vitrage Matériau Fragilité du verre
Temps de dépose
selon la taille du véhicule
Pare-brise avant Verre feuilleté +++ 20 min à 1 h
Fenêtre arrière
Verre recuit + 10 à 20 minVitres de custode
Fenêtres latérales
Inducteur dégrippage
réf. 053366
Description
L’inducteur dégrippage est utilisé pour un chauffage intense des parties rouillées ou grippées telles que des écrous et
des boulons. Cet inducteur peut également être utilisé pour l’enlèvement du calfatage des châssis de camions ou des
coffres de voitures, pour la soudure de gros connecteurs ou encore le formage du métal.
Utilisation
Pour retirer un écrou / boulon grippé ou rouillé :
1. Choisir le mode Auto ou régler la puissance à niveau très élevée (80 à 100% de la puissance).
2. Placer l’inducteur dégrippage sur l’écrou tel qu’illustré ci-contre.
3. Démarrer la chauffe et la faire durer quelques secondes.
4. Déserrer l’écrou ou le boulon grippé.
10
GYSDUCTION AUTO
FR
Notice originale
Inducteur adhésifs
réf. 053359
Description
Cet inducteur est conçu pour décoller sans détérioration en quelques minutes les baguettes de porte, monogramme,
logos ainsi que pour décoller les adhésifs publicitaires et décoratifs.
Utilisation
Pour chauffer les tôles peintes
1. Choisir le mode Auto ou régler la puissance à un niveau faible (10 à 30% de sa capacité de chauffe maximale).
2. Placer l’inducteur juste au dessus de la zone à chauffer. Il ne doit pas y avoir de contact entre l’inducteur et la zone ou
l’élément à chauffer.
3. Tout en activant la chauffe, exercer un mouvement circulaire ou de va-et-vient sur la zone à chauffer.
Si l’inducteur reste trop longtemps sur une même zone, la peinture peut brûler. Pour éviter cela, il est nécessaire de garder
constamment l’inducteur en mouvement (va-et-vient ou circulaire).
Pour décoller des décalcomanies, autocollants de vinyle ou barres collées
Réaliser les trois étapes décrites ci-dessus (cf. pour chauffer
les tôles peintes). Chauffer quelques secondes et essayer de
soulever un bord de l’élément. S’il commence à se décoller
facilement vers le haut, la température requise a été atteinte,
sinon, continuer la chauffe quelques secondes supplémentaires
et essayer à nouveau.
Certains éléments collés depuis longtemps, nécessitent souvent un temps de chauffe plus long. Si un autocollant est
surchauffé, il devient souvent mou et boursoufé. Si cela se produit, laisser refroidir et essayer de nouveau d’enlever et
peler l’autocollant. Faire attention à ne pas brûler la peinture ! Si la tôle est chauffée sufsamment, les joncs doivent se
décoller sans effort, en emmenant la colle avec eux.
Pour des déposes de moulures collées sur la carrosserie
Les moulures des côtés de carrosserie sont enlevées de la même façon que les décalcomanies et les autocollants. Une
puissance plus élevée ou un temps plus long sont nécessaires pour les moulures épaisses. Le métal sous les moulures
étant plus éloigné de l’inducteur.
1. Choisir le mode Auto ou régler la puissance à un niveau moyen (40 à 60% de chauffe maximale)
2. Placer l’inducteur parallèlement à la surface de travail pour réaliser une distribution uniforme de la chaleur.
3. Privilégier un mouvement de va-et-vient sur la longueur de la moulure. Commencer par une extrémité de la moulure.
Effectuer lentement un mouvement de va-et-vient sur quelques centimètres jusqu’à ce qu’il soit possible de décoller
facilement l’extrémité de la moulure sans effort.
4. Déplacer alors lentement l’inducteur plus loin sur la moulure tout en détachant celle-ci de la carrosserie.
Le ruban adhésif est en général retiré avec la moulure. Si de l’adhésif ou du ruban reste collé sur la carrosserie, alors
avancer plus lentement ou augmenter la puissance.
11
GYSDUCTION AUTO
FR
Notice originale
Pour le chauffage des parties de carrosserie
En hiver ou dans les régions aux climats froids, la carrosserie d’une voiture sur laquelle on souhaite coller des décalco-
manies, des autocollants ou des joncs doit être préchauffée en atelier pour permettre le collage des adhésifs.
1. Régler la puissance à niveau faible (10 à 30% de sa capacité de chauffe maximale)
2. Exercer des mouvements circulaires ou de va-et-vient sur la zone à préchauffer.
Inducteur débosselage
sans peinture
réf. 054776
Description
L’inducteur de débosselage a été conçu pour la réparation de légères bosses sur les carrosseries, causés par des impacts
de grêle par exemple, sans besoin de retoucher la peinture. Il n’est pas nécessaire de dégarnir les intérieurs des
éléments à redresser, car la chauffe de la tôle s’effectue de l’extérieur et de manière très limitée.
Utilisation
73502 - V2 - 04/11/2019
FR
EN
DE
ES
RU
2-6 / 42-43
7-11 / 42-43
12-16 / 42-43
17-21 / 42-43
22-26 / 42-43
INDUCTEUR DÉBOSSELAGE
DENT PULLING INDUCTOR
AUSBEULINDUKTOR
INDUCTOR DE DESABOLLO
ИНДУКТОР ДЛЯ ПРАВКИ
INDUTOR DE REMOÇÃO
INDUTORE TIRA BOLLI
UITDEUKEN ZONDER SPUITEN
(UZS) INDUCTIE HULPSTUK
NL
IT
PT
27-31 / 42-43
32-36 / 42-43
37-41 / 42-43
Consulter la notice fournie avec le
produit pour les conseils d’utilisation.
Inducteur spirale
réf. 054783
Description
Cet inducteur est conçu pour chauffer, dégripper et retirer facilement toutes les pièces mécaniques en quelques
secondes : boulons/écrous grippés, vis, brides d’échappement, biellettes de direction, amortisseurs... etc.
Utilisation
73502_V1_20/11/2019
FR
2-8 / 49-50
www.gys.fr
EN
9-14 / 49-50
DE
15-21 / 49-50
RU
29-35 / 49-50
IT
43-48 / 49-50
ES
22-28 / 49-50
NL
36-42 / 49-50
Find more languages of user manuals on our website
INDUCTEUR SPIRALE
COILED INDUCTOR
SPIRALINDUKTOR
INDUCTOR ESPIRAL
СПИРАЛЬНЫЙ ИНДУКТОР
SPIRAAL INDUCTOR
INDUTTORE FILO SPIRALE
Consulter la notice fournie avec le
produit pour les conseils d’utilisation.
12
GYSDUCTION AUTO
FR
Notice originale
CONSOMMABLES
Toiles pour inducteurs
La toile en bre de verre présente sur les inducteurs vitre et dégrippage peut s’user à force d’utilisation et frottements
contre les pièces à chauffer. Ces toiles peuvent être remplacées, et GYS met à disposition les références de kits suivants
pour permettre ce changement.
053854 JEU DE 5 PROTECTIONS INDUCTEUR VITRE + COLLE
053847 JEU DE 10 PROTECTIONS INDUCTEUR DEGRIPPAGE + COLLE
059108 1 PROTECTION INDUCTEUR ADHÉSIF + COLLE
Spray refroidisseur
Ce spray refroidisseur est particulièrement utile lors d’opération de débosselage sans peinture et pour refroidir des
pièces chauffées.
048898 LOT DE 12 SPRAYS REFROIDISSEUR -50°C / 400ml
CODES DÉFAUT
CODE SIGNIFICATION
E - 1 Poire actionnée à la mise sous tension.
E - 2 Bouton inducteur vitre actionné à la mise sous tension.
E - 3 Bouton ON/OFF en face-avant actionné à la mise sous tension.
E - 4 Surintensité dans l’inducteur (soit parce qu’il est très chaud, soit parce qu’il y a un court-circuit).
E - 5 Inducteur défectueux (l coupé ou débranché).
NO– ACC Accessoire non branché.
AC - Accessoire non reconnu.
CONDITIONS DE GARANTIE
La garantie couvre tous défauts ou vices de fabrication pendant 2 ans, à compter de la date d’achat (pièces et main
d’oeuvre).
La garantie ne couvre pas :
• Toutes autres avaries dues au transport.
• L’usure normale des pièces (Ex. : câbles, pinces, etc.).
• Les incidents dus à un mauvais usage (erreur d’alimentation, chute, démontage).
• Les pannes liées à l’environnement (pollution, rouille, poussière).
• Les inducteurs et ferrites démontables qui sont des consommables.
En cas de panne, retourner l’appareil à votre distributeur, en y joignant :
- un justicatif d’achat daté (ticket de sortie de caisse, facture….)
- une note explicative de la panne.
13
GYSDUCTION AUTO
EN
Translation of the original instructions
SAFETY INSTRUCTIONS
This manual contains safety and operating instructions, to be fol-
lowed for your safety. Please read it carefully before using the
device for the first time and keep it in a safe place for future refe-
rence. Read and understand the following safety recommenda-
tions before using or servicing the unit. Any change or servicing
that is not specified in the instruction manual must not be underta-
ken. The manufacturer is not liable for any injury or damage
caused due to non-compliance with the instructions featured in this
manual . If there is any issue or uncertainty, please consult a qua-
lified individual to operate the equipment correctly. This machine
may only be used to heat ferrous materials within the limits indica-
ted on the equipment and manual. The operator must observe the
safety precautions. In case of inedaquate or unsafe use, the manu-
facturer cannot be held liable for damage or injury. Any other
uses not specified in this manual is forbidden, and possibly dange-
rous.The product is semi automatic and requires the presence of
an operator.
This unit can be used by children aged 8 or over and by people
with reduced physical, sensory or mental capabilities or lack of
experience or knowledge, if they are properly monitored or if ins-
tructions for using the equipment safely have been read and risks
made aware of. Children must not play with the product. Cleaning
and maintenance should not be performed by an unsupervised
child.
Do not use the charger if the mains cable or plug is damaged.
Do not cover the device.
Fire and explosion risks!
Do not use the device in an explosive atmosphere.
Keep gas cannisters or other pressurised gas containers away
from the induction heating machine.
Warning, heat and ame risk.
Do not overheat parts and adhesives.
Be wary of fire, keep a fire extinguisher is in the vicinity..
Do not position the machine on, or near flammable surfaces.
Do not position the machine near flammable materials.
Warning ! Very hot surface. Risk of burns.
The parts and pieces that have just been heated are hot and
may cause burns when manipulated.
Do not touch any hot parts with your hands.
Wait for the parts and pieces to cool down before handling
them.
Check that jewellery (such as wedding rings) or other metal
pieces do not get close to the induction heating machine or
the inductor when switched on.
Remove any jewellery or any metal object from yourself before
using this machine
14
GYSDUCTION AUTO
EN
Translation of the original instructions
People with metal implants should not use this machine.
In case of burns, rinse with water abundantly and see a medi-
cal doctor as soon as possible.
Dangerosity of the gas fumes
Keep the head away from the fumes, do not inhale.
If working inside, ventilate the area or use a fume extractor to
evacuate the gases and fumes.
Induction heating of certain materials such as adhesives and
flux can generate fumes and gases. Breathing these fumes and
gases can be dangerous for your health. For example, heating
urethane generates a gas : hydrogen cyanide, potentially mor-
tal for humans.
If the ventilation is insufficent, use an approved respiratory unit.
Read the safety data sheets (MSDS) and the manufacturer’s ins-
tructions for adhesvies, flux, metals, consumables, coatings, clea-
ning agents, corrosives, and paint strippers.
Do not use the heater on parts being degreased or sprayed. The
heat might react with fumes and generate highly toxic gases.
Work in a confined area only if it’s well ventilated, or use an ap-
proved repiratory/filtration unit. Make sure that a qualified per-
son is around to watch over you. The fumes and gases released
while heating can replace oxygen or air, causing accidents or
death. Check the quality of the air you’re breathing
Do not overheat metals, such as galvanised steel, covered with
lead or cadmium, unless the coating is removed from the surface
before it’s heated, that the area is well ventilated, and if needed,
use an approved filtration/respiratory unit.. Foundry pieces and
all metals containing such elements may generates toxic fumes if
overheated. Check the MSDS for temperature related details.
Warning, electrical danger
Caution: Danger of optical radiation when the heated metal ele-
ments reach fusion.
Warning ! Major magnetic eld. People wearing active or
passive implants must be informed.
No further protectective steps are required when the machine is
used on its own. Further restrictions and/or protective measures may
be necessary in other cases
After maintenance, the magnetic field levels must be checked
before the machine is used again.
When switched on, never put the inductor near the head or vital
organs.
People wearing pacemakers are advised to not come close to the
machine. Risk of disruption of pacemaker operations when close
to the machine. Consult a doctor before getting close to induction
heaters.
15
GYSDUCTION AUTO
EN
Translation of the original instructions
Risk of metal or adhesive projections
Wear approved protective goggles with lateral protections, or
protect the whole face with a screen.
Wear protective clothes.
Wear gloves.
Do not obstruct the machine’s air intake, which facilitates air circu-
lation. Check the installation chapter before using the device.
Connection:
This machine must be connected to an earthed socket.
These Class A devices are not intended to be used on a residen-
tial site where the electric current is supplied by the public
network, with a low voltage power supply. There may be poten-
tial difficulties in ensuring electromagnetic compatibility on these
sites, because of the interferences, as well as radio frequencies.
This hardware is compliant with the IEC 61000-3-12.
This equipment complies with the IEC 61000-3-11.
Maintenance:
If the power cable is damaged, it must be replaced by the ma-
nufacturer, its after sales service or an equally qualified person
to prevent danger.
Warning! Always disconnect from the mains before perfor-
ming maintenance on the device.
High Voltage and Currents inside the machine.
Remove the casing on a regular basis, to remove any excess
dust. Take this opportunity to have the electrical connections
checked by a qualified person, with an insulated tool.
Do not use solvents or any agressive cleaning products.
Regulations:
Device complies with europeans directives.
The certificate of compliance is available on our website.
EAC Conformity marking (Eurasian Economic Community).
• Equipment in conformity with Moroccan standards.
The declaration Cم (CMIM) of conformity is available on our
website (see cover page).
Waste management:
This product should be disposed of at an appropriate recycling
facility. Do not throw away in a domestic bin.
The product’s manufacturer contributes to the recycling of its
packaging by contributing to a global recycling system.
•This product should be recycled appropriately.
16
GYSDUCTION AUTO
EN
Translation of the original instructions
IDENTIFICATION
On the back of the product is the following information:
• Manufacturer’s name and address
• Model
• Product serial number
• Operating voltage
• Product power
Model and serial numbermust be mentioned each time a technician intervention is required or if spare parts are
requested.
POWER SUPPLY
The GYSDUCTION is tted with a 16A socket type CEE7/7 which must be connected to a single-phase 230V (50/60 Hz)
power supply tted with three wires and one earthed neutral.
Check that the power supply and its protection (fuse and/or circuit breaker) are compatible with the current needed by
the machine. The product is protected for operation on a generator.
SAFETY DEVICES
The product has the safety feature PROTEC 400. It is protected against overvoltage above 300V and against neutral
disconnection.
During intensive use, the inductor, cables, electronics and power transformer heat up. In order to avoid dysfunction
due to overheating, the Gysduction is equipped with an air cooling circuit. A thermal protection also switches off the
product when the internal temperature becomes too high.
• The inductors are insulated to protect the user against possible electric shock..
The Gysduction is equipped with a safety device against accidental heating. If the heating control is inadvertently
activated (pressure on the control pedal or glass inductor control button), and the inductor is not in contact with the
metal to be heated for a time exceeding one minute, then the unit will beep and switch off automatically. Release
the heater control to go back to a normal heating cycle.
PRODUCT DESCRIPTION
Gysduction is made up of an inductor connected to an alternating medium-frequency power source. When a heating
control is switched on, a strong magnetic eld is emitted by the inductor. When approaching a ferrous metal, the induc-
ted currents will create heating in the metal, without physical contact.
Gysduction Auto can be used for many applications (depending on the selected inductor):
- to remove all logos, adhesives, mouldings, plastic rods glued to bodywork.
- unbolt and unlock metal parts (bolts, screws, connecting rods...).
- remove bonded glass (rear glass, rear quarter, panoramic roof).
- Remove rubbing strips and seals.
The product will heat steel, but is not suitable for heating Aluminum, copper or zinc.
OPERATING INSTRUCTIONS
2
1
3
4
6
8
9
10
7
5
1 Setting controls
2 Digital display
3 Power-on indicator
4 Auto mode indicator
5 Manual mode indicator
6 Max. power indicator
7 Selection mode button
8 Thermal protection indicator
9 Optimal heating area
10 «No load» indicator
17
GYSDUCTION AUTO
EN
Translation of the original instructions
No-Load If there is no part to be heated, or if the inductor is placed on a non-ferrous
metal, the « no-load »indicator (10) lights up when pressure is applied on one
of the heating controls.
Automatic mode With this mode, Gysduction adapts to suit the part to be heated (size-thick-
ness) and takes into account the distance between the part and the induc-
tor. It maintains a constant and optimal heating power, symbolised by the
OK zone (9) of the interface. With this mode, the GYSduction never heats at
maximum power.
To start this mode:
Automatic mode is the default heating mode. If, however, the unit is set to
manual mode, briey press the MODE button (7) until the LED in front of
AUTO” (4) lights up.
Display :
The digital display shows the last % value used by the machine to maintain
a constant and optimal power according to the heating conditions. This
value corresponds to the settings that should be used in Manual mode to
obtain the same result with the same conditions. Thus, if the user considers
the heating recommended by the Gysduction too low or too high, he can
copy this value in the manual mode and vary it to reach the desired power.
Manual mode In this mode, the user selects the desired heating power.
To start this mode:
Briey press the MODE button (7) until the LED in front of « MANUAL » (5)
lights up.
Operating :
The digital display (2) shows the percentage of the maximum power (2400
W) that the inductor can transmit to the workpiece to be heated. Use the
setting buttons (1) to adjust to the desired power.
The manual mode allows to reach the maximum power of the Gysduction. At this power, workpieces can
heat up very quickly. The closer the inductor is to the workpiece, the higher the heating power will be.
Audible heating signal An audible BEEP can be activated to indicate heating activity. The BEEP
sounds as soon as the heating is effective and its frequency varies according
to the position of the inductor in relation to the part to be heated. The closer
the inductor, the higher the frequency.
To activate/deactivate this function:
Press the MODE button (7) for 3 seconds to activate/deactivate this BEEP.
Thermal protection indicator (8) This indicator lights up to indicate that the product has entered thermal pro-
tection due to overheating. As long as this light remains on, the product is
inoperative. It switches off when the product has cooled enough.
Heating can only be reactivated from this point on.
18
GYSDUCTION AUTO
EN
Translation of the original instructions
PRODUCT START UP
1
Switch on the station (1)
Accessory connection (2)
1. Select the required inductor.
2. Lift the valve on the Gysduction connector.
3. Connect the inductor connector to the Gysduction.
4. Close the valve to lock the connection.
5. The display shows the number of the connected accessory (eg.
AC1)
Connection of the control pedal (3)
The Gysduction can be supplied with a control pedal (ref. 055490),
necessary for the use of the bolt, adhesive and spiral inductors.
Connect the cable to the Gysduction and the pedal to make it
work.
Heating activation
The glass and dent pulling inductors are tted with a heating but-
ton. The three other ones work with the control pedal.
Bring the inductor close to the metal part to be heated, then press
the inductor button or the control pedal to activate the heating.
23
INDUCTOR DESCRIPTION & USE
All operations described below require practice. GYS recommend experimenting by carrying out
tests on sheet metal or write-off.
Glass inductor
ref. 053373
Description
This inductor is specically designed to strip off the anti-gravel protection from the lower part of the car body. It can
also be used to remove bonded glass (rear glass, rear quarter, panoramic roof, etc.).
Automatic mode is particularly recommended for removing glass.
Removing glass
◊ Preparation
1. Remove any exterior trim beforehand: For mouldings that cannot be removed, heat the bond from the inside.
2. It is recommended that you also remove any interior trim and components such as clips and studs that may be used
to hold the glass in place.
3. Disconnect aerials and glass defrost circuits.
4. Apply protective tape around the glass to prevent damage to the painted surfaces during handling.
5. Apply protective tape on the glass inductor to avoid scratching the glass. Replace the adhesive tape after each glass
removal.
6. Thoroughly clean the glass before starting the removal process.
19
GYSDUCTION AUTO
EN
Translation of the original instructions
◊ Heating step & glass removal
The greatest risk of painting damage is at the beginning of the heat-up because of the extra difculty of introdu-
cing shims between the glass and the body.
Start in a corner and heat up on each side of that corner as you progress to the opposite corners.
If the glass is damaged, start at the corner to be repaired and work your way to the undamaged part of the glass.
Welded edges on which the glue joints sit
Visible painted surfaces that must not be heated
Heating progress directions
7. Place the inductor opposite the urethane glue joint for easy removal from the glass.
Some vehicles have narrow welded edges, heating of the inductor can damage the visible painted surface In that case it is advisable
to cool the outer surface with a damp cloth or cooling spray. Move the inductor towards the middle of the glass so that it is at least
2 cm away from the visible painted part.
8. Move the inductor back and forth about 30 cm on both adjacent sides of the corner. Finding the right heating speed:
A pace that is too slow results in excessive localized heating that is inefcient because it reduces the heat produced at
the welded edge. A high pace does not allow sufcient heating of the welded edge and the glue joint. A slight smoke is
emitted to indicate that the optimal temperature of the urethane glue bead has been reached.
If thick smoke appears, stop heating immediately. Move away from the area to avoid breathing fumes and try to deter-
mine the cause. Heating the urethane glue causes the emission of hydrogen cyanide, which is very dangerous to ingest.
9. Apply pressure from inside the vehicle without breaking the seal.
Once the seal is removed, it will not stick to the metal again.
When the glass corner lifts, slide a plastic wedge into the space left between
the glass and the welded edge. Be careful not to exert too much force that
could break the ice.
10. Once the corner of the pane is released / peeled off, repeat the heating process along the length and height of the
pane while moving the wedges under the pane as you go.
Windows Material Glass fragility
Removal time
according to vehicle size
Front windscreen Laminated glass +++ 20 min to 1 h
Rear window
Annealed glass + 10 to 20 minQuarterlight window
Side windows
20
GYSDUCTION AUTO
EN
Translation of the original instructions
Bolt inductor
ref. 053366
Description
The bold inductor is used for intense heating of rusted or seized parts such as nuts and bolts. This inductor can also be
used for removing caulking from truck chassis or car trunks, for welding large connectors or for metal forming.
Use
To remove a seized or rusted nut / bolt:
1. Choose Auto mode or set the power at a very high level (80 to 100% of power).
2. Place the bolt inductor on the nut as shown.
3. Start the heater and let it run for a few seconds.
4. Loosen the nut or the bolt.
Adhesive inductor
ref. 053359
Description
This inductor is designed to peel off door mouldings / rubbing strips, badges as well as advertising and decorative
adhesives in a few minutes without damage.
Use
For heating painted metal sheets
1. Select Auto mode or set the power to a low level (10 to 30% of its maximum heating capacity).
2. Place the inductor just above the area to be heated. There must be no contact between the inductor and the area
or element to be heated.
3. While activating the heater, make a circular or to-and-fro movement on the area to be heated.
If the inductor stays too long on the same area, the paint may burn. To avoid this, it is necessary to keep the inductor
constantly in motion (back and forth or circular).
For peeling off decals, vinyl stickers or glued bars
Carry out the three steps described above (see to heat the pain-
ted sheets). Heat for a few seconds and try to lift one edge of
the element. If it starts to peel off easily upwards, the required
temperature has been reached, otherwise continue heating for
a few more seconds and try again.
21
GYSDUCTION AUTO
EN
Translation of the original instructions
Some elements that have been glued for a long time often require a longer heating time. If a sticker is overheated, it
often becomes soft and puffy. If this happens, allow to cool and try again to remove and peel the sticker. Be careful not
to burn the paint! If the sheet metal is heated sufciently, the stickers should peel off easily, taking the glue with them.
For the removal of mouldings glued to the bodywork
Body side mouldings are removed in the same manner as transfers and stickers. Higher power or longer time is required
for thicker mouldings. The metal under the mouldings is further away from the inductor.
1. Select Auto mode or set the power to a medium level (40 to 60% maximum heating).
2. Place the inductor parallel to the work surface to achieve uniform heat distribution.
3. Favour a back and forth movement along the length of the moulding. Start with one end of the moulding. Slowly
move back and forth a few centimetres until the end of the moulding can be removed effortlessly.
4.Then slowly move the inductor further along the molding while detaching the molding from the body.
The tape is usually removed with the moulding. If adhesive or tape remains stuck to the body, then advance more slowly
or increase power.
For heating body parts
In winter or in regions with cold climates, the body of a car to which transfers, stickers or beads are to be afxed
must be preheated in the workshop to allow the adhesives to adhere.
1. Set the power at low level (10 to 30% of its maximum heating capacity)
2. Use circular or back and forth movements on the area to be preheated.
Paintless dent pulling
inductor
ref. 054776
Description
The dent pulling inductor has been designed for paintless dent repairs on car bodies, made by hail impacts for example.
The heating is from the outside and the heat is very limited.
Application and use
73502 - V2 - 04/11/2019
FR
EN
DE
ES
RU
2-6 / 42-43
7-11 / 42-43
12-16 / 42-43
17-21 / 42-43
22-26 / 42-43
INDUCTEUR DÉBOSSELAGE
DENT PULLING INDUCTOR
AUSBEULINDUKTOR
INDUCTOR DE DESABOLLO
ИНДУКТОР ДЛЯ ПРАВКИ
INDUTOR DE REMOÇÃO
INDUTORE TIRA BOLLI
UITDEUKEN ZONDER SPUITEN
(UZS) INDUCTIE HULPSTUK
NL
IT
PT
27-31 / 42-43
32-36 / 42-43
37-41 / 42-43
Refer to the manual supplied with the
product for instructions on how to use it.
Spiral inductor
ref. 054783
22
GYSDUCTION AUTO
EN
Translation of the original instructions
Description
This inductor is designed to heat and remove any mechanical part in a few seconds: e.g. seized bolts/nuts, screws...etc.
Application and use
73502_V1_20/11/2019
FR
2-8 / 49-50
www.gys.fr
EN
9-14 / 49-50
DE
15-21 / 49-50
RU
29-35 / 49-50
IT
43-48 / 49-50
ES
22-28 / 49-50
NL
36-42 / 49-50
Find more languages of user manuals on our website
INDUCTEUR SPIRALE
COILED INDUCTOR
SPIRALINDUKTOR
INDUCTOR ESPIRAL
СПИРАЛЬНЫЙ ИНДУКТОР
SPIRAAL INDUCTOR
INDUTTORE FILO SPIRALE
Refer to the manual supplied with the
product for instructions on how to use it.
CONSUMABLES
Inductor cloths
The breglass cloth on the glass and de-seize inductors can wear out through use and friction against the parts to be
heated. These cloths can be replaced, and GYS provides the following kit references to allow this change.
053854 SET OF 5 GLASS INDUCTOR PROTECTIONS + GLUE
053847 SET OF 10 BOLT INDUCTOR PROTECTIONS GYSDUCTION + GLUE
059108 1 ADHESIVE INDUCTIVE PROTECTION + GLUE
Cooling spray
This cooling spray is particularly useful during paintless dent removal operations and for cooling heated parts.
048898 SET OF 12 COOLING SPRAYS -50°C / 400 ml
FAULT CODES
CODE MEANING
E - 1 Pedal activated on power-up.
E - 2 Glass inductor button activated on power-up.
E - 3 Front panel ON/OFF button activated on power-up.
E - 4 Overcurrent in the inductor (either because it is very hot or because there is a short circuit).
E - 5 Defective inductor (wire cut or disconnected).
NO– ACC Accessory not connected.
AC - Accessory not recognized.
WARRANTY
The warranty covers faulty workmanship for 2 years from the date of purchase (parts and labour).
The warranty does not cover:
• Transit damage.
• Normal wear of parts (eg. : cables, clamps, etc..).
• Damages due to misuse (power supply error, dropping of equipment, disassembling).
• Environment related failures (pollution, rust, dust).
• Inductors and removable ferrites that are consumables.
• Use of unspecied coolant.
In case of failure, return the unit to your distributor together with:
- The proof of purchase (receipt etc ...)
- A description of the fault reported
23
GYSDUCTION AUTO
DE
Übersetzung der Originalbetriebsanleitung
SICHERHEITSANWEISUNGEN
Diese Betriebsanleitung enthält Sicherheits- und Betriebshinweise.
Bitte lesen Sie diese Anleitung aufmerksam durch, bevor Sie das
Gerät zum ersten Mal benutzen und bewahren Sie diese sorgfäl-
tig auf. Lesen Sie vor Inbetriebnahme des Gerätes die Anleitung
sorgfältig durch. Nehmen Sie keine Wartungsarbeiten oder Verän-
derungen am Gerät vor, wenn diese nicht explizit in der Anleitung
genannt werden. Der Hersteller haftet nicht für Verletzungen oder
Schäden, die durch unsachgemäße Handhabung dieses Gerätes
enstanden sind. Bei Problemen oder Fragen zum korrekten Ge-
brauch dieses Gerätes, wenden Sie sich bitte an entsprechend
qualifiziertes und geschultes Fachpersonal. Dieses Gerät darf nur
zum Erwärmen von Eisenwerkstoffen innerhalb der in der Betrieb-
sanleitung angegebenen Grenzen verwendet werden. Die Si-
cherheitsanweisungen müssen in jedem Fall beachtet werden. Der
Hersteller ist für Schäden bei fehlerhaften oder gefährlichen Ve-
rwendung nicht verantwortlich. Jede andere Nutzung, die nicht in
dieser Bedienungsanleitung erwähnt wurde, ist untersagt und po-
tentiell gefährlich. Das Produkt ist halbautomatisch und die Anwe-
senheit eines Bedieners ist erforderlich.
Dieses Gerät kann von Personen ab 8 Jahren, und von Personen
mit eingeschränkten physischen, sensorischen oder geistigen
Fähigkeiten sowie von Personen ohne Erfahrungen oder Kenntnis-
sen benutzt werden, wenn sie durch eine für ihre Sicherheit veran-
twortliche Person beaufsichtigt oder bezüglich des Gebrauchs des
Gerätes angeleitet werden. Kinder müssen beaufsichtigt werden,
um sicherzustellen, dass sie mit dem Gerät nicht spielen. Die Reini-
gung und Wartung darf nicht von unbewachten Kindern durchge-
führt werden.
Das Gerät nicht nutzen, wenn das Netzkabel oder der Stecker
beschädigt sind.
Das Gerät nicht abdecken.
Brand- und Explosionsgefahr!
Verwenden Sie nicht das Produkt in explosionsgefährdeten
Bereichen.
Das Induktionsheizgerät nicht in der Nähe von Spraydosen
und anderen Druckbehälter betreiben.
Schützen Sie sich vor Hitze und vor Feuer.
Werkstücke und Klebestoffe nicht überhitzen.
Achten Sie darauf, dass kein Brand entsteht, und halten Sie stets
einen Feuerlöscher bereit.
Setzen Sie das Gerät nicht an oder in der Nähe von brennba-
ren Oberflächen und Stoffen ein.
Achtung! Sehr heiße Oberäche. Verbrennungsgefahr.
ACHTUNG! Die Werkstücke und Geräte sind nach Anwendung
sehr heiß! Seien Sie daher im Umgang mit den Werkstücken und
Geräten vorsichtig, um Verbrennungen zu vermeiden.
24
GYSDUCTION AUTO
DE
Übersetzung der Originalbetriebsanleitung
Berühren Sie die heißen Werkstücke nicht mit bloßen Händen
und lassen Sie diese vorher abkühlen.
Achten Sie darauf, dass Schmuckstücke (z.B. Eheringe) oder
andere Metallteile nicht in der Nähe des betriebenen In-
duktionsheizgerätes oder des Induktors sind.
Legen Sie alle Schmuckstücke und Metallteile ab, bevor Sie
dieses Gerät benutzen möchten.
Achtung! Personen die Implantate aus Metall tragen, dürfen
dieses Gerät nicht benutzen.
Im Falle einer Verbrennung, sofort gründlich mit Wasser kühlen
und Arzt konsultieren.
Im Falle einer Verbrennung, sofort gründlich mit Wasser kühlen
und Arzt konsultieren.
Gefährdung durch Dämpfe und Gase
Den Kopf nicht über den Rauch halten, bzw. Dämpfe nicht einatmen.
Bei Arbeiten in geschlossenen Räumen müssen diese entsprechend
den geltenden Bestimmungen gut belüftet sein um Dämpfe und
Gase vom Bediener fern zu halten.
Die Induktionserwärmung von manchen Werkstoffen, Klebstoffen
kann giftige Dämpfe und Gase entwickeln. Das Einatmen dieser
Dämpfe und Gase kann gesundheitsschädlich sein. Zum Beispiel
setzt das Erhitzen von Urethan u.U. tödlich wirkenden Cyanwas-
serstoff frei.
Bei unzureichender Belüftung in jedem Fall Atemschutzgerät an-
legen.
Lesen Sie die SDB (Sicherheitsdatenblätter) und Anweisungen
des Herstellers für Klebstoffe, Metalle, Verschleißteile, Be-
schichtungs- u. Reinigungsmittel sowie Beizen etc.
Erwärmen Sie keine Werkstücke im laufenden Entfettungs- oder
Zerstäubungsprozess. Die Hitze kann mit den Dämpfen reagie-
ren, und sehr giftige und reizende Gase bilden.
Damit Sie in beengten Raumverhältnissen arbeiten können, muss
der Raum gut belüftet sein, oder Sie müssen ein zugelassenes
Beatmungsgerät nutzen. Achten Sie darauf, dass eine zur Übe-
rwachung qualifizierte Person anwesend ist. Die durch das Erhit-
zen entstehenden Dämpfe und Gase können den Sauerstoff in
der Luft ersetzen, und zu unter Umständen tödlichen Unfällen füh-
ren. Achten Sie auf eine gute Belüftung und auf die Qualität der
Atemluft.
Mit Zink-, Blei- oder Cadmium haltigen Beschichtungen versehene
Metalle nicht überhitzen sofern die Beschichtung nicht vorher ent-
fernt wurde und/oder der Raum entsprechend gut belüftet wird.
Bei Bedarf tragen Sie ein zugelassenes Beatmungsgerät. Guß-
teile und Werkstoffe mit den genannten chemischen Elementen
können bei Überhitzung giftige Dämpfe entwickeln. Siehe SDB
für Informationen über Grenztemperaturen.
Achtung! Elektrische Gefährdung!
25
GYSDUCTION AUTO
DE
Übersetzung der Originalbetriebsanleitung
Achtung ! Gefahr von optischen Strahlungen, wenn erhitzte Me-
tallteile ihren Schmelzpunkt erreichen.
Achtung! Starkes Magnetfeld. Personen die aktive oder pas-
sive Implantate tragen müssen informiert werden.
Weitere Schutzmaßnahmen sind nicht erforderlich wenn das Gerät
allein benutzt wird. Beschränkungen und/oder zusätzliche Schutz-
maßnahme können in allen anderen Fälleb notwendig werden.
Nach einer Wartung oder Reparatur müssen vor der Wiederinbe-
triebnahme die Feldstärken geprüft werden.
Während des Betriebs niemals den Induktor an die Nähe des
Kopfes oder andere lebenswichtige Organe halten.
Träger von Herzschrittmachern oder anderen medizinischen Gerä-
ten müssen sich vom Gerät fernhalten. Achtung! Betriebsstörung
von Herzschrittmachern oder ähnlichen medizinischen Geräten in
der Nähe möglich. Konsultieren Sie im Zweifel einen Arzt, bevor
Sie sich einem Induktionsheizgerät nähern.
ACHTUNG! Gefahr von Metall- und Klebstoffspritzern!
Tragen Sie zugelassene Sicherheitsschutzbrillen mit Seitens-
chutz oder nutzen Sie einen Voll-Gesichtsschutz.
Tragen Sie geignete Arbeitsschutzkleidung.
Tragen Sie Schutzhandschuhe.
Achten Sie darauf, dass die Entlüftungsöffnungen der Maschine
nicht abgedeckt werden. Vor der Anwendung des Gerätes die
Montage-Anleitung lesen.
Anschluss
Dieses Gerät muss an eine mit Schutzleiter und ausreichender
Absicherung versehene Steckdose angeschlossen werden.
ACHTUNG! Dieses Gerät wird als Klasse A Gerät eingestuft. Es
ist nicht für den Einsatz in Wohngebieten bestimmt, in denen die
lokale Stromversorgung über das öffentliche Niederspan-
nungsnetz geregelt wird. In diesem Umfeld ist es auf Grund von
Hochfrequenz-Störungen und Strahlungen schwierig die elektro-
magnetische Verträglichkeit zu gewährleisten.
Das Gerät entspricht der Norm ICE 61000-3-12.
Das Gerät entspricht der Norm ICE 61000-3-11.
Wartung:
Falls das Anschlusskabel beschädigt ist, muss es durch den Hers-
teller, seinen Reparaturservice oder eine qualifizierte Person
ausgetauscht werden, um Gefahren zu vermeiden.
Anweisung! Vor Wartungsarbeiten das Gerät immer vom Net-
zanschluss trennen. Hohe Spannungen und Ströme im Gerät
bergen die Gefahr von u.U. tödlichen elektrischen Schlägen.
26
GYSDUCTION AUTO
DE
Übersetzung der Originalbetriebsanleitung
Nehmen Sie regelmäßig (mindenstens 2 bis 3 x pro Jahr) das
Gehäuse ab und reinigen Sie das Innere des Gerätes mit
Druckluft. Lassen Sie regelmäßig Prüfungen des GYS-Gerätes
auf seine elektrische Betriebssicherheit von qualifiziertem Tech-
nikern durchführen.
In keinem Fall dürfen Sie Lösungsmittel oder andere aggresive
Mittel zur Reinigung verwenden.
Regelung:
Gerät entspricht europäischen Richtlinien.
Die Konformitätserklärung finden Sie auf unserer Webseite.
EAC-Konformitätszeichen (Eurasische Wirtschaftsgemeinschaft))
• Das Gerät entspricht die marokkanischen Standards.
Die Konformitätserklärung Cم (CMIM) ist auf unserer Webseite
verfügbar (siehe Titelseite).
Entsorgung:
Produkt für getrennte Sammlung (Sondermüll). Nicht mit dem
Hausmüll entsorgen.
Produkt für getrenne Entsorgung (Elektroschrott). Werfen Sie es
daher nicht in den Hausmüll!
Recyclebares Produkt, das spezifisch entsorgt wird (nach dem
Dekret N°2014-1577).
TYPSCHILD
Auf der Rückseite der Maschine bendet sich ein Typenschild, auf dem die folgenden Angaben zu nden sind:
• Name und Anschrift des Herstellers
• Modell
• Seriennummer
• Betriebsspannung
• Leistung des Geräts
Die Modellbezeichnung und die Seriennummer müssen vor jedem Eingriff von Technikern mitgeteilt werden oder wenn
Ersatzteile angefordert werden.
STROMVERSORGUNG
Das Gysduction besitzt einen Schutzkontaktstecker (Schukostecker) (EEC7/7) und muss an eine einphasige, geerdete
230V/16A (50-60Hz) Schutzkontaktsteckdose mit drei Leitern angeschlossen werden.
Beachten Sie, dass die Versorgung und der Schutz (Sicherung und/oder Schutzschalter) Ihres Stromnetzes mit der erfor-
derlichen Stromstärke kompatibel sein muss. Das Gerät kann an einem Stromaggregat betrieben werden.
SICHERHEITSVORKEHRUNGEN
Das Gerät verfügt über die Sicherheitsvorkehrung PROTEC 400. Es ist gegen Überspannungen über 400V und gegen
eine falsche Verkabelung des Neutralleiters geschützt.
Bei intensiver Nutzung werden der Induktor, die Kabel, die Elektronik und der Transformators heiss. Um einen Ausfall
des Gysduction wegen Überhitzung zu vermeiden verfügt das Gerät über eine Luftkühlung. Ein Überhitzungsschutz
schaltet das Gerät ab, wenn die Temperatur im Inneren zu hoch wird.
• Die Induktoren sind isoliert, um den Bediener vor einem elektrischen Schlag zu schützen.
Das Gysduction verfügt über eine Schutzfunktion gegen versehentliches Heizen. Wenn ein Heizvorgang aus Ver-
sehen ausgelöst wird (Drücken der Fernbedienung oder Taste am Induktor) und der Induktor dabei während einer
Minute nicht in Kontakt mit einem zu heizenden Metalls ist, gibt das Gerät ein Tonsignal aus und schaltet sich ab.
Stellen Sie die Taste zurück, um einen normalen Heizvorgang zu starten.
27
GYSDUCTION AUTO
DE
Übersetzung der Originalbetriebsanleitung
PRODUKTBESCHREIBUNG
Das Gysduction besteht aus einem Induktor, welcher mit einer Wechselstromquelle mittlerer Frequenz erregt wird. Bei
einem Heizvorgang wird ein sehr starkes Magnetfeld vom Induktor erzeugt. Bei Annäherung an ein eisenhaltiges Metall
werden induzierte Ströme eine Erwärmung hervorrufen, ohne dass ein physischer Kontakt besteht.
Das Gysduction Auto kann für vielfältige Anwendungen Verwendung nden (in Abhängigkeit vom gewählten Induktor) :
- Entkleben von Logos, Klebfolien, Zierleisten, Kunststoff-Schweißstäben auf der Karosserie
- Metallteile (Bolzen, Schrauben, Schaltgestänge usw.) lockern und gangbar machen.
- Abnahme von geklebten Scheiben (Rückfenster, Fondseitenfenster, Panoramadach).
- Demontieren von Steinschlagschutz und Dichtelementen.
Das Gerät erhitzt Stahl, aber nicht Aluminium, Kupfer oder Zink.
BEDIENUNG
2
1
3
4
6
8
9
10
7
5
1 Einstelltasten
2 Digitalanzeige
3 Betriebsanzeige
4 Anzeige des Automatik-Modus
5 Anzeige des manuellen Modus
6 Anzeige der Höchstleistung
7 Taste zur Auswahl eines Modus
8 Überhitzungsschutz
9 Optimaler Heizbereich
10 Anzeige «No load (keine Heizlast)»
No-Load (keine Heizlast) Die LED « no-load » (10) leuchtet, wenn kein zu erhitzendes Teil vorhanden
ist oder wenn der Induktor über ein nicht eisenhaltiges Teil bewegt und die
Heiztaste gedrückt wird.
Automatik-Modus In diesem Modus passt das Gerät sich dem zu erhitzenden Teil (Grösse,
Dicke) und dem Abstand zwischen Induktor und Teil an. Das Gerät übt
eine konstante und optimale Heizleistung aus, was durch die Anzeige des
optimalen Heizbereiches OK (9) des Bedienfeldes wiedergegeben wird. In
diesem Modus bleibt das Gerät unter der maximalen Heizleistung.
Um diesen Modus aufzurufen :
Der Automatik-Modus ist voreingestellt. Falls sich das Gerät im manuellen
Modus bendet, drücken Sie kurz auf die Taste zur Auswahl eines Modus (7),
bis die LED bei « AUTO » (4) leuchtet.
Anzeige :
Die Digitalanzeige zeigt in Prozent den Wert an, der eine gleichmäßige und
optimale Heizleistung bewirkt bei den gegebenen Heizbedingungen. Dieser
Wert entspricht den Einstellungen, welche im manuellen Modus vorzuneh-
men wären, um dasselbe Ergebnis bei denselben Bedingungen erhalten zu
können. Wenn der Bediener die vom Gysduction empfohlenen Heizleistung
als zu schwach oder zu stark beurteilt, kann er so diesen Wert im manuellen
Modus übernehmen und ihn dann so variieren, dass die gewünschte Leis-
tung erreicht wird.
Manueller Modus In diesem Modus stellt der Bediener selbst die gewünschte Heizleistung ein.
Um diesen Modus aufzurufen :
Drücken Sie kurz auf die Taste zur Auswahl eines Modus (7), bis die LED bei
der Anzeige des manuellen Modus « MANUAL » (5) leuchtet.
28
GYSDUCTION AUTO
DE
Übersetzung der Originalbetriebsanleitung
Funktionsweise :
Die Digitalanzeige (2) weist den Prozentsatz der Maximalleistung (2400 W)
aus, die der Induktor übertragen kann. Stellen Sie die gewünschte Leistung
mit den Einstelltasten (1) ein.
Der manuelle Modus erlaubt den Betrieb des Gysduction bei maximaler Leistung. Bei dieser Leistung erfolgt
das Erhitzen von Werkstücken sehr schnell. Die Erhitzung ist umso grösser, je näher der Induktor dem Wer-
kstück kommt.
Tonsignal heim Heizvorgang Ein Tonsignal kann aktiviert werden, um den Heizvorgang anzuzeigen. Das
Tonsignal erklingt, sobald der Heizvorgang aktiviert wurde. Seine Frequenz
variiert je nach Position des Induktors in Bezug zu dem zu erhitzenden Werk-
stück : je näher der Induktor sich bendet, desto höher ist die Frequenz.
Um diese Funktion zu aktivieren
oder desaktivieren :
Drücken Sie die Taste zur Auswahl eines Modus (7) während 3 Sekunden, um
das Tonsignal zu aktivieren oder zu desaktivieren.
Überhitzungsschutz (8) Das Leuchten dieser Kontrollleuchte zeigt an, dass der Überhitzungsschutz
infolge einer Überhitzung ausgelöst hat. Das Gerät ist nicht betriebsbereit,
solange diese Kontrollleuchte leuchtet. Sie erlischt, sobald das Gerät hinre-
ichend abgekühlt ist.
Erst ab diesem Moment kann der Heizvorgang wieder aufgenommen werden.
INBETRIEBNAHME
1
Gerät einschalten (1)
Anschluss für Zubehör (2)
1. Wählen Sie den gewünschten Induktor.
2. Heben Sie Klappe des Anschlusses des Gysduction an.
3. Stecken Sie den Induktor am Gysduction an.
4. Schliessen Sie die Klappe, um den Anschluss zu befestigen.
5. Die Digitalanzeige zeigt die Nummer des angeschlossenen Zu-
behörs an (z.B. AC1)
Anschluss der Fernbedienung (3)
Das Gysduction kann mit einem Fußfernregler (Art.-Nr. 055490)
geliefert werden. Dieser ist erforderlich bei der Verwendung von
Schrauben-Induktoren, Entklebe-Induktoren und Spiraldrahtin-
duktoren.
Verbinden Sie das Kabel mit dem Gysduction und mit dem Fußfer-
nregler, um diesen in Betrieb zu nehmen.
Start des Heizvorgangs
Die Scheiben-Induktoren und Ausbeul-Induktoren verfügen über
eine Heiztaste. Die drei anderen werden mit der Fernbedienung
betätigt.
Nähern Sie den Induktor an das zu erhitzende Werkstück und
drücken Sie dann die Taste des Induktors oder die Fernbedienung,
um den Heizvorgang zu starten.
23
29
GYSDUCTION AUTO
DE
Übersetzung der Originalbetriebsanleitung
BESCHREIBUNG & VERWENDUNG DER INDUKTOREN
Die nachfolgend beschriebenen Tätigkeiten erforden Praxis. Üben Sie an Blechen oder schrot-
treifen Fahrzeugen.
Scheiben-Induktor
Art.-Nr. 053373
Beschreibung
Dieser Induktor wurde speziell entwickelt für das Entkleben von punktschweissgeklebten Blechen und für das Abtragen
des Steinschlagschutzes von Seitenschwellern. Er dient auch zum Abnehmen von geklebten Scheiben (Rückfenster,
Fondseitenfenster, Panoramadach, usw.). Der Automatik-Modus eignet sich besonders für das Entkleben von Scheiben.
Entfernen einer Fahrzeugglasscheibe
◊ Vorbereitung
1. Entfernen Sie eventuell am Scheibenrahmen vorhandene Zierleisten so weit wie möglich. Die Fahrzeugscheiben sind
jedoch manchmal von Zierleisten umgeben, die nicht entfernt werden können. Erwärmen Sie die angeschweißten
Halterungen vom Fahrzeuginneren her.
2. Es wird empfohlen, jede Verzierung im Inneren und alle Kleinteile wie Clips und Bolzen zu entfernen, welche das
Fenster halten.
3. Demontieren Sie alle Anschlüsse von Scheibenantennen, Scheibenheizungen oder Ahnlichem.
4. Um Kratzer auf lackierten Flächen zu vermeiden, bringen Sie bitte ein Schutzklebeband am Scheibenrahmen direkt
neben der Scheibenkante an.
5. Kleben Sie ebenfalls Schutzklebeband auf den Scheiben-Induktor, um Kratzer auf der Scheibe zu vermeiden. Ersetzen
Sie das Klebeband nach jedem Scheibenausbau.
6. Reinigen Sie die Scheibe gründlich, bevor Sie mit ihrem Ausbau beginnen.
◊ Heizvorgang & Entfernen der Scheibe
Das größte Risiko von Lackbeschädigungen durch zu starke Erhitzung entsteht zu Beginn der Erwärmung, weil
dabei das Einsetzen der Keile zwischen Scheibe und Karosserie schwieriger ist. Idealerweise beginnen Sie an
einer Ecke und arbeiten von dort in beide Richtungen weiter zur gegenüberliegenden Ecke. Wenn die Scheibe
beschädigt ist, so beginnen Sie bei der zu reparierenden Ecke und arbeiten in Richtung des intakten Teils der
Scheibe vor.
Klebebereiche
Lackierte Flächen, welche nicht zu erhitzen sind
Bewegungsrichtung beim Heizen
7. Optimal ist die Positionierung des Scheiben-Induktors unmittelbar gegenüber der Klebenaht aus Urethan.
Bei manchen Fahrzeugen ist die Blechkante, in die die Scheibe eingesetzt ist, sehr schmal und es besteht die Gefahr von Lackver-
färbungen. Hier empehlt es sich, die Außenseiten des Bleches mit nassen Tüchern oder einen Kühlspray zu kühlen. Führen Sie den
Induktor mit etwa 2 cm Abstand zur Blecheinfassung, um Überhitzung zu vermeiden.
30
GYSDUCTION AUTO
DE
Übersetzung der Originalbetriebsanleitung
8. Bewegen Sie den Induktor zuerst auf einer Länge von 30 cm hin und her zu beiden Seiten der Ecke. Finden Sie die
angemessene Geschwindigkeit : ist diese zu gering, so erfolgt eine exzessive und lokalisierte Erhitzung. Dies ist inef-
zient, da die Hitze an den Blechkanten gering ausfällt. Bei einer zu hohen Geschwindigkeit werden die Blechkanten
und die Klebepunkte nicht ausreichend erwärmt. Ein leichter Rauch wird freigesetzt und zeigt an, dass die optimale
Lösetemperatur des Klebers erreicht ist.
Wird ein dichter Rauch freigesetzt, so brechen Sie den Heizvorgang sofort ab. Entfernen Sie sich aus dem Bereich, um
das Einatmen zu vermeiden und versuchen Sie, die Ursache der starken Rauchentwicklung zu lokalisieren. Die Erhitzung
von Urethan-Kleber geht einher mit der Freisetzung von Wasserstoffzyanid, was für den Menschen sehr gefährlich ist.
9. Üben Sie aus dem Innenraum des Fahrzeugs leichten Druck aus, um die
Klebenaht zu lösen.
Das erste Ablösen kann einige Minuten dauern. Einmal abgelöst, wird der Kle-
ber sich nicht wieder mit dem Metall verbinden.
Nach dem Lösen der Ecke können sie einen Kunststoffkeil in den Freiraum
zwischen Scheibe und Blechkante schieben. Bleiben Sie vorsichtig, üben Sie
nicht zu viel Druck aus, da die Scheibe sonst brechen kann.
10. Sobald eine Ecke der Scheibe gelöst ist, wiederholen Sie den Heizvorgang entlang der Breite und der Höhe der
Scheibe. Fügen Sie weitere Keile in die gelösten Stellen ein oder setzen Sie die ersten Keile Stück für Stück um.
Scheibe Materialien
Bruchanfälligkeit des
Glases
Zeitraum für den Ausbau
abhängig von Fahrzeuggrösse
Scheinwerfer Verbund-Sicherheitsglas +++ 20 min bis 1 h
Rückfenster
nicht vorgespanntes Glas + 10 bis 20 minFondseitenfenster
Seitenfenster
Schrauben-Induktor
réf. 053366
Beschreibung
Der Schrauben-Induktor wird zum Aufheizen korrodierter oder festsitzender Teile wie Schrauben, Bolzen oder Muttern
angewendet. Der Induktor kann auch zum Entfernen von Dichtungsmaterial an LKW-Chassis oder beispielsweise Koffer-
raumböden bei PKW genutzt werden. Außerdem eignet er sich zum Verlöten von größeren elektrischen Steckverbindern
und zum Formen von Blech- bzw. Metallteilen.
Anwendung
Entfernen von festsitzenden oder verrosteten Bolzen :
1. Wählen Sie den Automatik-Modus oder stellen Sie die Leistung auf ein sehr hohes Niveau (80
bis 100% der Leistung).
2. Führen Sie den Schrauben-Induktor über die Schraubenmutter, wie nebenstehend gezeigt.
3. Beginnen Sie den Heizvorgang; dieser sollte mehrere Sekunden andauern.
4. Entfernen Sie die festsitzende Schraubenmutter oder den festgefressenen Bolzen.
31
GYSDUCTION AUTO
DE
Übersetzung der Originalbetriebsanleitung
Entklebe-Induktor
Art.-Nr. 053359
Beschreibung
Dieser Induktor wurde entwickelt, um Zierleisten, Logos, Werbeaufkleber und Zierfolien in wenigen Minuten
schädigungsfrei zu entkleben.
Anwendung
Erhitzen von lackierten Blechen
1. Wählen Sie den Automatik-Modus oder stellen Sie eine geringe Leistung ein (10 bis 30% der maximalen Heizleistung).
2. Halten Sie den Induktor über die Fläche, die Sie erwärmen wollen. Es darf kein Kontakt vorliegen zwischen dem
Induktor und dem zu erhitzenden Bereich.
3. Starten Sie die Erwärmung, und bewegen Sie den Induktor dabei kreisförmig oder hin und zurück.
Beachten Sie, dass bei zu starker Erhitzung oder einem zu langen Halten des Induktors über einer Stelle der Lack verbren-
nen kann. Um dies zu vermeiden, müssen Sie durchgehend den Induktor bewegen (kreisförmige Bewegung oder hin und
zurück).
Aufkleber, Vinylbeschichtungen oder Zierleisten entfernen
Führen Sie die drei oben beschriebenen Schritte aus (siehe
Abschnitt «Erhitzen von lackierten Blechen»). Versuchen Sie
nach einigen Sekunden, eine Seite des zu entfernenden Ele-
ments anzuheben. Lässt es sich leicht anheben, haben Sie die
erforderliche Temperatur erreicht. Wenn nicht, erwärmen Sie
das Element einige Sekunden weiter und versuchen es wieder.
Lang haftende Aufkleber und Teile erfordern oft eine längere Erwärmungszeit. Wenn Sie einen Aufkleber überhitzen, wird
dieser oft weich und bläht sich auf. In diesem Fall lassen Sie ihn abkühlen und versuchen Sie dann erneut, den Aufkleber
zu entfernen. Achten Sie darauf, den Lack nicht zu überhitzen ! Bei genügend langer Erwärmung lassen sich die zu ent-
fernenden Elemente inklusive Klebstoffreste mühelos entfernen.
Entfernen von aufgeklebten Zierleisten auf der Karosserie
Seitliche Zierleisten werden wie Aufkleber entfernt. Bei massiveren Zierleisten ist jedoch eine höhere Leistung oder eine
längere Erwärmung nötig, da das Metall unter der Zierleiste weiter entfernt ist vom Induktor.
1. Wählen Sie den Automatik-Modus oder stellen Sie eine mittlere Leistung ein (40 bis 60% der maximalen Heizleistung).
2. Halten Sie den Induktor parallel zur Arbeitsäche, um eine gleichmäßige Verteilung der Hitze zu erreichen.
3. Bewegen Sie den Induktor hin und zurück entlang der Länge der Zierleiste. Beginnen Sie an einem Ende der Zier-
leiste. Bewegen Sie den Induktor langsam über einige Zentimeter hin und zurück, bis Sie das Ende des zu entfernenden
Elements leicht und mühelos lösen können.
4. Führen Sie den Induktor weiter entlang der Zierleiste und lösen Sie sie von der Karosserie.
Der Klebestreifen wird normalerweise mit der Zierleiste entfernt. Falls Klebstoff oder Klebeband an der Karosserie ver-
bleibt, arbeiten Sie langsamer weiter oder erhöhen die Ausgangsleistung des Gerätes.
32
GYSDUCTION AUTO
DE
Übersetzung der Originalbetriebsanleitung
Erwärmung von Karosserieteilen
Bei sehr niedrigen Außentemperaturen muss die Karosserie eines Fahrzeuges, auf der Aufkleber oder Zierleisten ange-
bracht werden sollen, vorab in der Werkstatt erwärmt werden, um das Aufbringen der Klebstoffe zu erleichtern.
1. Stellen Sie eine geringe Leistung ein (10 bis 30% der maximalen Heizleistung).
2. Bewegen Sie den Induktor dabei kreisförmig oder hin und zurück und der zu erhitzenden Fläche.
Ausbeul-Induktor
Art.-Nr. 054776
Beschreibung
Der Ausbeul-Induktor wurde entwickelt für die Reparatur von kleinen Dellen auf der Karosserie, zum Beispiel durch
Hagel, ohne Lacknachbearbeitung. Es ist nicht erforderlich, die Innenverkleidungen an den zu bearbeitenden Elementen
zu entfernen. Es wird ausschließlich die Oberäche des Karosserieteils erhitzt.
Anwendung
73502 - V2 - 04/11/2019
FR
EN
DE
ES
RU
2-6 / 42-43
7-11 / 42-43
12-16 / 42-43
17-21 / 42-43
22-26 / 42-43
INDUCTEUR DÉBOSSELAGE
DENT PULLING INDUCTOR
AUSBEULINDUKTOR
INDUCTOR DE DESABOLLO
ИНДУКТОР ДЛЯ ПРАВКИ
INDUTOR DE REMOÇÃO
INDUTORE TIRA BOLLI
UITDEUKEN ZONDER SPUITEN
(UZS) INDUCTIE HULPSTUK
NL
IT
PT
27-31 / 42-43
32-36 / 42-43
37-41 / 42-43
Lesen Sie die Bedienungsanleitung
mit diesem Produkt.
Spiraldrahtinduktor
Art.-Nr. 054783
Beschreibung
Mit dem Spiraldrahtinduktor können Sie innerhalb weniger Sekunden verklemmte Bauteile erhitzen und lockern : ein-
gerostete Schrauben und Muttern, Stoßdämpfer, Flansche, Lenkgestänge, Stossdämpfer usw.
Anwendung
73502_V1_20/11/2019
FR
2-8 / 49-50
www.gys.fr
EN
9-14 / 49-50
DE
15-21 / 49-50
RU
29-35 / 49-50
IT
43-48 / 49-50
ES
22-28 / 49-50
NL
36-42 / 49-50
Find more languages of user manuals on our website
INDUCTEUR SPIRALE
COILED INDUCTOR
SPIRALINDUKTOR
INDUCTOR ESPIRAL
СПИРАЛЬНЫЙ ИНДУКТОР
SPIRAAL INDUCTOR
INDUTTORE FILO SPIRALE
Lesen Sie die Bedienungsanleitung mit
diesem Produkt.
33
GYSDUCTION AUTO
DE
Übersetzung der Originalbetriebsanleitung
VERBRAUCHSMATERIAL
Abdeckung für Induktoren
Die Glasfaserabdeckung für den Scheiben-Induktor und den Schrauben-Induktor kann sich intensiver Nutzung und
Reibung an dem zu erhitzenden Teil abnutzen. Diese Abdeckungen können ersetzt werden und GYS stellt die folgenden
Kits zur Verfügung zu diesem Zweck.
053854 SET 5 GLASFASERABDECKUNG FÜR SCHEIBENINDUKTOR GYSDUCTION + KLEBSTOFF
053847 SET 10 GLASFASERABDECKUNG FÜR BOLZENINDUKTOR GYSDUCTION + KLEBSTOFF
059108 GLASFASERABDECKUNG FÜR ENTKLEBE-INDUKTOR + KLEBSTOFF
Kältespray
Dieses Spray eignet sich zum Ausbeulen ohne Lacknachbearbeitung und zum Kühlen erhitzter Teile.
048898 12 Dosen Kältespray - 50°C - 400 ml
FEHLER-CODES
CODE BEDEUTUNG
E - 1 Fernregler ausgelöst bei der Spannungszuschaltung.
E - 2 Scheiben-Induktor ausgelöst bei der Spannungszuschaltung.
E - 3 Ein/Aus-Schalter auf der Gerätevorderseite ausgelöst bei der Spannungszuschaltung.
E - 4 Stromstärke des Induktors zu hoch (entweder sehr heiß, oder Kurzschluss).
E - 5 Induktor defekt (Draht unterbrochen oder nicht eingestecktes Kabel).
NO– ACC Zubehör nicht angeschlossen.
AC - Zubehör nicht erkannt.
CONDITIONS DE GARANTIE
Die Garantieleistung des Herstellers erfolgt ausschließlich bei Fabrikations- oder Materialfehlern, die binnen 24 Monate
nach Kauf angezeigt werden (Nachweis Kaufbeleg).
Die Garantieleistung erfolgt nicht bei:
• Durch Transport verursachten Beschädigungen.
• Normalem Verschleiß der Teile (z.B. : Kabel, Klemmen, usw.) sowie Gebrauchsspuren.
• Von unsachgemäßem Gebrauch verursachten Defekten (Sturz, harte Stöße, Demontage).
• Durch Umwelteinüsse entstandene Defekte (Verschmutzung, Rost, Staub).
• Abnehmbare Induktoren und Ferrite, die Verbrauchsmaterialien sind.
• Verwendung von nicht speziziertem Kühlmittel.
Die Reparatur erfolgt erst nach Erhalt einer schriftlichen Akzeptanz (Unterschrift) des zuvor vorgelegten Kostenvoran-
schlages durch den Besteller. Im Fall einer Garantieleistung trägt GYS ausschließlich die Kosten für den Rückversand
an den Fachhändler.
34
GYSDUCTION AUTO
ES
Traducción de las instrucciones originales
INSTRUCCIONES DE SEGURIDAD
Este manual de instrucciones contiene indicaciones sobre el fun-
cionamiento de su aparato y las precauciones a seguir para su
seguridad. Léalo atentamente antes del primer uso y consérvelo
con cuidado para cualquier relectura en el futuro. Estas instruc-
ciones se deben leer y comprender antes de toda operación.
Toda modificación o mantenimiento no indicado en el manual no
se debe llevar a cabo. Todo daño físico o material debido a un
uso no conforme con las instrucciones de este manual no podrá
atribuírsele al fabricante. En caso de problema o de incertidumbre,
consulte con una persona cualificada para manejar correcta-
mente el aparato. Este equipo sólo puede ser utilizado para calen-
tar materiales ferrosos dentro de los límites indicados en el equipo
y en el manual. Se deben respetar las instrucciones relativas a la
seguridad. En caso de uso inadecuado o peligroso, el fabricante
no podrá considerarse responsable. Todo otro uso no menciona-
do en este manual está estrictamente prohibido y puede ser po-
tencialmente peligroso. El producto es semiautomático y requiere
la presencia de un operador.
Este aparato se puede utilizar por niños de al menos 8 años y por
personas con capacidades físicas, sensoriales o mentales reduci-
das o sin experiencia o conocimiento, siempre y cuando estén
correctamente vigilados y que se entreguen instrucciones relati-
vas al uso del aparato con toda seguridad y si se han señalado
los posibles riesgos. Los niños no deben jugar con el aparato. La
limpieza y mantenimiento por el usuario no se debe efectuar por
niños sin vigilancia.
No utilice el aparato si el cable de corriente o la toma de cor-
riente están dañados.
No cubra el aparato.
Riesgo de explosión y de incendio.
No utilice el aparato bajo una atmósfera explosiva.
Mantenga los aerosoles y otros recipientes presurizados lejos
del equipo de calentamiento por inducción.
Atención, riesgo de calor y de llama
No sobrecaliente las piezas y los adhesivos.
Preste atención al riesgo de fuego, mantenga un extintor a
proximidad.
No coloque el aparato sobre o cerca de superficies infla-
mables.
No instale el aparato cerca de sustancias inflamables.
¡Atención! Supercie muy caliente. Riesgo de quemaduras.
Las piezas y el equipamiento calientes pueden causar quemaduras.
No toque las piezas calientes con la mano desnuda.
Espere a que se enfríen las piezas y el equipo antes de mani-
pularlos.
35
GYSDUCTION AUTO
ES
Traducción de las instrucciones originales
Compruebe que las joyas (alianzas en particular) o piezas
metálicas no estén cerca del inductor o del aparato durante su
funcionamiento.
Retire sus joyas u otros objetos metálicos de su cuerpo antes
de utilizar este equipamiento.
Las personas con implantes de metal en el cuerpo no deben
utilizar este equipamiento.
En caso de quemadura, aplique agua abundante y consulte
con un médico sin demora.
Peligrosidad de los vapores y gases
Mantenga la cabeza lejos de humos, no respire los vapores.
En trabajo interior, airee el lugar o utilice un extractor de aire
para evacuar vapores y gases.
El calentamiento por inducción de algunos materiales, adhesivos
y flux pueden producir vapores y gases. La respiración de estos
vapores y gas puede ser peligrosa para su salud. Por ejemplo, el
calentamiento del uretano libera un gas: el cianuro de hidróge-
no, que puede ser mortal para los humanos.
Si la ventilación es insuficiente, utilice un respirador conforme.
Lea las fichas técnicas de higiene y seguridad de los productos
(MSDS) y las instrucciones del fabricante para los adhesivos,
flux, metales, consumibles, revestimientos, limpiadores y los deca-
pantes.
No utilice el calentamiento sobre partes en proceso de desen-
grasado o de pulverizado. El calor puede reaccionar con los
vapores y formar gases tóxicos e irritantes.
Trabaje en un espacio confinado sólo si este está bien aireado,
o utilizando un respirador conforme. Compruebe que cerca haya
una persona cualificada para vigilancia. Los vapores y los gases
resultantes del calentamiento pueden reemplazar el oxígeno del
aire y provocar un accidente o la muerte. Asegúrese de la cali-
dad del aire que se respira.
No sobrecaliente metales como el acero galvanizado, revesti-
mientos de plomo o de cadmio, a menos que el revestimiento se
haya quitado de la superficie a calentar, que el aire de trabajo
esté bien ventilado y, si fuera necesario, que se lleve un respira-
dor conforme. Las piezas de fundición y todos los metales que
contienen estos elementos pueden liberar vapores tóxicos si se
sobrecalientan. Compruebe la Ficha de Datos de Seguridad (o
MSDS como se conoce por la siglas en inglés) sobre la informa-
ción relativas a las temperaturas.
Atención, peligro eléctrico
Peligro de radiación óptica cuando los elementos metálicos calen-
tados alcanzan la fusión.
¡Atención! Campo magnético importante. Las personas que
lleven implantes activos o pasivos deben ser informadas.
36
GYSDUCTION AUTO
ES
Traducción de las instrucciones originales
No se requiere ninguna medida adicional de protección cuando la
máquina se utiliza sola. Restricciones y/o medidas de protección
complementarias pueden ser necesarias en otros casos.
Durante un mantenimiento, el nivel de los campos electromagnéti-
cos se debe comprobar antes de la puesta en marcha del material.
Durante su funcionamiento, no acerque nunca la cabeza u órga-
nos vitales al inductor.
Las persones que lleven un estimulador cardíaco no deben acer-
carse al aparato. Riesgo de perturbación de funcionamiento de
los estimuladores cardíacos cerca del aparato.
Consulte un médico antes de acercarse a sistemas de calenta-
mientos por inducción.
Riesgos de proyección de metal o de adhesivo.
Lleve gafas de seguridad conformes con protecciones laterales
o utilice una máscara de protección sobre la cabeza.
Lleve vestimenta de trabajo.
Lleve guantes.
No obstruya las aperturas de ventilación. Lea la sección de insta-
lación antes de utilizar el aparato.
Conexión:
Este aparato se debe conectar a una toma de corriente conec-
tada a tierra.
Este aparato de Clase A está destinado a entornos industriales
y no está previsto para ser utilizado en lugares residenciales
donde la corriente eléctrica está suministrada por la red eléc-
trica pública de baja tensión. En estos lugares puede encontrar
dificultades a nivel de potencia para asegurar una compatibili-
dad electromagnética, debido a las interferencias propagadas
por conducción y por radiación con frecuencia radioeléctrica.
Este material es conforme con la CEI 61000-3-12.
Este material es conforme con la CEI 61000-3-11.
Mantenimiento:
Si el cable de alimentación está dañado, debe ser sustituido
por el fabricante, su servicio post-venta o una persona con cua-
lificación similar, para evitar cualquier peligro.
Aviso! Desconecte siempre la toma de corriente de la red
eléctrica antes de realizar trabajos sobre el aparato. En su
interior, la tensión y la intensidad son elevadas y peligrosas.
De forma regular, quite el capó y desempolve con un soplador
de aire. Aproveche la ocasión para pedir a un personal cualifi-
cado que compruebe que las conexiones eléctricas estén bien
en sitio con una herramienta aislada.
No utilice en ningún caso solventes u otros productos de lim-
pieza agresivos
37
GYSDUCTION AUTO
ES
Traducción de las instrucciones originales
Normativa:
Aparato conforme a las directivas europeas.
La declaración de conformidad está disponible en nuestra página.
Marca de conformidad EAC (Comunidad económica euroasiática).
• Equipamiento conforme a las normas marroquíes.
La declaración de conformidad Cم (CMIM) está disponible en
nuestra página web (ver página de portada).
Desecho:
Producto objeto de recogida colectiva. Ne lo tire a la basura
doméstica.
Producto sobre el cual el fabricante participa mediante una
valorización de los embalajes cotizando a un sistema global de
separación, recogida selectiva y reciclado de los deshechos de
embalajes domésticos.
Producto reciclable que requiere una separación determinada
según el decreto nº 2014-1577.
IDENTIFICACIÓN
En la parte posterior del producto está la siguiente información:
Nombre y dirección del fabricante
• Modelo
Número de serie del producto
El voltaje de funcionamiento
La fuerza del producto
El modelo, así como el número de serie del producto, debe mencionarse cada vez que intervenga un técnico o que se
soliciten piezas de repuesto.
ALIMENTACIÓN ELÉCTRICA
El GYSDUCTION incluye una clavija de 16 A de tipo CEE7/7 y se debe conectar a una instalación eléctrica monofásica
de 230V (50-60 Hz) de tres hilos con el neutro conectado a tierra.
Compruebe que la toma eléctrica y sus protecciones (fusible y/o disyuntor) son compatibles con la corriente necesaria
para su uso. El producto está protegido para un uso con un grupo electrógeno.
DISPOSITIVOS DE SEGURIDAD
El producto tiene la seguridad PROTEC 400. Está protegido contra sobretensiones superiores a 300V y contra la
desconexión del neutro.
Durante el uso intensivo, el inductor, los cables, la electrónica y el transformador de potencia se calientan. Para pre-
venir el mal funcionamiento debido al sobrecalentamiento, el Gysduction está equipado con un circuito de refrigera-
ción de aire. Un protector térmica interrumpe el producto cuando la temperatura interna se eleva demasiado.
• Los inductores están aislados para proveer protección contra una posible descarga eléctrica.
El GYSDUCTION AUTO está equipado con una seguridad contra un calentamiento accidental. Si el mando de calen-
tamiento está accionado por descuido (presión en el accionador de pera o el botón del inductor para vidrio) y el
inductor no hace contacto con un metal tras un minuto, el equipo emite una señal sonora y se interrumpe automáti-
camente. Libere el control del calentador para reanudar un ciclo de calentamiento normal.
38
GYSDUCTION AUTO
ES
Traducción de las instrucciones originales
DESCRIPCIÓN DEL PRODUCTO
El Gysduction está compuesto por un inductor conectado a una fuente de energía eléctrica alterna de frecuencia media.
Cuando se activa un control de calentamiento, el inductor emite un fuerte campo magnético. Al acercarse a un metal
ferroso, las corrientes inducidas crearán un calentamiento en el metal, sin contacto físico.
Le Gysduction Auto puede utilizarse para múltiples aplicaciones (dependiendo del inductor elegido):
- despegar todos los logotipos, adhesivos, molduras, tiras de plástico pegadas a la carrocería.
- desatrancar y desbloquear las partes metálicas (pernos, tornillos, bielets...).
- instalar los acristalamientos pegados (luneta trasera, de custodia, techo panorámico...)
- separa los anti gravillas y las juntas de hermeticidad.
El producto calienta el acero, pero no es adecuado para calentar el aluminio, el cobre o el zinc.
INSTRUCCIONES DE UTILIZACIÓN
2
1
3
4
6
8
9
10
7
5
1 Botones de ajustes
2 Indicador digital
3 Indicador de encendido
4 Indicador modo Auto
5 Indicador modo Manual
6 Indicador de potencia máxima
7 Botón de selección de modo
8 Indicador de protección térmica
9 Zona de calentamiento óptima
10 Indicador «No load»
No-Load Si no hay ninguna pieza que calentar, o si el inductor se presenta sobre un
metal no ferroso, el indicador de no carga (10) se enciende cuando se aplica
presión a uno de los controles de calentamiento.
Modo automático En este modo, la Gysducción se adapta a la parte que calienta (espesor de
corte) y a la distancia entre esta parte y el inductor. Mantiene una potencia
de calentamiento constante y óptima, simbolizada por la zona OK (9) de la
interfaz. La estación nunca se calienta a máxima potencia en este modo.
Para entrar en este modo:
El modo automático es el modo por defecto. Sin embargo, si la unidad está en
modo manual, pulse brevemente el botón MODE (7) hasta que se encienda el
LED delante de “AUTO” (4).
Visualizado:
La pantalla digital muestra el último valor porcentual utilizado por la máqui-
na para mantener una potencia constante y óptima según las condiciones
de calentamiento. Este valor corresponde a los ajustes que sería necesario
usar en modo Manual para obtener los mismos resultados de calentamiento
en las mismas condiciones. Así, si el usuario considera que el calentamiento
recomendado por el Gysduction es demasiado bajo o demasiado alto, puede
copiar este valor en el modo manual y variarlo a voluntad para alcanzar la
potencia deseada.
Modo Manual En este modo, el usuario selecciona la potencia de calefacción por sí mismo.
deseado.
39
GYSDUCTION AUTO
ES
Traducción de las instrucciones originales
Para entrar en este modo:
Presione el botón MODE (7) brevemente hasta que se encienda el LED
frente a “MANUAL” (5).
Funcionamiento:
La pantalla digital (2) muestra el porcentaje de la potencia máxima (2400
W) que el inductor puede transmitir a la pieza a calentar. Utilice los botones
de conguración (1) para ajustar la potencia deseada.
El modo manual permite alcanzar la máxima potencia de la Gysducción Con este poder, las piezas se pueden
calentar muy rápidamente. La potencia de calentamiento sera más elevada cuanto más cerca esté el inductor de la
pieza.
Señal de calentamiento sonora Se puede activar un BIP sonoro para indicar la actividad de calentamiento.
El BIP resuena tan pronto como el calentamiento es efectivo y su frecuencia
varía según la posición del inductor en relación con la pieza a calentar. Cuanto
más cerca del inductor, más alta es la frecuencia.
Para activar / desactivar
esta función:
Presione el botón MODE (7) durante 3 segundos para activar/desactivar este
BIP
Indicador de protección térmica
(8)
Esta luz se enciende para indicar que el producto ha entrado en la protec-
ción térmica debido al sobrecalentamiento. Mientras esta luz permanezca
encendida, el producto es inoperante. Se apaga cuando el producto se ha
enfriado lo suciente. Sólo es posible reanudar el calentamiento a partir de
este momento.
PUESTA EN MARCHA DEL PRODUCTO
1
Enciende el set (1)
Conexión de accesorios (2)
1. Seleccione el inductor deseado.
2. Levante la válvula del conector de Gysduction.
3. Conecta el conector del inductor al Gysduction.
4. Cierra la solapa para bloquear la conexión.
5. La pantalla muestra el número del accesorio conectado. (ej.
AC1)
Conexión de la bombilla de control (3)
El Gysduction puede ser suministrado con un control de pedal.
(ref. 055490), necesario para el uso de los inductores, adhesivos y
espirales anti-agarrotamiento.
Conecta el cable al Gysduction y el pedal para hacerlo
operativo.
Activar el calentador
El vidrio y los inductores de desabollado están equipados con un
botón de calentamiento. Los otros tres trabajan con el colgante
de control.
Acerque el inductor a la parte metálica a calentar, luego presione
el botón del inductor o la bombilla de control para activar el calen-
tamiento.
23
40
GYSDUCTION AUTO
ES
Traducción de las instrucciones originales
DESCRIPCIÓN Y USO DE LOS INDUCTORES
Todas las operaciones que se describen a continuación requieren práctica. No duden en experi-
mentar realizando pruebas con chapas o restos de metal.
Inductor de vidrio
réf. 053373
Descripción
Este inductor está especialmente diseñado para eliminar las chapas soldadas y pegadas, para quitar el anti-grafti de la
parte inferior de la carrocería del coche. También se puede utilizar para quitar las ventanas pegadas (ventana trasera,
cuarto trasero, techo panorámico, etc.).
El modo automático está especialmente recomendado para la eliminación de los cristales.
Desprender un vidrio:
◊ Preparación
1. Quitar cualquier adorno exterior: cristales de vidrio con molduras de metal o plástico engarzadas. Para las molduras
que no se pueden quitar, calentar la soldadura de sujeción desde el interior.
2. También se recomienda retirar cualquier adorno interior y los componentes, como clips y tacos, que puedan utilizarse
para mantener la ventana en su lugar.
3. Desconecte las antenas y los circuitos de desescarche de los vidrios.
4. Pegue cinta protectora alrededor del vidrio para evitar que se dañen las supercies pintadas al manipularlas.
5. Pegue la cinta adhesiva de protección sobre el inductor de vidrio para evitar que se raye el vidrio. Reemplace la cinta
adhesiva tras poner el vidrio.
6. Limpia el vidrio completamente antes de empezar a quitarlo.
◊ Fase de calentamiento y retirada del cristal de la ventana
El mayor riesgo de daños para la pintura se sitúa al principio del calentamiento, debido a la dicultad de intro-
ducir la cuña entre el vidrio y la carrocería.
Empieza en una esquina y calienta a cada lado de esa esquina mientras progresas hacia las esquinas opuestas.
Si el cristal está dañado, empieza en la esquina que hay que reparar y sigue hasta la parte intacta del cristal.
Bordes soldados sobre los que descansan las juntas de pegamento
Las supercies pintadas visibles no deben ser calentadas
Direcciones de progreso de la calefacción
7. Coloque el inductor frente a la junta adhesiva de uretano para facilitar su extracción del cristal.
Algunos vehículos tienen bordes soldados estrechos, el calentamiento del inductor puede inducir la supercie pintada visible, posi-
blemente comprometiendo su apariencia. En este caso es aconsejable enfriar la supercie exterior con un paño húmedo o un spray
refrigerante. Aleje el inductor del centro del vidrio para que esté al menos a 2 cm de la parte pintada visible.
41
GYSDUCTION AUTO
ES
Traducción de las instrucciones originales
8. Mueva el inductor hacia adelante y hacia atrás unos 30 cm en ambos lados adyacentes a la esquina. Encontrar la tasa
de calentamiento adecuada: una tasa demasiado lenta da como resultado un calentamiento localizado excesivo que es
ineciente porque reduce el calor producido en el borde soldado. Una frecuencia elevada no permite un calentamiento
suciente del borde soldado y de la junta de pegamento. La producción de un ligero humo indica que se ha alcanzado
la temperatura óptima del cordón de pegado de uretano.
Si aparece un humo espeso, deje de calentar inmediatamente. Aléjese del área para evitar respirar los vapores y trate
de determinar la causa. El calentamiento del pegamento de uretano causa la emisión de cianuro de hidrógeno, que es
muy peligroso para los humanos.
9. Aplicar presión desde el interior del vehículo sin forzar a romper la continui-
dad del sello.
Crear una cartilla de lanzamiento puede llevar unos minutos. Una vez que se
despega la junta, no se vuelve a pegar al metal.
Cuando la esquina del vidrio se levante, deslice una cuña de plástico en el
espacio entre el vidrio y el borde soldado. Sin embargo, es necesario tener pru-
dencia para no ejercer una fuerza demasiado alta que podría quebrar el vidrio.
10. Una vez que la esquina del cristal se haya despegado, repita el proceso de calentamiento a lo largo y a lo alto del
cristal mientras mueve las cuñas bajo el cristal a medida que avanza.
Vidrio Material Fragilidad del vidrio
Tiempo de entrega
dependiendo del tamaño del vehículo
Parabrisas delantero Vidrio laminado +++ 20 min a 1 h
La ventana trasera
Vidrio recocido + 10 a 20 minVidrios de custodia
Ventanas laterales
inductor anti-captación
ref. 053366
Descripción
El inductor antiagarrotamiento se utiliza para el calentamiento intenso de piezas oxidadas o agarrotadas, como tuercas
y pernos. Este inductor también puede utilizarse para eliminar el calafateo de los chasis de los camiones o los maleteros
de los coches, para soldar grandes conectores o para la formación de metales.
Utilice
Para quitar una tuerca o perno agarrado u oxidado
1. Seleccione el modo automático o establezca la potencia a un nivel muy alto (80 a 100% de
potencia)
2. Coloque el inductor anti-agarrotamiento en la tuerca como se muestra a continuación
3. Encienda el calentador y déjelo funcionar durante unos segundos.
4. Aojar la tuerca o el tornillo atascado.
42
GYSDUCTION AUTO
ES
Traducción de las instrucciones originales
Inductor adhesivo
ref. 053359
Descripción
Este inductor está diseñado para despegar palos de puerta, monogramas, logotipos, así como adhesivos publicitarios
y decorativos en pocos minutos sin dañarlos.
Utilice
Para calentar chapas de metal pintadas
1. Seleccione el modo automático o establezca la potencia a un nivel bajo (del 10 al 30% de su capacidad máxima de
calentamiento).
2. Coloca el inductor justo encima del área a calentar. No debe haber ningún contacto entre el inductor y el área o
elemento a calentar.
3. Mientras se activa el calentador, haga un movimiento circular o recíproco en la zona a calentar.
Si el inductor permanece demasiado tiempo en la misma zona, la pintura puede quemarse. Para evitarlo, es necesario
mantener el inductor en constante movimiento (ida y vuelta o circular).
Para quitar calcomanías, pegatinas de vinilo o barras de pegamento
Lleve a cabo los tres pasos descritos anteriormente (vea para
calentar las hojas pintadas). Caliente durante unos segundos e
intente levantar un borde del elemento. Si comienza a levan-
tarse fácilmente hacia arriba, se ha alcanzado la temperatura
requerida, de lo contrario continúe calentando durante unos
segundos más e inténtelo de nuevo.
Algunos elementos que han permanecido pegados durante mucho tiempo a menudo requieren un tiempo de calenta-
miento más largo. Si una pegatina se calienta demasiado, a menudo se vuelve blanda e hinchada. Si esto ocurre, deja
que se enfríe e intenta de nuevo quitar y pelar la pegatina. ¡Ten cuidado de no quemar la pintura! Si la chapa se calienta
lo suciente, las juntas deben despegarse sin esfuerzo, llevándose el pegamento con ellas.
Para quitar las molduras pegadas a la carrocería
Las molduras laterales del cuerpo se eliminan de la misma manera que las calcomanías y las pegatinas. Se requiere
mayor potencia o más tiempo para las molduras más gruesas. El metal bajo las molduras está más lejos del inductor.
1. Seleccione el modo automático o establezca la potencia a un nivel bajo (del 40 al 30% de su capacidad máxima de
calentamiento).
2. Coloca el inductor en paralelo a la supercie de trabajo para lograr una distribución uniforme del calor.
3. Favorece un movimiento de ida y vuelta a lo largo de la moldura. Empieza con un extremo de la moldura. Mueva
lentamente hacia adelante y hacia atrás unos pocos centímetros hasta que el extremo de la moldura pueda ser fácil-
mente despegado sin esfuerzo.
4. Luego mueva lentamente el inductor a lo largo de la moldura mientras lo separa del cuerpo.
La cinta adhesiva se retira generalmente con la moldura. Si el adhesivo o la cinta siguen pegadas a la carrocería, avance
lentamente o aumente la potencia.
43
GYSDUCTION AUTO
ES
Traducción de las instrucciones originales
Para calentar partes de la carrocería
En invierno o en climas fríos, la carrocería de un automóvil en el que se vayan a pegar calcomanías, pegatinas o aba-
lorios debe ser precalentada en el taller para permitir la colocación de los adhesivos.
1. Poner la potencia a un nivel bajo (10 a 30% de su capacidad máxima de calentamiento)
2. Utilice movimientos circulares o de ida y vuelta en el área a precalentar.
Inductor de desabol-
lado sin pintura
ref. 054776
Descripción
El inductor de desabollo ha sido diseñado para la reparación de abolladuras ligera de la carrocería, causadas por impac-
tos de granizo, por ejemplo, sin necesidad de retocar la pintura. No hay necesidad de despejar los interiores de la
elementos a enderezar, ya que la chapa se calienta desde el exterior y de forma muy limitada.
Utilización
73502 - V2 - 04/11/2019
FR
EN
DE
ES
RU
2-6 / 42-43
7-11 / 42-43
12-16 / 42-43
17-21 / 42-43
22-26 / 42-43
INDUCTEUR DÉBOSSELAGE
DENT PULLING INDUCTOR
AUSBEULINDUKTOR
INDUCTOR DE DESABOLLO
ИНДУКТОР ДЛЯ ПРАВКИ
INDUTOR DE REMOÇÃO
INDUTORE TIRA BOLLI
UITDEUKEN ZONDER SPUITEN
(UZS) INDUCTIE HULPSTUK
NL
IT
PT
27-31 / 42-43
32-36 / 42-43
37-41 / 42-43
Consulte el manual suministrado con el
producto para asesorar sobre su uso.
Inductor spiral
ref. 054783
Descripción
Este inductor está diseñado para calentar, abrir y retirar fácilmente todas las partes mecánicas en unos pocos segun-
dos: pernos/tuercas agarradas, tornillos, bridas de escape, tirantes de dirección, amortiguadores, etc.
Utilización
73502_V1_20/11/2019
FR
2-8 / 49-50
www.gys.fr
EN
9-14 / 49-50
DE
15-21 / 49-50
RU
29-35 / 49-50
IT
43-48 / 49-50
ES
22-28 / 49-50
NL
36-42 / 49-50
Find more languages of user manuals on our website
INDUCTEUR SPIRALE
COILED INDUCTOR
SPIRALINDUKTOR
INDUCTOR ESPIRAL
СПИРАЛЬНЫЙ ИНДУКТОР
SPIRAAL INDUCTOR
INDUTTORE FILO SPIRALE
Consulte el manual suministrado con el
producto para asesorar sobre su uso.
44
GYSDUCTION AUTO
ES
Traducción de las instrucciones originales
CONSUMIBLES
Telas inductoras
La tela de bra de vidrio en el vidrio y los inductores de desgarro pueden desgastarse por el uso y el roce contra las
partes a calentar.. Estos tejidos pueden ser reemplazados y GYS proporciona las referencias de los siguientes kits para
su reemplazo.
053854 JUEGO DE 5 PROTECCIONES DE INDUCTOR DE VIDRIO + PEGAMENTO
053847 JUEGO DE 10 PROTECCIONES PARA EL INDUCTOR + PEGAMENTO
059108 1 PROTECCIÓN INDUCTIVA ADHESIVA + PEGAMENTO
Spray refrigerante
Este spray refrigerante es especialmente útil para las operaciones de eliminación de abolladuras sin pintura y para
enfriar las piezas calentadas.
048898 Lote de 12 sprays refrigerantes -50°c / 400 ml
CÓDIGO DE FALLO
CÓDIGO SIGNIFICADO
E - 1 Pera se activaba al encenderse.
E - 2 El botón de inducción de vidrio estaba apretado cuando se conectó el equipo.
E - 3 Botón ON/OFF en la parte delantera estaba apretado cuando se conectó el equipo.
E - 4 Sobreintensidad en el inductor (ya sea porque está muy caliente o porque hay un cortocircuito).
E - 5 Inductor defectuoso (cable cortado o desconectado).
NO– ACC Accesorio no conectado.
AC - Accesorio no reconocido.
GARANTÍA
La garantía cubre todos los defectos o vicios de fabricación durante 2 años, a partir de la fecha de compra (piezas y
mano de obra)
La garantía no cubre:
• Todas las otras averías resultando del transporte
• El desgaste normal de las piezas (cables, pinzas…)
• Los incidentes resultando de un mal uso (error de alimentación, caída, desmontaje)
• Los fallos relacionados con el entorno (polución, oxidación, polvo…)
En caso de fallo, regresen la maquina a su distribuidor, adjuntando:
• Un justicativo de compra con fecha (recibo, factura…)
• Una nota explicativa del fallo
GYSDUCTION AUTO
Перевод оригинальных инструкций
45
RU
ПРАВИЛА БЕЗОПАСНОСТИ
Данная инструкция описывает функционирование вашего
устройства и меры предосторожности в целях обеспечения
вашей безопасности. Пожалуйста, прочтите ее перед
первым использованием и сохраните, чтобы при надобности
перечитать. Эти указания должны быть прочтены и поняты
до начала сварочных работ. Изменения и ремонт, не
указанные в этой инструкции, не должны быть предприняты.
Производитель не несет ответственности за травмы и
материальные повреждения связанные с
несоответствующим данной инструкции использованием
аппарата. В случае проблемы или сомнений, обратитесь к
квалифицированному профессионалу для правильного
подключения.Данное оборудование разрешается
использовать для нагрева черных материалов только в
пределах, указанных на оборудовании и руководстве.
Соблюдайте правила безопасности. В случае неадекватного
или опасного использования производитель не несет
ответственности. Любое другое использование этого
аппарата, не указанное в данном руководстве,
категорически воспрещено и потенциально опасно. Аппарат
полуавтоматический и требует присутствия оператора.
Этот аппарат может быть использован детьми старше 8 лет,
а также лицами с ограниченными физическими, умственными
возможностями или ограниченным сенсорным восприятием,
а также не обладающими опытом и знаниями, при условии,
что за ними надлежащим образом следят или если с ними
провели инструктаж по безопасному использованию аппарата
и если все возможные риски были предусмотрены. Дети не
должны играть с устройством. Чистка и уход не должны
производится детьми без надлежащего присмотра.
Не используйте аппарат если сетевой шнур или вилка
повреждены.
Не накрывайте аппарат.
Риск пожара и взрыва!
• Не используйте аппарат во взрывоопасной среде.
•  Держите аэрозольные баллоны и прочие емкости под
давлением вдали от оборудования для индукционного
нагрева.
Опасность высокой температуры и пламени.
• Не перегревайте детали и молдинги.
•  Будьте бдителaны, всегда держите поблизости
огнетушитель.
•  Не ставьте аппарат на или вблизи воспламеняющихся
поверхностей.
•  Не устанавливайте аппарат вблизи воспламеняющихся
веществ.
GYSDUCTION AUTO
Перевод оригинальных инструкций
46
RU
Внимание! Горячая поверхность. Опасность ожогов.
•  Горячие детали и горячее оборудование могут вызвать
ожоги.
• Не дотрагивайтесь голыми руками до нагретых деталей.
•  Дождитесь, что детали и оборудование остынут прежде
чем до них дотрагиваться.
•  Следите за тем, чтобы ювелирные украшения (в частности,
обручальные кольца) или металлические детали не
находились вблизи индукционной системы и индуктора во
время работы.
•  Снимите с себя все ювелирные украшения и другие
металлические предметы перед тем, как использовать это
оборудование.
•  Лица, имеющие металлические имплантаты, не должны
использовать это оборудование.
•  В случае ожога, обильно промойте водой и
проконсультируйте врача без промедления.
Опасные испарения и газ
•  Держите голову вдали от дыма, не вдыхайте испарения.
•  При работе в помещении проветривайте рабочую зону и/
или используйте эксгаустер для вытяжки испарений и газов.
•  Индукционный нагрев некоторых материалов, клеящих
веществ и флюсов может вызвать испарения и образование
газов. Вдыхать эти испарения и газы может быть опасным
для вашего здоровья. Например, нагрев уретана вызывает
образование газа цианистого водорода, который может
быть смертельным.
•  Если вентиляции недостаточно, то пользуйтесь респиратором,
отвечающим принятым стандартам.
•  Читайте листы безопасности веществ (MSDS) и руководства
производителя по клеящим веществам, флюсам, металлам,
расходным материалам, покрытиям, чистящим средствам и
растворителям.
•  Не нагревайте детали, которые очищают от жира или на
которые что-либо распыляют. Тепло может вступить в
реакцию с испарениями и привести к образованию сильно
токсичного и раздражающего газа.
•  Работайте в замкнутом пространстве только в том случае,
если оно хорошо проветривается или используя респиратор,
отвечающим принятым стандартам. Работайте в присутствии
компетентного специалиста, который мог бы прийти на
помощь. Испарения и газы, образующиеся в результате
нагрева могут вытеснить кислород и привести к несчастному
случаю или вызвать смерть. Убедитесь в качестве воздуха,
которым вы дышите.
GYSDUCTION AUTO
Перевод оригинальных инструкций
47
RU
•  Не перегревайте такие металлы, как оцинкованная сталь,
сталь со свинцовым или кадмиевым покрытием за
исключением случаев, когда покрытие удалено с нагреваемой
поверхности, рабочая зона хорошо проветривается или при
надобности используя респиратор, отвечающий принятым
стандартам. Литые заготовки и все металлы, содержащие
эти элементы, способны выделять ядовитые испарения,
если они перегреты. Смотрите информацию о температурах
в листе безопасности вещества (MSDS).
Опасность поражения электрическим током.
Внимание: опасность излучения света когда нагретые
металлические элементы достигают плавления.
Внимание! Сильное магнитное поле. Лица, имеющие
активные или пассивные имплантаты должны быть
информированы.
Когда аппарат используется один, то не требуется никакой
другой дополнительной защитной меры. В других случаях
могут потребоваться дополнительные ограничения и/или
защитные меры.
Во время техобслуживания уровень излучения магнитного
поля должен быть проверен до следующего использования
оборудования.
В рабочем режиме никогда не приближайте индуктор к голове
или к жизненно важным органам.
Носители электрокардиостимуляторов не должны
приближаться к аппарату. Риск сбоя работы
электрокардиостимуляторов вблизи аппарата.
Проконсультируйтесь у врача перед тем, как приближаться к
индукционному нагревателю.
Риск брызг металла или клеящего вещества
•  Защитите себя очками безопасности с боковыми защитами,
отвечающими принятым стандартам, или используйте экран
перед лицом.
• Носите рабочую одежду
• Носите перчатки.
Не перекрывайте вентиляционные отверстия. Перед испол-
ьзованием ознакомьтесь с разделом «установка» инструкции.
Подключение:
•  Это устройство должно быть подключено к розетке с
заземлением.
•  Этот аппарат класса A, предназначенный для промышленных
помещений, не подходит для использования в жилых
кварталах, где электрический ток подается общественной
системой питания низкого напряжения. В таких кварталах
могут возникнуть трудности обеспечения электромагнитную
совместимость из-за кондуктивных и индуктивных помех на
радиочастоте.
GYSDUCTION AUTO
Перевод оригинальных инструкций
48
RU
• Этот аппарат соответствует норме CEI 61000-3-12.
•  Этот аппарат соответствует норме CEI 61000-3-11.
Обслуживание:
•  Если шнур питания поврежден, он должен быть заменен
производителем, его сервисной службой или
квалифицированным специалистом во избежание опасности.
•  Внимание! Отключите аппарат от розетки до начала
ремонтных работ. Внутри аппарата высокие и опасные
напряжение и ток.
•  Регулярно открывайте аппарат и продувайте его, чтобы
очистить от пыли. Необходимо также проверять все
электрические соединения с помощью изолированного
инструмента. Проверка должна осуществляться
квалифицированным специалистом.
•  Ни в коем случае не использовать растворители или другие
коррозийные моющие средства.
Нормы и правила:
Аппарат соответствует директивам Евросоюза.
Декларация соответствия есть на нашем сайте..
Знак соответствия EAC (Евразийское экономическое
сообщество).
Товар соответствует нормам Марокко.
Декларация Cم (CMIM) доступна для скачивания на нашем
сайте (см на титульной странице).
Утилизация:
Это оборудование подлежит переработке. Не выбрасывать
в общий мусоросборник.
Аппарат, производитель которого участвует в глобальной
программе переработки упаковки, выборочной утилизации
и переработке бытовых отходов
Этот аппарат подлежит утилизации согласно постановлению
n°2014-1577.
ИДЕНТИФИКАЦИЯ
На тыльной части аппарата указаны следующие данные:
• Название и адрес изготовителя
• Модель
• Серийный номер аппарата
• Напряжение использования
• Мощность аппарата
Модель, а также серийный номер должны быть указаны при каждом запросе относительно ремонтного обслужи-
вания аппарата или запчастей.
ЭЛЕКТРОПИТАНИЕ
Gysduction поставляется с розеткой CEE7 / 7 на 16 А и должен быть подключен к однофазному трехпроводному
источнику питания 230 В (50/60 Гц) с заземленной нейтралью.
Проверьте что питание и его защиты (плавкий предохранитель и/или прерыватель) совместимы с током, необ-
ходимым для работы аппарата Аппарат защищен для работы от электрогенераторов.
GYSDUCTION AUTO
Перевод оригинальных инструкций
49
RU
МЕРЫ И УСТРОЙСТВА БЕЗОПАСНОСТИ
Изделие имеет защиту PROTEC 400.. Оно защищено от перенапряжения выше 300В и от отключения нейтрали.
При интенсивном использовании индуктор, кабели, электроника и силовой трансформатор нагреваются. Чтобы
избежать сбоев в работе из-за перегрева, Gysduction оборудован контуром воздушного охлаждения.. Термоза-
щита останавливает работу аппарата, если температура внутри аппарата становится слишком высокой.
• Индукторы изолированы для защиты пользователя от возможных ударов электрическим током.
Аппарат GYSDUCTION AUTO оснащен защитой против случайного перегрева. Если случайно вызвать нагрев
(нажатием на грушу или на кнопку управления индуктора для стекол) и если индуктор не находится в контакте
с металлом в течение более 1 минуты, тогда аппарат выдаст звуковой сигнал и автоматически выключится.
Отпустите грушу или кнопку управления, чтобы возобновить нагрев.
ОПИСАНИЕ АППАРАТА
Аппарат GYSDUCTION Auto состоит в основном из индуктора и альтернативного источника электроэнергии. Ког-
да активирован контроль нагрева, индуктор излучает сильное магнитное поле. При приближении к черному
металлу индуцированные токи будут нагревать металл без физического контакта..
Gysduction Auto может использоваться для множества приложений (в зависимости от выбранного индуктора):
- удалить все логотипы, клеи, молдинги, пластиковые ленты, наклеенные на кузов.
- прочистите и разблокируйте металлические детали (болты, винты, стержни ...).
- снимать приклеенные стекла (задние стекла, задние форточки, панорамные стекла на крыше).
- Удалите антигравий и уплотнители.
Аппарат нагревает сталь, но он не подходит для нагрева алюминия, меди или цинка.
РУКОВОДСТВО ПО ИСПОЛЬЗОВАНИЮ
2
1
3
4
6
8
9
10
7
5
1 Кнопки настроек
2 Цифровой индикатор
3 Индикатор включения
4 Индикатор режима Auto
5 Индикатор ручного режима
6 Индикатор максимально мощности
7 Кнопка выбора режима
8 Индикатор термозащиты
9 Оптимальная зона нагрева
10 Индикатор «No load»
Нет загрузки Если нет нагреваемой детали или если индуктор представлен на цвет-
ном металле, индикатор «холостого хода» (10) загорается при приложе-
нии давления к одному из регуляторов нагрева.
Автоматический режим
В этом режиме Gysduction адаптируется к нагреваемой детали (раз-
мер-толщина) и к расстоянию между этой частью и индуктором. Он
поддерживает постоянную и оптимальную мощность нагрева, обозна-
ченную зоной ОК (9) на интерфейсе. В этом режиме машина никогда не
нагревается на максимальной мощности.
Чтобы войти в этот режим:
Автоматический режим является режимом по умолчанию. Если же уста-
новка находится в ручном режиме, кратковременно нажмите кнопку РЕ-
ЖИМ (7), пока не загорится светодиод перед индикатором «АВТО» (4).
GYSDUCTION AUTO
Перевод оригинальных инструкций
50
RU
Вывод на экран :
Цифровой дисплей показывает последнее значение в%, используемое
машиной для поддержания постоянной и оптимальной мощности в за-
висимости от условий нагрева. Это значение соответствует настройкам,
которые следует использовать в ручном режиме для получения того же
результата при тех же условиях. Таким образом, если пользователь счи-
тает нагрев, рекомендованный Gysduction, слишком низким или слишком
высоким, он может скопировать это значение в ручном режиме и изме-
нять его по своему желанию для достижения желаемой мощности.
Ручной режим В этом режиме пользователь сам выбирает желаемую мощность нагрева.
Чтобы войти в этот режим:
Кратковременно нажмите кнопку MODE (7), пока не загорится светоди-
од перед индикацией «MANUAL» (5).
Принцип действия:
Цифровой дисплей (2) показывает процент максимальной мощности
(2400 Вт), которую индуктор может передать в обогреваемое помеще-
ние. С помощью кнопок регулировки (1) установите желаемую мощность.
Ручной режим позволяет достичь максимальной мощности Gysduction. При такой мощности детали
могут очень быстро нагреваться. Мощность нагрева будет тем выше, чем ближе индуктор к комнате.
Звуковой сигнал нагрева
Звуковой сигнал может быть активирован, чтобы указать на нагревание.
Звуковой сигнал звучит, как только начинается нагрев, и его частота из-
меняется в зависимости от положения индуктора по отношению к нагре-
ваемой детали. Чем ближе катушка индуктивности, тем выше частота.
Активировать / деактивировать
эта функция:
Нажмите кнопку MODE (7) в течение 3 секунд, чтобы включить / выклю-
чить этот звуковой сигнал.
Индикатор тепловой защиты
(8)
Этот индикатор загорается, чтобы указать, что изделие в режиме те-
пловой защиты после перегрева. Пока этот индикатор горит, продукт не
работает. Он выключается, когда продукт достаточно остынет.
Только с этого момента можно возобновить нагрев.
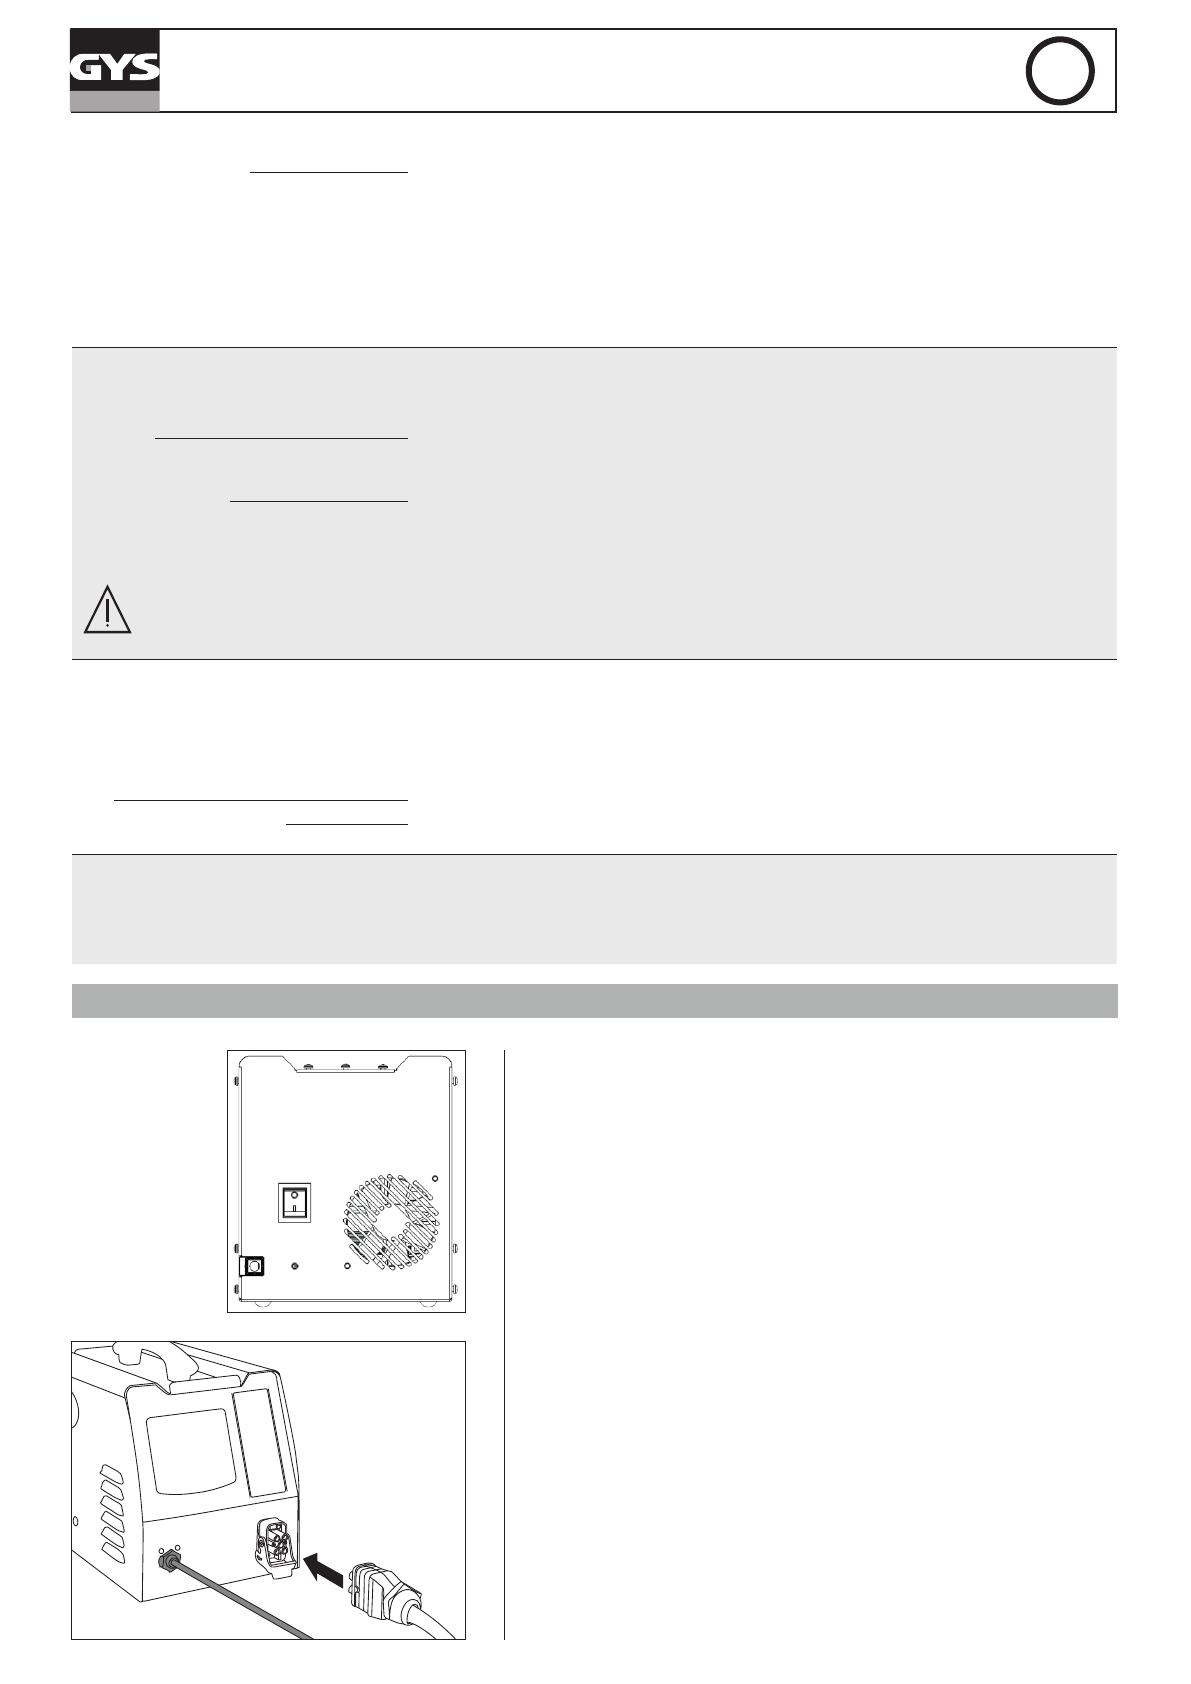
ВКЛЮЧЕНИЕ АППАРАТА
1
Включите аппарат (1)
Подключение аксессуара (2)
1. Выберите желаемый индуктор.
2. Поднимите клапан соединителя Gysduction.
3. Подключите соединитель индуктора к Gysduction.
4. Закройте клапан, чтобы заблокировать соединение.
5. На дисплее отображается номер подключенного аксессуара
(например, АС1)
Подключение контрольной лампы (3)
Gysduction может поставляться с педалью управления.
(арт. 055490), необходим для использования проникающих
индукторов, клея и спиралей.
Подключите кабель к Gysduction и педали, чтобы он
оперативный.
Активация нагрева
Индукторы для стекол и удаления вмятин оснащены кнопкой
подогрева.. Остальные три работают с контрольной лампочкой.
Поднесите индуктор к нагреваемой металлической части,
затем нажмите кнопку индуктора или контрольную лампочку,
чтобы включить нагреватель.
23
GYSDUCTION AUTO
Перевод оригинальных инструкций
51
RU
ОПИСАНИЕ И ИСПОЛЬЗОВАНИЕ ИНДУКТОРОВ
Все описанные ниже манипуляции требуют практики. Не бойтесь экспериментировать,
проводя испытания на листах или обломках.
Индуктор для стекол
арт. 053373
Описание
Этот индуктор специально разработан для снятия сварных листов и удаления гравия с подоконников. Также
позволяет снимать клееные окна (заднее стекло, заднее стекло, панорамную крышу и т. Д.)
Автоматический режим особенно рекомендуется для снятия остекления.
Снятие стекла
◊ Подготовка
1. Сначала снимите любую внешнюю обшивку: окна, отделанные гофрированным молдингом, металлом или
пластиком. Для молдингов, которые нельзя снять, нагрейте удерживающий сварной шов изнутри.
2. Рекомендуется также удалить любую внутреннюю отделку и любые компоненты, такие как зажимы и шпиль-
ки, которые могут использоваться для удержания окна.
3. Отсоедините антенны и цепи оттаивания окон.
4. Наклейте защитную ленту вокруг стекла, чтобы не повредить окрашенные поверхности во время работы.
5. Приклейте защитную липкую ленту на индуктор для стекол, чтобы не поцарапать стекло. Заменяйте липкую
ленту после каждого снятия окна.
6. Перед снятием полностью очистите стекло.
◊ Фаза нагрева и удаление окон
Наибольший риск повреждения лакокрасочного покрытия возникает в начале нагрева, так как встав-
лять прокладки между стеклом и корпусом труднее.
Начните с угла и нагрейте по обе стороны от этого угла, продвигаясь к противоположным углам.
Если стекло повреждено, начните с угла, который нужно отремонтировать, и продвигайтесь к неповре-
жденной части стекла.
Сварные кромки, на которые опираются клеевые соединения
Видимые окрашенные поверхности не нагреваются
Направления прогрессирования нагрева
7. Поместите индуктор напротив прокладки из уретанового клея для легкого отслаивания стекла.
Некоторые автомобили имеют узкие сварные кромки, нагрев индуктора может сделать окрашенную поверхность видимой,
что может ухудшить ее внешний вид. В этом случае рекомендуется охладить внешнюю поверхность влажной тканью или
охлаждающим спреем. Переместите индуктор к середине стекла так, чтобы он находился на расстоянии не менее 2 см от
видимой окрашенной части.
GYSDUCTION AUTO
Перевод оригинальных инструкций
52
RU
8. Переместите индуктор вперед и назад примерно на 30 см с двух сторон, прилегающих к углу. Поиск правиль-
ной скорости нагрева: слишком низкая скорость вызывает чрезмерный локальный нагрев, который неэффекти-
вен, поскольку снижает тепло, выделяемое на сварной кромке. Высокий показатель не допускает достаточного
нагрева свариваемой кромки и клеевого шва. Появляется легкий дым, указывающий на достижение оптималь-
ной температуры валика уретанового клея.
При появлении густого дыма немедленно прекратите нагрев. Выйдите из этой зоны, чтобы не вдыхать пары, и
попытайтесь определить причину. Нагревание уретанового клея вызывает выделение цианистого водорода, что
очень опасно для человека.
9. Продавите изнутри автомобиля, не нарушая целостности уплотнения.
Отклеивание может занять несколько минут. После снятия пломбы она не
будет прилипать к металлу..
Когда угол стекла приподнимется, вставьте пластиковый шпатель в
пространство между стеклом и сварным краем. Будьте осторожны, не
прилагайте слишком больших усилий, которые могут сломать стекло.
10. Как только угол остекления отклеится, повторите процесс нагрева по длине и высоте стекла, перемещая
прокладки под стеклом по ходу движения.
Вставка стёкол Материал Хрупкость стекла
Время отклеивания
зависит от размера автомобиля
Лобовое стекло Многослойное стекло +++ от 20 мин. à 1 часа
Заднее стекло
Отожжённое стекло + от 10 до 20 мин.Заднее боковое стекло
Стекла боковых окон
Индуктор для
устранения заедания
арт. 053366
Описание
или заедающих деталей, таких как гайки и болты. Этот индуктор также может использоваться для удаления
герметика с шасси грузовика или багажника автомобилей, для пайки больших разъемов или для формования
металла.
Использование
Чтобы удалить заклинившую или заржавевшую гайку / болт:
1. Выберите автоматический режим или установите мощность на очень высокий уровень
(от 80 до 100% мощности).
2. Установите индуктор на гайку, как показано на рис. напротив.
3. Начните нагревание и дайте ему продержаться несколько секунд.
4. Ослабьте заедающую гайку или болт.
GYSDUCTION AUTO
Перевод оригинальных инструкций
53
RU
Адезивный
индуктор
арт. 053359
Описание
Этот индуктор предназначен для снятия дверных планок, монограмм и логотипов без повреждения за
несколько минут, а также для удаления рекламных и декоративных наклеек.
Использование
Для нагрева окрашенных листов
1. Выберите автоматический режим или установите мощность на низкий уровень (от 10 до 30% максимальной
мощности нагрева)..
2. Поместите индуктор прямо над нагреваемой зоной. Между индуктором и нагреваемым участком или элемен-
том не должно быть соприкосновения.
3. Включив обогрев, совершайте круговые движения или назад и вперед по нагреваемой области.
Если индуктор остается в одном месте слишком долго, краска может сгореть. Чтобы избежать этого, необходимо,
чтобы индуктор постоянно перемещался (вперед-назад или по кругу).
Для снятия наклеек, виниловых наклеек или клееных полос
Выполните три описанных выше шага (см. Информацию
о нагреве окрашенных листов). Нагрейте несколько
секунд и попробуйте приподнять один край элемента.
Если он начинает легко отслаиваться вверх, значит,
была достигнута необходимая температура, если нет,
продолжайте нагревание еще несколько секунд и
повторите попытку.
Некоторым детлям, который были заклеены в течение длительного времени, часто требуется более длительное
время нагрева. Если перегреть наклейку, то она размягчиться и вздуется. Если это случится, то дайте ей остыть
и снова попробуйте снять ее. Будьте осторожны, не сожгите краску! Если металл достаточно нагрет, то прутки
отсоединяются без усилий вместе со слоем клея.
Для снятия молдингов, приклеенных к кузову
Боковые молдинги снимаются так же, как декали и наклейки.. Для толстых молдингов требуется большая мощ-
ность или больше времени. Металл под молдингами находится дальше от индуктора.
1. Выберите автоматический режим или установите мощность на средний уровень (от 40 до 60% максимального
нагрева).
2. Поместите индуктор параллельно рабочей поверхности, чтобы добиться равномерного распределения тепла..
3. Делайте движения вперед и назад по всей длине лепного украшения. Начните с одного конца лепного укра-
шения. Медленно продвигайтесь вперед и назад на несколько дюймов, пока не сможете легко оторвать конец
молдинга.
4. Затем медленно переместите индуктор дальше по молдингу, отсоединяя его от корпуса.
Клейкая лента обычно снимается вместе с молдингом. Если клей или лента остается прилипшей к корпусу,
двигайтесь медленнее или увеличьте мощность.
GYSDUCTION AUTO
Перевод оригинальных инструкций
54
RU
Для обогрева частей кузова
Зимой или в регионах с холодным климатом кузов автомобиля, на который вы хотите наклеить наклейки или
стержни, необходимо предварительно нагреть в мастерской, чтобы клей мог прилипнуть.
1. Установите мощность на низкий уровень (от 10 до 30% максимальной мощности нагрева)
2. Используйте круговые или возвратно-поступательные движения на участке, который нужно предварительно
нагреть.
Индуктор для
удаления вмятин без
покраски
арт. 054776
Описание
Индуктор для удаления вмятин был разработан для устранения небольших вмятин на кузове, возникших в ре-
зультате ударов.
град, например, без необходимости подкрашивать краску. Необязательно снимать внутренности
деталей для выпрямления, потому что нагрев листа происходит снаружи и очень ограниченным образом.
Использование
73502 - V2 - 04/11/2019
FR
EN
DE
ES
RU
2-6 / 42-43
7-11 / 42-43
12-16 / 42-43
17-21 / 42-43
22-26 / 42-43
INDUCTEUR DÉBOSSELAGE
DENT PULLING INDUCTOR
AUSBEULINDUKTOR
INDUCTOR DE DESABOLLO
ИНДУКТОР ДЛЯ ПРАВКИ
INDUTOR DE REMOÇÃO
INDUTORE TIRA BOLLI
UITDEUKEN ZONDER SPUITEN
(UZS) INDUCTIE HULPSTUK
NL
IT
PT
27-31 / 42-43
32-36 / 42-43
37-41 / 42-43
См. Инструкции, прилагаемые к
продукту для советов по
использованию.
Спиральный
индуктор
арт. 054783
Описание
Этот индуктор предназначен для легкого нагрева, снятия и снятия всех механических частей за секунды:
заклинившие болты / гайки, винты, фланцы выхлопных газов, рулевые тяги, амортизаторы и т. д..
Использование
73502_V1_20/11/2019
FR
2-8 / 49-50
www.gys.fr
EN
9-14 / 49-50
DE
15-21 / 49-50
RU
29-35 / 49-50
IT
43-48 / 49-50
ES
22-28 / 49-50
NL
36-42 / 49-50
Find more languages of user manuals on our website
INDUCTEUR SPIRALE
COILED INDUCTOR
SPIRALINDUKTOR
INDUCTOR ESPIRAL
СПИРАЛЬНЫЙ ИНДУКТОР
SPIRAAL INDUCTOR
INDUTTORE FILO SPIRALE
См. Инструкции, прилагаемые к
продукту для советов по
использованию.
GYSDUCTION AUTO
Перевод оригинальных инструкций
55
RU
РАСХОДНЫЕ МАТЕРИАЛЫ
Салфетки для индукторов
Стекловолоконная ткань, присутствующая на стеклянных индукторах и проникающих индукторах, может из-
нашиваться при использовании и трении о нагреваемые детали. Эти ткани можно заменить, и GYS предлагает
следующие комплекты комплектов, чтобы разрешить это изменение.
053854 НАБОР ИЗ 10 ЗАЩИТНЫХ ПОКРЫТИЙ ДЛЯ ИНДУКТОРА ДЛЯ СТЕКОЛ + КЛЕЙ
053847 НАБОР ИЗ 10 ЗАЩИТНЫХ ПОКРЫТИЙ ДЛЯ ИНДУКТОРА ДЛЯ УСТРАНЕНИЯ ЗАЕДАНИЯ + КЛЕЙ
059108 1 ЗАЩИТНЫЙ ИНДУКЦИОННЫЙ КЛЕЙ + КЛЕЙ
Кулер спрей
Этот спрей с охлаждающей жидкостью особенно полезен при удалении вмятин без покраски и для охлаждения
нагретых деталей.
048898 ЛОТ ИЗ 12 ОХЛАЖДАЮЩИХ СПРЕЕВ -50 ° C / 400 мл
КОД ОШИБКИ
КОД ЗНАЧЕНИЕ
Е- 1 Грушевидная кнопка включается при включении под напряжение.
Е - 2 Кнопка индуктора для стекол включается при включении под напряжение.
Е - 3 Кнопка ON/OF на передней панели включается при включении под напряжение.
Е - 4 Перегрузка по току в индукторе (либо потому, что он очень горячий, либо из-за короткого
замыкания).
Е - 5 Дефектный индуктор (обрезанный или отключенный провод).
НЕ– ACC Аксессуар не подключен.
АС- Аппарат не распознает аксессуар.
ГАРАНТИЯ
Гарантия распространяется на любой заводской дефект или брак в течение 2х лет с даты покупки изделия
(запчасти и рабочая сила).
Гарантия не распространяется на:
• Любые поломки, вызванные транспортировкой.
• Нормальный износ деталей (Например : кабели, зажимы и т.д.).
• Случаи неправильного использования (ошибка питания, падение, разборка).
• Случаи выхода из строя из-за окружающей среды (загрязнение воздуха, коррозия, пыль).
• Съемные индукторы и ферриты, являющиеся расходными материалами.
• Использование неподходящей охлаждающей жидкости.
При выходе из строя, обратитесь в пункт покупки аппарата с предъявлением следующих документов:
- документ, подтверждающий покупку (с датой): кассовый чек, инвойс....
- описание поломки.
56
GYSDUCTION AUTO
NL
Vertaling van de oorspronkelijke gebruiksaanwijzing
BELANGRIJKE VEILIGHEIDSINSTRUCTIES
Deze gebruikershandleiding bevat aanwijzingen voor het gebruik
van uw apparaat en de veiligheidsmaatregelen die in acht geno-
men moeten worden. Leest u deze handleiding alstublieft aan-
dachtig door alvorens het apparaat in gebruik te nemen, en
bewaar de handleiding als naslagwerk. Voor het in gebruik ne-
men van het product moeten deze instructies gelezen en goed
begrepen worden. Voer geen wijzigingen of onderhoud uit die
niet in de handleiding vermeld staan. Geen enkel lichamelijk letsel
of schade, veroorzaakt door het niet naleven van de instructies in
deze handleiding, kan verhaald worden op de fabrikant van het
apparaat. Raadpleeg, in geval van problemen of onzekerheid
over het gebruik, een gekwalificeerd persoon, die u kan helpen
het apparaat correct te gebruiken. Deze apparatuur mag alleen
worden gebruikt voor het verwarmen van ijzerhoudende materia-
len binnen de grenzen die op de apparatuur en de handleiding
zijn aangegeven. De veiligheidsvoorschriften moeten gerespec-
teerd worden. In geval van onjuist of gevaarlijk gebruik kan de
fabrikant niet aansprakelijk worden gesteld. Elk ander gebruik,
niet vermeld in deze handleiding, is strikt verboden, en mogelijk
gevaarlijk. Het apparaat is semi-automatisch en vereist de aanwe-
zigheid van een gebruiker.
Dit apparaat kan gebruikt worden door kinderen ouder dan 8
jaar en door personen met lichamelijke, zintuiglijke of mentale
beperkingen, of personen met gebrek aan ervaring of kennis, al-
leen als ze onder voldoende toezicht staan of als ze de instructies
voor het veilig gebruik van het apparaat hebben ontvangen, en
als de bestaande risico’s goed begrepen zijn. Kinderen mogen
niet met het apparaat spelen. Reinigen en onderhoud van het ap-
paraat door de gebruiker mogen niet uitgevoerd worden door
kinderen zonder toezicht.
Gebruik het apparaat niet wanneer de voedingskabel of de
stekker beschadigd zijn.
Bedek het apparaat niet.
Brand- en ontplofngsgevaar!
Gebruik het apparaat niet in een explosie-gevaarlijke omge-
ving.
Houd spuitbussen en andere houders die onder druk staan op
voldoende afstand van de inductie-verwarming apparatuur.
Waarschuwing : risico hitte en vlammen
De onderdelen en de hechtmiddelen niet oververhitten.
Wees waakzaam voor brand, zorgt u ervoor dat er een
brandblusser in de buurt is.
Plaats het apparaat niet op, of nabij brandbare oppervlaktes.
Plaats het apparaat niet dichtbij ontvlambare stoffen.
57
GYSDUCTION AUTO
NL
Vertaling van de oorspronkelijke gebruiksaanwijzing
Let op! Zeer heet oppervlak. Kan brandwonden veroorzaken.
De onderdelen en de apparatuur die heet worden kunnen
brandwonden veroorzaken.
Raak de opgewarmde onderdelen niet met blote handen aan.
Wacht tot de onderdelen en de apparatuur afgekoeld zijn
alvorens deze aan te raken.
Let u erop dat sieraden (in het bijzonder ringen) of metalen
voorwerpen niet dichtbij het inductie-systeem en de inductor
komen tijdens het opwarmen.
Verwijder alle sieraden en andere metalen voorwerpen van
uw lichaam, voor u dit apparaat gebruikt.
Personen met metalen implantaten in het lichaam mogen dit
apparaat niet gebruiken.
Bij brandwonden, grondig en met veel water afspoelen en
onmiddellijk een arts raadplegen.
Gevaarlijke dampen en gassen
Houd uw hoofd verwijderd van rook, adem de dampen niet in.
Wanneer er binnen gewerkt wordt, de werkruimte goed ventileren
en/of een luchtafzuigsysteem gebruiken om dampen en gassen te
evacueren.
Verwarming door inductie van sommige materialen, hechtmidde
-
len en vloeistoffen kan dampen en gassen produceren. Het inade-
men van deze dampen en gassen kan gevaarlijk zijn voor uw ge-
zondheid. Bijvoorbeeld : het opwarmen van urethaan doet het gas
waterstofcyanide vrijkomen, dat dodelijk kan zijn voor mensen.
Gebruik, wanneer er onvoldoende ventilatie is, een goedgekeurde
adembescherming.
Lees de hygiënevoorschriften en de veiligheidsinstructies van de
producten (MSD) en de instructies van de fabrikant wanneer u
werkt met hechtmiddelen, vloeistoffen, metalen, verbruiksartikelen,
coatings, reinigingsmiddelen en afbijtmiddelen.
Gebruik het verwarmingssysteem niet op onderdelen die ontvet
worden, of onderdelen die worden gespoten. Het opwarmen kan
een reactie met de dampen veroorzaken en zeer giftige en irrite
-
rende gassen doen ontstaan.
Er mag alleen in beperkte ruimtes gewerkt worden als deze vol
-
doende geventileerd worden, of wanneer er een goedgekeurde
adembescherming gebruikt wordt. Er moet toezicht gehouden wor
-
den door een gekwalificeerd persoon. De dampen en de gassen
die vrijkomen tijdens het opwarmen kunnen de zuurstof in de lucht
vervangen en een ongeluk of de dood veroorzaken. Verzekert u
zich ervan dat de ingeademde lucht van goede kwaliteit is.
Metalen zoals gegalvaniseerd staal, bekleed met lood of cad
-
mium, kunnen alleen verwarmd worden wanneer de bekleding
verwijderd is van het te verwarmen oppervlak, wanneer de werk
-
plek voldoende geventileerd wordt en als er, indien nodig, met een
goedgekeurde adembescherming wordt gewerkt. Gietstukken en
alle metalen die deze elementen bevatten kunnen giftige gassen
vrijgeven als ze worden oververhit. Raadpleeg de MSD voor infor
-
matie over de temperaturen.
58
GYSDUCTION AUTO
NL
Vertaling van de oorspronkelijke gebruiksaanwijzing
Waarschuwing : elektrisch gevaar
Waarschuwing : optisch stralingsgevaar wanneer de opgewar-
mde metalen elementen een smeltpunt bereiken.
Let op! Sterk magnetisch veld. Dragers van actieve of pas-
sieve implantaten moeten worden geïnformeerd.
Geen enkele aanvullende beschermingsmaatregel is vereist wan-
neer het apparaat alleen gebruikt wordt. In andere gevallen kunnen
beperkingen en/of beveiligingsmaatregelen kunnen nodig.
Tijdens een onderhoudsbeurt moeten de veldsterktes gecontroleerd
worden, voordat het materiaal weer in werking wordt gesteld.
Breng, wanneer het apparaat in werking is, nooit de inductor
dichtbij het hoofd of de vitale organen.
Dragers van een pacemaker mogen niet in de buurt van het appa-
raat komen. Risico op storing van het functioneren van pacema-
kers in de buurt van het apparaat.
Raadpleeg een arts, voordat u zich in de buurt van een inductie
verwarmingssysyteem begeeft.
Risico op wegspattende deeltjes metaal of lijm.
Draag een goedgekeurde veiligheidsbril met zijbescherming of
een veiligheidsscherm voor het gelaat.
Draag werkkleding.
Draag handschoenen.
Houd de openingen van de ventilator vrij. Raadpleeg het gedeelte
«installatie» alvorens het apparaat in gebruik te nemen.
Aansluiting :
Dit apparaat moet aangesloten worden op een geaard stop-
contact.
Deze klasse A apparaten zijn bestemd voor industrieel gebruik,
en zijn niet geschikt voor gebruik in woonwijken, waar de stroom
wordt geleverd door een openbaar laagspanningsnet. Het is
mogelijk dat er problemen ontstaan met de elektromagnetische
compatibiliteit in deze omgevingen, vanwege storingen of ra-
diofrequente straling.
Deze apparatuur is conform aan CEI 61000-3-12
Deze apparatuur is conform aan CEI 61000-3-11 norm.
Onderhoud :
Als de voedingskabel beschadigd is moet deze vervangen wor-
den door de fabrikant, zijn reparatie dienst of een gekwali-
ficeerd persoon, om zo ieder risico te vermijden.
59
GYSDUCTION AUTO
NL
Vertaling van de oorspronkelijke gebruiksaanwijzing
Waarschuwing ! Haal altijd eerst de stekker uit het stopcontact
voor u werkzaamheden op het apparaat verricht. De spanning
en de stroom binnenin het apparaat zijn hoog en gevaarlijk.
De kap regelmatig afnemen en met een blazer stofvrij maken.
Maak van deze gelegenheid gebruik om met behulp van geïso-
leerd gereedschap ook de elektrische verbindingen te laten
controleren door gekwalificeerd personeel.
Gebruik nooit oplosmiddelen of andere agressieve reinigings-
middelen.
Regelgevinga :
Het toestel is in overeenstemming met de Europese richtlijnen.
De conformiteitsverklaring is te vinden op onze internetsite.
EAC (Euraziatische Economische Gemeenschap) merkteken van
overeenstemming.
• Dit materiaal voldoet aan de Marokkaanse normen.
De verklaring Cم (CMIM) van overeenstemming is beschikbaar op
onze internet site (vermeld op de omslag).
Afvalverwerking :
Afzonderlijke inzameling vereist. Apparaat niet weggooien met
het huishoudelijk afval.
De fabrikant van dit product neemt deel aan het hergebruik en
recyclen van de verpakkingen, door middel van een contributie
aan een globaal sorteer en recyclage systeem van huishoudelijk
verpakkingsafval
Product recyclebaar, niet bij het huishoudelijk afval gooien.
IDENTIFICATIE
Op de achterzijde van het apparaat vindt u de volgende informatie :
• Naam en adres van de fabrikant
• Model
• Serienummer van het apparaat
• Voedingsspanning
• Vermogen van het apparaat
Het model en het serienummer van het apparaat moeten bij iedere technische interventie en bestelling van onderdelen
vermeld worden.
ELEKTRISCHE VOEDING
De Gysduction wordt standaard geleverd met een 16 A aansluiting type CEE7/7, en moet worden aangesloten op een
geaarde 230 V enkelfase elektrische installatie (50/60 Hz).
Controleer of de voeding en de beveiligingen (zekering en/of stroomonderbreker) geschikt zijn voor de stroom die nodig
is voor een correct gebruik van dit apparaat. Het apparaat is beveiligd tijdens het functioneren met een generator.
VEILIGHEIDSMAATREGELEN
Het apparaat beschikt over de PROTEC 400 beveiliging. Het apparaat is beveiligd tegen overspanning boven de
300V en tegen ontaarding.
Tijdens intensief gebruik worden inductor, kabels, elektronica en voedingstransformator warm. Om storingen veroor-
zaakt door oververhitting te voorkomen is de Gysduction uitgerust met een luchtgekoeld koelsysteem. De ther-
mische beveiliging zal het apparaat stopzetten wanneer de interne temperatuur te hoog wordt.
• De inductoren zijn geïsoleerd, om de gebruiker te beschermen tegen eventuele elektrische schokken.
60
GYSDUCTION AUTO
NL
Vertaling van de oorspronkelijke gebruiksaanwijzing
De Gysduction is uitgerust met een beveiliging tegen een onbedoelde opwarming. Als het opwarmen per ongeluk
of onbedoeld wordt geactiveerd (druk op de aan/uit balg of aan/uit knop), en als de inductor op dat moment niet
in contact is met een op te warmen metalen voorwerp (voor een periode van minimaal één minuut) zal het appa-
raat een pieptoon laten horen en zichzelf automatisch uitschakelen. Laat de opwarm-bediening los om een normale
opwarm-cyclus te hervatten.
OMSCHRIJVING VAN HET APPARAAT
De Gysduction bestaat uit een inductor, die gekoppeld is aan een elektrische energiebron (wisselspanning, midden-
frequentie). Wanneer er een opwarm impuls wordt gegeven, wordt er een krachtig magnetisch veld door de inductor
gestuurd. Bij het naderen van een ijzerhoudend materiaal zal de stroom het metaal, zonder fysiek contact te maken,
opwarmen.
De Gysduction Auto kan worden gebruikt voor vele toepassingen (naar gelang de gekozen inductor) :
- het verwijderen van alle soorten logo’s, stickers, sierstrippen en kunststoffen strippen op de carrosserie.
- het deblokkeren van metalen onderdelen (bouten, schroeven, staven...).
- het verwijderen van gelijmde ruiten (achterruit, zijruit, dakraam).
- het verwijderen van anti-steenslag coatings en afdichtende naden.
Het apparaat kan staal opwarmen, maar is niet geschikt om Aluminium, koper of zink op te
warmen.
GEBRUIKSINSTRUCTIES
2
1
3
4
6
8
9
10
7
5
1 Instelknoppen
2 Digitale display
3 Aan/Uit Ledlampje
4 Auto module
5 Handmatige module
6 Maximale vermogen
7 Knop om de verschillende modules te kiezen
8 Thermische beveiliging
9 Optimale opwarmtemperatuur
10 «No load»
No-Load Bij afwezigheid van een op te warmen voorwerp, of wanneer de inductor bij
een niet-metaalhoudend voorwerp wordt gehouden, gaat het lampje « no-
load » (10) branden.
Automatische module In deze module past de Gysduction zich vanzelf aan aan het op te warmen
onderdeel (afmeting, dikte) en aan de afstand tussen dit onderdeel en de
inductor. De Gysduction behoudt een constant en optimaal verwarmend
vermogen, weergegeven door de zone OK (9) op het bedieningspaneel. In
deze module warmt het apparaat nooit op maximaal vermogen op.
Om in deze module te geraken :
De Automatische module is de standaard module. Als het apparaat in de
handmatige module staat, kunt u kort drukken op de toets MODULE (7) tot-
dat de LED voor de melding « AUTO » (4) gaat branden.
Weergave :
De digitale weergave toont de laatste waarde in % die is gebruikt door het
apparaat om een constant en optimaal vermogen te behouden, afhanke-
lijk van de opwarm-omstandigheden. Deze waarde komt overeen met de
instellingen die gebruikt zouden moeten worden in de Handmatige module
om dezelfde resultaten in dezelfde omstandigheden te verkrijgen. Wanneer
de gebruiker iets meer of minder wil verwarmen,dan de Gysduction aan-
geeft, kan hij deze waarde ingeven in de handmatige module en deze doen
variëren om de voor hem geschikt temperatuur te verkrijgen.
61
GYSDUCTION AUTO
NL
Vertaling van de oorspronkelijke gebruiksaanwijzing
Handmatige Module In deze module kan de gebruiker zelf het gewenste opwarmend vermogen
kiezen.
Om in deze module te geraken :
Houd de toets MODULE (7) kort ingedrukt, totdat de LED voor het woord «
HANDMATIG » (5) gaat branden.
Werking :
De digitale weergave (2) geeft het % van het maximale vermogen (2400
W) aan dat de inductor kan overbrengen op het op te warmen onderdeel.
Gebruik de instelknoppen (1) om het gewenste vermogen in te stellen.
Met de handmatige module kunt u het maximale vermogen van de Gysduction bereiken. Met dit vermogen
kan het opwarmen van onderdelen zeer snel gaan. Het opwarmend vermogen zal hoger zijn wanneer de
inductor dichter bij het voorwerp gehouden wordt.
Geluidssignaal opwarmen Een geluidssignaal kan worden geactiveerd om aan te geven dat het apparaat
opwarmt. Het geluidssignaal gaat klinken zodra het opwarmen aanvangt, en
de frequentie ervan hangt af van de positie van de inductor ten opzichte van
het te verwarmen onderdeel. Hoe dichter de inductor zich bij het onderdeel
bevindt, hoe harder het geluidssignaal zal zijn.
Deze functie activeren of
deactiveren :
Druk gedurende 3 seconden op de toets MODULE (7) om de geluidssig-
naal-functie te activeren of te deactiveren.
Lampje thermische beveiliging
(8)
Dit lampje zal gaan branden wanneer het apparaat, ten gevolge van overver-
hitting, in thermische beveiliging staat, Het apparaat is onbruikbaar zolang
dit lampje brandt. Het lampje zal uitdoven wanneer het apparaat voldoende
is afgekoeld.
Pas dan zal het apparaat weer gebruikt kunnen worden.
WERKING VAN HET APPARAAT
1
Apparaat aanzetten (1)
Aansluiten van een accessoire (2)
1. Kies de gewenste inductor.
2. Open het klepje van de aansluiting van de Gysduction.
3. Koppel de aansluiting van de inductor aan op de Gysduction.
4. Sluit het klepje om de aansluiting te vergrendelen.
5. Het display toont het nummer van het aangesloten accessoire
(bijvoorbeeld AC1)
Aansluiting van de blaasbalg-afstandsbediening (3)
De Gysduction kan worden voorzien van een controle-pedaal
(art. code 055490), nodig voor een gebruik met deblokkeer-induc-
tor, de sticker-inductor en de spiraal inductor.
Sluit de kabel aan op de Gysduction en op de pedaal, om deze
operationeel te maken.
Opwarmen activeren
De ruit en uitdeuk-inductoren beschikken over een opwarmings-
knop. De andere drie functioneren met een blaasbalgje.
Benader met de inductor het op te warmen onderdeel, en druk
vervolgens op de knop van de inductor of het blaasbalgje om het
opwarmen te activeren.
23
62
GYSDUCTION AUTO
NL
Vertaling van de oorspronkelijke gebruiksaanwijzing
BESCHRIJVING & GEBRUIK VAN DE INDUCTOREN
Alle hieronder beschreven handelingen moeten eerst goed geoefend en voorbereid worden. Voer
zoveel testen en proeven uit (eventueel op wrakken) als nodig.
Inductor ruit
art. code. 053373
Omschrijving
Deze inductor is bij uitstek geschikt voor het verwijderen van gesoldeerd plaatwerk of het verwijderen van anti-steenslag
coating. U kunt deze inductor tevens gebruiken om auto-ruiten mee los te weken (achterruit, zijraampjes, dakraam enz.)
De Automatische module is in het bijzonder geschikt voor het losweken van ruiten.
Verwijderen van een autoruit
◊ Voorbereiding
1. Verwijder eerst alle eventuele kunststoffen en metalen elementen aan de buitenkant : Wanneer de metalen omlijs-
ting niet kan worden verwijderd, moet het ondersteunend laswerk vanuit de binnenkant van het voertuig verwarmd
worden.
2. Het wordt aanbevolen om ook alle binnenbekleding en alle clips en elementen die de ruit ondersteunen te verwijderen.
3. Koppel de verbindingen van de antenne en de aansluitingen voor het ontdooien van de autoruit af.
4. Plak een beschermend plakband rond de ruit om beschadigingen van de gelakte oppervlaktes te voorkomen.
5. Plak een beschermend plakband op de ruit inductor, om te voorkomen dat de ruit bekrast wordt. Vervang het plak-
band na iedere klus.
6. Maak, voor u de ruit gaat verwijderen, deze helemaal schoon.
◊ Fase opwarmen & verwijderen van de ruit
Wees voorzichtig tijdens het inbrengen van de eerste wiggen : vanwege de moeilijkheid om deze wiggen tus-
sen de ruit en de carrosserie te plaatsen loopt u tijdens deze fase het meeste risico op het beschadigen van
de lak van het voertuig.
Begin altijd in een hoek, en warm vervolgens aan weerskanten van deze koek op, en vervolg zo het opwarmen
naar de tegenoverliggende hoek.
Begin, indien de ruit beschadigd is, in de hoek die u moet repareren en vervolg het opwarmen in de richting
van de onbeschadigde kant van de ruit.
Gelaste randen waarop de lijmverbinding zich bevindt
Zichtbaar geschilderde oppervlaktes die niet verwarmd mogen worden
Richting van het opwarmen
7. Plaats de inductor tegenover de urethaan lijmverbinding, om zo de ruit eenvoudig te kunnen demonteren.
Bepaalde voertuigen hebben smalle gelaste randen, de warmte van de inductor kan dan de lak beschadigen. In dit geval is het
verstandig om het buitenste oppervlak met een vochtige doek of een spray af te koelen. Beweeg de inductor naar het midden toe,
zodat deze zich op minimaal 2 cm van het zichtbaar geschilderde oppervlak bevindt.
63
GYSDUCTION AUTO
NL
Vertaling van de oorspronkelijke gebruiksaanwijzing
8. Verplaats de inductor met een heen en weer gaande beweging van ongeveer 30 cm over de 2 naastliggende kanten
van de hoek. Probeer de geschikte snelheid te vinden : een te traag tempo zal plaatselijk te veel verhitten. Een te hoog
tempo zal de gelaste kanten en de lijmverbinding niet voldoende opwarmen. Er zal een lichte rookontwikkeling ontstaan,
die aangeeft dat de optimale temperatuur voor de urethaan lijmverbinding is bereikt.
Als er een dikkere rookontwikkeling ontstaat, moet u onmiddellijk stoppen met opwarmen. Verwijdert u zich van de
werkzone, om te voorkomen dat u de rook inademt, en probeer de oorzaak te vinden. Het opwarmen van urethaan lijm
veroorzaakt het vrijkomen van de voor de mens gevaarlijke stof waterstofcyanide.
9. Voer vanuit de binnenkant van het voertuig druk uit, zonder evenwel te for-
ceren, om de continuïteit van de lijmnaad te onderbreken.
Het begin van het losweken kan enkele minuten duren. Wanneer de lijm is
losgeweekt zal deze niet opnieuw weer aan het metaal vastplakken.
Wanneer de hoek van de ruit kan worden opgelicht, kunt u er een kunststoffen
wig onder plaatsen. Ga zeer voorzichtig te werk, en oefen geen al te hoge druk
uit. Dit kan de ruit breken.
10. Wanneer de hoek van de ruit is opgelicht, kunt u de opwarm-procedure herhalen over de lengte en de breedte van
de ruit, en zo de wiggen één voor één onder de ruit plaatsen.
Ruit Materiaal
Breekbaarheid
van het glas
Duur verwijderen ruiten
afhankelijk van de grootte van het
voertuig
Voorruit Gelaagd glas +++ 20 min tot 1 uur
Achterruit
Gehard glas + 10 tot 20 minutenHoekraampjes zijkant
Zijraampjes
Deblokkeer inductor
art. code. 053366
Omschrijving
De inductor voor het deblokkeren van onderdelen wordt gebruikt voor het intens opwarmen van vastgeroeste of ge-
blokkeerde onderdelen, zoals bouten of moeren. Deze inductor kan ook gebruikt worden voor het verwijderen van
afdichtingsmateriaal van het chassis van vrachtauto’s of auto’s, grotere lasverbindingen of voor het vormen van metaal.
Gebruik
Voor het verwijderen van een vastgeroeste of geblokkeerde bout / moer
1. Kies de module Auto of stel het vermogen in op een zeer hoog niveau (80 tot 100 % van het
vermogen).
2. Plaats de inductor op de moer (zie afbeelding hiernaast).
3. Start het opwarmen en laat dit enkele seconden duren.
4. Draai de bout of moer los.
64
GYSDUCTION AUTO
NL
Vertaling van de oorspronkelijke gebruiksaanwijzing
Inductor voor het ve-
rwijderen van stickers
art. code. 053359
Omschrijving
Deze inductor is geschikt voor het snel (binnen enkele minuten) losweken en verwijderen van deurlijsten,
monogrammen, logo’s en stickers, zonder de lak van het voertuig te beschadigen.
Gebruik
Voor het opwarmen van gelakt plaatwerk
1. Kies de Automatische module of stel het vermogen in op een laag niveau (10 tot 30% van de maximale capaciteit).
2. Plaats de inductor precies boven het op te warmen oppervlak. Er mag geen contact zijn tussen de inductor en de op
te warmen zone.
3. Terwijl u opwarmt moet u een circulaire of een heen en weer gaande beweging maken.
Wanneer de inductor te lang op dezelfde zone gericht blijft, kan de lak verbranden. Om dit te voorkomen, is het noodza-
kelijk om de inductor steeds te bewegen (heen en weer of circulair).
Voor het losweken van (vinyl) stickers of gelijmde strippen.
Voer de drie hierboven beschreven stappen uit (zie voor het
opwarmen van gelakt plaatwerk). Warm gedurende enkele
seconden op en probeer één kant van het element op te lich-
ten. Als dit makkelijk gaat is de temperatuur van de inductor
juist afgesteld. Zoniet, laat het apparaat enkele seconden lang
opwarmen en probeer het opnieuw.
Bij sommige onderdelen, die al heel lang vastgelijmd zijn, kan het nodig zijn om langer op te warmen. Wanneer een stic-
ker oververhit is, wordt hij vaak zacht en opgezwollen. Laat, wanneer dit gebeurt, de sticker afkoelen en probeer opnieuw
om hem los te peuteren en te verwijderen. Waarschuwing : Let goed op dat u de lak van de carrosserie niet verbrandt !
Wanneer het plaatwerk voldoende opgewarmd is, zullen de strippen zonder veel moeite loslaten en de lijm meetrekken.
Losweken van strippen op een carrosserie
De strippen op de zijkant van de carrosserie kunnen op dezelfde manier verwijderd worden als (vinyl) stickers. Een
hoger vermogen of een langere opwarmingsduur kunnen nodig zijn bij dikkere strippen. Het metaal onder de strippen
ligt verder weg van de inductor.
1. Kies de Automatische module of stel het vermogen in op een matig niveau (40 tot 60% van de maximale sterkte)
2. Plaats de inductor parallel aan de werkzone, om zo gelijkmatig mogelijk op te kunnen warmen.
3. Maak bij voorkeur een heen en weer gaande beweging over de lengte van het element. Begin bij een uiteinde van
het te verwijderen element. Voer langzaam een heen en weer gaande beweging uit over enkele centimeters, totdat
het element zich makkelijk los laat trekken.
4. Verplaats dan langzaam de inductor een eindje verder, en verwijder de rest van het element
Het plakband wordt meestal verwijderd met de strip. Als het plakband of de kleefstof op de carrosserie blijft plakken kunt
u de bewegingen langzamer uitvoeren, of het vermogen iets verhogen.
65
GYSDUCTION AUTO
NL
Vertaling van de oorspronkelijke gebruiksaanwijzing
Voor het opwarmen van onderdelen van de carrosserie
In de winter, en in gebieden met een koeler klimaat, moet het plaatwerk van een voertuig waarvan men (vinyl) stic-
kers of andere elementen wil losweken op voorhand voorverwarmd worden.
1. Stel het vermogen in op 10 tot 30% van de maximale capaciteit.
2. Maak vervolgens circulaire of heen en weer gaande bewegingen op de voor te verwarmen zone.
Inductor uitdeuken
zonder naspuiten
art. code. 054776
Omschrijving
De uitdeuk-inductor is geschikt voor het repareren van lichte deuken in het plaatwerk, veroorzaakt door bijvoorbeeld ha-
gel, zonder naspuiten. Het is niet nodig om het interieur van het voertuig te verwijderen, daar het opwarmen plaatsvindt
vanaf de buitenkant en zich beperkt tot het plaatwerk.
Gebruik
73502 - V2 - 04/11/2019
FR
EN
DE
ES
RU
2-6 / 42-43
7-11 / 42-43
12-16 / 42-43
17-21 / 42-43
22-26 / 42-43
INDUCTEUR DÉBOSSELAGE
DENT PULLING INDUCTOR
AUSBEULINDUKTOR
INDUCTOR DE DESABOLLO
ИНДУКТОР ДЛЯ ПРАВКИ
INDUTOR DE REMOÇÃO
INDUTORE TIRA BOLLI
UITDEUKEN ZONDER SPUITEN
(UZS) INDUCTIE HULPSTUK
NL
IT
PT
27-31 / 42-43
32-36 / 42-43
37-41 / 42-43
Raadpleeg de meegeleverde handleiding voor
adviezen betreffende het gebruik.
Spiraal inductor
art. code. 054783
Omschrijving
Deze inductor is geschikt voor het opwarmen, deblokkeren en eenvoudig verwijderen van mechanische onderdelen
binnen enkele seconden : vastzittende bouten/moeren, schroeven, uitlaatenzen, trekstangen, schokdempers enz.
Gebruik
73502_V1_20/11/2019
FR
2-8 / 49-50
www.gys.fr
EN
9-14 / 49-50
DE
15-21 / 49-50
RU
29-35 / 49-50
IT
43-48 / 49-50
ES
22-28 / 49-50
NL
36-42 / 49-50
Find more languages of user manuals on our website
INDUCTEUR SPIRALE
COILED INDUCTOR
SPIRALINDUKTOR
INDUCTOR ESPIRAL
СПИРАЛЬНЫЙ ИНДУКТОР
SPIRAAL INDUCTOR
INDUTTORE FILO SPIRALE
Raadpleeg de meegeleverde handleiding
voor adviezen betreffende het gebruik.
66
GYSDUCTION AUTO
NL
Vertaling van de oorspronkelijke gebruiksaanwijzing
SLIJTONDERDELEN
Vezeldoek voor inductoren
Het glasvezeldoek voor de ruit-inductoren en deblokkeer-inductoren kan door gebruik verslijten. Deze doeken kunnen
worden vervangen. GYS levert de volgende referenties :
053854 SET VAN 5 GLASVEZELDOEKEN VOOR RUIT-INDUCTOR + LIJM
053847 SET VAN 10 GLASVEZELDOEKEN VOOR DEBLOKKEER INDUCTOR + LIJM
059108 1 GLASVEZELDOEK STICKER + LIJM
Afkoelende spray
Deze spray is zeer nuttig tijdens het uitdeuken zonder spuiten, en voor het laten afkoelen van verwarmde onderdelen.
048898 SET VAN 12 AFKOELENDE SPRAYS -50°C / 400ml
CODES STORING
CODE BETEKENIS
E - 1 Blaasbalgje geactiveerd tijdens het onder spanning stellen van het apparaat.
E - 2 Knop ruit-inductor is geactiveerd tijdens het aanzetten van het apparaat.
E - 3 AAN/UIT knop voorop het apparaat geactiveerd bij het aanzetten van het apparaat.
E - 4 Overspanning in de inductor (of omdat het warm is, of vanwege kortsluiting).
E - 5 Inductor defect (draad doorgesneden of niet aangesloten).
NO– ACC Accessoire niet aangesloten.
AC - Accessoire niet herkend.
GARANTIE
De garantie dekt alle gebreken en fabricagefouten gedurende twee jaar vanaf de aankoopdatum (onderdelen en
arbeidsloon).
De garantie dekt niet :
• Alle overige schade als gevolg van vervoer.
• De gebruikelijke slijtage van onderdelen (Bijvoorbeeld : kabels, klemmen, enz.).
• Incidenten als gevolg van verkeerd gebruik (verkeerde elektrische voeding, vallen, ontmanteling).
• Gebreken ten gevolge van de gebruiksomgeving (vervuiling, roest, stof).
In geval van storing moet het apparaat teruggestuurd worden naar uw distributeur, samen met:
- Een gedateerd aankoopbewijs (betaalbewijs, factuur ...).
- Een beschrijving van de storing.
67
GYSDUCTION AUTO
IT
Traduzione delle istruzioni originali
MADE IN FRANCE
ISTRUZIONI DI SICUREZZA
Questo manuale descrive il funzionamento di questo apparecchio
e le precauzioni da seguire per vostra sicurezza. Leggerlo atten-
tamente prima dell’uso e conservarlo con cura per poterlo consul-
tare successivamente. Queste istruzioni devono essere lette e com-
prese prima dell’uso. Ogni modifica o manutenzione non indicata
nel manuale non deve essere effettuata. Ogni danno fisico o ma-
teriale dovuto ad un uso non conforme alle istruzioni presenti in
questo manuale non potrà essere considerato a carico del fabbri-
cante. In caso di problema o d’incertezza, si prega di consultare
una persona qualificata per manipolare correttamente il disposi-
tivo. Questo apparecchio può essere utilizzato solo per riscaldare
materiali ferrosi entro i limiti indicati sull’apparecchio e sul ma-
nuale. Bisogna rispettare le istruzioni relative alla sicurezza. In
caso di uso inadeguato o pericoloso, il fabbricante non potrà es-
sere ritenuto responsabile. Qualsiasi altro utilizzo non menzionato
in questo manuale è strettamente vietato e potenzialmente perico-
loso. Il prodotto è semi-automatico e richiede la presenza di un
operatore.
Questo dispositivo può essere usato da bambini di età superiore
a 8 anni, da persone con capacità fisiche, sensoriali o mentali ri-
dotte e da persone senza esperienza o conoscenze, purchè esse
siano correttamente sorvegliate o se le istruzioni relative all’uso
del dispositivo in sicurezza siano state loro trasmesse e qualora i
rischi intrapresi siano stati presi in considerazione. I bambini non
devono giocare con il dispositivo. La pulizia e la manutenzione
non devono essere effettuate da bambini non sorvegliati.
Non usare il dispositivo se il cavo di alimentazione o la presa
sono danneggiati.
Non coprire il dispositivo.
Rischio di esplosione e d’incendio!
Non utilizzare l’apparecchio in atmosfera esplosiva.
Tenere le bombole aerosol e altri recipienti pressurizzati lon-
tano dall’impianto di riscaldamento per induzione.
Attenzione rischio di calore e di amma
Non surriscaldare i pezzi e gli adesivi.
essere vigili al fuoco, tenere un estintore in prossimità.
Non posizionare l’apparecchio sopra o in prossimità di super-
fici infiammabili.
Non installare l’apparecchio vicino a sostanze infiammabili.
Attenzione! Supercie molto calda. Rischio di ustioni.
I pezzi e le attrezzature calde possono causare delle ustioni.
Non toccare i pezzi caldi a mani nude.
Attendere il raffreddamento dei pezzi e delle attrezzature
prima di manipolarli.
68
GYSDUCTION AUTO
IT
Traduzione delle istruzioni originali
MADE IN FRANCE
Controllare che gioielli (anelli in particolare) o pezzi metallici
non siano in prossimità del sistema d’induzione e dell’indut-
tore quando quest’ultimo è in funzione.
Togliere qualsiasi gioiello o oggetto metallico dal vostro corpo
prima di utilizzare quest’apparecchio.
Le persone con impianti in metallo nel corpo non devono utiliz-
zare quest’apparecchio.
In caso di ustione risciacquare con abbondante acqua e
consultare immediatamente un medico.
Pericolosità di gas e vapori.
Tenere la testa lontano dai fumi e non respirare i vapori.
Lavorando all’interno, aerare l’ambiente e/o utilizzare un estart-
tore d’aria per evacuare i vapori e i gas.
Il riscaldamento ad induzione di alcuni materiali, adesivi e fluidi
può produrre vapori e gas. La respirazione di questi gas e vapo-
ri può essere pericolosa per la vostra salute. Per esempio il riscal-
damento dell’uretano libera un gas : il cianuro d’idrogeno, che
può essere mortale agli essere umani.
Se la ventilazione è insufficiente, utilizzare un respiratore certificato.
Leggere le schede tecniche d’igien e sicurezza dei prodotti
(MSDS) e le istruzioni del fabricante per gli adesivi, i flussi, i me-
talli, i ricambi, i rivestimenti, i detergenti e i decapanti.
Non utilizzare il riscaldamento sulla parti in sgrassaggio o polve-
rizzazione. Il calore può reagire con i vapori e formare gas for-
temente tossici ed irritanti.
Lavorare in uno spazio limitato solo se è ben aerato o utilizzando
un respiratore certificato. Assicurarsi di avere una persona qualifi
-
cata per la sorveglianza. I vapori e i gas risultanti dal riscalda-
mento possono sostituirsi all’ossigeno dell’aria e provocare un
malore o la morte. Assicurarsi della qualità dell’aria che respirate.
Non surriscaldare i metalli, quali l’acciaio galvanizzato, rivestito
di piombo o di cadmio, a meno che il rivestimento non sia rimosso
dalla superficie da riscaldare, che l’aria sia ben ventilata e, se
necessario, indossare un respiratore certificato. Le fusioni e tutti i
metalli contenenti questi elementi possono liberare vapori tossici
se surriscaldati. Far riferimento al MSDS per le informazioni rela-
tive alle temperature.
Attenzione pericolo elettrico.
Attenzione pericolo di radiazioni ottiche quando gli elementi
metallici riscaldati raggiungono la fusione.
Attenzione! Campo magnetico importante. Le persone che
hanno impianti attivi o passivi devono essere informate.
Nessuna misura di protezione supplementare è necessaria quando
la macchina è usata da sola. Restrizioni e/o misure di protezione
supplementari possono essere necessarie negli altri casi.
69
GYSDUCTION AUTO
IT
Traduzione delle istruzioni originali
MADE IN FRANCE
In caso di manutenzione i livelli di campo devono essere verificati
prima del riavvio dell’apparecchio.
Durante il funzionamento non avvicinare l’induttore al livello della
testa o degli organi vitali.
I protatori di stimolatori cardiaci non devono avvicinarsi all’appa-
recchio. Rischio di disturbi/interferenze del funzionamento degli
stimolatori cardiaci in prossimità dell’apparecchio.
Consultare un medico proma avvicinarsi al sistema di riscalda-
mento ad induzione.
Rischi di proiezioni di metallo o collanti.
Indossare occhiali di sicurezza con protezioni laterali o usare
uno schermo sul viso.
Indossare un abito da lavoro
Indossare guanti.
Non ostruire le aperture della ventilazione. Riferirsi alla parte ins-
tallazione prima di usare il dispositivo.
Collegamento :
Questo dispositivo deve essere collegato ad una presa di cor-
rente con messa a terra.
Questo materiale destinato agli ambienti industriali (classe A)
non è progettato per essere utilizzato in un sito residenziale in
cui la corrente elettrica è fornita dalla rete pubblica a bassa
tensione. Potrebbero esserci difficoltà potenziali per assicurare
la compatibilità elettromagnetica in questi siti, a causa delle
perturbazioni condotte o irradiate.
Questo materiale è in conformità con la CEI 61000-3-12
Questo materiale è conforme alla CEI 61000-3-11.
Manutenzione :
Se il cavo di alimentazione è danneggiato, deve essere sosti-
tuito dal fabbricante, dal suo servizio post-vendita o da persone
di qualifiche simili per evitare pericoli.
Avvertenze ! Scollegare sempre la schede dalla presa elettrica
prima di effettuare qualsiasi manipolazione sul dispositivo.
All’interno, le tensioni e l’intensità sono elevate e pericolose.
Regolarmente, togliere la custodia metallica e spolverare con
una pistola ad aria. Cogliere l’occasione per far verificare le
connessioni elettriche con un utensile isolato da persone quali-
ficate.
Non usare in nessun caso solventi o altri prodotti di pulizia ag-
gressivi.
Regolamentazione:
Dispositivo in conformità con le direttive europee,
La dichiarazione di conformità è disponibile sul nostro sito internet.
Marchio di conformità EAC (Comunità Economica Eurasiatica)
70
GYSDUCTION AUTO
IT
Traduzione delle istruzioni originali
MADE IN FRANCE
•Materiale conforme alle normative marocchine.
La dichiarazione Cم (CMIM) di conformità è disponibile sul nostro
sito (vedi scheda del prodotto)
Smaltimento :
Questo materiale è soggetto alla raccolta differenziata. Non
deve essere smaltito con i rifiuti domestici.
Il fabbricante di questo prodotto partecipa alla valorizzazione
degli imballi contribuendo ad un sistema globale di smistamento,
raccolta differenziata e riciclaggio dei rifiuti degli imballaggi
domestici.
Prodotto riciclabile che riporta un ordinamento di smistamento
secondo il decreto n°2014-1577.
IDENTIFICAZIONE
Sul retro del prodotto si trovano le seguenti informazioni :
• Nome e indirizzo del fabbricante
• Modello
• Numero di serie del prodotto
• Tensione d’utilizzo
• Potenza del prodotto
Sia il modello che il numero di serie del prodotto devono essere menzionati ad ogni intervento di tecnici o per richiedere
pezzi di ricambio.
ALIMENTAZIONE ELETTRICA
Il Gysduction è fornito con una presa 16A di tipo CEE7/7 e deve essere collegato a un’alimentazione elettrica monofase
230 V (50/60 Hz) a tre li con il neutro collegato a terra.
Vericare che l’alimentazione e le protezioni (fusibile e/o disgiuntore) siano compatibili con la corrente necessaria in uso.
Il prodotto è protetto per il funzionamento su un gruppo elettrogeno.
DISPOSITIVI DI SICUREZZA
Il prodotto dispone della sicurezza PROTEC 400. Protetto contro le sovratensioni aldilà di 300V e contro i scollega-
menti del neutro.
Durante un utilizzo intensivo, l’induttore, i cavi , l’elettronica e il trasformatore di potenza si riscaldano. Per evitare
ogni malfunzionamento dovuto ai surriscaldamenti, il Gysduction è dotato di un circuito di raffreddamento ad aria.
Una protezione termica interrompe il funzionamento quando la temperatura interna al prodotto diventa troppo
importante.
• Gli induttori sono isolati per proteggere l’utilizzatore da eventuali scosse elettriche.
Il Gysduction è dotato di una sicurezza contro un riscaldamento accidentale. Se il comando di riscaldamento viene
azionato inavvertitamente (pressione sul pedale pneumatico o sul pulsante di comando dell’induttore), e se l’indut-
tore non è in contatto con un metallo da scaldare per un periodo di tempo superiore al minuto, allora il dispositivo
emette un BIP sonoro e s’interrompe automaticamente. Rilasciare il comando di riscaldamento per poter riprendere
un ciclo di riscaldemento normale.
DESCRIZIONE DEL PRODOTTO
Il Gysduction è composto da un induttore collegato a una fonte d’energia elettrica alternata mezza frequenza. Quando
un comando di riscaldamento viene lanciato, un potente campo magnetico viene emesso dall’induttore. Vicino a metalli
ferrosi, le correnti indotte creeranno un aumento di temperatura nel metallo, senza contatto sico.
Il Gysduction Auto può essere utilizzata per molteplici applicazioni ( a seconda dell’induttore scelto):
- scollare qualsiasi logo, adesivi, modanature, proli plastici incollati alla carrozzeria.
- disinceppare e sbloccare i pezzi metallici (bulloni, viti, billette...).
- togliere i vetri incollati (lunotto posteriore, tetto panoramico).
- Togliere gli anti-ghiaia e le guarnizioni di tenuta.
71
GYSDUCTION AUTO
IT
Traduzione delle istruzioni originali
MADE IN FRANCE
Il prodotto riscalda l’acciaio ma non è adatto per riscaldare l’alluminio, il rame e lo zinco.
ISTRUZIONI D’USO
2
1
3
4
6
8
9
10
7
5
1 Tasti di regolazione
2 Schermo digitale
3 Indicatore messa in funzione
4 Indicatore modalità Auto
5 Indicatore modalità Manuale
6 Indicatore di potenza massima
7 Tasto di selezione della modalità
8 Indicatore di protezione termica
9 Zona di riscaldamento ottimale
10 Indicatore «No load»
No-Load In assenza del pezzo da riscaldare, o se l’induttore si avvicina a materiale non
ferroso, si accende l’indicatore « no-load » (10) quando una pressione viene
esercitata su uno dei comandi di riscaldamento.
Modalità Automatioca In questa modalità, il Gysduction si adatta al pezzo che riscalda (taglia - sp-
essore) e alla distanza tra questo pezzo e l’induttore. Conserva una potenza
di riscaldamento costante e ottimale simboleggiata dalla zona OK (9) dell’in-
terfaccia. Il dispositivo non riscalda mai alla potenza massimale in questa
modalità.
Per entrare in questa modalità:
La modalità Automatica è la modalità predenita. Se tuttavia il dispositivo è
in modalità Manuale, pemere brevemente sul pulsante MODE (7) no a che il
LED davanti all’indicazione « AUTO » (4) si accende.
Schermo:
Il display mostra l’ultimo valore in percentuale utilizzato dalla macchina per
mantenere una potenza costante e ottimale secondo le condizioni di riscal-
damento. Questo valore corrisponde alle regolazioni utilizzate in modalita
Manuale per ottenere lo stesso risultato, nelle medesime condizioni. Così,
Ainsi, si l’utilisateur juge la chauffe préconisée par le Gysduction trop faible
ou trop forte, il peut calquer cette valeur dans le mode manuel et la faire
varier à sa guise pour atteindre la puissance désirée.
Modalità Manuale In questa modalità, l’utilizzatore seleziona lui stesso la potenza di riscalda-
mento desiderata.
Per entrare in questa modalità:
Premere brevemente sul pulsante MODE (7) no a che il LED davanti all’in-
dicazione « MANUAL » (5) si accende.
Funzionamento :
Il display digitrale (2) indica la percentuale di potenza massima (2400W)
che l’induttore può trasmettere al pezzo da riscaldare. Utilizzare i pulsanti di
regolazione (1) per regolare nella potenza desirata.
La modalità manuale permette di raggiungere la potenza massima del Gysduction. A questa potenza, il
riscaldamento dei pezzi può essere molto veloce. La potenza riscaldante sarà tanto più elevata quanto
l’induttore sarà più vicino al pezzo.
72
GYSDUCTION AUTO
IT
Traduzione delle istruzioni originali
MADE IN FRANCE
Segnalazione sonora del
riscaldamento
Un BIP sonoro può essere attivato per indicare l’attività di riscaldamento. Il
BIP risuona non appena il riscaldamento è efcace e la sua frequenza varia
a seconda della posizione dell’induttore rispetto alla parte da riscaldare. Più
l’induttore è vicino, più la frequenza è elevata.
Per attivare / disattivare
questa funzione:
Premere il pulsante MODE (7) per 3 secondi per attivare / disattivare questo
BIP.
Soia protezione termica (8) Questa spia si accende per indicare che il prodotto è entrato in protezione
termica a causa di un surriscaldamento. Quando questa spia è accesa, il pro-
dotto è inoperante. Essa si spegne quando il prodotto si è sufcientemente
raffreddato.
Non è possibile riprendere il riscaldamento prima di questo momento.
ACCENSIONE DEL PRODOTTO
1
Accendere il dispositivo (1)
Connessione dell’accessorio (2)
1. Selezioanre l’induttore desiderato.
2. Sollevare la valvola del connettore del Gysduction.
3. Collegare il connettore dell’induttore al Gysduction.
4. Richiudere la valvola per bloccare la connessione.
5. Lo schermo indica il numero di accessori collegati (es. AC1)
Connessione del pedale di comando (3)
Il Gysduction può essere fornito con un pedale di controllo (rif.
055490), necessario per l’utilizzo di induttori di degrippaggio, ade-
sivi e spirali.
Collegare il cavo al Gysduction e al pedale per renderlo operativo.
Attivazione del riscaldamento
Gli induttore vetro e di riparazione sono dotati di un pulsante di
riscaldamento. Le altre tre funzioni con il pedale di comando.
Avvicinare l’induttore del pezzo metallico da riscaldare e poi pre-
mere il pulsante dell’induttore o il pedale di comando per attivare
il riscaldamento.
23
DESCRIZIONE & UTILIZZO DEGLI INDUTTORI
Ogni manipolazione descritta di seguito richiedono pratica. Non esitare a sperimentare realiz-
zando dei test su delle lamiere o su degli scarti.
Induttore vetro
rif. 053373
73
GYSDUCTION AUTO
IT
Traduzione delle istruzioni originali
MADE IN FRANCE
Descrizione
Questo induttore è specialmente progettato per scollare le lamiera saldo-incollate, decapare gli anti-ghiaia delle parti
inferiore dell’automobile. Permette anche di togliere i vetri incollati (vetro anteriore, tettuccio,ecc.)
La modalità Automatica è particolarmente raccomandata per lo scollamento del vetro.
Rimozione di un vetro
◊ Preparazione
1. Rimuovere preventivamente tutte le eventuali guarniture: vetri riempiti con modanature aggraffate, in metallo o plas-
tica. Per le modanature che non possono essere sollevate, riscaldare la saldatura di sostegno dall’interno.
2. E’ raccomandato rimuovere ugualmente ogni guarnizione interna e tutti i componenti come clip e spilli che possono
servire a mantenere il vetro.
3. Scollegare le antenne e i circuiti di sbrinamento dei vetri.
4. Incollare un nastro adesivo di protezione attorno al vetro in modo da evitare di danneggiare le superci verniciate
durante la manipolazione.
5. Incollare un nastro adesivo di protezione sull’induttore vetro per evitare di grafare il vetro. Sostituire il nastro adesivo
dopo ogni volta che si toglie un vetro.
6. Pulire il vetro completamente prima di cominciare a toglierlo.
◊ Fase di riscaldamento & prelevamento del vetro
Il rischio maggiore di danno alla vernice si verica all’inizio del riscaldamaneto, tenedo conto della difcoltà di
inserire dei blocchetti tra il vetro e la carrozzeria.
Inizia in un angolo e riscalda su ciascun lato di questo angolo, lavorando verso angoli opposti.
Se il vetro è danneggiato, iniziare dall’angolo da riparare e lavorare verso la parte intatta del vetro.
Bordi saldati su cui poggiano i giunti adesivi
Superci verniciate visibili da non riscaldare
Indicazioni di avanzamento del riscaldamento
7. Posizionare l’induttore di fronte al giunto di colla di uretano per una facile rimozione del vetro.
Alcuni veicoli hanno bordi saldati stretti, il riscaldamento dell’induttore può indurre la supercie verniciata visibile, compromet-
tendone eventualmente l’aspetto. In questo caso è opportuno raffreddare la supercie esterna con un panno umido o uno spray
raffreddante. Allontanare l’induttore verso il centro del vetro in modo che sia almeno a cm dalla parte verniciata visibile.
8. Spostare l’induttore avanti e indietro di circa 30 cm su entrambi i lati adiacenti all’angolo. Trovare la velocità di ris-
caldamento adeguata: un ritmo troppo lento riscalda eccessivamente in modo localizzato tanto da essere inefcace
perchè riduce il calore prodotto a livello del bordo saldato. Un ritmo elevato non permette di riscaldare sufcientemente
il bordo saldato e il giunto di colla. Un leggero fumo si libera per indicare che la temperatura ottimale del cordone di
colla uretanica è stata raggiunta.
Se un fumo denso appare, spegnere il riscaldamento immediatamente. Allontanarsi dalla zona per non respirare i vapori
e provare a capirne la causa. Il riscaldamento della colla uretanica provoca l’emissione di cianuro di idrogeno, molto
pericolosa per l’uomo.
9. Esercitare una pressione all’interno del veicolo senza forzare per rompere la
continuità della guarnizione.
Creare un avvio di partenza può prendere qualche minuto. Una volta che la
guarnizione è scollata, non si riattacca più al metallo.
Quando l’angolo del vetro si solleva, far scorrere un cuneo di plastica nello
spazio libero tra il vetro e il bordo saldato. Essere prudenti e non esercitare una
forza troppo importante che può rompere il vetro.
74
GYSDUCTION AUTO
IT
Traduzione delle istruzioni originali
MADE IN FRANCE
10. Una volta che l’angolo del vetro è stato rimosso, ripetere il processo di riscaldamento lungo la lunghezza e l’altezza
del vetro mentre si spostano gli spessori sotto il vetro mentre si procede.
Vetro Materiale Fragilità del vetro
Tempo di erogazione
a seconda della dimensione del veicolo
Para-brezza anteriore Vetro laminato +++ 20 min a 1 h
Finestra posteriore
Vetro ricotto + 10 a 20 minVetri laterali
Finestre laterali
Induttore di sblocco
réf. 053366
Descrizione
L’induttore sbloccante viene utilizzato per un riscaldamento intenso delle parti arrugginite o bloccate come dadi e bul-
loni. Questo induttore può anche essere utilizzato per rimuovere la calafature del telaio dei camions o dei cofani delle
vetture, per saldare grossi connettori o la formatura dei metalli.
Utilizzo
Per rimuovere un dado / bullone bloccato o arruginito :
1. Scegliere la modalità Auto o regolare la potenza a un livello molto alto (80 a 100% della
potenza).
2. Posizionare l’induttore di sblocco sul dado come illustrato di seguito.
3. Avviare di riscaldamento e farlo durare qualche secondo.
4. Allentare il dado o il bullone da sbloccare.
Induttore adesivo
rif. 053359
Descrizione
Questo induttore è progettato per scollare bachette, monogrammi, logo, adesivi publicitari e decorativi senza
deteriorarli.
Utilizzo
Per riscaldare le lamiere verniciate
1. Scegliere la modalità Auto o regolare la potenza a un livello basso (10 a 30% della sua capacità di riscaldamento
massimale).
2. Posizionare l’induttore giusto sotto la zona da riscaldare. Non ci deve essere troppo contatto tra l’induttore e la zona o
l’elemento da risacaldare.
3. Durante l’attivazione del riscaldamento, esercitare un movimento circolare o avanti e indietro sulla zona da riscaldare.
Se l’induttore resta troppo a lungo su una stessa zona la vernice può bruciare. Per evitare ciò, mantenere l’induttore cos-
tantemente in movimento (va-e-vieni o circolare).
75
GYSDUCTION AUTO
IT
Traduzione delle istruzioni originali
MADE IN FRANCE
Per scollare le decalcomanie, adesivi in vinile o proli incollati
Realizzare le tre tappe descritte qui sopra (cfr. per riscaldare le
lamere verniciate). Riscaldare per qualche secondo e provare
a sollevare un bordo dell’elemento. Se inizia a scollarsi facil-
mente verso l’alto, è stata raggiunta la temperatura richiesta,
se no, continuare il riscaldamento ancora per qualche secondo
e provare di nuovo.
Certi elementi incollati da molto tempo, necessitano di un tempo di riscaldamento più lungo. Se un adesivo viene sur-
riscaldanto diventa morbido e gono. Se si verica questo, lasciar raffreddare e provare di nuovo a togliere e sbucciare
l’adesivo. Far attenzione a non bruciare la vernice ! Se la lamiera è sufcientemente riscaldata le cose incollate dovrebbero
staccarsi facilmente portando con loro la colla.
Per i depositi di modanature incollate sulla carrozzeria.
Le modanature ai lati della carrozzeria vengono tolte allo stesso modo delle decalcomanie e degli adeisivi. Una potenza
più elevata o un tempo lungo sono necessari per le modanature spesse. Il metallo sotto la modanatura è più lontano
dall’induttore.
1. Scegliere la modalità Auto o regolare la potenza a un livello medio (40 a 60% di riscaldamento massimale)
2. Posizionare l’induttore parallelamente alla supercie di lavoro per realizzare una distribuzione uniforme del calore.
3. Privilegiare un movimento va e vieni sulla lunghezza della modanatura. Iniziare da un’estremità della modanatura.
Effettuare lentamente un movimento di va e vieni su qualche centimetro no a che è possibile scollare facilmente
l’estremità della modanatura senza sforzo.
4. Spostare allora lentamente l’induttore lungo la modanatura, più lontano, staccandola dalla carrozzeria.
Il nastro adesivo di solito viene tolto con la modanatura. Se l’adesivo o il nastro resta incollato alla carrozzeria, avanzare
più lentamente o aumentare la potenza.
Per il riscaldamento di parti della carrozzeria
In inverno o nei nei climi freddi, la carrozzeria di un veicolo sul quale si desidera incollare decalcomanie o adesivi deve
essere preriscaldata in ofcina per permettere il ssaggio degli adesivi.
1. Regolare la potenza a un livello basso (10 a 30% della sua capacità di riscaldamento massimale)
2. Esercitare dei movimenti circolari o di va e vieni sulla zona da pre-riscaldare.
Induttore riparazione
ammaccature senza
vernice
rif. 054776
Descrizione
L’indutore tira bolli è stato concepito per la riparazione di piccoli bolli sulle carrozzerie, causati da impatti
di grandine, per esempio, senza bisogno di togliere la vernice. Non è più necessario spogliare gli interni degli elementi
da raddrizzare, poiché il riscaldamento è fatto dall’esterno e rimane limitato.
76
GYSDUCTION AUTO
IT
Traduzione delle istruzioni originali
MADE IN FRANCE
Utilizzo
73502 - V2 - 04/11/2019
FR
EN
DE
ES
RU
2-6 / 42-43
7-11 / 42-43
12-16 / 42-43
17-21 / 42-43
22-26 / 42-43
INDUCTEUR DÉBOSSELAGE
DENT PULLING INDUCTOR
AUSBEULINDUKTOR
INDUCTOR DE DESABOLLO
ИНДУКТОР ДЛЯ ПРАВКИ
INDUTOR DE REMOÇÃO
INDUTORE TIRA BOLLI
UITDEUKEN ZONDER SPUITEN
(UZS) INDUCTIE HULPSTUK
NL
IT
PT
27-31 / 42-43
32-36 / 42-43
37-41 / 42-43
Consultare il manuale fornito con il
prodotto per i consigli di utilizzo.
Induttore a spirale
rif. 054783
Descrizione
Questo induttore è stato progettato per riscaldare e rimuovere facilmente tutte le parti metalliche in pochi secondi:
bulloni/dadi bloccati, viti, ecc...
Utilizzo
73502_V1_20/11/2019
FR
2-8 / 49-50
www.gys.fr
EN
9-14 / 49-50
DE
15-21 / 49-50
RU
29-35 / 49-50
IT
43-48 / 49-50
ES
22-28 / 49-50
NL
36-42 / 49-50
Find more languages of user manuals on our website
INDUCTEUR SPIRALE
COILED INDUCTOR
SPIRALINDUKTOR
INDUCTOR ESPIRAL
СПИРАЛЬНЫЙ ИНДУКТОР
SPIRAAL INDUCTOR
INDUTTORE FILO SPIRALE
Consultare il manuale fornito con il
prodotto per i consigli di utilizzo.
CONSUMABILI
Lamiere per induttori
La tela in bra di vetro presente sugli induttori vetro e sbloccaggio può usurarsi in seguito all’utilizzo e all’attrito contro i
pezzi da riscaldare. Queste tele possono essere sostituite, e GYS mette a disposizione i riferimenti dei kits seguenti per
permettere questa sostituzione.
053854 SET DI 5 PROTEZIONI INDUTTORE VETRO + COLLA
053847 SET DI 10 PROTEZIONI INDUTTORE SBLOCCAGGIO + COLLA
059108 1 PROTEZIONE INDUTTORE ADESIVO + COLLA
Spray raffreddante
Questo spray raffreddante è particolarmente utile durante l’operazione di riparazione ammaccature senza vernice e
può raffreddare dei pezzi riscaldati.
048898 SET DI 12 SPRAY RAFFREDDANTI -50°C / 400ml
77
GYSDUCTION AUTO
IT
Traduzione delle istruzioni originali
MADE IN FRANCE
CODICI ERRORE
CODICE SIGNIFICATO
E - 1 Pedale azionato nel momento della messa sotto tensione.
E - 2 Pulsante induttore vetro azionato nel momento della messa sotto tensione.
E - 3 Pulsante ON/OF nella parte anteriore azionato nel momento della messa sotto tensione.
E - 4 Sovracorrente nell'induttore (sia perchè esso è molto caldo, sia perchè c'è un corto circuito).
E - 5 Induttore difettoso (lo tagliato o scollegato).
NO– ACC Accessorio non collegato.
AC - Accessorio non riconosciuto.
GARANZIA
La garanzia copre qualsiasi difetto di fabbricazione per 2 anni, a partire dalla data d’acquisto (pezzi e mano d’opera).
La garanzia non copre:
• Danni dovuti al trasporto.
• La normale usura dei pezzi (Es. : cavi, morsetti, ecc.).
• Gli incidenti causati da uso improprio (errore di alimentazione, cadute, smontaggio).
• I guasti legati all’ambiente (inquinamento, ruggine, polvere).
In caso di guasto, rinviare il dispositivo al distributore, allegando:
- la prova d’acquisto con data (scontrino, fattura...)
- una nota esplicativa del guasto.
78
GYSDUCTION AUTO
PIÈCES DÉTACHÉES / SPARE PARTS LIST / LISTE DER ERSATZTEILE / RECAMBIOS / ДЕТАЛИРОВКА /
ONDERDELEN / PEZZI DI RICAMBIO
1
Clavier / Keypad / Bedienfeld / Teclado / Панель управления / Bedieningspaneel / Tastiera
51952IndX
2
Ventilateur / Fan / Ventilator / Ventilador / Вентилятор / Ventilator / Ventilatore
51048
3
Connecteur pneumatique / Pneumatic connector / Pneumatischer Anschluss / Conector neumático /
Пневматический соединитель / Pneumatische aansluiting / Connettore pneumatico
71179
4
Connecteur pour inducteur / Connector for inductor / Anschluss für Induktor / Conector para inductor
/ Разъем для индуктора / Aansluiting inductor / Connettore per induttore
S91534
5
Circuit de commande / Control circuit / Mikrokontrollerplatine / Circuito de commando / Плата
управления / Besturingscircuit / Circuito di comando
97251C
6
Carte électronique / Circuit board / Platine / Tarjeta electrónica / Электронная плата / Printplaat /
Scheda elettrica
97239C
7
Interrupeur marche/arrêt / ON/OFF switch / Ein/Aus Schalter / Interruptor encendido/apagado /
Прерыватель ВКЛ/ВЫКЛ / Aan/uit knop / Interruttore avvio/arresto
52460
8
Cordon secteur / Power supply cable / Netzleitung / Cable de conexión eléctrica / Сетевой шнур /
Netsnoer / Cavo corrente
21468
9
Transformateur / Transformer / Transformator / Transformador / Transformator / Trasformatore
96100
10
Poignée / Handle / Handgriff / Mango / Handvat / Impugnatura
56047
2
1
2
3
4
5
9
10
6
7
8
GYSDUCTION AUTO
79
SPECIFICATIONS / SPECIFICATIONS / TECHNISCHE DATEN / ESPECIFICACIONES / ТЕХНИЧЕСКИЕ
ХАРАКТЕРИСТИКИ / SPECIFICATIES / SPECIFICHE
GYSDUCTION AUTO
Puissance / Power / Leistung / Potencia / Мощность / Vermogen / Potenza
2.4 kW
Fréquence tension secteur / Mains voltage frequency / Frequenz der Netzspannung /
Frecuencia del voltaje de la red / Частота напряжения сети / Frequentie netspanning /
Frequenza di tensione rete
50-60 Hz
Tension d’utilisation / Voltage in use / Betriebsspannung / Tensión de uso / Напряжение
использования / Bedrijfsspanning / Tensione d’utilizzo
165-240 V
Fréquence du réchauffeur / Heater frequency / Frequenz des Vorwärmers / Frecuencia
del calentador / Частота нагрева / Frequenza del riscaldatore / Frequentie verwar-
mingselement / Frequenza del riscaldatore
35-120 kHz
Longueur câble secteur / Mains cable length / Länge der Netzleitung / Longitud del
cable eléctrico / Длина сетевого шнура / Lengte voedingskabel / Lunghezza cavo rete
2.5 m
Longueur câble inducteur / Inductor cable length / Länge des Induktorkabels / Longitud
de cable del inductor / Длина кабеля индуктора / Lengte inductiekabel / Lunghezza
cavo induttore
2 m
Tuyau poire de commande / Control pedal pipe / Schlauchlänge des Fernreglers / Conducto
del accionador pera / Шланг дистанционного упраления / Slangetje besturingsblaasbalg
/ Tubo pedale di comando
2.5 m
Indice de protection / Protection rating / Schutzart / Índice de protección / Степень
защиты / Beschermingsklasse / Indice di protezione
IP 21
Poids générateur / Generator weight / Gewicht der Stromquelle / Peso del generador /
вес (кг) / Gewicht generator / Peso generatore
7.5 kg
Dimensions / Dimensions / Abmessungen / Dimensiones / Габариты / Afmetingen /
Dimensioni
21.5 x 35.5 x 27 cm
SCHÉMA ÉLECTRIQUE / ELECTRICAL DIAGRAM / SCHALTPLAN / ESQUEMA ELÉCTRICO / ЭЛЕКТРИЧЕСКАЯ
СХЕМА / ELEKTRISCH SCHEMA / SCHEMA ELETTRICO
52460
21468
TERRE
TERRE
1
2
3
1
2
3
5
6
Interrupteur
Pneumatique
P
11
4
12
2
3 4
1
11 12
M
51048
97239C
97251C
51952
71179
80
GYSDUCTION AUTO
SIGNIFICATION DES PICTOGRAMMES / MEANING OF PICTOGRAMS / BEDEUTUNG DER PIKTOGRAMME /
SIGNIFICADO DE LOS PICTOGRAMAS / ЗНАЧЕНИЕ СИМВОЛОВ / BETEKENIS PICTOGRAMMEN / SIGNIFICATO
DEI PITTOGRAMMI
- Source de courant de technologie onduleur délivrant un courant alternatif.
- Undulating current technology based source delivering alternating curent.
- Inverterwechselstromquelle.
- Fuente de corriente de tecnología ondulador que libera corriente continua.
- Источник тока инверторной технологии, вырабатывающий переменный ток.
- Stroombron wisselstroom
- Fonte di corrente con tecnologia inverter che rilascia una corrente alternata.
- Alimentación eléctrica monofásica 50 o 60Hz
- Single phase power supply 50 or 60 Hz
- Einphasige Netzversorgung mit 50 oder 60Hz
- Alimentación eléctrica monofásica 50 o 60Hz
- Однофазное электропитание 50 или 60Гц
- Enkelfase elektrische voeding 50 of 60 Hz
- Alimentazione elettrica monofase 50 o 60Hz
GYS SAS
1, rue de la Croix des Landes
CS 54159
53941 SAINT-BERTHEVIN Cedex
  • Page 1 1
  • Page 2 2
  • Page 3 3
  • Page 4 4
  • Page 5 5
  • Page 6 6
  • Page 7 7
  • Page 8 8
  • Page 9 9
  • Page 10 10
  • Page 11 11
  • Page 12 12
  • Page 13 13
  • Page 14 14
  • Page 15 15
  • Page 16 16
  • Page 17 17
  • Page 18 18
  • Page 19 19
  • Page 20 20
  • Page 21 21
  • Page 22 22
  • Page 23 23
  • Page 24 24
  • Page 25 25
  • Page 26 26
  • Page 27 27
  • Page 28 28
  • Page 29 29
  • Page 30 30
  • Page 31 31
  • Page 32 32
  • Page 33 33
  • Page 34 34
  • Page 35 35
  • Page 36 36
  • Page 37 37
  • Page 38 38
  • Page 39 39
  • Page 40 40
  • Page 41 41
  • Page 42 42
  • Page 43 43
  • Page 44 44
  • Page 45 45
  • Page 46 46
  • Page 47 47
  • Page 48 48
  • Page 49 49
  • Page 50 50
  • Page 51 51
  • Page 52 52
  • Page 53 53
  • Page 54 54
  • Page 55 55
  • Page 56 56
  • Page 57 57
  • Page 58 58
  • Page 59 59
  • Page 60 60
  • Page 61 61
  • Page 62 62
  • Page 63 63
  • Page 64 64
  • Page 65 65
  • Page 66 66
  • Page 67 67
  • Page 68 68
  • Page 69 69
  • Page 70 70
  • Page 71 71
  • Page 72 72
  • Page 73 73
  • Page 74 74
  • Page 75 75
  • Page 76 76
  • Page 77 77
  • Page 78 78
  • Page 79 79
  • Page 80 80