LG WM0742HGA El manual del propietario
- Categoría
- Lavadoras
- Tipo
- El manual del propietario

STEAMWASHERTMtm
USER'SGUIDE&
INSTA//MIONiNSTRUcTiONS
Before beginning installation, read these
instructions carefullY. This will simplify installation
and ensure that the washer is installed correctly
and safely. Leave these instructions near the washer
after installation for future reference.
STEA
TO contact LG Electronics, 24 hours a day,
7 days a week:
1-800-243-0000
Or visit us on the Web at: usJge.com
NOmero telef6nico de LG Electronics, las 24
horas del dia, 7 dias a la semana:
1-800-243-0000
O visitenos en la Web en: us.lge.com
GUIADE[ USUARIOE
INSTRUcclONESDEINSTAiAclON
Antes de comenzar la instalacion, lea atentamente estas
instrucciones. Esto simplificara la instalacion y asegurara
que la lavadora esta instalada en forma correcta y segura.
Conserve estas instrucciones cerca de la lavadora luego
de la instalacion para futuras consultas.
Model/Modelo
WM0742H*A
Designed specially to use only
HE (High-Efficiency) detergent
Dise_ada especificamente para
usar con el detergente tipo HE
(Alta eficiencia)
protocol p172
Sanitization performance of Residential and
Commercial, Family Sized Clothes Washers
Protocolo P172
Ejecucion de Saneamiento en la zona
residencial Y comerdal, lavodoras del uso del hogar
P/No. MFL31245132

INT 0 UCTI N
_MPORTANT SAFETY H_STRUCT_ONS
Basic Safety Precautions .................................. 3=6
PARTS AND FEATURES
Special Features ..................................................... 7
Key Parts and Components ................................... 8
H_STALLAT_ON H_STRUCT_ONS
Choose the Proper Location .................................. 9
Clearances ............................................................. 9
Flooring ................................................................ 10
Unpacking and Removing Shipping Bolts ........... 11
Connecting the Water Lines ................................. 12
Connecting the Drain Line .................................... 13
Leveling the Washer ............................................. 14
HOW TO USE
Sorting Wash Loads ............................................. 15
Selecting Detergent .............................................. 16
About the Dispenser ............................................. 16
Loading the dispenser .......................................... 17
Control Panel Features ......................................... 18
Cycle Guide .......................................................... 19
The Time and Status Display ............................... 20
Operating the Washer .......................................... 21
Steam Cycles ....................................................... 22
Cycle Setting Buttons .......................................... 23
Custom Program .................................................. 24
Cycle Option Buttons .......................................... 25
Speciat Functions ................................................. 26
CARE AND CLEANING
Regular Cleaning .................................................. 27
Cleaning the Washer ............................................ 28
Maintenance ................................................... 29=30
TROUBLESHOOTff_6
Normal Sounds You May Hear ............................. 31
Before Calling for Service ............................... 31-33
SPECiFiCATiONS
Key Dimensions and Specifications ..................... 34
WARRANTY ...................................................35
YOUI
Congratulations on your purchase
and welcome to the LG family.
Your new LG Steam Washer TM
combines the most advanced
washing technology with simple
operation and high efficiency.
By following the operating and care
instructions in this manual, your
washer will provide you with many
years of reliable service.
Product Registration information
Modeh
Seriam Number:
Date of Purchase:
The model and serial number can be located on
the rating plate on the front of the washer.
P NT SA ¥ iNST UCTIONS
RL=AD ALL
_WA_|_G For your safety, the information in this manuaU must be
followed to minimize the risk of fire or expUosion, eUectric shock, or to prevent
property damage, personaU injury, or Uoss of Uifeo
S Your Safety and the safety of others is very important.
We have provided many important safety messages in this manual and on your appliance. Always read
and obey all safety messages.
This is the safety alert symbol.
This symbol alerts you to potential hazards that can kill or hurt you and others.
All safety messages will follow the safety alert symbol and either the word DANGER or WARNING.
These words mean:
_DANGER: You can be killed or seriously injured if you don't immediately follow instructions.
_WARN_G: You can be killed or seriously injured if you don't follow instructions.
All safety messages will tell you what the potential hazard is, tell you how to reduce the chance of
injury, and tell you what can happen if the instructions are not followed.
3

INST UCTIONS
READ ALL
_WA_|_G For your safety, the information in this manuaU must be
followed to minimize the risk of fire or e×pUosion, eUectric shock, or to prevent
property damage, personaU injury, or Uoss of Uife.
BASIC SAFETY PRECAUTIONS
_WA__f_G: To reduce the risk of fire, e,ectfic shock, or injury to persons when using this
appliance, follow basic precautions, including the following.
• Before use, the washer must be properly installed as
described in this manual.
Do not wash articles that have been previously
cleaned in, washed in, soaked in, or spotted with
gasoline, dry cleaning solvents, or other flammable
or explosive substances, as they give off vapors that
could ignite or explode.
Do not add gasoline, dry cleaning solvents, or other
flammable or explosive substances to the wash
water. These substances give off vapors that could
ignite or explode.
Under certain conditions, hydrogen gas may be
produced in a hot water system that has not been
used for 2 weeks or more. HYDROGEN GAS IS
EXPLOSIVE. If the hot water system has not been
used for such a period, before using the washer,
turn on all hot water faucets and let the water flow
from each for several minutes. This will release any
accumulated hydrogen gas. As the gas is flammable,
do not smoke or use an open flame during this time.
Do not allow children to play on or in the washer.
Close supervision of children is necessary when the
washer is used near children.
Before the washer is removed from service or
discarded, remove the door to prevent children from
climbing inside.
Do not install or store the washer where it will be
exposed to the weather or freezing temperatures.
Do not tamper with controls.
Do not repair or replace any part of the washer or
attempt any servicing other than as described in this
manual. We strongly recommend that any service be
performed by a qualified individual.
See Installation Instructions for grounding
requirements.
ALWAYS follow the fabric care instructions
supplied by the garment manufacturer.
Do not place items exposed to cooking oil in your
washer. Items contaminated with cooking oils may
contribute to a chemical reaction that could cause a
load to catch fire.
Use fabric softeners or products to eliminate static
only as recommended by the manufacturer.
This washer is not designed for maritime use or for
mobile installations such as in RVs, aircraft, etc.
Turn off the water taps and unplug the washer if the
machine is to be left for an extended period of time,
such as during vacations.
Packaging material can be dangerous for children.
There is a risk of suffocatio!! Keep all packaging
from children.
Always check the inside of the washer for foreign
objects before loading laundry. Keep the door closed
when not in use.
GROUNDING iNSTRUCTiONS
This appliance must be grounded. In the event of malfunction or breakdown, grounding will reduce
the risk of electric shock by providing a path of least resistance for electric current. This appliance is
equipped with a cord having an equipment-grounding conductor and grounding plug. The plug must
be plugged into an appropriate outlet that is properly installed and grounded in accordance with all
local codes and ordinances.
4
Improper connection of the equipment-grounding conductor can result in risk
of electric shock. Check with a qualified electrician or serviceman if you are in doubt as to whether the
appliance is properly grounded. Do not modify the plug provided with the appliance. If it does not fit the
outlet, have a proper outlet installed by a qualified electrician. Failure to follow these warnings can cause
serious injury, fire, electrical shock, or death.
P NT SA ¥ [NST UCTiONS
READ ALL
_WA_|_G For your safety, the information in this rnanuaU must be
followed to minimize the risk of fire or expUosion, eUectric shock, or to prevent
property damage, personaU injury, or Uoss of Uifeo
SAFETY iNSTRUCTiONS FOR iNSTALLATiON
To reduce the risk of fire, electric shock, or injury to persons when using this
appliance, follow basic precautions, including the following.
Refer to iNSTALLATiON iNSTRUCTiONS for
detailed grounding procedures. Installation
instructions are packed in the washer for installer's
reference, if the washer ismoved to a new location,
have it checked and reinstalled by a qualified service
person. Failure to follow this warning can cause
serious injury, fire, electrical shock, or death.
Do not, under any circumstances, cut or remove
the third (ground) prong from the power cord.
Failure to follow this warning can cause serious
injury, fire, electrical shock, or death.
For persona1 safety, this appliance must be
properly grounded. Failure to follow this warning
can cause serious injury, fire, electrical shock,
or death.
• The power cord of this appliance is equipped
with a 3-prong (grounding} pJug which mates
with a standard 3-prong {grounding} wall outlet to
minimize the possibility of electric shock hazard from
this appliance.
This washer must be plugged into a 120VAC, 60Hz
grounded outlet. Failure to follow this warning can
cause serious injury, fire, electrical shock, or death.
Have the wall outlet and circuit checked by a
qualified electrician to make sure the out_et is
properly grounded. Failure to follow this warning
can cause serious injury, fire, electrical shock,
or death.
Where a standard 2-prong wall outlet is
encountered, it is your personal responsibility
and obligation to have it replaced with a properly
grounded 3-prong wall outlet. Failure to follow
this warning can cause serious injury, fire, electrical
shock, or death.
Do not install on carpet. Install washer on a solid
floor. Failure to follow this warning can cause serious
leak damage.
Do not remove ground prong. Do not use an
adapter or extension cord. PJug into a grounded
3-prong outlet. Failure to follow these warnings can
cause serious injury, fire, electrical shock, or death.
The washer should always be plugged into its
own individuaJ electricaJ outlet which has a
voltage rating that matches the rating plate. This
provides the best performance and atso prevents
overloading house wiring circuits which could cause
a fire hazard from overheated wires.
Never unpJug your washer by pulling on the
power cord. Always grip plug firmly and pull straight
out from the outlet. Failure to follow this warning can
cause serious injury, fire, electrical shock, or death.
Repair or replace immediately aH power cords
that have become frayed or otherwise damaged.
Do not use a cord that shows cracks or abrasion
damage along its length or at either end. Failure
to follow this warning can cause serious injury, fire,
electrical shock, or death.
When installing or moving the washer, be careful
not to pinch, crush, or damage the power cord.
Failure to follow this warning can cause serious
injury, fire, electrical shock, or death.
The washer must be installed and electrically
grounded by a qualified service person in
accordance with Jocat codes to prevent shock
hazard and assure stability during operation.
Washer is heavy. Two or more people may be
needed to install and move the appliance. Failure
to do so can result in back or other injury.
Store and install the washer where itwill not
be exposed to temperatures below freezing or
exposed to outdoor weather conditions. Failure to
follow this warning can cause serious leak damage.
Do not install the washer in humid spaces to
reduce the risk of electric shock. Failure to follow
this warning can cause serious injury, fire, electrical
shock, or death.
5

6
INST UCTIONS
READ ALL
WARNING yoorso ety,thein or,,,otioninthis m stbe
followed to minimize the risk of fire or e×pUosion, eUectric shock, or to prevent
property damage, personaU injury, or Uoss of Uife.
SAFETY iNSTRUCTiONS FOR USE, CARE AND CLEANING, AND DISPOSAL
_WA__G: To reduce the risk of fire, e,ectfic shock, or injury to persons when using this
appBiance, follow basic precautions, incBuding the following.
• Unplug the washer before cleaning to avoid the
risk of electric shock.
• Never use harsh chemicals, abrasive cleaners,
or solvents to dean the washer. They will
damage the finish.
Do not put oily or greasy rags or clothing on
top of the washer. These substances give off
vapors that could ignite the materials.
Do not wash items that are soiled with
vegetable or cooking oil. These items may
contain some oil after laundering. Due to the
remaining oil, the fabric may smoke or catch
fire by itself.
Disconnect this appliance from the power
supply before attempting any user maintenance.
Turning the controms to the OFF position does
not disconnect this appliance from the power
supply. Failure to follow this warning can cause
serious injury, fire, electrical shock, or death.
Do not combine laundry products for use
in one load unless specified on the label.
Do not mix chlorine bleach with ammonia
or acids such as vinegar. Follow package
directions when using laundry products.
Incorrect usage can produce poisonous gas,
resulting in serious injury or death.
• Do not reach into the washer while parts are
moving. Before loading, unloading, or adding
items, push in the cycle selector knob and
allow the drum to coast to a complete stop
before reaching inside. Failure to follow this
warning can cause serious injury, fire, electrical
shock, or death.
Do not aiiow children to play on or in the
washer. Close supervision of children is
necessary when the washer is used near
children. As children grow, teach them the
proper, safe use of all appliances. Failure to
comply with these warnings could result in serious
personal injuries.
Destroy the carton, plastic bag, and other
packing materials after the washer is
unpacked. Children might use them for piayo
Cartons covered with rugs, bedspreads, or
plastic sheets can become airtight chambers.
Failure to comply with these warnings could result
in serious personal injuries.
Keep laundry products out of children's reach.
To prevent personal injury, observe all warnings
on product labels. Failure to comply with these
warnings could result in serious personal injuries.
Remove the door to the washing compartment
to avoid the danger of chitdren or smait animals
getting trapped inside before your washer is
removed from service or discarded. Failure to do
so can result in serious personal injury or death.
SAVI= THESE
SPECIAL FEATURES
O DETERGENT DUSPENSER
This four-compartment drawer provides separate
dispensers for prewash and main wash detergent,
liquid bleach, and liquid fabric softener.
CONTROL PANEL WUTN LED DUSPLAY
Simple electronic controls are user-friendly.
The LED display indicates cycle options and
cycle time during operation.
EASY-ACCESS LOCKUNG DOOR
Extra-large door locks during operation and
features a delay to prevent the door from being
opened until the washer interior has cooled and
the water level has lowered.
_l NUGNoEFFUCUENCY STEAM CYCLES
During LG's unique high-efficiency STEAM cycles,
the steam nozzle injects fabrics with hot steam to
gently remove tough stains.
ROLLER JETS
The RollerJet system enhances wash
performance while reducing fabric wear.
Integrated jets spray clothes to further improve
washing efficiency.
_jJ UNTERUOR DRUM MGNT
The drum light illuminates the washer interior for
greater visibility when loading and unloading.
The ultra long-life LED bulbs should never need
replacement.
_l DURECToDRUVE MOTOR
Direct-drive motor eliminates the belt and pulleys
found on most washers to provide improved
performance and reliability while increasing
energy efficiency.
S N U

P RTS ND U S
KEY PARTS AND COMPONENTS
Rnaddition to the special features and
components outHined in the Special Features
section, there are severaHother important
components that are referenced in this manual
_) ULTRAoCAPACUTY STAUNLESS STEEL DRUM
The ultraqarge stainHess steeHdrum offers extreme
durabiHity and is tilted to improve efficiency and
allow easier access for Bargeitems.
@
WATER CURCULATUON ,AND STEAM
The water circulation nozzHesspray the water,,'
detergent soHution directly onto garments for
super cHeaning performance. During LG's unique
high=efficiency STEAM cycles, the steam nozzle
injects fabrics with hot steam to gently remove
tough stains.
LEVELUNG FEET
Four leveling feet (two in the front and two in
the back) adjust to improve washer stability on
uneven floors.
_) DRAUN ACCr:SS PAN_:L
Provides access to the drain line and drain
pump filter.
Drain _.i
Hose !
Hot and Cold
Water Inlets
Rear of Washer
mnduded Accessories
Hot an
Water Hoses
Caps (4)
(for covering
shipping bolt holes)
8
h
Tie Strap
Elbow Bracket
shipping bolts and (for securing (for securing
adjusting leveling feet) drain hose)
drain hose)
iON [NST UCTiONS
CHOOSE THE PROPER LOCATION
WARNING
• Washer is heavy! Two or more people
are required when moving and unpacking
the washer. Failure to do so can result in back
or other injury.
• Store and install the washer where it will not
be exposed to temperatures bemow freezing
or exposed to outdoor weather conditions.
Failure to foHIow this warning can cause serious
injury, fire, electrical shock, or death.
• Property ground washer to conform with aH
governing codes and ordinances. Failure to
follow this warning can cause serious injury, fire,
electrical shock, or death.
To reduce the risk of emectric shock, do not
install the washer in humid spaces. Failure to
follow this warning can cause serious injury, fire,
electrical shock, or death.
The base opening must not be obstructed by
carpeting when the washer is installed on a
carpeted floor.
Do not remove ground prong. Do not use
an adapter or extension cord. Pmuginto a
grounded 3-prong outmet. Failure to follow this
warning can cause serious injury, fire, electrical
shock, or death.
Po wet Outlet
• The power outlet must be within 60 in. (1.5 m) of
either side of the washer.
The appliance and outlet must be positioned so
that the plug is easily accessible.
Do not overload the outlet with more than one
appliance.
The outlet must be grounded in accordance with
current wiring codes and regulations.
®Time=delay fuse or circuit breaker is
recommended.
NOTE: It is the personal responsibility and
obligation of the product owner to have a
proper outlet installed by a qualified electrician.
CLEARANCES
211/4"_
(54 cm)
1_293/4 ''_ 1_4"
(75,6 ore) (10 cm)
(129.5 cm)
1"-_1 _ 27" _ _-1"
(2,5 crn) (68.6 cm) (2,5 cm)
To ensure sufficient clearance for water lines and
airflow, aIHowminimum clearances of at least
1 in. (2.5 cm) at the sides and 4 in. (10 cm)
behind the unit. Be sure to allow for wall, door,
or floor moldings that may increase the required
cHearances.
Allow at least 24 in. (61.2 cm) in front of the
washer to open the door.
9

iN [[AT! N INST UCTI NS
FLOORING
TOminimize noise and vibration, the washer
MUST be installed on a soBidByconstructed floor.
See the NOTE at right.
AHowabBesBope under the entire washer is
1o maximum.
Carpeting and soft tiBesurfaces are not
recommended.
Never install the washer on a platform or weakBy
supported structure.
NOTE: PBeasenote that the floor must be strong
and rigid enough to support the weight of the
washer when fully Boaded, without flexing or
bouncing. Rfyour floor has too much flex in it,
you may need to reinforce it to make it more
rigid. A floor that is adequate for a top-loading
washer may not be rigid enough for a front-
Boading washer, due to the difference in the spin
speed and direction. If the floor is not solid, your
washer may vibrate and you may hear and feel
the vibration throughout your house.
iON [NST UCTiONS
UNpAcKiNG AND REMOVING SHippiNG BOLTS
When removing the washer from the carton
base, be sure to remove the foam tub support
in the middle of the carton base.
If you must lay the washer down to remove the
base packaging materials, always lay it carefully
on its side. Do NOT lay the washer on its front
or back.
iMPORTANT: To prevent internal damage
during transport, the washer is equipped with
4 shipping bolts and plastic retainers. These
bolts and retainers MUST be removed before
operating the washer.
Failure to remove shipping bolts and retainers
may cause severe vibration and noise, which can
lead to permanent damage to the washer. The
cord is secured to the back of the washer with
a shipping bolt to help prevent operation with
shipping bolts in place.
Foam Tub Carton Base
Support
Starting with the bottom 2 shipping bolts,
use the included wrench to remove the
4 shipping bolts by turning them
counterclockwise.
HoleCap" % %
Remove the retainers by turning them slightly
while pulling. Rotate and press the hole caps
into the shipping bolt holes.
NOTE: Save the bolts and retainers for
future use. To prevent damage to internal
components, the shipping bolts and
retainers must be installed when
transporting the washer.
10 11

iN [[AT! N INST UCTI NS
CONNECTING THE WATER LINES
IMPORTANT: Use new hoses when installing
the washer. Do NOT reuse oBdhoses.
IMPORTANT: Use ONLY the inBethoses
provided by LG with this laundry product.
Aftermarket hoses are not guaranteed to fit or
function correctly. Other hoses may not tighten
correctly and couBdcause Beaks.Subsequent
damage to product or property will not be
covered under the terms of LG's warranty.
Water suppBy pressure must be between
14.5 PSRand 116 PSR(100-800 kPa). Rfthe
water supply pressure is more than 116 PSR,a
pressure reducing vaBvemust be installed.
Periodically check the hose for cracks, Beaks,
and wear, and replace the hose if necessary.
Make sure that the water lines are not stretched,
pinched, crushed, or kinked.
The washer should never be installed or stored
in a location subject to freezing temperatures.
Damage to the water lines and internal
mechanisms of the washer can result. If the
washer was exposed to freezing temperatures
prior to installation, allow it to stand at room
temperature for several hours before use.
Hose
(to water inlet
Rubber Seal
Rubber Seal
/
Water Hose
(to tap)
Insert a rubber seal into the threaded
fittings on each hose.
Water
NOTE: Do not cross=thread the hose fittings.
Attach the hot water line to the red hot water
inlet on the back of the washer. Attach the
cold water line to the blue cold water inlet on
the back of the washer. Tighten the fittings
securely.
Water Tap
the hot water line to the hot water
tap. Attach the cold water line to the cold
water tap.
Tighten the fittings securely. Open the water
taps fully to check for leaks.
iNS iON [NST UCTiONS
CONNECTING THE DRAIN LiNE
The drain hose should always be properly
secured. Failure to properly secure the drain
hose can result in flooding and property
damage.
Do not install the end of the drain hose higher
than 96 in. (244.8 cm) above the bottom of the
washer.
The drain must be installed in accordance with
any applicable local codes and regulations.
Make sure that the water lines are not stretched,
pinched, crushed, or kinked.
Option 1: Standpipe
_Elb2c'_'et
Drain
Hose
Clip the end of the hose into the elbow bracket.
Insert the end of the drain hose into a standpipe.
Use tie strap to secure the drain hose in place.
NOTE: Total height of the hose end should not
exceed 96 in. (244.8 cm) from the bottom of the
washer.
Option 2: Laundry Tub
Elbow
Bracket Laundry
Hose
Clip the end of the hose into the elbow bracket.
Hang the end of the drain hose over the side of
the laundry tub. Use tie strap to secure the drain
hose in place.
NOTE: Total height of the hose end should not
exceed 96 in. (244.8 cm) from the bottom of the
washer.
Option 3: Floor Drain
Drain Hose
Floor Drain
Insert the end of the drain hose into the floor
drain. Secure the hose in place to prevent it
from moving.
12 15

iN LLAT! N INST UCTI NS
LEVELING THE WASHER
The drum of your new washer spins at very high
speeds, up to 1200 RPM. To minimize vibration,
noise, and unwanted movement, the floor must
be a perfectly BeveB,sofid surface.
NOTE: Adjust the levering feet onByas far as
necessary to BeveBthe washer. Extending the
Bevefingfeet more than necessary can cause
the washer to vibrate.
Aft four Bevefingfeet must rest sofidByon the
floor. Rock the washer gently from corner to
corner to make sure that the washer does
not rock.
,/
Leveling
Feet
@ @
Level
Leveling
Feet
Position the washer in the finaBlocation,
taking special care to not pinch, strain, or
crush the water and drain fines. PBacea BeveB
across the top of the washer.
Raise Lower
J
Loosen the Iocknuts on aft 4 leveling feet
until you can turn the feet with the included
wrench. Turn clockwise to raise the washer
or counterclockwise to lower it.
Tighten all 4
Iocknuts securely
J
Once the washer is level from side to side
and front to back, tighten all Iocknuts
securely.
Make sure that all 4 leveling feet are in firm
contact with the floor.
NOTE: To make sure that the washer is
properly level, run the washer with a test
load: place approximately 6 pounds of
laundry in the machine. Then press POWER,
press RINSE+SPIN, and then press the
START/PAUSE button. See the following
sections for additional information on cycle
selection and operation.
Verify that the washer does not rock or
vibrate excessively during the spin cycle.
If the washer vibrates or shakes, adjust
the leveling feet until the washer is stable
and retest.
0 US
SORTING WASH LOADS
Fabric Care Labels
Most articles of clothing feature fabric care labels
that include instructions for proper care.
fF,_ CareLabels
Machine
w sh
cycle Normal Permanent gross/ Gent_/
wrinkle resistant de_icete
H h Donotwash Donotwring
Water @@ @
temperature .or
(50°C/120°F)
Bleach
symbols
Any bleach
_ (when needed)
0
Warm Cald/coo_
(40°C/105°F) (30°C/85°F)
0n[y non-chlorine bleach Donot bleach
(whenneeded)
Grouping Similar Items
For best results, sort clothes into loads that can
be washed with the same wash cycle.
Different fabrics have different care requirements.
Always wash dark colors separately from light
colors and whites to prevent discoloration. If
possible, do not wash heavily soiled items with
lightly soiled ones. The chart below shows
recommended groupings.
Loading the washer
Check aii pockets to make sure that they
are empty, items such as clips, matches,
pens, coins, and keys can damage both your
washer and your clothes°
Close zippers, hooks, and drawstrings to
prevent these items from snagging or tangling
on other clothes.
Pretreat heavily stained areas for best results.
Combine large and small items in a load. Load
large items first.
Large items should not be more than half of the
total wasNoad.
The washer can be fully loaded, but the drum
should not be tightly packed with items. The
door of the washer should close easily.
To prevent an out-of-balance load, do not wash
single items. Add one or two similar items to
the load. Large, bulky items, such as a blanket,
comforter, or bedspread should be washed
individually.
Do not wash or spin waterproof clothes.
When unloading the washer, check under the
door seal for small items.
14 15

0
SELEcTiNG DETERGENT LOADING THE DISPENSER
iMPORTANT: Your Steam washer TM is designed
for use with only High-Efficbncy (HE) detergents.
HE detergents are formulated specifically for front-
load washers and contain suds-reducing agents.
Always look for the HE symbol when purchasing
detergent.
HE detergents produce fewer suds, dissolve
more efficiently to improve washing and rinsing
performance, and help to keep the interior of your
washer clean.
Using a regular detergent may cause oversudsing
and unsatisfactory performance.
iMPORTANT: Do not place or store laundry
products, such as detergent, bleach, or liquid
fabric softener, on top of your washer or dryer.
Wipe up any spills immediately. These products
can damage the finish and controls.
Designed specially to use onlv
HE (High-Efficiencv) detergent
ABOUT THi: DtSpI::NS!:R
The automatic dispenser consists of four
compartments which hold:
• Liquid chlorine bleach.
• Liquid fabric softener.
• Liquid or powdered detergent for prewash.
• Liquid or powdered detergent and color-safe
bleach for main wash.
All laundry products can be added at once in
their respective dispenser compartments. They
will be dispensed at the appropriate time for the
most effective cleaning.
After adding the laundry products to the
dispenser, close the dispenser drawer.
To add detergent, bleach, and fabric softener
to the automatic dispenser:
_Open the drawer.
d_spenser
Load the into the
Baundry products
appropriate compartments.
_ Slowly close the drawer tod_spenser
avoid early dispensing of the laundry
products.
NOTE: It is normal for a small amount of water to
remain in the dispenser compartments at the end
of the cycle.
Main Wash Detergent
Compartment
Liquid Chlorine Bleach
Compartment
Liquid Fabric Softener
Compartment
Prewash Detergent
Compartment
Prewash Detergent Compartment
Add liquid or powdered detergent to this
compartment when using the Prewash option.
Always use HE (High-Efficiency) detergent with
your washing machine.
• The amount of detergent added for the Prewash
option is 1/2 the amount recommended for the
main wash cycle. For example, if the main wash
cycle requires one measure of detergent, add
1/2 measure for the Prewash option.
NOTE: If liquid detergent is to be used for the
main wash when using the pre-wash option, the
liquid detergent cup accessory must be used
in main wash dispenser to prevent the main
wash liquid detergent from being dispensed
immediately.
Main wash Detergent Compartment
This compartment holds laundry detergent
for the main wash cycle, which is added to
the load at the beginning of the cycle. Always
use HE (High-Efficiency) detergent with your
washing machine.
Never exceed the manufacturer's
recommendations when adding detergent.
Using too much detergent can result in
detergent buildup in clothing and the washer.
Either powdered or liquid detergent may be used.
• When using liquid detergent, make sure the
liquid detergent cup and insert are in place.
Do not exceed the maximum fill line.
• When using powdered detergent, remove
the insert and liquid detergent cup from the
compartment. Powdered detergent will not
dispense with the liquid detergent cup and
insert in place.
NOTE: Liquid or powdered color-safe bleach
may be added to the main wash compartment
with detergent of the same type.
Designed speciallv to use onlv
HE (High-Efficiencv) detergent
Liquid Bleach Compartment
This compartment holds liquid chlodne bleach,
which will be dispensed automatically at the
proper time during the wash cycle.
Do not add powdered or liquid color-safe bleach
to this compartment.
Always follow the manufacturer's
recommendations when adding bleach. Do not
exceed the maximum fill line. Using too much
bleach can damage fabrics.
Never pour undiluted liquid chlorine bleach
directly onto the load or into the drum. Fabric
damage can occur.
Fabric Softener Compartment
This compartment holds liquid fabric softener,
which will be automatically dispensed during the
final rinse cycle.
Always follow the manufacturer's
recommendations when adding fabric softener.
Do not exceed the maximum fill line. Using
too much fabric softener may result in stained
clothes.
Dilute concentrated fabric softeners with warm
water. Do not exceed the maximum fill line.
Never pour fabric softener directly onto the load
or into the drum.
16 17

USE
CONTROL PANEL FEATURES
POWER
COT;ONINORMAL
_l POWER ON/OFF BUTTON
Press to turn the washer ON, Press again to turn
the washer OFE
NOTE: Pressing the ON/OFF button during a
cycle wifl canceB that cycb and any bad settings
wifl be bst,
@
CYCLE SELECTOR KNOB
Turn this knob to sebct the desired cycb. Once
the desired cycb has been sebcted, the standard
presets wifl be shown in the display. These
settings can be adjusted using the cycb setting
buttons anytime before starting the cycb.
Press this knob to START the sebcted cycle.
ff the washer is running, use this knob to PAUSE
the cycb without bsing the current settings.
NOTE: If you do not press the cycle selector
knob within 4 minutes of selecting a cycle, the
washer automatically turns off.
@ CUSTOM PROGRAM BUTTON
Press the CUSTOM PROGRAM button to save
and recall a customized wash cycle for future use,
You can save the Cycle, Wash/Rinse
Temperature, Spin Speed, and Soil Level
settings, as well as other cycle options.
O
@
CYCLE SETTUNG BUTTONS
Use these buttons to adjust the desired cycle
options for the selected cycle,
DELAY BUTTON
Press this button to delay the start of the wash
cycle, Each press of the button increases the
delay time by one hour, up to 12 hours,
TUME AND STATUS
The display shows the settings, estimated
time remaining, options, and status messages
for your washer.
@
OPTUON BUTTONS
The option buttons aflow you to select
additional cycle options and will light when
selected. Certain buttons also aflow you to
activate special functions by pressing and
holding the button for 3 seconds.
For detailed information about the individual
options, please see the following pages.
18
0
CYCLE GUIDE
The cycle guide below shows the options and recommended fabric types for each cycle,
Saoitary
PermPress
Aliergieoe
#eUicates
HandWash/
Wool
Speed
Wash
Dressshirts, blouses
Heavilysoiled
underwear,work
clothes,diapers,etc.
Largeitemssuchas
blanketsandcomforters
Dressshirts/pants,
wrinkle-freeclothing,
poly/cottonblend
clothing,tablecloths
Cotton,linen,towels,
shirts,sheets,jeans,
mixedloads
Cotton,underwear,
pillowcovers,
bedsheets,babywear
Dressshirts/blouses,
nylons,sheeror lacy
garments
itemslabeled
"hand°washabb"
Lightlysoiledclothing
andsmallloads
ExtraHot/Cold
High
ExtraHigh
Warm/Cold
Warm/Warm
Hot/Cold
TapCold/Cold
Cold/Cold
Warm/Cold
Warm/Warm
Hot/Cold
TapCold/Cold
Cold/Cold
Warm/Cold
Warm/Warm
Hot/Cold
TapCold/Cold
Cold/Cold
Cold/Cold
Warm/Cold
Warm/Warm
TapCold/Cold
Warm/Cold
Warm/Warm
TapCold/Cold
Cold/Cold
Hot/Cold
TapCold/Cold
Cold/Cold
Warm/Cold
Warm/Warm
No Spin
Low
Medium
Gentle
Low
Medium
NoSpin
Medium
High
No Spin
Gentle
Low
High
ExtraHigh
No Spin
Low
Medium
High
No Spin
Low
Medium
Low
Medium
NoSpin
Gentb
Low
No Spin
Gentb
ExtraHigh
NoSpin
Gentle
Low
Medium
High
Normal
Heavy
Light
Normal
Heavy
Light
Normal
Heavy
Light
Normal
Heavy
Light
Normal
Heavy
Light
Normal
Light
Light
Normal
Heavy
US
@
@ @ @ @ @
@ @ @ @ @
NOTE: To protect your garments, not every wash/rinse temperature, spin speed, soil level,
or option is available with every cycle.
19

0
@
@
THE TiME AND STATUS DISPLAY
The time and status dispHay shows the cycHe progress and estimated time remaining, cycle
options, and other status messages for your washer.
@
ESTUMATED TUME REMAUNUNG
When the cycHeseHector knob is pressed, the
washer automatically detects the wash Hoad
(weight) and optimizes the washing time, based
on the selected cycHeand options. The dispHay
will then indicate the estimated time remaining
for the seHected wash cycHe.
NOTE: The cycHetime dispHayed may appear
much Mongerthan that of a topqoading washer.
The dispHayed time is for the compHete cyclic,
rather than just the agitation portion of the cycle,
as is typically shown on a topqoading washer.
DOOR LOCK UNDUCATOR
Indicates that the door is locked. The washer
door will lock while the washer is operating.
The door can be unlocked by pressing the cycle
selector knob to stop the washer.
NOTE: If the temperature in the washer is too
high, the door cannot be unlocked until the
washer has cooled. If the water level is too high,
select the DRAIN & SPIN cycle to drain excess
water. Do not try to force open the door.
CYCLE COMPLETUON UNDUCATOR
Shows how much of the current wash cycle has
been completed.
OPERATING THE WASHER
Once you have loaded the washer and added
laundry products (detergent, bleach, and/or
fabric softener):
Press the ON/OFF button to turn on the
washer. The lights around the cycle
selector knob will illuminate.
Turn the cycle selector knob to the desired
cycle. The display will show the
preset Rinse/Wash Temperature,
Spin Speed, Soil Level, and
Option settings for that cycle.
_j) If you would like to change the settings
for that cycle, press the appropriate cycle
settings button(s) until the indicator light for
the desired setting is Hit.
@
NOTE: To protect your garments, not every
wash/rinse temperature, spin speed, soil
level, or option is available with every cycle.
Select any additional cycle options, such
as PRE-WASH, STAIN CYCLE, STEAM, EXTRA
RINSE, RINSE + SPIN, or DELAY WASH, by
pressing the button for that option.
@
@
Press the cycle selector knob to begin
the cycle. The door wiHIlatch,
the display wiIHchange, and
the washer will calcuHate the
estimated time remaining. Once
the washer has calculated the estimated
total cycle time, the washer will start.
To pause the cycle at any time, press the
cycle selector knob
NOTE: The cycle time displayed may
appear much longer than that of a top-
loading washer. The displayed time is for the
complete cycle, rather than just the agitation
portion of the cycle, as is typically shown on
a top-loading washer.
NOTE: If the temperature in the washer is
too high, the door cannot be unlocked until
the washer has cooled. If the water Hevelis
too high, select the DRAIN & SPIN cycle to
drain excess water. Do not try to force the
door open.
Washing time can be reduced significantly
for small or lightly soiled loads by selecting
the Speed Wash cycle and setting the Soil
Level button to Light.
When the load is finished, the beeper (if set)
will sound and the door will unlock.
Remove damp clothes from the washer
immediately. Check under the door seal
for small items.
NOTE: To protect your garments, not every
wash/rinse temperature, spin speed, soil
level, or option is available with every cycle.
20 21

USE US
STEAM CYCLES CYCLESETTING BUTTONS
STEAM cycBes incBudethe
SteamFresh TM, AHergieneTM, Sanitary,
BuBky/Large, Cotton/NormaB, and
Perm. Press cycBes. Adding the
Steam option to these cycBes
provides superior cleaning performance while
reducing energy and water consumption. By
using a hot steam spray from above and cooBer
water beBow,fabrics get the cBeaning benefits of
a super hot wash, without the energy usage or
potentiaB damage to fabrics.
TOAdd STEAM tO a Standard Cycle:
Turn on the washer and turn the cycBe
seBector knob to seBecta cycBe with the
STEAM option.
O Press the STEAM button. The washer will
automatically adjust the cycle settings.
O Set any other desired options.
O Press the START/PAUSE button to start the
cycBe. The washer will start automatically.
CAUTION:
Do not touch the door during steam cycles,
The door surface can become very hot,
AHow the door mockto remease before
opening the door.
Do not attempt to override the door mock
mechanism or reach into the washer during a
steam cydeo Steam can cause severe burns.
iMPORTANT NOTES ABOUT STEAM CYCLES:
Steam may not be clearly visible during the
steam cycles. This is normal. Too much steam
could damage clothing.
Do not use steam with delicate fabrics such as
wool, silk, or easily discolored fabrics.
Do not touch the door.
Using the SteamFresl7 "_Cycle
SteamFresh uses the power of steam alone to
quickly reduce wrinkles and odor in fabrics. It
brings new life to wrinkled clothes that have been
stored for an extended time and makes heavily
wrinkled clothes easier to iron. SteamFresh can
also be used to help reduce odors in fabrics.
TOUSe the SteamFresl7 Cycle:
Turn on the washer and turn the cycle
selector knob to select the SteamFresh cycle.
@
O
Load up to 5 items and close the door.
NOTE: If there is any moisture inside the
drum, such as from a previous wash cycle,
wipe the drum dry with a towel before
adding clothes.
Press the STEAM button until the correct
number of items is shown in the display.
No other options need to be set.
Press the START/PAUSE button to start
the cycle.
After the SteamFresh cycle is complete,
the washer will tumble the clothes for up
to 30 minutes to prevent rewrinkling.
After removing clothes from the SteamFresh
cycle, they may feel slightly damp. Place
clothes on a hanger for at least 10 minutes to
allow them to dry.
The SteamFresh cycle is not recommended for
use with 100% cotton clothing.
Remove stains from clothing before using the
SteamFresh cycle; the high heat could cause
stains to set permanently.
Do not use SteamFresh with the following items:
wool, blankets, leather jackets, silk, wet clothes,
lingerie, foam products, or electric blankets.
Best results are achieved when articles are of
similar size and fabric type. Do not overload.
Each cycle has preset settings that are selected
automatically. You may also customize the
settings using the cycle setting buttons. Press the
button for that setting until the indicator light for
the desired value is lit.
The washer automatically adjusts the water level
for the type and size of wash load for best results
and maximum efficiency. It may seem there is no
water inside the drum in some cycles, but this is
normal
NOTE: To protect your garments, not every wash/
rinse temperature, spin speed, soil level, or option
is available with every cycle. See the Cycle Guide
for details.
Selects the wash and rinse temperature
combination for the selected cycle.
Press the WASH/RINSE button until
the indicator light for the desired
setting is lit.
Your washer features a heating element to
boost the hot water temperature for Extra
Hot settings. This provides improved wash
performance at normal water heater settings.
Select the water temperature suitable for the
type of load you are washing. Follow the fabric
care label for best results.
Warm rinses are regulated at approximately
86°F (30°0).
Warm rinses leave the loads drier than cold
rinses. Warm rinses can increase wrinkling.
In cold climates, a warm rinse makes the load
more comfortable to handle.
Cold rinses use less energy, and the rinse
temperature depends on the cold water at the
faucet.
SPIN SPEED
The washer drum spins at up to 1,200 RPM. This
extracts more water from clothes,
reducing drying time and saving
energy.
Press the SPIN SPEED button until
the indicator light for the desired setting is lit.
Some fabrics, such as delicates, require a slower
spin speed.
The Drain & Spin cycle:
The Spin Speed button also activates the Drain
& Spin cycle to drain the tub and spin clothes;
for example, if you want to remove clothes before
the cycle has ended.
SOIL LEVEL
Adjusts the selected cycle to allow more time for
heavily soiled clothes OFless time for
lightly soiled clothes. Press the SOIL
LEVEL button until the indicator light
for the desired setting is lit.
BEEPER
Press repeatedly to adjust the volume of
the beeper. You may turn the
end-of-cycle beeper on or off
with the BEEPER button.
25

USE
CUSTOM PROGRAM
CUSTOM PROGRAM aflows you
to store a customized wash cycle
for future use. Rtaflows you to save
favorite temperature, spin speed, soft
Bevel,and other options for a cycBe, and then
recafl them at the touch of a button.
TOstore a Custom Program:
_J_ SeBect a cycBe.
O Adjust the Wash/Rinse Temperature, Spin
Speed, and Soft LeveBto the desired settings.
_Set any other desired options.
O Press and hoBdthe CUSTOM PROGRAM
button for 3 seconds. You wifl hear two
beeps to confirm the settings have been
stored.
iMPORTANT: If you press and hold the
CUSTOM PROGRAM button for 3 seconds, you
will overwrite any previously stored CUSTOM
PROGRAM.
TOrecall a Custom Program:
Press and release the CUSTOM PROGRAM
button. The stored settings will be displayed.
Press and release the START/PAUSE button
to start the cycle. The washer will start
automatically.
CYCLE OPTION BUTTONS
Your washing machine features several additional
cycle options to customize cycles to meet your
individual needs. Certain option buttons also
feature a special function (see the following page
for details) that can be activated by pressing and
holding that option button for 3 seconds.
TO Add Cycle Options to a Cycle..
@ Turn on the washer and turn the cycle
selector knob to select the desired cycle.
Use the cycle setting buttons to adjust the
settings for that cycle.
Press the cycle option button(s) for the
option you would like to add. The cycle
option buttons, except DELAY, will light
when selected.
O Press the selector knob to start the
cycBe
cycle. The washer will start automatically.
NOTE; To protect your garments, not every wash/
rinse temperature, spin speed, soil level, or option
is available with every cycle. See the Cycle Guide
for details.
STEAM
Use the STEAM button to add steam
to the cycle for extra cleaning power
and improved efficiency. See Steam
Cycles section for additional details.
NOTEs Not all cycles can be used
with the STEAM option.
DELAY WASH
Once you have selected the cycle and
other settings, press this button to
delay the start of the wash cycle. Each
press of the button increases the delay
time by one hour, up to 12 hours.
PREWASH
Select this option to add a 16=minute
prewash and spin cycle to the chosen
cycle. This is especially useful for
heavily soiled items.
0 US
RiNSE+SPiN
Select this option to rinse and spin a
load separately from a regular cycle.
This can be helpful in preventing fresh
stains from setting in fabrics.
To activate the Rinse+Spin cycle:
Press the ON/OFF button to turn on
the washer.
Press the RINSE+SPIN button.
O Press the cycle selector knob.
EXTRA R/IVSE
This option wifl add an extra rinse
cycle to the selected cycle. Use this
option to help ensure the removal
of detergent or bleach residue from
fabrics.
STAIN CYCLE
Select this option for heavily stained
clothes, such as play clothes or work
clothes. Stain Cycle will add extra
wash time to the selected cycle, as
well as an additional rinse cycle.
24 25

26
USE
SPECIAL FUNCTIONS
The option buttons also activate speciaB functions,
incBuding CHRLD LOCK, SPINSENSF Mand TUB
CLEAN. Press and hoBdthe option button marked
with the speciaB function for 3 seconds to activate.
CHILD LOCI(
Use this option to prevent unwanted use of the
washer or to keep cycBesettings from
being changed whiBethe washer is
operating. Press and hoBdthe DELAY
WASH button for 3 seconds to activate
or deactivate CHILD LOCK.
The lock icon win be shown in the display, and aH
controls are disabBed°The washer can be bcked
during a cycBe. Once CHILD LOCK is seBected,the
display will alternate between CL and the
time remaining.
SPINSENSE TM
SPINSENSF Mcan be used to
help reduce or eliminate vibrations,
especially on wood floor installations.
To activate SPINSENSETm:
While the washing machine is running in any
cycle, press and hold the STAIN CYCLE button
for 3 seconds.
The STAIN CYCLE button light will blink while
the washer is running to show that SPINSENSE TM
is active. The SPINSENSF Mfunction will remain
active for every cycle, even after a power failure.
To cancem SPINSENSETm:
Press and hold the STAIN CYCLE button for 3
seconds to turn off the SPINSENSF Mfunction.
TUB CLEAN
A buildup of detergent residue can occur in the
wash tub over time and can lead to
a mildewy or musty smell. The TUB
CLEAN cycle is specially designed to
remove this buildup. Press and hold
the EXTRA RINSE button for 3 seconds to activate
this cycle. The display will show a message to add
liquid bleach to the dispenser. After the cycle has
ended, open the door and allow the drum interior
to dry completely.
NOTE: Do NOT use this cycle with clothes,
and do NOT add detergent or fabric softener.
ALLERGIENE TM
TheALLERGIENETM cycleisa powerful,hightemperature
cycledesignedspecificallyto reducecertainallergens.
SelectingtheALLERGIENETM cycleautomatically
incorporatessteamintothewashcycle.
TheALLERGIENETM cyclecansignificantlyreduceallergens
in beddingandclothing.
TheALLERGIENETM cyclehelpsreducedust mite
populationsand helpsreduceallergens.
Dueto thehigherenergyandtemperaturesused,the
ALLERGIENETM cycleisnotrecommendedforwool,silk,
leather,or anyotherdelicateortemperaturesensitiveitems.
HAND WASH/WOOL
Only woolen items that are designated as
"Machine-WashabW' should be washed in this
washing machine
Wash only small loads for optimum fabric care
(less than 8 Ibs.)
Only neutral (wool safe) detergents should
be used (Only a small quantity of detergent
is needed due to the small load size and low
volume of water in the cycle.)
The HANDWASH/WOOL cycle uses a gentle
tumble action and low speed spin for ultimate
fabric care
The wool wash cycle of this machine has been
approved by Wbolmark for the washing of machine
washable Woolmark products provided that the
products are washed according to the instructions
WOOLMARI( on the garment hbel and those issued by the
manufacturer of this washing machine, M0708.
Certified by NSF
Certificado pot NSF
NSF international (formerly the National Sanitation Foundation),
certifies that SANmTARY cycle reduces 99.9% of bacteria on
laundry, and none of bacteria will carry over onto the next laundry
load.
¢ N C[ NiNG
REGULAR CLEANING
WARNING:
• Unplug the washer before cleaning to avoid the risk of electric shock. Failure to follow this warning
can cause serious injury, fire, electrical shock, or death.
Never use harsh chemicams, abrasive cleaners, or somvents to dean washer. They will damage the finish.
Cleaning the Exterior
Proper care of your washer can extend its life. The
outside of the machine can be cleaned with warm
water and a mild, nonabrasive household detergent.
Immediately wipe off any spills with a soft,
damp cloth.
mMPORTANT: Do not use methylated spirits,
solvents, or similar products.
Never use steel wool or abrasive cleansers; they
can damage the surface.
Care and Cleaning of the interior
Use a towel or soft cloth to wipe around the
washer door opening, door seal, and door glass.
These areas should be kept clean to ensure a
watertight seal. Be sure to wipe under the inside
rubber seal to remove any moisture or soil.
Always remove items from the washer as soon
as the cycle is completed. Leaving damp items
in the washer can cause wrinkling, color transfer,
and odor.
Run the TUB CLEAN cycle regularly to remove
detergent buildup and other residue.
Cleaning the Steam and Water
drcdation NOzzles
Use a cotton swab to remove lime or detergent
buildup from the inside of the steam and water
circulation nozzles. NEVER use a sharp or
pointed object; you could damage the nozzles.
Removing t#e Stain in Door Seal
NOTE: Wear rubber gloves and eye protection
while performing the following procedure:
Dilute 3/4 cup (177 ml) liquid chlorine bleach
with 1 gallon (3.8 L) of warm/hot water.
Use this solution to wipe down all surfaces
of the gasket to remove the deposits that are
causing any odor. (Be sure to fold back the
lip of the gasket to get under the edge where
residue can build up.)
Wipe the gasket with a dry cloth.
Leave the door open to allow the gasket to
dry completely. Do not use undiluted bleach
as this will damage the gasket. Follow the
manufacturer's instructions for proper use
of bleach. If the gasket cannot be cleaned
properly, it should be replaced.
Storing the was#er
If the washer will not be used for an extended
period of time and is in an area that could be
exposed to freezing temperatures:
Turn off water suppBy
tap.
Disconnect hoses from water supply and
drain water from hoses.
@
Plug the power cord into a properly grounded
electrical outlet.
Add 1 gallon of nontoxic recreational vehicle
(RV) antifreeze to the empty wash drum.
Close door.
Select the spin cycle and let washer spin
for 1 minute to drain out all the water.
NOTE: Not all of the RV antifreeze will be
expelled.
Unplug the power cord, dry the drum interior
with a soft cloth, and close the door.
Remove the inserts from the dispenser. Drain
any water in compartments and dry the
compartments.
Store the washer in an upright position.
To remove the antifreeze from the washer
after storage, run washer through a complete
cycle using detergent. Do not add laundry!
Removing Lime Buildup
If you live in an area with hard ware5 lime scale
can form on internal components of the washer.
Use of a water softener is recommended in areas
with hard water. If a descaler is used, make sure
that it is suitable for use in a washer, and run the
TUB CLEAN cycle before washing clothing.
Lime scale and other spots may be removed
from the stainless steel drum using a stainless
steel cleaner. Do NOT use steel wool or abrasive
cleansers; they can damage the surface.

¢ ¢ N cL NING
cLEANiNG THE WASHER
Cleaning the Dispenser
The dispenser shouBd be cBeaned periodically
to remove buiBdup from detergent and other
laundry products.
,J
the caps covering the siphon tube
for the bBeachand softener.
L
Lift the two-compartment container, tiBt
sBighfly to the left, and remove from the
main dispenser.
J
MAINTENANCE
Cleaning the Water inlet Filters
Rfthe washer detects that water is not entering
the dispenser, an error message will show on the
display. Rfyou We in an area with hard water, this
may be caused by cBogged inlet filters.
iMPORTANT: Use extreme care when removing
and cleaning the filters. If the filters cannot be
cleaned or are damaged, do NOT operate the
washer without the inlet filters. Contact LG
Customer Service or a qualified LG servicer.
off both water taps completely. Unscrew
the hot and cold water lines from the back of
the washer.
IMPORTANTE: Use ONLY the inlet hoses
provided by LG with this laundry product.
Aftermarket hoses are not guaranteed to fit or
function correctly. Other hoses may not tighten
correctly and could cause leaks. Subsequent
damage to product or property will not be
covered under the terms of LG's warranty.
Carefully remove the filters from the water
inlets, and soak them in white vinegar
or a lime scale remover, following the
manufacturer's instructions. Rinse thoroughly
before reinstalling.
Press the filters back into place and reattach
the water lines. Do NOT operate the washer
without the inlet filters.
28 29

C N C
MAINTENANCE cont.)
Cleaning the Drain Pump Filter
Lint and other objects may accumulate and cBog
the drain pump filter. If the washer fails to drain
properly, unpBug the washer and allow the water
to cool if necessary, before proceeding.
the drain pump fiBter access panel
\
Drain Hose
J
UncBipthe drain hose and pull it out. PBace
the end of the drain hose in a pan, bucket,
or floor drain to catch water.
Pump
Filter
Plug
Remove the plug from the drain hose, and
allow the water to drain completely.
Twist the pump filter counterclockwise to
remove. Remove any Bintand foreign objects
from the pump filter.
Reverse the above steps to reinstall the drain
pump filter and drain hose. Be sure to close
the cover panel when finished.
T [ES
NORMAL SOUNDS YOU MAY NEAR
The following sounds may be heard while the
washer is operating. They are normal.
Door lock relay when the door locks and unlocks.
Spraying or hissing:
Water spraying or circulating during the cycle.
Humming or gurgming:
Drain pump pumping water from the washer at
the end of a cycle.
Clothes tumbling in the drum during the wash
and rinse cycles.
BEFORE CALL,N(; FOR SERVICE
Your washing machine is equipped with an automatic error=monitoring system to detect and diagnose
problems at an early stage. If your washer does not function properly or does not function at all, check the
following before you call for service.
Rattling and
cmanking noise
Thumping sound
Vibrating noise
Water meaking
around washer
Excessive sudsing
Staining
oForeign objects, such as
keys, coins, or safety pins,
may be in drum or pump.
oHeavy wash loads may
produce a thumping sound.
oWasher load may be out
of balance.
oShipping bolts and/or
packaging materials not
removed.
• Wash load may be unevenly
distributed in the drum.
oNot all leveling feet are resting
firmly on the floor.
oFloor not rigid enough.
oFill hose connection is loose
at tap or washer.
oHouse drain pipes are
clogged.
oToo much detergent or
incorrect detergent.
oLaundry products added to
washer drum.
oWasher not unloaded
promptly.
oClothes not properly sorted.
oStop washer and check drum and drain filter for
foreign objects. If noise continues after washer is
restarted, call for service.
oThis is normal. If sound continues, washer is
probably out of balance. Stop and redistribute
wash load.
oStop and redistribute wash load.
oSee Installation Instructions for removing shipping
bolts and packaging.
• Stop washer and rearrange wash load.
oAdjust the leveling feet. Make sure all four feet are in
firm contact with the floor while the washer is in the
spin cycle with a load.
oMake sure that the floor is solid and does not flex.
Refer to "Flooring" in the Installation section.
oCheck hoses. Check and tighten hose connections.
oUnclog drain pipe. Contact a plumber if necessary.
oReduce detergent amount or use low-sudsing
detergent.
Only use detergent with the HE
(High-Efficiency) logo.
oLoad laundry products into the dispenser.
oAlways remove items from the washer as soon as the
cycle is complete.
oAlways wash dark colors separately from light colors
and whites to prevent discoloration. If possible, do
not wash heavily soiled items with lightly soiled onesy
30 31

T OU [ES OTING
BEFORE cALLiNG FOR SERVicE ccont.)
Water in the washer
drains slowly or not
at all, or the display
shows:
Washer fills with
water slowly or not
at all, or the display
shows:
/E
Washer will not
turn on
Washer Won't
spin, or the display
shows:
Door will not
unlock when cycle
is stopped or
paused
Wash cycle time is
longer than usual
Musty or mildewy
odor in washer
oDrain hose is bent, pinched,
or clogged.
oThe drain filter isclogged.
oWater supply taps are not
open fully.
oWater line hoses are kinked,
pinched, or bent.
oWater inlet filters are clogged.
oWater pressure to tap or
house is too low.
oPower cord is not properly
plugged in.
oHouse fuse is blown, circuit
breaker has tripped, or power
outage has occurred.
oThe door is not closed
properly.
oInterior temperature of
washer istoo high.
oWater level in washer is too
high.
oThe washer automatically
adjusts the wash time for
the amount of laundry, water
pressure, water temperature,
and other operating
conditions.
oIncorrect or too much
detergent has been used.
oInside of tub not cleaned
properly.
oMake sure the drain hose isfree of clogs, kinks, etc.,
and is not pinched behind or under the washer.
oClean the drain filter. See the User Maintenance
Instructions section.
oMake sure that the water taps are open fully.
oMake sure the hoses are not kinked or pinched.
Be careful when moving the washer.
oClean the inlet filters. See the User Maintenance
Instructions section.
oCheck another faucet in the house to make sure
that household water pressure is adequate.
o Make sure that the plug is plugged securely into a
grounded, 3=prong, 120=VAC, 60=Hz. outlet.
o Reset circuit breaker or replace fuse. Do not increase
fuse capacity. If the problem is a circuit overload,
have it corrected by a qualified electrician.
oMake sure that the door is closed properly and press
the START/PAUSE button. After starting a cycle, it
may take a few moments before the drum begins to
turn or spin. The washer will not spin unless the door
is locked (DOOR LOCK will appear in the display).
oIf the door is closed and locked and the open door
error message is displayed, call for service.
oThe washer door has a safety lock to prevent burns.
Allow the washer to cool until the DOOR LOCK
indicator turns off in the display.
oAllow the washer to complete the programmed cycle,
or run the DRAIN & SPIN cycle to drain the water.
oThis is normal. The washer adjusts cycle time
automatically to provide optimal results for the
selected cycle.
oUse only HE (High=Efficiency) detergent in
accordance with the manufacturer's instructions.
oRun the TUB CLEAN cycle regularly. Be sure to wipe
around and under the door seat frequently.
oClean around door seaWglass to prevent odor or
mildew:
1. wipe dry the door seaWglass and the door
opening area
2. wipe around the inner drum/door seal and
the lower door seal
J
T [ES
BEFORE CALLING FOR SERVICE cont.)
Wrinkling
The display shows:
uC
The display shows:
_E
I-C
The display shows:
PF
oWasher not unloaded
promptly.
oWasher overloaded.
oHot and cold water inlet
hoses are reversed.
oLoad is too small.
oLoad is out of balance.
oThe washer has an imbalance
detection and correction
system. If individual heavy
articles are loaded (bath
mat, bath robe, etc.) and the
imbalance is too great, the
washer will make several
attempts to restart the spin
cycle. If an imbalance is still
detected, the washer will stop
and the error code will be
displayed.
oControl error.
oWater level is too high due to
a faulty water valve.
oThe water level sensor is not
working correctly.
oThermal overload protection
circuit in the motor has been
tripped.
oA power failure has occurred.
oAlways remove items from the washer as soon as
the cycle is complete.
oThe washer can be fully loaded but the drum should
not be tightly packed, and the door should close
easily.
oHot water rinse can set wrinkles in garments. Check
the inlet hose connections.
oAdd 1 or 2 similar items to help balance the load.
oRearrange items to help balance the load.
oUnplug the washer and call for service.
oClose the water taps, unplug the washer, and call
for service.
oClose the water taps, unplug the washer, and call
for service.
oAllow the washer to stand for 30 minutes to allow the
motor to cool; then restart the cycle. If the LE error
code still appears, unplug the washer and call
for service.
oRestart the cycle.

SP [C NS
KEY DiMENSiONS AND SPECiFiCATiONS
The appearance and specifications listed in this manual may vary due to constant product _mprovements.
Description
Electrical Requirements
Max. Water Pressure
Dimensions
Front-Loading Washer
120 VAC @60 Hz.
14.5-116 PSR(100-800 kPa)
27"(W) X 293,/4"(D)X 38!1/16"(H),51 "(D with door open)
68.6 cm (VV)X 75.6 cm (D)X 98.3 cm (H), 129.5 cm (D with door open)
Net Weight 192 Bb.(87 kg)
Max. Spin Speed 1,200 RPM
Your LG Washing Machine will be will repaired or replaced, at LG's option, if it proves to be defective in material or work-
manship under normal use, during the warranty period ("Warranty Period") set forth below, effective from the date ("Date
of Purchase") of originaB consumer purchase of the product. This warranty is good only to the original purchaser of the
product and effective only when used in the United States, including Alaska, Hawaii, and U.S. Territories.
WARRANTY PER[OD:
LABOR: One Year from the Date of Purchase.
PARTS (except as misted bemow): One Year from the Date
of Purchase.
Emectronic Controm Board: Two Years from the Date
of Purchase.
Drum Motor: Seven Years from the Date of Purchase.
Stai@ess SteemDrum: Lifetime
Replacement Units and Repair Parts may be new or
remanufactured.
Replacement Units and Repair Parts are warranted for the
remaining portion of the original unit's warranty period.
HOW SERVICE [S HANDLED:
in-Home Service:
Please retain dealer's dated bill of sale or delivery
ticket as evidence of the Date of Purchase for proof of
warranty, and submit a copy of the bill of sale to the
service person at the time warranty service is provided.
Pmeasecarom1o800o243o0000 and choose the
appropriate option to mocate your nearest LG
Authorized Service Center.
Or visit our Web site at: http:/,iwww.lgservice.com.
THINSWARRANTY mSmNLmEUOF ANY OTHER WARRANTY, F_.J(PRESSOR mMPLmED,[NCLUDmNG WmTHOUT LmMmTAT[ON,
ANY WARRANTY OF MERCHANTABmLmTY OR FmTNESS FOR A PARTmCULAR PURPOSE. TO THE F_.J(TENTANY mMPLmED
WARRANTY mSREQUmRED BY LAW, mTmSLmMiTED mNDURATmON TO THE EXPRESS WARRANTY PERmODABOVE.
NEmTHER THE MANUFACTURER NOR roTSU.S. DmSTRmBUTOR SHALL BE LmABLEFOR ANY mNCmDENTAL,CONSEQUENTmAL,
mNDmRECT,SPECIAL, OR PUNmT[VE DAMAGES OF ANY NATURE, mNCLUDmNGWITHOUT LmMiTATmON,LOST REVENUES OR
PRONTS, OR ANY OTHER DAMAGE WHETHER BASED IN CONTRACT, TORT, OR OTHERWmSE. Some states do not allow
the exclusion or limitation of incidental or consequential damages or limitations on how long an implied warranty lasts, so the above
exclusion or [imitation may not apply to you. This warranty gives you specific regal rights and you may also have other rights that vary
from state to state.
THINSLmM[TED WARRANTY DOES NOT APPLY TO:
o Service trips to your home to delive5 pick up, and/or instatl the product, instruct, or replace house fuses or correct wiring, or
correction of unauthorized repairs.
o Damages or operating problems that result from misuse, abuse, operation outside environmental specifications or contrary to the
requirements of precautions in the Operating Guide, accident, vermin, fire, flood, improper installation,acts of God, unauthorized
modification or alteration, incorrect electrical current or voltage, or commercial use, or use for other than intended purpose.
The cost of repair or replacement under these excluded circumstances shat[ be borne by the consumer.
CUSTOMER mNTERACT[VE CENTER NUMBERS
To obtain Customer Assistance, Product
information, or Deamer or Authorized Service
Center mocation:
Call 1o800o243o0000 (24 hours a day, 365 days a
year), and select the appropriate option from the menu.
Or visit our Web site at: http://wwwJgserviceocom.
TO CONTACT LG ELECTRONICS
BY MALL:
LG Customer Interactive Center
P.O. Box 240007
201 James Record Road
Huntsville, Alabama 35824
ATTN: CIC
54 55

UCcl N
_MSTRUCC_ONES _MPORTANTES DE
Precauciones bAsicas de seguridad .............. 37-40
P_EzASY CARACTER{ST_CAS
Caractedstlcas especiates .................................... 41
Piezas y componentes clave ................................ 42
_NSTRUCC_ONES PARA LA
Escoja et lugar adecuado ..................................... 43
Espacios de instalaci6n ........................................ 43
Tipo de piso .......................................................... 44
Desembalaje y retiro de los pernos de embalaje... 45
Conexi6n de las tuberfas de agua ........................ 46
Conexi6n de la tuberfa de drenaje ....................... 47
Nivelaci6n de la lavadora ..................................... 48
C0MO USAR
Clasificaci6n de las cargas de lavado .................. 49
Selecci6n de detergente ...................................... 50
Detalles sobre el dep6sito .................................... 50
Carga del dep6sito ............................................... 51
Caracterfsticas del panel de control ..................... 52
Gu[a de ciclos ....................................................... 53
La pantatla de hora y estado ................................ 54
Funcionamiento de la lavadora ............................ 55
Ciclos de Vapor .................................................... 56
Botones de ajuste de ciclo ................................... 57
Programa personatizado ..................................... 58
Botones de opci6n de ciclo ................................. 59
Funciones especiates ..................................... 59-60
IVIANTENiMiENTO Y LiIViPiEZA
Limpieza regular ................................................... 61
Limpieza de la lavadora ........................................ 62
Mantenimiento ................................................. 63-64
RESOLUC_0N DE PROBLEMAS
Sonidos normales que podda escuchar .............. 65
Antes de Ilamar a mantenimiento ................... 65-67
I::SPI::CUFUCACUONES
Dimensiones y especificaciones clave ................. 68
6ARANTiA ......................................................69
_
Felicitaciones por su compra
y bienvenido a la familia LG.
Su nueva Steam Washer TM combina
la tecnologia de lavado mas
avanzada con funcionamiento
sencillo y alta eficiencia. AI seguir
las instrucciones de funcionamiento
y mantenimiento de este manual,
su lavadora le brindara muchos
a_os de servicio confiable.
Information de registro del producto
Modeio:
NQmero de serie:
Fecha de compra:
Se puede encontrar el n0mero de serie y el
modelo en la placa de clasificaci6n en la frente
de la lavadora.
INSI UCC[ NES OP,TANT D
AE)VERTENCmA seguridad,deb s guirUai. o oi6,i.dio d
en este manuaU para minimizar eUriesgo de incendio o expUosi6n, descarga eU_ctrica,
o para prevenir dahos a Uapropiedad, Uesiones personaUes o muerteo
F Su Seguridad y la de los demas son de suma importancia.
En este manual yen su electrodom6stico figuran muchos mensajes importantes de seguridad. Lea y
cumpla siempre con todos los mensajes de seguridad.
Este es el simbolo de alerta de seguridad.
El mismo alerta sobre potenciales nesgos de muerte o heridas tanto para usted como para
otras personas.
Todos los mensajes de seguridad estarAn a continuacion del simbolo de alerta de seguridad y con la
palabra PEMGRO o ADVERTENCIA. Estas palabras significan:
__0_ Corre riesgo de muerte o de sufrir heridas serias si no sigue las instrucciones
inmediatamente.
_DV_RT__: Corre nesgo de muerte o de sufrir heridas serias si no sigue las
instrucciones.
Todos los mensajes de seguridad le indicaran cual es el riesgo potencial, le diran c6mo reducir las
_)osibilidades de sufrir heridas y que puede suceder si no se siguen las instrucciones.
J
56 57

iNS UCCi0N S bit D S Li
LEA TODA$ LA [@$TRUCCiO@E$ A@TE$ DE
en este manuaU para minimizar eUriesgo de incendio o expUosi6n, descarga eU_ctrica,
o para prevenir dahos a Uapropiedad, Uesiones personaUes o muerte.
[NSTRUCCiONES BASicAS DE SEGURiDAD
ADVERTENC[A Para minimizar e, riesgo de incendio o exp,osi6n, descarga e,6ctrica,
o para prevenir lesiones personales cuando use electrodomesticos, se deben seguir precauciones
bb_sicasde seguridad, incluyendo las siguientes:
, Antes de usar, la lavadora debe estar correctamente
instalada como se describe en este manual.
, No lave art[culos que han sido limpiados,
lavados, remojados o salpicados previamente
con gasolina, disolventes de limpieza en seco,
u otras substancias infiamables o explosivas,
ya que emanan vapores que poddan
encenderse o explotar.
, No agregue gasolina, disoiventes de limpieza en seco
u otras substancias explosivas al agua de lavado.
Estas substancias emanan vapores que podrfan
encenderse o explotar.
, Bajo ciertas condiciones, se puede producir gas
hidr6geno en un sistema de agua caliente que no
se haya usado pot un plazo de 2 semanas o m_.s.
EL GAS HIDROGENO ES EXPLOSIVO. Si no se ha
usado el sistema de agua caliente durante tal perfodo,
antes de utilizar la lavadora, abra todas las Ilaves
de agua caliente y deje que el agua fluya durante
algunos minutos. Esto liberar& cualquier gas hidr6geno
acumulado. Ya que el gas es infiamable, no fume ni
use ninguna llama abierta durante este per[odo.
, No deje que los niffos jueguen en la lavadora o dentro
de ella. Cuando se usa la lavadora cerca de los niffos
se necesita supervisi6n minuciosa.
, Antes de poner la lavadora fuera de servicio o de
tiraria, quite la puerta para prevenir que los niffos se
metan dentro.
, No instale ni guarde la lavadora cuando est6 expuesta
a la intemperie o temperaturas de congelamiento.
, No toquetee los controles.
, No repare ni cambie ninguna pieza de la lavadora ni
intente dar un mantenimiento dlferente al descrito en
este manual. Recomendamos enf&ticamente que el
mantenimiento Io brinde una persona calificada.
, Vea las Instrucciones de instalaci6n para referirse a los
requisitos de puesta a tierra.
,Siga SIEMPRE las instrucciones de
mantenimiento de f_.brica provistas pot el fabricante
de las prendas.
, No coloque art[culos expuestos a aceite comestible en
su lavadora. Los art[culos contaminados con aceites
comestibles podrfan contribuir a la formaci6n de una
reacci6n qu[mica que cause que una carga de lavado
se incendie.
Use suavizadores de tela o productos para eliminar
est_tica Onicamente del modo recomendado pot el
fabricante.
, Esta lavadora no est6. dise_ada para uso marino
o instalaciones m6viles tales como vehfculos
recreativos, aeronaves, etc.
• Cierre las Ilaves de agua y desenchufe la lavadora si
ha dejado la lavadora sin funcionar por un perfodo
prolongado de tiempo, como durante las vacaciones.
, El material de embalaje podrfa resultar peligroso
para los niffos, iExiste el peligro de sufrir sofocaci6n!
Mantenga todos los elementos de embalaje fuera del
alcance de los niffos.
Antes de cargar la lavadora, siempre revise que no
haya objetos extraffos en su interior. Mantenga la
puerta cerrada cuando no se use.
[NSTRUcciONES PARA LA ¢ONEXiON A TiERRA
Este aparato debe set conectado a tierra. Dado el caso de descompostura 6 mal funcionamiento, la
conexi6n a tierra reduce el riesgo de recibir una descarga electrica proveyendo una via de menor resistencia
a la corriente electrica. Este aparato esta equipado con un cable que tiene un conductor de equipo a
tierra y una clavija de tierra. La clavija debe ser conectada en una toma de cornente adecuada que
este propiamente instalada y conectada a tierra de acuerdo con los cOdigos y ordenanzas locales.
_A_V_T_C_A Una conexioninapropiadade,conductorde equipoa tierrapuede
resultar en riesgo de recibir una descarga el6ctrica. Verifique con un electricista calificado si t[ene dudas sobre
si el aparato esta correctamente conectado a tierra. No modifique la clavija provista con el aparato. Si no
encaja con la toma de corriente, haga instalar una toma de corriente adecuada por un electricista calificado.
58
[NST CO[ N P S GU [Di
LEA TODA$ LA [@$T@UCCiO@E$ A@TE$ DE
ADVERTENC|A Pots.seg.Hda¢deb Uai. o oi6, i.dio d
en este manual para mirlimizar el riesgo de incendio o expUosi6n, descarga eU_ctrica,
o para prevenir dahos a Uapropiedad, Uesiones personaUes o muerteo
[NSTRUCCiONES DE SEGURiDAD PARA LA [NSTALACK}N
ADVERTEHC[A Paraminimizare, riesgo de incendio o exp,osiOn, descarga e,6ctrica,
o para prevenir lesiones personales cuando use electrodom6sticos, se deben seguir precauciones
bb_sicasde seguridad, induyendo las siguientes:
,Consulte ias iNSTRUOOmONES DE iNSTALACmON
para un procedimiento deta[[ado de conexi6n
a tierra. Junto con la lavadora se encuentran las
instrucciones de instalaci6n como referencia. Si
cambiar_, de lugar la lavadora, contrate a una
persona del servicio calificada para que la controle
y reinstale. Si no se cumple con esta advertencia se
podr&n producir heridas graves, incendios, descargas
el6ctricas o muerte.
,Nunca, bajo ninguna circunstancia, corte o elirnine
emtercer came {tierra) del cable de corriente. Si no
se cumple con esta advertencia se podr&n producir
heridas graves, incendios, descargas el6ctricas o
muerte.
,Rata au seguridad personal, este eiectrodom_stico
debe estar adecuadamente conectado a tierra. Si
no se cumple con esta advertencia se podr&n producir
heridas graves, incendios, descargas el6ctricas o
muerte.
,El cable de corriente de este emectrodom_stico
contiene un enchufe de 3 cables (conexi6n a
tierra) que se conecta a un tomacorriente de
pared est&ndar de 3 cables (cone×i6n a tierra)
para minimizar la posibilidad de riesgos de descargas
el_ctricas pot parte del mismo.
,La iavadora deber_ estar conectada a un
tomacorriente con conexi6n a tierra de 120VAC,
60 Hz. Si no se cumple con esta advertencia se
podr&n producir heridas graves, incendios, descargas
el6ctricas o muerte.
,Contrate a un eiectricista caiificado para que
controle el tomacorriente y emcircuito em_ctrico
con emfin de asegurar que el enchufe est_
correctamente conectado a tierra. Si no se cumpie
con esta advertencia se podr&n producir heridas
graves, incendios, descargas el_ctricas o muerte.
• En caso de contar con un tomacorriente de pared
de 2 cables, es su responsabilidad y obiigaci6n
reemplazarlo par un tomacorriente de pared de 3
cables correctarnente conectado a tierra, Si no se
cumpie con esta advertencia se podr&n producir heridas
graves, incendios, descargas el_ctricas o muerte.
,No instaiar sobre aifombra, instale maiavadora
sobre un suelo firme. Si no se cump[e con esta
advertencia se podr&n producir daSos pot fiItraciones.
,No elimine el cable de conexi6n a tierra. No
use un adaptador o prolongador. Enchufe en un
tomacorriente con conexi6n a tierra de 3 cables.
Si no se cumple con esta advertencia se podr&n
producir heridas graves, incendlos, descargas
el6ctricas o muerte.
, La [avadora deber[a estar siempre conectada a
un enchufe especffico con un _ndice de voltaje
equivalente ai que figura en su etiqueta de
caracteffsticas t6cnicas. Esto garantiza el mejor
funcionamiento y ademas previene la sobrecarga de
los circuitos del hogar, Io cual podda ocasionar riesgos
de incendio debido al recalentamiento de cables.
• Nunca desenchufe su iavadora empujando el cable
de corriente. Siempre tome su enchufe firmemente
y empuje el mismo hacia fuera para retirarlo. Si no
se cumple con esta advertencia se podr&n producir
heridas graves, incendios, descargas eI_ctricas o
muerte.
,Repare o reemplace de inmediato todos los cables
de corriente peiados o con cuaiquier tipo de da_o.
No use un cable con cortaduras o abraai6n sobre
su extensi6n o extremos. Si no se cumple con
esta advertencia se podr&n producir heridas graves,
incendios, descargas el_ctricas o muerte.
,Am instalar o cambiar de iugar ia mavadora, evite
todo tipo de cortes u otros dahos en el cable de
corriente. Si no se cumple con esta advertencia se
podr&n producir heridas graves, incendios, descargas
el_ctricas o muerte.
,La iavadora debe set instaiada y conectada a tierra
pot una persona especializada demaervicio t_cnico
cumpmiendo con los c6digos locales para prevenir
riesgos de descargas y asegurar la estabilidad durante
el funcionamiento.
,La iavadora es pesada. Se necesitan dos
o m&s personas para instaiar y trasladar el
eiectrodom_stico. Si esto no se cumple se podr_.n
producir diversas heridas.
• Ubique e instale ia iavadora evitando su exposici6n
a temperaturas bajo cero o a condiciones ciim_ticas
en &teas exteriores, Si no se cumple con esta
advertencia se podr&n producir dahos per filtraciones.
,Con el fin de reducir emriesgo de descargas
ei_ctricas no instaie ia mavadora en espacios
hQrnedos. Si no se cumple con esta advertencia se
podr&n producir heridas graves, incendios, descargas
el6ctricas o muerte.
59

[NST UCC[ NES PO
LEA TODA$ LA INSTRUCCIONE$ ANTES DE USAR
en este rnanuaU para rninirnizar eUriesgo de incendio o expUosi6n, descarga eU_ctrica,
o para preverfir daSos a Uapropiedad, Uesiones personaUes o muerte.
tNSTRUCCtONES DE $EGURIDAD PARA LA UTtLtSACt0N,
cUtDADO Y LtMPtEZA, Y LA DtSPOSt¢tON
ADVERTI= NC Parami°imi are,riesgodei°ce°diooexp,osio.,descargae,6ctrica,
o para prevenir lesiones personales cuando use electrodom6sticos, se deben seguir precauciones
bb,sicas de seguridad, induyendo las siguientes:
®Desenchufe la lavadora antes de limpiar la misma
para evitar el riesgo de descargas el6ctricas.
• AI limpiar la lavadora nunca utilice qu_micos
de torte, limpiadores abrasivos o solventes.
Los mismos da5ar&n su aspecto.
®No coloque trapos grasosos o aceitosos sobre la
lavadora. Estas sustancias despiden vapores que
podrfan prender fuego los matedales.
®No lave prendas que est6n sucias con aceite
vegetal o de cocina. Las mismas pueden quedar con
algo de aceite luego del lavado. Debido al aceite que
permanece, la tela puede despedir humo o prenderse
fuego por s[ sola.
®Desconecte este electrodom_stico del
tomacorriente antes de realizar cualquier
funci6n de mantenimientoo Colocar los controles
en la posici6n OFF (apagado) no desconecta el
electrodom6stico de la toma de corriente. Si no se
cumple con esta advertencia se podr&n producir
heridas graves, incendios, descargas el6ctricas o
muerte.
®No combine diferentes productos de lavanderia en
1 misma carga a menos que esto se especifique en
la etiqueta. No mezcle blanqueador con cloro junto
con amon_aco o &cidos tales como vinagre. AI usar
productos de lavander_a siga las instrucciones del
envoltorioo Un uso indebido puede producir gases
venenosos, Io que puede resultar en heridas graves
o muerte.
eNo coloque las manos dentro de la lavadora
cuando sus partes est_n en movimiento. Antes de
cargar, descargar o agregar prendas, presione la
perilla selectora de ciclos y espere hasta que el
tambor se detenga totalmente antes de colocar las
manos dentro. Si no se cumple con esta advertencia
se podr&n producir heridas graves, incendios,
descargas el6ctricas o muerte.
®No permita que los ni_os jueguen sobre o dentro
de la lavadora. Si hay niSos cerca mientras la
lavadora est_ en funcionamiento es necesario
supervisarlos de cerca. A medida que los ni_os
crezcan, ens65eles sobre el uso adecuado y
seguro de todos los electrodom6sticos. Siestas
advertencias no se cumplen se podrfan producir
heridas graves.
®Destruya la bolsa pl_stica y otros materiales
de embalaje una vez retirada la lavadora. Es
posible que los niSos deseen usarlas para jugar.
Los cartones cubiertos con alfombra, colchas
o l_minas de pl_stico se pueden convertir en
c_maras herm_ticas. Si estas advertencias no se
cumplen se podrfan producir heridas graves.
®Mantenga los productos de lavandeHa fuera del
alcance de los niSos. Rata evitar heridas, cumpla
con todas las advertencias que figuran en las
etiquetas de los productos. Siestas advertencias no
se cumplen se podrfan producir heridas graves.
®Retire la puerta del compartimiento de lavado
para evitar el riesgo de que los niSos o animales
pequeSos queden atrapados dentro, si dejar_ de
usar definitivamente o se deshar8 de su lavadora.
Si no se cumple con esto se podr&n producir heridas o
muerte.
ESTA$ INSTRUCCtONI=$
PIEZ
CARACTER|STtCASESPECtALES
CAJ0N DE DEPOSUTO DE DETERGENTE
Este caj6n de cuatro secciones provee
dep6sitos separados para el prelavado y
detergente principal de lavado, asi como
suavizante liquido de telas.
O PANTALLA DE LED DEL PANEL DE
CONTROL
Los controles electr0nicos son sencillos y
faciles de utilizar. La pantalla de LED muestra
las opciones y la informaciOn de cido, y los
mensajes de estado durante el funcionamiento.
COMPUERTA DE SEGURUDAD DE
FAC& ACCESO
La compuerta extra=grande se asegura durante
el funcionamiento y consta de un bloqueo
demorado para prevenir que la compuerta se
abra hasta que el interior de la lavadora se haya
enfriado y haya bajado el nivel del agua.
CUCLOS DE VAPOR DE ALTA EFUCUENCUA
Durante los ciclos de VAPOR de alta eficiencia
0nicos de LG, la boquilla de vapor inyecta alas
telas vapor caliente para eliminar suavemente las
manchas mAs dificiles,
CHORROS DE ROD&LO
El sistema de chorros de rodillo mejora el
desempe_o de lavado, a la vez que reduce el
desgaste de la tela. Los chorros integrados
rocian las prendas para mejorar aOn mb.s la
eficiencia de lavado.
LUZ DEL TAMBOR INTERIOR
La luz del tambor ilumina el interior de la
lavadora para aumentar la visibilidad en la carga
y descarga. Las bombillas LED de duracion ultra
larga nunca necesitarb, n set reemplazadas.
MOTOR DE ACC_0N D_RECTA
El motor de acci6n directa elimina la correa
y las poleas incluidas en la mayoria de las
lavadoras para brindar desempeSo y confiabilidad
mejorados, a la vez que aumenta el ahorro
de energia.
ISTI
S
4o 41

Pl ¥C l€
PtEZAS Y COMPONENTES CLAVE
Ademas de Boscomponentes y Bascaractedsticas
descritos en Basecci6n de Caracterfsticas
especiales, hay varios componentes importantes
adicionaBes a BoscuaBes se hace referencia en
este manual
O TAMBOR DE ACERO UNOXUDABLE DE
ULTRA CAPACUDAD
EBtambor de acero inoxidabBe uBtragrande ofrece
una durabiBidad extraordinaria y esta incBinado
para mejorar Baeficiencia y permitir eBacceso faciB
para prendas grandes.
42
@
CIRCULACION DE AGUA Y BOOUILLAS
DE VAPOR
Las boquiHas de circuBaci6n de agua rocian
BasoBuciOnagua/eB detergente directamente
sobre Basprendas permitiendo una Hmpieza
extraordinada. Durante los ciclos de VAPOR
de alta eficiencia exclusivos de LG, la boquifla
de vapor inyecta alas telas vapor caliente para
eliminar suavemente las manchas mb.sdificiles.
PATAS NUVELADORAS
Cuatro patas niveladoras (dos en la parte frontal
y dos en la trasera) ajustables para mejorar la
estabilidad de la lavadora en pisos desnivelados.
PANEL DE ACCESO AL DRI::::NA,JE
Bnnda acceso a la tuberia de drenaje y al filtro
de la bomba de drenaje.
Entradas de agua
caliente y fria
Manc
de drenaje
Parte trasera de
la lavadora
Accesorios induidos
agua fria y caliente
Tap6n (4) _
(para tapar los agujeros de
los pernos para transporte)
_ra Correa de amarre Abrazadera
sacar los pernos de (para asegurar de codo (para
embalaje y ajustar las la manguera de asegurar la
patas niveladoras) drenaje) manguera de
drenaje)
[NST UCC[ N S PA S {Aci N
ESCOJA EL LUGAR ADECUADO
La iavadora es pesada. Se necesitan dos
o m,_s personas para instaiar y trasmadar
ememectrodom6sticoo Si esto no se cumple
se podrb.n sufrir heridas en la espalda u otras
heridas.
Aimacene e instaie ia iavadora en un iugar
no expuesto a temperaturas inferiores a
las de eongeiaci6n ni a la intemperieo Si no
se cumple con esta advertencia se podrb.n
producir heridas graves, incendios, descargas
el6ctricas o muerte.
• Para su seguridad personam, este
eleetrodom_stico debe set eoneetado a
tierra adeeuadamenteo Si no se cumple con
esta advertencia se podran producir heridas
graves, incendios, descargas el6ctricas o
muerte.
Coneete a tierra la iavadora siguiendo
todos mosc6digos y ordenanzas megames.Si
no se cumple con esta advertencia se podr&n
producir heridas graves, incendios, descargas
el6ctricas o muerte.
La apertura de la base no debe estar obstruida
por una alfombra cuando la lavadora se instale
en un piso alfombrado.
No eiimine ei cable de conexi6n a tierrao No
use un adaptador o promongadoro Enchufe en
un tomacorriente con conexi6n a tierra de 3
cables. Si no se cumple con esta advertencia
se podr_n producir heridas graves, incendios,
descargas el6ctricas o muerte.
Tomacorriente
El tomacornente debe estar dentro de un area
minima de 1,5 m (60 pulgadas) a cualquiera de
los lados de la lavadora.
El electrodom6stico y el tomacorriente deben
estar colocados de forma tal que se pueda
acceder al enchufe facilmente.
No sobrecargar el tomacornente con mb.sde un
electrodom6stico.
El tomacornente debera estar puesto a tierra de
acuerdo con los c6digos y las regulaciones de
cableado actuales.
Se recomienda utilizar un fusible de demora de
tiempo o disyuntor.
NOTA: Es responsabilidad y obligaci6n personal
del duefio del producto pedir a un electricista
calificado que instale el tomacornente adecuado.
ESPACiOS DE iNSTALACi0N
_, 211/4"_
(54 ore)
1_29s/4,,_
(75,6 cm)
51 "_
(129.5 cm)
(10 cm)
Para asegurar que se haya dotado de suficiente
espacio para las tuberias de agua y flujo de aire,
deje espacios minimos de por Io menos 2,5 cm
(1 pulgada) en los lados y 10 cm (4 pulgadas)
detras de la unidad. No olvidar prever espacio
para las molduras de pared, puerta o piso que
podrian aumentar los espacios de instalaci6n
requeridos.
(2,5 ore) (68.6 cm) (2,5 cm)
j_
Deje pot Io menos 61,2 cm (24 pulgadas) al frente
de la lavadora para poder abrir la compuerta.
43

[NST CC[ INSTAL [ N
T[PO DE P[SO
Para minimizar eBruido y vibraciOn, se DEBE
instaBar BaBavadora en un piso sOHdamente
construido. Vet BaNOTA a Baderecha.
La pendiente permitida debajo de toda Ba
Bavadora es de 1o
No se recomiendan Bassuperficies affombradas
o de baBdosas bBandas.
Nunca instaBe BaBavadora en una pBataforma o
estructura soportada con poca soHdez.
NOTA: Tome en cuenta que eBpiso debe set
Bosuficientemente fuerte y rigido para soportar
eBpeso de BaBavadora cuando se encuentra
compBetamente cargada, sin flexionarse ni
rebotar. Si su piso tiene mucha flexi6n, podria
necesitar reforzarlo para hacerlo m_s rigido. Un
piso adecuado para una lavadora de carga por
la parte superior podria no ser Io suficientemente
rigido para una de carga frontal debido a
la diferencia en la direcci6n y velocidad del
centrifugado. Si el piso no es sOlido, su lavadora
podda vibrar y la vibracion podria sentirse en
toda la casa.
[NST CC[ iNS [AC[ N
DESEMBALAJE Y RETiRO DE LOS PER@OS DE EMBALAJE
AI retirar la lavadora de la base de carton,
aseg0rese de quitar el soporte de base de
espuma colocado en la mitad de la base
de carton.
Si debe asentar la lavadora hacia abajo para
quitar los materiales de embalaje de la base,
hagalo siempre cuidadosamente sobre su parte
lateral. NO asiente la lavadora sobre su parte
frontal o posterior.
IMPORTANTE: Para prevenir da_os en el interior
durante el transporte, la lavadora esta equipada
con cuatro pernos de embalaje y sujetadores
plb.sticos. Se DEBEN quitar estos pemos y
sujetadores antes de porter en funcionamiento
la lavadora.
De Io contrario se podria causar vibraciOn
y ruido severos, que podrian causar da_os
permanentes a la lavadora. El cable esta
asegurado a la parte posterior de la lavadora
con un pemo de embalaje para prevenir el
funcionamiento con los pemos colocados.
Soporte de base Base de
de espuma cart6n
Pernos de
embalaje
Comenzando por los 2 pemos de embalaje
inferiores, use la Ilave incluida para quitar los
4 pernos de embalaje rotandolos en sentido
contrario alas agujas del reloj.
Tapa de
agujero
Quite los sujetadores haci6ndolos girar
levemente mientras tira. Gire y apriete las
tapas de orificio en los orificios de los
pemos de embalaje.
NOTA: Guarde los pemos y sujetadores
para su uso futuro. Para prevenir daffos
a los componentes internos, los pernos y
sujetadores internos deben ser instalados
cuando se transporte la lavadora.
_,,,,J
44 45

[NST CC[ INSTAl [ N
,, mMPORTANTE:Cuando instale lalavadora
use mangueras nuevas. NO reutilice
mangueras viejas.
o [MPORTANTE:UsarSOLAMENTElasmanguerasde
laentradaproporcionadaspor LGde este productodel
lavadero.Lasmanguerasdel mercadode accesorios
noestan garantizadasparacabero parafuncionar
correctamente.Otras mangueraspuedenno apretar
correctamentey podriancausarbs escapes.Elda_os
subsecuenteal producto o ala propbdad no seran
cubbrtos de conformidadconla garantiade LG.
,, La presi6n de suministro de agua debe estar entre
14,5 libras por pulgada cuadrada y 116 libras por
pulgada cuadrada (100-_800kPa).Si la presi6n
de suministro de agua essuperior a 116 libras
por pulgada cuadrada, debe instalar una vAlvula
reductora de presi6n.
,, Reviseperi6dicamente que la manguera no tenga
rajaduras, fugas y desgaste, y reempl_cela de ser
necesario.
,,AsegOresede que las tuberias de agua no se
encuentren extendidas, apretadas, aplastadas
o curvadas.
,, Nunca se debe instalar niatmacenar la lavadora en
un lugar expuesto a temperaturas de congelamiento.
Pueden daffarse las tuberias de aguay mecanismos
internos de la lavadora.Si se expone la lavadora
a temperaturas de congelamiento antes de la
instalaci6n, deje que permanezca a una temperatura
ambiente por varias horas antes de usar.
Manguera de agua (a
la conexi6n de agua
en la lavadora)
Sello de caucho
Manguera /
de agua
Sel[o de caucho
(a la Ilave)
[nserte un seHo de caucho en Basconexiones
roscadas en cada manguera.
46
f°' Entradas
de agua
No da_ie Barosca de Basconexiones
de manguera.
Conecte la tuberia de agua caliente a la entrada
roja de agua caliente en la parte posterior de la
lavadora. Conecte la tubeda de agua fria a la
entrada azulde agua fria en la parte posterior de
la lavadora. Ajuste lasconexiones con firmeza.
Llave de agua
Conecte la tuberia de agua caliente a la Ilave
de agua caliente. Conecte la tuberia de agua
fda a la Ilave de agua fria.
Ajuste las conexiones con firmeza. Abra las
Ilaves de agua completamente para revisar
que no haya fugas.
[NST CC[ iNS [AC[ N
cONi::XiON DE LA TUBER[A DE DRENAjE
,, La manguera de drenaje siempre debe estar
asegurada adecuadamente. No asegurar
adecuadamente la manguera de drenaje puede
resultar en inundaci6n o da_os a la propiedad.
,, No instalar el extremo de la manguera a una
altura de mas de 2,44 m (96 pulgadas) sobre la
parte inferior de la lavadora.
,, El drenaje debe instalarse seg0n todos los
cOdigos y regulaciones locales vigentes.
,, Aseg0rese de que las tuber[as de agua no se
encuentren extendidas, apretadas, aplastadas
o curvadas.
Option 1: Tu/so vertical
Abrazadera
U Manguera
de drenqe
Enganche el extremo de la manguera en la
abrazadera del codo. Inserte el extremo de la
manguera de drenaje en el tubo vertical. Utilice la
correa para asegurar la manguera en su lugar.
NOTA: La altura total d@extremo de la manguera
no deber,_ sobrepasar 2,44 m (96 pulgadas)
desde la parte inferior de la lavadora.
Opdon 2: zavadero
Abrazadera
del codo
Correa
Manguera
de drenaje
Enganche el extremo de la manguera en la
abrazadera del codo. Cuelgue el extremo de la
manguera sobre el lado del lavadero. Utilice la
correa para asegurar la manguera en su lugar.
NOTA: La altura total d@extremo de la manguera
no debera sobrepasar 2,44 m (96 pulgadas)
desde la parte inferior de la lavadora.
Opddn 3; Drenaje de/p/so
Manguera
de drenaje
Drenaje
de[ piso
inserte el extremo de la manguera de drenaje en
el drenaje del piso. Asegure la manguera en su
lugar para prevenir su movimiento.
47

(NST UcCi NES
NtVELACt0N DE LA LAVADORA
E)tambor de su nueva )avadora centrifuga a
ve)ocidades muy a)tas, de hasta 1 200 r.p.m.
Para minimizar )a vibraciOn, el ruido y movimiento
no deseados, e) piso debera set una superficie
perfectamente nive)ada y sO)ida.
NOTA: Fije )as patas niveladoras so)o en )a
medida necesana para n)veIar )a )avadora. La
extensi6n de )as patas nive)adoras mAs de )o
necesario puede causar vibraci6n de )a )avadora.
Las 4 patas niveladoras deborah apoyarse
firmemente en e) piso. Mueva )a )avadora
suavemente de esquina a esquina para
asegurarse de que no se ba)ancee.
@ @ @
Niveiador
J
Patas
n(veladoras
Paras
Co)oque )a lavadora en el )ugar final,
tomando la precauci6n especial de no
apretar, forzar ni apIastar )as tuberias de
drenaje y agua. Co)oque un nive)ador en
)a parte superior de )a )avadora.
48
Para (evantar Para bajar
Afloje )as tuercas de seguridad en )as 4 patas
nive)adoras hasta que pueda girar )a pata con
)a ))ave incIuida. Gire en )a direcci6n de )as
agujas de) re)oj para )evantar )a )avadora o a)
contrario para bajar)a.
Ajustar firmemente
(as 4 tuercas
,J
Una vez que )a )avadora se encuentre nive)ada
de )ado a )ado y atrAs y adeIante, ajuste todas
)as tuercas de seguridad con firmeza.
Aseg0rese de que )as 4 patas nive)adoras
se encuentran haciendo contacto firme con
el piso.
NOTA: Para asegurar que )a )avadora
esta niveIada adecuadamente, haga)a
funcionar con una carga de prueba: coloque
aproximadamente 3 kilos de ropa en )a
mAquina. Luego, apriete POWER (encendido),
RINSE+SPIN (enjuague+centdfugado), y
el boton de START/PAUSE (inicio/pausa).
Vea )as siguientes secciones para obtener
informaci0n adiciona) sobre )a se)eccion y el
funcionamiento de cidos.
Verifique que )a )avadora no se meza o
vibre excesivamente durante el cic)o de
centrifugado. Si )a )avadora vibra o se sacude,
ajuste )as patas nive)adoras hasta que se
encuentre estab)e y vue)va a comprobar.
cO
CLAS(F(CAC(0N DE LAS CARGAS DE LAVADO
Etiquetas de cuidado de/as to/as
La mayoria de )as prendas de vestir tienen
etiquetas de cuidado de )as te)as para )ograr
un cuidado adecuado.
f_
Etiquetas de cuidado de/as re/as
Normal Pianchad0permanente/ S_/
Antiarrugas De_icado
Nolavar No oscurNr
Cicl0de
lavad0a
mAquina
@@@ @@ @
Caliente Tibia Fria
(50°C/120°F) (40°C/105°F) (30°C/85_F)
Lsvado manual
Temperatura
de(agua
Simb010sdel
blanquead0rCuaiquierblanqueador Cuaiquierbianqueador Nobtanquear
N,...... (cuandosenecesita) sincloro (cuandosenecesita) ....
Agrupamiento de prendas simi/ares
Para obtener los mejores resu)tados, dasifique
las prendas en cargas que puedan lavarse con
el mismo cic)o de )avado.
Te)as diferentes tienen requisitos de
mantenimiento distintos.
Siempre lave )as prendas de co)ores oscuros
separadas de )as de co)ores c)aros y ropa b)anca
para evitar manchas. De set posib)e, no lave
prendas muy sucias con otras menos sucias.
El cuadro indicado mAs abajo muestra los
agrupamientos recomendados.
f C/asifique /os grupos de/avado°°°
Liviana
Oscura
pot nivel
de suc(edad
Pesada
Normal
L(viana
pot tipo
de tela
Deiicada
Mantenimiento
fAcil
Resistente
pot hilas
Producteur
de peluche
Recolectora
de hilachas
Carga de/a/avadora
Revise todos los boisiHos para asegurarse
de que est6n vac(os. Art(cuios como dips,
ceriHos, piumas, monedas y Haves pueden
daSar su iavadora o sus prendaso
Cierre las cremalleras, ganchos y cordones para
prevenir que estos articu)os se enganchen o
enreden en otras prendas.
Trate previamente )asAreas muy manchadas
para obtener los mejores resu)tados.
Combine prendas grandes y pequeSas en una
carga. Cargue primero )as prendas grandes.
Las prendas grandes no deberAn ser mAs de
)a mitad de )a carga de )avado total.
Se puede cargar )a)avadora comp)etamente,
pero el tambor no puede quedar co)mado de
prendas. La compuerta de )a )avadora deberA
cerrar con faci)idad.
Para prevenir una carga fuera de balance, no
lave prendas so)as. A_ada una o das prendas
similares a )a carga. Las prendas grandes,
que requieren mucho espacio, tales como
sAbanas, cubrecamas o co)chas se deben )avar
individua)mente.
No lave ni centrifugue prendas impermeab)es.
Cuando descargue )a )avadora, revise debajo
de) se))o de )a compuerta para contro)ar que
no haya articu)os peque_os.
49

¢ US
SELECC ON E)EDETERGENTE
#VtPORTANTE: Su Bavadora esta dise_ada para
usarse exdusivamente con detergentes de aBta
eficiencia (HE). Los detergentes de aBtaeficiencia
estan formuBados especificamente para Bas
Bavadores de carga frontal y contienen agentes
reductores de espuma. Busque siempre eBsimbolo
de aBtaeficiencia (HE)cuando compra detergente.
Los detergentes de aBtaeficiencia producen
menos espuma, se disuelven m_s eficientemente
para mejorar eBdesempe_o de Bavadoy enjuague,
y ayudan a mantener BimpioeBinterior de su
Bavadora.
UtiHzar un detergente regular puede causar
demasiada espuma y desempe_o insatisfactorio.
mlVIPORTANTE: No coloque o almacene
productos de lavado como detergente,
blanqueador o suavizante liquido en la parte
superior de su lavadora o secadora. Limpie
inmediatamente cualquier derrame. Estos
productos pueden da5ar el acabado y los
controles.
Dise_ada especfficamente para
usar con el detergente tipo HE
(AIta eficiencia)
Dr:TALLr:S SOBRE r:L DI=POStTO
El caj6n de suministro automatico consiste en
4 compartimentos que almacenan:
Blanqueador liquido.
Suavizante liquido de telas.
Detergente liquido o en polvo para el prelavado.
Detergente liquido o en polvo y cloro a prueba
de decoloramiento para el lavado principal.
Se pueden a_adir todos los productos de
lavado al mismo tiempo en sus respectivos
compartimientos de suministro. Ser_n
suministrados en el momento adecuado para
brindar el lavado mb_seficaz.
Despues de a_adir los productos de lavado al
depOsito, cierre el caj6n de depOsito.
Para a_adir detergente, blanqueador, y suavizante
al cajon de suministro autom_tico:
O Abra el caj6n de
depOs_to.
Cargue los productos de lavado en los
compartimientos adecuados.
O Cierre lentamente el cajon de depOsito para
evitar la salida temprana de los productos.
NOTA: Es normal que una cantidad peque_a de
agua permanezca en los compartimientos de
suministro al final del ciclo.
Compartimiento de
detergente para el
lavado principal
Compartimiento del
blanqueador liquido
Compartimiento del
suavizante liquido de
telas
Compartimiento
de detergente para
prelavado
CARGA DEL DEPOStTO
Compartimiento de detergente
para prelavado
Agregue el detergente ffquido o en polvo a este
compartimiento cuando se usa la opciOn de
Prewash (prelavado). Use siempre detergente tipo
HE (de alta eficiencia) con su lavadora.
La cantidad de detergente agregado para la
opci6n de prelavado debe ser la mitad de la
cantidad para el ciclo de lavado principal. Pot
ejemplo, si el ciclo de lavado principal requiere
una medida de detergente, a_ada media
medida para la opci6n de prelavado.
NOTA: Si usted use el detergente liquido para
el lavado principal cuando se usa la opci6n
de prelavado, el accessono de la taza de
detergente debe ser usado en el dep6sito del
lavado principal para evitar que el detergente
liquido de lavado principal esta suministrado
inmediatamente.
Compardmiento de detergente
para el lavado principal
Este compartimiento alberga el detergente para
el ciclo de lavado principal, el cual se agrega
a la carga al pdncipio del ciclo. Use siempre
detergente tipo HE (de alta eficiencia) con
su Bavadora.
Cuando agregue detergente nunea sobrepase
las recomendaciones del fabricante. Utilizar
demasiado detergente puede resultar en la
acumulaci6n del mismo en las prendas yen
la lavadora. Se puede utilizar tanto detergente
liquido como en polvo.
Cuando usa detergente liquido, aseg0rese de
que la taza e inserto se encuentran colocados
en su sitio. No exceda la linea de Ilenado
m_xima.
Cuando utiliza detergente en polvo, quite el
inserto y la taza de detergente liquido del
compartimiento. El detergente en polvo no
se suministrarb_ si estan colocados la taza de
detergente ffquido y el inserto.
NOTA: Se puede agregar el blanqueador a
prueba de decoloramiento liquido o en polvo al
compartimiento de lavado principal utilizando
detergente del mismo tipo.
DiseF]ada especfficamente para
usar con el detergente tipo HE
(AIta eficiencia)
cOM
Compardmiento de
blanqueador I/quido
Este compartimiento alberga blanqueador ffquido,
que se suministrarb_ autom&ticamente en el
mornento adecuado del ciclo de lavado.
• No agregue blanqueador a prueba de
decoloramiento liquido o en polvo a este
compartimiento.
Siga siempre las recomendaciones del
fabricante cuando agregue blanqueador.
No exceda la linea de Ilenado m_xima. Usar
demasiado blanqueador puede da_ar las telas.
Nunca descargue blanqueador liquido no diluido
directamente en la carga o en el tambor. Puede
da_ar las telas.
Compardmiento de/suavizante
Este compartimiento alberga el suavizante liquido
de telas, que se suministrar_ autom_ticamente
durante el ciclo de enjuague final.
Siga siempre las recomendaciones del
fabricante cuando agregue suavizante.
No exceda la linea de Ilenado mb.xima.
Usar demasiado suavizante puede causar
que las telas se manchen.
Diluya los suavizadores de tela concentrados
junto con agua caliente. No exceda la linea
de Ilenado maxima.
Nunca agregue suavizador de tela directamente
en la carga o en el tambor.
50 51

¢
@
@
@
US
CARACTER|STtCA$ DEL PANEL DE CONTROL
BOTON DE ENCENDUDO/APAGADO
Apdete eHbaton para ENCENDER HaHavadora.
Apriete nuevamente para APAGAR HaHavadora.
NOTA: Apretar eHbaton de ENCENDRDO/
APAGADO durante un cicHocanceHara ese cicHo
y borrarb, cuaHquier programacion de carga.
PERULLA SELECTORA DE CUCLOS
Gire esta perifla para seHeccionar el cicHo
deseado. Una vez qua se haya seHeccionado
el ciclo deseado, los preajustes estandar
se mostrar_,n en Hapantafla. Se pueden
programar estos ajustes usando Hasbotones de
programaciOn de cicHos en cuaHquier momenta
antes dell inicio.
Presione esta perilla para iniciar (START) el cicHo
seleccionado. Si HaHavadora esta funcionando,
utilice esta perifla para detener (PAUSE) el cicHo
sin perder Hasconfiguraciones actuaries.
NOTA: Si no presiona Haperifla seHectora de
ciclos dentro de los 4 minutos despues de haber
seHeccionado un cicHo, HaHavadora se apaga
automAticamente.
BOTON DE PROGRANIA PERSONAUZADO
Presione el baton CUSTOM PROGRAM
para guardar y acceder a un cicHode Havado
personafizado para usos futuros.
Usted tambien puede guardar Hasconfiguraciones
de cido (Cycle), temperatura de Havadoienjuague
_Nash/Rinse Temperature), veHocidad de
centrifugado (Spin Speed) y niveHde suciedad
(Soil Level), adem_,s de otras opciones de cicHo.
0
BOTONES DE PROGRAIVIACU0N DE CUCLOS
Utifice estos botones para seHeccionar Has
opciones de cido deseadas para el cido
seHeccionado.
@
BOTON DE DELAY (DEMORA)
Apriete el bot6n de DELAY (demora) para
demorar el inicio dell cicHode Havado. Cada vez
qua se aprieta este baton se aumenta el tiempo
de demora en Hapsosde 1 hora, hasta 12 horas.
0
@
HORA Y ESTADO
La pantafla muestra los ajustes, tiempo restante
estimado, opciones y mensajes dell estado
actual de su Havadora.
BOTONES DE OPCUONES
Los botones de opciones Hepermiten
seHeccionar opciones adicionales de cicHo
y se encenderan cuando se seHeccionan.
Ciertos botones tambien Hepermitirb,n activar
funciones especiaHes apretando y manteniendo
apretado el baton par 3 segundos.
Para obtener informacion detaHHadasabre
Hasopciones individuaHes, consuHte Has
siguientes p_tginas.
cO 0 USA
GUiA DE CtCLOS
La gala de cicHos indicada m_,s abajo muestra Hasopciones y tipos de teHasrecomendadas para cada cicHo.
_team Camisasdeetiqueta,
FreshT_ blusas
Ropainteriormuysucia,
Sanitary ropadetrabajo,
(Sanitaria) paSaies,etc.
Bulky/Large
(Voiuminosol
Grande)
Prendasgrandestales
comamantasy edredones
Camisasde etiqueta/
Perm,Press pantalones,ropa
(PRENSAR antiarrugas,ropas
PERIdANENTE)de mezclapoli6steri
algod6n,manteles
Cattenl
Normal AlgodSn,linD,toallas,
(Alged6n/ camisas,vaqueros,
Nermai) cargasmixtas
Aiiergiene
AIgod6n,ropainterior,
fundasde almohadas,
s&banas,ropadebeb6
Delicates Camisasde etiquetd
(Delieada) blusas,prendasdenylon,
muyfinas odeencaje
HandWash/
Weal Prendasetiquetadas
(Lavar coma"lavablesa mano
Mane/Lana) (hand-washable)"
SpeedWash Ropaligeramente
(Lavar suciay cargas
Rapida)
ExtraCalienteiFrio
Tibia/Frio
Tibia/Tibia
Caliente/ Rio
LigeramenteFrio/Frio
Rio/Rio
Tibia/Rio
Tibia/ Tibia
Caliente/ Rio
LigeramenteFridFrio
Rio / Rio
Tibia!Rio
Tibia/ Tibia
Caliente/ Fdo
LigeramenteFdo/Frio
Ffio/ Rio
Frio/ Rio
Tibia/Frio
Tibia/ Tibia
LigeramenteFrio!Frio
Tibia/Frio
Tibia/ Tibia
LigeramenteFrio/Frio
Frio/ Frio
Caliente / Fdo
LigeramenteFrioiFr_
Rio/Rio
Tibia/Rio
Tibia/Tibia
Alto
Extraalto
Noexpdmido
Bajo
Mediano
Gentil
Baio
Mediano
Noexprimido
Mediano
Alto
Noexprimido
Gentil
Bajo
Alto
Extraalto
Noexpnmido
Bajo
Mediano
Alto
Noexprimido
Bajo
Mediano
Baio
Mediano
Noexprimodo
Gentil
Bajo
Noexpdmido
Gentil
Extraalto
Noexprimido
Gentil
Bajo
Mediano
Alto
Normal
Pesado
Lave
Normam
Pesado
Leve
Normal
Pesado
Lave
Normal
Pesado
Lave
Normal
Pesado
Leve
Normal
Leve
Lave
Normal
Pesado
@ @ @ @ @
@ @ @ @ @
@ @ @ @ @
NOTA: Para proteger sus prendas de vestir, no todas Hastemperaturas de Havado/enjuague,
veHocidades de centrifugado, niveHesde suciedad u opciones estan disponibHes en cada cicHo.
"h
.J
52 55

¢
LA PANTALLA DE HORA Y ESTADO
La pantaHa de hora y estado muestra eHprogreso dell cicHoy el tiempo restante estimado,
opciones de cicHos y otros mensajes dell estado actuaHde su Havadora.
@
ESTUMATED TUME REMAUNUNG (TUEMPO
RESTANTE ESTUMADO}
Cuando se aprieta eHboton RNRCRO/PAUSA,Ha
Havadora detecta automaticamente Hacarga de
Havado (peso) y optimiza el tiempo de Havado,en
base aMcicHoy Hasopciones seHeccionados. Luego
HapantaHa indicarb, eHtiempo restante estimado
para dicho cicHo.
NOTA: EHtiempo de ciclo mostrado puede
mostrarse mucho mb.s Hargoque eHde una
Havadora de carga superior. El tiempo mostrado
corresponde al cicHocompleto, y no solo Ha
porcion de agitaciOn dell cicHo, como se muestra
tipicamente en una Havadora de carga superior.
_) UNDUCADOff DE FUNALUZACUON DE CUCLO
hdica el niveHde finaHizacion dell cido de Havado
actual.
0
ff_DUCADOR DE SEOURO DE LA
Indica que Hacompuerta estb. asegurada.
La compuerta de HaHavadora se asegurara
mientras HaHavadora se encuentra funcionando.
La puerta puede destrabarse presionando
HaperiHHaseHectora de cicHopara detener Ha
lavadora.
NOTE: Si Hatemperatura en HaHavadora
es demasiado alta, no se podra HiberarHa
compuerta hasta que se haya enfriado Ha
Havadora.Si el niveHde agua es demasiado alto,
seHeccione el cicHo DRAIN & SPIN (drenaje y
centrifugado) para drenar el exceso de agua.
No intente forzar Haapertura de Hacompuerta.
FUNCtONAMIENTO DE LA LAVADORA
Una vez que ha cargado HaHavadoray aSadido los
productos de Havado(detergente, bHanqueador yio
suavizante):
Apdete el bot6n de ENCENDIDOiAPAGADO
para encender HaHavadora. Las
luces aHrededor de HaperiHHa
seHectora de cidos se iHuminarb.n.
@Gire HaperiIHaseHectora aHcicHodeseado.
La pantaHHamostrara el preajuste
programado de Rinse/Wash
Temperature (temperatura de
enjuague/Havado), Spin Speed
(veHocidad de centrifugado), Soil Level (niveH
de suciedad), y Option (opci6n) para ese
cicHo.
0 Si desea cambiar los ajustes para ese cicHo,
presione el bot6n(es) de ajuste de ciclo
adecuado hasta que HaHuzque indica el
ajuste deseado se encienda.
O
NOTA: Para proteger sus prendas de
vestir, no todas Hastemperaturas de Havadoi
enjuague, veHocidades de centrifugado,
niveHesde suciedad u opciones estan
disponibHes en cada cicHo.
Seleccione cualquier otra opci6n de cUo
adicional, como PRE:WASH, STAIN CYCLE,
STEAM, EXTRA RINSE, RINSE + SPIN, o
DELAY WASH, presionando el bot6n para esa
opci6n.
NOTA: Para proteger sus prendas de
vestir, no todas Hastemperaturas de lavadoi
enjuague, veHocidades de centrifugado,
niveHesde suciedad u opciones estan
disponibHes en cada cicHo.
@
0
cO 0 USA
Presione Haperilla seHectora de cicHo para
iniciar el ciclo. La compuerta se
asegurara, Hapantalla cambiara,
y HaHavadora caHcuHarb,el tiempo
restante estimado. Una vez que Ha
Havadora haya caHcuHadoel tiempo de cicHo
total estimado, comenzarb, a trabajar.
Para pausar el cicHoen cualquier momento,
presione HaperiHHaseHectora de cido.
NOTA: El tiempo de cicHo mostrado puede
mostrarse mucho mb.s largo que el de una
Havadora de carga superior.
El tiempo mostrado corresponde al cido
compHeto, no solo HaporciOn de agitaciOn dell
cicHo, como se muestra t[picamente en una
Havadora de carga superior.
NOTA: Si Hatemperatura en HaHavadora
es demasiado alta, no se podrb. HiberarHa
compuerta hasta que se haya enfriado Ha
Havadora. Si el niveHde agua es demasiado
alto, seHeccione el cicHoDRAIN & SPIN
(drenaje y centrifugado) para drenar el
exceso de agua. No intente forzar Ha
apertura de Hacompuerta.
Se puede reducir significativamente el
tiempo de Havado para cargas peque_as
o poco sucias seHeccionando el cicHode
Speed Wash (lavado rapido) y programando
el boton de Soil Level (niveHde suciedad) a
Light Oigero).
Cuando se ha terminado Hacarga, Haalarma
(de haberse programado) sonarb, y se
desasegurara Hacompuerta.
Quite Hasprendas hOmedas fuera de Ha
Havadora inmediatamente. Revise debajo dell
seHIode Hacompuerta observando que no
haya articuHos peque_os.
54 55

C IJS
C CLOS E)EVAPOR
Los cidos de STEAM incBuyen
SteamFresh TM, AHergieneTM, Sanitary,
BuBky/Large, Cotton/NormaB y Prem.
Press. Adadir BaopciOn de vapor
a estos cicBos permite un mejor
desempe_o de Bimpieza a Bavez que se ahorra
energia y consumo de agua. ABusar un chorro
de vapor caHente desde arriba y agua mas fria
mAs abajo, BasteBas obtienen Bosbeneficios de
Hmpieza de un Bavado s0per caliente, sin eBuso
de energia o daSo potenciaB a BasteBas.
Para a#adir vapor a/ dde estandar:
O Encienda BaBavadora y gire la perHBa
seBectora de ciclos para seleccionar un ciclo
con la opci6n STEAM (vapor).
Apriete el botOn STEAM (vapor). La
lavadora programarA automAticamente los
ajustes de ciclo.
Programe cualquiera de las demAs
opciones deseadas.
Apriete el boton INICIO/PAUSA para iniciar el
ciclo. La lavadora iniciarA automAticamente.
PRECAUCK:)N:
No toque macompuerta durante mosciclos de
vapor. La superficie de macompuerta puede
estar muy camienteo Permita que emseguro
de macompuerta se mibereantes de abrir ma
compuerta,
No intente forzar emmecanismo de seguro de
macompuerta o meter mamano dentro de ma
mavadora durante un ciclo de vapor. Emvapor
puede causar quemaduras severas.
NOTAS mMPORTANTES SOBRE LOS CmCLOS
DE VAPOR:
Puede que el vapor no sea claramente visible
durante los ciclos de vapor. Esto es normal.
Demasiado vapor podria daSar las prendas.
No utilice el vapor en telas delicadas tales como
lana, seda o telas que se decoloren fAcilmente.
No toque la compuerta.
Cdmo usar e/ddo SteamFresl7 "_
SteamFresh usa el poder del vapor per si solo
para reducir arrugas y olores en las telas. Brinda
nueva vida a prendas arrugadas que hart sido
almacenadas por un pedodo prolongado de
tiempo y facilita el planchado en prendas muy
arrugadas. SteamFresh tambien puede usarse
para ayudar a reducir los males olores de las telas.
Udlice el cido SteamFresh:
Encienda la lavadora y gire la perilla selectora
de cidos hasta el cido SteamFresh.
Cargue hasta 5 prendas y cierre la
compuerta.
@
@
NOTA: Si hay humedad dentro del tambor,
de un ciclo de lavado previo, s6quelo con
una toalla antes de agregar las prendas.
Apriete el boton STEAM (vapor) hasta
que se indique el n0mero correcto de
prendas en la pantalla. No se necesita
programar ninguna otra opcion.
Apriete el boton INICIO/PAUSA para iniciar
el ciclo.
Despues de completar el ciclo SteamFresh,
la lavadora voltearA las prendas durante un
mAximo de 30 minutos para prevenir la
formaciOn de arrugas.
Despues de sacar las prendas del ciclo
SteamFresh, pueden sentirse levemente
hOmedas. Coloque las prendas en un colgador
durante 10 minutos para que se sequen.
No se recomienda utilizar el ciclo SteamFresh
en prendas que sean 100% de algodOn.
Elimine las manchas de las prendas antes de
utilizar el ciclo Steam Fresh; el calor harA que
las manchas se fijen permanentemente.
No utilice SteamFresh con las siguientes
prendas: lana, cobijas, chaquetas de cuero,
seda0 prendas mojadas0 lenceria0 productos de
espuma o cobijas el6ctricas.
Se IograrAn mejores resultados cuando las
prendas sean similares en tamaSo y tipo de tela.
No sobrecargue.
BOTONE$ DE AJUSTE DE C CLO
Cada ciclo tiene ajustes preprogramables que se
seleccionan automaticamente. Tambien puede
personalizar los ajustes utilizando los botones de
programaci6n de ciclos. Presione el boton para
dicho ajuste hasta que la luz que indica el valor
deseado se encienda.
La lavadora ajusta automAticamente el nivel
de agua seg0n el tipo y tama_o de la carga de
lavado para proporcionar los mejores resultados
y eficiencia maxima. Puede parecer que no hay
agua dentro del tambor en algunos ciclos, pero
esto es normal.
NOTA: Para proteger sus prendas de vestir, no
todas las temperaturas de lavadoienjuague,
velocidades de centdfugado, niveles de suciedad
u opciones estan disponibles en cada ciclo. Yea
la Guia de ciclos para obtener mAs detalles.
WASH/R/NSE davado/enjuague)
Selecciona la combinacion de temperatura de
lavado y enjuague para el ciclo
seleccionado. Apriete el bot6n
WASH/RINSE (lavado/enjuague)
hasta que la luz que indica el ajuste
deseado se encienda.
Su lavadora contiene un elemento de
calentamiento que propulsa la temperatura del
agua caliente para ajustes extra calientes (Extra
Hot). Esto brinda un desempe_o de lavado
mejorado que con los ajustes de calefactor de
agua normales.
Seleccione la temperatura de agua adecuada
para el tipo de carga que se encuentra
lavando. Siga las instrucciones de la etiqueta
de mantenimiento de la tela para obtener los
mejores resultados.
Los enjuagues tibios se regulan en
aproximadamente 86°F (30°C).
Los enjuagues calientes dejan las cargas mas
secas que los fries. Los enjuagues calientes
pueden aumentar las arrugas.
En climas fdos, un enjuague caliente
permite mayor comodidad en la manipulaci6n
de la carga.
Los enjuagues frios ahorran energia, y la
temperatura del enjuague depende del agua fda
de la canilla.
C 0 USA
SP/N SPEED (ve/oddad de centrifugado)
El tambor de la lavadora centrifuga a 1 200 r.p.m.
Esto extrae mayor cantidad de agua
de la ropa, reduce el ciclo de secado
y ahorra energia.
Apriete el botOn SPIN SPEED
(velocidad de centrifugado) hasta que la luz que
indica el ajuste deseado se encienda. Algunas
telas, como las delicadas, requieren
una velocidad de centrifugado mAs lenta.
Emcido de Drain & Spin (drenaje y
centrifugado):
El boton de Spin Speed (velocidad de
centrifugado) tambien activa el ciclo de Drain
& Spin (drenaje y centrifugado) para drenar el
lavado y centrifugar las prendas; por ejemplo, si
desea sacar las prendas antes de que el ciclo
haya terminado.
SO/L LEVEL (hive/de sudedad)
Ajusta el ciclo seleccionado para permitir mAs
tiempo de lavado para prendas muy
sucias o menos tiempo para prendas
levemente sucias. Presione el boton
SOIL LEVEL (nivel de suciedad)
hasta que la luz que indica el ajuste deseado se
encienda.
BEEPER ta/erta sonora)
Presione repetidamente para ajustar
el volumen de la alerta sonora. Usted
puede encender o apagar la alarma
sonora de finalizaciOn de ciclo con el
boton BEEPER.
56 57

¢
EBprograma CUSTOM PROGRAM Be
permite guardar un cicBo de Bavado
personaBizado para uso futuro. Permite
guardar Batemperatura, BaveBocidad de
centnfugado, niveBde suciedad y otras opciones
favoritas para un cicBo,y Buego pueden accederse
a elias presionando un boton.
Para guardar un programa
personalizado:
O SeBeccione un cicBo.
Ajuste Batemperatura de Bavado/enjuague,
veBocidad de centrifugado y niveBde
suciedad a Basconfiguraciones deseadas.
_ Configure otras opciones deseadas.
O Presione el bot6n CUSTOMY
sostenga
PROGRAM (programa personalizado)
durante 3 segundos. Escucharb. dos pitidos
para confirmar que se hart guardado Bas
configuraciones.
mMPORTANTE: Si presiona y sostiene el botOn
CUSTOM PROGRAM (programa personalizado)
durante 3 segundos, eliminara cualquier otro
programa personalizado que haya guardado
anteriormente.
Para acceder,t un programa
personalizado ya guardado:
Presione y libere el boton CUSTOM
PROGRAM (programa personalizado).
Podrb.n verse las configuraciones guardadas.
Presione libere el boton de START/PAUSE
Y
(inicio/pausa) para iniciar el ciclo. La lavadora
se encenderb, automb.ticamente.
BOTONES E)EOPCION E)ECICLO
Su lavadora dispone de varias opciones de ciclo
adicionales, las cuales personalizan los cidos
para cumplir con sus necesidades individuales.
Ciertos botones de opciOn tambien incorporan
una funcion especial (vea la siguiente pb.gina para
obtener mayor informacion) que puede activarse
apretando y manteniendo apretado ese boton de
opcion por 3 segundos.
Para a_adir opdones de ddo al ddo:
@ Encienda la lavadora y gire la perilla
selectora de cidos para seleccionar el ciclo
deseado.
Use los botones de programaci6n de ciclo
para fijar los ajustes para ese ciclo.
Apriete efflos) bot6n(es) de opcion de
ciclo para la opciOn que desea aSadir. Los
botones de opcion de ciclo, a excepci6n de
DELAY (demora), se encenderb.n cuando se
seleccionan.
A Presione la perilla selectora de ciclo para
iniciar el ciclo. La lavadora se iniciarb.
autom_ticamente.
NOTA: Para proteger sus prendas de vestir, no
todas las temperaturas de lavadoienjuague,
velocidades de centrifugado, niveles de suciedad
u opciones estan disponibles en cada cido. Vea
la Guia de ciclos para obtener mb.sdetalles.
STEAM (vapor)
Use el boton STEAM (vapor) para
aSadir vapor al ciclo para a5adir
poder de limpieza adicional y
eficiencia mejorada. Vea la seccion de
Ciclos de
vapor para obtener detalles
adicionales.
NOTA: No se pueden usar todos los cidos con la
opcion STEAM (vapor).
DELAY (demora)
Una vez que haya seleccionado
el ciclo y otros ajustes, apriete este
botOn para demorar el inicio del ciclo de
lavado. Cada vez que se aprieta este
botOn se aumenta el tiempo de demora
en lapsos de 1 hora, hasta 12 horas.
cO 0 USi
PREWASN (prelavado)
Seleccione esta opcion para aSadir un
prelavado de 16 minutos y un ciclo de
centrifugado al ciclo escogido. Esta
opcion es especialmente Litilpara
articulos muy sucios.
RINSE+SPIN (enjuague+centrifugado)
Seleccione esta opciOn para enjuagar
y centrifugar una carga separadamente
de un ciclo regular. Esto puede ser Litil
para prevenir que manchas frescas
permanezcan en las telas.
Para activar emcido Rinse+Spin
(enjuague+centrifugado):
Apriete el boton ON/OFF (encendido/
apagado) para encender la lavadora.
Apriete el boton RINSE+SPIN
(enjuague+centrifugado).
Presione la perilla selectora de ciclo.
EXTRA RINSE (enjuague adidonal)
Esta opcion a_adir_ un ciclo de
enjuague extra al ciclo seleccionado.
Use esta opci6n para ayudar a
asegurar la eliminaciOn de residuos de
detergente o blanqueador de las telas.
STAIN CYCLE (ddo para manchas)
Seleccione esta opcion para prendas
muy sucias, tales como prendas
de juego o de trabajo. El Ciclo para
manchas a_adira tiempo de lavado al
ciclo seleccionado, as{ como un ciclo
de enjuague adicional.
FUNC ONES ESPEC ALES
Los botones de funcion tambien activan
funciones especiales, induyendo CHILD LOCK,
SPINSENSE TM e TUB CLEAN. Apriete y mantenga
apretado el boton de opciOn marcado con la
funcion especial por 3 segundos para activar.
58 59

¢ US
FUNCtONES ESPECtALES {cont.)
CHILD LOCi( ($eguro #Ifand#
use esta/unciOnparaprevenireluso no
deseado de lalavadorao paraimpedir
cambiarlosajustesde un cido
mientras la lavadora se encuentra en
funcionamiento. Apriete y mantenga
apretado el botOn de DELAY (demora) por 3
segundos para actNar o desactivar el CHILD
LOCK (seguro infantil).
Se mostrara el s[mbolo de CHILD LOCK en la
pantalla, y todos los controles permanecer_n
desactivados. Se puede bloquear a la lavadora
durante un ciclo. Cuando CHILD LOCK este
seleccionado, la pantalla alterna entre CL y el
tiempo restante.
SPINSENSE TM (SENSOR DE OIRO)
SPINSENSE TM se puede utilizar
para reducir o eliminar vibraciones,
especialmente sobre instalaciones en
pisos de madera.
Para activar SPmNSENSETm:
Mientras la lavadora estb. realizando un ciclo,
presione y sostenga el boton RINSE+SPIN
durante 3 segundos.
La luz del boton de RINSE+SPIN titilara mientras
la lavadora esta funcionando para mostrar
que SPINSENSE TM esta activo. La funcion
SPINSENSE TM permanecera activa durante cada
ciclo, incluso si se produjera un corte de luz.
Para desactivar SPmNSENSETM:
Presione y sostenga el botOn de RINSE+SPIN
durante 3 segundos para apagar la funcion
SPINSENSE TM.
6O
TUB CLEAN dimpieza de lavadero)
Puede ocurrir la acumulacion de residuos de
detergente en el lavadero despues de
alg0n tiempo, Io que puede causar
un olor a humedad o moho. El ciclo
TUB CLEAN (limpieza de lavadero)
esta especialmente disehado para eliminar esta
acumulaci6n. Apriete y mantenga apretado el
botOn EXTRA RINSE (enjuague adiciona0 por
3 segundos para activar este ciclo. La pantalla
mostrara un mensaje de afiadir blanqueador
liquido en el cajOn de dep6sito. Despues que
haya terminado el ciclo, abra la compuerta y
permita que el interior del tambor se seque
completamente.
NOTA: NO use este ciclo con prendas, NI aSada
detergente o suavizante.
ALLERGIENE TM
El ALLERGENE TM es un ciclo poderoso y
alto de la temperatura disefiado para reducir
especificamente ciertos alergenos.
La selecciOn del cido "ALLERGENE TM
automaticamente incorpora el vapor en el ciclo
del lavado.
El cicloALLERGIENE TM puede
apreciablemente reducir al6rgenos en el ropa
de cama y la ropa.
El ciclo ALLERGIENE TM ayuda a reducir a
poblaciones de arado de polvo y ayuda a
reducir al6rgenos.
Debido al uso de la alta energia y temperatura,
el ciclo ALLERGIENE TM no es recomendado
para la lana, la seda, el cuero, ni cualquier otto
articulo delicado y sensibles a la temperatura.
La vat* MafJo/Lafla
solo las prendas de lana marcadas como "apta
para lavadora" deben lavarse en esta maquina.
Lave s61opequefias cargas para un cuidado
6ptimo de las telas (menos de 8 libras).
S01o deben usarse detergentes neutrales (aptos
para lana) ($61o se necesita una pequefia
cantidad de detergente debido al tamafio
pequefio de carga y el bajo volumen de agua
del ciclo).
El ciclo HANDWASHAqOOL (Lavar Mano/Lana)
utiliza un secado delicado y un centrifugado de
baja velocidad para un cuidado extremo de las
telas.
El ciclo de lavado de lana de esta m&quina ha sido
aprobado pot Woolmark para el lavado de productos
Woolmark aptos para lavadoras siempre que tales
productos se laven de acuerdo con las instrucciones
WOOLMARK de la etiqueta de la prenda y las emitidas pot el
fabdcante de esta lavadora, M0708,
Certified by NSF
Certificado pot NSF
NSF international (formalmente La Base Nacional de
Saneamiento) certifica el curso SANITARIO, cuyo obietivo es
reducir 99,9% de bacterias, no se convervara a la proxima carga
despues del ciclo en la lavadora
l ¥ [1 PIEZA
LtMPtEZA REGULAR
,&ADVERTm=NCmA:
Desenchufe la tavadora antes de timpiar ta misma para evitar el riesgo de descargas el6ctricas° Si no
se cumple con esta advertencia se podran producir heridas graves, incendios, descargas electricas o muerte.
,,Amlimpiar malavadora nunca utimice quimicos de corte, mimpiadores abrasivos o somventes° Los mismos
dafiarb_nsu aspecto.
Limpieza del exterior
El mantenimiento adecuado de su lavadora
podria prolongar su vida 0til. El exterior de la
unidad puede limpiarse con agua tibia y un
detergente de jabon medio, no abrasivo.
Limpie inmediatamente cualquier clase de fuga,
con un trapo suave h0medo.
mMPORTANTE: No use alcohol desnaturalizado,
disolventes o productos similares.
Nunca use limpiadores abrasivos o de lana
metalica; pueden dafiar la superficie.
Mantenimiento y limpieza del interior
Use una toalla o trapo suave para pasar por
la apertura de la compuerta de la lavadora, el
budete yio la compuerta de vidrio. Estas b.reas
deben mantenerse limpias para asegurar la
impermeabilidad. Aseg0rese de limpiar debajo
del sello de caucho interior para eliminar
cualquier resto de humedad o suciedad.
Siempre remueva articulos de la lavadora tan
pronto como se complete el cido. De Io contrario
se podrian causar arrugas, transferencias de
color y mal olor.
Ejecute el ciclo TUB CLEAN 0impieza de
lavadero) regularmente para eliminar la
acumulaci6n de detergente y otros residuos.
Limpieza de las boqu#las de drculaddn
de vapor y agua
Utiliceun hisopode algod6n para eliminarlosdep6sitos
de calcio o acumulaci6nde detergentedel interiorde las
boquillasde circulaci6nde agua y vapor.NUNOAuseun
objetofiloso o puntiagudo;podria dafiarlasboquillas.
O
Deje la puerta abierta para que la junta se seque
pot completo. No use lejia sin diluir porque
puede dafiar la junta. Siga las instrucciones del
fabricante para un use adecuado de la lejia. Si
la junta no puede limpiarse adecuadamente,
esta debe cambiarse.
Almacenamiento de la lavadora
Si no se utilizar_ la lavadora por un pedodo prolongado
de tiempo y se encuentra en un area que puede estar
expuesta a temperaturas de congelamiento:
Cierre la Ilavede suministro de agua.
Desconecte las mangueras del suministro de agua
y drene el agua de las mangueras.
Conecte el cable el6ctrico a un tomacorriente
conectado a tierra correctamente.
Afiada 3,8 litros de anticongelante para vehiculo
recreacional en eltambor vacio de la lavadora.
Cierre la compuerta.
Seleccioneelciclode centrifugadoy dejequela
lavadoracentrifugueper 1minuteparadrenarelagua.
NOTA: NO todo el anticongelante para vehiculo
recreacionatsera expulsado.
_! Desconecte el cable el_ctrico, seque el interior del
tambor con un trapo suave, y cierre la compuerta.
Quite los insertos del dep6sito. Drone
cualquier resto de agua en los compartimientos y
sequelos.
Almacene la lavadora en posici6n vertical.
Para eliminar el anticongetante de la lavadora
despues dot atmacenamiento, active la lavadora
por un ciclo completo utilizando detergente, iNo
afiada prendas para lavar!
Como quitar las mane#as del sellado
de la puerta
NOTA: Use guantes de goma y proteccion ocular
mientras realiza el siguiente procedimiento:
Diluya 3/4 taza (177 m0 de lejia liquida con
1 gal6n (3,8 L) de agua tibi&_caliente.
Utilice esta solucion para limpiar todas las
superficies de la junta a fin de quitar los
depositos que esten provocando los olores.
(Aseg0rese de doblar el reborde de la junta
para Ilegar bajo el extremo donde pueden
acumularse residuos).
!_ Limpie la junta con un patio seco.
Eliminaddn de la acumulacidn de cal
Si vive en un _rea con agua dura, se pueden formar
dep6sitos calcareos a partir de los componentes
intemos de la lavadora. Se recomienda el uso de
ablandador de agua en _reascon agua dura. Si se
utiliza un desincrustante, aseg0rese de que sea el
adecuado para usar con una lavadora, y active
etciclo TUB CLEAN (limpieza de lavadero)antes de
lavar prendas.
Se pueden etiminar los dep6sitos calcareos y otras
manchas dot tambor de acero inoxidable utilizando un
limpiador para acero inoxidable.NO use lana de acero
ni limpiadores abrasNos; pueden dafiar la superficie.
61

J ¥ [j PjEZA
LtMPtEZA Dl: LA LAVADORA
Limpieza del deposito
Se debe BimpiareBdepOsito peri6dicamente para
eBiminar BaacumuBaci6n de detergente y otros
productos de Bavanderia.
/
/
,J
Quite Bastapas que cubren eBtubo sifon para
BaBejiay eBsuavizante.
L
J
Levante eBrecipiente de dos
compartimentos, incffneBo un poco a Ba
izquierda y quiteBo deBdispensador principal
MANTENiMIENTO
dmpieza de los filtros de entrada
de agua
Si Balavadora detecta que el agua no esta
ingresando aBcajOn de dep6sito, se mostrarb_ un
mensaje de error en Bapantalla. Si vive en una
zona de agua dura, esto puede set el motivo del
taponamiento de los filtros de entrada.
IMPORTANTE: Ponga mucho cuidado al
quitar y limpiar los filtros. Si no se pueden
limpiar los filtros o estan dafiados, NO ponga
en funcionamiento la lavadora sin los filtros
de entrada. POngase en contacto con el
Departamento de Atencion al Cliente de
LG o Ilame a un tecnico de mantenimiento
calificado de LG.
Cierre ambas Ilaves de agua completamente.
Desatomille las tuberias de agua caliente y
fria de la parte posterior de la lavadora.
IMPORTANTE: Usar SOLAMENTE las
mangueras de la entrada proporcionadas por LG
de este producto del lavadero. Las mangueras
del mercado de accesorios no estan garantizadas
para caber o para funcionar correctamente. Otras
mangueras pueden no apretar correctamente
y podrian causar los escapes. El dafios
subsecuente al producto o a la propiedad no
seran cubiertos de conformidad con la garantia
de LG.
Filtro de entrada
uite cuidadosamente los filtros de las
entradas de agua, luego rem6jelas en
vinagre blanco o un eliminador de dep6sitos
calcareos, siguiendo las instrucciones del
fabncante. Enjuague profundamente antes
de reinstalar.
Apriete los filtros nuevamente en su lugar y
vuelva a conectar las tubedas de agua. NO
ponga en funcionamiento la lavadora sin los
filtros de entrada.
62 63

64
MANTENtMIENTO {cont.)
Limpieza de/fi/tro de/a bomba
de drenaje
Se pueden acumuBar peBusas y otros objetos y
taponar eBfiBtrode Babomba de drenaje. Si Ba
Bavadora no drena adecuadamente, desconecteBa
y deje enfnar eBagua, de ser necesano, antes de
continuar.
f
Abra eBfiBtro deBpaneBde acceso de Ba
bomba de desagOe.
J
Manguera
de drenaje
Desenganche Bamanguera de drenaje y
tirela hacia fuera. CoBoque eBextremo de Ba
manguera de drenaje en una caceroBa, baBde,
o drenaje de piso para recoger eBagua.
Tap6n
!
Filtro
_de la
t bomba
J
Quite eBtap6n de Bamanguera de drenaje, y
deje que eBagua drene compBetamente.
Gire eBfiBtro de Babomba en sentido contrario
a Basagujas del reBojpara quitado. Quite
cualquier dep6sito de pelusa o objetos
extra_os del filtro de la bomba.
Siga las indicaciones anteriores (pero a la
inversa) para reinstalar el filtro de la bomba
de drenaje y la manguera de drenaje.
AsegOrese de cerrar el panel de cubierta
cuando haya terminado.
[UCION P [E AS
SONtDOS NORMALES OUE pODRjA ESCUCHAR
Se pueden escuchar los siguientes sonidos mientras
la lavadora se encuentra en funcionamiento. Son
normates.
Chasquido:
El seguro de la compuerta se vuelve a colocar cuando
la misma se cierra y abre.
Sonido de chorro o sibimante:
Chorro de agua o en circulaci6n durante el ciclo.
Zumbido o gorgoteo:
La bomba de drenaje bombea agua de la lavadora at
final de un ciclo.
Salpicadura:
Las prendas dan vueltas en el tambor durante los
ciclos de lavado y enjuague.
ANTES DE LLAMAR A MANTENtMIENTO
Su lavadora est_ equipada con un sistema de monitoreo de error autom_tico para la detecci6n y el diagn6stico de
problemas en una etapa temprana. Si su lavadora no funciona adecuadamente o no funciona del todo, revise Io
siguiente antes de Ilamar a mantenimiento.
Ruidos de traqueteo
$onido de gompes
Ruido de vibraci6n
Fugas de agua
amrededor de ma
mavadora
oObjetos extraSos, tales como
Ilaves, monedas, o imperdibles,
pueden encontrarse en el
tambor o bomba.
oLas cargas pesadas pueden
producir sonidos de golpes.
oLa lavadora podda estar
desbalanceada.
oNo se han quitado los pernos
yio los materiales de embalaje.
oLa carga de lavado podda estar
distribuida de manera desiguat
en el tambor.
oNo todas las patas niveladoras
se encuentran apoyadas
firmemente en el piso.
oEl piso no es Io suficientemente
rfgido.
oLa conexi6n de la manguera
de Ilenado est9 floja en la
Ilave o en la lavadora.
oLas tuberfas de drenaje del
oDetenga la lavadora y revise que no se encuentren
objetos extraSos en el tambor y el filtro de drenaje.
Si el ruido contin0a despu6s de que se vuelva a
encender la lavadora, Ilame a mantenimiento.
o Esto es normal. Si el sonido contin0a, la lavadora
probablemente esta desbalanceada. Detenga la
lavadora y vuelva a distribuir la carga de lavado.
oDetenga la lavadora y vuelva a distribuir la carga
de lavado.
oVea las Instrucciones de instalaci6n para referirse a
c6mo quitar los pernos de embalaje y el embataje.
oDetenga la lavadora y vuelva a distribuir la carga de
lavado.
oAjuste las patas niveladoras. AsegOrese de que las
cuatro patas se encuentren haciendo contacto firme
con el piso mientras la lavadora se encuentra en el
ciclo de centrifugado con una carga.
oAsegOrese que el piso es s61ido y no flexiona.
Refi6rase a la secci6n de instatacidn "Piso".
oRevise las mangueras. Revise y ajuste las
conexiones de la manguera.
oDestape la tubeda de drenaje. P6ngase en contacto
con un plomero de set necesario.
hogar estan taponadas.
Cantidades
excesivas de
espuma
Temasmanchadas
oDemasiado detergente o
detergente incorrecto.
oAgregue detergente en el
tambor de la lavadora.
oReduzca la cantidad de detergente o utilice
detergente con baja producci6n de espuma.
Utilice detergente que porta el Iogotipo
HE (Alta eficiencia) 0nicamente.
oNo ha descargado la lavadora
con rapidez.
oNo hart sido clasificadas las
prendas correctamente.
oCargue los productos de lavado en los
compartimientos adecuados.
oSiempre remueva articulos de la lavadora tan pronto
termine el ciclo.
oSiempre lave las prendas de colores oscuros
separadas de las de colores claros y de color blanco
para evitar manchas. De set posible, no lave prendas
muy suoias con otras menos suoias.
65

SOLUCI N DE P 0 AS
ANTES DE LLAMAR A MANTENtMiENTO cont.)
El agua en la
lavadora drena
demasiado lento
0 nO drena, o la
pantaiia muestra:
_F
uC
Lalavadora se liena
con agua lentamente
o no se iiena dei todo,
o ia pantaiia muestra:
;E
La mavadorano s÷
enciende
$i la lavadora no
centtifuga, o el
mensaje indica:
IF
L3C
La compuetta no
se abre cuando se ha
detenido o pausado
emcicmo
El tiempo de cicio
de iavado toma m_s
tiempo de lo normal
Olor a humedad o
moho en la lawdora
oLa manguera de drenaje esta
doblada, apretada o taponada.
oEl filtro de drenaje estA
taponado.
oLas Ilaves de agua no estAn
completamente abiertas.
oLas mangueras de la tuber_a de
agua estAn curvadas, apretadas
o dobladas.
oLos filtros de la entrada de
agua estAn taponados.
oLa presi6n de agua hacia la
Ilave u hogar es muy baja.
oEl cable el6ctrico no estA
enchufado adecuadamente.
oEl fusible del hogar estA
quemado, el cortacircuitos se
ha accionado, o ha ocurrido
una interrupci6n el6ctrica.
oLa compuerta no estA cerrada
adecuadamente.
• La temperatura interior de la
lavadora es demasiado elevada.
oEl nivel del agua en la lavadora
es demasiado alto.
oLa lavadora programa
automAticamente el tiempo de
lavado segOn la cantidad de
prendas de lavado, presi6n del
agua, temperatura del agua y otras
condiciones de funcionamiento.
oSe ha utilizado demasiado
detergente o el detergente
incorrecto.
o El interior del lavadero no se ha
limpiado adecuadamente.
oAsegOrese de que la manguera de drenaje est6 libre
de taponamientos, dobladuras, etc., y no estA
apretada debajo de la lavadora.
oLimpie el filtro de drenaje. Yea la secci6n de
lnstrucciones de/mantenimento para el usario.
u
oAsegOrese de que las Ilaves de agua estAn abiertas
completamente.
oAsegOrese de que las mangueras de agua no estAn
agarradas o curvadas. Tenga cuidado at transportar la
lavadora.
oLimpie los filtros de entrada. Vea la secci6n de
lnstrucciones de/mantenimento para e/usuario.
oRevise otra Ilave en el hogar para asegurar que la
presi6n de agua del hogar es adecuada.
o AsegOrese de que el enchufe estA conectado de
manera segura a un tomacorriente de 3 patas, con
conexi6n a tierra de 120 V AC, 60 Hz.
o Reactive el disyuntor o cambie el fusible. No aumente
la capacidad del fusible. Si el problema se debe a una
sobrecarga de circuito, pida a un electricista calificado
que solucione el problema.
oAsegOrese de que la compuerta estA adecuadamente
cerrada y apriete el bot6n INICIOiPAUSA. Despu6s
de iniciar un ciclo, puede demorar algunos momentos
antes que el tambor empiece a girar o centrifugar.
La lavadora no centrifuga a menos que la compuerta
est6 cerrada (el mensaje DOOR LOCK [seguro de la
compuerta] aparecera en la pantalla).
oSi la compuerta estA cerrada y asegurada y se muestra
el mensaje de error de compuerta abierta, Ilame a
mantenimiento.
oLa compuerta de la lavadora dispone de un seguro
para prevenir quemaduras. Deje que la lavadora se
enfr{e hasta que el indicador del DOOR LOCK (seguro
de la compuerta) se apague en la pantalla.
oDeje que la lavadora complete el ciclo programado, o
ejecute el ciclo DRAIN & SPIN (drenajeicentrifugado)
para drenar el agua.
oEsto es normal. La lavadora programa
automAticamente el ciclo de tiempo para brindar
resultados 6ptimos para el ciclo seleccionado.
oUtilice detergente de alta eficiencia HE (High-Efficiency)
Onicamente, segOn las instrucciones del fabricante.
oActive el ciclo TUB CLEAN (limpieza de lavadero) de
manera regular. AsegOrese de limpiar alrededor y debajo
del sello de la compuerta con frecuencia.
oLimpie alrededor del sellado/vidrio de la puerta para
evitar olores o moho:
1. Seque con un paso el selladoividrio de la puerta
y el Area de apertura de la puerta.
2. Limpie alrededor del tambor internoisellado de la
puerta y el sellado inferior de la puerta.
[[JClON P [E AS
au, !eses
Prendas arrugadas , No ha descargado la
lavadora con rapidez.
, Ha sobrecargado la lavadora.
La pantaiia muestra:
uC
La pantaiia muestra:
La pantalla muestra:
La pantaiia muestra:
F
LL-
La pantaiia muestra:
PF
oLas mangueras de agua han
sido invertidas de entrada.
oLa carga es demasiado
pequeSa.
oLa carga est9 desbalanceada.
La lavadora cuenta con
un sistema de detecci6n y
correcci6n de desbalances. Si
se cargan art{culos pesados
individuales (alfombra de
baSo, bata de baSo, etc.) y
hay demasiado desbalance,
la lavadora realizarA algunos
intentos para reiniciar el ciclo
de centrifugado. Si a0n se
detecta desbalance, la lavadora
se detendrA y se mostrarA el
c6digo de error.
Error de control.
El nivel del agua es
demasiado alto debido a una
vAIvula de agua con falla.
El sensor de nivel del
agua no estA funcionando
correctamente.
El circuito de protecci6n
termal de carga en el motor
se ha activado.
Ha ocurrido un corte de
corriente.
Siempre remueva articulos de la lavadora tan pronto
termine el ciclo.
Se puede cargar la lavadora completamente, pero
el tambor no puede quedar colmado de prendas. La
compuerta de la lavadora deberA cerrar con facilidad.
El ciclo de enjuague con agua catiente puede aumentar
las arrugas. Verifique la conexi6n de las mangueras.
ASada 1 6 2 prendas similares para ayudar a
balancear la carga.
Vuelva a acomodar las prendas para ayudar a
batancear la carga.
Desconecte la lavadora y Ilame a mantenimiento.
Cierre las Ilaves de agua, desconecte la lavadora, y
Ilame a mantenimiento.
Cierre las Ilaves de agua, desconecte la lavadora, y
Ilame a mantenimiento.
Deje la lavadora en espera pot 30 minutos para
permitir que se enfde el motor; luego reinicie el ciclo.
Si aparece el c6digo de error LE, desenchufe la
lavadora y Ilame a mantenimiento.
_Reinicie el ciclo.
.J
66 67

ESP C[ [CACiON
DtMENStONI:S Y I:SPl:CtFtCACtONl:S CLAVE
EBaspecto y Basespecificaciones enumeradas en esta gala poddan variar debido a mejoras constantes
del producto.
Descripcidn
Requisitos el_ctricos
Presidn de agua m,_xo
Dimensiones
Peso neto
Presi6n de agua rn_x.
Lavadora de carga frontal
120 V CA a 60 Hz.
14,5-116 ffbras por puBgada cuadrada (100-800 kPa)
68,6 cm (anchura) X 75,6 cm (prof.) X 98,3 cm (aBtura),
129,5 cm (profundidad con Bacompuerta abierta)
27" (anchura) X 293/4'' (prof.) X 3811/16'' (aBtura),
51" (profundidad con Bacompuerta abierta)
87 Kg (192 ffbras)
1 200 r.p.m, j
Su mb.quina Bavadora LG sera reparada o reempBazada, a discreciOn de LG, si se comprueba que existe un defecto en
el matedal o Bamano de obra bajo condiciones de use normaBes, durante eBpedodo de garant{a ("Periodo de garantia')
establecido mb.s abajo, vigente desde la fecha ("Fecha de compra") de la compra del cliente original de producto.
Esta garantia es vbJida 0nicamente para el comprador original del producto y cuando se usa en EE. UU., induyendo
Alaska, Hawaii, y los territories de los EE. UU., exdusivamente.
PER{ODO DE GARANTiA:
MANO DE OBRA: Un aSo desde la Fecha de compra.
PIEZAS (e×cepto como se indica m_s abajo): Un a_o
desde la Fecha de compra.
Tabmero electr6nico de controh Dos aSos desde la
Fecha de compra.
Motor del tambor: Siete aSos desde la Fecha de
compra.
Tambor de acero inoxidabie: Para toda ia vida.
Las unidades de reemplazo y piezas de reparacion podrian
ser nuevas o refabricadas.
Las unidades de reemplazo o piezas de reparaciOn estan
garantizadas pot la porci6n restante del periodo de garantia
de la unidad original.
COMO SE ADMINISTRA EL MANTENIMIENTO:
Mantenimiento en el hogar "in-Home":
Guarde la factura fechada del distribuidor o la boleta de
entrega como evidencia de la Fecha de compra como
prueba para la garantia, y entregue una copia de la
factura al tecnico de mantenimiento al momento que se
presta el mantenimiento.
Liame ai 1-800-243-0000 y escoja la opci6n adecuada
para ubicar a su Centro de Mantenimiento Autorizado
LG m_s cercanoo
O visite nuestro sitio Web en: http:/,iwww.lgservice.com.
ESTA GARANTiA REEMPLAZA CUALQUmER OTRA, EXPRESA O IMPLiCiTA, INCLUYENDO SiN LIMITACI6N, CUALQUmER
GARANTiA DE COMERCmALmZACm6NO ADECUACm6N PARA UN PROP6SmTO DETERMmNADOo EN LA MEDmDA REQUERmDA
POR LA LEY, CUALQUmER GARANTiA mMPLiCmTA8E LmMITAEN SU VmGENCmAAL PERiODO DE GARANTiA EXPRESA mNDmCADO
M_,S ARRmBAoNmEL FABRmCANTE NmEL DmSTRmBUmDORDE LOS EEoUUo 8ER_,N RESPONSABLE8 POR BAthOS mNCmDENTALES,
CONSECUENCmALES, mNDmRECTO$,ESPECmALES O PUNmTmVOSDE CUALQUmER NATURALEZA mNCLUYENDO StunLIMmTACKSN,
PERDmDA DE GANACmA$ O mNGRE$OS, O CUALQUmER OTRA CLASE DE DAI_O$, CONTRACTUALES, EXTRACONTRACTUALE8,
O DE CUALQUmER TmPOoAlgunos estados no perm{ten la exclusi6n o lim{taci6n de daSos incidentales o consecuenciales o limitaci6n
en la duraci6n de una garantfa impffcita,de modo que la exclusi6n o limitaci6n indicada anteriormente podrfa no aplicar en su caso. Esta
garantfa le brinda derechos legates especificos y podda tambi6n tenet otros derechos que vadan seg0n el estado.
ESTA GARANTiA LIMITADA NO APLICA A:
o Viajes de mantenimiento desde su hogar para entrega, recepci6n yio instalaci6n del producto, instrucci6n o reemplazo de fusibles
del hogar o cableado adecuado o correcci6n de reparaciones no autorizadas.
Los da_os o problemas operativos que resulten de la negligencia en el uso, el abuso, el funcionamiento fuera de las
especificaciones medioambientales o inconsistentes con los requisitos de precauciones establecidos en la Gu{a de funcionamiento,
accidente, insectos, incendio, inundaci6n, instalaci6n inadecuada, casos de fuerza mayor, modificaci6n o atteraci6n no autorizada,
corriente o voltaje incorrectos, o uso comerciat, o uso diferente al indicado.
El costo de reparaci6n o reemplazo bajo estas circunstancias excluidas ser_ responsabilidad del cliente.
NOMEROS DE CENTROS INTERACTIVOS DE CLIENTE
Para obtener Asistencia para ei ciiente,
informaci6n dei producto o mantenimiento o
distribuidor autorizado:
PARA CONTACTAR A LG ELECTRONICS
POR CORREO:
LG Customer Interactive Center
R O. Box 240007
201 James Record Road
Huntsville, Alabama 35824
ATTN: CIC
Liame ai 1-800-243-0000 (24 horas al d[a, 365 dias al aSo),
y seleccione la opcion adecuada a partir del men0.
O visite nuestro sitio Web en: http:iiwwwJgserviceocomo
68 69

S N
70 71

P/NO. MFL31245132
-
 1
1
-
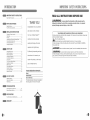 2
2
-
 3
3
-
 4
4
-
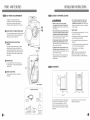 5
5
-
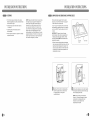 6
6
-
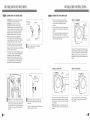 7
7
-
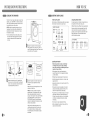 8
8
-
 9
9
-
 10
10
-
 11
11
-
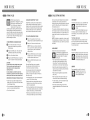 12
12
-
 13
13
-
 14
14
-
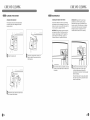 15
15
-
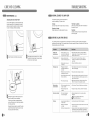 16
16
-
 17
17
-
 18
18
-
 19
19
-
 20
20
-
 21
21
-
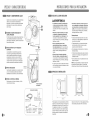 22
22
-
 23
23
-
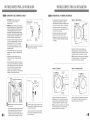 24
24
-
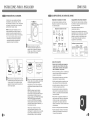 25
25
-
 26
26
-
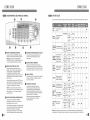 27
27
-
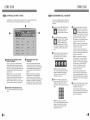 28
28
-
 29
29
-
 30
30
-
 31
31
-
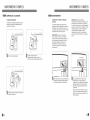 32
32
-
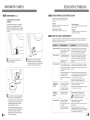 33
33
-
 34
34
-
 35
35
-
 36
36
-
 37
37


LG WM0742HGA El manual del propietario
- Categoría
- Lavadoras
- Tipo
- El manual del propietario
en otros idiomas
- English: LG WM0742HGA Owner's manual
Artículos relacionados
-
LG WM3875HVCA El manual del propietario
-
LG WD-15439BDA El manual del propietario
-
-
LG WM1377HW El manual del propietario
-
LG Electronics WM2101H Manual de usuario
-
-
LG WM2688HWMA El manual del propietario
-
LG WM3485HWA El manual del propietario
-
LG WM2501HWA El manual del propietario
-
LG WM2050CW/00 El manual del propietario