Bissell 1132 Series Symphony All-In-One Vacuum and Steam Mop Guía del usuario
- Categoría
- Aspiradoras
- Tipo
- Guía del usuario

SYMPHONY
™
ALL-IN-ONE VACUUM AND STEAM MOP
1132 SERIES

www.BISSELL.com
2
IMPORTANT SAFETY INSTRUCTIONS
READ ALL INSTRUCTIONS BEFORE
USING YOUR HARD FLOOR CLEANER.
When using an electrical appliance, basic precautions should be
observed, including the following.
WARNING
ALWAYS CONNECT TO PROPERLY GROUNDED
OUTLET. SEE GROUNDING INSTRUCTIONS.
WARNING
TO REDUCE THE RISK OF FIRE, ELECTRIC
SHOCK, OR INJURY:
» Turn off all controls before unplugging
» Do not direct steam at people, animals, or equipment
containing electrical components.
» Unplug from outlet when not in use and before
conducting maintenance or troubleshooting.
» Do not fill water tank with more than 12 ounces of water
» Do not leave unattended.
» Do not allow to be used as a toy.
»
Close attention is necessary when used by or near children.
» Do not immerse in water.
» Do not use for any purpose other than described in
this User Guide.
» Use extra care when cleaning on stairs.
» Do not turn over the device or touch the steam nozzle
when using the device in steam mode.
» Do not open water fill cap when machine is turned on.
» Use only manufacturer’s recommended attachments; use
of attachments not provided or sold by BISSELL may
cause fire, electric shock or injury.
» Never put descaling, aromatic, alcoholic, chemicals,
additives, or detergent products into the appliance, as
this may damage it or make it unsafe for use.
» Do not use with damaged cord or plug.
» If the supply cord is damaged, it must be replaced by
the manufacturer, its service agent or similarly qualified
persons in order to avoid a hazard.
» If appliance has been dropped, damaged, left outdoors,
or dropped into water, have it repaired at an authorized
service center.
» Do not pull or carry by cord, use cord as a handle,
close a door on cord, or pull cord around sharp edges
or corners. Do not run appliance over cord. Keep cord
away from heated surfaces.
» Do not unplug by pulling on cord. To unplug, grasp
the plug, not the cord.
» Do not handle with wet hands.
» Do not put any object into appliance openings,
or restrict air flow.
» Do not use with any opening blocked.
» Keep openings free of dust, lint, hair and anything
that may reduce airflow.
» Keep hair, loose clothing, fingers, and all parts of
body away from openings and moving parts.
» Do not pick up flammable materials (lighter fluid,
gasoline, kerosene, etc.) or use in the presence of
explosive liquids or vapors.
» Do not pick up toxic material (chlorine bleach,
ammonia, drain cleaner, etc.).
» Do not use appliance in an enclosed space filled with
vapors given off by oil base paint, paint thinner, some
moth proofing substances, flammable dust, or other
explosive or toxic vapors.
» Do not use on leather, wax polished furniture or
floors, synthetic fabrics, velvet or other delicate,
steam-sensitive materials.
» Do not use outdoors.
» Do not pick up hard or sharp objects such as glass,
nails, screws, coins, etc.
» Do not pick up anything that is burning or smoking,
such as cigarettes, matches, or hot ashes.
» Do not use without dust cup or filters in place.
» Always turn off this appliance before connecting or
disconnecting the nozzle.
» Use only on indoor surfaces.
» Keep appliance on a level surface.
» Always turn off vacuum mode if you encounter
liquid on the floor.
SAVE THESE
INSTRUCTIONS FOR FUTURE USE
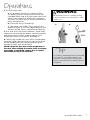
WARNING
Improper connection of the equipment-grounding conductor can
result in a risk of electrical shock. Check with a qualified electrician
or service person if you aren’t sure if the outlet is properly grounded.
DO NOT MODIFY THE PLUG. If it will not fit the outlet, have a proper
outlet installed by a qualified electrician. This appliance is designed
for use on a nominal 120-volt circuit, and has a grounding attachment
plug that looks like the plug in the illustration. Make certain that the
appliance is connected to an outlet having the same configuration as
the plug. No plug adapter should be used with this appliance.
GROUNDING INSTRUCTIONS
This appliance must be connected to a grounded wiring system. If it
should malfunction or break down, grounding provides a safe path
of least resistance for electrical current, reducing the risk of electrical
shock. The cord for this
appliance has an equipment-grounding
conductor and a grounding plug. It must
only be plugged into an outlet that is
properly installed and grounded in
accordance with all local codes and ordinances.
Grounded
Outlets
Grounding Pin
FOR OPERATION ON A 120 VOLT A.C. 60 HZ
POWER SUPPLY ONLY.
This model is for household use only.
WARNING
SURFACE MAY BE HOT. AVOID CONTACT.

www.BISSELL.com
3
Th for buying a BISSELL hard flr cleer
We’re glad you purchased a BISSELL
hard floor cleaner. Everything we
know about floor care went into
the design and construction of
this complete, high-tech home
cleaning system.
Your BISSELL hard floor cleaner is
well made, and we back it with a
limited two-year warranty. We also
stand behind it with a knowledge-
able, dedicated Consumer Care
department, so, should you ever
have a problem, you’ll receive fast,
considerate assistance.
My great-grandfather invented the
floor sweeper in 1876. Today, BISSELL
is a global leader in the design,
manufacture, and service of high
quality homecare products like your
BISSELL hard floor cleaner.
Thanks again, from all of us
at BISSELL.
Mark J. Bissell
Chairman & CEO
Safety Instructions...........2
Product View................4
Assembly ...................5
Operations ................5-8
Maintenance & Care ......9-12
Troubleshooting ............13
Replacement Parts .........14
Accessories ................14
Warranty ...................15
Service .....................15
Consumer Care.............16

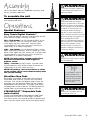
1 Steam Trigger
2 Easy Touch Digital Controls™ –
LO/HI Steam & Vac On/Off
3 Cord Clip
4 Adjustable Handle
5 25’ Power Cord
6 Water Tank with Easy Fill Opening
7 Vacuum Filter
8 Bottom Empty Dirt Bin
9 Microfiber Mop Pads (quantity varies by model)
10 Quick Release Pad Tray™
11 Water Cup
12 Water Filter (varies by model)
13 Carpet Glider (varies by model)
14 Scent Discs (varies by model)
15 STEAMBOOST™ Tray (varies by model)
16 STEAMBOOST™ Disposable Pads (varies by model)
17 Vacuum Nozzle
Product View
WARNING
Do not plug in your hard floor cleaner until
you are familiar with all instructions and
operating procedures.
WARNING
Plastic film can be dangerous. To avoid
danger of suocation, keep away from
babies and children.
www.BISSELL.com
4
WARNING
To reduce the risk of electric shock, turn
power switch o and disconnect polarized
plug from electrical outlet before performing
maintenance or troubleshooting checks.
11
13
15
1
4
2
5
3
7
6
8
9
10
17
9
12
14
16

www.BISSELL.com
5
Asmbly
Operatis
Your hard floor cleaner assembles quickly and
easily, no tools required.
To assemble the unit
Insert the body into the foot until you hear
the locking tab click.
Special Features
Easy Touch Digital Controls™
The fingertip power controls are located on the
front of the handle. Settings include:
(HI) – High Steam Use for durable floors or on
sticky messes. To turn steam on, press once.
Click again to turn steam off. Can be used
simultaneously with the vacuum function or
separately as a steam mop only.
(LO) – Low Steam Use on delicate floors or for
light, everyday cleaning. To turn steam on, click
once. Click again to turn steam off. Can be used
simultaneously with the vacuum function or
separately as a steam mop only.
NOTE: You must select a steam setting first
and then hold down the hand trigger to
produce steam.
(VAC) – Vacuum On/off switch. Can be used
simultaneously with either steam function or
separately as a stick vacuum only.
NOTE: All settings can be used alone or either
steam setting can be used simultaneously with
the vacuum setting.
Microfiber Mop Pads
Reusable microfiber mop pads are machine
washable and safe for virtually all hard floor
surfaces. The white microfiber pad is best for
everyday use on delicate flooring like sealed
hardwoods and laminate. The gray and white
striped pad can be used for scrubbing heavily
soiled floors and cleaning tougher messes.
STEAMBOOST™ Disposable Pads
(select units)
Single use disposable Steamboost Mop Pads
are safe for virtually all hard floor surfaces.
Use them when you would prefer to dispose of
your messes rather than wash your pads clean.
WARNING
Do not plug in your hard floor cleaner until
you are familiar with all instructions and
operating procedures.
WARNING
Exercise extreme care when using the
Symphony on hardwood floors. Prolonged
application of steam in one area increases
the risk of damage to the surface treatment
on timber floors. Test steam mop in an
inconspicuous area before mopping a
large area. The steam mop generates hot
steam, so move the unit continuously when
depressing the trigger. The trigger does not
need to be depressed at all times.
Regular foot trac and direct sunlight will
wear down timber floor surface treatment,
making it more susceptible to steam
damage. Check with your timber floor
treatment and application specialist prior
to steam mop operation.
WARNING
Be sure to turn o vacuum mode if you
encounter liquid on the floor
» Do not attempt to use your
hard floor cleaner on the
steam setting without water
in the tank. You may hear a
knocking sound indicating
there is no water.
Tip
WARNING
Appliance will not pick up crayons, marbles
and other large objects.

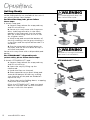
Getting Ready
The mop pad may have already come attached
to the mop pad tray on the foot of the unit. If
not, please follow step 1 below.
For Microfiber Mop pads, please follow
these steps:
1. Attach mop pad.
a. Step on foot release for mop pad tray
and lift unit off tray.
b. Some units may come with fragrance
discs. Add fragrance disc in the mesh
pocket in the mop pad. Use the whole
disc for a refreshing scent or cut in half
for a lighter scent.
c. Wrap mop pad around the bottom of
the tray, making sure the gray stitching is
in the front and the quick release tab is in
the back.
d. Put the mop pad tray back down on
the floor and set the unit back on top. It
will click into place.
Some units may come with a disposable pad
option.
For STEAMBOOST™ disposable pads
(select units), please follow these steps:
1. Attach STEAMBOOST™ pad
a. Step on foot release for mop pad tray
and lift unit off tray.
b. Open the tray by lifting up the
release tab.
c. Undo the flaps on the pad.
d. Place opened tray on pad. Wrap pad
around the bottom of the tray, making
sure the ends of the pad are folded on
top of the tray.
e. Close the tray by folding down, snapping
into place over the pad.
f. Put the STEAMBOOST™ pad tray back
down on the floor and set the unit back
on top. It will click into place.
Operatis
6
WARNING
Do not operate appliance with damp or wet
filters or without all filters in place.
WARNING
Tinted plates on foot may get hot while steam
mop is in use. Do not touch while hot.
1a.
1b.
1b.
1d.
1e.
1c.
1f.
Microfiber Mop Pad
STEAMBOOST™ Pad
www.BISSELL.com

2. Fill the water tank.
a. On the back of the unit, open the Easy
Fill opening of the water tank and use the
included water cup to fill the water tank with
water. Don’t overfill or water may spill from
the tank. For best results, water should be at
room temperature.
b. Close the Easy Fill opening.
c. The water tank holds 13oz. and will last
approximately 15 minutes depending on the
amount of the steam used during cleaning.
3. Pull and twist the Quick Release™ cord wrap
clockwise to unwrap the power cord completely
and plug into an outlet as described on the
Important Safety Instructions on page 2.
4. Adjust the handle for your most comfortable
cleaning height by pressing the tab at the base
of the handle with one hand and pulling the
handle up with your other hand.
NOTE: Upon the first use of the Symphony or
first use after refilling the water tank, the pump
may make a ‘knocking’ sound. This is normal
and could last up to 30 seconds.
7
Operatis
WARNING
Never put descaling, alcoholic, or detergent products
into the steam cleaner, as this may damage it or make
it unsafe for use.
2. 4.
» Use of distilled or demineralized water is recommended
to prolong the life of your hard floor cleaner. To add
a fresh scent as you clean, try BISSELL demineralized
waters in various scents like Citrus, Eucalyptus Mint and
Spring Breeze.
Tip
www.BISSELL.com

Operatis
Using Your Symphony Hard Floor
Vacuum and Steam Mop
The hard floor cleaner can be used as a vacuum
and a steam mop at the same time or separately.
For best results and time savings, use the
powerful vacuum to clear floor of dust and
small debris as you steam mop.
Your hard floor cleaner is designed to clean
hard flooring, such as ceramic tile, marble, stone
and sealed hard wood floors. Use on waxed or
some unwaxed floors may result in a diminished
glossiness. The hard floor cleaner is not for use
on unsealed wood floors. For best results, test in
an inconspicuous area and check the care
instructions from your flooring manufacturer.
1. Plug the unit in and wait 30 seconds for it to
heat up. When the Steam Ready light illuminates,
choose the level of steam to clean your floor:
HI (for durable floors or sticky messes) or
LO (for delicate floors or every day cleaning).
NOTE: It is recommended to use the low level
steam setting when using the STEAMBOOST™
disposable pad (select units).
2. Press steam trigger on the underside of the
handle to actuate steam
3. Push the VAC switch down to turn on the
cyclonic vacuum.
4. Begin cleaning by slowly moving the unit over
the floor surface while pressing the steam trigger
on the underside of the handle. Moisture on the
floor is normal when using in steam mode.
5. When the hard floor cleaner stops emitting
steam, turn the unit off (both steam mop and
vacuum functions) and unplug. Open the Easy
Fill opening of the water tank and use the water
cup to add more water to the tank. For best
results, water should be at room temperature.
Then close the Easy Fill opening, turn the unit
back on and continue cleaning.
NOTE:To be sure to sanitize an area of your
floor, use the microfiber cloth pads and slowly
and evenly stroke the Symphony back and
forth at least three times over the area using
continuous steam.For best results, remove the
pad and wash after use.
WARNING
To reduce the risk of electric shock, turn power switch o
and disconnect polarized plug from electrical outlet before
performing maintenance or troubleshooting checks.
8
» For vacuum use on low
pile area rugs, remove
pad tray for improved
performance.
Tip
1.
2.
www.BISSELL.com

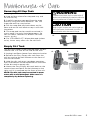
Mainnce & Care
Removing All Mop Pads
1. Unplug hard floor cleaner from electrical outlet.
2. Step on foot release for mop pad tray and
lift unit off tray.
3. Carefully remove mop pad from the mop
pad tray using the Quick Release™ Tab. The
mop pad and tray may be hot.
4. Put the mop pad tray back down on the
floor and set the unit back on top. It will click
into place.
5. The mop pad can be machine washed in
warm water. Use only liquid detergents. Do
not use fabric softeners or bleach. For best
results, air dry.
6. For STEAMBOOST™ disposable pad (select
units), throw away after use. Do not flush.
Empty Dirt Tank
The dirt tank needs to be emptied when the dirt
reaches the ‘Full’ line on the side of the tank.
1. Unplug hard floor cleaner from electrical outlet.
2. Remove the Easy Empty dirt tank from the
unit by moving the lock button on the front of
the unit to the left.
3. Hold the dirt tank over a garbage container.
Press the bottom lid release button on the back
of the dirt tank to empty dirt.
4. Mount the Easy Empty dirt tank back on the
vacuum base and push the lock button to the
right until it is centered on the front of the unit.
NOTE: The dirt tank may be washed in warm
water with a mild detergent. Make sure it is
completely dry before replacing.
WARNING
To reduce the risk of electric shock, turn power switch o
and disconnect polarized plug from electrical outlet before
performing maintenance or troubleshooting checks.
9
2. 3.
CAUTION
Upright storage of the cleaner with a wet mop pad may
result in the formation of white marks on your floor. To
remove the white marks, clean area with vinegar.
2.
www.BISSELL.com

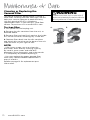
Mainnce & Care
Cleaning or Replacing the
Vacuum Filter
The key to maximum performance is having a
clean filter. Cleaning the filter after each use will
help your vacuum operate at peak efficiency.
Use only genuine BISSELL Symphony
replacement filters in your BISSELL hard floor
cleaner. To purchase visit www.BISSELL.com.
To clean filter:
1. Turn power off and unplug unit.
2. Remove the dirt container from the unit, as
directed above.
3. Remove filter and tap firmly against the inside
of a waste container, removing any visible dirt.
4. Replace filters back into the dirt container
and attach dirt container to the base of the unit.
Slide the lever to your right to lock.
NOTE:
• After heavy usage, you may clean the
pre-motor, foam filter by washing it gently
by hand in warm water and mild dish
detergent. Rinse thoroughly and make certain
it is completely dry before replacing it.
• You may replace the paper, pleated filter
when dirty. Recommended replacement is
every 6 months.
Reference page 10 for replacement part
information.
WARNING
To reduce the risk of electric shock, turn power switch o
and disconnect polarized plug from electrical outlet before
performing maintenance or troubleshooting checks.
2. 3.
10
www.BISSELL.com

Mainnce & Care
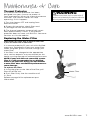
Thermal Protector
An internal thermal protector has been
designed into your vacuum to protect it
from overheating. When the thermal protector
activates, the vacuum motor will stop
operating. If this happens:
1. Turn the cleaner OFF and unplug from
electrical outlet.
2. Empty dirt container, check filters and
air passages for dirt accumulation.
3. The thermal protector automatically resets
after approximately 2 hours. If the thermal
protector does not reset, call BISSELL Consumer
Services or visit the website.
Replacing the Water Filter
Some models will come with an optional water filter.
If your unit comes with a water filter:
It is recommended to fill your unit with distilled
water only. Periodically check your water filter.
When the green grains turn blue, change your
water filter.
If the filter is not changed at the appropriate
time, calcium deposits may accumulate on the
heater, causing damage or reduced performance.
NOTE: If your unit does not come with a water
filter, it is still recommended to use distilled
water to fill your unit. Using your unit without
a water filter does not diminish performance or
cause damage.
To replace the filter:
1. Using the grips on the side of the filter, pull
filter out of the unit.
2. Push filter firmly into the machine until
it’s flush.
Reference page 14 for replacement part
information.
WARNING
To reduce the risk of electric shock, turn power switch o
and disconnect polarized plug from electrical outlet before
performing maintenance or troubleshooting checks.
11
Water Filter
www.BISSELL.com

Mainnce & Care
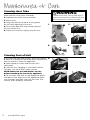
Cleaning Hose Tube
1. Grab bottom end of the hose and pull
lower portion away from the body.
2. Seperate the hose into two pieces.
3. Wash hose.
4. Align the top of the hose to the groves
on the hose opening of the unit.
5. Twist hose down to insert lower portion
of hose to the unit.
6. Make sure hose fits tightly into the unit.
Cleaning Foot of Unit
1. To clean the foot and bristles, push the release
button on the back of the pivot joint and pull the
foot to release it from the appliance.
2. Wash bottom of foot and bristles with
cold water.
3. Look for any clogging in the steam nozzle.
To clean, run water over steam nozzle.
NOTE: Make sure foot and bristles are dry
before attaching the foot to the appliance.
4. To re-attach the foot to the appliance: place
the foot on the floor, push the appliance down
into the foot and then listen for the click that
sounds when properly attached.
WARNING
To reduce the risk of electric shock, turn power switch o
and disconnect polarized plug from electrical outlet before
performing maintenance or troubleshooting checks.
2.
1.
5. 6.
3.
12
www.BISSELL.com

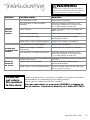
Trbleshting
WARNING
To reduce the risk of electric shock, turn power switch o
and disconnect polarized plug from electrical outlet before
performing maintenance or troubleshooting checks.
Problem Possible causes Remedies
Vacuum
cleaner
has low
suction
Dirt container is full Empty dirt container
Dirt container is not installed
properly
Position container correctly and
move lock button to the right until
it is in the center of the unit
Foot is loose Make sure foot is fully inserted into
body of unit
Filters need cleaning Follow filter instructions on page 8
Filters need replacing Visit www.bissell.com to order
replacement filters
Hose tube is not installed properly Follow instructions on page 9
Visible dirt
escaping from
cleaner
Dirt container is full of debris Empty dirt container
Filter is missing or installed
incorrectly
Check filter for correct installation
Dirt container installed incorrectly Position container correctly and
move lock button to the right until
it is in the center of the unit
Reduced
steam or
no steam
Water tank empty Fill tank
Steam level not selected Select steam level by pushing
steam level button
Water filter is not installed properly Push the water filter all the way into
the unit until it’s flush
Other maintenance or service not included in the manual should be
performed by an authorized service representative.
Thank you for selecting a BISSELL product.
For any questions or concerns, BISSELL is happy to
be of service. Contact us directly at 1-800-237-7691.
Please do
not return
this product
to the store.
13
www.BISSELL.com

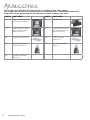
Accessories
These items are available for your BISSELL Symphony hard floor cleaner.
Call 1-800-237-7691 or visit www.bissell.com. SwifferBISSELL Steamboost disposable
mop pads can be purchased (or found) where Swiffer products are sold.
PART # PART NAME PART # PART NAME
1252 Symphony Hard Floor Vacuum
and Steam Mop Mop Pad Kit
1513 STEAMBOOST™ Kit
1250 Symphony Hard Floor Vacuum
and Steam Mop Motor Filters
Replacement Kit (Red)
1410 Symphony Hard Floor Vacuum
and Steam Mop Motor Filters
Replacement Kit (Blue)
1095 Spring Breeze Fragrance Discs 10951 Odor Eliminating Pet
Fragrance Discs
1392 Eucalyptus Mint Scented
Demineralized Water (32 oz.)
1393 Citrus Scented Demineralized
Water (32 oz.)
1394 Spring Breeze Demineralized
Water (32 oz.)
14
www.BISSELL.com

15
Warrty
This warranty gives you specific legal rights, and you may also
have other rights which may vary from state to state. If you need
additional instruction regarding this warranty or have questions
regarding what it may cover, please contact BISSELL Consumer Care
by E-mail, telephone, or regular mail as described below.
Limited Two-Year Warranty
Subject to the *EXCEPTIONS AND EXCLUSIONS identified below, upon
receipt of the product BISSELL will repair or replace (with new or
remanufactured components or products), at BISSELL’s option, free of
charge from the date of purchase by the original purchaser, for two
years any defective or malfunctioning part.
See information below on "If your BISSELL product should require service".
This warranty applies to product used for personal, and not
commercial or rental service. This warranty does not apply to fans
or routine maintenance components such as filters, belts, or brushes.
Damage or malfunction caused by negligence, abuse, neglect,
unauthorized repair, or any other use not in accordance with the
User's Guide is not covered.
BISSELL IS NOT LIABLE FOR INCIDENTAL OR CONSEQUENTIAL DAMAGES
OF ANY NATURE ASSOCIATED WITH THE USE OF THIS PRODUCT. BISSELL’S
LIABILITY WILL NOT EXCEED THE PURCHASE PRICE OF THE PRODUCT.
Some states do not allow the exclusion or limita-
tion of incidental or consequential damages, so the
above limitation or exclusion may not apply to you.
*EXCEPTIONS AND EXCLUSIONS FROM
THE TERMS OF THE LIMITED WARRANTY
THIS WARRANTY IS EXCLUSIVE AND IN LIEU OF ANY OTHER
WARRANTIES EITHER ORAL OR WRITTEN. ANY IMPLIED WARRANTIES
WHICH MAY ARISE BY OPERATION OF LAW, INCLUDING THE IMPLIED
WARRANTIES OF MERCHANTABILITY AND FITNESS FOR A PARTICULAR
PURPOSE, ARE LIMITED TO THE TWO YEAR DURATION FROM THE DATE
OF PURCHASE AS DESCRIBED ABOVE.
Some states do not allow limitations on how long an implied
warranty last so the above limitation may not apply to you.
NOTE: Please keep your original sales
receipt. It provides proof of date of
purchase in the event of a warranty claim.
Service
If your BISSELL product should
require service:
Visit BISSELL.com or contact BISSELL Consumer Care to locate a
BISSELL Authorized Service Center in your area.
If you need information about repairs or replacement parts, or if you
have questions about your warranty, contact BISSELL Consumer Care.
Website or E-mail:
www.BISSELL.com
Or Call:
BISSELL Consumer Care
1-800-237-7691
Monday – Friday 8am - 10pm ET
Saturday 9am - 8pm ET
Sunday 10am - 7pm ET
www.BISSELL.com

16
©2016 BISSELL Homecare, Inc
Grand Rapids, Michigan
All rights reserved. Printed in China
Part Number 161-1628 12/16
Visit our website at: www.BISSELL.com
For information about repairs or replacement parts, or questions about your warranty:
Registering is quick, easy and offers you benefits over the lifetime of your product.
You’ll receive:
Visit www.BISSELL.com/registration now!
Visit the BISSELL website: www.BISSELL.com
When contacting BISSELL, have model number of cleaner available.
Please record your Model Number: ___________________
Please record your Purchase Date: ___________________
NOTE: Please keep your original sales receipt. It provides proof of purchase
date in the event of a warranty claim. See Warranty on page 15 for details.
Call:
BISSELL Consumer Care
1-800-237-7691
Monday - Friday 8 am - 10 pm ET
Saturday 9 am - 8 pm ET
Sunday 10am - 7pm ET
Email:
www.BISSELL.com/email-us
BISSELL Csumer Care
Regr yr product tod!
BISSELL Rewards Points
Automatically earn points for
discounts and free shipping on
future purchases.
Faster Service
Supplying your information now
saves you time should you need
to contact us with questions
regarding your product.
Product Support
Reminders and Alerts
We’ll contact you with any
important product maintenance
reminders and alerts.
Special Promotions
Optional: Register your email
to receive notice of offers,
contests, cleaning tips and more!

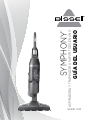
SYMPHONY
™
ASPIRADORA Y TRAPEADOR A VAPOR TODO EN UNO
GUÍA DEL USUARIO
SERIE 1312

2
INSTRUCCIONES IMPORTANTES DE SEGURIDAD
LEA TODAS LAS INSTRUCCIONES
ANTES DE UTILIZAR SU LIMPIADOR
PARA PISOS DUROS. Al utilizar electrodomésticos,
debe respetar las siguientes medidas de precaución básicas.
ADVERTENCIA
CONECTE SIEMPRE A UN TOMACORRIENTE CON
LA DEBIDA DESCARGA A TIERRA. CONSULTE LAS
INSTRUCCIONES DE PUESTA A TIERRA.
ADVERTENCIA
PARA DISMINUIR EL RIESGO DE INCENDIO,
DESCARGAS ELÉCTRICAS O LESIONES:
» Apague todos los controles antes de desenchufar.
» No dirija el vapor hacia personas, animales o hacia equipos
eléctricos.
» Desenchufe del tomacorriente cuando no esté en uso y
antes de darle mantenimiento o solucionar problemas.
» No llene el tanque de agua con más de 12 onzas de agua.
» No deje el artículo sin supervisión.
» No permita que se use como un juguete.
» Es necesaria una estricta supervisión cuando los niños
utilicen el electrodoméstico o estén cerca de él.
» No lo sumerja en agua.
» No use este electrodoméstico para otro fin que no sea el
especificado en esta Guía del usuario.
» Tenga sumo cuidado cuando limpie sobre escaleras.
» No gire el electrodoméstico ni toque la boquilla de vapor
cuando esté en modo de vapor.
» No abra la tapa de llenado para el agua cuando el
electrodoméstico esté encendido.
» Use solo los accesorios recomendados por el fabricante: el
uso de accesorios que no proporcione o venda BISSELL
puede provocar incendios, descargas eléctricas o lesiones.
» Nunca coloque productos desincrustantes, aromáticos,
químicos, a base de alcohol, con aditivos o detergentes en
el electrodoméstico, ya que pueden dañarlo o hacer que su
uso no sea seguro.
» No lo utilice si el enchufe o el cable están dañados.
» Si el cable de alimentación está dañado, este debe ser
reemplazado por el fabricante, su empresa de servicio o
alguna persona con calificación similar para evitar peligros.
» Si el electrodoméstico se ha caído, dañado, dejado en el
exterior o caído al agua, llévelo a un centro de servicio
autorizado para su reparación.
» No jale ni transporte del cable, no use el cable como manija,
no cierre puertas sobre el cable ni jale el cable alrededor de
esquinas o bordes filosos. No pase el electrodoméstico sobre
el cable. Mantenga el cable alejado de superficies calientes.
» No jale del cable para desenchufarlo. Para desenchufar, tome
el enchufe, no el cable.
» No lo manipule con las manos mojadas.
» No coloque ningún objeto en las aberturas del
electrodoméstico ni restrinja el flujo de aire.
» No utilice con las aberturas bloqueadas.
» Mantenga las aberturas libres de polvo, pelusas, cabellos y
cualquier elemento que pueda reducir el flujo de aire.
» Mantenga el cabello, las ropas holgadas, los dedos y todas las
partes del cuerpo lejos de las aberturas y piezas en movimiento.
» No aspire materiales inflamables (líquido para encendedores,
gasolina, queroseno, etc.) ni use el electrodoméstico en
presencia de líquidos o vapores explosivos.
» No aspire materiales tóxicos (blanqueador con cloro,
amoníaco, limpiador para desagües, etc.).
» No utilice el electrodoméstico en un ambiente cerrado lleno
de los vapores despedidos por pintura a base de aceite,
diluyentes de pintura, algunas sustancias repelentes de
polillas, polvo inflamable u otros vapores explosivos o tóxicos.
» No lo utilice en cuero, muebles o pisos pulidos con cera,
telas sintéticas, terciopelo ni en otros materiales delicados y
sensibles al vapor.
» No lo use en exteriores.
» No aspire objetos duros o filosos tales como vidrio, clavos,
tornillos, monedas, etc.
» No aspire objetos encendidos o con humo, tales como
cigarrillos, fósforos o cenizas calientes.
» No lo utilice si la bolsa para polvo o el filtro no están en su lugar.
» Apague siempre este electrodoméstico antes de conectar o
desconectar la boquilla.
» Utilícelo solo en interiores.
» Mantenga el electrodoméstico en una superficie nivelada.
» Apague la aspiradora si encuentra líquido en el piso.
GUARDE ESTAS
INSTRUCCIONES PARA UN USO FUTURO.
PARA EL FUNCIONAMIENTO EN 120 VOLTIOS
DE CA 60 HZ SOLO SUMINISTRO DE
ELECTRICIDAD.
Este modelo es solo para uso doméstico.
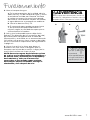
ADVERTENCIA
La conexión inapropiada del conductor de puesta a tierra del equipo
puede causar peligro de descarga eléctrica. Consulte a un electricista
calificado o personal de mantenimiento si no está seguro de si el toma
-
corriente tiene una puesta a tierra apropiada. NO MODIFIQUE EL ENCHUFE.
Si el enchufe no encaja en el tomacorriente, pídale a un electricista
calificado que instale el tomacorriente adecuado. Este electrodoméstico
está diseñado para utilizarse en un circuito nominal de 120 voltios y
cuenta con un accesorio de puesta a tierra similar al que se muestra en
la ilustración. Asegúrese de que el electrodoméstico esté conectado a
un tomacorriente con la misma configuración que el enchufe. No debe
utilizarse ningún adaptador para enchufes con este electrodoméstico.
INSTRUCCIONES DE PUESTA
A TIERRA
Este electrodoméstico debe conectarse a un sistema de cableado con
puesta a tierra. En caso de malfuncionamiento o avería, la puesta a
tierra hace que pase la menor resistencia d
e corriente eléctrica y reduce el riesgo
de descarga eléctrica. El cable para este
electrodoméstico cuenta con un conductor
de puesta a tierra del equipo y un enchufe
con puesta a tierra. Debe conectarse solo a
un tomacorriente correctamente instalado
y
con puesta a tierra que cumpla todas las ordenanzas y códigos
locales.
Tomacorrientes con
puesta a tierra
Clavija con puesta a tierra
ADVERTENCIA
LA SUPERFICIE PUEDE ESTAR CALIENTE. EVITE EL CONTACTO.
www.BISSELL.com

3
Gracias por comprar un limpiador BISSELL para
po duro
Nos complace que haya comprado
un producto de limpieza BISSELL
para piso duro. Utilizamos todos
nuestros conocimientos sobre el
cuidado de pisos para diseñar y
fabricar este completo sistema de
limpieza de alta tecnología para el
hogar.
Su limpiador profundo BISSELL
para piso duro está bien fabricado y
respaldado por dos años de garantía
limitada. Además, lo respaldamos
con un Departamento de Atención
al Consumidor especializado y
dedicado, de manera que si alguna
vez tiene algún problema, recibirá
una atención rápida y considerada.
Mi bisabuelo inventó la barredora
para pisos en 1876. Actualmente,
BISSELL es líder mundial en el
diseño, la fabricación y el servicio
técnico de productos de alta calidad
para el cuidado del hogar, como su
limpiador BISSELL para piso duro.
Gracias nuevamente, de parte de
todo el equipo de BISSELL.
Mark J. Bissell
Presidente y Presidente Ejecutivo
Instrucciones de seguridad...2
Vista del producto ...........4
Montaje .....................5
Funcionamiento ...........5-8
Mantenimiento y cuidado . 9-12
Solución de problemas......13
Piezas de repuesto .........14
Accesorios .................14
Garantía....................15
Reparación .................15
Atención al consumidor.....16
www.BISSELL.com

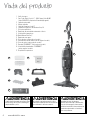
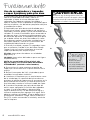
1 Gatillo de vapor
2 Easy Touch Digital Controls™ – LO/HI Steam & Vac On/Off
(Vapor BAJO/ALTO y Aspiradora Encendida/Apagada)
3 Sujetador para cable
4 Manija ajustable
5 Cable de alimentación de 25’
6 Tanque para agua con fácil abertura Easy Fill
7 Filtro para aspiradora
8 Recipiente de suciedad de vaciamiento inferior
9 Almohadillas trapeadoras
10 Quick Release Pad Tray™
11 Recipiente para agua
12. Filtro de agua (varía según el modelo)
13. Deslizadores para alfombras (varían según el modelo)
14. Disco de aroma (varía según el modelo)
15. Bandeja STEAMBOOST™ (varía según el modelo)
16. Almohadillas desechables STEAMBOOST™
(varían según el modelo)
17. Boquilla de la aspiradora
Vta del producto
4
11
13
15
1
4
2
5
3
7
6
8
9
10
17
9
12
14
16
ADVERTENCIA
No enchufe la aspiradora para pisos duros
hasta que comprenda todas las instrucciones
y procedimientos de funcionamiento.
ADVERTENCIA
La película plástica puede ser peligrosa. Para
evitar el riesgo de sofocación, manténgala
alejada de bebés y niños.
ADVERTENCIA
Para reducir el riesgo de descarga
eléctrica, lleve el interruptor de encendido
a la posición de apagado y desconecte el
enchufe polarizado del tomacorriente antes
de realizar mantenimiento a la unidad o
solucionar problemas.
www.BISSELL.com

5
Mtaje
Funciiento
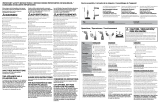
Su limpiador para piso duro se ensambla rápida
y fácilmente y no se necesitan herramientas.
Para ensamblar la unidad
Inserte el cuerpo en el pie hasta que escuche un
clic en la lengüeta de seguro.
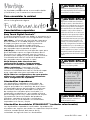
Características especiales
Easy Touch Digital Controls™
El control de potencia con los dedos se encuentra en la
parte frontal de la manija. Las configuraciones incluyen:
(HI) (alto) – utilización de nivel alto de vapor para
pisos duraderos o suciedad pegajosa. Para activar
el vapor, presione una vez. Vuelva a presionar
para apagar. Esta opción puede utilizarse
simultáneamente con la función de aspiradora o
por separado como trapeador a vapor.
(LO) (bajo) – utilización de nivel bajo de vapor para
pisos delicados o para una ligera limpieza diaria.
Para activar el vapor, presione una vez. Vuelva a
presionar para apagar. Esta opción puede utilizarse
simultáneamente con la función de aspiradora o
por separado como trapeador a vapor.
NOTA: Primero, debe seleccionar una
configuración de vapor y luego mantener
presionada la manija para producir el vapor.
(VAC) (aspiradora) – interruptor On/Off
(Encendido/Apagado). Esta opción puede
utilizarse simultáneamente con la función de vapor
o por separado solo como aspiradora de tubo.
NOTA: Todas las configuraciones de vapor pueden
utilizarse por separado o bien simultáneamente
con la configuración de aspiradora.
Almohadillas trapeadoras
Las almohadillas trapeadoras reutilizables de
microfibra pueden lavarse en la lavadora y son
seguras para todas las superficies de pisos duros.
La almohadilla blanca de microfibra es ideal para
el uso diario sobre pisos delicados como pisos
de madera dura sellada o pisos laminados. La
almohadilla rayada blanca y gris puede utilizarse
para restregar pisos muy sucios difíciles de limpiar.
La protección contra microbios del producto
Microban® combate el mal olor causado por
bacterias con el fin de obtener una almohadilla
trapeadora más fresca y limpia.
Almohadillas desechables STEAMBOOST™ (unidades seleccionadas)
Las almohadillas trapeadoras reutilizables Steamboost de
microfibra son seguras para todas las superficies de pisos duros.
Utilícelas cuando quiera deshacerse de las
suciedades en lugar de lavar las almohadillas.
ADVERTENCIA
No enchufe la aspiradora para pisos duros
hasta que comprenda todas las instrucciones
y procedimientos de funcionamiento.
ADVERTENCIA
Tenga mucho cuidado cuando manipule
la Symphony en pisos de madera dura. La
aplicación prolongada de vapor en un área
aumenta el riesgo de dañar el tratamiento
de la superficie de pisos de madera. Pruebe
el trapeador a vapor sobre un área poco
visible antes de utilizarlo en un área mayor.
El trapeador a vapor genera vapor caliente,
de modo que mueva el electrodoméstico
constantemente mientras presiona el gatillo.
No es necesario presionar el gatillo todo
el tiempo. La constante circulación y la luz
directa del sol desgastarán el tratamiento de
las superficies de los pisos de madera y, en
consecuencia, los volverá más susceptibles a
los daños causados por el vapor. Consulte a
un especialista acerca del tratamiento de su
piso de madera antes de utilizar el trapeador
a vapor.
ADVERTENCIA
Asegúrese de apagar la aspiradora si
encuentra líquido en el piso.
» No intente utilizar
su limpiador para piso duro
en la configuración de vapor
si el tanque no tiene agua.
Puede escuchar un sonido
de golpeteo que le indica
que no hay agua.
Cjo
ADVERTENCIA
Este electrodoméstico no aspirará crayones,
canicas ni otros objetos grandes.
www.BISSELL.com

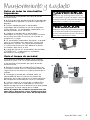
Antes de comenzar
Es posible que la almohadilla trapeadora ya esté
fija a la bandeja de almohadilla trapeadora en el
pie del electrodoméstico. De no ser así, siga con el
paso 1 a continuación.
Para las almohadillas trapeadoras de
microfibra, siga los pasos a continuación:
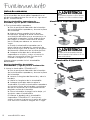
1. Fije la almohadilla trapeadora.
a. Pise el pestillo de liberación de la bandeja
de la almohadilla trapeadora y levante la pieza
de la bandeja.
b. Algunas piezas pueden incluir discos
refrescantes. Agregue el disco refrescante
en el bolsillo de malla que se encuentra en la
almohadilla trapeadora. Utilice todo el disco
para lograr un aroma refrescante o córtelo
por la mitad para obtener un aroma más
suave.
c. Enrolle la almohadilla trapeadora en la
parte inferior de la bandeja y asegúrese de
que la costura gris esté al frente y la lengüeta
de liberación rápida esté en la parte de atrás.
d. Coloque la bandeja de la almohadilla
trapeadora en el piso y vuelva a insertar la
pieza en la parte de arriba. Esta hará clic
cuando se asegure en su lugar.
Algunas piezas pueden incluir almohadillas
desechables.
Para las almohadillas desechables
STEAMBOOST™, siga los pasos a continuación:
1. Sujete la almohadilla STEAMBOOST™.
a. Pise el pestillo de liberación de la bandeja
de la almohadilla trapeadora y levante la pieza
de la bandeja.
b. Levante la lengüeta de liberación y abra la
bandeja.
c. Libere las lengüetas de la almohadilla.
d. Coloque la bandeja abierta sobre la
almohadilla. Enrrolle la almohadilla trapeadora
en la parte inferior de la bandeja y asegúrese
de que los extremos de la almohadilla estén
plegados arriba de la bandeja.
e. Cierre la bandeja al plegar hacia abajo y al
encajarla sobre la almohadilla.
f. Coloque la bandeja de la almohadilla
trapeadora STEAMBOOST™ en el piso y
vuelva a insertar la pieza en la parte de arriba.
Esta hará clic cuando se asegure en su lugar.
Funciiento
6
ADVERTENCIA
No use el electrodoméstico con filtros húmedos
o mojados, o si los filtros no están en su lugar.
ADVERTENCIA
Las placas teñidas del pie pueden calentarse
cuando el trapeador a vapor esté en uso. No las
toque si están calientes.
1a.
1b.
1b.
1d.
1e.
1c.
1f.
Almohadilla trapeadora Microban®
Almohadilla STEAMBOOST
www.BISSELL.com

2. Llene el tanque de agua.
a. En la parte posterior de la unidad, abra la
abertura Easy Fill del tanque de agua y utilice
el recipiente incluido para llenarlo. No llene
el tanque en exceso ya que el agua puede
derramarse. Para obtener mejores resultados,
el agua debe estar a temperatura ambiente.
b. Cierre la abertura Easy Fill.
c. El tanque de agua puede contener hasta
13oz que durarán aproximadamente 15
minutos según la cantidad de vapor que se
utilice durante la limpieza.
3. Jale y gire la abrazadera para cable Quick
Release™ en dirección de las manecillas del reloj
para desenrollar completamente el cable de
alimentación y enchúfelo en un tomacorriente de
120 voltios con puesta a tierra, como se describe
en las Instrucciones importantes de seguridad en
la página 2.
4. Ajuste la manija a la altura que desee al
presionar con una mano la lengüeta que se
encuentra en la base de la manija. Luego, jale la
manija hacia arriba con la otra mano.
NOTA: Para estar seguro de desinfectar un área
de su piso, use las almohadillas de microfibras y
de manera lenta y uniforme pase la Symphony
hacia adelante y atrás por lo menos tres
veces sobre el área usando vapor continuo.
Para obtener mejores resultados, extraiga la
almohadilla y lave después de usar.
7
Funciiento
» Se recomienda
utilizar agua destilada para
prolongar la vida útil de su
limpiador para piso duro.
Cjo
ADVERTENCIA
Nunca coloque productos desincrustantes, aromáticos, a
base de alcohol o detergentes en el limpiador a vapor, ya
que pueden dañarlo o hacer que su uso sea poco seguro.
2. 4.
www.BISSELL.com

Funciiento
Uso de su aspiradora y trapeador
a vapor Symphony para piso duro
El limpiador para piso duro puede ser utilizado
como una aspiradora de tubo y como un
trapeador a vapor al mismo tiempo o por
separado. Para obtener mejores resultados y
ahorrar tiempo, utilice la poderosa aspiradora para
eliminar el polvo y los desechos pequeños del piso
a medida que trapea.
El limpiador para piso duro está diseñado para
limpiar pisos duros, como baldosas de cerámica,
laminados, mármol, piedra y pisos de madera dura
sellados. El uso de la unidad en pisos encerados o
en algunos pisos sin encerar puede provocar una
disminución del brillo. El limpiador para piso duro
no se debe utilizar en pisos de madera sin sellar.
Para obtener mejores resultados, pruébela en un
área poco notoria y revise las instrucciones de
cuidado del fabricante de sus pisos.
1. Enchufe la unidad y espere 30 segundos hasta
que se caliente. Cuando la luz de Steam Ready
(Vapor listo) se ilumine, seleccione el nivel de
vapor que desea para limpiar el piso.
HI (alto) (para pisos duraderos o suciedades
pegajosas) o
LO (bajo) (para pisos delicados o para una ligera
limpieza diaria).
NOTA: Se recomienda utilizar el nivel más
bajo de vapor con la almohadilla desechable
STEAMBOOST (unidades seleccionadas).
2. Para activar el vapor, presione el gatillo de
vapor que se encuentra en la parte inferior de la
manija.
3. Baje el interruptor de VAC (Aspiradora) para
encender la aspiradora ciclónica.
4. Comience la limpieza con un movimiento suave
de la unidad por la superficie del piso mientras
presiona el gatillo de vapor que se encuentra en la
parte inferior de la manija. Es normal que el piso
esté húmedo cuando se utiliza el modo de vapor.
5. Cuando el limpiador para piso duro deje de
emitir vapor, apáguelo (la función de trapeador
a vapor y la de aspiradora) y desenchúfelo.
Abra la abertura Easy Fill del tanque de agua y
utilice el recipiente para agregar más agua. Para
obtener mejores resultados, el agua debe estar a
temperatura ambiente. Luego, cierre la abertura
Easy Fill, vuelva a encender la unidad y continúe
con la limpieza.
ADVERTENCIA
Para reducir el riesgo de descarga eléctrica, lleve el inter-
ruptor de encendido a la posición de apagado y desconecte
el enchufe polarizado del tomacorriente antes de realizar
mantenimiento a la unidad o solucionar problemas.
8
1.
2.
» Para utilizar la
aspiradora en tapetes
de interiores de pelo
corto, retire la bandeja de la
almohadilla trapeadora para
lograr mejores resultados.
Cjo
www.BISSELL.com

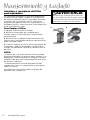
Mnimiento y cuidado
Retiro de todas las almohadillas
trapeadoras
1. Desenchufe el limpiador para piso duro del
tomacorriente.
2. a. Pise el pestillo de liberación de la bandeja de
la almohadilla trapeadora y levante la pieza de la
bandeja.
3. Quite cuidadosamente la almohadilla
trapeadora de la bandeja al utilizar la lengüeta
Quick Release™. La almohadilla trapeadora y la
bandeja pueden estar calientes.
4. Coloque la bandeja de la almohadilla
trapeadora en el piso y vuelva a insertar la pieza
en la parte de arriba. Esta hará clic cuando se
asegure en su lugar.
5. La almohadilla trapeadora Microban® se puede
lavar en la lavadora con agua tibia. Utilice solo
detergentes líquidos. No utilice blanqueadores
ni suavizantes para tela. Para obtener mejores
resultados, deje secar al aire.
6. Luego de utilizar las almohadillas desechables
STEAMBOOST™ (seleccione las unidades),
descártelas. No enjuagar.
Vacíe el tanque de suciedad
El tanque de suciedad se debe vaciar cuando
alcanza la línea “Full” en el costado del tanque.
1. Desenchufe el limpiador para piso duro del
tomacorriente.
2. Retire el tanque de suciedad Easy Empty de
la unidad al mover hacia la izquierda el botón de
seguro que se encuentra en la parte frontal de la
unidad.
3. Sostenga el tanque de suciedad sobre un
contenedor de basura. Presione el botón de
liberación de la tapa inferior en la parte posterior
del tanque de suciedad para vaciar la suciedad.
4. Vuelva a colocar el tanque de suciedad Easy
Empty en la base de la aspiradora y mueva el
botón de seguro hacia la derecha hasta que quede
centrado en la parte frontal de la unidad.
NOTA: El tanque de suciedad se puede lavar con
agua tibia y detergente suave. Asegúrese de que
esté completamente seco antes de reemplazarlo.
ADVERTENCIA
Para reducir el riesgo de descarga eléctrica, lleve el inter-
ruptor de encendido a la posición de apagado y desconecte
el enchufe polarizado del tomacorriente antes de realizar
mantenimiento a la unidad o solucionar problemas.
9
2. 3.
PRECAUCIÓN
Almacenar el contenido del limpiador de manera vertical
con una almohadilla trapeadora húmeda puede provocar
la formación de marcas blancas en su piso. Para retirar las
marcas blancas, limpie el área con vinagre.
2.
www.BISSELL.com

Mnimiento y cuidado
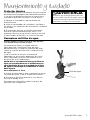
Limpieza o reemplazo del filtro
para aspiradora
La clave para mantener un máximo rendimiento
es tener el filtro limpio. Limpiar el filtro después
de cada uso permitirá que la aspiradora funcione
al máximo de su eficiencia. Utilice solo filtros
originales de repuesto BISSELL Symphony en su
limpiador BISSELL para piso duro. Para adquirirlos,
visite www.BISSELL.com.
Para limpiar el filtro:
1. Apague y desenchufe la unidad.
2. Retire el contenedor de suciedad de la
unidad, según las descripciones mencionadas
anteriormente.
3. Retire el filtro y golpee firmemente contra el
interior de un contenedor de basura para eliminar
toda suciedad visible.
4. Vuelva a colocar los filtros en el contenedor de
suciedad y sujete el contenedor a la base de la
unidad. Para bloquear, deslice la palanca hacia la
derecha.
NOTA:
• Después de usar intensamente el filtro, puede
limpiarlo lavándolo a mano con agua caliente y un
detergente suave para platos. Enjuague a fondo y
asegúrese de que esté completamente seco antes
de volver a colocarlo.
• Puede reemplazar el filtro de papel plisado
cuando esté sucio. Se recomienda su reemplazo
cada seis meses.
Para obtener información sobre las piezas de
repuesto, vea la página 10.
2. 3.
10
ADVERTENCIA
Para reducir el riesgo de descarga eléctrica, lleve el inter-
ruptor de encendido a la posición de apagado y desconecte
el enchufe polarizado del tomacorriente antes de realizar
mantenimiento a la unidad o solucionar problemas.
www.BISSELL.com

Mnimiento y cuidado
Protector térmico
Su aspiradora posee un protector térmico interno
diseñado para protegerla del sobrecalentamiento.
Si se activa el protector térmico, el motor de la
aspiradora dejará de funcionar. Si esto ocurre:
1. Apague la aspiradora y desconéctela del
tomacorriente.
2. Vacíe el contenedor de suciedad y verifique si
los filtros y los conductos de aire poseen suciedad
acumulada.
3. El protector térmico se reinicia automática-
mente en aproximadamente dos horas. Si el
protector térmico no se reinicia, llame al Servicio
al consumidor de BISSELL o visite el sitio web.
Reemplazo del filtro de agua
Algunos modelos incluirán un filtro de agua opcional.
Si su unidad incluye un filtro de agua:
Se recomienda llenar la unidad solo con
agua destilada. Verifique el filtro de agua
periódicamente. Cuando los gránulos de color
verde se vuelvan de color azul, cambie el filtro
de agua.
Si no se cambia el filtro en el momento
adecuado, se acumularán depósitos de calcio
en el calentador, lo que causará daños o una
disminución en el rendimiento.
NOTA: Aun si su unidad no incluye un filtro de
agua, se recomienda llenar la unidad solo con
agua destilada. El uso de la unidad sin el filtro
de agua no disminuye el rendimiento ni causa
daño alguno.
Para reemplazar el filtro:
1. Utilice las agarraderas que se encuentran en los
costados del filtro y jale la unidad hacia afuera.
2. Presione el filtro firmemente en la máquina
hasta que quede al ras.
Para obtener información sobre las piezas de
repuesto, vea la página 14.
11
Filtro de agua
ADVERTENCIA
Para reducir el riesgo de descarga eléctrica, lleve el inter-
ruptor de encendido a la posición de apagado y desconecte
el enchufe polarizado del tomacorriente antes de realizar
mantenimiento a la unidad o solucionar problemas.
www.BISSELL.com

Mnimiento y cuidado
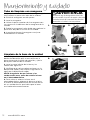
Tubo de limpieza con manguera
1. Sujete el extremo inferior de la manguera y jale
hacia afuera la parte más baja de la unidad.
2. Divida la manguera en dos partes.
3. Lave la manguera.
4. Alinee la parte superior de la manguera con
las ranuras en la abertura de la manguera de la
unidad.
5. Doble la manguera hacia abajo para colocar la
parte más baja de la misma en la unidad.
6. Asegúrese de que la manguera se ajuste
firmemente a la unidad.
Limpieza de la base de la unidad
1. Para limpiar la base y las cerdas, jale el
botón de liberación que se encuentra en la
parte trasera de la unión de rotación y jale la
base para liberarla de la unidad.
2. Lave la parte inferior de la base y las
cerdas con agua fría.
3. Verifique que no haya obstrucciones en la
boquilla de vapor. Para limpiar, haga correr el
agua por la boquilla de vapor.
NOTA: Asegúrese de que la base y las
cerdas estén secas antes de colocar la base
en el electrodoméstico.
4. Para volver a colocar la base en el
electrodoméstico: coloque la base en el piso
e inserte el electrodoméstico en la base hasta
oír un sonido de clic que indica que la base
está colocada correctamente.
2.
1.
5. 6.
3.
12
ADVERTENCIA
Para reducir el riesgo de descarga eléctrica, lleve el inter-
ruptor de encendido a la posición de apagado y desconecte
el enchufe polarizado del tomacorriente antes de realizar
mantenimiento a la unidad o solucionar problemas.
www.BISSELL.com

Solución de
problemas
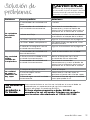
Problema Causas posibles Soluciones
La aspiradora
ha perdido
succión
El contenedor de suciedad está
lleno.
Vacíelo.
El contenedor de suciedad no
está instalado correctamente.
Posicione el contenedor cor-
rectamente y mueva el botón de
seguro hacia la derecha hasta que se
encuentre en el centro de la unidad.
La base está floja. Verifique que la base esté totalmente
insertada en el cuerpo de la unidad.
Los filtros necesitan limpieza. Siga las instrucciones en la página 8.
Los filtros deben reemplazarse. Para pedir filtros de repuesto, visite
www.bissell.com.
El tubo de la manguera no está
instalado correctamente.
Siga las instrucciones en la página 9.
Hay suciedad
visible
saliendo de
la aspiradora
El contenedor de suciedad está
lleno de desechos.
Vacíe el contenedor de suciedad.
El filtro no está instalado o está
instalado incorrectamente.
Revise el filtro para ver si está
instalado de forma adecuada.
El contenedor de suciedad está
instalado incorrectamente.
Posicione el contenedor
correctamente y mueva el botón de
seguro hacia la derecha hasta que se
encuentre en el centro de la unidad.
La cantidad
de vapor es
reducida o no
hay vapor
El tanque de agua está vacío. Llene el tanque.
El nivel de vapor no fue
seleccionado.
Seleccione el nivel del vapor al
presionar el botón del nivel de vapor.
El filtro de agua no está instalado
correctamente.
Presione el filtro de agua en la unidad
hasta que quede al ras.
13
ADVERTENCIA
Para reducir el riesgo de descarga eléctrica, lleve el inter-
ruptor de encendido a la posición de apagado y desconecte
el enchufe polarizado del tomacorriente antes de realizar
mantenimiento a la unidad o solucionar problemas.
Otro mantenimiento o servicio no incluido en el manual debe ser
realizado por un representante de servicio autorizado.
Gracias por elegir un producto BISSELL.
Si tiene alguna pregunta o duda, BISSELL se
complace en ser de ayuda. Póngase en contacto
con nosotros directamente al 1-800-237-7691.
No devuelva
este
producto a
la tienda.
www.BISSELL.com

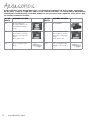
Accesorios
Estos artículos están disponibles para su aspiradora limpiadora de pisos duros Symphony
de BISSELL. Llame al 1-800-237-7691 o visite www.bissell.com. Las almohadillas desechables
Steamboost SwifferBISSELL pueden adquirirse (o encontrarse) en aquellos sitios en los que
se venden productos Swiffer.
N.º DE
PIEZA
NOMBRE DE PIEZA N.º DE
PIEZA
NOMBRE DE PIEZA
1252 Kit de la aspiradora de
pisos duros Symphony y de
almohadillas del trapeador
a vapor
1513 Kit SteamBOOST™
1250 Kit de la aspiradora de pisos
duros Symphony y de filtros
para el motor del trapeador
a vapor
Kit de repuesto (rojo)
1410 Kit de la aspiradora de pisos
duros Symphony y de filtros
para el motor del trapeador
a vapor
Kit de repuesto (azul)
1095 Discos con fragancia Spring
Breeze
10951 Discos con fragancias para
eliminar los malos olores
14
www.BISSELL.com

15
Esta garantía le otorga derechos legales específicos, pero podría
tener también otros derechos que pueden variar de un estado a otro.
Si necesita instrucciones adicionales con respecto a esta garantía o
tiene preguntas sobre lo que esta cubre, póngase en contacto con
Atención al Consumidor de BISSELL por correo electrónico, teléfono o
correo regular como se describe a continuación.
Garantía limitada de dos años
Sujeta a las *EXCEPCIONES Y EXCLUSIONES detalladas a continuación,
presentando el comprobante de compra del producto, BISSELL
reparará o reemplazará (con componentes o productos nuevos o
fabricados nuevamente), a discreción de BISSELL, sin costo para el
comprador original a partir de la fecha de compra y durante dos
años, cualquier pieza defectuosa o con mal funcionamiento.
Consulte la información siguiente en “Si su producto BISSELL necesita
mantenimiento”.
Esta garantía se aplica al producto utilizado para el servicio personal y
no comercial o de alquiler. Esta garantía no se aplica a los ventiladores
o a los componentes de mantenimiento de rutina, como filtros, correas
o cepillos. Los daños o el mal funcionamiento causados por negligencia,
uso inadecuado, descuido, reparación no autorizada o cualquier otro
uso que no se ajuste a la Guía del usuario no están cubiertos.
BISSELL NO SE HACE RESPONSABLE POR NINGÚN DAÑO ACCIDENTAL O
RESULTANTE DE NINGUNA NATURALEZA RELACIONADO CON EL USO DE
ESTE PRODUCTO. LA RESPONSABILIDAD DE BISSELL NO SUPERARÁ EL
PRECIO DE COMPRA DEL PRODUCTO.
Algunos estados no permiten la exclusión
o limitación de los daños accidentales o
resultantes, de modo que la exclusión o
limitación anterior pueden no aplicarse en su
caso.
*EXCEPCIONES Y EXCLUSIONES DE LOS
TÉRMINOS DE LA GARANTÍA LIMITADA
ESTA GARANTÍA ES EXCLUSIVA Y REEMPLAZA A CUALQUIER OTRA
GARANTÍA ORAL O ESCRITA. CUALQUIER GARANTÍA IMPLÍCITA QUE
PUEDA SURGIR POR UNA OPERACIÓN LEGAL, QUE INCLUYA LAS
GARANTÍAS IMPLÍCITAS DE COMERCIABILIDAD E IDONEIDAD PARA UN
FIN EN PARTICULAR, ESTÁ LIMITADA A DOS AÑOS DE DURACIÓN A
PARTIR DE LA FECHA DE COMPRA COMO SE DETALLÓ ANTERIORMENTE.
Algunos estados no permiten limitaciones sobre el tiempo de
duración de la garantía implícita, de modo que la limitación anterior
tal vez no se aplica a su caso.
NOTA: Conserve el recibo de venta original.
Es el comprobante de la fecha de compra
en caso de una reclamación de garantía.
Si su producto BISSELL necesita
un servicio:
Póngase en contacto con la Atención al Consumidor de BISSELL para
ubicar un centro de servicio autorizado de BISSELL en su área.
Si necesita información sobre reparaciones o piezas de repuesto, o si
tiene preguntas sobre la garantía, póngase en contacto con Atención
al Consumidor de BISSELL.
Sitio Web o correo electrónico:
www.BISSELL.com
O llame a:
Atención al Consumidor de BISSELL
1-800-237-7691
Lunes a viernes de 8 a.m. a 10 p.m.,
hora del Este
Sábados de 9 a.m. a 8 p.m.,
hora del Este
Domingos de 10 a.m. a 7 p.m.,
hora del Este
Gartía Reparación
www.BISSELL.com

16
©2016 BISSELL Homecare, Inc
Grand Rapids, Michigan
Todos los derechos reservados. Impreso en China
Número de pieza: 161-1628 12/16
Visite nuestro sitio web en: www.BISSELL.com44
Para obtener información sobre reparaciones o piezas de repuesto, o si tiene preguntas
acerca de la garantía:
Registrarse es rápido, fácil y le ofrece beneficios para todo el período de vida
útil del producto. Usted recibirá:
Visite www.BISSELL.com/registration ahora.
Visite el sitio Web de BISSELL: www.BISSELL.com
Cuando se ponga en contacto con BISSELL, tenga a mano el número de modelo de la aspiradora.
Registre su número de modelo: ___________________
Registre su fecha de compra: ___________________
NOTA: Conserve el recibo de venta original. Es el comprobante de la fecha de
compra en caso de una reclamación de garantía. Para obtener más detalles,
consulte la garantía en la página 15.
Llame al:
Atención al Consumidor de BISSELL
1-800-237-7691
De lunes a viernes de 8 a.m. a 10 p.m.,
hora del Este
Sábados de 9 a.m. a 8 p.m.,
hora del Este
Domingos de 10 a.m. a 7 p.m.,
hora del Este
Correo electrónico:
www.BISSELL.com/email-us
Anción al Csumidor de BISSELL
¡Regtre su producto hoy!
Puntos de recompensa BISSELL
Obtenga automáticamente puntos para
descuentos y entrega a domicilio gratis en
compras futuras.
Servicio más rápido
Si envía la información ahora, ahorrará
tiempo por si necesita ponerse en
contacto con nosotros con preguntas
relacionadas con el producto.
Recordatorios y alertas del
centro de servicio de productos
Nos pondremos en contacto con
usted ante cualquier recordatorio y
alerta importante relacionada con el
mantenimiento del producto.
Promociones especiales
Opcional: Registre su correo electrónico
para recibir notificaciones de ofertas,
concursos, consejos de limpieza y más.
-
 1
1
-
 2
2
-
 3
3
-
 4
4
-
 5
5
-
 6
6
-
 7
7
-
 8
8
-
 9
9
-
 10
10
-
 11
11
-
 12
12
-
 13
13
-
 14
14
-
 15
15
-
 16
16
-
 17
17
-
 18
18
-
 19
19
-
 20
20
-
 21
21
-
 22
22
-
 23
23
-
 24
24
-
 25
25
-
 26
26
-
 27
27
-
 28
28
-
 29
29
-
 30
30
-
 31
31
-
 32
32


Bissell 1132 Series Symphony All-In-One Vacuum and Steam Mop Guía del usuario
- Categoría
- Aspiradoras
- Tipo
- Guía del usuario
en otros idiomas
Artículos relacionados
-
Bissell Zing 6489 SERIES Guía del usuario
-
 Swiffer Swiffer BISSELL STEAMBOOST Steam Mop 6639 El manual del propietario
-
-
-
-
-
-
-
-
