Jacuzzi SOAKER BATH SERIES Installation And Operation Instructions Manual
- Tipo
- Installation And Operation Instructions Manual


Soaker™ Bath Series
Installation and Operation www.jacuzzi.com Page 3
English
Product Information
Contents
Save these instructions for future use. Use the form below to record your model and serial number for future
reference.
Date Purchased
Purchased From
Installed By
Serial Number
Model
Installer: Leave the manual for the homeowner.
Homeowner: Read this manual and keep for future reference.
Contents. ......................................................................................................................................................................... 3
Product Information. ........................................................................................................................................................ 3
Safety Instructions. .......................................................................................................................................................... 4
Operational Safety Instructions. ...................................................................................................................................... 5
Inspection and Testing. .................................................................................................................................................... 6
Installation. ...................................................................................................................................................................... 6
Framing. .......................................................................................................................................................................... 6
Electrical Connections (Soakers with Chromatherapy Only). .......................................................................................... 7
Chromatherapy Light Installation. .................................................................................................................................... 7
Drop-in Installation......................................................................................................................................................... 10
3-Wall Alcove Installation. ...............................................................................................................................................11
Skirt Installation. ............................................................................................................................................................ 12
Undermount Installation................................................................................................................................................. 12
Cleanup. ........................................................................................................................................................................ 13
Operation. ...................................................................................................................................................................... 13
Maintenance. ................................................................................................................................................................. 13
Authorized Service. ....................................................................................................................................................... 14
Warranty. ....................................................................................................................................................................... 15

Soaker™ Bath Series
Page 4 www.jacuzzi.com Installation and Operation
English
Safety Instructions
INSTRUCTIONS PERTAINING TO A RISK OF FIRE, ELECTRIC SHOCK, OR INJURY TO PERSONS.
WARNING: RISK OF ACCIDENTAL INJURY OR DROWNING!
Do not permit children to use this unit unless they are closely supervised at all times. Do not
use hydromassage bathtub unless all suction guards are installed to prevent body and hair
entrapment. Never operate the hydromassage bathtub if the suction cover is broken, damaged or
missing.
DANGER: RISK OF SEVERE INJURY FROM ELECTRIC SHOCK OR DEATH FROM ELECTROCUTION!
This unit must be connected only to a supply circuit that is protected by a 15 amp ground fault
circuit interrupter (GFCI). Such a GFCI should be provided by the installer and should be tested
on a routine basis. To test the GFCI, push the test button. The GFCI should interrupt power. Push
the reset button. Power should be restored. If the GFCI fails to operate in this manner, the GFCI
is defective. If the GFCI interrupts power to the bathtub without the test button being pushed,
agroundcurrentisowing,indicatingapossibilityofanelectricshock.Donotusethis
hydromassage bathtub. Disconnect the hydromassage bathtub and have the problem corrected
byaqualiedservicerepresentativebeforeusing.
WARNING: RISK OF ELECTRIC SHOCK!
Connect only to a circuit protected by a ground fault circuit interrupter (GFCI). (For permanently
connected units) A green-colored terminal (or a wire connector) marked “G,” “GR,” “GROUND,”
or “GROUNDING”) is provided within the terminal compartment. To reduce the risk of electric
shock, connect the terminal or connector to the grounding terminal of your electric service or
supply panel with a conductor equivalent in size to the circuit conductors supplying the
equipment.
CAUTION: This equipment is intended for indoor use only. Install the equipment in accordance with these
instructions. Use supply wires that are suitable for 167°F (75°C), including the temperature rating
of the supply conductors to be used. This unit should be electrically grounded and installed by a
licensed contractor, electrician, and plumber. Building materials and wiring should be routed
away from the motor/pump or blower or other heat producing components of this unit. A pressure
wire connector is provided on the exterior of the motor/pump and heater to permit connection of
an No. 8 AWG solid copper bonding conductor between this unit and all other electric
equipment and exposed metal in the vicinity, as needed to comply with local requirements.
Important CSA Safety Instructions (Canadian models only)
When using this electrical equipment, basic safety precautions should always be followed, including the following:
1. WARNING: RISK OF ACCIDENTAL INJURY OR DROWNING! CHILDREN SHOULD NOT USE
HYDROMASSAGE BATHTUB WITHOUT ADULT SUPERVISION.
2. WARNING: RISK OF ACCIDENTAL INJURY OR DROWNING! DO NOT USE HYDROMASSAGE
BATHTUB UNLESS ALL SUCTION GUARDS ARE INSTALLED TO PREVENT BODY AND HAIR
ENTRAPMENT.
3 WARNING: TO AVOID INJURY, EXERCISE CARE WHEN ENTERING OR EXITING THE
HYDROMASSAGE BATHTUB.
4. WARNING: RISK OF ACCIDENTAL INJURY OR DROWNING! DO NOT USE DRUGS OR ALCOHOL
BEFORE OR DURING THE USE OF A HYDROMASSAGE BATHTUB EQUIPPED WITH A HEATER TO
AVOID UNCONSCIOUSNESS AND POSSIBLE DROWNING.
5. WARNING: RISK OF FETAL INJURY! PREGNANT OR POSSIBLY PREGNANT WOMEN SHOULD
CONSULT A PHYSICIAN BEFORE USING A HYDROMASSAGE BATHTUB EQUIPPED WITH A
HEATER.
6. WARNING: RISK OF HYPERTHERMIA AND POSSIBLE DROWNING: DO NOT USE A
HYDROMASSAGE BATHTUB EQUIPPED WITH A HEATER IMMEDIATELY FOLLOWING STRENUOUS
EXERCISE.
7. SAVE THESE INSTRUCTIONS .
CAUTION: When using this unit, basic precautions should always be performed, including the following:
•READ AND FOLLOW ALL INSTRUCTIONS. SAVE THESE
INSTRUCTIONS.
•Use this unit only for its intended use as described in this manual. Do not use attachments
not recommended by the manufacturer.
•Never drop or insert any object into any opening.
This is a professional grade product. A knowledge of construction techniques, plumbing and electrical installation
according to codes are required for proper installation and user satisfaction. We recommend that a licensed contractor
perform the installation of all Jacuzzi® Luxury Bath products. Our warranty does not cover improper installation related
problems.

Soaker™ Bath Series
Installation and Operation www.jacuzzi.com Page 5
English
Operational Safety Instructions
WARNING: RISK OF HYPERTHERMIA AND POSSIBLE DROWNING!
Do not use a hydromassage bathtub equipped with a heater immediately following strenuous
exercise.
WARNING: RISK OF ELECTRICAL SHOCK!
WARNING: PROLONGED IMMERSION IN HOT WATER MAY INDUCE HYPERTHERMIA!
Hyperthermia occurs when the internal temperature of the body reaches a level several degrees
above the normal body temperature of 98.6°F (37°C). The symptoms of hyperthermia include an
increase in the internal temperature of the body, dizziness, lethargy, drowsiness and fainting. The
effects of hyperthermia include:
A. Failure to perceive heat.
B. Failure to recognize the need to exit the bathtub.
C. Unawareness of impending hazard.
D. Fetal damage in pregnant women.
E. Physical inability to exit the bathtub.
F. Unconsciousness resulting in danger of drowning.
WARNING: RISK OF FETAL INJURY!
Pregnant or possibly pregnant women should consult a physician before using a hydromassage
bathtub equipped with a heater.
WARNING: The use of alcohol, drugs or medication can greatly increase the risk of fatal hyperthermia.
People using medications or having an adverse medical history should consult a physician
before using a hydromassage bathtub equipped with a heater.
WARNING: Do not tamper with user-operated controls or such devices.
WARNING: Use this unit only for its intended use as described in this manual. Do not use attachments not
recommended by the manufacturers.
WARNING: To avoid injury, exercise caution when entering or exiting the hydromassage bathtub.
WARNING: Do not use hydromassage bathtub unless all suction guards are installed to prevent body and
hair entrapment. Never operate the hydromassage bathtub if the suction cover is broken,
damaged or missing.
WARNING: Water temperature in excess of 104°F (40°C) may be injurious to your health. Check and adjust
water temperature before use.
CAUTION: Test the ground fault circuit interrupter protecting this appliance periodically in accordance with
manufacturer’s instructions.
IMPORTANT: Read the complete instructions provided in this manual before beginning installation.
The Company has obtained applicable code (standards) listings generally available on a national basis for products
ofthistype.Itistheresponsibilityoftheinstaller/ownertodeterminespeciclocalcodecompliancepriortoinstallation
of the product. The Company makes no representation or warranty regarding, and will not be responsible for any code
compliance.Productspecicationsaresubjecttochangewithoutnotice.
•Do not permit electrical appliances (such as a hair dryer, lamp, telephone, radio or television)
within60˝(1524mm)ofthishydromassagebathtub.
•Donotoperatehydromassagesystemunlessthebathtubislledwithwatertoatleast1-2˝
(25-51 mm) above the highest air hole.
•Donotimmersethecontrolpanelbyoverllingthebathtub.
•When cleaning your bathtub, do not use abrasive substances which will damage the bathtub’s
surface.
•Topreventdiscolorationoftheacrylicnish,donotllthebathtubwithwaterinexcessof
140°F (60°C).

Soaker™ Bath Series
Page 6 www.jacuzzi.com Installation and Operation
English
Inspection and Testing
Visual Inspection
1 Remove the bathtub from the shipping carton. Be careful not to scratch the surface of the bathtub on exposed
staples. Remove the staples or fold them into the carton. Retain the carton until satisfactory inspection of the
product has been made. Do not lift the bathtub by the plumbing at any time; handle by the shell only.
2 Inspecttheshellandbathtubcomponents.Shouldinspectionrevealanydamageordefectinthenishorvisible
damagetoanycomponents,donotinstallthebathtub.Damageordefecttothenishclaimedafterthebathtub
is installed is excluded from the warranty. Jacuzzi Luxury Bath’s responsibility for shipping damage ceases upon
delivery of the products in good order to the carrier.
3 Referanyclaimsfordamagetothecarrier.Fordenitionsofwarrantycoverageandlimitations,refertothe
published warranty information packed with the product or in the back of this manual.
Installation
Atechnicalspecicationsmanualhasbeenincludedwithyourbathtub.TheTechnicalSpecicationsManualwill
containpertinentinformationregardingyourJacuzziLuxuryBathproduct.LocatetheTechnicalSpecicationsManual
at this time.
Figure 1 - Common Access Location
Framing
•Dimensions provided on rough-in diagrams are nominal.
Measure your actual unit upon receipt and build
according to the actual dimensions.
•Theoorstructurebeneaththebathtubmustbeableto
support the total weight of the bathtub, water and bather.
PleaserefertotheTechnicalSpecicationsManual
(column marked ‘Total Weight/ Floor Loading’).
•The unit must be supported from the bottom of the
bathtub and not from the bathtub rim. For drop-in
installations, take into account the thickness of the
surroundmaterialandnishingmaterial(marble,tile,
etc.).
•Ensure the rim will rest on a level surface.
•Per code, access must be provided to the chromatherapy
control panel box (if equipped). Service access
locations are shown in the rough-in diagrams contained
intheTechnicalSpecicationsManual(Figure1).
It is the responsibility of the installer, building
contractor, or owner to provide access for service.
Jacuzzi is not responsible for any costs relating to
obtaining access for repair. The owner shall bear such
costs and, if appropriate, must seek recovery from the
installer.
Frame out the space where the bathtub is to be located. The
following should be taken into consideration when preparing
the area:
OVERFLOW
F
CHROMATHERAPY
LIGHT LOCATIONS

Soaker™ Bath Series
Installation and Operation www.jacuzzi.com Page 7
English
Suboor
Preparethesuboorforthedrainandensurethattheareaislevel.
1 Thedrain/overowofthebathtubextendsbelowthebottomofthebathtub.IdentifythedrawingintheTechnical
SpecicationsManualthatcorrespondswithyourbathtub.
2 Makeappropriatecutstothesuboortoaccommodatethedrain.
3 Jacuzzi’sTru-Level™baseisastandardfeatureonallbathtubs.Ifthesuboorislevelandacontinuoussurface,
no other preparation is necessary. Proceed to the “Installation” section.
4 Ifthesuboorisnotlevel,youmustleveltheentiresurfacepriortoinstallingthebathtub.Thematerialsused
will insure that the bathtub is supported from the bottom. These materials include: leveling compound, mortar,
plaster or minimal expansion structural foam (having a density of a minimum 5lbs/cubic foot). The bathtub must
remain level in order for it to drain properly and must make contact with the leveling material. Both sides of a joint
orspliceofsuboorshouldbeleveltoeachother.
Electrical Connections (Soakers with Chromatherapy Only)
Risk of electric shock. Connect only to a circuit
protected by a GFCI.
When using electrical products, basic precautions
should always be followed:
•Always follow local building and electrical codes.
•For soakers with chromatherapy, grounding is
required. The unit should be installed and
groundedbyaqualiedelectrician.
A 120V, 15A, GFCI protected circuit is required. Install a
duplex outlet to the wall stud underneath the bathtub, at
least4˝(101mm)abovetheoor.Theduplexoutletisnot
supplied.
Reset
Test
Chromatherapy Light Installation
Your bathtub comes with two lights, cables, and control
box (pre-installed). The control panel requires installation
in a location selected by the installer.
1 Plan the location of the control panel. A possible
congurationisshownatright(Figure2).
The panel cannot be immersed in the bathtub
water.Selectalocationatleast1˝abovethelevel
oftheoverowdrain.
Thecontrolpanelmustbeinstalledonaatsurface
atleast3˝widex2˝tall.Youmaymountonanyat
surface on the bathtub shell, bathtub surround or
on the adjacent wall.
The control cable has a length of 10’. If you plan to
remote-mount the control panel (not on the bathtub
deck), the control panel cannot be located more
than 10’ from the control box.
Figure 2 - Possible Conguration
Chromatherapy
Lights Control Panel

Soaker™ Bath Series
Page 8 www.jacuzzi.com Installation and Operation
English
2 Place masking tape over the entire area of the
proposed hole to prevent chipping.
If you are installing the control panel on the acrylic
surface of the bathtub, the holes must be drilled from
the inside (glossy side) of the bathtub.
3 Mark the center line of the two-hole pattern
(Figure3).Itiscriticalthatthe˝diameternotch
hole be located correctly or the control panel will not
be centered and straight.
4 Usea˝drillbitanddrilloutthenotch(Figure4).
5 Usea˝drillbitanddrillapilotholeforthe1˝
diameter hole.
6 Use a 1 16
1
/
˝holesawtocompletetheholeforthe
control panel.
7 Sparingly, apply a bead of clear silicone to the back
surface of the control panel, just inside the perimeter.
8 Insertthecontrolpanelintotheholeandpressrmly
into place.
Do not allow the silicone to enter the plug housing
on the back of the control panel; this could result in
damage to the equipment.
9 Allow the silicone to fully cure according to the
manufacturer’s instructions.
10 Attach the control cable from the control box
(Figure 5).
Rim of Bathtub
Light Hole
4˝(minimum)
OverowDrain
1˝
Control Panel
Hole
Water Line
Figure 3 - Hole Pattern
32
5
/
32
5
/
32
5
/
32
5
/
16
1
/
16
1
/
Figure 5 - Control Cable Attachment
Control Cable
Control Panel
Figure 4 - Hole Sizes
1˝
˝
½˝

Soaker™ Bath Series
Installation and Operation www.jacuzzi.com Page 9
English
OverowFitting
Apply sealant/caulking
(commercially available)
Flat Rubber
Washer
Lock Nut
DirectWasteOverowDrain
Assemble in accordance with the local plumbing or
building codes.
1 Identifydrainoverowkitprovidedwithyour
bathtub.Removeandopentheoverowpackage
andconrmthatallpartsarepresent.
2 Removewashersandnutsfromtheoverowtting.
3 Place a small bead of plumbers putty, silicone, or
similar approved sealant around the underside of
thetopangeoftheoverowtting.
4 Placetheoverowttingintotheoverowholeof
the bathtub (Figure 6).
5 From the underside of the unit, place the rubber
washerthenlocknutontheoverowttingand
tighten securely. Be careful not to overtighten.
6 Assemble the remaining drain pieces as shown in
the illustration.
7 After the drain is fully installed, test for proper
drainage. If the unit does not drain properly, rectify
this condition before proceeding with further
bathtub installation.
Watertightinstallationofthedrainandoverow
is the installer’s responsibility. Drain leakage is
excluded from the Jacuzzi Luxury Bath warranty of
this product
PVC Flex Pipe
PVC Tee
PVC Pipe
DirectWasteOverow
Drain
Overow
Drain
Assembly
Twist and
Turn Drain
Assembly
Waste Seal Gasket
Waste Elbow
PVC Pipe
Fuzion™ Specic Material
Fuzion™ Overow Drain Installation
Figure 6 - Overow Installation
The additional design features of the Fuzion™ require that the following steps be completed prior to installing the
bathtubintheconstructedsurround.Thefollowingstepsmustalsobecompletedintheorderspecied:
•Fuzion™Overow/DrainInstallation
•Fuzion™ Wood Frame Installation
You will not use all pieces provided.
OPTIONAL - If the Fuzion™ Wood Frame is not being used, please proceed to Step 2 in the Undermount Installation section.
Fuzion™ Faucet Installation
Selecting a faucet for rim mounting: The combined thickness at the rim of the bathtub shell and optional
wooddeckis2˝(50mm)nominal.Thelengthofthefaucettailpiece(s)mustbelongenoughtoextendpast
this dimension and have ample clearance to assemble any hardware (i.e. locknut, water supply fittings, etc.)
necessaryforinstallation.Forundermountunits,thecombinedthicknessofthebathtubshellis½˝(12mm)
nominal and the undermount deck should not exceed the length of the faucet tailpiece(s), including any
assembly hardware.

Soaker™ Bath Series
Page 10 www.jacuzzi.com Installation and Operation
English
Flashing
Exploded View
1˝x4˝
(25mm x 101mm)
Not For Support
Mortar or
Adhesive
Suboor
Sealant
Tile
Complete the bathtub surround installation (Figure 7).
1 Installdrain/overowaccordingtothe
manufacturer’s instructions. Refer also to the
TechnicalSpecicationsManual.
Watertight installation of the drain is the installer’s
responsibility. Drain leakage is excluded from the
Jacuzzi Luxury Bath warranty of this product.
2 Install the faucet at this time. It is recommended
thatthefaucetbeinstalledbyaqualiedplumber.
Proper installation of the spout plumbing and
compliance with local codes are the responsibility of
the installer. Jacuzzi Luxury Bath does not warrant
connectionsofwatersupplyttingsandpiping,
llsystems,ordrain/overowsystems.Norisit
responsible for damage to the bathtub which may
occur during installation.
Anon-ammableprotectivebarriermustbeplaced
between the soldering work and the bathtub unit to
prevent damage to the bathtub.
3 Prepare the cut-out hole for the bathtub using
either the provided full scale template or the cutout
dimensionslistedintheTechnicalSpecications
Manual.
The template may show guides for more than one
bathtub, be certain to select the appropriate guide
lines. If undermounting is an option, be careful to
select the guide lines that apply to the installation
that you are performing.
4 Completealldecknishworkandcovertoprotect
from damaging while placing the bathtub.
5 Insulation may be placed within the bathtub
surround.
6 Turn off the power supply to the GFCI protected
circuit.
7 Place a piece of scrap lumber on each of the ends
of the cutout – this will be used as a temporary
support prior to lowering the bathtub fully into the
opening (Figure 8).
Tile or Finished
Surface
Substrate
Scrap Lumber
Support
Member FlatSuboor
Scrap Lumber
Minimum3˝
(76mm)
Clearance
Figure 7 - Surround Installation
Figure 8 - Drop-In Installation
Before you begin your installation, please read the following:
Drop-in Installation
•Observe all local and building codes.
•Determine which tools will be used during the installation.
•Additional bathtub drain parts and plumbing are commercially available at plumbing and hardware stores.
•Drain/Overowrough-ininformationisincludedwithyourbathtubintheTechnicalSpecicationsManual
Fuzion™ Frame Installation
If you are installing a Fuzion™ bathtub, please
refer to the Fuzion™ Frame Installation Guide
(#GL44000) before proceeding any further. Complete
the installation and assembly steps according to the
Fuzion™ Frame Installation Guide.
Fuzion™ Frame

Soaker™ Bath Series
Installation and Operation www.jacuzzi.com Page 11
English
Drop-in Installation (con’t)
Figure 11 - Support
Figure 10 - Support
Figure 9 - Drop-In (side view)
8 Inspectallttings,plumbing,andcontrol
lines after inserting the bathtub to insure the
components are not damaged, disconnected, or
contactingthenishsurfacesubstrateorsupport
members (Figure 9).
9 Connectexwatersupplylinestofaucetandplug
power cords into GFCI outlet.
10 Remove scrap lumber and lower the bathtub fully
into the opening (Figures 10 and 11).
The bathtub must be fully supported from the
bottom.Thebathtubmustrestonthesuboor,or
be in contact with the leveling material.
11 Align the bathtub and connect the drain.
12 Turn on the power supply to the dedicated GFCI
protected circuits and check system operation.
13 Caulk around the perimeter of bathtub to seal the
spacebetweentherimandthenisheddeck.
LevelSuboor
LevelSuboor
Scrap Lumber
Minimum2˝
(50mm) Max
Thickness
Tile or
Finished
Surface
Member
Support
Substrate
Uneven
Suboor
Floating
Floor
Compound
3-Wall Alcove Installation
1 Installthedrain/overowaccordingtothe
manufacturer’s instructions. Refer also to the
TechnicalSpecicationsManual.
Watertight installation of the drain is the installer’s
responsibility. Drain leakage is excluded from the
Jacuzzi Luxury Bath warranty of this product.
2 Install the faucet at this time. It is recommended that
thefaucetbeinstalledbyaqualiedplumber.
3 Installtheange(purchasedseparately)according
to the instructions that are included with the kit. If the
bathtubisequippedwithanintegratedange,skipthis
step.
4 Placethebathtubintotheniche.Screwtheangeto
the wood stud. It may be necessary to shim the unit
to close up any gaps between the wood stud and the
ange(Figure12).
5 Insulation may be placed within the bathtub surround.
6 Turn off the power supply to the GFCI protected
circuit.
7 Align the bathtub and connect the drain.
8 Connectexwatersupplylinestofaucetandplug
power cords into GFCI outlet.
9 Inspectallttings,plumbing,andcontrollinesafter
inserting the bathtub to insure the components are
notdamaged,disconnected,orcontactingthenish
surface substrate or support members.
10 Turn on the power supply to the dedicated GFCI
protected circuits and check system operation.
11 Completeallnishworkaroundtheperimeterof
bathtub to seal the space between the rim and the
nisheddeck
(Figure 13).
Screw Tile Flange
Tile
Cement Board
Caulking
Stud Wall
Tile Adhesive
Stud
Mounting
Screw
1˝x4˝
(not for
support)
Tile Flange
Figure 13 - Finishing
Silicon/Sealant
Bath Rim
Plastic Filler
Cement Board
Mortar
Stud Wall
1˝x4˝(notfor
support)
Finishing
Material
Figure 12 - Support

Soaker™ Bath Series
Page 12 www.jacuzzi.com Installation and Operation
English
Undermount Installation
1 Installdrain/overowaccordingto the manufacturer’s
instructions.
Watertight installation of the drain is the installer’s
responsibility. Drain leakage is excluded from the Jacuzzi
Luxury Bath warranty of this product.
2 Turn off power supply to dedicated GFCI protected
circuit.
3 Inspectallttings,plumbing,andcontrollinesafter
inserting to insure the components are not damaged or
disconnected.
4 Align the bathtub and connect the drain.
5 Insulation may be placed within the bathtub surround.
6 Cutdeck/countertotusingtheundermounttemplate
provided as follows:
•Position the template so that the desired undermount
guidelines are aligned with the rim edge as shown
(Figure 15).
•Using a grease pencil, mark the center lines (denoted
by on template). Remove template.
•Measurethedistancefromthewall,orotherxedpoint
to the center lines (Figure 16).
7 Afxcountertobathtub.Cleananydirtordebrisfromthe
top of the bathtub rim. Apply a bead of silicone sealant
around the entire rim of bathtub.
8 Apply a continuous bed of silicone sealant around
the entire seam between the counter and the bathtub
rim. Allow sealant to cure according to manufacturer’s
instructions.
Template
Bathtub Rim
Figure 15 - Template Placement
AB
C
D
TemplateCounter
Figure 16 - Distance Measurement
Skirt Installation
Bathtubs with an Integral Skirt
Finishing
Materials
Caulking Bead
Skirt Panel
Figure 14 - Skirt Installation
If you are installing a integral skirt, please refer to the Skirt
Installation Guide before proceeding any further. Complete
the installation and assembly steps according to the Skirt
Installation Guide.
Bathtubs with Optional Skirt
Mounting
Screws (as
viewed from
inside the
enclosure)
1 Screwskirtangesintowallstuds.
It may be necessary to shim the unit to close any
gapsbetweenwallstudsandtheanges.
2 Completenishworkoverskirtange.
3 Caulk around the perimeter of the skirt to seal the
spacebetweentheskirtandthenisheddeck.
Do not use an adhesive or adhesive sealant to secure the counter to the bathtub. If maintenance or remodeling
is required, the counter may have to be removed. Adhesive will permanently bond the counter to the bathtub.
Carefully position the deck/counter over the bathtub. Follow manufacturer’s instructions to determine cure time.
9 Turn on the power supply to the dedicated GFCI protected circuit and check system operation.

Soaker™ Bath Series
Installation and Operation www.jacuzzi.com Page 13
English
Cleanup
To avoid dulling and scratching the surface of the bathtub, never use abrasive cleaners. For most soiled surfaces, a
mildliquiddetergentandwarmwaterissufcient.Thefollowingisalsorecommended:
•Remove spilled plaster with a wood or plastic edge. Spots left by plaster or grout can be removed if lightly rubbed
with detergent on a damp cloth or sponge. Do not use metal scrapers, wire brushes or other metal tools, as they
will damage the bathtub’s surface.
•Paint,tar,orotherdifcultstainscanberemovedwithFantastik®orsoapywater.
•Minorscratcheswhichdonotpenetratethecolornishcanberemovedbylightlysandingwith600-gritwet/dry
sandpaper.Youcanrestoretheglossynishtotheacrylicsurfaceofthebathtubwithaspecialcompound,
Meguiar’s #10 Mirror Glaze. If that is not available, use automotive rubbing compound followed by an application
of automotive paste wax.
•Majorscratchesandgougeswhichpenetratetheacrylicsurfacewillrequirerenishing.CallJacuzziLuxuryBath
tondaserviceagentinyourarea.
Chromatherapy (Light) Operation
Press light button 1st time:
Turns colored lighting ON, use up and down buttons to start
color scroll or select alternate color.
Press light button 2nd time:
Turns white lighting ON, use up and down buttons to select
intensity of white light.
Press light button 3rd time:
Turns all lighting OFF
Colored Lighting Operation
The colored lighting default is constant blue. Pressing the (UP) arrow button activates color scroll in this order: blue,
teal, green, yellow, orange, red, pink, purple and then returns to blue and continuously repeats. To stop on a selected
color, press the (UP) arrow button again. Pressing the (DOWN) arrow button activates color scroll in this order: blue,
purple, pink, red, orange, yellow, green, teal and then returns to blue and continuously repeats. To stop on a selected
color, press the (DOWN) arrow button again.
White Lighting Operation
Therearevewhitelightintensities.Pressthe(+)buttontoincreaselightintensity.Pressthe(-)buttontodecrease
light intensity. If chromatherapy fails to work:
- reset the GFCI
- ensure the plug is fully in the outlet
- ensure the connectors to the control panel and control box are fully engaged in receptacles
- contact Jacuzzi Luxury Bath if the above does not resolve the issue
Operation
AllbathtubsmanufacturedbyJacuzziLuxuryBatharedesignedfor“llanddrain,”whichmeansthebathtubshouldbe
drainedaftereachuseandlledwithfreshwaterbythenextbather.Thisisahealthprecaution,asthesebathtubsare
not designed to hold water continuously like pools or spas.
‘UP’ Arrow ‘DOWN’ ArrowLight
Maintenance
Cleaning the Bathtub
Surface Repair
To clean your bathtub, simply use a mild, nonabrasive liquid detergent solution. You can protect and restore the gloss
toadulledacrylicsurfacebyapplyingMeguiar’s#10MirrorGlaze,aproductspecicallydesignedforuseonacrylic
nishes.IfMeguiar’sisnotavailable,useanegradeautomotiverubbingcompoundfollowedbyanapplicationof
automotive paste wax.
Never use abrasive household cleaners on any Jacuzzi Luxury Bath product.
Minorscratcheswhichdonotpenetratethecolornishcanberemovedbylightlysandingwith600-gritwet/dry
sandpaper. Restore the gloss using Meguiar’s Mirror Glaze or automotive paste wax. Major scratches and gouges
whichpenetratetheacrylicsurfacewillrequirerenishing.CallJacuzziLuxuryBathtondaserviceagentinyourarea.

Soaker™ Bath Series
Page 14 www.jacuzzi.com Installation and Operation
English
PRODUCT SPECIFICATIONS ARE SUBJECT TO CHANGE WITHOUT NOTICE.
USE TECHNICAL SPECIFICATIONS MANUAL SUPPLIED WITH PRODUCT.
Jacuzzi® Luxury Bath has obtained applicable code (standards) listings generally available on a national basis for products of this
type.Itistheresponsibilityoftheinstaller/ownertodeterminespeciclocalcodecompliancepriortoinstallationoftheproduct.
Jacuzzi® Luxury Bath makes no representation or warranty regarding, and will not be responsible for any code compliance.
Jacuzzi® Luxury Bath
14525 Monte Vista Avenue
Chino, California, 91710
1-800-288-4002
www.jacuzzi.com
Authorized Service
If you need a referral for a service company near you, or need assistance with operation or maintenance-related
questions, please call our Service Support Department at 1-800-288-4002. Visit our web site at
http://www.jacuzzi.com/ for products, services, and an online copy of these Installation and Operation Instructions.
When requesting service or technical assistance please have available both the model and serial number of your
unit. This information can be obtained from the product registration card provided with your unit. If the card has been
misplaced,thisinformationcanbeobtainedfromthespecication/serialnumberlabelontheunititself.Thelabelis
located on the wall of the bath near the blower motor.
SPECIFICATION/SERIAL NUMBER LABEL
MODEL: XXXXXXX
NAME: XXXXX
COLOR: XXXXX
MFG#: XXXXX
SER#: XXXXXX
Appropriate Safety Compliance Logos for your unit.
ApplicableElectricalSpecicationsforyourunit.
Electricalspecicationsprintedinthisarea.
Made in the USA
XXXX-XXXXX
Core Number,
Serial Number
Youwillndyourserial
number here

Soaker™ Bath Series
Installation and Operation www.jacuzzi.com Page 15
English
Warranty
WARRANTY COVERAGE
Jacuzzi Luxury Bath (the “Company”) offers the following expressed limited lifetime warranty to the original purchaser of any Jacuzzi® Luxury Bath products provided
in the Company’s Comfort, Comfort Plus, Pure Air®, Pure Air® II, and Luxury™ collections ("Bath") who purchases the Bath for personal or single family residential use
(“User”): The Company will repair or replace, at its sole option, the Bath or its equipment in accordance with the following terms and conditions. This warranty does not
apply to non-branded Bath products manufactured by the Company.
LIFETIME WARRANTY ON BATHS
TheCompanyextendstotheUseroftheBathanon-transferablelimitedlifetimewarrantythattheshellwillmaintainitsstructuralintegrityandcongurationandbefree
of water loss due to a defect in the bathtub shell. This warranty covers only the bathtub shell and the manufacturer installed pump, jets, controls, and blower against
defects in material or workmanship. This warranty does not apply to any display models or to any options or accessories which are covered under our limited ninety (90)
day warranty set forth below. Warranty coverage begins on the date the unit was originally purchased by the User and upon receipt by the Company of a completely
lledoutWarrantyRegistrationCardasdescribedbelow.
2 YEAR LABOR WARRANTY FOR ALL FACTORY INSTALLED COMPONENTS
Our limited labor warranty is for a period of two (2) years from the date the unit was originally purchased by the User, but not more than Three (3) Years from date of
manufacture. All factory installed components (e.g., pump, motor, blower, and plumbing) are covered under our labor warranty against failure due to defects in materials
and workmanship.
NINETY DAY (PARTS ONLY) LIMITED WARRANTY ON OPTIONS AND ACCESSORIES
Ourlimitedwarrantyonoptionsandaccessoriesisforninety(90)daysforpartsonly.Ourwarrantycoversoptionsandaccessoriesmanufactured(e.g.,drainsllspout
kits,trimkits,skirts,videomonitors,LCDatpanelscreens,CDandMP3playersandothermusicandvideodevicesandoptionalheaters)againstdefectsinmaterial
or workmanship. Warranty coverage begins on the date the option or accessory was originally purchased by the User. These items may be covered by a manufacturer's
warrantywhichmayhavealongerdurationthanthislimitedwarranty.PleaseconrmwiththemanufacturerthedurationoftheappropriatewarrantyforOptionsand
Accessories.
WARRANTY LIMITATIONS
Our limited warranty does not cover defects, damage, or failure caused by the common carrier, installer, user, or other persons, pets, or rodents, or resulting from,
withoutlimitation,anyofthefollowing:carelesshandling(liftingunitbyplumbing,abradingnish,etc.)includingitsownnegligence;modicationofanytypeforany
reason(includingmodicationtomeetlocalcodes);improperinstallation(includinginstallationnotinaccordancewithinstructionsandspecicationsprovidedwith
theunit);connectionssuppliedbytheinstalleroftheequipment;impropervoltagesupplyorunauthorizedelectricalmodication;misuse;incorrectoperation,orlack
ofproperroutinemaintenance;operationoftheunitwithoutspeciedminimumamountofwateroratinappropriatewatertemperature;useofabrasiveorimproper
cleaners;oractsofGod,suchaslightning,oods,earthquakes,etc.
In addition, THE COMPANY WILL NOT BE RESPONSIBLE FOR INCIDENTAL OR CONSEQUENTIAL DAMAGES or losses arising from any cause (e.g., water
damage to carpet, ceiling, tiles, marble, loss of use, etc.) including its own negligence; damages to, respecting, or resulting from: plated parts when pool and/or
spa chemicals are used in the unit or hard water conditions; optional bathtub equipment not manufactured by the Company but supplied by Dealer, installer or the
Company; the unit's prior usage as an operational display; or defects that should have been discovered before installation.
This limited warranty does not include: labor, transportation, or other costs incurred in the removal and/or reinstallation of the original unit and/or installation of a
replacementunit;anycostsrelatingtoobtainingaccessforrepair;orlossofusedamage,includinglossofsales,protorbusinessadvantageofanykindunderany
circumstances.Bathtubunitsareexcludedfromanywarrantycoverageifanyaddition,deletion,ormodicationofanykindwhatsoeverhasbeenmadetotheunit(orto
any component). Warranty coverage is provided in the United States of America and Canada only.
EXCLUSION OF IMPLIED WARRANTIES
IMPLIED WARRANTIES OF MERCHANTABILITY AND FITNESS FOR A PARTICULAR PURPOSE ARE DISCLAIMED ALTOGETHER OR TO THE FULLEST EXTENT
ALLOWED BY LAW.
NOTICE:Thiswarrantygivesyouspeciclegalrights,andyoumayalsohaveotherrightswhichvaryfromstatetostate.TherearenowarrantiesapplicabletoJacuzzi
Luxury Bath products except as expressly stated herein or as implied by applicable state and federal laws. The Company will not be responsible for any statements or
representationsmadeinanyformthatgobeyond,arebroaderthanorareinconsistentwithanyauthorizedliteratureorspecicationsfurnishedbytheCompany.Some
states do not allow limitations on how long an implied warranty lasts, or the exclusion or limitation of incidental or consequential damages, so the above limitations and
exclusions may not apply to you.
Jacuzzi® Luxury Bath
14525 Monte Vista Avenue
Chino, California 91710
Limited Lifetime Warranty on Jacuzzi Luxury Branded Bathtubs for the Comfort, Comfort
Plus, Pure Air®, Luxury, Salon™ Spa, and Pure Air® II Collections
Luxury Bath by Jacuzzi®
HD87000

Soaker™ Bath Series
Page 16 www.jacuzzi.com Installation and Operation
English
WARRANTY
REGISTRATION CARD
HD87000
Tocompleteyourregistration,visitourwebsiteatwww.jacuzzi.comorllout
and mail this card to the address printed on the other side within thirty (30)
days from date of purchase in order for this warranty to be come effective.
Purchaser's Name __________________________________________
Purchaser's Address ________________________________________
City _____________________________ State ______Zip _________
Date of Purchase ___________________________________________
Model Name ______________________________________________
Serial Number _____________________________________________
Dealer's Name _____________________________________________
Dealer's Address ___________________________________________
1. HowdidyoursthearaboutthisJacuzzi®product?
( ) Advertisement ( ) Article in Magazine/Newspaper
( ) Visited Dealer/Plumbing Supplier ( ) Yellow Pages
( ) Builder/Plumber/Remodeler ( ) Decorator/Architect
( ) Visited Retailer/Home Center Store
( ) Word of Mouth . . . Friend/Relative/Acquaintance
( ) Other (Please Describe) _________________________________
2. Whorstgaveyouspecicinformationaboutthisproduct(specications,
prices,etc.)?
( ) Dealer/Plumbing Supplier ( ) Builder ( ) Remodeler
( ) Plumbing Contractor ( ) Retailer/Home Center Store
( ) Decorator/Architect ( ) Already Installed
3. Whatwasthemainreasonforpurchase?
( ) Styling ( ) Warranty Service ( ) Product Features
( ) Brand Name ( ) Price ( ) Hydrotherapy
( ) Home Resale _________________________________________
( ) Other _______________________________________________
4. Whonallydecidedwhichproductyouwouldbuy?
( ) Self ( ) Spouse ( ) Self and Spouse Together
( ) Other Family Member ( ) Designer/Architect
( ) Builder/Plumber/Remodeler ( ) Already Installed
5. Whoinstalled?()Alreadyinstalled/NewHome
( ) Contractor/Plumber when remodeling
( ) Self/Spouse when remodeling
( ) Other _______________________________________________
6. Whatisthecurrentmarketvalueofthisproperty?
Please estimate $________________________________________
7. Whatistheageoftheheadofthehousehold? _____________ Years
8. Whatothermanufacturersdidyouconsider?
()Eljer()Lasco()PricePster()AquaGlass
( ) Kohler ( ) American Standard ( ) Sterling
( ) Other (Specify) _______________________________________
9. Howlongdidyoushopbeforepurchasingunit?
( ) 1 day ( ) 2 months- 6 months
( ) 2-7 days ( ) 6 months- 1 year
( ) 1 week- 2 weeks ( ) 1 year- 2 years
()2weeks-4weeks ()+2years
( ) 1 month- 2 months
10.Approximatelyhowlonghaveyoulivedinthishome?____________
11. Please indicate, approximately, the total annual income of your house-
hold.
( ) Up to $24,999 ( ) $50,000 to $74,999
( ) $25,000 to $29,999 ( ) $75,000 to $99,999
( ) $30,000 to $39,999 ( ) $100,000 to $149,999
( ) $40,000 to $49,999 ( ) $150,000 and Above
12.Wasyourpurchaseprocess?
()Veryeasy()Easy()Difcult()VeryDifcult
13. How technically aware were you of the patented Jacuzzi® jet system
priortoyourpurchase?
( ) Not aware ( ) Somewhat aware ( ) Very aware
JACUZZI LUXURY BATH
Ninety-Day
Parts Only
Limited Warranty
On
Accessory(ies)
Ninety-Day
Parts Only
Limited Warranty
On
Accessory(ies)
RETURN OF WARRANTY REGISTRATION
To register your product, please go to our web-site Jacuzzi.com, click on Bath and Showers, then select ONLINE WARRANTY REGISTRATION from the top of the page.
You will then be prompted to enter your product Serial Number followed by your warranty registration information. Or you may also register by completing the registration
below and mailing it to Jacuzzi at the address provided below.
TheattachedWarrantyRegistrationMUSTbelledoutbythepurchaserwithinthirty(30)daysfrompurchaseandreceivedbyJacuzziLuxuryBathinorderforthis
warranty to become effective.
RESPONSIBILITIES OF OTHERS
Inspecting the unit prior to installation is the responsibility of the installer or building contractor who acts on behalf of the User. They are responsible for ensuring the unit
is free of defect or damage. Notices are placed on and in the unit and on the shipping carton advising the installer of this responsibility. In the event of a problem, the unit
must not be installed. The Company is not responsible for failures or damage that could have been discovered, repaired, or avoided by proper inspection and testing
(including proper water testing) prior to installation.
Damage occurring in transit is the responsibility of the carrier. The User or installer MUST open the crate and inspect the unit for damage when it is delivered. If damage is
discovered, it must be reported immediately to the seller and the carrier in writing, and an inspection requested. Failure of the carrier to respond should be reported to the
sellerandthecarrier.Yourfreightclaimsshouldbeledpromptlythereafter.
Damage occurring to the unit during installation is the responsibility of the installer and/or building contractor and damage occurring thereafter is the responsibility of the
user.
Failure of any optional equipment is the sole responsibility of the equipment manufacturer except as provided above and shall not extend to or apply to any replacement
parts for the Options and Accessories. Any replacement parts shall be covered by the original equipment manufacturer.
The Distributor or Dealer is responsible for knowing local code requirements and notifying the installing contractor and/or User of these requirements at the time of
purchase. The Company is not responsible for costs to modify any product to obtain any code approval, such as city, county, or state building codes in U.S.A. or municipal
or provincial codes in Canada.
WARRANTY SERVICE
Forthecustomer'sbenet,theCompanymaintainsalistofindependentservicepersonneltoperformrequiredwarrantyservicerepairs.Suchrmsarenotagentsor
representatives of the Company and cannot bind the Company by words or conduct.
The Company will provide the warranty service described above when the following conditions have been met: the failure is of the nature or type covered by the warranty;
the User has informed an Authorized Jacuzzi Luxury Bath Service Agent or Warranty Service Department Representative of the nature of the problem during the warranty
period; conclusive evidence (e.g., proof of purchase or installation) is provided to the foregoing by the user proving that the failure occurred or was discovered within the
warranty period; an authorized independent service person or Company representative has been permitted to inspect the unit during regular business hours within a
reasonable time after the problem was reported by the User. In order to obtain warranty service, contact Jacuzzi Luxury Bath at:
jacuzzi.com
or
Warranty Service Department
14525 Monte Vista Avenue
Chino, California 91710
Call: 1-(800) 288-4002
To obtain warranty replacement for factory-installed components for Company supplied options and accessories manufactured and supplied by the Company, call or write
the above. Provide a description of the problem and proof of purchase. You will be instructed how to obtain replacements and where to return, at your expense, the failed
component(s), option(s), or accessory(ies).
All replacement parts, equipment, and repairs shall assume the remaining warranty period of the part(s) replaced.
The Company's warranty obligation shall be discharged upon tender of replacement or repair. The customer's refusal to accept the tender terminates the Company's
warranty obligation.


Soaker™ Bath Series
Page 18 www.jacuzzi.com Installation and Operation
English
Instalación y Funcionamiento
Información del producto
Contenido
Conserve estas instrucciones para uso futuro. Utilice el formulario a continuación para registrar su
modelo y número de serie para referencia futura.
Fecha de la
compra
Comprado a
Instalado por
Número de serie
Modelo
Instalador: Deje el manual para el propietario.
Propietario: Lea este manual y consérvelo para referencia futura.
Contenido. ..................................................................................................................................................................... 18
Información del producto. .............................................................................................................................................. 18
Instrucciones de seguridad............................................................................................................................................ 19
Instrucciones de seguridad operacional. ....................................................................................................................... 20
Inspección y prueba. ..................................................................................................................................................... 21
Instalación. .................................................................................................................................................................... 21
Estructura. ..................................................................................................................................................................... 21
Conexiones eléctricas (Sólo modelos Soaker con cromoterapia). ................................................................................ 22
Instalación de luces para cromoterapia . ....................................................................................................................... 22
MaterialespecicodeFuzion™ .................................................................................................................................... 24
Unstalacion del drenaje de rebusadero Fuzion™ ......................................................................................................... 24
Instalación empotrada. .................................................................................................................................................. 25
Instalación en el hueco de 3 paredes (continuación). ................................................................................................... 26
Instalación del faldón. .................................................................................................................................................... 27
Instalación de montaje bajo cubierta. ............................................................................................................................ 28
Limpieza. ....................................................................................................................................................................... 28
Funcionamiento. ............................................................................................................................................................ 29
Mantenimiento. .............................................................................................................................................................. 29
Servicio técnico autorizado............................................................................................................................................ 30
Warranty. ....................................................................................................................................................................... 31

Soaker™ Bath Series
Installation and Operation www.jacuzzi.com Page 19
English
Instalación y Funcionamiento
Serie de bañeras Soaker™
Español
Instrucciones de seguridad
INSTRUCCIONES RELATIVAS A RIESGOS DE INCENDIO, DESCARGAS ELÉCTRICAS O LESIONES A PERSONAS.
ADVERTENCIA: RIESGO DE LESIONES ACCIDENTALES O AHOGAMIENTO.
No permita que los niños utilicen esta unidad a menos que sean supervisados atentamente en todo
momento. No utilice la bañera de hidromasaje a menos que todas las tapas protectoras de succión estén
instaladas para evitar que el cabello o partes del cuerpo queden atrapados. Nunca utilice la bañera de
hidromasaje si la tapa protectora de succión está rota, dañada o extraviada.
PELIGRO: RIESGO DE LESIONES GRAVES POR DESCARGA ELÉCTRICA O MUERTE POR
ELECTROCUCIÓN
Esta unidad se debe conectar solamente a un circuito de suministro que esté protegido por un interruptor
de circuito con detección de falla a tierra (GFCI, por su sigla en inglés) de 15 A. Dicho GFCI debe ser
uministrado por el instalador y debe ser puesto a prueba habitualmente. Para probar el GFCI, pulse el
botón de prueba. El GFCI debería interrumpir la alimentación. Pulse el botón de restablecimiento. La
alimentación debería restablecerse. Si el GFCI no funciona de esta manera, el GFCI está defectuoso. Si
elGFCIinterrumpelaalimentaciónhacialabañerasinquesepulseelbotóndeprueba,unujode
corriente de retorno por tierra está indicando la posibilidad de una descarga eléctrica. No utilice esta
bañera de hidromasaje. Desconecte la bañera de hidromasaje y haga corregir el problema por un
representantecalicadodelserviciotécnicoantesdeusarla.
ADVERTENCIA: RIESGO DE DESCARGA ELÉCTRICA
Realice la conexión solamente a un circuito protegido por un interruptor de circuito con detección de falla
a tierra (GFCI). (Para unidades conectadas permanentemente) Hay un terminal de color verde (o un
conector de cable) marcado como “G”, “GR”, “GROUND” o “GROUNDING” dentro del compartimiento
del terminal. Para reducir el riesgo de descarga eléctrica, conecte el terminal o el conector al terminal a
tierra de su servicio eléctrico o panel de alimentación con un conductor de igual tamaño a los conductores
del circuito que alimentan el equipo.
PRECAUCIÓN: Este equipo está previsto para uso en interiores solamente. Instale el equipo conforme a estas instrucciones.
Utilice los cables de alimentación adecuados para 167 °F (75 °C), incluido el índice de temperatura de los
conductores de alimentación que se van a utilizar. Esta unidad debe conectarse eléctricamente a tierra,
y debe instalarla un contratista, electricista o fontanero matriculado. Los materiales de construcción y
el cableado deben direccionarse lejos del motor/bomba o del generador de burbujas de aire, o de otros
componentes de producción de calor de esta unidad. En el exterior del motor/bomba y del calentador, se
proporciona un conector de cable de presión para facilitar la conexión de un conductor de unión de cobre
sólido N.º 8 AWG entre esta unidad y todos los otros equipos eléctricos y los metales expuestos próximos,
según sea necesario para cumplir con los requerimientos locales.
Cuando utilice este equipo eléctrico, siempre debe tomar las precauciones de seguridad básicas, que incluyen las siguientes:
1. ADVERTENCIA: RIESGO DE LESIONES ACCIDENTALES O AHOGAMIENTO. LOS NIÑOS NO DEBEN UTILIZAR
BAÑERAS DE HIDROMASAJE SIN LA SUPERVISIÓN DE UN ADULTO. BAÑERA DE HIDROMASAJE CON
CALENTADOR.
2. ADVERTENCIA: RIESGO DE LESIONES ACCIDENTALES O AHOGAMIENTO. NO UTILICE LA BAÑERA DE
HIDROMASAJE A MENOS QUE TODAS LAS TAPAS PROTECTORAS DE SUCCIÓN ESTÉN INSTALADAS PARA
EVITAR QUE EL CABELLO O PARTES DEL CUERPO QUEDEN
ATRAPADOS.
3 ADVERTENCIA: PARA EVITAR LESIONES, TENGA CUIDADO AL ENTRAR O SALIR DE LA BAÑERA DE
HIDROMASAJE.
4. ADVERTENCIA: RIESGO DE LESIONES ACCIDENTALES O AHOGAMIENTO. NO UTILICE DROGAS O ALCOHOL
ANTES O DURANTE LA UTILIZACIÓN DE UNA BAÑERA DE HIDROMASAJE CON CALENTADOR PARA EVITAR
LA PÉRDIDA DEL CONOCIMIENTO Y UN POSIBLE AHOGAMIENTO.
5. ADVERTENCIA: RIESGO DE LESIÓN FETAL. LAS MUJERES EMBARAZADAS O CON POSIBILIDAD DE
EMBARAZO DEBEN CONSULTAR A UN MÉDICO ANTES DE UTILIZAR UNA BAÑERA DE HIDROMASAJE CON
CALENTADOR.
6. ADVERTENCIA: RIESGO DE HIPERTEMIA Y POSIBLE AHOGAMIENTO: NO UTILICE UNA BAÑERA DE
HIDROMASAJE CON CALENTADOR INMEDIATAMENTE DESPUÉS DE REALIZAR EJERCICIOS FÍSICOS
EXTENUANTES.
7. CONSERVE ESTAS INSTRUCCIONES.
PRECAUCIÓN: AL UTILIZAR ESTA UNIDAD, SIEMPRE DEBE TOMAR LAS PRECAUCIONES BÁSICAS, QUE
INCLUYEN LO SIGUIENTE:
•LEA Y SIGA TODAS LAS INSTRUCCIONES. CONSERVE ESTAS
INSTRUCCIONES.
•Utiliceestaunidadsóloparaelnparaelcualfuediseñada,segúnsedescribeeneste
manual. No utilice accesorios que no están recomendados por el fabricante.
•Nunca deje caer ni introduzca objetos en ninguna de las aberturas.
Éste es un producto de calidad profesional. Se requieren conocimientos de técnicas de construcción, fontanería e
instalación eléctrica conforme a los códigos para la instalación apropiada y la satisfacción del usuario. Recomendamos
que un contratista matriculado realice la instalación de todos los productos Jacuzzi® Luxury Bath. Nuestra garantía no
cubre problemas relacionados con instalaciones inadecuadas.
Instrucciones importantes de seguridad de la Asociación de Normas
Canadienses (sólo para modelos canadienses)

Soaker™ Bath Series
Page 20 www.jacuzzi.com Installation and Operation
English
Español
Instalación y Funcionamiento
Español
Instalación y Funcionamiento
Instrucciones de seguridad operacional
ADVERTENCIA: RIESGO DE HIPERTERMIA Y POSIBLE AHOGAMIENTO!
No utilice una bañera de hidromasaje con calentador inmediatamente después de
realizar ejercicios físicos extenuantes.
ADVERTENCIA: RIESGO DE DESCARGA ELÉCTRICA
ADVERTENCIA: LA INMERSIÓN PROLONGADA EN AGUA CALIENTE PUEDE CAUSAR
HIPERTERMIA
La hipertermia ocurre cuando la temperatura interna del cuerpo alcanza un nivel superior
a la temperatura corporal normal de 98,6 ºF (37 ºC). Los síntomas de la hipertermia
incluyen el aumento de la temperatura corporal interna, mareos, aletargamiento,
somnolencia y desvanecimiento. Los efectos de la hipertermia incluyen los siguientes:
A. Incapacidad para percibir el calor.
B. Incapacidad para reconocer la necesidad de salir de la bañera.
C. Desconocimiento de un peligro inminente.
D. Daño fetal en mujeres embarazadas.
E. Incapacidad física para salir de la bañera.
F. PÉRDIDA DEL CONOCIMIENTO CON PELIGRO DE AHOGAMIENTO.
ADVERTENCIA: RIESGO DE LESIÓN FETAL
LAS MUJERES EMBARAZADAS O CON POSIBILIDAD DE EMBARAZO DEBEN
CONSULTAR A UN MÉDICO ANTES DE UTILIZAR UNA BAÑERA DE HIDROMASAJE
CON CALENTADOR.
ADVERTENCIA: El uso de alcohol, drogas o medicamentos puede aumentar en gran medida el riesgo
de hipertermia fatal. Las personas que tomen medicamentos o tengan una historia clínica
desfavorable deben consultar a un médico antes de utilizar una bañera de hidromasaje
con calentador.
ADVERTENCIA: NO ALTERE LOS CONTROLES OPERADOS POR EL USUARIO NI LOS DISPOSITIVOS
SEMEJANTES.
ADVERTENCIA: UTILICE ESTA UNIDAD SÓLO PARA EL FIN PARA EL CUAL FUE DISEÑADA, SEGÚN
SE DESCRIBE EN ESTE MANUAL. NO UTILICE ACCESORIOS QUE NO ESTÁN
RECOMENDADOS POR LOS FABRICANTES.
ADVERTENCIA: PARA EVITAR LESIONES, TENGA CUIDADO AL ENTRAR Y AL SALIR DE LA BAÑERA
DE HIDROMASAJE.
ADVERTENCIA: No utilice la bañera de hidromasaje a menos que todas las tapas protectoras de succión
estén instaladas para evitar que el cabello o partes del cuerpo queden atrapados. Nunca
utilice la bañera de hidromasaje si la tapa protectora de succión está rota, dañada o
extraviada.
ADVERTENCIA: La temperatura del agua que excede los 104 ºF (40 ºC) puede resultar perjudicial para su
salud. Controle y regule la temperatura del agua antes de utilizar la bañera.
PRECAUCIÓN: Controle el interruptor de circuito con detección de falla a tierra que protege este
dispositivo de forma periódica conforme a las instrucciones del fabricante.
IMPORTANT: LEA LAS INSTRUCCIONES COMPLETAS PROPORCIONADAS EN ESTE MANUAL
ANTES DE COMENZAR LA INSTALACIÓN.
La empresa ha obtenido los listados de los códigos (normas) aplicables que suelen estar disponibles a nivel nacional
para productos de este tipo. Es responsabilidad del instalador o propietario determinar el cumplimiento de los códigos
localesespecícosantesdeinstalarelproducto.Laempresanorealizamanifestacionesniofrecegarantíascon
respectoalcumplimientodeningúncódigo,niseráresponsablededichocumplimiento.Lasespecicacionesdel
producto están sujetas a cambio sin previo aviso.
• No utilice electrodomésticos como secadores de pelo, lámparas, teléfonos, radios
o televisores dentro de un radio de 60 pulgadas (1524 mm) de esta bañera de
hidromasaje.
• No ponga en funcionamiento el sistema de hidromasaje a menos que la bañera
tenga un nivel de agua de, al menos, 1 a 2 pulgadas (de 25 a 51 mm) por encima
deloriciodeairemásalto.
• No sumerja el panel de control llenando en exceso la bañera.
• No utilice sustancias abrasivas para limpiar su bañera, ya que pueden dañar la
supercie.
• Para evitar la decoloración del acabado acrílico, no llene la bañera con agua a
más de 140 ºF (60 ºC).
Salón™ de Bañera de Hidromasaje
Serie de bañeras Soaker™

Soaker™ Bath Series
Installation and Operation www.jacuzzi.com Page 21
EnglishEspañol
Instalación y Funcionamiento
Serie de bañeras Soaker™
Español
Instalación y Funcionamiento
Español
Salón™ de Bañera de Hidromasaje
Serie de bañeras Soaker™
Inspección y prueba
Inspección visual
1 Retirelabañeradelacajadeenvío.Tengacuidadodenorayarlasuperciedelabañeraconlasgrapas
expuestas. Retire las grapas o pliéguelas hacia el interior de la caja. Conserve la caja hasta que la inspección
del producto haya sido satisfactoria. Nunca levante la bañera sujetándola por la fontanería; solo hágalo por el
armazón.
2 Inspeccione el armazón y los componentes de la bañera. En caso de que la inspección revele cualquier daño
o defecto en el acabado o daño visible en cualquiera de los componentes, no instale la bañera. Los daños o
defectos en el acabado reclamados después de la instalación de la bañera están excluidos de la garantía. La
responsabilidaddeJacuzziLuxuryBathpordañosduranteeltransportenalizacontraentregadelosproductos
en buen estado al transportista.
3 Presente sus reclamos por daños al transportista. Para conocer los términos de la cobertura y las limitaciones
de la garantía, consulte la información publicada sobre la garantía embalada con el producto o al dorso de este
manual.
Instalación
SehaincluidounManualdeespecicacionestécnicasconsubañera.ElManualdeespecicacionestécnicasincluirá
lainformaciónimportanterelacionadaasuproductoJacuzziLuxuryBath.HagausodelManualdeespecicaciones
técnicas en este momento.
Figura 1 - Ubicaciones comunes de accesos
Estructura
•Las dimensiones proporcionadas en los diagramas de
instalación son nominales. Tome las medidas de su
unidad al recibirla y construya conforme a las
dimensiones reales.
•La estructura del piso debajo de la bañera debe poder
soportar el peso total de la bañera, el agua y el
ocupante.
ConsulteelManualdeespecicacionestécnicas(la
columna marcada con “Peso total/Carga de piso”).
•La bañera debe estar apoyada sobre su base, no sobre
su borde. En el caso de instalaciones empotradas, tenga
en cuenta el espesor del material de recubrimiento y del
material de acabado (mármol, azulejo, etc.).
•Asegúresedequeelbordedescanseenunasupercie
nivelada.
•Por norma, se debe facilitar el acceso a la caja del
panel de control de cromoterapia (si es suministrado).
Las ubicaciones de acceso al servicio se muestran en
los diagramas de instalación incluidos en el Manual de
especicacionestécnicas(Figura1).
Es responsabilidad del instalador, el contratista de
obra o el propietario proporcionar el acceso al servicio.
Jacuzzi no se responsabiliza de ninguno de los costos
relacionados con la obtención de accesos para efectuar
reparaciones. El propietario debe soportar dichos
costos y, si es apropiado, debe solicitar el reintegro del
instalador.
Enmarque el espacio donde colocará la bañera. Al preparar
el área deberá tener en cuenta lo siguiente:
F
Rebosadero
Ubicación De Luces De
Cromoterapia

Soaker™ Bath Series
Page 22 www.jacuzzi.com Installation and Operation
English
Español
Instalación y Funcionamiento
Salón™ de Bañera de Hidromasaje
Serie de bañeras Soaker™
Salón™ de Bañera de Hidromasaje
Serie de bañeras Soaker™
Español
Contrapiso
Prepare el contrapiso para el drenaje y asegúrese de que el área esté nivelada.
1 Eldrenaje/rebosaderodelabañeraseextiendepordebajodelaparteinferiordeésta.Identiquelailustración
quecorrespondeasubañeraenelManualdeespecicacionestécnicas.
2 Realice los cortes adecuados en el contrapiso para ubicar el drenaje.
3 La base Tru-Level™ de Jacuzzi es una características estándar en todas las bañeras. Si el contrapiso
estániveladoytieneunasuperciecontinua,noesnecesariorealizarotrapreparación.Vayaalasección
“Instalación”.
4 Sielcontrapisonoestánivelado,debenivelartodalasupercieantesdeinstalarlabañera.Losmateriales
utilizados asegurarán que la bañera esté sostenida desde la parte inferior. Estos materiales incluyen: un
compuesto de nivelación, mortero, yeso o espuma estructural de mínima expansión (con una densidad de un
mínimo de 5 lb./pie cúbico). La bañera debe permanecer nivelada para que pueda drenar adecuadamente, y
debe hacer contacto con el material de nivelación. Ambos lados de la unión o el empalme del contrapiso deben
estar nivelados.
Conexiones eléctricas (Sólo modelos Soaker con cromoterapia)
Riesgo de descarga eléctrica. Realice la conexión
sólo a un circuito protegido por un GFCI.
Al utilizar productos eléctricos, siempre debe tomar
las siguientes precauciones básicas:
•Siempre siga los códigos para el sistema
eléctrico y de construcción locales.
•En el caso de las bañeras con cromoterapia, es
necesaria la conexión a tierra. La unidad debe
ser instalada y conectada a tierra por un
electricistacalicado.
Es necesario un circuito con protección GFCI de 120V,
15 A. Instale una toma doble en el travesaño por debajo
de la bañera a una distancia del piso de, al menos, 4
pulgadas (101 mm). No se incluye la toma doble.
Restablecer
Prueba
Instalación de luces para cromoterapia
La bañera viene con dos luces, cables y una caja de
control (preinstalada). El panel de control debe ser
instalado en el lugar que seleccione el instalador.
1 Planiquelaubicacióndelpaneldecontrol.Ala
derechasemuestraunaposibleconguración
(Figura 2).
El panel no puede estar sumergido en el agua de
la bañera. Seleccione una ubicación que esté al
menos 1 pulgada por encima del nivel de drenaje
del rebosadero.
El panel de control debe instalarse en una
supercieplanadealmenos3pulgadasdeancho
x 2 pulgadas de alto. Puede montarlo en cualquier
supercieplanasobreelarmazóndelabañera,
alrededor de ella o en la pared adyacente.
El cable de control tiene una extensión de 10’.
Si desea montar el panel de control de manera
remota (fuera de la plataforma de la bañera), no
podrá ubicarlo a más de 10’ de la caja de control.
Figura 2 -Posibleconguración
Luces para
cromoterapia Panel de control

Soaker™ Bath Series
Installation and Operation www.jacuzzi.com Page 23
English
Español
Instalación y Funcionamiento
Salón™ de Bañera de Hidromasaje
Serie de bañeras Soaker™
Salón™ de Bañera de Hidromasaje
Serie de bañeras Soaker™
2 Coloque cinta adhesiva protectora sobre toda la
superciedondeplanearealizareloricioyasí
evitará que se astille.
Siinstalaelpaneldecontrolsobrelasuperciede
acrílicodelabañera,sedebenrealizarlosoricios
desde el interior (lado brillante) de la bañera.
3 Marquelalíneacentraldelpatróndedosoricios
(Figura3).Esfundamentalqueeloricioconmuesca
de ” de diámetro esté ubicado correctamente o el
panel de control no estará centrado ni derecho.
4 Utilice una barrena de perforación de ” y perfore la
muesca (Figura 4).
5 Utilice una barrena de perforación de ” y haga un
oriciopilotoparaeloriciode1”dediámetro.
6 Utilice una sierra de perforación de 1 ” para
completareloricioparaelpaneldecontrol.
7 Con moderación, aplique una pequeña cantidad
desiliconatransparenteenlasupercietraseradel
panel de control, apenas dentro del perímetro.
8 Introduzcaelpaneldecontroleneloricioypresione
rmemente.
No permita que la silicona ingrese a la caja del
tomacorriente que se encuentra en la parte trasera
del panel de control; podría dañar el equipo.
9 Permita que la silicona se cure totalmente, de
acuerdo con las instrucciones del fabricante.
10 Ajuste el cable de control desde la caja de control
(Figura 5).
Borde de la
bañera
Oricioparaluz
4˝(mínimo)
Drenaje del
rebosadero
1˝
Oricioparael
panel de control
Tubería de agua
Figura 3 -Patróndeoricios
32
5
/
32
5
/
32
5
/
32
5
/
16
1
/
16
1
/
Figura 5 - Ajuste del cable de control
Cable de control
Panel de control
Figura 4 -Tamañosdeoricios
1˝
˝
½˝
16
1
/

Soaker™ Bath Series
Page 24 www.jacuzzi.com Installation and Operation
English
Español
Instalación y Funcionamiento
Salón™ de Bañera de Hidromasaje
Serie de bañeras Soaker™
Salón™ de Bañera de Hidromasaje
Serie de bañeras Soaker™
Accesorio de rebosadero
Aplique sellador o
masilla (comercialmente
disponible).
Arandela plana
de goma
Contratuerca
Drenaje de rebosadero de
descarga directa
Realice el montaje conforme a los códigos de
fontanería y de construcción .
1 Identiqueelequipodedrenajederebosadero
proporcionado con su bañera. Retire y abra
elconjuntodelrebosaderoyconrmequese
encuentren todas las partes.
2 Extraiga las arandelas y las tuercas del accesorio
de rebosadero.
3 Coloque una pequeña cantidad de masilla de
fontanería, silicona o un sellador similar autorizado
alrededor de la parte inferior del ala superior del
accesorio de rebosadero.
4 Coloque una pequeña cantidad de masilla de
fontanería, silicona o un sellador similar autorizado
alrededor de la parte inferior del ala superior del
accesorio de rebosadero (Figura 6).
5 Desde la parte inferior de la unidad, coloque la
arandela de goma, luego ajuste la contratuerca
en el accesorio de rebosadero y apriete para que
quede asegurado. Tenga cuidado de no apretar
demasiado.
6 Arme las piezas restantes de drenaje como se
muestra en la ilustración.
7 Luego de que el drenaje esté completamente
instalado, pruébelo para controlar que el
drenaje sea apropiado. Si la unidad no drena
adecuadamente, corrija esta condición antes de
continuar con la instalación de la bañera.
La instalación hermética del drenaje y el
rebosadero es responsabilidad del instalador. La
pérdida del drenaje no está incluida en la garantía
Jacuzzi Luxury Bath de este producto.
Tuboexiblede
PVC
Conector en
forma de T
de PVC
Tubo de PVC
Drenaje de rebosadero de
descarga directa
Montaje del
drenaje del
rebosadero
Montaje del
drenaje circular y
en espiral
Junta de sello de
descarga
Codo de descarga
Tubo de PVC
Material especíco de Fuzion™
Instalación del drenaje de rebosadero
Fuzion™
Figura 6 - Instalación del rebosadero
Las características de diseño adicionales de Fuzion™ requieren que se completen los siguientes pasos antes de
instalar la bañera en el recubrimiento construido. Los pasos siguientes además deben completarse en el orden
especicado:
•Instalación del rebosadero/drenaje Fuzion™
•Instalación del marco de madera Fuzion™
No utilizará todas las piezas proporcionadas.
OPCIONAL – Si el marco de madera Fuzion™ no se utiliza,
continúe con el Paso 2 en la sección de Instalación de montaje
bajo cubierta
Instalación del grifo Fuzion™
Selección de un grifo para el montaje en el borde de la bañera: El espesor combinado del borde del armazón
de la bañera y la plataforma opcional de madera es de 2” (50 mm) nominales. La longitud del/de los apéndice/s
delgrifodebeserlosucientementeextensaparasuperarestadimensiónytenerespaciosucientepara
ensamblar cualquier herraje (es decir, contratuerca, accesorios para el suministro de agua, etc.) necesario para
la instalación. Para las unidades de montaje bajo cubierta, el espesor combinado del armazón de la bañera es de
un valor nominal de ½” (12 mm), y la plataforma de montaje bajo cubierta no debe superar la longitud del/de los
apéndice/s del grifo, incluidos los herrajes para montaje.

Soaker™ Bath Series
Installation and Operation www.jacuzzi.com Page 25
English
Español
Instalación y Funcionamiento
Salón™ de Bañera de Hidromasaje
Serie de bañeras Soaker™
Salón™ de Bañera de Hidromasaje
Serie de bañeras Soaker™
Tapajuntas
Vista detallada
1˝x4˝(25mmx
101 mm)
No para el soporte
Mortero o
adhesivo
Contrapiso
Sellador
Azulejo
Finalice la instalación del recubrimiento de la bañera
(Figura 7).
1 Instale el drenaje/rebosadero conforme a las
instrucciones del fabricante. Consulte también el
Manualdeespecicacionestécnicas.
La instalación hermética del drenaje es
responsabilidad del instalador. La pérdida del
drenaje no está incluida en la garantía Jacuzzi
Luxury Bath de este producto.
2 Instale el grifo en este momento. Se recomienda
que el grifo sea instalado por un fontanero
calicado.
La instalación adecuada de las tuberías de
descarga y el cumplimiento de los códigos locales
son responsabilidad del instalador. Jacuzzi Luxury
Bath no garantiza las conexiones de las tuberías
y los accesorios para el suministro de agua, los
sistemas de llenado o los sistemas de drenaje/
rebosadero. Tampoco se responsabiliza de los
daños ocasionados a la bañera que puedan ocurrir
durante la instalación.
Se debe colocar una barrera protectora no
inamableentreeltrabajodesoldaduraylabañera
para evitar daños en la unidad.
3 Prepareeloriciodecorteparalabañera;utilice
la plantilla de tamaño natural proporcionada o las
dimensiones de corte indicadas en el Manual de
especicacionestécnicas.
Supercieterminada
o azulejo
Sustrato
Madera para
desecho
Componente de
soporte Contrapiso plano
Madera para
desecho
Espacio libre
mínimo de 3”
(76 mm)
Figura 7 - Instalación del recubrimiento
Figura 8 - Instalación empotrada
Antes de que comience con la instalación, lea lo siguiente:
Instalación empotrada
•Observe todos los códigos locales y de construcción.
•Denalasherramientasquevaautilizardurantelainstalación.
•Las piezas adicionales de drenaje de la bañera y fontanería están comercialmente disponibles en las tiendas
de instalaciones sanitarias y ferreterías.
•La información para la instalación del drenaje/rebosadero está incluida con su bañera en el Manual de
especicacionestécnicas
Instalación del marco Fuzion™
Si está instalando una bañera Fuzion™, consulte la
Guía de instalación del marco Fuzion™
(P/N GL44000) antes de continuar. Complete los
pasos de montaje e instalación conforme a la Guía de
instalación del marco Fuzion™. Marco Fuzion™
La plantilla puede mostrar las pautas para más de una bañera; asegúrese de seleccionar los lineamientos
apropiados. Si considera el montaje bajo cubierta como una opción, procure seleccionar los lineamientos que se
aplican a la instalación que está realizando.
4 Finalice todo el trabajo de acabado de la plataforma y la cubierta para evitar daños mientras coloca la bañera.
5 El aislamiento se puede colocar dentro del recubrimiento de la bañera.
6 Desconecte el suministro de energía hacia los circuitos protegidos con GFCI.
7 Coloque pedazos de madera para desecho en cada uno de los extremos del recorte; esto se utilizará como un
soporte temporal antes de bajar la bañera completamente en la abertura (Figura 8).

Soaker™ Bath Series
Page 26 www.jacuzzi.com Installation and Operation
EnglishEspañol
Instalación y Funcionamiento
Salón™ de Bañera de Hidromasaje
Serie de bañeras Soaker™
Instalación empotrada (continuación)
Figura 11 - Soporte
Figura 10 - Soporte
Figura 9 - Instalación empotrada (vista lateral)
8 Inspeccione todos los accesorios, las instalaciones
de fontanería y las líneas de control luego
de insertar la bañera para asegurar que los
componentes no estén dañados, desconectados
oencontactoconelsustratodelasupercie
terminada o con los componentes de soporte
(Figura 9).
9 Conectelastuberíasexiblesdesuministrodeagua
hacia el grifo y enchufe los cables de alimentación
en la toma del GFCI.
10 Quite los pedazos de madera para desecho y baje
la bañera completamente dentro de la abertura
(Figuras 10 y 11).
La bañera debe estar completamente apoyada en
su base. La bañera debe descansar en el contrapiso
o estar en contacto con el material de nivelación.
11 Encuadre la bañera y conecte el drenaje.
12 Encienda el suministro de energía para los circuitos
especializados protegidos con GFCI y compruebe el
funcionamiento del sistema.
13 Aplique masilla alrededor del perímetro de la bañera
para sellar el espacio entre el borde y la plataforma
terminada.
Nivele el contrapisoel contrapiso
Nivele el
contrapiso
Espesor
máximo de
al menos 2”
(50 mm)
Supercie
terminada o
azulejo
Soporte del
componente
Sustrato
Contrapiso
desnivelado
Compuesto
del piso
otante
Instalación en el hueco de 3 paredes
1 Instale el drenaje/rebosadero conforme a las
instrucciones del fabricante. Consulte también el
Manualdeespecicacionestécnicas.
La instalación hermética del drenaje es
responsabilidad del instalador. La pérdida del drenaje
no está incluida en la garantía Jacuzzi Luxury Bath de
este producto.
2 Instale el grifo en este momento. Se recomienda que
elgrifoseainstaladoporunfontanerocalicado.
3 Instale el borde (no incluido) según las instrucciones
que están incluidas en el kit. Si la bañera viene
equipada con un borde integrado, omita este paso.
4 Coloque la bañera en el nicho. Atornille el borde al
travesaño de madera. Es posible que necesite colocar
cuñas a la unidad para cerrar cualquier brecha que
exista entre el travesaño de madera y el borde (Figura
12).
5 El aislamiento se puede colocar dentro del
recubrimiento de la bañera.
Tornillo Borde de
azulejos
Silicona/
sellador
Borde de la
bañera
Relleno
plástico
Placa de
cemento
Mortero
Travesaño de
la pared
1˝x4˝(nopara
soporte)
Material de
acabado
Figura 12 - Soporte

Soaker™ Bath Series
Installation and Operation www.jacuzzi.com Page 27
English
Español
Instalación y Funcionamiento
Salón™ de Bañera de Hidromasaje
Serie de bañeras Soaker™
Instalación del faldón
Bañeras con faldón integral
Materiales de
acabado
Capa de
masilla
Panel del
faldón
Figura 14 - Instalación del faldón
Si está instalando un faldón integral, consulte la Guía de
instalación de faldones antes de continuar. Complete los
pasos de montaje e instalación conforme a la Guía de
instalación de faldones.
Bañeras con faldón opcional
Tornillos de
montaje (tal
como se
ven desde
dentro del
cerramiento)
1 1Atornille los bordes del faldón a los travesaños de
la pared.
Es posible que necesite colocar cuñas a la unidad
para cerrar cualquier brecha que exista entre los
travesaños de la pared y los bordes.
2 Complete el trabajo de acabado sobre los bordes
del faldón.
3 Aplique masilla alrededor del perímetro del faldón
para sellar el espacio entre el faldón y la plataforma
terminada.
6 Desconecte el suministro de energía hacia los
circuitos protegidos con GFCI.
7 Encuadre la bañera y conecte el drenaje.
8 Conectelastuberíasexiblesdesuministro
de agua hacia el grifo y enchufe los cables de
alimentación en la toma del GFCI.
9 Inspeccione todos los accesorios, las instalaciones
de fontanería y las líneas de control luego
de insertar la bañera para asegurar que los
componentes no estén dañados, desconectados
oencontactoconelsustratodelasupercie
terminada o con los componentes de soporte.
10 Encienda el suministro de energía para los circuitos
especializados protegidos con GFCI y compruebe
el funcionamiento del sistema.
11 Complete todo el trabajo de acabado alrededor del
perímetro de la bañera para sellar el espacio entre
el borde y la plataforma terminada (Figura 13).
Instalación en el hueco de 3 paredes (continuación)
Azulejo
Placa de
cemento
Masilla
Travesaño de la
pared
Adhesivo para
azulejos
Travesaño
Tornillo de
montaje
1˝x4˝(nopara
soporte)
Borde de azulejos
Figura 13 - Acabado

Soaker™ Bath Series
Page 28 www.jacuzzi.com Installation and Operation
EnglishEspañol
Instalación y Funcionamiento
Salón™ de Bañera de Hidromasaje
Serie de bañeras Soaker™
Instalación de montaje bajo cubierta
1 Instale el drenaje/rebosadero conforme a las
instrucciones del fabricante.
La instalación hermética del drenaje es responsabilidad
del instalador. La pérdida del drenaje no está incluida en
la garantía Jacuzzi Luxury Bath de este producto.
2 Desconecte el suministro de energía hacia los circuitos
especializados protegidos con GFCI.
3 Inspeccione todos los accesorios, las instalaciones de
fontanería y las líneas de control luego de colocar la
bañeraparavericarqueningunodeloscomponentes
esté dañado o desconectado.
4 Encuadre la bañera y conecte el drenaje.
5 El aislamiento se puede colocar dentro del recubrimiento
de la bañera.
6 Corte la plataforma/encimera para que calce utilizando
la plantilla de montaje bajo cubierta que viene con la
unidad de la siguiente manera:
•Ubique la plantilla de modo que las guías deseadas de
montaje bajo cubierta estén alineadas con el borde tal
como se muestra (Figura 15).
•Conunlápizlitográco,marquelaslíneasdelcentro
(indicadas con en la plantilla). Quite la plantilla.
•Midaladistanciadesdelapareduotropuntojohasta
las líneas del centro (Figura 16)
7 Fije la encimera a la bañera. Limpie cualquier suciedad
o residuo de la parte superior del borde de la bañera.
Aplique gotas de sellador de silicona en todo el borde de
la bañera.
Plantilla
Borde de la bañera
Figura 15 - Colocación de la plantilla
AB
C
D
PlantillaEncimera
Figura 16 - Medición de distancias
Limpieza
Paraevitarquelasuperciedelabañeraserayeopierdabrillo,nuncauselimpiadoresabrasivos.Paralassupercies
más sucias, basta el uso de detergente líquido suave y agua tibia. También se recomienda lo siguiente:
•Quiteelyesoderramadoconunlodemaderaoplástico.Lasmanchasdejadasporelyesoolechadapueden
eliminarse frotando ligeramente con una esponja o un paño húmedo con detergente. No use rasquetas de metal,
cepillosdeaceroniotrasherramientasmetálicasyaquedañaránlasuperciedelabañera.
•Las manchas de pintura, alquitrán u otras manchas difíciles se pueden eliminar con Fantastik® o agua jabonosa.
•Los rayones menores que no penetran en el acabado de color se pueden eliminar lijando suavemente con un
papeldelijahúmedoosecodegrano600.Puederestaurarelacabadobrillantedelasupercieacrílicadela
bañera con un compuesto especial, el Meguiar’s Mirror Glaze N.º 10. Si no lo puede conseguir, utilice un
compuesto de lustrado de automóviles y luego aplique cera en pasta para automóviles.
•Seránecesariovolveraaplicarelacabadosilosrayonesyestríaspenetranenlasupercieacrílica.Llamea
Jacuzzi Luxury Bath para localizar a un agente de servicio cercano a su domicilio.
8 Aplique una capa continua de sellador de silicona alrededor de toda la juntura entre la encimera y el borde de la
bañera. Deje curar el sellador de acuerdo con las instrucciones del fabricante.
Noutiliceadhesivoniselladoradhesivoparajarlaencimeraalabañera.Siserequieremantenimientoo
remodelación, es posible que deba quitarse la encimera. El adhesivo unirá de manera permanente la encimera
a la bañera. Ubique con cuidado la plataforma/encimera sobre la bañera. Siga las instrucciones del fabricante
para determinar el tiempo de curado.
9 Encienda el suministro de energía para los circuitos especializados protegidos con GFCI y compruebe el
funcionamiento del sistema.

Soaker™ Bath Series
Installation and Operation www.jacuzzi.com Page 29
English
Español
Instalación y Funcionamiento
Salón™ de Bañera de Hidromasaje
Serie de bañeras Soaker™
Funcionamiento de cromoterapia (luz)
Oprima el botón de la luz una primera vez:
Se enciende la iluminación de color; utilice los botones
ascendente y descendente para comenzar la visualización
secuencial de colores o seleccionar otro color.
Oprima el botón de la luz una segunda vez:
Se enciende la iluminación blanca; utilice los botones
ascendente y descendente para seleccionar la intensidad de
la luz blanca.
Oprima el botón de la luz una tercera vez:
Se apagan todas las luces.
Funcionamiento de la iluminación de color
Lailuminacióndecolorpredeterminadaesazulconstante.Aloprimirelbotónconlaecha(ARRIBA),seactivala
visualización secuencial de colores en este orden: azul, verde azulado, verde, amarillo, anaranjado, rojo, rosado,
morado y luego regresa al azul y así sucesivamente. Para detenerse en el color deseado, oprima nuevamente el
botónconlaecha(ARRIBA).Aloprimirelbotónconlaecha(ABAJO),seactivalavisualizaciónsecuencialde
colores en este orden: azul, morado, rosado, rojo, anaranjado, amarillo, verde, verde azulado y luego regresa al azul y
asísucesivamente.Paradetenerseenelcolordeseado,oprimanuevamenteelbotónconlaecha(ABAJO).
Funcionamiento de la iluminación blanca
Laslucesblancastienencincointensidades.Oprimaelbotón(+)paraaumentarlaintensidaddelasluces.Oprimael
botón (-) para disminuir la intensidad de las luces.
Si la cromoterapia no funciona:
- reinicie el GFCI
- asegúrese de que el enchufe esté completamente insertado en la toma
- asegúrese de que los conectores del panel de control y de la caja de control estén totalmente activados en los
receptáculos
- comuníquese con Jacuzzi Luxury Bath si las sugerencias anteriores no resuelven el problema
Funcionamiento
TodaslasbañerasfabricadasporJacuzziLuxuryBathestándiseñadaspara“llenarydrenar”,loquesignicaquese
debe vaciar la bañera después de cada uso y llenarla con agua limpia para el próximo baño. Esto es una precaución
para la salud, ya que estas bañeras no están diseñadas para contener agua de manera continua como las piscinas o
bañeras de hidromasaje.
Flecha “ARRIBA” Flecha “ABAJO”Luz
Mantenimiento
Limpieza de la bañera
Reparación de supercies
Para limpiar la bañera, simplemente use un detergente líquido suave no abrasivo. Puede proteger y restaurar el brillo
deunasupercieacrílicaaplicandoMeguiar’sMirrorGlazen.º10,unproductodiseñadoespecícamenteparausoen
acabados acrílicos. Si no se puede conseguir Meguiar’s, utilice un compuesto de buena calidad para el lustrado de
automóviles seguido de una aplicación de cera en pasta para automóviles.
Nunca utilice limpiadores abrasivos de uso doméstico en ningún producto Jacuzzi Luxury Bath.
Los rayones menores que no penetran en el acabado de color se pueden eliminar lijando suavemente con un papel de
lija húmedo o seco de grano 600. Restaure el brillo con Meguiar’s Mirror Glaze o cera en pasta para automóviles. Será
necesariovolveraaplicarelacabadosilosrayonesyestríaspenetranenlasupercieacrílica.LlameaJacuzziLuxury
Bath para localizar a un agente de servicio cercano a su domicilio.

Soaker™ Bath Series
Page 30 www.jacuzzi.com Installation and Operation
EnglishEspañol
Instalación y Funcionamiento
Salón™ de Bañera de Hidromasaje
Serie de bañeras Soaker™
LAS ESPECIFICACIONES DEL PRODUCTO ESTÁN SUJETAS A CAMBIO SIN PREVIO AVISO.
UTILICE EL MANUAL DE ESPECIFICACIONES TÉCNICAS PROVISTO CON EL PRODUCTO.
Jacuzzi® Luxury Bath ha obtenido los listados de los códigos (normas) aplicables que suelen estar disponibles a nivel nacional para
productosdeestetipo.Esresponsabilidaddelinstaladoropropietariodeterminarelcumplimientodeloscódigoslocalesespecícos
antes de instalar el producto. Jacuzzi® Luxury Bath no realiza manifestaciones ni ofrece garantías con respecto al cumplimiento de
ningún código, ni será responsable de dicho cumplimiento.
Jacuzzi® Luxury Bath
14525 Monte Vista Avenue
Chino, California, 91710
1-800-288-4002
www.jacuzzi.com
Servicio técnico autorizado
MODEL: XXXXXXX
NAME: XXXXX
COLOR: XXXXX
MFG#: XXXXX
SER#: XXXXXX
Logotipos del cumplimiento de las normas de seguridad
correspondientes para su unidad
Especicacioneseléctricasaplicablesparasuunidad
Lasespecicacioneseléctricasaparecenimpresasen
esta área.
Made in the USA
XXXX-XXXXX
Número central,
número de serie
Aquí encontrará el
número de serie.
Si necesita obtener los datos de una empresa de servicio técnico cercana a su domicilio o necesita ayuda con dudas
relacionadas con el funcionamiento o mantenimiento, llame a nuestro Departamento de Asistencia de Servicio Técnico
al 1-800-288-4002. Visite nuestro sitio web en http://www.jacuzzi.com/ para conocer los productos y servicios y obtener
una copia electrónica de estas Instrucciones para la instalación y el funcionamiento.
Cuando solicite un servicio o asistencia técnica, tenga a mano tanto el número de modelo como el número de serie
de su unidad. Puede consultar esta información en la tarjeta de registro del producto que se proporciona junto con la
unidad.Siextraviólatarjeta,puedeobtenerestainformaciónenlaetiquetadeespecicaciones/númerodeserieque
se encuentra en la unidad misma. La etiqueta está ubicada en la pared de la bañera cerca del motor del generador de
burbujas de aire.
ETIQUETA DE ESPECIFICACIONES/NÚMERO DE SERIE

Soaker™ Bath Series
Installation and Operation www.jacuzzi.com Page 31
English
Español
Instalación y Funcionamiento
Salón™ de Bañera de Hidromasaje
Serie de bañeras Soaker™
Español
Warranty
COBERTURA DE LA GARANTÍA
Jacuzzi Luxury Bath (la “Empresa”) ofrece la siguiente garantía expresa limitada de por vida al comprador original de cualquiera de los productos Jacuzzi® Luxury
Bath incluidos en las colecciones Comfort, Comfort Plus, Pure Air®, Pure Air® II y Luxury™ (“Bañera”) de la Empresa que adquiera la Bañera para uso personal
o residencial unifamiliar (“Usuario”): La Empresa reparará o reemplazará, a su exclusiva elección, la Bañera o su equipo conforme a los siguientes términos y
condiciones. Esta garantía no tiene validez para productos de Bañera que no son de la marca fabricados por la Empresa.
GARANTÍA DE POR VIDA PARA LAS BAÑERAS
LaEmpresaextiendealUsuariodelaBañeraunagarantíaintransferiblelimitadadeporvida,queestablecequeelarmazónmantendrásuconguracióneintegridad
estructural y que no presentará pérdidas de agua debido a un defecto. Esta garantía cubre los defectos en el material o en la confección únicamente del armazón
de la bañera y la bomba, los chorros, los controles y el generador de burbujas de aire instalados por el fabricante. Esta garantía no tiene validez para ninguno de
los modelos de exhibición ni para ninguna de las opciones o los accesorios que están cubiertos por nuestra garantía limitada de noventa (90) días estipulada a
continuación. La cobertura de la garantía comienza a partir de la fecha en que el Usuario compró originalmente la unidad y cuando la Empresa recibe la Tarjeta de
registro de la garantía llenada en su totalidad según se describe más adelante.
GARANTÍA DE MANO DE OBRA DE 2 AÑOS PARA TODOS LOS COMPONENTES INSTALADOS DE FÁBRICA
Nuestra garantía limitada de mano de obra cubre un período de dos (2) años a partir de la fecha en que el Usuario compró originalmente la unidad y de no más de
tres (3) años a partir de la fecha de fabricación. Todos los componentes instalados de fábrica (p. ej., bomba, motor, generador de burbujas de aire y conexiones de
fontanería) están cubiertas por nuestra garantía de mano de obra por cualquier falla debida a defectos en los materiales y la confección.
GARANTÍA LÍMITADA DE NOVENTA DÍAS (ÚNICAMENTE PARA LAS PIEZAS) SOBRE OPCIONES Y ACCESORIOS
Nuestra garantía limitada sobre opciones y accesorios cubre piezas únicamente por un período de noventa (90) días. Nuestra garantía cubre opciones y accesorios
fabricados (p. ej., drenajes, equipos de tubos de llenado, juegos de accesorios ornamentales, faldones, monitores de video, pantallas planas LCD, reproductores
de CD y MP3 y otros dispositivos de música y video y calentadores opcionales) contra defectos en el material o la confección. La cobertura de la garantía entra en
vigencia a partir de la fecha de compra de la opción o el accesorio por parte del Usuario. Estos artículos pueden estar cubiertos por una garantía del fabricante, la cual
puedetenerunamayorduraciónqueestagarantíalimitada.ConrmeconelfabricanteladuracióndelagarantíapertinenteparaOpcionesyAccesorios.
LIMITACIONES DE LA GARANTÍA
Nuestra garantía limitada no cubre fallas, defectos ni daños causados por el transportista común, el instalador, el usuario u otras personas, mascotas o roedores ni
aquellos que sean consecuencia, aunque no exclusivamente, de cualquiera de las siguientes situaciones: manipulación imprudente (incluidos levantamiento de la
unidadporsusaccesoriosdefontanería,abrasióndelacabado,etc.)queincluyasupropianegligencia;modicacióndecualquiertipoporcualquiermotivo(incluida
lamodicaciónparacumplirconloscódigoslocales);instalaciónincorrecta(incluidalainstalaciónnoconformealasinstruccionesyespecicacionesproporcionadas
conlaunidad);conexionessuministradasporelinstaladordelequipo;suministrodevoltajeinadecuadoomodicacióneléctricanoautorizada;maluso;operación
incorrectaofaltademantenimientoderutinaadecuado;funcionamientodelaunidadsinlacantidadmínimaespecicadadeaguaoconaguaatemperatura
inadecuada; uso de limpiadores abrasivos o inapropiados; o desastres naturales, como rayos, inundaciones, terremotos, etc.
Además, LA EMPRESA NO SE RESPONSABILIZARÁ DE LOS DAÑOS FORTUITOS O EMERGENTES o pérdidas originadas por cualquier causa (p. ej., daños
ocasionados por el agua en alfombras, cielorraso, azulejos, mármol, pérdida de uso, etc.) que incluyan su propia negligencia; daños en, relativos a o resultantes de:
piezas enchapadas cuando se utilizan productos químicos para piscinas o bañeras de hidromasajes en la unidad o condiciones de agua dura; equipos opcionales
para bañeras no fabricados por la Empresa pero sí suministrados por el Distribuidor, instalador o la Empresa; uso previo de la unidad como producto exhibido en
funcionamiento; o defectos que deben descubrirse antes de la instalación.
Esta garantía limitada no incluye: mano de obra, transporte ni otros costos incurridos en el retiro y/o la reinstalación de la unidad original y/o la instalación de una
unidad de reemplazo; ningún costo relacionado con la obtención de accesos para efectuar reparaciones; o daños por pérdida de uso, incluida la pérdida de ventas,
lucro cesante o pérdida de ventaja comercial de cualquier tipo en cualquier circunstancia. Las bañeras están excluidas de cualquier cobertura de garantía si se
harealizadoalgunaadición,eliminaciónomodicacióndecualquiertipoenlaunidad(oencualquieradeloscomponentes).Lacoberturadelagarantíasebrinda
exclusivamente en los Estados Unidos de América y Canadá.
EXCLUSIÓN DE GARANTÍAS IMPLÍCITAS
LAS GARANTÍAS IMPLÍCITAS DE COMERCIABILIDAD Y APTITUD PARA UN FIN ESPECÍFICO QUEDAN EXCLUIDAS EN SU TOTALIDAD O EN LA MÁXIMA
MEDIDA PERMITIDA POR LA LEY.
AVISO:Lapresentegarantíaleotorgaderechoslegalesespecícos,yesposiblequeustedgocedeotrosderechosquevaríandeunestadoaotro.Noexisten
garantías que se apliquen a los productos Jacuzzi Luxury Bath excepto las estipuladas expresamente en la presente o las implícitas en las leyes estatales y federales
pertinentes. La Empresa no será responsable de ninguna declaración o manifestación realizada en cualquier forma que sobrepase, exceda o resulte contraria a
cualquiermaterialpublicadoautorizadoolasespecicacionesentregadasporlaEmpresa.Algunosestadosnopermitenlaslimitacionesaladuracióndeunagarantía
implícita ni la exclusión o limitación de daños fortuitos o emergentes, de modo que es posible que las limitaciones y exclusiones mencionadas no se apliquen a su
caso.
Jacuzzi® Luxury Bath
14525 Monte Vista Avenue
Chino, California 91710
Garantía limitada de por vida para las bañeras de marca Jacuzzi Luxury de las
Colecciones Comfort, Comfort Plus, Pure Air®, Luxury, Salon™ Spa y Pure Air® II
Luxury Bath by Jacuzzi®
HD87000

Soaker™ Bath Series
Page 32 www.jacuzzi.com Installation and Operation
EnglishEspañol
Instalación y Funcionamiento
Salón™ de Bañera de Hidromasaje
Serie de bañeras Soaker™
Español
Instalación y Funcionamiento
TARJETA DE REGIS-
TRO DE LA GARANTÍA
Garantía limitada
de noventa días
únicamente para
piezas sobre
accesorio(s)
DEVOLUCIÓN DE LA TARJETA DE REGISTRO DE LA GARANTÍA
Para registrar su producto, ingrese en nuestro sitio web Jacuzzi.com, haga clic en Bath and Showers (Bañeras y duchas) y luego seleccione ONLINE WARRANTY
REGISTRATION (REGISTRO DE LA GARANTÍA EN LÍNEA) en la parte superior de página. Se le pedirá que ingrese el número de serie de su producto y, a continuación, la
información de registro de la garantía. También puede completar el registro que se encuentra abajo y enviarlo por correo a Jacuzzi a la dirección indicada a continuación.
Para que esta garantía entre en vigencia, el comprador DEBE llenar el Registro de la garantía que se adjunta en un plazo de treinta (30) días a partir de la compra, y Jacuzzi
Luxury Bath debe recibirlo.
RESPONSABILIDADES DE TERCEROS
La inspección de la unidad antes de la instalación es responsabilidad del instalador o el contratista de obra que actúa en representación del Usuario. Estos terceros
sonresponsablesdevericarquelaunidadnopresentedefectosnidaños.Hayavisoscolocadosenlaunidadyenlacajadeenvíoenlosqueseinformaalinstalador
acerca de esta responsabilidad. En caso de producirse un problema, no se debe instalar la unidad. La Empresa no se responsabiliza de las fallas o los daños que podrían
haberse descubierto, reparado o evitado mediante una inspección y pruebas adecuadas (incluida la prueba de agua correspondiente) antes de la instalación.
Losdañosocurridosduranteeltransportesonresponsabilidaddeltransportista.ElUsuariooinstaladorDEBEabrirlacajaeinspeccionarlaunidadparavericarqueno
tenga daños al momento de la entrega. Si se descubre algún daño, inmediatamente debe informarse por escrito al vendedor y al transportista y solicitar una inspección. Si
eltransportistanoresponde,sedebeinformaralvendedoryaltransportista.Susreclamosdeetedebenpresentarsesindemorasdespuésdeeso.
Los daños ocasionados en la unidad durante la instalación son responsabilidad del instalador y/o contratista de obra, y los daños ocasionados posteriormente son
responsabilidad del usuario.
Las fallas de cualquier equipo opcional son responsabilidad exclusiva del fabricante del equipo, excepto por lo estipulado anteriormente, y no se extenderá ni aplicará a
ninguna pieza de reemplazo para las Opciones y Accesorios. Todas las piezas de reemplazo estarán cubiertas por el fabricante del equipo original.
ElDistribuidoroVendedoresresponsabledeconocerlosrequisitosdeloscódigoslocalesydenoticarestosrequisitosalcontratistainstaladory/oalUsuarioalmomento
delacompra.LaEmpresanoesresponsabledeloscostosincurridosparalamodicacióndealgúnproductoconelndeobtenerlaaprobacióndeloscódigos,comolos
códigos de construcción de la ciudad, el condado o el estado en los EE. UU. o los códigos municipales o provinciales en Canadá.
SERVICIO DE GARANTÍA
Parabeneciodelcliente,laEmpresamantieneunalistadepersonaldeserviciotécnicoindependienteparaefectuarlasreparacionesrequeridasdelserviciodegarantía.
Estas empresas no son agentes ni representantes de la Empresa ni pueden obligar a la Empresa mediante palabras o proceder.
La Empresa proporcionará el servicio de garantía antes descrito siempre que se cumplan las siguientes condiciones: la falla es de la naturaleza o del tipo cubierto por
la garantía; el Usuario ha informado a un Agente de Servicio Autorizado de Jacuzzi Luxury Bath o a un Representante del Departamento de Servicio de Garantía acerca
de la naturaleza del problema durante el período de la garantía; el usuario entrega a dicho agente o representante pruebas concluyentes (p. ej., comprobante de compra
o instalación) que demuestran que la falla ocurrió o se descubrió dentro del período de la garantía; se le ha permitido a una persona del servicio técnico independiente
autorizado o un representante de la Empresa inspeccionar la unidad en horario comercial normal dentro de un tiempo razonable después de que el Usuario informó sobre
elproblema.Andeobtenerserviciodegarantía,comuníqueseconJacuzziLuxuryBathal:
jacuzzi.com
or
Warranty Service Department
14525 Monte Vista Avenue
Chino, California 91710
Call: 1-(800) 288-4002
Para obtener un reemplazo cubierto por la garantía de componentes instalados de fábrica para las opciones y los accesorios proporcionados y fabricados por la Empresa,
llame al teléfono o escriba a la dirección que se indican arriba. Brinde una descripción del problema y un comprobante de compra. Se le indicará cómo obtener los
reemplazos y dónde devolver, a su cargo, el/los componente/s, la/s opción/opciones o el/los accesorio/s fallado/s.
Todas las piezas y los equipos de reemplazo y las reparaciones asumirán lo que quede del período de la garantía de la/s pieza/s reemplazada/s.
LaobligacióndelaEmpresaconrelaciónalagarantíanalizaráconlaofertadereemplazooreparación.Lanegativadelclienteaaceptarlaofertadejasinefectola
obligación de la Empresa con relación a la garantía.
HD87000
JACUZZI LUXURY BATH
Garantía limitada
de noventa días
únicamente para
piezas sobre
accesorio(s)
Para que esta garantía entre en vigencia, visite nuestro sitio web en www.
jacuzzi.com o llene esta tarjeta y envíela por correo a la dirección impresa al
dorso dentro de los treinta (30) días a partir de la fecha de compra.
Nombre del comprador ______________________________________
Dirección del comprador _____________________________________
Ciudad Estado Código postal
Fecha de compra ___________________________________________
Nombre del modelo ________________________________________
Número de serie ___________________________________________
Nombre del distribuidor ______________________________________
Dirección del distribuidor _____________________________________
1. ¿CómoseenteróporprimeravezdeesteproductoJacuzzi®?
( ) Anuncio publicitario ( ) Artículo en revista/periódico
( ) Visitó al distribuidor/proveedor de instalaciones sanitarias
( ) Páginas amarillas
( ) Constructor/fontanero/remodelador ( ) Decorador/arquitecto
( ) Visitó tienda minorista/de artículos para el hogar
( ) Referido por otros… Amigo/pariente/conocido
( ) Otro (Describa) ________________________________________
2. ¿Quiénfueelprimeroendarleinformaciónespecícasobreesteproducto
(especicaciones,precios,etc.)?
( ) Distribuidor/proveedor de instalaciones sanitarias ( ) Constructor
( ) Remodelador
( ) Contratista de fontanería ( ) Tienda minorista/de artículos para el
hogar
( ) Decorador/arquitecto ( ) Ya estaba instalado
3. ¿Cuálfueelprincipalmotivoparalacompra?
( ) Estilo ( ) Servicio de garantía ( ) Características del producto
( ) Marca ( ) Precio ( ) Hidroterapia
( ) Reventa de la casa ____________________________________
( ) Otro _______________________________________________
4. ¿Quiéntomóladecisiónnaldequéproductocomprar?
( ) Usted mismo ( ) Cónyuge ( ) Usted y su cónyuge
( ) Otro miembro de la familia ( ) Diseñador/arquitecto
( ) Constructor/fontanero/remodelador ( ) Ya estaba instalado
5. ¿Quiénloinstaló?()Yaestabainstalado/casanueva
( ) Contratista/fontanero durante la remodelación
( ) Usted/cónyuge durante la remodelación
( ) Otro ________________________________________________
6. ¿Cuáleselvalordemercadoactualdeestapropiedad?
Estime en $ ____________________________________________
7. ¿Quéedadtieneeljefedefamilia? ______________________ años
8. ¿Quéotrosfabricantestuvieronencuenta?
()Eljer()Lasco()PricePster()AquaGlass
( ) Kohler ( ) American Standard ( ) Sterling
()Otro(especique) _____________________________________
9. ¿Cuántotiempoestuvobuscandoantesdecomprarlaunidad?
( ) 1 día ( ) de 2 a 6 meses
( ) de 2 a 7 días ( ) de 6 meses a 1 año
( ) de 1 a 2 semanas ( ) de 1 a 2 años
( ) de 2 a 4 semanas ( ) más de 2 años
( ) de 1 a 2 meses
10.Aproximadamente,¿cuántotiempollevaviviendoenestacasa? ___
11. Indique, aproximadamente, el ingreso anual total de su grupo familiar.
( ) Hasta $24.999 ( ) de $50.000 a $74.999
( ) De $25.000 a $29.999 ( ) de $75.000 a $99.999
( ) De $30.000 a $39.999 ( ) de $100.000 a $149.999
( ) De $40.000 a $49.999 ( ) más de $150.000
12.¿Cómofueelprocesodecompra?
( ) Muy fácil ( ) Fácil ( ) Difícil ( ) Muy difícil
13. Desde el punto de vista técnico, ¿cuánto conocía usted sobre el
sistemadechorrosJacuzzi®patentadoantesderealizarlacompra?
( ) No conocía nada ( ) Conocía algo ( ) Conocía mucho

Soaker™ Bath Series
Installation and Operation www.jacuzzi.com Page 33
English
Instalación y Funcionamiento
Salón™ de Bañera de Hidromasaje
Serie de bañeras Soaker™
Français
DIRECTIVES D’INSTALLATION ET D’UTILISATION
HD87000
Jacuzzi® Luxury Bath
14525 Avenue Monte Vista
Chino, CA 91710 É.-U.
1-800-288-4002
www.jacuzzi.com
SÉRIE DE BAIGNOIRES
SOAKER®

Soaker™ Bath Series
Page 34 www.jacuzzi.com Installation and Operation
English
Renseignements sur le produit
Contenu
Conservez ces directives pour utilisation ultérieure. Utilisez le formulaire ci-dessous pour noter votre
modèle et numéro de série pour consultation future.
Date d’achat
Acheté chez
Installé par
Numéro de série
Modèle
Installateur : laissez le manuel au propriétaire.
Propriétaire : lisez ce manuel et gardez-le pour consultation future.
Contenu . ....................................................................................................................................................................... 34
Renseignements sur le produit . .................................................................................................................................... 34
Directives de sécurité. ................................................................................................................................................... 35
Instrucciones de seguridad operacional. ....................................................................................................................... 36
Inspection et essai. ........................................................................................................................................................ 37
Installation. .................................................................................................................................................................... 37
Cadrage. ........................................................................................................................................................................ 37
Connexions électriques (baignoires de trempage avec chromothérapie seulement) . .................................................. 38
Installation des lumières de chromothérapie. ................................................................................................................ 38
MatériauspéciqueàFuzion™ ..................................................................................................................................... 40
Installation d l’évacuation du trop-plein Fuzion™ .......................................................................................................... 40
Instalación empotrada. .................................................................................................................................................. 41
Installationdansunealcôveàtroismurs. ..................................................................................................................... 42
Installation de la jupe. .................................................................................................................................................... 43
Instalación de montaje bajo cubierta. ............................................................................................................................ 44
Nettoyage. ..................................................................................................................................................................... 44
Utilisation. ...................................................................................................................................................................... 45
Entretien. ....................................................................................................................................................................... 45
Service autorisé. ............................................................................................................................................................ 46
Warranty. ....................................................................................................................................................................... 47
Français
Série de baignoires Soaker™
Installation et utilisation

Soaker™ Bath Series
Installation and Operation www.jacuzzi.com Page 35
EnglishFrançais
Série de baignoires Soaker™
Installation et utilisation
Directives de sécurité
DIRECTIVES RELATIVES AUX RISQUES D’INCENDIE, D’ÉLECTROCUTION OU DE BLESSURES.
Il s’agit d’un produit de qualité professionnelle. Des connaissances relatives aux techniques de construction, de plomberie et
d’installationélectriqueconformesauxcodessontrequisespoureffectueruneinstallationadéquateàlasatisfactiondel’utilisateur.
Nous vous recommandons d’obtenir les services d’un entrepreneur agréé pour effectuer l’installation des produits Jacuzzi® Luxury
Bath. Notre garantie ne couvre pas les problèmes causés par une mauvaise installation.
AVERTISSEMENT : RISQUE DE BLESSURE ACCIDENTELLE OU DE NOYADE!
Nelaissezpaslesenfantsutilisercetteunitéàmoinsqu’ilsnesoientétroitementsurveillésentouttemps.
N’utilisezpaslabaignoired’hydromassagesansquetouslesgardesàventousesoientinstalléspour
prévenirlesaccidentsdusàlaprisedecheveuxoudesmembres.Nefaitesjamaisfonctionnerlabaignoire
d’hydromassage si le couvercle de succion est brisé, endommagé ou manquant.
DANGER : RISQUE DE BLESSURE GRAVE CAUSÉE PAR UNE DÉCHARGE ÉLECTRIQUE OU DE DÉCÈS PAR
ÉLECTROCUTION ! Cetappareilnedoitêtrereliéqu’àuncircuitd’alimentationprotégéparundisjoncteur
détecteurdefuiteàlaterre(DDFT)de15ampères.Unteldisjoncteurdoitêtrefourniparl’installateuretdoitêtre
vériésurunebaserégulière.Pourvérierledisjoncteur,enfoncezleboutond’essai.Ledisjoncteurdevrait
interrompre le courant. Appuyez sur le bouton de réinitialisation. Le courant devrait être rétabli. Si le disjoncteur ne
fonctionne pas de cette façon, il est défectueux. Si le disjoncteur interrompt le courant vers la baignoire sans devoir
enfoncerleboutond’essai,ilyauncourantmisàlaterrequicircule,indiquantlapossibilitéd’unedécharge
électrique. N’utilisez pas cette baignoire d’hydromassage. Débranchez la baignoire d’hydromassage et faites réparer
leproblèmeparunreprésentantdeservicequaliéavantdel’utiliserànouveau.
AVERTISSEMENT : RISQUE DE DÉCHARGE ÉLECTRIQUE !
Nereliezl’appareilqu’àuncircuitprotégéparundisjoncteurdétecteurdefuiteàlaterre(DDFT).
(Pourlesunitésreliéesdefaçonpermanente)uneborneverte(ouunconnecteurdel)marquée«G»,«
GR»,«GROUND»ou«GROUNDING»estfourniedanslecompartimentdesbornes.Pourréduirele
risquededéchargeélectrique,reliezlaborneouleconnecteuràlabornedemiseàlaterredevotre
service électrique ou panneau d’alimentation avec un conducteur de taille équivalente aux conducteurs du
circuit alimentant l’équipement.
MISE EN GARDE : Cetéquipementestconçupourêtreutiliséàl’intérieurseulement.Installezl’équipementenrespectantces
directives.Utilisezdeslsd’alimentationappropriéspourunetempératurede75°C(167°F),ycomprisla
températurenominaledesconducteursd’alimentationdevantêtreutilisés.Cetteunitédoitêtremiseàla
terre électriquement et installée par un entrepreneur, un électricien et un plombier agréés. Les matériaux
de construction et le câblage doivent être acheminés loin du moteur/de la pompe ou du ventilateur ou
desautrescomposantsdecetteunitéproduisantdelachaleur.Unconnecteurdelàpressionestfourni
àl’extérieurdumoteur/delapompeetdel’appareildechauffagepourpermettrelaconnexiond’un
conducteurdemiseàlamasseencuivremassifn°8AWGentrecetteunitéettoutautreéquipement
électrique et métal exposé dans les environs, au besoin pour se conformer aux exigences locales.
Cuando utilice este equipo eléctrico, siempre debe tomar las precauciones de seguridad básicas, que incluyen las siguientes:
1. ADVERTENCIA: RIESGO DE LESIONES ACCIDENTALES O AHOGAMIENTO. LOS NIÑOS NO DEBEN UTILIZAR
BAÑERAS DE HIDROMASAJE SIN LA SUPERVISIÓN DE UN ADULTO. BAÑERA DE HIDROMASAJE CON
CALENTADOR.
2. ADVERTENCIA: RIESGO DE LESIONES ACCIDENTALES O AHOGAMIENTO. NO UTILICE LA BAÑERA DE
HIDROMASAJE A MENOS QUE TODAS LAS TAPAS PROTECTORAS DE SUCCIÓN ESTÉN INSTALADAS PARA
EVITAR QUE EL CABELLO O PARTES DEL CUERPO QUEDEN
ATRAPADOS.
3 ADVERTENCIA: PARA EVITAR LESIONES, TENGA CUIDADO AL ENTRAR O SALIR DE LA BAÑERA DE
HIDROMASAJE.
4. ADVERTENCIA: RIESGO DE LESIONES ACCIDENTALES O AHOGAMIENTO. NO UTILICE DROGAS O ALCOHOL
ANTES O DURANTE LA UTILIZACIÓN DE UNA BAÑERA DE HIDROMASAJE CON CALENTADOR PARA EVITAR
LA PÉRDIDA DEL CONOCIMIENTO Y UN POSIBLE AHOGAMIENTO.
5. ADVERTENCIA: RIESGO DE LESIÓN FETAL. LAS MUJERES EMBARAZADAS O CON POSIBILIDAD DE
EMBARAZO DEBEN CONSULTAR A UN MÉDICO ANTES DE UTILIZAR UNA BAÑERA DE HIDROMASAJE CON
CALENTADOR.
6. ADVERTENCIA: RIESGO DE HIPERTEMIA Y POSIBLE AHOGAMIENTO: NO UTILICE UNA BAÑERA DE
HIDROMASAJE CON CALENTADOR INMEDIATAMENTE DESPUÉS DE REALIZAR EJERCICIOS FÍSICOS
EXTENUANTES.
7. CONSERVE ESTAS INSTRUCCIONES.
MISE EN GARDE : Des mesures de sécurité de base doivent toujours être prises lors de l’utilisation de cet appareil, y compris
• LEA Y SIGA TODAS LAS INSTRUCCIONES. CONSERVE
ESTAS INSTRUCCIONES.
• Utilisezcetteunitéseulementpoursonutilisationprévuequiestdécritedanscemanuel.
N’utilisez pas des accessoires qui ne sont pas recommandés par le fabricant.
• Nedéposezoun’insérezjamaisdesobjetsdanslesouvertures.
Instrucciones importantes de seguridad de la Asociación de Normas
Canadienses (sólo para modelos canadienses)

Soaker™ Bath Series
Page 36 www.jacuzzi.com Installation and Operation
EnglishFrançais
Série de baignoires Soaker™
Installation et utilisation
Instrucciones de seguridad operacional
AVERTISSEMENT : RISQUE D’HYPOTHERMIE ET DE NOYADE !
N’utilisez pas une baignoire d’hydromassage munie d’un appareil de chauffage
immédiatement après avoir fait des exercices vigoureux.
ADVERTENCIA: RIESGO DE DESCARGA ELÉCTRICA
AVERTISSEMENT : UNE IMMERSION PROLONGÉE DANS DE L’EAU CHAUDE PEUT ENTRAÎNER
L’HYPERTHERMIE !
L’hyperthermie survient lorsque la température interne du corps dépasse de plusieurs degrés la
température normale du corps de 37 °C (98,6 °F). Les symptômes de l’hyperthermie comprennent une
augmentation de la température interne du corps, des étourdissements, la léthargie, la somnolence et
l’évanouissement. Les effets de l’hyperthermie comprennent :
A. l’omission de percevoir la chaleur;
B. ne pas reconnaître la nécessité de sortir de la baignoire;
C. l’ignorance des dangers imminents;
D. des dommages fœtaux pour les femmes enceintes;
E. l’incapacité physique de sortir de la baignoire;
F. l’évanouissement entraînant le danger de noyade.
AVERTISSEMENT : RISQUE DE BLESSURE FŒTALE !
Les femmes enceintes ou possiblement enceintes doivent consulter un médecin avant
d’utiliser une baignoire d’hydromassage munie d’un appareil de chauffage.
AVERTISSEMENT : L’usage d’alcool, de narcotiques ou de médicaments peut grandement augmenter le risque de décès par
hyperthermie. Les gens qui prennent des médicaments ou qui ont des antécédents médicaux néfastes
doivent consulter un médecin avant d’utiliser une baignoire d’hydromassage munie d’un appareil de
chauffage.
AVERTISSEMENT : Nefalsiezpaslescommandesactionnéesparl’utilisateuroulesdispositifssimilaires.
AVERTISSEMENT : Utilisez cette unité seulement pour son utilisation prévue qui est décrite dans ce manuel. N’utilisez pas
des accessoires qui ne sont pas recommandés par le fabricant.
AVERTISSEMENT : Pour éviter les accidents, soyez prudents en entrant et en sortant de la baignoire d’hydromassage.
AVERTISSEMENT : N’utilisezpaslabaignoired’hydromassagesansquetouslesgardesàventousesoientinstalléspour
prévenirlesaccidentsdusàlaprisedecheveuxoudesmembres.Nefaitesjamaisfonctionnerla
baignoireàhydromassagesilecouvercledesuccionestbrisé,endommagéoumanquant.
AVERTISSEMENT : Une température d’eau excédant 40 °C (104 °F) peut produire des effets physiologiques dangereux.
Vériezetajustezlatempératuredel’eauavantl’utilisation.
MISE EN GARDE : Vériezpériodiquementledisjoncteurdefuitedeterreprotégeantcetappareilconformémentaux
directives du fabricant.
IMPORTANT: Lisez toutes les directives fournies dans ce manuel avant de commencer l’installation.
L’entrepriseaobtenulesclassicationsdecode(normes)applicableshabituellementoffertesàl’échellenationale
pour les produits de ce type. L’installateur/le propriétaire doivent déterminer la conformité au code local précis avant
d’installerleproduit.L’entreprisen’effectueaucunereprésentationougarantierelativesàlaconformitéaucodeetelle
neserapasresponsabledecettedernière.Lesspécicationsduproduitpeuventêtremodiéessanspréavis.
• Nepermettezpaslesappareilsélectriques(commelessèche-cheveux,leslampes,lestéléphones,les
radiosoulestéléviseurs)àunedistancedemoinsde1,5m(60po)decettebaignoired’hydromassage.
• Nefaitespasfonctionnerlesystèmed'hydromassageàmoinsquelabaignoirenesoitremplied'eau
jusqu'àunedistanced'aumoins2,5à5cm(1à2po)au-dessusdutroud'airleplusélevé.
• N’immergezpaslepanneaudecommandeenremplissantlabaignoiredefaçonexcessive.
• Pournettoyervotrebaignoire,n’utilisezpasdesubstancesabrasivesquiendommagerontlasurfacede
la baignoire.
• Pouréviterladécolorationdunienacrylique,neremplissezpaslabaignoireavecdel’eaudontla
température dépasse 60 °C (140 °F).

Soaker™ Bath Series
Installation and Operation www.jacuzzi.com Page 37
EnglishFrançais
Série de baignoires Soaker™
Installation et utilisation
Inspection et essai
Inspection visuelle
1 Retirez la baignoire de la boîte d’expédition. Faites attention de ne pas égratigner la surface de la baignoire sur
lesagrafesexposées.Retirezlesagrafesoupliez-lessurlaboîte.Conservezlaboîtejusqu’àcequevousayez
effectué une inspection satisfaisante du produit. Ne soulevez jamais la baignoire par la plomberie; manipulez-la
par la coquille seulement.
2 Examinez la coquille et les composants de la baignoire. Si l’inspection révèle des dommages ou des défauts dans
lenioudesdommagesvisiblesàl’unoul’autredescomposants,n’installezpaslabaignoire.Lesdommages
oulesdéfautsauniréclamésaprèsl’installationdelabaignoiresontexclusdelagarantie.Laresponsabilité
deJacuzziLuxuryBathquantauxdommagescausésparl’expéditionprendnaumomentdelalivraisonau
transporteur de produits en bon état.
3 Communiquez avec le transporteur pour toute réclamation pour des dommages. Pour obtenir des détails sur la
couverture et les limites de la garantie, reportez-vous aux renseignements sur la garantie publiés et emballés
avecleproduitouàceuxquisetrouventàlandecemanuel.
Installation
Unmanueldespécicationstechniquesestoffertavecvotrebaignoire.Lemanueldespécicationstechniques
comprend des renseignements utiles concernant votre produit Jacuzzi Luxury Bath. Localisez le manuel de
spécicationstechniques.
Figure 1 - emplacements d’accès communs
Cadrage
•Les dimensions indiquées dans les diagrammes
installation sont nominales. Prendre les mesures de
votre appareil de recevoir et construits selon les
dimensions éelles.
•La structure du plancher sous la baignoire doit supporter
tout le poids de la baignoire, l’eau et l’occupant.
Reportez-vousauxspécicationstechniques(lacolonne
«Poidstotal/plancherdechargement).
•La baignoire doit reposer sur sa base, pas de son
bord. Pour une installation en retrait, note l’épaisseur du
matériauderevêtementetlesmatériauxdenition
(marbre, carrelage, etc).
•Assurez-vous que la jante est au repos sur une surface
plane.
•Pour que la politique devrait faciliter l’accès au panneau
de contrôle boîte de chromothérapie (si fournis).
Les lieux d’accès au service indiqué dans le schéma
d’installationinclusdansleManueldespécications
techniques (Figure 1).
Il est de la responsabilité de l’installateur, entrepreneur
en bâtiment ou le propriétaire de fournir un accès
au service. Jacuzzi n’est pas responsable des coûts
associésàl’accèspourlesréparations.Lepropriétaire
doit assumer ces coûts et, le cas échéant, doivent
demander un remboursement de l’installateur.
Cadre de l’espace où la place de bain. Dans la préparation
de la région devraient prendre en compte les éléments
suivants:
F
Trop-Plein
Ubicación De Luces De
Cromoterapia

Soaker™ Bath Series
Page 38 www.jacuzzi.com Installation and Operation
EnglishFrançais
Série de baignoires Soaker™
Installation et utilisation
Sous-plancher
Préparez le sous-plancher pour l’évacuation et assurez-vous que la zone est de niveau.
1 L’évacuation/le trop-plein de la baignoire se prolonge sous le fond de la baignoire. Dans le manuel de
spécicationstechniques,identiezledessinquicorrespondàvotrebaignoire.
2 Effectuez les coupes appropriées dans le sous-plancher pour accommoder l’évacuation.
3 La base Tru-Level™ de Jacuzzi est une caractéristique standard sur toutes les baignoires. Si le sous-plancher
estunesurfacecontinuedeniveau,aucuneautrepréparationn’estrequise.Procédezàlasection«Installation».
4 Si le sous-plancher n’est pas au niveau, vous devez niveler la surface au complet avant d’installer la baignoire.
Les matériaux utilisés permettront de vous assurer que la baignoire est soutenue par le fond. Ces matériaux sont
:composédenivellement,mortier,plâtreoumoussestructurelleàexpansionminimale(avecunedensitéd’au
moins80kg/m³).Labaignoiredoitdemeurerdeniveauanqu’elles’évacuecorrectementetelledoitêtreen
contact avec le matériau de nivellement. Les deux côtés d’un joint ou d’une épissure d’un sous-plancher doivent
être au même niveau.
Connexions électriques (baignoires de trempage avec chromothérapie seulement)
Risquededéchargeélectrique.Reliezseulementà
un circuit protégé par un disjoncteur de fuite de terre.
Des précautions de base doivent toujours être prises
lorsque vous utilisez des appareils électriques :
•respectez toujours les codes locaux d’électricité
et de construction.
•Pour les baignoires de trempage avec
chromothérapie,lamiseàlaterreestrequise.
L’unitédoitêtreinstalléeetmiseàlaterreparun
électricienqualié.
Un circuit protégé par un disjoncteur de fuite de terre
de 120 volts, 15 ampères est requis. Installez une prise
doublesurlepoteaumuralsouslabaignoireàune
distance d’au moins 10 cm (4 po) du sol. La prise double
n’est pas fournie.
Réinitialisation
Essai
Installation des lumières de chromothérapie
Votre baignoire est offerte avec deux lumières, des
câbles et boîtier de commande (préinstallés). Le
panneau de commande doit être installé dans un endroit
choisi par l’installateur.
1 Planiezl’emplacementdupanneaudecommande.
Unecongurationpossibleestillustréeàladroite
(gure2).
Le panneau ne peut pas être immergé dans l’eau
de la baignoire. Sélectionnez un endroit se trouvant
àunedistanced’aumoins2,5cmau-dessusdu
niveau du trop-plein.
Le panneau de commande doit être installé sur une
surface plate mesurant au moins 7,6 cm de largeur
et 5 cm de hauteur. Vous pouvez l’installer sur
toute surface plate de la coquille de la baignoire, du
pourtour de la baignoire ou sur le mur adjacent.
Le câble de commande mesure 3 mètres de
longueur. Si vous prévoyez installer le panneau
decommandeàdistance(passurlesupportde
la baignoire), le panneau de commande ne peut
pasêtresituéàplusde3mètresduboîtierde
commande.
Figure 2 -congurationpossible
Lumières de
chromothérapie Panneau de commande

Soaker™ Bath Series
Installation and Operation www.jacuzzi.com Page 39
EnglishFrançais
Installation et utilisation
Série de baignoires Soaker™
Installation et utilisation
2 Placez du ruban-masque sur toute la zone du trou
proposé pour éviter tout écaillage.
Si vous installez le panneau de commande sur la
surface acrylique de la baignoire, les trous doivent
êtrepercésàpartirdel’intérieur(côtébrillant)dela
baignoire.
3 Marquezlalignecentraledumotifàdeuxtrous
(gure3).Ilestcritiquequeletrouàencochede4
mm soit bien situé, sinon, le panneau de commande
ne sera pas centré et droit.
4 Utilisezunemèchede4mmetpercezletrou(gure
4).
5 Utilisez une mèche de 4 mm et percez un avant-trou
pour le trou de 2,7 cm de diamètre.
6 Utilisez une scie cylindrique de 2,7 cm pour terminer
le trou pour le panneau de commande.
7 Appliquez modérément un boudin de silicone
transparentàl’arrièredelasurfacedupanneaude
commande,justeàl’intérieurdupérimètre.
8 Insérez le panneau de commande dans le trou et
appuyez-le fermement en place.
Ne laissez pas la silicone entrer dans le boîtier de
connexionàl’arrièredupanneaudecommande;cela
pourrait endommager l’équipement.
9 Laissez la silicone sécher complètement
conformément aux directives du fabricant.
10 Fixez le câble de commande du boîtier de commande
(gure5).
Bordure de la
baignoire
Trou de la
lumière
4˝(minimum)
Évacuation du
trop-plein
1˝
Trou du panneau
de commande
Ligne d’eau
Figure 3 - motif des trous
32
5
/
16
1
/
Figure 5-xationducâbledecommande
Câble de
commande
Panneau de
commande
Figure 4 - dimensions des trous
1˝
˝
½˝

Soaker™ Bath Series
Page 40 www.jacuzzi.com Installation and Operation
EnglishFrançais
Installation et utilisation
Série de baignoires Soaker™
Raccord du trop-plein
Appliquez un agent de
calfeutrage/d’étanchéité
(offert sur le marché)
Rondelle plate
en caoutchouc
Écrou de
blocage
Évacuation directe des eaux
usées par le trop-plein
Assemblez conformément aux codes locaux de
plomberie et de construction.
1 Identiezlatroussed’évacuationdutrop-plein
fournie avec votre baignoire. Retirez et ouvrez
lepaquetdel’évacuationetconrmezqu’ilne
manque pas de pièces.
2 Retirez les rondelles et les écrous du raccord de
trop-plein.
3 Placez un petit boudin de mastic de plombier, de
silicone ou d’agent d’étanchéité similaire approuvé
autour de la partie inférieure de la bride supérieure
du raccord de trop-plein.
4 Placez le raccord de trop-plein dans le trou de trop-
pleindelabaignoire(gure6).
5 Sous l’unité, placez la rondelle en caoutchouc,
puis l’écrou de blocage sur le raccord de trop-plein,
puis serrez fermement. Prenez soin de ne pas trop
serrer.
6 Assemblez le reste des pièces de l’évacuation
comme dans l’illustration.
7 Une fois l’évacuation complètement installée,
vériezquel’eaus’évacuecorrectement.Sil’unité
nes’évacuepascorrectement,rectiezleproblème
avant de continuer l’installation de la baignoire.
L’installateur est responsable de l’étanchéité de
l’installation de l’évacuation et du trop-plein. Toute
fuite de l’évacuation est exclue de la garantie
Jacuzzi Luxury Bath de ce produit.
Conduiteexible
en PVC
Conduite en
PVC
T en PVC
Évacuation directe des
eaux usées par le trop-
plein
Assemblage du
trop-plein
Assemblage de
l’évacuationà
torsion
Joint d’étanchéité des
eaux usées
Coude des eaux usées
T en PVC
Matériau spécique à Fuzion™
Installation de l’évacuation du trop-plein
Fuzion™
Figura 6 - installation du trop-plein
Les caractéristiques supplémentaires de conception de Fuzion™ exigent que les étapes suivantes soient terminées
avant l’installation de la baignoire dans la périphérie construite. Les étapes suivantes doivent aussi être terminées
dans l’ordre précisé :
•Installation de l’évacuation/du trop-plein Fuzion™
•Installation du cadre en bois Fuzion™
Vous n’utiliserez pas toutes les pièces fournies.
EN OPTION – si le cadre en bois Fuzion™ n’est pas utilisé,
veuillezpasseràl’étape2danslasectionInstallation
en dessous.
Installation du robinet Fuzion™
Sélection d’un robinet pour montage sur le rebord : l’épaisseur combinée du rebord de la coquille de la baignoire
et du support en bois est de 5 cm (2 po). La longueur de la (des) pièce(s) de raccordement du robinet doit être
sufsantepourseprolongerau-delàdecettedimensionetavoirassezd’espacepourassemblerlaquincaillerie
(comme les écrous de blocage, les raccords d’alimentation en eau, etc.) nécessaire pour l’installation. Pour
les unités montées en dessous, l’épaisseur combinée de la coquille de la baignoire est de 12 mm (½ po) et
le support de montage en dessous ne doit pas dépasser la longueur de la (des) pièce(s) de raccordement du
robinet, y compris la quincaillerie d’assemblage.

Soaker™ Bath Series
Installation and Operation www.jacuzzi.com Page 41
EnglishFrançais
Installation et utilisation
Série de baignoires Soaker™
Solin
2mm x 10mm
(1 x 4 po)
Mortier ou
adhésif
Sous-
plancher
Agent
d’étanchéité
Carreaux
Terminez l’installation de la périphérie de la baignoire
(gure7).
1 Installez l’évacuation/le trop-plein conformément
aux directives du fabricant. Reportez-vous aussi au
manueldespécicationstechniques.
L’installateur est responsable de l’étanchéité
de l’installation de l’évacuation. Toute fuite de
l’évacuation est exclue de la garantie Jacuzzi
Luxury Bath de ce produit.
2 Installez maintenant le robinet. Nous
recommandons de faire installer le robinet par un
plombierqualié.
L’installateur est responsable de l’installation
adéquate du bec de plomberie et de la conformité
aux codes locaux. Jacuzzi Luxury Bath ne garantit
pas les connexions des conduites et des raccords
d’alimentation en eau, les systèmes de remplissage
ou les systèmes d’évacuation/de trop-plein. Elle
n’est également pas responsable des dommages
àlabaignoirequipourraientsurvenirpendant
l’installation.
Unebarrièreprotectriceininammabledoitêtre
placée entre le travail de soudure et la baignoire
pour éviter d’endommager cette dernière.
3 Préparez le trou de la baignoire en utilisant le
gabarit pleine grandeur fourni ou les dimensions de
coupeindiquéesdanslemanueldespécications
techniques.
Carreaux ou
surfacenie
Substrat
Morceau de
retailles de bois
Membre de
soutien Sous-plancher plat
Morceau de
retailles de
bois
Dégagement
minimal de 7,6
cm (3 po)
Figure 7 - installation de la périphérie
Figure 8 - installation par le dessus
Avant de commencer l’installation, veuillez lire ce qui suit :
Instalación empotrada
•Respectez tous les codes locaux et de construction.
•Déterminez les outils qui seront utilisés pendant l’installation.
•D’autres pièces de plomberie et d’évacuation de la baignoire sont offertes sur le marché dans des
quincailleries et des magasins de fourniture de plomberie.
•Les renseignements sur la disposition des tuyaux d’évacuation/du trop-plein sont compris avec votre baignoire
etsetrouventdanslemanueldesspécicationstechniques
Installation du cadre Fuzion™
Si vous installez une baignoire Fuzion™, veuillez vous
reporter au guide d’installation du cadre Fuzion™ (n°
GL44000) avant de continuer. Terminez l’installation
et les étapes d’assemblage conformément au guide
d’installation du cadre Fuzion™. Cadre Fuzion™
Le gabarit peut indiquer des guides pour plus d’une baignoire; assurez-vous alors de sélectionner les lignes de
guidage appropriées. Si le montage par en dessous est une option, sélectionnez soigneusement les lignes qui
s’appliquentàl’installationquevouseffectuez.
4 Terminez tout le travail du support et couvrez-le pour éviter de l’endommager lorsque vous placerez la baignoire.
5 Vouspouvezinstallerunmatériauisolantàl’intérieurdelapériphériedelabaignoire.
6 Coupez l’alimentation du circuit protégé par un disjoncteur de fuite de terre.
7 Placez un morceau de retailles de bois sur chaque extrémité de la forme découpée – ils serviront de support
temporaireavantd’abaisserlabaignoirecomplètementdansl’ouverture(gure8).

Soaker™ Bath Series
Page 42 www.jacuzzi.com Installation and Operation
EnglishFrançais
Installation et utilisation
Série de baignoires Soaker™
Installation par le dessus (suite)
Figure 11 - soutien
Figure 10 - soutien
Figure 9 - installation par le dessus (vue latérale)
8 Examinez contact avec le substrat de la surface
nieoulestouslesraccords,laplomberieetles
conduites après l’insertion de la baignoire pour
vous assurer que les composants ne sont pas
endommagés, débranchés ou en membres de
soutien(gure9).
9 Reliezlesconduitesexiblesd’alimentationeneau
au robinet et branchez les cordons d’alimentation
danslapriseàdisjoncteurdefuitedeterre.
10 Retirez les morceaux de retailles de bois et abaissez
labaignoirecomplètementdansl’ouverture(gures
10 et 11).
La baignoire doit être entièrement soutenue par le
fond. La baignoire doit être appuyée sur le sous-
plancher ou être en contact avec le matériau de
nivellement.
11 Alignez la baignoire et reliez l’évacuation
12 Appliquez l’alimentation aux circuits spécialisés
protégés par un disjoncteur de fuite de terre et
vériezlefonctionnementdusystème.
13 Calfeutrez autour du périmètre de la baignoire pour
scellerl’espaceentrelerebordetlesupportni.
Sous-plancher de niveau
Sous-plancher
Morceau de
retailles de
bois
Minimum 5
cm (2 po)
Épaisseur
maximale
Carreaux ou
surfacenie
Membre de
soutien
Substrat
Sous-
plancher
inégal
Composé
àplancher
ottant
Installation dans une alcôve à trois murs
1 Installez l’évacuation/le trop-plein conformément
aux directives du fabricant. Reportez-vous aussi au
manueldespécicationstechniques.
L’installateur est responsable de l’étanchéité
de l’installation de l’évacuation. Toute fuite de
l’évacuation est exclue de la garantie Jacuzzi Luxury
Bath de ce produit.
2 Installez maintenant le robinet. Nous recommandons
defaireinstallerlerobinetparunplombierqualié.
3 Installez la bride (achetée séparément) conformément
aux directives qui sont comprises avec la trousse. Si
la baignoire est munie d’une bride intégrée, sautez
cette étape.
4 Placez la baignoire dans la niche. Vissez la bride sur
le montant en bois. Il pourra s’avérer nécessaire de
compenser l’unité pour combler tout espace entre le
poteauenboisetlabride(gure12).
5 Vouspouvezinstallerunmatériauisolantàl’intérieur
de la périphérie de la baignoire.
Vis Bride en
carrelage
Silicone/agent
d’étanchéité
Bordure de la
baignoire
Fourrure en
plastique
Panneau en
ciment
Mortier
Colombage
2,5 x 10 cm
(non destiné
au soutien)
Matériau de
nition
Figure 12 - soutien

Soaker™ Bath Series
Installation and Operation www.jacuzzi.com Page 43
EnglishFrançais
Installation et utilisation
Série de baignoires Soaker™
Installation de la jupe
Baignoires avec jupe intégrée
Matériaux de
nition
Boudin de
calfeutrage
Panneau de
la jupe
Figure 14 - installation de la jupe
Si vous installez une jupe intégrée, veuillez vous reporter au
guide d’installation de la jupe avant de continuer. Terminez
l’installation et les étapes d’assemblage conformément au
guide d’installation de la jupe.
Baignoires avec jupe en option
Vis de
montage (vue
de l’intérieur
de l’enceinte)
1 Vissez les brides de jupe dans les poteaux muraux.
Il pourra s’avérer nécessaire de compenser l’unité
pour combler tout espace entre les poteaux et les
brides.
2 Terminez le travail sur la bride de la jupe.
3 Calfeutrez autour du périmètre de la jupe pour
scellerl’espaceentrelajupeetlesupportni.
6 Coupez l’alimentation du circuit protégé par un
disjoncteur de fuite de terre.
7 Alignez la baignoire et reliez l’évacuation.
8 Reliezlesconduitesexiblesd’alimentationeneau
au robinet et branchez les cordons d’alimentation
danslapriseàdisjoncteurdefuitedeterre.
9 Examinez tous les raccords, la plomberie et les
conduites après l’insertion de la baignoire pour
vous assurer que les composants ne sont pas
endommagés, débranchés ou en contact avec
lesubstratdelasurfacenieoulesmembresde
soutien.
10 Appliquez l’alimentation aux circuits spécialisés
protégés par un disjoncteur de fuite de terre et
vériezlefonctionnementdusystème.
11 Calfeutrez tout le travail terminé autour du
périmètre de la baignoire pour sceller l’espace
entrelabordureetlesupportni(gure13).
Installation dans une alcôve à trois murs (suite)
Carreaux
Panneau en
ciment
Calfeutrage
Colombage
Adhésifà
carrelage
Poteau
Vis de
montage
2,5 x 10 cm
(non destiné
au soutien)
Bride en carrelage
Figure 13 - nition

Soaker™ Bath Series
Page 44 www.jacuzzi.com Installation and Operation
EnglishFrançais
Installation et utilisation
Série de baignoires Soaker™
Instalación de montaje bajo cubierta
1 Installez l’évacuation/le trop-plein conformément aux
directives du fabricant.
L’installateur est responsable de l’étanchéité de
l’installation de l’évacuation. Toute fuite de l’évacuation
est exclue de la garantie Jacuzzi Luxury Bath de ce
produit.
2 Coupez l’alimentation au circuit spécialisé protégé par un
disjoncteur de fuite de terre.
3 Inspectez tous les raccords, la plomberie et les conduites
de commande après l’insertion pour s’assurer que les
composants ne sont pas endommagés ou débranchés.
4 Alignez la baignoire et reliez l’évacuation.
5 Vouspouvezinstallerunmatériauisolantàl’intérieurde
la périphérie de la baignoire.
6 Coupez le support/comptoir selon les dimensions au
moyen du gabarit du montage en dessous fourni comme
suit :
•Placezlegabaritdemanièreàcequeleslignesdu
montage en dessous désirées soient alignées avec le
rebordcommedansl’illustration(gure15).
•Au moyen d’un crayon gras, marquez les lignes centrales
(notées par sur le gabarit). Retirez le gabarit.
•Mesurezladistancedumuroud’unautrepointxe
jusqu’auxlignescentrales(gure16)
7 Fixezlecomptoiràlabaignoire.Nettoyezlasaletéoules
débris de la partie supérieure du rebord de la baignoire.
Appliquez un boudin d’agent d’étanchéité en silicone
autour du rebord complet de la baignoire.
Gabarit
Bordure de la
baignoire
Figure 15 - – position du gabarit
AB
C
D
GabaritComptoir
Figure 16 - mesure de la distance
Nettoyage
Pour éviter de dépolir et d’égratigner la surface de la baignoire, n’utilisez jamais des nettoyants abrasifs. Pour la
plupartdessurfacessales,undétergentliquidedouxetdel’eautempéréesufsent.Nouseffectuonsaussiles
recommandations suivantes :
•Retirez le plâtre renversé au moyen d’une lame en bois ou en plastique. Les taches laissées par le plâtre ou
le coulis peuvent être éliminées en les frottant légèrement avec un détergent versé sur un chiffon ou une
éponge humide. N’utilisez pas des grattoirs en métal, des brosses métalliques ou d’autres outils en métal
puisqu’ils endommageront la surface de la baignoire.
•La peinture, le goudron et les autres taches rebelles peuvent être éliminées avec du Fantastik® ou de l’eau
savonneuse.
•Leségratignuresmineuresquinepénètrentpasleniencouleurpeuventêtreéliminéesenponçantlégèrement
avecunpapierdeverremouillé/secde600grains.Vouspouvezrestaurerlenibrillantdelasurfaceacryliquede
la baignoire au moyen d’un composé spécial appelé Meguiar’s #10 Mirror Glaze. Si ce produit n’est pas
disponible,utilisezunepâteàpolirautomobilesuiviedel’applicationd’unecireautomobileenpâte.
•Leségratignuresetlesrainuresmajeuresquipénètrentlasurfaceacryliquedevrontêtreniesànouveau.
Communiquez avec Jacuzzi Luxury Bath pour trouver un agent de service dans votre région.
8 Appliquez un boudin d’agent d’étanchéité en silicone continu autour de tout le joint entre le comptoir et le rebord
de la baignoire. Laissez l’agent d’étanchéité sécher conformément aux directives du fabricant.
Noutiliceadhesivoniselladoradhesivoparajarlaencimeraalabañera.Siserequieremantenimientoo
remodelación, es posible que deba quitarse la encimera. El adhesivo unirá de manera permanente la encimera
a la bañera. Ubique con cuidado la plataforma/encimera sobre la bañera. Siga las instrucciones del fabricante
para determinar el tiempo de curado.
9 Appliquezl’alimentationaucircuitspécialiséprotégéparundisjoncteurdefuitedeterreetvériezle
fonctionnement du système.

Soaker™ Bath Series
Installation and Operation www.jacuzzi.com Page 45
EnglishFrançais
Installation et utilisation
Série de baignoires Soaker™
Fonctionnement de la chromothérapie
(éclairage)
Appuyez sur le bouton d’éclairage une fois :
met l’éclairage en couleur EN MARCHE; utilisez les boutons
verslehautetverslebaspourfairedélerlescouleursou
sélectionner une autre couleur.
Appuyez sur le bouton d’éclairage une seconde fois :
met l’éclairage blanc EN MARCHE; utilisez les boutons
vers le haut et vers le bas pour sélectionner l’intensité de
l’éclairage blanc.
Appuyez sur le bouton d’éclairage une troisième fois :
éteint l’éclairage.
Fonctionnement de l’éclairage en couleur
L’éclairageencouleurpardéfautestlebleuconstant.Appuyezsurlaèche(verslehaut)pouractiverledélement
descouleursdanscetordre:bleu,bleusarcelle,vert,jaune,orange,rouge,rose,mauve,puisledélementretourne
aubleuetserépètecontinuellement.Pourarrêtersurunecouleurprécise,appuyezsurlaèche(verslehaut)à
nouveau.Appuyezsurlaèche(verslebas)pouractiverledélementdescouleursdanscetordre:bleu,mauve,
rose,rouge,orange,jaune,vert,bleusarcelle,puisledélementretourneaubleuetserépètecontinuellement.Pour
arrêtersurunecouleurprécise,appuyezsurlaèche(verslebas)ànouveau.
Fonctionnement de l’éclairage blanc
Ilyacinqintensitésd’éclairageblanc.Appuyezsurlebouton(+)pouraugmenterl’intensitédel’éclairage.Appuyezsur
le bouton (-) pour diminuer l’intensité de l’éclairage.
Si la chromothérapie ne fonctionne pas :
- réinitialisez le disjoncteur de fuite de terre
- assurez-vousquelacheestbienentréedanslaprise
- assurez-vous que les connecteurs du panneau de commande et du boîtier de commande sont bien insérés dans
les prises
- communiquez avec Jacuzzi Luxury Bath si les actions ci-dessus ne corrigent pas le problème.
Utilisation
TouteslesbaignoiresfabriquéesparJacuzziLuxuryBathsontconçuespour«remplissageetévacuation»,cequi
signiequelabaignoiredoitêtrevidéeaprèschaqueutilisationetremplied’eaufraîcheparlebaigneursuivant.Il
s’agit d’une précaution de santé puisque ces baignoires ne sont pas conçues pour conserver de l’eau continuellement
comme les piscines ou les spas.
Flèche vers le
haut Flèche vers le basLumière
Entretien
Nettoyage de la baignoire
Réparation de la surface
Pour nettoyer votre baignoire, utilisez simplement une solution de détergent liquide doux non abrasif. Vous pouvez
protéger et restaurer le lustre d’une surface acrylique dépolie en appliquant Meguiar’s #10 Mirror Glaze, un produit
spéciquementconçupourêtreutilisésurlesnisenacrylique.SileproduitMeguiarn’estpasdisponible,utilisezune
pâteàpolirautomobiledehautequalitésuiviedel’applicationd’unecireautomobileenpâte.
N’utilisez jamais des nettoyants domestiques abrasifs sur aucun produit Jacuzzi Luxury Bath.
Leségratignuresmineuresquinepénètrentpasleniencouleurpeuventêtreéliminéesenponçantlégèrementavec
un papier de verre mouillé/sec de 600 grains. Restaurez le lustre au moyen de Meguiar’s Mirror Glaze ou d’une cire
automobileenpâte.Leségratignuresetlesrainuresmajeuresquipénètrentlasurfaceacryliquedevrontêtreniesà
nouveau. Communiquez avec Jacuzzi Luxury Bath pour trouver un agent de service dans votre région.

Soaker™ Bath Series
Page 46 www.jacuzzi.com Installation and Operation
EnglishFrançais
Installation et utilisation
Série de baignoires Soaker™
Service autorisé
Si vous avez besoin d’une référence pour une entreprise de service près de chez vous ou si vous avez des questions
concernantlefonctionnementoul’entretien,veuillezcommuniqueravecnotreserviceàlaclientèleau1-800-288-4002.
VisiteznotresiteWebàhttp://www.jacuzzi.compourlesproduits,lesservicesetunecopieenlignedecesdirectives
d’installation et d’utilisation.
Lorsque vous demandez une visite de service ou de l’aide technique, ayez le modèle et le numéro de série de votre
unitéàlaportéedelamain.Cesrenseignementssetrouventsurlached’enregistrementduproduitfournieavec
votreunité.Silacheaétéégarée,cesrenseignementssetrouventsurl’étiquettedespécications/numérodesérie
située sur l’unité elle-même. Cette étiquette se trouve sur le mur de la baignoire près du moteur du ventilateur.
ÉTIQUETTE DE SPÉCIFICATIONS/NUMÉRO DE SÉRIE
MODÈLE: XXXXXXX
NOM: XXXXX
COULEUR: XXXXX
DU FABRICANT #: XXXXX
DE SÉRIE #: XXXXXX
Logosdeconformitéàlasécuritéappropriéspourvotreunité
Spécicationsélectriquesapplicablesàvotreunité.
Spécicationsélectriquesimpriméesàcetendroit.
Fabriqué aux É.-U.
XXXX-XXXXX
Numéro principal,
numéro de série
Vous trouverez le
numéro de série ici
LES SPÉCIFICATIONS DU PRODUIT PEUVENT ÊTRE MODIFIÉES SANS PRÉAVIS.
UTILISEZ LE MANUEL DE SPÉCIFICATIONS TECHNIQUES FOURNI AVEC CE PRODUIT.
Jacuzzi®LuxuryBathaobtenulesclassicationsdecode(normes)applicableshabituellementoffertesàl’échelle
nationale pour les produits de ce type. L’installateur/le propriétaire doivent déterminer la conformité au code local
précisavantd’installerleproduit.Jacuzzi®LuxuryBathn’effectueaucunereprésentationougarantierelativesàla
conformité au code et elle ne sera pas responsable de cette dernière.
Jacuzzi® Luxury Bath
14525 Avenue Monte Vista
Chino, Californie, 91710 É.-U.
1-800-288-4002
www.jacuzzi.com

Soaker™ Bath Series
Installation and Operation www.jacuzzi.com Page 47
EnglishFrançais
Installation et utilisation
Série de baignoires Soaker™
Français
Français
Warranty
COUVERTURE DE LA GARANTIE
JacuzziLuxuryBath(«l’Entreprise»)offrelagarantielimitéeàvieexpressesuivanteàl’acheteuroriginaldesproduitsJacuzzi®LuxuryBathoffertsauseindes
collectionsComfort,ComfortPlus,PureAir®,PureAir®IIetLuxury™(«Baignoire»)quiaachetélaBaignoirepourunusagepersonnelouunifamilialrésidentiel(«
Utilisateur»).L’Entrepriserépareraouremplacera,àsonentièrediscrétion,laBaignoireousonéquipementconformémentauxconditionsetmodalitéssuivantes.Cette
garantie ne s’applique pas aux Baignoires sans marque fabriquées par l’Entreprise.
GARANTIE À VIE SUR LES BAIGNOIRES
L’Entrepriseoffreàl’UtilisateurdelaBaignoireunegarantielimitéeàvienontransférablequelacoquilleconserverasonintégritéstructurelleetsacongurationet
sera exempte de fuite d’eau causée par un défaut dans sa coquille. La garantie ne couvre que la coquille de la baignoire et la pompe, les jets, les commandes et le
ventilateur installés par le fabricant contre les défauts de matériaux ou de fabrication. La garantie ne s’applique pas aux modèles de présentation ou aux options ou aux
accessoiresquisontcouvertsenvertudenotregarantielimitéedequatre-vingt-dix(90)joursdécriteci-dessous.Lacouverturedelagarantiecommenceàladateoù
l’unitéaétéachetéeparl’Utilisateuretdèslaréceptionparl’Entreprised’uneched’enregistrementdegarantiedûmentremplie,commeilestdécritci-dessous.
GARANTIE DE DEUX ANS SUR LA MAIN D’OEUVRE POUR TOUS LES COMPOSANTS INSTALLÉS EN USINE
Notregarantielimitéesurlamaind’œuvreestoffertependantunepériodededeux(2)ansàcompterdeladateoùl’unitéaétéachetéeparl’Utilisateur,maisnedevant
pasdépassertrois(3)ansàcompterdeladatedefabrication.Touslescomposantsinstallésenusine(commelapompe,lemoteur,leventilateuretlaplomberie)sont
couverts en vertu de notre garantie sur la main d’œuvre contre les pannes causées par des défauts de matériaux et de main d’œuvre.
GARANTIE LIMITÉE DE QUATRE-VINGT-DIX JOURS (PIÈCES SEULEMENT) SUR LES OPTIONS ET LES ACCESSOIRES
Notre garantie limitée sur les options et les accessoires est en vigueur pendant quatre-vingt-dix (90) jours pour les pièces seulement. Notre garantie couvre les options
et les accessoires fabriqués (comme les trousses de bec de remplissage d’évacuation, les trousses de parement, les jupes, les moniteurs vidéo, les écrans plats
ACL et les lecteurs MP3 et les autres appareils de musique et de vidéo et les appareils de chauffage en option) contre les défauts de matériaux ou de fabrication. La
couverturedegarantiecommenceàladateoùl’optionoul’accessoireontétéoriginalementachetésparl’Utilisateur.Cesarticlespeuventêtrecouvertsparlagarantie
d’unfabricantquipeutêtrepluslonguequecelleofferteparcettegarantielimitée.Veuillezconrmeraveclefabricantladuréedelagarantiepertinentepourlesoptions
et les accessoires.
LIMITES DE LA GARANTIE
Notre garantie limitée ne couvre pas les défauts, les dommages ou les pannes causés par le transporteur, l’installateur ou d’autres personnes, les animaux ou les
rongeurs ou découlant, sans en exclure d’autres, de l’un ou l’autre des éléments suivants : la manipulation négligente (soulever l’unité par la plomberie, abraser
leni,etc.)ycomprissaproprenégligence;lesmodicationsdetoutesortepourquelqueraisonquisoit(ycomprislesmodicationseffectuéespoursatisfaireles
codeslocaux);unemauvaiseinstallation(ycompristouteinstallationnonconformeauxdirectivesetspécicationsfourniesavecl’unité);lesconnexionsfourniespar
l’installateurdel’équipement;unemauvaisetensiond’alimentationouunemodicationélectriquenonautorisée;unemauvaiseutilisation;unfonctionnementinadéquat
oul’absenced’uneroutined’entretienappropriée;lefonctionnementdel’unitésanslaquantitéminimaled’eaupréciséeouàunetempératured’eauinappropriée;
l’utilisation de nettoyants abrasifs ou inappropriés ou les catastrophes naturelles, comme les éclairs, les inondations, les tremblements de terre, etc.
De plus, L’ENTREPRISE NE SERA PAS RESPONSABLE DES DOMMAGES CONSÉCUTIFS OU INDIRECTS ou des pertes découlant de toute cause (par ex.,
dommagesd’eauauxtapis,plafonds,carreaux,marbre,perted’utilisation,etc.),ycomprissaproprenégligence;lesdommagescausésà,concernantoudécoulant:
de pièces plaquées lorsque des produits chimiques de piscine et/ou de spa sont utilisés dans l’unité ou lorsque l’eau est dure; de l’équipement de baignoire en option
nonfabriquéparl’Entreprise,maisfourniparledépositaire,l’installateuroul’Entreprise;d’unusageantérieurdel’unitéàtitredeprésentoirfonctionnel;oudedéfauts
qui auraient dû être découverts avant l’installation.
Cette garantie limitée ne comprend pas : la main d’œuvre, le transport ou les autres frais encourus pour le retrait et/ou la réinstallation de l’unité originale et/ou
l’installation d’une unité de rechange; les frais encourus pour obtenir l’accès pour effectuer la réparation; ou les dommages causés par la perte d’utilisation, y compris
lapertedeventes,deprotsoud’avantagesconcurrentielsdetoutesortequellesquesoientlescirconstances.Lesbaignoiressontexcluesdetoutecouverturede
garantiesiunajout,unesuppressionouunemodicationdetoutessortesaétéeffectuéàl’unité(ouàundesescomposants).Lacouverturedegarantieestfournie
aux États-Unis d’Amérique et au Canada seulement.
EXCLUSION DES GARANTIES IMPLICITES
LES GARANTIES IMPLICITES DE VALEUR MARCHANDE ET D’ADAPTATION À UN USAGE PARTICULIER SONT ENTIÈREMENT DÉCLINÉES OU DANS LA
MESURE LA PLUS GRANDE PERMISE PAR LA LOI.
REMARQUE:Cettegarantievousconfèredesdroitslégauxprécisetvouspouvezaussiavoird’autresdroitsquivarientd’uneprovinceàl’autre.Iln’yapasde
garantiesquis’appliquentauxproduitsJacuzziLuxuryBathàl’exceptiondecequiestexpressémentindiquéauxprésentesouimpliquéparlesloisfédéraleset
provincialesenvigueur.L’Entrepriseneserapasresponsabledesdéclarationsoudesreprésentationseffectuéessoustouteformequivontau-delà,quisontplus
vastesouquinesontpasconformesàladocumentationautoriséeouauxspécicationsfourniesparl’Entreprise.Certainesprovincesnepermettentpasleslimitessur
laduréedesgarantieslimitéesoul’exclusionoulalimitedesdommagesconsécutifsouindirects;parconséquent,leslimitesprécédentespeuventnepass’appliquerà
votre cas.
.
Jacuzzi® Luxury Bath
14525 Monte Vista Avenue
Chino, California 91710
Garantie limitée à vie sur les baignoires de marque Jacuzzi Luxury pour les collections
Comfort, Comfort Plus, Pure Air®, Luxury, Salon™ Spa et Pure Air® II
Luxury Bath by Jacuzzi®
HD87000

Soaker™ Bath Series
Page 48 www.jacuzzi.com Installation and Operation
EnglishFrançais
Série de baignoires Soaker™
Français
HD87000
JACUZZI LUXURY BATH
Garantie limitée
de quatre-vingt-dix
jours
seulement sur les
pièces des acces-
soires
Garantie limitée
de quatre-vingt-dix
jours
seulement sur les
pièces des acces-
soires
RETOUR DE L’ENREGISTREMENT DE LA GARANTIE
Pourenregistrervotreproduit,veuillezvisiternotresiteWeb,Jacuzzi.com,cliquezsur«BathandShowers»(baignoiresetdouches),puissélectionnezONLINE
WARRANTY REGISTRATION (enregistrement de la garantie en ligne) dans la partie supérieure de la page. On vous demandera d’entrer le numéro de série de votre
produit,suividesrenseignementsd’enregistrementdevotregarantie.Ouencore,vouspouvezaussienregistrervotreproduitenremplissantlacheci-dessouseten
l’envoyantàJacuzziàl’adresseindiquée.
L’enregistrementdegarantieci-jointDOITêtrerempliparl’acheteurdansundélaidetrente(30)joursdel’achatetreçuparJacuzziLuxuryBathanquecettegarantie
soit en vigueur.
RESPONSABILITÉS DES AUTRES
L’installateur ou l’entrepreneur qui agit au nom de l’Utilisateur doit examiner l’unité avant de l’installer. Il doit s’assurer que l’unité est libre de défauts ou de dommages.
Des avis sont placés sur et dans l’unité ainsi que sur la boîte d’expédition avisant l’installateur de cette responsabilité. En cas de problème, l’unité ne doit pas être
installée.L’Entreprisen’estpasresponsabledespannesoudesdommagesquiauraientpuêtredécouverts,réparésouévitésgrâceàuneinspectionetunessaiadéquats
(y compris un essai d’eau approprié) avant l’installation.
Le transporteur est responsable des dommages qui surviennent pendant le transport. L’Utilisateur ou l’installateur DOIT ouvrir la boîte et examiner l’unité lorsqu’elle est
livrée. Si des dommages sont découverts, ils doivent être immédiatement signalés au vendeur et au transporteur par écrit et une inspection doit être demandée. Si le
transporteur ne répond pas, vous devez le signaler au vendeur et au transporteur. Vos réclamations de transport doivent être présentées dans un court délai.
L’installateur et/ou l’entrepreneur sont responsables des dommages survenant pendant l’installation et l’Utilisateur est responsable des dommages survenant par la suite.
Lefabricantd’équipementestentièrementresponsabledetoutedéfaillancedeséquipementsenoptionàl’exceptiondecequiestprévuci-dessusetcetteresponsabilité
ne se prolonge pas ou ne s’applique pas aux pièces de rechange pour les options et les accessoires. Les pièces de rechange seront couvertes par le fabricant original de
l’équipement.
Le distributeur ou le dépositaire doit connaître les exigences relatives aux codes locaux et aviser l’entrepreneur qui effectuera l’installation et/ou l’Utilisateur de ces
exigencesaumomentdel’achat.L’Entreprisen’estpasresponsabledesfraisencouruspourmodierunproduitpourseconformeràuncode,commelescodesde
construction de la ville, du conté ou de l’État aux États-Unis ou les codes municipaux ou provinciaux au Canada.
SERVICE DE GARANTIE
Pour la commodité des clients, l’Entreprise conserve une liste de réparateurs indépendants qui effectuent les réparations requises en vertu de la garantie. Ces personnes
ne sont pas des agents ou des représentants de l’Entreprise et ne peuvent pas lier l’Entreprise par leurs paroles ou leur comportement.
L’Entreprise fournit le service de garantie décrit ci-dessus lorsque les conditions suivantes sont respectées : la panne est de nature ou de type couvert par la garantie;
l’Utilisateur a informé l’agent de service Jacuzzi Luxury Bath autorisé ou un représentant du service de la garantie de la nature du problème pendant la période de
garantie; des preuves concluantes (par ex., une preuve d’achat ou d’installation) est fournie par l’utilisateur prouvant que la panne s’est produite ou a été découverte
pendant la période de garantie; un réparateur indépendant autorisé ou un représentant de l’Entreprise a eu la permission d’inspecter l’unité pendant les heures normales
d’affairedansundélairaisonnableaprèslasignalisationduproblèmeparl’Utilisateur.And’obtenirleserviceenvertudelagarantie,communiquezavecJacuzziLuxury
Bathà:
jacuzzi.com
ou
Service de garantie
14525 Avenue Monte Vista
Chino, Californie 91710 É.-U.
Composez le : 1-(800) 288-4002
Pour obtenir un remplacement de garantie pour les composants installés en usine pour les options et les accessoires fournis par l’Entreprise et fabriqués et fournis par
l’Entreprise,composezlenuméroouécrivezàl’adresseindiquésci-dessus.Fournissezunedescriptionduproblèmeetunepreuved’achat.Onvousindiqueracomment
obtenirdespiècesderechangeetoùretourner,àvosfrais,le(s)composant(s),l’option(lesoptions)oul’accessoire(lesaccessoires)défectueux.
Toutes les pièces ou l’équipement de rechange et les réparations seront garantis pendant la période de garantie restante de la(es) pièce(s) remplacée(s).
L’obligation de garantie de l’Entreprise sera acquittée au moment de la remise du remplacement ou de la réparation. Si le client refuse le remplacement ou la réparation,
l’obligation de garantie de l’Entreprise est alors terminée.
FICHE D’ENREGISTREMENT
DE LA GARANTIE
Poureffectuervotreenregistrement, visiteznotresite Webà www.jacuzzi.
comouremplissezetpostezcettecheàl’adresseindiquéeauverso,etce,
dansundélaidetrente(30)joursdeladated’achatanquecettegarantie
soit en vigueur.
Nom de l’acheteur __________________________________________
Adresse de l’acheteur _______________________________________
Ville ____________________________ Province ___ Code postal __
Date d’achat ______________________________________________
Nom du modèle ___________________________________________
Numéro de série ___________________________________________
Nom du dépositaire _________________________________________
Adresse du dépositaire ______________________________________
1.Commentavez-vousentenduparlerdeceproduitJacuzzi®?
( ) Publicité ( ) Article dans une revue/un journal
( ) Visité un dépositaire/fournisseur de plomberie ( ) Pages jaunes
( ) Constructeur/plombier/rénovateur ( ) Décorateur/architecte
( ) Visité un détaillant/magasin de rénovation
()Boucheàoreille...Ami/parent/connaissance
( ) Autre (veuillez préciser)
2. Qui est la première personne vous ayant donné des renseignements
précisausujetdeceproduit(spécications,prix,etc.)?
( ) Dépositaire/fournisseur de plomberie ( ) Constructeur ( ) Rénovateur
( ) Entrepreneur en plomberie ( ) Détaillant/magasin de rénovation
()Décorateur/architecte()Déjàinstallé
3.Quelleétaitlaprincipaleraisondevotreachat?
( ) Style ( ) Service de garantie ( ) Caractéristiques du produit
( ) Nom de la marque ( ) Prix ( ) Hydrothérapie
( ) Revente de la résidence
( ) Autre
4.Quianalementchoisileproduitquevousavezacheté?
( ) Moi ( ) Mon conjoint ( ) Moi et mon conjoint ensemble
( ) Autre membre de la famille ( ) Décorateur/architecte
()Constructeur/plombier/rénovateur()Déjàinstallé
5.Quil’ainstallé?()Déjàinstallé/nouvellerésidence
( ) Entrepreneur/plombier lors de la rénovation
( ) Moi/mon conjoint lors d’une rénovation
( ) Autre
6.Quelleestlavaleuractuellesurlemarchédecettepropriété?
Veuillez l’évaluer en dollars
7.Quelestl’âgeduchefduménage? ans
8.Quelautrefabricantavez-vousconsidéré?
()Eljer()Lasco()PricePster()AquaGlass
( ) Kohler ( ) American Standard ( ) Sterling
( ) Autre (précisez)
9.Combiendetempsavez-vousmagasinéavantd’achetercetteunité?
()1jour()2à6mois
()2à7jours()6moisà1an
()1à2semaines()1à2ans
()2à4semaines()+2ans
()1à2mois
10. Depuis combien de temps approximativement habitez-vous dans cette
résidence?
11. Veuillez indiquer, approximativement, le revenu annuel total de votre
ménage
()Jusqu’à24999$()50000à74999$
()25000à29999$()75000à99999$
()30000à39999$()100000à149999$
()40000à49999$()150000$etplus
12.Est-cequevotreprocessusd’achataété…?
()Trèsfacile()Facile()Difcile()Trèsdifcile
13. Est-ce que vous connaissiez le système de jets breveté de Jacuzzi
avantvotreachat?
( ) Non, je ne le connaissais pas ( ) Je le connaissais un peu ( ) Je le
connaissais très bien
-
 1
1
-
 2
2
-
 3
3
-
 4
4
-
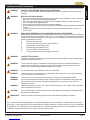 5
5
-
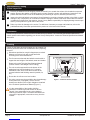 6
6
-
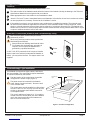 7
7
-
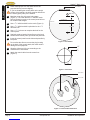 8
8
-
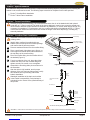 9
9
-
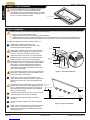 10
10
-
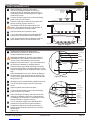 11
11
-
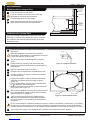 12
12
-
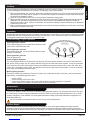 13
13
-
 14
14
-
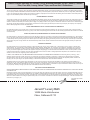 15
15
-
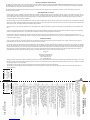 16
16
-
 17
17
-
 18
18
-
 19
19
-
 20
20
-
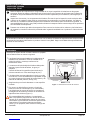 21
21
-
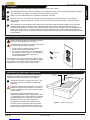 22
22
-
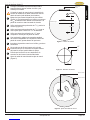 23
23
-
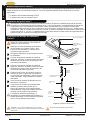 24
24
-
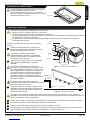 25
25
-
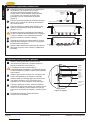 26
26
-
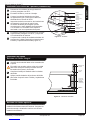 27
27
-
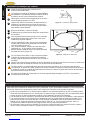 28
28
-
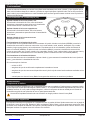 29
29
-
 30
30
-
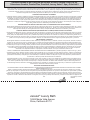 31
31
-
 32
32
-
 33
33
-
 34
34
-
 35
35
-
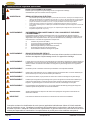 36
36
-
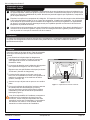 37
37
-
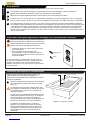 38
38
-
 39
39
-
 40
40
-
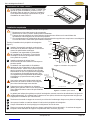 41
41
-
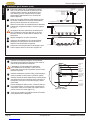 42
42
-
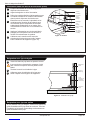 43
43
-
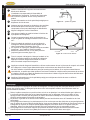 44
44
-
 45
45
-
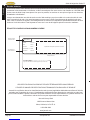 46
46
-
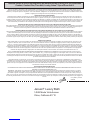 47
47
-
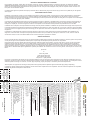 48
48


Jacuzzi SOAKER BATH SERIES Installation And Operation Instructions Manual
- Tipo
- Installation And Operation Instructions Manual
en otros idiomas
- français: Jacuzzi SOAKER BATH SERIES
- English: Jacuzzi SOAKER BATH SERIES
Artículos relacionados
-
Jacuzzi N1S6032WRL1XXW Guía de instalación
-
Jacuzzi NOV7242WLR2XXW Guía de instalación
-
-
Jacuzzi MOF6636WCR2CPWC Guía de instalación
-
-
Jacuzzi P1D6032WLR1XXW Guía de instalación
-


