Lindy 9 Port HDMI Video Wall Scaler Manual de usuario
- Tipo
- Manual de usuario

© LINDY Group - FIRST EDITION (June 2022)
9 Port HDMI Video Wall Scaler
User Manual English
Benutzerhandbuch Deutsch
Manuel Utilisateur Français
Manuale Italiano
Manual de Usuario Español
No. 38261
lindy.com

User Manual English
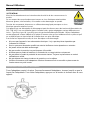
Safety Instructions
! WARNING !
Please read the following safety information carefully and always keep this document with
the product.
Failure to follow these precautions can result in serious injuries or death from electric
shock, fire or damage to the product.
Touching the internal components or a damaged cable may cause electric shock, which
may result in death.
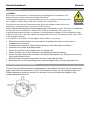
This device is a switching type power supply and can work with supply voltages in the range 100 - 240
VAC For worldwide usability four different AC adapters are enclosed: Euro type, UK type, US/Japan type
and Australia/New Zealand type. Use the appropriate AC adapter as shown in the picture and ensure it
is firmly secured in place and does not detach by pulling before installing into a power socket.
To reduce risk of fire, electric shocks or damage:
▪ Do not open the product nor its power supply. There are no user serviceable parts inside.
▪ Only qualified servicing personnel may carry out any repairs or maintenance.
▪ Never use damaged cables.
▪ Do not expose the product to water or places of moisture.
▪ Do not use this product outdoors it is intended for indoor use only.
▪ Do not place the product near direct heat sources. Always place it in a well-ventilated place.
▪ Do not place heavy items on the product or the cables.
▪ Please ensure any adapters are firmly secured and locked in place before inserting into a wall socket
Instructions for Use of Power Supply
Attach the required adapter to the plug. Push the adapter firmly, twist until the latch secures the adapter.
To remove, push the button and twist in the opposite direction.

User Manual English
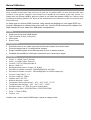
Introduction
Thank you for purchasing the 9 Port HDMI Video Wall Scaler. This product has been designed to provide
trouble free, reliable operation. It benefits from both a LINDY 2 year warranty and free lifetime technical
support. To ensure correct use, please read this manual carefully and retain it for future reference.
The Lindy 9 Port HDMI Video Wall Scaler allows a single HDMI input signal to be split up to 9 times using
a single unit. Featuring 9 HDMI outputs allows for a great deal of flexibility in creating a wide range of
different video walls suitable for any environment.
Package Contents
▪ 9 Port HDMI Video Wall Scaler
▪ IR Remote Control with 2 x AAA batteries
▪ PSU
▪ Lindy Manual
Features
▪ Create up to a 3x3 video wall from a single input source
▪ Supports 13 different video wall splicing modes
▪ Simple operation using either the included IR remote or push buttons
▪ Ability to combine multiple units for larger video wall configurations
Specification
▪ Input: 1 x HDMI Type A (Female)
▪ Output: 9 x HDMI Type A (Female)
▪ Control: RS-232, IR Remote Control
▪ Interface Standard: HDMI 1.4
▪ Supports Bandwidth: 10.2Gbps
▪ Maximum Input Resolution: 3840x2160@30Hz 4:4:4 8bit
▪ Maximum Output Resolution: 1920x1080@60Hz 4:4:4 8bit each
▪ HDCP Support: 1.4
▪ IR Support: 38kHz
▪ Serial Interface: RS-232
▪ Housing Material: Metal
▪ Operating Temperature: -10°C - 45°C (14°F - 113°F)
▪ Storage Temperature: -10°C - 80°C (14°F - 176°F)
▪ Humidity: 10 - 85% RH (non-condensing)
▪ Dimension (LxWxH): 305x185x35mm (12.01x7.28x1.38in)
▪ Weight: 1.747kg (3.85lb)
▪ Colour: Black
Please note: HDMI Output 1 is the only HDMI output that supports audio

User Manual English
Installation
1. Ensure all devices are powered off before connection. Once the power supply is connected the
Power LED will illuminate.
2. Connect an HDMI input device to the HDMI IN port.
3. Connect the displays to the HDMI Output ports using HDMI cables.
4. Power on all devices.
5. For simple push button control use the switches on the front panel.
6. For IR control, please ensure the IR receiver is in line of sight of the IR remote. For instructions
on the various functions of the IR remote please see the diagrams below.
7. For RS-232 control, please connect a PC to the RS-232 port of the switch and open a RS-232
terminal software. For instructions on the RS-232 commands please see below.
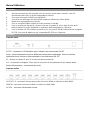
Operation
Front Panel
RS232 – Connect to a PC/Notebook for the use of RS-232 commands
Mode – Cycles between the available video output modes. For specific control please use the IR remote
or RS-232 control
IR – IR receiver window for control using the included IR remote
R/L – 3.5mm analog audio output for connection with headphones or speakers
Power Switch – Toggles the main power to the unit on and off
Rear Panel
OUTPUT 1-9: Connect each output to a single HDMI display using a HDMI cable
HDMI IN: Connect an HDMI source device using a HDMI cable
DC/12V – Connect the included power supply and connect to a mains power outlet

User Manual English
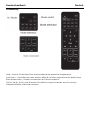
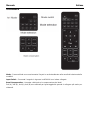
Remote Control
Mode – Press Mode and afterwards the desired output layout from the mode selection section
Input Switch – Switch the input between HDMI IN and a connected player
Bezel Compensation – Raise and lower the bezel compensation
3x4 (A), 3x4 (B), 4x4 (A), 4x4 (B) are used for additional layouts when you connect multiple video wall
scalers together

User Manual English
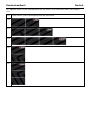
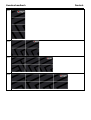
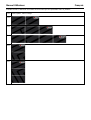
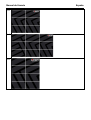
Please find the below video wall modes that are possible with one 9 Port HDMI Video Wall Scaler:
1x1
Splitter mode, each video output is the same image
1x2
1x3
1x4
2x1
3x1

User Manual English
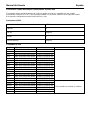
4x1
2x2
2x3
2x4

User Manual English
3x2
3x3
4x2

User Manual English
Daisy Chain of Multiple Video Wall Controllers
The Lindy 9 Port Video Wall Controller can be cascaded with another unit by connecting the OUTPUT 9
port of the first unit with the HDMI IN port of the second unit.
This allows additional 3x4 and 4x4 configurations.
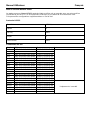
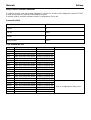
RS-232 Protocols
Baud Rate
9600bps
DataB
8
DPaity
None
StopB
1
Flow Control
None
RS-232 Commands
Layout
HEX
Feedback
Note
1x1
0xD5 0x01 0x01 0x00 0xAA
72 65 63 76 20 6F 6B
1x2
0xD5 0x02 0x01 0x00 0xAA
72 65 63 76 20 6F 6B
1x3
0xD5 0x03 0x01 0x00 0xAA
72 65 63 76 20 6F 6B
1x4
0xD5 0x04 0x01 0x00 0xAA
72 65 63 76 20 6F 6B
1x5
0xD5 0x05 0x01 0x00 0xAA
72 65 63 76 20 6F 6B
2x1
0xD5 0x01 0x02 0x00 0xAA
72 65 63 76 20 6F 6B
3x1
0xD5 0x01 0x03 0x00 0xAA
72 65 63 76 20 6F 6B
4x1
0xD5 0x01 0x04 0x00 0xAA
72 65 63 76 20 6F 6B
5x1
0xD5 0x01 0x05 0x00 0xAA
72 65 63 76 20 6F 6B
2x2
0xD5 0x02 0x02 0x00 0xAA
72 65 63 76 20 6F 6B
2x3
0xD5 0x03 0x02 0x00 0xAA
72 65 63 76 20 6F 6B
2x4
0xD5 0x04 0x02 0x00 0xAA
72 65 63 76 20 6F 6B
4x2
0xD5 0x02 0x04 0x00 0xAA
72 65 63 76 20 6F 6B
3x3
0xD5 0x03 0x03 0x00 0xAA
72 65 63 76 20 6F 6B
3x4 -A
0xD5 0x04 0x03 0x0A 0xAA
72 65 63 76 20 6F 6B
Only when daisy chained
3x4 -B
0xD5 0x04 0x03 0x0B 0xAA
72 65 63 76 20 6F 6B
4x3 -A
0xD5 0x03 0x04 0x0A 0xAA
72 65 63 76 20 6F 6B
4x3 -B
0xD5 0x03 0x04 0x0B 0xAA
72 65 63 76 20 6F 6B
4x4 -A
0xD5 0x04 0x04 0x0A 0xAA
72 65 63 76 20 6F 6B
4x4 -B
0xD5 0x04 0x04 0x0B 0xAA
72 65 63 76 20 6F 6B

Benutzerhandbuch Deutsch
Sicherheitshinweise
! GEFAHR !
Bitte lesen Sie die folgenden Sicherheitshinweise sorgfältig durch und bewahren Sie
dieses Dokument immer zusammen mit dem Produkt auf.
Die Nichtbeachtung dieser Vorsichtsmaßnahmen kann zu schweren Verletzungen oder
zum Tod durch Stromschlag, Feuer oder Schäden am Produkt führen.
Das Berühren der internen Komponenten oder eines beschädigten Kabels kann einen
elektrischen Schlag verursachen, der zum Tod führen kann.
Dieses Schaltnetzteil arbeitet mit Anschlussspannungen im Bereich von 100…240 VAC. Für weltweiten
Einsatz sind vier verschiedene AC-Adapter für Europa, Großbritannien, USA/Japan und
Australien/Neuseeland enthalten. Verwenden Sie den geeigneten Adapter wie es die Abbildung zeigt.
Stellen Sie bitte sicher, dass der Adapter fest eingerastet ist und sich nicht abziehen lässt, bevor Sie ihn
in die Steckdose stecken.
Um die Gefahr von Bränden, Stromschlägen oder Schäden zu verringern:
▪ Öffnen Sie weder das Produkt noch sein Netzteil. Es befinden sich keine vom Benutzer zu
wartenden Teile im Inneren.
▪ Ausschließlich qualifiziertes Personal darf Reparaturen oder Wartungen durchführen.
▪ Verwenden Sie niemals beschädigte Kabel.
▪ Setzen Sie das Produkt nicht Wasser oder Feuchtigkeit aus.
▪ Dieses Produkt ist nur für den Gebrauch in geschlossenen Räumen bestimmt.
▪ Stellen Sie das Produkt nicht in der Nähe von direkten Wärmequellen auf. Stellen Sie es immer an
einem gut belüfteten Ort auf.
▪ Stellen Sie keine schweren Gegenstände auf das Produkt oder die Kabel.
▪ Bitte stellen Sie vor der Verwendung sicher, dass alle Adapter sicher und fest eingerastet sind
Anwendungshinweise für das Netzteil
Stecken Sie den entsprechenden Länderadapter in das Netzteil. Drücken Sie den Adapter fest
gegen das Gehäuse und drehen Sie ihn, bis er einrastet. Wenn Sie den Adapter wieder vom
Netzteil abnehmen möchten, drücken Sie auf den Knopf und drehen den Adapter in die
entgegengesetzte Richtung.

Benutzerhandbuch Deutsch
Einführung
Wir freuen uns, dass Ihre Wahl auf ein LINDY-Produkt gefallen ist und danken Ihnen für Ihr Vertrauen. Sie
können sich jederzeit auf unsere Produkte und einen guten Service verlassen. Dieser 9 Port HDMI Video
Wall Scaler unterliegt einer 2-Jahres LINDY Herstellergarantie und lebenslangem kostenlosen
technischen Support. Bitte lesen Sie diese Anleitung sorgfältig und bewahren Sie sie auf.
Lieferumfang
▪ 9 Port HDMI Video Wall Scaler
▪ Infrarot-Fernbedienung mit 2 x AAA Batterien
▪ Netzteil
▪ Lindy Handbuch
Eigenschaften
▪ Erstellet bis zu 3x3 Videowände aus einer einzigen Eingangsquelle
▪ Unterstützt 13 verschiedene Videowand-Modi
▪ Einfache Bedienung über die mitgelieferte Infrarot-Fernbedienung oder Drucktasten am Gerät
▪ Ermöglicht die Kombination zweier Geräte für größere Videowandkonfigurationen
Spezifikationen
▪ Eingänge: 1 x HDMI Typ A (Buchse)
▪ Ausgänge: 9 x HDMI Typ A (Buchse)
▪ Steuerung: RS-232, Infrarot-Fernbedienung
▪ Schnittstellen-Standard: HDMI 1.4
▪ Unterstütze Bandbreite: 10.2Gb/s
▪ Maximale Eingangs-Auflösung: 3840x2160@30Hz 4:4:4 8bit
▪ Maximale Ausgangs-Auflösung: jeweils 1920x1080@60Hz 4:4:4 8bit
▪ HDCP Unterstützung: HDCP 1.4
▪ IR-Unterstützung: 38kHz
▪ Gehäusematerial: Metall
▪ Betriebstemperatur: -10°C - 45°C (14°F - 113°F)
▪ Lagertemperatur: -10°C - 80°C (14°F - 176°F)
▪ Feuchtigkeit: 10 - 85% RH (nicht kondensierend)
▪ Gehäuseabmessungen (ca.) BxTxH: 305x185x35mm (12.01x7.28x1.38in)
▪ Gewicht: 1.747kg (3.85lb)
▪ Farbe: Schwarz

Benutzerhandbuch Deutsch
Installation
1. Stellen Sie sicher, dass alle Geräte vor dem Anschluss ausgeschaltet sind. Sobald das Netzteil
angeschlossen ist, leuchtet die Power-LED auf.
2. Schließen Sie ein HDMI-Eingangsgerät an den HDMI IN-Anschluss an.
3. Schließen Sie die Bildschirme mit HDMI-Kabeln an die HDMI-Ausgangsanschlüsse an.
4. Schalten Sie alle Geräte ein.
5. Verwenden Sie die Schalter an der Vorderseite für eine einfache Steuerung per Knopfdruck.
6. Für die Fernbedienungs-Steuerung stellen Sie bitte sicher, dass sich der Infrarot-Empfänger in
Sichtweite der Infrarot-Fernbedienung befindet. Anweisungen zu den verschiedenen Funktionen
der Infrarot-Fernbedienung finden Sie in den nachstehenden Diagrammen.
7. Für die RS-232-Steuerung schließen Sie bitte einen PC an den RS-232-Port des Scalers an und
öffnen Sie eine RS-232-Terminal-Software. Anweisungen zu den RS-232-Befehlen finden Sie
weiter unten.
Betrieb
Vorderseite
RS232 – Zum Anschluss an einen PC/Notebook für die Verwendung von RS-232-Befehlen
Mode – Wechselt zwischen den verfügbaren Videowandmodi. Für die spezifische Steuerung verwenden
Sie bitte die Infrarot-Fernbedienung oder die RS-232-Steuerung
IR – IR-Empfänger für die Steuerung mit der mitgelieferten Infrarot-Fernbedienung
R/L – 3,5 mm analoger Audioausgang für den Anschluss von Kopfhörern oder Lautsprechern
Power Switch – Schaltet die Hauptstromversorgung des Geräts ein und aus
Rückseite
OUTPUT 1-9: Schließen Sie jeden Ausgang mit einem HDMI-Kabel an einzelne HDMI-Bildschirme an
HDMI IN: Schließen Sie ein HDMI-Quellgerät über ein HDMI-Kabel an
DC/12V – Schließen Sie das mitgelieferte Netzteil an und verbinden Sie es mit einer Netzsteckdose

Benutzerhandbuch Deutsch
Fernbedienung
Mode – Drücken Sie die Mode-Taste und anschließend das gewünschte Ausgabelayout
Input Switch – Umschalten des Inputs zwischen HDMI IN und einem angeschlossenen Medien-Player
Bezel Kompensation – Anheben und Absenken der Rahmen-Ausgleichs
3x4 (A), 3x4 (B), 4x4 (A), 4x4 (B) werden für zusätzliche Layouts verwendet, wenn Sie mehrere
Videowand-Skalierer miteinander verbinden

Benutzerhandbuch Deutsch
Im Folgenden finden Sie die Videowandmodi, die mit einem 9 Port HDMI Video Wall Scaler möglich
sind:
1x1
Splitter-Modus, jeder Videoausgang zeigt das gleiche Bild
1x2
1x3
1x4
2x1
3x1

Benutzerhandbuch Deutsch
4x1
2x2
2x3
2x4

Benutzerhandbuch Deutsch
3x2
3x3
4x2

Benutzerhandbuch Deutsch
Verkettung mehrerer Videowand-Controller
Der Lindy 9 Port Video Wall Scaler kann mit einem anderen Gerät kaskadiert werden, indem der
OUTPUT 9-Anschluss des ersten Geräts mit dem HDMI IN-Anschluss des zweiten Geräts verbunden
wird.
Dies ermöglicht zusätzliche 3x4- und 4x4-Konfigurationen.
RS-232 Protokoll
Baud Rate
9600bps
DataB
8
DPaity
None
StopB
1
Flow Control
None
RS-232 Befehle
Layout
HEX
Feedback
Note
1x1
0xD5 0x01 0x01 0x00 0xAA
72 65 63 76 20 6F 6B
1x2
0xD5 0x02 0x01 0x00 0xAA
72 65 63 76 20 6F 6B
1x3
0xD5 0x03 0x01 0x00 0xAA
72 65 63 76 20 6F 6B
1x4
0xD5 0x04 0x01 0x00 0xAA
72 65 63 76 20 6F 6B
1x5
0xD5 0x05 0x01 0x00 0xAA
72 65 63 76 20 6F 6B
2x1
0xD5 0x01 0x02 0x00 0xAA
72 65 63 76 20 6F 6B
3x1
0xD5 0x01 0x03 0x00 0xAA
72 65 63 76 20 6F 6B
4x1
0xD5 0x01 0x04 0x00 0xAA
72 65 63 76 20 6F 6B
5x1
0xD5 0x01 0x05 0x00 0xAA
72 65 63 76 20 6F 6B
2x2
0xD5 0x02 0x02 0x00 0xAA
72 65 63 76 20 6F 6B
2x3
0xD5 0x03 0x02 0x00 0xAA
72 65 63 76 20 6F 6B
2x4
0xD5 0x04 0x02 0x00 0xAA
72 65 63 76 20 6F 6B
4x2
0xD5 0x02 0x04 0x00 0xAA
72 65 63 76 20 6F 6B
3x3
0xD5 0x03 0x03 0x00 0xAA
72 65 63 76 20 6F 6B
3x4 -A
0xD5 0x04 0x03 0x0A 0xAA
72 65 63 76 20 6F 6B
Nur bei Verkettung
3x4 -B
0xD5 0x04 0x03 0x0B 0xAA
72 65 63 76 20 6F 6B
4x3 -A
0xD5 0x03 0x04 0x0A 0xAA
72 65 63 76 20 6F 6B
4x3 -B
0xD5 0x03 0x04 0x0B 0xAA
72 65 63 76 20 6F 6B
4x4 -A
0xD5 0x04 0x04 0x0A 0xAA
72 65 63 76 20 6F 6B
4x4 -B
0xD5 0x04 0x04 0x0B 0xAA
72 65 63 76 20 6F 6B

Manuel Utilisateur Français
Consignes de sécurité
! ATTENTION !
Merci de lire attentivement ces instructions de sécurité et de les conserver avec le
produit.
Le non-respect de ces précautions peut causer un choc électrique entrainant des
blessures graves, voire mortelles, un incendie ou des dommages au produit.
Toucher les composants internes ou un câble endommagé peut provoquer un choc
électrique pouvant entraîner la mort.
Cet appareil est une alimentation à découpage et peut fonctionner avec des tensions d'alimentation de
100...240 VAC Pour une utilisation dans le monde entier, quatre adaptateurs secteur différents sont
inclus : Type Euro, type UK, type US/Japon et type Australie/Nouvelle-Zélande. Utilisez l'adaptateur
secteur approprié comme indiqué sur la photo et assurez-vous qu'il est solidement fixé en place et qu'il
ne se détache pas en tirant avant de l'installer dans une prise électrique.
Pour éviter les risques d'incendie, de choc électrique ou de dommages:
▪ N'ouvrez pas l'appareil ni son alimentation électrique. Il n'y a pas de pièces réparables par
l'utilisateur à l'intérieur.
▪ Seul un personnel d'entretien qualifié est autorisé à effectuer toute réparation ou entretien.
▪ Ne jamais utiliser de câble endommagé.
▪ Ne pas mouiller le produit et ne pas l'exposer à l'humidité.
▪ N'utilisez pas ce produit à l'extérieur, il est destiné à un usage intérieur uniquement.
▪ Ne pas placer le produit à proximité de sources de chaleur. Toujours le placer dans un endroit
suffisamment ventilé.
▪ Ne pas déposer de charge lourde sur le produit ou sur les câbles.
▪ Veuillez vous assurer que l'adaptateur utilisé est fermement fixé et verrouillé en place avant de
l'insérer dans une prise murale.
Instructions d’utilisation de l’alimentation
Fixez l'adaptateur requis à la prise. Poussez fermement l'adaptateur, tournez jusqu'à ce que le
loquet fixe l'adaptateur. Pour retirer l'adaptateur, appuyez sur le bouton et tournez dans le sens
opposé.

Manuel Utilisateur Français
Introduction
Nous sommes heureux que votre choix se soit porté sur un produit LINDY et vous remercions de votre
confiance. Vous pouvez compter à tout moment sur la qualité de nos produits et de notre service. Ce
Scaler pour mur d’écran HDMI 9 ports est soumis à une durée de garantie LINDY de 2 ans et d’une
assistance technique gratuite à vie. Merci de lire attentivement ces instructions et de les conserver pour
future référence.
Le Scaler pour mur d’écran HDMI 9 ports de Lindy permet de distribuer un seul signal HDMI sur
jusqu'à 9 affichages en utilisant une seule unité. Les 9 sorties HDMI autorisent la création d'un
large éventail de murs vidéo dans différentes configurations.
Contenu
▪ Scaler pour mur d’écran HDMI 9 ports
▪ Télécommande IR avec 2 piles AAA
▪ Alimentation
▪ Manuel Lindy
Caractéristiques
▪ Permet de créer un mur vidéo avec jusqu’à 3x3 écrans à partir d’une seule entrée
▪ Prend en charge jusqu’à 13 configurations d’écrans
▪ Simple d’utilisation grâce à une télécommande IR ou à un bouton poussoir
▪ Possibilité de cascader les unités pour obtenir des murs d’écrans plus larges
Spécification
▪ Entrée : 1 x HDMI Type A (femelle)
▪ Sortie : 9 x HDMI Type A (femelle)
▪ Contrôle : RS-232, télécommande IR
▪ Norme : HDMI 1.4
▪ Bande passante prise en charge : 10.2Gbit/s
▪ Résolution maximale en entrée : 3840x2160@30Hz 4:4:4 8bit
▪ Résolution maximale en sortie : 1920x1080@60Hz 4:4:4 8bit chaque port
▪ Prise en charge HDCP : 1.4
▪ Prise en charge IR : 38kHz
▪ Interface série : RS-232
▪ Matériau du boitier : métal
▪ Température de fonctionnement : -10°C - 45°C (14°F - 113°F)
▪ Température de stockage : -10°C - 80°C (14°F - 176°F)
▪ Humidité relative : 10 - 85% RH (sans condensation)
▪ Dimensions (LxlxH) : 305x185x35mm (12.01x7.28x1.38in)
▪ Poids : 1.747kg (3.85lb)
▪ Couleur : noir
Veuillez noter : seule la sortie HDMI Output 1 prend en charge l’audio

Manuel Utilisateur Français
Installation
1. Assurez-vous que tous les appareils sont hors tension avant toute connexion. Une fois
l'alimentation branchée, le voyant d'alimentation s'allume.
2. Connectez une source HDMI au port HDMI IN.
3. Connectez les affichages aux ports HDMI Output en utilisant des câbles HDMI.
4. Mettez tous les appareils sous tension.
5. Pour un contrôle simplifié, utilisez le bouton poussoir en façade.
6. Pour le contrôle par signaux IR, assurez-vous que le capteur IR est en ligne de mire de la
télécommande. Pour plus de détails au sujet de la télécommande voir ci-dessous.
7. Pour le contrôle RS-232, veuillez connecter un PC au port RS-232 de l’unité et ouvrir un logiciel
RS-232. Pour plus de détails sur les commandes RS-232 voir ci-dessous.
Utilisation
Panneau avant
RS232 – connectez un PC/Notebook pour l’utilisation des commandes RS-232
Mode – permet de basculer autre les différentes configurations d’affichage. Pour les contrôles
spécifiques merci d’utiliser la télécommande ou les commandes RS-232
IR – fenêtre du capteur IR pour le contrôle par télécommande IR
R/L – sortie audio analogique 3.5mm pour la connexion de haut-parleurs ou d’un casque audio
Bouton d’alimentation – marche/arrêt de l’unité
Panneau arrière
OUTPUT 1-9 : connectez chacune des sorties à un écran HDMI en utilisant un câble HDMI
HDMI IN : connectez une source HDMI en utilisant un câble HDMI
DC/12V – connectez l’alimentation fournie

Manuel Utilisateur Français
Télécommande
Mode – Appuyez sur Mode et ensuite sur la disposition de sortie souhaitée à partir de la section de
sélection du mode.
Input Switch – commute entre une source HDMI IN et un player
Bezel Compensation – permet de compenser le décalage des bords d’écran
3x4 (A), 3x4 (B), 4x4 (A), 4x4 (B) sont utilisés pour des mises en page supplémentaires lorsque vous
connectez deux scalers de murs vidéo ensemble

Manuel Utilisateur Français
Veuillez trouver ci-dessous les modes de mur vidéo qui sont possibles avec ce produit :
1x1
Mode splitter, même image
1x2
1x3
1x4
2x1
3x1

Manuel Utilisateur Français
4x1
2x2
2x3
2x4

Manuel Utilisateur Français
3x2
3x3
4x2

Manuel Utilisateur Français
Mise en cascade de deux unités
Le scaler pour mur d’écran HDMI 9 ports de Lindy peut être mis en cascade avec une autre unité en
connectant le port OUTPUT 9 de la première unité avec le port HDMI IN de la deuxième unité.
Cela permet des configurations supplémentaires en 3x4 et 4x4.
Protocole RS-232
Baud Rate
9600bit/s
DataB
8
DParity
None
StopB
1
Flow Control
None
Commandes RS-232
Conf.
HEX
Retour
Note
1x1
0xD5 0x01 0x01 0x00 0xAA
72 65 63 76 20 6F 6B
1x2
0xD5 0x02 0x01 0x00 0xAA
72 65 63 76 20 6F 6B
1x3
0xD5 0x03 0x01 0x00 0xAA
72 65 63 76 20 6F 6B
1x4
0xD5 0x04 0x01 0x00 0xAA
72 65 63 76 20 6F 6B
1x5
0xD5 0x05 0x01 0x00 0xAA
72 65 63 76 20 6F 6B
2x1
0xD5 0x01 0x02 0x00 0xAA
72 65 63 76 20 6F 6B
3x1
0xD5 0x01 0x03 0x00 0xAA
72 65 63 76 20 6F 6B
4x1
0xD5 0x01 0x04 0x00 0xAA
72 65 63 76 20 6F 6B
5x1
0xD5 0x01 0x05 0x00 0xAA
72 65 63 76 20 6F 6B
2x2
0xD5 0x02 0x02 0x00 0xAA
72 65 63 76 20 6F 6B
2x3
0xD5 0x03 0x02 0x00 0xAA
72 65 63 76 20 6F 6B
2x4
0xD5 0x04 0x02 0x00 0xAA
72 65 63 76 20 6F 6B
4x2
0xD5 0x02 0x04 0x00 0xAA
72 65 63 76 20 6F 6B
3x3
0xD5 0x03 0x03 0x00 0xAA
72 65 63 76 20 6F 6B
3x4 -A
0xD5 0x04 0x03 0x0A 0xAA
72 65 63 76 20 6F 6B
Uniquement si cascadé
3x4 -B
0xD5 0x04 0x03 0x0B 0xAA
72 65 63 76 20 6F 6B
4x3 -A
0xD5 0x03 0x04 0x0A 0xAA
72 65 63 76 20 6F 6B
4x3 -B
0xD5 0x03 0x04 0x0B 0xAA
72 65 63 76 20 6F 6B
4x4 -A
0xD5 0x04 0x04 0x0A 0xAA
72 65 63 76 20 6F 6B
4x4 -B
0xD5 0x04 0x04 0x0B 0xAA
72 65 63 76 20 6F 6B

Manuale Italiano
Istruzioni di sicurezza
! ATTENZIONE !
Per favore leggete la seguente informativa e conservate sempre questo documento con
il prodotto.
La mancata osservanza di queste precauzione può causare seri infortuni o la morte per
folgorazione, incendi o danneggiare il prodotto.
Toccare i componenti interni o un cavo danneggiato può causare uno shock elettrico che può condurre
alla morte.
Questo dispositivo ha un alimentatore a commutazione che può funzionare con tensioni di alimentazione
all’interno del range 100…240 VAC. La fornitura comprende quattro adattatori AC per prese di tutto il
mondo: Euro, UK, US/Giappone e Australia/Nuova Zelanda. Utilizzate l’adattatore AC appropriato e
montatelo come mostrato nell’immagine, assicurandovi che sia fissato correttamente e che non si
stacchi estraendolo dalla presa.
Per ridurre il rischio di incendi, folgorazione o danni:
▪ Non aprite il prodotto o l’alimentatore. Non esistono componenti utilizzabili all'interno.
▪ La riparazione o manutenzione del prodotto può essere effettuata solo da personale qualificato.
▪ Non utilizzare mai cavi danneggiati.
▪ Non fate entrare il prodotto in contatto con acqua e non utilizzatelo in luoghi umidi.
▪ Questo prodotto è pensato esclusivamente per l’uso in ambienti interni.
▪ Non posizionate il prodotto nelle vicinanze di sorgenti di calore. Installatelo sempre in luoghi ben
ventilati.
▪ Non appoggiate oggetti pesanti sul prodotto o sui cavi.
▪ Vi preghiamo di assicurarvi che ogni adattatore sia fermamente inserito e bloccato in sede prima di
collegarlo a una presa di corrente.
Istruzioni per l’uso dell’alimentatore
Fissare l'adattatore richiesto alla spina. Spingere saldamente l'adattatore, ruotare fino a quando
il fermo blocca l'adattatore. Per rimuoverlo, premere il pulsante e ruotare nella direzione
opposta.

Manuale Italiano
Introduzione
Vi ringraziamo per aver acquistato questo Scaler HDMI Video Wall 9 porte. Questo prodotto è stato
progettato per garantirvi la massima affidabilità e semplicità di utilizzo ed è coperto da 2 anni di garanzia
LINDY oltre che da un servizio di supporto tecnico a vita. Per assicurarvi di farne un uso corretto vi
invitiamo a leggere attentamente questo manuale e a conservarlo per future consultazioni.
Contenuto della confezione
▪ Scaler HDMI Video Wall 9 porte
▪ Telecomando IR con 2 batterie AAA
▪ Alimentatore
▪ Manuale Lindy
Caratteristiche
▪ Crea un videowall fino a 3x3 da una singola sorgente di ingresso
▪ Supporta 13 diversi layout videowall
▪ Semplicità di utilizzo tramite il telecomando a infrarossi in dotazione o tramite pulsanti sul pannello
▪ Possibilità di abbinare più unità per configurazioni videowall di maggiori dimensioni
Specifiche
▪ Input: 1x HDMI tipo A (femmina)
▪ Output: 9x HDMI tipo A (femmina)
▪ Controllo: RS-232, telecomando IR
▪ Interfaccia: HDMI 1.4
▪ Larghezza di banda supportata: 10.2 Gbps
▪ Risoluzione massima in ingresso: 3840x2160@30Hz 4:4:4 8bit
▪ Risoluzione massima in uscita: 1920x1080@60Hz 4:4:4 8bit ciascuno
▪ Supporto HDCP: 1.4
▪ Supporto IR: 38kHz
▪ Interfaccia seriale: RS-232
▪ Materiale del corpo: Metallo
▪ Temperatura di esercizio: -10°C - 45°C (14°F - 113°F)
▪ Temperatura di stoccaggio: -10°C - 80°C (14°F - 176°F)
▪ Umidità: 10 - 85% RH (senza condensa)
▪ Dimensioni (LxLxA): 305x185x35 mm (12.01x7.28x1,38in)
▪ Peso: 1.747kg (3.85lb)
▪ Colore: Nero
Nota bene: l'uscita HDMI 1 è l'unica a supportare l'audio.

Manuale Italiano
Installazione
1. Assicurarsi che tutti i dispositivi siano spenti prima del collegamento. Una volta collegato
l'alimentatore, il LED di alimentazione si illuminerà.
2. Collegare il dispositivo di ingresso HDMI alla porta HDMI IN.
3. Collegare i display alle porte di uscita HDMI utilizzando i cavi HDMI.
4. Accendere tutti i dispositivi.
5. Per un rapido controllo tramite pulsanti, utilizzare gli interruttori sul pannello anteriore.
6. Per il controllo IR, assicurarsi che il ricevitore IR sia a portata visiva del telecomando IR. Per le
istruzioni sulle varie funzioni del telecomando IR, consultare i diagrammi riportati di seguito.
7. Per il controllo RS-232, collegare un PC alla porta RS-232 dello switch e avviare un software per
terminali RS-232. Per le istruzioni sui comandi RS-232, consultare il seguente paragrafo.
Utilizzo
Pannello frontale
RS232 – Collegare a un PC/Notebook per utilizzare i comandi RS-232
Mode – Passa da una modalità di uscita video all'altra. Per un controllo specifico, utilizzare il
telecomando IR o il controllo RS-232
IR – Terminale di ricezione IR per il controllo tramite il telecomando IR in dotazione
R/L – Uscita audio analogica da 3.5mm per il collegamento di cuffie o altoparlanti
Power Switch – Attiva e disattiva l'alimentazione principale dell'unità
Pannello posteriore
OUTPUT 1-9: Collegare ciascuna uscita a un singolo display HDMI utilizzando un cavo HDMI
HDMI IN: Collegare una sorgente HDMI con un cavo HDMI
DC/12V – Collegare l'alimentatore in dotazione e collegarlo a una presa di corrente

Manuale Italiano
Telecomando IR
Mode – Premere Mode e successivamente il layout in uscita desiderato nella casella di selezione della
modalità
Input Switch – Commuta il segnale in ingresso tra HDMI IN e un lettore collegato
Bezel Compensation – Aumenta e diminuisce la compensazione dei bordi
3x4 (A), 3x4 (B), 4x4 (A), 4x4 (B) sono utilizzati per layout aggiuntivi quando si collegano più scaler per
videowall

Manuale Italiano
Di seguito sono riportati i layout videowall disponibili con uno scaler video wall HDMI a 9 porte:
1x1
Splitter mode, ogni uscita video rende la stessa immagine
1x2
1x3
1x4
2x1
3x1

Manuale Italiano
4x1
2x2
2x3
2x4

Manuale Italiano
3x2
3x3
4x2

Manuale Italiano
Daisy Chain di controller Video Wall
Il controller Lindy 9 porte può essere collegato in cascata con un'altra unità collegando la porta OUTPUT
9 della prima unità con la porta HDMI IN della seconda.
In questo modo è possibile realizzare ulteriori configurazioni 3x4 e 4x4.
Protocolli RS-232
Baud Rate
9600bps
DataB
8
DPaity
None
StopB
1
Flow Control
None
Lista comandi RS-232
Layout
HEX
Feedback
Note
1x1
0xD5 0x01 0x01 0x00 0xAA
72 65 63 76 20 6F 6B
1x2
0xD5 0x02 0x01 0x00 0xAA
72 65 63 76 20 6F 6B
1x3
0xD5 0x03 0x01 0x00 0xAA
72 65 63 76 20 6F 6B
1x4
0xD5 0x04 0x01 0x00 0xAA
72 65 63 76 20 6F 6B
1x5
0xD5 0x05 0x01 0x00 0xAA
72 65 63 76 20 6F 6B
2x1
0xD5 0x01 0x02 0x00 0xAA
72 65 63 76 20 6F 6B
3x1
0xD5 0x01 0x03 0x00 0xAA
72 65 63 76 20 6F 6B
4x1
0xD5 0x01 0x04 0x00 0xAA
72 65 63 76 20 6F 6B
5x1
0xD5 0x01 0x05 0x00 0xAA
72 65 63 76 20 6F 6B
2x2
0xD5 0x02 0x02 0x00 0xAA
72 65 63 76 20 6F 6B
2x3
0xD5 0x03 0x02 0x00 0xAA
72 65 63 76 20 6F 6B
2x4
0xD5 0x04 0x02 0x00 0xAA
72 65 63 76 20 6F 6B
4x2
0xD5 0x02 0x04 0x00 0xAA
72 65 63 76 20 6F 6B
3x3
0xD5 0x03 0x03 0x00 0xAA
72 65 63 76 20 6F 6B
3x4 -A
0xD5 0x04 0x03 0x0A 0xAA
72 65 63 76 20 6F 6B
Solo in configurazioni daisy chain
3x4 -B
0xD5 0x04 0x03 0x0B 0xAA
72 65 63 76 20 6F 6B
4x3 -A
0xD5 0x03 0x04 0x0A 0xAA
72 65 63 76 20 6F 6B
4x3 -B
0xD5 0x03 0x04 0x0B 0xAA
72 65 63 76 20 6F 6B
4x4 -A
0xD5 0x04 0x04 0x0A 0xAA
72 65 63 76 20 6F 6B
4x4 -B
0xD5 0x04 0x04 0x0B 0xAA
72 65 63 76 20 6F 6B

Manual de Usuario España
Información de seguridad
! ADVERTENCIA !
Lea atentamente la siguiente información de seguridad y guarde siempre este
documento junto con el producto.
El incumplimiento de estas precauciones puede provocar lesiones graves o la muerte
por descarga eléctrica, incendio o daños al producto.
Este dispositivo es una fuente de alimentación de tipo de conmutación y puede funcionar
con voltajes de suministro en el rango de 100 a 240 VCA. Para su uso en todo el mundo, se incluyen
cuatro adaptadores de CA diferentes: tipo Euro, tipo Británico, tipo Estadounidense / Japonés y tipo
Australiano / Neozelandés. Utilice el adaptador de CA apropiado como se muestra en la imagen y
cerciórese de que esté firmemente asegurado en su lugar y que no se separe tirando levemente antes de
instalarlo en una toma de corriente.
Para reducir el riesgo de incendio, descargas eléctricas o daños:
▪ No abra el producto. No hay partes internas que puedan ser reparables por el usuario.
▪ Solo personal de servicio cualificado puede realizar reparaciones o mantenimiento.
▪ No utilice nunca cables dañados.
▪ No exponga el producto al agua ni a lugares húmedos.
▪ No utilice este producto al aire libre, esta únicamente diseñado para su uso en interiores.
▪ No coloque el producto cerca de fuentes de calor directas. Colóquelo siempre en un lugar bien
ventilado.
▪ No coloque objetos pesados sobre el producto o los cables.
▪ Asegúrese de que los cables estén firmemente asegurados y bloqueados en su lugar antes de
insertarlos en una toma de corriente.
Instrucciones para el uso de la fuente de alimentación
Coloque el adaptador necesario en el enchufe. Empuje el adaptador con firmeza y gírelo hasta que el
pestillo asegure el adaptador.
Para quitarlo, pulse el botón y gire en la dirección opuesta.

Manual de Usuario España
Introducción
Gracias por la compra de nuestro producto Escalador de video wall HDMI de 9 puertos. Este producto ha
sido diseñado para proporcionar un funcionamiento confiable y sin problemas. Se beneficia tanto de una
garantía LINDY 3 años, así como de nuestro soporte técnico gratuito de por vida. Para garantizar su uso
correcto, lea este manual detenidamente y consérvelo para consultarlo en el futuro.
El Escalador video video wall HDMI de 9 puertos de Lindy permite dividir una sola señal de entrada HDMI
hasta 9 veces utilizando una sola unidad. Con 9 salidas HDMI permite una gran flexibilidad en la creación
de una amplia gama de diferentes configuraciones de video wall adecuadas para cualquier entorno.
Contenido del paquete
▪ Escalador de video wall HDMI de 9 puertos
▪ Control remoto IR con 2 pilas AAA
▪ Fuente de alimentación
▪ Manual Lindy
Características
▪ Cree un video wall de hasta 3x3 desde una sola fuente de entrada
▪ Soporta 13 modos diferentes de división de video wall
▪ Funcionamiento simple usando el control remoto IR incluido o los botones pulsadores
▪ Capacidad para combinar múltiples unidades para configuraciones de video wall más grandes
Especificaciones
▪ Entrada: 1 x HDMI Tipo A (hembra)
▪ Salida: 9 x HDMI Tipo A (Hembra)
▪ Control: RS-232, control remoto IR
▪ Estándar de interfaz: HDMI 1.4
▪ Soporta ancho de banda: 10.2Gbps
▪ Resolución máxima de entrada: 3840x2160@30Hz 4: 4: 4 4 8 bits
▪ Resolución máxima de salida: 1920x1080@60Hz 4: 4: 4 4 8 bits cada uno
▪ Soporte HDCP: 1.4
▪ Soporte IR: 38kHz
▪ Interfaz serie: RS-232
▪ Material de la carcasa: Metal
▪ Temperatura de funcionamiento: -10 °C - 45 °C (14 °F - 113 °F)
▪ Temperatura de almacenamiento: -10 °C - 80 °C (14 °F - 176 °F)
▪ Humedad: 10 - 85% HR (sin condensación)
▪ Dimensión (LxWxH): 305x185x35mm (12,01 x 7,28 x 1,38 pulgadas)
▪ Peso: 1,747 kg (3,85 libras)
▪ Color: Negro
Tenga en cuenta: La salida HDMI 1 es la única salida HDMI que admite audio

Manual de Usuario España
Instalación
1. Asegúrese de que todos los dispositivos estén apagados antes de la conexión. Una vez que la
fuente de alimentación está conectada, el LED de alimentación se iluminará.
2. Conecte un dispositivo de entrada HDMI al puerto HDMI IN.
3. Conecte las pantallas a los puertos de salida HDMI utilizando cables HDMI.
4. Encienda todos los dispositivos.
5. Para un control sencillo pulsando botones, use los interruptores en el panel frontal.
6. Para el control IR, asegúrese de que el receptor IR esté en la línea de visión del control remoto
IR. Para obtener instrucciones sobre las diversas funciones del control remoto IR, consulte el
diagrama a continuación.
7. Para el control RS-232, conecte un PC al puerto RS-232 del conmutador y abra un software de
terminal RS-232. Para obtener instrucciones sobre los comandos RS-232, consulte a
continuación.
Operación
Panel frontal
RS232 – Conécte a un PC/portátil para el uso de comandos RS-232
Modo: Cambia entre los modos de salida de video disponibles. Para un control específico, utilice el
control remoto IR o RS-232
IR – Ventana del receptor IR para el control utilizando el control remoto IR incluido
R/L – Salida de audio analógico de 3,5 mm para conexión con auriculares o altavoces
Interruptor de encendido: Cambia la alimentación principal a la unidad a encendido o apagado
Panel posterior
SALIDAS 1-9: Conecte cada salida a una sola pantalla HDMI mediante un cable HDMI
Entrada HDMI: Conecte un dispositivo fuente HDMI mediante un cable HDMI
DC/12V – Conecte la fuente de alimentación incluida y enchúfela a una toma de corriente

Manual de Usuario España
Control remoto
Modo: presione Modo y luego la configuración de salida deseada de la sección de selección de modo
Interruptor de entrada: Cambie la entrada entre HDMI IN y un reproductor conectado
Compensación del bisel: Aumente y baje la compensación del bisel
3x4 (A), 3x4 (B), 4x4 (A), 4x4 (B) se utilizan para diseños adicionales cuando se conectan varios
escaladores de video wall juntos

Manual de Usuario España
Los siguientes modos de video wall son posibles con un escalador de pared de video HDMI de 9
puertos:
1x1
Modo divisor, cada salida de video es la misma imagen
1x2
1x3
1x4
2x1
3x1

Manual de Usuario España
4x1
2x2
2x3
2x4

Manual de Usuario España
3x2
3x3
4x2

Manual de Usuario España
Conexión en cadena de múltiples controladores de video wall
El escalador video wall de 9 puertos de Lindy se puede conectar en cascada con otra unidad
conectando el puerto OUTPUT 9 de la primera unidad con el puerto HDMI IN de la segunda unidad.
Esto permite configuraciones adicionales de 3x4 y 4x4.
Protocolos RS-232
Velocidad en baudios
9600bps
DatosB
8
DPaity
Ninguno
StopB
1
Control de flujo
Ninguno
Comandos RS-232
Diseño
HEX
Retroalimentación
Nota
1x1
0xD5 0x01 0x01 0x00 0xAA
72 65 63 76 20 6F 6B
1x2
0xD5 0x02 0x01 0x00 0xAA
72 65 63 76 20 6F 6B
1x3
0xD5 0x03 0x01 0x00 0xAA
72 65 63 76 20 6F 6B
1x4
0xD5 0x04 0x01 0x00 0xAA
72 65 63 76 20 6F 6B
1x5
0xD5 0x05 0x01 0x00 0xAA
72 65 63 76 20 6F 6B
2x1
0xD5 0x01 0x02 0x00 0xAA
72 65 63 76 20 6F 6B
3x1
0xD5 0x01 0x03 0x00 0xAA
72 65 63 76 20 6F 6B
4x1
0xD5 0x01 0x04 0x00 0xAA
72 65 63 76 20 6F 6B
5x1
0xD5 0x01 0x05 0x00 0xAA
72 65 63 76 20 6F 6B
2x2
0xD5 0x02 0x02 0x00 0xAA
72 65 63 76 20 6F 6B
2x3
0xD5 0x03 0x02 0x00 0xAA
72 65 63 76 20 6F 6B
2x4
0xD5 0x04 0x02 0x00 0xAA
72 65 63 76 20 6F 6B
4x2
0xD5 0x02 0x04 0x00 0xAA
72 65 63 76 20 6F 6B
3x3
0xD5 0x03 0x03 0x00 0xAA
72 65 63 76 20 6F 6B
3x4 -A
0xD5 0x04 0x03 0x0A 0xAA
72 65 63 76 20 6F 6B
Solo cuando se conecta en cadena
3x4 -B
0xD5 0x04 0x03 0x0B 0xAA
72 65 63 76 20 6F 6B
4x3 -A
0xD5 0x03 0x04 0x0A 0xAA
72 65 63 76 20 6F 6B
4x3 -B
0xD5 0x03 0x04 0x0B 0xAA
72 65 63 76 20 6F 6B
4x4 -A
0xD5 0x04 0x04 0x0A 0xAA
72 65 63 76 20 6F 6B
4x4 -B
0xD5 0x04 0x04 0x0B 0xAA
72 65 63 76 20 6F 6B

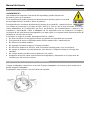
Recycling Information
WEEE (Waste of Electrical and Electronic Equipment), Recycling of Electronic Products
Europe, United Kingdom
In 2006 the European Union introduced regulations (WEEE) for the collection and recycling of all
waste electrical and electronic equipment. It is no longer allowable to simply throw away electrical and
electronic equipment. Instead, these products must enter the recycling process. Each individual EU
member state, as well as the UK, has implemented the WEEE regulations into national law in slightly
different ways. Please follow your national law when you want to dispose of any electrical or electronic
products. More details can be obtained from your national WEEE recycling agency.
Germany / Deutschland Elektro- und Elektronikgeräte
Informationen für private Haushalte sowie gewerbliche Endverbraucher
Hersteller-Informationen gemäß § 18 Abs. 4 ElektroG (Deutschland)
Das Elektro- und Elektronikgerätegesetz (ElektroG) enthält eine Vielzahl von Anforderungen an den
Umgang mit Elektro- und Elektronikgeräten. Die wichtigsten sind hier zusammengestellt.
1. Bedeutung des Symbols „durchgestrichene Mülltonne“
Das auf Elektro- und Elektronikgeräten regelmäßig abgebildete Symbol einer durchgestrichenen
Mülltonne weist darauf hin, dass das jeweilige Gerät am Ende seiner Lebensdauer getrennt vom
unsortierten Siedlungsabfall zu erfassen ist.
2. Getrennte Erfassung von Altgeräten
Elektro- und Elektronikgeräte, die zu Abfall geworden sind, werden als Altgeräte bezeichnet. Besitzer von
Altgeräten haben diese einer vom unsortierten Siedlungsabfall getrennten Erfassung zuzuführen.
Altgeräte gehören insbesondere nicht in den Hausmüll, sondern in spezielle Sammel- und
Rückgabesysteme.
3. Batterien und Akkus sowie Lampen
Besitzer von Altgeräten haben Altbatterien und Altakkumulatoren, die nicht vom Altgerät umschlossen
sind, sowie Lampen, die zerstörungsfrei aus dem Altgerät entnommen werden können, im Regelfall vor
der Abgabe an einer Erfassungsstelle vom Altgerät zu trennen. Dies gilt nicht, soweit Altgeräte einer
Vorbereitung zur Wiederverwendung unter Beteiligung eines öffentlich-rechtlichen Entsorgungsträgers
zugeführt werden.
4. Möglichkeiten der Rückgabe von Altgeräten
Besitzer von Altgeräten aus privaten Haushalten können diese bei den Sammelstellen der öffentlich-
rechtlichen Entsorgungsträger oder bei den von Herstellern oder Vertreibern im Sinne des ElektroG
eingerichteten Rücknahmestellen unentgeltlich abgeben.
Rücknahmepflichtig sind Geschäfte mit einer Verkaufsfläche von mindestens 400 m² für Elektro- und
Elektronikgeräte sowie diejenigen Lebensmittelgeschäfte mit einer Gesamtverkaufsfläche von mindestens
800 m², die mehrmals pro Jahr oder dauerhaft Elektro- und Elektronikgeräte anbieten und auf dem Markt
bereitstellen. Dies gilt auch bei Vertrieb unter Verwendung von Fernkommunikationsmitteln, wenn die
Lager- und Versandflächen für Elektro- und Elektronikgeräte mindestens 400 m² betragen oder die
gesamten Lager- und Versandflächen mindestens 800m² betragen. Vertreiber haben die Rücknahme
grundsätzlich durch geeignete Rückgabemöglichkeiten in zumutbarer Entfernung zum jeweiligen
Endnutzer zu gewährleisten.
Die Möglichkeit der unentgeltlichen Rückgabe eines Altgerätes besteht bei rücknahmepflichtigen
Vertreibern unter anderem dann, wenn ein neues gleichartiges Gerät, das im Wesentlichen die gleichen
Funktionen erfüllt, an einen Endnutzer abgegeben wird. Wenn ein neues Gerät an einen privaten Haushalt
ausgeliefert wird, kann das gleichartige Altgerät auch dort zur unentgeltlichen Abholung übergeben
werden; dies gilt bei einem Vertrieb unter Verwendung von Fernkommunikationsmitteln für Geräte der
Kategorien 1, 2 oder 4 gemäß § 2 Abs. 1 ElektroG, nämlich „Wärmeüberträger“, „Bildschirmgeräte“ oder
„Großgeräte“ (letztere mit mindestens einer äußeren Abmessung über 50 Zentimeter). Zu einer
entsprechenden Rückgabe-Absicht werden Endnutzer beim Abschluss eines Kaufvertrages befragt.
Außerdem besteht die Möglichkeit der unentgeltlichen Rückgabe bei Sammelstellen der Vertreiber
unabhängig vom Kauf eines neuen Gerätes für solche Altgeräte, die in keiner äußeren Abmessung größer
als 25 Zentimeter sind, und zwar beschränkt auf drei Altgeräte pro Geräteart.
5. Datenschutz-Hinweis
Altgeräte enthalten häufig sensible personenbezogene Daten. Dies gilt insbesondere für Geräte der
Informations- und Telekommunikationstechnik wie Computer und Smartphones. Bitte beachten Sie in

Recycling Information
Ihrem eigenen Interesse, dass für die Löschung der Daten auf den zu entsorgenden Altgeräten jeder
Endnutzer selbst verantwortlich ist.
France
En 2006, l'union Européenne a introduit la nouvelle réglementation (DEEE) pour le recyclage de tout
équipement électrique et électronique. Chaque Etat membre de l’Union Européenne a mis en application
la nouvelle réglementation DEEE de manières légèrement différentes. Veuillez suivre le décret
d’application correspondant à l’élimination des déchets électriques ou électroniques de votre pays.
Italy
Nel 2006 l’unione europea ha introdotto regolamentazioni (WEEE) per la raccolta e il riciclo di apparecchi
elettrici ed elettronici. Non è più consentito semplicemente gettare queste apparecchiature, devono essere
riciclate. Ogni stato membro dell’EU ha tramutato le direttive WEEE in leggi statali in varie misure. Fare
riferimento alle leggi del proprio Stato quando si dispone di un apparecchio elettrico o elettronico. Per
ulteriori dettagli fare riferimento alla direttiva WEEE sul riciclaggio del proprio Stato.
España
En 2006, la Unión Europea introdujo regulaciones (WEEE) para la recolección y reciclaje de todos los
residuos de aparatos eléctricos y electrónicos. Ya no está permitido simplemente tirar los equipos
eléctricos y electrónicos. En cambio, estos productos deben entrar en el proceso de reciclaje. Cada estado
miembro de la UE ha implementado las regulaciones de WEEE en la legislación nacional de manera
ligeramente diferente. Por favor, siga su legislación nacional cuando desee deshacerse de cualquier
producto eléctrico o electrónico. Se pueden obtener más detalles en su agencia nacional de reciclaje de
WEEE.

CE/FCC Statement
CE Certification
LINDY declares that this equipment complies with relevant European CE requirements.
CE Konformitätserklärung
LINDY erklärt, dass dieses Equipment den europäischen CE-Anforderungen entspricht
UKCA Certification
LINDY declares that this equipment complies with relevant UKCA requirements.
FCC Certification
This equipment has been tested and found to comply with the limits for a Class B digital device, pursuant
to part 15 of the FCC Rules. These limits are designed to provide reasonable protection against harmful
interference in a residential installation.
You are cautioned that changes or modification not expressly approved by the party responsible for
compliance could void your authority to operate the equipment.
This device complies with part 15 of the FCC Rules.
Operation is subject to the following two conditions:
1. This device may not cause harmful interference, and
2. This device must accept any interference received, including interference that may cause undesired
operation.
The enclosed power supply has passed Safety test requirements, conforming to the US American versions
of the international Standard IEC 60950-1 or 60065 or 62368-1.
LINDY Herstellergarantie – Hinweis für Kunden in Deutschland
LINDY gewährt für dieses Produkt über die gesetzliche Regelung in Deutschland hinaus eine zweijährige
Herstellergarantie ab Kaufdatum. Die detaillierten Bedingungen dieser Garantie finden Sie auf der LINDY
Website aufgelistet bei den AGBs.
Hersteller / Manufacturer (EU): Manufacturer (UK):
LINDY-Elektronik GmbH LINDY Electronics Ltd
Markircher Str. 20 Sadler Forster Way
68229 Mannheim Stockton-on-Tees, TS17 9JY
Germany England
Email: info@lindy.com, T: +49 (0)621 470050 sales@lindy.co.uk, T: +44 (0)1642 754000
No. 38261
1st Edition, July 2022
lindy.com
Tested to comply with
FCC standards.
For home and office use.
-
 1
1
-
 2
2
-
 3
3
-
 4
4
-
 5
5
-
 6
6
-
 7
7
-
 8
8
-
 9
9
-
 10
10
-
 11
11
-
 12
12
-
 13
13
-
 14
14
-
 15
15
-
 16
16
-
 17
17
-
 18
18
-
 19
19
-
 20
20
-
 21
21
-
 22
22
-
 23
23
-
 24
24
-
 25
25
-
 26
26
-
 27
27
-
 28
28
-
 29
29
-
 30
30
-
 31
31
-
 32
32
-
 33
33
-
 34
34
-
 35
35
-
 36
36
-
 37
37
-
 38
38
-
 39
39
-
 40
40
-
 41
41
-
 42
42
-
 43
43
-
 44
44


Lindy 9 Port HDMI Video Wall Scaler Manual de usuario
- Tipo
- Manual de usuario
en otros idiomas
Artículos relacionados
Otros documentos
-
NEBO NB7000 Manual de usuario
-
ViewSonic LS700-4K Guía del usuario
-
ViewSonic LS625X-S Guía del usuario
-
ViewSonic LS700HD-S Guía del usuario
-
-
-
Dell PowerEdge C5230 El manual del propietario
-
WEG CFW700 Manual de usuario
-
Samsung SBB-MT Manual de usuario
-
Samsung UD46E-B Manual de usuario