Midea EM025FXXXV2 Manual de usuario
- Categoría
- Microondas
- Tipo
- Manual de usuario

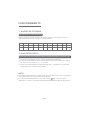
PRECAUTIONS TO AVOID POSSIBLE
EXPOSURE TO EXCESSIVE MICROWAVE
ENERGY
120V~ 60Hz
Rated Voltage:
Rated Input Power(Microwave):
Rated Output Power(Microwave):
Oven Capacity:
Turntable Diameter:
External Dimensions:
Net Weight:
Model:
10.6 inch/ 270 mm
1350W
Approx. 27.3 Lbs (12.4 kg)
900W
0.9 cu.ft. /25 L
19.1X16.1X11.5 inch (485X410X293 mm)
EM925A5A-BS
EN-2
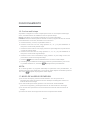
Do not attempt to operate this oven with the door open since this can result
in harmful exposure to microwave energy. It is important not to
defeat or tamper with the safety interlocks.
a. DOOR (bent)
b. HINGES AND LATCHES (broken or loosened)
c. DOOR SEALS AND SEALING SURFACE
The oven should not be adjusted or reparied by anyone except properly
qualified service personnel.
Do not place any object between the oven front face and the door or allow
soil or cleaner residue to accumulate on sealing surfaces.
Do not operate the oven if it is damaged. It is particularly important
that the oven door closes properly and that there is no damage to the:
1.
2.
3.
4.

Read all instructions before using the appliance.
Read and follow the speci c: " PRECAUTIONS TO AVOID POSSIBLE EXPOSURE TO
EXCESSIVE MICROWAVE ENERGY" found on page 2.
As with most cooking appliances, close supervision is necessary to reduce the risk
To reduce the risk of re in the oven cavity:
This oven must be grounded. Connect only to properly grounded outlet. See
"GROUNDING INSTRUCTIONS" found on page 6.
Install or locate this oven only in accordance with the installation instructions
provided.
Some products such as whole eggs and sealed containers-for example, closed
glass jars-are able to explode and should not be heated in the oven.
1.
2.
3.
4.
5.
6.
7.
To reduce the risk of burns, electric shock, re, injury to persons or
exposure to excessive microwave oven energy when using your appli-
ance, follow basic safety precautions, including the following:
IMPORTANT SAFETY INSTRUCTIONS
WARNING
Do not overcook food. Carefully attend the appliance when paper, plastic, or
other combustible materials are placed inside the oven to facilitate cooking.
Remove wire twist-ties and metal handles from paper or plastic containers/
bags before placing them in the oven.
If materials inside the oven ignite, keep the oven door closed. Turn the oven
o , and unplug the appliance. Disconnect the power cord, shut o power at
the fuse or circuit breaker panel.
Do not leave paper products, cooking utensils, or food in the cavity when not
in use.
a.
b.
c.
d.
EN-3

8.
9.
10.
11.
12.
13.
14.
15.
16.
17.
18.
19.
Use this appliance only for its intended uses as described in this manual. Do not
designed to heat or cook or dry food. It is not designed for industrial or laborato-
ry use.
As with any appliance, close supervision is necessary when used by children.
Do not operate this oven if it has a damaged cord or plug, if it is not working
properly or if it has been damaged or dropped.
Do not cover or block any openings on the oven.
Do not store or use this appliance outdoors.
Do not use this oven near water, for example, near a kitchen sink, in a wetbase-
ment, near a swimming pool, or similar locations.
Do not immerse cord or plug in water.
Keep cord away from heated surfaces.
Do not let cord hang over edge of table or counter.
When cleaning surfaces of door and oven that comes together on closing the
door, use only mild, nonabrasive soaps or detergents applied with a sponge of
soft cloth.
This appliance is for private household use only.
IMPORTANT SAFETY INSTRUCTIONS
WARNING
EN-4
This microwave should be serviced only by qualified service personnel.
use corrosive chemicals or vapors in this appliance. This oven is specifically

20. Liquids, such as water, co ee, or tea are able to be overheated beyond the
boiling point without appearing to be boiling. Visible bubbling or boiling when
the container is removed from the microwave oven is not always present. THIS
COULD RESULT IN VERY HOT LIQUIDS SUDDENLY BOILING OVER WHEN THE
CONTAINER IS DISTURBED OR A SPOON OR OTHER UTENSIL IS INSERTED INTO
THE LIQUID.
IMPORTANT SAFETY INSTRUCTIONS
WARNING
Do not overheat the liquid.
Stir the liquid both before and halfway through heating it.
Do not use straight-sided containers with narrow necks.
After heating, allow the container to stand in the microwave oven for a short
time before removing the container.
Use extreme care when inserting a spoon or other utensil into the container.
a.
b.
c.
d.
e.
EN-5

CAUTION:
SAVE THESE INSTRUCTIONS
GROUNDING INSTRUCTIONS
DANGER
WARNING
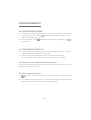
This appliance must be grounded. In the event of an electrical short circuit, ground-
ing reduces the risk of electric shock by providing an escape wire for the electric
current. To protect against electrical shock, this appliance is equipped with a cord
having a 3 prong grounding-type plug for insertion into a proper grounding-type
receptacle. DO NOT alter the plug for use in a 2-prong receptacle. If the plug will not
Touching some of the internal components can cause serious personal injury or
death. Do not disassemble this appliance.
An improperly grounded appliance can result in
electric shock. Do not plug into an outlet until appli-
ance is properly installed and grounded.
Electric Shock Hazard
Electric Shock Hazard (grounding) plug
Three-pronged
EN-6
fit into a receptacle, have the proper receptacle installed by a qualified electrician.
Do not insert your fingers into any gaps or holes; it may cause injuries.

SAVE THESE INSTRUCTIONS
GROUNDING INSTRUCTIONS
A short power-supply cord is provided to reduce the risks resulting from becom-
ing entangled in or tripping over a longer cord.
Longer cord sets or extension cords are available and may be used if care is
exercised in their use.
If a long cord sets or extension cord is used:
a.
b.
c.
The marked electrical rating of the cord set or extension marked electrial
rating of the cord set or extension cord should be at least as great as the
electrical rating of the appliance.
The extension cord must be a grounding -type 3-wire cord.
The longer cord should be arranged so that it will not drape over the counter-
top or tabletop where it can be pulled on by children or tripped over uninten-
tionally.
completely understood or if doubt exists as to whether the appliance is properly
grounded. If it is necessary to use an extension cord, use only a 3-wire extension
cord that has a 3-pronged grounding plug , and a 3-slot receptacle that will accept
the plug on the appliance.The marked rating of the extension cord shall be equal to
or greater than the electrical rating of the appliance.
1.
2.
3.
EN-7
Consult a qualified electrician or serviceman if the grounding instructions are not

SAVE THESE INSTRUCTIONS
GROUNDING INSTRUCTIONS
Operation of the microwave oven may cause interference to your radio, TV or
similar equipment.
When there is interference, it may be reduced or eliminated by taking the follow-
ing measures:
a.
b.
c.
d.
e.
Clean door and sealing surface of the oven.
Reorient the receiving antenna of radio or television.
Relocate the microwave oven with respect to the receiver.
Move the microwave oven away from the receiver.
RADIO INTERFERENCE
EN-8
Plug the microwave oven into a different outlet so that microwave oven and
receiver are on different branch circuits.

UTENSILS
SAVE THESE INSTRUCTIONS
GROUNDING INSTRUCTIONS
See the instructions on "Materials you can use in microwave oven or to be avoided
in microwave oven." There may be certain non-metallic utensils that are not safe to
use for microwaving. If in doubt, you can test the utensil in question following the
procedure below.
Fill a microwave-safe container with 1 cup of cold water (250ml) along with the
utensil in question.
Cook on maximum power for 1 minute.
Carefully feel the utensil. If the empty utensil is warm, do not use it for microwave
cooking.
Do not exceed 1 minute cooking time.
1.
2.
3.
4.
Tightly-closed utensils could explode. Closed containers should be opened and
plastic pouches should be pierced before cooking.
UTENSIL TEST:
SAVE THESE INSTRUCTIONS
HOUSEHOLD INDOOR USE ONLY
CAUTION
Electric Shock Hazard
EN-9

MATERIALS YOU CAN USE IN MICROWAVE OVEN
EN-10
Shelding only. Small smooth pieces can be used to cover thin
parts of meat or poultry to prevent overcooking. Arcing can occur if
foil is too close to oven walls. The foil should be at least 1
inch (2.5cm) away from oven walls.
UTENSILS
Aluminum foil
REMARKS
Follow manufacturer’s instructions.The bottom of browning dish
must be at least 3/16 inch (5mm) above the turntable. Incorrect
usage may cause the turntable to break.
Browning dish
Microwave-safe only. Follow manufacturer’s instructions. Do not
use cracked or chipped dishes.
Dinnerware
Always remove lid. Use only to heat food until just warm. Most
glass jars are not heat resistant and may break.
Glass jars
Heat-resistant oven glassware only. Make sure there is no metallic
trim. Do not use cracked or chipped dishes.
Glassware
Follow manufacturer’s instructions. Do not close with metal tie.
Make slits to allow steam to escape.
Oven cooking bags
Use for short–term cooking/warming only. Do not leave oven
unattended while cooking.
Paper plates and cups
Use to cover food for reheating and absorbing fat. Use with
supervision for a short-term cooking only.
Paper towels
Use as a cover to prevent splattering or a wrap for steaming.
Microwave-safe only. Use to cover food during cooking to retain
moisture. Do not allow plastic wrap to touch food.
Microwave-safe only ( meat and candy thermometers).
Use as a cover to prevent splattering and retain moisture.
Parchment paper
Microwave-safe only. Follow the manufacturer’s instructions.
Should be labeled "Microwave Safe". Some plastic cont ainers
soften, as the food inside gets hot. "Boiling bags" and tightly closed
plastic bags should be slit, pierced or vented as directed by
package.
Plastic
Wax paper
Thermometers
Plastic wrap

UTENSILS REMARKS
MATERIALS TO BE AVOIDED IN MICROWAVE OVEN
May cause arcing. Transfer food into microwave-safe dish.
Aluminum tray
Metal twist ties
May cause arcing. Transfer food into microwave-safe dish.
May cause arcing and could cause a fire in the oven.
Food carton with
metal handle
Paper bags
Plastic foam
Wood
Plastic foam may melt or contaminate the liquid inside when
exposed to high temperature.
Wood will dry out when used in the microwave oven and may
split or crack.
EN-11
May cause a fire in the oven.

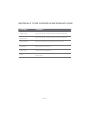
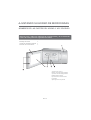
SETTI NG UP YOUR OVEN
NAMES OF OVEN PARTS AND ACCESSORIES
Glass t ray 1
Turntable ring 1
Insrtuction Manual 1
Control panel
Turntable shaft
Turntable ring
Glass tray
Observation window
Oven Door
Safet y int erlock syst em
A
B
C
D
E
F
G
.
.
.
.
.
.
.
F
G
A
C B
ED
EN-12
Remove the oven and all materials from the carton and oven cavity. Your
oven comes with the following accessories:

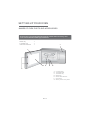
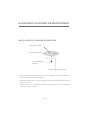
SETTI NG UP YOUR OVEN
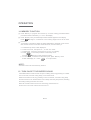
TURNTABLE INSTALLATION
a. Never place the glass tray upside down. The glass tray should never be restricted.
b. Both glass tray and turntable ring must always be used during cooking.
c. All food and containers of food are always placed on the glass tray for cooking.
Turntable ring
Turntable shaft
Hub (underside)
Glass tray
EN-13

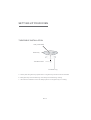
SETTI NG UP YOUR OVEN
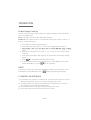
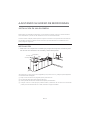
COUNTERTOP INSTALLATION
INSTALLATION
1. Select a level surface that provide enough open space for the intake
and/or outlet vents.
A minimum clearance of 3.0 inches (7.5cm) is required between the oven and any adjacent walls.
One side must be open.
(1)
(2)
(3)
(4)
Leave a minimum clearance of 12 inches (30cm) above the oven.
Do not remove the legs from the bottom of the oven.
Blocking the intake and/or outlet openings can damage the oven.
Place the oven as far away from radios and TV a s possible.
Operation of microwave oven may cause interference to your radio or TV reception.
EN-14
OPEN
12 inches(30cm )
3.0 inches(7.5cm )
3.0 inches(7.5cm )
Remove all packing material and accessories. Examine the oven for any damage such as dents or
broken door. Do not install if oven is damaged.
Cabinet: Remove any protective film found on the microwave oven cabinet surface. Do not remove
the light brown Mica cover that is attached to the oven cavity to protect the magnetron.

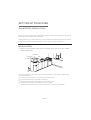
SETTI NG UP YOUR OVEN
INSTALLATION
2.Plug your oven into a standard household outlet. Be sure the voltage and
the frequency is the same as the voltage
WARNING
Do not install oven over a range cooktop or other heat-producing appli-
ance. If installed near or over a heat source, the oven could be damaged
and the warranty would be avoid.
The accessible surface may
be hot during operation
EN-15

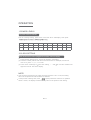
1.POWER LEVELS
OPERATION
Prior to or during cooking, press Power Level and "PL10" will display. Then press
2.CLOCK SETTING
(1)
(2)
(3)
Press Clock & Settings once, "00:00" will appear in the display.
Press the number pads to enter the current clock time. For example, if the time is
now 10:12, press " 1, 0, 1, 2 " in order.
Press Clock ettings to nish clock setting, " : " will ash and the numbers will
appear as a clock time in the display.
Level 10 9 8 7 6 5 4 3 2 1
Power 100% 90% 80% 70% 60% 50% 40% 30% 20% 10%
Display PL10 PL 9 PL 8 PL 7 PL 6 PL 5 PL 4 PL 3 PL 2 PL 1
NOTE:
If the numbers entered are not within the range between 1:00 to 12:59, the setting
will not be accepted until valid numbers are entered.
In the process of setting clock, if the pad is pressed or if there is no operation
within 1 minute, the display will automatically return to the previous clock setting.
Ten power levels are available.
When the microwave oven is plugged into an outlet, "0:00" will display.
& S
EN-17

Press Kitchen Timer once, "00:00" will appear in the display.
Press the number pads to enter the time amount. The maximum amount of time
that can be entered is 99 minutes, 99 seconds.
When the time amount elapses, timer indicator will disappear. The oven will
beep 5 times.
OPERATION
Press Time Cook , "00:00" will appear in the display.
Press number pads to enter the cooking time. The maximum cooking time is 99
minutes,99 seconds.
through 9 to select a
power level if desired. See the POWER LEVEL table
above.
Press to start cooking. The remaining cooking time will display.
a.
b.
c.
d.
Press Time Cook , "00:00" will display.
Press "1, 5, 0, 0" in order for 15:00 to appear in the display.
Press Power Level , then press "5" to select 50% microwave power.
Press to start cooking. Buzzer sounds once. The remaining cooking
time will display.
4.MICROWAVE COOK
(1)
(2)
(3)
(4)
3. KITCHEN TIMER
(1)
(2)
(3)
(4)
Note:
During the Kitchen Timer function, no cooking function can be set into operation.
Kitchen Timer amount cannot be increased by pressing .
Pressing will cancel the Timer countdown.
Example : To cook the food with 50% microwave power for 15 minutes.
EN-18
Press to confirm setting, and the timer will start to count down.
The Kitchen Timer setting is different from the Clock setting; it is simply a timer.

NOTE:
In the process of setting, if the pad is pressed or if there is no operation within
1 minute, the oven will automatically return to display the clock.
OPERATION
Instant cooking at 100% power level and 1 to 6 minutes cooking time can be
started by pressing number pads 1 to 6. Press to increase the cooking
time by 30 seconds with each press. The maximum cooking time is 99 minutes,
99 seconds.
Instant cooking at 100% power level and 30 seconds cooking time can be
started by pressing . Each repeated press will increase cooking time by 30
seconds. The maximum cooking time is 99 minutes, 99 seconds.
NOTE:
Time can also be added in 30 second increments by pressing during Micro-
wave Cooking, Time Defrost and Multi-stage Cooking.
Time cannot be added by pressing during Weight Defrost and Kitchen Timer
functions.
(1)
(2)
5.ONE TOUCH START
Press Time Defrost , "dEF2" will appear in the display.
Press the number pads to input the defrost time.
Press to start defro cooking. And the remaining defrost time will display.
(1)
(2)
(4)
6.TIME DEFROST
(3) The de
fault microwave power is power level 3. If you want to change the power level,
level, press
Power Level once, and PL3 will display; then press the number pad for
the desired power level.
EN-19

OPERATION
(2) Press number pads to input weight to be defrosted.
disp
(1) Press
Input the
(4) Press to start defrosting and the cooking time remaining will be
(3) If the weight input is not between 4 to100 Oz, the input will be invalid. A beep
Weight Defrost
weight range between 4 to100 Oz.
layed.
once,"dEF1" will display.
will sound and the unit will not work until valid numbers are entered.
Press Popcorn , "1.75" will appear in the display.
Press Popcorn two more times to choose the weight, "3.0" and "3.5" will
display in order.
(1)
(2)
8. POPCORN
repeatedly until the number you wish appears in the display
Press 3 Times: 3 po
"1",
Potato
Press nce : 1 potato (approx. 8.0 oz)
Press Twice: 2 potatoes ( approx. 16.0 oz)
"2", "3" will display in order.
tatoes ( approx. 24.0 oz)
O
Oven beeps 5 times when
9. POTATO
(1) Press
Press to cook. The remaining time will display.
(2)
cooking finish.
10. FROZEN VEGETABLE
7. WEIGHT DEFROST FUNCTION
Press Frozen Vegetable , "4.0" will appear in the display.
Press Frozen Vegetable two more times to choose the weight, "8.0" and "16.0" will
display in order.
(1)
(2)
Oven beeps 5 times when
Press to cook. The remaining time will display.
(3)
cooking finish.
Oven beeps 5 times when
Press to cook. The remaining time will display.
(3)
cooking finish.
EN-20

OPERATION
11. BEVERAGE
Press Beverage , "1" will appear in the display.
Press Beverage two more times to choose the weight, "2" and "3" will
display in order. One cup is about 4.0 Oz.
(1)
(2)
Oven beeps 5 times when
Press to cook. The remaining time will display.
(3)
cooking finish.
12. DINNER PLATE
Press Dinner Plate , "9.0" will appear in the display.
Press Dinner Plate two more times to choose the weight, "12.0" and "18.0" will
display in order.
(1)
(2)
Oven beeps 5 times whenPress to cook. The remaining time will display.
(3)
cooking finish.
Press Pizza , "4.0" will appear in the display.
Press Pizza two more times to choose the weight, "8.0" and "14.0" will
display in order.
(1)
(2)
Oven beeps 5 times when
Press to cook. The remaining time will display.
(3)
cooking finish.
13. PIZZA
EN-21

OPERATION
Press Memory to program and choose up to three cooking procedures.Each
procedure will be indicated by 1, 2 or 3 in the display.
Press Memory until your desired procedure number appears in the display.
Press to begin it. A maximum of two cooking stages can be set for each
procedure.
To program a procedure, follow the steps listed below. Example: Cook food at
80% Power Level for 3 minutes and 20 seconds; save as memory 2.
14. MEMORY FUNCTION
(1)
(2)
(3)
Press Memory twice; screen displays 2.
Press Time Cook , then press "3" , "2" and "0" in order.
Press Power Level once, then press "8" for "PL 8" to display.
Press to save the procedure. Oven beeps once.
Or press directly to save and start cooking.
To choose the procedure from the memory list, press Memory twice.
Screen will display "2". Press to run procedure.
a.
b.
c.
d.
e.
NOTE:
Auto Menu cannot be set in Memory function.
It is default that the buzzer sounds is open.In waiting state, long pressing on number
turns off the sound.
When the sounds turn off, long pressing on 8 for 3 seconds, it sounds a long beep
and the sound turn off. All the buttons has no beep when they are pressed, including
the ending cooking sounds is turn off too.
Note: All m odels has m ute function and energy-saved function.
This funct ion can work under lock function too.
15. TURN ON/OFF THE BUZZER SOUND
EN-22
8 for 3 seconds, it sounds a long beep,

OPERATION
At most 2 stages can be set for cooking. If one stage is Defrost, it will automatically
set to be the rst stage.
16.Muti-Stage Cooking
EXAMPLE: 80% Power Level for 5 minutes followed by 60% Power Level for 10
minutes; saved as memory 3.
NOTE: Auto Menu cannot be set in Multi-stage Cooking.
Press Memory 3 times; screen displays 3.
Press Time Cook, then press "5" , "0" and "0" to set rst stage cook time.
power.
Press Time Cook again, then press "1", "0", "0" and "0" to set second stage
Press Power Level again, then press "6" to choose 60% second stage cooking
power.
Press to immediately start multi-stage cooking.
To choose the procedure from the memory list, press Memory three times.
Screen will display "3"; press to run procedure.
a.
b.
c.
d.
e.
f .
g.
NOTE:
If you do not want to save a particular multi-stage program as a procedure, do not
press Memory as the rst step. Press after programming both stages.
cook time.
In standby mode, press the " STOP/ Cancel" once (less than 3 seconds to avoid
starti ng t he child lock functi on to enter the Energy Saver mode.
)
In child-locked mode, press the " STOP/Cancel" once (less than 3 seconds)
and release to ent er the
Energy Saver Mode .
Above operation is the only way to start the Energy Saver mode.
The Energy Saver mode works only if the door is closed.
(1)
(2)
(3)
(4)
17.ENERGY SAVER MODE
EN-23

OPERATION
To lock the microwave so that it cannot be operated by children or other
unintended users, press pad for 3 seconds. You will hear a long beep.
" " will display.
To unlock, press for 3 seconds, you will hear a long beep and " "
20.Cooking End Reminder Function
The oven will beep ve times to alert the user that cooking time has ended.
must be pressed to continue cooking if the door is opened during cooing.
A single beep sounds to indicate that a pad is correctly pressed; if pad is not
correctly pressed, no beep sounds.
(1)
(2)
18.LOCK FUNCTION
(1)
(2)
When oven is cooking, press Clock Settings for the time of day to appear for
When oven is cooking, press Power Level pad for cooking power to
appear for three seconds in the display.
19.INQUIRING FUNCTION
(1)
(2)
three seconds in the display.
will disappear.
EN-24

MAINTENANCE
Cooking time,
power level is not suitable.
Use correct cooking time,
power level.
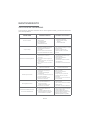
Check your problem by using the chart below and try the solutions for each prob-
lem.
TROUBLESHOOTING
TROUBLE
Oven will not start
Arcing or sparking
Unevenly cooked foods
Overcooked foods
Undercooked foods
Improper defrosting
Sensor cooked foods
not properly cooked
Cover or lid over food must contain
vent hole for escaping steam.
Do not open door to stir orturn food
before sensor-detected cooking time
appears in display.
a.
b.
a.
b.
c.
Materials to be avoided inmicrowa-
veoven were used.
Cooking time, power level is not
suitable.
Food is not turned or stirred.
a.
b.
c.
d.
Use microwave-safe cookware only.
Completely defrost food.
Use correct cooking time, power
level.
Turn or stir food.
a.
b.
c.
d.
Materials to be avoided in microwave
oven were used.
Food is not defrosted completely.
Cooking time, power level is not
suitable.
Food is not turned or stirred.
a.
b.
c.
Materials to be avoided in microwave
oven were used.
The oven is operated when empty.
Spilled food remains in the cavity.
a.
b.
c.
Use microwave-safe cookware only.
Do not operate with oven empty.
Clean cavity with wet towel.
a.
b.
c.
Plug into the outlet.
Close the door and try again.
Check instructions
a.
b.
c.
Electrical cord for oven is not
plugged in.
Door is open.
Wrong operation is set.
a.
b.
c.
Use microwave-safe cookware only.
Use correct cooking time, power
level.
Turn or stir food
a.
b.
c.
d.
Use microwave-safe cookware only.
Completely defrost food.
Check to see that oven venti-lation
ports are not restricted.
Use correct cooking time, power
level
a.
b.
c.
d.
Materials to be avoided in microwave
oven were used.
Food is not defrosted completely.
Oven ventilation ports are restricted.
Cooking time, power level is not
suitable.
Cover or lid on food not vented.
Door opened before sensor-detect -
ed cooking time appears in display.
a.
b.
EN-25
Possible Cause Possible Remedy

Bienvenido al mundo de
TOSHIBA
ANTES DE UTILIZAR ESTE PRODUCTO, LEA, ENTENDA Y SIGA ESTAS
INSTRUCCIONES.
ASEGÚRESE DE GUARDAR ESTA LISTA DE LIBROS PARA SU CONSUL-
TA EN EL FUTURO
CONTENIDO
PRECAUCIONES PARA EVITAR EXPOSICIÓN EXCESIVA A ENERGÍA
DE MICROONDAS
INSTRUCCIONES DE SEGURIDAD IMPORTANTES
GUARDE ESTAS INSTRUCCIONES
UTENSILIOS
AJUSTANDO SU HORNO DE MICROONDAS
FUNCIONAMIENTO
MANTENIMIENTO

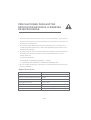
PRECAUCIONES PARA EVITAR
EXPOSICIÓN EXCESIVA A ENERGÍA
DE MICROONDAS
No intente hacer funcionar este horno con la puerta abierta, ya que podría
exponerse a energía de microondas dañina. Es importante no interferir con
los seguros del dispositivo.
120V~ 60Hz
Voltaje nominal:
Potencia nominal de salida (Microondas):
Capacidad del horno:
Diámetro del disco giratorio:
Dimensiones exteriores:
Peso Neto:
Especificaciones
a. PUERTA (doblada)
b. BISAGRAS Y SEGUROS (quebrados o sueltos)
c. JUNTAS DE LAS PUERTAS Y SUPERFICIES DE SELLADO
El horno debe ser ajustado o reparado por exclusivamente por personal de
servicio calificado.
No coloque ningún objeto entre la parte frontal del horno y la puerta, de lo
contrario permitirá que el polvo o restos de limpiadores se acumulen en las
superficies de sellados.
No haga funcionar el horno microondas si está dañado. Es particularmente
importante que la puerta del horno se cierre adecuadamente y que no
existan daños en:
Modelo:
10,6 inch/ 270 mm
1350W
Aprox. 27,3 Lbs (12,4 kg)
1.
2.
3.
4.
Potencia no minal de entrada (Microondas):
0,9 cu.ft. /25 L
19,1X16,1X11,5 pulg. (485X410X293 mm)
900W
ES-2
EM925A5A-BS

Lea todas las instrucciones antes de usar el electrodoméstico.
Lea y siga las "PRECAUCIONES PARA EVITAR LA POSIBLE EXPOSICIÓN A
ENERGÍA DE MICROONDAS EXCESIVA" en la página 2.
Al igual que ocurre con la mayoría de los aparatos de cocina, se requiere una estre-
cha supervisión para reducir el riesgo de incendio en la cavidad del horno.
Para reducir el riesgo de incendio en la cavidad del horno microondas:
Este aparato debe estar conectado a tierra. Conectar únicamente a un tomacorriente
conectado a tierra apropiadamente. Ver "Instrucciones de conexión a tierra" en la
página .
Instale o coloque este electrodoméstico sólo de acuerdo con las instrucciones de
instalación provistas.
1.
2.
3.
4.
5.
6.
Para reducir los riesgos de quemaduras, choques eléctricos, incendio,
lesiones a personas o exposición excesiva a energía de microondas,
cuando utilice aparatos eléctricos, siempre debe seguir las precauciones
básicas de seguridad, incluyendo las siguientes:
INSTRUCCIONES DE SEGURIDAD
IMPORTANTES
ADVERTENCIA
No cocine en exceso los alimentos. Supervise cuidadosamente el electrodomésti-
co al colocar papel, plástico u otros materiales combustibles en el interior del
horno microondas para facilitar la cocción.
Retire los alambres de amarre de las bolsas plásticas o papel antes de colocar la
bolsa en el horno microondas.
Si los materiales en el interior del horno microondas se encienden, mantenga
cerrada la puerta del horno microondas, apague el horno microondas y
desconecte el cable de suministro de energía o corte la energía desde el panel de
fusibles o disyuntor.
No deje productos de papel, utensilios de cocina o alimentos en la cavidad del
horno microondas cuando no está en uso.
a.
b.
c.
d.
6
ES-3

7. Algunos productos tales como huevos con cáscara y recipientes sellados — por
ejemplo, recipientes de vidrio cerrados - pueden explotar y no deben calentarse
en este horno microondas.
8. Utilice este electrodoméstico sólo para el uso previsto que se describe en este
manual. No use vapores o químicos corrosivos en este electrodoméstico. Este
tipo de horno microondas está diseñado específi camente para calentar, cocinar
o descongelar alimentos. No está diseñado para uso industrial o de laboratorios.
9. Como con cualquier electrodoméstico, es necesaria una estricta supervisión al
momento de ser operado por menores de edad.
10. No opere este electrodoméstico si tiene un cordón, cable o enchufe dañado, si
el electrodoméstico no está funcionando adecuadamente; o si ha sido dañado o
dejado caer.
11. Este electrodoméstico únicamente debe ser provisto de servicio de manten-
imiento por personal de servicio califi cado.
12. No cubra ni bloquee ningún orifi cio del electrodoméstico.
13. No almacene ni utilice este electrodoméstico al aire libre.
14. No utilice este producto cerca del agua - por ejemplo, cerca del fregadero de la
cocina, en un sótano húmedo o cerca de una piscina o lugares similares.
15. No almacene ni utilice este electrodoméstico al aire libre.
16. No almacene ni utilice este electrodoméstico al aire libre.
17. No deje que el cable cuelgue del borde de la mesa o mostrador..
18. Cuando limpie las superficies de la puerta y el horno que se juntan al cerrar la
puerta, use solamente jabones suaves y no abrasivos o detergentes aplicados
con una esponja de paño suave.
19. Este aparato es para el uso privado del hogar solamente.
INSTRUCCIONES DE SEGURIDAD
IMPORTANTES
ADVERTENCIA
ES-4

20. Líquidos, tales como agua, café o té, son propensos a sobrecalentarse más allá del
punto de ebullición sin aparentar que lo están. No siempre será visible un burbujeo
o ebullición al retirar el recipiente del horno microondas.
ESTO PUEDE DAR COMO RESULTADO QUE LÍQUIDOS MUY CALIENTES
EBULLAN REPENTINAMENTE AL INSERTAR UNA CUCHARA U OTRO UTEN-
SILIODENTRO DEL LÍQUIDO.
INSTRUCCIONES DE SEGURIDAD
IMPORTANTES
ADVERTENCIA
No sobrecalentar el líquido.
Revolver el líquido antes y durante el proceso de calentamiento.
No utilizar recipientes de lados rectos con cuellos angostos.
Después de calentar, deje reposar el recipiente dentro del horno microondas
por un corto tiempo antes de removerlo.
Tener cuidado extremo al momento de introducir una cuchara u otro utensilio
dentro del recipiente.
a.
b.
c.
d.
e.
ES-5

PRECAUCIÓN:
No introduzca el dedo en los huecos o agujeros ya que podría causar lesiones.
GUARDE ESTAS INSTRUCCIONES
INSTRUCCIONES DE CONEXIÓN A TIERRA
PELIGRO
ADVERTENCIA
Este horno debe tener una conexión a tierra. En caso de corto circuito, este tipo de
conexión reduce el riesgo de descargas eléctricas al proporcionar un cable de escape
para la corriente eléctrica. Para protegerse contra descargas eléctricas, este electro-
doméstico está equipado con un cable con un enchufe de 3 clavijas para conexión a
tierra que se inserta en una toma de corriente apropiada. NO altere el enchufe para su
uso en un receptáculo de 2 clavijas. Si el enchufe no encaja en un receptáculo, tenga un
receptáculo apropiado instalado por un electricista cualificado.
Tocar alguno de los componentes internos puede provocar graves lesiones personales
o incluso la muerte. No desarme este aparato.
El uso inadecuado de la conexión a tierra puede
ocasionar un choque eléctrico. No conecte
el dispositivo en un tomacorriente hasta que el
primero haya sido correctamente instalado y
conectado a tierra.
Riesgo de choque eléctrico
Riesgo de choque eléctrico
Clavija de tres clavijas
(conexión a tierra)
ES-6

GUARDE ESTAS INSTRUCCIONES
INSTRUCCIONES DE CONEXIÓN A TIERRA
Este dispositivo cuenta con un cable de alimentación corto para evitar riesgos
relacionados con personas que se puedan enredar o tropezar con un cable largo.
Puede utilizar cables más largos o extensiones si tiene cuidado a la hora de
manejarlos.
Si utiliza cables o extensiones más largos:
a.
b.
c.
La clasificación eléctrica marcada del cable o extensión debe ser tan alta como la
del propio dispositivo.
La extensión debe tener un cable de conexión a tierra tipo 3.
El cable más largo debe ser ordenado de tal manera que no represente un
peligro para los niños y para evitar que estos últimos lo tiren o se tropiecen de
forma involuntaria.
Consulte con un eléctrico o con personal de servicio técnico calificado si no comprende
completamente las instrucciones de conexión a tierra o si tiene dudas sobre si el
microondas está conectado a tierra de forma adecuada. Si es necesario utilizar una
extensión, sólo utilice una que cuente con 3 cables o que tenga un enchufe de 3 clavijas
y un receptáculo de 3 ranuras que sea compatible con el enchufe del microondas. La
clasificación eléctrica que aparece en la extensión debe ser igual o superior a la de este
dispositivo
1.
2.
3.
ES-7

GUARDE ESTAS INSTRUCCIONES
INSTRUCCIONES DE CONEXIÓN A TIERRA
El uso del horno microondas puede provocar interferencias en su radio, televisión o
equipos similares.
Cuando exista interferencia, puede ser reducida o eliminada si toma las siguientes
medidas:
a.
b.
c.
d.
e.
Clean door and sealing surface of the oven.
Reorient the receiving antenna of radio or television.
Relocate the microwave oven with respect to the receiver.
Move the microwave oven away from the receiver.
Plug the microwave oven into a different outlet so that microwave oven and receiv-
er are on different branch circuits.
INTERFERENCIA DE RADIO
ES-8

UTENSILIOS
GUARDE ESTAS INSTRUCCIONES
INSTRUCCIONES DE CONEXIÓN A TIERRA
Consulte las instrucciones en “Materiales que puede utilizar en el horno microondas o
para evitar en el horno de microondas". Podrían existir ciertos utensilios no metálicos
que podrían no ser seguros de usar en
un horno de microondas. Si tiene dudas, puede revisar los utensilios en cuestión
siguiendo el procedimiento que le presentamos a continuación:
Llene un contenedor microondeable con una taza de agua fría junto con el utensilio
que desee probar.
Cocine a máxima potencia durante un minuto.
Con cuidado toque el utensilio. Si el utensilio está caliente, entonces no lo utilice en
el microondas.
No exceda el tiempo de 1 minuto.
1.
2.
3.
4.
Los utensilios herméticamente cerrados podrían estallar. Los contenedores cerrados
deben ser abiertos y las bolsas de plástico deben ser agujereadas antes de cocinar.
REVISIÓN DE UTENSILIOS:
GUARDE ESTAS INSTRUCCIONES
SOLO PARA USO DOMÉSTICO
PRECAUCIÓN
Riesgo de choque eléctrico
ES-9

Sólo como protección. Se pueden usar pequeños pedazos para
cubrir las partes delgadas de carne o pollos y así evitar
sobre-cocción. Podría producirse un arco eléctrico si el papel se
coloca demasiado cerca de las paredes del horno. El papel debe
usar al menos a una pulgada (2,5cm) de las paredes del horno.
MATERIALES QUE SE PUEDEN UTILIZAR EN EL HORNO
DE MICROONDAS
UTENSILIOS
Papel de aluminio
OBSERVACIONES
Siga las recomendaciones del fabricante. El fondo del plato para
dorar debe estar al menos 3/16 pulgadas (5mm) por sobre del
plato giratorio. Su uso incorrecto podría provocar que el plato se
quiebre.
Plato para dorar
Utilice sólo vajilla microondeable. Siga las recomendaciones del
fabricante. No use platos agrietados o astillados.
Vajilla
Siempre retire la tapa. Sólo utilícelos para calentar comida. La
mayoría de los recipientes de vidrio no son resistentes al calor y
podrían quebrarse.
Recipiente de vidrio
Utilice sólo cristalería resistente al calor. Asegúrese de que no
tengan bordes metálicos. No use platos agrietados o astillados.
Cristalería
Siga las recomendaciones del fabricante. No cierre las bolsas
usando ataduras de metal. Realice agujeros para permitir que
escape el vapor.
Bolsas para hornear
Sólo utilícelos para periodos de cocción cortos. No deje el horno
sin vigilancia cuando cocine con estos utensilios.
Platos y vasos de papel
Utilícelas para cubrir la comida cuando la recaliente y para
absorber la grasa. Utilícelas bajo supervisión y durante periodos
de cocción breves.
Toallas de papel
Utilícelo como cubierta para evitar salpicones o como envoltura
para el vapor.
Utilice sólo productos microondeables. Utilícelo para cubrir la
comida y retener la humedad. No permita que las envolturas de
plástico toquen la comida
Utilice sólo utensilios microondeables (termómetros de carne y
dulce).
Utilícelo como cubierta para evitar salpicaduras y retener humedad.
Papel manteca
Utilice sólo productos microondeables. Siga las recomenda-
ciones del fabricante. Debe tener una marca que señale que el
producto es "Microondeable". Algunos contenedores de plástico
se ablandan, pues la comida en su interior se calienta. Las
“bolsas de cocción” y las bolsas de plásticos selladas deben ser
agujereadas tal y como señalan sus instrucciones.
Plástico
Papel encerado
Termómetros
Envoltura plástica
ES-10

UTENSILIOS OBSERVACIONES
MATERIALES QUE DEBEN EVITARSE EN EL HORNO
DE MICROONDAS
Podría provocar un arco eléctrico. Transfiera la comida a un plato
microondeabe.
Bandeja de aluminio
Ataduras de metal
Podría provocar un arco eléctrico. Transfiera la comida a un plato
microondeable.
Podrían causar arcos eléctricos y provocar incendios en el horno.
Comida envuelta
con manijas de metal
Bolsas de papel Podrían provocar incendio en el horno.
Porexpán
Madera
El porexpán podría derretirse y contaminar la comida cuando se
expone altas temperaturas.
La madera podría secarse cuando la utilice en el horno de
microondas y podría partirse o agrietarse.
ES-11

AJUSTANDO SU HORNO DE MICROONDAS
Retire el horno y todos los materiales de la caja de cartón y de la cavidad del
horno. Su horno posee los siguientes accesorios:
NOMBRES DE LAS PARTES DEL HORNO Y ACC ESORIOS
Bandeja de vidrio 1
Aanillo de bandeja giratoria 1
Manual de instrucciones 1
A) Panel de control
B) Eje de la bandeja giratoria
C) Anillo de bandeja giratoria
D) Bandeja de vidrio
E) Ventana de observación
F) Puerta
G) Seguros de la puerta
ES-12

AJUSTANDO SU HORNO DE MICROONDAS
INSTALACIÓN DE LA BANDEJA GIRATORIA
Anillo d e bandeja giratoria
Eje de la bandeja
giratoria
Eje (parte inferior)
Bandeja de vidrio
a. Nunca coloque la bandeja de vidrio al revés. La bandeja de vidrio nunca debe tener
restricciones que la imposibiliten de girar.
b. Tanto la bandeja de vidrio como el ensamblaje del anillo de la misma deben usarse a
la hora de cocinar.
c. Toda la comida y los contenedores de comida deben colocarse sobre la bandeja de
vidrio para cocinar o calentar.
ES-13

AJUSTANDO SU HORNO DE MICROONDAS
INSTALACIÓN EN UNA ENCIMERA
INSTALACIÓN
1.
Retire todos los materiales de empaque y los accesorios. Examine el horno en busca de daños
como abolladuras o puerta rota. No instalar si el horno se encuentra dañado.
Carcasa: Retire cualquier película protectora que se encuentre en la superficie de la carcasa del
microondas. No retire la cubierta marrón claro Mica que está adherida a la cavidad del horno
para proteger el magnetrón.
Seleccione una superficie nivelada que proporcione espacio suficiente para
las ranuras de ventilación de entrada y salida del aparato.
Se requiere de un claro mínimo de 3,0 pulgadas (7,5cm) entre el horno y cualquier pared adyacente.
Un lado debe estar despejado.
(1)
(2)
(3)
(4)
Deje un claro mínimo de 12 pulgadas (30cm) sobre el horno..
No retire las patas de la parte de abajo del horno.
Si bloquea las aberturas de ventilación del aparato podría dañarlo.
Coloque el horno lo más lejos que pueda de radios y televisores. El uso del horno microondas
puede provocar interferencias en su radio, televisión o equipos similares.
OPEN
12 inches(30cm )
3.0 inches( 7.5cm )
3.0 inches(7.5cm )
ES-14

AJUSTANDO SU HORNO DE MICROONDAS
INSTALACIÓN
2.Conecte su horno en un tomacorriente casero estándar. Asegúrese de que
el voltaje.
ADVERTENCIA
No coloque el horno sobre una estufa o parrillas u otros aparatos productores
de calor. Si instala el horno cerca o sobre una fuente de calor, podría dañarlo
y la garantía quedaría inválida.
La superficie accesible podría
calentarse cuando utilice el horno.
ES-15

1. NIVELES DE POTENCIA
FUNCIONAMIENTO
Antes o durante la cocción, presione el nivel de potencia y se mostrará "PL10". Un
teclado numérico para seleccionar un nivel de potencia.
2. AJUSTE DEL RELOJ
(1)
(2)
(3)
Presione Clock Settings una vez, "00:00" aparecerá en la pantalla.
Pulse las teclas numéricas para introducir la hora actual. Por ejemplo, si el tiempo
es ahora 10:12, presione "1, 0, 1, 2" en orden.
Pulse Clock para finalizar la configuración del reloj, ":" parpadeará y los números
aparecerán como una hora en la pantalla.
Nivel 10 9 8 7 6 5 4 3 2 1
Potencia 100% 90% 80% 70% 60% 50% 40% 30% 20% 10%
Monitor PL10 PL 9 PL 8 PL 7 PL 6 PL 5 PL 4 PL 3 PL 2 PL 1
NOTA:
Si los números introducidos no están dentro del rango entre 1:00 a 12:59, el ajuste no
se aceptará hasta que se ingresen números válidos.
En el proceso de ajuste del reloj, si se pulsa el botón o si no hay ninguna
operación en 1 minuto, la pantalla volverá automáticamente al ajuste del reloj anterior.
Hay disponibles 10 niveles de potencia
Cuando el horno de microondas esté conectado a una toma de corriente, se mostrará "0:00".
ES-17

Pulse Kitchen Timer una vez, "00:00" aparecerán en la pantalla.
Pulse las teclas numéricas para introducir la cantidad de tiempo. La cantidad
máxima de tiempo que se puede introducir es 99 minutos, 99 segundos.
Pulse para confirmar el ajuste, el indicador del temporizador parpadeará y el
temporizador comenzará a contar hacia abajo.
Cuando haya transcurrido el tiempo, el horno sonará 5 veces.
FUNCIONAMIENTO
Presione Time Cook, "00:00" aparecerán en la pantalla.
Pulse las teclas numéricas para introducir el tiempo de cocción. El tiempo de
cocción máximo es de 99 minutos, 99 segundos.
Pulse Power Level, PL10 parpadeará. Pulse Power Level varias veces o las teclas
0 a 9 para seleccionar un nivel de potencia diferente si lo desea. Vea la tabla
POWER LEVEL de arriba.
Pulse para iniciar la cocción. Se mostrará el tiempo de cocción restante.
a.
b.
c.
d.
Presione Time Cook, "00:00" se mostrará.
Presione "1, 5, 0, 0" para que aparezcan 15:00 en la pantalla.
Presione Power Level, luego presione "5" para seleccionar 50% de potencia de
microondas.
Presione para iniciar la cocción. El timbre suena una vez. Se mostrará el
tiempo de cocción restante.
4. COCINA DE MICROONDAS
(1)
(2)
(3)
(4)
3. TEMPORIZADOR DE COCINA
(1)
(2)
(3)
(4)
NOTA:
El ajuste del temporizador de cocina es diferente del ajuste del reloj; Es simplemente un
temporizador.
Durante la función de temporizador de cocina, no se puede poner en funcionamiento
ninguna función de cocción.
La cantidad del temporizador de cocina no se puede aumentar presionando .
Al pulsar se cancelará la cuenta atrás del temporizador.
Ejemplo
: Cocinar los alimentos con un 50% de potencia de microondas durante 15 min.
ES-18

FUNCIONAMIENTO
La cocción instantánea al 100% del nivel de potencia y de 1 a 6 minutos de tiempo
de cocción se puede iniciar pulsando las teclas numéricas 1 a 6. Pulse para
aumentar el tiempo de cocción en 30 segundos con cada presión. El tiempo de
cocción máximo es de 99 minutos 99 segundos.
La cocción instantánea al 100% del nivel de potencia y el tiempo de cocción de 30
segundos se pueden iniciar pulsando . Cada repetición de pulsación aumen-
tará el tiempo de cocción en 30 segundos. El tiempo máximo de cocción es de 99
minutos, 99 segundos.
5. INICIO DE UN TOQUE
(1)
(2)
NOTA:
El tiempo también se puede añadir en incrementos de 30 segundos presionando
durante la Cocción por Microondas, Descongelación por tiempo y Cocción en múltiples
etapas.
El tiempo no se puede agregar presionando durante las funciones de descongel-
ación de peso y temporizador de cocina.
Pulse Time Defrost dos veces, "dEF2" aparecerá en la pantalla.
Pulse los botones numéricos para introducir el tiempo de descongelación. La
disposición de la imagen es 00: 01-99: 99.
La potencia de microondas predeterminada es el nivel de potencia 3. Si desea
cambiar el nivel de potencia, pulse Power Level una vez, y PL3 aparecerá; luego
presione el teclado numérico para el nivel de potencia deseado.
Pulse para iniciar la cocción de descongelación. Y se mostrará el tiempo de
descongelación restante.
6. DESCONGELACIÓN POR TIEMPO
(1)
(2)
(3)
(4)
NOTA:
En el proceso de ajuste, si se presiona la tecla o si no hay operación en 1 minuto,
el horno regresará automáticamente para mostrar el reloj.
ES-19

8. PALOMITAS DE MAÍZ
(1)
(2)
(3)
FUNCIONAMIENTO
Pulse Weight Defrost una vez, se mostrará "dEF1".
Presione los botones numéricos para introducir el peso que desee descongelar.
Introduzca el rango de peso entre 4 y 100 oz.
Si el rango de peso está entre 4 y 100 oz, la entrada será inválida. Se escuchará
un pitido y la unidad no funcionará hasta que se introduzcan números válidos.
Pulse para iniciar la descongelación y se mostrará el tiempo de cocción
restante.
7. FUNCIÓN DE DESCONGELACIÓN DE PESO
(1)
(2)
(3)
(4)
Presione Popcorn, "1.75" aparecerá en la pantalla.
Presione Popcorn dos veces más para elegir el peso, "3.0" y "3.5" se mostrará en
orden.
Presione para cocinar. Se mostrará el tiempo restante. El horno emite cinco
pitidos al finalizar la cocción.
9. PATATA
1) Presione Potato varias veces hasta que aparezca el número deseado en la pantalla
"1", "2", "3" se mostrará en orden.
Presione una vez: 1 patata (aprox. 8,0 oz)
Presione dos veces: 2 patatas (aproximadamente 16,0 oz)
Pulse 3 veces: 3 patatas (aprox. 24,0 oz)
2) Presione para cocinar. Se mostrará el tiempo restante. El horno emite cinco
pitidos al finalizar la cocción.
10. VERDURAS CONGELADAS
1) Presione Frozen Vegetable, "4.0" aparecerá en la pantalla.
2) Presione Frozen Vegetable dos veces más para elegir el peso, "8.0" y "16.0" se
mostrarán en orden.
3) Presione para cocinar. Se mostrará el tiempo restante. El horno emite cinco
pitidos al finalizar la cocción.
ES-20

FUNCIONAMIENTO
11. BEBIDA
1) Pulse Beverage, "1" aparecerá en la pantalla.
2) Presione Beverage dos veces más para elegir el peso, "2" y "3" se mostrarán en
orden. Una taza es de aproximadamente 4,0 onzas.
3) Presione para cocinar. Se mostrará el tiempo restante. El horno emite cinco
pitidos al finalizar la cocción.
12. PLATO DE CENA
1) Presione Dinner Plate, "9.0" aparecerá en la pantalla.
2) Presione Dinner Plate dos veces más para elegir el peso, "12.0" y "18.0" se mostrarán
en orden.
3) Presione para cocinar. Se mostrará el tiempo restante. El horno emite cinco
pitidos al finalizar la cocción.
13. PIZZA
1) Presione Pizza, "4.0" aparecerá en la pantalla.
2) Presione Pizza dos veces más para elegir el peso, "8.0" y "14.0" se mostrarán en
orden.
3) Presione para cocinar. Se mostrará el tiempo restante. El horno emite cinco
pitidos al finalizar la cocción.
ES-21

FUNCIONAMIENTO
14. FUNCIÓN DE MEMORIA
1) Pulse Memory para programar y seleccione hasta tres procedimientos de cocción.
Cada procedimiento se indicará con 1, 2 o 3 en la pantalla.
2) Presione Memory hasta que aparezca el número de procedimiento deseado en la
pantalla.
Presione para comenzar. Se puede ajustar un máximo de dos etapas de
cocción para cada procedimiento.
3) Para programar un procedimiento, siga los pasos que se indican a continuación.
Ejemplo: cocinar los alimentos a un nivel de potencia del 80% durante 3 minutos y
20 segundos; Guardar como memoria 2.
a. Presione Memory dos veces; Pantalla 2.
b. Presione Time Cook de cocción, luego presione "3", "2" y "0" en orden.
c. Pulse Power Level una vez, luego pulse "8" para que aparezca "PL 8".
d. Pulse para guardar el procedimiento. El horno emite un pitido una vez.
O presione directamente para guardar e iniciar la cocción.
e. Para elegir el procedimiento de la lista de memoria, presione Memory dos veces.
La pantalla mostrará "2". Pulse para ejecutar el procedimiento.
NOTA:
El menú Auto no se puede ajustar en la función de memoria.
15. ENCENDER/APAGAR EL SONIDO DEL TIMBRE
Por defecto, los sonidos del timbre están abiertos. En estado de espera, presionando
el número 8 durante 3 segundos, suena un pitido largo.
Apaga el sonido.
Cuando los sonidos se apaguen, un presionado largo en 8 durante 3 segundos, suena
un pitido largo y el sonido se apaga. Ningún botón tiene pitido cuando se presiona,
incluyendo los sonidos de cocción final se apaga también.
Nota: todos los modelos tienen función de silencio y función de ahorro de energía.
Esta función también puede funcionar bajo la función de bloqueo.
ES-22

FUNCIONAMIENTO
Se pueden configurar a lo sumo 2 etapas para cocinar. Si una etapa es Descongel-
ación, automáticamente se establecerá como la primera etapa.
NOTA: Auto Menu no se pueden configurar en la cocción multi-etapa.
EJEMPLO: 80% de nivel de potencia durante 5 minutos, seguido de 60% de nivel de
potencia durante 10 minutos; Guardado como memoria 3.
16. Cocina multi-etapa
Presione Memory 3 veces; La pantalla muestra 3.
Presione Cook Time una vez, luego presione "5", "0" y "0" para establecer el
tiempo de cocción de la primera etapa.
Presione Power Level una vez, luego presione "8" para elegir 80% de potencia de
cocción de primera etapa.
Presione Cook Time otra vez, luego presione "1", "0", "0" y "0" para establecer el
tiempo de cocción de la segunda etapa.
Presione Power Level nuevamente, luego presione "6" para elegir el 60% de
potencia de cocción de la segunda etapa.
Presione para iniciar inmediatamente la cocción en varias etapas.
Para elegir el procedimiento de la lista de memoria, presione Memory tres veces.
La pantalla mostrará "3"; Presione para ejecutar el procedimiento.
a.
b.
c.
d.
e.
f .
g.
1) En el modo de espera, presione "STOP/CANCEL" una vez (menos de 3
segundos para evitar el inicio de la función de bloqueo infantil) para entrar en el
modo de ahorro de energía.
2) En modo de bloqueo infantil, presione una vez la tecla "STOP/CANCEL"
(menos de 3 segundos) y suelte para entrar en el modo de ahorro de energía.
3) Por encima de la operación es la única manera de iniciar el modo de ahorro de
energía.
4) El modo de ahorro de energía sólo funciona si la puerta está cerrada.
17. MODO DE AHORRO DE ENERGÍA
NOTA:
Si no desea guardar un programa multi-etapa en particular como procedimiento, no
presione Favorite como primer paso. La cocción en varias etapas comenzará la primera
vez. Pulse después de programar ambas etapas.
ES-23

FUNCIONAMIENTO
Para bloquear el microondas de modo que no pueda ser operado por niños u otros
usuarios no deseados, presione durante 3 segundos. Escuchará un largo
pitido. Se visualizará " ".
Para desbloquear, pulse durante 3 segundos, oirá un pitido largo y " "
desaparecerá.
18. FUNCION DE BLOQUEO
(1)
(2)
Cuando el horno esté cocinando, presione Clock& Settings para que la hora del día
aparezca durante tres segundos en la pantalla.
Cuando el horno esté cocinando, presione las teclas Power Level para
que la energía de cocción aparezca durante tres segundos en la pantalla.
19. FUNCION DE CONSULTA
(1)
(2)
20. Función de recordatorio final de cocción
El horno emitirá un pitido cinco veces para avisar al usuario que el tiempo de cocción ha
terminado. Aparecerá "End" (Fin).
se debe presionar para continuar cocinando si se abre la puerta durante el
cocinado.
Un solo pitido suena para indicar que un botón está presionado correctamente; Si el
botón no se presiona correctamente, no suena ningún pitido.
21. Otras especificaciones
(1)
(2)
ES-24

MANTENIMIENTO
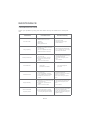
CAUSA POSIBLE
El tiempo de cocinado, nivel de
potencia no es adecuado.
Use el tiempo correcto de
cocinado, nivel de potencia.
POSIBLE SOLUCIÓN
Compruebe su problema mediante el uso de la siguiente tabla y pruebe las soluciones
para cada problema.
SOLUCIÓN DE PROBLEMAS
PROBLEMA
El horno no arranca
Arqueo o chispa
Alimentos cocinados desigualmente
Alimentos demasiado cocinados
Alimentos poco cocinados
Descongelación incorrecta
Los alimentos cocinados por sensor
no se cocinan adecuadamente
La cubierta o la tapa de los alimentos
debe contener el orificio de ventilación
para el escape de vapor.
No abra la puerta para remover o
revolver los alimentos antes de que el
tiempo de cocción por sensor
detectado aparezca en la pantalla.
a.
b.
a.
b.
c.
Se utilizaron materiales que
hay que evitar introducir en el
horno de microondas.
b. El tiempo de cocinado, nivel
de potencia no es adecuado.
a.
b.
c.
d.
Use solamente utensilios de cocina
para microondas.
Descongele los alimentos
completamente.
Use el tiempo correcto de cocinado,
nivel de potencia.
Dé la vuelta o remueva los alimentos.
a.
b.
c.
d.
Se utilizaron materiales que hay que
evitar introducir en el horno de
microondas.
La comida no está descongelada por
completo.
El tiempo de cocinado, nivel de potencia
no es adecuado.
No se ha dado la vuelta o removido el
alimento.
a.
b.
c.
Se utilizaron materiales que hay que
evitar introducir en el horno de
microondas.
El horno se opera cuando está vacío.
Hay comida derramada en la cavidad.
a.
b.
c.
Use solamente utensilios de cocina
para microondas.
No opere con el horno vacío.
Limpie la cavidad con una toalla
húmeda.
a.
b.
c.
Conecte en el enchufe.
Cierre la puerta y vuelva a
intentarlo.
Lea las instrucciones.
a.
b.
c.
El cable eléctrico para el horno no
está enchufado.
La puerta está abierta.
Hay configurado un
funcionamiento erróneo.
a.
b.
c.
Use solamente utensilios de cocina
para microondas.
Use el tiempo correcto de cocinado,
nivel de potencia.
Dé la vuelta o remueva los alimentos.
a.
b.
c.
d.
Use solamente utensilios de cocina
para microondas.
Descongele los alimentos
completamente.
Compruebe que los puertos de
ventilación del horno no están
restringidos.
Use el tiempo correcto de cocinado,
nivel de potencia.
a.
b.
c.
d.
Se utilizaron materiales que hay que
evitar introducir en el horno de
microondas.
La comida no se descongela
completamente.
Los puertos de ventilación del horno se
encuentran restringidos.
El tiempo de cocinado, nivel de
potencia no es adecuado.
Cubra o tape los alimentos no
ventilados.
La puerta se abrió antes de que
apareciera el tiempo de cocción por
sensor detectado en la pantalla.
a.
b.
ES-25
-
 1
1
-
 2
2
-
 3
3
-
 4
4
-
 5
5
-
 6
6
-
 7
7
-
 8
8
-
 9
9
-
 10
10
-
 11
11
-
 12
12
-
 13
13
-
 14
14
-
 15
15
-
 16
16
-
 17
17
-
 18
18
-
 19
19
-
 20
20
-
 21
21
-
 22
22
-
 23
23
-
 24
24
-
 25
25
-
 26
26
-
 27
27
-
 28
28
-
 29
29
-
 30
30
-
 31
31
-
 32
32
-
 33
33
-
 34
34
-
 35
35
-
 36
36
-
 37
37
-
 38
38
-
 39
39
-
 40
40
-
 41
41
-
 42
42
-
 43
43
-
 44
44
-
 45
45
-
 46
46
-
 47
47


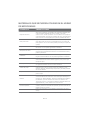
Midea EM025FXXXV2 Manual de usuario
- Categoría
- Microondas
- Tipo
- Manual de usuario
En otros idiomas
- English: Midea EM025FXXXV2 User manual
Otros documentos
-
 Comfee’ EM720CPL-PM Manual de usuario
-
Kenmore Elite 40574223310 El manual del propietario
-
 Kenmore Elite 405.74153310 El manual del propietario
-
Oster POGYME1502G Manual de usuario
-
Rival EM720CWA-PM El manual del propietario
-
-
Magic Chef MCM1511KSB El manual del propietario
-
Sanyo EM-S5595S Manual de usuario
-
Kenmore 204.79399610 Guía del usuario

