Phoenix NESO SS0200F Series Instrucciones de operación
- Tipo
- Instrucciones de operación

PREMIÈRE OUVERTURE
1. Lors de la livraison de votre coffre-fort, les batteries ne seront pas installées. La clé de secours doit être
utilisé pour ouvrir la porte.
2. Pour accéder à la serrure à clé d'urgence, recherchez le panneau sous le clavier. Placez votre pouce sur le
panneau et faites le glisser vers le bas.
3. Insérez la clé et tournez dans le sens antihoraire.
4. Tournez lla poignée dans le sens horaire et ouvrez la porte.
5. Retirez le couvercle du compartiment des piles à l'arrière de la porte et insérez les piles alcalines AA x 4.
Remarque: les piles sont fournies pour le transit et l'utilisation initiale seulement.
INSTALLER UN CODE UTILISATEUR
Le code usine installé est "1234"
1. Appuyez sur lla touche "1" pendant 5 secondes, la lumière verte s'allumera.
2. Entrez le code utilisateur actuel (pour la 1ère utilisation 1234) et appuyez sur le bouton de déverrouillage
(ce qui sera confirmé par 1 bip).
3. Entrez le nouveau code (4 - 8 chiffres) et appuyez sur le bouton de déverrouillage.
4. Entrez le nouveau code une fois de plus et appuyez sur le bouton de déverrouillage (Ceci sera confirmé par
2 bips)
Exemple: Appuyez sur 1 (pendant 5 secondes) > 1234 bouton de déverouiilage > 4321 > bouton de
déverouillage > 4321 > bouton de déverouillage. Une entrée réussie est confirmée par 2 bips.
OUVERTURE EN UTILISANT LE CODE UTILISATEUR
1. Entrez le code d'utilisateur suivi par le bouton de déverrouillage, un long bip sonore retentira et le voyant
vert s'allumera. Tournez lla poignée vers la droite et ouvrez la porte
ENREGISTREMENT DES EMPREINTES
1. Appuyez sur le bouton de réinitialisation et vous entendrez 2 bips courts.
2. Alors que la lumière rouge est allumée, placez votre doigt sur le capteur.
3. Vous entendrez 4 bips consécutifs, ce qui signifie que l'empreinte a été correctement enregistrée. (3 bips
courts indiquent que l'enregistrement a échoué.)
REMARQUE: Un maximum de 20 empreintes peut être enregistrées.
COMMENT OUVRIR À L'AIDE D'UNE EMPREINTE DIGITALE
1. Appuyez sur le bouton de déverrouillage, le capteur devient rouge.
2. Placez votre doigt sur le capteur jusqu'à ce que le capteur passe au vert.
3. Tournez la poignée dans le sens horaire et ouvrir votre coffre-fort.
COMMENT SUPPRIMER LES EMPREINTES DIGITALES ENREGISTRÉES
1. Appuyez sur le bouton de réinitialisation pendant 5 secondes, le voyant vert clignotera 15 fois.
2. Relâchez le bouton quand le voyant a cessé de clignoter. Après avoir entendu un long "tick", toutes les
empreintes digitales enregistrées dans la serrure seront supprimées et la serrure retournera au réglage
d'usine.
SOURCE DE COURANT
• Si la lumière rouge s' éclaire après avoir entré le code utilisateur ou entrer une empreinte digitale, cecii
indique que les piles sont faibles. Veuillez remplacer les piles immédiatement.
• Nous vous recommandons d'utiliser des piles alcalines de haute qualité.
ATTENTION: Pour une sécurité totale, veuillez prendre soin de la clé de secours et de les garder dans un
endroit sûr. NE PAS LAISSER LES CLEFS DE SECOURS A L'INTERIEUR DU COFFRE.
PRIMERA APERTURA
1. La caja de seguridad se suministra con las pilas no instaladas. Para abrir la caja, utilice la llave de
emergencia.
2. La cerradura de emergencia se encuentra bajo la tapa situada debajo del teclado. Coloque su dedo pulgar
sobre el panel y deslícelo hacia abajo.
3. Inserte la llave y gírela en sentido contrario a las agujas del reloj.
4. Gire el mando en el sentido de las agujas del reloj y abra la puerta.
5. Retire la tapa del compartimento de pilas situado en el interior de la puerta e inserte 4 x AA pilas alcalinas.
NOTA: Las pilas suministradas son solo para el uso inicial.
INTRODUCCIÓN DEL CÓDIGO DE USUARIO
El código predeterminado de fábrica es el "1234"
1. Pulse el botón número “1” durante 5 segundos, la luz verde se iluminará.
2. Introduzca el código de usuario (1234, la primera vez) y pulse el botón de desbloqueo (se escuchará un
pitido).
3. Introduzca el nuevo código (de 4 a 8 dígitos) y pulse el botón de desbloqueo.
4. Vuelva a introducir el nuevo código y pulse el botón de desbloqueo (se escucharán dos pitidos)
Ejemplo: Pulse 1 (durante 5 segundos) > 1234 > Llave de desbloqueo > 4321 > Llave de desbloqueo >
4321 > Llave de desbloqueo. La correcta operación quedará confirmada por dos pitidos.
APERTURA CON EL CÓDIGO DE USUARIO
1. Introduzca el código de usuario y pulse el botón de desbloqueo, se escuchará un pitido largo y la luz verde
se iluminará. Gire el mando en el sentido de las agujas del reloj y abra la puerta.
REGISTRO DE HUELLA DACTILAR
1. Pulse el botón de reinicio y se escucharán dos pitidos cortos.
2. Mientras la luz roja esté iluminada, coloque su dedo en el sensor.
3. Se escucharán cuatro pitidos consecutivos, que indican que la huella dactilar ha sido registrada
correctamente (si el registro no se ha llevado a cabo correctamente, se escucharán tres pitidos cortos).
NOTA: Es posible registrar un máximo de 20 huellas dactilares.
APERTURA CON HUELLA DACTILAR
1. Pulse el botón de desbloqueo, el sensor cambiará a rojo.
2. Coloque su dedo en el sensor hasta que cambie a verde.
3. Gire la maneta en el sentido de las agujas del reloj y abra la caja.
CÓMO ELIMINAR LAS HUELLAS DACTILARES REGISTRADAS
1. Pulse el botón de reinicio durante 5 segundos, el indicador verde destellará 15 veces.
2. Deje de pulsar el botón cuando los destellos finalicen. Después de oír un largo “clic”, todas las huellas
dactilares registradas quedarán eliminadas y la cerradura volverá a su estado original de fábrica.
PILAS
• Si la luz roja se ilumina después de introducir el código de usuario o las huellas digitales, esto indica que
la carga de las pilas está baja. Por favor, reemplazar las pilas inmediatamente.
• Recomendamos utilizar pilas alcalinas de alta calidad.
ATENCIÓN: Para su total seguridad, por favor, ponga especial cuidado con la llave de emergencia y guárdela
en lugar seguro. NO GUARDE LAS LLAVES DE EMERGENCIA DENTRO DE LA CAJA DE SEGURIDAD.
MODE D'EMPLOI POUR PHOENIX SÉRIE
NESO SS0200F
MANUAL DE INSTRUCCIONES PARA
NESO SS0200F PHOENIX SERIE
Veuillez enregistrer l’ achat de votre coffre-fort sur notre site internet
Si prega di registrare l’acquisto sul nostro sito Supporto Web
Bitte registrieren Sie Ihren Safe auf unserer Website
Por favor, registre su pedido en nuestra página Web de apoyo
Please register your purchase on our Support Website
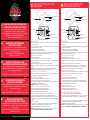
Etagère
Bouton de réinitialisation
Vis
Compartiment de la pile
1
2
3
4
Capteur
Bouton de déverouillage
Couvercle de la clef de secours
Numéro des touches
Poignée
Balda
Botón de reinicio
Cerrojos
Compartimento de pilas
1
2
3
4
Sensor
Botón de desbloqueo
Tapa de la cerradura de llave
de emergencia
Teclas numéricas
Mando giratorio
Phoenix Safe Company: Where peace mind is guaranteed
MANUAL DE INSTRUCCIONES PARA
NESO SS0200F PHOENIX SERIE & GARANTÍA
Para mayor seguridad, le recomendamos que cuando acceda a nuestra página
web www.phoenixsafe.com, haga clic en Registro de garantía e introduzca
su registro de garantía.
AVDA, DE LA INDUSTRIA, 52 POLÍGONO INDUSTRIAL, 28820 COSLADA, MADRID,
ESPAÑA | 0034 (91) 6736411
ISTRUZIONI PER L'USO DI NESO SS0200F
SERIE PHOENIX & REGISTRAZIONE DELLA GARANZIA
Per una maggiore sicurezza vi raccomandiamo di inoltrare la vostra
registrazione della garanzia visitando il nostro sito web: www.phoenixsafe.com e
cliccando su registrazione della garanzia.
VIA MONTE ROSA 28, 20049, CONCOREZZO, MILAN, ITALY | 39 039 5965844
BETRIEBSANLEITUNG FÜR PHOENIX NESO
SS0200F SERIE & GARANTIEKARTE
Aus Sicherheitsgründen empfehlen wir Ihnen, Ihre Garantiekarte online auf unserer
Website www.phoenixsafe.com per Mausklick auf der Schaltfläche
„Garantieanmeldung“ auszufüllen.
DEUTSCHLAND GMBH, BAHNSTR. 23, D-42327 WUPPERTAL 0049-202-69519-0
MODE D'EMPLOI POUR PHOENIX SÉRIE
NESO SS0200F & GARANTIE
Pour une meilleure sécurité, nous vous recommandons d’enregistrer
votre garantie en ligne par notre site: www.phoenixsafe.com et en cliquant
sur enregistrement de garantie.
19 RUE DES HALLES, 16510 VERTEUIL SUR CHARENTE,
FRANCE | 00 33 (0) 5 45 89 68 80
OPERATING INSTRUCTIONS FOR PHOENIX NESO
SS0200F SERIES & GUARANTEE REGISTRATION
Please submit your guarantee registration by visiting our website
www.phoenixsafe.com and clicking on guarantee registration.
For further assistance or information please contact us on 0151 944 6444.
APEX HOUSE, 1 ORRELL MOUNT, LIVERPOOL, L20 6NS,
UNITED KINGDOM | +44 (0)151 944 6444

OPERATING INSTRUCTIONS FOR PHOENIX
NESO SS0200F SERIES
ISTRUZIONI PER L'USO DI NESO SS0200F
SERIE PHOENIX
BEDIENUNGSANLEITUNG FÜR DIE
PHOENIX NESO SS0200F SERIE
OPENING FOR THE 1ST TIME
1. On delivery of your safe the over ride key must be used to open the door.
2. To access the emergency key lock, locate the panel under the keypad. Place your thumb on the panel and
drag downwards.
3. Insert the key and turn anti-clockwise.
4. Turn the knob clockwise and open the door.
5. Remove the battery compartment cover on the back of the door and insert 4 x AA alkaline batteries (not
supplied).
SETTING A USER CODE
The factory preset code is "1234"
1. Press button number “1” for 5 seconds, the green light will illuminate.
2. Input the current user code (for 1st time usage 1234) and press the unlock button (this will be confirmed
by 1 bleep).
3. Input the new code (4 – 8 digits) and press the unlock button.
4. Input the new code again and press the unlock button (This will be confirmed by 2 bleeps).
Example: Press 1 (for 5 Seconds) > 1234 > Unlock key > 4321 > Unlock key > 4321 > Unlock Key.
A successful entry is confirmed by 2 bleeps.
OPENING USING THE USER CODE
1. Enter the user code followed by unlock button, a long bleep will sound and the green light will illuminate.
Turn the knob clockwise and open the door.
FINGERPINT REGISTRATION
1. Press the reset button and you will hear 2 short bleeps.
2. While the red light is illuminated, place your finger on the sensor.
3. You will hear 4 consecutive bleeps, which means that the fingerprint has successfully been registered.
(3 short bleeps indicate that the registration was unsuccessful.)
NOTE: A maximum of 20 fingerprints can be registered.
HOW TO OPEN USING A FINGERPRINT
1. Press the unlock button, the sensor will turn red.
2. Place your finger on the sensor until the sensor turns green.
3. Turn the handle clockwise and open your safe.
HOW TO DELETE REGISTERED FINGERPRINTS
1. Press the reset button for 5 seconds, the green indicator light will flash 15 times.
2. Release the button when it has stopped flashing. After hearing a long “tick”, all fingerprints recorded in
the lock are deleted and the lock will be returned to the original factory settings.
POWER SUPPLY
• If the red light illuminates after entering the user code or entering a fingerprint, this indicates the batteries
are low. Please replace the batteries immediately.
• We recommend using high quality alkaline batteries.
CAUTION:
For your total security, please take care of the emergency key and keep them in safe place.
DO NOT STORE EMERGENCY KEYS INSIDE THE SAFE
APRIRE PER LA PRIMA VOLTA
1. La cassaforte viene consegnata senza pile nel vano preposto. Usare la chiave maestra per aprire lo
sportello.
2. Per accedere alla serratura di emergenza, localizzare il pannello sotto la tastierina. Posizionare il pollice
sul pannello e trascinare verso il basso.
3. Inserire la chiave e girare in senso anti-orario.
4. Girare il pomello in senso orario ed aprire lo sportello.
5. Togliere il coperchio del vano pile sul retro dello sportello ed inserire 4 x AA pile alcaline.
NOTA: Le pile fornite sono solo per il transito e l’uso iniziale.
IMPOSTARE UN CODICE UTENTE
Il codice impostato in fabbrica è "1234"
1. Premere il tasto numero “1” per 5 secondi, si accenderà un indicatore verde .
2. Inserire il codice utente corrente (la prima volta sarà 1234) e premere il tasto sblocco (questo verrà
confermato da 1 bip).
3. Inserire il nuovo codice (4 – 8 cifre) e premere il tasto sblocco.
4. Inserire ancora il nuovo codice e premere il tasto sblocco (Questo verrà confermato da 2 bip)
Esempio: Premere 1 (per 5 Secondi) > 1234 > Tasto sblocco > 4321 > Tasto sblocco > 4321 > Tasto
Sblocco. Il corretto inserimento è confermato da 2 bip.
APRIRE USANDO IL CODICE UTENTE
1. Digitare il codice utente seguito dal tasto sblocco, si sentirà un lungo bip e si accenderà l’indicatore verde.
Girare il pomello in senso orario ed aprire lo sportello.
REGISTRAZIONE IMPRONTA
1. Premere il tasto reset. Si sentiranno 2 brevi bip.
2. Mentre è acceso l’indicatore rosso, posizionare il dito sul sensore.
3. Si sentiranno 4 bip consecutivi, a conferma che l’impronta è stata registrata correttamente. (3 brevi bip
indicano che la registrazione non è stata effettuata.)
NOTA: E’ possibile registrare un massimo di 20 impronte.
APRIRE USANDO L’IMPRONTA
1. Premere il tasto sblocco, il sensore diventerà di colore rosso.
2. Posizionare il dito sul sensore fino a quando il sensore diventerà di colore verde.
3. Girare la maniglia in senso orario ed aprire la cassaforte.
ELIMINARE IMPRONTE REGISTRATE
1. Premere il tasto reset per 5 secondi, l’indicatore verde lampeggerà per 15 volte.
2. Rilasciare il tasto a fine lampeggio. Si sentirà un “tick” prolungato, tutte le impronte registrate nella
chiusura sono state eliminate e la chiusura tornerà alle impostazione di fabbrica.
ALIMENTAZIONE
• Indicatore rosso acceso dopo aver inserito il codice utente oppure un’impronta indica pile in esaurimento.
Sostituire le pile immediatamente.
• Si raccomanda l’uso di pile alcaline di alta qualità.
ATTENZIONE: Per vostra tranquillità, custodire la chiave di emergenza in un posto sicuro.
NON CUSTODIRE LA CHIAVE D’EMERGENZA ALL’INTERNO DELLA CASSAFORTE.
Version 1/PB/APR 16
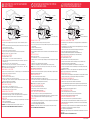
Shelf
Reset Button
Bolts
Battery Compartment
1
2
3
4
Sensor
Unlock Key
The cover to emergency battery
Numbers Key
Knob
Ripiano
Tasto Reset
Chiavistelli
Vano Pile
1
2
3
4
Sensore
Tasto sblocco
Coperchio serratura di emergenza
Chiave numeri
Pomello
DEN TRESOR ZUM ERSTEN MAL ÖFFNEN
1. Bei Anlieferung des Tresors sind die Batterien noch nicht eingelegt. Benutzen Sie den Notschlüssel um
den Tresor zu öffnen.
2. Um das Notschloss zu erreichen, nutzen Sie das Panel unter dem Eingabefeld, legen Sie Ihren Daumen
auf das Panel und drücken es nach unten.
3. Stecken Sie den Schlüssel in das Schloss und drehen ihn entgegen des Uhrzeigersinns.
4. Drehen Sie den Türknopf im Uhrzeigersinn und öffnen Sie die Tür.
5. Entfernen Sie die Batteriefachabdeckung und setzen Sie 4 AA Alkalibatterien ein.
Notiz:Die mitgelieferten Batterien sind nur für den Transport und die erste Nutzung.
ERSTELLEN DES BENUTZERCODES
Der voreingestellte Werkscode ist „1234“
1. Drücken Sie die Taste 1 für 5 Sek. Und die grüne LED leuchtet auf.
2. Geben Sie den korrekten Benutzercode (für die erste Öffnung „1234“) ein und drücken Sie die
Entsperrtaste ( dies wird mit einem Signalton bestätigt).
3. Geben Sie den neuen 4-8 stelligen Benutzercode ein und drücken Sie die Entsperrtaste.
4. Geben Sie den neuen Benutzercode erneut ein und bestätigen Sie ihn mit der Entsperrtaste (dies wird
mit 2 Signaltönen bestätigt)
Beispiel: Drücken Sie „1“ für 5 Sek. > 1234 > Entsperrtaste > 4321 > Entsperrtaste > 4321 > Entsperr-
taste. Eine erfolgreiche Eingabe wird mit 2 Signaltönen bestätigt.
ÖFFNEN MIT DEM USERCODE
1. Geben Sie den Usercode ein und bestätigen Sie mit der Entsperrtaste, ein langer Signalton ertönt und die
grüne LED leuchtet auf. Drehen Sie nun den Türknopf im Uhrzeigersinn und öffnen die Tür.
REGISTRIERUNG DES FINGERABDRUCKS
1. Drücken Sie die Reset Taste, Sie werden 2 kurze Signaltöne hören.
2. Platzieren Sie Ihren Finger auf dem Sensor während die rote LED aufleuchtet.
3. Sie hören 4 aufeinanderfolgende Signaltöne wenn der Fingerabdruck erfolgreich registriert worden ist.
4. Sie hören 3 kurze Signaltöne wenn der Vorgang nicht erfolgreich war, dann müssen Sie den Vorgang
wiederholen.
Notiz: Sie können bis maximal 20 Fingerabdrücke registrieren.
MIT DEM FINGERABDRUCK ÖFFNEN
1. Drücken Sie die Entsperrtaste der Sensor leuchtet rot auf.
2. Platzieren Sie Ihren Finger auf dem Sensor bis der Sensor auf grün aufleuchtet.
3. Drehen Sie den Türknopf im Uhrzeigersinn und öffnen Sie die Tür.
REGISTRIERTE FINGERABDRÜCKE LÖSCHEN
1. Drücken Sie die Reset Taste für 5 Sek. Die grüne LED wird 15 mal aufleuchten.
2. Lassen Sie den Knopf los sobald die LED aufhört zu blinken. Nachdem Sie ein langes „tick“ gehört
haben sind alle gespeicherten Fingerabdrücke gelöscht und der Tresor ist wieder in Werkseinstellung.
STROMVERSORGUNG
1. Wenn die rote LED nach Eingabe des Benutzercodes oder Fingerabdrucks aufleuchtet, bedeutet das,
dass die Batterien leer sind. Bitte ersetzen Sie die Batterien unverzüglich.
2. Wir empfehlen hochwertige Alkali Batterien.
Achtung: Zu Ihrer eigenen Sicherheit, passen Sie auf Ihre Notschlüssel auf und verwahren Sie sie an einen
sicheren Platz.
VERWAHREN SIE DIE NOTSCHLÜSSEL NIEMALS IM TRESOR
Fachboden
Reset Taste
Riegelbolzen
Batteriefach
1
2
3
4
Fingerprintsensor
Entsperrtaste
Abdeckung des Notbatteriefachs
Eingabefeld
Türknopf
Transcripción de documentos
MANUAL DE INSTRUCCIONES PARA NESO SS0200F PHOENIX SERIE MODE D'EMPLOI POUR PHOENIX SÉRIE NESO SS0200F Bouton de réinitialisation Vis Etagère Botón de reinicio Cerrojos Balda Compartiment de la pile Compartimento de pilas OPERATING INSTRUCTIONS FOR PHOENIX NESO SS0200F SERIES & GUARANTEE REGISTRATION Please submit your guarantee registration by visiting our website www.phoenixsafe.com and clicking on guarantee registration. For further assistance or information please contact us on 0151 944 6444. APEX HOUSE, 1 ORRELL MOUNT, LIVERPOOL, L20 6NS, UNITED KINGDOM | +44 (0)151 944 6444 MODE D'EMPLOI POUR PHOENIX SÉRIE NESO SS0200F & GARANTIE Pour une meilleure sécurité, nous vous recommandons d’enregistrer votre garantie en ligne par notre site: www.phoenixsafe.com et en cliquant sur enregistrement de garantie. 19 RUE DES HALLES, 16510 VERTEUIL SUR CHARENTE, FRANCE | 00 33 (0) 5 45 89 68 80 ISTRUZIONI PER L'USO DI NESO SS0200F SERIE PHOENIX & REGISTRAZIONE DELLA GARANZIA Per una maggiore sicurezza vi raccomandiamo di inoltrare la vostra registrazione della garanzia visitando il nostro sito web: www.phoenixsafe.com e cliccando su registrazione della garanzia. VIA MONTE ROSA 28, 20049, CONCOREZZO, MILAN, ITALY | 39 039 5965844 Numéro des touches 2 Poignée Teclas numéricas 1 Capteur Mando giratorio Bouton de déverouillage Aus Sicherheitsgründen empfehlen wir Ihnen, Ihre Garantiekarte online auf unserer Website www.phoenixsafe.com per Mausklick auf der Schaltfläche „Garantieanmeldung“ auszufüllen. DEUTSCHLAND GMBH, BAHNSTR. 23, D-42327 WUPPERTAL 0049-202-69519-0 MANUAL DE INSTRUCCIONES PARA NESO SS0200F PHOENIX SERIE & GARANTÍA Para mayor seguridad, le recomendamos que cuando acceda a nuestra página web www.phoenixsafe.com, haga clic en Registro de garantía e introduzca su registro de garantía. Veuillez enregistrer l’ achat de votre coffre-fort sur notre site internet AVDA, DE LA INDUSTRIA, 52 POLÍGONO 28820Web COSLADA, MADRID, Si prega di registrare l’acquistoINDUSTRIAL, sul nostro sito Supporto Bitte registrieren Ihren Safe unserer Website ESPAÑASie| 0034 (91)auf6736411 Por favor, registre su pedido en nuestra página Web de apoyo Please register your purchase on our Support Website Phoenix Safe Company: Where peace of mind is guaranteed 3 4 Couvercle de la clef de secours Botón de desbloqueo Tapa de la cerradura de llave de emergencia PREMIÈRE OUVERTURE PRIMERA APERTURA 1. Lors de la livraison de votre coffre-fort, les batteries ne seront pas installées. La clé de secours doit être utilisé pour ouvrir la porte. 2. Pour accéder à la serrure à clé d'urgence, recherchez le panneau sous le clavier. Placez votre pouce sur le panneau et faites le glisser vers le bas. 3. Insérez la clé et tournez dans le sens antihoraire. 4. Tournez lla poignée dans le sens horaire et ouvrez la porte. 5. Retirez le couvercle du compartiment des piles à l'arrière de la porte et insérez les piles alcalines AA x 4. Remarque: les piles sont fournies pour le transit et l'utilisation initiale seulement. 1. La caja de seguridad se suministra con las pilas no instaladas. Para abrir la caja, utilice la llave de emergencia. 2. La cerradura de emergencia se encuentra bajo la tapa situada debajo del teclado. Coloque su dedo pulgar sobre el panel y deslícelo hacia abajo. 3. Inserte la llave y gírela en sentido contrario a las agujas del reloj. 4. Gire el mando en el sentido de las agujas del reloj y abra la puerta. 5. Retire la tapa del compartimento de pilas situado en el interior de la puerta e inserte 4 x AA pilas alcalinas. NOTA: Las pilas suministradas son solo para el uso inicial. INSTALLER UN CODE UTILISATEUR INTRODUCCIÓN DEL CÓDIGO DE USUARIO Le code usine installé est "1234" 1. Appuyez sur lla touche "1" pendant 5 secondes, la lumière verte s'allumera. 2. Entrez le code utilisateur actuel (pour la 1ère utilisation 1234) et appuyez sur le bouton de déverrouillage (ce qui sera confirmé par 1 bip). 3. Entrez le nouveau code (4 - 8 chiffres) et appuyez sur le bouton de déverrouillage. 4. Entrez le nouveau code une fois de plus et appuyez sur le bouton de déverrouillage (Ceci sera confirmé par 2 bips) Exemple: Appuyez sur 1 (pendant 5 secondes) > 1234 bouton de déverouiilage > 4321 > bouton de déverouillage > 4321 > bouton de déverouillage. Une entrée réussie est confirmée par 2 bips. El código predeterminado de fábrica es el "1234" 1. Pulse el botón número “1” durante 5 segundos, la luz verde se iluminará. 2. Introduzca el código de usuario (1234, la primera vez) y pulse el botón de desbloqueo (se escuchará un pitido). 3. Introduzca el nuevo código (de 4 a 8 dígitos) y pulse el botón de desbloqueo. 4. Vuelva a introducir el nuevo código y pulse el botón de desbloqueo (se escucharán dos pitidos) Ejemplo: Pulse 1 (durante 5 segundos) > 1234 > Llave de desbloqueo > 4321 > Llave de desbloqueo > 4321 > Llave de desbloqueo. La correcta operación quedará confirmada por dos pitidos. OUVERTURE EN UTILISANT LE CODE UTILISATEUR 1. Introduzca el código de usuario y pulse el botón de desbloqueo, se escuchará un pitido largo y la luz verde se iluminará. Gire el mando en el sentido de las agujas del reloj y abra la puerta. 1. Entrez le code d'utilisateur suivi par le bouton de déverrouillage, un long bip sonore retentira et le voyant vert s'allumera. Tournez lla poignée vers la droite et ouvrez la porte ENREGISTREMENT DES EMPREINTES BETRIEBSANLEITUNG FÜR PHOENIX NESO SS0200F SERIE & GARANTIEKARTE Sensor 2 3 4 1 1. Appuyez sur le bouton de réinitialisation et vous entendrez 2 bips courts. 2. Alors que la lumière rouge est allumée, placez votre doigt sur le capteur. 3. Vous entendrez 4 bips consécutifs, ce qui signifie que l'empreinte a été correctement enregistrée. (3 bips courts indiquent que l'enregistrement a échoué.) REMARQUE: Un maximum de 20 empreintes peut être enregistrées. COMMENT OUVRIR À L'AIDE D'UNE EMPREINTE DIGITALE 1. Appuyez sur le bouton de déverrouillage, le capteur devient rouge. 2. Placez votre doigt sur le capteur jusqu'à ce que le capteur passe au vert. 3. Tournez la poignée dans le sens horaire et ouvrir votre coffre-fort. COMMENT SUPPRIMER LES EMPREINTES DIGITALES ENREGISTRÉES 1. Appuyez sur le bouton de réinitialisation pendant 5 secondes, le voyant vert clignotera 15 fois. 2. Relâchez le bouton quand le voyant a cessé de clignoter. Après avoir entendu un long "tick", toutes les empreintes digitales enregistrées dans la serrure seront supprimées et la serrure retournera au réglage d'usine. SOURCE DE COURANT • Si la lumière rouge s' éclaire après avoir entré le code utilisateur ou entrer une empreinte digitale, cecii indique que les piles sont faibles. Veuillez remplacer les piles immédiatement. • Nous vous recommandons d'utiliser des piles alcalines de haute qualité. ATTENTION: Pour une sécurité totale, veuillez prendre soin de la clé de secours et de les garder dans un endroit sûr. NE PAS LAISSER LES CLEFS DE SECOURS A L'INTERIEUR DU COFFRE. APERTURA CON EL CÓDIGO DE USUARIO REGISTRO DE HUELLA DACTILAR 1. Pulse el botón de reinicio y se escucharán dos pitidos cortos. 2. Mientras la luz roja esté iluminada, coloque su dedo en el sensor. 3. Se escucharán cuatro pitidos consecutivos, que indican que la huella dactilar ha sido registrada correctamente (si el registro no se ha llevado a cabo correctamente, se escucharán tres pitidos cortos). NOTA: Es posible registrar un máximo de 20 huellas dactilares. APERTURA CON HUELLA DACTILAR 1. Pulse el botón de desbloqueo, el sensor cambiará a rojo. 2. Coloque su dedo en el sensor hasta que cambie a verde. 3. Gire la maneta en el sentido de las agujas del reloj y abra la caja. CÓMO ELIMINAR LAS HUELLAS DACTILARES REGISTRADAS 1. Pulse el botón de reinicio durante 5 segundos, el indicador verde destellará 15 veces. 2. Deje de pulsar el botón cuando los destellos finalicen. Después de oír un largo “clic”, todas las huellas dactilares registradas quedarán eliminadas y la cerradura volverá a su estado original de fábrica. PILAS • Si la luz roja se ilumina después de introducir el código de usuario o las huellas digitales, esto indica que la carga de las pilas está baja. Por favor, reemplazar las pilas inmediatamente. • Recomendamos utilizar pilas alcalinas de alta calidad. ATENCIÓN: Para su total seguridad, por favor, ponga especial cuidado con la llave de emergencia y guárdela en lugar seguro. NO GUARDE LAS LLAVES DE EMERGENCIA DENTRO DE LA CAJA DE SEGURIDAD. ISTRUZIONI PER L'USO DI NESO SS0200F SERIE PHOENIX Tasto Reset Chiavistelli Ripiano Vano Pile Chiave numeri Pomello Shelf 4 Knob Tasto sblocco Sensor Coperchio serratura di emergenza 1 2 3 4 Batteriefach Eingabefeld 1 2 Reset Taste Riegelbolzen Fachboden Battery Compartment Sensore 3 BEDIENUNGSANLEITUNG FÜR DIE PHOENIX NESO SS0200F SERIE Reset Button Bolts Numbers Key 1 2 OPERATING INSTRUCTIONS FOR PHOENIX NESO SS0200F SERIES Türknopf Unlock Key Fingerprintsensor 3 4 The cover to emergency battery Entsperrtaste Abdeckung des Notbatteriefachs APRIRE PER LA PRIMA VOLTA OPENING FOR THE 1ST TIME DEN TRESOR ZUM ERSTEN MAL ÖFFNEN 1. La cassaforte viene consegnata senza pile nel vano preposto. Usare la chiave maestra per aprire lo sportello. 2. Per accedere alla serratura di emergenza, localizzare il pannello sotto la tastierina. Posizionare il pollice sul pannello e trascinare verso il basso. 3. Inserire la chiave e girare in senso anti-orario. 4. Girare il pomello in senso orario ed aprire lo sportello. 5. Togliere il coperchio del vano pile sul retro dello sportello ed inserire 4 x AA pile alcaline. NOTA: Le pile fornite sono solo per il transito e l’uso iniziale. 1. On delivery of your safe the over ride key must be used to open the door. 2. To access the emergency key lock, locate the panel under the keypad. Place your thumb on the panel and drag downwards. 3. Insert the key and turn anti-clockwise. 4. Turn the knob clockwise and open the door. 5. Remove the battery compartment cover on the back of the door and insert 4 x AA alkaline batteries (not supplied). 1. Bei Anlieferung des Tresors sind die Batterien noch nicht eingelegt. Benutzen Sie den Notschlüssel um den Tresor zu öffnen. 2. Um das Notschloss zu erreichen, nutzen Sie das Panel unter dem Eingabefeld, legen Sie Ihren Daumen auf das Panel und drücken es nach unten. 3. Stecken Sie den Schlüssel in das Schloss und drehen ihn entgegen des Uhrzeigersinns. 4. Drehen Sie den Türknopf im Uhrzeigersinn und öffnen Sie die Tür. 5. Entfernen Sie die Batteriefachabdeckung und setzen Sie 4 AA Alkalibatterien ein. Notiz:Die mitgelieferten Batterien sind nur für den Transport und die erste Nutzung. IMPOSTARE UN CODICE UTENTE Il codice impostato in fabbrica è "1234" 1. Premere il tasto numero “1” per 5 secondi, si accenderà un indicatore verde . 2. Inserire il codice utente corrente (la prima volta sarà 1234) e premere il tasto sblocco (questo verrà confermato da 1 bip). 3. Inserire il nuovo codice (4 – 8 cifre) e premere il tasto sblocco. 4. Inserire ancora il nuovo codice e premere il tasto sblocco (Questo verrà confermato da 2 bip) Esempio: Premere 1 (per 5 Secondi) > 1234 > Tasto sblocco > 4321 > Tasto sblocco > 4321 > Tasto Sblocco. Il corretto inserimento è confermato da 2 bip. APRIRE USANDO IL CODICE UTENTE 1. Digitare il codice utente seguito dal tasto sblocco, si sentirà un lungo bip e si accenderà l’indicatore verde. Girare il pomello in senso orario ed aprire lo sportello. REGISTRAZIONE IMPRONTA 1. Premere il tasto reset. Si sentiranno 2 brevi bip. 2. Mentre è acceso l’indicatore rosso, posizionare il dito sul sensore. 3. Si sentiranno 4 bip consecutivi, a conferma che l’impronta è stata registrata correttamente. (3 brevi bip indicano che la registrazione non è stata effettuata.) NOTA: E’ possibile registrare un massimo di 20 impronte. APRIRE USANDO L’IMPRONTA 1. Premere il tasto sblocco, il sensore diventerà di colore rosso. 2. Posizionare il dito sul sensore fino a quando il sensore diventerà di colore verde. 3. Girare la maniglia in senso orario ed aprire la cassaforte. ELIMINARE IMPRONTE REGISTRATE 1. Premere il tasto reset per 5 secondi, l’indicatore verde lampeggerà per 15 volte. 2. Rilasciare il tasto a fine lampeggio. Si sentirà un “tick” prolungato, tutte le impronte registrate nella chiusura sono state eliminate e la chiusura tornerà alle impostazione di fabbrica. ALIMENTAZIONE • Indicatore rosso acceso dopo aver inserito il codice utente oppure un’impronta indica pile in esaurimento. Sostituire le pile immediatamente. • Si raccomanda l’uso di pile alcaline di alta qualità. ATTENZIONE: Per vostra tranquillità, custodire la chiave di emergenza in un posto sicuro. NON CUSTODIRE LA CHIAVE D’EMERGENZA ALL’INTERNO DELLA CASSAFORTE. SETTING A USER CODE The factory preset code is "1234" 1. Press button number “1” for 5 seconds, the green light will illuminate. 2. Input the current user code (for 1st time usage 1234) and press the unlock button (this will be confirmed by 1 bleep). 3. Input the new code (4 – 8 digits) and press the unlock button. 4. Input the new code again and press the unlock button (This will be confirmed by 2 bleeps). Example: Press 1 (for 5 Seconds) > 1234 > Unlock key > 4321 > Unlock key > 4321 > Unlock Key. A successful entry is confirmed by 2 bleeps. OPENING USING THE USER CODE 1. Enter the user code followed by unlock button, a long bleep will sound and the green light will illuminate. Turn the knob clockwise and open the door. FINGERPINT REGISTRATION 1. Press the reset button and you will hear 2 short bleeps. 2. While the red light is illuminated, place your finger on the sensor. 3. You will hear 4 consecutive bleeps, which means that the fingerprint has successfully been registered. (3 short bleeps indicate that the registration was unsuccessful.) NOTE: A maximum of 20 fingerprints can be registered. ERSTELLEN DES BENUTZERCODES Der voreingestellte Werkscode ist „1234“ 1. Drücken Sie die Taste 1 für 5 Sek. Und die grüne LED leuchtet auf. 2. Geben Sie den korrekten Benutzercode (für die erste Öffnung „1234“) ein und drücken Sie die Entsperrtaste ( dies wird mit einem Signalton bestätigt). 3. Geben Sie den neuen 4-8 stelligen Benutzercode ein und drücken Sie die Entsperrtaste. 4. Geben Sie den neuen Benutzercode erneut ein und bestätigen Sie ihn mit der Entsperrtaste (dies wird mit 2 Signaltönen bestätigt) Beispiel: Drücken Sie „1“ für 5 Sek. > 1234 > Entsperrtaste > 4321 > Entsperrtaste > 4321 > Entsperrtaste. Eine erfolgreiche Eingabe wird mit 2 Signaltönen bestätigt. ÖFFNEN MIT DEM USERCODE 1. Geben Sie den Usercode ein und bestätigen Sie mit der Entsperrtaste, ein langer Signalton ertönt und die grüne LED leuchtet auf. Drehen Sie nun den Türknopf im Uhrzeigersinn und öffnen die Tür. REGISTRIERUNG DES FINGERABDRUCKS HOW TO OPEN USING A FINGERPRINT 1. 2. 3. 4. 1. Press the unlock button, the sensor will turn red. 2. Place your finger on the sensor until the sensor turns green. 3. Turn the handle clockwise and open your safe. MIT DEM FINGERABDRUCK ÖFFNEN HOW TO DELETE REGISTERED FINGERPRINTS 1. Press the reset button for 5 seconds, the green indicator light will flash 15 times. 2. Release the button when it has stopped flashing. After hearing a long “tick”, all fingerprints recorded in the lock are deleted and the lock will be returned to the original factory settings. POWER SUPPLY • If the red light illuminates after entering the user code or entering a fingerprint, this indicates the batteries are low. Please replace the batteries immediately. • We recommend using high quality alkaline batteries. CAUTION: For your total security, please take care of the emergency key and keep them in safe place. DO NOT STORE EMERGENCY KEYS INSIDE THE SAFE Drücken Sie die Reset Taste, Sie werden 2 kurze Signaltöne hören. Platzieren Sie Ihren Finger auf dem Sensor während die rote LED aufleuchtet. Sie hören 4 aufeinanderfolgende Signaltöne wenn der Fingerabdruck erfolgreich registriert worden ist. Sie hören 3 kurze Signaltöne wenn der Vorgang nicht erfolgreich war, dann müssen Sie den Vorgang wiederholen. Notiz: Sie können bis maximal 20 Fingerabdrücke registrieren. 1. Drücken Sie die Entsperrtaste der Sensor leuchtet rot auf. 2. Platzieren Sie Ihren Finger auf dem Sensor bis der Sensor auf grün aufleuchtet. 3. Drehen Sie den Türknopf im Uhrzeigersinn und öffnen Sie die Tür. REGISTRIERTE FINGERABDRÜCKE LÖSCHEN 1. Drücken Sie die Reset Taste für 5 Sek. Die grüne LED wird 15 mal aufleuchten. 2. Lassen Sie den Knopf los sobald die LED aufhört zu blinken. Nachdem Sie ein langes „tick“ gehört haben sind alle gespeicherten Fingerabdrücke gelöscht und der Tresor ist wieder in Werkseinstellung. STROMVERSORGUNG 1. Wenn die rote LED nach Eingabe des Benutzercodes oder Fingerabdrucks aufleuchtet, bedeutet das, dass die Batterien leer sind. Bitte ersetzen Sie die Batterien unverzüglich. 2. Wir empfehlen hochwertige Alkali Batterien. Achtung: Zu Ihrer eigenen Sicherheit, passen Sie auf Ihre Notschlüssel auf und verwahren Sie sie an einen sicheren Platz. VERWAHREN SIE DIE NOTSCHLÜSSEL NIEMALS IM TRESOR Version 1/PB/APR 16-
 1
1
-
 2
2


Phoenix NESO SS0200F Series Instrucciones de operación
- Tipo
- Instrucciones de operación
en otros idiomas
Artículos relacionados
-
Phoenix FS1910K Fire Commander Manual de usuario
-
Phoenix FS1290 Series Instrucciones de operación
-
-
-
-
-
-
-
-

