Stanley STDC001LB Manual de usuario
- Categoría
- Herramientas eléctricas
- Tipo
- Manual de usuario
Este manual también es adecuado para

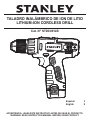
TALADRO INALÁMBRICO DE ION DE LITIO
LITHIUM-ION CORDLESS DRILL
Cat. N° STDC001LB
ADVERTENCIA: LEASE ESTE INSTRUCTIVO ANTES DE USAR EL PRODUCTO.
WARNING: READ INSTRUCTION MANUAL BEFORE USING PRODUCT.
Español 3
English 9

FIG. A
FIG. B
FIG. DFIG. C
FIG. E FIG. F
4
3
7
1
6
2
10
11
8
9
5
5
13
3
2
5
12

ESPAÑOL • 3
NO DEVUELVA ESTE PRODUCTO A LA TIENDA,
comuníquese antes a las oficinas locales o con el Centro
de Servicio Stanley más cercano a usted.
CONSERVE ESTAS INSTRUCCIONES
¡Advertencia! Lea todas las instrucciones antes de
operar el producto. El incumplimiento de todas y cada
una de las instrucciones enumeradas a continuación
puede provocar una descarga eléctrica, un incendio
o lesiones graves.
NORMAS GENERALES DE SEGURIDAD
INSTRUCCIONES DE SEGURIDAD
Advertencias de seguridad generales
para herramientas eléctricas.
¡Atención! Lea todas las advertencias e instrucciones de
seguridad. En caso de no respetarse las advertencias e
instrucciones indicadas a continuación, podría producirse
una descarga eléctrica, incendio y/o lesión grave.
Conserve todas las advertencias e instrucciones
para su posterior consulta. El término empleado en
las advertencias indicadas a continuación se refiere a la
herramienta eléctrica con alimentación de red (con cable)
o alimentada por pila (sin cable).
1. Seguridad del área de trabajo
a. Mantenga limpia y bien iluminada el área de trabajo.
El desorden o una iluminación deficiente en las áreas
de trabajo pueden provocar accidentes.
b. No utilice la herramienta eléctrica en un entorno
con peligro de explosión, en el que se encuentren
combustibles líquidos, gases o material en polvo.
Las herramientas eléctricas producen chispas que
pueden llegar a inflamar los materiales en polvo
o vapores.
c. Mantenga alejados a los niños y otras personas
del área de trabajo al emplear la herramienta
eléctrica. Una distracción le puede hacer perder
el control sobre la herramienta.
2. Seguridad eléctrica
a. El enchufe de la herramienta eléctrica
debe corresponder a la toma de corriente
utilizada. No es admisible modificar el enchufe
en forma alguna. No emplee adaptadores en
herramientas eléctricas dotadas con una toma de
tierra. Los enchufes sin modificar adecuados a las
respectivas tomas de corriente reducen el riesgo de
una descarga eléctrica.
b. Evite que su cuerpo toque partes conectadas
a tierra como tuberías, radiadores, cocinas y
refrigeradores. El riesgo a quedar expuesto a
una descarga eléctrica es mayor si su cuerpo tiene
contacto con tierra.
c. No exponga las herramientas eléctricas a la lluvia
y evite que penetren líquidos en su interior. Existe
el peligro de recibir una descarga eléctrica si penetran
ciertos líquidos en la herramienta eléctrica.
d. Cuide el cable eléctrico. No utilice el cable
eléctrico para transportar o colgar la herramienta
eléctrica, ni tire de él para sacar el enchufe
de la toma de corriente. Mantenga el cable
eléctrico alejado del calor, aceite, bordes afilados
o piezas móviles. Los cables eléctricos dañados o
enredados pueden provocar una descarga eléctrica.
e. Al trabajar con la herramienta eléctrica en la
intemperie utilice solamente cables alargadores
homologados para su uso en exteriores. La
utilización de un cable alargador adecuado para su
uso en exteriores reduce el riesgo de una descarga
eléctrica.
f. Si fuera inevitable la utilización de
una herramienta eléctrica en un lugar húmedo,
utilice un suministro protegido con un dispositivo
de corriente residual (RCD). La utilización de un
dispositivo de corriente residual reduce el riesgo de
descarga eléctrica.
Nota: El término de “Dispositivo de Corriente
Residual (RCD)” puede ser sustituido por el término
“Interruptor de Falla a Tierra del Circuito (GFCI)” o
“Disyuntor de Fugas a Tierra (ELCB)”.
3. Seguridad personal
a. Esté atento a lo que hace y emplee la herramienta
eléctrica con prudencia. No utilice la herramienta
eléctrica si estuviese cansado, ni tampoco después
de haber consumido alcohol, drogas o medicamentos.
El no estar atento durante el uso de una herramienta
eléctrica puede provocarle serias lesiones.
b. Utilice equipos de protección personal.
Lleve siempre protección ocular, respiratoria
y auditiva. Los equipos de protección tales como
una mascarilla antipolvo, zapatos de seguridad
con suela antideslizante, casco o protectores
auditivos, utilizados en condiciones adecuadas,
contribuyen a reducir las lesiones personales.
c. Evite una puesta en marcha involuntaria.
Asegúrese de que el interruptor esté en la
posición de apagado antes de conectar a
la fuente de alimentación o la batería, coger
o transportar la herramienta. Si se transportan
herramientas eléctricas con el dedo sobre el
interruptor o si se enchufan con el interruptor
encendido puede dar lugar a accidentes.
d. Retire las herramientas de ajuste o llaves fijas
antes de conectar la herramienta eléctrica. Una
herramienta o llave colocada en una pieza giratoria

4 • ESPAÑOL
de la herramienta eléctrica puede producir lesiones
al ponerse a funcionar.
e. Sea precavido. Evite adoptar una posición que
fatigue su cuerpo; mantenga un apoyo firme
sobre el suelo y conserve el equilibrio en todo
momento. Ello le permitirá controlar mejor la
herramienta eléctrica en caso de presentarse una
situación inesperada.
f. Utilice ropa apropiada. No vista ropa suelta o
joyas. Mantenga su cabello, vestimenta y guantes
lejos de las partes móviles. Ropa suelta, joyas o
cabello largo partes móviles.
g. Siempre que sea posible utilizar unos equipos
de aspiración o captación de polvo, asegúrese
que éstos estén montados y que sean utilizados
correctamente. El empleo de equipos de recogida
de polvo reduce los riesgos derivados del polvo.
4. Uso y cuidado de herramientas eléctricas
a. No sobrecargue la herramienta eléctrica.
Use la herramienta eléctrica adecuada para cada
aplicación. Con la herramienta eléctrica adecuada
podrá trabajar mejor y más seguro dentro del margen
de potencia indicado.
b. No utilice herramientas eléctricas con un
interruptor defectuoso. Las herramientas eléctricas
que no se puedan conectar o desconectar son
peligrosas y deben hacerse reparar.
c. Desconecte el enchufe de la fuente eléctrica y/o
la batería de la herramienta eléctrica antes de
realizar ajustes, cambiar accesorios o almacenar
la herramienta eléctrica. Esta medida preventiva
reduce el riesgo de conectar accidentalmente la
herramienta eléctrica.
d. Guarde las herramientas eléctricas fuera del
alcance de los niños y de las personas que no
estén familiarizadas con su uso. Las herramientas
eléctricas utilizadas por personas inexpertas son
peligrosas.
e. Cuide sus herramientas eléctricas con esmero.
Controle si funcionan correctamente, sin
atascarse, las partes móviles de la herramienta
eléctrica, y si existen partes rotas o deterioradas
que pudieran afectar al funcionamiento de
la herramienta. Si la herramienta eléctrica estuviese
defectuosa haga que la reparen antes de volver a
utilizarla. Muchos accidentes se deben a herramientas
eléctricas con un mantenimiento deficiente.
f. Mantenga las herramientas de corte limpias
y afiladas. Las herramientas de corte mantenidas
correctamente se dejan guiar y controlar mejor.
g. Utilice la herramienta eléctrica, los accesorios,
los útiles de la herramienta, etc. de acuerdo con
estas instrucciones, y tenga en cuenta las
condiciones de trabajo y la tarea a realizar. El uso
de herramientas eléctricas para trabajos diferentes
de aquellos para los que han sido concebidas puede
resultar peligroso.
5. Servicio técnico
a. Haga reparar su herramienta eléctrica sólo
por personal técnico autorizado que emplee
exclusivamente piezas de repuesto originales.
Solamente así se garantiza la seguridad de la
herramienta eléctrica.
6. Seguridad eléctrica
La herramienta lleva un doble aislamiento; por lo
tanto no requiere una toma a tierra. Compruebe
siempre que la tensión de la red corresponda al
valor indicado en la placa de características.
¡Advertencia! Si el cable de alimentación esta
dañado lo debe reemplazar el fabricante o su
representante o una persona igualmente
calificada para evitar peligro. Si el cable es
reemplazado por una persona igualmente
calificada pero no autorizada por Black &
Decker, la garantía no tendrá efecto.
7. Etiquetas sobre la herramienta: La etiqueta de su
herramienta puede incluir los siguientes símbolos:
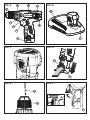
CARACTERÍSTICAS (Fig. A)
Esta herramienta incluye algunas o todas las siguientes
características.
1. Interruptor de velocidad variable
2. Interruptor de avance/retroceso
3. Portabrocas
4. Collar de ajuste de torque
5. Batería
6. Clip para cinturón
7. Luz LED de trabajo
8. Selector de velocidad
9. Porta-puntas magnético
Fig. B
10. Cargador
11. Indicador de carga
Lea el
manual de
instrucciones
Use
protección
ocular
Use
protección
auditiva
V ........ Voltios
A ........ Amperes
Hz ....... Hertz
W ........ Watts
min ..... minutos
..... Corriente
Alterna
..... Corriente
Directa
n
0
....... Velocidad
sin Carga
...... Construcción
Clase II
.... Terminales
de Conexión
a Tierra
.... Símbolo
de Alerta
Seguridad
.../min.. Revoluciones
o Recipro-
caciones
por minuto
.... El cargador
est á
diseñado
únicamente
para uso en
interiores.

ESPAÑOL • 5
ADVERTENCIAS DE SEGURIDAD ADICIONALES
PARA HERRAMIENTAS ELÉCTRICAS
¡Advertencia! Advertencias de seguridad adicionales
para taladros y taladros de impacto.
f Use protectores de oídos al usar taladros de
impacto. La exposición al ruido puede causar pérdida
de audición.
f Utilice los mangos auxiliares suministrados con
la herramienta. La pérdida de control puede causar
lesiones personales.
f Sujete la herramienta eléctrica por las superficies
de agarre aisladas al realizar una operación en
la que el accesorio de corte pueda entrar
en contacto con cables ocultos. Si el accesorio
de corte entra en contacto con un cable “cargado”,
esto puede hacer que las partes metálicas expuestas
de la herramienta eléctrica estén “cargadas” y podría
dar una descarga eléctrica al operador.
f Sujete la herramienta eléctrica por las superficies
de agarre aisladas al realizar una operación
en la que el sujetador pueda entrar en contacto
con cables ocultos. Si el sujetador entra en contacto
con un cable “cargado”, esto puede hacer que las
partes metálicas expuestas de la herramienta
eléctrica estén “cargadas” y podría dar una descarga
eléctrica al operador.
f Utilice abrazaderas u otra forma práctica de
asegurar y sujetar la pieza de trabajo a una
plataforma estable. Sujetar la pieza de trabajo con la
mano o contra su cuerpo no le brinda estabilidad y
puede provocar la pérdida de control.
f Antes de taladrar paredes, suelos o techos, revise la
ubicación de los cableados y tuberías.
f Evite tocar la punta de una broca justo después de la
perforación, ya que puede estar caliente.
f Esta herramienta no está diseñada para su uso
por personas (incluyendo niños) con capacidades
físicas, sensoriales o mentales reducidas, o con
falta de experiencia y conocimiento, a menos
que sean supervisadas o instruidas acerca del
uso del aparato por una persona responsable de su
seguridad. Los niños deben ser supervisados para
asegurarse de que no jueguen con el aparato.
f El uso previsto se describe en este manual de
instrucciones. El uso de cualquier accesorio,
adaptador, o la realización de cualquier operación
con esta herramienta que no sean los recomendados
en este manual de instrucciones puede provocar el
riesgo de lesiones corporales y/o daños a la propiedad.
Seguridad de terceros
f Este aparato no está diseñado para su uso
por personas (incluyendo niños) con capacidades
físicas, sensoriales o mentales reducidas, o con
falta de experiencia y conocimiento, a menos que
sean supervisadas o instruidas acerca del uso
del aparato por una persona responsable de su
seguridad.
f Los niños deben ser supervisados para asegurarse
de que no jueguen con el aparato.
Riesgos residuales
Pueden surgir riesgos residuales adicionales al usar la
herramienta que pueden no haber sido incluidos en las
advertencias de seguridad adjuntas. Estos riesgos pueden
derivarse del uso indebido, uso prolongado, etc.
Incluso con la aplicación de las normas de seguridad
pertinentes y la implementación de dispositivos de
seguridad, algunos riesgos residuales no pueden evitarse.
Éstos incluyen:
f Lesiones causadas por el contacto con partes
giratorias/móviles.
f Lesiones causadas al cambiar cualquier pieza,
cuchilla o accesorio.
f Lesiones causadas por el uso prolongado de una
herramienta. Al utilizar cualquier herramienta
durante periodos prolongados, asegúrese de tomar
descansos regulares.
f Deterioro de la audición.
f Riesgos para la salud causados por respirar el polvo
desarrollado al usar la herramienta (por ejemplo: al
trabajar con madera, especialmente roble, haya y
MDF).
INSTRUCCIONES DE SEGURIDAD ADICIONALES
PARA BATERÍAS Y CARGADORES
Baterías
f Nunca intente abrirla por ningún motivo.
f No exponga la batería al agua.
f No la almacene en lugares donde la temperatura
pueda exceder los 40 °C.
f Cargue sólo a temperaturas ambiente entre 10 °C
y 40 °C.
f Cargue solamente con el cargador suministrado con
la herramienta.
f Para desechar las baterías, siga las instrucciones
dadas en la sección “Protección del medio ambiente”.
No intente cargar baterías dañadas.
Cargadores
f Utilice su cargador de Stanley sólo para cargar
la batería en la herramienta con la que se haya
suministrado. Otras baterías podrían explotar,
causando lesiones personales y daños.
f Nunca intente cargar baterías que no sean
recargables.
f Reemplace los cables defectuosos inmediatamente.
f No exponga el cargador al agua.
f No abra el cargador.
f No explore el cargador.

6 • ESPAÑOL
ENSAMBLAJE
¡Advertencia! Antes del ensamblaje, retire la batería
de la herramienta.
Colocación y remoción de la batería (Fig D)
f Para colocar la batería (5), alíneela con el receptáculo
de la herramienta. Deslice la batería en el receptáculo
y empuje hasta que la batería encaje en su lugar.
f Para remover la batería, presione los botones
de liberación (12), mientras que extrae la batería del
receptáculo al mismo tiempo.
Colocación y remoción de una broca o punta de
destornillador (Fig. E)
Esta herramienta está equipada con un portabrocas sin
llave para permitir un fácil cambio de brocas.
f Asegure la herramienta con el control deslizante de
avance/retroceso (2) en la posición central.
f Sujete el portabrocas (3) y gírelo hacia la izquierda,
viéndolo desde el extremo del portabrocas.
f Inserte la broca (13) en el portabrocas.
f Apriete firmemente el portabrocas girándolo hacia la
derecha, viéndolo desde el extremo del portabrocas.
¡Advertencia! No intente apretar las brocas (o
cualquier otro accesorio) agarrando la parte frontal del
portabrocas y encendiendo la herramienta. Se pueden
producir daños en el portabrocas y lesiones personales al
cambiar accesorios de esta manera.
USO
¡Advertencia! Deje que la herramienta funcione a su
propio ritmo. No la sobrecargue.
Carga de la batería (Fig. B)
La batería necesita ser cargada antes de su primer uso y
siempre que no tenga suficiente potencia en trabajos que
antes realizaba con facilidad. La batería puede calentarse
durante la carga, esto es normal y no indica un problema.
¡Advertencia! No cargue la batería a una temperatura
ambiente inferior a 10 °C o por encima de 40 °C.
Temperatura de carga recomendada: aprox. 24 °C.
Nota: El cargador no cargará una batería si la
temperatura de la celda se encuentra por debajo de
aproximadamente 10 °C o por encima de 40 °C. La
batería se debe dejar en el cargador y el cargador
comenzará a cargar automáticamente cuando la
temperatura de la celda suba o baje.
f Para cargar la batería (5), insértela en el cargador
(10). La batería sólo encajará en el cargador de una
manera. No la fuerce. Asegúrese de que la batería
esté completamente asentada en el cargador.
f Enchufe el cargador y conéctelo a la red eléctrica.
El indicador de carga (11) parpadeará en verde de
forma continua (lentamente).
La carga se ha completado cuando el indicador de carga
(11) se ilumina en verde de forma continua. El cargador
y la batería pueden dejarse conectados indefinidamente
con la luz LED encendida. La luz LED cambiará a verde
intermitente (carga), ya que el cargador rellena la carga
de la batería ocasionalmente. El indicador de carga (11)
estará encendido mientras la batería esté conectada al
cargador enchufado.
f Cargue las baterías descargadas dentro de un plazo
de 1 semana. La duración de la batería se verá
disminuida en gran medida si se almacena en estado
de descarga.
Dejar la batería en el cargador
El cargador y la batería pueden dejarse conectados
con la luz LED encendida indefinidamente. El cargador
mantendrá la batería como nueva y completamente
cargada.
Diagnósticos del cargador
Si el cargador detecta una batería débil o dañada, el
indicador de carga (11) parpadeará rápidamente en color
rojo. Proceda de la siguiente manera:
f Vuelva a insertar la batería (5).
f Si el indicador de carga continúa parpadeando
rápidamente en rojo, utilice una batería diferente
para determinar si el proceso de carga funciona
correctamente.
f Si la batería de reemplazo se carga correctamente, la
batería original está defectuosa y debe ser devuelta a
un centro de servicio para su reciclaje.
f Si la nueva batería da la misma indicación que la
batería original, lleve el cargador para ser probado en
un centro de servicio autorizado.
Nota: Puede tomar hasta 60 minutos determinar que la
batería está defectuosa. Si la batería está demasiado
caliente o demasiado fría, la luz LED parpadeará en
rojo alternativamente, rápido y lento, un parpadeo en
cada velocidad y se repetirá.
Selección de la dirección de rotación (Fig. F)
Para perforar y para apretar tornillos, utilice la rotación de
avance (hacia la derecha). Para aflojar tornillos o retirar
una broca atascada, use la rotación en reversa (hacia la
izquierda).
f Para seleccionar la rotación de avance, empuje el
interruptor de avance/retroceso (2) a la izquierda.
f Para seleccionar la rotación en reversa, empuje el
interruptor de avance/retroceso a la derecha.
f Para asegurar la herramienta, coloque el control
deslizante de avance/retroceso en la posición central.
Selección del torque
Esta herramienta está equipada con un collar para ajustar
el torque para diversas aplicaciones de atornillado y

ESPAÑOL • 7
perforación. Los materiales de piezas de trabajo duras y
los tornillos largos requieren una configuración de torque
más alta que los materiales de piezas de trabajo suaves
y los tornillos pequeños. Para la definición del símbolo,
consulte la siguiente lista.
f Para taladrar en madera, metal y plásticos, coloque
el collar de ajuste de torque (4) en la posición del
símbolo .
f Para atornillar, fije el collar en la configuración
deseada. Si usted todavía no conoce la configuración
apropiada, haga lo siguiente:
- Coloque el collar de ajuste de torque (4) en la
configuración de torque más baja.
- Apriete el primer tornillo.
- Si el embrague se atasca antes de obtener el
resultado deseado, aumente la configuración
de torque del collar y continúe apretando el
tornillo. Repita este proceso hasta que alcance
la configuración correcta. Utilice esta configuración
para los tornillos restantes.
Selector de velocidad
f Para taladrar en acero y para aplicaciones de
atornillado, deslice el selector de velocidad (8) hacia
la parte trasera de la herramienta (1era velocidad).
f Para taladrar en materiales que no sean acero,
deslice el selector de velocidad (8) hacia la parte
frontal de la herramienta (2da velocidad).
Perforación/atornillado
f Seleccione la rotación de avance o en reversa con el
control deslizante de avance/retroceso (2).
f Para encender la herramienta, presione el interruptor
(1). La velocidad de la herramienta depende de qué
tanto presione el interruptor.
f Para apagar la herramienta, suelte el interruptor.
Luz LED de trabajo
La luz LED de trabajo (7) se activa automáticamente
cuando se aprieta el gatillo. La luz LED de trabajo se
encenderá cuando se presione parcialmente el gatillo,
antes de que la unidad comience a funcionar.
CONSEJOS PARA EL USO ÓPTIMO
Perforación
f Siempre aplique una ligera presión en línea recta con
la broca.
f Justo antes de que la broca atraviese el otro lado
de la pieza de trabajo, disminuya la presión sobre la
herramienta.
f Use un bloque de madera para sostener las piezas de
trabajo que puedan astillarse.
f Utilice brocas de pala al taladrar agujeros de gran
diámetro en madera.
f Utilice brocas HSS al taladrar en metal.
f Utilice brocas de mampostería al taladrar en
mampostería suave.
f Use un lubricante cuando taladre metales que no
sean latón y hierro fundido.
f Haga una muesca usando un punzón en el centro del
agujero a ser perforado para mejorar la precisión.
Atornillado
f Utilice siempre el tipo y tamaño correctos de punta de
destornillador.
f Si los tornillos son difíciles de apretar, intente aplicar
una pequeña cantidad de detergente o jabón como
lubricante.
f Sujete siempre la herramienta y la punta de
destornillador en línea recta con el tornillo
MANTENIMIENTO
Su herramienta Stanley ha sido diseñada para funcionar
durante un largo periodo de tiempo con un mínimo de
mantenimiento. Su funcionamiento satisfactorio y continuo
depende de un cuidado adecuado y limpieza regular.
Su cargador no requiere ningún mantenimiento aparte de
la limpieza regular.
¡Advertencia! Antes de realizar cualquier operación
de mantenimiento de la herramienta, retire la batería de la
herramienta. Desenchufe el cargador antes de limpiarlo.
f Limpie con regularidad las ranuras de ventilación de
su herramienta y cargador con un cepillo suave o un
paño seco.
f Limpie con regularidad la carcasa del motor con un
paño húmedo. No use limpiadores abrasivos o a base
de solventes.
f Abra periódicamente el portabrocas y dé ligeros
golpes para eliminar el polvo del interior.
¡Importante! Para asegurar la SEGURIDAD y
CONFIABILIDAD del producto, se deben realizar
reparaciones, mantenimiento y ajuste (además de las
mencionadas en este manual) por los centros de servicio
autorizados u otras organizaciones calificadas, siempre
utilizando partes de repuesto idénticas. La unidad no
contiene en el interior partes a las que pueda dar el
servicio el usuario
ACCESORIOS
El rendimiento de cualquier herramienta eléctrica
depende del accesorio utilizado. Los accesorios Stanley
están diseñados para estándares de alta calidad y están
diseñados para mejorar el rendimiento de la herramienta
eléctrica. El utilizar accesorios Stanley, le asegura que
obtendrá lo mejor de su herramienta Stanley. Stanley
ofrece una amplia selección de accesorios disponibles en

8 • ESPAÑOL
nuestro distribuidor local o centro de servicio autorizado a
un costo extra.
Nota: Se deben clasificar los accesorios para utilizarlos
a una velocidad igual a o mayor que los RPM en la placa
del fabricante de la herramienta con la cual está siendo
utilizada.
¡Precaución! El uso de cualesquier accesorios no
recomendados puede ser peligroso.
PROTECCIÓN DEL MEDIO AMBIENTE
Separación de desechos. Este producto no debe
desecharse con la basura doméstica normal. Si
llega el momento de reemplazar su producto
Stanley o éste ha dejado de tener utilidad para
usted, no lo deseche con la basura doméstica
normal. Asegúrese de que este producto se
deseche por separado.
La separación de desechos de productos usados
y embalajes permite que los materiales puedan
reciclarse y reutilizarse. La reutilización de
materiales reciclados ayuda a evitar la contaminación
medioambiental y reduce la demanda de materias
primas. La normativa local puede ofrecer la
separación de desechos de productos eléctricos
de uso doméstico en centros municipales de
recogida de desechos o a ravés del distribuidor
cuando adquiere un nuevo producto.
Baterías
Vacíe por completo la batería, luego retírela de
la herramienta.
Las baterías de NiCd, NiMH y Ión-Litio son reciclables.
Llévelas a cualquier centro de servicio técnico autorizado
o centro de reciclaje local
INFORMACIÓN DE SERVICIO
Todos los Centros de Servicio de Stanley cuentan con
personal altamente capacitado dispuesto a brindar a todos
los clientes un servicio eficiente y confiable en la reparación
de herramientas eléctricas. Para mayor informacion acerca
de nuestros centros de servicio autorizados y si necesita
consejo técnico, reparaciones o piezas de repuesto
originales de fábrica, comuniquese a su oficina local.

ENGLISH • 9
DO NOT RETURN THIS PRODUCT TO THE STORE,
first contact your local Stanley office
or nearest authorized service center.
GENERAL SAFETY RULES
Warning! Read and understand all instructions. Failure
to follow all instructions listed below, may result in electric
shock, fire and/or serious personal injury.
SAVE THESE INSTRUCTIONS
SAFETY INSTRUCTIONS
General power tool safety warnings.
Warning! Read all safety warnings and
all instructions. Failure to follow the warnings and
instructions listed below may result in electric shock,
fire and/or serious injury.
Save all warnings and instructions for future reference.
The term “power tool” in all of the warnings listed below
refers to your mains operated (corded) power tool or
battery operated (cordless) power tool.
1. Work Area Safety
a. Keep work area clean and well lit. Cluttered and
dark areas invite accidents.
b. Do not operate power tools in explosive atmospheres,
such as in the presence of flammable liquids,
gases or dust. Power tools create sparks which may
ignite the dust or fumes.
c. Keep children and bystanders away while
operating a power tool. Distractions can cause you
to lose control.
2. Electrical Safety
a. Power tool plugs must match the outlet. Never
modify the plug in any way. Do not use any
adapter plugs with earthed (grounded) power
tools. Unmodified plugs and matching outlets will
reduce risk of electric shock.
b. Avoid body contact with earthed or grounded
surfaces such as pipes, radiators, ranges and
refrigerators. There is an increased risk of electric
shock if your body is earthed or grounded.
c. Do not expose power tools to rain or wet conditions.
Water entering a power tool will increase the risk of
electric shock.
d. Do not abuse the cord. Never use the cord for
carrying, pulling or unplugging the power tool.
Keep cord away from heat, oil, sharp edges or
moving parts. Damaged or entangled cords increase
the risk of electric shock.
e. When operating a power tool outdoors, use an
extension cord suitable for outdoor use. Use of
a cord suitable for outdoor use reduces the risk of
electric shock.
f. If operating a power tool in a damp location is
unavoidable, use a residual current device (RCD)
protected supply. Use of an RCD reduces the risk of
electric shock. Note: The term “Residual Curent Device
(RCD)” can be replaced by “Ground Fault Circuit
Interrupter (GFCI)” or by “Earth Leakage Circuit
Breaker (ELCB)”.
3. Personal Safety
a. Stay alert, watch what you are doing and use
common sense when operating a power tool. Do
not use a power tool while you are tired or under
the influence of drugs, alcohol or medication. A
moment of inattention while operating power tools
may result in serious personal injury.
b. Use personal protective equipment. Always wear
eye protection. Protective equipment such as dust
mask, non-skid safety shoes, hard hat, or hearing
protection used for appropriate conditions will reduce
personal injuries.
c. Prevent unintentional starting. Ensure the switch
is in the off-position before connecting to power
source and/or battery pack, picking up or carrying
the tool. Carrying power tools with your finger on the
switch or energising power tools that have the switch
on invites accidents.
d. Remove any adjusting key or wrench before
turning the power tool on. A wrench or a key left
attached to a rotating part of the power tool may result
in personal injury.
e. Do not overreach. Keep proper footing and
balance at all times. This enables better control of
the power tool in unexpected situations.
f. Dress properly. Do not wear loose clothing or
jewellery. Keep your hair, clothing and gloves away
from moving parts. Loose clothes, jewellery or long
hair can be caught in moving parts.
g. If devices are provided for the connection of dust
extraction and collection facilities, ensure these are
connected and properly used. Use of these devices
can reduce dust related hazards.
4. Power Tool Use and Care
a. Do not force the power tool. Use the correct power
tool for your application. The correct power tool will
do the job better and safer at the rate for which it was
designed.
b. Do not use the power tool if the switch does not
turn it on and off. Any power tool that cannot be
controlled with the switch is dangerous and must be
repaired.

10 • ENGLISH
c. Disconnect the plug from the power source and/or
the battery pack from the power tool before
making any adjustments, changing accessories,
or storing power tools. Such preventive safety measures
reduce the risk of starting the power tool accidentally.
d. Store idle power tools out of the reach of children
and do not allow persons unfamiliar with the power
tool or these instructions to operate the power
tool. Power tools are dangerous in the hands
of untrained users.
e. Maintain power tools. Check for misalignment
or binding of moving parts, breakage of parts and
any other condition that may affect the power
tools operation. If damaged, have the power tool
repaired before use. Many accidents are caused by
poorly maintained power tools.
f. Keep cutting tools sharp and clean. Properly
maintained cutting tools with sharp cutting edges are
less likely to bind and are easier to control.
5. Service
a. Have your power tool serviced by a qualified
repair person using only identical replacement
parts. This will ensure that the safety of the power
tool is maintained.
6. Electrical safety
Your tool is double insulated; therefore no earth
wire is required. Always check that the main
voltage corresponds to the voltage on the rating
plate.
Warning! If the power cord is damaged, it must
be replaced by the manufacturer, authorized
Stanley Service Center or an equally qualified
person in order to avoid damage or injury. If the
power cord is replaced by an equally qualified
person, but not authorized by Stanley, the
warranty will not be valid.
7. Labels on tool
The label on your tool may include the following
symbols:
FEATURES (Fig. A)
This tool includes some or all of the following features.
1. Variable speed switch
2. Forward/reverse slider
3. Chuck
4. Torque adjustment collar
5. Battery
6. Belt clip
7. LED work light
8. Speed selector
9. Magnetic bit holder
Fig. B
10. Charger
11. Charging indicator
ADDITIONAL POWER TOOL SAFETY WARNINGS
Warning! Additional safety warnings for drills and
impact drills.
f Wear ear protectors with impact drills. Exposure to
noise can cause hearing loss.
f Use auxiliary handles supplied with the tool. Loss
of control can cause personal injury.
f Hold power tool by insulated gripping surfaces
when performing an operation where the cutting
accessory may contact hidden wiring. Cutting
accessory contacting a “live” wire may make exposed
metal parts of the power tool “live” and could give the
operator an electric shock.
f Hold power tool by insulated gripping surfaces
when performing an operation where the fastener
may contact hidden wiring. Fasteners contacting
a “live” wire may make exposed metal parts of
the power tool “live” and could give the operator an
electric shock.
f Use clamps or another practical way to secure
and support the workpiece to a stable platform.
Holding the work by hand or against your body leaves
it unstable and may lead to loss of control.
f Before drilling into walls, floors or cellings, check for
the location of wiring and pipes.
f Avoid touching the tip of a drill bit just after drilling,
as it may be hot.
f This tool is not intended for use by persons (including
children) with reduced physical, sensory or mental
capabilities, or lack of experience and knowledge,
unless they have been given supervision or instruction
concerning use of the appliance by a person responsible
for their safety. Children should be supervised to
ensure that they do not play with the appliance.
f The intended use is described in this instruction
manual. The use of any accessory or attachment
or performance of any operation with this tool other
than those recom- mended in this instruction manual
Read
Instructions
Manual
Use Eye
Protection
Use Ear
Protection
V ........ Volts
A ........ Amperes
Hz ....... Hertz
W ........ Watts
min ..... minutes
..... Alternating
Current
..... Direct
Current
n
0
....... No-Load
Speed
...... Class II
Construction
.... Earthing
Terminal
.... Safety Alert
Symbol
.../min.. Revolutions
or Recipro-
cation per
minute
.... The charger
is intended
for indoor
use only.

ENGLISH • 11
may present a risk of personal injury and/or damage
to property.
Safety of others
f This appliance is not intended for use by persons
(including children) with reduced physical, sensory
or mental capabilities, or lack of experience and
knowledge, unless they have been given supervision
or instruction concerning use of the appliance by a
person responsible for their safety.
f Children should be supervised to ensure that they do
not play with the appliance.
Residual risks
Additional residual risks may arise when using the
tool which may not be included in the enclosed safety
warnings. These risks can arise from misuse, prolonged
use etc.
Even with the application of the relevant safety regulations
and the implementation of safety devices, certain residual
risks can not be avoided. These include:
f Injuries caused by touching any rotating/moving parts.
f Injuries caused when changing any parts, blades or
accessories.
f Injuries caused by prolonged use of a tool. When
using any tool for prolonged periods ensure you take
regular breaks.
f Impairment of hearing.
f Health hazards caused by breathing dust developed
when using your tool (example:- working with wood,
especially oak, beech and MDF.)
ADDITIONAL SAFETY INSTRUCTIONS FOR
BATTERIES AND CHARGERS
Batteries
f Never attempt to open for any reason.
f Do not expose the battery to water.
f Do not store in locations where the temperature may
exceed 40 °C.
f Charge only at ambient temperatures between 10 °C
and 40 °C.
f Charge only using the charger provided with the tool.
f When disposing of batteries, follow the instructions
given in the section “Protecting the environment”.
Do not attempt to charge damaged batteries.
Chargers
f Use your Stanley charger only to charge the battery in
the tool with which it was supplied. Other batteries
could burst, causing personal injury and damage.
f Never attempt to charge non-rechargeable batteries.
f Have defective cords replaced immediately.
f Do not expose the charger to water.
f Do not open the charger.
f Do not probe the charger.
ASSEMBLY
Warning! Before assembly, remove the battery from
the tool.
Fitting and removing the battery (Fig D)
f To fit battery (5), line it up with the receptacle on the
tool. Slide the battery into the receptacle and push
until the battery snaps into place.
f To remove the battery, push the release buttons (12)
while at the same time pulling the battery out of the
receptacle.
Fitting and removing a drill bit or screwdriver bit
(Fig. E)
This tool is fitted with a keyless chuck to allow for an easy
exchange of bits.
f Lock the tool by setting the forward/reverse slider (2)
to the centre position.
f Grasp the chuck (3) and rotate it in the counter
clockwise direction, as viewed from the chuck end.
f Insert the bit shaft (13) into the chuck.
f Firmly tighten the chuck by rotating it in the clockwise
direction as viewed from the chuck end.
Warning! Do not attempt to tighten drill bits (or any
other accessory) by gripping the front part of the chuck and
turning the tool on. Damage to the chuck and personal injury
may occur when changing accessories in this manner.
USE
Warning! Let the tool work at its own pace. Do not
overload.
Charging the battery (Fig. B)
The battery needs to be charged before first use and
whenever it fails to produce sufficient power on jobs that
were easily done before. The battery may become warm
while charging; this is normal and does not indicate a
problem.
Warning! Do not charge the battery at ambient
temperatures below 10°C or above 40°C. Recommended
charging temperature: approx. 24°C.
Note: The charger will not charge a battery if the cell
temperature is below approximately 10°C or above
40°C. The battery should be left in the charger and the
charger will begin to charge automatically when the
cell tempera- ture warms up or cools down.
f To charge the battery (5), insert it into the charger (10).
The battery will only fit into the charger in one way. Do
not force. Be sure that the battery is fully seated in the
charger.
f Plug in the charger and switch on at the mains.
The charging indicator (11) will flash green
continuously (slowly)

12 • ENGLISH
The charge is complete when the charging indicator (11)
lights green continuously. The charger and the battery can
be left connected indefinitely with the LED illuminated.
The LED will change to flashing green (charging) state as
the charge occasionally tops up the battery charge. The
charging indicator (11) will be lit as long as the battery is
connected to the plugged-in charger.
f Charge discharged batteries within 1 week. Battery
life will be greatly diminished if stored in a discharged
state.
Leaving the battery in the charger
The charger and battery pack can be left connected with
the LED glowing indefinitely. The charger will keep the
battery pack fresh and fully charged.
Charger diagnostics
If the charger detects a weak or damaged battery, the
charging indicator (11) will flash red at a fast rate. Proceed
as follows:
f Re-insert the battery (5).
f If the charging indicators continues flashing red at a
fast rate, use a different battery to determine if the
charging process works properly.
f If the replaced battery charges correctly, the original
battery is defective and should be returned to a
service centre for recycling.
f If the new battery gives the same indication as the
original battery, take the charger to be tested at an
authorised service centre.
Note: It may take as long as 60 minutes to determine
that the battery is defective. If the battery is too hot
or too cold, the LED will alternately blink red, fast and
slow, one flash at each speed and repeat.
Selecting the direction of rotation (Fig. F)
For drilling and for tightening screws, use forward
(clockwise) rotation. For loosening screws or removing a
jammed drill bit, use reverse (counterclockwise) rotation.
f To select forward rotation, push the forward/reverse
slider (2) to the left.
f To select reverse rotation, push the forward/reverse
slider to the right.
f To lock the tool, set the forward/reverse slider into the
centre position.
Selecting the torque
This tool is fitted with a collar to set the torque for various
screwdriving and drilling applications. Large screws and
hard workpiece materials require a higher torque setting
than small screw and soft workpiece materials. For the
definition of the symbol refer to the listing below.
f For drilling in wood, metal and plastics, set the torque
adjustment collar (4) to the symbol.
f For screwdriving, set the collar to the desired setting.
If you do not yet know the appropriate setting,
proceed as follows:
- Set the torque adjustment collar (4) to the lowest
torque setting.
- Tighten the first screw.
- If the clutch ratchets before the desired result
is achieved, increase the collar setting and
continue tightening the screw. Repeat until you
reach the correct setting. Use this setting for the
remaining screws.
Speed selector
f For drilling in steel and for screwdriving applications,
slide the speed selector (8) towards the rear of the
tool (1st gear).
f For drilling in materials other than steel, slide the
speed selector (8) towards the front of the tool (2nd
gear).
Drilling/screwdriving
f Select forward or reverse rotation using the forward/
reverse slider (2).
f To switch the tool on, press the switch (1). The tool
speed depends on how far you press the switch.
f To switch the tool off, release the switch.
LED work light
The LED work light (7) is activated automatically when
the trigger is depressed. The LED work light will illuminate
when the trigger is partially depressed, before the unit
begins running.
HINTS FOR OPTIMUM USE
Drilling
f Always apply a light pressure in a straight line with
the drill bit.
f Just before the drill tip breaks through the other side
of the workpiece, decrease pressure on the tool.
f Use a block of wood to back up workpieces that may
splinter.
f Use spade bits when drilling large diameter holes in
wood.
f Use HSS drill bits when drilling in metal.
f Use masonry bits when drilling in soft masonry.
f Use a lubricant when drilling metals other than cast
iron and brass.
f Make an indentation using a centre punch at the
centre of the hole to be drilled in order to improve
accuracy.
Screwdriving
f Always use the correct type and size of screwdriver bit.
f If screw are difficult to tighten, try applying a small
amount of washing liquid or soap as a lubricant.

ENGLISH • 13
f Always hold the tool and screwdriver bit in a straight
line with the screw.
MAINTENANCE
Your Stanley tool has been designed to operate over
a long period of time with a minimum of maintenance.
Continuous satisfactory operation depends upon proper
tool care and regular cleaning.
Your charger does not require any maintenance apart from
regular cleaning.
Warning! Before performing any maintenance on the
tool, remove the battery from the tool. Unplug the charger
before cleaning it.
f Regularly clean the ventilation slots in your tool and
charger using a soft brush or dry cloth.
f Regularly clean the motor housing using a damp
cloth. Do not use any abrasive or solvent-based
cleaner.
f Regularly open the chuck and tap it to remove any
dust from the interior.
¡Important!To ensure product SAFETY and
RELIABILITY, repairs, maintenance and adjustment
(other than those listed in thismanual) should be
performed by authorized service centers or other qualified
organizations, always-using identicalreplacement parts.
Unit contains no user serviceable parts inside.
ACCESSORIES
The performance of any power tool is dependent upon the
accessory used. Stanley accessories are engineered to
high quality standards and are designed to enhance the
performance of power tool. By using Stanley accessories
will ensure that you get the very best from your Stanley
tool. Stanley offers a large selection of accessories
available at our local dealer or authorized service center
at extracost.
Note: Accessory must be rated for use at speed equal
to or higher than nameplate RPM of tool with which it is
beingused.
¡Caution! The use of any non-recommended
accesories may be hazardous.
PROTECTING THE ENVIRONMENT
Separate collection. This product must not be
disposed of with normal household waste.
Should you find one day that your Stnley product
needs replacement, or if it is of no further use
to you, do not dispose of it with household
waste. Make this product available for separate
collection.
Separate collection of used products and packaging
allows materials to be recycled and used again.
Re-use of recycled materials helps prevent
environmental pollution and reduces the demand
for raw materials. Local regulations may provide for
separate collection of electrical products from the
household, at municipal waste sites or by the
retailer when you purchase a new product.
Batteries
Run the battery down completely, then remove it
from the tool.
NiCd, NiMH and Li-Ion batteries are recyclable. Take them
to any authorised repair agent or a local recycling station.
SERVICE INFORMATION
Stanley offers a full network of company-owned and
authorized service locations. All Stanley Service Centers
are staffed with trained personnel to provide customers
with efficient and reliable power tool service. For more
information about our authorized service centers and
if you need technical advice, repair, or genuine factory
replacement parts, contact the Stanley location nearest you.

Solamente para propósito de Argentina:
Importado por: Black & Decker Argentina S.A.
Pacheco Trade Center
Colectora Este de Ruta Panamericana
Km. 32.0 El Talar de Pacheco
Partido de Tigre
Buenos Aires (B1618FBQ)
República de Argentina
No. de Importador: 1146/66
Tel.: (011) 4726-4400
Imported by/Importado por:
Black & Decker do Brasil Ltda.
Rod. BR 050, s/n°- Km 167
Dist. Industrial II
Uberaba ˆ MG ˆ Cep: 38064-750
CNPJ: 53.296.273/0001-91
Insc. Est.: 701.948.711.00-98
S.A.C.: 0800-703-4644
Solamente para propósito de Colombia
Importado por: Black & Decker de Colombia, S.A.
Carrera 85D # 51-65, Bodega 23
Complejo Logístico San Cayetano
Bogotá - Colombia
Tel.: 744-7100
Solamente para propósito de Chile:
Importado por: Black & Decker de Chile, S.A.
Av. Pdte. Eduardo Frei M. 6001-67 Conchalí
Santiago de Chile
Tel.: (56-2) 2687 1700
Impreso en China
Impresso em China
Printed in China
90609958
04/17/2014
Solamente para propósito de México:
Importado por: Black and Decker S.A. de C.V.
Avenida Antonio Dovali Jaime
# 70 Torre B Piso 9
Colonia Santa Fé
Delegación Alvaro Obregón,
México D.F. 01210
Tel.: (52) 555-326-7100
R.F.C.: BDE810626-1W7
Black & Decker del Perú S.A.
Av. Enrique Meiggs 227.
Pque. Industrial - Callao
Tel.: (511) 614-4242
RUC 20266596805
-
 1
1
-
 2
2
-
 3
3
-
 4
4
-
 5
5
-
 6
6
-
 7
7
-
 8
8
-
 9
9
-
 10
10
-
 11
11
-
 12
12
-
 13
13
-
 14
14


Stanley STDC001LB Manual de usuario
- Categoría
- Herramientas eléctricas
- Tipo
- Manual de usuario
- Este manual también es adecuado para
en otros idiomas
- English: Stanley STDC001LB User manual
Artículos relacionados
-
Stanley STDC001LB Manual de usuario
-
-
-
-
-
-
-
-
-
Otros documentos
-
Black & Decker MT218 Manual de usuario
-
Black & Decker MTDD6 Manual de usuario
-
-
Black & Decker MT1435 El manual del propietario
-
Black & Decker MT143 Multifunktionswerkzeug El manual del propietario
-
Black & Decker ASD14 Manual de usuario
-
 BAUKER SD El manual del propietario
