Sony WALKMAN CKH-NWX1000 Manual de usuario

Tipo
Manual de usuario

Este manual también es adecuado para

El Sony WALKMAN CKH-NWX1000 es un reproductor de música portátil con una pantalla clara y un estuche protector transparente. El estuche se puede abrir y cerrar fácilmente, y tiene un soporte para que puedas inclinar el reproductor y verlo mejor. El reproductor también tiene una función de reinicio en la parte posterior del estuche, que puede ser útil si el reproductor se bloquea o no responde.

El Sony WALKMAN CKH-NWX1000 es un reproductor de música portátil con una pantalla clara y un estuche protector transparente. El estuche se puede abrir y cerrar fácilmente, y tiene un soporte para que puedas inclinar el reproductor y verlo mejor. El reproductor también tiene una función de reinicio en la parte posterior del estuche, que puede ser útil si el reproductor se bloquea o no responde.

CKH-NWX1000
4-136-237-11(1)
©2009 Sony Corporation Printed in China
English
Operating Instructions
To attach the protector sheet
1 Wipe the display of your “WALKMAN” thoroughly
with a so cloth, such as an eyeglass cleaning cloth.
Even minimal dirt or dust may cause air traps.
2 Peel o the protector sheet (from indent) halfway
from its base (Figure -). e base is the larger
sheet.
3 Align the protector sheet with the bottom edge of
the display - HOME button end - (Figure -)
while taking care to avoid air traps (Figure -).
Be careful not to touch the adhesive side.
Note that if the protector sheet is not pasted squarely
on the display, the contact of the front case may peel
it o.
Hint
If the protector sheet is not positioned well, carefully
remove it and reposition. Using adhesive tape makes it
easier to peel off the protector sheet.
To attach/open the case
e clear case is sold with the front and rear assembled.
To open the case and install the “WALKMAN”:
1 Holding the rear case, slide the front of the case in
the direction of the arrow (about 5mm) to open
(Figure ).
2 Place the “WALKMAN” into the rear case.
3 Place the front case overlapping the bottom of the
rear case (about 5mm), and holding the top of the
front case lightly (Figure -), slide it as in the
illustration until it clicks (Figure -).
Hint
You can use the stand on the rear case to use the case in
an inclined position (Figure ). The stand can unfold in
2 levels (40 or 60 degrees, approx.). Exerting force on the
stand may break it off.
Notes
Attach a strap to the rear case before installing the
“WALKMAN.
To prevent the “WALKMAN” from possible damage,
make sure that there is no dirt or dust inside the clear
case or on the “WALKMAN” before use. If necessary,
wipe the clear case with a soft cloth, such as an eyeglass
cleaning cloth.
Detach the case if you use any product which requires
use of an attachment supplied with your “WALKMAN.
If the stand comes off, re-attach and return it to the
original position.
“WALKMAN” and are registered
trademarks of Sony Corporation.
Français
Mode d’emploi
Pour xer la feuille de protection
1 Essuyez lécran de votre « WALKMAN » avec un
chion doux, tel quun chion à lunettes. Même la
plus inme saleté ou poussière est susceptible de
provoquer des bulles dair.
2 Retirez la feuille de protection (de la découpe)
jusquà la moitié de son support (Figure -). Le
support est la feuille la plus large.
3 Alignez la feuille de protection avec le bord inférieur
de lécran - té de la touche HOME - (Figure -)
tout en veillant à éviter les bulles dair (Figure -).
Veillez à ne pas toucher le côté adhésif.
Notez que si la feuille de protection nest pas
complètement collée sur l’écran, la partie en contact
avec la partie avant de létui risque de se décoller.
Conseil
Si la feuille de protection nest pas correctement
positionnée, détachez-la délicatement et repositionnez-la.
L’utilisation de ruban adhésif facilite le retrait de la feuille
de protection.
Pour xer/ouvrir l’étui
Létui transparent est vendu avec lavant et larrière
assemblés. Pour ouvrir l’étui et installer le
« WALKMAN »:
1 En tenant la partie arrière de l’étui, faites glisser la
partie avant dans le sens de la èche (environ 5 mm)
pour l’ouvrir (Figure ).
2 Placez le « WALKMAN » dans la partie arrière de
l’étui.
3 Placez la partie avant de létui par-dessus la base
de la partie arrière de l’étui (environ 5 mm) et en
tenant légèrement le dessus de la partie avant de
l’étui (Figure -), faites-la glisser de la manière
illustrée jusquà ce quelle émette un déclic (Figure
-).
Conseil
Vous pouvez utiliser le support de la partie arrière de l’étui
lorsque vous souhaitez utiliser l’étui en position inclinée
(Figure ). Le support peut être déployé sur 2 niveaux (40
ou 60 degrés environ). Si vous appuyez sur le support, vous
risquez de le briser.
Remarques
Fixez une sangle sur la partie arrière de l’étui avant
d’installer le « WALKMAN ».
Afin d’éviter d’abîmer le « WALKMAN », veillez à ce qu’il
n’y ait pas de saleté ou de poussière à l’intérieur de létui
transparent ou sur le « WALKMAN » avant dutiliser
l’étui transparent. Si nécessaire, essuyez l’étui transparent
à l’aide dun chiffon doux, notamment un chiffon pour
verres de lunettes.
Détachez l’étui lorsque vous employez un produit qui
exige lutilisation dun accessoire fourni avec votre
« WALKMAN ».
Si le support se détache, refixez-le et replacez-le dans sa
position dorigine.
« WALKMAN » et sont des
marques déposées de Sony Corporation.
Español
Manual de instrucciones
Para colocar la lámina protectora
1 Limpie la pantalla del “WALKMAN” con cuidado
con un paño suave, como por ejemplo una gamuza.
Incluso el más mínimo resto de polvo o suciedad
puede provocar la aparición de burbujas de aire.
2 Quite la lámina protectora de la base (por la
hendidura) hasta la mitad (Figura -). La base
tiene la lámina más grande.
3 Ajuste la lámina protectora con el borde inferior
la pantalla - botón HOME - (Figura -)
procurando evitar la formación de burbujas (Figura
-). No toque nunca la cara adhesiva.
Si la lámina protectora no está pegada en la pantalla
en ángulo recto, puede desprenderse al contacto con
la carcasa frontal.
Sugerencia
Si la lámina protectora no está bien colocada, retírela con
cuidado y vuelva a colocarla. Si utiliza cinta adhesiva le
resultará más fácil quitar la lámina protectora.
Para colocar o abrir la carcasa
El estuche transparente se comercializa con las piezas
frontal y posterior montadas. Para abrir el estuche e
instalar el “WALKMAN”:
1 Sujetando la carcasa posterior, deslice la parte frontal
en la dirección de la echa (unos 5 mm) para abrirla
(Figura ).
2 Coloque el “WALKMAN” en la carcasa posterior.
3 Coloque la carcasa frontal solapada con la parte
inferior de la carcasa posterior (unos 5 mm) y,
sujetando ligeramente la parte superior de la carcasa
frontal (Figura -), deslícela como muestra la
ilustración hasta que quede encajada (Figura -
).
Sugerencia
Puede utilizar la base de la carcasa posterior para
utilizar la carcasa en posición inclinada (Figura ).
La base puede colocarse en dos niveles (40 o 60 grados,
aproximadamente). Si ejerce fuerza contra la base, podría
romperla.
Notas
Coloque una cinta en la carcasa posterior antes de
colocar el “WALKMAN”.
Para evitar posibles daños en el “WALKMAN”, asegúrese
de que no haya suciedad ni polvo en el interior del
estuche transparente o en el “WALKMAN” antes de
utilizarlo. Si es necesario, limpie el estuche transparente
con un paño suave, como una gamuza.
Extraiga el estuche cuando utilice cualquier producto
que requiera el uso de una fijación suministrado con tu
“WALKMAN”.
Si la base se desprende, vuelva a colocar la carcasa y a
situarla en la posición original.
“WALKMAN” y son marcas
comerciales registradas de Sony Corporation.
Strap hole
Trou pour sangle
Oricio para la
correa
Stand
Support
Base
Indent
Découpe
Hendidura
Alignment position
Position d’alignement
Posición de ajuste
Rear case reset button
Bouton de réinitialisation de la partie
arrière de l’étui
Botón de reinicio de la carcasa posterior
Front case
coupling
Raccord de la
partie avant
de l’étui
Acoplamiento
de la carcasa
frontal
Front case
Partie avant de l’étui
Carcasa frontal
About 5mm
Environ 5 mm
Unos 5 mm
Deutsch
Bedienungsanleitung
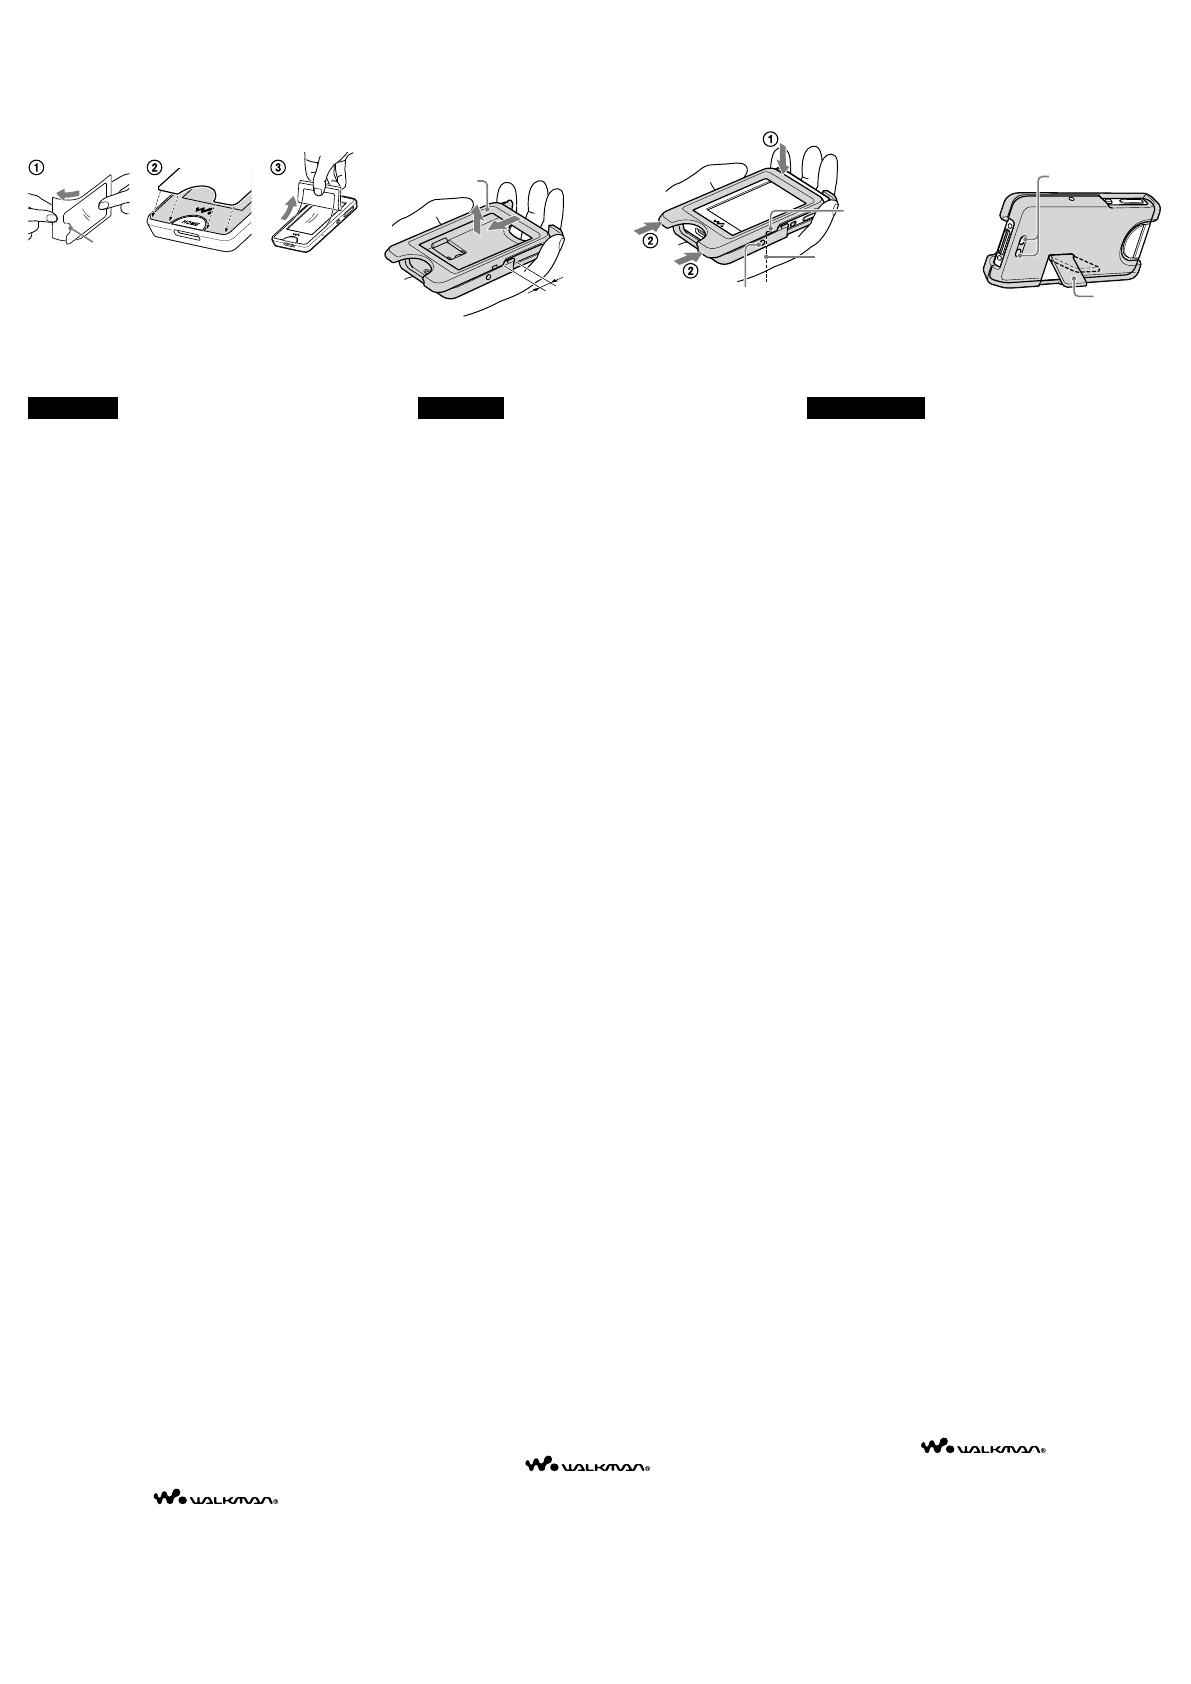
So bringen Sie die Schutzfolie an
1 Wischen Sie das Display des „WALKMAN“ sorgfältig
mit einem weichen Tuch, wie zum Beispiel einem
Brillenreinigungstuch ab. Auch winzige Schmutz-
oder Staubteile können zu Lueinschlüssen führen.
2 Ziehen Sie die Schutzfolie (von der Einbuchtung
aus) halb von der Trägerfolie ab (Abbildung -).
Die Trägerfolie ist die größere Folie.
3 Richten Sie die Schutzfolie an der Unterkante der
HOME-Taste des Displays aus (Abbildung -)
und vermeiden Sie dabei Lueinschlüsse (Abbildung
-). Achten Sie darauf, die Klebeseite nicht zu
berühren.
Beachten Sie, dass sich die Schutzfolie durch den
Kontakt mit der vorderen Hülle lösen kann, wenn sie
nicht richtig auf dem Display ausgerichtet ist.
Tipp
Wenn die Schutzfolie nicht richtig positioniert ist,
entfernen Sie sie vorsichtig und positionieren Sie sie neu.
Die Verwendung von Klebeband macht das Entfernen der
Schutzfolie einfacher.
So befestigen/entfernen Sie die Hülle
Beim Kauf sind die vordere und hintere Schale der
transparenten Schutzhülle zusammengesetzt. So önen
Sie die Schutzhülle und setzen den „WALKMAN“ ein:
1 Halten Sie die hintere Hülle fest und schieben Sie die
vordere Hülle in Pfeilrichtung (ca. 5 mm), um sie zu
önen (Abbildung ).
2 Legen Sie den „WALKMAN“ in die hintere Hülle.
3 Legen Sie die vordere Hülle so auf die hintere Hülle,
dass sie an der unteren Kante etwas übersteht (ca. 5
mm). Halten Sie die Oberseite der vorderen Hülle
leicht fest (Abbildung -) und schieben Sie
sie, wie in der Abbildung dargestellt, bis sie hörbar
einrastet (Abbildung -).
Tipp
Sie können den Ständer an der hinteren Hülle verwenden,
um die Hülle in einer geneigten Position aufzustellen
(Abbildung ). Der Ständer kann in 2 Positionen
aufgestellt werden (ca. 40 bzw. 60 Grad). Wenn Sie zu
starken Druck auf den Ständer ausüben, kann dieser
abbrechen.
Hinweise
Bringen Sie einen Gurt an der hinteren Hülle an, bevor
Sie den „WALKMAN“ einsetzen.
Vergewissern Sie sich vor der Verwendung der
transparenten Schutzhülle, dass sich in der transparenten
Schutzhülle und auf dem „WALKMAN“ kein Staub
oder Schmutz befindet, um eine Beschädigung
des „WALKMAN“ zu verhindern. Reinigen Sie die
transparente Schutzhülle gegebenenfalls mit einem
weichen Tuch, wie z. B. einem Brillenreinigungstuch.
Nehmen Sie die Schutzhülle ab, wenn Sie andere
Produkte, wie z. B. das mitgelieferte Zubehör des
WALKMAN, anschließen wollen.
Wenn sich der Ständer löst, setzen Sie ihn wieder ein und
bringen Sie ihn in die ursprüngliche Position.
WALKMAN“ und sind
eingetragene Markenzeichen der Sony Corporation.
Italiano
Istruzioni per l’uso
Applicazione della pellicola protettiva
1 Pulire accuratamente il display del “WALKMAN”
con un panno morbido, come ad esempio un panno
per la pulizia degli occhiali. Anche residui minimi
di sporco o polvere possono bloccare il passaggio
dell’aria.
2 Rimuovere la pellicola protettiva (dall’intaccatura) a
metà dalla base trasparente (Figura -). La base
è la pellicola più larga.
3 Allineare la pellicola protettiva al bordo del tasto
HOME del display (Figura -), facendo
attenzione ad evitare il blocco del passaggio dell’aria
(Figura -). Attenzione: non toccare il lato
adesivo.
Tenere presente che se la pellicola protettiva non è
incollata perfettamente sul display, questa potrebbe
staccarsi a contatto con la custodia anteriore.
Suggerimento
Se la pellicola protettiva non è stata posizionata
correttamente, rimuoverla con attenzione e riposizionarla.
L’uso di un nastro adesivo facilita la rimozione della
pellicola protettiva.
Applicazione/apertura della custodia
La custodia viene venduta con la parte anteriore
e posteriore già montate. Per aprire la custodia e
installare il “WALKMAN”:
1 Tenendo la custodia posteriore, far scorrere la parte
frontale della custodia nella direzione indicata dalla
freccia (circa 5mm) per aprirla (Figura ).
2 Inserire il “WALKMAN” nella custodia posteriore.
3 Posizionare la custodia anteriore sovrapponendola
alla parte inferiore della custodia posteriore (circa
5mm) e, tenendo delicatamente la parte superiore
della custodia anteriore (Figura -), farla
scorrere come mostrato nell’illustrazione nché non
si sente un clic (Figura -).
Suggerimento
È possibile utilizzare il supporto di cui è dotata la custodia
posteriore per usare la custodia in posizione inclinata
(Figura ). Il supporto può essere piegato in 2 modi (a
40 o a 60 gradi approssimativamente). Esercitare una forza
eccessiva sul supporto potrebbe romperlo.
Note
Agganciare un cinturino alla custodia posteriore prima
di installare il “WALKMAN”.
Per evitare eventuali danni al “WALKMAN”, accertarsi
che non vi sia sporco o polvere all’interno della custodia
trasparente o sul “WALKMAN” stesso prima delluso. Se
necessario, pulire la custodia trasparente con un panno
morbido, come ad esempio un panno per la pulizia degli
occhiali.
Togliere la custodia quando si utilizzano prodotti che
richiedono luso di un accessorio in dotazione con il
“WALKMAN”.
Se il supporto si apre, riportarlo alla posizione originale.
“WALKMAN” e sono marchi di
fabbrica registrati di Sony Corporation.
Nederlands
Gebruiksaanwijzing
De beschermfolie bevestigen
1 Reinig het scherm van uw "WALKMAN" grondig
met een zachte doek, zoals een reinigingsdoekje voor
brilglazen. Zelfs heel kleine hoeveelheden vuil of stof
kunnen luchtbellen veroorzaken.
2 Maak de beschermfolie (vanaf de inkeping) voor de
hel los van de onderlaag (aeelding -). De
onderlaag is de grotere folie.
3 Breng de beschermfolie gelijk met de onderkant
van het scherm aan de kant van de HOME-
knop (aeelding -) en vermijd luchtbellen
(aeelding -). Zorg ervoor dat u de klevende
zijde niet aanraakt.
Als de beschermfolie niet recht op het scherm wordt
gekleefd, kan de beschermfolie loskomen door het
contact met de voorhoes.
Tip
Als de beschermfolie niet goed geplaatst is, verwijdert
u hem voorzichtig en plaatst u hem opnieuw. U kunt de
beschermfolie gemakkelijker losmaken met een stukje
plakband.
De hoes bevestigen/openen
De doorzichtige hoes wordt verkocht met de voor-
en achterkant gemonteerd. De hoes openen en de
"WALKMAN" plaatsen:
1 Terwijl u de achterhoes vasthoudt, schui u de
voorzijde van de hoes in de richting van de pijl
(ongeveer 5 mm) om te openen (aeelding ).
2 Plaats de "WALKMAN" in de achterhoes.
3 Plaats de voorhoes zo dat ze de onderzijde van de
achterhoes overlapt (ongeveer 5 mm). Terwijl u de
bovenzijde van de voorhoes voorzichtig vasthoudt
(aeelding -), verschui u de voorhoes zoals
in de illustratie, tot u een klik hoort (aeelding
-).
Tip
U kunt de steun op de achterhoes gebruiken om de hoes
schuin te plaatsen (afbeelding ). U kunt de steun in 2
standen uitklappen (ongeveer 40 of 60 graden). Oefen niet
te veel kracht uit want de steun zou kunnen afbreken.
Opmerkingen
Bevestig een riempje op de achterhoes voor u de
"WALKMAN" installeert.
Om schade aan de "WALKMAN" te voorkomen, dient
u ervoor te zorgen dat er zich geen vuil of stof in de
transparante hoes of op de "WALKMAN" bevindt
voordat u de transparante hoes gebruikt. Veeg indien
nodig de transparante hoes schoon met een zachte doek,
zoals een reinigingsdoekje voor brilglazen.
Maak de beschermhoes los als u een product gebruikt
waarvoor een hulpstuk is vereist dat bij uw "WALKMAN"
werd geleverd.
Als de steun loskomt, bevestigt u hem opnieuw en zet u
hem terug in de oorspronkelijke positie.
"WALKMAN" en zijn
gedeponeerde handelsmerken van Sony Corporation.
Einbuchtung
Intaccatura
Inkeping
Ausrichtungsposition
Posizione di
allineamento
Uitlijnpositie
Rücksetztaste der
hinteren Hülle
Tasto reset custodia
posteriore
Resetknop achterhoes
Verbindungsstück
der vorderen Hülle
Aggancio custodia
anteriore
Koppeling
voorhoes
Vordere Hülle
Custodia anteriore
Voorhoes
ca. 5 mm
Circa 5mm
Ongeveer 5 mm
Ständer
Supporto
Steun
Öse für den
Riemen
Foro per il
cinturino
Opening voor
het riempje
  • Page 1 1
  • Page 2 2

Sony WALKMAN CKH-NWX1000 Manual de usuario

Tipo
Manual de usuario
Este manual también es adecuado para

El Sony WALKMAN CKH-NWX1000 es un reproductor de música portátil con una pantalla clara y un estuche protector transparente. El estuche se puede abrir y cerrar fácilmente, y tiene un soporte para que puedas inclinar el reproductor y verlo mejor. El reproductor también tiene una función de reinicio en la parte posterior del estuche, que puede ser útil si el reproductor se bloquea o no responde.