La página se está cargando...

HoMedics Service Center
1.800.466.3342
8:30 – 5:00 p.m.
(
EST
)
M–F
Dirección postal:
HoMedics
Service Center Dept. 168
3000 Pontiac Trail
Commerce Township, MI
48390
Correo electrónico:
©2005 HoMedics, Inc. y sus compañías afiliadas, reservados todos los derechos.
HoMedics® es una marca registrada de HoMedics Inc. y sus compañías afiliadas.
The beauty of living well™ es una marca registrada de HoMedics, Inc. y sus compañías afiliadas. Reservados todos los derechos.
IB-SCAN1A
GARANTÍA LIMITADA POR DOS AÑOS
(Válida únicamente en los EE.UU.)
HoMedics, Inc., garantiza este producto contra defectos en material y mano
de obra durante el período de dos años a partir de la fecha original de
compra con las excepciones que se detallan a continuación.
Esta garantía de producto de HoMedics no cubre daños causados por un
uso inadecuado, abuso, accidente, la conexión de accesorios no autorizados,
la alteración del producto o cualquier otra condición sin importar cual sea
que se encuentre fuera del control de HoMedics. Esta garantía es válida sólo
si el producto es comprado y usado en los EE.UU. Esta garantía no cubre un
producto que requiera modificación o alteración para que pueda usarse en
cualquier otro país distinto del país por el cual fue diseñado, fabricado,
aprobado y/o autorizado, o la reparación de productos dañados a causa de
estas modificaciones. HoMedics no será responsable de ningún tipo de
daños incidentales, consecuentes o especiales. Todas las garantías implícitas,
incluyendo entre otras aquellas garantías implícitas de idoneidad y
comerciabilidad, están limitadas a la duración total de dos años a partir de la
fecha de compra original.
Para obtener un servicio cubierto por la garantía para su producto HoMedics,
puede entregar la unidad personalmente o enviarla por correo junto con su
recibo de compra fechado (como prueba de la compra), el franqueo pagado,
junto con un cheque o una orden de pago pagadera a HoMedics, Inc. para
cubrir los gastos de manipulación. El servicio bajo garantía del sillón
reclinable cuesta $20.00. Refiérase por favor a la sección “Espaldar, Silla y
Otomana” para las instrucciones del Servicio de Garantía, en pág. 8.
Una vez recibido, HoMedics reparará o reemplazará su producto, según lo
que sea apropiado y se lo enviará con el franqueo pagado. Si es apropiado
reemplazar su producto, HoMedics lo reemplazará con uno igual o
comparable, a opción de Homedics. La garantía es válida únicamente a
través del Centro de Servicio HoMedics. El servicio realizado a este producto
por cualquier otro diferente al Centro de servicio HoMedics anulará la
garantía.
Esta garantía le proporciona derechos legales específicos. Es posible que
usted tenga derechos adicionales que pueden variar de un estado a otro.
Debido a las regulaciones de los diferentes estados, es posible que algunas
de las limitaciones y exclusiones no se apliquen en su caso.
Por más información con respecto a nuestra línea de productos en los
EE.UU., visítenos en: www.homedics.com
Instruction Manual and
Warranty Information
SCAN-1
Scandinavian Massaging
Recliner & Ottoman
With Heat
El manual en español
empieza a la página 13
SCAN-1 A 3/16/05 9:51 AM Page 1

IMPORTANT SAFEGUARDS
WHEN USING ELECTRICAL PRODUCTS, ESPECIALLY
WHEN CHILDREN ARE PRESENT, BASIC SAFETY PRE-
CAUTIONS SHOULD ALWAYS BE FOLLOWED, INCLUDING
THE FOLLOWING:
READ ALL INSTRUCTIONS BEFORE USING
DANGER
- TO REDUCE THE RISK OF ELECTROCUTION:
• ALWAYS unplug the appliance from the electrical outlet immediately after
using and before cleaning.
• DO NOT reach for an appliance that has fallen into water. Unplug it
immediately.
WARNING
- TO REDUCE THE RISK OF BURNS,
ELECTROCUTION, FIRE OR INJURY TO PERSONS:
• An appliance should NEVER be left unattended when plugged in. Unplug
from outlet when not in use and before putting on or taking off parts or
attachments.
• Close supervision is necessary when this appliance is used by, on or near
children, invalids or disabled persons.
• Use this appliance only for its intended use as described in this manual.
DO NOT use attachments not recommended by HoMedics; specifically any
attachments not provided with the unit.
• NEVER operate this appliance if it has a damaged cord or plug, if it is not
working properly, if it has been dropped or damaged, or dropped into
water. Return it to HoMedics Service Center for examination and repair.
• NEVER use pins or other metallic fasteners with this appliance.
• Keep cord away from heated surfaces.
• NEVER use while sleeping or fall asleep while using the massager.
• NEVER drop or insert any object into any opening.
• DO NOT operate where aerosol (spray) products are being used or where
oxygen is being administered.
• DO NOT carry this appliance by power cord or use cord as handle.
• To disconnect, turn all controls to the “OFF” position, then remove plug
from outlet.
• This appliance is designed for household use only.
• This appliance is designed for personal, non-professional use only.
2
Caution — Please read all instructions carefully
before operating.
• If you have any concerns regarding your health consult your
doctor before using this product.
• Individuals with pacemakers should consult a doctor before use.
•
NEVER leave the appliance unattended, especially if children are
present.
• NEVER cover the appliance when it is in operation.
• DO NOT use this product for more than 15 minutes at a time.
• Extensive use could lead to the products excessive heating and
shorter life. Should this occur, discontinue use and allow the unit
to cool before operating.
• NEVER use this product directly on swollen or inflamed areas or
skin eruptions.
• This product is a non-professional appliance designed to provide
soothing massage to worn muscles. DO NOT use this product as
a substitute for medical attention.
• DO NOT use this product before bed. The massage has a
stimulating effect and can delay sleep.
• This product should NEVER be used by any individual suffering
from any physical ailment that would limit the user’s capacity to
operate the controls.
• This product should never be used by any individual suffering
from any ailments that would limit or altogether inhibit the user’s
capacity to feel or have any sensation in the body part that the
product is being used on.
• Temperature sufficiently high to cause burns may occur regard-
less of the control setting. DO NOT use on an infant or invalid or
on a sleeping or unconscious person. DO NOT use on insensitive
skin or on a person with poor blood circulation. Check the skin in
contact with the heated area of the appliance frequently to reduce
the risk of blistering.
• Use heated surfaces carefully.
• DO NOT use outdoors.
SAVE THESE INSTRUCTIONS
3
Caution : All
servicing of this
massager must
be performed
by authorized
HoMedics service
personnel only.
SCAN-1 A 3/16/05 9:51 AM Page 3

A
B
C
D
E
F
F
G
H
I
J
K
L
M
N
O
Q
P
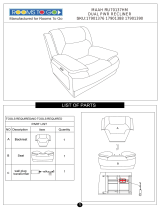
Components
Carefully remove all contents from packaging
and inspect the product to make sure all
components of the recliner have been received.
These should include:
A. Recliner frame with seat cushion
B. Back Cushion with hand control attached
C. Ottoman base
D. Ottoman support legs
E. Ottoman cushion
F. Arm rest pads
G. AC adaptor plug
H. Six 1.5”L screws for the arm rests
I. Four 7/8” screws for the ottoman cushion
4 5
J. Two 2” screws for the back cushion arm
supports
K. Two castle bolts to secure the back cushion
and seat together
L. Two castle pins to secure the back cushion
and seat together
M. Four large washers to be used in the
ottoman base
N. Two wrenches, one large and one small
O. Wooden caps for armrests
P. Four 1.75” Screws for ottoman base
Q. Six small washers for the armrests
Assembly Instructions
1. Attach the back cushion to the seat cushion
• Align the back cushion (B) support eyelets with the seat
cushion (A) eyelets. (Fig 1.)
• Insert the two castle bolts (K), one at a time, into the eyelets.
• Secure the pin through the bolt (L), making sure the pins
are pushed all the way in and snap into place.
• Attach the cover from the back cushion to the seat bottom,
covering up the bolts.
• Now that the seat and back cushions are secured, it’s time
to secure the back cushion bolts to the arm rests.
• Line up the arm bolts to the arm rests holes. (Fig 2.)
• Insert both of the seat cushion connector bolts (J) and
tighten with wrench (N) only when both bolts have
been inserted.
• Cover the two-connector bolt holes with wooden covers
(O). Snap into place, or tap lightly with a rubber hammer
taking precaution not to damage the wood.
• Align armrests (F) to the wood frame, making sure they are flush
with the shape of the arm. Secure each armrest with three
screws (H) and insert all three screws before tightening to make
sure they all align properly. (Fig 3.) Tighten with large wrench (N).
Figure 1
Figure 3
Figure 2
SCAN-1 A 3/16/05 9:51 AM Page 5

2. Assemble ottoman support legs to base
• Align support legs (D) to ottoman base (C) with the brackets
facing inward towards each other. (Fig 4.)
• Flip ottoman base on its side and insert one washer (M)
per available hole in the base of the ottoman.
• Insert two bolts (P) up through the washers and into the
support legs (Fig 5.) and tighten slightly, partially securing
the base and the support legs.
• Turn the ottoman base to the opposite side and repeat
the previous two steps.
• Tighten all four screws with small wrench (N).
3. Assemble ottoman cushion to support base
• Lay cushion on a clean surface with the screw holes facing
up. Flip the support legs over so that the brackets line up
with the screw holes on the cushion.
• Align cushion so the slope of the cushion matches the
slope of the support legs. (Fig 6.)
• Line up the support brackets with the screw holes in
the cushion.
• Insert four screws (I) into the bottom and slightly tighten
into place.
• Tighten all four screws completely with the wrench (N).
4. Connect power source
• To supply power to the back cushion and seat you must
connect the two power supply plugs to each other.
• Locate the output jack on the lower left hand side of the
back cushion and the input jack just under the back left
side of the seat cushion. (Fig 7a.)
• Line up the arrows on both jacks and connect to each
other. (Fig 8.)
• Now you are ready to connect the power supply from the
recliner to the ottoman.
• Locate the output jack in the left underside of the seat
cushion and the input jack on the underside of the
ottoman. (Fig 7b.)
• Line up the arrows on both jacks and connect both
adaptors to each other. (Fig 8.)
• Now the back cushion, seat cushion and ottoman are
connected and able to communicate with the hand control.
Figure 4
Figure 5
Figure 6
• The last step is to connect the main power supply into
the wall outlet.
• Locate the adaptor jack on the back side of the back cushion
and connect it to the adaptor jack that came with this recliner.
(Fig 9.)
• Once connected, plug the other end into an AC adaptor
into a power outlet. Use only the AC power adaptor
provided with this unit.
See pages 10 – 11 for operating instructions.
Product Care & Maintenance
To Clean
• Disconnect the recliner from power source before cleaning.
• A soft, damp cloth may be used for the recliner. When cleaning
the controller or around the power switch, use a dry cloth only.
• Dust may be removed from the backrest or armrest with
a vacuum.
• Do not use abrasive cleaners, brushes, gasoline, kerosene, polish
or paint thinner to clean.
• The cushions are not machine washable. Do not immerse
in liquids to clean.
To Store
• Place the controller in its specially designed pocket on the left
side of the recliner.
• Avoid contact with sharp edges or pointed objects which might
damage/puncture the fabric.
• Do not store near heat or open flame. Do not leave this product
exposed to direct sunlight for long periods of time. This may
cause fading.
• It is recommended that the recliner be covered when not
in use for long periods of time.
• It is suggested that the power cord be coiled and the unit
kept in an area free of dust and moisture if not in use for long
periods of time
Frame:
• Periodically, the frame should be checked to ensure the screws
are tight. If the frame is found to be loose, tighten screws with the
tools provided.
The Scandinavian recliner and massage cushion are designed for
indoor applications only. Use of this product for outdoor applications
may cause irreparable damage and void your warranty.
Figure 7a
Figure 8
Figure 7b
Figure 9
6 7
SCAN-1 A 3/16/05 9:51 AM Page 7

Back Cushion, Seat and Ottoman Removal for Warranty Service
If you experience a problem with the massage mechanism located in the Back, Seat or Ottoman of
the Scandinavian Recliner within a two year period, contact the HoMedics Service Center for repair
at 1.800.466.3342 as noted in the warranty section on page 12.
To disassemble the back cushion, seat or ottoman, first disconnect the power source located
behind the recliner at the back cushion base and seat cushion. (See figure 7a and 7b on page 7
for an illustration). Now completely unscrew the bolts located along the base of the back cushion
to detach from the recliner. (See figure 1 and 2 on page 5). Once removed, please see the warranty
on page 12 for further instruction.
Do not use the recliner or connect it to a power source while
disassembled.
AC Power adaptor Information
Your massage recliner is powered by an attached custom AC home adaptor. Use only the supplied
AC home adaptor as other similar-looking adaptors may cause irreparable damage to the unit and
void your warranty.
Massage Recliner and Hand Control Instructions
Press the POWER button once to activate the remote control. The LED indicator will illuminate. To
deactivate, press again. For complete instructions, please see pages 10 – 11.
Automatic Shut Off
The Scandinavian Massage Recliner and Ottoman has been designed for convenience and
safety. As a special precaution against falling asleep while using the unit, or leaving the unit on
while it is still in operation we’ve programmed it to automatically stop working 15 minutes after
the last function is selected. This special feature should not be considered as a substitute for OFF.
Always remember to turn your unit off when not in use
8 9
Scandinavian Massaging
Recliner & Ottoman
With Heat
Integrated Headrest
Massaging Back
Cushion
Recline Lever
Padded Arm Rests
Massaging Seat
Cushion
Massaging Ottoman
Rich Wood Frame
Programmable
Hand Control
SCAN-1 A 3/16/05 9:51 AM Page 9

Demo Button
The demonstration is approximately a 1
minute preset program to give you a quick idea
of what the Scandinavian massage recliner
functions feel like. The demo feature will start
with Steady Massage and then cycle through
all three programs, Up and Down, Side-to-Side
and Pulsating. While going through each
program, the demo will also cycle through
each of the three speeds and intensities While
in demo, you can select any other function and
it will automatically cancel the demo program.
Once demo is complete, the unit will automati-
cally turn off.
Note: You can engage the Demo program
by pressing the Demo button without first
pressing Power. You can stop the Demo
program by either pressing Demo, choosing
another function or by pressing Power.
Intensity
Allows you to adjust the strength of the
massage. Choose from Low (L) for relaxing,
Medium (M) for soothing and High (H) for
invigorating massage. The intensity of
the massage will be indicated by the LED
above the button. Push the button once to
change the intensity or continue to press the
button for each of the three intensity options.
Speed
Allows you to adjust the speed of the massage
in any function. Choose from Low (L) for
relaxing, Medium (M) for soothing and High
(H) for invigorating massage. The speed of
the massage will be indicated by the LED
above the button. Push the button once to
change the speed or continue to press the
button for each of the three speed options.
Zone Control
Customize your massage with five different body
zone options. Choose from Neck and Shoulders,
Upper Back, Lower Back, Seat and Calves. You
can select or deselect each zone by pressing
the appropriate button on the hand control. Each
zone has two LED’s that will illuminate when
activated.
Heat
Activate heat to provide soothing relief to your
lower back. Heat will only function when selected
with a massage function. Heat will not work alone.
Note: When selecting the heat feature with
massaging action, there will be a slight
decrease in the strength of the massage output.
This adjustment is perfectly normal and should
not be considered as a defect.
Programs
We have created three massage styles to choose
from. P1 is Up and Down massage that repeated-
ly travels up and down your body. P2 is Side-to-
Side massage that repeatedly travels from the left
side to the right side of your body. P3 is Pulsating,
massage pulses on and off of your entire body at
once. Each program is set to low speed and
intensity. You can adjust the speed or intensity of
any program by simply pressing those buttons.
Power
Press power button to engage the massage
system. The red LED above the power button
will illuminate telling you it’s activated. Once you
press power, all over Steady massage will activate
in medium intensity. Each body zone has two
LED lights and they will illuminate when that body
part is being massaged. Simply press the power
button again to turn the unit off.
Note: The unit will automatically shut off 15
minutes after the last function selected. Simply
press the power button to turn the unit back on.
10 11
Demo
To activate a brief preset program of
massage functions
Intensity
To adjust the strength of the massage
Speed
To adjust the speed of the massage
Zones
Neck & Shoulders
Upper Back
Lower back
Seat
Calves
Heat
To activate the heat function
Programs
To activate the three massage programs,
Up and Down, Side to Side and Pulsating.
Power
To turn the massage recliner on or off.
SCAN-1 A 3/16/05 9:51 AM Page 11

HoMedics Service Center
1.800.466.3342
8:30 – 5:00 p.m.
(
EST
)
M–F
Mail To:
HoMedics
Service Center Dept. 168
3000 Pontiac Trail
Commerce Township, MI
48390
Email:
©2005 HoMedics, Inc. and its affiliated companies, all rights reserved.
HoMedics® is a registered trademark of HoMedics Inc. and its affiliated companies.
The beauty of living well.™ is a trademark of HoMedics Inc. and its affiliated companies. All rights reserved.
IB-SCAN1A
TWO YEAR LIMITED WARRANTY
(Valid in USA only)
HoMedics, Inc., guarantees this product free from defects in material
and workmanship for a period of two years from the date of original
purchase, except as noted below.
This HoMedics product warranty does not cover damage caused by
misuse or abuse; accident; the attachment of any unauthorized
accessory; alteration to the product; or any other conditions whatsoever
that are beyond the control of HoMedics. This warranty is effective only
if the product is purchased and operated in the USA. A product that
requires modification or adaptation to enable it to operate in any country
other than the country for which it was designed, manufactured,
approved and/or authorized, or repair of products damaged by these
modifications is not covered under warranty. HoMedics shall not be
responsible for any type of incidental, consequential or special damages.
All implied warranties, including but not limited to those implied war-
ranties of fitness and merchantability, are limited in the total duration of
two years from the original purchase date.
To obtain warranty service on your HoMedics product, mail the unit and
your dated sales receipt (as proof of purchase), postpaid, along with
check or money order payable to HoMedics, Inc. to cover handling.
Recliner warranty service is $20.00. Please refer to the “Back, Seat and
Ottoman” section for Warranty Service instructions on page 8.
Upon receipt, HoMedics will repair or replace, as appropriate, your
product and return it to you, postpaid. If it is appropriate to replace
your product, HoMedics will replace the product with the same product
or a comparable product at HoMedics’ option. Warranty is solely
through HoMedics Service Center. Service of this product by anyone
other than HoMedics Service Center voids warranty.
This warranty provides you with specific legal rights. You may have
additional rights which may vary from state to state. Because of individual
state regulations, some of the above limitations and exclusions may not
apply to you.
For more information regarding our product line in the USA, please
visit: www.homedics.com.
Manual de instrucciones e
Información de garantía
SCAN-1
Sillón Masajeador Reclinable
Escandínavo y Otomana
Con Calor
SCAN-1 A 3/16/05 9:51 AM Page 13

IMPORTANTES PRECAUCIONES DE SEGURIDAD
CUANDO SE UTILIZAN PRODUCTOS ELÉCTRICOS,
ESPECIALMENTE CUANDO ESTÁN NIÑOS PRESENTES,
SE DEBEN CUMPLIR CIERTAS PRECAUCIONES BÁSICAS
DE SEGURIDAD, INCLUYENDO LO SIGUIENTE:
LEA TODAS LAS INSTRUCCIONES ANTES DE USAR
PELIGRO
- PARA REDUCIR EL RIESGO DE ELECTROCUCIÓN:
• SIEMPRE desenchufe el artefacto del tomacorriente, inmediatamente después
de usar y antes de limpiarlo.
• NO intente alcanzar un artefacto que haya caído al agua. Desenchúfelo de
inmediato.
ADVERTENCIA
- PARA REDUCIR EL RIESGO DE
QUEMADURAS, ELECTROCUCIÓN, INCENDIO O
LESIONES A LAS PERSONAS:
• Un artefacto NUNCA debe ser dejado sin atención cuando está enchufado.
Desenchúfelo del tomacorriente cuando no lo esté usando y antes de colocar o
quitar piezas o accesorios.
• Se requiere una supervisión estricta cuando este artefacto es usado por, en o
cerca de niños, personas minusválidas o incapacitadas.
• Utilice este artefacto sólo para el uso para el cual está diseñado y como se
describe en este manual. NO use accesorios no recomendados por HoMedics,
específicamente ningún accesorio no proporcionado con la unidad.
• NUNCA haga funcionar este artefacto si tiene el cable o enchufe dañado, si no
está funcionando adecuadamente, si se cayó o se dañó o si se dejó caer al
agua. Envíelo al Centro de servicio de HoMedics para que lo examinen y lo
reparen.
• NUNCA use alfileres ni otros sujetadores metálicos con este artefacto.
• Mantenga el cable alejado de superficies calientes.
• NUNCA lo use mientras duerme ni se duerma mientras usa el masajeador.
• NUNCA lo deje caer ni inserte ningún objeto en ninguna abertura.
• NO lo haga funcionar donde se utilizan productos de rociado por aerosol o
donde se está administrando oxígeno.
• NO lleve este artefacto tomado del cable, ni use el cable como manija.
• Para desconectar, coloque todos los controles en la posición “OFF” y luego
retire el enchufe del tomacorriente.
• Este artefacto está diseñado para uso doméstico exclusivamente.
• Este artefacto está diseñado exclusivamente para uso doméstico y no
profesional.
14
Precaución— Sírvase leer todas las instrucciones con
atención antes de poner en funcionamiento.
• Si tiene alguna preocupación con respecto a su salud, consulte a su
doctor antes de usar este producto.
• Los individuos con marcapasos deben consultar a un médico antes de
usarlo.
• NUNCA deje el artefacto sin vigilancia, especialmente si hay niños
presentes.
• NUNCA cubra el artefacto mientras está en funcionamiento.
• NO use este producto durante más de 15 minutos por vez.
• El uso prolongado puede causar un recalentamiento del producto y
disminuir su vida útil. Si esto sucediera, discontinúe su uso y permita
que la unidad se enfríe antes de volver a ponerla en funcionamiento.
• NUNCA use este producto directamente sobre áreas hinchadas o
inflamadas o sobre erupciones cutáneas.
• Este producto es un artefacto no profesional diseñado para
proporcionar masajes calmantes a los músculos cansados. NO utilice
este producto como sustituto de la atención médica.
• NO use este producto antes de ir a dormir. El masaje tiene un efecto
estimulante y puede retrasar el sueño.
• Este producto no debe ser usado NUNCA por individuos que
padezcan algún tipo de enfermedad que pueda limitar la capacidad
del usuario de manejar los controles.
• Este producto no debe ser usado NUNCA por individuos que
padezcan algún tipo de enfermedad que pueda limitar o inhibir
totalmente la capacidad del usuario de sentir o tener cualquier
sensación en la parte del cuerpo donde está siendo usado el
producto.
• A pesar del ajuste de los controles, puede producirse una temperatura
suficientemente elevada para causar quemaduras. NO lo use con un
bebé o un minusválido, o con una persona dormida o desvanecida.
NO lo use en áreas de piel insensible o con una persona con
circulación de la sangre insuficiente. Para reducir el riesgo de
ampollas, observe con frecuencia la piel en contacto con la superficie
caliente de este artefacto.
• Utilice con cuidado las superficies calientes.
• NO LO USE al aire libre.
GUARDE ESTAS INSTRUCCIONES
15
Precaución:
Todo servicio
para este
masajeador debe
ser realizado por
personal de
servicio
autorizado de
HoMedics.
SCAN-1 A 3/16/05 9:51 AM Page 15

A
B
C
D
E
F
F
G
H
I
J
K
L
M
N
O
Q
P
Componentes
Retire cuidadosamente todos los elementos del
paquete e inspeccione el producto para asegurarse
de haber recibido todas las piezas del sillón. Deben
incluir:
A. Marco reclinable con cojín para el asiento
B. Cojín del espaldar con control manual adjunto
C. Base de otomana
D. Patas de soporte de la otomana
E. Cojín de la otomana
F. Almohadillas del apoyabrazos
G. Enchufe del adaptador de CA
H. Seis tornillos de 1.5" de largo para los
apoyabrazos
I. Cuatro tornillos de 7/8" para el cojín de la
otomana
16 17
J. Dos tornillos de 2" para los apoyabrazos del cojín
del espaldar
K. Dos pernos entallados para asegurar el cojín del
espaldar al asiento
L. Dos pasadores entallados para asegurar el cojín
del espaldar al asiento
M. Cuatro arandelas grandes para la base de la
otomana
N. Dos llaves, una grande y una pequeña
O. Tapas de madera para los apoyabrazos
P. Cuatro tornillos de 1.75" para la base de la
otomana
Q. Seis arandelas pequeñas para los apoyabrazos
Instrucciones de armado
1. Sujete el cojín del espaldar al cojín del asiento
• Alinee los ojales metálicos del cojín del espaldar (B) con los ojales del
cojín del asiento (A). (Fig. 1).
• Inserte los dos pernos entallados (K), uno a la vez, en los ojales.
• Asegure el pasador a través del perno (L), cuidando que los
pasadores queden insertados hasta el fondo y sujetados en su lugar.
• Sujete la cubierta del cojín del respaldo al asiento, cubriendo los
pernos.
• Ahora que el asiento y el cojín del espadar han quedado asegurados,
tiene que sujetar los pernos del cojín del espaldar a los apoyabrazos.
• Alinee los pernos de los brazos con los orificios de los
apoyabrazos. (Fig. 2).
• Inserte ambos pernos de conexión del cojín del asiento (J)
y ajústelos con la llave (N) sólo cuando ambos pernos hayan sido
insertados.
• Cubra los orificios de los pernos conectores con las tapas de
madera
• (O). Presiónelos en su lugar, o golpéelos suavemente con un
martillo de caucho sin dañar la madera.
• Alinee los apoyabrazos (F) al marco de madera, asegurándose de
que queden a ras con la forma del brazo. Asegure cada apoyabrazos
con tres tornillos (H) e inserte los tres tornillos antes de ajustarlos para
asegurarse de que queden bien alineados. (Fig. 3). Ajuste con la llave
grande (N).
Figura 1
Figura 3
Figura 2
SCAN-1 A 3/16/05 9:51 AM Page 17

2. Ensamble las patas de soporte de la
otomana a la base
• Alinee las patas de soporte (D) a la base de la otomana (C) con los
soportes volteados hacia adentro en posición contrapuesta. (Fig. 4).
• Voltee la base de la otomana sobre el lado e inserte una arandela
(M) en cada orificio disponible en la base de la otomana.
• Inserte dos pernos (P) a través de las arandelas y dentro de las
patas de soporte (Fig. 5) y ajústelos apenas, asegurando
parcialmente la base a las patas.
• Gire la base de la otomana en el lado opuesto y repita los dos
pasos anteriores.
• Ajuste los cuatro tornillos con la llave pequeña (N).
3. Ensamble el cojín de la otomana a la base
de soporte
• Coloque el cojín sobre una superficie limpia con los orificios para
los tornillos hacia arriba. Voltee las patas para que los soportes
queden alineados con los orificios para los tornillos en el cojín.
• Alinee el cojín para que la curva del cojín quede igual a la curva de
las patas. (Fig. 6).
• Alinee los soportes con los orificios para los tornillos en el cojín.
• Inserte cuatro tornillos (I) en el fondo y ajústelos suavemente en su
lugar.
• Ajuste completamente todos los cuatro tornillos con la llave (N).
4. Conecte la fuente de energía
• Para conectar el cojín del espaldar y el asiento, usted debe
conectar entre ellos los dos enchufes de la energía.
• Ubique el tomacorriente en el lado inferior izquierdo del cojín del
espaldar y el enchufe que se encuentra bajo el lado izquierdo
del cojín del asiento. (Fig. 7a).
• Alinee las flechas de ambos enchufes y conéctelos juntos.
(Fig. 8).
• Ahora puede conectar la toma de energía del sillón reclinable a la
otomana.
• Ubique el tomacorriente en el lado inferior izquierdo del cojín del
asiento y el enchufe en el lado inferior de la otomana. (Fig. 7b).
• Alinee las flechas de ambos enchufes y conecte ambos
adaptadores juntos. (Fig. 8).
• Ahora el cojín del espaldar, el cojín del asiento y la otomana están
conectados y pueden comunicar con el control manual.
• La última etapa consiste en enchufar la fuente de energía principal
Figura 4
Figura 5
Figura 6
al tomacorriente de la pared.
• Ubique el enchufe del adaptador en la parte trasera del cojín del
espaldar y conéctelo al enchufe del adaptador proporcionado con el
sillón reclinable. (Fig. 9).
• vez conectado, enchufe el otro extremo en un adaptador de CA en un
tomacorriente. Use únicamente el adaptador de CA eléctrica
proporcionado con esta unidad.
Ver páginas 10 – 11 para las instrucciones de uso.
Cuidado y Mantenimiento de este Producto
Para limpiar
• Desconecte el sillón reclinable de la fuente de energía antes de limpiar.
• Para el sillón reclinable puede usarse un trapo suave y húmedo. Cuando
limpie el control o cerca del interruptor de corriente, use sólo un trapo
seco.
• Para quitar el polvo del espaldar o de los apoyabrazos puede usarse
una aspiradora.
• Para limpiar, no utilice limpiadores abrasivos, cepillos, gasolina,
querosén, barniz o diluyente de pintura.
• Los cojines no pueden lavarse en la lavadora. Para limpiar, no sumerja
en ningún líquido.
Para guardar
• Coloque el control en el bolsillo especialmente diseñado en el lado
izquierdo del sillón reclinable.
• Evite el contacto con bordes filosos u objetos punzantes que puedan
dañar/perforar el material que lo recubre.
• No lo guarde cerca de calor o llamas vivas. No deje que este producto
quede expuesto a la luz solar directa por largos períodos de tiempo.
Esto puede causar descolorimiento.
• Se recomienda dejar el sillón reclinable cubierto cuando no se use por
largos períodos de tiempo.
• Si no se usara por largos períodos de tiempo, se recomienda envolver el
cordón eléctrico y guardar la unidad en un área libre de polvo y
humedad.
Marco:
• El marco debe verificarse periódicamente para asegurarse de que los
tornillos estén apretados. Si el marco está flojo, ajuste los tornillos con
las herramientas proporcionadas.
El sillón reclinable Scandinavian y el almohadón masajeador están
diseñados para aplicaciones interiores solamente. El uso de este producto
para aplicaciones exteriores puede causar daño irreparable y anular su
garantía.
Figura 7a
Figura 8
Figura 7b
Figura 9
18 19
SCAN-1 A 3/16/05 9:51 AM Page 19

Remoción del Cojín del Espadar, del Asiento y de la Otomana para el
Servicio en Garantía
Si se presentara algún problema con el mecanismo de masaje ubicado en el espaldar, en el asiento o en la
otomana dentro de un período de dos años, contacte el Centro de Servicio HoMedics para reparaciones al
teléfono 1.800.466.3342 como se indica en la sección de garantía en página 12.
Para desarmar el cojín del espaldar, el asiento o la otomana, primero desconecte la fuente de energía
ubicada detrás de la silla a la base del cojín del espadar y del cojín del asiento. (Para ilustraciones, ver la
figura 7a y 7b en la página 7). Ahora destornille completamente los pernos ubicados a lo largo de la base
del cojín del espaldar para desprenderlo del sillón reclinable. (Ver las figuras 1 y 2 en página 5). Una vez
retirado, vea la garantía en página 12 por más instrucciones.
Mientras esté desarmado, no use el sillón reclinable ni lo conecte a una
fuente de energía.
Información del adaptador de CA
Su sillón masajeador se alimenta con un normal adaptador de CA doméstica incluido. Use únicamente el
adaptador de CA doméstica proporcionado ya que otros adaptadores que parezcan similares pueden
causar daño irreparable a la unidad y anularán su garantía.
Instrucciones del Sillón Reclinable Masajeador y del Control Manual
Oprima el botón POWER (ENCENDIDO) para activar el control remoto. El indicador LED se iluminará. Para
desactivar, oprima nuevamente. Para las instrucciones completas, por favor vea las páginas 10 - 11.
Apagado Automático
El Sillón Reclinable Scandinavian y la Otomana han sido diseñados para su comodidad y seguridad. Como
precaución especial para no quedarse dormido mientras usa la unidad, o dejar la unidad encendida
mientras está todavía en funcionamiento, hemos programado el sillón para que se apague automáticamente
15 minutos después de que la última función ha sido seleccionada. Esta función especial no debe
considerarse como un substitutivo de la función OFF (Apagado). Recuerde siempre de apagar esta unidad
cuando no se esté usándola.
20 21
Sillón Masajeador Reclinable
Escandínavo y Otomana
Con Calor
Descanso para la cabeza integrado
Cojín Masajeador del Espaldar
Palanca para
Reclinar
Apoyabrazos acolchonados
Cojín Masajeador del Asiento
Otomana
Masajeadora
Lujoso Marco
de Madera
Control Manual
Programable
SCAN-1 A 3/16/05 9:51 AM Page 21

Botón de demostración
La demostración es un ciclo programado de cerca
de 1 minuto que permite hacerse rápidamente una
idea de cómo se sienten las funciones del sillón
reclinable masajeador Scandinavian. La función de
demostración empieza con el Masaje Constante
(Steady Massage) y pasa por los tres programas,
Masaje Vertical (Up and Down), Lateral (Side to
Side), y Pulsaciones (Pulsating). Mientras pasa por
cada programa, la demostración alterna también
las tres velocidades e intensidades. Durante la
demostración, usted puede seleccionar cualquier
otra función y esto cancela automáticamente el
programa de demostración. Una vez terminada la
demostración, la unidad se apaga
automáticamente.
ATENCIÓN: Usted puede empezar el programa
de demostración presionando la tecla Demo sin
haber anteriormente presionado Power
(Encendido). Usted puede parar el programa
Demo presionando Demo otra vez o Power.
Intensidad
Permite ajustar la intensidad del masaje.
Seleccione desde Low (L – baja) para un masaje
relajante, Médium (M – mediana) para una masaje
suavizador, y High (H – alta) para un masaje
energizante. La intensidad del masaje aparece en
el LED arriba de la tecla. Presione la tecla una vez
para cambiar la intensidad o siga presionando la
tecla para seleccionar cada una de las tres
opciones de intensidad.
Velocidad
Permite ajustar la velocidad del masaje en
cualquier función.. Seleccione desde Low (L – baja)
para un masaje relajante, Médium (M – mediana)
para una masaje suavizador, y High (H – alta) para
un masaje energizante. La velocidad del masaje
aparece en el LED arriba de la tecla. Presione la
tecla una vez para cambiar la velocidad o siga
presionando la tecla para seleccionar cada una de
las tres opciones de velocidad.
Control de Área
Ajuste su masaje con cinco opciones de diferentes
áreas del cuerpo. Seleccione Neck and Shoulders
(cuello y hombros), Upper Back (espalda), Lower
Back (región lumbar), Seat and Calves (nalgas y
pantorrillas). Usted pede seleccionar o deseleccionar
cada área presionando la tecla apropiada en el
control manual. Cada área tiene dos LED que se
iluminan cuando quedan activadas.
Calor
Active la función de calor para un alivio suavizador de
su región lumbar. La función de calor puede activarse
sólo en conjunto con una función de masaje. El calor
no puede activarse sin una función de masaje.
ATENCIÓN: Cuando seleccione la opción de calor
con acción masajeadora, habrá una leve
disminución en la acción del masaje. Esto es
absolutamente normal y no debe interpretarse
como desperfecto.
Programas
Hemos creado tres estilos posibles de masaje.
P1 es un masaje Up and Down que se desplaza
repetidamente hacia arriba y abajo de su cuerpo.
P2 es un masaje Side-to-Side que se desplaza
repetidamente del lado izquierdo al derecho de su
cuerpo. P3 es un masaje Pulsátil que emite
pulsaciones sobre el cuerpo entero al mismo tiempo.
Cada programa está preajustado a intensidad y
velocidad bajas. Usted puede cambiar la velocidad o
la intensidad de cada programa simplemente
presionando esas teclas.
Encendido
Presione la tecla Power (Encendido) para activar el
sistema de masaje. El LED rojo arriba de la tecla de
encendido se ilumina confirmado que está activado.
Una vez presionado Power, el masaje Steady
(constante) se activa con intensidad mediana. Cada
área del cuerpo tiene dos LED que se iluminan
cuando esa parte del cuerpo está siendo masajeada.
Simplemente presione otra vez la tecla Power
(encendido) para apagar la unidad.
ATENCIÓN: La unidad se apaga automáticamente
a los 15 minutos después de haber seleccionado
la última función. Simplemente oprima el botón
Power (encendido) para volver a encender la
unidad.
22 23
Demostración
Para activar un breve programa preajustado
de funciones de masaje
Intensidad
Para ajustar la intensidad del masaje
Velocidad
Para ajustar la velocidad del masaje
Áreas
Cuello y Hombros
Hombros
Región lumbar
Nalgas
Pantorrillas
Calor
Para activar la función de Calor
Programas
Para activar los tres programas de masaje,
Up and Down, Side to Side, y Pulsating.
Encendido
Para apagar o encender el sillón reclinable
masajeador.
SCAN-1 A 3/16/05 9:52 AM Page 23
/