Somfy Sonesse Ultra 50 RH Instructions Manual
- Tipo
- Instructions Manual


EN
3
Copyright © 2014 Somfy SAS. All rights reserved. Images not contractually binding
CONTENTS
ORIGINAL GUIDE
1. PREREQUISITE INFORMATION
1.1 FIELDS OF APPLICATION
The Sonesse 50 motor is designed to operate indoor applications (Roller blinds and projection
screens).
The Sonesse 50 motor is designed to operate multi-banding roller blinds.
The Sonesse 50 motor is designed to operate multiple roller blinds simultaneously, where these are
interconnected by an intermediate bracket.
The Sonesse 50 motor is not designed to be used with a compensating spring.
Any use outside the elds of application is prohibited, in particular:
The Sonesse 50 motor is not designed for outdoor applications (e.g. outdoor vertical blinds,
roller shutters, etc.)
The Sonesse Ultra 50 motor has been developed for indoor use.
Its quiet operation ensures user comfort and well-being.
For more information, and to optimise the acoustic performance of your indoor application,
please contact a Somfy adviser.
1. Prerequisite information 3
1.1 Fields of application 3
1.2 liability 4
2. Installation 4
2.1. Installation 4
2.2. Wiring 5
2.3. Commissioning 6
2.4. Tips and recommendations for
installation 7
3. Use and maintenance 8
3.1. Up and Down buttons 8
3.2. STOP function 8
3.3. Tips and recommendations for use 8
4. Technical data 8
These instructions applies to all Sonesse Ultra 50 and Sonesse Ultra 50 RH drive irrespective
of torque and speed variations.

EN
4Copyright © 2014 Somfy SAS. All rights reserved.Images not contractually binding
1.2 LIABILITY
Before installing and using the motor, please read operating and installation guide care-
fully. In addition to following the instructions given in this guide, the instructions detailed in the
attached Safety instructions document must also be observed.
The motor must be installed by a motor and home automation professional, according
to instructions from Somfy and the regulations applicable in the country in which it is
commissioned.
It is prohibited to use the motor outside the elds of application described above. Such use,
and any failure to comply with the instructions given in this guide and in the attached Safety
instructions document, absolves Somfy from any liability and invalidates the warranty.
The installer must inform its customers of the operating and maintenance conditions for the
motor and must provide them with the instructions for use and maintenance, and the attached
Safety instructions document, after installing the motor. Any After-Sales Service operation on
the motor must be performed by a motor and home automation professional.
If in doubt when installing the motor, or to obtain additional information, contact a Somfy adviser
or go to the website www.somfy.com.
2. INSTALLATION
Instructions which must be followed by the motor and home automation professional
installing the motor.
Never drop, knock, drill or submerge the motor.
Install a separate control point for each motor.
To optimize ultra quiet operation, the mechanical plays between motor, accessories, tube
and end of tube must be decreased to the maximum.
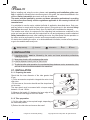
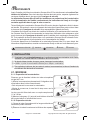
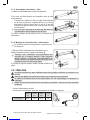
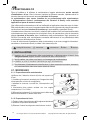
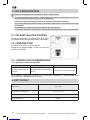
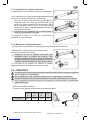
2.1. INSTALLATION
2.1.1. Preparing the motor
Check that the inner diameter of the tube greater than
47mm.
1) Fit the accessories required to integrate the motor in the
roller tube:
• Fit the crown a, the motor wheel b and the stop wheel c
on the motor.
The stop wheel must be screwed with a torque ranging
between 1.5 and 1.8 Nm.
2) Measure the length (L1) between the inner edge of the
motor head and the edge of the motor wheel.
2.1.2. Tube preparation
1) Cut the roller tube to the required length, depending on
the motorised product.
2) Deburr the roller tube and remove the swarf.
1) 2)
Safety warning! Information Λ Up V Down
Caution!
1)
L1
L1 = …
2)
Ø > 47 mm
ba
c

EN
5
Copyright © 2014 Somfy SAS. All rights reserved. Images not contractually binding
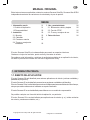
Neutral
(N)
Live
(L1)
Live
(L2)
Earth
( )
120V -60 Hz White Black Red Green
L1L2N
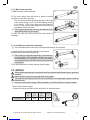
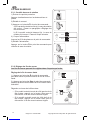
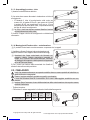
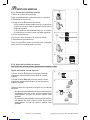
2.1.3. Motor/tube assembly
1) Slide the motor into the roller tube.
2) The motor wheel must be locked in place to prevent
movement inside the roller tube:
• This can be done either by xing the roller tube to the
motor wheel using 4 x Ø 5 mm self-tapping screws,
or by using 4 x Ø 4.8 mm steel pop rivets placed 5
mm to 15 mm from the outer edge of the motor wheel,
regardless of the roller tube.
The screws or pop rivets must only be attached to the
motor wheel and not to the motor.
3) Slide the end cap into the roller tube and locked it if
necessary.
2.1.4. Installing the motor/tube assembly
The motorised product must not be compressed between the brackets
1) Install and x the motor/tube assembly onto the end
bracket f and onto the motor bracket g:
Ensure that the motor/tube assembly is secured onto
the end bracket. This operation prevents the motor/
tube assembly from coming out of the end bracket
mounting when the roller blind reaches the lower end
limit position.
2) For star head motors, ensure the stop ring h in place.
1)
2)
h
g
ab
Ø>47mm
ehe
h
f
ab
Ø>47mm
ehe
h
15 mm
5 mm
20 mm
L1
1)
2)
3)
2.2. WIRING
Cables which pass through a metal wall must be protected and isolated using a grommet
or sleeve.
Attach cables to prevent any contact with moving parts.
The cable on the Sonesse Ultra 50 can be removed. If it is damaged, replace it with an
identical cable.
Leave the motor power supply cable accessible: it must be possible to replace it easily.
- Switch off the power supply.
- Connect the motor according to the information in the table below:

EN
6Copyright © 2014 Somfy SAS. All rights reserved.Images not contractually binding
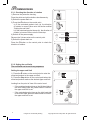
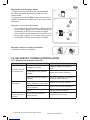
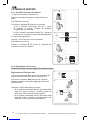
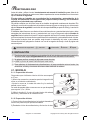
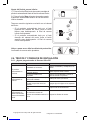
2.3. COMMISSIONING
2.3.1. Checking the direction of rotation
1) Remove the protective housing.
Press the white and yellow buttons simultaneously.
2) Switch the power back on.
3) Press the Λ button on the control point:
a) If the motorised product rises (a), the direction
of rotation is correct: Move onto the section entitled
“Setting the end limits”.
b) If the motorised product lowers (b), the direction of
rotation is incorrect: Move onto the next step.
4) Switch off the power supply.
Reverse the 2 phase wires on the control point.
5) Switch the power back on.
Press the Λ button on the control point to check the
direction of rotation.
2.3.2. Setting the end limits
The end limits can be set in any sequence.
Setting the upper end limit
1) Press the Λ button on the control point to raise the
motorised product to the upper end limit.
2) Press the Stop button on the control point when the
motorised product reaches the desired upper end limit.
Looking from the point of view of the motor head:
• If the motorised product rises on the left-hand side of
the motor head, press the yellow button to unlock it:
the upper end limit is set.
• If the motorised product rises on the right-hand side
of the motor head, press the white button to unlock it:
the upper end limit is set.
2)
3)
5)
4)
a
b
=
=
a
b
=
=
a
b
=
=
a
b
=
=
a
b
=
=
1)
1)
2)

EN
7
Copyright © 2014 Somfy SAS. All rights reserved. Images not contractually binding
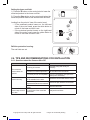
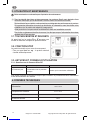
Setting the lower end limit
1) Press the V button on the control point to lower the
motorised product to the lower end limit.
2) Press the Stop button on the control point when the
motorised product reaches the desired lower end limit.
Looking from the point of view of the motor head:
• If the motorised product lowers on the left-hand
side of the motor head, press the white button to
unlock it: the lower end limit is set.
• If the motorised product lowers on the right-hand
side of the motor head, press the yellow button to
unlock it: the lower end limit is set.
Ret the protective housing.
The end limits are set.
2.4. TIPS AND RECOMMENDATIONS FOR INSTALLATION
2.4.1. Questions about the Sonesse Ultra 50?
Observations Possible causes Solutions
The motorised
product does not
operate.
The wiring is incorrect. Check the wiring and modify it if
necessary.
The motor is in thermal protection. Wait until the motor cools down.
The control point is not compatible. Check for compatibility and replace the
control point if necessary.
The motorised
product is noisy:
The drive wheel and the crown
are not suitable for the tube. Replace the drive wheel and the crown
The motorised product is
compressed between the brackets Increase the play between the brackets
The tube contains swarf and
screws. Clean the roller tube.
The motorised
product stop to soon
or to late.
The end-limits of the motorised
product drift. Readjust the end-limits
1)
2)

EN
8Copyright © 2014 Somfy SAS. All rights reserved.Images not contractually binding
3. USE AND MAINTENANCE
3.1. UP AND DOWN BUTTONS
Pressing the Λ or V button fully raises or lowers the
motorised product.
3.2. STOP FUNCTION
The motorised product is moving.
Pressing the Stop button stops the motorised product.
3.3. TIPS AND RECOMMENDATIONS FOR USE
3.3.1. Questions about the Sonesse Ultra 50?
If the motorised product still does not work, contact a drive and home automation professional.
Observations Possible causes Solutions
The motorised product
does not operate. The motor is in thermal protection. Wait until the motor cools down.
4. TECHNICAL DATA
Power supply 120V~ 60 Hz
Operating temperature 0°C to + 60°C
Index protection rating IP 31
Safety level Class I
1)
2)
This motor is maintenance-free
For the safety of goods and people, Somfy motors are equipped with thermal protection
that will trigger the motor stops in the event of overheating.
Repeated activation of this protection can degrade motor performance.
If the motor goes to thermal protection, please check your installation and check that the
motor is rated for the intended use.
A normal installation is not expected to trigger this protection.
To avoid the drift of the end limits, do not cut the power supply more than 1 week.

9
Copyright © 2014 Somfy SAS. All rights reserved.
FR
Images non contractuelles
SOMMAIRE
NOTICE ORIGINALE
1. INFORMATIONS PRÉALABLE
1.1
DOMAINE D’APPLICATION
La motorisation Sonesse Ultra 50 est conçue pour motoriser tous les stores d’intérieur (stores
rouleaux et écrans de projection).
La motorisation Sonesse Ultra 50 est conçue pour motoriser des stores rouleaux multi-banding.
La motorisation Sonesse Ultra 50 est conçue pour motoriser plusieurs stores rouleaux en même
temps, si ceux-ci sont reliés entre eux par une équerre d’entraînement.
La motorisation Sonesse Ultra 50 n’est pas conçue pour être utilisée avec un ressort de compensation.
Toute utilisation hors du domaine d’application est interdite, en particulier:
La motorisation Sonesse Ultra 50 n’est pas conçue pour les stores d’extérieur (ex: stores verticaux
d’extérieur, volets roulants, ...)
La motorisation Sonesse Ultra 50 RTS a été développée pour répondre au besoin de motori-
sation des stores d’intérieur.
Elle apporte confort et bien être à l’utilisateur grâce à son faible niveau acoustique.
Pour en savoir plus et optimiser la performance acoustique de votre store d’intérieur, n’hésitez
pas à contacter un interlocuteur Somfy.
Cette notice s’applique à toutes les motorisations de Sonesse Ultra 50 et Sonesse Ultra 50
RTS RH quelles que soient les déclinaisons de couple/vitesse.
1. Informations préalable 9
1.1 Domaine d’application 9
1.2 responsabilité 10
2. Installation 10
2.1. Montage 10
2.2. Câblage 11
2.3. Mise en service 12
2.4. Astuces et conseils d’installation 13
3. Utilisation et maintenance 14
3.1. Touches Montée et Descente 14
3.2. Fonction STOP 14
3.3. Astuces et conseils d’utilisation 14
4. Données techniques 14

10 Copyright © 2014 Somfy SAS. All rights reserved.
FR
Images non contractuelles
1.2
RESPONSABILITÉ
Avant d’installer et d’utiliser la motorisation Sonesse Ultra 50, lire attentivement cette notice d’ins-
tallation et d’utilisation. Outre les instructions décrites dans cette notice, respecter également les
consignes détaillées dans le document joint Consignes de sécurité.
La motorisation Sonesse Ultra 50 doit être installée par un professionnel de la motorisation
et de l’automatisation de l’habitat, conformément aux instructions de Somfy et à la régle-
mentation applicable dans le pays de mise en service.
Toute utilisation de la motorisation Sonesse Ultra 50 hors du domaine d’application décrit ci-dessus
est interdite. Elle exclurait, comme tout irrespect des instructions gurant dans cette notice et dans
le document joint Consignes de sécurité, toute responsabilité et garantie de Somfy.
L’installateur doit informer ses clients des conditions d’utilisation et de maintenance de la motorisa-
tion Sonesse Ultra 50 et doit leur transmettre les instructions d’utilisation et de maintenance, ainsi
que le document joint Consignes de sécurité, après l’installation de la motorisation Sonesse Ultra
50. Toute opération de Service Après-Vente sur la motorisation Sonesse Ultra 50 nécessite l’inter-
vention d’un professionnel de la motorisation et de l’automatisation de l’habitat.
Si un doute apparaît lors de l’installation de la motorisation Sonesse Ultra 50 ou pour obtenir des
informations complémentaires, consulter un interlocuteur Somfy ou aller sur le site www.somfy.com.
2. INSTALLATION
Consignes à suivre impérativement par le professionnel de la motorisation et de l’auto-
matisation de l’habitat réalisant l’installation de la motorisation
Ne jamais laisser tomber, choquer, percer, immerger la motorisation.
Installer un point de commande individuel pour chaque motorisation.
Pour optimiser le silence, les jeux entre le moteur, les accessoires, le tube et l’embout de
tube doivent être diminués au maximum.
2.1. MONTAGE
2.1.1. Preparation de la motorisation
S’assurer que le diamètre intérieur du tube est supérieur
ou égal à 47 mm.
1) Monter les accessoires nécessaires à l’intégration de la
motorisation dans le tube d’enroulement :
• Soit uniquement la roue a sur la motorisation.
• Monter la couronne a, la roue b et le stop roue c sur la
motorisation.
Le stop roue doit être vissé avec un couple compris entre
1,5 et 1,8 Nm.
2) Mesurer la longueur (L1) entre le bord intérieur de la tête
de la motorisation et l’extrémité de la roue.
2.1.2. Préparation du tube
1) Couper le tube d’enroulement à la longueur désirée en
fonction du produit motorisé.
2) Ébavurer le tube d’enroulement et éliminer les copeaux.
1) 2)
1)
L1
L1 = …
2)
Ø > 47 mm
ba c
Avertissement Sécurité! Attention! Information Λ Montée V Descente

11
Copyright © 2014 Somfy SAS. All rights reserved.
FR
Images non contractuelles
Neutre
(N)
Phase
(L1)
Phase
(L2)
Terre
( )
120V -60 Hz Blanc Noir Rouge Vert
L1L2N
2.2. CÂBLAGE
Les câbles traversant une paroi métallique doivent être protégés et isolés par un manchon ou un
fourreau
.
Attacher les câbles pour éviter tout contact avec une partie en mouvement.
Le câble du Sonesse Ultra 50 est démontable. S’il est endommagé, le remplacer à
l’identique.
Laisser le câble d’alimentation de la motorisation accessible : il doit pouvoir être remplacé
facilement.
- Couper l’alimentation secteur.
- Connecter la motorisation selon les informations du tableau ci-dessous :
2.1.3. Assemblage motorisation - tube
1) Glisser la motorisation dans le tube d’enroulement..
2) La roue doit être bloquée en translation dans le tube
d’enroulement:
• Cela peu être réalisé en xant le tube d’enroulement
sur la roue à l’aide de 4 vis parker Ø 5 mm ou 4 rivets
pop acier Ø 4,8 mm placés entre 5 mm et 15 mm de
l’extrémité extérieure de la roue, quel que soit le tube
d’enroulement.
Les vis ou les rivets pop ne doivent pas être xés sur
la motorisation mais uniquement sur la roue..
3) Glisser l’embout de tube dans celui-ci et bloqué le si
nécessaire.
2.1.4. Montage de l’ensemble tube - motorisation
Le produit motorisé ne doit pas être comprimé entre
les supports.
1) Monter et xer l’ensemble tube-motorisation sur le
support embout f et sur le support motorisation g :
S’assurer que l’ensemble tube-motorisation est
verrouillé sur le support embout. Cette opération
permet d’éviter à l’ensemble tube-motorisation de
sortir de la xation du support embout lorsque le store
rouleaux arrive en n de course basse.
2) Suivant le type de support, mettre l’anneau d’arrêt h en
place.
1)
2)
h
g
ab
Ø>47mm
ehe
h
f
ab
Ø>47mm
ehe
h
15 mm
5 mm
20 mm
L1
1)
2)
3)

12 Copyright © 2014 Somfy SAS. All rights reserved.
FR
Images non contractuelles
2.3. MISE EN SERVICE
2.3.1. Contrôle du sens de rotation
1) Enlever le capot de protection.
Appuyer simultanéement sur les boutons blanc et
jaunes.
2) Rétablir le courant.
3) Appuyer sur la touche Λ du point de commande :
a) Si le produit motorisé monte (a), le sens de rotation
est correct : Passer au paragraphe «Réglage des
ns de course».
b) Si le produit motorisé descend (b), le sens de
rotation est incorrect : Passer à l’étape suivante.
4) Couper l’alimentation.
Inverser les 2 ls de phase sur le point de commande.
5) Rétablir l’alimentation.
Appuyer sur la touche Λ du point de commande pour
contrôler le sens de rotation.
2.3.2. Réglage des ns de course
Les ns de course peuvent être réglées dans n’importe quel ordre.
Réglage de la n de course haute
1) Appuyer sur la touche Λ du point de commande
pour faire monter le produit motorisé en n de course
haute.
2) Appuyer sur la touche Stop du point de commande
quand le produit motorisé atteint la n de course haute
souhaitée.
Regarder au niveau de la tête moteur:
• Si le produit motorisé monte du côté gauche de la
tête moteur, appuyé sur le bouton jaune pour le
déverouiller: la n de course haute est réglée.
• Si le produit motorisé monte du côté droit de la
tête moteur, appuyé sur le bouton blanc pour le
déverouiller: la n de course haute est réglée.
2)
3)
5)
4)
a
b
=
=
a
b
=
=
a
b
=
=
a
b
=
=
a
b
=
=
1)
1)
2)

13
Copyright © 2014 Somfy SAS. All rights reserved.
FR
Images non contractuelles
Réglage de la n de course basse
1) Appuyer sur la touche V du point de commande
pour faire descendre le produit motorisé en n de
course basse.
2) Appuyer sur la touche Stop du point de commande
quand le produit motorisé atteint la n de course basse
souhaitée.
Regarder au niveau de la tête moteur:
• Si le produit motorisé descend du côté gauche de
la tête moteur, appuyé sur le bouton blanc pour le
déverouiller: la n de course basse est réglée.
• Si le produit motorisé descend du côté droit de la
tête moteur, appuyé sur le bouton jaune pour le
déverouiller: la n de course basse est réglée.
Remettre en place le capot de protection.
Les ns de courses sont réglées
2.4. ASTUCES ET CONSEILS D’INSTALLATION
2.4.1. Questions sur le Sonesse Ultra 50?
1)
2)
Constats Causes possibles Solutions
Le produit motorisé
ne fonctionne pas.
Le câblage est incorrect. Contrôler le câblage et le modier si
besoin.
La motorisation est en protection
thermique. Attendre que le moteur refroidisse.
Le point de commande n’est pas
compatible.
Contrôler la compatibilité et remplacer le
point de commande si besoin.
Le produit motorisé
est bruyant: La roue et la couronne ne sont
pas bien adaptées au tube utilisé. Remplacer La roue et la couronne
Le produit motorisé est comprimé
entre les supports Ajouter du jeu au niveau des supports
Des copeaux, des vis sont dans
le tube. Nettoyer le tube d’enroulement.
Le produit motorisé
s’arrête trop tôt ou
trop tard.
Les ns de course du produit
motorisé glissent. Re-régler les ns de courses.

14 Copyright © 2014 Somfy SAS. All rights reserved.
FR
Images non contractuelles
3.3. ASTUCES ET CONSEILS D’UTILISATION
3.3.1. Questions sur le Sonesse Ultra 50?
Si le produit motorisé ne fonctionne toujours pas, contacter un professionnel de la motorisation
et de l’automatisation de l’habitat.
4. DONNÉES TECHNIQUES
Alimentation 120V~ 60 Hz
Température d’utilisation 0°C to + 60°C
Indice de protection IP 31
Niveau de sécurité Class I
1)
2)
3. UTILISATION ET MAINTENANCE
Cette motorisation ne nécessite pas d’opération de maintenance
Pour la sécurité des biens et des personnes, les moteurs Somfy sont équipés d’une
protection thermique qui va déclencher l’arrêt du moteur en cas de surchauffe.
Déclenchée de façon répétée, cette protection peut dégrader les performances du moteur.
Si la protection thermique du moteur se déclenche, si nécessaire, merci de vérier votre
installation et si le moteur est adapté à l’usage prévu.
Cette protection n’est pas censée se déclencher dans une installation normale.
Pour éviter un glissement des ns de course, il ne faut pas couper l’alimentation du moteur
pendant plus d’une semaine.
3.1. TOUCHES MONTÉE ET DESCENTE
Un appui bref sur la touche Λ ou V provoque une
montée ou descente complète du produit motorisé.
3.2. FONCTION STOP
Le produit motorisé est en cours de mouvement.
- Faire un appui bref sur my : le produit motorisé
s’arrête automatiquement.
Constats Causes possibles Solutions
Le produit motorisé
ne fonctionne pas. La motorisation est en protection
thermique. Attendre que la motorisation refroidisse.

15
Copyright © 2014 Somfy SAS. All rights reserved.
IT
Le immagini hanno uno scopo puramente indicativo.
INDICE
MANUALE ORIGINALE
1. INFORMAZIONI PRELIMINARI
1.1 SETTORE D'APPLICAZIONE
La motorizzazione Sonesse 50 è stata progettata per azionare dispositivi per interni (Tende a rullo e
schermi di proiezione).
La motorizzazione Sonesse 50 è stata progettata per azionare le tende a rullo con diversi tipi di
pacchetto.
La motorizzazione Sonesse 50 è stata progettata per motorizzare varie tende a rullo
contemporaneamente, se queste tende sono collegate tra di loro da un supporto intermedio.
La motorizzazione Sonesse 50 non è progettata per essere utilizzata con una molla di compensazione.
Ogni utilizzo per scopi diversi dal settore di applicazione è vietato, in particolare:
La motorizzazione Sonesse 50 non è progettata per applicazioni da esterno (ad es. tende
verticali da esterno, tapparelle, ecc.)
La motorizzazione Sonesse Ultra 50 è stata sviluppata per l'uso in ambienti interni.
La sua acustica di basso livello favorisce il comfort e il benessere dell'utente.
Per ulteriori informazioni e per ottimizzare le prestazioni acustiche del vostro dispositivo per
interno, non esitate a contattare un interlocutore Somfy.
1. Informazioni preliminari 15
1.1 Settore d'applicazione 15
1.2 responsabilità 16
2. Installazione 16
2.1. Montaggio 16
2.2. Cablaggio 17
2.3. Messa in servizio 18
2.4. Consigli e raccomandazioni per
l'installazione 19
3. Uso e manutenzione 20
3.1. Pulsanti Salita e Discesa 20
3.2. Funzione STOP 20
3.3. Consigli e raccomandazioni per
l'utilizzo 20
4. Dati tecnici 20
Questo manuale si applica a tutte le motorizzazioniSonesse Ultra 50 e Sonesse Ultra 50 RH
indipendentemente dalle varianti di coppia e velocità.

16 Copyright © 2014 Somfy SAS. All rights reserved.
IT
Le immagini hanno uno scopo puramente indicativo.
1.2 RESPONSABILITÀ
Prima di installare e di utilizzare la motorizzazione, leggere attentamente questo manuale
d'installazione e d'uso. Oltre le istruzioni riportate nel presente manuale, rispettare altresì le
istruzioni elencate nel documento annesso Istruzioni di sicurezza.
La motorizzazione deve essere installata da un professionista della motorizzazione
e dell'automazione d'interni, conformemente alle istruzioni di Somfy e alle normative
applicabili nel paese di messa in servizio.
Ogni utilizzo della motorizzazione al di fuori dell'ambito di applicazione descritto sopra è vietato.
Esso escluderebbe, così come il mancato rispetto delle istruzioni riportate nel presente manuale e
nel documento annesso Istruzioni di sicurezza,ogni responsabilità e garanzia di Somfy.
L'installatore deve informare i suoi clienti in relazione alle condizioni d'uso e di manutenzione della
motorizzazione e deve consegnare loro le istruzioni d'uso e di manutenzione, oltre al documento
allegato Istruzioni di sicurezza, dopo l'installazione della motorizzazione. Ogni operazione di
Servizio Post-vendita sulla motorizzazione necessita dell'intervento di un professionista della
motorizzazione e dell'automazione d'interni.
In caso di dubbi durante l'installazione della motorizzazione o per avere maggiori informazioni,
consultare un interlocutore Somfy o visitare il sito www.somfy.com.
2. INSTALLAZIONE
Istruzioni che il professionista della motorizzazione e dell'automazione d'interni deve
obbligatoriamente seguire durante l'installazione della motorizzazione.
Non far cadere, non urtare, non forare, non immergere la motorizzazione.
Installare un punto di comando individuale per ogni motorizzazione.
Per ottimizzare il funzionamento ultra silenzioso, il gioco meccanico tra motore, accessori,
tubo ed estremità del tubo deve essere ridotto al minimo.
2.1. MONTAGGIO
2.1.1. Preparazione della motorizzazione
Vericare che il diametro interno del tubo sia superiore a
47mm.
1) Installare gli accessori necessari per l'integrazione della
motorizzazione nel tubo di avvolgimento:
• Installare la corona a, la ruota b e il bloccaruota c sul
motore.
Il bloccaruota deve essere avvitato con una coppia
compresa tra 1.5 e 1.8 Nm.
2) Misurare la lunghezza (L1) tra il bordo interno della testa
della motorizzazione e il bordo della ruota.
2.1.2. Preparazione del tubo
1) Tagliare il tubo di avvolgimento alla lunghezza desiderata
in funzione del prodotto motorizzato.
2) Sbavare il tubo di avvolgimento ed eliminare i trucioli.
1) 2)
Consigli di Sicurezza! Informazione Λ Salita V Discesa
Attenzione!
1)
L1
L1 = …
2)
Ø > 47 mm
ba c

17
Copyright © 2014 Somfy SAS. All rights reserved.
IT
Le immagini hanno uno scopo puramente indicativo.
Neutro
(N)
Fase
(L1)
Fase
(L2)
Terra
( )
120V-60Hz Bianco Nero Rosso Verde
L1L2N
2.1.3. Assemblaggio motore - tubo
1) Inserire il motore all'interno del tubo.
2) La ruota deve essere bloccata in traslazione nel tubo di
avvolgimento:
• O ssando il tubo di avvolgimento sulla ruota per
mezzo di 4 viti parker Ø 5 mm o per mezzo di 4 rivetti
in acciaio Ø 4,8 mm posizionati tra 5 mm e 15 mm
dall'estremità esterna della ruota, indipendentemente
dal tipo di tubo di avvolgimento.
Le viti o i rivetti non devono essere ssati sul motore
ma esclusivamente sulla ruota.
3) Inserire il tappo nel tubo di avvolgimento e chiuderlo se
necessario.
2.1.4. Montaggio dell'insieme tubo - motorizzazione
Il prodotto motorizzato non deve essere compresso tra i supporti
1) Installare e ssare l'insieme tubo-motorizzazione sul
supporto calotta f e sul supporto della motorizzazioneg:
Accertarsi che l'asse motorizzato sia bloccato sul
supporto calotta. Questa operazione permette di
evitare che l'insieme tubo-motorizzazione fuoriesca
dal ssaggio del supporto calotta quando la tapparella
arriva al necorsa basso.
2) Per i motori con testa a stella, accertarsi che l'anello di
arresto h sia nella corretta posizione.
1)
2)
h
g
ab
Ø>47mm
ehe
h
f
ab
Ø>47mm
ehe
h
15 mm
5 mm
20 mm
L1
1)
2)
3)
2.2. CABLAGGIO
I cavi che passano attraverso una parete metallica devono essere protetti ed isolati da un
anello di tenuta o una guaina.
Fissare i cavi per evitare il contatto con parti in movimento.
Il cavo del Sonesse Ultra 50 è removibile. Se il cavo è danneggiato, sostituirlo con uno
identico.
Lasciare libero l'accesso al cavo d'alimentazione della motorizzazione: deve poter essere
sostituito facilmente.
- Togliere tensione.
- Connettere il motore seguendo le indicazioni della tabella seguente:

18 Copyright © 2014 Somfy SAS. All rights reserved.
IT
Le immagini hanno uno scopo puramente indicativo.
2.3. MESSA IN SERVIZIO
2.3.1. Controllo del senso di rotazione
1) Togliere la copertura di protezione.
Premere contemporaneamente i pulsanti bianco e
giallo.
2) Ristabilire la corrente.
3) Premere il pulsante Λ del punto di comando:
a) Se il prodotto motorizzato sale (a), il senso
di rotazione è corretto: Passare al paragrafo
"Regolazione dei necorsa".
b) Se il prodotto motorizzato scende (b), il senso di
rotazione non è corretto: Passare alla fase seguente.
4) Togliere l'alimentazione.
Invertire i 2 li di fase sul punto di comando.
5) Ristabilire la corrente.
Premere il pulsante Λ del punto di comando per
controllare il senso di rotazione.
2.3.2. Regolazione dei necorsa
I necorsa possono essere regolati in qualsiasi ordine.
Regolazione del necorsa alto
1) Premere il pulsante Λ del punto di comando per far
salire il prodotto motorizzato no al necorsa alto.
2) Premere il pulsante Stop del punto di comando
quando il prodotto motorizzato raggiunge il necorsa
alto desiderato.
Guardare a livello della testa del motore:
• Se il prodotto motorizzato sale sul lato sinistro della
testa del motore, premere il pulsante giallo per
sbloccarlo: il ne corsa alto è stato regolato.
• Se il prodotto motorizzato sale sul lato destro della
testa del motore, premere il pulsante bianco per
sbloccarlo: il ne corsa alto è stato regolato.
2)
3)
5)
4)
a
b
=
=
a
b
=
=
a
b
=
=
a
b
=
=
a
b
=
=
1)
1)
2)

19
Copyright © 2014 Somfy SAS. All rights reserved.
IT
Le immagini hanno uno scopo puramente indicativo.
Regolazione del necorsa basso
1) Premere il pulsante Λ del punto di comando per far
scender il prodotto motorizzato no al necorsa basso.
2) Premere il pulsante Stop del punto di comando
quando il prodotto motorizzato raggiunge il necorsa
basso desiderato.
Guardare a livello della testa del motore:
• Se il prodotto motorizzato scende sul lato sinistro
della testa del motore, premere il pulsante bianco
per sbloccarlo: il ne corsa basso è stato regolato.
• Se il prodotto motorizzato scende sul lato destro
della testa del motore, premere il pulsante giallo
per sbloccarlo: il ne corsa basso è stato regolato.
Riposizionare la copertura di protezione.
I ne corsa sono regolati.
2.4. CONSIGLI E RACCOMANDAZIONI
2.4.1. Domande su Sonesse Ultra 50?
Constatazioni Possibili cause Soluzioni
Il prodotto
motorizzato non
funziona.
Il cablaggio non è corretto. Controllare il cablaggio e modicarlo, se
necessario.
La motorizzazione è in protezione
termica. Attendere che il motore si raffreddi.
Il trasmettitore non è compatibile. Controllare la compatibilità e sostituire il
trasmettitore, se necessario.
Il prodotto
motorizzato fa
rumore:
La ruota e la corona non
corrispondono al tubo utilizzato. Sostituire La ruota e la corona
Il prodotto motorizzato è
compresso tra i supporti Allentare il gioco al livello dei supporti
Ci sono trucioli o viti nel tubo. Pulire il tubo di avvolgimento.
Il prodotto
motorizzato si ferma
troppo presto o
troppo tardi.
I necorsa del prodotto
motorizzato deviano. Reimpostare i necorsa.
1)
2)

20 Copyright © 2014 Somfy SAS. All rights reserved.
IT
Le immagini hanno uno scopo puramente indicativo.
3. USO E MANUTENZIONE
3.1. PULSANTI SALITA E DISCESA
Premendo brevemente sul pulsante Λ o V, si attiva
la completa salita o discesa del prodotto motorizzato.
3.2. FUNZIONE STOP
Il prodotto motorizzato si sta muovendo.
Premendo sul pulsante Stop, si attiva l'arresto del
prodotto motorizzato.
3.3. CONSIGLI E RACCOMANDAZIONI
3.3.1. Domande su Sonesse Ultra 50?
Se il prodotto motorizzato continua a non funzionare, contattare un professionista della
motorizzazione e dell'automazione d'interni.
Constatazioni Possibili cause Soluzioni
Il prodotto motorizzato non
funziona.
La motorizzazione è in protezione
termica. Attendere che il motore si raffreddi.
4. DATI TECNICI
Alimentazione 120V~ 60Hz
Temperatura di funzionamento da + 0°C a + 60°C
Grado di protezione IP 31
Classe d'isolamento Classe I
1)
2)
Questa motorizzazione non necessita di alcuna manutenzione
Per la sicurezza di beni e persone, i motori Somfy sono dotati di una protezione termica che
provoca l'arresto del motore in caso di surriscaldamento.
L'attivazione ripetuta di questa protezione può ridurre le prestazioni del motore.
Se il motore passa in protezione termica, controllare l'installazione e l'idoneità del motore per
l'uso previsto.
Un'installazione normale non dovrebbe attivare questa protezione.
Per evitare il movimento dei necorsa, non staccare l'alimentazione per più di una settimana.

21
Copyright © 2014 Somfy SAS. All rights reserved.
ES
Imágenes no contractuales
ÍNDICE
MANUAL ORIGINAL
1. INFORMACIÓN PREVIA
1.1 ÁMBITO DE APLICACIÓN
El motor Sonesse 50 está diseñado para accionar aplicaciones de interior (cortinas enrollables y
pantallas de proyección).
El motor Sonesse 50 se ha diseñado para accionar persianas enrollables multi-banding.
El motor Sonesse 50 se ha diseñado para accionar múltiples persianas enrollables al mismo tiempo,
siempre que estén unidas entre sí mediante un soporte intermedio.
El motor Sonesse 50 no se ha diseñado para utilizarse con un muelle de compensación.
Se prohíbe cualquier uso fuera del ámbito de aplicación, en particular:
El motor Sonesse 50 no se ha diseñado para aplicaciones de exterior (p. ej., toldos verticales
de exterior, persianas enrollables, etc.)
El motor Sonesse Ultra 50 se ha desarrollado para usarlo en espacios interiores.
Gracias a su bajo nivel acústico, aporta confort y bienestar al usuario.
Para obtener más información y optimizar el rendimiento acústico de su aplicación de interior,
no dude en ponerse en contacto con uno de los agentes de Somfy.
1. Información previa 21
1.1 Ámbito de aplicación 21
1.2 Responsabilidad 22
2. Instalación 22
2.1. Montaje 22
2.2. Cableado 23
2.3. Puesta en marcha 24
2.4. Trucos y consejos de
instalación 25
3. Uso y mantenimiento 26
3.1. Botones de subida y bajada 26
3.2. Función STOP 26
3.3. Trucos y consejos de uso 26
4. Datos técnicos 26
Estas instrucciones son aplicables a todos los motores Sonesse Ultra 50 y Sonesse Ultra 50 RH
independientemente de las variaciones de velocidad y de par de apriete.

22 Copyright © 2014 Somfy SAS. All rights reserved.
ES
Imágenes no contractuales
1.2 RESPONSABILIDAD
Antes de instalar y utilizar el motor, lea atentamente este manual de instalación y uso. Además de
las instrucciones descritas en este manual, deben respetarse las normas detalladas en el documento
adjunto Normas de seguridad.
El motor debe ser instalado por un profesional de la motorización y automatización de la
vivienda, de conformidad con las instrucciones proporcionadas por Somfy y con la normativa
aplicable en el país donde vaya a utilizarse.
Se prohíbe cualquier uso del motor fuera de los ámbitos de aplicación anteriormente descritos. Ello
conllevaría, como todo incumplimiento de las instrucciones que guran en esta guía y en el documento
adjunto Normas de seguridad, la exclusión de toda responsabilidad por parte de Somfy y la anulación
de la garantía.
El instalador debe informar a sus clientes de las condiciones de uso y mantenimiento del motor y debe
entregarles las instrucciones de uso y mantenimiento, así como el documento adjunto Normas de
seguridad, tras la instalación del motor. Cualquier operación del Servicio Posventa que deba realizarse
en el motor requiere la intervención de un profesional de la motorización y automatización de la vivienda.
Para resolver cualquier duda que pudiera surgir durante la instalación del motor o para obtener
información adicional, póngase en contacto con uno de los agentes de Somfy o visite la página web
www.somfy.com.
2. INSTALACIÓN
El profesional de la motorización y automatización de la vivienda encargado de la instalación
del motor debe seguir obligatoriamente las instrucciones descritas a continuación.
No golpee, perfore, sumerja ni deje caer nunca el motor.
Instale un punto de mando individual para cada motor.
Para optimizar el funcionamiento ultrasilencioso, el juego mecánico entre el motor, los
accesorios, el tubo y el extremo del mismo debe reducirse al máximo.
2.1. MONTAJE
2.1.1. Preparación del motor
Compruebe que el diámetro interior del tubo sea superior
a 47 mm.
1) Monte los accesorios necesarios para la integración del
motor en el tubo de enrollamiento:
• Ajuste la corona a, la rueda del motor b y la rueda de
parada c en el motor.
La rueda de parada debe enroscarse con un par de apriete
que vaya de 1,5 a 1,8 Nm.
2) Mida la longitud (L1) entre el borde interior del cabezal
del motor y el extremo de la rueda del motor.
2.1.2. Preparación del tubo
1) Corte el tubo de enrollamiento a la longitud deseada en
función del producto que quiera automatizar.
2) Desbarbe el tubo de enrollamiento y elimine las virutas.
1) 2)
¡Advertencia de seguridad! Información Λ Subida V Bajada
¡Atención!
1)
L1
L1 = …
2)
Ø > 47 mm
ba c

23
Copyright © 2014 Somfy SAS. All rights reserved.
ES
Imágenes no contractuales
Neutro
(N)
Fase
(L1)
Fase
(L2)
Tierra
( )
120 V-60 Hz Blanco Negro Rojo Verde
L1L2N
2.1.3. Instalación del conjunto motor-tubo
1) Introduzca el motor en el interior del tubo de enrollamiento.
2) La rueda del motor debe quedar bloqueada para evitar
su movimiento dentro del tubo de enrollamiento:
• Para ello, el tubo de enrollamiento se debe jar a la
rueda del motor con cuatro tornillos Parker de 5 mm
de Ø o con cuatro remaches Pop de acero de 4,8 mm
de Ø colocados a entre 5 mm y 15 mm del extremo
exterior de la rueda, independientemente del tubo de
enrollamiento utilizado.
Los tornillos o los remaches Pop no deben jarse al
motor, sino únicamente a la rueda.
3) Introduzca el tapón en el tubo de enrollamiento y
bloquéelo en caso necesario.
2.1.4. Montaje del conjunto tubo-motor
El producto automatizado no debe quedar comprimido entre los soportes.
1) Monte y je el conjunto tubo-motor al soporte del
extremo f y al soporte del motor g:
Asegúrese de que el conjunto tubo-motor esté
bloqueado sobre el soporte del extremo. Esta
operación permite evitar que el conjunto tubo-motor
se salga de la jación del soporte del extremo mientras
la persiana enrollable llega al nal de carrera inferior.
2) En el caso de los motores con cabezal en estrella,
asegúrese de que la anilla de tope h esté en su lugar.
1)
2)
h
g
ab
Ø>47mm
ehe
h
f
ab
Ø>47mm
ehe
h
15 mm
5 mm
20 mm
L1
1)
2)
3)
2.2. CABLEADO
En caso de que los cables deban atravesar una pared metálica, deben protegerse y aislarse
con un manguito o un pasacables.
Fije los cables para evitar cualquier contacto con un componente en movimiento.
El cable del Sonesse Ultra 50 es desmontable. Si se daña, sustitúyalo por uno idéntico.
Deje el cable de alimentación del motor de manera que resulte accesible: se debe poder
sustituir fácilmente.
- Corte la alimentación eléctrica.
- Conecte el motor según la información de la siguiente tabla:

24 Copyright © 2014 Somfy SAS. All rights reserved.
ES
Imágenes no contractuales
2.3. PUESTA EN MARCHA
2.3.1. Control del sentido de rotación
1) Retire la cubierta de protección.
Pulse simultáneamente los botones blanco y amarillo.
2) Restablezca la corriente.
3) Pulse el botón Λ del punto de mando:
a) Si el producto automatizado sube (a), el sentido de
rotación es correcto: pase al apartado «Ajuste de los
nales de carrera».
b) Si el producto automatizado baja (b), el sentido
de rotación es incorrecto: pase a la etapa siguiente.
4) Corte la alimentación.
Invierta los 2 hilos de fase en el punto de mando.
5) Restablezca la alimentación.
Pulse el botón Λ del punto de mando para comprobar
que el sentido de rotación sea el correcto.
2.3.2. Ajuste de los nales de carrera
Los nales de carrera pueden ajustarse en cualquier orden.
Ajuste del nal de carrera superior
1) Pulse el botón Λ del punto de mando para subir
el producto automatizado hasta el nal de carrera
superior.
2) Pulse el botón Stop del punto de mando cuando
el producto automatizado alcance el nal de carrera
superior deseado.
Tenga en cuenta lo siguiente en relación con el cabezal
del motor:
• Si el producto automatizado sube por el lado izquierdo
del cabezal del motor, pulse el botón amarillo para
desbloquearlo: el nal de carrera superior está
ajustado.
• Si el producto automatizado sube por el lado derecho
del cabezal del motor, pulse el botón blanco para
desbloquearlo: el nal de carrera superior está
ajustado.
2)
3)
5)
4)
a
b
=
=
a
b
=
=
a
b
=
=
a
b
=
=
a
b
=
=
1)
1)
2)

25
Copyright © 2014 Somfy SAS. All rights reserved.
ES
Imágenes no contractuales
Ajuste del nal de carrera inferior
1) Pulse el botón Λ del punto de mando para bajar el
producto automatizado hasta el nal de carrera inferior.
2) Pulse el botón Stop del punto de mando cuando
el producto automatizado alcance el nal de carrera
inferior deseado.
Tenga en cuenta lo siguiente en relación con el cabezal
del motor:
• Si el producto automatizado baja por el lado
izquierdo del cabezal del motor, pulse el botón
blanco para desbloquearlo: el nal de carrera
inferior está ajustado.
• Si el producto automatizado baja por el lado
derecho del cabezal del motor, pulse el botón
amarillo para desbloquearlo: el nal de carrera
inferior está ajustado.
Volver a poner en su sitio la cubierta de protección.
Los nales de carrera están ajustados.
2.4. TRUCOS Y CONSEJOS DE INSTALACIÓN
2.4.1. ¿Alguna pregunta sobre el Sonesse Ultra 50?
Problemas Posibles causas Soluciones
El producto
automatizado no
funciona.
El cableado es incorrecto. Verique el cableado y modifíquelo si es
preciso.
El motor está en modo de
protección térmica. Espere a que se enfríe el motor.
El punto de mando no es
compatible. Verique la compatibilidad y cambie el
punto de mando si es preciso.
El producto
automatizado es
ruidoso.
La rueda y la corona no son aptas
para el tubo utilizado. Sustituya la rueda y la corona.
El producto automatizado ha
quedado comprimido entre los
soportes.
Agregue algo de holgura en los soportes.
Hay virutas o tornillos dentro del
tubo. Limpie el tubo de enrollamiento.
El producto
automatizado se
detiene demasiado
pronto o demasiado
tarde.
Los nales de carrera del
producto automatizado están a la
deriva.
Reajuste los nales de carrera.
1)
2)

26 Copyright © 2014 Somfy SAS. All rights reserved.
ES
Imágenes no contractuales
3. USO Y MANTENIMIENTO
3.1. BOTONES DE SUBIDA Y BAJADA
Al pulsar brevemente el botón Λ o V, el producto
automatizado sube o baja por completo.
3.2. FUNCIÓN STOP
El producto automatizado debe estar en movimiento.
Al pulsar una vez el botón Stop, el producto
automatizado se detiene.
3.3. TRUCOS Y CONSEJOS DE USO
3.3.1. ¿Alguna pregunta sobre el Sonesse Ultra 50?
Si el producto automatizado sigue sin funcionar, póngase en contacto con un profesional de la
motorización y la automatización de la vivienda.
Problemas Posibles causas Soluciones
El producto automatizado
no funciona.
El motor está en modo de
protección térmica. Espere a que se enfríe el motor.
4. DATOS TÉCNICOS
Alimentación eléctrica 120 V~ 60 Hz
Temperatura de funcionamiento de 0 °C a + 60 °C
Índice de protección IP 31
Nivel de seguridad Clase I
1)
2)
Este motor no requiere ninguna operación de mantenimiento.
Por seguridad de los productos y las personas, los motores Somfy están equipados con
una protección térmica que activará la parada del motor en caso de que se produzca un
recalentamiento.
La activación repetida de esta protección puede deteriorar el rendimiento del motor.
Si el motor utiliza la protección térmica, compruebe su instalación y que el motor esté
destinado a ese uso en cuestión.
Una instalación normal no debe activar esta protección.
Para evitar la deriva de los nales de carrera, no se debe cortar el suministro eléctrico
durante más de una semana.

ZH
27
Copyright © 2014 Somfy SAS. All rights reserved. 图片不具合同约束力
目录
1. 前提条件信息
1.1 适用范围
Sonesse 50电机设计用于驱动室内应用(卷帘和投影屏幕)。
Sonesse 50电机设计用于驱动多条带卷帘。
Sonesse 50电机设计用于同时驱动通过中间支架相互连接的多个卷帘。
Sonesse 50电机并非设计与补偿弹簧搭配使用。
严禁在适用范围之外使用电机,特别是:
Sonesse 50电机并非设计用于户外应用(例如户外垂直百叶窗、卷帘等)
Sonesse Ultra 50电机专为室内应用而开发。
其安静运行特性可确保用户的舒适和健康。
如需了解更多信息,或优化您室内应用的噪音效果,请与Somfy联系。
1. 前提条件信息 27
1.1 适用范围 27
1.2 责任 28
2. 安装 28
2.1. 安装 28
2.2. 接线 29
2.3. 调试 30
2.4. 安装提示和建议 31
3. 使用和维护 32
3.1. 向上和向下按钮 32
3.2. 停止功能 32
3.3. 使用提示和建议 32
4. 技术参数 32
这些说明适用于所有扭矩和速度型号的Sonesse Ultra 50和Sonesse Ultra 50 RH驱动装置。
原版指南

ZH
28 Copyright © 2014 Somfy SAS. All rights reserved.
图片不具合同约束力
1.2 责任
安装和使用电机之前,请仔细阅读本操作和安装指南。除了遵守本指南中的说明之外,还必须
注意随附的安全说明文件中详述的说明。
电机必须由专业人员按照Somfy提供的说明和所在国家适用的相关规定安装和调试。
严禁在上述适用范围之外使用该电机。在适用范围之外使用电机以及未能遵守本指南和随附的
安全说明文件中的说明将免除Somfy的一切责任并导致保修失效。
安装该电机后,安装人员必须告知客户电机的运行和维护条件,并为客户提供使用和维护说明
以及随附的安全说明文件。有关电机的所有售后服务工作都只能由专业人员操作。
安装电机时如有任何疑问,或欲了解更多信息,请与Somfy联系或访问www.somfy.com网站。
2. 安装
电机和家庭自动化专业人员在安装电机时必须遵守的说明。
切勿使电机掉落或浸入水中,切勿对其进行敲击或钻孔。
为每台电机安装一个单独的控制器。
为了优化超静驱动,必须最大程度地减小电机、附件、管道和管端之间的机械余隙。
2.1. 安装
2.1.1. 准备电机
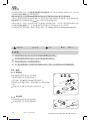
检查并确认卷管的内径大于47 mm。
1) 将所需的配件安装到卷管电机上:
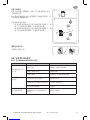
• 将皇冠a、转轮b和转轮挡块c安装到电机上。
转轮挡块必须用螺钉固定,扭矩范围介于1.5和1.8 Nm
之间。
2) 测量电机头内缘与转轮边缘之间的长度(L1)。
2.1.2. 准备卷管
1) 按照所驱动成品的长度切割卷管。
2) 去除卷轴管上的毛刺并清除碎屑。 1) 2)
安全警告! 信息 Λ 向上 V 向下
注意!
1)
L1
L1 = …
2)
Ø > 47 mm
ba
c

ZH
29
Copyright © 2014 Somfy SAS. All rights reserved. 图片不具合同约束力
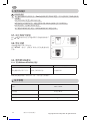
零线
(N)
火线
(L1)
火线
(L2)
地线
( )
120 V-60 Hz 白色 黑色 红色 绿色
L1L2N
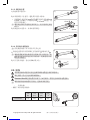
2.1.3. 装配电机/管
1) 将电机滑入卷管中。
2) 必须使转轮卡住卷管,避免其在卷管中滑动:
• 可使用4个直径为5 mm的自攻螺钉或4个直径4.8 mm
的钢制空心铆钉,在离转轮外缘5–15 mm的位置,将
卷管与转轮固定。
螺钉或拉铆钉只能固定到转轮上,而不能固定到电
机上。
3) 将端盖滑入卷管中,必要时将其锁定。
2.1.4. 安装电机/卷管组件
受电机驱动的产品不得压在支架之间
1) 将电机/卷管组件安装和固定至尾插支架f和驱动支架g
确保将装配好的电机/卷管在尾插支架上固定好。该
操作可以防止卷帘运行到下限位时,电机/卷管从尾
插支架中脱出。
2) 对于星形头电机,将止动环h安装入位。
1)
2)
h
g
ab
Ø>47mm
ehe
h
f
ab
Ø>47mm
ehe
h
15 mm
5 mm
20 mm
L1
1)
2)
3)
2.2. 接线
必须使用索环或套管对穿过金属幕墙的电缆进行保护和绝缘。
固定电缆,防止与运动部件相接触。
Sonesse Ultra 50上的电缆可以拆下。如有损坏,需用完全相同的电缆更换。
确保电机的电源电缆易于接近:更换必须很方便。
-关闭电源。
-根据下表信息连接电机:

ZH
30 Copyright © 2014 Somfy SAS. All rights reserved.
图片不具合同约束力
2.3. 调试
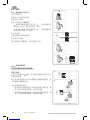
2.3.1. 检查电机转动方向
1) 拆下保护壳。
同时按下白色和黄色按钮。
2) 重新打开电源。
3) 按下控制器上的Λ按钮:
a)
如果受电机驱动的产品升起(a),则说明旋转方
向正确:转到“设置末端限位”部分。
b)
如果受电机驱动的产品降低(b),则说明旋转方
向不正确:转到下一步骤。
4) 关闭电源。
互换控制器上的两条相线。
5) 重新打开电源。
按下控制器上的Λ按钮,以检查旋转方向。
2.3.2. 设置末端限位
可按照任意顺序设置末端限位。
设置上限位
1) 按下控制器上的Λ按钮,以升起受电机驱动的产品至
上端极限位置。
2) 当受电机驱动的产品达到预期的上端极限位置时,按
下控制器上的停止按钮。
从电机前端的角度看:
• 若要将受电机驱动的产品在电机前端左侧升起,则
按下黄色按钮将其解锁:上限位被设置。
• 若要将受电机驱动的产品在电机前端右侧升起,则
按下白色按钮将其解锁:上限位被设置。
2)
3)
5)
4)
a
b
=
=
a
b
=
=
a
b
=
=
a
b
=
=
a
b
=
=
1)
1)
2)

ZH
31
Copyright © 2014 Somfy SAS. All rights reserved. 图片不具合同约束力
设置下端限位
1) 按下控制器上的V按钮,以降下受电机驱动的产品至
下端极限位置。
2) 当受电机驱动的产品达到预期的下端极限位置时,按
下控制器上的停止按钮。
从电机前端的角度看:
• 若要将受电机驱动的产品在电机前端左侧降下,则
按下白色按钮将其解锁:下端限位被设置。
• 若要将受电机驱动的产品在电机前端右侧降下,则
按下黄色按钮将其解锁:下端限位被设置。
重新安装保护壳。
末端限位设置完成。
2.4. 安装提示和建议
2.4.1. 有关Sonesse Ultra 50的问题?
观察结果 可能的原因 解决方案
受电机驱动的产品
不工作。
接线不正确。 检查接线,必要时改变接线。
电机处于热保护状态。 等待电机冷却。
控制器不兼容。 检查兼容性,必要时更换控制器。
受电机驱动的产品
有噪音: 转轮和皇冠与卷管不匹配。 更换转轮和皇冠
受电机驱动的产品被压在支架之间 增大支架之间的间隙
管中包含碎屑和螺钉。 清洁卷管。
受电机驱动的产品
停止过快或过慢。 受电机驱动的产品的末端限位发
生变化。 重新调节末端限位
1)
2)

ZH
32 Copyright © 2014 Somfy SAS. All rights reserved.
图片不具合同约束力
3. 使用和维护
3.1. 向上和向下按钮
按下Λ或V按钮可以完全升起或降下受电机驱动的产
品。
3.2. 停止功能
受电机驱动的产品正在运动。
按下STOP(停止)按钮可以停止受电机驱动的
产品。
3.3. 使用提示和建议
3.3.1. 有关Sonesse Ultra 50的问题?
如果受电机驱动的产品仍然不工作,请专业人员联系。
观察结果 可能的原因 解决方案
受电机驱动的产品不工作。 电机处于热保护状态。 等待电机冷却。
4. 技术参数
电源 120 V ~ 60 Hz
工作温度 0 °C至+ 60 °C
防护等级 IP 31
安全等级 I级
1)
2)
本电机免维护
为了保证货物和人员的安全,Somfy电机配备有热保护装置,可在过热情况下触发电机停
止装置。
反复启动该保护装置会降低电机性能。
如果电机进入热保护状态,请检查您的设备并确认电机限定用于预期用途。
标准设备预计不会触发该保护装置。
为了避免末端限位发生变化,切断电源的时间不要超过1周。


-
 1
1
-
 2
2
-
 3
3
-
 4
4
-
 5
5
-
 6
6
-
 7
7
-
 8
8
-
 9
9
-
 10
10
-
 11
11
-
 12
12
-
 13
13
-
 14
14
-
 15
15
-
 16
16
-
 17
17
-
 18
18
-
 19
19
-
 20
20
-
 21
21
-
 22
22
-
 23
23
-
 24
24
-
 25
25
-
 26
26
-
 27
27
-
 28
28
-
 29
29
-
 30
30
-
 31
31
-
 32
32
-
 33
33
-
 34
34
-
 35
35
-
 36
36


Somfy Sonesse Ultra 50 RH Instructions Manual
- Tipo
- Instructions Manual
en otros idiomas
- français: Somfy Sonesse Ultra 50 RH
- italiano: Somfy Sonesse Ultra 50 RH
- English: Somfy Sonesse Ultra 50 RH
Artículos relacionados
-
Somfy LS 40 Instructions Manual
-
Somfy ROLL UP 28 WIREFREE Instrucciones de operación
-
-
Somfy Sonesse 30 RS485 Manual de usuario
-
-
-
-
-
-