Lifan Power USA Platinum Series 15Kw Generator El manual del propietario
- Categoría
- Generadores de poder
- Tipo
- El manual del propietario

Model LF-15000E-PL Model LF-15000E-PL
Please read this manual carefully before operating your new portable generator.
(CA) in the model number designated California Compliant by CARB 7/2020
COMMERCIAL / CONTRACTOR-GRADE GENERATORSCOMMERCIAL / CONTRACTOR-GRADE GENERATORS

OPERATING INSTRUCTIONS AND OWNER’S MANUAL
LF-15000E-PL
PLEASE KEEP AND READ THIS MANUAL CAREFULLY BEFORE OPERATING YOUR NEW
LIFAN POWER USA PORTABLE GENERATOR
STANDBY POWER CAPABILITY
Your Pro Series Platinum 15000E-PL generator is equipped and
designed to connect and communicate with the 100 amp Automat-
ic Transfer Switch, which is sold separately, to be used as a Home
Standby Power System during any power outage or threatened
power outage.
If you purchase the 100a ATS Kit, Model 100AMP-SR-ATS, have it in-
stalled by a qualied Electrician or Installer, in the case of a threatened
power outage or any power outage, you can place your Pro Series Plati-
num Generator to be accessed with the Power and Signal cord supplied
with 100a ATS, plug in the power cord to the receptacle on the 100a ATS
and to the generator 50a 240v receptacle, plug in the supplied Signal
Cord to the 100a ATS and the marked receptacle on the generator, and
follow the instructions supplied with the 100a ATS to place both the gen-
erator and 100a ATS in the automatic mode. If you experience a power
outage, the ATS will automatically recognize the loss of utility power,
transfer the power from Utility Power to Generator Power, send the mes-
sage to start the generator, and restore power to your breaker panel to
provide power to your selected appliances, equipment, and receptacles
and become your Standby Generator Power Source. When your utility
power is restored, the ATS will automatically recognize utility power and
switch back from generator power to utility power and send the message
for the generator to shut down, returning your structure to your normal
power source. You can then return your generator to its normal use as a
portable power source whenever you need or want it.
22

33

44
SPECIAL HAZARDS
• CO Poisoning: Exhaust from engine contains carbon monoxide, a poisonous gas that
can cause carbon monoxide poisoning and possible death if inhaled.
• Electric shock: Operating equipment in wet conditions or near water can cause
electric shock.
• Chemical Exposure: Cleaning chemical vapors or contact with skin may be hazardous.
• Fire/Explosion: Engine sparking can ignite fuel or other ammable liquids or vapors in
the vicinity. Hot exhaust from engine can ignite combustible materials.
• Burns: Generator engine is a hot surface that can cause burn injuries.
EQUIPMENT PROTECTION FACTS
Inspect Upon Delivery: FIRST! Inspect for missing or damaged
components. See “Initial Set-Up/Installation” section for where
to report missing or damaged parts.
Add Engine Oil: Engine is shipped without oil. See the “Engine
Manual” section of this manual for instructions on capacity and
viscosity recommendations.
Maintenance Schedule: Engine requires periodic inspection
and servicing to keep generator functioning efciently. See
“Maintenance Schedule Summary” for frequency of servicing.

55
PLEASE READ THE
FOLLOWING INSTRUCTIONS!
1. Unit Shipped without engine oil. See Preoperating Instructions for further
information.
2. For repair under Warranty or questions concerning Warranty, DO NOT RETURN
this product to the Store where purchased. Follow the procedures as outlined in
the “WARRANTY POLICY” and “WARRANTY REGISTRATION” in the Owner’s
Manual. For any questions visit www.lifanpowerusa.com or call 1-866-471-7464,
Option 2 (Warranty and Service).
3. Read the “Owner’s Manual” prior to operating any equipment and familiarize
yourself with the Proper and safe operation of the equipment. If you have any
questions, visit www.lifanpowerusa.com or call 1-866-471-7464, Option 2
(Warranty and Service).
TABLE OF CONTENTS
Preface . . . . . . . . . . . . .
6Operation of Generator . . . . . . . . . . . . . 19
Product Specifications . . . . . . . . . . . 7Storing the Unit . . . . . . . . . . . . . . 26
Safety Instructions . . . . . . . . . . .
8Maintenance . . . . . . . . . . . . . . 27
Controls and Features . . . . . . . . . . . 11 Troubleshooting . . . . . . . . . . . . . . . 31
PRE-OPERATING INSTRUCTIONS Safety . . . . . . . . . . . . . . . . . . . . . . . 32
Assembly . . . . . . . . . . . . . . . . . . . . . . . . . . . . 14
Wattage Chart . . . . . . . . . . . . . . 33
Engine Fuel Level Check . . . . . . . . . . . . . . . . . 16
Limited Warranty Policy . . . . . . . . . . . . . . . 37
Engine Oil Level Check . . . . . . . . . . . . . . . . . . 17
Las instrucciones en Español comienzan en la página 40

66
PREFACE
Thank you for choosing LIFAN Power USA for your Power Equipment needs. LIFAN Pow-
er USA prides itself on providing quality products at affordable pricing, creating the “Best
Equipment Value on Today’s Market!”
Your Portable Generator utilizes our Industrial Grade Gasoline Engines and is intended for
OUTDOOR USE ONLY.
All LIFAN Power USA products are manufactured utilizing the latest technology.
Built with quality components, your new Power Equipment Product will give you
years of dependable service. Your unit, along with all of LIFAN Power USA products
are designed, engineered, and manufactured with LIFAN’s Industrial Grade Gaso-
line Engine.
This Owner’s Manual will provide you with all of your needed information for your
new Power Equipment Product, including Safe Operation and Maintenance of your
unit. Please keep and read this Owner’s Manual completely and carefully prior to
operation. Keep this Owner’s Manual for assistance in the future, such as proper
maintenance schedules and tips to prolong the life and effective use of your unit.
If you require assistance, please visit our website (www.lifanpowerusa.com) or call
toll free 866-471-7464 Option 2, Warranty and Service.
This Owner’s Manual contains information with respect to the newest products at
the time of publication. Due to revision and modications, the information noted
in the Owner’s Manual might vary from the actual status. This Owner’s Manual is
subject to change without notice. The copyright of the Owner’s Manual belongs to
EquipSource, LLC. Any group or individual is forbidden to reprint or copy any of
this Owner’s Manual without the written consent of EquipSource, LLC.
FOR ALL WARRANTY AND SERVICE RELATED ISSUES/QUESTIONS DO NOT
RETURN YOUR UNIT TO THE STORE OR DEALER WHERE THE ITEM WAS PUR-
CHASED. FOR SERVICE VISIT LIFAN POWER USA’S WEBSITE
(WWW.LIFANPOWERUSA.COM) OR CALL 1-866-471-7464 Option 2, Warranty and
Service. WE WILL BE HAPPY TO HANDLE YOUR WARRANTY ISSUE OR DIRECT
YOU TO THE NEAREST “AUTHORIZED SERVICE CENTER.”

77
PRODUCT SPECIFICATIONS
LF15000E-PL
Voltage 120V / 240V
AC Surge Output115000 watts
Rated AC Output214000 watts
Maximum AC Amperage
120 amps
AC Cycle 60hz
Storage Capacitors Battery Maintainer
120V 8.3amp DC Receptacle 1 ea.
120V 20amp AC GFCI Receptacle 2 Duplex
120/240V 30amp AC Twist Lock Receptacle 1 ea.
120V 30amp AC Twist Lock Receptacle 1 ea.
USB Port 2 ea.
Circuit Protection Master Circuit Breaker / Circuit Protectors
Voltage Selector Switch
Yes
ENGINE
Manufacturer LIFAN
Model LF-2V80-F
Maximum Horsepower (MHP) 27 MHP
Engine Displacement 724cc
Starting System Electric
Fuel Tank Capacity 14 gallons
Fuel Tank Material Rust Preventive Coated Steel
Run Time (@ 50% Load) 12 hours
Sound Level (@ 7m / 23ft)
75db
Engine Type 4-stroke OHV
Fuel Type Automotive Grade Unleaded Gasoline
Fuel Compliance 10% ethanol mix
Oil Type & Amount SAE 10W30 1.4 liters
Automatic Idle Control Yes
Low Oil Shutoff Protection
Yes
CARB Certified (-CA) Model Only
DIMENSIONS
Packaged Dimensions 890mm x 740mm x 875mm
Packaged Weight 170kg / 375 lbs.
Unpackaged Dimensions 835mm x 685mm x 730mm
Unpackaged Weight 162kg / 358 lbs.
ACCESSORIES
Battery Maintainer Power Cord
Included
Spark Plug Wrench 1 ea.
Mobility / Wheel Kit Yes

88

99
ONLY operate generators outdoors.
Exhaust gas must be prevented
from entering conned areas.
Direct exhaust gas away from
windows, doors, ventilation, and
other openings.
Do not operate this generator inside
or under any buildings.
WHEN ADDING OR DRAINING FUEL
• Turn generator off and let it cool for at least three minutes before removing fuel cap. Loosen cap
slowly in order to relieve pressure in the fuel tank.
• Fill or drain fuel tank outdoors. Do not excessively inhale fuel vapors.
• Keep away from open ames or sparks and other sources of ignition.
• Do NOT smoke while lling fuel tank.
• Do NOT overll tank. Allow space for fuel expansion.
WHEN TRANSPORTING OR REPAIRING EQUIPMENT
• Transport generator with the fuel valve in the off position.
• Repair generator with the fuel tank empty or the fuel valve in the off position.
• Disconnect spark plug wire before transport or service.
WHEN STORING FUEL OR EQUIPMENT CONTAINING FUEL
• Store away from furnaces, stoves, water heaters, clothes dryers or other appliances that have pilot light
or other ignition source because they can ignite fuel vapors.
WHEN STARTING EQUIPMENT
• Ensure spark plug, mufer, air cleaner, and fuel cap are in place.
• Do NOT crank engine with spark plug removed.
• If fuels spills, wait until it evaporates before starting engine.
WHEN OPERATING EQUIPMENT
• Do NOT choke carburetor to stop engine.
• Do NOT tip engine or equipment at an angle, which causes fuel to spill.
• This generator is not for use in marine applications.

1010
CAUTION!
Improper use and care of this generator will cause damage and shorten
its lifespan. Failure to follow these actions will void all warranties.
• Use generator only for appropriate and designated purposes.
• The dealer or customer helpline (1-866-471-7464) can instruct you on intended
uses.
• Generator must be placed on a level surface.
• Do NOT expose generator to extreme conditions. Excessive dust, moisture, and
corrosive vapors will damage unit.
• Engine cooling slots must be kept clear of debris.
• Shut off generator and take to a qualied service center if the unit fails to operate
properly.

1111
CONTROLS AND FEATURES
LF-15000E-PL
1 Generator 4 Engine
2 Steel frame 5 Generator cover
3 Control panel 6 Mufer end cover

1212
CONTROLS AND FEATURES
LF-15000E-PL
Generators supply voltage and amperage as sine-wave-shaped
energy. As devices are connected to the generator, the sine-wave
shaped energy is disrupted. Measurement of this disruption is
known as total harmonic distortion.total harmonic distortion. The lesser the percentage of
total harmonic distortion, the greater the generator’s ability to
smoothly power a load. Sensitive electronics may malfunction or
fail to operate when powered by a generator with a tot harmonic
distortion greater than 5%, while the upper limit for “clean” electricity is usually 6%. The use of a gen-
erator with a high total harmonic distortion can reduce the life of an electrical appliance, often voiding
the appliance’s warranty.LIFAN Power USA’s Platinum Generators utilize multiple power slots, 100%
copper windings, and welded magnetic plates to produce a maximum total harmonic distortion of 5%,
safely powering all sensitive electronics at home or on the job site.

1313
LEGEND
Fuel Level Sensor - Displays current fuel level
Fuel Tank Cap - Vented fuel cap must be properly installed at all times during operation
Receptacle Panel - see product specications for individual model
Double Pole Circuit Breaker (AC) - protects receptacles & generator from overload
Crankcase Oil Dipstick / Oil Fill Hole Cap - check/ll engine oil
On / Off Switch - rocker style; set to “ON” to start engine and “OFF” to shut off engine
Crankcase Oil Drain Plug - remove to drain oil from crankcase
Fuel Cock (Valve) - turn to “OFF” to terminate fuel delivery to engine
Air Cleaner - check maintenance schedule for service intervals
Earth Grounding Stud - always connect generator to an earth grounding source. Consult local
energy jurisdiction for code requirements in your area
Mufer & Mufer Hood - exhaust mufer emits combustion gas from engine and lowers noise
level of generator
Valve Cover - cover for overhead valves designed to be removed periodically for valve
adjustments
All Lifan Power USA Energy Storm Generators
are equipped with Automatic Voltage
Regulators to ensure maximum protection for
your appliances as well as your generator. By
regulating the level of voltage in an alternating
current (AC) system to a narrower range of
output, the AVR protects any parts of your
systems that might be damaged by surges or
drops in voltage or power, particularly during the start-up of your applicances when the maximum
voltage and power are required. The AVR ensures a constant quality and quantity of voltage is sup-
plied to protect the appliances and the system. All Energy Storm Generators are equipped with AVR
to get maximum performance and power from your unit.

1414
PRE-OPERATING
INSTRUCTIONS
WHEEL KIT ASSEMBLY FOR LF-15000E-PL
Wheel Kit Installation Directions:
NOTE: Install Wheel Kit BEFORE Filling the Generator with Fuel
or Oil. Never Tip a Unit that contains Fuel or Oil.
1. Tip Generator so Engine End is up.
2. Put the wheels and wheel mounting plates in place (the
generator frame is pre-tapped to install these).
3. Screw the wheel mounting plates tightly into place.
4. Ensure that wheels are properly installed before setting
the generator upright.

1515
PRE-OPERATING
INSTRUCTIONS
BATTERY SPECIFICATIONS
Your generator is equipped with the latest battery technology: the lith-
ium ion battery. Lightweight, yet with advanced cold cranking amper-
age available to start your engine with the ease. Long life expectancy
and faster recharging. See the battery specications below for com-
plete details.
12V48WH-36 Lithium Ion Battery
Charge cut-off voltage 14.6V
Nominal cut-off voltage 12.0V
Discharge cut-off voltage 8.0V
Nominal Capacity 4000mAh @ 0.5C Discharge
Nominal charge current 0.5C
Starting current ≥400A(5S)
Operating temperature Charging: -20°C~45°C
Discharging: -20°C~60°C
"Storage temperature (at shipping status:
approx. 50% capacity of fully charged state)
1 month: -20°C~40°C
3 months: -20°C~30°C
1 year: 0°C~30°C
Battery should be
charged every 3
months. Keep its
charge state at about
50%.
Dimensions 128mm x 77mm x 81mm
Amp / hour 48WH/12V = 4AH
Follow all the battery manufacturers’ warnings
for proper installation of your battery in order to
prevent damage to personnel or equipment.
1. Battery leads consist of a Red (hot) lead that connects to the (+) battery post and is connected to
the (+) terminal on the starter solenoid and a Black lead which is connected to the (- ) negative
battery terminal and the frame mounting bolt.
2. Connect the Red (hot) terminal to the battery.
3. Connect the Black (negative) terminal to the battery.

1616
PRE-OPERATING
INSTRUCTIONS: SETUP
WHEN ADDING FUEL
• Turn generator off and let it cool for a minimum of three minutes before removing
fuel cap.
• Turn and remove cap slowly in order to relieve residual tank pressure.
• Always ll the fuel tank with the unit outdoors.
• DO NOT overll tank. Allow room for fuel expansion.
• Keep fuel away from sparks, open ames, heat, pilot lights, and other ignition
sources.
ADD FUEL:
Refer to Controls and Features section for diagrams.
1. Clean area around fuel cap, then remove fuel cap.
2. Pour fresh, clean regular automotive grade unleaded fuel with a minimum octane
rating of 85 into fuel tank. Do NOT mix fuel with oil. Fuel must have ethanol blend
of 10% or less. Pay close attention to the storage requirements of these fuels. Do
NOT overll fuel tank.
3. Install the fuel cap. Rotate the fuel cap clockwise until it is in its locked position.
Wipe away any spilled fuel.

1717
PRE-OPERATING
INSTRUCTIONS: SETUP
CAUTION: Any attempt to start the generator before it has been properly serviced
may result in engine failure and void warranty.
ADD ENGINE OIL: Refer to the diagram below.
1. Place generator on level surface.
2. Clean area around Oil Hole Dipstick/Plug &
Unscrew Oil Hole Dipstick/Plug.
3. Fill with appropriate type and amount. Refer
to Chart for recommended oil type based on
Environmental temperature.
NOTE: Refer to “Product Specications” section for universal recommended oil
type and oil amount.
4. Replace Oil Hole Dipstick/Plug and tighten securely.

1818
PRE-OPERATING
INSTRUCTIONS: SETUP
WHEN ADDING FUEL
• Turn generator off and let it cool for a minimum of three minutes before removing fuel cap.
• Turn and remove cap slowly in order to relieve residual tank pressure.
• Always ll the fuel tank with the unit outdoors.
• DO NOT overll tank. Allow room for fuel expansion.
• Keep fuel away from sparks, open ames, heat, pilot lights, and other ignition sources.
ADD FUEL: Refer to Controls and Features section for diagrams.
1. Clean area around fuel cap, then remove fuel cap.
2. Pour fresh, clean regular automotive grade unleaded fuel with a minimum octane rating of 87
into fuel tank. Do NOT mix fuel with oil. Fuel must have ethanol blend of 10% or less. Pay
close attention to the storage requirements of these fuels. Do NOT overll fuel tank.
3. Install the fuel cap. Rotate the fuel cap clockwise until it is in its locked position. Wipe away
any spilled fuel.
CAUTION: Alcohol-blended fuels (gasohol, ethanol, or methanol) will attract moisture, which
leads to separation and formation of acids during storage. Acidic gas can damage the fuel sys-
tem of an engine while in storage. To avoid engine problems, the fuel system should be treated
with a fuel stabilizer or drained if the generator will not be started for thirty (30) days. If using a
fuel stabilizer, follow the manufacturer’s recommended instructions for use.
Always drain old fuel and use fresh fuel before next use. If you do not use a fuel stabilizer, the fuel
system must be drained and cleaned. Drain the fuel tank and start the engine, allowing it to run
until all fuel lines and carburetor are drained of fuel.
Before restarting the carburetor the oat bowl must be removed and cleaned of any debris.
NEVER use chemical solvents or cleaners in the fuel tank or damage may occur.
GROUNDING THE GENERATOR:
Refer to Controls and Features section.
Connect the Ground Terminal on the generator to an acceptable source of electrical ground, such
as a copper-grounding stake, using copper electrical wire with a minimum diameter of 16 gauges.

1919
OPERATING YOUR
GENERATOR
CHECK AIR CLEANER ELEMENT:
Refer to “Air Cleaner Maintenance” in the Maintenance section of this Owner’s Manual to ensure
Air Cleaner Element is in operable condition.

2020
CONNECTING ELECTRICAL LOADS:
1. Ensure engine is started before plugging in any electrical appliance.
2. Plug in desired 120 Volt loads to the 120 Volt U-Ground and 240 Volt loads to the 240 Volt
receptacles. Always plug appliances into the generator with appliance in its “OFF” position.
3. Do NOT connect 240 Volt loads to the 120 Volt receptacles.
4. Only connect single-phase 60 Hertz loads.
5. DO NOT OVERLOAD THE GENERATOR. FOLLOW THE PROVIDED “GENERATOR
WATTAGE REFERENCE WORKSHEET” TO DETERMINE THE RUNNING AND STARTING
WATTAGE OF YOUR EQUIPMENT REFER TO THE PRODUCT SPECIFICATIONS TO
ENSURE YOUR GENERATOR WILL OPERATE THE DESIRED EQUIPMENT.
NOTE: Use the running and starting wattage provided by the equipment manufacturer if avail-
able. If not available, use provided “Generator Wattage Reference Worksheet.”
OPERATING YOUR
GENERATOR

2121
OPERATING YOUR
GENERATOR
5. Place the On/Off switch in the “ON” (l) position.
6. Grasp starter handle and pull slowly until
resistance is felt. Then pull the cord rapidly with
a full arm stroke. Allow the rope to return slowly.
Do NOT allow the rope to snap back against
housing.
7. Once the engine runs for 3-5 seconds, push the
choke lever in to disengage.
1. Unplug all electrical loads from the generator.
2. Make sure the generator is in a level position.
3. Open the fuel cock by turning the fuel cock to
the “ON” position.
4. For cold engine starts only: Push the choke
lever to the engaged position per the
instruction label on the generator main frame.

2222
LOW OIL ALARM SYSTEM:
This model is equipped with a Low Oil Alert System designed to avoid engine damage from
insufcient oil in the crankcase. The Low Oil Alarm System will stop the engine automatically
before the oil level in the crankcase drops below safe operating levels.
STOPPING THE GENERATOR:
Refer to Controls and Features section for diagram.
EMERGENCY SHUTDOWN
1. Turn the Fuel Valve to “OFF” position
NORMAL SHUTDOWN
1. Unplug all electrical loads or turn the main breaker to the “OFF” position.
2. In order to stabilize internal equipment temperatures, allow the engine to run for 3-5 minutes
under no load.
3. If the generator will not be in use for more than 7 days, turn the fuel valve to the “OFF” position
and allow the unit to run until the fuel in the carburetor is used and the engine shuts itself off.
4. Turn the ignition switch to the “OFF” position.
5. Allow unit to cool to ambient temperature before storage or transportation.
6. Always transport the generator with the fuel valve in the “OFF” position. Failure to do so will
result in damage to the engine.
OPERATING YOUR
GENERATOR

2323
OPERATING YOUR
GENERATOR
USAGE IN HIGH ALTITUDE REGIONS:
In regions with high altitude, the standard carburetor produces overly dense combinations of
fuel and air, which result in decreased engine performance and increased fuel consumption. To
maintain high engine performance at high altitudes, install a high altitude carburetor main spray
nozzle and re-adjust the adjusting screw for idle speed. For usage in regions with an altitude of
over 4,527ft (1380m), contact your dealer to replace the standard carburetor and make needed
adjustments in advance. Even with a proper high altitude carburetor spray nozzle installed in the
engine, the power output of the engine will drop about 3.5% with every 1000ft (305m) increase in
altitude. If the standard carburetor jets are not replaced and adjusted for usage in high altitude,
the increased altitude effect will be even more severe.
NOTE: Usage of the generator in regions with lower altitude than the high altitude car-
buretor spray nozzle is applicable, may result in decrease of engine performance. The
engine may become overheated and over-lean combination of fuel and air produced may
cause severe damage to the engine.
TRANSFER SWITCH CONNECTIONS - Only allow Professional Electricians
The Lifan Energy Storm generator is wired with the neutral bonded to ground. If you are con-
necting your generator to a transfer switch, the electrician must rst determine what type trans-
fer switch is being used. Transfer switches for this equipment are either two-pole or three- pole
types.
A two-pole transfer switch will not switch the neutral from the generator to the service panel. That
means the generator will be grounded to the service panel. To use the generator with two-pole
transfer switches, the electrician will need to change the neutral from bonded to oating.
This is done by removing the jumper wire that connects the alternator ground to the alternator
neutral. Remove the jumper wire and retighten the connections. Keep the jumper wire with the
owner’s manual in case it is needed for future use when not connected to a transfer switch.

2424
• To prevent electrical shock from faulty appliances, the generator should be
grounded. Connect a length of heavy cable between the generator’s
grounding terminal and an external ground source.
• This generator is not intended, nor designed, for use as a standby power
supply, or to be connected to an automatic transfer switch (ATS); it should
never be used as such. Severe property damage and/or severe personal
injury or death may result. Such back feed may electrocute utility company
workers or others who contact the lines during a power outage. When
utility power is restored the generator may explode, burn, or cause res in
the building’s electrical system.
• Indoor use of a generator can kill quickly. Generators should be used
outdoors only.
• The total wattage of all appliances connected must be considered.
• Do not exceed the current limit specied for any one receptacle.
• Do not connect the generator to a household circuit. This could cause
damage to the generator or to electrical appliances in the house.
• Do not modify or use the generator for purposes other than its intended
use.
• Do not connect an extension to the exhaust pipe.
• When an extension cord is required, be sure to use a rubber sheathed
exible cord. Also be sure to use the proper size and length cord.
– 16 Gauge Cords - a 16 gauge cord between 0 and 100 feet long will
safely handle tool and appliance loads up to 10 amps.
– 14 Gauge Cords - a 14 gauge cord between 0 and 50 feet long will
safely handle tool and appliance loads between 10 and 15 amps.
– 12 Gauge Cords - a 12 gauge cord between 50 and 100 feet will safely
handle tool and appliance loads between 10 and 15 amps.
WARNING
CAUTION

2525
• Only operate generator outdoors.
• Prevent exhaust gas from entering, through windows doors or ventilation intakes, any conned
areas.
• DO NOT operate generator inside any enclosed or roofed areas. This includes the generator
compartment of any recreational vehicle (RV).
• Keep the generator away from other electric cables or wires such as commercial power supply
lines.
• The DC receptacle (in the Battery Charge section of the control panel) can be used while the AC
power is in use. If you use both at the same time, be sure not to exceed the total power for AC
and DC.
• Most appliance motors require more than their rated wattage for start-up.
• It is normal for the run time indicator to have 1-2 hours on the meter from the factory for testing
and quality assurance inspections.
• This generator uses a system ground which connects the ground terminals in the AC
receptacles on the control panel to the unit frame. The AC neutral wire is not connected to
the system ground. If you check the receptacles on this generator with a receptacle tester, the
ground circuit condition will appear different than it would for a receptacle in your home.
CAUTION
Never start or shutoff the generator with electrical loads
connected and in the operational mode (on switch
activated).
1. Unplug all electrical loads from the generator.
2. Make sure the generator is in a level position.

2626
STORAGE
Before long term storage of your power equipment product, typically 30 days or more,
perform the following:
1. Set the fuel valve to the “OFF” position.
2. Let the unit continue to run until it stops itself, burning all of the fuel in the fuel system.
3. Turn the ignition switch to the “OFF” position.
4. Drain the engine oil in accordance with the “Oil Change Procedures” in this Owner’s Manual’s
Maintenance section. Do NOT re-ll with oil until ready to use again.
5. Remove the Spark Plug in accordance with the “Spark Plug Maintenance” in the Owner’s Man-
ual’s Maintenance section. Spray a lubricant, such as WD40®, into the Spark Plug hole to lubri-
cate the top of the piston and walls of the cylinder. Replace the Spark Plug.
6. Pull starter rope until resistance is felt. This will place the valves in the closed position.
7. Add the recommended amount of fuel stabilizer, in accordance with the amount recommended
by the manufacturer of the fuel stabilizer, to the unused gasoline left in the fuel tank.
8. Place the unit in a clean, dry, and secure location.
9. Cover with “LIFAN Water Proof Generator Cover,” Item Number LF100-69600 not included) or
canvas/vinyl tarpaulin. Do NOT operate unit with cover installed.
STORING THE UNIT

2727
MAINTENANCE
NOTE: Refer to Following Procedures for Proper Method to Perform Maintenance
MAINTENANCE SCHEDULE
PROCEDURE TIME
Engine Oil Check Each Use
Replace Engine Oil After Each 40 Hours of use (for initial
break-in - after rst 10 hours of use)
Air Cleaner Filter Check Each Use
Air Cleaner Filter Replacement When Needed or After Every 50 Hours
of Use
Air Cleaner Wash Every 3 months or When Needed
Spark Plug Clean every 6 months or whenever
necessary
Valve Clearance Check & re-adjust annually or after 300
hours of use
Oil Filter Clean every 6 months or whenever
necessary

2828
MAINTENANCE
NOTE: Refer to Following Procedures for Proper Method to Perform Maintenance
OIL CHANGE PROCEDURES: Refer to Controls and Feature section for diagram. Periodic
Maintenance of your engine oil should be performed after each 40 hours of use of you
Power Equipment Product. Check your engine oil level prior to each use.
1. Start your engine and let it warm up to get the oil warm and thinner. Turn the engine On/Off
switch to the “OFF” position. Turn Fuel Valve to the “OFF” position.
2. Remove the oil cap/dipstick by turning counter clockwise. Remove the oil drain plug located
below the oil cap/dipstick utilizing the appropriate tools.
USE CAUTION: THE OIL MAY BE HOT.
3. Drain the engine oil into an approved receptacle and discard in accordance with all Federal
and State Regulations. Never dump the used engine oil on the ground or into drains, only
discard in an approved manner. Check with your local authorities to determine the
regulations in your area.
WARNING! AVOID SPLASHING OF HOT OIL; IT CAN BURN YOU AND CAUSE SEVERE INJURY.
4. After oil is completely drained, replace oil drain plug and tighten with appropriate tools.
Replace oil with the proper oil for your product. Refer to the Pre-Operating Instruction:
Generator Setup section for exact fill requirements.
Always use your dipstick to check the oil level and only fill to the full mark on the dipstick.
Never overfill the engine as this can cause damage to the unit and void warranty.
5. Replace the dipstick/oil cap on the engine.
6. Shake generator to ensure the float in the Oil Alert System is free.

2929
MAINTENANCE
PROPER MAINTENANCE OF THE UNIT WILL INCREASE THE LIFE OF YOUR PRODUCT. THE OIL
MUST BE CHANGED ON A REGULAR BASIS FOR PROPER OPERATION, AND RELIABILITY AND
TO ALSO MAINTAIN THE WARRANTY ON THIS PRODUCT.
AIR CLEANER MAINTENANCE:
1. Remove the clip or the wing nut to remove and
check the air filter element.
2. For Sponge Type Air Filters, wash with soap and
water when contaminated. Squeeze excess liquid
from air filter element, and allow the air filter
element to dry. lubricate with a few drops of oil.
For Paper Type Air Filters, replace with the correct
Air Filter for your unit. They are available at your dealer or from LIFAN Power USA. Order your
filter by calling toll free 866-471-7464.
3. Re-Install the air lter element into the air lters housing.

3030
MAINTENANCE
SPARK PLUG MAINTENANCE
1. Remove Spark Plug Cap (refer to “Spark Plug Cap
Removal” gure below.)
2. Remove Spark Plug with socket and handle supplied with your unit (refer to
“Spark Plug Removal” gure below.)
3. Clean any carbon build-up around the Spark Plug.
4. Check the Spark Plug Gap and adjust if necessary. 0.30-inch gap.
5. Lubricate the threads of the Spark Plug with anti-seize compound or engine oil.
6. Re-install the Spark Plug and Spark Plug Cap.
FUEL SYSTEM MAINTENANCE:
NOTE: Periodically you can get sediment or trash in your Carburetor Bowl. Use the following
procedures to clean:
1. Turn the fuel valve to the “OFF” Position.
2. Remove the carburetor bowl by removing the mounting bolt located at the bottom of the bowl.
3. Dump out the old fuel and sediment into an approved container and clean carburetor bowl
thoroughly.

3131
MAINTENANCE
Fuel Filter
Element Removal
Fuel Filter
Element Assembly
4. Fit a new rubber washer into
place and re-attach fuel bowl to
the carburetor, and either clean
or replace the fuel lter element.
Re-assemble the fuel lter
element.
TROUBLESHOOTING
IF THE ENGINE WILL NOT START:
1. Check to ensure switches are in the “ON” position. (Both unit and engine)
2. Check engine oil level. Your unit possesses a Low Oil Alarm System that will not allow your
engine to start if the oil is below safe operating levels. This feature is installed to increase the
life of your engine and prevent engine damage. If oil level is low, ll to the full mark on dipstick.
Refer to the Product Specications for exact oil type and amounts.
3. Check the fuel level to insure adequate fuel. Add fuel if necessary.
4. Remove and inspect the spark plug for cleanliness and proper electrode gap. If needed, clean
or replace the spark plug. Refer to Spark Plug Maintenance in the Maintenance section of the
Owner’s Manual for proper procedure.
5. If your unit will still NOT start after performing the above checks, call our customer hotline at
LIFAN Power USA Toll Free 1-866-471-7464 OPTION 2.
NOTE: Periodically on the initial start-up or after the unit has been stored for a long period of
time, the oat for the “Low Oil Alarm System” will stick to the bottom of your oil pan. Locate the
two (2) wires to the Low Oil Sensor Diode (refer to gure on the right) located on the side of the
engine block. Unplug these wires and, only after ensuring the engine is full of oil, start the engine
and allow to run until warm (normally 20 minutes, as this will heat the oil and release the oat on
the Low Oil Alert System). Then re-plug the wires to the terminals on the Low Oil Alarm Sending
Unit.
UNIT DOES NOT PROVIDE ELECTRICAL CURRENT:
1. Plug in a small appliance or tool to test.
2. Check if the AC (or DC) Circuit Breaker is in the “ON” position. If not, place in “ON” position. If
equipped with a GFCI receptacle, re-set GFCI Breaker by pushing in the reset button in the
middle of the GFCI’s faceplate (this must be done with the engine running).
3. If your unit still does NOT produce electricity after performing the previous checks, call LIFAN
Power USA at 1-866-471-7464, OPTION 2.

3232
GENERATOR SAFETY
1. Never operate gasoline engine powered products in any enclosed spaces, as they produce
deadly Carbon Monoxide Poisonous Gases.
2. Never hook a generator directly to your home circuit without the proper installation by a
Licensed Electrician and without the proper power transfer devices.
3. Do NOT operate your power equipment in inclement weather such as rain, snow, and/or sleet.
4. Do NOT operate your power equipment within ve (5) feet of any ammable materials.
5. When refueling the power equipment never smoke or refuel near any ame or ignition devices.
Never refuel while the unit is running. If during the refueling process some fuel is spilled,
always completely clean the fuel and allow sufcient drying time prior to re-starting the unit.
Gasoline vapors ignite easily and are very dangerous.
6. Do NOT parallel connect this model. Generator cannot be combined with other electric wires
or multiple socket boxes.
7. Do NOT lengthen the exhaust pipe or vent it with any extension.
8. Use SJ or SJO type extension cords if necessary.
9. Do not use extension cords exceeding: 16 Gauge, 200ft or 10 Gauge, 330ft.
10. NEVER ALLOW CHILDREN OR ANIMALS TO BE NEAR THIS EQUIPMENT DURING OPERATION.
ONLY QUALIFIED PERSONS SHOULD OPERATE THIS EQUIPMENT. FOLLOW ALL GUIDELINES
CONTAINED IN THIS OWNER’S MANUAL FOR THE SAFE OPERATION OF THIS EQUIPMENT.

3333
WATTAGE CHART

3434
WATTAGE CHART

3535
WATTAGE CHART
RECORD PURCHASE HERE
MODEL # _____________________________________________________
ENGINE ID # _________________________________________________
DATE OF PURCHASE _________________________________________
PURCHASE LOCATION _______________________________________
-CA INDICATES THIS UNIT IS CARB CERTIFIED

3636
CONVERTING AMPS OR
HORSEPOWER INTO WATTS
If necessary, use these formulas:
Watts = Amps x Volts
Running Watts* = Horsepower x 932** (for motors)
Remember, this worksheet lists average power requirements a particular manufacturer’s
device may use more or less than the listed wattage.
• Add a 10% correction factor to your totals to help overcome this uncertainty.
If your customer plans to operate devices that use electric motors, list both the starting and
running requirements of each.
• Starting requirements of some devices maybe signicantly higher than their running
requirements. This higher demand must be considered when estimating your power needs.
Some small, universal motors — which do not draw a heavy starting load (drills, small saws,
blenders, etc.) — require very little extra current for starting.
When listing items that use motors, take them in the order of highest-to-lowest starting require-
ments, as shown in the example below. Motor A, for instance, has a starting requirement of 2,600
watts, so it’s listed rst, followed by Motor B at 1,300 watts, and Motor C at 1,000 watts.
NO ELECTRIC MOTORS
If your list does not include any devices that use electric motors, simply add the power (running)
requirements of all the items on your list to obtain the maximum power needed.
For example, if you intend to use only an electric skillet, a 100-watt light and a heating pad (as
shown below), the maximum power requirement would be 1,655 watts. In this case, a generator
like the EF2600, that can produce 2,300 watts rated output, is recommended.

3737
LIMITED WARRANTY POLICY
This warranty is limited to the following Lifan Power and Storm Series products that are distributed by the
EquipSource LLC, d/b/a LIFAN POWER USA, located at 2205 Industrial Park Road, Van Buren, AR 72956.
Effective date is 1/1/2019.
LENGTH OF WARRANTY
Residential Use** Commercial/Rental**
PRODUCTS COVERED 1st Year 2nd Year 3rd Year Warranty not to exceed 300
hrs. or terms listed below.
Walk Behind Mowers Full unit parts & labor / 250 hrs. Full unit parts only / 250 hrs. Engine only Full unit: 3 months parts & labor
Water Pumps Full unit parts & labor / 250 hrs. Full unit parts only / 250 hrs. Engine only Full unit: 12 months parts & labor
Generators/Inverter
Generators Full unit parts & labor / 250 hrs. Full unit parts only / 250 hrs. Engine only Full unit: 12 months parts & labor
Pressure Washer Engines Full unit parts & labor / 250 hrs. Full unit parts only / 250 hrs. Engine only Full unit: 12 months parts & labor
Pressure Washer Pumps* Full unit parts & labor / 250 hrs. NA NA Full unit: 12 months parts & labor
Gasoline Engines Full unit parts & labor / 250 hrs. Full unit parts only / 250 hrs. Engine only Full unit: 12 months parts & labor
Gasoline Powered Welders Full unit parts & labor / 250 hrs. Full unit parts only / 250 hrs. Engine only Full unit: 6 months parts & labor
*All Lifan Pressure Pro™ and Storm Series Pressure Storm™ pressure washers are equipped with Annovi
Reverberi ™ high pressure water pumps which are covered by the manufacturer’s 1 year limited warranty.
Go to www.lifanpowerusa.com for details.
** Residential Use is dened as items that are for personal use.
*** Commercial/Rental use is dened as any usage for income producing or other business related uses.
In order to qualify for the limited warranty the product(s) must be purchased in North America from an authorized Equip-
Source, LLF d/b/a Lifan Power USA dealer or a dealer authorized by EquipSource to sell Lifan products. This warranty is
non-transferable and applies only to the original purchaser. The supplied “Warranty Registration Card” must be complet-
ed and on le with American Warranty Service (at the supplied address), at the time that any warranty claim is made. The
“Warranty Registration Card” must be submitted with a receipt of purchase which clearly states the date of purchase and
where the purchase was made.
During the warranty period (stated above) Equipsource, LLC and/or American Warranty Service will repair or replace,
at its’ option, any part that is proven to be defective in material or workmanship under normal usage. Repairs and/or
replacement will be made without charge for parts or labor. All parts found to be defective must be returned to Equip-
Source or American Warranty Service at our direction. Upon reception of the parts a judgment as to the validity of the
warranty claim will be determined. All parts replaced under warranty or any replacement of the complete unit will be
considered part of the original product and replacement of any product, and any warranty on those parts or replacement
unit will coincide with the original warranty.
To obtain Warranty Service, call our Customer Service Hotline at 1-866-471-7464 and press 2 for Warranty Service at
which time you will be transferred to the technicians at American Warranty Service. In lieu of this you may call directly
to American Warranty Service at 866-926-4313 to be directly connected to a repair specialist. If your issue cannot be
resolved through consultation with our customer service representatives, you will be directed to an Independent Service
Center of your choice nearest your location. Any manufacture’s Defects of your product will be repaired or replaced at
no charge to you per our commitment. If the issue with your unit is not a Manufacture’s Defect, you will be advised to
make payment to the Service Center upon diagnosis of repairs which are not covered under the Manufacturer’s Warranty
Policy. In this case the end user is responsible for all shipping and handling charges associated with the exchange and
as stated above the warranty will coincide with the date of the original purchased unit.
This warranty is not valid for products or parts affected or damaged by accident, collision, normal wear, fuel
contamination, abuse, neglect, misuse, alteration and/or unsuitable use or unauthorized parts replacement. Mower

3838
This warranty is not valid for products or parts affected or damaged by accident, collision, normal wear, fuel
contamination, abuse, neglect, misuse, alteration and/or unsuitable use or unauthorized parts replacement. Mower
decks and blades are specically not warranted for impact or abrasive damage. Warranty becomes void if the
customer fails to install, maintain, and/or operate the product in accordance with the instructions and recommended
actions of Lifan set forth in the owner’s manual. EquipSource, LLC disclaims any responsibility for time loss or loss of
usage of the product, transportation, commercial loss, or any other incidental or consequential damage. Prior to any
warranty service an approval code must be issued to the service center in order for the warranty claim to be valid. Any
implied warranties are limited to the duration of this written limited warranty. This warranty gives you specic legal
rights, and you may also have other rights, which may vary from state to state.
OWNER’S RESPONSIBILITY
To ensure trouble free warranty coverage it is important that you register your Lifan generator by phone at
1-866-471-7464, or by lling out and returning to Lifan Power USA the warranty registration card supplied with
your generator.
REGISTERING YOUR PRODUCT
This conrms your warranty coverage and provides a direct link between you and Lifan Power USA if we nd it necessary
to contact you. Your receipt for purchase including date, model and serial number must be maintained and registered
to receive service from an Authorized Service Dealer for warranty service. Proof of purchase rests solely with you, the
original purchaser. You must demonstrate reasonable care and use, and follow preventive maintenance, storage, fuel
and oil usage as prescribed in the operator’s manual for your Lifan Power unit. For the warranty assistance from a Lifan
Authorized Service Dealer nearest to you, call Lifan’s automated phone at 1-866-471-4764 Option 2. Should you require
assistance or have questions concerning Lifan Power USA Warranty Statement, you can contact us through the web at
www.lifanpowerusa.com or call toll free 1-866-471-7464.
EXCLUSIONS
• Lifan Power Equipment that utilize non-Lifan replacement parts.
• Failure to perform “Periodic Maintenance” as required and specied in the supplied “Owner’s Manual.”
• Costs of normal maintenance and adjustments.
• Failures caused by any contaminated fuels, oils, or lack of proper oil levels.
• Repairs or diagnostics performed by individuals other than Lifan authorized dealers not authorized in
writing by Lifan.
• Failures due to normal wear and tear, accident, misuse, abuse, negligence or improper use.
• As with all mechanical devices, the Lifan engines need periodic part(s) service and replacement to perform
as designed. This warranty will not cover repair when normal use has exhausted the life of a part(s) or
engine.
• Failures caused by any external cause or act of God, including but not limited to, collision, theft, vandalism,
riot, war, re, freezing, lightning, earth-quake, windstorm, hail, water, ood, tornado, or hurricane or any
occurrence outside of normal use and activity.
• Damage related to any animal infestation to include rodent and/or insect infestation.
• Products that are modied or altered in a manner not authorized in writing by Lifan.
• Any incidental, consequential or indirect damages caused by defects in materials or workmanship, or any
delay in repair or replacement of the defective part(s).
• Failure due to misapplication.
• Telephone, cellular phone, facsimile, internet access, or other communication expenses.
• Expenses related to “customer instruction” or troubleshooting where no manufacturing defect is found.
• Overnight freight or special shipping costs for replacement part(s).
• Overtime, holiday or emergency labor.
• Starting batteries, fuses, light bulbs and engine uids.
• SPECIAL RESTRICTION ON ALL RESIDENTIAL GRADE EQUIPMENT: Any residential grade unit used in a
commercial application falls under a 60-day limited warranty.
LIMITED WARRANTY POLICY

3939
DISCLAIMER OF IMPLIED WARRANTIES
This limited warranty is in lieu of all other expressed or implied warranties, including any warranty of the unit’s
tness for any particular use and any implied warranty of MERCHANTABILITY otherwise applicable to Lifan
Power Equipment and its afliated companies shall not be liable for any special, incidental or consequential
damage, including lost prots. There are no warranties extended other than as provided herein. This limited
warranty may be modied only by Lifan Power USA. Any implied warranties allowed by law shall be limited in duration to
the terms of the express warranty provided herein. Some states do not allow limitations on how long an implied warranty
lasts, so the above limitation may not apply to you. Some states do not allow the exclusion or
limitation of incidental or consequential damages, so the above limitation may not apply to you. This warranty gives you
specic legal rights. You also have other rights from state to state. Lifan’s ONLY LIABILITY SHALL BE THE REPAIR OR
REPLACEMENT AS STATED ABOVE. IN NO EVENT SHALL Lifan BE LIABLE FOR ANY
INCIDENTAL OR CONSEQUENTIAL DAMAGES, EVEN IF SUCH DAMAGES ARE A DIRECT RESULT OF Lifan’s NEGLI-
GENCE. Some states do not allow the exclusion or limitation of incidental or consequential damages, so the above lim-
itation may not apply to you. This warranty gives you specic legal rights and you may also have other rights from state
to state.
GOVERNING LAW/ CONSENT TO JURISDICTION AND FORUM SELECTION
The laws of the State of Arkansas shall govern the rights and duties of the parties under this agreement and jurisdiction
and venue is xed in Crawford County, Arkansas. The buyer/owner hereby waives any right it may have to assert the
doctrine of forum non conveniens or similar doctrine or to object to venue with respect to any proceeding brought in ac-
cordance with this paragraph, and stipulates that the State and Federal courts located in the County of Crawford, State
of Arkansas shall have in person jurisdiction and venue over each of them for the purpose of litigating any dispute, con-
troversy, or proceeding arising out of or related to the sale, manufacture or warranty of products with EquipSource, LLC.
OWNER’S WARRANTY RESPONSIBILITIES
As the outdoor equipment owner, you are responsible for performance of the required maintenance listed in your own-
er’s manual. EquipSource, LLC d/b/a Lifan Power USA recommends that you retain all receipts covering maintenance on
your outdoor equipment. Lifan Power USA will not deny your warranty coverage based solely on your lack of receipts for
service however, the condition of the equipment upon arrival at the service center will determine the warrantable nature
of the product.
As the outdoor equipment owner, you should however be aware that Lifan Power USA may deny your warranty coverage
if your outdoor equipment or a part has failed due to abuse, neglect, or improper maintenance or unapproved modica-
tions.
If you have any questions regarding your warranty rights and responsibilities, you should contact Lifan Power USA or
American Warranty Service Representative at 1-866-471-7464 Option 2 Warranty and Service or at the following address
Lifan Power USA, 2205 Industrial Park Road, Van Buren, AR 72956 or by contacting us through www.lifanpowerusa.com.
This warranty specifically excludes the use of any Lifan Power Equipment or Storm Series power
equipment as the “Sole Source of Power” for “off the power grid applications” and this warranty
will become null and void for units used for this purpose and manner. This warranty specifically
excludes the use of any Lifan Power Equipment or Storm Series power equipment for the
purpose of powering Life Support devices, Life Support appliances, Medical devices, and/or
Medical appliances.
EquipSource, LLC will not be held responsible for any damage due to the use of any Lifan or
Storm Series power equipment for these purposes.
LIMITED WARRANTY POLICY

4040
PELIGROS ESPECIALES
• Envenenamiento por CO: El escape del motor contiene monóxido de carbono, un gas
venenoso que puede causar intoxicación por monóxido de carbono y una posible
muerte si se inhala.
• Descarga eléctrica: El funcionamiento del equipo en condiciones de humedad o cerca
del agua puede provocar una descarga eléctrica.
• Exposición química: Limpiar los vapores químicos o el contacto con la piel puede ser
peligroso.
• Fuego / Explosión: Las chispas del motor pueden encender el combustible u otros
líquidos o vapores inamables en las cercanías. El escape caliente del motor puede
encender materiales combustibles.
• Quemaduras: El motor del generador es una supercie caliente que puede provocar
quemaduras.
DATOS DE PROTECCIÓN DEL EQUIPO
Inspeccione al momento de la entrega: ¡PRIMERO! Inspec-
cione si hay componentes faltantes o dañados. Consulte la sec-
ción “Conguración / instalación inicial” para saber dónde infor-
mar sobre piezas faltantes o dañadas.
Agregar aceite de motor: El motor se envía sin petróleo. Con-
sulte la sección “Manual del motor” de este manual para obtener
instrucciones sobre las recomendaciones de capacidad y visco-
sidad.
Programa de mantenimiento: El motor requiere inspección y
servicio periódicos para que el generador funcione de manera
eciente. Consulte el “Resumen del programa de mantenimien-
to” para conocer la frecuencia del servicio.

PREFACIO
Gracias por elegir LIFAN Power USA para sus necesidades de equipos eléctricos. LI-
FAN Power USA se enorgullece de ofrecer productos de calidad a precios asequibles,
creando el “Mejor valor de equipo en el mercado actual”.
Su generador portátil utiliza nuestros motores de gasolina de grado industrial y está
diseñado para USO EN EXTERIORES SOLAMENTE.
Todos los productos LIFAN Power USA se fabrican utilizando la última tecnología.
Construido con componentes de calidad, su nuevo producto de equipos eléctricos le
brindará años de servicio conable. Su unidad, junto con todos los productos LIFAN
Power USA, están diseñados, fabricados y fabricados con el motor de gasolina de
grado industrial de LIFAN.
Este manual del propietario le proporcionará toda la información necesaria para su
nuevo producto de equipo eléctrico, incluido el funcionamiento y el mantenimiento
seguros de su unidad. Guarde y lea este Manual del propietario completa y detenida-
mente antes de la operación. Conserve este Manual del propietario para obtener ayu-
da en el futuro, como programas de mantenimiento adecuados y consejos para pro-
longar la vida útil y el uso ecaz de su unidad. Si necesita ayuda, visite nuestro sitio
web (www.lifanpowerusa.com) o llame sin cargo al 866-471-7464 Opción 2, Garantía y
servicio.
Este manual del propietario contiene información con respecto a los productos más
nuevos en el momento de su publicación. Debido a revisiones y modicaciones, la
información que se indica en el Manual del propietario puede diferir del estado real.
Este manual del propietario está sujeto a cambios sin previo aviso. Los derechos de
autor del manual del propietario pertenecen a EquipSource, LLC. Cualquier grupo o
individuo tiene prohibido reimprimir o copiar cualquier parte de este Manual del propi-
etario sin el consentimiento por escrito de EquipSource, LLC.
PARA TODOS LOS PROBLEMAS / PREGUNTAS RELACIONADOS CON LA GARANTÍA
Y EL SERVICIO, NO DEVUELVA SU UNIDAD A LA TIENDA O DISTRIBUIDOR DONDE
SE COMPRÓ EL ARTÍCULO. PARA OBTENER SERVICIO, VISITE EL SITIO WEB DE
LIFAN POWER USA (WWW.LIFANPOWERUSA.COM) O LLAME AL 1-866-471-7464 Op-
ción 2, Garantía y servicio. ESTAREMOS FELICES DE MANEJAR SU PROBLEMA DE
GARANTÍA O DIRIGIRLE AL “CENTRO DE SERVICIO AUTORIZADO” MÁS CERCANO.
4141

4242
Usar un generador en el interior puede MATAR
EN MINUTOS!
Escape del generador contiene monóxido de carbono.
Este es un veneno que no se puede ver ni oler.
NUNCA utilice dentro de una
casa o en el garaje, INCLUSO
SI las puertas y ventanas
están abiertas.
Utilice sólo AL AIRE LIBRE y
lejos de ventanas,
puertas y respiraderos.
Evitar otros peligros generador,
LEER EL MANUAL ANTES DE USAR
En utilisant un générateur à l'intérieur peut vous tuer en
quelques minutes!
D'air du générateur contient du monoxyde de carbone.
C'est un poison qui vous ne pouvez pas voir ou sentir.
NE JAMAIS utiliser a l’intérieur
d’une maison ou d’un garage,
MEME SI les portes et fenêtres
sont ouvertes.
Utiliser uniquement à
l’EXTERIEUR et loin des
fenêtres, portes et ouvertures
d’aèration.
Éviter d'autres dangers du générateur,
LIRE LE MANUEL AVANT UTILISATION

4343
SOLO opere generadores en exteri-
ores.
Debe evitarse que los gases de es-
cape entren en áreas connadas.
Dirija los gases de escape lejos de
ventanas, puertas, ventilación y
otras aberturas.
No opere este generador dentro o
debajo de edicios.
AL AÑADIR O DRENAR COMBUSTIBLE
• Apague el generador y déjelo enfriar durante al menos tres minutos antes de quitar la tapa de combustible. Afloje la tapa
lentamente para aliviar la presión en el tanque de combustible.
• Llene o drene el tanque de combustible al aire libre. No inhale excesivamente los vapores de combustible.
• Mantener alejado de llamas abiertas o chispas y otras fuentes de ignición.
• NO fume mientras llena el tanque de combustible.
• NO llene demasiado el tanque. Deje espacio para la expansión del combustible.
AL TRANSPORTAR O REPARAR EQUIPO
• Transporte el generador con la válvula de combustible en la posición de apagado.
• Repare el generador con el tanque de combustible vacío o la válvula de combustible en la posición de apagado.
• Desconecte el cable de la bujía antes del transporte o servicio.
AL ALMACENAR COMBUSTIBLE O EQUIPO QUE CONTIENE COMBUSTIBLE
• Almacene lejos de hornos, estufas, calentadores de agua, secadoras de ropa u otros electrodomésticos que tengan luz piloto
u otra fuente de ignición porque pueden encender los vapores del combustible.
AL PONER EN MARCHA EL EQUIPO
• Asegúrese de que la bujía, el silenciador, el filtro de aire y la tapa de combustible estén en su lugar.
• NO arranque el motor sin la bujía.
• Si se derrama combustible, espere hasta que se evapore antes de arrancar el motor.
CUANDO OPERA EL EQUIPO
• NO estrangule el carburador para detener el motor.
• NO vuelque el motor o el equipo en ángulo, ya que esto hará que se derrame combustible.
• Este generador no es para uso en aplicaciones marinas.

4444
¡PRECAUCIÓN!
El uso y cuidado inadecuado de este generador provocará daños y acortará su vida útil. El
incumplimiento de estas acciones anulará todas las garantías.
• Utilice el generador solo para los nes apropiados y designados.
• El distribuidor o la línea de ayuda al cliente (1-866-471-7464) pueden instruirle sobre
los usos previstos.
• El generador debe colocarse sobre una supercie nivelada.
• NO exponga el generador a condiciones extremas. El polvo, la humedad y los
vapores corrosivos excesivos dañarán la unidad.
• Las ranuras de enfriamiento del motor deben mantenerse libres de residuos.
• Apague el generador y llévelo a un centro de servicio calicado si la unidad no
funciona correctamente.

4545
CONTROLES Y CARACTERÍSTICAS
LF-15000E-PL
1 Generador 4 Motor
2 Marco de acero 5 Cubierta del generador
3 Panel de control 6 Cubierta del extremo
del silenciador

4646
CONTROLES Y CARACTERÍSTICAS
LF-15000E-PL

4747
LEYENDA
Sensor de nivel de combustible: muestra el nivel de combustible actual
Tapón del tanque de combustible: el tapón de combustible ventilado debe instalarse correcta-
mente en todo momento durante la operación
Panel de receptáculo: consulte las especicaciones del producto para el modelo individual
Disyuntor bipolar (CA): protege los receptáculos y el generador contra sobrecargas
Varilla medidora de aceite del cárter / Tapa del oricio de llenado de aceite: comprobar /
llenar el aceite del motor
Interruptor de encendido / apagado: estilo balancín; establecer en “ON” para arrancar el motor
y “OFF” para apagar el motor Tapón de drenaje de aceite del cárter - quitar para drenar el aceite
del cárter
Válvula de combustible: gire a la posición “OFF” para interrumpir el suministro de combustible al
motor.
Filtro de aire: consulte el programa de mantenimiento para conocer los intervalos de servicio
Perno de conexión a tierra: conecte siempre el generador a una fuente de conexión a tierra.
Consulte la jurisdicción energética local para conocer los requisitos del código en su área.
Silenciador y capucha del silenciador: el silenciador de escape emite gas de combustión del
motor y reduce el nivel de ruido del generador.
Cubierta de válvula: cubierta para válvulas aéreas diseñada para quitarse periódicamente para
válvulas ajustes.
Todos los generadores Energy Storm de Lifan Power USA están equipa-
dos con reguladores de voltaje automáticos para garantizar la máxima
protección para sus electrodomésticos y su generador. Al regular el
nivel de voltaje en un sistema de corriente alterna (CA) a un rango más
estrecho de salida, el AVR protege cualquier parte de sus sistemas que
pueda resultar dañada por sobrecargas o caídas de voltaje o energía,
particularmente durante el arranque de su aplicaciones cuando se re-
quiere la máxima tensión y potencia. El AVR asegura que se suministre
una calidad y cantidad constante de voltaje para proteger los aparatos
y el sistema. Todos los generadores Energy Storm están equipados con
AVR para obtener el máximo rendimiento y potencia de su unidad.

4848
PRE-OPERACIÓN
INSTRUCCIONES
CONJUNTO DE KIT DE RUEDAS PARA LF-15000E-PL
Instrucciones de instalación del juego de ruedas:
NOTA: Instale el juego de ruedas ANTES de llenar el generador con com-
bustible o aceite. Nunca incline una unidad que contenga combustible o
aceite.
1. Incline el generador de modo que el extremo del motor esté hacia
arriba.
2. Coloque las ruedas y las placas de montaje de las ruedas en su
lugar (el bastidor del generador está pre-roscado para instalarlas).
3. Atornille las placas de montaje de la rueda firmemente en su lugar.
4. Asegúrese de que las ruedas estén instaladas correctamente antes
de colocar el generador en posición vertical.

4949
PRE-OPERACIÓN
INSTRUCCIONES
ESPECIFICACIONES DE LA BATERIA
Su generador está equipado con la última tecnología en baterías: la batería de iones
de litio. Ligero, pero con un avanzado amperaje de arranque en frío disponible para
arrancar el motor con facilidad. Larga esperanza de vida y recarga más rápida. Con-
sulte las especicaciones de la batería a continuación para obtener detalles comple-
tos.
12V48WH-36 Batería de iones de litio
Voltaje de corte de carga 14.6V
Voltaje de corte nominal 12.0V
Voltaje de corte de descarga 8.0V
Capacidad nominal 4000mAh @ 0.5C Descarga
Corriente de carga nominal 0.5C
Corriente de arranque ≥400A(5S)
Temperatura de funcionamiento Cargando: -20°C~45°C
Descarga: -20°C~60°C
Temperatura de almacenamiento (en estado
de envío: aprox. 50% de capacidad del esta-
do de carga completa)
1 mes: -20°C~40°C
3 meses: -20°C~30°C
1 año: 0°C~30°C
La batería debe cam-
biarse cada 3 meses.
Mantenga su estado
de carga aproximada-
mente al 50%.
Dimensiones 128mm x 77mm x 81mm
Amp / hora 48WH/12V = 4AH
Siga todas las advertencias de los fabricantes
de baterías para la instalación adecuada de su
batería a n de evitar daños al personal o al
equipo.
1. Los cables de la batería consisten en un cable rojo (vivo) que se conecta al borne (+) de la batería
y está conectado al terminal (+) en el solenoide de arranque y un cable negro que está conectado al
terminal negativo (-) de la batería y el perno de montaje del marco.
2. Conecte el terminal rojo (vivo) a la batería.
3. Conecte el terminal negro (negativo) a la batería.

5050
INSTRUCCIONES PREVIAS A LA
OPERACIÓN: CONFIGURACIÓN
AL AÑADIR COMBUSTIBLE
• Apague el generador y déjelo enfriar por un mínimo de tres minutos antes de
quitar la tapa de combustible.
• Gire y retire la tapa lentamente para aliviar la presión residual del tanque.
• Siempre llene el tanque de combustible con la unidad al aire libre.
• NO llene demasiado el tanque. Deje espacio para la expansión del combustible.
• Mantenga el combustible alejado de chispas, llamas abiertas, calor, luces piloto y
otras fuentes de ignición.
AGREGUE COMBUSTIBLE:
Consulte la sección Controles y
características para ver los
diagramas.
1. Limpie el área alrededor de la tapa de combustible, luego retire la tapa de
combustible.
2. Vierta combustible sin plomo de grado automotriz, fresco y limpio, con un
octanaje mínimo de 85 en el tanque de combustible. NO mezcle combustible
con aceite. El combustible debe tener una mezcla de etanol del 10% o menos.
Preste mucha atención a los requisitos de almacenamiento de estos
combustibles. NO llene demasiado el tanque de combustible.
3. Instale la tapa de combustible. Gire la tapa de combustible en el sentido de las
agujas del reloj hasta que esté en su posición bloqueada. Limpie cualquier
derrame de combustible.

5151
PRECAUCIÓN: Cualquier intento de poner en marcha el generador antes de que
haya recibido el servicio adecuado puede resultar en una falla del motor y anular la
garantía.
AGREGUE ACEITE DE MOTOR: Consulte el diagrama a continuación.
1. Coloque el generador en una supercie
nivelada.
2. Limpie el área alrededor de la varilla medidora
/ tapón del oricio de aceite y desatornille la
varilla medidora / tapón del oricio de aceite.
3. Complete con el tipo y la cantidad adecuados. Consulte la tabla para conocer el
tipo de aceite recomendado según la temperatura ambiental.
NOTA: Consulte la sección “Especicaciones del producto” para conocer el tipo y
la cantidad de aceite recomendados universalmente.
4. Vuelva a colocar la varilla medidora / tapón del oricio de aceite y apriete
rmemente.
INSTRUCCIONES PREVIAS A LA
OPERACIÓN: CONFIGURACIÓN

5252
AL AÑADIR COMBUSTIBLE
• Apague el generador y déjelo enfriar por un mínimo de tres minutos antes de quitar la tapa de
combustible.
• Gire y retire la tapa lentamente para aliviar la presión residual del tanque.
• Siempre llene el tanque de combustible con la unidad al aire libre.
• NO llene demasiado el tanque. Deje espacio para la expansión del combustible.
• Mantenga el combustible alejado de chispas, llamas abiertas, calor, luces piloto y otras fuentes
de ignición.
AÑADA COMBUSTIBLE: Consulte la sección Controles y características para ver los
diagramas.
1. Limpie el área alrededor de la tapa de combustible, luego retire la tapa de combustible.
2. Vierta combustible regular sin plomo fresco y limpio de grado automotriz con un octanaje
mínimo de 87 en el tanque de combustible. NO mezcle combustible con aceite. El
combustible debe tener una mezcla de etanol del 10% o menos. Preste mucha atención a los
requisitos de almacenamiento de estos combustibles. NO llene demasiado el tanque de
combustible.
3. Instale la tapa de combustible. Gire la tapa de combustible en el sentido de las agujas del
reloj hasta que esté en su posición bloqueada. Limpie cualquier derrame de combustible.
PRECAUCIÓN: Los combustibles mezclados con alcohol (gasohol, etanol o metanol) atraerán la
humedad, lo que conduce a la separación y formación de ácidos durante el almacenamiento. El
gas ácido puede dañar el sistema de combustible de un motor mientras está almacenado. Para
evitar problemas con el motor, el sistema de combustible debe tratarse con un estabilizador de
combustible o drenarse si el generador no se pondrá en marcha durante treinta (30) días. Si usa
un estabilizador de combustible, siga las instrucciones de uso recomendadas por el fabricante.
Drene siempre el combustible viejo y use combustible nuevo antes del próximo uso. Si no utiliza
un estabilizador de combustible, se debe drenar y limpiar el sistema de combustible. Drene el
tanque de combustible y encienda el motor, dejándolo funcionar hasta que se vacíen todas las
líneas de combustible y el carburador.
Antes de reiniciar el carburador, se debe retirar el recipiente del otador y limpiar cualquier resid-
uo.
NUNCA use solventes químicos o limpiadores en el tanque de combustible o pueden ocurrir
daños.
INSTRUCCIONES PREVIAS A LA
OPERACIÓN: CONFIGURACIÓN

5353
OPERANDO SU
GENERADOR
CONEXIÓN A TIERRA DEL GENERADOR:
Consulte la sección Controles y funciones.
Conecte la terminal de tierra del generador a una fuente aceptable de tierra eléctrica, como una
estaca de cobre para conexión a tierra, utilizando un cable eléctrico de cobre con un diámetro
mínimo de 16 calibres.
COMPRUEBE EL ELEMENTO DEL FILTRO DE AIRE:
Consulte “Mantenimiento del ltro de aire” en la sección Mantenimiento de este manual del pro-
pietario para asegurarse de que el elemento del ltro de aire esté en condiciones operativas.

5454
CONEXIÓN DE CARGAS ELÉCTRICAS:
1. Asegúrese de que el motor esté encendido antes de enchufar cualquier aparato eléctrico.
2. Enchufe las cargas deseadas de 120 voltios a la toma de tierra en U de 120 voltios y las cargas
de 240 voltios a los receptáculos de 240 voltios. Siempre conecte los electrodomésticos al
generador con el electrodoméstico en la posición “APAGADO”.
3. NO conecte cargas de 240 voltios a los receptáculos de 120 voltios.
4. Solo conecte cargas monofásicas de 60 Hertz.
5. NO SOBRECARGUE EL GENERADOR. SIGA LA “HOJA DE TRABAJO DE REFERENCIA DE
POTENCIA DEL GENERADOR” PROPORCIONADA PARA DETERMINAR LA POTENCIA DE
FUNCIONAMIENTO Y ARRANQUE DE SU EQUIPO CONSULTE LAS ESPECIFICACIONES DEL
PRODUCTO PARA ASEGURARSE DE QUE SU GENERADOR OPERARÁ EL EQUIPO DESEADO.
NOTA: Utilice el vataje de funcionamiento y arranque proporcionado por el fabricante del equipo
si está disponible. Si no está disponible, utilice la “Hoja de trabajo de referencia de potencia del
generador”.
OPERANDO SU
GENERADOR

5555
OPERANDO SU
GENERADOR
5. Coloque el interruptor de encendido / apagado en
la posición “ON” (l).
6. Agarre la manija del motor de arranque y tire
lentamente hasta que sienta resistencia. Luego,
tire del cordón rápidamente con un movimiento
completo del brazo. Deje que la cuerda regrese
lentamente. NO permita que la cuerda golpee
contra la carcasa.
7. Una vez que el motor funcione durante 3-5
segundos, presione la palanca del estrangulador
para desengancharla.
1. Desenchufe todas las cargas eléctricas del
generador.
2. Asegúrese de que el generador esté en una
posición nivelada.
3. Abra la llave de combustible girando la válvula
de combustible a la posición “ON”.
4. Solo para arranques de motor en frío: Empuje la
palanca del estrangulador a la posición de
engranado según la etiqueta de instrucciones
en el bastidor principal del generador.

5656
SISTEMA DE ALARMA DE BAJO ACEITE:
Este modelo está equipado con un sistema de alerta de aceite bajo diseñado para evitar daños
en el motor por falta de aceite en el cárter. El sistema de alarma de aceite bajo detendrá el motor
automáticamente antes de que el nivel de aceite en el cárter caiga por debajo de los niveles de
funcionamiento seguros.
DETENER EL GENERADOR:
Consulte la sección Controles y características para ver el diagrama.
PARADA DE EMERGENCIA
1. Gire la válvula de combustible a la posición “OFF”
APAGADO NORMAL
1. Desenchufe todas las cargas eléctricas o coloque el disyuntor principal en la posición
“APAGADO”.
2. Para estabilizar las temperaturas internas del equipo, deje que el motor funcione durante 3-5
minutos sin carga.
3. Si el generador no estará en uso por más de 7 días, gire la válvula de combustible a la
posición “OFF” y deje que la unidad funcione hasta que se use el combustible en el
carburador y el motor se apague solo.
4. Gire el interruptor de encendido a la posición “OFF”.
5. Deje que la unidad se enfríe a temperatura ambiente antes de almacenarla o transportarla.
6. Siempre transporte el generador con la válvula de combustible en la posición “APAGADO”. No
hacerlo resultará en daños al motor.
OPERANDO SU
GENERADOR

5757
OPERANDO SU
GENERADOR
USO EN REGIONES DE GRAN ALTITUD:
En regiones con gran altitud, el carburador estándar produce combinaciones demasiado densas
de combustible y aire, lo que resulta en un menor rendimiento del motor y un mayor consumo
de combustible. Para mantener un alto rendimiento del motor a grandes altitudes, instale una
boquilla de pulverización principal del carburador para grandes altitudes y reajuste el tornillo de
ajuste para la velocidad de ralentí. Para uso en regiones con una altitud de más de 4.527 pies
(1380 m), comuníquese con su distribuidor para reemplazar el carburador estándar y hacer los
ajustes necesarios con anticipación. Incluso con una boquilla de pulverización de carburador de
gran altitud adecuada instalada en el motor, la potencia de salida del motor caerá aproximada-
mente un 3,5% con cada 1000 pies (305 m) de aumento de altitud. Si los surtidores de carbura-
dor estándar no se reemplazan y ajustan para su uso en altitudes elevadas, el efecto de mayor
altitud será aún más severo.
NOTA: El uso del generador en regiones con una altitud inferior a la que se aplica a la
boquilla de pulverización del carburador a gran altitud puede provocar una disminución
del rendimiento del motor. El motor puede sobrecalentarse y una combinación demasia-
do pobre de combustible y aire producido puede causar daños graves al motor.
CONEXIONES DEL INTERRUPTOR DE TRANSFERENCIA: solo se permiten electricistas
profesionales
El generador Lifan Energy Storm está cableado con el neutro conectado a tierra. Si está
conectando su generador a un interruptor de transferencia, el electricista primero debe determi-
nar qué tipo de interruptor de transferencia se está utilizando. Los interruptores de transferencia
para este equipo son de tipo bipolar o tripolar.
Un interruptor de transferencia de dos polos no cambiará el neutro del generador al panel de
servicio. Eso signica que el generador estará conectado a tierra al panel de servicio. Para usar
el generador con interruptores de transferencia de dos polos, el electricista deberá cambiar el
neutro de conectado a otante.
Esto se hace quitando el cable de puente que conecta la tierra del alternador al alternador neu-
tral. Retire el cable de puente y vuelva a apretar las conexiones. Guarde el cable de puente con el
manual del propietario en caso de que sea necesario para uso futuro cuando no esté conectado
a un interruptor de transferencia.

5858
• Para evitar descargas eléctricas de aparatos defectuosos, el generador
debe estar conectado a tierra. Conecte un tramo de cable pesado entre el
terminal de tierra del generador y una fuente de tierra externa.
• Este generador no está destinado ni diseñado para usarse como fuente de
alimentación de reserva ni para conectarse a un interruptor de
transferencia automática (ATS); nunca debe usarse como tal. Pueden
producirse daños materiales graves y / o lesiones personales graves o la
muerte. Tal retroalimentación puede electrocutar a los trabajadores de la
empresa de servicios públicos u otras personas que entren en contacto
con las líneas durante un corte de energía. Cuando se restablece la
energía de la red pública, el generador puede explotar, quemarse o
provocar incendios en el sistema eléctrico del edicio.
• El uso de un generador en interiores puede matar rápidamente. Deben
usarse generadores solo al aire libre.
• Se debe considerar la potencia total de todos los aparatos conectados.
• No exceda el límite de corriente especicado para ningún receptáculo.
• No conecte el generador a un circuito doméstico. Esto podría dañar el
generador o los aparatos eléctricos de la casa.
• No modique ni utilice el generador para nes distintos a los previstos.
• No conecte una extensión al tubo de escape.
• Cuando se requiera un cable de extensión, asegúrese de usar un cable
exible con revestimiento de goma. También asegúrese de utilizar un cable
del tamaño y la longitud adecuados.
- 16 cables de calibre: un cable de calibre 16 entre 0 y 100 pies de largo
manejará con seguridad cargas de herramientas y electrodomésticos
de hasta 10 amperios.
- 14 cables de calibre: un cable de calibre 14 de entre 0 y 50 pies de
largo manejará con seguridad cargas de herramientas y
electrodomésticos de entre 10 y 15 amperios.
- Cables de calibre 12: un cable de calibre 12 entre 50 y 100 pies
manejará con seguridad cargas de herramientas y electrodomésticos
entre 10 y 15 amperios.
ADVERTENCIA
PRECAUCIÓN

5959
• Solo opere el generador en exteriores.
• Evite que los gases de escape ingresen, a través de las ventanas, puertas o tomas de
ventilación, cualquier áreas.
• NO opere el generador dentro de áreas cerradas o techadas. Esto incluye el generador
compartimento de cualquier vehículo recreativo (RV).
• Mantenga el generador alejado de otros cables eléctricos o alambres como el suministro de
energía comercial líneas.
• El receptáculo de CC (en la sección Carga de la batería del panel de control) se puede usar
mientras la energía está en uso. Si usa ambos al mismo tiempo, asegúrese de no exceder la
potencia total para CA y DC.
• La mayoría de los motores de electrodomésticos requieren una potencia superior a la nominal
para la puesta en marcha.
• Es normal que el indicador de tiempo de funcionamiento tenga 1-2 horas en el medidor desde
la fábrica para las pruebas y las inspecciones de control de calidad.
• Este generador usa un sistema de tierra que conecta los terminales de tierra en los
receptáculos de CA en el panel de control al marco de la unidad. El cable neutro de CA no está
conectado a la tierra del sistema. Si revisa los receptáculos de este generador con un probador
de receptáculos, la condición del circuito de tierra parecerá diferente a la de un receptáculo en
su hogar.
PRECAUCIÓN
Nunca encienda ni apague el generador con cargas eléctri-
cas conectadas y en el modo operativo (en el interruptor
activado).
1. Desenchufe todas las cargas eléctricas del generador.
2. Asegúrese de que el generador esté en una posición nivelada.

6060
ALMACENAMIENTO
Antes del almacenamiento a largo plazo de su producto de equipo de energía, general-
mente 30 días o más, realice lo siguiente:
1. Coloque la válvula de combustible en la posición “APAGADO”.
2. Deje que la unidad continúe funcionando hasta que se detenga, quemando todo el
combustible del sistema de combustible.
3. Gire el interruptor de encendido a la posición “OFF”.
4. Drene el aceite del motor de acuerdo con los “Procedimientos de cambio de aceite” en la
sección Mantenimiento de este Manual del propietario. NO vuelva a llenar con aceite hasta
que esté listo para usar nuevamente.
5. Retire la bujía de acuerdo con el “Mantenimiento de la bujía” en la sección de mantenimiento
del Manual del propietario. Rocíe un lubricante, como WD40®, en el oricio de la bujía para
lubricar la parte superior del pistón y las paredes del cilindro. Reemplace la bujía.
6. Tirar de la cuerda de arranque hasta sentir resistencia. Esto colocará las válvulas en la
posición cerrada.
7. Agregue la cantidad recomendada de estabilizador de combustible, de acuerdo con la
cantidad recomendada por el fabricante del estabilizador de combustible, a la gasolina sin
usar que queda en el tanque de combustible.
8. Coloque la unidad en un lugar limpio, seco y seguro.
9. Cubra con “Cubierta de generador a prueba de agua LIFAN”, número de artículo LF100-69600
no incluido) o lona / lona de vinilo. NO opere la unidad con la cubierta instalada.
ALMACENAMIENTO DE
LA UNIDAD

6161
MANTENIMIENTO
NOTA: Consulte los siguientes procedimientos para conocer el método adecuado
para realizar el mantenimiento.
PROGRAMA DE MANTENIMIENTO
PROCEDIMIENTO EL TIEMPO
Comprobación del aceite del motor Cada uso
Reemplace el aceite del motor
Después de cada 40 horas de uso (para
el rodaje inicial, después de las prime-
ras 10 horas de uso)
Comprobación del ltro del
limpiador de aire Cada uso
Reemplazo del ltro del
limpiador de aire
Cuando sea necesario después de cada
50 horas de uso
Lavado del ltro de aire Cada 3 meses o cuando sea necesario
Bujía Limpiar cada 6 meses o cuando sea
necesario
Holgura de válvulas Verique y reajuste anualmente o
después de 300 horas de uso
Taza del ltro de aceite Limpiar cada 6 meses o cuando sea
necesario

6262
MANTENIMIENTO
NOTA: Consulte los siguientes procedimientos para conocer el método adecuado
para realizar el mantenimiento.
PROCEDIMIENTOS DE CAMBIO DE ACEITE: Consulte la sección Controles y funciones para
ver el diagrama. El mantenimiento periódico de su aceite de motor debe realizarse después de
cada 40 horas de uso de su producto de equipo motorizado. Verique el nivel de aceite de su
motor antes de cada uso.
1. Encienda el motor y déjelo calentar para que el aceite se caliente y se diluya. Coloque el
interruptor de encendido / apagado del motor en la posición de apagado. Gire la válvula de
combustible a la posición “APAGADO”.
2. Retire la tapa de aceite / varilla de nivel girándola en sentido antihorario. Retire el tapón de
drenaje de aceite que se encuentra debajo de la tapa de aceite / varilla de medición
utilizando las herramientas adecuadas.
TENGA PRECAUCIÓN: EL ACEITE PUEDE ESTAR CALIENTE.
3. Drene el aceite del motor en un recipiente aprobado y deséchelo de acuerdo con todas las
reglamentaciones federales y estatales. Nunca vierta el aceite de motor usado en el suelo o
en los desagües, solo deséchelo de una manera aprobada. Consulte con sus autoridades
locales para determinar las regulaciones en su área.
¡ADVERTENCIA! EVITE LAS SALPICADURAS DE ACEITE CALIENTE; PUEDE QUEMARLE Y CAU-
SAR LESIONES GRAVES.
4. Una vez que el aceite esté completamente drenado, reemplace el tapón de drenaje de aceite
y apriete con las herramientas adecuadas. Reemplace el aceite con el aceite adecuado para
su producto. Consulte la sección de Instrucciones previas a la operación: Configuración del
generador para conocer los requisitos de llenado exactos. Utilice siempre su varilla de nivel
para verificar el nivel de aceite y llene solo hasta la marca completa en la varilla de nivel.
Nunca llene demasiado el motor, ya que esto puede dañar la unidad y anular la garantía.
5. Reemplace la varilla medidora / tapa de aceite en el motor.
6. Agite el generador para asegurarse de que el flotador del sistema de alerta de aceite esté
libre.

6363
MANTENIMIENTO
EL MANTENIMIENTO ADECUADO DE LA UNIDAD AUMENTARÁ LA VIDA ÚTIL DE SU PRODUC-
TO. EL ACEITE SE DEBE CAMBIAR DE FORMA REGULAR PARA EL FUNCIONAMIENTO COR-
RECTO Y LA FIABILIDAD Y TAMBIÉN PARA MANTENER LA GARANTÍA DE ESTE PRODUCTO.
MANTENIMIENTO DEL FILTRO DE AIRE:
1. Quite el clip o la tuerca de mariposa para quitar y
revisar el elemento del filtro de aire.
2. Para filtros de aire tipo esponja, lávelos con agua y
jabón cuando estén contaminados. Exprima el
exceso de líquido del elemento del filtro de aire y
deje que se seque. lubricar con unas gotas de
aceite. Para los filtros de aire de tipo papel,
reemplácelos por el filtro de aire correcto para su unidad. Están disponibles en su
distribuidor o en LIFAN Power USA. Solicite su filtro llamando al número gratuito
866-471-7464.
3. Vuelva a instalar el elemento del filtro de aire en la carcasa de los filtros de aire.

6464
MANTENIMIENTO
MANTENIMIENTO DE BUJÍAS
1. Retire la tapa de la bujía (consulte la gura
“Extracción de la tapa de la bujía” a continuación).
2. Quite la bujía con el enchufe y la manija que se suministran con su unidad
(consulte la gura “Extracción de la bujía” a continuación).
3. Limpie cualquier acumulación de carbón alrededor de la bujía.
4. Compruebe el espacio de la bujía y ajústelo si es necesario.
Espacio de 0,30 pulgadas.
5. Lubrique las roscas de la bujía con compuesto antiagarrotamiento o aceite de
motor.
6. Vuelva a instalar la bujía y la tapa de la bujía.
MANTENIMIENTO DEL
SISTEMA DE COMBUSTIBLE:
NOTA: Periódicamente, puede
acumular sedimentos o basura
en el recipiente del carburador.
Utilice los siguientes
procedimientos para
limpiar:
1. Gire la válvula de
combustible a la posición
“APAGADO”.
2. Retire el tazón del carburador quitando el perno de montaje ubicado en la parte inferior del
tazón.
3. Vacíe el combustible y los sedimentos viejos en un recipiente aprobado y limpie a fondo la taza
del carburador.

6565
MANTENIMIENTO
Filtro de combustible
Eliminación de
elementos
Filtro de
combustible
Ensamblaje de
elementos
4. Fit a new rubber washer into
place and re-attach fuel bowl to
the carburetor, and either clean
or replace the fuel lter element.
Re-assemble the fuel lter
element.
SOLUCIÓN DE PROBLEMAS
SI EL MOTOR NO ARRANCA:
1. Verique que los interruptores estén en la posición “ON”. (Tanto la unidad como el motor)
2. Verique el nivel de aceite del motor. Su unidad posee un sistema de alarma de aceite bajo
que no permitirá que su motor arranque si el aceite está por debajo de los niveles de
operación seguros. Esta función está instalada para aumentar la vida útil de su motor y evitar
daños en el motor. Si el nivel de aceite es bajo, llene hasta la marca de lleno en la varilla
medidora. Consulte las Especicaciones del producto para conocer el tipo y las cantidades
exactas de aceite.
3. Verique el nivel de combustible para asegurarse de que haya combustible suciente. Agregue
combustible si es necesario.
4. Retire e inspeccione la bujía para vericar que esté limpia y que el espacio entre electrodos
sea adecuado. Si es necesario, limpie o reemplace la bujía. Consulte Mantenimiento de las
bujías en la sección Mantenimiento del manual del propietario para conocer el procedimiento
adecuado.
5. Si su unidad aún NO arranca después de realizar las comprobaciones anteriores, llame a
nuestra línea directa para clientes al número gratuito de LIFAN Power USA 1-866-471-7464
OPCIÓN 2.
NOTA: Periódicamente durante la puesta en marcha inicial o después de que la unidad haya
estado almacenada durante un período prolongado, el otador del “Sistema de alarma de aceite
bajo” se adherirá al fondo de su cárter de aceite. Ubique los dos (2) cables al diodo del sensor de
aceite bajo (consulte la gura de la derecha) ubicado en el costado del bloque del motor. Desen-
chufe estos cables y, solo después de asegurarse de que el motor esté lleno de aceite, encienda
el motor y déjelo funcionar hasta que se caliente (normalmente 20 minutos, ya que esto calentará
el aceite y liberará el otador en el sistema de alerta de aceite bajo). Luego, vuelva a conectar los
cables a los terminales de la unidad de envío de alarma de aceite bajo.
LA UNIDAD NO PROPORCIONA CORRIENTE ELÉCTRICA:
1. Enchufe un pequeño aparato o herramienta para probar.
2. Compruebe si el disyuntor de CA (o CC) está en la posición “ON”. De lo contrario, colóquelo en
la posición “ON”. Reajuste el disyuntor presionando el botón de reinicio en el medio de la
placa frontal (esto debe hacerse con el motor en marcha).
3. Si su unidad aún NO produce electricidad después de realizar las vericaciones anteriores,
llame a LIFAN Power USA al 1-866-471-7464, OPCIÓN 2.

6666
SEGURIDAD DEL GENERADOR
1. Nunca opere productos con motor de gasolina en espacios cerrados, ya que producen gases
venenosos de monóxido de carbono letales.
2. Nunca conecte un generador directamente al circuito de su hogar sin la instalación adecuada por
parte de un electricista autorizado y sin los dispositivos de transferencia de energía adecuados.
3. NO opere su equipo eléctrico en condiciones climáticas adversas como lluvia, nieve y / o
aguanieve.
4. NO opere su equipo eléctrico a menos de cinco (5) pies de cualquier material inamable.
5. Al repostar el equipo motorizado, nunca fume ni reposte cerca de llamas o dispositivos de
encendido. Nunca reposte mientras la unidad está funcionando. Si durante el proceso de
reabastecimiento de combustible se derrama algo de combustible, siempre limpie
completamente el combustible y deje que se seque antes de volver a encender la unidad. Los
vapores de gasolina se encienden fácilmente y son muy peligrosos.
6. NO conecte este modelo en paralelo. El generador no se puede combinar con otros cables
eléctricos o cajas de enchufes múltiples.
7. NO alargue el tubo de escape ni lo ventile con ninguna extensión.
8. Utilice cables de extensión de tipo SJ o SJO si es necesario.
9. No use cables de extensión que excedan: calibre 16, 200 pies o calibre 10, 330 pies.
10. NUNCA PERMITA QUE NIÑOS O ANIMALES ESTÉN CERCA DE ESTE EQUIPO DURANTE EL
FUNCIONAMIENTO. SOLO PERSONAS CALIFICADAS DEBEN OPERAR ESTE EQUIPO. SIGA
TODAS LAS DIRECTRICES CONTENIDAS EN ESTE MANUAL DEL PROPIETARIO PARA EL
FUNCIONAMIENTO SEGURO DE ESTE EQUIPO.

6767
CONVERTIR AMPERIOS O
CABALLOS DE POTENCIA EN
VATIOS
Si es necesario, use estas fórmulas:
Watts = Amperios x Voltios
Watts en funcionamiento* = Caballos de fuerza x 932** (para motores)
Recuerde, esta hoja de trabajo enumera los requisitos de energía promedio que el dispositivo de
un fabricante en particular puede usar más o menos que la potencia indicada.
• Agregue un factor de corrección del 10% a sus totales para ayudar a superar esta
incertidumbre. Si su cliente planea operar dispositivos que usan motores eléctricos, enumere
los requisitos de arranque y funcionamiento de cada uno.
• Los requisitos iniciales de algunos dispositivos pueden ser signicativamente más altos que
sus requisitos de ejecución. Esta mayor demanda debe tenerse en cuenta al estimar sus
necesidades de energía. Algunos motores pequeños y universales, que no consumen una gran
carga de arranque (taladros, sierras pequeñas, batidoras, etc.), requieren muy poca corriente
adicional para arrancar.
Cuando enumere los elementos que utilizan motores, tómelos en el orden de requisitos de arran-
que de mayor a menor, como se muestra en el ejemplo a continuación. El motor A, por ejemplo,
tiene un requisito de arranque de 2600 vatios, por lo que aparece en primer lugar, seguido del
motor B a 1300 vatios y el motor C a 1000 vatios.
SIN MOTORES ELÉCTRICOS
Si su lista no incluye ningún dispositivo que utilice motores eléctricos, simplemente agregue los
requisitos de potencia (funcionamiento) de todos los elementos de su lista para obtener la poten-
cia máxima necesaria.
Por ejemplo, si tiene la intención de usar solo una sartén eléctrica, una luz de 100 vatios y una
almohadilla térmica (como se muestra a continuación), el requisito de potencia máxima sería de
1655 vatios. En este caso, se recomienda un generador como el EF2600, que puede producir una
potencia nominal de 2300 vatios.

-
 1
1
-
 2
2
-
 3
3
-
 4
4
-
 5
5
-
 6
6
-
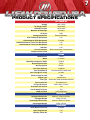 7
7
-
 8
8
-
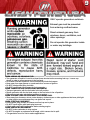 9
9
-
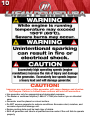 10
10
-
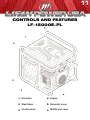 11
11
-
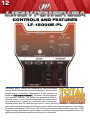 12
12
-
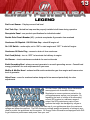 13
13
-
 14
14
-
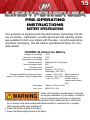 15
15
-
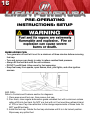 16
16
-
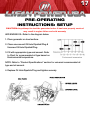 17
17
-
 18
18
-
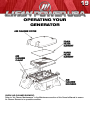 19
19
-
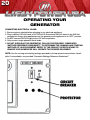 20
20
-
 21
21
-
 22
22
-
 23
23
-
 24
24
-
 25
25
-
 26
26
-
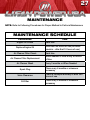 27
27
-
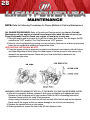 28
28
-
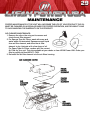 29
29
-
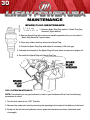 30
30
-
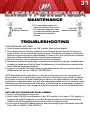 31
31
-
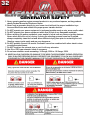 32
32
-
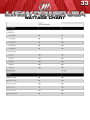 33
33
-
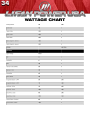 34
34
-
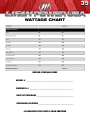 35
35
-
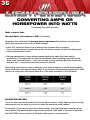 36
36
-
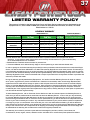 37
37
-
 38
38
-
 39
39
-
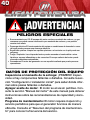 40
40
-
 41
41
-
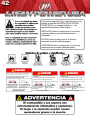 42
42
-
 43
43
-
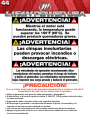 44
44
-
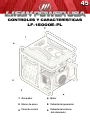 45
45
-
 46
46
-
 47
47
-
 48
48
-
 49
49
-
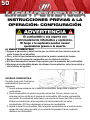 50
50
-
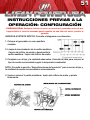 51
51
-
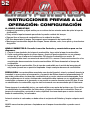 52
52
-
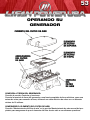 53
53
-
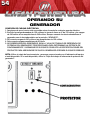 54
54
-
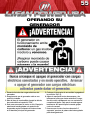 55
55
-
 56
56
-
 57
57
-
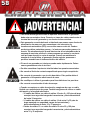 58
58
-
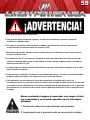 59
59
-
 60
60
-
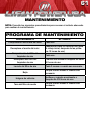 61
61
-
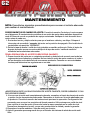 62
62
-
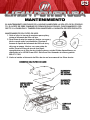 63
63
-
 64
64
-
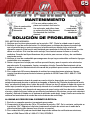 65
65
-
 66
66
-
 67
67
-
 68
68


Lifan Power USA Platinum Series 15Kw Generator El manual del propietario
- Categoría
- Generadores de poder
- Tipo
- El manual del propietario
en otros idiomas
Artículos relacionados


Otros documentos
-
LIFAN ESI3600iERCA Guía del usuario
-
-
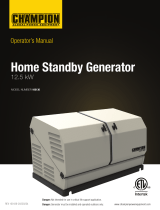 Champion Power Equipment Champion 12.5 Kilowatt Home Standby El manual del propietario
-
Champion Power Equipment Model #100510 Manual de usuario
-
Champion Power Equipment 100237 Manual de usuario
-
Simplicity 030555-00 Manual de usuario
-
Simplicity 030454-00 Manual de usuario
-
Simplicity 030362-0 Manual de usuario
