Polaroid Lab Instant Printer Manual de usuario
- Tipo
- Manual de usuario

User Manual

Polaroid
Lab
The Polaroid Lab helps you transform
your digital photos from your phone
into tangible, beautiful Polaroid
photographs.
Please be sure to read through this
manual before using the Polaroid Lab.
Keep for future reference.
To download the companion app,
for updated information, video
tutorials and more, please visit:
polaroid.com/polaroidlab

A Platform cover
Couvercle de la plateforme
Tapadera de la plataforma
Coperchio della base d’appoggio
Plattformabdeckung
プ ラットフォ ー ム カ バ ー
平台盖
平台蓋
플랫폼 커버
Крышка платформы
B Phone platform
Plateforme pour smartphone
Plataforma para el teléfono
Base d’appoggio per il telefono
Smartphone-Plattform
ス マ ー トフ ォン プ ラ ットフ ォ ー ム
手机平台
手機平台
전화 플랫폼
Платформа для телефона
C Touch points (2)
Points de contact (2)
Puntos de contacto (2)
Punti di contatto (2)
Kontaktpunkte (2)
タッチポイント(2)
接触点(2)
接觸點(2)
터치 포인트(2)
Точки контакта (2)
D Light sensor
Capteur de lumière
Sensor lumínico
Sensore luminoso
Lichtsensor
光センサー
光线传感器
光線感測器
광센서
Оптический датчик
E On/Platform release button
Bouton marche/ libération de la plateforme
Botón de encendido/extracción de la plataforma
Pulsante di rilascio della base d’appoggio/On
Ein/Plattformfreigabe-Taste
オ ン / プ ラ ッ ト フ ォ ー ム・リ リ ー ス ボ タ ン
打开/平台释放按钮
打開/平台釋放按鈕
On/플랫폼 릴리즈 버튼
Кнопка включения /
поднятия платформы
F Rainbow logo LED
LED du logo arc-en-ciel
LED del logotipo del arcoíris
LED del logo arcobaleno
Regenbogenlogo-LED
レインボーロゴLED
彩虹徽标LED
彩虹徽標LED
레인보우 로고 LED
Светодиодный индикатор с
радужным логотипом
G Shutter button
Déclencheur
Botón de disparo
Pulsante dell’otturatore
Auslöser
シャッタ ー ボタン
快门按钮
快門按鈕
셔터 버튼
Кнопка затвора
H Film counter LEDs
LED du compteur de photos
LED del contador de película
LED del contatore della pellicola
Restbildanzeige-LEDs
フィルムカウンタLED
相纸计数器LED灯
相紙計數器LED指示燈
필름 카운터 LED
Светодиодные индикаторы
счетчика кадров
I Film door
Compartimentlm
Compartimento de película
Sportello del vano pellicola
Filmklappe
フィルムドア
相纸仓门
相紙倉蓋
필름 도어
Кассетоприемник
J Battery level rear LEDs
LED du niveau de la batterie (arrière)
LED traseros del nivel de batería
LED posteriori del livello della batteria
Rückseitige Akkustand-LEDs
背面のバッテリーレベルLED
电池电量后LED灯
電池電量後LED指示燈
배터리 레벨 후면 LED
Задние светодиодные индикаторы
уровня заряда аккумулятора
K Micro-USB charging port
Port de chargement micro USB
Puerto de carga Micro USB
Porta di ricarica per micro USB
Micro-USB-Ladeanschluss
Micro-USB充電ポート
Micro-USB充电口
Micro-USB充電口
마이크로-USB 충전 포트
Зарядный разъем Micro-USB
A
B
C
D
E
F
G
H
I
K
J
C

User Manual
10 Box Contents
10 How to use the
Polaroid Lab
11 Further Guidance
12 Troubleshooting & FAQ
13 Tips for Making
Great Photos
14 Customer Support
14 TechnicalSpecications
15 Safety Information
15 Compliance
Manuel dʼutilisation
18 Contenu de la boîte
18 Utilisation du Polaroid Lab
19 Conseils supplémentaires
20 Dépannage et FAQ
21 Conseils pour prendre
d’excellentes photos
22 Service clientèle
22 Spécicationstechniques
23 Informations de sécurité
23 Conformité
Manual de usuario
26 Contenido de la caja
26 Cómo usar la Polaroid Lab
27 Guía adicional
28 Solución de problemas y
preguntas frecuentes
29 Consejos para hacer
fotografías impresionantes
30 Atención al cliente
30 Especicacionestécnicas
31 Información sobre la
seguridad
31 Cumplimiento
de la normativa
Manuale utente
34 Contenuto della scatola
34 Come si utilizza la
Polaroid Lab
35 Ulteriori istruzioni
36 Risoluzione problemi e FAQ
37 Consigli per realizzare foto
perfette
38 Assistenza clienti
38 Scheda tecnica
39 Informazioni di sicurezza
39 Conformità
Benutzerhandbuch
42 Lieferumfang
42 Verwenden des Polaroid
43 Weitere Informationen
44 Problembehebung und
häuggestellteFragen
45 Tipps für großartige Fotos
46 Kundenbetreuung
46 Technische Daten
47 Sicherheitshinweise
47 Konformitätserklärung
ユーザ ー マニュアル
50 内容物
50 PolaroidLabプリンタの使い方
51 詳 細 ガ イド
52 トラブルシュー ティン グとよくあ
る質問
53 良い写真を撮るコツ
54 カスタマーサポート
54 技術仕様
55 安全情報
55 コンプライアンス
用户手册
58 盒内物品
58 如何使用PolaroidLab
59 详细指南
60 故障排除与常见问题
60 拍摄精彩照片的诀窍
62 客户支持
62 技术规格
63 安全信息
63 遵守规定
使用手冊
66 包裝清單
66 PolaroidLab使用指南
67 詳細指南
68 疑難排解與常見問題
68 拍攝好照片的訣竅
70 客戶支援
70 技術規格
71 安全資訊
71 法規遵從
사용 설명서
74 제품 구성
74 프린터 사용 방법
75 기타 지침
76 문제 해결 & FAQ
77 좋은 사진을 찍는 요령
78 고객 지원
78 기술 명세
79 안전 정보
79 준수
Руководство
пользователя
82 Комплектация
82 Как пользоваться
Polaroid Lab
83 Дополнительные инструкции
84 Поиск и устранение
неисправностей и часто
задаваемые вопросы
85 Полезные советы для
отличных снимков
86 Техническая поддержка
86 Технические характеристики
87 Меры предосторожности
87 Соответствие стандартам

User Manual
User Manual
8
9
User
Manual
Warranty
Find the Warranty for this product by following this link:
polaroid.com/warranty

User Manual
User Manual
10
11
Box
contents
01 Polaroid Lab
02 USB charging cable
03 Quick Start Guide
04 User Manual
How to use the
Polaroid Lab
1. Download the Polaroid App
on your phone
You will need the Polaroid App to use the
Polaroid Lab. The App also contains Tips,
Tricks & Tutorials, and Inspiration for more
ways to create.
→ polaroid.com/polaroidlab
2. Charge the Polaroid Lab
ImportantImportant The Polaroid Lab will not be fully
charged upon purchase. Make sure that it is
fullychargedbeforerstuse.Tochargethe
Polaroid Lab, plug the USB charging cable
into the Micro-USB slot on the Polaroid Lab’s
back panel and the other end of the cable
into a charger, such as a phone adapter or
your computer’s USB slot. The LEDs next to
the slot light up to show the current battery
level, four lit LEDs means fully charged. If the
Polaroid Lab is connected to a charger and
is fully charged then all charging LEDs will be
off. A full charge usually takes about 2 hours
through a wall socket with a phone adapter, or
up to 4 hours through a computer’s USB slot.
A fully-charged Polaroid Lab will have enough
powertoshoot100packsoflm,depending
on usage. Remember to turn off the Polaroid
Lab after use to conserve battery life.
3. Load the lm
Pick up the Polaroid Lab and gently pull
downthefrontoftheFilmdoor.Takethelm
cassette out of the packaging and push the
lmcassetteallthewayin,withthelm’s
darkslidefacingup.Whenyouclosethelm
door, the darkslide will eject from the Polaroid
Lab automatically. If the darkslide has not
ejected,removethelmpackandre-insertit,
making sure it is pushed all the way to the back
of the
Polaroid Lab
.
Note Pleasecheckindividuallm
packaging for development time, handling
and storage details.
4. Turn the Polaroid Lab on
Push the black button on the right side of
the Polaroid Lab to raise the phone platform
to the photo taking position and power on.
The Rainbow logo LED will light up and the
lmcounterLEDwilllightuptoshowhow
many shots are remaining in the
Polaroid
Origilals App
. When you’re done, turn off the
Polaroid Lab by pushing down the platform.
Alternatively, it will turn itself off automatically
after several minutes of inactivity.
5. Open the app and select your photo
Open the Polaroid App and select the Polaroid
Lab section. Tap the image selection button to
choose the image you want to expose and tap
proceed. The app will guide you through your
rstexposure.
6. Place your phone on the phone platform
Place your phone on the phone platform
with the screen facing toward the lens of the
Polaroid Lab. Ensure that it is correctly aligned:
the top of your phone must be facing the rear
of the camera. Remove any phone covers or
screen protectors to ensure best performance.
The app will detect the Polaroid Lab and
orientate the image to be perfectly aligned
withthelm.Itwillalsodisplayacalibration
image above the light sensor to correctly
expose your image without having to adjust
your phone’s backlight. Make sure that you
turnoffallsettingsorappswhichinuencethe
color of the display, such as night shift or true
tone,asthesecanseverelyimpingethenal
photograph.
7. Push the red Shutter button
The Polaroid Lab will detect your phone on
the platform and will measure the brightness
of the display to ensure the perfect exposure.
WaituntiltheRainbowlogoLEDashesthen
press the red shutter button. The photo will be
ejected from the slot at the front of the camera
as soon as you let go of the shutter button.
Removethephotofrombeneaththelmshield
and let the shield roll back into the Polaroid
Lab. Place the photo face down to continue
shielding it from light as it develops.
If you want to take another photo of the same
image then press the shutter button again.
Further Guidance
1. How much lm is left in the pack?
There are 8 orange LED lights on the front of
the Polaroid Lab. When the Lab is switched on
and not in sleep mode, the LEDs will constantly
displaythelmcount.ThenumberofLEDs
which light up corresponds to the number of
shotsleftinthelmpack.Forexample:If6
LEDs light up, that means there are 6 shots
leftinthelmpack.Ifyouhaveusedupall8
shotsinthelmpack,orifthereisnolmpack
inserted in the camera, then the LEDs will blink
rapidly when you turn the Polaroid Lab on or
press the shutter button.
2. How much battery is left?
The Polaroid Lab displays the remaining battery
level on four LED above the USB slot. When the
PolaroidLabischargingtheLEDwillash,and
when fully charged with a USB cable inserted
the LEDs will all be unlit as it will be running on
power directly from the charger.
Battery level:
1. Between 1 to 4 LEDs light upBetween 1 to 4 LEDs light up
One LED indicates enough charge for
atleast2packsoflm.
2. Battery charged and USB cable Battery charged and USB cable
connected: No LEDs light up.connected: No LEDs light up.
ThelmcounterLEDwillshowthe
remaining number of photos.
3. Battery emptyBattery empty
No charge remaining. No LEDs light No charge remaining. No LEDs light
up, and the Polaroid Lab will cease to up, and the Polaroid Lab will cease to
operate until it is recharged.operate until it is recharged.
3. Compatible lm
The Polaroid Lab works with all Polaroid i-Type

User Manual
User Manual
12
13
and600typelmpacks.
Werecommendusingi-Typelmasitis
optimized for use with the Polaroid Lab.
The Polaroid Lab is not intended to be used
withSX-70lm,Spectralmoranyother
typeoflm.
4. Power supply
Charge the Polaroid Lab before use to ensure
it has enough (see →Charge the Polaroid Lab).
ThebatterylevelrearLEDswillashwhilst
the Polaroid Lab is plugged in and charging,
and will turn off once the Polaroid Lab is
fully charged.
5. Cleaning the rollers
Sometimes excess developer paste from
photos may build up on the Polaroid
Lab’s rollers, affecting the Polaroid Lab’s
performance and causing photos to show
unwanted imperfections. The Polaroid Lab has
a built-in roller cleaning mode to help with this
issue. Just follow these steps:
1. Close the phone platform to turn off
the Polaroid Lab
2.Openlmdoor
3. Hold down the right touch point and press
and hold shutter button for >2 seconds
4. Rollers will move to the starting
position for cleaning
5. Release the both buttons, the Polaroid Lab
is now in roller cleaning mode
6. Using a damp cloth or cotton swab,
gently clean the rollers
7. Press the shutter button to
incrementally advance the roller
positions
8. Once both rollers are clean on all
sides,closethelmdoor
Troubleshooting
& FAQ
1. My Polaroid Lab won’t eject
my photo/darkslide
Make sure that your Polaroid Lab is charged:
The Rainbow logo LED and rear LEDs won’t light
up unless there is enough charge to operate.
If this is the case, you should connect the
Polaroid Lab to a charger before using again.
MakesureyoustillhavelminyourPolaroid
Lab: to check, lower and then raise the phone
platform.TheremaininglmcounterLEDswill
indicate how many shots you have left in the
lmpack.IftheLEDsashrapidlywhenthe
Polaroid Lab turns on again, this means that
therearenoshotsleftinthelmpack,orthat
nolmpackisinserted.
1. All unlitAll unlit
Polaroid Lab off, or no pack inserted
2. Shutterbuttondepressed,allashingShutterbuttondepressed,allashing
Packinserted,nolm
3. All litAll lit
Pack inserted, 8 photographs available
4. Alternate LED litAlternate LED lit
Pack insertion error
2. The app made an error noise at me
The app will detect if your phone has been
placed on the Polaroid Lab correctly. The
touch points on the phone platform allow the
app to rotate and place the image directly
above the lens of the Polaroid Lab. If the app
can’t do this then it will let you know so you
can place your phone in a better position.
When you pick up your phone the app will
guide you through the correct positioning with
a short video.
3. The shutter button won’t work
If the Rainbow logo LED is lit up then the
Polaroid Lab is powered on, and if there is
lminthePolaroidLabthentheappropriate
numberoflmcountLEDwillbelit.Ifyoupress
the shutter button and nothing comes out,
lookatthelmcountLED.Ifyourphoneisn’t
oriented correctly then the Polaroid Lab won’t
be able to read the brightness of the image.
The Rainbow logo LED will blink 3 times
if the phone is recognized. If it keeps rapidly
blinking, the Polaroid Lab can’t recognize the
sensor area/brightness correctly. If it doesn’t
blink at all, it means that it doesn’t recognize the
phone on top. This can be because of a phone
case or screen protector, which can impair the
recognition of the phone. To rectify this, remove
any phone case or screen protector. Gently push
the phone on the Polaroid Lab.
4. My photo turned out slightly too dark
We didn’t take the original photo on your
phone camera, but our regular photo taking
advice still applies. We’d recommend that you
disable True Tone, Night Shift or Night Mode.
The app will automatically adjust your phone
brightness. You can also adjust exposure
under the “More” menu in the app. EV can be
adjust from -3 to +3 f-stops.
Tips for Making
Great Photos
• Make sure your phone screen is clean.
If you have a phone screen protector
make sure that the screen doesn’t
havescratches,stainsorngerprints.
Ideally, remove any phone screen
protector or phone covers to ensure
optimum results.
• Make sure that your phone is
completelyatonthePolaroidLab
phone platform.
• Makesurethatyourlmisfresh!
Stockuponnewlmatpolaroid.com
and follow the tip sheet that comes
withthelmpackagingtoensurethat
yourlmisasgoodasitcanbe.
• Make sure all settings and apps which
inuencecolorsareturnedoff(eg.
night shift, true tone).

User Manual
User Manual
14
15
Customer
Support
The Polaroid Customer Support Team is
always more than happy to hear from you. Get
in touch using the contact details provided.
For more detailed and up-to-date information,
visit polaroid.com/help
USA/Canada
+1 212 219 3254
Europe/Rest of World
00 800 577 01500
Polaroid International B.V.
1013 AP Amsterdam
The Netherlands
Technical
Specications
General
DimensionsDimensions
150mm (L) ×115.6mm (W) ×149.7mm
(H closed) ×177.16mm (H open)
WeightWeight
600grams(withoutlmpack)
Operating TemperatureOperating Temperature
40–108°F / 4–42°C, 5–90% relative humidity
Compatible FilmCompatible Film
Polaroidi-Typeand600typelminbothColor
and Black & White, including Special Editions.
BatteryBattery
High performance lithium-ion battery,
1100mAh, 3.7V nominal voltage, 4.07Wh
Materials
Outer shellsOuter shells
Polycarbonate, TPU, EPDM (Ethylene
Propylene Diene Monomer)
LensLens
Optical grade polycarbonate lens, AR coated
Shutter systemShutter system
Fixed aperture, variable speed shutter
Optical System
LensLens
Fixed focus lens
Focal lengthFocal length
150mm
Lens typeLens type
1:2.35 3 element lens system
App System Requirements
Supported phonesSupported phones
• iPhone 6 and newer
(except iPhone SE)
• Most current Android devices
Supported phones and operating systems are
subject to change. For a full list please visit
polaroid.com/labworkswith
Safety Information
Caution
Risk of electric shock — Do not open/
Disassemble the motorized roller system
• Do not disassemble the device. Incorrect • Do not disassemble the device. Incorrect
reassembly can cause electrical shock if reassembly can cause electrical shock if
the device is used again.the device is used again.
• Do not immerse the device in water or • Do not immerse the device in water or
otheruids.otheruids.
• Do not operate the device in a high • Do not operate the device in a high
humidity environment or very dusty humidity environment or very dusty
environments.environments.
• Do not attempt to tamper with, adjust or • Do not attempt to tamper with, adjust or
remove the battery and/or the electron-remove the battery and/or the electron-
ics located below the rollers behind the ics located below the rollers behind the
device’slmdoor.device’slmdoor.
• Do not attempt to remove the door itself • Do not attempt to remove the door itself
as it is connected electronically to the as it is connected electronically to the
body of the device. Doing so is unsafe, body of the device. Doing so is unsafe,
will likely damage your device, and will will likely damage your device, and will
void your warranty.void your warranty.
• Do not insert metal objects into the • Do not insert metal objects into the
device.device.
• •
Do not insert any objects into the rollers or Do not insert any objects into the rollers or
gears.gears.
• Keep small children and infants away • Keep small children and infants away
from device to avoid them being injured from device to avoid them being injured
by the device’s moving parts.by the device’s moving parts.
• Do not use or store the device near any • Do not use or store the device near any
heatsourceoranytypeofequipmentheatsourceoranytypeofequipment
that generates heat, including stereo that generates heat, including stereo
ampliers.ampliers.
• Donotusethedevicenearammableor• Donotusethedevicenearammableor
explosive gases.explosive gases.
• Do not charge the device if you notice • Do not charge the device if you notice
any unusual odors, noise or smoke.any unusual odors, noise or smoke.
• Donotattempttodisassemblethelm’s• Donotattempttodisassemblethelm’s
battery or modify it in any way (if using battery or modify it in any way (if using
600-typelm).Ifbatteryuidgetsin600-typelm).Ifbatteryuidgetsin
your eyes, immediately rinse your eyes your eyes, immediately rinse your eyes
with fresh, cold running water and seek with fresh, cold running water and seek
medical attention immediately.medical attention immediately.
Battery and ChargerBattery and Charger
• This device uses a custom lithium-ion • This device uses a custom lithium-ion
battery that is non-removable andbattery that is non-removable and
mounted inside the Lab body. No other mounted inside the Lab body. No other
type of battery can be used. Battery type of battery can be used. Battery
replacement can only be done by autho-replacement can only be done by autho-
rized service centers. The battery will rized service centers. The battery will
provide many years of service if properly provide many years of service if properly
used. Power consumption varies depend-used. Power consumption varies depend-
ing on the environment the device is used ing on the environment the device is used
in and how the device has been stored. in and how the device has been stored.
Used immediately after full charge, the Used immediately after full charge, the
battery will power the processing of up to battery will power the processing of up to
100lmpacks.100lmpacks.
• Once the battery energy level falls below • Once the battery energy level falls below
a certain level, the device will no longer a certain level, the device will no longer
processlm.TheLEDwillblinkandsignalprocesslm.TheLEDwillblinkandsignal
when it needs to be recharged. This is to when it needs to be recharged. This is to
avoid a photo getting stuck as it is being avoid a photo getting stuck as it is being
processed through the roller system.processed through the roller system.
• The rechargeable battery is not fully • The rechargeable battery is not fully
charged at the time of purchase. Charge charged at the time of purchase. Charge
the battery fully with the USB charging the battery fully with the USB charging
cable (provided). This usually takes 1-2 cable (provided). This usually takes 1-2
hours (can vary depending on usage).hours (can vary depending on usage).
• The supplied battery charging cable • The supplied battery charging cable
has been tested to work with the Apple has been tested to work with the Apple
iPhone power adaptors. While it can be iPhone power adaptors. While it can be
used in other USB ports e.g. computer, used in other USB ports e.g. computer,
USB power adaptors, TVs, cars etc., cor-USB power adaptors, TVs, cars etc., cor-
rect operation cannot be guaranteed.rect operation cannot be guaranteed.
• When the device is no longer in use, • When the device is no longer in use,
please recycle it properly.please recycle it properly.
Usage EnvironmentUsage Environment
• To protect the high-precision technology • To protect the high-precision technology
contained in this device, never leave the contained in this device, never leave the
Lab in the following environments for ex-Lab in the following environments for ex-
tended periods of time: high temperature tended periods of time: high temperature
(+42°C/108°F), high humidity, places (+42°C/108°F), high humidity, places
with extreme changes in temperature with extreme changes in temperature
(hot and cold), direct sunlight, sandy or (hot and cold), direct sunlight, sandy or
dusty environments such as beaches, dusty environments such as beaches,
damp places, or places with strong damp places, or places with strong
vibrations.vibrations.
• Do not drop the device or subject it to • Do not drop the device or subject it to
severe shocks or vibrations.severe shocks or vibrations.
• Do not push, pull or press on the lens • Do not push, pull or press on the lens
surfacesurface
Compliance
Important directions for using Important directions for using
Lithium–Ion BatteriesLithium–Ion Batteries
1.Donotthrowintore.1.Donotthrowintore.
2. Do not short circuit.2. Do not short circuit.
3. Do not disassemble.3. Do not disassemble.
4. Do not continue to use when damaged.4. Do not continue to use when damaged.
5. Dispose correctly after use.5. Dispose correctly after use.
6. Keep away from water.6. Keep away from water.
EU Declaration of ConformityEU Declaration of Conformity
Hereby, Polaroid International B.V. declares Hereby, Polaroid International B.V. declares
that the Polaroid Lab is in compliance with that the Polaroid Lab is in compliance with
theessentialrequirementsoftheElectro-theessentialrequirementsoftheElectro-
magnetic Compatibility Directive (2014/30/magnetic Compatibility Directive (2014/30/
EU), Low Voltage Directive (2014/35/EU) EU), Low Voltage Directive (2014/35/EU)
and RoHs Directive (2011/65/EU) and and RoHs Directive (2011/65/EU) and
other relevant provisions, when used for its other relevant provisions, when used for its
intended purpose.intended purpose.
FCC Compliance StatementFCC Compliance Statement
This device complies with Part 15 of the FCC This device complies with Part 15 of the FCC
Rules. Operation is subject to the following Rules. Operation is subject to the following
two conditions: (1) this device may not cause two conditions: (1) this device may not cause
harmful interference, and (2) this device harmful interference, and (2) this device
must accept any interference received, must accept any interference received,
including interference that may cause including interference that may cause
undesired operation.undesired operation.
Caution The user is cautioned that
changesormodicationsnotexpressly
approved by the party responsible for
compliance could void the user’s authority
tooperatetheequipment.Thisequipment
must not be co-located or operated in
conjunction with any other antenna or
transmitter.
Note Thisequipmenthasbeentestedand
found to comply with the limits for a Class B
digital device, pursuant to part 15 of the FCC
rules. These limits are designed to provide
reasonable protection against harmful
interference in a residential installation.
Thisequipmentgenerates,usesandcan
radiateradiofrequencyenergyand,ifnot
installed and used in accordance with the
instructions, may cause harmful interference
to radio communications. However, there
is no guarantee that interference will not
occur in a particular installation. If this
equipmentdoescauseharmfulinterference
to radio or television reception, which can
bedeterminedbyturningtheequipment
off and on, the user is encouraged to try to
correct the interference by one or more of
the following measures:
• Reorient or relocate the receiving antenna.• Reorient or relocate the receiving antenna.
• Increase the separation between the • Increase the separation between the
equipmentandreceiver.equipmentandreceiver.
• Connecttheequipmentintoanoutleton• Connecttheequipmentintoanoutleton
a circuit different from that to which the a circuit different from that to which the
receiver is connected.receiver is connected.
• Consult the dealer or an experienced • Consult the dealer or an experienced
radio/TV technician for help.radio/TV technician for help.
ThisequipmentcomplieswithThisequipmentcomplieswithFCCFCC radiation radiation
exposure limits set forth for an uncontrolled exposure limits set forth for an uncontrolled
environment. End user must follow the environment. End user must follow the
specicoperatinginstructionsforsatisfyingspecicoperatinginstructionsforsatisfying
RFRF exposure compliance. exposure compliance.
Industry Canada (IC)Industry Canada (IC)
This device complies with part 15 of the FCC This device complies with part 15 of the FCC
Rule and Industry Canada license–exempt Rule and Industry Canada license–exempt
RSS standard(s). Operation is subject to the RSS standard(s). Operation is subject to the
following two conditions: (1) This device following two conditions: (1) This device
may not cause harmful interference, and (2) may not cause harmful interference, and (2)
this device must accept any interference this device must accept any interference
received, including interference that may received, including interference that may
cause undesired operation. Le present cause undesired operation. Le present
appareil est conforme aux CNR d’Industrie appareil est conforme aux CNR d’Industrie
Canada applicables aux appareils radio Canada applicables aux appareils radio
exempts de licence. L’exploitation est exempts de licence. L’exploitation est
autorisée aux deux conditions suivantes: (1) autorisée aux deux conditions suivantes: (1)
l’appareil ne doit pas produire de brouillage, l’appareil ne doit pas produire de brouillage,
et (2) l’utilisateur d’appareil doit accepter et (2) l’utilisateur d’appareil doit accepter
toutbrouillageradioélectriquesubi,mêmesitoutbrouillageradioélectriquesubi,mêmesi
le brouillage est susceptible d’en comprom-le brouillage est susceptible d’en comprom-
ettre le fonctionnement.ettre le fonctionnement.
The symbol means that according to The symbol means that according to
local laws and regulations your prod-local laws and regulations your prod-
uct should be disposed of separately uct should be disposed of separately
from household waste. When this product from household waste. When this product
reaches its end of life, take it to a collection reaches its end of life, take it to a collection
point designated by local authorities. Some point designated by local authorities. Some
collection points accept products for free. collection points accept products for free.
The separate collection and recycling of The separate collection and recycling of
your product at the time of disposal will your product at the time of disposal will
help conserve natural resources and ensure help conserve natural resources and ensure
that it is recycled in a manner that protects that it is recycled in a manner that protects
human health and the environment.human health and the environment.

User Manual
User Manual
Manuel d’Utilisation
Manuel d’Utilisation
16
17
Manuel
d’Utilisation
Garantie
Pour connaître la garantie de ce produit,
visitez la page suivante : polaroid.com/warranty

User Manual
User Manual
Manuel d’Utilisation
Manuel d’Utilisation
18
19
Contenu
de la boîte
01 Polaroid Lab
02 Câble de chargement USB
03 Guide de démarrage rapide
04 Manuel d’utilisation
Utilisation du
Polaroid Lab
1. Téléchargement de l’application
Polaroid sur votre smartphone
Pour utiliser le Polaroid Lab, vous avez
besoin de l’application Polaroid. L’application
contient également des conseils, des astuces
etdestutoriels,ainsiquedesmodèles
d’inspiration pour vous aider dans vos
créations.
→ polaroid.com/polaroidlab
2. Chargement du Polaroid Lab
ImportantImportant Le Polaroid Lab n’est pas
complètement chargé lors de l’achat.
Veillez à le charger complètement avant
la première utilisation. Pour le charger,
branchez le câble de chargement USB dans
le port micro USB de la face arrière de
l’appareil, et l’autre extrémité du câble dans
un chargeur, comme une prise murale munie
d’un adaptateur pour smartphone ou le port
USB de votre ordinateur. Les LED situées
àcôtéduports’allumentpourindiquerle
niveaudelabatterie.LorsquelesquatreLED
sont allumées, l’appareil est complètement
chargé.LorsquelePolaroidLabbranché
sur un chargeur est complètement chargé,
toutes les LED sont éteintes. Une charge
complète dure généralement environ
2 heures via une prise murale avec
adaptateurpoursmartphoneetjusqu’à
4 heures via le port USB d’un ordinateur.
Un Polaroid Lab complètement chargé
disposed’uneautonomiesufsantepour
traiter100cartouchesdelm,enfonction
de l’utilisation. N’oubliez pas d’éteindre le
PolaroidLabaprèschaqueutilisationpour
économiser la batterie.
3. Chargement de la cartouche de lm
Prenez le Polaroid Lab et tirez doucement le
couvercleducompartimentlmverslebas.
Sortezlacartouchedelmdesonemballage
et poussez-la complètement à l’intérieur du
compartiment, avec le carton de protection
dulm(darkslide)verslehaut.Lorsque
vous fermez le compartiment, le carton de
protection(darkslide)estautomatiquement
éjecté du Polaroid Lab. Si le carton de
protectiondulm(darkslide)n’apasété
éjecté,retirezlacartouchedelmetinsérez-la
à nouveau, en veillant bien à l’enfoncer le plus
possible vers le fond de l’appareil.
Remarque Veuillez consulter l’emballage
dulmand’obtenirlesinformations
relatives au temps de développement, à la
manipulation et au stockage.
4. Mise en marche du Polaroid Lab
Appuyez sur le bouton noir à droite du Polaroid
Lab pour lever la plateforme pour smartphone
en position de prise de photo et allumer
l’appareil. La LED du logo arc-en-ciel s’allume,
ainsiquecellesducompteurdephotospour
indiquerlenombredephotosrestantessur
lePolaroidLab.Lorsquevousavezterminé,
éteignez l’appareil en rabaissant la plateforme.
Sinon,l’appareils’éteintautomatiquement
aprèsquelquesminutesd’inactivité.
5. Ouverture de l’application
et sélection d’une photo
Ouvrez l’application
Polaroid
et sélectionnez
lasectionPolaroidLab.Cliquezsurlebouton
desélectiond’imageandechoisirl’imageà
exposeretcliquezsurProceed(Continuer).
L’application vous guidera tout au long de votre
première exposition.
6. Placement du smartphone
sur la plateforme
Placez votre smartphone sur la plateforme
dédiée avec l’écran tourné vers l’objectif
duPolaroidLab.Veillezàcequ’ilsoit
correctement aligné : le haut de votre
smartphonedoitêtretournéversl’arrière
du Polaroid Lab. Retirez tout cache ou toute
protection du smartphone pour obtenir de
meilleures performances. L’application détecte
lePolaroidLabetorientel’imageanqu’elle
soitparfaitementalignéeaveclelm.Elle
afcheégalementuneimaged’étalonnageau-
dessusducapteurdelumièreand’exposer
correctement votre image sans avoir besoin de
régler le rétroéclairage de votre smartphone.
Veillez à désactiver tous les paramètres et
applicationsquiontuneincidencesurles
couleursdel’afchage(commenightshift,
true tone ou tout autre mode de contrôle de
luminosité) car ces modes peuvent avoir un
effetsurlaphotographienale.
7. Appui sur le bouton rouge du déclencheur
Le Polaroid Lab détecte votre smartphone
sur la plateforme et mesure la luminosité
del’afchagepourgarantiruneexposition
optimale.AttendezquelaLEDdulogo
arc-en-cielsoitalluméeetxe,puisappuyez
sur le bouton rouge du déclencheur. La photo
est éjectée de la fente avant de l’appareil dès
quevousrelâchezledéclencheur.Retirezla
photodudessousduprotecteurdelmet
laissezcederniers’enroulersurlui-même.
Placez la photo face vers le bas pour
continuer à la protéger de la lumière durant le
développement.
Si vous voulez prendre une autre photo
delamêmeimage,appuyezànouveausurle
déclencheur.
Conseils
supplémentaires
1. Déterminer le nombre de photos restantes
La face avant du Polaroid Lab compte 8 LED
de couleur orange. Quand le Polaroid Lab
est allumé et n’est pas en mode veille, les
LEDafchentconstammentledécomptede
photos.LenombredeLEDquis’allument
correspond au nombre de photos restantes
dans la cartouche. Par exemple : si 6 voyants
LED sont allumés, il reste 6 photos dans la
cartouchedelm.Sivousavezutiliséles
8 photos contenues dans la cartouche, ou
siaucunecartouchedelmn’aétéinsérée
dans l’appareil, les LED clignotent rapidement

User Manual
User Manual
Manuel d’Utilisation
Manuel d’Utilisation
20
21
lorsquevousallumezl’appareilou
lorsquevousappuyezsurledéclencheur.
2. Niveau restant de la batterie
LePolaroidLabafcheleniveaurestantdela
batteriesurlesquatreLEDsituéesau-dessusdu
portUSB.LorsquelePolaroidLabestencours
decharge,lesLEDclignotent,etlorsqu’ilest
complètement chargé tout en étant branché via
câbleUSB,lesLEDsonttouteséteintes,puisqu’il
est alimenté directement par le chargeur.
Niveau de la batterie :
1. Entre 1 et 4 LED alluméesEntre 1 et 4 LED allumées
UneLEDindiqueunechargesufsante
pouraumoins2cartouchesdelm.
2. Batterie chargée et câble USB branché : Batterie chargée et câble USB branché :
Aucune LED alluméeAucune LED allumée
LesLEDducompteurdephotosindiquent
le nombre de photos restantes.
3. Batterie déchargéeBatterie déchargée
Aucune charge restante. Aucune LED Aucune charge restante. Aucune LED
ne s’allume et le Polaroid Lab cesse de ne s’allume et le Polaroid Lab cesse de
fonctionnerjusqu’àcequ’ilsoitrechargé.fonctionnerjusqu’àcequ’ilsoitrechargé.
3. Film compatible
Le Polaroid Lab fonctionne avec toutes les
cartouchesdelmPolaroidi-Typeettype600.
Nousrecommandonsl’utilisationdulmi-Type,
car il est optimisé pour une utilisation avec le
Polaroid Lab. Le Polaroid Lab n’est pas conçu
pourêtreutiliséavecleslmsSX-70,leslms
Spectra ou tout autre type
delm.
4. Alimentation
Chargez le Polaroid Lab avant utilisation
pourgarantirunechargesufsante(voir
→Chargement du Polaroid Lab). Les LED du
niveau de la batterie à l’arrière de l’appareil
clignotentlorsquelePolaroidLabestbranché
etencoursdechargeets’éteignentlorsqu’il
est complètement chargé.
5. Nettoyage des rouleaux
Ilarriveparfoisqu’unexcèsdepâtede
développement des photos s’accumule sur les
rouleauxdel’appareil,cequiauneincidence
sur ses performances et se traduit par des
imperfections indésirables sur les photos. Le
Polaroid Lab comporte un mode intégré de
nettoyage des rouleaux pour aider à résoudre ce
problème.Ilsuftdesuivrelesétapessuivantes:
1. Rabaissez la plateforme pour
smartphoneand’éteindre
le Polaroid Lab.
2. Ouvrezlecompartimentlm.
3. Appuyez et maintenez enfoncé le point
de contact de droite et le déclencheur
enmêmetempspendantplusde
2 secondes.
4. Les rouleaux doivent se mettre en
position de départ pour le nettoyage.
5. Relâchez les deux boutons; le Polaroid
Lab est désormais en mode de
nettoyage des rouleaux.
6. À l’aide d’un coton-tige ou un tissu
humide, nettoyez doucement les
rouleaux.
7. Appuyez sur le déclencheur pour
faire avancer pas-à-pas la position
des rouleaux.
8. Unefoisquetoutelasurfacedes
rouleaux est propre, fermez le
couvercleducompartimentlm.
D épannage et FAQ
1. Mon Polaroid Lab n’éjecte pas ma photo/
le carton de protection du lm (darkslide)
Assurez-vousquelePolaroidLabestbien
chargé: la LED du logo arc-en-ciel et les LED sur
la face arrière sont éteintes en cas de charge
insufsante.Danscecas,vousdevezrecharger
le Polaroid Lab avant de pouvoir l’utiliser.
Assurez-vousqu’ilrestedulmdansvotre
PolaroidLab:pourvérier,abaissezpuisrelevez
la plateforme pour smartphone. Les LED du
compteurdephotosindiquentlenombrede
clichésrestantsdanslacartouchedelm.Si
les LED clignotent rapidement lors du rallumage
del’appareil,celasigniequ’ilneresteplusde
lmdanslacartoucheouqu’aucunecartouche
delmn’estinsérée.
1.Toutes les LED sont éteintesToutes les LED sont éteintes
Polaroid Lab éteint ou absence de cartouche
2. Déclencheur enfoncé, toutes les LED Déclencheur enfoncé, toutes les LED
clignotentclignotent
Cartouche insérée, aucune photo restante
3. Toutes les LED sont alluméesToutes les LED sont allumées
Cartouche insérée, 8 photos restantes
4. Les LED clignotent alternativementLes LED clignotent alternativement
Erreur d’insertion de la cartouche
2. L’application émet un son d’erreur
L’application détecte une mauvaise position
de votre smartphone sur le Polaroid Lab.
Les points de contact sur la plateforme pour
smartphone permettent à l’application de
faire tourner et de placer l’image directement
au-dessus de l’objectif du Polaroid Lab. Si
l’application ne peut pas effectuer cette action,
ellevouslesignalepourquevouspuissiez
mieuxpositionnervotresmartphone.Lorsque
vous prenez votre smartphone, l’application
vous aide à trouver une meilleure position à
l’aide d’une vidéo.
3. Le déclencheur ne fonctionne pas
SilaLEDdulogoarc-en-ciels’allumelorsque
le Polaroid Lab est mis en marche, et s’il y a
sufsammentdelmdansl’appareil,lesLEDdu
compteur de photos s’allument en fonction du
nombre de photos restantes. Si vous appuyez
surledéclencheuretqueriennesort,vériez
lesLEDducompteurdephotosouvériezque
votre smartphone est orienté correctement sur
la plateforme.
La LED du logo arc-en ciel clignote 3 fois.
Si elle clignote rapidement en continu, le
Polaroid Lab n’arrive pas à reconnaître la
luminosité/zone du capteur correctement. Si
elle ne clignote pas du tout, le smartphone n’est
pasreconnu.Celapeutêtredûàlaprésence
d’uneprotectiond’écranoud’unecoquede
smartphone. Pour éviter ce problème, retirez la
coqueoulaprotectiond’écrandusmartphone.
Remettez délicatement le smartphone
sur l’appareil Polaroid Lab.
4. Ma photo est un peu trop sombre
Laqualitédelaphotonaledépenden
grandepartiedelaqualitédel’image
originale.Assurez-vousquel’imageutilisée
est ni trop claire, ni trop sombre. Nous
vous recommandons de désactiver tous
lesparamètresetapplicationsquiontune
incidencesurlescouleursdel’afchage
(comme night shift, true tone ou tout
autre mode de contrôle de luminosité)
car ces modes peuvent avoir un effet sur
laphotographienale.L’applicationrègle
automatiquementlaluminositédevotre
smartphone. Vous pouvez également régler
l’exposition dans le menu « More » (Plus) de
l’application. Les valeurs d’exposition peuvent
êtredéniesentre-3et+3f-stops.
Conseils pour prendre
d’excellentes photos
• Veillezàcequel’écrandevotre
smartphone soit bien propre. Si
votresmartphoneestéquipéd’une
protection d’écran, assurez-vous
qu’elleestexemptederayures,de
taches et d’empreintes de doigt.
Pour des résultats optimaux, retirez
laprotectiond’écranetlacoquede
votre smartphone.
• Vériezquevotresmartphoneest
bien à plat sur la plateforme du
Polaroid Lab.
• Veillezàconservervoslmsdefaçon
appropriée.Achetezvoslmssur
polaroid.com et suivez les conseils
fournis dans l’emballage pour garantir
lameilleurequalitépossibledevos
lms.
• Vériezquetouslesparamètreset
applicationsquiontuneincidencesur
lescouleursdel’afchage(comme
night shift, true tone ou tout autre
mode de contrôle de luminosité) sont
désactivés sur votre smartphone.

User Manual
User Manual
Manuel d’Utilisation
Manuel d’Utilisation
22
23
Service
Clientèle
L’équipeduserviceclientèledePolaroid
répondraavecplaisiràvosquestionset
commentaires. Vous pouvez nous contacter
en utilisant les informations de contact
fournies ci-dessous. Pour des informations
plus détaillées et à jour, veuillez consulter le
site polaroid.com/help
États-Unis/Canada
+1 212 219 3254
Europe/Reste du Monde
00 800 577 01500
Polaroid International B.V.
1013 AP Amsterdam
Pays-Bas
Spécications
techniques
Général
DimensionsDimensions
150 mm (L) × 115,6 mm (P) × 149,7 mm
(H fermé) x 177,16 mm (H ouvert)
PoidsPoids
600grammes(sanscartouchedelm)
Température de fonctionnementTempérature de fonctionnement
40 à 108 °F/4 à 42 °C, 5 à 90 %
d’humidité relative
Films compatibleFilms compatible
Films Polaroid i-Type et type 600 couleur et
noir et blanc, y compris les
éditions spéciales
BatterieBatterie
Batterie lithium-ion hautes performances,
1100 mAh, 3,7 V de tension nominale, 4,07 Wh
Matériaux
CoquesexternesCoquesexternes
Polycarbonate, TPU, EPDM (éthylène-
propylène-diène monomère)
ObjectifObjectif
Objectifdequalitéoptiqueenpolycarbonate,
avecrevêtementantireet
Système de déclenchementSystème de déclenchement
Déclencheuràvitessevariable,ouverturexe
Système optique
ObjectifObjectif
Objectifàlentillexe
Distance focaleDistance focale
150 mm
Type de lentilleType de lentille
Système de lentille à 3 éléments 1:2.35
Conguration requise pour l’application
Smartphones pris en chargeSmartphones pris en charge
• iPhone 6 ou plus récent
(à l’exception de l’iPhone SE)
• La plupart des appareils Android actuels
Les smartphones et les systèmes
d’exploitation pris en charge peuvent faire
l’objetdemodications.Pourobtenirlaliste
complète, veuillez visiter la page suivante :
polaroid.com/labworkswith
Informations de sécurité
Avertissement
Risque d’électrocution - Ne pas ouvrir/
démonter le système de rouleaux motorisés
• Ne pas démonter l’appareil. Un • Ne pas démonter l’appareil. Un
réassemblage incorrect peut occasionner réassemblage incorrect peut occasionner
unrisqued’électrocutionsil’appareilestunrisqued’électrocutionsil’appareilest
utilisé à nouveau.utilisé à nouveau.
• Ne pas immerger l’appareil dans l’eau ou • Ne pas immerger l’appareil dans l’eau ou
d’autresliquides.d’autresliquides.
• Ne pas utiliser l’appareil dans un • Ne pas utiliser l’appareil dans un
environnement à très fort taux d’humidité environnement à très fort taux d’humidité
ou très poussiéreux.ou très poussiéreux.
• Ne pas tenter d’altérer, d’ajuster ou de • Ne pas tenter d’altérer, d’ajuster ou de
retirer la batterie et/ou les composants retirer la batterie et/ou les composants
électroniquessituéssouslesrouleaux,électroniquessituéssouslesrouleaux,
derrièrelecompartimentlmdel’appareil.derrièrelecompartimentlmdel’appareil.
• Ne pas tenter de retirer le couvercle du • Ne pas tenter de retirer le couvercle du
compartimentlui-même,carilestreliécompartimentlui-même,carilestrelié
électroniquementaucorpsdel’appareil.électroniquementaucorpsdel’appareil.
Cesactionssontdangereuses,risquerontCesactionssontdangereuses,risqueront
fortement d’endommager votre appareil fortement d’endommager votre appareil
et annuleront votre garantie.et annuleront votre garantie.
• Nepasinsérerd’objetsmétalliquesdans• Nepasinsérerd’objetsmétalliquesdans
l’appareil.l’appareil.
• Ne pas insérer d’objet dans les rouleaux • Ne pas insérer d’objet dans les rouleaux
ou les engrenages.ou les engrenages.
• Tenir l’appareil hors de portée des • Tenir l’appareil hors de portée des
jeunesenfantsoudesnourrissonsanjeunesenfantsoudesnourrissonsan
d’éviterlesrisquesdeblessuresduesauxd’éviterlesrisquesdeblessuresduesaux
éléments mobiles de l’appareil.éléments mobiles de l’appareil.
• Ne pas utiliser ni entreposer l’appareil • Ne pas utiliser ni entreposer l’appareil
près d’une source de chaleur ou de tout près d’une source de chaleur ou de tout
équipementgénérantdelachaleur,yéquipementgénérantdelachaleur,y
comprislesamplicateursstéréo.comprislesamplicateursstéréo.
• Ne pas utiliser l’appareil à proximité de • Ne pas utiliser l’appareil à proximité de
gazinammablesouexplosifs.gazinammablesouexplosifs.
• Ne pas charger l’appareil si vous • Ne pas charger l’appareil si vous
remarquezdesodeurs,unbruitouuneremarquezdesodeurs,unbruitouune
fumée inhabituels.fumée inhabituels.
• Ne pas tenter de démonter la batterie du • Ne pas tenter de démonter la batterie du
lmnidelamodierd’aucunemanièrelmnidelamodierd’aucunemanière
(sivousutilisezdeslmsdetype600).En(sivousutilisezdeslmsdetype600).En
casdeprojectiondeliquidedebatteriecasdeprojectiondeliquidedebatterie
dans les yeux, rincer abondamment dans les yeux, rincer abondamment
à l’eau froide du robinet et consulter à l’eau froide du robinet et consulter
immédiatement un médecin.immédiatement un médecin.
Batterie et chargeurBatterie et chargeur
• L’appareil utilise une batterie lithium-ion • L’appareil utilise une batterie lithium-ion
conçuesurmesure,quiestinamovibleconçuesurmesure,quiestinamovible
etxéeàl’intérieurduboîtierduPolaroidetxéeàl’intérieurduboîtierduPolaroid
Lab. Aucun autre type de batterie ne Lab. Aucun autre type de batterie ne
peutêtreutilisé.Leremplacementdepeutêtreutilisé.Leremplacementde
labatterienepeutêtreréaliséqueparlabatterienepeutêtreréaliséquepar
un centre de dépannage autorisé. Si un centre de dépannage autorisé. Si
elleestutiliséedemanièreadéquate,elleestutiliséedemanièreadéquate,
la batterie fonctionnera pendant de la batterie fonctionnera pendant de
nombreusesannéesentouteabilité.nombreusesannéesentouteabilité.
LaconsommationélectriquevarieselonLaconsommationélectriquevarieselon
l’environnementdanslequell’appareill’environnementdanslequell’appareil
est utilisé et la manière dont il a été est utilisé et la manière dont il a été
entreposé. Utilisée immédiatement entreposé. Utilisée immédiatement
après une charge complète, la batterie après une charge complète, la batterie
permettradetraiterjusqu’à100permettradetraiterjusqu’à100
cartouchesdelm.cartouchesdelm.
• Unefoisqueleniveaudechargedela• Unefoisqueleniveaudechargedela
batterie chute au-dessous d’un certain batterie chute au-dessous d’un certain
niveau, l’appareil n’est plus en mesure niveau, l’appareil n’est plus en mesure
detraiterlelm.LaLEDclignoteetdetraiterlelm.LaLEDclignoteet
signalequel’appareildoitêtrerechargé.signalequel’appareildoitêtrerechargé.
Celapermetd’éviterqu’unephotoneseCelapermetd’éviterqu’unephotonese
bloquedanslesystèmederouleauxdebloquedanslesystèmederouleauxde
l’appareil.l’appareil.
• La batterie rechargeable n’est pas • La batterie rechargeable n’est pas
complètement chargée au moment de complètement chargée au moment de
l’achat. Chargez complètement la batterie l’achat. Chargez complètement la batterie
à l’aide du chargeur USB (fourni). Cela à l’aide du chargeur USB (fourni). Cela
prend environ 1 à 2 heures (en fonction de prend environ 1 à 2 heures (en fonction de
l’utilisation).l’utilisation).
• Le câble de chargement de batterie • Le câble de chargement de batterie
fourni a été testé et fonctionne avec les fourni a été testé et fonctionne avec les
adaptateurs secteur pour Apple iPhone. adaptateurs secteur pour Apple iPhone.
Bienqu’ilpuisseêtreutiliséavecd’autresBienqu’ilpuisseêtreutiliséavecd’autres
types de port USB, p. ex. ordinateur, types de port USB, p. ex. ordinateur,
adaptateurs secteur USB, TV, voitures, adaptateurs secteur USB, TV, voitures,
etc., nous ne pouvons garantir un etc., nous ne pouvons garantir un
fonctionnementadéquat.fonctionnementadéquat.
• Quand vous cesserez d’utiliser l’appareil, • Quand vous cesserez d’utiliser l’appareil,
veuillezlerecyclerdemanièreadéquate.veuillezlerecyclerdemanièreadéquate.
Environnement d’utilisationEnvironnement d’utilisation
• Pour protéger la technologie • Pour protéger la technologie
haute précision contenue dans cet haute précision contenue dans cet
appareil, ne le laissez jamais dans les appareil, ne le laissez jamais dans les
environnements suivants durant une environnements suivants durant une
période prolongée : températures élevées période prolongée : températures élevées
(supérieures à +42 °C/108 °F), humidité (supérieures à +42 °C/108 °F), humidité
élevée, lieux présentant des variations de élevée, lieux présentant des variations de
températureextrêmes(chaudetfroid),températureextrêmes(chaudetfroid),
environnements directement exposés environnements directement exposés
à la lumière du soleil, sablonneux ou à la lumière du soleil, sablonneux ou
poussiéreux comme des plages, endroits poussiéreux comme des plages, endroits
humides ou présentant des vibrations humides ou présentant des vibrations
élevées.élevées.
• Ne laissez pas tomber l’appareil et • Ne laissez pas tomber l’appareil et
ne lui faites pas subir de chocs ou de ne lui faites pas subir de chocs ou de
vibrations importantes.vibrations importantes.
• Aucune pression, traction ou torsion ne • Aucune pression, traction ou torsion ne
doitêtreexercéesurl’objectif.doitêtreexercéesurl’objectif.
ConformitéConformité
Directives importantes relatives à Directives importantes relatives à
l’utilisation des batteries lithium-ionl’utilisation des batteries lithium-ion
1. Ne pas jeter dans le feu.1. Ne pas jeter dans le feu.
2.Nepasprovoquerdecourt-circuit.2.Nepasprovoquerdecourt-circuit.
3. Ne pas démonter.3. Ne pas démonter.
4. Cesser d’utiliser l’appareil s’il est 4. Cesser d’utiliser l’appareil s’il est
endommagé.endommagé.
5.Éliminerdemanièreadéquate 5.Éliminerdemanièreadéquate
après usage.après usage.
6. Tenir éloigné de l’eau.6. Tenir éloigné de l’eau.
Déclaration de conformité Déclaration de conformité
pour l’Union européennepour l’Union européenne
Par la présente, Polaroid International B.V. Par la présente, Polaroid International B.V.
déclarequel’appareilPolaroidLabestdéclarequel’appareilPolaroidLabest
conforme aux exigences essentielles de conforme aux exigences essentielles de
la Directive en matière de Compatibilité la Directive en matière de Compatibilité
électromagnétique(2014/30/UE),delaélectromagnétique(2014/30/UE),dela
DirectiverelativeauxéquipementsbasseDirectiverelativeauxéquipementsbasse
tension (2014/35/UE) et de la Directive tension (2014/35/UE) et de la Directive
RoHs(2011/65/UE),ainsiqu’auxautresRoHs(2011/65/UE),ainsiqu’auxautres
dispositionsenvigueur,lorsqu’ilestutilisédispositionsenvigueur,lorsqu’ilestutilisé
auxnsauxquellesilestdestiné.auxnsauxquellesilestdestiné.
Déclaration de conformité FCCDéclaration de conformité FCC
Cet appareil est conforme à la section 15 Cet appareil est conforme à la section 15
du Règlement de la FCC. L’utilisation est du Règlement de la FCC. L’utilisation est
soumise aux deux conditions suivantes : (1) soumise aux deux conditions suivantes : (1)
cet appareil ne peut causer d’interférence cet appareil ne peut causer d’interférence
nuisible, et (2) cet appareil doit accepter nuisible, et (2) cet appareil doit accepter
toutes les interférences reçues, y compris toutes les interférences reçues, y compris
lesinterférencessusceptiblesdeprovoquerlesinterférencessusceptiblesdeprovoquer
des problèmes de fonctionnement.des problèmes de fonctionnement.
Avertissement L’utilisateur est averti
quetoutchangementoumodicationqui
n’a pas été expressément approuvé par la
partie responsable de la conformité est de
natureàrévoquerl’autoritédontdispose
l’utilisateurpourutilisercetéquipement.
Cetéquipementnedoitpasêtrecolocalisé
ni utilisé en combinaison avec toute autre
antenne ou émetteur.
Remarque cetéquipementaététesté
etcertiéconformeauxlimitespourun
dispositif de Catégorie B, conformément à la
section 15 des règles de la FCC. Ces limites
sontconçuesand’offriruneprotection
raisonnable contre les interférences
nuisibles dans une installation résidentielle.
Cetéquipementgénère,utiliseetpeut
émettredel’énergieradiofréquenceet,s’il
n’est pas installé et utilisé conformément
auxinstructions,peutprovoquer
des interférences nuisibles pour les
communications radio. Néanmoins, aucune
garantien’estfourniequantàl’absence
de toute interférence dans le cadre d’une
installationparticulière.Sicetéquipement
provoquedesinterférencesnuisibles
pour la réception des signaux de radio et
detélévision,cequipeutêtredéterminé
en éteignant et en rallumant l’appareil,
nous suggérons à l’utilisateur de tenter
une ou plusieurs des mesures correctives
suivantes :
• Réorienter ou déplacer l’antenne de • Réorienter ou déplacer l’antenne de
réception.réception.
• Augmenter la distance entre • Augmenter la distance entre
l’équipementetlerécepteur.l’équipementetlerécepteur.
• Brancherl’équipementsurlaprised’un• Brancherl’équipementsurlaprised’un
circuitdifférentdeceluiauquelestreliécircuitdifférentdeceluiauquelestrelié
le récepteur.le récepteur.
• Consulter le revendeur ou un technicien • Consulter le revendeur ou un technicien
Radio/téléqualiépourobtenirdel’aide.Radio/téléqualiépourobtenirdel’aide.
CetéquipementestconformeauxCetéquipementestconformeaux
limitesdéniesparlaFCCenmatièrelimitesdéniesparlaFCCenmatière
d’exposition aux rayonnements pour un d’exposition aux rayonnements pour un
environnement non contrôlé. L’utilisateur environnement non contrôlé. L’utilisateur
naldoitrespecterlesinstructionsnaldoitrespecterlesinstructions
d’utilisationspéciéesanderespecterd’utilisationspéciéesanderespecter
la conformité en matière d’exposition aux la conformité en matière d’exposition aux
radiofréquences.radiofréquences.
Industry Canada (IC)Industry Canada (IC)
This device complies with part 15 of the FCC This device complies with part 15 of the FCC
Rule and Industry Canada license–exempt Rule and Industry Canada license–exempt
RSS standard(s). Operation is subject to the RSS standard(s). Operation is subject to the
following two conditions: (1) This device following two conditions: (1) This device
may not cause harmful interference, and (2) may not cause harmful interference, and (2)
this device must accept any interference this device must accept any interference
received, including interference that may received, including interference that may
cause undesired operation. Le present cause undesired operation. Le present
appareil est conforme aux CNR d’Industrie appareil est conforme aux CNR d’Industrie
Canada applicables aux appareils radio Canada applicables aux appareils radio
exempts de licence. L’exploitation est exempts de licence. L’exploitation est
autorisée aux deux conditions suivantes: (1) autorisée aux deux conditions suivantes: (1)
l’appareil ne doit pas produire de brouillage, l’appareil ne doit pas produire de brouillage,
et (2) l’utilisateur d’appareil doit accepter et (2) l’utilisateur d’appareil doit accepter
toutbrouillageradioélectriquesubi,toutbrouillageradioélectriquesubi,
mêmesilebrouillageestsusceptibled’enmêmesilebrouillageestsusceptibled’en
compromettre le fonctionnement.compromettre le fonctionnement.
CesymbolesigniequeCesymbolesignieque
conformément aux lois et règlements conformément aux lois et règlements
locaux,votreproduitdoitêtreéliminélocaux,votreproduitdoitêtreéliminé
séparément des déchets ménagers. Quand séparément des déchets ménagers. Quand
ce produit est hors d’usage, emmenez-le ce produit est hors d’usage, emmenez-le
à un point de collecte désigné par les à un point de collecte désigné par les
autorités locales. Certains points de autorités locales. Certains points de
collecte prennent gratuitement en charge collecte prennent gratuitement en charge
les produits. La collecte et le recyclage les produits. La collecte et le recyclage
sélectif de votre produit au moment de son sélectif de votre produit au moment de son
élimination aident à préserver les ressources élimination aident à préserver les ressources
naturelles,etàfaireensortequ’ilsoitnaturelles,etàfaireensortequ’ilsoit
recyclé dans le respect de la santé humaine recyclé dans le respect de la santé humaine
et de l’environnement.et de l’environnement.

Manual de Usuario
Manual de Usuario
24
25
Manual
de Usuario
Garantía
Encontrará la garantía de este producto siguiendo este
enlace: polaroid.com/warranty

Manual de Usuario
Manual de Usuario
26
27
Contenido
de la caja
01 Polaroid Lab
02 Cable de carga USB
03 Guía de inicio rápido
04 Manual de usuario
Cómo usar la
Polaroid Lab
1. Descargue la aplicación Polaroid en su
teléfono
Necesitará la aplicación Polaroid para utilizar
la Polaroid Lab. La aplicación también
contiene consejos, trucos y tutoriales,
ademásdeinspiraciónqueleayudaráa
encontrar nuevas maneras de explorar su
creatividad.
→ polaroid.com/polaroidlab
2. Cargue la Polaroid Lab
ImportanteImportante La Polaroid Lab no estará
completamente cargada cuando la compre.
Asegúresedequeestácompletamente
cargada antes de utilizarla por primera vez.
Cargue la Polaroid Lab completamente
antes de su primer uso. Para ello, conecte el
cable USB en la ranura micro USB de la parte
trasera de la Polaroid Lab; el otro extremo
deberá enchufarlo a una toma de corriente
con un adaptador de teléfono o directamente
en la ranura USB de su ordenador. Los LED
quehayjuntoalaranuraseenciendenpara
mostrar el nivel actual de la batería; cuatro
LEDencendidosindicanquelabateríaestá
completamente cargada. Si la Polaroid
Lab está conectada a un cargador y está
completamente cargada, todos los LED de
carga estarán apagados. Por lo general,
la cámara tarda unas 2 horas en cargarse
totalmente con un adaptador de teléfono o
hasta 3 o 4 horas si se carga a través de la
ranura USB de un ordenador. Con la batería
totalmente cargada, la Polaroid Lab tiene
sucientecargaparahacerfotosutilizando
100 cartuchos de película, según el uso.
Para conservar la batería, recuerde apagar la
Polaroid Lab después de cada uso.
3. Colocación de la película
Coja la Polaroid Lab y tire con suavidad
hacia abajo la parte delantera de la tapadera
delcompartimentodelapelícula.Saqueel
cartuchodepelículadelpaqueteeintroduzca
el cartucho de película hasta el fondo, con
la lámina negra boca arriba. Al cerrar el
compartimento de la película, la lámina negra
saldrá de la Polaroid Lab automáticamente.
Si la Polaroid Lab no expulsa la lámina negra,
quiteelcartuchodepelículayvuelvaa
colocarlo.Asegúresedequeseintroduzca
hastaadeutreyquedejo.
Importante Lea el embalaje del
paquetedelapelículaparaconocer
el tiempo de revelado, la manipulación
y el almacenamiento.
4. Encienda la Polaroid Lab
Pulseelbotónnegroqueestáenellado
derecho de la Polaroid Lab para elevar la
plataforma para el teléfono hasta la posición
de toma de fotografías y encenderla.
El Logo LED con el arcoíris se encenderá y el
LED del contador de película se encenderá
paramostrarcuántosdisparosquedanen
la Polaroid Lab. Cuando acabe, apague
la Polaroid Lab empujando la plataforma
hacia abajo. Además, esta se apagará
automáticamente tras varios minutos
de inactividad.
5. Abra la aplicación y seleccione su foto
Abra la aplicación
Polaroid
y elija
laseccióndelaPolaroidLab.Toqueelbotón
de selección de imagen para elegir la imagen
quequieraexponerypulseenavanzar.
La aplicación le guiará a lo largo de su
primera exposición.
6. Coloque su teléfono en la plataforma
para el teléfono
Coloquesuteléfonoenlaplataformapara
el teléfono con la pantalla mirando hacia la
lentedelaPolaroidLab.Compruebequeestá
correctamente alineado: la parte superior
del teléfono debe estar mirando hacia la
parteposteriordelacámara.Retirecualquier
funda o protector de pantalla para garantizar
mejores resultados. La aplicación detectará
laPolaroidLabyorientarálaimagenparaque
quedeperfectamentealineadaconlapelícula.
También mostrará una imagen de calibración
encima del sensor lumínico para exponer
correctamentesuimagensintenerqueajustar
la retroiluminación de su teléfono. Asegúrese
de desactivar todos los ajustes o aplicaciones
queafectenalcolordelapantalla,comoNight
ShiftoTrueTone,yaqueestospuedenafectar
engranmedidaalafotografíanal.
7. Pulse el botón rojo de disparo
La Polaroid Lab detectará su teléfono en la
plataforma y medirá el brillo de la pantalla para
garantizar una exposición perfecta. Espere
hastaqueelLogoLEDconelarcoírisparpadee
y pulse el botón rojo de disparo. La fotografía
saldrá por la ranura frontel de la cámara en
cuanto suelte el botón de disparo. Extraiga la
foto de debajo del protector de película para
queelprotectorregreseasuposiciónenla
PolaroidLab.Coloquelafotobocaabajo
paraquecontinúeprotegidadelaluzmientras
se revela.
Siquieresacarotrafotoconlamisma
imagen, vuelva a pulsar el botón de disparo.
Guía adicional
1. ¿Cuánta película quedan en el cartucho?
Hay 8 luces LED naranja en la parte delantera
de la Polaroid Lab. Cuando la Polaroid Lab
está encendida, pero no en modo de reposo,
losLEDlemuestranlasfotosquequedan
con una luz continua. La cantidad de LED
encendidoscorrespondealasfotosque
quedanenelcartucho.Porejemplo:sihay6
LEDencendidos,quedan6fotosenlacámara.
Cuando se consuman los 8 disparos del
cartuchodepelícula,onohayaningúnpaquete
de película en el interior de la Polaroid Lab, los
LED comenzarán a parpadear rápidamente al
encender la Polaroid Lab o pulsar el botón
de disparo.

Manual de Usuario
Manual de Usuario
28
29
2. ¿Cuánta batería queda?
La Polaroid Lab muestra el nivel de batería
restanteenloscuatroLEDquehayencima
de la ranura USB. Cuando la Polaroid Lab
está cargando, los LED parpadearán; cuando
esté completamente cargada con un cable
USB introducido en la ranura, todos los LED
estaránapagados,yaqueestaráalimentándose
directamente del cargador.
Nivel de batería:
1. Entre 1 y 4 LED encendidosEntre 1 y 4 LED encendidos
UnLEDindicaquehaycargasuciente
para un mínimo de 2 cartuchos de
película.
2. Batería cargada y cable USB Batería cargada y cable USB
conectado: Ningún LED encendidoconectado: Ningún LED encendido
El LED del contador de película
mostrará el número restante de fotos.
3. Batería agotadaBatería agotada
Noquedacarga.NingúnLEDNoquedacarga.NingúnLED
encendido, y la Polaroid Lab dejará de encendido, y la Polaroid Lab dejará de
funcionarhastaqueserecargue.funcionarhastaqueserecargue.
3. Película compatible
La Polaroid Lab es compatible con todos los
carretes Polaroid de película i-Type y 600.
Recomendamos utilizar la película tipo I, ya
queestáoptimizadaparalaPolaroidLab.La
Polaroid Lab no está pensada para funcionar
con la película SX-70, la película Spectra o
cualquierotrotipodepelícula.
4. Alimentación
CarguelaPolaroidLabparaasegurarsedeque
tienesucientecarga(ver→Cargue la Polaroid
Lab). Los LED de nivel de la batería traseros
parpadearán mientras la Polaroid Lab esté
conectada a la alimentación y cargando, y se
apagaráunavezquelaPolaroidLabalcancela
carga completa.
5. Limpieza de los rodillos
A veces el exceso de pasta del revelador de
fotos puede acumularse en los rodillos de la
Polaroid Lab, afectando al rendimiento de la
PolaroidLabygenerandofotosquemuestran
imperfecciones no deseadas. La Polaroid Lab
lleva incorporado el modo limpieza de rodillo
para ayudarle con este problema. Proceda
conforme a los siguientes pasos:
1. Cierre la plataforma para el teléfono
para apagar la Polaroid Lab.
2. Abra el compartimento de la película.
3. Mantenga pulsado el punto de
contacto derecho y deje pulsado
el botón de disparo durante más
de 2 segundos.
4. Los rodillos se moverán a la posición
de inicio para la limpieza.
5. Suelte los dos botones; la Polaroid
Lab está ahora en modo limpieza
de rodillos.
6. Con un paño húmedo o bastoncillo,
limpie suavemente los rodillos.
7. Pulse el botón del disparador para
quelosrodillosavancendeposición
de manera gradual.
8. Unavezqueesténlimpioslos
rodillos por todos los lados, cierre
el compartimento de la película.
Solución de problemas
y preguntas frecuentes
1. Mi Polaroid Lab no expulsa las fotos/la
lámina negra
CompruebequesuPolaroidLabestécargada:
el
Logo LED con el arcoíris
y los LED traseros
noseencenderánamenosquehayacarga
sucienteparafuncionar.Siesteeselcaso,
debe conectar la Polaroid Lab a un cargador
antesdevolverautilizarla.Compruebeque
quedapelículaensuPolaroidLab:para
ello, baje y luego suba la plataforma para el
teléfono. Los LED indicadores del contador
de película restante mostrarán cuántas fotos
quedanenelcartuchodelapelícula.Silos
LED parpadean rápidamente tras volver a
encenderlaPolaroidLab,signicaqueel
cartucho de la película se ha consumido en
sutotalidadoquelacámaranoreconoce
ninguno en su interior.
1. Todos apagadosTodos apagados
La cámara está apagada o no hay
cartucho de película
2. Botón de disparo hacia abajo, Botón de disparo hacia abajo,
todos parpadeandotodos parpadeando
Hay cartucho, pero no película
3. Todos encendidosTodos encendidos
Haycartucho,quedan8fotografías
4. LED alternos encendidosLED alternos encendidos
Error al introducir el cartucho
2. La aplicación ha hecho un sonido de error
La aplicación detectará si su teléfono se ha
colocado de forma correcta en la Polaroid Lab
Los puntos de contacto de la plataforma para
el teléfono le permiten a la aplicación rotar y
colocar la imagen directamente sobre la lente
de la Polaroid Lab. Si la aplicación no puede
haceresto,seloharásaberparaquepueda
colocar su teléfono en una posición mejor.
Cuando coja el teléfono, la aplicación le guiará
paraquelocoloquecorrectamenteconun
breve vídeo.
3. El botón de disparo no funciona
Si el LED con el logo del arcoíris está
encendido, la Polaroid Lab tiene alimentación,
y si hay película en la Polaroid Lab, el LED del
contador de película se iluminará mostrando el
número adecuado. Si pulsa el botón de disparo
y no sale nada, mire el LED del contador de
película. Si su teléfono no está correctamente
orientado, la Polaroid Lab no podrá leer el brillo
de la imagen.
El LED con el logo del arcoíris parpadeará
3 veces si se reconoce el teléfono. Si sigue
parpadeando rápidamente, la Polaroid Lab
no puede reconocer correctamente el área
delsensor/brillo.Sinoparpadea,signica
quenoreconoceelteléfonoqueseha
colocado. Esto puede ser debido a una funda
demóviloprotectordepantallaqueimpideel
reconocimiento del teléfono. Para solucionar
esto,quitecualquierfundaoprotectorde
pantalla. Empuje el teléfono con suavidad en la
Polaroid Lab.
4. Mi foto salió demasiado oscura
No hicimos la foto original con la cámara de
su teléfono, pero nuestros consejos usuales
para hacer fotos siguen siendo relevantes.
RecomendamosquedesactiveTrueTone,
Night Shift o Night Mode. La aplicación
ajustará automáticamente el brillos de su
teléfono. También puede ajustar la exposición
en el menú “Más” de la aplicación. El valor
de exposición puede ajustarse entre -3 y +3
números f.
Consejos para hacer
fotografías impresionantes
• Asegúresedequelapantallaestá
limpia. Si tiene un protector de
pantalla,asegúresedequelapantalla
no tiene arañazos, manchas o huellas.
Idealmente,retirecualquierprotector
de pantalla o funda de móvil para
garantizar los mejores resultados.
• Asegúresedequesuteléfono
está completamente plano en la
plataforma para el teléfono de la
Polaroid Lab.
• ¡Asegúresedequesupelículaestá
enbuenascondiciones!Compresu
película nueva en polaroid.com y
sigalosconsejosquevienenconel
paquetedepelículaparaasegurarse
dequeestasemantienesiempreen
las mejores condiciones.
• Compruebequetodoslosajustes
yaplicacionesqueafectanalcolor
están desactivados (p. ej., Night Shift
o True Tone).

Manual de Usuario
Manual de Usuario
30
31
Atención
al cliente
ElequipodeatenciónalclientedePolaroid
siempre está encantado de recibir sus
inquietudesoconsultas.Utilicelainformación
queapareceacontinuaciónparaponerse
en contacto con nosotros. Para recibir
información más detallada y actualizada
visite: polaroid.com/help
EE.UU/Canadá
+1 212 219 3254
Europa/Resto del mundo
00 800 577 01500
Polaroid International B.V.
1013 AP Amsterdam
Países Bajos
Especicaciones
técnicas
Generales
DimensionesDimensiones
150mm (largo) ×115.6mm (ancho) ×149.7mm
(alto, cerrada) ×177.16mm (alto, abierta)
PesoPeso
600 gramos (sin el cartucho de película)
Temperatura de trabajoTemperatura de trabajo
40–108°F / 4–42°C, 5–90%
de humedad relativa
Película compatiblePelícula compatible
Películas Polaroid i-Type y 600 en blanco
y negro, y en color, incluidas las ediciones
especiales.
BateríaBatería
Batería de iones de litio de alto rendimiento
de 1100 mAh, tensión nominal 3,7V, 4,07 Wh
Materiales
Capa exteriorCapa exterior
Policarbonato, TPU, EPDM
(caucho de etileno propileno dieno)
LenteLente
Lente de policarbonato de calidad óptica,
concapaantirreectante
Sistema del obturadorSistema del obturador
Aperturaja,velocidaddeldisparadorvariable
Sistema óptico
LenteLente
Lentedeenfoquejo
Distancia focalDistancia focal
150mm
Tipo de lenteTipo de lente
Sistema de lente de 3 elementos 1:2.35
Requisitos del sistema de la aplicación
Teléfonos compatiblesTeléfonos compatibles
• iPhone 6 o más nuevo
(excepto el iPhone SE)
• Dispositivos Android más actuales
Los teléfonos y sistemas operativos
compatibles están sujetos a cambio. Puede
obtener una lista completa en polaroid.com/
labworkswith
Información sobre seguridad
Precaución
Peligro de descarga eléctrica. No abra
ni desmonte el sistema de rodillos
motorizados.
• No desmonte el dispositivo. Si lo • No desmonte el dispositivo. Si lo
ensambla de forma incorrecta, puede ensambla de forma incorrecta, puede
sufrir una descarga eléctrica cuando sufrir una descarga eléctrica cuando
vuelva a utilizar el dispositivo.vuelva a utilizar el dispositivo.
• Nosumerjaelequipoenaguauotros• Nosumerjaelequipoenaguauotros
líquidos.líquidos.
• No utilice el dispositivo en ambientes con • No utilice el dispositivo en ambientes con
humedad elevada o demasiado polvo.humedad elevada o demasiado polvo.
• Nointentealterar,ajustarniquitarla• Nointentealterar,ajustarniquitarla
batería ni las piezas electrónicas ubicadas batería ni las piezas electrónicas ubicadas
debajo de los rodillos, detrás de la debajo de los rodillos, detrás de la
tapa del compartimento de película del tapa del compartimento de película del
dispositivo.dispositivo.
• Nointentequitarlatapaporsuspropios• Nointentequitarlatapaporsuspropios
medios,yaqueestáconectadaalcuerpomedios,yaqueestáconectadaalcuerpo
de la cámara por medios electrónicos. de la cámara por medios electrónicos.
Es peligroso, puede dañar el dispositivo y Es peligroso, puede dañar el dispositivo y
anulará la garantía.anulará la garantía.
• No introduzca objetos metálicos en el • No introduzca objetos metálicos en el
aparato.aparato.
• No introduzca objetos en los rodillos o • No introduzca objetos en los rodillos o
mecanismos.mecanismos.
• Mantengaalosniñospequeñosyrecién• Mantengaalosniñospequeñosyrecién
nacidos lejos del dispositivo para evitar nacidos lejos del dispositivo para evitar
queselastimenconlaspiezasmóviles.queselastimenconlaspiezasmóviles.
• No utilice ni guarde la cámara cerca de • No utilice ni guarde la cámara cerca de
fuentesdecaloroequiposquegenerenfuentesdecaloroequiposquegeneren
calor,incluidosamplicadoresestéreo.calor,incluidosamplicadoresestéreo.
• No utilice el dispositivo cerca de gases • No utilice el dispositivo cerca de gases
inamablesoexplosivos.inamablesoexplosivos.
• No cargue el dispositivo si percibe olores • No cargue el dispositivo si percibe olores
inusuales, ruidos o humo.inusuales, ruidos o humo.
• No intente desmontar la batería de la • No intente desmontar la batería de la
película o alterarla de algún modo (si película o alterarla de algún modo (si
utilizapelículastipo600).Siellíquidoutilizapelículastipo600).Siellíquido
de la batería entra en contacto con la de la batería entra en contacto con la
vista, lávese los ojos con agua dulce, vista, lávese los ojos con agua dulce,
fría y potable, y solicite atención médica fría y potable, y solicite atención médica
inmediata.inmediata.
Batería y cargadorBatería y cargador
• Este dispositivo utiliza una batería de • Este dispositivo utiliza una batería de
ionesdelitioamedidaquenopuedeionesdelitioamedidaquenopuede
extraerse y está instalada dentro del extraerse y está instalada dentro del
cuerpo de la Polaroid Lab. No utilice cuerpo de la Polaroid Lab. No utilice
otro tipo de batería. La sustitución de otro tipo de batería. La sustitución de
la batería solamente la pueden llevar la batería solamente la pueden llevar
a cabo los centros de servicio técnico a cabo los centros de servicio técnico
autorizados. La batería tendrá una vida autorizados. La batería tendrá una vida
útil prolongada si se mantiene en las útil prolongada si se mantiene en las
condiciones correctas. El consumo de condiciones correctas. El consumo de
energía varía según el ambiente en el energía varía según el ambiente en el
queseutilizaeldispositivoylaformaenqueseutilizaeldispositivoylaformaen
queestesealmacena.Inmediatamentequeestesealmacena.Inmediatamente
después de realizar una carga completa, después de realizar una carga completa,
labateríapermitefotograarhasta100labateríapermitefotograarhasta100
paquetesdepelícula.paquetesdepelícula.
• Cuando la carga de la batería se • Cuando la carga de la batería se
encuentre por debajo de un nivel encuentre por debajo de un nivel
determinado,elequiponoharádeterminado,elequiponohará
fotografías. El LED parpadeará para fotografías. El LED parpadeará para
queustedsepacuándodebecargarqueustedsepacuándodebecargar
lacámara.Estesistemaevitaquelaslacámara.Estesistemaevitaquelas
fotografíasquedenatascadascuandosefotografíasquedenatascadascuandose
procesan a través del sistema de rodillos.procesan a través del sistema de rodillos.
• La batería recargable no viene totalmente • La batería recargable no viene totalmente
cargada de fábrica. Cárguela al máximo cargada de fábrica. Cárguela al máximo
con el cargador USB (incluido). El proceso con el cargador USB (incluido). El proceso
tarda entre 1 y 2 horas (puede variar tarda entre 1 y 2 horas (puede variar
según el uso).según el uso).
• Sehaprobadoqueelcargadorde• Sehaprobadoqueelcargadorde
batería proporcionado funciona con batería proporcionado funciona con
los adaptadores de corriente de Apple los adaptadores de corriente de Apple
iPhone. Si bien puede utilizarse en otros iPhone. Si bien puede utilizarse en otros
puertos USB, por ejemplo ordenadores, puertos USB, por ejemplo ordenadores,
adaptadores de corriente USB, TV, adaptadores de corriente USB, TV,
coches, etc., no podemos garantizar coches, etc., no podemos garantizar
el funcionamiento correcto de este el funcionamiento correcto de este
accesorio.accesorio.
• Cuando ya no utilice el dispositivo, • Cuando ya no utilice el dispositivo,
deséchelo de forma correcta.deséchelo de forma correcta.
Entorno de usoEntorno de uso
• Para proteger la tecnología de alta • Para proteger la tecnología de alta
precisión incluida en este dispositivo, precisión incluida en este dispositivo,
nunca deje la Polaroid Lab en los nunca deje la Polaroid Lab en los
siguientes ambientes durante períodos siguientes ambientes durante períodos
prolongados: temperaturas elevadas prolongados: temperaturas elevadas
(+42 °C/108 °F); nivel de humedad alto; (+42 °C/108 °F); nivel de humedad alto;
sitios con cambios de temperatura sitios con cambios de temperatura
extremos (frío y calor); luz solar directa; extremos (frío y calor); luz solar directa;
ambientes arenosos o polvorientos, ambientes arenosos o polvorientos,
como playas, sitios húmedos o sitios como playas, sitios húmedos o sitios
quesufranvibracionesfuertes.quesufranvibracionesfuertes.
• No deje caer el dispositivo ni lo someta a • No deje caer el dispositivo ni lo someta a
golpes o vibraciones fuertes.golpes o vibraciones fuertes.
• Notire,empujenipresionelasupercie.• Notire,empujenipresionelasupercie.
Cumplimiento de la normativaCumplimiento de la normativa
Instrucciones importantes sobre el uso Instrucciones importantes sobre el uso
de baterías de iones de litiode baterías de iones de litio
1. No las arroje al fuego.1. No las arroje al fuego.
2. No ocasione un cortocircuito 2. No ocasione un cortocircuito
en las baterías.en las baterías.
3. No las desmonte.3. No las desmonte.
4. No las continúe utilizando 4. No las continúe utilizando
si están dañadas.si están dañadas.
5. Deséchelas de forma correcta 5. Deséchelas de forma correcta
después de usarlas.después de usarlas.
6. Manténgalas alejadas del agua6. Manténgalas alejadas del agua
Declaración de conformidad de la UEDeclaración de conformidad de la UE
Por la presente, Polaroid International B.V. Por la presente, Polaroid International B.V.
declaraquelaPolaroidLabcumplecondeclaraquelaPolaroidLabcumplecon
losrequisitosprincipalesdelaDirectivadelosrequisitosprincipalesdelaDirectivade
Compatibilidad electromagnética (2014/30/Compatibilidad electromagnética (2014/30/
UE), Directiva de Baja Tensión (2014/35/UE), Directiva de Baja Tensión (2014/35/
UE), Directiva RoHs (2011/65/UE) y otras UE), Directiva RoHs (2011/65/UE) y otras
disposiciones correspondientes cuando se disposiciones correspondientes cuando se
utilizanparaelnpretendido.utilizanparaelnpretendido.
Declaración de cumplimiento de la Declaración de cumplimiento de la
Comisión Federal de Comunicaciones Comisión Federal de Comunicaciones
(FCC, según sus siglas en inglés)(FCC, según sus siglas en inglés)
Este dispositivo cumple la sección 15 Este dispositivo cumple la sección 15
delasnormasqueestipulalaFCC.SudelasnormasqueestipulalaFCC.Su
uso está sujeto a las siguientes dos uso está sujeto a las siguientes dos
condiciones: (1) este dispositivo no puede condiciones: (1) este dispositivo no puede
causar interferencias perjudiciales; (2) causar interferencias perjudiciales; (2)
estedispositivodebeaceptarcualquierestedispositivodebeaceptarcualquier
interferenciarecibida,incluidaslasqueinterferenciarecibida,incluidaslasque
puedan afectar el funcionamiento del puedan afectar el funcionamiento del
equipo.equipo.
Precaución Seadviertealusuarioque
loscambiosolasmodicacionesquela
parte responsable del cumplimiento no
apruebe de forma expresa pueden anular
suautoridadparautilizarelequipo.Este
equiponodebecolocarsejuntoaantenas
o transmisores de ningún tipo, ni utilizarse
junto con ellos.
Importante Tras una serie de pruebas,
sehadeterminadoqueesteequipo
cumple los límites de un dispositivo
digital clase B, de conformidad con la
sección15delasnormasqueestipula
la FCC. Estos límites están diseñados
para proporcionar protección razonable
frente a las interferencias perjudiciales en
unainstalaciónresidencial.Esteequipo
genera, utiliza y puede irradiar energía
de radiofrecuencia y, si no se instala y se
utiliza de acuerdo con las instrucciones
proporcionadas, puede interferir
negativamente en las comunicaciones por
radio. No obstante, no existen garantías
dequenoseproduzcaninterferencias
enunainstalaciónespecíca.Sieste
dispositivo provoca interferencias negativas
en la recepción de una radio o televisión,
quepuedecomprobarseapagandoy
encendiendolosequipos,serecomienda
queelusuariotratedesolucionarla
interferencia mediante una o más de las
medidasquesepresentanacontinuación:
• Cambiar la orientación o ubicación de la • Cambiar la orientación o ubicación de la
antena receptora.antena receptora.
• Separarmáselequipodelreceptor.• Separarmáselequipodelreceptor.
• Conectarelequipoaunatomade• Conectarelequipoaunatomade
corrientedeuncircuitodiferentedelquecorrientedeuncircuitodiferentedelque
esté conectado el receptor.esté conectado el receptor.
• Consultar con el distribuidor del producto • Consultar con el distribuidor del producto
o solicitar ayuda a un técnico de radio o TV o solicitar ayuda a un técnico de radio o TV
experimentado.experimentado.
EsteequipocumpleloslímitesdeexposiciónEsteequipocumpleloslímitesdeexposición
alaradiaciónquelaFCCestableceparaalaradiaciónquelaFCCestablecepara
entornosnocontrolados.Elusuarionalentornosnocontrolados.Elusuarional
debe seguir las instrucciones de uso debe seguir las instrucciones de uso
especícasparacumplirlosnivelesdeespecícasparacumplirlosnivelesde
exposición a las radiofrecuencias.exposición a las radiofrecuencias.
Estesímboloindicaque,deacuerdoEstesímboloindicaque,deacuerdo
con las normas y reglamentaciones con las normas y reglamentaciones
locales, el producto debe desecharse locales, el producto debe desecharse
separado de los residuos domésticos. separado de los residuos domésticos.
CuandoesteproductolleguealnaldesuCuandoesteproductolleguealnaldesu
vidaútil,lléveloacualquieradelospuntosvidaútil,lléveloacualquieradelospuntos
derecogidaqueindicanlasautoridadesderecogidaqueindicanlasautoridades
locales. Ciertos puntos de recogida locales. Ciertos puntos de recogida
aceptan productos sin cargo. La recogida aceptan productos sin cargo. La recogida
y el reciclaje por separado del producto al y el reciclaje por separado del producto al
momento de desecharlo ayudará a preservar momento de desecharlo ayudará a preservar
losrecursosnaturalesygarantizaráqueestelosrecursosnaturalesygarantizaráqueeste
serecicledeunmodoqueprotejalasaludserecicledeunmodoqueprotejalasalud
humana y el medioambiente.humana y el medioambiente.

Manuale Utente
Manuale Utente
32
33
Manuale
Utente
Garanzia
LaGaranziaperquestoprodottoèdisponibilealseguente
link: polaroid.com/warranty

Manuale Utente
Manuale Utente
34
35
Contenuto
della scatola
01 Polaroid Lab
02 Cavo di ricarica USB
03 Guida di avvio rapido
04 Manuale Utente
Come si utilizza la
Polaroid Lab
1. Scaricare l’App Polaroid
sul proprio telefono
L’App Polaroid è necessaria per usare
la Polaroid Lab. L’App contiene anche
suggerimenti, tutorial e spunti per esprimere
al meglio la propria creatività.
→ polaroid.com/polaroidlab
2. Caricare la Polaroid Lab
ImportanteImportante La Polaroid Lab non sarà
completamente carica al momento
dell’acquisto.Assicurarsichesia
completamente carica prima dell’utilizzo.
Per caricare la Polaroid Lab, inserire il
cavo di ricarica USB nella porta per micro
USB sul pannello posteriore della Polaroid
Lab, e inserire l’altra estremità del cavo
in un’unità di ricarica come un adattatore
per telefono o la porta USB del vostro
computer. I LED di ricarica vicini alla porta si
accendono indicando il livello della batteria:
sesonoaccesiquattroLEDlabatteriaè
completamente carica. Se la Polaroid Lab è
collegata a un caricatore ed è completamente
carica, tutti i LED di ricarica saranno spenti.
Una ricarica completa richiede di norma
circa 2 ore tramite una presa a muro con
unadattatoreperiltelefonooppurenoa
4 ore tramite una porta USB del computer.
Una Polaroid Lab completamente carica avrà
un’autonomiasufcienteperscattare100
caricatori di pellicola, a seconda dell’utilizzo.
Ricordarsi di spegnere la Polaroid Lab dopo
l’uso per mantenere la durata della batteria.
3. Caricamento della pellicola
Sollevare la Polaroid Lab e tirare delicatamente
verso il basso lo sportello del vano pellicola.
Estrarre il caricatore della pellicola
dall’imballaggio e inserirlo completamente
tenendo il cartoncino nero di protezione
della pellicola rivolto verso l’alto. Quando
si chiude lo sportello del vano pellicola, il
cartoncino nero di protezione viene espulso
automaticamente dalla Polaroid Lab. Se il
cartoncino nero di protezione non è stato
espulso, estrarre la pellicola e reintrodurla,
vericandochesiainseritanoinfondo.
Nota Controllare le singole confezioni di
pellicole riguardo a dettagli su tempi di
sviluppo, funzionamento e conservazione.
4. Accendere la Polaroid Lab
Premere il pulsante nero sul lato destro della
Polaroid Lab per sollevare la base d’appoggio
del telefono nella posizione di scatto illuminerà
il.AquestopuntosiLEDdellogoarcobaleno
e il contatore della pellicola, indicando gli
scatti rimanenti sulla Polaroid Lab. Una volta
terminato, spegnere la Polaroid Lab premendo
la base d’appoggio verso il basso. Altrimenti, si
spegnerà automaticamente dopo alcuni minuti
di inattività.
5. Aprire l’app e selezionare la propria foto
Aprire l’app
Polaroid
e selezionare la sezione
dedicata alla Polaroid Lab. Toccare il pulsante
di selezione dell’immagine per scegliere
l’immagine da esporre e premere Avanti.
L’app guiderà l’utente nel corso della prima
esposizione.
6.
Posizionare il telefono sulla base d’appoggio
Posizionare il telefono sulla base d’appoggio
con lo schermo rivolto verso la lente
della Polaroid Lab. Assicurarsi che sia
correttamente allineato: la parte superiore
del telefono deve essere rivolta verso la
parte posteriore della fotocamera. Rimuovere
eventuali cover o protezioni dello schermo del
telefono per ottenere le prestazioni migliori.
L’app individuerà la Polaroid Lab e orienterà
l’immagine per renderla perfettamente
allineata con la pellicola. Inoltre visualizzerà
un’immagine di calibrazione sopra al sensore
luminoso per esporre correttamente
l’immagine senza dover regolare la
retroilluminazione del telefono. Assicurarsi di
aver spento tutte le impostazioni o le app che
inuisconosulcoloredeldisplay,comelaluce
notturna o la modalità “true tone”, tali funzioni
incidononegativamentesullafotograanale.
7. Premere il pulsante rosso dell’otturatore
La Polaroid Lab rileverà il telefono presente
sulla base d’appoggio e misurerà la luminosità
del display per assicurare un’esposizione
perfetta.AttenderenchéilLEDdellogo
arcobalenolampeggia,quindipremereil
pulsante dell’otturatore rosso. La foto sarà
espulsa dalla fessura posizionata sulla parte
frontale della fotocamera non appena si rilascia
il pulsante dell’otturatore. Estrarre la foto da
sotto la linguetta di protezione e lasciare che
quest’ultimasiarrotolinuovamenteall’interno
della Polaroid Lab. Rivolgere la foto a faccia
in giù per continuare a proteggerla della luce
durante lo sviluppo.
Sesidesiderarealizzareun’altrafotograa
della stessa immagine, premere nuovamente il
pulsante dell’otturatore.
Ulteriori istruzioni
1. Scatti rimanenti nel caricatore
Nella parte anteriore della Polaroid Lab vi sono
8 luci LED arancioni. Quando la Lab è accesa
e non è in modalità “sleep”, i LED visualizzano
sempre il numero di scatti. Il numero di LED
accesi corrisponde al numero di scatti ancora
disponibile nel caricatore della pellicola.
Adesempio,sesonoaccesi6LED,signica
che nel caricatore sono ancora disponibili 6
scatti. Se sono stati usati tutti gli 8 scatti, o
se nella fotocamera non è stato inserito alcun
caricatore, i LED lampeggeranno rapidamente
quandosiaccendelaPolaroidLaboquandosi
preme il pulsante dell’otturatore.
2. Autonomia residua della batteria
La Polaroid Lab indica l’autonomia residua
dellabatteriaconquattroLEDpostisopra
la porta USB. Quando la Polaroid Lab è in
modalitàdicarica,iLEDlampeggiano;quando
è completamente carica con un cavo USB

Manuale Utente
Manuale Utente
36
37
inserito, i LED sono spenti perché è alimentata
direttamente dal caricatore.
Livello della batteria:
1. Si accendono da 1 a 4 LEDSi accendono da 1 a 4 LED
Un LED indica che vi è una carica
sufcienteperalmeno2caricatori.
2. Batteria carica e cavo USB collegato: Batteria carica e cavo USB collegato:
Non si accende nessun LEDNon si accende nessun LED
Il LED del contatore della pellicola
indicherà il numero di foto rimanenti.
3. Batteria scaricaBatteria scarica
Nessuna carica residua. Non si Nessuna carica residua. Non si
accende alcun LED e la Polaroid LAB accende alcun LED e la Polaroid LAB
cesseràdifunzionarenchénoncesseràdifunzionarenchénon
viene ricaricata. viene ricaricata.
3. Pellicole compatibili
La Polaroid Lab funziona con tutte le pellicole
Polaroid 600 e i-Type. Si consiglia l’utilizzo
dipellicolei-Type,inquantoottimizzateper
l’uso della Polaroid Lab. Con la Polaroid Lab
non è previsto l’impiego della pellicola SX-70,
dellapellicolaSpectraodiqualsiasialtrotipo
di pellicola.
4. Alimentazione
Caricare la Polaroid Lab prima dell’uso per
assicurarechevisiaunacaricasufciente
(vedere →Caricare la Polaroid Lab). I LED
del livello della batteria posti sul retro
lampeggerannoquandolaPolaroidLab
è collegata ed è in modalità di carica e si
spegneranno,invece,quandolaPolaroidLab
è completamente carica.
5. Pulizia dei rulli
Talvolta, la pasta per lo sviluppo delle foto
in eccesso può formare residui sui rulli della
Polaroid Lab compromettendo le prestazioni
della Polaroid Lab e causando imperfezioni
indesideratesullefoto.Alnedirisolvere
il problema, la Polaroid Lab è dotata di
una modalità di pulizia dei rulli integrata. È
sufcienteeffettuareleseguentioperazioni:
1. Chiudere la base d’appoggio del
telefono per spegnere la Polaroid Lab
2. Aprire lo sportello del vano pellicola
3. Premere il punto di contatto destro
e tenere premuto il pulsante
dell’otturatore per >2 secondi
4. I rulli si sposteranno nella posizione
iniziale per la pulizia
5. Rilasciare entrambi i pulsanti: la
Polaroid Lab ora è nella modalità di
pulizia dei rulli
6. Usare un panno umido o tamponare
con del cotone per pulire
delicatamente i rulli.
7. Premere il pulsante dell’otturatore per
spostare gradualmente in avanti la
posizione dei rulli
8. Una volta puliti completamente
i rulli, chiudere lo sportello del
vano pellicola.
Risoluzione problemi
e FAQ
1. La mia Polaroid Lab non espelle la foto/il
cartoncino nero di protezione
Assicurarsi che la Polaroid Lab sia carica: il
LED del logo arcobaleno e i LED posteriori
non si accenderanno se non vi è una carica
sufcienteperassicurareilfunzionamento.
In tal caso, collegare la Polaroid Lab a un
caricatore prima di riutilizzarla. Assicurarsi
che all’interno della Polaroid Lab sia ancora
presente la pellicola: per controllare,
abbassare e sollevare la base d’appoggio del
telefono. I LED del contatore della pellicola
residuaindicherannoquantiscattisono
ancora disponibili nel caricatore. Se i LED
lampeggiano rapidamente una volta riaccesa
laPolaroidLab,signicachenelcaricatore
non sono rimasti scatti o che non è inserito
alcun caricatore.
1. Tutti spentiTutti spenti
La fotocamera è spenta oppure
non è presente un caricatore
2. Pulsante dell’otturatore premuto, Pulsante dell’otturatore premuto,
tutti lampeggianti tutti lampeggianti
Caricatore inserito, nessuna pellicola
3. Tutti accesiTutti accesi
Caricatore inserito, sono disponibili
8fotograe
4. LED accesi alternativamenteLED accesi alternativamente
Errore nell’inserimento del caricatore
2. L’app ha emesso un segnale acustico
d’errore
L’app rileverà se il telefono è stato posizionato
correttamente sulla Polaroid Lab. I punti di
contatto sulla base d’appoggio del telefono
consentono all’app di ruotare e posizionare
l’immagine direttamente sopra la lente della
Polaroid Lab. Se l’app non riesce a farlo,
l’utente riceverà una opportuna indicazione,
così da poter mettere il telefono in una
posizione migliore. Quando si solleva il
telefono, l’app guida l’utente al corretto
posizionamento con l’aiuto di un breve video.
3. Il pulsante dell’otturatore non funziona
Se il LED del logo arcobaleno è acceso,
signicachelaPolaroidLabèaccesaedispone
di pellicola; pertanto i LED corrispondenti del
contatore della pellicola saranno accesi. Se si
preme il pulsante dell’otturatore e non succede
nulla, occorre guardare il LED del contatore
della pellicola. Se il telefono non è orientato
correttamente, la Polaroid Lab non sarà in
grado di rilevare la luminosità dell’immagine.
Il LED del logo arcobaleno lampeggerà 3
voltequandoiltelefonovienericonosciuto.
Se continua a lampeggiare rapidamente,
la Polaroid Lab non riesce a riconoscere
correttamente la luminosità/l’area del sensore.
Senonlampeggiaaffatto,signicachenon
riconosce il telefono collocato sopra. La causa
potrebbe essere la presenza di una custodia
o di una protezione dello schermo che può
impedire il riconoscimento del telefono. Per
correggere l’errore, rimuovere l’eventuale
custodia o protezione dello schermo. Premere
delicatamente il telefono sulla Polaroid Lab.
4. Le foto risultano leggermente troppo scure
Non abbiamo scattato la foto originale con la
fotocamera del telefono, ma i nostri consigli
sullo scatto rimangono validi. Consigliamo
di disattivare le funzioni True Tone, Luce
notturna o Modalità notturna. L’app regolerà
automaticamente la luminosità del telefono.
È inoltre possibile regolare l’esposizione
nel menu “More” dell’app. L’EV può essere
regolato da -3 a +3 rapporti focali.
Consigli per realizzare
foto perfette
• Assicurarsi che lo schermo del telefono
sia pulito. Se è presente una protezione
dello schermo del telefono, assicurarsi
chesiaprivadigraf,macchieo
impronte. Per ottenere risultati ottimali,
rimuovere la protezione dello schermo le
cover del telefono.
• Assicurarsi che il telefono aderisca
completamente all’apposita base
d’appoggio della Polaroid Lab.
• Assicurarsi che la pellicola non sia
scaduta!Fatescortadipellicolenuove
su polaroid.com e seguite i consigli
presenti sulla confezione, per fare sì che
la pellicola sia sempre nelle condizioni
migliori.
• Assicurarsi che tutte le impostazioni e le
appcheinuisconosuicolorisianospente
(ad esempio luce notturna, true tone).

Manuale Utente
Manuale Utente
38
39
Assistenza
Clienti
Il team dell’assistenza clienti di Polaroid è
a vostra disposizione e sarà lieto di potervi
aiutare. Per ricevere assistenza, rivolgersi
aicontattiquisottoriportati.Permaggiori
dettagli e informazioni aggiornate, consultare
polaroid.com/help
USA/Canada
+1 212 219 3254
Europa/Resto del Mondo
00 800 577 01500
Polaroid International B.V.
1013 AP Amsterdam
Paesi Bassi
Scheda
Tecnica
Dati generali
DimensioniDimensioni
150mm (L) ×115,6 mm (P) ×149,7 mm
(H chiusa) ×177,16 mm (H aperta)
PesoPeso
600 grammi (senza il caricatore)
Temperatura OperativaTemperatura Operativa
42°C / 40–108 °F, 5–90% di umidità relativa
Pellicola compatibilePellicola compatibile
Pellicole per fotocamere Polaroid i-Type e
600 a colori e in bianco e nero, comprese le
edizioni speciali.
BatteriaBatteria
Batteria agli ioni di litio a elevate prestazioni,
1100 mAh, 3,7 V di tensione nominale, 4,07 Wh
Materiali
Involucri esterniInvolucri esterni
Policarbonato, TPU, EPDM
(Etilene, Propilene e Diene Monomero)
ObiettivoObiettivo
Lente ottica sfumata in policarbonato,
rivestita in AR
Sistema dell’otturatoreSistema dell’otturatore
Aperturassa,otturatoreavelocitàvariabile
Sistema ottico
ObiettivoObiettivo
Lenteafuocosso
Lunghezza focaleLunghezza focale
150 mm
Tipo di lenteTipo di lente
Sistema di lenti a 3 elementi 1:2.35
Requisiti di sistema dell’app
Telefoni supportatiTelefoni supportati
• iPhone 6 e successivi
(eccetto iPhone SE)
• I più recenti dispositivi Android
I telefoni e i sistemi operativi supportati sono
soggettiamodiche.Perunelencocompleto,
visitare polaroid.com/labworkswith
Informazioni di Sicurezza
Attenzione
Rischio di scossa elettrica – non aprire/
smontare il sistema a rulli motorizzato
• Non smontare il dispositivo. Un riassem-• Non smontare il dispositivo. Un riassem-
blaggio non corretto può causare scossa blaggio non corretto può causare scossa
elettrica nel dispositivo se usato di nuovo.elettrica nel dispositivo se usato di nuovo.
• Nonimmergereildispositivoinacquao• Nonimmergereildispositivoinacquao
inaltriliquidi.inaltriliquidi.
• Non usare il dispositivo in ambienti ad • Non usare il dispositivo in ambienti ad
elevata umidità o molto polverosi.elevata umidità o molto polverosi.
• Non tentare di manomettere, regolare o • Non tentare di manomettere, regolare o
rimuovere la batteria e/o i componenti rimuovere la batteria e/o i componenti
elettronici posizionati al di sotto dei rulli elettronici posizionati al di sotto dei rulli
dietro lo sportello del vano pellicola del dietro lo sportello del vano pellicola del
dispositivo.dispositivo.
• Non tentare di rimuovere lo sportello, in • Non tentare di rimuovere lo sportello, in
quantoècollegatoelettronicamentealquantoècollegatoelettronicamenteal
corpo del dispositivo. Tale operazione corpo del dispositivo. Tale operazione
non è sicura, può danneggiare il dispositi-non è sicura, può danneggiare il dispositi-
vo,equindiannullarelagaranzia.vo,equindiannullarelagaranzia.
• Non inserire oggetti metallici nell’appa-• Non inserire oggetti metallici nell’appa-
recchio.recchio.
• Non inserire oggetti nei rulli o negli • Non inserire oggetti nei rulli o negli
ingranaggi.ingranaggi.
• Tenere bambini piccoli e neonati lontani • Tenere bambini piccoli e neonati lontani
dal dispositivo per evitare che le parti dal dispositivo per evitare che le parti
mobili dell’apparecchio possano arrecare mobili dell’apparecchio possano arrecare
loro lesioni.loro lesioni.
• Non usare o conservare il dispositivo • Non usare o conservare il dispositivo
vicinoafontidicaloreoaqualsiasitipovicinoafontidicaloreoaqualsiasitipo
di apparecchio che generi calore, tra cui di apparecchio che generi calore, tra cui
gliamplicatoristereo.gliamplicatoristereo.
• Non usare il dispositivo vicino a gas • Non usare il dispositivo vicino a gas
inammabilioesplosivi.inammabilioesplosivi.
• Non caricare il dispositivo in caso di • Non caricare il dispositivo in caso di
odore, rumore o fumo insoliti.odore, rumore o fumo insoliti.
• Non tentare di smontare la batteria della • Non tentare di smontare la batteria della
pellicolaodimodicarla(sesiusanopellicolaodimodicarla(sesiusano
pellicoleperlaserie600).Seilliquidopellicoleperlaserie600).Seilliquido
della batteria entra a contatto con gli della batteria entra a contatto con gli
occhi, lavare immediatamente gli occhi occhi, lavare immediatamente gli occhi
conacquacorrentefrescaerichiedereconacquacorrentefrescaerichiedere
immediatamente l’intervento di un medico.immediatamente l’intervento di un medico.
Batteria e unità di ricaricaBatteria e unità di ricarica
• Ildispositivousaunaspecicabatteria• Ildispositivousaunaspecicabatteria
agli ioni di litio non estraibile e montata agli ioni di litio non estraibile e montata
all’interno del corpo della Polaroid Lab. all’interno del corpo della Polaroid Lab.
Non usare nessun altro tipo di batteria. Non usare nessun altro tipo di batteria.
La sostituzione della batteria può essere La sostituzione della batteria può essere
effettuatasolodacentridiassistenzaeffettuatasolodacentridiassistenza
autorizzati. La batteria avrà una durata autorizzati. La batteria avrà una durata
di molti anni, se usata in modo corretto. di molti anni, se usata in modo corretto.
Il consumo di energia varia a seconda Il consumo di energia varia a seconda
dell’ambiente in cui il dispositivo viene dell’ambiente in cui il dispositivo viene
utilizzato e di come viene conservato. utilizzato e di come viene conservato.
Usata immediatamente dopo la ricarica Usata immediatamente dopo la ricarica
completa, la batteria può garantire l’ela-completa, la batteria può garantire l’ela-
borazione di un massimo di 100 caricatori. borazione di un massimo di 100 caricatori.
• Quando il livello di energia della batteria • Quando il livello di energia della batteria
scende al di sotto di una certa percen-scende al di sotto di una certa percen-
tuale, il dispositivo non elaborerà più la tuale, il dispositivo non elaborerà più la
pellicola. Il LED lampeggerà e segnalerà pellicola. Il LED lampeggerà e segnalerà
quandooccorrericaricarel’apparecchio.quandooccorrericaricarel’apparecchio.
Questo serve per evitare che una foto Questo serve per evitare che una foto
si inceppi nel sistema dei rulli durante si inceppi nel sistema dei rulli durante
l’elaborazione.l’elaborazione.
• La batteria ricaricabile non è completa-• La batteria ricaricabile non è completa-
mentecaricaalmomentodell’acquisto.mentecaricaalmomentodell’acquisto.
Ricaricare completamente la batteria Ricaricare completamente la batteria
con l’unità di ricarica USB (in dotazione). con l’unità di ricarica USB (in dotazione).
Questa operazione richiede di norma 1-2 Questa operazione richiede di norma 1-2
ore (può variare a seconda dell’uso).ore (può variare a seconda dell’uso).
• Il cavo di ricarica della batteria fornito è • Il cavo di ricarica della batteria fornito è
stato testato per il funzionamento con stato testato per il funzionamento con
adattatori di alimentazione per iPhone adattatori di alimentazione per iPhone
Apple. Sebbene possa essere usato in Apple. Sebbene possa essere usato in
altre porte USB, ad esempio di computer, altre porte USB, ad esempio di computer,
adattatori di alimentazione USB, TV, auto adattatori di alimentazione USB, TV, auto
e così via, non è possibile garantirne il e così via, non è possibile garantirne il
funzionamento corretto.funzionamento corretto.
• Quando il dispositivo non è più in uso, • Quando il dispositivo non è più in uso,
riciclarlo in modo corretto.riciclarlo in modo corretto.
Ambiente di utilizzoAmbiente di utilizzo
• Per proteggere la tecnologia ad alta • Per proteggere la tecnologia ad alta
precisione contenuta nel dispositivo, precisione contenuta nel dispositivo,
non lasciare mai la Polaroid Lab esposta non lasciare mai la Polaroid Lab esposta
alle seguenti condizioni per lunghi inter-alle seguenti condizioni per lunghi inter-
valli di tempo: temperature elevate (+42 valli di tempo: temperature elevate (+42
°C/108 °F), umidità elevata, luoghi con °C/108 °F), umidità elevata, luoghi con
variazioni estreme di temperatura (caldo variazioni estreme di temperatura (caldo
e freddo), luce solare diretta, ambienti e freddo), luce solare diretta, ambienti
sabbiosiopolverosiqualispiagge,localisabbiosiopolverosiqualispiagge,locali
umidi o luoghi soggetti a forti vibrazioni.umidi o luoghi soggetti a forti vibrazioni.
• Non far cadere il dispositivo, non sotto-• Non far cadere il dispositivo, non sotto-
porlo a colpi o vibrazioni pesanti.porlo a colpi o vibrazioni pesanti.
• Non schiacciare, tirare o premere la • Non schiacciare, tirare o premere la
superciedell’obiettivo.superciedell’obiettivo.
Conformità
Norme importanti per l’uso Norme importanti per l’uso
delle batterie agli ioni di litiodelle batterie agli ioni di litio
1. Non gettare nel fuoco.1. Non gettare nel fuoco.
2. Non provocare corto circuito.2. Non provocare corto circuito.
3. Non smontare.3. Non smontare.
4. Non continuare a usarle se danneggiate.4. Non continuare a usarle se danneggiate.
5. Smaltire in modo corretto dopo l’utilizzo.5. Smaltire in modo corretto dopo l’utilizzo.
6.Tenerelontanodall’acqua.6.Tenerelontanodall’acqua.
Dichiarazione di conformità Dichiarazione di conformità
dell’Unione Europeadell’Unione Europea
Con la presente, Polaroid International B.V. Con la presente, Polaroid International B.V.
dichiara che la Polaroid Lab è conforme dichiara che la Polaroid Lab è conforme
airequisitiessenzialidelladirettivasullaairequisitiessenzialidelladirettivasulla
compatibilità elettromagnetica (2014/30/compatibilità elettromagnetica (2014/30/
CE), della direttiva sulla bassa tensione CE), della direttiva sulla bassa tensione
(2014/35/UE) e della direttiva RoHs (2014/35/UE) e della direttiva RoHs
(2011/65/UE) e ad altre disposizioni (2011/65/UE) e ad altre disposizioni
pertinenti, se usata per lo scopo a cui è pertinenti, se usata per lo scopo a cui è
destinata.destinata.
Dichiarazione di conformità della FCCDichiarazione di conformità della FCC
Il dispositivo è conforme alla Parte 15 delle Il dispositivo è conforme alla Parte 15 delle
norme della FCC. L’utilizzo è soggetto alle norme della FCC. L’utilizzo è soggetto alle
seguenti due condizioni: (1) il dispositivo non seguenti due condizioni: (1) il dispositivo non
deve provocare interferenze dannose e (2) il deve provocare interferenze dannose e (2) il
dispositivodeveaccettarequalsiasiinterfe-dispositivodeveaccettarequalsiasiinterfe-
renza, incluse le interferenze che potrebbero renza, incluse le interferenze che potrebbero
causare problemi di funzionamento.causare problemi di funzionamento.
Attenzione Siavvertel’utentechequalsiasi
variazioneomodicanonespressamente
approvata dall’ente responsabile
della conformità possono annullare
l’autorizzazione dell’utente per l’utilizzo del
dispositivo. L’apparecchio non deve essere
posizionato o utilizzato insieme ad altre
antenne o trasmettitori.
Nota L’apparecchio è stato testato e
ritenuto conforme ai limiti previsti per un
dispositivo digitale di classe B, ai sensi
della Parte 15 delle norme della FCC. Tali
limiti sono stabiliti nell’intento di fornire una
protezione ragionevole dalle interferenze
dannose in un’installazione residenziale.
Questo dispositivo genera, utilizza e può
irradiareenergiaaradiofrequenzae,senon
installatoeutilizzatocomespecicatonelle
istruzioni, può causare interferenze dannose
alle comunicazioni radio. Non si garantisce,
tuttavia, l’esclusione di interferenze in
una particolare installazione. Qualora
l’apparecchio causi interferenze dannose
alla ricezione radiotelevisiva, fenomeno
che si può determinare accendendo e
spegnendo il dispositivo, l’utente è invitato a
ovviare alle interferenze adottando una o più
delle seguenti misure:
• Riorientare o riposizionare l’antenna • Riorientare o riposizionare l’antenna
ricevente.ricevente.
• Aumentare la distanza tra il dispositivo e • Aumentare la distanza tra il dispositivo e
il ricevitore.il ricevitore.
• Collegare il dispositivo a una presa su • Collegare il dispositivo a una presa su
uncircuitodiversodaquelloincuièuncircuitodiversodaquelloincuiè
collegato il ricevitore.collegato il ricevitore.
• Chiedere assistenza al rivenditore o a un • Chiedere assistenza al rivenditore o a un
tecnico radio/TV esperto.tecnico radio/TV esperto.
L’apparecchio è conforme ai limiti di L’apparecchio è conforme ai limiti di
esposizione alle radiazioni stabiliti dalla FCC, esposizione alle radiazioni stabiliti dalla FCC,
denitiperunambientenoncontrollato.denitiperunambientenoncontrollato.
PerrispondereairequisitidiconformitàRF,PerrispondereairequisitidiconformitàRF,
l’utentenaledeveattenersialleistruzionidil’utentenaledeveattenersialleistruzionidi
funzionamentospeciche.funzionamentospeciche.
Questo simbolo indica che ai sensi Questo simbolo indica che ai sensi
delle leggi e dei regolamenti locali il delle leggi e dei regolamenti locali il
prodotto deve essere smaltito separatamen-prodotto deve essere smaltito separatamen-
tedairiutidomestici.Quandoilprodottotedairiutidomestici.Quandoilprodotto
ha esaurito il suo ciclo di vita, portarlo in ha esaurito il suo ciclo di vita, portarlo in
un punto di raccolta indicato dalle autorità un punto di raccolta indicato dalle autorità
locali. Alcuni punti di raccolta accettano i locali. Alcuni punti di raccolta accettano i
prodotti gratuitamente. La raccolta separata prodotti gratuitamente. La raccolta separata
e il riciclaggio del prodotto al momento dello e il riciclaggio del prodotto al momento dello
smaltimento contribuiranno a conservare smaltimento contribuiranno a conservare
le risorse naturali e a garantire un riciclo le risorse naturali e a garantire un riciclo
all’insegna di criteri che proteggono la salute all’insegna di criteri che proteggono la salute
umana e l’ambiente.umana e l’ambiente.

Benutzerhandbuch
Benutzerhandbuch
40
41
Benutzer-
handbuch
Gewährleistung
Die Gewährleistung zu diesem Produkt nden Sie unter
folgendem Link: polaroid.com/warranty

Benutzerhandbuch
Benutzerhandbuch
42
43
Lieferumfang
01 Polaroid Lab
02 USB-Ladekabel
03 Schnellstartanleitung
04 Benutzerhandbuch
Verwenden des Polaroid
1. Laden Sie die Polaroid-App auf Ihr
Smartphone herunter
Um das Polaroid Lab verwenden zu können,
benötigen Sie die Polaroid-App. Die App umfasst
ebenfalls Tipps, Tricks, Tutorials und Ideen für
weitere kreative Möglichkeiten.
→ polaroid.com/polaroidlab
2. Laden des Polaroid Lab
WichtigWichtig Das Polaroid Lab ist zum Zeitpunkt des
Kaufs nicht vollständig aufgeladen. Sie sollten
esvollständigauaden,bevorSieeszum
ersten Mal verwenden. Zum Laden schließen
Sie das eine Ende des USB-Ladekabels an den
Micro-USB-Anschluss an der Rückseite Des
Polaroid Labs und das andere Ende mithilfe
eines Adapters wie dem Ladeadapter Ihres
Smartphones oder einen USB-Anschluss
Ihres Computers an. Die LEDs neben dem
Schlitz leuchten auf und zeigen den aktuellen
Akkustand an, vier leuchtende LEDs bedeuten,
dass der das Lab vollständig aufgeladen ist.
Wenn das Polaroid Lab mit einem Ladegerät
verbunden und vollständig geladen ist, sind
alle Lade-LEDs aus. Die Ladezeit für eine
vollständige Akkuladung beträgt beim Laden
über einen Smartphone-Adapter an der
Steckdose ca. zwei Stunden, beim Laden über
den USB-Anschluss eines Computers bis zu
vier Stunden. Eine vollständige Akkuladung des
Polaroid Lab genügt – je nach Verwendung –
für bis 100 Filmkassetten. Denken Sie daran,
das Polaroid Lab nach dem Verwenden
auszuschalten, um Akkuleistung einzusparen.
3. Film einlegen
Nehmen Sie das Polaroid Lab in die Hand und
ziehen Sie die Vorderseite der Filmklappe leicht
nach unten. Nehmen Sie die Filmkassette aus
der Verpackung und drücken Sie sie vollständig
in die Filmklappe, dabei muss der Darkslide
des Films nach oben zeigen. Wenn Sie die
Filmklappe schließen, wird der Darkslide vom
Polaroid Lab automatisch ausgeworfen. Sollte
der Darkslide (Lichtschutz) des Films nicht
ausgegeben worden sein, entfernen Sie die
Filmkassette und legen Sie sie erneut ein.
Achten Sie dabei darauf, dass sie tatsächlich
an der Rückseite
das Polaroid Lab
anstößt.
Hinweis: Die Entwicklungszeit sowie
Hinweise zur Handhabung und Lagerung
entnehmen Sie bitte der Verpackung des
jeweiligen Films.
4. Einschalten des Polaroid Lab
Drücken Sie auf die schwarze Taste auf
der rechten Seite des Polaroid Lab, um die
Smartphone-Plattform in die Fotoaufnahme-
Position zu bringen und einzuschalten.
Die Regenbogenlogo-LEDs, leuchtet auf und
die Restbildanzeige-LED leuchtet, und zeigt
dadurch an, wie viele Aufnahmen noch mit dem
Polaroid Lab Polaroid Lab gemacht werden
können. Wenn Sie fertig sind, schalten Sie das
Polaroid Lab aus, indem Sie die Plattform nach
unten drücken. Alternativ schaltet er sich nach
einigen Minuten Inaktivität automatisch aus.
5. Öffnen Sie die App und wählen Sie Ihr Foto aus
Öffnen Sie die Polaroid-App und wählen Sie
den Bereich Polaroid Lab. Tippen Sie auf die
Bildauswahl-Schaltäche,umdiegewünschte
Bildaufnahme auszuwählen und tippen Sie
dann auf „Weiter“. Die App führt Sie durch die
erste Aufnahme.
6. Positionieren des Smartphones auf der
Smartphone-Plattform
Positionieren Sie Ihr Smartphone auf der
Smartphone-Plattform, dabei muss der
Bildschirm zur Linse des Polaroid Lab
zeigen. Vergewissern Sie sich, dass es
korrekt ausgerichtet ist: die Oberseite
Ihres Smartphones muss zur Rückseite
der Kamera zeigen. Entfernen Sie ggf.
Smartphonehülle oder Bildschirmschutz,
damit eine bestmögliche Leistungsfähigkeit
gewährleistet ist. Die App erkennt das Polaroid
Lab und richtet das Bild perfekt für den Film
aus. Sie zeigt außerdem ein Kalibrierungsbild
über dem Lichtsensor an, damit Ihr Bild
korrekt belichtet wird, ohne dass Sie die
Hintergrundbeleuchtung Ihres Smartphones
anpassen müssen. Vergewissern Sie sich, alle
Einstellungen oder Apps zu deaktivieren, die
dieFarbedesDisplaysbeeinussen,wiez.B.
Nachtanzeige oder Echtfarbton, da sie das
endgültigeFotoerheblichbeeinussenkönnen.
7. Drücken des roten Auslösers
Das Polaroid Lab erkennt Ihr Smartphone
auf der Plattform und misst die Helligkeit
des Displays, um eine perfekte Belichtung
zu gewährleisten. Warten Sie, bis die
Regenbogenlogo-LED blinkt, drücken Sie dann
auf den roten Auslöser. Sobald Sie den Finger
wieder vom Auslöser nehmen, wird das Foto
durch den Schlitz an der Kameravorderseite
ausgegeben. Ziehen Sie das Foto unter dem
Filmschutz hervor und lassen Sie zu, dass
sich der Filmschutz wieder einrollt. Legen Sie
das Foto mit dem Bild nach unten ab, um es
weiterhin vor Licht zu schützen, während es
entwickelt wird.
Wenn Sie eine weitere Aufnahme des
gleichen Bilds machen möchten, drücken Sie
erneut auf den Auslöser.
Weitere Informationen
1. Anzahl der verbleibenden Fotos
Auf der Vorderseite des Polaroid Lab
bendensich8orangeLED-Leuchten.Im
eingeschalteten Zustand - nicht im Standby-
Modus - zeigt der Lab immer an, wie viele Fotos
noch aufgenommen werden können. Dabei
entspricht die Anzahl der leuchtenden LEDs der
Anzahl der in der Filmkassette verbleibenden
Fotos. Zum Beispiel: Leuchten sechs LEDs,
können Sie noch sechs Fotos aufnehmen.
Wenn Sie bereits alle acht in einer Filmkassette
enthaltenen Fotos aufgenommen haben oder
sichkeineFilmkassetteinderKamerabendet,
wird dies durch schnelles Blinken der LEDs
beim Einschalten der Polaroid Lab angezeigt.

Benutzerhandbuch
Benutzerhandbuch
44
45
2. Verbleibende Akkuladung
Das Polaroid Lab zeigt den verbleibenden
Akkustand mithilfe von vier LEDs über dem
USB-Anschluss an. Wenn das Polaroid Lab lädt,
blinkt die LED, und wenn er vollständig über ein
angeschlossenes USB-Kabel geladen wurde,
erlöschen die LEDs, da der Drucker direkt über
das Ladegerät mit Strom versorgt wird.
Akkustand:
1. 1 bis 4 LEDs leuchten auf1 bis 4 LEDs leuchten auf
Die Ladung einer LED reicht aus für
mindestens 2 Filmkassetten.
2. Akku geladen und USB-Kabel ange- Akku geladen und USB-Kabel ange-
schlossen: Keine LEDs leuchten auf.schlossen: Keine LEDs leuchten auf.
Die Restbildanzeige-LED zeigt die
verbleibende Anzahl von Fotos an.
3. Akku leerAkku leer
Der Akku ist erschöpft. Keine der LEDs Der Akku ist erschöpft. Keine der LEDs
leuchtet auf und der Polaroid Lab leuchtet auf und der Polaroid Lab
funktioniert erst wieder, nachdem er funktioniert erst wieder, nachdem er
aufgeladen wurde.aufgeladen wurde.
3. Kompatibler Film:
Das Polaroid Lab ist mit allen I-Type- und
600-Filmkassetten von Polaroid kompatibel.
Wir empfehlen Ihnen die Verwendung der
I-Type-Kassetten, da diese für das Polaroid Lab
optimiert wurden. Das Polaroid Lab ist nicht für
SX-70-Film, Spectra-Film oder ähnliche Filme
ausgelegt.
4. Stromversorgung
Laden Sie das Polaroid Lab vor der
Verwendung, damit eine ausreichende Ladung
sichergestelltist(siehe→LadendesPolaroid
Lab). Die rückseitigen Akkustand-LEDs blinken,
während das Polaroid Lab angeschlossen ist
und lädt, und sie erlöschen, nachdem das
Polaroid Lab vollständig geladen ist.
5. Walzen reinigen
Es kann vorkommen, dass sich überschüssige
Entwicklerpaste von den Fotos an den Polaroid
Lab Walzen absetzt, was die Kameraleistung
beeinträchtigt und Fotos mit unerwünschten
Mängeln erzeugt. Das Polaroid Lab verfügt
über einen Walzenreinigungsmodus, um dieses
Problem zu beseitigen. Folgen Sie einfach
diesen Schritten:
1. Schließen Sie die Smartphone-
Plattform, um das Polaroid Lab
auszuschalten.
2. Öffnen Sie die Filmklappe
3. Halten Sie den rechten Kontaktpunkt
gedrückt und halten Sie dann den
Auslöser >2 Sekunden gedrückt
4. Die Walzen bewegen sich in die
Starposition für die Reinigung
5. Lassen Sie beide Tasten los, der
PolaroidLabbendetsichnunim
Walzenreinigungsmodus.
6. Reinigen Sie die Walzen vorsichtig
mit einem feuchten Tuch oder
Wattestäbchen.
7. Drücken Sie auf den Auslöser, um
die Walzenpositionen schrittweise zu
verändern.
8. Wenn beide Walzen rundherum sauber
sind, schließen Sie die Filmladeklappe.
Problembehandlung und
häug gestellte Fragen
1. Mein Polaroid Lab lässt mich mein Foto/
Darkslide nicht auswerfen
Vergewissern Sie sich, dass Ihr Polaroid Lab
geladen ist: Die Regenbogenlogo-LED und die
rückseitigen LEDs leuchten nur auf, sofern
ausreichend Ladung für den Betrieb zur
Verfügung steht. Wenn dies nicht der Fall ist,
sollten Sie das Polaroid Lab vor der erneuten
Verwendung an ein Ladegerät anschließen.
Vergewissern Sie sich, dass ein Film in Ihrem
Polaroid Lab vorhanden ist: senken Sie dazu
die Smartphone-Plattform und heben Sie sie
wieder an. Die Restbildanzeige-LEDs zeigen die
Anzahl der in der Filmkassette verbleibenden
Fotos an. Blinken die LEDs beim Einschalten der
Polaroid Lab
schnell, bedeutet dies, dass die
Filmkassette leer ist oder keine Filmkassette
eingelegt ist.
1. Alle LEDs sind ausAlle LEDs sind aus
Polaroid Lab aus oder keine
Filmkassette eingelegt
2. Auslöser gedrückt, alle LEDs blinkenAuslöser gedrückt, alle LEDs blinken
Filmkassette eingelegt, kein Film
3. Alle LEDs leuchtenAlle LEDs leuchten
Filmkassette eingelegt, 8 Fotos
verbleiben
4. Wechselnde LEDs leuchten aufWechselnde LEDs leuchten auf
Filmkassetten-Einlegefehler
2. Die App gibt einen Fehlerton aus
Die App erkennt, ob Ihr Smartphone korrekt auf
dem Polaroid Lab positioniert ist. Mithilfe der
Kontaktpunkte auf der Smartphone-Plattform
kann die App das Bild direkt über der Linse des
Polaroid Lab drehen und positionieren. Wenn
die App dies nicht vornehmen kann, erfolgt
eine Meldung, sodass Sie Ihre Smartphone in
eine bessere Position bringen können. Wenn
Sie Ihr Smartphone in die Hand nehmen, führt
Sie die App anhand eines kurzen Videos durch
die korrekte Positionierung.
3. Der Auslöser funktioniert nicht
WenndieRegenbogenlogo-LEDaueuchtet,
ist das Polaroid Lab eingeschaltet und wenn
Film in das Polaroid Lab eingelegt ist, leuchtet
die entsprechende Anzahl Restbildanzeige-
LEDs auf. Wenn Sie auf den Auslöser drücken
und kein Foto ausgegeben wird, sehen Sie
sich die Restbildanzeige-LED an. Wenn Ihr
Smartphone nicht korrekt ausgerichtet ist,
kann das Polaroid Lab die Helligkeit des Bilds
nicht korrekt auslesen.
Die Regenbogenlogo-LED blinkt drei Mal,
wenn das Smartphone erkannt wird. Wenn
sie weiterhin schnell hintereinander blinkt,
kann das Polaroid Lab den Sensorbereich/
die Helligkeit nicht korrekt erkennen. Wenn
Sie gar nicht blinkt, bedeutet das, dass
das Smartphone nicht erkannt wird. Das
kann an einer Smartphonehülle oder einem
Displayschutz liegen, wodurch die Erkennung
des Smartphones beeinträchtigt wird.
Entfernen Sie zum Beheben dieses Problems
die Smartphonehülle oder den Displayschutz.
Schieben Sie das Smartphone auf
die Plattform.
4. Mein Foto wurde zu dunkel
Wir haben nicht das Originalfoto von Ihrer
Smartphone-Kamera genommen, die
Empfehlung für unser normales Foto gilt
jedoch ebenfalls. Wir empfehlen, Echtfarbton,
Nachtanzeige oder Nachtmodus zu
deaktivieren. Die App passt die Helligkeit Ihres
Smartphones automatisch an. Sie können
die Belichtung in der App im Menü „Mehr“
anpassen. EV kann auf einen Wert zwischen
-3 und +3 F-Stopps eingestellt werden.
Tipps für großartige
Fotoaufnahmen
• Vergewissern Sie sich, dass Ihr
Smartphone-Display sauber ist.
Wenn Sie über einen Displayschutz
verfügen, vergewissern Sie
sich, dass sich keine Kratzer,
Flecken oder Fingerabdrücke
daraufbenden.EntfernenSie
idealerweise Smartphonehülle
oder Bildschirmschutz, damit die
bestmöglichen Ergebnisse erzielt
werden.
• Vergewissern Sie sich, dass
IhrSmartphoneachaufder
Smartphone-Plattform des Polaroid
Lab liegt.
• Vergewissern Sie sich, das Ihr Film
neuist!BevorratenSiesichunter
polaroid.com mit neuem Film und
lesen Sie das Hinweisblatt, das im
Lieferumfang des Films enthalten
ist, damit Sie Ihren Film bestmöglich
verwenden.
• Vergewissern Sie sich, dass alle
Einstellungen und Apps deaktiviert
sind,dieEinussaufdieFarben
nehmen können (z. B. Nachtanzeige,
Echtfarbton).

Benutzerhandbuch
Benutzerhandbuch
46
47
Kundenbetreuung
Das Kundenbetreuungsteam von Polaroid
freut sich auf Sie. Sie erreichen uns unter
den nachstehenden Kontaktdaten. Weitere
detaillierte und aktuelle Informationen
erhalten Sie unter polaroid.com/help
USA/Canada
+1 212 219 3254
Europe/Rest der Welt
00 800 577 01500
Polaroid International B.V.
1013 AP Amsterdam
Niederlande
Technische
Daten
Allgemein
AbmessungenAbmessungen
150mm (L) ×115.6mm (B) ×149.7mm
(H geschlossen) ×177.16mm (H geöffnet)
GewichtGewicht
600 Gramm (ohne Filmkassette)
BetriebstemperaturBetriebstemperatur
42 °C (40 – 108 °F), 5 – 90 % relative
Luftfeuchtigkeit
Kompatible FilmeKompatible Filme
Polaroid I-Type-Film und 600-Film in
Farbe und Schwarz-Weiß, einschließlich
Sondereditionen.
AkkuAkku
Leistungsstarker Lithium-Ionen-Akku,
1100 mAh, 3,7 V Nennspannung, 4,07 Wh
Materialien
AußengehäuseAußengehäuse
Polycarbonat, TPU, EPDM-Linse (Ethylen-
Propylen-Dien-Monomer)
LinseLinse
Optische Polycarbonatlinse, beschichtet
VerschlusssystemVerschlusssystem
Feste Blende, Auslöser mit variabler
Geschwindigkeit
Optisches System
LinseLinse
Fixfokus-Objektiv
BrennweiteBrennweite
150mm
LinsentypLinsentyp
1:2.35 3 element lens system
App-Systemanforderungen
Unterstützte SmartphonesUnterstützte Smartphones
• iPhone 6 und neuer
(außer iPhone SE)
• Die meisten aktuellen Android-Geräte
Unterstützte Smartphones und
Betriebssysteme können geändert werden.
EinevollständigeListendenSieunter
polaroid.com/labworkswith
Sicherheitshinweise
Achtung
Gefahr eines Stromschlags - das angetriebene
Walzensystem nicht öffnen/zerlegen
• Das Gerät nicht auseinanderbauen. • Das Gerät nicht auseinanderbauen.
Ein nicht korrektes erneutes Ein nicht korrektes erneutes
Zusammenbauen birgt die Gefahr eines Zusammenbauen birgt die Gefahr eines
Stromschlags beim Wiedereinschalten Stromschlags beim Wiedereinschalten
des Geräts.Das Gerät nicht in Wasser des Geräts.Das Gerät nicht in Wasser
oder sonstige Flüssigkeiten tauchen. oder sonstige Flüssigkeiten tauchen.
Das Gerät nicht in Umgebungen mit Das Gerät nicht in Umgebungen mit
hoher Luftfeuchtigkeit oder sehr hoher Luftfeuchtigkeit oder sehr
staubigen Umgebungen verwenden. staubigen Umgebungen verwenden.
Versuchen Sie nicht, den Akku und/Versuchen Sie nicht, den Akku und/
oder die elektronischen Bauteile unter oder die elektronischen Bauteile unter
den Walzen hinter der Filmladeklappe den Walzen hinter der Filmladeklappe
zu manipulieren, einzustellen oder zu zu manipulieren, einzustellen oder zu
entfernen.entfernen.
• Versuchen Sie nicht, die Klappe zu • Versuchen Sie nicht, die Klappe zu
entfernen, da sie elektronisch mit dem entfernen, da sie elektronisch mit dem
Gerätekörper verbunden ist. Dies ist Gerätekörper verbunden ist. Dies ist
gefährlich, kann Ihr Gerät beschädigen gefährlich, kann Ihr Gerät beschädigen
und macht Ihre Garantieansprüche und macht Ihre Garantieansprüche
ungültig.Keine Metallgegenstände in das ungültig.Keine Metallgegenstände in das
Gerät stecken. Keine Gegenstände in die Gerät stecken. Keine Gegenstände in die
Walzen oder Antriebe stecken.Walzen oder Antriebe stecken.
• Kinder und Kleinkinder von dem Gerät • Kinder und Kleinkinder von dem Gerät
fernhalten, um eine Verletzungsgefahr fernhalten, um eine Verletzungsgefahr
durch bewegliche Teile des Geräts durch bewegliche Teile des Geräts
zu vermeiden. Das Gerät nicht in zu vermeiden. Das Gerät nicht in
derNähevonWärmequellenoderderNähevonWärmequellenoder
wärmeerzeugenden Geräten wie wärmeerzeugenden Geräten wie
Stereoverstärkern verwenden oder Stereoverstärkern verwenden oder
lagern.lagern.
• Das Gerät nicht in der Nähe von • Das Gerät nicht in der Nähe von
brennbaren oder explosiven Gasen brennbaren oder explosiven Gasen
verwenden.Das Gerät nicht laden, wenn verwenden.Das Gerät nicht laden, wenn
Sie unübliche Gerüche, Geräusche oder Sie unübliche Gerüche, Geräusche oder
Rauch wahrnehmen.Rauch wahrnehmen.
• Versuchen Sie nicht, den Akku des • Versuchen Sie nicht, den Akku des
Films zu zerlegen oder zu verändern (bei Films zu zerlegen oder zu verändern (bei
Verwendung des Films vom Typ 600). Verwendung des Films vom Typ 600).
SollteBatterieüssigkeitinIhreAugenSollteBatterieüssigkeitinIhreAugen
gelangen, spülen Sie sie sofort mit gelangen, spülen Sie sie sofort mit
sauberem,kaltemießendemWassersauberem,kaltemießendemWasser
aus und suchen Sie unmittelbar einen aus und suchen Sie unmittelbar einen
Arzt auf.Arzt auf.
Akku und LadegerätAkku und Ladegerät
• •
Dieses Gerät verfügt über einen Dieses Gerät verfügt über einen
passgenauen Lithium-Ionen-Akku, der passgenauen Lithium-Ionen-Akku, der
nicht entfernt werden kann und in die nicht entfernt werden kann und in die
Kamera eingebaut ist. Es darf kein Akku Kamera eingebaut ist. Es darf kein Akku
eines anderen Typs verwendet werden. eines anderen Typs verwendet werden.
Der Austausch des Akkus kann nur in Der Austausch des Akkus kann nur in
autorisierten Service-Centern erfolgen. autorisierten Service-Centern erfolgen.
Bei korrekter Verwendung kann der Bei korrekter Verwendung kann der
Akku viele Jahre lang verwendet werden. Akku viele Jahre lang verwendet werden.
Der Stromverbrauch variiert je nach Der Stromverbrauch variiert je nach
Umgebung, in der das Gerät verwendet Umgebung, in der das Gerät verwendet
und wie das Gerät gelagert wird. Bei und wie das Gerät gelagert wird. Bei
der sofortigen Verwendung nach einer der sofortigen Verwendung nach einer
vollständigen Ladung können mit dem vollständigen Ladung können mit dem
Akku bis zu 100 Filmkassetten verarbeitet Akku bis zu 100 Filmkassetten verarbeitet
werden. werden.
• •
Sobald der Ladezustand des Akkus Sobald der Ladezustand des Akkus
eine bestimmte Untergrenze erreicht, eine bestimmte Untergrenze erreicht,
entwickelt das Gerät keine Filme mehr. entwickelt das Gerät keine Filme mehr.
Die Blitz-LED blinkt und signalisiert damit, Die Blitz-LED blinkt und signalisiert damit,
dass das Gerät aufgeladen werden muss. dass das Gerät aufgeladen werden muss.
Hierdurch wird vermieden, dass ein Foto Hierdurch wird vermieden, dass ein Foto
im Walzensystem stecken bleibt.im Walzensystem stecken bleibt.
• •
Der Akku ist beim Kaufzeitpunkt nicht Der Akku ist beim Kaufzeitpunkt nicht
vollständig geladen. Laden Sie den Akku vollständig geladen. Laden Sie den Akku
mit dem USB-Ladegerät (im Lieferumfang mit dem USB-Ladegerät (im Lieferumfang
enthalten) vollständig auf. Dies dauert enthalten) vollständig auf. Dies dauert
normalerweise 1-2 Stunden (kann je nach normalerweise 1-2 Stunden (kann je nach
Verwendung variieren).Verwendung variieren).
• •
Das mitgelieferte Ladekabel wurde Das mitgelieferte Ladekabel wurde
getestet und funktioniert mit den Apple getestet und funktioniert mit den Apple
iPhone-Netzteiladaptern. Es kann iPhone-Netzteiladaptern. Es kann
zwar mit anderen USB-Anschlüssen zwar mit anderen USB-Anschlüssen
verwendet werden, z. B. Computer, verwendet werden, z. B. Computer,
USB-Steckernetzteile, Fernsehgeräte, USB-Steckernetzteile, Fernsehgeräte,
Kraftfahrzeuge usw., in diesem Fall Kraftfahrzeuge usw., in diesem Fall
kann jedoch ein korrekter Betrieb nicht kann jedoch ein korrekter Betrieb nicht
garantiert werden.garantiert werden.
• •
Wenn das Gerät nicht mehr verwendet Wenn das Gerät nicht mehr verwendet
wird, recyceln Sie es bitte ordnungsgemäß.wird, recyceln Sie es bitte ordnungsgemäß.
VerwendungsumgebungVerwendungsumgebung
• •
Um die Hochpräzisionstechnologie Um die Hochpräzisionstechnologie
dieses Gerätes zu schützen, lagern Sie dieses Gerätes zu schützen, lagern Sie
das Gerät niemals für längere Zeit bei das Gerät niemals für längere Zeit bei
hoher Temperatur (+42 °C), bei hoher hoher Temperatur (+42 °C), bei hoher
Feuchtigkeit, an Orten mit starken Feuchtigkeit, an Orten mit starken
Temperaturschwankungen (heiß und Temperaturschwankungen (heiß und
kalt), in direkter Sonneneinstrahlung, in kalt), in direkter Sonneneinstrahlung, in
sandigen oder staubigen Umgebungen wie sandigen oder staubigen Umgebungen wie
Stränden, an feuchten Orten oder an Orten Stränden, an feuchten Orten oder an Orten
mit starken Vibrationen.mit starken Vibrationen.
• •
Lassen Sie das Gerät nicht fallen und Lassen Sie das Gerät nicht fallen und
setzen Sie es keinen starken Stößen oder setzen Sie es keinen starken Stößen oder
Vibrationen aus.Vibrationen aus.
• •
Üben Sie keinen Druck oder Zug auf die Üben Sie keinen Druck oder Zug auf die
Linse aus.Linse aus.
KonformitätserklärungKonformitätserklärung
Wichtige Anweisungen zur Verwendung Wichtige Anweisungen zur Verwendung
von Lithium-Ionen-Batterienvon Lithium-Ionen-Batterien
1. Nicht ins Feuer werfen.1. Nicht ins Feuer werfen.
2. Nicht kurzschließen.2. Nicht kurzschließen.
3. Nicht zerlegen.3. Nicht zerlegen.
4. Bei Beschädigung nicht weiterverwenden.4. Bei Beschädigung nicht weiterverwenden.
5. Nach der Benutzung korrekt entsorgen.5. Nach der Benutzung korrekt entsorgen.
6. Von Wasser fernhalten6. Von Wasser fernhalten
EU-KonformitätserklärungEU-Konformitätserklärung
Polaroid International B.V. erklärt hiermit, Polaroid International B.V. erklärt hiermit,
dass der Polaroid Lab den grundlegenden dass der Polaroid Lab den grundlegenden
Anforderungen der EMV-Richtlinie Anforderungen der EMV-Richtlinie
(Elektromagnetische Verträglichkeit) (Elektromagnetische Verträglichkeit)
2014/30/EU, Niederspannungsrichtlinie 2014/30/EU, Niederspannungsrichtlinie
2014/35/EU und RoHS-Richtlinie 2011/65/2014/35/EU und RoHS-Richtlinie 2011/65/
EU sowie anderen maßgeblichen EU sowie anderen maßgeblichen
Vorschriften bei bestimmungsgemäßer Vorschriften bei bestimmungsgemäßer
Benutzung entspricht.Benutzung entspricht.
FCC EinhaltungserklärungFCC Einhaltungserklärung
Dieses Gerät entspricht Teil 15 der FCC-
Bestimmungen. Für den Betrieb gelten
folgende Bedingungen: (1) Das Gerät darf
keine schädlichen Störungen verursachen,
und (2) das Gerät muss den Empfang von
Interferenzen zulassen, einschließlich von
Interferenzen, die einen ungewünschten
Betrieb verursachen können.
DerAnwenderwirdgewarnt,dassalle
nicht ausdrücklich von der für Compliance
verantwortlichen Partei autorisierten
ÄnderungenoderModikationendie
Erlaubnis des Anwenders zum Betrieb des
Geräts null und nichtig machen können.
Dieses Gerät darf nicht zusammen mit
anderen Antennen oder Sendern aufgestellt
oder in Betrieb gesetzt werden.
Hinweis:DiesesGerätwurdegetestet
und unterliegt den gemäß Teil 15 der FCC-
Vorschriften für digitale Geräte der Klasse
B festgelegten Beschränkungen. Diese
Beschränkungen wurden für ausreichenden
Schutz gegen Störungen bei Installation in
einem Wohngebiet entwickelt. Dieses Gerät
erzeugt, nutzt und strahlt Energie in Form
vonFunkfrequenzenabundkann,wennes
nicht in Übereinstimmung mit der Anleitung
installiert und verwendet wird, zu störenden
Interferenzen in der Funkkommunikation
führen. Es besteht allerdings keine Garantie,
dass in einer bestimmten Installation
keine Störungen auftreten werden. Sollte
das Gerät Störungen im Rundfunk- und
Fernsehempfang verursachen, was
durch Aus- und Einschalten des Gerätes
festgestellt werden kann, empfehlen wir
zu versuchen, die Störung durch eine oder
mehrere der folgenden Maßnahmen zu
beheben:
• Ausrichtung oder Lage der • Ausrichtung oder Lage der
Empfangsantenne verändern.Empfangsantenne verändern.
• Erhöhen Sie den Abstand zwischen Gerät • Erhöhen Sie den Abstand zwischen Gerät
und Empfänger.und Empfänger.
• Schließen Sie das Gerät an einer • Schließen Sie das Gerät an einer
Steckdose eines Stromkreises an, der Steckdose eines Stromkreises an, der
vom Stromkreis abweicht, an dem der vom Stromkreis abweicht, an dem der
Empfänger angeschlossen ist.Empfänger angeschlossen ist.
• Bitten Sie den Händler oder einen • Bitten Sie den Händler oder einen
erfahrenen Radio/Fernseh-Techniker erfahrenen Radio/Fernseh-Techniker
um Hilfe.um Hilfe.
Dieses Gerät stimmt mit den FCC-Dieses Gerät stimmt mit den FCC-
Grenzwerten für Bestrahlung überein, die für Grenzwerten für Bestrahlung überein, die für
eine unkontrollierte Umgebung ausgelegt eine unkontrollierte Umgebung ausgelegt
sind.Endnutzermüssendiespezischensind.Endnutzermüssendiespezischen
Betriebsanweisungen befolgen, um die Betriebsanweisungen befolgen, um die
Bedingungen der Richtlinien für HF-Belastung Bedingungen der Richtlinien für HF-Belastung
entsprechend einzuhalten.entsprechend einzuhalten.
Dieses Symbol bedeutet, dass Dieses Symbol bedeutet, dass
Ihr Produkt gemäß den örtlichen Ihr Produkt gemäß den örtlichen
Gesetzen und Vorschriften getrennt Gesetzen und Vorschriften getrennt
vom Hausmüll entsorgt werden muss. vom Hausmüll entsorgt werden muss.
Bringen Sie das Produkt nach Ablauf Bringen Sie das Produkt nach Ablauf
seiner Lebensdauer zu einer örtlichen seiner Lebensdauer zu einer örtlichen
Annahmestelle. Einige Annahmestellen Annahmestelle. Einige Annahmestellen
nehmen Produkte ohne Gebühr entgegen. nehmen Produkte ohne Gebühr entgegen.
Die separate Sammlung und das Recyceln Die separate Sammlung und das Recyceln
Ihres Geräts zum Zeitpunkt der Entsorgung Ihres Geräts zum Zeitpunkt der Entsorgung
tragen zum Schutz der Umwelt bei und tragen zum Schutz der Umwelt bei und
gewährleisten, dass es auf eine Art und gewährleisten, dass es auf eine Art und
Weise recycelt wird, die keine Gefährdung Weise recycelt wird, die keine Gefährdung
für die Gesundheit des Menschen und der für die Gesundheit des Menschen und der
Umwelt darstellt.Umwelt darstellt.

48
49
ユ ー ザ ー マ ニュアル
ユ ー ザ ー マ ニュアル
保証内容
本製品の保証内容はこちらリンクからご覧ください:
polaroid.com/warranty
ユーザー
マニュアル

50
51
ユ ー ザ ー マ ニュアル
ユ ー ザ ー マ ニュアル
同梱物
01Polaroid Lab
02USB
03
04
Polaroid Lab
の使い方
1. スマートフォンに Polaroid アプリをダウン
ロードします
Polaroid LabPolaroid
→ polaroid.com/polaroidlab
2. Polaroid Lab を充電する
Polaroid Lab
USB
USB
USB
LED
Polaroid Lab
LED
2USB
34 Polaroid Lab
100
Polaroid Lab
3. フィルムを装着する
Polaroid Lab
Polaroid Lab
注意
4. Polaroid Lab をオンにする
Polaroid Lab
LEDLED
Polaroid Lab
Polaroid Lab
5. アプリを開いて写真を選択します
PolaroidPolaroid Lab
6. スマートフォンをスマートフォンプラットフ
ォームに置きます。
Polaroid Lab
Polaroid Lab
Night ShiftTrue Tone
7. 赤色のシャッターボタンを押す
Polaroid Lab
LED
詳細ガイド
1. パック内に残ったフィルムの量を知る
Polaroid LabLED
Polaroid Lab
LED
LED
6LED
6
8
LED
2. バッテリー残量は?
Polaroid LabUSB4
LED
Polaroid LabLED
USB
LED
LED14
LED 12
USB
LED
LED
LED
Polaroid Lab
3. 使用可能なフィルム
Polaroid LabPo-

52
53
ユ ー ザ ー マ ニュアル
ユ ー ザ ー マ ニュアル
laroid600
Polaroid Lab
Polaroid LabSpectra
4. 電源
Polaroid Lab
→Polaroid Lab
Polaroid Lab
LED Polaroid Lab
5. ローラーの清掃
Polaroid Lab
Polaroid Lab
Polaroid Lab
トラブルシューティングと
よくある質問
1. Polaroid Lab から写真/ダークスライドがイ
ジェクトされません
Polaroid Lab
LED
LED
Polaroid Lab
LED
LED
8
LED
2. アプリからエラー音が鳴りました
Polaroid Lab
Polaroid Lab
3. シャッターボタンが機能しません
LEDPolar-
oid LabPolaroid
Lab
LED
LED
Polaroid Lab
LED3
Polaroid Lab
Polaroid Lab
4. 写真のでき上がりがやや暗すぎます
True Tone
Night ShiftNight Mode
More
EV3+3
良い写真を撮るコツ
Polaroid Lab
polaroid.com
Night ShiftTrue Tone

54
55
ユ ー ザ ー マ ニュアル
ユ ー ザ ー マ ニュアル
カスタマー サポート
Polaroid
polaroid.com/help
米国/カナダ
+1 212 219 3254
ヨーロッパ/その他の地域
00 800 577 01500
Polaroid International B.V.
1013 AP Amsterdam
The Netherlands
技術仕様
一般
150mm115.6mm
149.7mm
177.16mm
600
40°108°C590%
Polaroid600
1100mAh3.7V4.07Wh
材質
TPUEPDM
光学システム
150mm
1:2.35 3
アプリのシステム要件
iPhone 6iPhone SE
Android
polaroid.com/labworkswith
安全情報
感電の危険 – 電動式ローラー システムを開
けたり分解したりしないでください。
600600
バッテリーおよび充電器バッテリーおよび充電器
100100
LEDLED
USBUSB
1122
Apple Apple
iPhoneiPhone
USBUSB
USBUSB
使用環境使用環境
+42°C+42°C
コンプライアンス
リチウムイオン バッテリーを使用する際のリチウムイオン バッテリーを使用する際の
重要指示事項重要指示事項
EU 適合宣言書EU 適合宣言書
Polaroid International B.V.Polaroid International B.V.
Polaroid LabPolaroid Lab
2014/30/EU2014/30/EU
2014/35/EU2014/35/EURoHsRoHs
2011/65/EU2011/65/EU
FCC コンプライアンス宣言FCC コンプライアンス宣言
FCCFCC1515
22
11
22
FCC
15B
1
FCCFCC
RFRF

ユ ー ザ ー マ ニュアル
ユ ー ザ ー マ ニュアル
56
57
用户手册
用户手册
保修
polaroid.com/warranty
用户手册

ユ ー ザ ー マ ニュアル
ユ ー ザ ー マ ニュアル
58
59
用户手册
用户手册
包装盒内容
01Polaroid Lab
02USB
03
04
如何使用 Polaroid Lab
1. 把 Polaroid 应用程序下载到您的手机
Polaroid Polaroid
Lab
→ polaroid.com/polaroidlab
2. 给 Polaroid Lab 充电
Polaroid LabPolaroid Lab
Polaroid Polaroid
LabLabUSBUSBPolaroid LabPolaroid Lab
Micro-USBMicro-USB
USBUSBLEDLED
LEDLED
Polaroid LabPolaroid Lab
LEDLED
22
USBUSB
44Polaroid LabPolaroid Lab
100 100
Polaroid LabPolaroid Lab
3. 装载相纸
Polaroid Lab
Polaroid Lab
注:
4. 打开 Polaroid Lab
Polaroid Lab
LED
LEDPolaroid Lab
Polaroid
Lab
5. 打开应用程序并选择您的照片
PolaroidPolaroid Lab
6. 将手机放在手机平台上
Polaroid Lab
Polaroid Lab
7. 按下红色快门按钮
Polaroid Lab
LED
Polaroid Lab
进一步指导
1. 相纸盒中剩余多少相纸?
Polaroid Lab8LEDLab
LED
LED6LED
6
8
Polaroid Lab
LED
2. 剩多少电量?
Polaroid LabUSBLED
LED
LED
电池电量:
1144LEDLED
LED2
USBUSB
LEDLED
LEDPolaroid
Lab
3. 兼容相纸
Polaroid LabPolaroid i600
i
Polaroid LabPolaroid Lab
SX-70Spectra
4. 电源
Polaroid Lab
→Polaroid LabPolaroid
LabLED
Polaroid Lab
5. 清洁墨辊
Polaroid
LabPolaroid Lab
Polaroid Lab
Polaroid Lab
2
Polaroid Lab
故障排除与常见问题
1. 我的 Polaroid Lab 不会弹出照片/黑卡
Polaroid Lab
LEDLED
Polaroid Lab
Polaroid Lab

ユ ー ザ ー マ ニュアル
ユ ー ザ ー マ ニュアル
60
61
用户手册
用户手册
LED
Polaroid Lab
LED
8
LEDLED
2. 应用程序向我发出噪音
Polaroid Lab
Polaroid
Lab
3. 快门按钮不起作用
LEDPolaroid Lab
Polaroid Lab
LED
LED
Polaroid Lab
LED3
Polaroid Lab
4. 我的照片稍显太暗
EV
-3+3
拍摄精彩照片的诀窍
Polaroid Lab
polaroid.com
客户支持
Polaroid
polaroid.com/help
美国/加拿大
+1 212 219 3254
欧洲/世界其他地
00 800 577 01500
Polaroid International B.V.
1013 AP Amsterdam
The Netherlands
技术规格
一般规格
150mm×115.6mm
×149.7mmx177.16mm
600
40–108°F / 4–42°C
5–90%
Polaroid
i
600
1100 mAh
3.7 V
4.07 Wh
材质
TPU
EPDM
光学系统
150mm
1:2.35 3
应用程序的系统要求
iPhone 6iPhone SE
Android
polaroid.com/labworkswith

ユ ー ザ ー マ ニュアル
ユ ー ザ ー マ ニュアル
62
63
用户手册
用户手册
安全信息
请勿打开/拆解电动墨辊系统
600600
电池和充电器电池和充电器
Polaroid LabPolaroid Lab
100100
LEDLED
USBUSB
1122
Apple iPhoneApple iPhone
USBUSBUSBUSB
使用环境使用环境
Polaroid LabPolaroid Lab
+42°C/108°F+42°C/108°F
合规合规
锂离子电池的重要使用说明锂离子电池的重要使用说明
欧盟符合性声明欧盟符合性声明
Polaroid LabPolaroid Lab
2014/30/EU2014/30/EU
2014/35/EU2014/35/EU
2011/65/EU2011/65/EU
FCC 合规声明FCC 合规声明
FCCFCC1515
11
22
FCC
15B
FCCFCC

用户手册
64
65
使用手冊
使用手冊
使用者手冊
保固
polaroid.com/warranty

用户手册
66
67
使用手冊
使用手冊
包裝清單
01 Polaroid Lab
02 USB
03
04
Polaroid Lab
使用指南
1. 把 Polaroid
Polaroid
Polaroid Lab
→ polaroid.com/polaroidlab
2. 對 Polaroid Lab 充電
Polaroid Lab
Polaroid LabUSB
Polaroid LabMicro-USB
USBLED
LED
Polaroid Lab
LED
2USB
4Polaroid Lab
100
Polaroid Lab
3. 裝相紙
Polaroid Lab
Polaroid Lab
4. 啟動 Polaroid Lab
Polaroid Lab
LED
LED
Polaroid Lab
Polaroid Lab
5. 打開應用程式並選取您的照片
Polaroid Polaroid Lab
6. 將手機放在手機平台上
Polaroid Lab
Polaroid Lab
Polaroid Lab
LED
Polaroid Lab
詳細指南
1. 相紙盒中剩餘多少張相紙?
Polaroid Lab8LED
LED
LED
6 LED6
8
LED
2. 相紙盒中還有 多少電池電量
Polaroid LabUSBLED
Polaroid Lab
LEDUSB
LED
電池電量:
LED
LED
2
USB
LEDLED
LED
Polaroid Lab
3. 相容相紙
Polaroid LabPolaroid i600
Polaroid LabPolaroid
LabSX-70Spectra
4. 電源
Polaroid Lab
→Polaroid Lab
Polaroid Lab
LEDPolaroid Lab
5. 清潔滾筒
Polaroid Lab
Polaroid Lab
Polaroid Lab
Polaroid Lab
2
Polaroid Lab

用户手册
68
69
使用手冊
使用手冊
故障排除與常見問答
1. 我的 Polaroid Lab 不會彈出照片/遮光板
Polaroid LabLED
LED
Polaroid Lab
Polaroid Lab
LED
Polaroid
Lab LED
8
LED
2. 應用程式向我發出噪音,提示有錯誤
Polaroid Lab
Polaroid Lab
3. 快門按鈕不起作用
LEDPolaroid Lab
Polaroid Lab
LED
LED
Polaroid Lab
LED3
Polaroid Lab
4. 我的照片稍顯太暗
-3
+3EV
拍攝好照片的訣竅
客戶服務
Polaroid
polaroid.com/help
+212 219 3254
00 800 577 01500
Polaroid International B.V.
1013 AP Amsterdam
The Netherlands
技術規格
一般規格
150mm×115.6mm
×149.7mmx177.16mm
600
40–108°F / 4–42°C5–90%
Polaroid i600
1100 mAh
3.7 V4.07 Wh
材質
TPUEPDM
光學系統
150mm
1:2.35 3
應用程式的系統要求
iPhone 6iPhone SE
Android
polaroid.com/labworkswith

用户手册
70
71
使用手冊
使用手冊
安全資訊
電擊危險——請勿拆開/拆解電動滾筒系統電擊危險——請勿拆開/拆解電動滾筒系統
600600
電池與充電器電池與充電器
Polaroid LabPolaroid Lab
100100
LEDLED
USBUSB
1-21-2
Apple Apple
iPhoneiPhone
USBUSBUSBUSB
使用環境使用環境
Polaroid LabPolaroid Lab
+42°C/108°F+42°C/108°F
法規遵從法規遵從
關於鋰離子電池的重要注意事項關於鋰離子電池的重要注意事項
歐盟符合性聲明歐盟符合性聲明
Polaroid International B.V.Polaroid International B.V.
Polaroid LabPolaroid Lab
2014/30/EU2014/30/EU
2014/35/EU2014/35/EU
2011/65/EU2011/65/EU
FCCFCC 合規聲明 合規聲明
FCCFCC1515
11
22
BB
FCCFCC1515
FCCFCC
加拿大工業部 (IC)加拿大工業部 (IC)
FCCFCC1515
RSSRSS
11
22

72
73
사용 설명서
사용 설명서
사용설명서
보증
이 링크를 따라가면 이 제품의 보증을 확인할 수 있습니다: polaroid.com/warranty

74
75
사용 설명서
사용 설명서
제품 구성
01 Polaroid Lab
02 USB 충전 케이블
03 빠른 시작 안내서
04 보증 정보
Polaroid Lab
사용 방법
1. 휴대폰에 Polaroid앱을 다운로드한다
Polaroid Lab 사용하려면 Polaroid 앱이
필요합니다. 또한 앱에는 팁, 요령 & 사용지침,
더 많은 제작 방법에 도움이 되는 내용도 담겨
있습니다.
→ polaroid.com/polaroidlab
2. Polaroid Lab 충전한다
중요사항; Polaroid Lab 구매 시 완전 충전되어 있중요사항; Polaroid Lab 구매 시 완전 충전되어 있
지 않습니다. 처음 사용하기 전에 완전히 충전하십지 않습니다. 처음 사용하기 전에 완전히 충전하십
시오. Polaroid Lab을 충전하려면 USB 충전 케이시오. Polaroid Lab을 충전하려면 USB 충전 케이
블을 Polaroid Lab 후면 패널에 있는 마이크로 USB 블을 Polaroid Lab 후면 패널에 있는 마이크로 USB
슬롯에 연결하고, 케이블의 반대편 끝은 휴대폰 어슬롯에 연결하고, 케이블의 반대편 끝은 휴대폰 어
댑터나 컴퓨터의 USB 슬롯 등의 충전기에 연결하시댑터나 컴퓨터의 USB 슬롯 등의 충전기에 연결하시
면 됩니다. 슬롯 옆에 있는 LED가 켜지면서 현 배터면 됩니다. 슬롯 옆에 있는 LED가 켜지면서 현 배터
리 충전 상태를 보여줍니다. 네 개의 LED가 보이면 리 충전 상태를 보여줍니다. 네 개의 LED가 보이면
완전 충전된 것입니다. Polaroid Lab 충전기에 연결완전 충전된 것입니다. Polaroid Lab 충전기에 연결
하고 완전히 충전되면 모든 충전 LED가 꺼집니다. 하고 완전히 충전되면 모든 충전 LED가 꺼집니다.
완전히 충전하는 데까지는 벽 콘센트에 연결된 휴완전히 충전하는 데까지는 벽 콘센트에 연결된 휴
대폰 어댑터로 충전하시는 경우 보통 2시간, 컴퓨터 대폰 어댑터로 충전하시는 경우 보통 2시간, 컴퓨터
USB 슬롯을 사용하시는 경우 최대 4시간이 소요됩USB 슬롯을 사용하시는 경우 최대 4시간이 소요됩
니다. 사용법에 따라 다르지만 Polaroid Lab 완전히 니다. 사용법에 따라 다르지만 Polaroid Lab 완전히
충전된 상 태에서 필름 100팩 정도를 촬영할 수 있충전된 상 태에서 필름 100팩 정도를 촬영할 수 있
습니다. 배터리 수명을 보존하려면 Polaroid Lab 사습니다. 배터리 수명을 보존하려면 Polaroid Lab 사
용한 후 전원을 꺼두십시오.용한 후 전원을 꺼두십시오.
3. 필름을 넣는다
Polaroid Lab Polaroid Lab 들고 필름 도어 앞부분을 부드럽게
내리십시오. 포장에서 필름 카세트를 꺼내어 필름
의 어두운 면이 위로 향하게 한 후 밀어넣으십시오.
필름 도어를 닫으면 다크슬라이드가 Polaroid Lab Polaroid Lab
에서 자동으로 배출됩니다. 다크슬라이드가 배출
되지 않은 경우, 필름 팩을 꺼냈다가 카메라 뒤까지
완전히 들어가도록 다시 밀어넣습니다.
참고현상 시간, 취급 방법, 보관 방법 등은 개별
필름 포장에 적힌 내용을 확인하세요.
4. Polaroid Lab Polaroid Lab 켠다
Polaroid Lab Polaroid Lab 우측에 있는 검정색 버튼을 눌러 휴
대폰 플랫폼을 사진 촬영 위치로 올리고 전원을 켜
십시오. Rainbow 로고 LED가 켜지고 필름 카운터
LED가 켜지면서 Polaroid Lab Polaroid Lab 에 몇 장의 사진이
남아있는지를 보여줍니다. 작업이 완료되면, 플랫폼
을 내려 Polaroid Lab Polaroid Lab 끕니다. 아니면 몇 분간 미사
용 상태로 놔두면 프린터가 자동으로 꺼집니다.
5. 앱을 열고 사진을 선택한다
Polaroid 앱을 열고 Polaroid Lab Polaroid Lab 섹션을 선택하
십시오. 이미지 선택 버튼을 탭하여 노출할 이미지
와 진행을 탭하십시오. 앱을 통해 첫 이미지를 노출
할 수 있습니다.
6. 휴대폰을 휴대폰 플랫폼 위에 올려두십시오.
스크린이 Polaroid Lab Polaroid Lab 렌즈 쪽을 향하도록 한 상
태에서 휴대폰을 휴대폰 플랫폼 위에 올려두십시오.
휴대폰 상부가 카메라 후면을 향하도록 올바르게 정
렬하십시오. 최고의 성능을 위해 휴대폰 커버나 스
크린 프로텍터를 제거하십시오. 앱이 Polaroid Lab Polaroid Lab
탐지하여 이미지가 필름에 완벽하게 정렬되도록 합
니다. 또한 광센서 위에 캘리브레이션 이미지를 표
시하여 휴대폰의 백라이트를 조정할 필요 없이 이
미지를 제대로 노출시킵니다. 나이트 쉬프트(Night
Shift) 또는 트루 톤(True Tone)과 같이 디스플레이
컬러에 영향을 주는 모든 설정이나 앱을 꺼두십시
오. 최종 사진에 심각하게 지장을 줄 수 있습니다.
7. 빨간 셔터 버튼을 누른다
Polaroid Lab Polaroid Lab 플랫폼에서 휴대폰을 탐지하고 디스
플레이의 밝기를 측정하여 완벽한 노출이 이뤄지도
록 합니다. Rainbow 로고 LED가 깜박일 때까지 기
다렸다가 빨간 셔터 버튼을 누르십시오. 촬영 버튼
에서 손을 떼면 바로 카메라 전면의 슬롯에서 사진
이 배출됩니다. 사진을 필름 가리개 밑에서 꺼내 필
름 가리개가 다시 Polaroid Lab Polaroid Lab 안으로 말려 들어가
도록 합니다. 사진면을 아래로 놓아 인화 중에 빛에
노출되지 않도록 계속 가려 줍니다.
같은 이미지의 다른 사진을 뽑고 싶다면 다시 셔
터 버튼을 누르면 됩니다.
기타 지침
1. 팩에 남아 있는 필름은 몇 장인가?
Polaroid Lab Polaroid Lab 앞에 8개의 오렌지색 LED 불이 있습
니다. 랩의 전원이 켜져 있고 대기 모드가 아닌 경우
이 LED 등이 계속 필름 수를 표시합니다. 불이 들어
와 있는 LED 수가 필름 팩에 남아 있는 필름 수를 나
타냅니다. 예를 들어: LED 등이 6개 켜져 있으면 필
름 팩에 필름이 6장 남아 있다는 뜻입니다. 필름 팩
에 들어 있는 8장을 모두 사용했거나 카메라에 필름
팩이 들어 있지 않은 경우 Polaroid Lab Polaroid Lab 켜거나 셔
터 버튼을 누르면 LED 등이 빠르게 깜빡거립니다.
2. 배터리는 얼마나 남았는가?
Polaroid Lab Polaroid Lab USB 슬롯 위에 있는 네 개의 LED 등
으로 남은 배터리 레벨을 표시합니다. Polaroid Lab Polaroid Lab
충전하면 LED 등이 깜박이고, USB 케이블을 삽입
하여 완전 충전하면 곧장 충전기의 전원으로 작동하
기 때문에 LED 등이 모두 꺼집니다.
배터리 레벨:
1. 1개 - 4개의 LED 등이 켜집니다.
1개의 LED 등은 최소 두 장의 필름을
충전하기에 충분하다는 표시입니다.
2. 배터리 충전 및 USB 케이블 연결됨: LED
등이 켜지지 않습니다.
필름 카운터 LED 등이 남은 사진 장 수를
보여줍니다.
3. 배터리 없음:
남은 충전분이 완전히 소진되었습니다.
LED 등이 모두 꺼지고, Polaroid LabPolaroid Lab
재충전까지 작동을 멈춥니다.
3. 호환 필름
Polaroid Lab은 Polaroid Lab은 모든 Polaroid i-타입과 600 타입 필
름 팩과 함께 작동합니다. i-타입 필름이 Polaroid Lab
에 최적화된 필름인 만큼 i-타입 필름 사용을 권장합니
다. Polaroid Lab은 SX-70 필름, Spectra 필름 또는
기타 다른 유형의 필름과 함께 사용할 수 없습니다.
4. 전원 공급
Polaroid Lab을 사용하려면 충전량이 충분하도록
먼저 충전하십시오(Polaroid Lab을 충전한다 참
조). Polaroid Lab 에 전원이 끼워져 충전 중일 때에
는 LED 등 뒤의 배터리 레벨이 깜박거리고,
Polaroid Lab이 완전히 충전되면 꺼집니다.
5. 롤러 청소하기
사진에서 나온 여분의 현상액이 Polaroid Lab 롤러
에 쌓여 Polaroid Lab 성능에 영향을 미치고 그 결
과 사진에 원치 않는 결함이 생기는 경우가 있습니
다. Polaroid Lab 에는 자체 롤러 청소 모드가 있어
이러한 문제를 해결해줍니다. 다음 방법을 따르기
만 하면 됩니다:
1. 휴대폰 플랫폼을 닫고 Polaroid Lab을
끕니다.

76
77
사용 설명서
사용 설명서
2. 필름 도어를 엽니다.
3. 우측 터치 포인트를 누른 상태에서 셔터
버튼을 >2초 동안 누릅니다.
4.
청소를 위해 롤러가 시작점으로 움직 니다.
5. 양쪽 버튼을 해제하면 Polaroid Lab이 롤
러 청소 모드에 들어갑니다.
6. 젖은 헝겊이나 면봉을 사용해 롤러를 조심
스럽게 닦아냅니다.
7. 셔터 버튼을 누르면 롤러 위치가 점차 올
라갑니다.
8. 양쪽 롤러 전체가 깨끗해지면 필름 도어
를 닫습니다.
문제 해결 & FAQ
1. 나의 Polaroid Lab이 사진/다크슬라이드를 배출
하지 않습니다.
Polaroid Lab이 충전되어 있는지 확인하십시오:
작동할 충전량이 충분하지 않으면 Rainbow 로고
LED 등과 후면 LED 등에 불이 들어오지 않습니다.
그럴 경우, Polaroid Lab을 충전기에 연결한 후
다시 사용해야 합니다. Polaroid Lab 에 필름이
계속 있는지 확인하십시오. 이를 확인하려면 휴대폰
플랫폼을 낮춘 후 올리면 됩니다. 남은 필름 카운터
LED 등을 보면 필름 팩에 필름이 몇 장 남아 있는지
알 수 있습니다. Polaroid Lab을 다시 켰는데
LED 등이 빠른 속도로 깜빡이는 경우 필름 팩에
남은 필름이 없거나 필름 팩이 들어 있지 않다는
뜻입니다.
1. 등이 모두 켜져 있지 않을 경우:
Polaroid Lab 꺼져 있거나 팩이 들어 있지
않다
2. 셔터 버튼을 누르자 모든 등이 깜박일 경우:
팩이 들어 있으나 필름이 없다.
3. 등이 모두 켜져 있을 경우:
팩이 들어 있고 사진 8장을 사용할 수 있다.
4. LED 등이 번갈아 켜질 경우:
팩 삽입 오류가 발생했다.
2. 앱이 오류 소음을 알립니다
휴대폰이 Polaroid Lab 위에 올바르게 올려있는지
앱이 탐지합니다. 휴대폰 플랫폼에 있는 터치 포인
트로 앱이 회전하면서 이미지를 Polaroid Lab 렌즈
위에 곧바로 올려놓습니다. 앱이 이렇게 하지 못하
면 휴대폰을 더 나은 위치에 놓을 수 있도록 알려줍
니다. 휴대폰을 쥐면 앱이 간단한 동영상으로 올바
른 포지셔닝을 알려줍니다.
3. 셔터 버튼이 작동하지 않습니다
Rainbow 로고 LED 등에 불이 들어오면
Polaroid Lab 의 전원이 들어오고, Polaroid Lab 에
필름이 있으면 적정 매수의 필름 카운트 LED 등의
불이 들이옵니다. 셔터 버튼을 눌렀는데 아무 것도
나오지 않으면 필름 카운트 LED 등을 살펴보십시
오. 휴대폰의 방향이 올바르지 않으면 Polaroid Lab
이 미지의 밝기를 읽을 수 없습니다.
휴대폰이 인식되면 Rainbow 로고 LED 등이 세
번 깜박입니다. 계속 빠르게 깜박거리면 Polaroid
Lab이 센서 부위/밝기를 제대로 인식할 수 없습니
다. 전혀 깜박거리지 않으면 상부에 있는 휴대폰을
인식하지 못한다는 의미입니다. 이는 휴대폰 케이스
나 화면 보호기 때문일 수 있으며, 이로 인해 휴대폰
인식 능력이 떨어질 수 있습니다. 이를 바로 잡으려
면 휴대폰 케이스나 화면 보호기를 제거하고, 랩에
있는 휴대폰을 살짝 밀어보십시오.
4. 내 사진이 살짝 너무 어둡게 나왔습니다
휴대폰 카메라에 있는 원본 사진을 사용하지 않았
지만 저희의 일반 사진 촬영 기법이 여전히 적용되
고 있습니다. 트루 톤(True Tone), 나이트 시프트
(Night Shift) 또는 나이트 모드(Night Mode)를 비
활성화 해보시기 바랍니다. 앱이 자동으로 휴대폰
밝기를 조정할 것입니다. 또한 앱의 “기타(More)”
메뉴로 노출을 조정할 수도 있습니다. EV는 -3 - +3
f-스톱까지 조정할 수 있습니다.
좋은 사진을 찍는 요령
• • 휴대폰 화면을 깨끗하게 합니다. 휴대폰
화면 보호기가 있으면 화면에 스크래치,
얼룩 또는 지문이 생기지 않습니다. 가장
좋은 방법은 휴대폰 화면 보호기 또는
휴대폰 커버를 제거하면 최적의 결과를
얻을 수 있습니다.
• • 휴대폰을 폴라로이드 랩 프린터 휴대폰
플랫폼에 완전히 납작하게 올려두십시오.
• • 필름은 새 것이어야 합니다! polaroid.
com에서 새 필름을 구비해두고 필름
포장에 나오는 팁 시트(tip sheet)에 따라
필름이 좋은 상태인지 확인하십시오.
• • 컬러에 영향을 주는 모든 설정과 앱을
꺼두어야 합니다(나이트 시프트(Night
Shift), 트루 톤(True Tone).
고객 지원
도움이 필요하시면 언제든지 Polaroid 고객 지원
팀에 문의하세요. 여기 나와 있는 연락처로 연락해
주시면 됩니다. 자세한 사항이나 최신 정보는 다음
사이트를 방문하기 바랍니다: polaroid.com/help
미국/캐나다
+212 219 3254
유럽/기타 지역
00 800 577 01500
Polaroid International B.V.
1013 AP Amsterdam
The Netherlands
기술 명세
일반 사항
치수
150mm (L) ×115.6mm (W) ×149.7mm (H
닫힘) x177.16mm (H 열림)
중량
600g(필름 팩 제외)
작동 온도
40–108°F / 4–42°C, 5–90%, 상대 습도
호환 필름
Polaroid i-타입 및 600 타입 필름, 컬러 및 흑백,
특별 에디션 포함.
배터리
고성능 리튬-이온 배터리, 1100mAh, 3.7V 공칭
전압, 4.07Wh
소재
외부 케이스
폴리카보네이트, TPU, EPDM(Ethylene Propylene 폴리카보네이트, TPU, EPDM(Ethylene Propylene
Diene Monomer)Diene Monomer)
렌즈
광학 등급 폴리카보네이트 렌즈, AR 코팅광학 등급 폴리카보네이트 렌즈, AR 코팅
셔터 시스템
고정 조리개, 다양한 스피드 셔터고정 조리개, 다양한 스피드 셔터
광학 시스템
렌즈
고정 초점 렌즈고정 초점 렌즈
초점거리
150mm150mm
렌즈 유형
1:2.35 3 요소 렌즈 시스템1:2.35 3 요소 렌즈 시스템
앱 시스템 요건앱 시스템 요건
지원 휴대폰
• • iPhone 6 및 상위 버전(iPhone SE 제외)iPhone 6 및 상위 버전(iPhone SE 제외)
• • 최신 안드로이드 기기최신 안드로이드 기기
지원 휴대폰 및 운영체제는 변경될 수 있습니다. 지원 휴대폰 및 운영체제는 변경될 수 있습니다.
전체 목록을 보려면 다음을 방문하십시오 전체 목록을 보려면 다음을 방문하십시오 polaroid.polaroid.
com/labworkswithcom/labworkswith

78
79
사용 설명서
사용 설명서
안전 정보
주의주의
감전 위험 - 모터로 작동되는 롤러 시스템을 열감전 위험 - 모터로 작동되는 롤러 시스템을 열
거나 분해하지 마십시오거나 분해하지 마십시오
• •
기기를 분해하지 마십시오. 잘못 재조립할 경기기를 분해하지 마십시오. 잘못 재조립할 경
우 기기를 다시 사용할 때 감전을 초래할 수 우 기기를 다시 사용할 때 감전을 초래할 수
있습니다.있습니다.
• •
카메라를 물이나 기타 용액에 넣어두지 마십카메라를 물이나 기타 용액에 넣어두지 마십
시오.시오.
• •
습도가 높거나 먼지가 많은 곳에서는 카메라습도가 높거나 먼지가 많은 곳에서는 카메라
를 사용하지 마십시오.를 사용하지 마십시오.
• •
기기의 필름 도어 뒤, 롤러 아래에 있는 배터기기의 필름 도어 뒤, 롤러 아래에 있는 배터
리 및/또는 전자 부품을 조작하거나, 조정하리 및/또는 전자 부품을 조작하거나, 조정하
거나 분리하지 마십시오.거나 분리하지 마십시오.
• •
도어는 전자적으로 기기 본체에 연결되어 있도어는 전자적으로 기기 본체에 연결되어 있
으며 분리하려고 하시면 됩니다. 분리 시도는 으며 분리하려고 하시면 됩니다. 분리 시도는
위험하고 기기를 손상시킬 수 있을 뿐 아니라 위험하고 기기를 손상시킬 수 있을 뿐 아니라
그렇게 하시면 보증이 무효화됩니다.그렇게 하시면 보증이 무효화됩니다.
• •
기기에 금속 물체를 삽입하지 마십시오.기기에 금속 물체를 삽입하지 마십시오.
• •
롤러나 기어에 일체 다른 물체를 삽입하지 마롤러나 기어에 일체 다른 물체를 삽입하지 마
십시오.십시오.
• •
기기의 움직이는 부속품에 의해 다치는 일이 기기의 움직이는 부속품에 의해 다치는 일이
없도록 기기는 어린이나 유아의 손이 닿지 않없도록 기기는 어린이나 유아의 손이 닿지 않
는 곳에 보관하십시오.는 곳에 보관하십시오.
• •
기기는 열원이나 스테레오 앰프 등 열을 발생기기는 열원이나 스테레오 앰프 등 열을 발생
시키는 기기 가까운 곳에서 사용하거나 보관시키는 기기 가까운 곳에서 사용하거나 보관
하지 마십시오. 하지 마십시오.
• •
인화성 또는 폭발성 기체 가까이에서 카메라인화성 또는 폭발성 기체 가까이에서 카메라
를 사용하지 마십시오.를 사용하지 마십시오.
• •
비정상적인 냄새나 소음, 연기가 감지되는 경비정상적인 냄새나 소음, 연기가 감지되는 경
우 기기를 충전하지 마십시오.우 기기를 충전하지 마십시오.
• •
어떤 방식으로든 필름의 배터리를 분리하거어떤 방식으로든 필름의 배터리를 분리하거
나 조작하려고 시도하지 마십시오(600 타입 나 조작하려고 시도하지 마십시오(600 타입
필름을 사용하는 경우). 배터리액이 눈에 들필름을 사용하는 경우). 배터리액이 눈에 들
어간 경우 즉시 차가운 수돗물로 헹구고 바로 어간 경우 즉시 차가운 수돗물로 헹구고 바로
의료 처치를 받도록 하십시오.의료 처치를 받도록 하십시오.
배터리와 충전기배터리와 충전기
• •
이 기기는 비분리형으로 Polaroid Lab 본체 내이 기기는 비분리형으로 Polaroid Lab 본체 내
부에 내장되어 있는 맞춤형 리튬-이온 배터리부에 내장되어 있는 맞춤형 리튬-이온 배터리
를 사용합니다. 다른 타입 배터리는 사용할 수 를 사용합니다. 다른 타입 배터리는 사용할 수
없습니다. 배터리 교체는 지정 서비스 센터에없습니다. 배터리 교체는 지정 서비스 센터에
서만가능합니다. 올바로 사용할 경우 배터리는 서만가능합니다. 올바로 사용할 경우 배터리는
다년간 사용 가능합니다. 전력 소비량은 기기 다년간 사용 가능합니다. 전력 소비량은 기기
사용 환경과 보관 방법에 따라다릅니다. 완전 사용 환경과 보관 방법에 따라다릅니다. 완전
충전한 후 즉시 사용하면 배터리가최대 100개충전한 후 즉시 사용하면 배터리가최대 100개
의 필름 팩을 처리할 수 있습니다. 의 필름 팩을 처리할 수 있습니다.
• 남은 배터리 양이 특정 수준 아래로 떨어지면 • 남은 배터리 양이 특정 수준 아래로 떨어지면
기기가 더 이상 필름을 처리하지 못하게 됩니기기가 더 이상 필름을 처리하지 못하게 됩니
다. 충전이 필요한 시점이 되면 LED가 점멸하다. 충전이 필요한 시점이 되면 LED가 점멸하
면서 알려 줍니다. 사진 처리 중에 배터리가 면서 알려 줍니다. 사진 처리 중에 배터리가
완전히 소진되어 롤러에 끼어버리는 상황을 완전히 소진되어 롤러에 끼어버리는 상황을
방지하기 위해 미리 알려 드리는 것입니다.방지하기 위해 미리 알려 드리는 것입니다.
• 충전용 배터리는 완전히 충전되지 않은 상태• 충전용 배터리는 완전히 충전되지 않은 상태
로 판매됩니다. USB 충전 케이블(제품에 포로 판매됩니다. USB 충전 케이블(제품에 포
함)을 사용해 완전히 충전해 주십시오. 완전히 함)을 사용해 완전히 충전해 주십시오. 완전히
충전되는 데 보통 1-2시간이 소요됩니다(사용 충전되는 데 보통 1-2시간이 소요됩니다(사용
방식에 따라 달라질 수 있습니다).방식에 따라 달라질 수 있습니다).
• 제품에 포함되어 있는 배터리 충전 케이블은 • 제품에 포함되어 있는 배터리 충전 케이블은
Apple iPhone 전원 어댑터와의 작동 여부 테Apple iPhone 전원 어댑터와의 작동 여부 테
스트를 거친 것입니다. 컴퓨터, USB 전원 어스트를 거친 것입니다. 컴퓨터, USB 전원 어
댑터, TV, 차량 등 기타 USB 포트에서도 사용댑터, TV, 차량 등 기타 USB 포트에서도 사용
할 수는 있지만 올바른 작동을 보장할 수 없습할 수는 있지만 올바른 작동을 보장할 수 없습
니다.니다.
• 기기를 더 이상 사용할 수 없게 되면 올바른 방• 기기를 더 이상 사용할 수 없게 되면 올바른 방
법으로 재활용하십시오.법으로 재활용하십시오.
사용 환경사용 환경
• 이 기기에 적용된 고정밀 기술을 보호하려면 • 이 기기에 적용된 고정밀 기술을 보호하려면
고온(+42°C/108°F), 고습 환경, 온도가 급격고온(+42°C/108°F), 고습 환경, 온도가 급격
하게 변화하는 환경(고온 및 저온), 직사광선, 하게 변화하는 환경(고온 및 저온), 직사광선,
해변과 같이 모래나 먼지가 많은 장소, 축축한 해변과 같이 모래나 먼지가 많은 장소, 축축한
장소, 또는 강한 진동이 발생하는 장소 등과 장소, 또는 강한 진동이 발생하는 장소 등과
같은 환경에 절대 카메라를 장시간 두어서는 같은 환경에 절대 카메라를 장시간 두어서는
안 됩니다.안 됩니다.
• 기기를 떨어뜨리거나 심한 충격 또는 진동에 • 기기를 떨어뜨리거나 심한 충격 또는 진동에
노출시키지 마십시오.노출시키지 마십시오.
• 렌즈를 밀거나, 당기거나, 표면을 누르지 마십• 렌즈를 밀거나, 당기거나, 표면을 누르지 마십
시오.시오.
준수준수
리튬 이온 배터리 사용 시 중요 지침리튬 이온 배터리 사용 시 중요 지침
1. 화염에 던져넣지 마십시오.1. 화염에 던져넣지 마십시오.
2. 합선되지 않도록 하십시오.2. 합선되지 않도록 하십시오.
3. 분해하지 마십시오.3. 분해하지 마십시오.
4. 속상된 상태로 계속 사용하지 마십시오.4. 속상된 상태로 계속 사용하지 마십시오.
5. 사용 후에는 올바른 방법으로 폐기하십시오.5. 사용 후에는 올바른 방법으로 폐기하십시오.
6. 물에서 멀리 하십시오.6. 물에서 멀리 하십시오.
EU 적합성 선언EU 적합성 선언
Polaroid International B.V.는 이로써 지정Polaroid International B.V.는 이로써 지정
된 용도로 사용하는 경우, 전자파 호환성 지침된 용도로 사용하는 경우, 전자파 호환성 지침
(2014/30/EU), 저전압 지침(2014/35/EU), 전(2014/30/EU), 저전압 지침(2014/35/EU), 전
기전자제품 유해물질 사용제한 지침(2011/65/기전자제품 유해물질 사용제한 지침(2011/65/
EU) 및 기타 관련 조항의 필수 요건을 준수함EU) 및 기타 관련 조항의 필수 요건을 준수함
을 선언합니다.을 선언합니다.
FCC 준수 성명FCC 준수 성명
이 기기는 FCC 규정(FCC Rules) 파트 15를 준수이 기기는 FCC 규정(FCC Rules) 파트 15를 준수
합니다. 그 작동에는 다음 2개 조건이 적용됩니합니다. 그 작동에는 다음 2개 조건이 적용됩니
다. (1) 이 기기는 유해한 간섭을 초래해서는 안 다. (1) 이 기기는 유해한 간섭을 초래해서는 안
되며, (2) 이 기기는 의도치 않은 작동을 초래할 되며, (2) 이 기기는 의도치 않은 작동을 초래할
수 있는 간섭을 포함해, 일체 수신된 간섭을 수락수 있는 간섭을 포함해, 일체 수신된 간섭을 수락
해서는 안 됩니다.해서는 안 됩니다.
주의 사용자는 준수 책임이 있는 당사자가 명시주의 사용자는 준수 책임이 있는 당사자가 명시
적으로 승인하지 않은 변경 또는 조작을 실행하적으로 승인하지 않은 변경 또는 조작을 실행하
는 경우 해당 기기를 작동할 수 있는 사용자의 는 경우 해당 기기를 작동할 수 있는 사용자의
권한이 무효화될 수 있다는 사실에 주의해야 합권한이 무효화될 수 있다는 사실에 주의해야 합
니다. 이 장치는 다른 안테나 또는 송신기와 같니다. 이 장치는 다른 안테나 또는 송신기와 같
은 장소에 배치하거나 연결해 작동해서는 안 은 장소에 배치하거나 연결해 작동해서는 안
됩니다.됩니다.
참고 이 장치는 테스트를 통해 FCC 규정 파트 15참고 이 장치는 테스트를 통해 FCC 규정 파트 15
에 따른 클래스 B 디지털 기기의 허용치를 준수하에 따른 클래스 B 디지털 기기의 허용치를 준수하
는 것으로 확인되었습니다. 이러한 허용치는 주는 것으로 확인되었습니다. 이러한 허용치는 주
거 지역 내 설치 시 유해한 간섭으로부터 합당한 거 지역 내 설치 시 유해한 간섭으로부터 합당한
수준의 보호를 제공하기 위해 마련된 것입니다. 수준의 보호를 제공하기 위해 마련된 것입니다.
이 장치는 무선 주파수 에너지를 생성 및 사용하이 장치는 무선 주파수 에너지를 생성 및 사용하
며 이를 방사할 수 있고, 지침에 따라 설치 및 사며 이를 방사할 수 있고, 지침에 따라 설치 및 사
용하지 않을 경우 무선 통신에 유해한 간섭을 초용하지 않을 경우 무선 통신에 유해한 간섭을 초
래할 수 있습니다. 그러나 특정 설치 상황에서 간래할 수 있습니다. 그러나 특정 설치 상황에서 간
섭이 발생하지 않을 것이라는 보장은 할 수 없습섭이 발생하지 않을 것이라는 보장은 할 수 없습
니다. 이 장치가 무선 또는 TV 수신에 유해한 간니다. 이 장치가 무선 또는 TV 수신에 유해한 간
섭을 초래하는지 그 여부는 해당 장치의 전원섭을 초래하는지 그 여부는 해당 장치의 전원
을 껐다 켜는 방법으로 확인할 수 있으며, 초래을 껐다 켜는 방법으로 확인할 수 있으며, 초래
하는 것으로 확인되는 경우 사용자는 다음 중 하는 것으로 확인되는 경우 사용자는 다음 중
한 가지 방법을 이용해 간섭 시정을 시도해 보한 가지 방법을 이용해 간섭 시정을 시도해 보
십시오.십시오.
• 수신 안테나의 방향을 조정하거나 다른 곳• 수신 안테나의 방향을 조정하거나 다른 곳
으로.으로.
• 장치와 수신기 간의 이격을 늘린다.• 장치와 수신기 간의 이격을 늘린다.
• 장치를 수신기와 연결된 회로가 아닌 다른 회• 장치를 수신기와 연결된 회로가 아닌 다른 회
로에 콘센트에 연결한다.로에 콘센트에 연결한다.
• 도움이 필요할 경우 딜러 또는 경험 많은 무선/• 도움이 필요할 경우 딜러 또는 경험 많은 무선/
TV 기술자에게 문의한다.TV 기술자에게 문의한다.
이 장치는 비규제 환경과 관련해 정해진 FCC 방 이 장치는 비규제 환경과 관련해 정해진 FCC 방
사선 노출 허용치를 준수합니다. 실제 사용자 는 사선 노출 허용치를 준수합니다. 실제 사용자 는
반드시 무선 주파 수 노출준수에 대한 구체적 인 반드시 무선 주파 수 노출준수에 대한 구체적 인
작동 지시를 라 야 합니다.작동 지시를 라 야 합니다.
이 기호는 현지 법률 및 규정에 따라 제품 이 기호는 현지 법률 및 규정에 따라 제품
을 가정용 폐기물과 별도로 폐기해야 함을 을 가정용 폐기물과 별도로 폐기해야 함을
의미합니다. 이 제품의 수명이 다한 경우 의미합니다. 이 제품의 수명이 다한 경우
현지 감독 당국이 지정한 수거 장소에 폐기하십시현지 감독 당국이 지정한 수거 장소에 폐기하십시
오. 일부 수거 장소는 무료로 이용할 수 있습니다. 오. 일부 수거 장소는 무료로 이용할 수 있습니다.
제품을 폐기할 때 별도로 수집 및 재활용하면 천제품을 폐기할 때 별도로 수집 및 재활용하면 천
연 자원을 보존하고 인체 건강과 환경을 보호하는 연 자원을 보존하고 인체 건강과 환경을 보호하는
방식으로 재활용하는데 도움이 될 것입니다.방식으로 재활용하는데 도움이 될 것입니다.

81
Руководство пользователя
80 Руководство пользователя
Гарантия
Гарантию на данный фотоаппарат
см. по следующей ссылке:
polaroid.com/warranty
Руководство по
эксплуатации

83
Руководство пользователя
82 Руководство пользователя
Комплектация
01 Polaroid Lab
02 Зарядный USB-кабель
03 Краткое руководство пользователя
04 Информация о гарантии
Как пользоваться
Polaroid Lab
1. Скачайте на телефон приложение
Polaroid
Чтобы использовать Polaroid Lab необходимо
установить приложение Polaroid. В
приложении имеются советы, рекомендации
и обучающие материалы, а также идеи для
вдохновения, которые откроют вам новые
пути для творчества.
→ polaroid.com/polaroidlab
2. Зарядка Polaroid Lab
Важная информация. На момент Важная информация. На момент
приобретения Polaroid Lab заряжен не приобретения Polaroid Lab заряжен не
полностью. Перед первым использованием полностью. Перед первым использованием
обязательно полностью зарядите его. обязательно полностью зарядите его.
Для зарядки Polaroid Lab вставьте один Для зарядки Polaroid Lab вставьте один
конец зарядного USB-кабеля в разъем конец зарядного USB-кабеля в разъем
Micro-USB на задней панели устройства, Micro-USB на задней панели устройства,
а другой конец подсоедините к зарядному а другой конец подсоедините к зарядному
устройству (через разъем адаптера питания устройству (через разъем адаптера питания
смартфона или разъем USB компьютера). смартфона или разъем USB компьютера).
Светодиодные индикаторы рядом с разъемом Светодиодные индикаторы рядом с разъемом
показывают уровень заряда аккумулятора показывают уровень заряда аккумулятора
(четыре горящих индикатора указывают, (четыре горящих индикатора указывают,
что аккумулятор полностью заряжен). Все что аккумулятор полностью заряжен). Все
светодиодные индикаторы зарядки Mi-светодиодные индикаторы зарядки Mi-
cro-USB на задней панели устройства, а cro-USB на задней панели устройства, а
Lab полностью зарядился, даже если он Lab полностью зарядился, даже если он
будет по-прежнему подключен к зарядному будет по-прежнему подключен к зарядному
устройству. Если использовать сетевую устройству. Если использовать сетевую
розетку с адаптером питания смартфона, розетку с адаптером питания смартфона,
для полного заряда обычно требуется 2 для полного заряда обычно требуется 2
часа. В случае зарядки через USB-разъем часа. В случае зарядки через USB-разъем
компьютера, полная зарядка может занимать компьютера, полная зарядка может занимать
до 4 часов. Полного заряда Polaroid Lab до 4 часов. Полного заряда Polaroid Lab
хватит на 100 кассет в зависимости от хватит на 100 кассет в зависимости от
условий использования. Чтобы сохранить условий использования. Чтобы сохранить
заряд аккумулятора, не забывайте выключать заряд аккумулятора, не забывайте выключать
Polaroid Lab после использования.Polaroid Lab после использования.
3. Загрузка пленки
Возьмите Polaroid Lab и аккуратно потяните
вниз переднюю часть кассетоприемника.
Извлеките кассету с пленкой из упаковки
и вставьте ее до упора светозащитной
заслонкой вверх. После закрытия
кассетоприемника устройство автоматически
извлечет заслонку. Если светозащитная
заслонка не появилась, извлеките кассету с
пленкой и переустановите ее так, чтобы она
встала на место до упора.
Примечание. Прочтите на упаковке пленки
информацию о времени проявки, а также
правила обращения и хранения.
4. Включите Polaroid Lab
Нажмите черную кнопку с правой стороны
устройства, чтобы поднять платформу для
телефона в положение для фотосъемки и
включить питание. Загорится светодиодный
индикатор с радужным логотипом, после чего
включится светодиодный индикатор счетчика
кадров, показывающий сколько снимков еще
устройства, чтобы поднять платформу для
работы с Polaroid Lab выключите его, прижав
платформу вниз. Кроме того, если устройство
не используется в течение нескольких минут,
оно выключится автоматически.
5. Откройте приложение и выберите
фотографию
Откройте приложение Polaroid и выберите
раздел Polaroid Lab. Нажмите кнопку выбора
изображения, чтобы выбрать фотографию,
которую хотите вывести, и нажмите
«Продолжить». В приложении появятся
подсказки, которые помогут вам в вашей
первой фотоэкспозиции.
6. Поместите свой телефон на платформу
для телефона
Поместите телефон на платформу таким
образом, чтобы экран был обращен к
объективу Polaroid Lab. Убедитесь, что
телефон расположен правильно – его верхняя
часть должна быть обращена к задней части
камеры. Для наилучшего качества следует
снять с телефона чехол или защитную
пленку. Приложение обнаружит Polaroid Lab и
идеально расположит изображение на пленке.
Также над оптическим датчиком появится
калибровочное изображение, которое поможет
правильно экспонировать вашу фотографию
без необходимости регулировки подсветки
телефона. Отключите все настройки или
приложения, которые влияют на цвет дисплея
(например, ночной режим Night Shift или
параметр True Tone), поскольку они могут
значительно повлиять на качество готовой
фотографии.
7. Нажмите красную кнопку затвора
Polaroid Lab обнаружит ваш телефон
на платформе и определит яркость
дисплея, чтобы обеспечить безупречное
экспонирование. Подождите, пока начнет
мигать светодиодный индикатор с радужным
логотипом, после чего нажмите красную
кнопку затвора. Фотография выйдет из слота
на передней панели фотоаппарата сразу
после отпускания кнопки затвора. Извлеките
фотографию из-под шторки и дождитесь,
пока шторка вернется в исходное положение.
Положите фотографию лицевой стороной вниз,
чтобы защитить ее от света во время проявки.
Если вы хотите напечатать еще одну такую же
фотографию, нажмите кнопку затвора еще раз.
Дополнительные
инструкции
1. Количество оставшейся в кассете пленки
На передней панели Polaroid Lab расположены
8 оранжевых светодиодных индикаторов. Если
устройство включено (кроме спящего режима),
эти индикаторы всегда показывают количество
кадров. Количество светящихся индикаторов
соответствует числу неиспользованных
кадров в кассете. Например, если светятся
6 индикаторов, значит в кассете осталось
6 кадров. Если все 8 кадров в кассете уже
использованы или в устройстве нет кассеты,
тогда после включения Polaroid Lab или
нажатия кнопки затвора индикаторы будут
быстро мигать.

85
Руководство пользователя
84 Руководство пользователя
2. Оставшийся уровень заряда
аккумулятора
Polaroid Lab отображает уровень заряда
аккумулятора четырьмя светодиодными
индикаторами над разъемом USB. В процессе
зарядки индикаторы мигают, а после полной
зарядки аккумулятора они погаснут, даже если
к устройству будет по-прежнему подключен
кабель USB, т. к. Polaroid Lab будет работать
напрямую от зарядного устройства.
1. Уровень заряда аккумулятора:
Горят от 1 до 4 светодиодных
индикаторов. Один горящий
светодиодный индикатор указывает,
что заряда хватит еще на 2 кассеты.
2. Аккумулятор заряжен, и подключен
кабель USB:
Светодиодные индикаторы не горят.
Светодиодный индикатор счетчика
кадров будет отображать количество
оставшихся фотографий.
3. Аккумулятор разряжен:
Полное отсутствие заряда.
Светодиодные индикаторы не горят, и
Polaroid Lab не начнет работать, пока
не будет заряжен аккумулятор.
3. Совместимая пленка
Polaroid Lab совместим с кассетами всех типов
Polaroid i-Type и серии 600. Рекомендуется
использовать пленку i-Type, поскольку она
специально предназначена для Polaroid
Lab. Polaroid Lab не предназначен для
использования с пленками SX-70, Spectra или
какими-либо другими видами фотопленок.
4. Электропитание
Перед использованием всегда заряжайте
Polaroid Lab, чтобы обеспечить достаточный
уровень заряда аккумулятора (см.
раздел→«Зарядка Polaroid Lab»). Когда
он подключено к зарядному устройству и
заряжается, задние светодиодные индикаторы
будут мигать и выключатся, когда Polaroid Lab
будет полностью заряжен.
5. Уход за роликами
Иногда избыток пасты проявителя с
фотографий может скапливаться на роликах,
что отрицательно влияет на работу устройства
и приводит к нежелательным дефектам на
фотографиях. Для устранения этой проблемы
Polaroid Lab имеет встроенный режим очистки
роликов. Просто выполните следующие
действия.
1. Чтобы выключить устройство,
закройте платформу для телефона
2. Откройте кассетоприемник
3. Удерживайте правую точку контакта,
после чего нажмите и удерживайте
кнопку затвора более 2 секунд
4. Ролики переместятся в начальное
положение для очистки
5. Отпустите обе кнопки, после чего
Polaroid Lab перейдет в режим
очистки роликов
6. Возьмите влажную ткань или ватную
палочку и осторожно почистите
ролики
7. Нажмите кнопку затвора для
постепенного продвижения роликов
8. Почистив ролики со всех сторон,
закройте дверцу кассетоприемника
Поиск и устранение
неисправностей и часто
задаваемые вопросы
1. Polaroid Lab не выдает фотографии /
светозащитную заслонку
бедитесь, что ваш Polaroid Lab заряжен:
Светодиодный индикатор с радужным
логотипом и задние светодиодные индикаторы
не горят, если заряда аккумулятора
недостаточно для работы. В этом случае
перед использованием устройства следует
подключить его к зарядному устройству.
Убедитесь, что в Polaroid Lab все еще есть
кадры. Для этого опустите, а затем поднимите
платформу для телефона. Светодиодные
индикаторы неиспользованных кадров
покажут, сколько кадров осталось на кассете.
Если светодиодные индикаторы быстро мигают
после повторного включения Polaroid Lab,
это значит, что в кассете больше не осталось
кадров или в устройстве нет кассеты.
Все индикаторы выключены: Камера
выключена или отсутствует кассета
Кнопка затвора не нажата, все индикаторы
мигают: Кассета вставлена, пленка
закончилась
Все индикаторы горят: Кассета вставлена,
осталось 8 фотографий
Индикаторы зажигаются поочередно: Кассета
вставлена неправильно
2. Приложение подает звуковой сигнал об
ошибке
Приложение определит, правильно ли
ваш телефон установлен на Polaroid Lab.
Точки контакта на платформе для телефона
позволяют приложению поворачивать
изображение и размещать его прямо над
объективом Polaroid Lab. Если приложение
не может этого сделать, оно сообщит об
этом, чтобы вы могли расположить свой
телефон правильно. Когда вы поднимете свой
телефон, в приложении запустится короткое
видео, которое поможет вам правильно
расположить телефон.
3. Кнопка затвора не работает
Если горит светодиодный индикатор с
радужным логотипом, Polaroid Lab включен,
и если в нем есть пленка, то загорается
соответствующий светодиодный индикатор
количества кадров. Если вы нажмете кнопку
затвора и ничего не произойдет, проверьте
индикатор количества кадров. Если ваш
телефон установлен неправильно, Polaroid Lab
не сможет определить яркость изображения.
Если телефон будет распознан, светодиодный
индикатор с радужным логотипом промигает 3
раза. Если он продолжает быстро мигать, это
означает, что устройство не может правильно
распознать область / яркость сенсорного
дисплея. Если индикатор не мигает совсем,
это означает, что устройство не распознает
установленный телефон. Это может
происходить из-за чехла или защитной пленки,
которые могут ухудшить распознаваемость
телефона. Чтобы устранить эту проблему,
снимите чехол или защитную пленку. Аккуратно
прижмите телефон к устройству.
4. Фотография получилась немного темной
Нам неизвестно, каким образом была сделана
оригинальная фотография на камере вашего
телефона, но вы можете воспользоваться
нашими универсальными советами по
фотосъемке. Мы рекомендуем отключать True
Tone, Night Shift и Night Mode. Приложение
автоматически настроит яркость телефона.
Вы также можете настроить экспозицию в
меню приложения «Дополнительно» (More).
Величину экспозиции можно настроить от -3
до +3 делений диафрагмы.
Полезные советы для
отличных снимков
• Убедитесь, что экран телефона
чист. Если установлена защитная
пленка, убедитесь, что на экране
нет царапин, пятен или отпечатков
пальцев. Желательно снять
защитную пленку и чехол, чтобы
обеспечить оптимальное качество.
• Убедитесь, что телефон лежит
ровно на поверхности платформы
Polaroid Lab.
• Убедитесь, что пленка не просрочена.
Покупайте новую пленку на polaroid.
com и следуйте инструкциям
на упаковке, чтобы обеспечить
оптимальное качество печати.
• Убедитесь, что все настройки и
приложения, которые влияют на
цвета, отключены (например, Night
Shift, True Tone).

87
Руководство пользователя
86 Руководство пользователя
Техническая поддержка
Служба технической поддержки клиентов
Polaroid всегда к вашим услугам. Используйте
предоставленные контактные данные для
связи с нами. Дополнительная и актуальная
информация:
polaroid.com/help
США / Канада
+212 219 3254
Европа / другие страны
00 800 577 01500
Polaroid International B.V.
1013 AP Amsterdam
The Netherlands
Технические
характеристики
Общие
размерыразмеры
150 мм (длина) ×115,6 мм (ширина) ×149,7 мм 150 мм (длина) ×115,6 мм (ширина) ×149,7 мм
(высота в закрытом положении) x177,16 мм (высота в закрытом положении) x177,16 мм
(высота в открытом положении)(высота в открытом положении)
МассаМасса
600 грамм (без кассеты)600 грамм (без кассеты)
Рабочая температураРабочая температура
40–108 °F / 4–42 °C, 5–90 %40–108 °F / 4–42 °C, 5–90 %
относительной влажностиотносительной влажности
Совместимая пленкаСовместимая пленка
Цветные и черно-белые пленки Polaroid Цветные и черно-белые пленки Polaroid
i-Type и серии 600, включая специальные i-Type и серии 600, включая специальные
выпуски.выпуски.
АккумуляторАккумулятор
Высокопроизводительный литий-ионный, Высокопроизводительный литий-ионный,
1100 мАч, номинальное напряжение 3,71100 мАч, номинальное напряжение 3,7
В; 4,07 ВтчВ; 4,07 Втч
Материал
Внешний корпусВнешний корпус
Поликарбонат, ТПУ, ЭПДМ (этилен-пропилен-Поликарбонат, ТПУ, ЭПДМ (этилен-пропилен-
диеновый каучук)диеновый каучук)
ОбъективОбъектив
Оптический поликарбонат с просветляющим Оптический поликарбонат с просветляющим
покрытиемпокрытием
Фотографический затворФотографический затвор
Фиксированная диафрагма, затвор с Фиксированная диафрагма, затвор с
переменной экспозициейпеременной экспозицией
Оптическая система
ОбъективОбъектив
С фиксированным фокусным расстояниемС фиксированным фокусным расстоянием
Фокусное расстояние 150 ммФокусное расстояние 150 мм
Тип объективаТип объектива
1:2.35 3-элементная система линз1:2.35 3-элементная система линз
Системные требования приложенияСистемные требования приложения
Поддерживаемые модели телефоновПоддерживаемые модели телефонов
iPhone 6 и новые модели (кроме iPhone SE)iPhone 6 и новые модели (кроме iPhone SE)
Устройства с самой новой системой AndroidУстройства с самой новой системой Android
Поддерживаемые модели телефонов и Поддерживаемые модели телефонов и
операционные системы могут изменяться. операционные системы могут изменяться.
Полный список можно найти на Полный список можно найти на polaroid.com/polaroid.com/
labworkswithlabworkswith
Меры предосторожности
Осторожно! Риск поражения
электрическим током — запрещается
вскрывать / разбирать систему приводных
роликов
• Запрещается разбирать аппарат. • Запрещается разбирать аппарат.
Неправильная сборка может привести Неправильная сборка может привести
к поражению электрическим током при к поражению электрическим током при
повторном использовании аппарата.повторном использовании аппарата.
• Не погружайте аппарат в воду или • Не погружайте аппарат в воду или
другие жидкости.другие жидкости.
• Не используйте аппарат в условиях • Не используйте аппарат в условиях
повышенной влажности или повышенной влажности или
запыленности.запыленности.
• Не пытайтесь нарушить целостность, • Не пытайтесь нарушить целостность,
отрегулировать или извлечь аккумулятор отрегулировать или извлечь аккумулятор
и / или электронику, расположенную под и / или электронику, расположенную под
роликами за дверцей кассетоприемника роликами за дверцей кассетоприемника
аппарата.аппарата.
• Не снимайте дверцу кассетоприемника, • Не снимайте дверцу кассетоприемника,
так как она имеет электронные так как она имеет электронные
соединения с аппаратом. Подобные соединения с аппаратом. Подобные
действия приведут к повреждению действия приведут к повреждению
аппарата, и ваша гарантия будет аппарата, и ваша гарантия будет
аннулирована.аннулирована.
• Запрещается вставлять металлические • Запрещается вставлять металлические
предметы в аппарат.предметы в аппарат.
• Не вставляйте никакие предметы в • Не вставляйте никакие предметы в
ролики или шестерни.ролики или шестерни.
• Маленькие дети могут травмироваться • Маленькие дети могут травмироваться
движущимися частями аппарата, движущимися частями аппарата,
поэтому храните аппарат в недоступном поэтому храните аппарат в недоступном
для них месте.для них месте.
• Не используйте и не храните аппарат • Не используйте и не храните аппарат
рядом с источником тепла или рядом с источником тепла или
оборудованием любого типа, которое оборудованием любого типа, которое
генерирует тепло, в том числе рядом со генерирует тепло, в том числе рядом со
стереоусилителями.стереоусилителями.
• Запрещается использовать аппарат • Запрещается использовать аппарат
рядом с воспламеняющимися или рядом с воспламеняющимися или
взрывоопасными газами.взрывоопасными газами.
• Не заряжайте аппарат, если • Не заряжайте аппарат, если
почувствовали посторонний запах, почувствовали посторонний запах,
услышали подозрительный шум или услышали подозрительный шум или
заметили дым.заметили дым.
• Не пытайтесь разобрать кассету с • Не пытайтесь разобрать кассету с
пленкой или модифицировать ее пленкой или модифицировать ее
каким-либо образом (если используется каким-либо образом (если используется
пленка серии 600). В случае попадания пленка серии 600). В случае попадания
аккумуляторной жидкости в глаза аккумуляторной жидкости в глаза
немедленно промойте глаза холодной немедленно промойте глаза холодной
проточной водой и обратитесь за проточной водой и обратитесь за
медицинской помощью.медицинской помощью.
Аккумулятор и зарядное устройствоАккумулятор и зарядное устройство
• Данный аппарат используется • Данный аппарат используется
с несъемным литий-ионным с несъемным литий-ионным
аккумулятором, который установлен аккумулятором, который установлен
внутри корпуса устройства. Не внутри корпуса устройства. Не
разрешается использование разрешается использование
аккумулятора другого типа. Замена аккумулятора другого типа. Замена
аккумулятора может выполняться только аккумулятора может выполняться только
в официальных сервисных центрах. в официальных сервисных центрах.
Аккумулятор прослужит много лет при Аккумулятор прослужит много лет при
правильной эксплуатации. Потребляемая правильной эксплуатации. Потребляемая
мощность зависит от среды, в которой мощность зависит от среды, в которой
используется устройство, и условий его используется устройство, и условий его
хранения. При использовании сразу хранения. При использовании сразу
после полной зарядки аккумулятор может после полной зарядки аккумулятор может
обеспечить обработку до 100 кассет. обеспечить обработку до 100 кассет.
• Если уровень заряда аккумулятора • Если уровень заряда аккумулятора
опустится ниже определенного значения, опустится ниже определенного значения,
аппарат перестанет обрабатывать аппарат перестанет обрабатывать
пленку. Лампа замигает, сигнализируя о пленку. Лампа замигает, сигнализируя о
необходимости зарядки. Таким образом необходимости зарядки. Таким образом
исключается застревание фотографии исключается застревание фотографии
во время ее прохождения через ролики.во время ее прохождения через ролики.
• На момент покупки перезаряжаемый • На момент покупки перезаряжаемый
аккумулятор заряжен не полностью. аккумулятор заряжен не полностью.
Полностью зарядите аккумулятор, Полностью зарядите аккумулятор,
используя зарядный USB-кабель (входит используя зарядный USB-кабель (входит
в комплект поставки). Процесс зарядки в комплект поставки). Процесс зарядки
обычно занимает 1–2 часа (может обычно занимает 1–2 часа (может
варьироваться в зависимости от условий варьироваться в зависимости от условий
использования).использования).
• Для испытаний зарядного кабеля • Для испытаний зарядного кабеля
аккумулятора, входящего в комплект аккумулятора, входящего в комплект
поставки, использовались адаптеры поставки, использовались адаптеры
питания для Apple iPhone. Зарядный питания для Apple iPhone. Зарядный
кабель совместим с другими кабель совместим с другими
компьютерными, телевизионными, компьютерными, телевизионными,
автомобильными USB-портами, а также автомобильными USB-портами, а также
с USB-адаптерами питания и прочими, с USB-адаптерами питания и прочими,
но его корректная работа в этих случаях но его корректная работа в этих случаях
не гарантируется.не гарантируется.
• Утилизируйте надлежащим образом • Утилизируйте надлежащим образом
аппараты, выведенные из эксплуатации.аппараты, выведенные из эксплуатации.
Условия эксплуатацииУсловия эксплуатации
• Для защиты высокоточной техники, • Для защиты высокоточной техники,
размещенной внутри данного аппарата, размещенной внутри данного аппарата,
никогда не оставляйте устройство на никогда не оставляйте устройство на
долгое время в следующих условиях: долгое время в следующих условиях:
высокая температура (+42 °C / 108 °F), высокая температура (+42 °C / 108 °F),
высокая влажность, резкие перепады высокая влажность, резкие перепады
температур (холод и жара), прямые температур (холод и жара), прямые
солнечные лучи, места с повышенным солнечные лучи, места с повышенным
содержанием песка или пыли содержанием песка или пыли
(например, пляжи), сырость или (например, пляжи), сырость или
сильные вибрации.сильные вибрации.
• Не допускайте падения аппарата и не • Не допускайте падения аппарата и не
подвергайте его воздействию сильных подвергайте его воздействию сильных
ударных нагрузок или вибраций.ударных нагрузок или вибраций.
• Постарайтесь не надавливать, не тянуть • Постарайтесь не надавливать, не тянуть
и не сжимать объективи не сжимать объектив
Соответствие стандартамСоответствие стандартам
Важные инструкции по использованию Важные инструкции по использованию
литий-ионных аккумуляторовлитий-ионных аккумуляторов
1. Не помещать их в огонь.1. Не помещать их в огонь.
2. Не закорачивать.2. Не закорачивать.
3. Не разбирать.3. Не разбирать.
4. Прекратить эксплуатацию в случае 4. Прекратить эксплуатацию в случае
повреждения.повреждения.
5. Использовать надлежащие методы 5. Использовать надлежащие методы
утилизации после завершения утилизации после завершения
эксплуатации.эксплуатации.
6. Держать на безопасном расстоянии 6. Держать на безопасном расстоянии
от воды.от воды.
Декларация о соответствии Декларация о соответствии
требованиям ЕСтребованиям ЕС
Настоящим компания Polaroid International Настоящим компания Polaroid International
B.V. заявляет, что Polaroid Lab отвечает B.V. заявляет, что Polaroid Lab отвечает
обязательным требованиям Директивы обязательным требованиям Директивы
по электромагнитной совместимости по электромагнитной совместимости
(2014/30/EU), Директивы по низковольтному (2014/30/EU), Директивы по низковольтному
оборудованию (2014/35/EU) и Директивы оборудованию (2014/35/EU) и Директивы
по ограничению использования опасных по ограничению использования опасных
веществ (2011/65/EU), а также других веществ (2011/65/EU), а также других
применимых нормативов при условии его применимых нормативов при условии его
использования по назначению.использования по назначению.
Декларация о соответствии нормам Декларация о соответствии нормам
Федерального агентства по связи (FCC)Федерального агентства по связи (FCC)
Данный аппарат отвечает требованиям
части 15 Правил FCC. Работа аппарата
возможна при соблюдении следующих двух
условий: 1) данный аппарат не должен
создавать недопустимых помех, и 2) на
работу устройства не должны оказывать
влияние посторонние помехи, в том числе
те, которые могут привести к сбою в его
работе. Предупреждение. Пользователь
предупреждается о том, что изменения
или модификации, которые не одобрены
в явной форме стороной, отвечающей за
соответствие стандартам, могут привести
к аннулированию прав пользователя на
эксплуатацию оборудования. Оборудование
не должно размещаться в одном
помещении с любой другой антенной
или передатчиком и эксплуатироваться
совместно с ними.
Примечание. Данное оборудование
протестировано и признано
соответствующим нормативам для
цифровых устройств класса B согласно
части 15 Правил FCC. Данные нормативы
разработаны для обеспечения надлежащей
защиты от вредных помех в жилых
помещениях. Данное оборудование
генерирует, использует и может
излучать радиочастотную энергию. Если
оборудование установлено и используется
с нарушением инструкций по эксплуатации,
оно может создавать недопустимые помехи
радиосвязи. При этом отсутствие помех в
каждых конкретных условиях установки не
гарантируется. Если оборудование создает
недопустимые помехи при приеме радио-
или телевизионных сигналов, что можно
установить путем выключения и повторного
включения устройства, пользователю
рекомендуется самостоятельно устранить
помехи с помощью одного или нескольких
действий:
• переориентация или перенос • переориентация или перенос
принимающейпринимающей
антенны в другое место; антенны в другое место;
• увеличение расстояния между• увеличение расстояния между
оборудованием и приемником; оборудованием и приемником;
• подключение оборудования к розетке в• подключение оборудования к розетке в
цепи, отличной от той, к которой цепи, отличной от той, к которой
подключен приемник; подключен приемник;
• консультация дилера или опытного• консультация дилера или опытного
специалиста по теле- и радиотехнике. специалиста по теле- и радиотехнике.
Данное оборудование соответствует Данное оборудование соответствует
нормативам Федеральной комиссии понормативам Федеральной комиссии по
связи США (Federal Communications Coсвязи США (Federal Communications Co
mission, FCC) по радиационному mission, FCC) по радиационному
излучению, установленным для излучению, установленным для
неконтролируемых сред. Конечный неконтролируемых сред. Конечный
пользователь обязан выполнять пользователь обязан выполнять
специальные инструкции по эксплуатации специальные инструкции по эксплуатации
с целью соблюдения стандартов по с целью соблюдения стандартов по
радиочастотному излучениюрадиочастотному излучению
Данный символ означает, что Данный символ означает, что
согласно региональным законам и согласно региональным законам и
регламентам данное изделиерегламентам данное изделие
подлежит утилизации отдельно от бытовых подлежит утилизации отдельно от бытовых
отходов. По окончании срока службы отходов. По окончании срока службы
изделия его следует утилизировать в изделия его следует утилизировать в
пунктах сборов отходов, указанных пунктах сборов отходов, указанных
региональными органами власти. региональными органами власти.
Утилизация в некоторых пунктах Утилизация в некоторых пунктах
проводится бесплатно. Раздельный проводится бесплатно. Раздельный
сбор и переработка изделия с целью сбор и переработка изделия с целью
его утилизации сбережет природные его утилизации сбережет природные
ресурсы, а также обеспечит применение ресурсы, а также обеспечит применение
надлежащего способа переработки, надлежащего способа переработки,
безопасного для здоровья людей и безопасного для здоровья людей и
окружающей среды.окружающей среды.

For updated information, video tutorials
and more, please visit
Pour plus d’informations, des tutoriels vidéos
et plus encore, visitez la page
Para tener información actualizada,
video tutoriales y más, visite
Per aggiornamenti, tutorial e ulteriori
informazioni, visitare il sito
Weitere Informationen, Videoanleitungen
undmehrndenSiehier
ビデオチュートリアルや詳細その他更新情報について
は、をご覧ください。
有关更新的信息,视频教程等等,请参考
如需最新的資訊、教學影片以及更多資訊,請造訪
최신 정보, 비디오 사용 지침서 등에 대한 내용은 를
방문해 주십시오
Для получения актуальной информации,
учебных материалов и посетите сайт
polaroid.com/help
Join our community
by signing up at
polaroid.com
Learn more about
the :

Polaroid International B.V.
1013 AP Amsterdam
The Netherlands
End of life disposal warning: When the product has come to the end of life, dispose of it in
accordance with local regulations. This product is subject to the EU directive 202/96/EC
on Waste Electrical and Electronic Equipment (WEEE) and should not be disposed as unsorted
municipal waste.
Made in China for and distributed by Polaroid International B.V., 1013 AP, Amsterdam, The Netherlands.
The POLAROID word and logos (including the Polaroid Classic Border Logo) and Polaroid Lab are
protected trademarks of Polaroid.
Fabriqué en Chine pour et distributé par Polaroid International B.V., 1013 AP, Amsterdam, Pays-Bas.
Le mot et les logos POLAROID (y compris le Polaroid Classic Border Logo) et Polaroid Lab sont des
marques protégées de Polaroid.
©2022 Polaroid. All rights reserved.
-
 1
1
-
 2
2
-
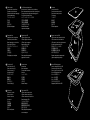 3
3
-
 4
4
-
 5
5
-
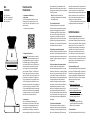 6
6
-
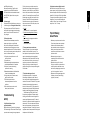 7
7
-
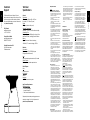 8
8
-
 9
9
-
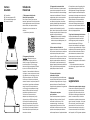 10
10
-
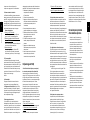 11
11
-
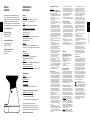 12
12
-
 13
13
-
 14
14
-
 15
15
-
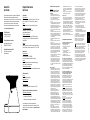 16
16
-
 17
17
-
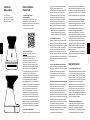 18
18
-
 19
19
-
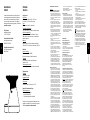 20
20
-
 21
21
-
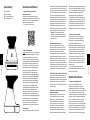 22
22
-
 23
23
-
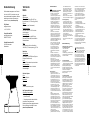 24
24
-
 25
25
-
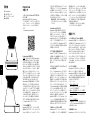 26
26
-
 27
27
-
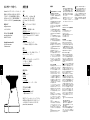 28
28
-
 29
29
-
 30
30
-
 31
31
-
 32
32
-
 33
33
-
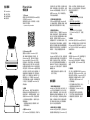 34
34
-
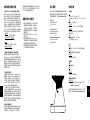 35
35
-
 36
36
-
 37
37
-
 38
38
-
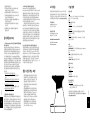 39
39
-
 40
40
-
 41
41
-
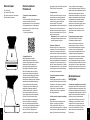 42
42
-
 43
43
-
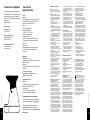 44
44
-
 45
45
-
 46
46


